develop a maintenance plan - tn.gov
TRANSCRIPT
T e n n e s s e e D e p a r T m e n T o f T r a n s p o r T a T i o n • L a n D s c a p e D e s i g n g u i D e L i n e s 5.1
Chapter 5InstallatIon and MaIntenanCe
DEVELOP A MAINTENANCE PLANNo landscape will be truly successful without an accompanying, achievable maintenance plan. This should be done in unison with the landscape design development. As the project is being developed, available maintenance resources should be evaluated for immediate and long-term care. Having a clear understanding of anticipated maintenance on the front end of a project will reduce any unexpected issues that may come up later. During design development, answer the following questions:
What are the available staff, equipment and funding •resources for maintenance?What level of maintenance will be required to maintain •the landscape to meet safety requirements (clear zone, sight lines, etc.)?What level of maintenance will be required to maintain •the landscape to achieve the intended function and project goals?
The maintenance plan is a powerful tool for TDOT and the maintenance crews and municipalities who maintain the highway. When a contract crew or municipality enters into a maintenance agreement with TDOT there should be a maintenance plan with clear objectives. By developing guidelines for an expected level of maintenance and maintenance procedures, the parties involved will have a better understanding of their roles and the maintenance goals. This will lead to a landscape that achieves the goals for which it was designed, better long-term health and appearance, and reduced maintenance costs.
The details of a maintenance plan will vary by project, but certain issues should be addressed: safety requirements, the intended function of the landscape, frequency of maintenance, time of year that tasks are to be completed, equipment and/or chemicals to be used and maintenance techniques to be used. The intended function of the landscape is an important item to consider because it ensures that the designer’s intent is carried through. For instance, if the landscape design includes a row of shrubs that are intended to become a hedge screen, then that information needs to be included in the maintenance plan. If that intent is not known, it is possible that the shrubs will be pruned individually instead of being allowed to grow together
L a n D s c a p e D e s i g n g u i D e L i n e s • T e n n e s s e e D e p a r T m e n T o f T r a n s p o r T a T i o n5.2
InstallatIon and MaIntenanCe Chapter 5
and pruned into a continuous hedge. Likewise, the clear zones and sight lines should be identified in the plan with information about how vegetation is to be maintained in those areas. Set clear guidelines for undesirable vegetation in the maintenance plan. This can include invasive species and weeds or vegetation that exceeds size requirements.
This chapter provides recommendations for maintaining roadside enhancement projects, including information about proposed maintenance techniques and frequency.
ESTABLISHING A LANDSCAPEEstablishing roadside landscapes is an ongoing process involving four general steps: preparation, installation, maintenance and long-term maintenance.
Preparation Preparation techniques will vary depending on the type of roadside enhancement project. Enhancements to existing vegetated areas will require the least preparation. Those projects are generally limited to pruning and selected removal of plant material. This section focuses on new landscape installations. New landscape installations will require the most preparation and are necessary to provide conditions for a wide range of species. Prior to installing a roadside landscape project the plant material must be selected from a nursery, and the site must be prepared for the planting. Planting areas should be staked and, in most cases, cleared of all existing grass and weeds. Soil amendments and slope stabilization, if necessary, will also be made at this time. It is important to identify soil types and drainage patterns because soil and water are the most important factors in the growth and long-term survival of vegetation.
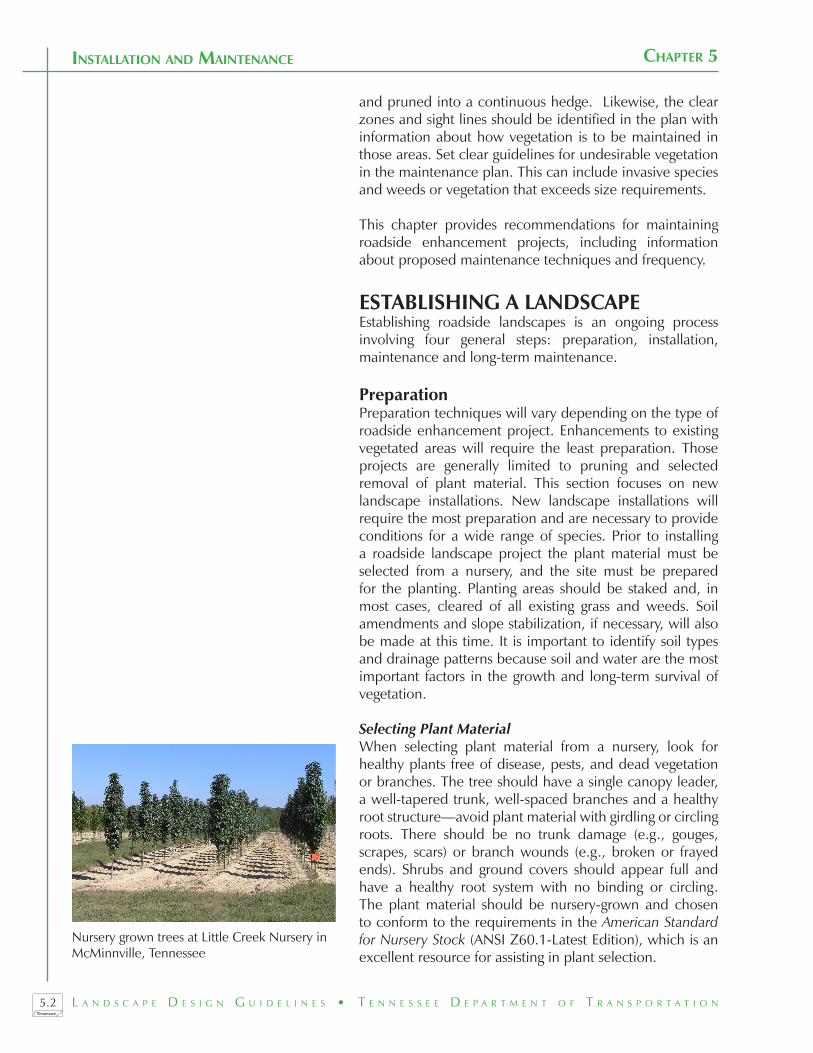
Selecting Plant MaterialWhen selecting plant material from a nursery, look for healthy plants free of disease, pests, and dead vegetation or branches. The tree should have a single canopy leader, a well-tapered trunk, well-spaced branches and a healthy root structure—avoid plant material with girdling or circling roots. There should be no trunk damage (e.g., gouges, scrapes, scars) or branch wounds (e.g., broken or frayed ends). Shrubs and ground covers should appear full and have a healthy root system with no binding or circling. The plant material should be nursery-grown and chosen to conform to the requirements in the American Standard for Nursery Stock (ANSI Z60.1-Latest Edition), which is an excellent resource for assisting in plant selection.
Nursery grown trees at Little Creek Nursery in McMinnville, Tennessee

T e n n e s s e e D e p a r T m e n T o f T r a n s p o r T a T i o n • L a n D s c a p e D e s i g n g u i D e L i n e s 5.3
InstallatIon and MaIntenanCeChapter 5
If the landscape plan requires massing or rows of like plants, matched plant material should be chosen to ensure uniformity. The size of the plant material will depend on its intended function, but a 2-inch caliper or less is recommended when selecting trees. Smaller trees recover more quickly from the shock of transplanting. Shrubs and ground covers, which are container grown, should be large enough to establish themselves in the roadside environment.
When plant material is brought to the project site it must be installed in a timely manner, preferably the same day. Plants should be healed-in on site in a staging area and kept watered throughout the installation process. Ideally, the site should be fully prepared for the plantings prior to their delivery. On large projects, multiple deliveries should be coordinated as the site is prepared.
Soil AmendmentsCompacted soils, rocks and debris are common in the roadside environment as a result of roadway construction. The qualities of soil that promote and sustain plant growth are good water filtration and retention, adequate aeration and low compaction/density.
A soil test should be completed for the project site to determine soil composition and to identify necessary soil amendments that will improve growing conditions. On long stretches of roadside enhancement projects, soil samples should be taken from both sides of the roadway at one-mile intervals. In smaller roadside enhancement projects, a minimum of four soil samples should be taken. These tests can be completed by Agriculture Extension Offices and other qualified professionals.
After the planting area has been cleared of vegetation and tilled, soil amendments can be made to improve growing conditions. Soil amendments reduce the need for water and provide viable nutrients for plant uptake. Soil amendments include compost and compost teas, lime, sulfur or fertilizer application (nitrogen, phosphorous, potassium). Generally, new plants do not need fertilizer if there is adequate organic material, but fertilizers may be added if the soil is not naturally producing the nutrients that plants need. Excess nitrates and phosphorous can run off into streams, affecting the streams’ ecology.
Drip Line
Central Leader
Trunk Flare
Root Ball
Figure 5.1: Tree Diagram

L a n D s c a p e D e s i g n g u i D e L i n e s • T e n n e s s e e D e p a r T m e n T o f T r a n s p o r T a T i o n5.4
InstallatIon and MaIntenanCe Chapter 5
Adding organic material, such as compost, to the top 1-½ inches of the planting area has been used successfully in other roadside projects. Organic material helps soil retain water and nutrients, improves soil structure and encourages root growth. The premise behind compost and organics is making minerals and nutrients available to plants. Compost and compost teas work naturally by reintroducing beneficial organisms that unlock the nutrients existing in the soil and making them available to the plants. No excess nutrients or phosphates are carried into streams or groundwater.
The soil pH can be adjusted with lime (to decrease acidity), ammonium sulfate (to increase acidity) and sulfur (to increase acidity). These should be applied with caution, as improper applications can result in plant damage from chemical burns.
SlopeSome sites will require slope or soil stabilization after the removal of existing vegetation. Drainage patterns may also cause erosion. Soil amendments can improve slope conditions because healthy soils support healthy root systems, which stabilize slopes and reduce erosion potential. Compost, especially, is effective for temporary erosion prevention and sediment control during construction and for permanent erosion prevention and sediment control by establishing sustainable vegetation. TDOT’s Special Provision Regarding Compost (SP801C) provides guidelines and requirements for using compost in the landscape.
Immediate solutions to erosion and slope stabilization are needed on new construction projects to minimize sediment loads in runoff. Sod and turfgrass are typically used on new construction projects, but alternatives to turfgrass can reduce the long-term need for mowing and improve aesthetics. These include hydro-seeding native grass and forb mixtures in combination with polymer soil stabilizers and temporary erosion control blankets. Native grasses are not ideal for all erosion prevention situations. Because most native grasses are bunch grasses, they do not have the soil-stabilizing abilities of turfgrass; however, native grass seeds can be included in mixes with turfgrass such as fescue or Bermuda.
Erosion control blankets are also used for slope stabilization but have weed control benefits as well. These blankets are designed to promote plant growth by allowing water and light to penetrate the soil. Holes can be cut in the fabric to allow for planting trees, shrubs and ground covers. The
Installation of an erosion control blanket

T e n n e s s e e D e p a r T m e n T o f T r a n s p o r T a T i o n • L a n D s c a p e D e s i g n g u i D e L i n e s 5.5
InstallatIon and MaIntenanCeChapter 5
blankets are made of natural and synthetic fibers. Consult TDOT’s Statewide Stormwater Management Plan and the TDOT Design Division Drainage Manual for information about erosion prevention techniques and guidelines to meet state requirements for land disturbance permits.
PlantingThe second stage of establishing a landscape is installation. Implementing proper installation techniques will increase survival rates of the plant material. Planting requires the placement and spacing of a plant to ensure healthy root systems. Plants must be put in the ground in a proper sized planting pit, backfilled with the proper soil and secured, if necessary.
The following guidelines and details provide information for the proper installation of various plant materials.
Flower InstallationTill the planting area to loosen the soil to a depth of 6 1. to 8 inches. Remove any rocks over 1-inch diameter, roots and large debris.In areas with poor soils, add a 1-½ inch layer of organic 2. material, such as compost.Create a uniform planting surface level with the adjacent 3. ground.For flowers in containers or flats, remove the plant 4. material and loosen the roots. Make a hole large enough to accommodate the roots, place the plant into the hole and gently tamp the soil to stabilize the plant and remove air pockets. For bulbs the process is similar, but the depth of the planting hole will vary by plant species. A plant spacing guide for is shown in Detail 5.1.Thoroughly water the planting area after all plants have 5. been placed.After watering, add 3 inches of mulch. Keep the mulch 6. away from the base of the plant material.
Shrub, Ornamental Grass and Ground Cover InstallationTill the soil around the planting area to create a pit that 1. is three times the width of the root ball and no deeper than the depth of the root ball. Remove any rocks over 1-inch diameter, roots and large debris.Remove the plant from the container at the time of 2. planting and no sooner. Check to ensure the plant is firmly intact and is not root-bound. Center the plant in the planting pit, and straighten it to 3. be level with the ground surface.

L a n D s c a p e D e s i g n g u i D e L i n e s • T e n n e s s e e D e p a r T m e n T o f T r a n s p o r T a T i o n5.6
InstallatIon and MaIntenanCe Chapter 5
If the plant is wrapped with burlap and wires, remove 4. them from the tops and side. If the plant is bare root, spread the roots carefully, and work the soil into them. Remove any broken roots.After the plant is centered in the pit, loosen the soil 5. and carefully tamp around the base of the root ball to eliminate air pockets.Backfill the planting pit with the excavated soil. Remove 6. any rocks or large debris. If necessary, add imported topsoil and other organic material to the planting pit.After the pit has been backfilled halfway, add water 7. slowly. Finish filling the planting pit and water again to soak the new planting. Additional watering techniques are discussed later in this chapter.After watering, add 3 inches of mulch. Keep the mulch 8. 6 inches away from the base of the plant material.
See Details 5.1 through 5.3 for shrub and ground cover planting details.

T e n n e s s e e D e p a r T m e n T o f T r a n s p o r T a T i o n • L a n D s c a p e D e s i g n g u i D e L i n e s 5.7
InstallatIon and MaIntenanCeChapter 5
D
A
Detail 5.1: Plant Spacing ChartTo determine the number of plants needed in a given area, multiply the planting area (in square feet) by the number in the chart under “Number of Plants per Square Feet.” For example, if the planting area is 200 square feet and the desired spacing is 6” on center (O.C.), multiply 200 by 4.61. You would need 922 plants to fill the area (200 x 4.61 = 922).
Spacing of “D”
Row Width of “A”
Number of Plants per Square Feet
6” O.C. 5” 4.61
8” O.C. 7” 2.60
10” O.C. 9” 1.66
12” O.C. 10” 1.15
15” O.C. 13” 0.738
18” O.C. 16” 0.512
24” O.C. 21” 0.290
36” O.C. 31” 0.128
4’ O.C. 42” 0.073
5’ O.C. 52” 0.046
O.C. - on center
Backfill with original soilAdd imported topsoil, if needed
Roughen sides of planting pit that have been glazed from digging equipment
Set top of root ball flush with finished grade
Topsoil tamped firm6” minimum
3” of mulchKeep mulch 6” away from central stemsPlace mulch in a 3’ ring (minimum) for shrubs not in planting beds
Existing grade
Remove all non-biodegradable material, burlap and wire basket from top and sides of root ballLoosen or score matted roots with a sharp knifeCut away dead, diseased, broken, twisted or girdling roots
Detail 5.2: Shrub and Ground Cover Planting
Detail 5.3: Shrub and Ground Cover Planting on Slopes
3” of mulchKeep mulch 6” away from central stems
Place mulch in a 3’ ring (minimum) for shrubs not in planting beds
Roughen sides of planting pit that have been glazed from digging equipment
Backfill with original soilAdd imported topsoil, if needed
Set top of root ball flush with finished grade
Topsoil tamped firm6” minimum
Existing grade
Remove all non-biodegradable material, burlap and wire basket from top and sides of root ballLoosen or score matted roots with a sharp knifeCut away dead, diseased, broken, twisted or girdling roots
Fill with original soil

L a n D s c a p e D e s i g n g u i D e L i n e s • T e n n e s s e e D e p a r T m e n T o f T r a n s p o r T a T i o n5.8
InstallatIon and MaIntenanCe Chapter 5
Tree InstallationThe following tree planting guidelines were developed by the Tennessee Department of Agriculture, Forestry Division (http://www.state.tn.us/agriculture/forestry/).
Trees should be planted in late fall to early spring 1. (November to March).The planting pit should be at least twice the width of 2. the root ball or container to encourage the roots to grow into the soil. The sides of the planting pit should be sloped, and the pit should be not deeper than the root ball or container to prevent the tree from settling or being placed too deeply.For a container tree, remove the container. For a balled 3. and burlapped (B&B) tree, remove the rope around the trunk and loosen the burlap. If the root flare is not visible, gently remove soil from the top of the ball until the tree is again at proper soil level. Check for large circling roots. If present, use shears to make a clean cut. Girdling roots will continue to grow in a circle, resulting in the death of the tree. If the circling roots are fibrous, make three or four vertical slits into the sides of the root ball about 1 inch deep. On balled and burlapped trees, remove as much wire, burlap and other materials from the top and sides of the root ball once the tree is in the planting pit. Remove all labels, tags, wires and rope from the trunk and branches to prevent girdling as it grows. Always move the tree by the container or root ball. Do not move trees by grabbing the trunk.To backfill the planting pit, use the excavated soil. If the 4. soil is very poor and appears to need topsoil, increase the pit size and sparingly mix in some local topsoil. Remove stones and other debris. Fill the planting pit halfway with backfill, then water. Finish filling the planting pit with the backfill and water again. Make sure to work the soil around the root ball firmly to eliminate any air pockets. Make sure the tree is vertical and properly supported, but do not pack the soil around the trunk. The trunk flare should be visible when the backfilling is complete.The area around the tree should be mulched with wood 5. chips, bark chips or pine mulch. The mulch should be 3 inches deep and cover the entire planting area and beyond. The mulch needs to be placed in a ring around the trunk of the tree, but it must be kept away from the trunk of the tree to keep insects away and prevent the trunk from being excessively wet. Mulch helps conserve soil moisture, reduces the competition from unwanted weeds, keeps lawn mowers and string trimmers from

T e n n e s s e e D e p a r T m e n T o f T r a n s p o r T a T i o n • L a n D s c a p e D e s i g n g u i D e L i n e s 5.9
InstallatIon and MaIntenanCeChapter 5
damaging the trunk, and moderates soil temperature extremes. Do not make mulch volcanoes. After the tree is in place, prune only the branches that 6. are dead, broken or severely deformed. Buds produce hormones that stimulate root growth, so keep the removal of buds to a minimum. Additional pruning techniques are discussed later in this chapter.Staking is not necessary if the tree has a proper size 7. root ball and has not been pruned too high. If staking is needed for support (e.g., plantings on slopes), attach them so the tree has some sway. Remove the wires or straps from the tree after one growing season.Generally new trees do not need fertilizers. Fertilize the 8. first year only if a specific problem develops.
See Details 5.4 through 5.8 for tree planting details.
Drip Line
2 X Width of Root Ball(minimum)
Do not cut central leader
Set top of root ball 2” above finished grade
3” of mulchKeep mulch 6” away from trunkPlace mulch in a 4’ ring (minimum) for trees not in planting beds
Roughen sides of planting pit that have been glazed from digging equipment
Backfill with original soilAdd imported topsoil, if needed
Undisturbed subsoil to prevent settlingIf pit is dug too deep, add soil and
tamp so that the truck flare is above finished grade
Remove all non-biodegradable material, burlap and wire basket from top and sides of root ballLoosen or score matted roots with a sharp knifeCut away dead, diseased, broken, twisted or girdling roots
Detail 5.4: Deciduous Tree Planting

L a n D s c a p e D e s i g n g u i D e L i n e s • T e n n e s s e e D e p a r T m e n T o f T r a n s p o r T a T i o n5.10
InstallatIon and MaIntenanCe Chapter 5
Detail 5.5: Deciduous Tree Planting on Slopes
2 X Width of Root Ball
(minimum)
Do not cut central leader
3” of mulchKeep mulch 6” away from trunk
Place mulch in a 4’ ring (minimum) for trees not in
planting beds
Roughen sides of planting pit that have been glazed from digging equipment
Backfill with original soilAdd imported topsoil, if needed
Remove all non-biodegradable material, burlap and wire basket from top and sides of root ballLoosen or score matted roots with a sharp knifeCut away dead, diseased, broken, twisted or girdling roots
12# wire through 1/2” diameter fabric bearing plastic hose
Three (3) 2”x2”x6’ oak posts spaced evenly around tree
Loosely tie wires at lowest portion of trunk to hold the
tree upright
Trunk flare should be even with finished grade on uphill side of tree and above finished grade on the downhill side of the tree to ensure adequate planting depth
Fill with original soil to smooth abrupt changes in grade and tap firm
Existing grade
Detail 5.6: Tree Planting for Poorly Drained Soils and/or Urban Areas
Drip Line
2 X Width of Root Ball(minimum)
Remove all non-biodegradable material, burlap and wire basket from top and sides of root ballLoosen or score matted roots with a sharp knifeCut away dead, diseased, broken, twisted or girdling roots
3” of mulchKeep mulch 6” away from trunkPlace mulch in a 4’ ring (minimum) for trees not in planting beds
Roughen sides of planting pit that have been glazed from digging equipment
Undisturbed subsoil to prevent settlingIf pit is dug too deep, add soil and tamp so that the truck flare is above finished grade
Do not cut central leader
Set top of root ball 2” above finished grade
Backfill with 50% original soil and 50% topsoil
Filter material
Clean 3/4” gravel fill
4” diameter perforated pipe connected to storm drain system

T e n n e s s e e D e p a r T m e n T o f T r a n s p o r T a T i o n • L a n D s c a p e D e s i g n g u i D e L i n e s 5.11
InstallatIon and MaIntenanCeChapter 5
2 X Width of Root Ball
(minimum)
3” of mulchKeep mulch 6” away from trunk
Place mulch in a 3’ ring (minimum) for trees not in planting beds
Do not cut main leaders
Set top of root ball 2” above finished grade
Remove all non-biodegradable material, burlap and wire basket from top and sides of root ballLoosen or score matted roots with a sharp knifeCut away dead, diseased, broken, twisted or girdling roots
Existing grade
Roughen sides of planting pit that have been glazed from digging equipment
Backfill with original soilAdd imported topsoil, if needed
Detail 5.7: Multi-Trunk Tree Planting
Detail 5.8: Conifer Tree Planting
2 X Width of Root Ball(minimum)
Do not cut central leader
3” of mulchKeep mulch 6” away from trunkPlace mulch in a 4’ ring (minimum) for trees not in planting beds
Roughen sides of planting pit that have been glazed from
digging equipment
Backfill with original soilAdd imported topsoil, if needed
Remove all non-biodegradable material, burlap and wire basket from top and sides of root ballLoosen or score matted roots with a sharp knifeCut away dead, diseased, broken, twisted or girdling roots
Set top of root ball 2” above finished grade
Undisturbed subsoil to prevent settlingIf pit is dug too deep, add soil and tamp so that the truck flare is above finished grade
L a n D s c a p e D e s i g n g u i D e L i n e s • T e n n e s s e e D e p a r T m e n T o f T r a n s p o r T a T i o n5.12
InstallatIon and MaIntenanCe Chapter 5
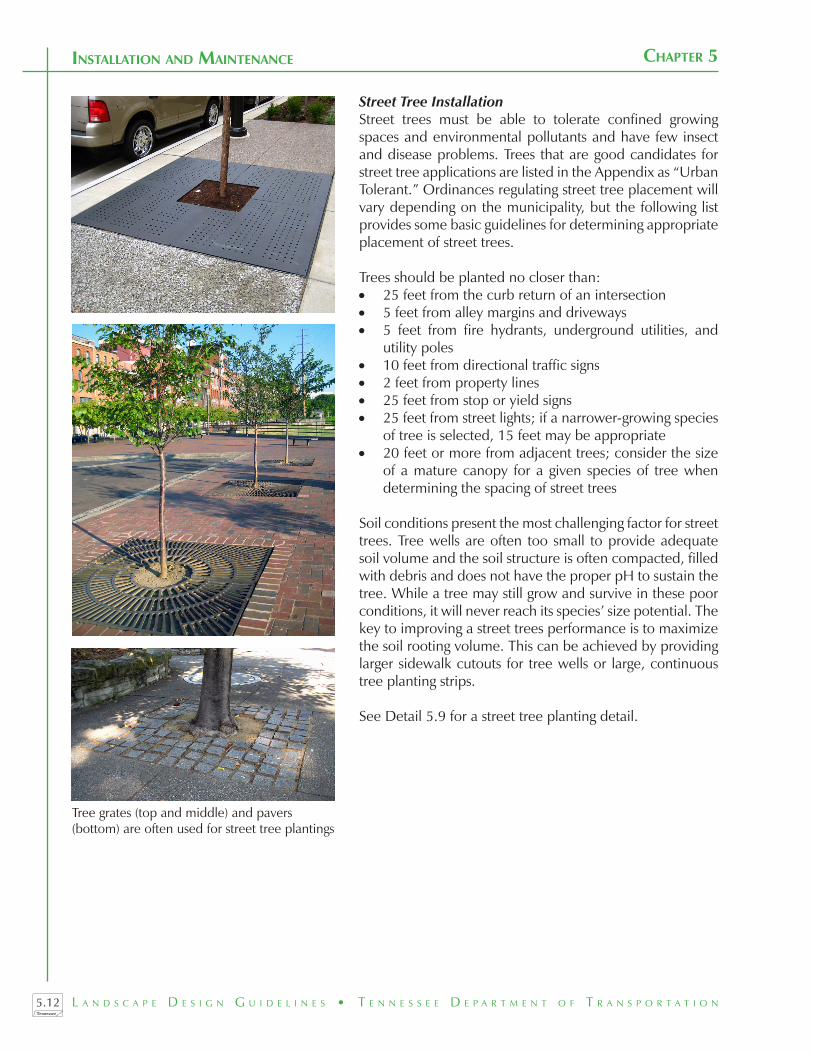
Street Tree InstallationStreet trees must be able to tolerate confined growing spaces and environmental pollutants and have few insect and disease problems. Trees that are good candidates for street tree applications are listed in the Appendix as “Urban Tolerant.” Ordinances regulating street tree placement will vary depending on the municipality, but the following list provides some basic guidelines for determining appropriate placement of street trees.
Trees should be planted no closer than:25 feet from the curb return of an intersection•5 feet from alley margins and driveways•5 feet from fire hydrants, underground utilities, and •utility poles10 feet from directional traffic signs•2 feet from property lines•25 feet from stop or yield signs•25 feet from street lights; if a narrower-growing species •of tree is selected, 15 feet may be appropriate20 feet or more from adjacent trees; consider the size •of a mature canopy for a given species of tree when determining the spacing of street trees
Soil conditions present the most challenging factor for street trees. Tree wells are often too small to provide adequate soil volume and the soil structure is often compacted, filled with debris and does not have the proper pH to sustain the tree. While a tree may still grow and survive in these poor conditions, it will never reach its species’ size potential. The key to improving a street trees performance is to maximize the soil rooting volume. This can be achieved by providing larger sidewalk cutouts for tree wells or large, continuous tree planting strips.
See Detail 5.9 for a street tree planting detail.
Tree grates (top and middle) and pavers (bottom) are often used for street tree plantings

T e n n e s s e e D e p a r T m e n T o f T r a n s p o r T a T i o n • L a n D s c a p e D e s i g n g u i D e L i n e s 5.13
InstallatIon and MaIntenanCeChapter 5
Figure 5.2: Minimum Spacing Recommendations for Street Trees
25 feet from stop sign25 feet from curb return
Mature height must be atleast 5 feet below power line
5 feet from fire hydrant
25 feet from street light
20 feet between trees
Large, continuous planting strips, grass (left) or landscaped (right), are ideal for street trees
L a n D s c a p e D e s i g n g u i D e L i n e s • T e n n e s s e e D e p a r T m e n T o f T r a n s p o r T a T i o n5.14
InstallatIon and MaIntenanCe Chapter 5
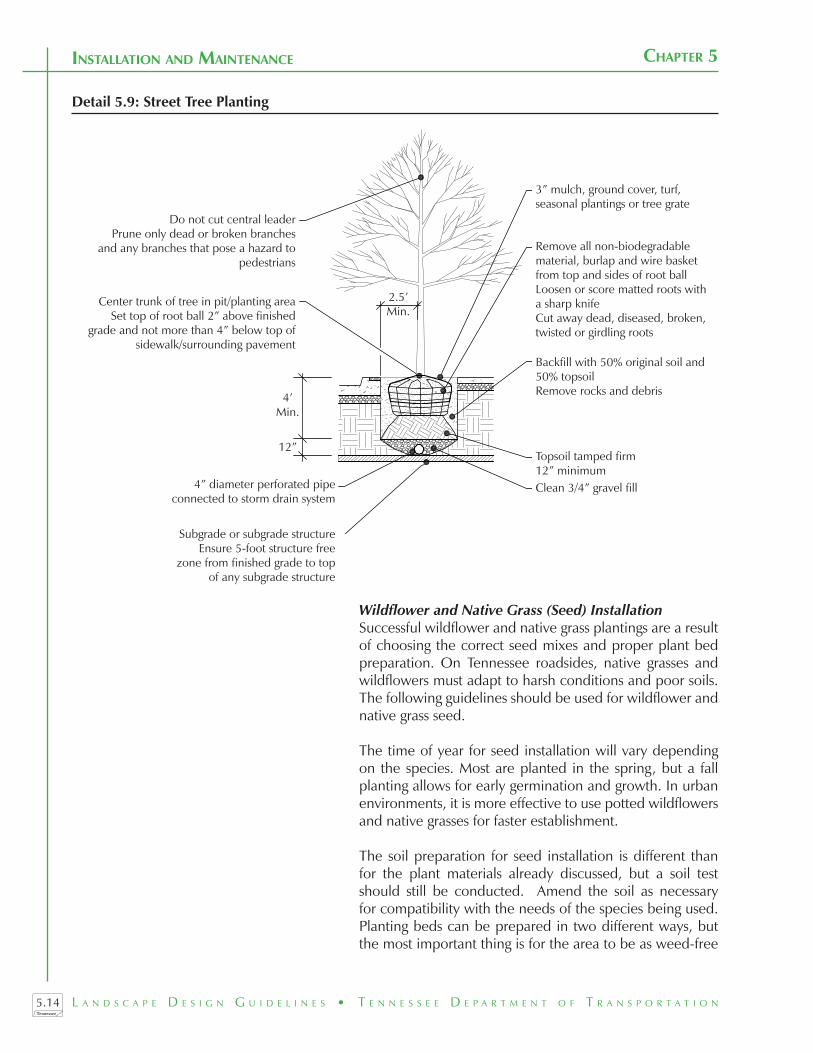
Wildflower and Native Grass (Seed) InstallationSuccessful wildflower and native grass plantings are a result of choosing the correct seed mixes and proper plant bed preparation. On Tennessee roadsides, native grasses and wildflowers must adapt to harsh conditions and poor soils. The following guidelines should be used for wildflower and native grass seed.
The time of year for seed installation will vary depending on the species. Most are planted in the spring, but a fall planting allows for early germination and growth. In urban environments, it is more effective to use potted wildflowers and native grasses for faster establishment.
The soil preparation for seed installation is different than for the plant materials already discussed, but a soil test should still be conducted. Amend the soil as necessary for compatibility with the needs of the species being used. Planting beds can be prepared in two different ways, but the most important thing is for the area to be as weed-free
Detail 5.9: Street Tree Planting
Do not cut central leaderPrune only dead or broken branches
and any branches that pose a hazard to pedestrians
2.5’Min.
Remove all non-biodegradable material, burlap and wire basket from top and sides of root ballLoosen or score matted roots with a sharp knifeCut away dead, diseased, broken, twisted or girdling roots
Backfill with 50% original soil and 50% topsoilRemove rocks and debris
Clean 3/4” gravel fill4” diameter perforated pipe connected to storm drain system
3” mulch, ground cover, turf, seasonal plantings or tree grate
Topsoil tamped firm 12” minimum
Subgrade or subgrade structureEnsure 5-foot structure free
zone from finished grade to top of any subgrade structure
Center trunk of tree in pit/planting areaSet top of root ball 2” above finished
grade and not more than 4” below top of sidewalk/surrounding pavement
4’Min.
12”

T e n n e s s e e D e p a r T m e n T o f T r a n s p o r T a T i o n • L a n D s c a p e D e s i g n g u i D e L i n e s 5.15
InstallatIon and MaIntenanCeChapter 5
as possible. The first option is to remove all the existing vegetation from the planting area and till the soil to a depth of only 1 inch. If the soil is disturbed any deeper than this, dormant weed seeds will be disturbed and brought back to the surface where they will grow. After the soil has been tilled, an herbicide like Round-Up® should be applied to kill any remaining existing vegetation. This should be done three days in advance of the installation of the seed. Once the soil is ready, broadcast the seeds over the area and rake or drag the planting area to ensure seed contact with the soil.
The second option is to plant over existing turf cover. For areas with a thin turf cover, seeds can be broadcast over the area and raked to ensure seed contact with the soil. For areas with thicker turf cover, the turf should be scalped to 1 inch. After the clippings are removed, the seed should be broadcast and raked or dragged into place, and the clippings can then be reapplied to the area as mulch. If a mechanized seed drill is used, the clippings can stay in place after the turf has been scalped.
In order for the seeds to become established, the area should be watered at the time of planting. The planting area will also need adequate moisture during the time leading up to germination. This can be done by rainfall or by supplemental watering techniques discussed later in this chapter. The planting area will become drought tolerant once the seeds have established.
The TDOT Maintenance Division’s Herbicide Recommendations Manual includes directions for the pre-plant treatment of wildflower beds for weed control. This treatment is conducted in the fall, prior to the wildflower planting.
MulchMulch conserves soil moisture, moderates soil temperature, reduces erosion and reduces weeds; however, applying mulch too thickly can prevent water infiltration. Mulch should be placed around all vegetation immediately after planting, as described in the planting installation instructions and details. The actual placement of the mulch will depend on the layout of the planting area. For individual plants, the mulch placement is shown on the details in Details 5.2 through 5.8. In smaller planting beds, the entire area should be mulched. This will help reduce maintenance within the planting bed and will protect the vegetation from mowing equipment.
L a n D s c a p e D e s i g n g u i D e L i n e s • T e n n e s s e e D e p a r T m e n T o f T r a n s p o r T a T i o n5.16
InstallatIon and MaIntenanCe Chapter 5
There are many types of mulch available. Each provides a different aesthetic, advantages and disadvantages. The replacement schedule will vary depending on the mulch type, but it should be replaced regularly to maintain a 3-inch depth.
Bark (Hardwood)Shredded hardwood bark is one of the most popular mulches used in landscape plantings. It is a byproduct of the paper and lumber industries that can be recycled as mulch. Its pH is slightly alkaline, but this problem can be managed by adding 3 pounds of elemental sulfur per cubic yard of bulk bark or per 100 square feet of bed area.
Bark (Softwood)Chunk pine, fir and redwood barks are the most popular types. This material is acidic in its reaction and does not require any additives to modify the pH. Softwood barks are more resistant to decay than hardwood bark. They are available in a variety of sizes that fit many landscape needs.
Pine NeedlesThis material makes a light, airy and attractive mulch. It is recommended to leave pine needles beneath pine trees rather than remove them. Pine needles will make the soil acidic and is good to use around acid-loving plants.
CompostCompost is one of the best mulch materials and should be used as much as possible in roadside projects. Not only is compost beneficial to the plants, it also has environmental benefits as a recycled product.
Wood ChipsThis material is available from garden centers, arborists, power companies and municipal yard waste facilities. It is very durable material. In landscape beds, nitrogen deficiencies will develop if fertilizer is not periodically applied.
T e n n e s s e e D e p a r T m e n T o f T r a n s p o r T a T i o n • L a n D s c a p e D e s i g n g u i D e L i n e s 5.17
InstallatIon and MaIntenanCeChapter 5
MaintenanceAfter the landscape has been installed, ongoing maintenance including watering, mowing, pruning and weed control will be required. It is necessary to integrate maintenance practices as part of the design to achieve the intended function and project goals.
Watering Water is essential for plant survival. Newly planted material must have a regular source of water to establish healthy root systems that will provide the plant with essential nutrients and structural support. When rainfall does not provide adequate moisture, supplemental watering is required. With the exception of some ornamental plantings in particularly harsh environments, roadside enhancement projects will not require watering after they become established.
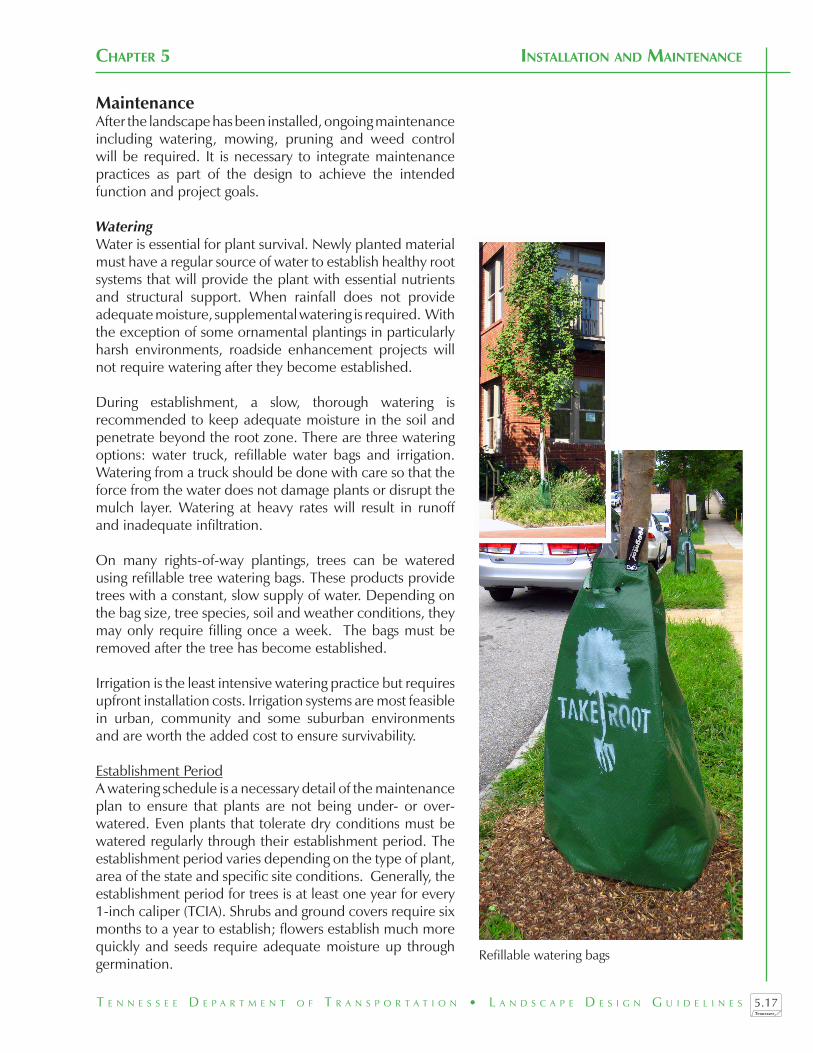
During establishment, a slow, thorough watering is recommended to keep adequate moisture in the soil and penetrate beyond the root zone. There are three watering options: water truck, refillable water bags and irrigation. Watering from a truck should be done with care so that the force from the water does not damage plants or disrupt the mulch layer. Watering at heavy rates will result in runoff and inadequate infiltration.
On many rights-of-way plantings, trees can be watered using refillable tree watering bags. These products provide trees with a constant, slow supply of water. Depending on the bag size, tree species, soil and weather conditions, they may only require filling once a week. The bags must be removed after the tree has become established.
Irrigation is the least intensive watering practice but requires upfront installation costs. Irrigation systems are most feasible in urban, community and some suburban environments and are worth the added cost to ensure survivability.
Establishment PeriodA watering schedule is a necessary detail of the maintenance plan to ensure that plants are not being under- or over-watered. Even plants that tolerate dry conditions must be watered regularly through their establishment period. The establishment period varies depending on the type of plant, area of the state and specific site conditions. Generally, the establishment period for trees is at least one year for every 1-inch caliper (TCIA). Shrubs and ground covers require six months to a year to establish; flowers establish much more quickly and seeds require adequate moisture up through germination.
Refillable watering bags

L a n D s c a p e D e s i g n g u i D e L i n e s • T e n n e s s e e D e p a r T m e n T o f T r a n s p o r T a T i o n5.18
InstallatIon and MaIntenanCe Chapter 5
Watering RatesThe Tree Care Industry Association (TCIA) describes standard practices for watering trees. Small-caliper trees need less water and establish faster than those of a larger caliper. It is recommended that newly planted trees receive 10 gallons of water per week for every 1-inch caliper. To ensure infiltration, trees should be watered slowly and thoroughly to penetrate beyond the root zone. Never dig trenches that create bowls to hold water around a tree trunk. This technique will not encourage roots to spread away from the root ball. The top 4 inches of soil in the tree’s drip line should be kept moist between watering.
Shrubs, ground covers and ornamental grasses should be watered 2 to 3 times per week for 8 weeks after installation, and then once a week until they are established.
Mowing Mowing patterns, techniques and timing have dramatic effects on the quality of the roadside environment. Mowing must be integrated into the design, and the areas to be mowed should be clearly defined as part of the maintenance plan.
Roadway rights-of-way are currently mowed by TDOT staff, contract crews and/or local governments. Mowing frequency depends on the region and time of year, but is typically three or four times a year along rural state routes and interstates, six times a year on urban interstates and as often as once a week within urban centers.
Mowing is currently performed as outlined in TDOT’s Special Provision Regarding Right-of-Way Mowing (SP806), but this manual makes recommendations for introducing new mowing practices. This section will outline the concept of reduced mowing and will introduce ideas for new mowing patterns that will not only save staff, fuel and equipment costs, but will provide numerous environmental and aesthetic benefits.

T e n n e s s e e D e p a r T m e n T o f T r a n s p o r T a T i o n • L a n D s c a p e D e s i g n g u i D e L i n e s 5.19
InstallatIon and MaIntenanCeChapter 5
Reduced MowingReduced mowing is the practice of reducing both the frequency and area of mowing in the right-of-way. The goals of reduced mowing are to facilitate safe, environmentally and economically beneficial, and manageable roadside landscapes. The direct benefits of this practice are:
Fewer staff hours•Lower fuel usage and costs•Less equipment maintenance•Reduced fuel emissions to improve air quality•Improved, self-sustaining plant communities•
While this practice may not be acceptable in some urban environments that require a higher level of maintenance, there are thousands of miles of roadways throughout Tennessee where this practice is not only acceptable but will enhance the natural beauty of our state. Aesthetics and public perception of reduced mowing have been a concern, but results from a statewide survey show that the public prefers a ‘naturalized’ roadside, but with a mown edge. These results match other studies that show a preference for natural landscapes but with some sign of human intervention (Kaplan).
Reduced mowing can be achieved through many methods, but the general technique is the same. The first step is to define the areas along the roadside into three distinct zones: regular maintenance zone (Zone 1), annually mowed zone (Zone 2), no mow zone (Zone 3). These are the broad definitions of the zones, but actual mowing practice will vary depending on the landscape classification (urban, suburban or rural), width of the right-of-way, adjacent land uses, required sight distances, land form and unique site conditions.
Zone 1, or the regular maintenance zone, requires regular mowing along the edge of the traveled way and around signs and structures. This zone is maintained by mechanical equipment to prevent trash accumulation and to provide visibility to structures and potential obstacles. Zone 1 is mowed three times a year with one pass of a mower blade, not to exceed 15 feet, at the back edge of the shoulder and around structures and signs. If there is a drainage ditch (grass or concrete swale) adjacent to the roadway, this zone will extend to the back edge of the ditch.

L a n D s c a p e D e s i g n g u i D e L i n e s • T e n n e s s e e D e p a r T m e n T o f T r a n s p o r T a T i o n5.20
InstallatIon and MaIntenanCe Chapter 5
Figure 5.3: Reduced Mowing in the Right-of-Way
Figure 5.4: Reduced Mowing in the Right-of-Way with Drainage Ditch
Clear Zone
Zone 1Regular
Maintenance
Zone 2Annual Mowing
Zone 3No-Mow Zone
Righ
t-of
-Way
Bou
ndar
yRi
ght-
of-W
ay B
ound
ary
Clear Zone
Zone 1Regular
Maintenance
Zone 2Annual Mowing
Zone 3No-Mow Zone

T e n n e s s e e D e p a r T m e n T o f T r a n s p o r T a T i o n • L a n D s c a p e D e s i g n g u i D e L i n e s 5.21
InstallatIon and MaIntenanCeChapter 5
Zone 2 receives annual mowing to the desirable clear zone. Mowing this transition zone only once a year will prevent woody vegetation from growing to a size that is a safety hazard. Annual mowing should take place in late spring when plants are weakened after expending their energy to produce leaves. Over time, less woody vegetation will appear and this zone can be mowed less frequently.
In areas where the right-of-way is narrow, reduced mowing may be confined to Zones 1 and 2, but where the right-of-way is wider there is a third zone. Zone 3 is the no-mow zone that is allowed to naturalize and reforest. This zone extends to the right-of-way, but it can also be the area in the center of wide medians or interchanges.
As a short-term solution, simply mowing less frequently and less area will achieve the desired environmental and economic benefits. Long-term solutions must be implemented in some Zone 3 areas to maximize environmental and economic benefits and prevent future maintenance issues. After the first two to three years of no mowing, this Zone 3 will begin to reforest with woody vegetation; however, it can become dominated by invasive or undesirable plant species if left completely unattended. Intervention in the first few years of natural succession will lead to a healthier, self-sustaining plant community with fewer long-term maintenance issues. After three to five years, a canopy will begin to establish, and less intervention will be required.
Figure 5.5: Reduced Mowing in Medians
Clear Zone
Zone 1RegularMaint.
Zone 2Annual Mowing
Zone 3No-Mow Zone
Clear Zone
Zone 2Annual Mowing
Zone 1Regular
Maintenance
L a n D s c a p e D e s i g n g u i D e L i n e s • T e n n e s s e e D e p a r T m e n T o f T r a n s p o r T a T i o n5.22
InstallatIon and MaIntenanCe Chapter 5
The growth of desired species can be promoted in two ways:
Removing undesirable vegetation mechanically or 1. controlling the growth of undesirable vegetation through chemical applications on an annual basis. This method will require some training and education among maintenance staff to identify desirable and undesirable species.Removing all vegetation and planting with desirable 2. plant species. This will require some annual maintenance in the first few years of establishment, but will quickly become self-sustaining.
Spot-treating undesirable vegetation through mechanical or chemical control is recommended in Zone 3, where promoting desirable species will increase aesthetic value. There is a short window of opportunity in the winter to use a foliar spray to control exotic and invasive plant species. At this time of year most native deciduous trees have lost their leaves, while many exotic and invasive species retain theirs. This technique is especially effective on honeysuckle and privet but should be used with caution so that desired vegetation, especially evergreens, is not destroyed. This treatment should be conducted during the winter for three to five years until the desired canopy is established.
Large, healthy trees should be promoted in the roadside landscape if their mature height is less than their distance from the road. Branches that overhang the road or are in danger of falling on structures should be removed.
Chemical MowingThere is currently a pilot program underway in which TDOT is exploring the use of chemical mowing as a means of reducing the frequency of mowing cycles. Chemical mowing is a term used to describe the practice of applying herbicides to stunt or suppress weeds and grasses. This technique reduces mechanical mowing and controls problem weeds along shoulders, slopes, around structures and other areas. There are risks to using chemical mowing. The Herbicide Recommendations Manual published by the TDOT Maintenance Division provides guidelines for the use of chemicals in the right-of-way.

T e n n e s s e e D e p a r T m e n T o f T r a n s p o r T a T i o n • L a n D s c a p e D e s i g n g u i D e L i n e s 5.23
InstallatIon and MaIntenanCeChapter 5
Mowing PatternsMowing patterns should be determined by slope, topography, viewsheds, landscape areas and safety requirements. Mowing techniques and patterns have a direct influence on perceptions of roadside beauty. Mowing creates the cleanliness and evidence of human intervention that the public desires (Kaplan).
Steep slopes should only be mowed at their base, or toe. Do not mow when the soil is saturated; mowing equipment on wet soil causes ruts. The ruts are unattractive, collect water and create erosion issues on steep slopes. Mowing should be done parallel to topographic contours. Care should be taken around existing vegetation and landscape beds to prevent damage. Smooth cuts, deliberate lines and healthy vegetation are appealing to the public. Long, sweeping contour mowing enhances landscape features and creates a pleasing curvilinear edge.
Mowing patterns play an important role in determining the reduced mowing zones. Items that should be considered when determining the reduced mowing zone are: keeping roadside signs and structures cleared of vegetation, land form, existing vegetation, wet or boggy soils and adjacent land use.
Pruning Techniques Pruning is used to achieve form, to keep vegetation healthy and for safety. Pruning occurs on small and large scales. There are appropriate techniques for both, which are guided by the size of the area, landscape classification, type of plant, intended function, safety requirements and
Figure 5.6: Mowing Patterns
Contour Lines (Land Form)
Zone 1Regular Maintenance
Zone 2Annual Mowing
Zone 3No Mowing

L a n D s c a p e D e s i g n g u i D e L i n e s • T e n n e s s e e D e p a r T m e n T o f T r a n s p o r T a T i o n5.24
InstallatIon and MaIntenanCe Chapter 5
time of year. Some pruning can be avoided by following the “right plant, right place” methodology. For example, where visibility or pedestrian access is an issue, choose trees with higher branching structures instead of trees with low or drooping branches. Trees with a vase shaped or columnar form are ideal for these situations.
In order to keep maintenance workers safe and plant material healthy, only use equipment designed for tree trimming and pruning. During design development and plant selection, consider the accessibility to the planting area if regular pruning will be required. Projects that require unique or intense pruning techniques are better suited for areas away from the roadway, rather than narrow medians or small islands.
Along highway rights-of-way, avoid pruning by keeping trees with large canopies clear of the shoulder. Tree canopies can overlap clear zones, but branches should not be in danger of falling into the road. Improper pruning techniques create undesirable aesthetics and a long- term safety hazard by making trees more susceptible to disease. If a tree must be removed, the trunk and roots must be completely removed with the proper equipment. If the tree is not completely removed, some species can regenerate from their roots or sucker from the trunk.
When to PruneTrees are best pruned in late winter, the dormant season, before spring growth begins. Not only is it easier to prune when there are no leaves, but it will also allow the wounds to be exposed for only a short time before the new growth helps them seal. Trees and shrubs that bloom early in the season on the previous year’s growth should be pruned after they finish blooming.
Some plants may require more frequent pruning. Shrubs that are planted to form a hedge will need to be pruned twice a year, before spring growth and in mid-summer. Hedges should be pruned so the base is wider than the top. This improves the hedges structure and allows sunlight onto all parts of the plant.
Some plants, such as evergreens, require little to no pruning. Pruning on pines should be limited to removing unhealthy or unsafe branches. Like other plants, evergreens should be pruned in the late winter before new growth. Some evergreens, like junipers and arborvitae, can be pruned through mid-summer, but pruning should be limited to unhealthy or undesired branches.

T e n n e s s e e D e p a r T m e n T o f T r a n s p o r T a T i o n • L a n D s c a p e D e s i g n g u i D e L i n e s 5.25
InstallatIon and MaIntenanCeChapter 5
TreesAt the time of planting, prune only the branches that are dead, broken or severely deformed. In the first year after planting, prune only the sucker sprouts from the base of the tree. All other pruning can be performed, as necessary, one year after planting. Care should be taken to never prune or cut back the central leader.
Tree pruning will be required to meet certain requirements. The Americans with Disabilities Act (ADA) requires tree branches to be cleared to 8 feet above sidewalks. Pruning is also required to remove tree branches that overhang roadways and shoulders as well as branches that obstruct road signs or sight lines.
As the tree matures, some crown thinning may be needed. Crown thinning involves selectively removing branches to improve a tree’s form. It also allows more light and air into the tree’s crown, promoting healthy growth. When thinning the crown, only remove the weak or unhealthy branches.
If tree pruning is required, follow the instructions for large branches as illustrated in Figure 5.8. This method avoids damage to the tree’s bark and leaves a wound that will heal well. For smaller branches or twigs, make a cut back to a side branch or make a cut just above the bud.
Shrubs and Ground CoversTo prune shrubs and ground covers, selectively remove branches to achieve the desired form and maintain the size or shape of the plant. Unless a unique form is desired, pruning should be limited to cutting the tips of the plant. Ground covers do not require much pruning other than branches that encroach into undesirable areas. Some shrubs and ground covers may require pruning to encourage flower and fruit development.
Ornamental GrassOrnamental grasses have attractive foliage throughout the winter and should not be pruned until the spring. Leaving the foliage throughout the winter also helps insulate the crown of the plant. In the spring before growth resumes, cut back the foliage to approximately 4 to 6 inches. When the dead foliage is removed, spring growth will begin earlier. If foliage is left on the plant, it can delay the crown’s warming and subsequent growth by as much as three weeks.
Figure 5.7: Required Tree Canopy Clearance on Walkways
8 feet
1. Make first cut at ‘A’. Cut part way through branch only.2. Cut off branch at ‘B’.3. Make final cut at ‘C-D’, just outside of branch collar.4. NEVER cut from ‘C-X’.
Branch Ridge Bark
C
D
X Branch Collar
B
A
Figure 5.8: Tree Pruning

L a n D s c a p e D e s i g n g u i D e L i n e s • T e n n e s s e e D e p a r T m e n T o f T r a n s p o r T a T i o n5.26
InstallatIon and MaIntenanCe Chapter 5
Weed Control Weeds affect the aesthetics of a planting, disrupt the desired function of the plant material, and compete for space, water and nutrients. Weed control should involve the use of plant culture, and mechanical and chemical vegetation control. Weed control using plant culture includes establishing a solid cover of desired vegetation that chokes out weed growth. Proper plant selection, spacing and soil conditions should reduce long-term weed growth by providing the conditions for plants to grow to their mature size and block the light needed for most weeds to grow.
Some techniques used for erosion prevention may also serve as weed control options. Mulch, filter fabric and cover crops can, at least temporarily, reduce weed growth. Longer-lasting options are available, such as pre-emergent herbicides and chemical or synthetic seed head suppressors recommended in the TDOT Maintenance Division’s Herbicide Recommendations Manual. Chemicals should only be used if cultural and mechanical methods are ineffective.
LONG-TERM MAINTENANCELandscapes have a lifespan. It is necessary to acknowledge this and make adjustments for it, especially when plants near the end of their lifecycle. Old or dying plants take on characteristics that are difficult to manage and contribute to a poor aesthetic. Root suckering and dying branches are common characteristics of old trees.
Include long-term maintenance considerations in your maintenance plan. These should include 5-, 10- and 15-year projections of maintenance needs. Landscapes can be phased out and replaced with different plants, different mowing techniques, or both. New plants can be added to the landscape before the old are removed so the site is never void of vegetation. Existing canopy trees can be useful for starting new plants by protecting them from the harsh sun during the first couple of growing seasons. When the old trees are removed, the new trees have already established.
The Zone 3/no-mow areas, or naturalizing landscapes, should be watched for potential hazard trees but otherwise should be allowed to finish out their lifecycle and be replaced through natural succession. These landscapes will not be visually prominent and will not contribute to poor aesthetics. Large fallen branches or trees that interfere with annual mowing must be removed.

T e n n e s s e e D e p a r T m e n T o f T r a n s p o r T a T i o n • L a n D s c a p e D e s i g n g u i D e L i n e s 5.27
InstallatIon and MaIntenanCeChapter 5
Phasing can be a useful tool for starting landscapes to achieve desired results under tight financial situations. All reasons for phasing out landscapes are most applicable to urban environments where a more controlled image is desired. When considering phasing out or removing plant material, evaluate the plants using the following criteria:
Plant Performance:• Is the plant demonstrating the characteristics/performing the function for which it was selected? Is the plant still appropriate for the site? Has it grown too large? Has it become invasive to adjacent areas?Plant Health and Structure:• Is it healthy? Are there signs of disease or pests? Are there any structural weaknesses that might be hazardous? Safety and Maintenance:• Are there conflicts with utilities? Are there conflicts with safety requirements?
If these criteria reveal irresolvable issues, the plant material should be removed and/or replaced.

L a n D s c a p e D e s i g n g u i D e L i n e s • T e n n e s s e e D e p a r T m e n T o f T r a n s p o r T a T i o n5.28
InstallatIon and MaIntenanCe Chapter 5
This page is intentionally left blank.