developer's guide -...
TRANSCRIPT

B1WS-1107-01ENZ0(00)January 2014
FUJITSU SoftwareInterstage AR Processing Server V1.0
Developer's Guide

Preface
Purpose of this document
This document explains how to develop applications using Interstage AR Processing Server.
Intended readers
This document is intended for users who will design and develop applications using Interstage AR Processing Server.Readers of this document are also assumed to have knowledge of:
- Basic knowledge of Interstage AR Processing Server
- Web services
- Application server management
- Database management
- JavaScript
- JDK
- Application development using smart devices
Structure of this document
This document is structured as follows:
Chapter 1 Introduction
Provides an overview of the knowledge required to develop systems using Interstage AR Processing Server.
Chapter 2 Development flow
Explains how to develop using Interstage AR Processing Server.
Chapter 3 Developing the overlay application (web application)
Explains how to develop the web application, which is a component of the overlay application.
Chapter 4 Developing the overlay application (native application)
Explains how to develop the native application, which is a component of the overlay application.
Chapter 5 Developing the system integration application
Explains how to develop the system integration application.
Chapter 6 Sample application
Explains how to run the sample applications provided by Interstage AR Processing Server.
Abbreviations
This manual uses the following abbreviations for the operating systems:
Official name Abbreviation
Microsoft Windows Server 2012 Foundation Windows Server 2012 Windows
Microsoft Windows Server 2012 Standard
Microsoft Windows Server 2012 Datacenter
Microsoft Windows Server 2008 R2 Standard Windows Server 2008 R2
Microsoft Windows Server 2008 R2 Enterprise
Microsoft Windows Server 2008 R2 Datacenter
Microsoft Windows Server 2008 R2 Foundation
- i -

Official name Abbreviation
Red Hat Enterprise Linux 6 (for Intel64) Linux
Notations
In this manual, text that must be replaced by the user is denoted in italicsWithMixedCase (for example, installDir).
Trademarks
- Access, Excel, PowerPoint and Word are products of Microsoft Corporation in the United States.
- Adobe, Acrobat, Adobe Reader, Acrobat Reader, the Adobe logo, Adobe AIR, Flash and Flash Player are registeredtrademarks or trademarks of Adobe Systems Incorporated in the United States and other countries.
- Android is a registered trademark of Google Inc.
- Eclipse is an open platform for the development tool integration constructed by Eclipse Foundation, Inc. that is an opencommunity of the development tool provider.
- Internet Explorer, the Microsoft Internet Explorer logo, Microsoft, Windows, Windows Server and other names andproduct names of Microsoft products are either registered trademarks or trademarks of Microsoft Corporation in theUnited States and/or other countries.
- Interstage is a registered trademark of Fujitsu Limited.
- iOS is a trademark of Apple Inc.
- Oracle and Java are registered trademarks of Oracle and/or its affiliates. Other company names and/or product namesappearing in this document may also be trademarks or registered trademarks of their respective companies.
- QuickTime and the QuickTime logo are trademarks of Apple Inc., registered in the United States and other countries.
- Xeon and Xeon Inside are trademarks of Intel Corporation in the United States and other countries.
- Other company names and product names used in this document are trademarks or registered trademarks of theirrespective owners.
Note that system names and product names in this document are not accompanied by trademark symbols such as (TM) or(R).
Export restrictions
If this document is to be exported or provided overseas, confirm legal requirements for the Foreign Exchange and ForeignTrade Act as well as other laws and regulations, including U.S. Export Administration Regulations, and follow the requiredprocedures.
Notice
- Information in this document may be subject to change without prior notice.
- No part of the contents of this document may be reproduced without the written permission of Fujitsu Limited.
- Fujitsu assumes no responsibility for infringement of any patent rights or other rights of third parties arising from useof information in the manual.
Issue date
January 2014
Copyright
Copyright 2014 FUJITSU LIMITED
- ii -

ContentsChapter 1 Introduction..............................................................................................................................................................1
1.1 Architecture.........................................................................................................................................................................................11.2 AR overlay content structure...............................................................................................................................................................21.3 Data structure.......................................................................................................................................................................................3
1.3.1 Interstage AR Processing Server data structure............................................................................................................................31.3.2 AR marker.....................................................................................................................................................................................41.3.3 Scenario........................................................................................................................................................................................51.3.4 Scene.............................................................................................................................................................................................51.3.5 AR overlay definition...................................................................................................................................................................6
1.4 AR overlay content definition..............................................................................................................................................................61.4.1 translation......................................................................................................................................................................................81.4.2 rotation..........................................................................................................................................................................................81.4.3 projectionType..............................................................................................................................................................................91.4.4 tapAction.....................................................................................................................................................................................101.4.5 graphic........................................................................................................................................................................................10
1.4.5.1 ImageTexture.......................................................................................................................................................................111.4.5.2 TextTexture..........................................................................................................................................................................111.4.5.3 HandwritingTexture.............................................................................................................................................................13
Chapter 2 Development flow..................................................................................................................................................142.1 Planning.............................................................................................................................................................................................142.2 Defining requirements.......................................................................................................................................................................15
2.2.1 Considering AR markers and content.........................................................................................................................................152.2.2 Size and material of AR markers................................................................................................................................................152.2.3 Considering the system configuration........................................................................................................................................16
2.3 Designing the system.........................................................................................................................................................................162.3.1 Considerations for reducing security risk...................................................................................................................................17
2.3.1.1 Overlay application (web application).................................................................................................................................172.3.1.2 Built-in storage....................................................................................................................................................................17
2.3.2 Designing data items...................................................................................................................................................................182.3.3 Considering responsive design...................................................................................................................................................18
2.3.3.1 Designing web applications.................................................................................................................................................182.3.3.2 Overlaying...........................................................................................................................................................................18
2.3.4 Designing scenarios and scenes..................................................................................................................................................192.3.5 Designing AR overlay definitions..............................................................................................................................................192.3.6 Designing a user-defined table...................................................................................................................................................21
2.4 Example external specifications........................................................................................................................................................222.4.1 index.html...................................................................................................................................................................................222.4.2 prework.html...............................................................................................................................................................................232.4.3 work.html....................................................................................................................................................................................242.4.4 comment.html.............................................................................................................................................................................26
2.5 Example internal specifications.........................................................................................................................................................262.5.1 Specifications common to all screens.........................................................................................................................................26
2.5.1.1 Cache file.............................................................................................................................................................................262.5.1.2 Properties.............................................................................................................................................................................272.5.1.3 Classes.................................................................................................................................................................................272.5.1.4 Methods...............................................................................................................................................................................282.5.1.5 Processes..............................................................................................................................................................................29
2.5.2 index.html...................................................................................................................................................................................302.5.2.1 onload processing................................................................................................................................................................302.5.2.2 Processing when Inspection work is operated.....................................................................................................................322.5.2.3 Processing when Delete data is operated.............................................................................................................................32
2.5.3 prework.html...............................................................................................................................................................................322.5.3.1 onload processing................................................................................................................................................................322.5.3.2 Operation for Prepare work.................................................................................................................................................34
- iii -

2.5.3.3 Operation for Start work......................................................................................................................................................382.5.4 work.html....................................................................................................................................................................................39
2.5.4.1 onload processing................................................................................................................................................................392.5.4.2 Operation when an AR marker is detected..........................................................................................................................392.5.4.3 Operation for Previous/Next buttons...................................................................................................................................402.5.4.4 Processing when Upload is operated...................................................................................................................................412.5.4.5 Operation when the screen is tapped...................................................................................................................................412.5.4.6 onunload processing............................................................................................................................................................42
2.5.5 comment.html.............................................................................................................................................................................422.5.5.1 onload processing................................................................................................................................................................422.5.5.2 Operation for OK.................................................................................................................................................................42
2.6 Creating the system............................................................................................................................................................................44
Chapter 3 Developing the overlay application (web application)............................................................................................463.1 Overview............................................................................................................................................................................................46
3.1.1 Composition of the overlay application (web application).........................................................................................................463.1.2 Operation mode...........................................................................................................................................................................473.1.3 Operating the camera..................................................................................................................................................................483.1.4 Development flow.......................................................................................................................................................................483.1.5 Basic authentication....................................................................................................................................................................483.1.6 SSL communication....................................................................................................................................................................483.1.7 Development environment..........................................................................................................................................................48
3.2 Overview of the JavaScript library....................................................................................................................................................493.2.1 Features provided by the JavaScript library...............................................................................................................................493.2.2 Loading the JavaScript library....................................................................................................................................................493.2.3 Calling APIs................................................................................................................................................................................493.2.4 Retrieving API results.................................................................................................................................................................493.2.5 Note.............................................................................................................................................................................................503.2.6 Error............................................................................................................................................................................................50
3.3 Data operation by the AR processing server.....................................................................................................................................513.3.1 Setting information about the AR processing server..................................................................................................................513.3.2 Registering data..........................................................................................................................................................................513.3.3 Examples of registering data.......................................................................................................................................................52
3.3.3.1 Registering QEntity.............................................................................................................................................................523.3.3.2 Registering QValue..............................................................................................................................................................523.3.3.3 Registering Quad.................................................................................................................................................................52
3.3.4 Retrieving data............................................................................................................................................................................543.3.5 Examples of retrieving data........................................................................................................................................................54
3.3.5.1 Retrieving specific data using a primary key.......................................................................................................................543.3.5.2 Retrieving data using a condition search.............................................................................................................................55
3.3.6 Deleting data...............................................................................................................................................................................623.4 Offline operation................................................................................................................................................................................62
3.4.1 Web resources.............................................................................................................................................................................633.4.1.1 Saving web resources...........................................................................................................................................................633.4.1.2 Updating web resources.......................................................................................................................................................633.4.1.3 Deleting web resources........................................................................................................................................................63
3.4.2 Resources in the AR processing server.......................................................................................................................................633.4.2.1 Saving data from the AR processing server.........................................................................................................................633.4.2.2 Updating resources in the AR processing server.................................................................................................................643.4.2.3 Deleting data from the AR processing server......................................................................................................................64
3.4.3 External resources for AR overlay content.................................................................................................................................643.4.4 Registering in (deleting from) the AR processing server...........................................................................................................64
3.5 Marker detection................................................................................................................................................................................643.6 Back button........................................................................................................................................................................................653.7 Displaying AR overlay content..........................................................................................................................................................65
3.7.1 Creating AR overlay definitions.................................................................................................................................................653.7.1.1 Creating definitions using a class of the JavaScript library.................................................................................................65
- iv -

3.7.1.2 Retrieving data from the AR processing server...................................................................................................................663.7.1.3 Identifying AR overlay definitions......................................................................................................................................673.7.1.4 Embedding user-defined data..............................................................................................................................................67
3.7.2 Setting AR overlay definitions...................................................................................................................................................673.7.2.1 Switching the AR overlay content.......................................................................................................................................67
3.7.3 Tap action...................................................................................................................................................................................673.8 Creating war files...............................................................................................................................................................................68
3.8.1 Using the jar command...............................................................................................................................................................68
Chapter 4 Developing the overlay application (native application).........................................................................................694.1 Overview............................................................................................................................................................................................69
4.1.1 Development resources provided by Interstage AR Processing Server.....................................................................................694.1.2 Development flow.......................................................................................................................................................................70
4.1.2.1 Building the development environment...............................................................................................................................704.1.2.2 Building...............................................................................................................................................................................714.1.2.3 Installing the developed application....................................................................................................................................71
4.2 Developing an Android native application........................................................................................................................................714.2.1 Application type and supported operations................................................................................................................................714.2.2 Configuring the project...............................................................................................................................................................724.2.3 Starting activities........................................................................................................................................................................734.2.4 Understanding the orientation of the activity screens.................................................................................................................744.2.5 Editing AndroidManifest.xml.....................................................................................................................................................754.2.6 Editing res/values........................................................................................................................................................................764.2.7 Changing the startup icon...........................................................................................................................................................764.2.8 Changing the application name...................................................................................................................................................764.2.9 Changing the package name.......................................................................................................................................................76
4.3 Developing an iOS native application...............................................................................................................................................774.3.1 Project.........................................................................................................................................................................................774.3.2 Starting UIViewController.........................................................................................................................................................784.3.3 Orientation of the UIViewController screens.............................................................................................................................794.3.4 Editing ARClientDev-info.plist and build settings.....................................................................................................................804.3.5 Editing Localizable.strings, InfoPlist.strings, and arrays.plist...................................................................................................814.3.6 Changing the startup icon...........................................................................................................................................................814.3.7 Changing the application name...................................................................................................................................................81
Chapter 5 Developing the system integration application...................................................................................................... 835.1 Overview............................................................................................................................................................................................83
5.1.1 Development environment..........................................................................................................................................................835.1.2 Development flow.......................................................................................................................................................................83
5.2 Programming.....................................................................................................................................................................................835.2.1 Reflecting data from the core business system to the AR processing server.............................................................................845.2.2 Reflecting data from the AR processing server to the core business system.............................................................................84
5.3 Notes on creating the system integration application........................................................................................................................85
Chapter 6 Sample application................................................................................................................................................ 866.1 Overview of the sample application..................................................................................................................................................86
6.1.1 Job content..................................................................................................................................................................................866.1.2 Composition of the sample application......................................................................................................................................866.1.3 Features used by the sample application.....................................................................................................................................87
6.2 Preparing the sample application.......................................................................................................................................................886.2.1 Installing and configuring the server..........................................................................................................................................886.2.2 Deploying the web application...................................................................................................................................................886.2.3 Installing the native application..................................................................................................................................................896.2.4 Configuring the native application.............................................................................................................................................90
6.3 Managing data of the sample application..........................................................................................................................................906.3.1 Assigning the AR marker...........................................................................................................................................................906.3.2 Registering a scenario.................................................................................................................................................................916.3.3 Registering scenes.......................................................................................................................................................................91
- v -

6.3.4 Registering files..........................................................................................................................................................................916.3.5 Authoring....................................................................................................................................................................................91
6.3.5.1 Operate valves scene............................................................................................................................................................916.3.5.2 Check interior scene.............................................................................................................................................................946.3.5.3 Check value scene................................................................................................................................................................966.3.5.4 Enter temperature scene.......................................................................................................................................................97
6.3.6 Create a user-defined table.......................................................................................................................................................1006.4 Running the sample application.......................................................................................................................................................100
6.4.1 Printing the AR marker location sheet......................................................................................................................................1006.4.2 Online jobs................................................................................................................................................................................1006.4.3 Offline jobs...............................................................................................................................................................................103
- vi -

Chapter 1 IntroductionThis chapter explains the architecture, data structure, and basic development flow that you should be familiar with beforedeveloping applications using Interstage AR Processing Server.
This chapter is divided in the following sections:
- ArchitectureExplains the basic configuration of the features provided by AR processing clients and AR processing servers.
- AR overlay content structureExplains the information retrieved by an AR processing client from an AR processing server for displaying overlays,and the structure of AR overlay content.
- Data structureData structure refers to the structure of the AR markers, scenarios, scenes, and AR overlay definitions stored in thedatabase of Interstage AR Processing Server. This section provides the information required for using the overlayapplication and the system integration application to retrieve and update data stored in Interstage AR Processing Server.
- AR overlay content definitionAR processing clients use AR overlay content definitions to render images and characters as AR overlay content. Thissection provides the information required for creating overlays using JavaScript, and for creating AR overlay contentdefinitions without using the client authoring tool or the data management console.
1.1 ArchitectureThis section explains the architecture of Interstage AR Processing Server.
Figure 1.1 Architecture
AR processing client
This is the environment that runs on smart devices, for delivering image recognition AR. It overlays digital informationsuch as images and characters retrieved from a server onto real-world camera images.
Recognition engine
Recognizes preview images taken by a camera. It then detects the ID number of the AR marker, and the distance andorientation of the AR marker in relation to the smart device.
Renderer
Analyzes the AR overlay definitions, and generates and renders AR overlay content.
Data management
Processes data and communications used by AR processing clients:
- Caches data used by the web layer, data used by the renderer, and files called by tap events to the file storagearea in the smart device
- 1 -

- Provides a general-purpose viewing and searching interface for accessing the file storage area in the smart device(ContentProvider format)
- Communicates with the server (data upload and download)
Utility
Provides features common to AR processing clients, such as the ability to save and analyze external resource filesand the ability to output logs.
Common infrastructure
Uses the components in an AR processing client to compose the overall structure and control the sequence, fromcamera recognition to rendering of the AR overlay content.
It has an internal web browser and connects to the JavaScript library to run processes on the browser.
Authoring
AR processing clients provide a feature that enables you to intuitively author (add and edit) AR overlay definitionson a smart device.
JavaScript library
Connects web applications and native applications. The AR processing client on Interstage AR Processing Serverruns on Android and iOS, so you can run the JavaScript library with the same interface on both types of terminals.
AR processing server
Centrally manages data in Interstage AR Processing Server, and manages AR overlay definitions so that they are overlaidappropriately for system users.
Data management and data management WebAPI
These components use an RDB to manage a range of information used by Interstage AR Processing Server, such asAR markers, scenarios, and AR overlay definitions.
File data management and file data management WebAPI
These components manage large-size data that cannot be managed by data management (file data such as images)and files that have no fixed format.
1.2 AR overlay content structureInterstage AR Processing Server retrieves the following information from the server, for rendering AR overlay content:
- AR overlay definitionInformation pre-associated with an AR marker to enable overlaying. The definition information retrieved from thedatabase of an AR processing server indicates which AR overlay content is displayed for which AR marker, the sizeand rotation of display, and for which scenario and scene.
- ResourceA file stored on an AR processing server or other media cloud, and used for tap action and AR overlay content.
- 2 -

Figure 1.2 Example of operations up to rendering of AR overlay content
The AR overlay content is rendered based on the retrieved information.
The AR overlay content is made up of a 3D polygon (quadrilateral) and an image pasted onto a surface, known as a texture.There are three types of textures:
- Image textures, made up of an image file in a format such as JPG or PNG and retrieved as a resource
- Text textures, made up of character information
- Scribble textures, created using the scribble feature of the client authoring tool.
1.3 Data structureInterstage AR Processing Server associates multiple information items with a single AR marker. It uses AR markers anduser permissions to search, sort, and connect only task-required information items for storing, retrieving, and editing them.
The EAV model used by Interstage AR Processing Server provides a framework that uses a relational database to managedata to perform these processes. The EAV model is a method of expressing data as a set with three elements: Entity (similarto row), Attribute (similar to column), and Value (similar to column value). It can express various data structures.
Applications that can parse the data structure and handle internal server data can be developed.
1.3.1 Interstage AR Processing Server data structureThis section explains the data structure in Interstage AR Processing Server. All data stored by Interstage AR ProcessingServer is managed based on the EAV model - it is necessary to understand the EAV model below to use the REST API.
- 3 -

Figure 1.3 Data management diagram
- QTypeStores, as values, what is referred to in relational databases as a "table".
- QAttributeStores, as values, what is referred to in relational databases as a "column". Its parent is QType, which is analogous toa "table".
- QEntityStores, as values, what is referred to in relational databases as a "row". Its parent is QType, which is analogous to a"table".
- QValueStores, as values, what is referred to in relational databases as a "value". Its parents are QAttribute, which is analogousto a "column", and QEntity, which is analogous to a "row".
- QuadA logical table that extends QEntity. It can handle both QEntity and QValue arrays (the latter have QEntity as theirparent).
- QEntity including QValue arrays can be registered by a single request.
- Quad can perform a cross-search of QType ("table"), QAttribute ("column"), and QValue ("column value") usinga conditional expression that is string-based rather than ID-based.
1.3.2 AR markerThe following table lists the members of the data type structure for managing the ID number, location, and state of an ARmarker:
- 4 -

Table 1.1 AR marker: armk_fjarmarkerAttribute Description Data type
ar_id AR marker ID LONG
ar_idalias Alias STRING
ar_name AR marker name STRING
ar_description Description STRING
ar_registrationtime Registration datetime LONG
ar_modificationtime Update datetime LONG
armk_location Location STRING
armk_publishtime Download datetime LONG
armk_publishuser Download user STRING
armk_state State
- Unused
- Used
STRING
Note
Reinstallation may be necessary after the following operations:
- Deleting armk_fjarmarker using the data management WebAPI (QType)
- Adding or deleting attributes for armk_fjarmarker using the data management WebAPI (QAttribute)
1.3.3 ScenarioThe following table lists the members of the scenario data type structure:
Table 1.2 Scenario: arscn_scenario
Attribute Description Data type
ar_id Scenario ID LONG
ar_name Scenario name STRING
ar_description Description STRING
ar_registrationtime Registration datetime LONG
ar_modificationtime Update datetime LONG
Note
Reinstallation may be necessary after the following operations:
- Deleting arscn_scenario using the data management WebAPI (QType)
- Adding or deleting attributes for arscn_scenario using the data management WebAPI (QAttribute)
1.3.4 SceneThe following table lists the members of the scene data type structure:
- 5 -

Table 1.3 Scene: arsen_sceneAttribute Description Data type
ar_id Scene ID LONG
ar_name Scene name STRING
ar_description Description STRING
ar_registrationtime Registration datetime LONG
ar_modificationtime Update datetime LONG
Note
Reinstallation may be necessary after the following operations:
- Deleting arsen_scene using the data management WebAPI (QType)
- Adding or deleting attributes for arsen_scene using the data management WebAPI (QAttribute)
1.3.5 AR overlay definitionThe following table lists the members of the AR overlay definition data type structure (Interstage AR Processing Serverprovides this structure as standard):
Table 1.4 AR overlay definition: arpoiarmk_default
Attribute Description Data type
ar_id AR overlay definition ID LONG
ar_name AR overlay definition name STRING
ar_registrationtime Registration datetime LONG
ar_modificationtime Update datetime LONG
arscn_scenarioid Scenario ID LONG
arsen_sceneid Scene ID LONG
armk_markerid AR marker ID LONG
arpoi_superimposedgraphic AR overlay content definition (refer to 1.4 ARoverlay content definition for details)
STRING
Note
Note the following when performing the operations described:
- Reinstallation may be necessary if you delete arpoiarmk_default using the data management WebAPI (QType).
- Reinstallation may be necessary if you delete or update attributes for arpoiarmk_default using the data managementWebAPI (QAttribute).
1.4 AR overlay content definitionThis section explains the structure of the AR overlay content definition contained in an AR overlay definition. The ARoverlay content definition (arpoi_superimposedgraphic) is specified in JSON format.
Using server authoring or client authoring automatically generates an AR overlay content definition, but the system developercan also create one using JavaScript.
- 6 -

Example
The following examples show basic descriptions.
- To overlay the image [http://(server):(portNumber)/filePath/sample.png]
{"typeName":"SuperimposedGraphic",
"projectionType":"PERSPECTIVE",
"graphic":{"typeName":"SquareModelGraphic",
"texture":{"typeName":"ImageTexture",
"src":"http://(server):(portNumber)/filePath/sample.png"},
"scale":{"typeName":"Point","x":1,"y":1,"z":1}},
"translation":{"typeName":"Point","x":23,"y":20,"z":1}
}
- To overlay the string "sample"
{"typeName":"SuperimposedGraphic",
"projectionType":"ORTHO2D",
"translation":{
"typeName":"Point","z":0,"y":0,"x":0},
"rotation":{
"typeName":"Point","z":0,"y":0,"x":0},
"graphic":{
"typeName":"SquareModelGraphic",
"scale":{"typeName":"Point","z":1,"y":1,"x":1},
"texture":{"typeName":"TextTexture",
"text":"sample",
"fontSize":50,
"color":"4278190335",
"wordWrap":false}}
}
- To overlay the image [http://(server):(portNumber)/filePath/sample.png] that calls a separate file ([http://(server):(portNumber)/filePath/sample.pdf]) when tapped
{"typeName":"SuperimposedGraphic",
"projectionType":"PERSPECTIVE",
"graphic":{"typeName":"SquareModelGraphic",
"texture":{"typeName":"ImageTexture",
"src":" http://(server):(portNumber)/filePath/sample.png "},
"scale":{"typeName":"Point","x":1,"y":1,"z":1}},
"translation":{"typeName":"Point", "x":-1,"y":6,"z":1},
"tapAction":{"typeName":"URLAction",
"src":" http://(server):(portNumber)/filePath/sample.pdf "}
}
- To overlay the string "sample" and have it call the method Apl.sample() when tapped
{"typeName":"SuperimposedGraphic",
"projectionType":"ORTHO2D",
"translation":{
"typeName":"Point","z":0,"y":0,"x":0},
"rotation":{
"typeName":"Point","z":0,"y":0,"x":0},
"graphic":{
"typeName":"SquareModelGraphic",
"scale":{"typeName":"Point","z":1,"y":1,"x":1},
"texture":{"typeName":"TextTexture",
"text":"sample",
"fontSize":50,
"color":"4278190335",
"wordWrap":false}}
- 7 -

"tapAction":{"typeName":"ScriptAction",
"expression":"Apl.sample()"}
}
The following tables provide an overview of all elements referred in the samples above (refer to sections 1.4.1 to 1.4.5 fordetails on these elements):
Table 1.5 typeName
typeName Description Type
SuperimposedGraphic AR overlay content type SuperimposedGraphic
Table 1.6 SuperimposedGraphic member list
Member Description Type
translation Relative distance from the AR marker Point
rotation Rotational angle relative to the AR marker Point
projectionType 2D/3D information about the AR overlay content(required key)
ProjectionType
tapAction Information about action to perform when ARoverlay content is tapped
ActionHolder
graphic AR overlay content information (required key) SquareModelGraphic
1.4.1 translationContains the relative distance between the AR marker and AR overlay content.
Details of this member are as follows:
- Point
- x: Indicates the value in the x-axis direction. 1=length of the AR markerType: floatRange: -32 to 32
- y: Indicates the value in the y-axis direction. 1=length of the AR markerType: floatRange: -32 to 32
- z: Indicates the value in the z-axis direction. 1=length of the AR markerPositive values represent content in front of the marker, and negative values represent content behind it.Type: floatRange: -32 to 32
Example
- To display AR overlay content on the AR marker
"translation":{"typeName":"Point","x":0,"y":0,"z":0}
1.4.2 rotationContains the rotational angle relative to the AR marker. It is effective only for the z-axis for AR overlay content displayedin 2D. Details of this member are as follows:
- 8 -
- Point
- x: Indicates the value in the x-axis direction. The unit is degrees.Type: floatRange: -360 to 360
- y: Indicates the value in the y-axis direction. The unit is degrees.Type: floatRange: -360 to 360
- z: Indicates the value in the z-axis direction. The unit is degrees.Type: floatRange: -360 to 360
Example
- To display AR overlay content without rotating it
" rotation":{"typeName":"Point","x":0,"y":0,"z":0}
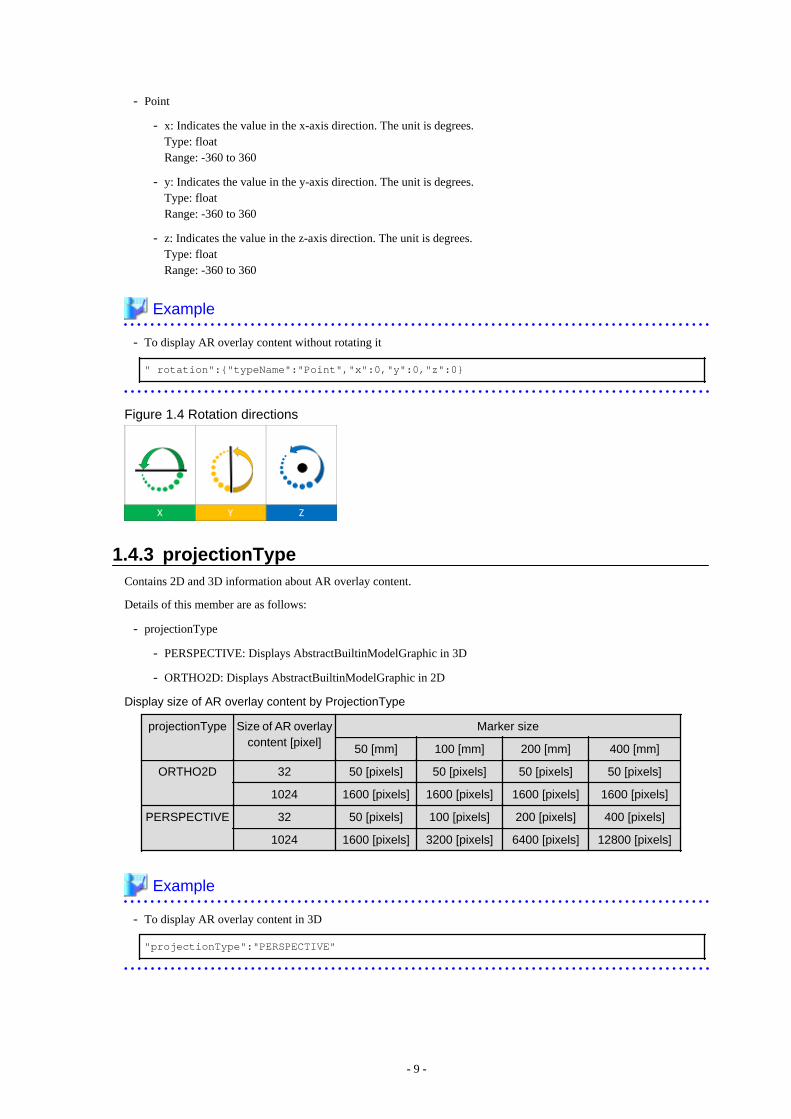
Figure 1.4 Rotation directions
1.4.3 projectionTypeContains 2D and 3D information about AR overlay content.
Details of this member are as follows:
- projectionType
- PERSPECTIVE: Displays AbstractBuiltinModelGraphic in 3D
- ORTHO2D: Displays AbstractBuiltinModelGraphic in 2D
Display size of AR overlay content by ProjectionType projectionType Size of AR overlay
content [pixel]Marker size
50 [mm] 100 [mm] 200 [mm] 400 [mm]
ORTHO2D 32 50 [pixels] 50 [pixels] 50 [pixels] 50 [pixels]
1024 1600 [pixels] 1600 [pixels] 1600 [pixels] 1600 [pixels]
PERSPECTIVE 32 50 [pixels] 100 [pixels] 200 [pixels] 400 [pixels]
1024 1600 [pixels] 3200 [pixels] 6400 [pixels] 12800 [pixels]
Example
- To display AR overlay content in 3D
"projectionType":"PERSPECTIVE"
- 9 -

1.4.4 tapActionContains tap action information for AR overlay content.
Details of this member are as follows:
- ActionHolder
- URLAction: Displays the information attached to an URL when overlay content is clicked
- src: URL of the information to be displayed when overlay content is clicked. Enter this value in 256 charactersor less.Type: URL
- ScriptAction: Calls a JavaScript method when overlay content is clicked
- expression: Name of the JavaScript method to be called when overlay content is clicked. Enter this value in256 characters or less.Type: String
Example
- To call another file when overlay content is clicked
"tapAction":{"typeName":"URLAction","src":"fileUrl"}
- To call a JavaScript method when overlay content is clicked
"tapAction":{"typeName":"ScriptAction","expression":"methodName"}
1.4.5 graphicContains AR overlay content information.
Table 1.7 typeName
typeName Description Type
SquareModelGraphic Specifies SquareModel SquareModelGraphic
Table 1.8 Member list
Member Description Type
scale AR overlay content magnification/reduction rate Point
texture Texture of AR overlay content AbstractTexture - one of: ImageTexture,TextTexture, or HandwritingTexture"
Details of this member are as follows:
- scale: Defines the magnification/reduction rate of AR overlay content
- Point
- x: Indicates the relative size in the x-axis direction. 1=Length of the frame of the AR markerType: floatRange: 0.1 to 32 times
- y: Indicates the relative size in the y-axis direction. 1=Length of the frame of the AR markerType: floatRange: 0.1 to 32 times
- z: Indicates the relative size in the z-axis direction. 1=Length of the frame of the AR markerType: floatRange: 0.1 to 32 times
- 10 -

- texture: Overlays characters, an image, or scribble
- ImageTexture: Image
- TextTexture: Characters
- HandwritingTexture: Scribble
1.4.5.1 ImageTextureSets texture information created for an image.
Table 1.9 typeName
typeName Description Type
ImageTexture Specifies ImageTexture ImageTexture
Table 1.10 Member list
Member Description Type
src Path of resource used for texture(required key). The maximum resourcesize that can be used for the imagetexture is 1024 [pixels] x 1024 [pixels].The recommended size is 5 MB.
URL (supported URLs: http(s))
Details of this member are as follows:
- src: Path of the resource to be used for the image texture
- Type: URL
- Range: Enter the URL of the resource to be used for the image texture in 256 characters or less.
- Specifiable file formats:
- png
- jpg, jpeg
1.4.5.2 TextTextureSets texture information created for a string.
Table 1.11 typeName
typeName Description Type
TextTexture Specifies TextTexture TextTexture
Table 1.12 Member list
Member Description Type
backgroundColor Background color. The value of ARGBis expressed in decimal.
int
size Texture rendering size (in [pixels]) Size
text Characters to be displayed. This is arequired key. To enter the symbols ", /,and \, type \", \/, and \\ respectively inaccordance with the JSON formatescape definition.
String
fontSize Font size of the string (in [pixels]) int
- 11 -

Member Description Type
color Font color. The value of ARGB isexpressed in decimal.
int
wordWrap Text wrapping enabled/disabled (notreflected if no size is specified)
boolean
Details of this member are as follows:
- backgroundColor: Background color. The value of ARGB is expressed in decimal.
- Type: int
- Range: 0 to 4294967295
Example
Non-transparent blue:
- ARGB: FF00FF00
- int type: 4278255360
- size: Texture rendering size
- typeName: Size
- width: Texture width. Enter a value in the range 10 to 1024 [pixels].
- height: Texture height. Enter a value in the range 10 to 1024 [pixels].
- text: Character information to be displayed
- Type: String
- Range: Enter 1 to 256 characters.
- fontSize: Size of the characters
- Type: int
- Range: 10 to 750By default, strings are displayed at 40 [pixels].
- color: Color of the AR overlay content. The value of ARGB is expressed in decimal.
- Type: int
- Range: 0 to 4294967295
- wordWrap:Whether text wrapping is enabled/disabled (ignored if size is not specified)
- Type:Boolean
- Range:True or False
Note
- You must specify the size if using wordWrap.
- Do not specify the size if not using wordWrap. If the display area for entered characters is larger than the area specifiedin size, not all characters may be displayed.
- When a string texture is rendered as AR overlay content with wordWrap disabled, a margin is displayed above andbelow the characters. The height of the texture is therefore the texture size which is greater than or equal to the valueset for fontSize (fontSize: height approximately equal to 3:4).
- 12 -

Example
- To display "Sample" with wordWrap enabled
"texture" : {
"typeName": "TextTexture",
"backgroundColor": 4294967295,
"size": {
"typeName" : "size",
"width" : 64,
"height" : 64
},
"text" : "Sample",
"fontSize" : 20,
"wordWrap" : true
}
1.4.5.3 HandwritingTextureSets image texture information created by the scribble feature provided by the client authoring tool.
Table 1.13 typeName
typeName Description Type
HandwritingTexture Specifies HandwritingTexture HandwritingTexture
Table 1.14 Member list
Member Description Type
src Path of resource used for texture (required key).The maximum resource size that can be used forthe image texture is 1024 [pixels] x 1024 [pixels].The upper limit is 5 MB.
URL (supported URLs: http(s))
handwritingColor Scribble color int
Details of this member are as follows:
- src: URL of the image texture
- Type: URL
- Range: Enter the URL of the resource to be used for the image texture in 256 characters or less.
- Specifiable file formats:
- png
- jpg, jpeg
- handwritingColor: Scribble color. The value of ARGB is expressed in decimal.
- Type: int
- Range: 0 to 4294967295
- 13 -

Chapter 2 Development flowThis chapter explains how to develop applications using Interstage AR Processing Server, using the provided sampleapplication as an example.
The basic flow for developing applications using Interstage AR Processing Server is as follows:
1. PlanningExamine the business and jobs, identify jobs for applying AR, and decide how to use it.
2. Defining requirementsVerify requirements for systemization of the jobs identified for applying AR in the planning stage, define the functionalrequirements, and design an overview of the system.
3. Designing the systemDesign the external specifications (such as system features and interfaces) of the system from the viewpoint of theusers. Also design the internal structure of the system, based on the external specifications.
4. Creating the systemProgram and compile the overlay application and the system integration application according to the design, andcreate a deployment file. Also create resources to be used for displaying overlays.
See
Refer to the Operator's Guide for details on authoring and how to deploy the applications you create.
2.1 PlanningInterstage AR Processing Server overlays various types of digital information such as images and text onto real-worldobjects. It is therefore very versatile and can be used in all business areas and for all jobs.
The planning stage prior to using Interstage AR Processing Server involves examining the business and jobs, identifyingthose suitable for applying AR, and deciding how to use it. If you are planning a system that uses AR, consider the followingin addition to the usual planning:
- Is there anyone to use the displayed content?AR technology is intended to assist humans, so it is not suited to fully automated tasks.
- Can smart devices be used?Smart devices are used as the AR processing clients, so they must be brought into the workplace.
Example Table 2.1 Examples of business considerations
No Businessoperation
Business challenge AR-based measure Applicability
1 Manufacturing
Save time Lighten the burden on workers byproviding appropriate work instructions
Lower the priority andexclude at this time,because automation isunderway
Improve product value Use AR for manuals provided tocustomers
Prevent accidentsduring manufacturing
Prevent accidents by providingprecautions before work starts and bypresenting past examples
2 Inspection Improve inspectionaccuracy
Prevent inspection omissions byoverlaying inspection items onto a product
Excluded from the currentsystemization due to thelow cost-effectiveness
Reduce inspection time Lighten the burden on workers byproviding appropriate work instructions
- 14 -

No Businessoperation
Business challenge AR-based measure Applicability
3 Maintenance Prevent accidentsduring inspection
Prevent accidents by providingprecautions before work starts and bypresenting past examples
Include in the currentsystemization
Reduce man-hours Lighten the burden on workers byproviding appropriate work instructions
4 Plantinspection
Improve customervalue
Aim to increase visitors by providing ARoverlay content to visitors to the plant
Include in the currentsystemization
2.2 Defining requirementsBefore using Interstage AR Processing Server, consider the following in addition to the usual requirements.
2.2.1 Considering AR markers and contentInterstage AR Processing Server displays various overlays when a device is held up to an AR marker. Therefore, considerwhat content will be displayed for an AR marker, and in which location.
- Can AR markers be affixed at the site, and if so, where will they be affixed?Interstage AR Processing Server uses AR markers to display overlays. Therefore, consider if there is anywhere to affixAR markers to objects onto which overlays are to be displayed, and whether users can hold a smart device up to thoseobjects.
- What content do you want to overlay?Consider what content you want to display immediately for the user or to superimpose on an object, and whether dataexists.
Example Table 2.2 Examples of determining target tasks
No Target task Task description AR target Content
1 Temperatureinspection
Inspect, twice daily (morningand night), the hydraulic pressesinstalled at a total of 8 locationswithin each building to ensurethere is no problem withpressure, flow rate, ortemperature.
- Water heater
- Valves
- Interior of theequipment
- Thermometer
- Work sequence
- Input field
- Contactinformation
- Previousinspection results
2.2.2 Size and material of AR markersYou must adjust the AR markers for Interstage AR Processing Server to suit the environment where they are used.
When considering the size of an AR marker, take the following into account (refer to the Overview for details on therelationship between the AR marker and the recognition distance).
- The distance between the position from which the user will hold up the smart device and the AR marker affixed to thetarget object
- How to print the AR markers
- The performance of the smart device to be used
- 15 -
Example
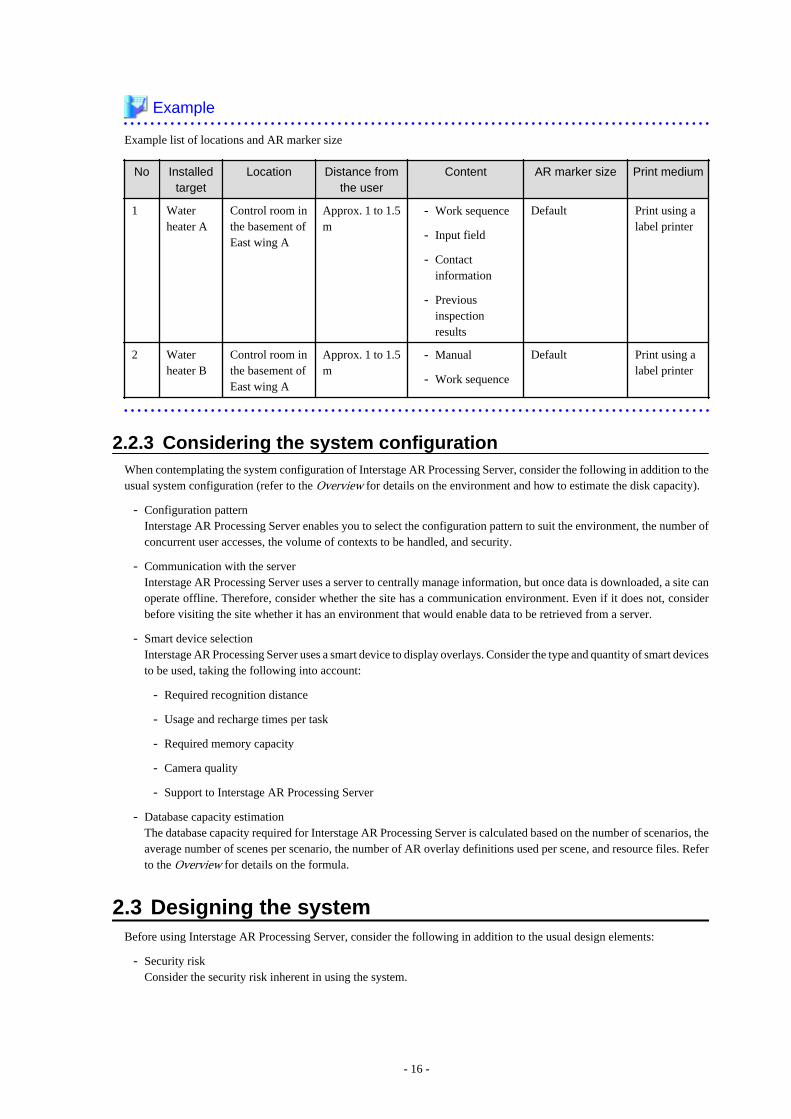
Example list of locations and AR marker size
No Installed
targetLocation Distance from
the userContent AR marker size Print medium
1 Waterheater A
Control room inthe basement ofEast wing A
Approx. 1 to 1.5m
- Work sequence
- Input field
- Contactinformation
- Previousinspectionresults
Default Print using alabel printer
2 Waterheater B
Control room inthe basement ofEast wing A
Approx. 1 to 1.5m
- Manual
- Work sequence
Default Print using alabel printer
2.2.3 Considering the system configurationWhen contemplating the system configuration of Interstage AR Processing Server, consider the following in addition to theusual system configuration (refer to the Overview for details on the environment and how to estimate the disk capacity).
- Configuration patternInterstage AR Processing Server enables you to select the configuration pattern to suit the environment, the number ofconcurrent user accesses, the volume of contexts to be handled, and security.
- Communication with the serverInterstage AR Processing Server uses a server to centrally manage information, but once data is downloaded, a site canoperate offline. Therefore, consider whether the site has a communication environment. Even if it does not, considerbefore visiting the site whether it has an environment that would enable data to be retrieved from a server.
- Smart device selectionInterstage AR Processing Server uses a smart device to display overlays. Consider the type and quantity of smart devicesto be used, taking the following into account:
- Required recognition distance
- Usage and recharge times per task
- Required memory capacity
- Camera quality
- Support to Interstage AR Processing Server
- Database capacity estimationThe database capacity required for Interstage AR Processing Server is calculated based on the number of scenarios, theaverage number of scenes per scenario, the number of AR overlay definitions used per scene, and resource files. Referto the Overview for details on the formula.
2.3 Designing the systemBefore using Interstage AR Processing Server, consider the following in addition to the usual design elements:
- Security riskConsider the security risk inherent in using the system.
- 16 -

- Design of data itemsIf integrating with an existing system, consider what data is to be viewed, registered, and stored, and at what time.
- Responsive designIf you want to use different types of devices such as smart phones and tablets for viewing the web applications youdevelop, consider responsive design.
- Scenario and scene designConsider the scenarios and scenes to be used in the system.
- AR overlay definition designDesign the information required for authoring.
- User-defined table designDesign the tables for storing external data to be used by the overlay application.
- External designDesign the external specifications of the system from the viewpoint of the system users.
- Internal designDesign the internal structure of the system and the program interfaces based on the external specifications.
2.3.1 Considerations for reducing security riskConsider the following points for reducing security risk while using Interstage AR Processing Server.
2.3.1.1 Overlay application (web application)This product uses WebView to provide HTML rendering and a JavaScript execution feature. WebView entails a securityrisk due to the nature of the content being accessed. In particular, executing an invalid JavaScript code may result in asecurity breach, such as a third party operating the device or acquiring information from it.
Ensure that web applications display content from your own administration server on the Internet.
The following lists possible measures:
- When setting the URL for starting the overlay application, set a fixed URL that links the application to the content inyour administration server (do not allow system users to specify the URL).
- Use HTTPS as the communication protocol for downloading the overlay application.
Example
Specifying the URL for calling the overlay application
//Set the overlay application Activity to intent.
String _package = "com.fujitsu.interstage.ar.mobileclient.android";
String _activity =
"com.fujitsu.interstage.ar.mobileclient.android.base.web.ArWebMainActivity";
Intent intent = new Intent();
intent.setClassName(_package, _activity);
//1) Set a fixed URL from the application as the activation URL
//2) Use HTTPS as the communication protocol
intent.putExtra("extraskey_widget_url", "https://www.fujitsu.com/index.html");
//Start Activity.
startActivity(intent);
2.3.1.2 Built-in storageThe files (offline resources, photos taken using authoring, log files) to be used by the applications are stored in built-instorage. You can view their content from a PC via a USB connection. The files are not deleted unless the application isuninstalled. If you do not want data to remain in the device, the system users should delete it using File Explorer.
- 17 -
2.3.2 Designing data itemsYou must consider the following if you want to integrate with a core business system:
- Data items to be reflected from the core business system to the AR processing serverIf, for example, you want to view previously stored data such as a history on site, adjust the data to be used with theoverlay application.
- Data items to be reflected from the AR processing server to the core business systemConsider what data is to be transferred when, for example, values entered by a user in the overlay application are to bereflected in the core business system.
- Managing data on the AR processing serverConsider how to manage data to suit your business style, such as whether to manage it using a user-defined table or touse a media cloud.
- Timing for reflecting dataConsider the timing for reflecting data from the core business system and AR processing server.
- Appending location information (for displaying data from a core business system as AR overlay content)There are two methods of creating an AR overlay definition: creating one from scratch by using a JavaScript library,and converting data already registered in the AR processing server. Consider which method to use for appending locationinformation.
Point
If you integrate with multiple core business systems, there may be duplicate parameter names and values. If this happens,problems may arise if a core business system application or AR business application retrieves or updates the wrong data.To avoid such problems, you must take measures to prevent duplication by, for example, attaching a prefix to the datamanaged by the AR processing server to identify each core business system.
2.3.3 Considering responsive designDepending on your business, you might use several different types of smart devices, such as smartphones and tablets, ratherthan a single type as your AR processing client. In this case, consider responsive design.
2.3.3.1 Designing web applicationsYou must ensure that the screen layout of web applications is displayed properly even if smart devices with different screensizes are used. In this case, consider responsive design for leveraging the single source multi-platform approach, instead ofcreating HTML/CSS for each screen size.
However, in some cases different web applications may be provided depending on the job purpose. For example, tabletsmay be used for jobs where a large screen area is needed for entering characters and reading manuals, and smartphones maybe used for jobs that do not require a large screen. In this situation, consider whether responsive design would be appropriate.
2.3.3.2 OverlayingIf using smart devices with different screen sizes and resolutions to display overlays based on a single AR overlay definition,consider the following:
- Distance between the AR marker and the smart deviceTo display overlays from Interstage AR Processing Server, you first calculate the position for placing AR overlay contentbased on the size of the AR marker captured by the camera. Therefore, differences in resolution or screen size nevercause the overlays to overlap or be displayed in the wrong place. Ensure that the position where you want to displayAR overlay content will be within the frame of the camera when the smart device is held up to the AR marker from theexpected position.
- Displaying AR overlay definition content with 2D projectionWhen the projection is 2D, AR overlay content is rendered according to the specified size in pixels. Therefore, whenthe same content is displayed using smart devices with different resolutions, it may appear differently on the different
- 18 -

smart devices. For example, it may be displayed in full on smart devices with a high resolution but be cut off on smartdevices with a low resolution. Consider the size of AR overlay content when displaying it in 2D.
2.3.4 Designing scenarios and scenesInterstage AR Processing Server uses scenarios and scenes for switching AR overlay content. Therefore, for each scenarioand scene, design what you want to overlay on which AR marker and what you want to instruct the user to do, using yourrequirement definition as a basis.
Example
Example scenario and scene design
Scenario Scene Operation content
Scenario name Scenario ID Scene name Scene ID
Inspectionwork
1 Operate valves 1 Display manual
Provide work instructions
Check interior 2 Play video
Check value 3 Provide work instructions
Entertemperature
4 Input temperature
2.3.5 Designing AR overlay definitionsDesign the overlays to be used with the overlay application. Consider the following:
- Basic information
- Overlay nameSpecify the name of the defined overlay. Specifying a unique name will make it easier to search for the overlayfrom an application and to specify the overlay.
- Scenario IDID of the scenario to be overlaid.
- Scene IDID of the scene to be overlaid.
- AR marker IDSpecify the AR marker ID on which the defined overlay definition is to be overlaid.
- Overlay definition contentSelect from the following types:
- TextUse this type to overlay text information.
- ShapesSelect this type to use the product-standard shapes.
- FileYou can use any image file as an overlay. Specify a file saved using file management on the AR processing serveror the URL of a file located externally. The overlay is displayed when the network is accessed for downloading theoverlay image.
- Overlay method
- ProjectionSelect 2D display or 3D display.
- 19 -

- Relative position from the AR markerSpecify the x-, y-, and z-coordinates from the center of the AR marker, using one side of the AR marker as themeasurement unit.
- Rotational angle relative to the AR markerSpecify the rotational angle of the x-, y-, and z-coordinates relative to the AR marker coordinate system, using thecenter of the AR marker as the reference point.
- Tap action
- URL actionURL containing the content that will be displayed when the overlay is tapped.
- Script actionScript that will be executed when the overlay is tapped. To specify a script for the script action, specify a JavaScriptmethod to be created when the application is mounted.
Example Table 2.3 Example design of an AR overlay definition
Basic information AR overlay definition name Job sample_valve step
AR marker ID 1
Text information Text Step 1: Turn valve clockwise
Font size 20
Font color #[B00000] Transparency 255
Background color #[FFC0C0] Transparency 255
Text wrapping Enabled
Area height 80
Area width 160
Position information Projection 2D
Translation x 4.0
y 1.5
z 0.0
Rotation x 0.0
y 0.0
z 0.0
Scale x 1.0
y 1.0
z 1.0
Other Use tap action Yes
Script action Apl.shiftScene(true)
- 20 -

Figure 2.1 Example display of AR overlay definition
2.3.6 Designing a user-defined tableUse a user-defined table when using external data in the overlay application. Data that will not be updated, such as fixedexternal data and external data URLs, can be used in an overlay by specifying it in the AR overlay definition. If data is likelyto be updated or you want to accumulate daily data, use a user-defined table.
Design the following items when designing a user-defined table:
- Design items
- Data table nameCorresponds to the table name in a database
- AttributeCorresponds to column information in a relational database
- Attribute nameName of the attribute
- Data typeType of the data to be stored in the attribute. Select LONG, FLOAT, or STRING.
Point
- You can retrieve the latest data by creating the registration datetime as an attribute and sorting the data in descendingorder when retrieving it. You can display overlays using the latest data by including a process in the overlay applicationfor embedding the latest data into the AR overlay definition data.
- The search feature provided by the AR processing server in Interstage AR Processing Server enables you to search forthe same attribute name across multiple tables. The user-defined tables in the sample application are designed using theattribute names (such as ar_id, ar_name, and ar_description) common to the product-standard tables (scenario, scene,and AR overlay definition). You do not need to use attribute names that are common to all tables. Design the data tablesaccording to your use.
- 21 -

- Note that AR processing servers do not automatically append a value to common attributes including ar_registrationtimeand ar_modificationtime even if you specify the same attribute name in the user-defined tables.
- The data type LONG is equivalent to the long type in Java. Depending on the programming language and applicationenvironment, the product may not be able to handle any long type data. For example, the number type in JavaScriptrounds numerical values of 17 digits or more. Determine the range of values according to the environment you intendto use.
Example
Design a user-defined table (usr_sample) for storing the name of the worker (usr_name) and temperature (usr_temperature)as inspection information in the sample application.
Table 2.4 Example user table design
Attribute name Data type Remarks
ar_id LONG User data ID
ar_name STRING User data name
ar_description STRING Description or memo
ar_registrationtime LONG Registration datetime
ar_modificationtime LONG Update datetime
usr_name STRING User name
usr_temperature LONG Inspection temperature
2.4 Example external specificationsThe method of applying external specifications depends on the job content. This section explains external specifications,using the sample application as an example.
Interstage AR Processing Server provides a web application to system users, so determine the following types of contentfor each screen:
- Processing when a screen is displayed
- Screen GUIs
- Operation content on the screens
2.4.1 index.htmlThis is the start screen of the sample application. The scenario name (in this case, "Inspection work") is not initially displayedin the topmost button - it is only displayed after the scenario is retrieved. You can delete web storage saved to an offlineenvironment and offline storage data. You can upload saved data by clicking Upload. This page changes the display of theoperation mode display area according to the operation mode.
- 22 -

This page performs the following:
- Stops the camera
- Enables offline storage
- Retrieves data saved to web storage
- Determines the operation mode
- Changes the display of the display area according to the operation mode
- In server connection mode: Retrieves the scenario list from the AR processing server and displays the scenario namein the button
- In standalone mode: Displays the scenario name retrieved from web storage in the buttonIf no scenario list is saved to web storage, this page displays a message.
Operation when Inspection work is clicked
Redirects to prework.html
Operation when Upload is clicked
Uploads data according to the operation mode
- In server connection mode: Uploads data to the AR processing server
- In standalone mode: Displays a dialog box prompting the user to run the process in server connection mode
Operation when Delete data is clicked
- Deletes web storage data
- Re-registers the scenario list in web storage
- Deletes offline storage data
- Displays the Data was deleted message if data is deleted successfully
2.4.2 prework.htmlThis is the preparation screen for inspection work. You can download user-defined data, AR overlay definitions, and externalresources in preparation for offline operation. For online use, you can start work without downloading anything.
This page performs the following:
- Stops the camera
- Retrieves data saved to web storage
- 23 -

- Determines the operation mode
- Changes the display of the display area according to the operation mode
- In server connection mode: Retrieves the scene list from the AR processing server and displays it as a message
- In standalone mode: Displays the scene list retrieved from web storage as a message. If no scene is saved to webstorage, this page displays a message and returns to index.html.
Operation when Prepare work is clicked
- Determines the operation mode
- In server connection mode:
- Retrieves the user-defined data and the AR overlay definition data from the AR processing server. It embedsthe user-defined data in a specific AR overlay definition and adds it to the renderer. When the AR overlaydefinition is added to the renderer, external resources are downloaded. This page displays a message whendownload finishes.
- The query sent to the executing AR processing server is saved to offline storage and is available during offlineuse. You can search for all scenes at once, but that means each search retrieves all data from offline storagewhen you need the data for one scene only. This page therefore runs a separate search for each scene.
- In standalone mode:Checks the operation mode and network status, and then prompts the user to run the process again.
Operation when Start work is clicked
Redirects to work.html
2.4.3 work.htmlThis is the inspection work screen. This page performs the following:
- Retrieves data saved to web storage
- Changes the HTML according to the operation mode and current scene
- Starts the camera
- Adds the AR marker detection event listener
- Adds the screen tap event listener
- 24 -

Operation when Previous/Next is clicked
- Switches from the current scene to the previous or next scene. Previous/Next is not displayed if you are viewing thefirst or last scene.
- Changes the display of the guidance area at the top of the screen
- Retrieves the AR marker that was recognized
- If the AR marker ID is 1, retrieves the AR overlay definition according to the operation mode
- In server connection mode: Retrieves the AR overlay definition for the current scenario ID and scene ID fromthe AR processing server. If the scene ID is 4, this page also retrieves the user-defined data and embeds it intothe AR overlay definition.
- In standalone mode: Retrieves the AR overlay definition from offline storage and sets it into the renderer. Ifthe scene ID is 4, this page embeds the user-defined data into the AR overlay definition.
- If offline storage is being used, runs the same query as the one downloaded beforehand
- To switch the scene and change the display of the AR overlay content, you must simultaneously also reset the ARoverlay definition set in the renderer. You can change the renderer setting by pointing the camera away from the ARmarker for a moment and then back again. Processing is as follows for changing the overlay the moment the scene isswitched.
- Performs the following when the AR marker is detected:
- If the AR marker with the AR marker ID of 1 is detected:
- Displays Marker 1 was detected in the AR marker detection notification area
- Retrieves the AR overlay definition according to the operation mode
- In server connection mode: Retrieves the AR overlay definition for the current scenario ID and scene ID fromthe AR processing server. If the current scene ID is 4, this page also retrieves the user-defined data and embedsit into the AR overlay definition.
- In standalone mode: Retrieves the AR overlay definition from offline storage and sets it into the renderer. Ifthe current scene ID is 4, this page embeds the user-defined data into the AR overlay definition.
- If the AR marker with the AR marker ID of 1 is lost:
- Deletes the display of the AR marker detection notification area
- 25 -

Redirects to comment.html
Deletes the AR marker detection event listener simultaneously to the redirection process
Processing when Upload is clicked
- Uploads data according to the operation mode
- In server connection mode: Uploads post data to the AR processing server
- In standalone mode: Displays an alert prompting the user to run the process in server connection mode
2.4.4 comment.htmlThis is the screen for entering and registering the inspection value. This page performs the following:
- Stops the camera
- Retrieves data saved to web storage
- Changes the HTML according to the operation mode
Operation when OK is clicked
- Retrieves the name from the form and displays a message if the name has not been entered or contains more than 30characters
- Retrieves the temperature from the input form and, if the temperature has not been entered or is not a number between0 and 999, displays a message
- Creates a data query for posting to the AR processing server, and saves the input data and post data to web storage
- Uploads data according to the operation mode
- In server connection mode: Uploads post data to the AR processing server
- In standalone mode: Displays a message prompting the user to run the process in server connection mode
- Redirects to work.html
Operation when Cancel is clicked
Redirects to work.html
2.5 Example internal specificationsThe method of applying internal specifications depends on the job content. This section explains internal specifications,using the sample application as an example.
2.5.1 Specifications common to all screens
2.5.1.1 Cache fileThis configuration file caches web resources using the features of HTML 5. It caches all the web resources to be used.
CACHE MANIFEST
#ver 20130702_0001
#Specify the resources to be cached.
CACHE:
index.html
prework.html
work.html
comment.html
gyoumu.css
apl_sample/apl.js
- 26 -

ar/ar.js
#Specify the resources that must be connected to the server.
NETWORK:
*
#Specify alternative resources to be used if the preferred resources cannot be accessed.
FALLBACK:
2.5.1.2 Properties
Variable Type Description Saved toweb storage
Apl.useScenarioId number Scenario to be used in the sample application. Can bechanged.
Apl.operationMode string Contains operation mode. Y
Apl.scenarioList Array<> Contains the scenario list.
It is an object that uses the ID as an index, and alsocontains the scenario name (name) and scenariodescription (description) as properties.
Y
Apl.scenarioId number Contains the current scenario ID. Y
Apl.sceneList Array<> Contains the scene lists.
It is an object that uses the ID as an index, and alsocontains the scene name (name) and scene description(description) as properties.
Y
Apl.sceneId number Contains the current scene ID. Y
Apl.superimposedGraphics Array<Array<>>
A 3-dimensional array containing scene IDs, AR markerIDs and AR overlay definitions.
1D: Scene ID, 2D: AR marker ID, 3D: AR overlaydefinition
Y
Apl.postData Object Data to be sent to the AR processing server when enteringinspection values.
query: Query string sent to the AR server
body: Data string registered in the AR server
Y
Apl.userData Object Contains the latest inspection data.
name: User name
temperature: Inspection temperature
time: Inspection time
Y
Apl.listenerId string Listener ID added for marker detection.
Apl.completionNotice Object Used when running multiple downloads, to determine ifdownload has completed.
2.5.1.3 Classes
Class Description Property
Apl.Quad Class for expressing Quad for the AR processingserver.
qtypeName
id
qvalues
- 27 -

Class Description Property
version
Apl.QValue Class for expressing QValue for the ARprocessing server.
qtypeName
qentityid
qattributeName
stringValue
longValue
floatValue
version
Apl.QuadQuery Class for expressing quad queries for the ARprocessing server.
type
limitRange
qattributeOrderIndexRange
qtypeNameRange
whereExpressions
sortOrderExpressions
Apl.Range Class for expressing quad query ranges for theAR processing server.
start
end
Apl.QuadQueryExpression Class for expressing quad query expressions forthe AR processing server.
qattributeNameRanges
qvalueRanges
qvalueType
desc
2.5.1.4 Methods
Method Outline Argument Description
Apl.noop(_result) This method does nothing.
Specify it when no operation is to beperformed at callback.
_result:AR.Native.Result
Native result object
Apl.log(_message, _detail) Creates an error message from aJavaScript error or string and displays analert. If Detail is specified, it is added andoutput to the log.
_message:String or Error
Error message text
_detail: String Detailed error informationused for log output
Apl.getLocalStorageData() Retrieves all data saved to web storage. None
Apl.*** Error(_result) Method for onError for various APIs in theJavaScript library. Displays details of anerror as an alert.
_result:AR.Native.Result
Native result object
Apl.makeQuadQuery(_qQuery)
Generates a quad search string from theQuadQuery class.
_qQuery:QuadQuery
Apl.QuadQuery object
Apl.showOperationMode() Changes the HTML according to theoperation mode.
None
- 28 -

2.5.1.5 ProcessesWeb storage
HTML and JavaScript do not save the data held during screen redirection and suspension of an application. All data tobe held in common after screen redirection is saved to web storage. Since the timing of screen redirection and suspensionis not predictable, web storage saves each data item individually whenever a change is made to it. In addition, the onloadfunction, which is executed for all screens, retrieves data from web storage.
Errors
When an error occurs in JavaScript or in AR native, an error message is displayed as an alert and output to a log.
//Outputs error log.
Apl.log = function (_message, _detail) {
if (_message == null) return;
var code = 0;
var message;
if (_message instanceof Error) { //For an Error object
if (typeof _message.code == 'number') code = _message.code;
message = _message.componentName == null ? _message : _message.componentName + " :
" + _message;
if (_message.cause != null) message += " Cause : " + _message.cause;
} else message = _message; //For a non-Error object
//Displays message as an alert.
alert(message);
//Outputs message + detail to a log.
if (_detail) message += "\n" + detail;
try {
AR.Log.log(AR.Log.LevelType.ERROR, code, message, Apl.noop, Apl.logError);
} catch (e) {
alert("Failed to output log." + e);
}
};
Example
- When an error occurs in JavaScript
try {
AR.Camera.stopCameraView(onSuccess, onError);
} catch (e) {
Apl.log(e);
}
- When an error occurs in AR native
onError = function (_result) {
var message = "Failed to start camera.";
var detail = _result.getStatus() + "\n" + _result.getValue();
Apl.log(message, detail);
};
- 29 -

2.5.2 index.html
2.5.2.1 onload processingAfter stopping the camera and retrieving data saved to web storage, determine the operation mode
Apl.onloadIndex = function(){
//Stops the camera.
AR.Camera.stopCameraView(Apl.noop, Apl.stopCameraViewError);
//Enables offline storage.
AR.Data.useOfflineStorage(true, Apl.noop,Apl.useOfflineStorageError);
//Gets stored data from the web stroage.
Apl.getLocalStorageData();
//Sets Secenario ID
Apl.scenarioId = Apl.useScenarioId;
//Gets the operation mode and saves it to Apl.operationMode.
AR.OS.getOperationMode(Apl.getOperationModeSuccess ,Apl.getOperationModeError);
};
Processing when the operation mode is determined successfully
Apl.getOperationModeSuccess = function (_result) {
Apl.operationMode = _result.getValue();
localStorage.setItem("operationMode", Apl.operationMode);
//Changes the HTML display according to the operation mode.
Apl.showOperationMode();
if (Apl.operationMode == "serverMode") { //For server connection mode
//Gets scenario lists from the AR processing server.
Apl.getScenario();
} else { //For standalone mode
//Displays the scenario button.
Apl.showScenarioButton();
}
};
Generate a query for retrieving the scenario and retrieve the scenario list from the AR processing server
Apl.getScenario = function () {
//Creates query objects for quads searches.
var query = new Apl.QuadQuery();
query.type = "RECORDSANDCOUNT";
query.limitRange = new Apl.Range(1, 10);
query.qattributeOrderIndexRange = new Apl.Range(1, 10);
//Specifies the qtype to which scenarios are registered.
query.qtypeNameRanges = new Apl.Range("arscn_scenario");
//Specifies scenario IDs.
query.whereExpressions = new Apl.QuadQueryExpression(new Apl.Range("ar_id"), new
Apl.Range(Apl.useScenarioId), "LONG");
//Converts to a string.
query = Apl.makeQuadQuery(query);
//Gets scenario lists from the AR processing server.
AR.Data.getArServerData(query, true, Apl.getScenarioSuccess,
Apl.getArServerDataError);
};
Processing when scenarios are retrieved successfully from the AR processing server
Apl.getScenarioSuccess = function (_result) {
//Initializes
Apl.scenarioList = null;
//Extracts scenarios from the results and stores them in Apl.scenarioList.
- 30 -

Apl.extractScenario(_result.getValue());
//Stores scenarioID in web storage.
localStorage.setItem("scenarioId", Apl.scenarioId);
//Stores registered scenarios in web storage.
if (Apl.scenarioList != null)
localStorage.setItem("scenarioList", JSON.stringify(Apl.scenarioList));
//Displays a button from the retrieved scenario.
Apl.showScenarioButton();
};
Extract scenarios from the JSON object
Apl.extractScenario = function (_data) {
//Number of retrieved records.
var recordLength = _data.records.length;
for (var recordIndex = 0; recordIndex < recordLength; recordIndex++) {
//Looks up records one by one.
var record = _data.records[recordIndex];
var valueLength = record.qvalues.length;
var scenarioId;
var value = new Object();
//Gets only the qvalues that will be used (determined by qattributeName)
for (var valueIndex = 0; valueIndex < valueLength; valueIndex++) {
var qvalue = record.qvalues[valueIndex];
if (qvalue.qattributeName == "ar_name") { //Scenario name
value.name = qvalue.stringValue;
}
if (qvalue.qattributeName == "ar_description") { //Scenario description
value.description = qvalue.stringValue;
}
if (qvalue.qattributeName == "ar_id") { //Scenario ID
scenarioId = qvalue.longValue;
}
}
if (value.name != null) {
//Stores in Apl.scenarioList.
if (Apl.scenarioList == null) Apl.scenarioList = new Array();
Apl.scenarioList[scenarioId] = value;
}
}
};
Print the retrieved scenario name onto the button
Apl.showScenarioButton = function () {
if (Apl.scenarioList != null && Apl.scenarioList[Apl.scenarioId] != null) {
document.getElementById("scenario_select").value =
Apl.scenarioList[Apl.scenarioId].name;
document.getElementById("scenario_select").style.visibility = "visible";
document.getElementById("scenario_select").onclick = Apl.changePreWork;
} else {
alert("Could not retrieve a scenario. Check the operation mode and network status,
and then retry the process.");
}
};
- 31 -

2.5.2.2 Processing when Inspection work is operatedRedirect to prework.html
Apl.changePreWork = function () {
//Redirects to prework.html.
location.href = "prework.html";
};
2.5.2.3 Processing when Delete data is operatedDelete data from web storage and offline storage. The scenario and operation mode are retrieved by index.html,so save the scenario list and operation mode to web storage again
Apl.clearCache = function () {
//Deletes all data from web storage.
localStorage.clear();
if(Apl.scenarioId != null)
//Saves scenarioID to web storage again.
localStorage.setItem("scenarioId", Apl.scenarioId);
if (Apl.scenarioList != null)
//Saves scenarios to web storage again.
localStorage.setItem("scenarioList", JSON.stringify(Apl.scenarioList));
if (Apl.operationMode != null)
//Saves operation modes to web storage again.
localStorage.setItem("operationMode", Apl.operationMode);
//Deletes data from offline storage.
AR.Data.clearResourceStorage(Apl.clearStorageSuccess, Apl.clearResourceStorageError);
};
//Callback function used when offline storage is deleted successfully.
Apl.clearStorageSuccess = function (_result) {
alert("The data was deleted.");
};
2.5.3 prework.html
2.5.3.1 onload processingRetrieve data saved to web storage, change the HTML according to the operation mode, and then retrieve thescene list
Apl.onloadPreWork = function () {
//Stops the camera.
AR.Camera.stopCameraView(Apl.noop, Apl.stopCameraViewError);
//Gets data from web storage.
Apl.getLocalStorageData();
//Changes the HTML display according to the operation mode.
Apl.showOperationMode();
//Gets scenes according to the operation mode.
if (Apl.operationMode == "serverMode") { //For server connection mode
//Gets a scene list for the current scenario ID and stores it in Apl.sceneList.
Apl.getScene(Apl.scenarioId);
} else { //For standalone mode
//Displays a scene list retained in Apl.sceneList.
Apl.showSceneList();
}
};
- 32 -

Generate a query for retrieving scenes and retrieve data from the AR processing server
A Apl.getScene = function (_scenarioId) {
//Creates query objects.
var query = new Apl.QuadQuery();
query.type = "RECORDSANDCOUNT";
query.limitRange = new Apl.Range(1, 10);
query.qattributeOrderIndexRange = new Apl.Range(1, 10);
//Specifies the qtype to which a scene is registered.
query.qtypeNameRanges = new Apl.Range("arsen_scene");
//Specifies the scene id range.
query.whereExpressions = new Array(new Apl.QuadQueryExpression(new
Apl.Range("ar_id"), new Apl.Range(1, 4), "LONG"));
if (typeof _scenarioId != 'undefined')
//Specifies the scenario ID.
query.whereExpressions.push(new Apl.QuadQueryExpression(new
Apl.Range("arscn_scenarioid"), new Apl.Range(_scenarioId), "LONG"));
//Converts to a string.
query = Apl.makeQuadQuery(query);
//Gets scenes from the AR processing server.
AR.Data.getArServerData(query, true, Apl.getSceneSuccess, Apl.getArServerDataError);
};
Processing when scenes are retrieved successfully from the AR processing server
Apl.getSceneSuccess = function (_result) {
//Initializes
Apl.sceneList = null;
//Extracts scenes from the results and stores them in Apl.scenarioList.
Apl.extractScene(_result.getValue());
//Stores registered scenes in web storage.
if (Apl.sceneList != null)
localStorage.setItem("sceneList", JSON.stringify(Apl.sceneList));
//Displays a scene list.
Apl.showSceneList();
};
Extract scenes
Apl.extractScene = function (_data) {
//Number of retrieved records.
var recordLength = _data.records.length;
for (var recordIndex = 0; recordIndex < recordLength; recordIndex++) {
//Looks up records one by one.
var record = _data.records[recordIndex];
var valueLength = record.qvalues.length;
var value = new Object();
var sceneId;
//Gets only the qvalues that will be used (determined by qattributeName)
for (var valueIndex = 0; valueIndex < valueLength; valueIndex++) {
var qvalue = record.qvalues[valueIndex];
if (qvalue.qattributeName == "ar_name") { //Scene name
value.name = qvalue.stringValue;
}
if (qvalue.qattributeName == "ar_description") { //Scene description
value.description = qvalue.stringValue;
}
if (qvalue.qattributeName == "ar_id") { //Scene ID
sceneId = qvalue.longValue
}
}
if (value.name != null && sceneId != null) {
- 33 -

//Stores in Apl.sceneList.
if (Apl.sceneList == null) Apl.sceneList = new Array();
Apl.sceneList[sceneId] = value;
}
}
};
Display the scene list
Apl.showSceneList = function () {
if (Apl.sceneList != null) {
var show = "[List of steps]\n";
for (scene in Apl.sceneList) {
if (Apl.sceneList[scene] != null)
show += "step" + scene + " : " + Apl.sceneList[scene].name + "\n";
}
alert(show);
} else {
alert("Could not get scene. Check the operation mode and network status, and then
retry the process.");
location.href = "index.html";
}
};
2.5.3.2 Operation for Prepare workDownload resources from AR processing server
Apl.resourceDownload = function(){
if(Apl.operationMode == "serverMode"){ //For server connection mode
//Sets download notifications.
Apl.completionNotice.notice = true;
Apl.completionNotice.count++;
//Gets user-defined data and stores it in Apl.userData.
Apl.getUserData(true);
//Gets AR overlay definition data for each scene and stores it in
Apl.superimposedGraphics.
//Queries and responses are saved to offline storage.
for(scene in Apl.sceneList){
Apl.completionNotice.count++;
Apl.getSuperimposedGraphicData(true, new Apl.Range(Apl.scenarioId), new
Apl.Range(parseInt(scene)),new Apl.Range(1));
}
} else { //For standalone mode
alert("Run in server connection mode.") ;
}
};
Generate a query for retrieving a user-defined data and retrieve data from the AR processing server
Apl.getUserData = function (_isSuperReload) {
//Creates query objects.
var query = new Apl.QuadQuery();
query.type = "RECORDSANDCOUNT";
query.limitRange = new Apl.Range(1, 1);
query.qattributeOrderIndexRange = new Apl.Range(1, 10);
//Specifies the qtype to which user-defined data is registered.
query.qtypeNameRanges = new Array(new Apl.Range("usr_sample"));
//Specifies ar_id.
query.whereExpressions = new Array(new Apl.QuadQueryExpression(new
Apl.Range("ar_id"), new Apl.Range(1), "LONG"));
//Sorts the registration time (ar_registrationtime) in descending order and gets
- 34 -

the latest data.
query.sortOrderExpressions = new Array(new Apl.QuadQueryExpression(new
Apl.Range("ar_registrationtime"), new Apl.Range(0, 9000000000000), "LONG", true));
//Converts to a string.
query = Apl.makeQuadQuery(query);
//Gets user-defined data from the AR processing server.
AR.Data.getArServerData(query, _isSuperReload, Apl.getUserDataSuccess,
Apl.getArServerDataError);
};
Processing when the user-defined data is retrieved successfully from the AR processing server
Apl.getUserDataSuccess = function(_result){
//Extracts the required data from the results and stores it in Apl.userData.
Apl.extractUserData(_result.getValue());
//Stores registered user-defined data in web storage.
if(Apl.userData != null)
localStorage.setItem("userData", JSON.stringify(Apl.userData));
//Determines download completion notifications.
Apl.checkCompletion();
};
Extract the user-defined data from the JSON object
Apl.extractUserData = function (_data) {
//Number of retrieved records.
var recordCount = _data.records.length;
for (var recordIndex = 0; recordIndex < recordCount; recordIndex++) {
//Looks up records one by one.
var record = _data.records[recordIndex];
var valueLength = record.qvalues.length;
var value = new Object();
//Gets only the qvalues that will be used (determined by qattributeName)
for (var valueIndex = 0; valueIndex < valueLength; valueIndex++) {
var qvalue = record.qvalues[valueIndex];
if (qvalue.qattributeName == "usr_name") { //User name
value.name = qvalue.stringValue;
}
if (qvalue.qattributeName == "usr_temperature") { //Inspection temperature
value.temperature = qvalue.longValue;
}
if (qvalue.qattributeName == "ar_registrationtime") { //Registration time
value.time = qvalue.longValue;
}
}
//Compares the registration times for the retrieved data and stores the latest
data in Apl.userData.
if (value.name != null)
if (Apl.userData == null || Apl.userData.time < value.time) {
Apl.userData = value;
}
}
}
Generate a query for retrieving the AR overlay definition and retrieve data from AR processing server
Apl.getSuperimposedGraphicData = function(_isSuperReload, _scenarioId, _sceneId,
_markerId){
//Creates quad query objects.
var query = new Apl.QuadQuery();
query.type = "RECORDSANDCOUNT";
query.limitRange = new Apl.Range(1,10);
- 35 -

query.qattributeOrderIndexRange = new Apl.Range(1,10);
//Specifies the qtype to which AR overlay definition data is registered.
query.qtypeNameRanges = new Array(new Apl.Range("arpoiarmk_default"));
query.whereExpressions = new Array();
//Specifies the scenario ID.
if(typeof _scenarioId != 'undefined'){
if(typeof _scenarioId == 'number' ) _scenarioId = new Apl.Range(_scenarioId);
query.whereExpressions.push(new Apl.QuadQueryExpression(new
Apl.Range("arscn_scenarioid"), _scenarioId, "LONG"));
}
//Specifies the scene ID.
if(typeof _sceneId != 'undefined'){
if(typeof _sceneId == 'number' ) _sceneId = new Apl.Range(_sceneId);
query.whereExpressions.push(new Apl.QuadQueryExpression(new
Apl.Range("arsen_sceneid"), _sceneId, "LONG"));
}
//Specifies the marker ID.
if(typeof _markerId != 'undefined'){
if(typeof _markerId == 'number' ) _markerId = new Apl.Range(_markerId);
query.whereExpressions.push(new Apl.QuadQueryExpression(new
Apl.Range("armk_markerid"), _markerId, "LONG"));
}
//Converts to a string.
query = Apl.makeQuadQuery(query);
//Gets AR overlay definition data from the AR processing server.
AR.Data.getArServerData(query, _isSuperReload,
Apl.getSuperimposedGraphicDataSuccess, Apl.getArServerDataError);
};
Processing when the AR overlay definition is retrieved successfully from the AR processing server
Apl.getSuperimposedGraphicDataSuccess = function(_result){
//Extracts AR overlay definition data from the results.
var contents = Apl.extractSuperimposedGraphic(_result.getValue());
//Stores the extracted AR overlay definition data by scene ID and marker ID in
Apl.superimposedGraphics.
for(scene in contents){
if(Apl.superimposedGraphics == null) Apl.superimposedGraphics = new Object();
if(Apl.superimposedGraphics[scene] == null) {
Apl.superimposedGraphics[scene] = contents[scene];
//Sets the AR overlay definition data in the native AR display layer.
Apl.setARContents(parseInt(scene));
} else {
for(marker in contents[scene]){
Apl.superimposedGraphics[scene][marker] = contents[scene][marker];
//Sets the AR overlay definition data in the native AR display layer.
Apl.setARContents(parseInt(scene),parseInt(marker));
}
}
}
//If AR overlay definition data exists, saves it to web storage.
if(Apl.superimposedGraphics != null){
localStorage.setItem("ARContents", JSON.stringify(Apl.superimposedGraphics));
}
//Verifies download completion notifications.
Apl.checkCompletion();
};
- 36 -

Extract the AR overlay definition from the JSON object
Apl.extractSuperimposedGraphic = function(_data){
//Number of retrieved records.
var recordCount = _data.records.length;
var superimposedGraphic = new Object();
for(var recordIndex = 0; recordIndex < recordCount; recordIndex++){
//Looks up records one by one.
var record = _data.records[recordIndex];
var valueLength = record.qvalues.length;
var arName, sceneId, markerId;
var value;
//Gets only the qvalues that will be used (determined by qattributeName).
for(var valueIndex = 0; valueIndex < valueLength; valueIndex++){
var qvalue = record.qvalues[valueIndex];
if(qvalue.qattributeName == "ar_name"){ //AR overlay definition name
arName = qvalue.stringValue;
}
if(qvalue.qattributeName == "arsen_sceneid"){ //Scene ID
sceneId = qvalue.longValue;
}
if(qvalue.qattributeName == "armk_markerid"){ //Marker ID
markerId = qvalue.longValue;
}
if(qvalue.qattributeName == "arpoi_superimposedgraphic"){ //R overlay
definition
value = AR.Renderer.parseSuperimposedGraphic(qvalue.stringValue);
}
}
//Ensures that AR overlay definition data name, Scene ID, Marker ID and AR
overlay definition data are not null.
//Scene ID, Marker ID and AR overlay definition data are required for overlays.
//AR overlay definition data name is checked in order to identify the overlay
when embedding user-defined data.
if(arName != null && sceneId!=null && markerId != null && value != null){
//Embeds the user-defined data in the AR overlay definition.
value = Apl.insertUserData(value, arName);
if(superimposedGraphic[sceneId] == null) superimposedGraphic[sceneId] = new
Object();
if(superimposedGraphic[sceneId][markerId] == null)
superimposedGraphic[sceneId][markerId] = new Array(value);
else superimposedGraphic[sceneId][markerId].push(value);
}
}
return superimposedGraphic;
};
Perform the process for embedding the user-defined table when ar_id of the AR overlay definition is thespecified value
Apl.insertUserData = function (_superimposedGraphic, _arName) {
if (_arName == "Job sample_inspection value" && Apl.userData != null) {
//Creates strings for embedding.
var registrationDate = new Date(Apl.userData.time);
var month = registrationDate.getMonth() + 1;
var vDate = month + "/" + registrationDate.getDate();
var commentStr = "[" + vDate + " " + Apl.userData.name + "]The temperature is
" + Apl.userData.temperature + " degrees C";
//superimposedGraphic -> SquareModelGraphic -> Edits the text for TextTexture.
_superimposedGraphic.getGraphic().getTexture().setText(commentStr);
}
- 37 -

return _superimposedGraphic;
};
Set the AR overlay definition with the specified scene ID and AR marker ID in the native AR display layer
Apl.setARContents = function(_sceneId, _markerId){
if(Apl.superimposedGraphics[_sceneId] != null){ //If there is AR overlay
definition data for the specified scene ID
if(_markerId == null){ //If no marker ID was specified, sets the AR overlay
definition data for all scenes.
for(marker in Apl.superimposedGraphics[_sceneId]){
//Creates a coordinate system for AR markers and specifies marker IDs.
var coordinateSystem = new AR.Renderer.FJARMarkerCoordinateSystem();
coordinateSystem.setValue(parseInt(marker));
//Deletes AR overlay content for applicable marker IDs.
AR.Renderer.remove(coordinateSystem, Apl.noop, Apl.removeError);
//Sets the AR overlay definition data in the native AR display layer.
AR.Renderer.put(coordinateSystem, Apl.superimposedGraphics[_sceneId]
[parseInt(marker)], Apl.noop, Apl.putError);
}
} else if(Apl.superimposedGraphics[_sceneId][_markerId] != null) { //If AR
overlay definition data exists for the specified marker ID
//Creates a coordinate system for AR markers and specifies marker IDs.
var coordinateSystem = new AR.Renderer.FJARMarkerCoordinateSystem();
coordinateSystem.setValue(_markerId);
//Deletes AR overlay content for applicable marker IDs
AR.Renderer.remove(coordinateSystem, Apl.noop, Apl.removeError);
//Sets the AR overlay definition data in the native AR display layer.
AR.Renderer.put(coordinateSystem, Apl.superimposedGraphics[_sceneId]
[_markerId], Apl.noop, Apl.putError);
}
}
};
Check if downloading has finished
Apl.checkCompletion = function(){
if(Apl.completionNotice.notice == true){
Apl.completionNotice.count--;
if(Apl.completionNotice.count == 0){
Apl.completionNotice.notice = false;
alert("The AR overlay definition data was downloaded");
}
}
};
2.5.3.3 Operation for Start workClear the AR overlay definition registered in the rendering layer and redirect to work.html
Apl.start = function(){
//Clears all AR overlay definition data set in the native AR display layer.
AR.Renderer.clear(Apl.clearSuccess,Apl.clearError);
};
//When AR overlay definition data is successfully cleared
Apl.clearSuccess = function(_result){
//Redirects to work.html.
location.href="work.html";
};
- 38 -

2.5.4 work.html
2.5.4.1 onload processingRetrieve data saved to web storage, change the screen display, add the screen tap event listener, start thecamera, and add the event listener when the AR marker is detected
Apl.onloadWork = function(){
//Gets all data saved to web storage.
Apl.getLocalStorageData();
//Changes the HTML display according to the operation mode.
Apl.showOperationMode();
//Changes the HTML display according to the scene.
Apl.changeSceneView();
//Adds event listeners for screen taps.
if(window.navigator.userAgent.match(/(iPad|iPhone|iPod)/i)) //In iOS
document.addEventListener("touchstart", Apl.clickEvent, false);
else document.addEventListener("click", Apl.clickEvent, false); //In android
//Starts the camera.
AR.Camera.startCameraView(Apl.noop, Apl.startCameraViewError);
//Adds event listeners for marker detection.
AR.Camera.addMarkerListener( Apl.addMarkerListenerSuccess,
Apl.addMarkerListenerError, Apl.onDetectMarker, Apl.noop);
};
Change the HTML to suit the scene
Apl.changeSceneView = function(){
//Toggles visibility of the scenario operation buttons at the bottom of the screen.
if(Apl.sceneId > 1) document.getElementById("backScene").style.visibility = "visible";
else document.getElementById("backScene").style.visibility = "hidden";
if(Apl.sceneId < 4 ) document.getElementById("forwardScene").style.visibility =
"visible";
else document.getElementById("forwardScene").style.visibility = "hidden";
//Changes the display at the top of the screen.
var guidance = "step"+Apl.sceneId+" : " + Apl.sceneList[Apl.sceneId].name + "<br>";
if( Apl.sceneList[Apl.sceneId].description != null) guidance +=
Apl.sceneList[Apl.sceneId].description;
document.getElementById("guidance").innerHTML = guidance;
};
Processing when the AR marker detection event listener is added successfully
Apl.addMarkerListenerSuccess = function(_result){
//Stores listener IDs in Apl.listenerId. Used for deletion of added marker detection
event listeners.
Apl.listenerId = _result.getValue();
};
2.5.4.2 Operation when an AR marker is detectedIf an AR marker with an AR marker ID of 1 is detected, change the display at the top part of the screen, andretrieve the AR overlay definition and user-defined data according to the mode and display AR overlay content
Apl.onDetectMarker = function(_result){
//Includes information about markers detected in an argument.
var markval = _result.getValue();
if(markval.markerId == 1){ //If marker 1 is detected
- 39 -

if(markval.status == true){ //If detected
//Changes the display of the marker detection notification area.
document.getElementById("detect").innerHTML ="marker" +markval.markerId+"was
detected.";
//Determines the operation mode.
if(Apl.operationMode == "serverMode"){ //For server connection mode
//Performs forced reading from the AR Processing Server.
//If the scene ID is 4, gets the user-defined data.
if(Apl.sceneId == 4) Apl.getUserData(true);
Apl.getSuperimposedGraphicData(true, new Apl.Range(Apl.scenarioId), new
Apl.Range(Apl.sceneId));
} else { //For standalone mode
//Gets data from offline storage.
if(Apl.sceneId == 4) Apl.getUserData(false);
Apl.getSuperimposedGraphicData(false, new Apl.Range(Apl.scenarioId), new
Apl.Range(Apl.sceneId));
}
} else if(markval.status == false){ //If missing
//Changes the display of the marker detection notification area.
document.getElementById("detect").innerHTML ="";
}
}
};
2.5.4.3 Operation for Previous/Next buttonsChange to the previous/next scene ID, change the screen display, and retrieve the detected AR marker
Apl.shiftScene = function(_shift){
if(_shift == true) Apl.sceneId++; //Moves to the next scene.
else Apl.sceneId--; //Moves to the previous scene.
//Changes the HTML display according to the scene.
Apl.changeSceneView();
//Saves the current scene ID to web storage.
localStorage.setItem("sceneId", Apl.sceneId);
//Gets the detected markers.
AR.Camera.getCurrentMarkers(Apl.getMarkersSuccess, Apl.getCurrentMarkersError);
};
If the AR marker was retrieved successfully and there is an AR marker with an AR marker ID of 1, retrievethe AR overlay definition and user-defined data according to the operation mode
Apl.getMarkersSuccess = function(_result){
//Searches for a specific marker among the detected markers.
for(var i=0;i<_result.getValue().length;i++){
var markerId = _result.getValue()[i].value;
if(markerId == 1){ //If the marker ID is 1
if(Apl.operationMode == "serverMode"){ //For server connection mode
//Performs forced reading from the AR Processing Server.
//If the scene ID is 4, gets the user-defined data.
if(Apl.sceneId == 4) Apl.getUserData(true);
Apl.getSuperimposedGraphicData(true, new Apl.Range(Apl.scenarioId), new
Apl.Range(Apl.sceneId));
} else { //For standalone mode
//Gets from offline storage.
//If the scene ID is 4, gets the user-defined data.
if(Apl.sceneId == 4) Apl.getUserData(false);
Apl.getSuperimposedGraphicData(false, new Apl.Range(Apl.scenarioId), new
Apl.Range(Apl.sceneId));
- 40 -

}
}
}
};
2.5.4.4 Processing when Upload is operatedIf registration data was saved, confirm in the dialog box whether to upload it, and check the network status. Ifdata was not saved, display a message.
Apl.onClickUpload = function(){
if(Apl.postData != null){ //If unregistered data exists
var result = confirm("Upload?");
if(result){
if(Apl.operationMode == "serverMode"){ //For server connection mode
Uploads the saved data.
Apl.upload();
} else { //For standalone mode
alert("The data was saved. Please upload in server connection mode.");
if(location.href != "work.html") location.href = "work.html";
}
}
} else {
alert("There is no saved data.")
}
};
Upload the saved data
Apl.upload = function(){
//Uploads to the AR processing server.
AR.Data.postArServerData(Apl.postData.query, Apl.postData.body, Apl.uploadSuccess,
Apl.postArServerDataError);
};
Processing when upload is successful
Apl.uploadSuccess = function(_result){
//Deletes data saved to web storage.
localStorage.removeItem("postData");
Apl.postData = null;
alert("Data was uploaded.");
//Redirects to work.html.
location.href = "work.html";
};
2.5.4.5 Operation when the screen is tappedNotification to the click event AR native in the HTML layer
Apl.clickEvent = function(){
//Notifies the native application of the click coordinates.
AR.OS.onBodyClick(event, Apl.noop, Apl.onBodyClickError);
};
Processing when the "enter inspection value" icon is tapped
Apl.changeCommentpage = function(){
//Confirms if there is any saved data.
if(Apl.postData){
var result = confirm("There is saved data. Discard data and reenter?");
if(result == false) return;
}
- 41 -

//Redirects to the page used for entering the inspection value.
location.href="comment.html";
};
Point
When the step overlay is tapped, Apl.shiftScene(true) is called (same processing as when Previous/Next is clicked).
2.5.4.6 onunload processingDelete the event listener used for detecting an AR marker
Apl.onUnloadWork = function(){
//Deletes an event listener.
AR.Camera.removeMarkerListener(Apl.listenerId, Apl.removeListenerSuccess,
Apl.removeListenerError);
};
//Called when deletion of the marker detection event listener was successful.
Apl.removeListenerSuccess= function(_result){
Apl.listenerId = “”;
};
2.5.5 comment.html
2.5.5.1 onload processing
Apl.onloadComment = function(){
//Gets all data saved to web storage.
Apl.getLocalStorageData();
//Changes the HTML display according to the operation mode.
Apl.showOperationMode();
//Stops the camera.
AR.Camera.stopCameraView(Apl.noop, Apl.stopCameraViewError);
};
2.5.5.2 Operation for OKRetrieve data from the input form
If there is no data, then displays an alert, otherwise generates an object to be posted to the AR processing server andsaves it to web storage.
Apl.onClickOK = function(){
//Gets input data.
var data = Apl.getCommentData();
if(data){
Apl.userData = data;
//Creates query data to be registered in the AR processing server.
Apl.postData = new Object();
Apl.postData.query = "quads";
Apl.postData.body = Apl.createCommentDataQuad(data);
//Saves to web storage.
localStorage.setItem("userData", JSON.stringify(Apl.userData));
localStorage.setItem("postData", JSON.stringify(Apl.postData));
if(Apl.operationMode == "serverMode"){ //For server connection mode
Apl.upload();
- 42 -

} else { //For standalone mode
alert("The data was saved. Please upload in server connection mode.");
if(location.href != "work.html") location.href = "work.html";
}
}
};
Retrieve data from the input form
Apl.getCommentData = function(){
var fName = document.comment_form.f_name.value;
//Displays an alert if a name has not been entered.
if(fName == null || fName == ""){
alert("A name has not been entered. Please enter a name.");
return;
}
//Displays an alert if the name is too long.
if(fName.length>30){
alert("The name is too long. Specify a name up to 30 characters long.");
return;
}
var fTemperature = document.comment_form.f_comment.value;
//Displays an alert if a temperature has not been entered.
if(fTemperature == null || fTemperature == ""){
alert("A temperature has not been entered. Please enter a temperature.");
return;
}
//If the temperature length exceeds 3 digits, displays an alert indicating that the
temperature should be between 0 and 999.
if(fTemperature.length > 3){
alert("Specify a temperature between 0 and 999.");
return;
}
//Creates a user data object.
var data = new Object();
data.name = fName;
data.temperature = parseInt(fTemperature);
data.time = new Date().getTime();
return data;
};
Create quad data for registration
Apl.createCommentDataQuad = function(_data){
//Creates a QUAD.
var quad = new Apl.Quad();
//Sets the QUAD type name.
quad.qtypeName = "usr_sample";
//Creates the attribute values for a QUAD.
//Creates QValue ar_id.
var arId = new Apl.QValue();
arId.qtypeName = "usr_sample";
arId.qattributeName = "ar_id";
arId.stringValue = null;
arId.longValue = 1;
arId.floatValue = null;
//Creates QValue ar_name.
var arName = new Apl.QValue();
arName.qtypeName = "usr_sample";
arName.qattributeName = "ar_name";
- 43 -

arName.stringValue = "inspectionResult";
arName.longValue = null;
arName.floatValue = null;
//Creates QValue ar_description.
var arDescription = new Apl.QValue();
arDescription.qtypeName = "usr_sample";
arDescription.qattributeName = "ar_description";
arDescription.stringValue = "Inspection result of the AR business sample
application";
arDescription.longValue = null;
arDescription.floatValue = null;
//Creates QValue ar_registrationtime.
var arRegistrationtime = new Apl.QValue();
arRegistrationtime.qtypeName = "usr_sample";
arRegistrationtime.qattributeName = "ar_registrationtime";
arRegistrationtime.stringValue = null;
arRegistrationtime.longValue = _data.time;
arRegistrationtime.floatValue = null
//Creates QValue ar_modificationtime.
var arModificationtime = new Apl.QValue();
arModificationtime.qtypeName = "usr_sample";
arModificationtime.qattributeName = "ar_modificationtime";
arModificationtime.stringValue = null;
arModificationtime.longValue = _data.time;
arModificationtime.floatValue = null;
//Creates QValue usr_name.
var usrName = new Apl.QValue();
usrName.qtypeName = "usr_sample";
usrName.qattributeName = "usr_name";
usrName.stringValue = _data.name;
usrName.longValue = null;
usrName.floatValue = null;
//Creates QValue usr_temperature.
var usrTemperature = new Apl.QValue();
usrTemperature.qtypeName = "usr_sample";
usrTemperature.qattributeName = "usr_temperature";
usrTemperature.stringValue = null;
usrTemperature.longValue = _data.temperature;
usrTemperature.floatValue = null;
//Sets a QValue for a QUAD.
quad.qvalues = [arId, arName, arDescription, arRegistrationtime,
arModificationtime, usrName,
usrTemperature]
//Converts to a string.
var rtndata = JSON.stringify(quad);
return rtndata;
};
2.6 Creating the systemCreate applications and resources to be used in applications based on the designed content.
- Developing applicationsInterstage AR processing server requires the development of an overlay application (web application) for displayingoverlays and an overlay application (native application) to be run on smart devices.
- 44 -

To integrate with an existing system, you must also develop a system integration application.Development of each of these applications is explained in "Chapter 3 Developing the overlay application (webapplication)", "Chapter 4 Developing the overlay application (native application)", and "Chapter 5 Developing thesystem integration application" respectively.
- Developing resourcesIf you need to create resources to be used in AR overlay content and tap actions, develop them using an image editoror similar software.
- 45 -

Chapter 3 Developing the overlay application (webapplication)
This chapter explains how to develop the web application, which is a component of the overlay application.
3.1 OverviewThe web application is a component of the overlay application, which is developed for using AR technology to overlay thedesired content on a camera preview screen. The web application must be developed using a web development languagesuch as HTML or JavaScript. This application is downloaded from the server to a smart device and runs on the nativeapplication of the smart device.
3.1.1 Composition of the overlay application (web application)Interstage AR Processing Server overlays digital information retrieved from the server onto real-world camera images. Thescreen that the overlay application provides to smart devices is rendered in the following three layers, with each layer beingsuperimposed to form one screen:
1. Native camera display layerDisplays the image captured by the camera.
2. Native AR display layerDisplays the AR overlay content specified in the AR overlay definition.
3. Web layerRuns and displays the web application.
- 46 -

Figure 3.1 Example screen composition
The overlay application controls the content displayed in the web layer and in the native AR display layer. Development ofthe web layer is identical to development of general web applications and is therefore not explained in this manual. Thefollowing explains the development of the native AR display layer.
3.1.2 Operation modeThe overlay application has two operation modes: server connection mode and standalone mode.
Server connection mode
In this mode the overlay application communicates with the server to retrieve data. If the network status is offline,communication with the server fails. You can use saved data even in server connection mode.
Standalone mode
In this mode the overlay application uses data stored in offline storage instead of communicating externally. Attemptsto upload data in this mode will fail - data can only be uploaded in server connection mode.
Operation mode Network status
Online Offline
Server connection mode Download: Communicates with theserver*Can store data
Upload: Communicates with theserver
Download: Fails*Can store data
Upload: Fails
Standalone mode Download: Uses storage Download: Uses storage
- 47 -
Operation mode Network status
Online Offline
Upload: Fails Upload: Fails
Note
You can determine the operation mode only during the application startup. If you want to change it, you must close theapplication and then restart it.
3.1.3 Operating the cameraThe camera starts when the overlay application starts. AR.Camera.startCameraView and AR.Camera.stopCameraView inthe JavaScript library enable you to switch between camera start/stop. Change this setting to suit operation of the application.
If you cancel the application by pressing Back or Home on the device while the camera is stopped, the camera will startwhen you restart the application. You cannot use the overlay application to capture images using the camera.
3.1.4 Development flowFollow the steps below to develop the overlay application:
1. Develop the application to perform the following operations, in accordance with the requirements definition createdduring the design process:
- Retrieve data from the AR processing server and registers it using the JavaScript library made publically availableby Interstage AR Processing Server and the REST API.
- Save resources when the site is offline.
- Detect AR markers from camera images.
- Pass an AR overlay definition based on the information in the detected AR marker and render the AR overlaycontent.
2. Create a war file of the developed overlay application.
3.1.5 Basic authenticationYou can use basic authentication with overlay applications. When the user attempts to display a webpage for which basicauthentication is enabled, a dialog box prompting the user to enter an account is displayed, and a valid account must beentered. To use basic authentication automatically, click Account Setting and then Add New Account in the window forsetting the overlay application, and set the account to be used. Set the account in Host name:Port number. You can setonly one account in one Host name:Port number.
3.1.6 SSL communicationYou can use SSL communication with overlay applications. If you access a server for which no SSL server certificate isregistered, a warning dialog box indicating that the certificate is invalid is displayed. To prevent this warning, register inthe server the SSL server certificate issued by the certificate authority. The method for registering a root certificate registeredby default in a smart device or a new root certificate if a self-certificate was issued depends on the operating system andmodel. Therefore, check details before using these certificates.
3.1.7 Development environmentPrepare a development environment (including a text editor and Eclipse) required for development in a web developmentlanguage such as HTML or JavaScript. Depending on the operating system, version, and model of the device, JavaScriptstandard APIs other than the JavaScript library provided by this product may not run, or may operate differently. Beforestarting development, check the APIs that can be run on your environment.
- 48 -

3.2 Overview of the JavaScript library
3.2.1 Features provided by the JavaScript libraryThe JavaScript library provided by Interstage AR Processing Server has the following features:
Library Feature
Camera control Start/stop camera
Register/remove marker detection
Retrieve ID and rectangular coordinates of detectedmarker
Log Output log
OS control Report click coordinates to the native application
Display specified URL content
Check the operation mode
Call settings screen
AR rendering Operate rendering object: Retrieve
Operate rendering object: Add
Operate rendering object: Remove
Operate rendering object: Remove all
Data management control Set server information
Set use of offline storage
Communicate with AR processing server: Retrieve
Communicate with AR processing server: Register
Communicate with AR processing server: Remove
Clear offline storage
3.2.2 Loading the JavaScript libraryLoad the ar.js file using the script tag of the HTML file where you want to use the JavaScript library.
Example
<script src="ar/ar.js"></script>
3.2.3 Calling APIsUse JavaScript to call methods starting with "AR.". Refer to "JavaScript library reference" in the Reference Guide for detailson APIs.
3.2.4 Retrieving API resultsThe JavaScript library APIs for calling the features of a native application are run asynchronously. APIs that performasynchronous processing do not return values as methods, so return the results using the callback function. For APIs executedasynchronously, specify onSuccess (called when processing is successful) and onError (called when processing fails) asarguments.
- 49 -

Property Description
status Status of the execution result of the AR processing client library.
If execution is successful, "OK" is set, and if it fails, the error type is set. This property can be retrievedusing getStatus().
value The return value of the AR processing client library is set. The value to be set depends on the executedmethod and status. This property can be retrieved using getValue().
Example
Example of retrieving the JavaScript result
AR.Camera.startCameraView(onSuccess, onError);
onSuccess = function(result){
alert(result.getStatus()) ;
};
onError = function(result){
alert("Failed.\ n"+result.getStatus()+ " : " + result.getValue());
};
3.2.5 Note- HTML specifications dictate that data in the JavaScript layer is discarded when the screen is changed. Do not change
the screen before the result callback is called.
- Manage application data not saved in the AR processing client on the web application side using web storage.
- The JavaScript prompt() function is used by the product, and therefore cannot be used by applications.
- The settings for the web layer features available from the web application are as follows:
- Enabled
- JavaScript
- WebStorage
- Application Cache
- Disabled
- Web SQL Database
- Plug-ins (such as Flash)
- Geolocation
- Saving form data
- Saving passwords
- File access (access to file:///)
3.2.6 ErrorThe following objects are thrown if an error occurs in the JavaScript library:
Property Description
name Name of the error
message Error message
componentName Name of the component in the JavaScript library where the error occurred
- 50 -

Property Description
code Error code
cause Originating error
3.3 Data operation by the AR processing serverThe REST API is used for connecting from the JavaScript library to the AR processing server. You can use the followingAPIs published by the AR processing server.
Item Register (POST) Identify via primary
key (GET)Search (GET) Delete (DELETE)
QType N Y Y N
QAttribute N Y Y N
QEntity Y Y Y Y
QValue Y Y Y Y
Quad Y N Y N
3.3.1 Setting information about the AR processing serverYou must set information about the AR processing server in the AR processing client before you can access the ARprocessing server. There are two methods of doing this: setting information from the Settings window of the overlayapplication (native application), and using the JavaScript library. The following explains how to register information fromthe JavaScript library.
Registering from the JavaScript library
Register the information using AR.Data.setArServerInfo (_url, _id, _password, _onSuccess, _onError). The argumentsare as follows:
Argument Description
_url URL of the AR processing server, excluding arsvdm (the final slash mark "/" is optional).
_id ID if using basic authentication on the AR processing server. Specify null if basic authentication isnot being used.
_password Password if using basic authentication on the AR processing server. Specify null if basic authenticationis not being used.
Example
var url = "http://***.***.***.***:9102/";
var id = "aradmin";
var password = "aradmin"
AR.Data.setArServerInfo(url, id, password, onSuccess, onError);
3.3.2 Registering dataYou can register data using AR.Data.postArServerData (_query, _body, _onSuccess, _onError) of the JavaScript library.The data that can be registered is QEntity, QValue, and Quad.
Argument Description
_query URL path query to the AR processing server
_body Data to be registered in the AR processing server. Specify a JSON string.
- 51 -

You can retrieve the response using the getValue() of the result object in the arguments of onSuccess.
Example
onSuccess = function(_result){
var response = _result.getValue();
};
3.3.3 Examples of registering dataThis section explains how to register each data instance, using the sample user-defined table usr_sample as an example.
3.3.3.1 Registering QEntityThe following explains how to register QEntity in usr_sample:
1. Create a JSON string for the QEntity to be registered.
var qentity = new Object();
qentity.qtypeName = "usr_sample";
var body = JSON.stringify(qentity); // {"qtypeName" : "usr_sample"}
2. Register using AR.Data.postServerData().
AR.Data.postArServerData("qentities", body, onSuccess, onError);
3. The response when registration is successful is the JSON object of QEntity. An automatically assigned ID and versionare appended - use them when registering or deleting QValue.
{"id":1, "qtypeName":"usr_sample", "version":1}
3.3.3.2 Registering QValueRegister a value in usr_name of usr_sample.
1. Create a JSON string for the QValue to be registered
var qvalue = new Object();
qvalue.qtypeName = "usr_sample";
qvalue.qentityId = 1; //Specify the ID of the registered qentity.
qvalue.qattributeName = "usr_name";
qvalue.stringValue = "user A";
qvalue.longValue = null; //Specify null if the value is not to be used.
qvalue.floatValue = null; //Specify null if the value is not to be used.
var body = JSON.stringify(qvalue); // {"qtypeName":"usr_sample", "qentityId":1,
"qattributeName":"usr_name", "stringValue":"user A", "longValue":null,
"floatValue":null}
2. Register using AR.Data.postServerData()
AR.Data.postArServerData("qvalues", body, onSuccess, onError);
3. The response when registration is successful is the JSON object of QValue. An automatically assigned version isappended - use it during deletion.
{"qtypeName":"usr_sample", "qentityId":1, "qattributeName":"usr_name",
"stringValue":"user A", "longValue":null, "floatValue":null, "version":1}
3.3.3.3 Registering QuadThe following explains how to register Quad in usr_sample:
- 52 -

1. Create QValue for each attribute. Do not specify qentityId and version, because they are assigned automatically.
var arId = new Object();
arId.qtypeName = "usr_sample";
arId.qattributeName = "ar_id";
arId.stringValue = null;
arId.longValue = 1; //Specify null if the value is not to be used.
arId.floatValue = null; //Specify null if the value is not to be used.
var arName = new Object();
arName.qtypeName = "usr_sample";
arName.qattributeName = "ar_name";
arName.stringValue = "inspection result";
arName.longValue = null; //Specify null if the value is not to be used.
arId.floatValue = null; //Specify null if the value is not to be used.
var arDescription = new Object();
arDescription.qtypeName = "usr_sample";
arDescription.qattributeName = "ar_description";
arDescription.stringValue = "Inspection result of the AR business sample application";
arDescription.longValue = null;
arDescription.floatValue = null;
var arRegistrationtime = new Object();
arRegistrationtime.qtypeName = "usr_sample";
arRegistrationtime.qattributeName = "ar_registrationtime";
arRegistrationtime.stringValue = null;
arRegistrationtime.longValue = new Date().getTime();
arRegistrationtime.floatValue = null;
var arModificationtime = new Object();
arModificationtime.qtypeName = "usr_sample";
arModificationtime.qattributeName = "ar_modificationtime";
arModificationtime.stringValue = null;
arModificationtime.longValue = new Date().getTime();
arModificationtime.floatValue = null;
var usrName = new Object();
usrName.qtypeName = "usr_sample";
usrName.qattributeName = "usr_name";
usrName.stringValue = "user A";
usrName.longValue = null; //Specify null if the value is not to be used.
usrName.floatValue = null; //Specify null if the value is not to be used.
var usrTemperature = new Object();
usrTemperature.qtypeName = "usr_sample";
usrTemperature.qattributeName = "usr_temperature";
usrTemperature.stringValue = null; //Specify null if the value is not to be used.
usrTemperature.longValue = 10;
usrTemperature.floatValue = null; //Specify null if the value is not to be used.
2. Create a JSON string for Quad. Do not specify ID and version, because they are assigned automatically.
var quad = new Object();
quad.qtypeName = "usr_sample";
quad.qvalues = [arId, arName, arDescription, arRegistrationtime, arModificationtime,
usrName, usrTemperature]; //Use the created attribute as an array.
var body = JSON.stringify(quad); //{"qtypeName" : "usr_sample" , "qvalues" :
[{"qtypeName" : "usr_sample" , "qattributeName" : "ar_id", ...}, ...]}
3. Register using AR.Data.postServerData()
AR.Data.postArServerData("quads", body, onSuccess, onError);
- 53 -

4. The response when registration is successful is the JSON object of Quad. An automatically assigned QEntityId andversion are appended - use them during deletion.
3.3.4 Retrieving dataRetrieve data from the AR processing server using AR.Data.getArServerData(_query, _isSuperReroad, _onSuccess,_onError) of the JavaScript library. The data that can be registered is QEntity, QValue, and Quad. The arguments are asfollows:
Argument Description
_query URL query to the AR processing server
_isSuperReload Whether to forcibly load from the server.
You can select either of the following methods for retrieving data:
- Specify the primary key of each data instance to retrieve specific data
- Specify conditions to retrieve multiple matching data instances
3.3.5 Examples of retrieving dataThis section explains how to retrieve each instance, using the sample user-defined table usr_sample as an example.
3.3.5.1 Retrieving specific data using a primary keyRetrieving QType
1. Retrieve QType whose name is usr_sample.
var query = "qtypes/usr_sample";
AR.Data.getArServerData(query, true, onSuccess, onError);
2. The response is the JSON object of the registered QType.
{"name":"usr_sample", "description":"business sample user data management table" ,
"version":1}
Retrieving QAttribute
1. Retrieve QAttribute whose QType is usr_sample and name is usr_temperature.
var query = "qattributes/usr_sample/usr_temperature";
AR.Data.getArServerData(query, true, onSuccess, onError);
2. The response is the JSON object of the registered QAttribute.
{"qtypeName":"usr_sample", "name":"usr_temperature", "description":"inspection
temperature", "orderIndex":7, "qvalueType":"LONG", "version":1}
Retrieving QEntity
1. Retrieve QEntity whose QType is usr_sample and ID is 1.
var query = "qentities/usr_sample/1";
AR.Data.getArServerData(query, true, onSuccess, onError);
2. The response is the JSON object of the registered QEntity.
{"qtypeName":"usr_sample", "id":1, "version":1}
- 54 -

Retrieving QValue
1. Retrieve QValue whose QType is usr_sample, QEntity ID is 1, and attribute is usr_name.
var query = "qvalues/usr_sample/1/usr_name";
AR.Data.getArServerData(query, true, onSuccess, onError);
2. The response is the JSON object of the registered QValue.
{"qtypeName":"usr_sample", "qentityId":1, "qattributeName":"usr_name",
"stringValue":"user A", "longValue":null, "floatValue":null, "version":1}
3.3.5.2 Retrieving data using a condition searchSearching for QType
The conditions specifiable for QType are as follows:
Query parameter Description
type Retrieved as a processing result.
RECORDS=Returns the result array, COUNT=Returnsthe total number of results,RECORDANDCOUNT=Retrieves the result array andtotal number of results
limitRange Range of records in the search result to return.
The interval start must be greater than 0, the interval endmust be greater than or equal to the interval start, and theinterval cannot include more than 100 items.
Example: {"start":1,"end":10}
nameRanges Name range array
Example: [{"start":"AR100","end":"AR999"}]
sortOrders Sort order array - can have the following values:
- NAME - Returns name in ascending order
- NAME_DESC - Returns name in descending order
Example: ["NAME"]
1. Searching for QType is as follows:
var query = "qtypes?";
//type specification
query += "type=RECORDSANDCOUNT"; //Retrieve the result array and total number of
results
//limitRange specifications
var limitRange = new Object();
limitRange.start = 1;
limitRange.end = 10;
query += "&limitRange="+JSON.stringify(limitRange); // {"start":1, "end":10}
//nameRanges specifications
var nameRanges = new Array();
nameRanges[0] = new Object()
nameRanges[0].start = "usr_sample";
nameRanges[0].end = "usr_sample100"
query += "&nameRanges=" +JSON.stringify(nameRanges); //{"start":"usr_sample",
"end":"usr_sample100"}
- 55 -

//sortOrders specifications
var sortOrders = ["NAME_DESC"];
query += "&sortOrders" + JSON.stringify(sortOrders);
AR.Data.getArServerData(query, true, onSuccess, onError);
2. The response is the JSON object of the QType that matches the condition.
{unlimitedRecordCount:1, "records":[searchResultQtypeArray]}
Searching for QAttribute
The conditions searchable for QAttribute are as follows:
Query parameter Description
type Retrieved as a processing result.
RECORDS=Returns the result array, COUNT=Returnsthe total number of results,RECORDANDCOUNT=Retrieves the result array andtotal number of results
limitRange Range of records in the search result to return.
Must be greater than 0.
Example: {"start":1,"end":10}
qtypeNameRanges name range array
Example: [{"start":"AR100","end":"AR999"}]
nameRanges name range array
Example: [{"start":"remarks01","end":"remarks99"}]
sortOrders Sort order array - can have the following values:
- QTYPENAME - Returns qtypeName in ascendingorder
- QTYPENAME_DESC - Returns qtypeName indescending order
- NAME - Returns name in ascending order
- NAME_DESC - Returns name in descending order
- ORDERINDEX - Returns orderIndex in ascendingorder
- ORDERINDEX_DESC - Returns orderIndex indescending order
Example:["ORDERINDEX","QTYPENAME","NAME"]
1. Searching for QAttribute is as follows:
var query = "qattributes?";
//type specification
query += "type=RECORDSANDCOUNT"; //Retrieve the result array and total number of
results
//limitRange specifications
var limitRange = new Object();
limitRange.start = 1;
limitRange.end = 10;
- 56 -

query += "&limitRange="+JSON.stringify(limitRange); // {"start":1, "end":10}
//qtypeNameRanges specifications
var qtypeNameRanges = new Array();
qtypeNameRanges[0] = new Object;
qtypeNameRanges[0].start = "usr_sample";
qtypeNameRanges[0].end = "usr_sample100"
query += "&qtypeNameRanges=" +JSON.stringify(qtypeNameRanges); //
{"start":"usr_sample",
"end":"usr_sample100"}
//nameRanges specifications
var nameRanges = new Array();
nameRanges[0] = new Object();
nameRanges[0].start = "usr_";
nameRanges[0].end = "usr_z"
query += "&nameRanges=" +JSON.stringify(nameRanges); //{"start":"usr_",
"end":"usr_z"}
//sortOrders specifications
var sortOrders = ["QTYPENAME_DESC","ORDERINDEX"];
query += "&sortOrders=" + JSON.stringify(sortOrders); //["QTYPENAME_DESC",
"ORDERINDEX"]
AR.Data.getArServerData(query, true, onSuccess, onError);
2. The response is the JSON object of the QType that matches the condition.
{unlimitedRecordCount:1, "records":[searchResultQattributeArray]}
Searching for QEntity
The conditions searchable for QEntity are as follows:
Query parameter Description
type Retrieved as a processing result.
RECORDS=Returns the result array, COUNT=Returnsthe total number of results,RECORDANDCOUNT=Retrieves the result array andtotal number of results
limitRange Range of records in the search result to return.
Must be greater than 0.
Example: {"start":1,"end":10}
qtypeNameRanges name range array
Example: [{"start":"AR100","end":"AR999"}]
idRanges id range array
Example: [{"start":100,"end":200}]
sortOrders Sort order array - can have the following values:
- QTYPENAME - Return qtypeName in ascendingorder
- QTYPENAME_DESC - Returns qtypeName indescending order
- ID - Returns ID in ascending order
- ID_DESC - Returns ID in descending order
- 57 -

Query parameter Description
Example: ["QTYPENAME","ID"]
1. Searching for QEntity is as follows:
var query = "qentities?";
//type specification
query += "type=RECORDSANDCOUNT"; //Retrieve the result array and total number of
results
//limitRange specifications
var limitRange = new Object();
limitRange.start = 1;
limitRange.end = 10;
query += "&limitRange="+JSON.stringify(limitRange); // {"start":1, "end":10}
//qtypeNameRanges specifications
var qtypeNameRanges = new Array();
qtypeNameRanges[0] = new Object();
qtypeNameRanges[0].start = "usr_sample";
qtypeNameRanges[0].end = "usr_sample100"
query += "&qtypeNameRanges=" +JSON.stringify(qtypeNameRanges); //
{"start":"usr_sample", "end":"usr_sample100"}
//idRanges specifications
var idRanges = new Array();
idRanges[0] = new Object();
idRanges[0].start = 1;
idRanges[0].end = 10000000000000000;
query += "&idRanges=" +JSON.stringify(idRanges); //{"start":1, "end":
10000000000000000}
//sortOrders specifications
var sortOrders = ["QTYPENAME_DESC","ID"];
query += "&sortOrders" + JSON.stringify(sortOrders); //["QTYPENAME_DESC",
"ORDERINDEX"]
AR.Data.getArServerData(query, true, onSuccess, onError);
2. The response is the JSON object of the QType that matches the condition.
{unlimitedRecordCount:1, "records":[searchResultQentityArray]}
Searching for QValue
The conditions specifiable in a QValue search are as follows:
Query parameter Description
type Retrieved as a processing result.
RECORDS=Returns the result array, COUNT=Returnsthe total number of results,RECORDANDCOUNT=Retrieves the result array andtotal number of results
limitRange Range of records in the search result to return.
Must be greater than 0.
Example: {"start":1,"end":10}
qtypeNameRanges name range array
Example: [{"start":"AR100","end":"AR999"}]
qentityIdRanges id range array
- 58 -

Query parameter Description
Example: [{"start":100,"end":200}]
qattributeNameRanges name range array
Example: [{"start":"AR100","end":"AR999"}]
stringValueRanges stringValue range array
Example: [{"start":"KanagawaPrefecture_A","end":"Kanagawa Prefecture_Z"}]
longValueRanges longValue range array
Example: [{"start":1,"end":100}]
floatValueRanges floatValue range array
Example: [{"start":0.1,"end":0.9}]
sortOrders Sort order array - can have the following values:
- QTYPENAME - Returns qtypeName in ascendingorder
- QTYPENAME_DESC - Returns qtypeName indescending order
- QENTITYID - Returns qentityId in ascending order
- QENTITYID_DESC - Returns qentityId indescending order
- QATTRIBUTENAME - Returns qattributeName inascending order
- QATTRIBUTENAME_DESC - ReturnsqattributeName in descending order
Example:["QTYPENAME","QENTITYID","QATTRIBUTENAME"]
1. Searching for QValue is as follows:
var query = "qvalues?";
//type specification
query += "type=RECORDSANDCOUNT"; //Retrieve the result array and total number of
results
//limitRange specifications
var limitRange = new Object();
limitRange.start = 1;
limitRange.end = 10;
query += "&limitRange="+JSON.stringify(limitRange); // {"start":1, "end":10}
//qtypeNameRanges specifications
var qtypeNameRanges = new Array();
qtypeNameRanges[0] = new Object();
qtypeNameRanges[0].start = "usr_sample";
qtypeNameRanges[0].end = "usr_sample100"
query += "&qtypeNameRanges=" +JSON.stringify(qtypeNameRanges); //
{"start":"usr_sample",
"end":"usr_sample100"}
//qentityIdRanges specifications
var qentityIdRanges = new Array();
qentityIdRanges[0] = new Object();
- 59 -

qentityIdRanges[0].start = 1;
qentityIdRanges[0].end = 10000000000000000;
query += "&qentityIdRanges=" +JSON.stringify(qentityIdRanges); //{"start":1, "end":
10000000000000000}
//qattributeNameRanges specifications
var qattributeNameRanges = new Array();
qattributeNameRanges[0] = new Object();
qattributeNameRanges[0].start = "usr_";
qattributeNameRanges[0].end = "usr_z"
query += "&qattributeNameRanges=" +JSON.stringify(qattributeNameRanges); //
{"start":"usr_", "end":"usr_z"}
//longValue specifications
var longValueRanges = new Array();
longValueRanges[0] = new Object();
longValueRanges[0].start = 0;
longValueRanges[0].end = 20;
query += "&longValueRanges=" +JSON.stringify(longValueRanges); //{"start":1, "end":
20}
//sortOrders specifications
var sortOrders = ["QTYPENAME_DESC","QATTRIBUTENAME"];
query += "&sortOrders" + JSON.stringify(sortOrders); //["QTYPENAME_DESC",
"QATTRIBUTENAME"]
AR.Data.getArServerData(query, true, onSuccess, onError);
2. The response is the JSON object of the QValue that matches the condition.
{unlimitedRecordCount:1, "records":[searchResultQvalueArray]}
Searching for Quad
The conditions searchable for Quad are as follows:
Query parameter Description
type Retrieved as a processing result.
RECORDS=Returns the result array, COUNT=Returnsthe total number of results,RECORDANDCOUNT=Retrieves the result array andtotal number of results
limitRange Range of records in the search result to return.
Must be greater than 0.
Example: {"start":1,"end":10}
qattributeOrderIndexRange Range for retrieving the result array in the QAttributedirection. Specify in the sequence used for sortingQAttribute.orderIndex in ascending order.
Must be greater than 0.
Example: {"start":1,"end":10}
qtypeNameRanges name range array
Example: [{"start":"AR100","end":"AR999"}]
whereExpressions Filter condition array
sortOrderExpressions Sort condition array
Expressions thrown by Quad are as follows:
- 60 -

Attribute Description
qattributeNameRanges Same as QValue
Example: [{"start":"column01","end":"column09"}]
If a range such as[{"start":"column01","end":"column99"}] is specified asa sort condition, any value from column 01 to column 99is used for sorting, and it is unpredictable which columnvalue will be used. Specify a single value in the sortcondition, and do not specify a range or range array.
qvalueType QAttribute.qvalueType identified byQValue.qtypeName, .qentityId, and .qattributeName
qvalueRanges QValue.xxxValue range
desc Whether to sort in descending order. Effective only whenthere is a sort condition.
1. Searching for Quad is as follows:
var query = "quads?";
//type specification
query += "type=RECORDSANDCOUNT"; //Retrieve the result array and total number of
results
//limitRange specifications
var limitRange = new Object();
limitRange.start = 1;
limitRange.end = 10;
query += "&limitRange="+JSON.stringify(limitRange); // {"start":1, "end":10}
//qattributeOrderIndexRange specifications
var qattributeOrderIndexRange = new Object();
qattributeOrderIndexRange.start = 1;
qattributeOrderIndexRange.end = 10;
query += "&limitRange="+JSON.stringify(qattributeOrderIndexRange); // {"start":1,
"end":10}
//qtypeNameRanges specifications
var qtypeNameRanges = new Array();
qtypeNameRanges[0] = new Object();
qtypeNameRanges[0].start = "usr_sample";
qtypeNameRanges[0].end = "usr_sample100"
query += "&qtypeNameRange=" +JSON.stringify(qtypeNameRanges); //
{"start":"usr_sample",
"end":"usr_sample100"}
//whereExpressions specifications
var whereExpressions = new Array();
whereExpressions[0] = new Object();
whereExpressions[0].qattributeRanges = new Array();
whereExpressions[0].qattributeRanges[0] = new Object();
whereExpressions[0].qattributeRanges[0].start = "usr_";
whereExpressions[0].qattributeRanges[0].end = "usr_z";
whereExpressions[0].qvalueType = "LONG";
whereExpressions[0].qvalueRanges = new Array();
whereExpressions[0].qvalueRanges[0] = new Object();
whereExpressions[0].qvalueRanges[0].start = 0;
whereExpressions[0].qvalueRanges[0].end = 20;
query += "&whereExpressions="+JSON.stringify(whereExpressions);
//sortOrderExpressions specifications
var sortOrderExpressions = new Array();
- 61 -

sortOrderExpressions[0] = new Object();
sortOrderExpressions[0].qattributeRanges = new Array();
sortOrderExpressions[0].qattributeRanges[0] = new Object();
sortOrderExpressions[0].qattributeRanges[0].start = "usr_temperature";
sortOrderExpressions[0].qattributeRanges[0].end = "usr_temperature";
sortOrderExpressions[0].qvalueType = "LONG";
sortOrderExpressions[0].qvalueRanges = new Array();
sortOrderExpressions[0].qvalueRanges[0] = new Object();
sortOrderExpressions[0].qvalueRanges[0].start = 0;
sortOrderExpressions[0].qvalueRanges[0].end = 20;
sortOrderExpressions[0].desc = true;
query += "&sortOrderExpressions="+JSON.stringify(sortOrderExpressions);
AR.Data.getArServerData(query, true, onSuccess, onError);
2. The response is the JSON object of the Quad that matches the condition.
{unlimitedRecordCount:1, "records":[searchResultQuadArray]}
3.3.6 Deleting dataDelete data using AR.Data.deleteArServerData (_query, _version, _onSuccess, _onError) of the JavaScript library. The datathat can be deleted is QEntity and QValue. The arguments are as follows:
Argument Description
_query URL path query to the AR processing server
_version Version of the data, currently registered in the AR processingserver, to be deleted.
Example
The following explains how to delete each instance, using the sample user-defined table usr_sample.
Deleting QEntity
To delete QEntity with ID of 1 and version of 1 registered in usr_sample:
AR.Data.deleteArServerData("qentities/usr_sample/1", 1, onSuccess, onError);
Deleting QValue
To delete QValue with QEntity ID of 1, QAttribute of usr_name, and version of 1 registered in usr_sample:
AR.Data.deleteArServerData("qvalues/usr_sample/1/ usr_name", 1, onSuccess, onError);
3.4 Offline operationThe overlay application supports three types of resources: web resources, resources saved in the AR processing server, andexternal resources. To use these resources offline, you must download and save them while online, but different methodsare used for saving each resource type.
Resource type Save method
Web resources HTML cache feature
Resources in the AR processing server Offline storage or web storage
External resources for AR overlay content Offline storage
- 62 -
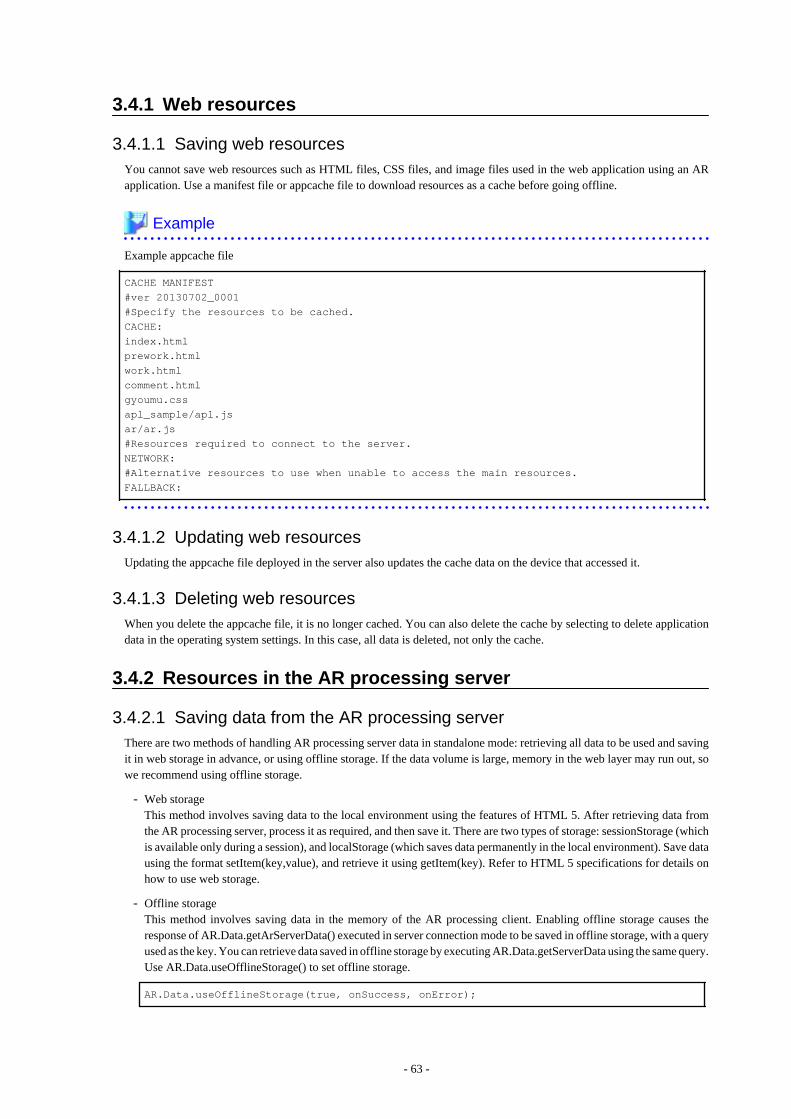
3.4.1 Web resources
3.4.1.1 Saving web resourcesYou cannot save web resources such as HTML files, CSS files, and image files used in the web application using an ARapplication. Use a manifest file or appcache file to download resources as a cache before going offline.
Example
Example appcache file
CACHE MANIFEST
#ver 20130702_0001
#Specify the resources to be cached.
CACHE:
index.html
prework.html
work.html
comment.html
gyoumu.css
apl_sample/apl.js
ar/ar.js
#Resources required to connect to the server.
NETWORK:
#Alternative resources to use when unable to access the main resources.
FALLBACK:
3.4.1.2 Updating web resourcesUpdating the appcache file deployed in the server also updates the cache data on the device that accessed it.
3.4.1.3 Deleting web resourcesWhen you delete the appcache file, it is no longer cached. You can also delete the cache by selecting to delete applicationdata in the operating system settings. In this case, all data is deleted, not only the cache.
3.4.2 Resources in the AR processing server
3.4.2.1 Saving data from the AR processing serverThere are two methods of handling AR processing server data in standalone mode: retrieving all data to be used and savingit in web storage in advance, or using offline storage. If the data volume is large, memory in the web layer may run out, sowe recommend using offline storage.
- Web storageThis method involves saving data to the local environment using the features of HTML 5. After retrieving data fromthe AR processing server, process it as required, and then save it. There are two types of storage: sessionStorage (whichis available only during a session), and localStorage (which saves data permanently in the local environment). Save datausing the format setItem(key,value), and retrieve it using getItem(key). Refer to HTML 5 specifications for details onhow to use web storage.
- Offline storageThis method involves saving data in the memory of the AR processing client. Enabling offline storage causes theresponse of AR.Data.getArServerData() executed in server connection mode to be saved in offline storage, with a queryused as the key. You can retrieve data saved in offline storage by executing AR.Data.getServerData using the same query.Use AR.Data.useOfflineStorage() to set offline storage.
AR.Data.useOfflineStorage(true, onSuccess, onError);
- 63 -

Point
When offline storage is enabled, data will be retrieved from offline storage even while the device is online, unless youforcibly load data from the server.
Executing a query that is not saved in offline storage will cause an error.
3.4.2.2 Updating resources in the AR processing server- Web storage
Execute setItem(key, value) for the key to be updated, in the same manner as when saving data.
3.4.2.3 Deleting data from the AR processing server- Web storage
To delete data with the specified key, execute removeItem(key). To delete all data saved in web storage, execute clear().
- Offline storageUse AR.Data.clearResourceStorage() to delete data from offline storage.
AR.Data.clearResourceStorage(onSuccess, onError);
3.4.3 External resources for AR overlay contentIf a resource used by an image texture or called by a tapAction is an external resource (a resource used via a network byspecifying an URL), you cannot download it in standalone mode or in offline state. Only data registered in the AR processingserver is saved in offline storage by AR.Data.getArServerData().
To save external resources in offline storage, use AR.Renderer.put() in server connection mode - this will register AR overlaydefinition data that uses external resources in the native AR display layer. When AR overlay definition data is analyzed, theAR native application downloads the external resources and saves them in offline storage.
3.4.4 Registering in (deleting from) the AR processing serverData in resources is deleted when registered in the AR processing server. You cannot register data in or delete it from theAR processing server in standalone mode or in offline state. Executed queries are not saved in offline storage, so use serverconnection mode to register data in (or delete it from) the AR processing server.
3.5 Marker detectionTo superimpose AR overlay content corresponding to the marker captured by the camera, useAR.Camera.addMarkerListener(), for confirming that the marker is within the camera image and for finding out whichmarker is being captured.
Point
A marker detection event is generated each time a marker is detected in the camera image or lost from it. Therefore, byregistering the callback function beforehand, you can set processing to be performed when a marker is detected or lost.
Example
AR.Camera.addMarkerListener(onSuccess, onError, onSuccessListener, onErrorListener);
var listenerId;
//Callback function to be called during registration of a marker detection event listener
onSuccess = function(_result){
listenerId = _result.getValue();
- 64 -

alert("Successfully registered the marker detection event listener.");
}
onError = function(_result){
alert("Failed to register the marker detection event listener.\ n" + _result.getStatus()
+" : " +
_result.getValue());
};
//Callback function to be called during generation of a marker detection event
onSuccessListener = function(_result){
//If a marker is detected
if(_result.getValue().status == true) {
alert("Marker"+_result.getValue().value+"was detected." );
//If a marker is lost
} else if(_result.getValue().status == false){
alert("Marker"+_result.getValue().value+"was lost.");
}
};
onErrorListener = function(_result){
alert("Failed to detect a marker.\ n" + _result.getStatus() +" : " + _result.getValue());
};
To delete a registered marker detection event listener, use AR.Camera.removeMarkerListener(), specifying the listener IDto be deleted.
Example
AR.Camera.removeMarkerListener(listenerId, onSuccess, onError);
onSuccess = function(_result){
alert("Successfully deleted the marker detection event listener.");
}
onError = function(_result){
alert("Failed to delete the marker detection event listener.\n" + _result.getStatus()
+" : " +
_result.getValue());
};
3.6 Back buttonTo return to the previous HTML screen when displaying HTML screens in the overlay application, press the back buttonon an Android device or the Back button soft-key on an iOS device.
Pressing the back button on the first screen that loads from the AR native application closes the overlay application andreturns to the AR native application.
3.7 Displaying AR overlay content
3.7.1 Creating AR overlay definitionsTo display overlays on an application, you must set an AR overlay definition in the native AR display layer using theJavaScript library. There are two methods of creating an AR overlay definition: creating one from scratch by using aJavaScript library, and converting data already registered in the AR processing server.
3.7.1.1 Creating definitions using a class of the JavaScript libraryAR overlay definitions are expressed using the AR.Renderer.SuperimposedGraphic class of the JavaScript library. Createan AR.Renderer.SuperimposedGraphic object and set the required property.
- 65 -

Example
var superimposedGraphic = new AR.Renderer.SuperimposedGraphic();
//Set the projection type.
superimposedGraphic.setProjectionType(AR.Renderer.SuperimposedGraphic.ProjectionType.ORTHO
2D);
//Set the translation coordinates.
var translation = new AR.Renderer.Point();
translation.setX(1);
translation.setY(1);
translation.setZ(1);
superimposedGraphic.setTranslation(translation);
//Set the rotation coordinates.
var rotation = new AR.Renderer.Point();
rotation.setX(0);
rotation.setY(0);
rotation.setZ(0);
superimposedGraphic.setRotation(rotation);
//Set click action.
var urlAction = new AR.Renderer.URLAction();
urlAction.setSrc("http://...");
superimposedGraphic.setClickAction(urlAction);
//Create graphics.
var squareModelGraphic = new AR.Renderer.SquareModelGraphic();
//Set the scale for the graphics.
var scale = new AR.Renderer.Point();
scale.setX(1);
scale.setY(1);
scale.setZ(1);
squareModelGraphic.setScale(scale);
//Set the texture for the graphics.
var textTexture = new AR.Renderer.TextTexture();
textTexture.setBackgroundColor(4294951104);
textTexture.setColor(4289724416);
textTexture.setFontSize(20);
textTexture.setText("text");
textTexture.setWordWrap(true);
var size = new AR.Renderer.Size();
size.setWidth(160);
size.setHeight(80);
textTexture.setSize(size);
squareModelGraphic.setTexture(textTexture);
//Set graphics.
superimposedGraphic.setGraphic(squareModelGraphic);
3.7.1.2 Retrieving data from the AR processing serverWhen retrieving or searching for QValue, or when searching for Quad, retrieve the JSON string registered in thearpoi_superimposedgraphic attribute of the arpoiarmk_default table. Use AR.Renderer.parseSuperimposedGraphic() toconvert to an AR.Renderer.SuperimposedGraphic object.
- 66 -

See
Refer to "3.3 Data operation by the AR processing server" for details on how to retrieve data from AR data management.
3.7.1.3 Identifying AR overlay definitionsTo specify an AR overlay definition and change the content of the overlay, or to display only the specified AR overlaydefinition, you must identify the target AR overlay definition. Each AR overlay definition ID has a unique value, and isassigned automatically when an AR overlay definition is created on the data management console. To use your own values,give a unique name to each AR overlay definition.
3.7.1.4 Embedding user-defined dataTo change the display of AR overlay content using user-defined data, edit the elements to be changed of the AR overlaydefinition created as the AR.Renderer.SuperimposedGraphic object.
Example
- To change the text of AR overlay content:
//SuperimposedGraphic -> SquareModelGraphic -> Edit Text in TextTexture
SuperimposeGraphic.getGraphic().getTexture().setText("stringToBeDisplayed");
- To change the image of AR overlay content:
//SuperimposedGraphic -> SquareModelGraphic -> Edit Src in ImageTexture
SuperimposeGraphic.getGraphic().getTexture().setSrc("urlOfImageToBeDisplayed");
3.7.2 Setting AR overlay definitionsSet AR overlay definitions that you have created with their coordinate system objects in the AR processing client. V1.0supports only AR.Renderer.FJARMarkerCoordinateSystem. Set the AR marker ID you want to overlay inAR.Renderer.FJARMarkerCoordinateSystem.
Example
//Create a coordinate system object
var coordinateSystem = new AR.Renderer.FJARMarkerCoordinateSystem();
//Set the marker ID
coordinateSystem.setValue(1);
AR.Renderer.put(coordinateSystem, superimposedGraphic, onSuccess, onError);
3.7.2.1 Switching the AR overlay contentThe AR processing client simultaneously renders all AR overlay definitions set for the same marker. The AR processingclient does not manage scenarios and scenes and does not distinguish between them. Therefore, to switch the displayaccording to the scenario and scene, change the AR overlay definition when the display is switched.
3.7.3 Tap actionTo run the set tapAction by tapping AR overlay content, use AR.OS.onBodyClick() - this will propagate the tap event onthe HTML layer to the rendering layer. You cannot operate the rendering layer directly because it is covered by the WebViewlayer. If AR overlay content exists on the reported coordinates, the set tapAction is run.
- 67 -

Example
//Register the screen tap event listener.
if(window.navigator.userAgent.match(/(iPad|iPhone|iPod)/i)) //On iOS:
document.addEventListener("touchstart", bodyclick, false);
else
document.addEventListener("click", bodyclick, false); //On android:
bodyclick = function(){
//Report the click coordinates to the AR native application.
AR.OS.onBodyClick(event, onSuccess, onError);
};
3.8 Creating war filesApplications must be in the war format to be deployed to the AR processing server. Therefore, web applications that youhave created must be converted to this format.
3.8.1 Using the jar commandThis section explains how to create war files using the jar command provided by Java.
1. Create the Web-INF directory and web.xml
- Create the Web-INF directory directly under the context directory of the web application, and store web.xml thatspecifies the required settings.
- To cache web resources, set mimetype used in web.xml to enable the cache configuration file.
Example
To use the appcache file:
<mime-mapping>
<extension>appcache</extension>
<mime-type>text/cache-manifest</mime-type>
</mime-mapping>
2. Create war files.
1. Using the command prompt, move to the root directory where you developed the application.
2. Use the jar command provided by Java to create a webapp.war file.The directory structure when the jar command is deployed depends on the current directory at the time thecommand is run, so check the directory before running the command.Refer to the Java manual for details on the jar command.
Example
Example of executing the jar command:
"C:\Program Files\Fujitsu\common\jdk7\bin\jar" cvf ../webapp.war *
- 68 -

Chapter 4 Developing the overlay application (nativeapplication)
This chapter explains how to develop the native application, which is a component of the overlay application.
4.1 OverviewThe development resources provided by Interstage AR Processing Server enable you to develop native applications that:
- Perform client authoring.
- Use the overlay application development tool on smart devices to run the sample application deployed on a web serverand the overlay application itself.
- Use the AR development project to embed this product's features into applications developed by the system developer.
4.1.1 Development resources provided by Interstage AR ProcessingServer
Interstage AR Processing Server provides the following resources for developing the native application:
- Resources provided for Android
- installDirmobileclient/android/ARClientAuthoring.apkClient authoring tool [executable file, apk format]
- installDirmobileclient/android/ARClientDev.zipAR development project [Eclipse development project, zip format]
- installDirmobileclient/android/ARClientDev.apkOverlay application (web application) development tool [executable file, apk format]
- Resources provided for iOS
- installDirmobileclient/ios/ARClientAuthoring.zipClient authoring tool development project [Xcode development project, zip format]
- installDirmobileclient/ios/ARClientDev.zipAR development project [Xcode development project, zip format]
- Common
- installDirlib\js/*JavaScript library
- installDir\samples\quickstart\*Sample application (web application)
- Resources provided for Android
- /opt/FJSVar/mobileclient/android/ARClientAuthoring.apkClient authoring tool [executable file, apk format]
- /opt/FJSVar/mobileclient/android/ARClientDev.zipAR development project [Eclipse development project, zip format]
- /opt/FJSVar/mobileclient/android/ARClientDev.apkOverlay application (web application) development tool [executable file, apk format]
- Resources provided for iOS
- /opt/FJSVar/mobileclient/ios/ARClientAuthoring.zipDevelopment project for the client authoring tool [Xcode development project, zip format]
- 69 -

- /opt/FJSVar/mobileclient/ios/ARClientDev.zipAR development project [Xcode development project, zip format]
- Common
- /opt/FJSVar/lib/js/*JavaScript library
- /opt/FJSVar/samples/quickstart/*Sample application (web application)
Note
The executable file for the client authoring tool (iOS) is not offered as a product, because Apple Inc. does not permitdistribution of executable files. To execute the client authoring tool on iOS, the client company must enter into a contractwith Apple Inc. and build the client authoring tool before it can be used.
4.1.2 Development flow
4.1.2.1 Building the development environmentYou must prepare the following environments for developing the native application to be used with Interstage AR ProcessingServer.
Note
To prepare the development environment, install and set up each product in accordance with the manual provided with thatproduct.
Android
To develop an Android version of the native application, prepare the development environment by following theprocedure below:
1. Prepare the following environments:
- Android SDK 2.3.3 (API10)
- Eclipse IDE
- JDK 6
- Android Development Tools (ADT) plug-in
2. Extract ARClientSample.zip to the desired folder.
3. Import the project file to Eclipse.
iOS
To develop an iOS version of the native application and build a client authoring tool, prepare the developmentenvironment by following the procedure below:
1. Prepare the following environment:
- Xcode 4.5 or later
2. Obtain a development certificate.
3. Extract the Xcode development project to the desired folder.
- To develop the native application, extract the ARClientDev project.
- To build the client authoring tool, extract the ARClientAuthoring project.
- 70 -

4. Import the project file to Xcode.
- To develop the native application, click ARClientDev.xcodeproj and import it.
- To build a client authoring tool, click ARClientAuthoring.xcodeproj and import it.
4.1.2.2 BuildingUse Eclipse or Xcode to build a project. Refer to the manual for your development environment for details on how to build.Refer to "4.2 Developing an Android native application" and "4.3 Developing an iOS native application" for details on howto develop the native application.
4.1.2.3 Installing the developed applicationInstall the application that you built onto a smart device - refer to the Operator's Guide for details.
4.2 Developing an Android native application
4.2.1 Application type and supported operationsThe native application that the system developer can develop calls the authoring screen and the overlay application activity.
Table 4.1 Application type and supported operations
Application type Development language Supported operations
Native application Native language such as Javaand Objective-C
- Call the authoring activity, overlay applicationactivity, and configuration activity (start theactivities), and create a native application.
Overlay application JavaScript - Use JavaScriptRender AR overlay content, communicate withthe AR server, enable offline use, retrievemarker recognition information, etc.
- Run user-defined web applications on theoverlay application.
Figure 4.1 Image of native application operation
- 71 -

Figure 4.2 Image of overlay application operation
4.2.2 Configuring the projectThis section explains the configuration of the ARClientDev project.
The root folder is ARClientDev - resources marked with a number sign (#) can be edited, but resources marked with anasterisk (*) are product files, and hence cannot be edited or deleted.
assets
authoring: Image folder used for product authoring *
logutil.properties: Product log configuration file *
libs: Library folder
armeabi-v7a
libarengine.so: Product library (C++) *
arclientlib.jar: Product library (Java) *
src: Sample source folder
com.fujistu.interstage.ar.mobileclient.android
R.java: Product resource file *
com.sample.clientdev
MainMenuActivity.java List menu screen #
res: Resources folder
drawable[option]: drawable folder
Product image file in the folder *
aricon.png: Product sample icon #
layout: layout folder
- 72 -

Product layout file in the folder *
raw: raw folder
Product raw file in the folder *
values: value folder (common)
Product value file in the folder *
strings.xml: Character resource file #
values-ja: value folder (Japanese)
Product value file in the folder *
strings.xml: Character resource file #
AndroidManifest.xml: Android manifest file #
4.2.3 Starting activitiesUsing the development project (ARClientDev) as the base, develop the user native application by adding user activities.
The native application provides the following three activities:
- ArWebMainActivityOverlay application activity.It superimposes the overlay application onto the camera layer and the AR overlay layer. During startup, it loads theoverlay application from the web server to the device according to the specified URL. Refer to "Chapter 3 Developingthe overlay application (web application)" for details.
- LiveAuthoringActivityClient authoring activity.It is used for adding and editing AR overlay content. Refer to the Operator's Guide for details on how to use the clientauthoring tool.
- ArPreferenceActivityConfiguration screen activity.It displays the configuration screen for retrieving application logs and setting up accounts. Refer to the Operator's Guidefor details.
By using "intent" to start the above activities from the native application developed by the system developer, you can createan executable file (apk) that combines developed activities and activities provided by Interstage AR Processing Server.Select the activities to be used and embed them into the executable file:
- To use the overlay application only:Embed ArWebMainActivity and ArPreferenceActivity into the application.
- To use client authoring only:Embed LiveAuthoringActivity and ArPreferenceActivity into the application.
- To use both:Embed all activities into the application.
Refer to the sample com.sample.clientdev.MainMenuActivity.java for an example of how to call an activity.
Table 4.2 Intent specifications of the overlay application activity
Class name com.fujitsu.interstage.ar.mobileclient.android.base.web.ArWebMainActivity
Extra - Activation URL
key: "extraskey_widget_url"
value: URL to be activated
- 73 -

Table 4.3 Intent specifications of the client authoring activity
Class name com.fujitsu.interstage.ar.mobileclient.android.authoring.ui.LiveAuthoringActivity
Extra None
Table 4.4 Intent specifications of the configuration screen activity
Class name com.fujitsu.interstage.ar.mobileclient.android.base.pref.ArPreferenceActivity
Extra None
Example
To start the overlay application activity:
//Set the overlay application activity in an intent.
String _activity =
"com.fujitsu.interstage.ar.mobileclient.android.base.web.ArWebMainActivity";
Intent intent = new Intent();
intent.setClassName(MainMenuActivity.this, _activity);
//Set the URL to be activated in the intent.
// key: extraskey_widget_url
// value: URL
intent.putExtra("extraskey_widget_url", "https://www.fujitsu.com/index.html");
//Start the activity.
startActivity(intent);
To start the client authoring activity:
//Set the client authoring activity in an intent.
String _activity =
"com.fujitsu.interstage.ar.mobileclient.android.authoring.ui.LiveAuthoringActivity";
Intent intent = new Intent();
intent.setClassName(MainMenuActivity.this, _activity);
//Start the activity.
startActivity(intent);
To start the configuration screen activity:
//Set the configuration screen activity in an intent.
String _activity =
"com.fujitsu.interstage.ar.mobileclient.android.base.pref.ArPreferenceAcitity";
Intent intent = new Intent();
intent.setClassName(MainMenuActivity.this, _activity);
//Start the activity.
startActivity(intent);
To set the start screen for a user overlay application
MainMenuActivity uses a button click event as a trigger to start ArWebMainActivity in an intent. To directly start the useroverlay application after startup, start ArWebMainActivity using the onCreate method.
Note
For security reasons, the above activities are configured as private from external intents, by setting android:exported="false"in AndroidManifest.xml.
4.2.4 Understanding the orientation of the activity screensThis section explains the orientation of each activity screen.
- 74 -

- ArWebMainActivityThe orientation is set to portrait or landscape depending on the orientation of the smart device during startup, andsubsequently remains fixed.
- LiveAuthoringActivityThe orientation is set to portrait mode if the smart device is a smart phone, or to landscape mode if it is a tablet.
- ArPreferenceActivityThe orientation varies between portrait and landscape modes depending on the orientation of the smart device.
4.2.5 Editing AndroidManifest.xmlTo develop an application using a development project, edit AndroidManifest.xml. Do not change the descriptions used onthe product side, otherwise a compilation error or abnormal operation may occur.
As a rule, you cannot change the Activity/ContentProvider/BroadcastReceiver or permission settings used by the product.
You can add settings to be used by user applications:
- Add a user application activity
- Add intent-filter to a user application activity
- Add user-permission to be used by a user application
Example
Refer to the comments in the source code for details on whether the source code can be edited.
<!-- Application settings for the product. Cannot be edited. Start-->
<application
android:name="com.fujitsu.interstage.ar.mobileclient.android.base.ArMainApplication"
android:debuggable="false"
android:icon="@drawable/aricon"
android:label="@string/app_name_dev"
android:theme="@android:style/Theme.NoTitleBar.Fullscreen" >
<!-- Application settings for the product. Cannot be edited. End-->
<!-- Activity for the sample. Can be edited. Start-->
<activity
android:name=".MainMenuActivity"
android:configChanges="keyboardHidden|orientation"
android:label="@string/app_name_dev"
android:screenOrientation="portrait" >
<intent-filter>
<action android:name="android.intent.action.MAIN" />
<category android:name="android.intent.category.LAUNCHER" />
</intent-filter>
</activity>
<!-- Activity for the sample. Can be edited. End-->
To change the startup activity of the launcher
The launcher is configured with intent-filter for setting MainMenuActivity. To change the startup activity, change the settingdestination activity in the following intent-filter settings.
Example
<intent-filter>
<action android:name="android.intent.action.MAIN" />
- 75 -

<category android:name="android.intent.category.LAUNCHER" />
</intent-filter>
4.2.6 Editing res/valuesIf editing the files (strings.xml, arrays.xml, attrs.xml, colors.xml, dimens.xml, styles.xml) under the res/values folder, donot delete or edit content already specified in the product. Descriptions can be added for a user application, as long as thenames do not conflict with existing attribute names.
Example
Example of editing res/values/string.xml
<?xml version="1.0" encoding="utf-8" standalone="no"?>
<resources>
<!-- Strings set in the product. Start -->
<string name="app_name">InterstageAR</string>
<string name="app_name_authoring">InterstageAR Authoring</string>
<string name="app_name_dev">InterstageAR Dev</string>
.....
<!-- Strings set in the product. End -->
<!-- Definitions can be added as follows -->
<string name="user_add_string1">user-defined string 1 </string>
<string name="user_add_string2">user-defined string 1 </string>
<!-- You cannot add a name already set in the product, as the one below, because a name
conflict will occur -->
<string name="app_name">user application</string>
</resources>
4.2.7 Changing the startup iconTo change the launcher icon, replace the icon aricon.png in the following folders with the desired image:
- res/drawable-xdpi/aricon.png
- res/drawable-ldpi/aricon.png
- res/drawable-mdpi/aricon.png
4.2.8 Changing the application nameTo change the application name, change the files below:
Example
- Application name to be displayed when the language setting is Englishres/values/strings.xml
<string name="app_name_dev">InterstageAR Dev</string>
- Application name to be displayed when the language setting is Japaneseres/values-ja/strings.xml
<string name="app_name_dev">InterstageAR Dev</string>
4.2.9 Changing the package nameFollow the procedure below to change the package name in a user application:
- 76 -

1. Change the package name using Android Tools
- Right-click the development project (ARClientDev), select Android Tools, and then Rename ApplicationPackage.
- Type the new package name and click OK (example: change to com.test).
- A list of the files to be changed is displayed. Confirm them and execute rename.
2. Change the ContentProvider description in AndroidManifest.xmlChange "com.sample.clientdev" specified inandroid:authorities="com.sample.clientdev.data.httpdata.httpdataprovider" to the desired package name.
4.3 Developing an iOS native applicationWhen developing an iOS native application, the system developer should use the ARClientDev project.
Note
Do not use the ARClientAuthoring project for any purpose other than to build a client authoring tool.
4.3.1 ProjectThis section explains the configuration of the ARClientDev project.
Resources marked with a number sign (#) can be edited, but resources marked with an asterisk (*) are product files, andhence cannot be edited or deleted.
ARClientDev: Root folder
Resources: Resources folder
drawable: Image data folder
(Product image file) *
en.lproj
Localizable.strings: English text file #
ja.lproj
Localizable.strings: Japanese text file #
values values folder
(Product values file) *
ARClientLib.framework: Product library folder
(Product library file in the folder) *
opencv2.framework: Library folder used by the product
(Library file used by the product in the folder) *
ARClientDev: Sample source folder
en.lproj
InfoPlist.strings: English text file #
- 77 -

ja.lproj
InfoPlist.strings: Japanese text file #
IARMainMenuViewController.h: List menu screen (.h) #
IARMainMenuViewController.m: List menu screen (.m) #
(Sample source file in the folder) #
Icon_114.png: Icon image #
Icon_144.png: Icon image #
Icon_57.png: Icon image #
Icon_72.png: Icon image #
4.3.2 Starting UIViewControllerUsing the development project (ARClientDev) as the base, develop the user native application by adding the userUIViewController.
This product contains the following three UIViewControllers:
- IARWebMainViewControllerOverlay application UIViewController.It superimposes the overlay application onto the camera layer and the AR overlay layer. During startup, it loads theoverlay application from the web server to the device according to the specified URL. Refer to "Chapter 3 Developingthe overlay application (web application)" for details.
- IARLiveAuthoringViewControllerClient authoring UIViewController.It is used for adding and editing AR overlay content. Refer to the Operator's Guide for details on how to use the clientauthoring tool.
- IARSettingViewControllerConfiguration screen UIViewController.It displays the configuration screen for retrieving application logs and setting up accounts. Refer to the Operator's Guidefor details.
You can start the above UIViewControllers from the native application. You can therefore create an executable file (app)that combines developed UIViewControllers and the UIViewControllers provided by the product. Select theUIViewControllers to be used and embed them into the executable file:
- To use the overlay application only:Embed IARWebMainViewController and IARSettingViewController into the application.
- To use client authoring only:Embed IARLiveAuthoringViewController and IARSettingViewController into the application.
- To use both:Embed all UIViewControllers into the application.
Refer to ARClientDev/IARMainMenuViewController.m for an example of how to call a UIViewController.
Starting UIViewController
IARMainMenuViewController uses a button click event as a trigger to start IARWebMainViewController. To directlystart the user overlay application after startup, start IARWebMainViewController using the viewDidLoad method.
Example
Overlay application UIViewController
- 78 -

- Example of calling IARWebMainViewController:
//Set the URL to be activated.
NSString *sampleUrl = @"https://www.fujitsu.com/index.html";
// Create UIViewController.
[IARMainController getInstance].mainViewCtrl = [[IARWebMainViewController alloc]
initWithUrl: sampleUrl inputClassName:NSStringFromClass([IARMainMenuViewController
class])];
//Start UIViewController.
self.window.rootViewController = [IARMainController getInstance].mainViewCtrl;
- Example of calling IARLiveAuthoringViewController:
// Create UIViewController.
[IARMainController getInstance].mainViewCtrl = [[IARLiveAuthoringViewController alloc]
initWithUrl: sampleUrl inputClassName:NSStringFromClass([IARMainMenuViewController
class])];
//Start UIViewController.
self.window.rootViewController = [IARMainController getInstance].mainViewCtrl;
- Example of calling IARSettingViewController:
// Create UIViewController.
id sampleViewController = [[IARSettingViewController alloc] init];
//Start UIViewController.
[self presentModalViewController: sampleViewController animated:NO];
To change the startup UIViewController of the launcher
The launcher is configured to display IARMainMenuViewController during startup. To change the startupUIViewController, set the UIViewController you want to start in self.window.rootViewController.
Example
- ARClientDev/AppDelegate.mmdidFinishLaunchingWithOptions
self.window.rootViewController = [[IARMainMenuViewController alloc] init];
4.3.3 Orientation of the UIViewController screensThe screen orientation is set as follows:
- iPhone: Portrait
- iPad: Landscape
To change the orientation setting for IARWebMainViewController screens, you can change the Xcode setting using thefollowing procedure:
1. Select the project in the project manager.
2. In the Summary tab, select the desired rotational directions for Supported Interface Orientations.
Note
If you change the screen orientation setting, you cannot display IARLiveAuthoringViewController properly.
If using IARLiveAuthoringViewController, do not change the screen orientation setting.
- 79 -

4.3.4 Editing ARClientDev-info.plist and build settingsTo develop the native application, edit info.plist. Do not change the descriptions used on the product side, otherwise acompilation error or abnormal operation may occur.
You must not change the settings for the following:
- UISupportedInterfaceOrientations and UIFileSharingEnabled in ARClientDev-info.plist
- iOS Deployment Target (iOS 5.0) in build settings
Example
Refer to the comments in the following source code for details on whether the source can be edited:
<?xml version="1.0" encoding="UTF-8"?>
<!DOCTYPE plist PUBLIC "-//Apple//DTD PLIST 1.0//EN" "http://www.apple.com/DTDs/
PropertyList-1.0.dtd">
<plist version="1.0">
<dict>
<key>CFBundleDevelopmentRegion</key>
<string>ja_JP</string>
<key>CFBundleDisplayName</key>
<string>InterstageAR</string>
<key>CFBundleExecutable</key>
<string>${EXECUTABLE_NAME}</string>
<key>CFBundleIcons</key>
<dict>
<key>CFBundlePrimaryIcon</key>
<dict>
<key>CFBundleIconFiles</key>
<array>
<string>Icon_57.png</string>
<string>Icon_114.png</string>
<string>Icon_72.png</string>
<string>Icon_144.png</string>
<string>Icon_57.png</string>
<string>Icon_114.png</string>
<string>Icon_72.png</string>
<string>Icon_144.png</string>
</array>
<key>UIPrerenderedIcon</key>
<true/>
</dict>
</dict>
<key>CFBundleIdentifier</key>
<string>com.fujitsu.${PRODUCT_NAME:rfc1034identifier}</string>
<key>CFBundleInfoDictionaryVersion</key>
<string>6.0</string>
<key>CFBundleName</key>
<string>${PRODUCT_NAME}</string>
<key>CFBundlePackageType</key>
<string>APPL</string>
<key>CFBundleShortVersionString</key>
<string>1.0</string>
<key>CFBundleSignature</key>
<string>????</string>
<key>CFBundleVersion</key>
<string>1.0</string>
<!-- Import/export feature for the product. Cannot be edited. Start-->
<key>UIFileSharingEnabled</key>
<true/>
<!-- Import/export feature for the product. Cannot be edited. End-->
- 80 -

<key>UIPrerenderedIcon</key>
<true/>
<key>UIRequiredDeviceCapabilities</key>
<array>
<string>armv7</string>
</array>
<!-- SupportedInterfaceOrientations for the product. Cannot be edited. Start-->
<key>UISupportedInterfaceOrientations</key>
<array>
<string>UIInterfaceOrientationPortrait</string>
</array>
<key>UISupportedInterfaceOrientations~ipad</key>
<array>
<string>UIInterfaceOrientationLandscapeRight</string>
</array>
<!-- SupportedInterfaceOrientations for the product. Cannot be edited. End-->
</dict>
</plist>
4.3.5 Editing Localizable.strings, InfoPlist.strings, and arrays.plistIf editing Localizable.strings and InfoPlist.strings, do not delete or edit content already specified in the product. Descriptionscan be added for a user application, as long as the names do not conflict with existing attribute names.
Example
- Example of editing Localizable.strings
<!-- String set in the product. Start -->
"app_name"= "InterstageAR";
"app_name_authoring" = "InterstageAR Authoring";
"app_name_dev" = "InterstageAR Dev";
.....
<!-- String set in the product. End -->
<!-- You can add definitions as shown below. -->
"user_add_string1" = "user-defined string 1";
"user_add_string2" = "user-defined string 1";
- Example of editing InfoPlist.strings
<!-- Application name -->
CFBundleDisplayName = " InterstageAR";
4.3.6 Changing the startup iconTo change the launcher icon, replace the icon in the following folders with an image of with the same dimensions:
- ARClientDev/Icon_57.png
- ARClientDev/Icon_72.png
- ARClientDev/Icon_114.png
- ARClientDev/Icon_144.png
4.3.7 Changing the application nameTo change the application name, change the files below:
- 81 -

Example
- Application name to be displayed when the language setting is EnglishARClientDev/en.lproj/InfoPlist.strings
CFBundleDisplayName = " InterstageAR";
- Application name to be displayed when the language setting is JapaneseARClientDev/ja.lproj/InfoPlist.strings
CFBundleDisplayName = " InterstageAR";
- 82 -

Chapter 5 Developing the system integrationapplication
This chapter explains how to develop the system integration application.
5.1 OverviewThe system integration application is created for using data from an existing business system in the overlay application, orfor reflecting data input using the overlay application to an existing business system.
The REST API published in Interstage AR Processing Server enables you to retrieve, register, and delete AR overlaydefinition information managed by the server.
You can create the system integration application using any programming language (such as Java and C). You can evendeploy the system integration application as a web application, or create it as a standalone application that is to be runperiodically using a scheduler such as cron. The developer must decide these details taking into account the purpose of thesystem.
Point
We cannot guarantee correct operation of system integration applications deployed to the server provided by this product.Please prepare a separate application server when deploying a system integration application.
5.1.1 Development environmentSelect the programming language to be used for development, taking into account the purpose of the system integrationapplication, the application server on which it is to be deployed, and integration with the core business system. Also preparethe development environment required for your selected programming language.
5.1.2 Development flowThis section explains how to develop the system integration application.
1. Program the system integration application.Code the system integration application. It is divided into "data reflection from the core business system to the ARprocessing server" and "data reflection from the AR processing server to the core business system".
2. Compile and package the system integration application.Compile the system integration application using the development environment, store it in a war file, and package it.
Point
If the system integration application was not created using Java, then it must be compiled and linked as required bythe programming language used.
3. Deploy the system integration applicationDeploy the packaged system integration application to the application server. Refer to the manual for your applicationserver for details on how to deploy the application. If you create the system integration application in any format otherthan a web application, follow the appropriate procedure to enable the system integration application to be used.
5.2 ProgrammingThe system integration application consists of one or both of the following: data reflection from the core business systemto the AR processing server, and data reflection from the AR processing server to the core business system.
- 83 -

5.2.1 Reflecting data from the core business system to the ARprocessing server
Create the following process to reflect data from the core business system to the AR processing server:
1. Retrieve data from the core business system.
2. Convert data for the AR processing server.
3. Send data to the AR processing server.
1. Use the interface provided by the core business system to retrieve data from it -if it uses an interface that sends data tothe system integration application, then you must create a mechanism for the system integration application to receive thedata.
2. Data conversion converts the data format provided by the interface of the core business system to a format that the ARprocessing server can receive.
A simple method is to assign the parameter names and parameter values of data in the core business system to the respectiveelements in the AR overlay definition. Another method is to design a data schema and convert data in accordance with it(the data schema must be created taking into account the purpose of the system).
During data conversion, use the REST API to retrieve other data from the core business system and send it to the ARprocessing server. You cannot register QType or QAttribute using the REST API. Therefore, you must build a user-definedtable before storing the retrieved data in the AR processing server.
Item Registration (POST) Identification using a
primary key (GET)
Search (GET) Delete (DELETE)
QType N Y Y N
QAttribute N Y Y N
QEntity Y Y Y Y
QValue Y Y Y Y
Quad Y N Y N
Example
The processing sequence if template information containing AR content location information for each job is stored in theAR processing server beforehand is as follows:
1. Retrieve job instruction data from the core business system.
2. Retrieve template information containing job instructions from the AR processing server.
3. Browse the template information containing job instructions and append location information about the AR object tothe job instruction data.
4. Reflect the job instruction data, to which location information for AR overlay content was appended, to the ARprocessing server.
5.2.2 Reflecting data from the AR processing server to the corebusiness system
Create the following process to reflect data from the AR processing server to the core business system:
1. Retrieve data from the AR processing server.Use the REST API (get) to retrieve data from the AR processing server.
2. Convert and reflect data to the core business system.Use the interface provided by the core business system to reflect data to it.
- 84 -

Example
For example, the processing sequence for reflecting job results entered by a worker on-site using a smart device to a corebusiness system is as follows:
1. The AR business application stores the job execution results in the AR processing server.
2. The AR business application reports the job completion event to the system integration application.
3. The system integration application retrieves the job results data from the AR processing server.
4. The system integration application converts JSON format job results data for the core business system.
5. The system integration application reflects the converted job results data to the core business system.
5.3 Notes on creating the system integration applicationThere is no feature for automatically calling APIs when data in the AR processing server is updated. Therefore, a mechanismis required for calling a process to reflect data from the AR processing server to the core business system.
Example
Example mechanisms:
- The AR business application reports data update to the system integration application when data in the AR processingserver is updated.
- The system integration application periodically checks if data in the AR processing server has been updated.
- 85 -

Chapter 6 Sample applicationThis chapter explains the sample application provided by Interstage AR Processing Server, focusing on the anticipated jobcontent, the composition of the sample application, and how to run it.
6.1 Overview of the sample application
6.1.1 Job contentBefore the introduction of Interstage AR Processing Server, a worker conducting an equipment inspection would check thejob content based on the job inspection sheet and fill out the inspection result. If an unexpected problem occurred, the workerwould note down or remember the model number of the equipment and look for the corresponding manual at the office.
The sample application has the following features to support equipment inspection jobs:
1. Provides instructions on operating valves.Previously, the worker had to check the work sequence while comparing the actual object with the inspection sheet,but Interstage AR Processing Server superimposes the inspection sheet onto a captured image of the real-world object.
2. Displays the equipment manual.Previously, if a problem occurred, the worker had to search for the corresponding manual at the office, but InterstageAR Processing Server enables the manual to be checked immediately on-site.
3. Inputs the inspection result.Previously, the worker registered the written inspection result after returning to the office, but Interstage ARProcessing Server enables the result to be registered immediately.
Figure 6.1 Equipment inspection job before and after the introduction of Interstage ARProcessing Server
6.1.2 Composition of the sample applicationThe sample application provided by Interstage AR Processing Server consists of the files listed below.
Point
The sample application provided by Interstage AR Processing Server is stored in the following location:
installDir\samples\quickstart\
/opt/FJSVar/samples/quickstart/
- 86 -

background.pdf: Background image used in the sample application
file: Directory with files used for overlaying in the sample application
INPUT.png
MANUAL.pdf
MANUALPOP.png
MOVIE.mp4
MOVIEPOP.png
PICTURE.jpg
THUMBNAIL.jpg
webapp: Sample application directory
ar: JavaScript library directory
ar.js: JavaScript library file
apl_sample: JavaScript directory for running the sample application
apl.js: JavaScript file for running the sample application
WEB_INF: Settings file directory for deploying the sample application
web.xml: Settings file
index.html: Start screen HTML file
perwork.html: Work preparation screen HTML
work.html: Work screen HTML
comment.html: Comment input screen HTML file
gyoumu.css: Sample application CSS file
work.appcache: Application cache settings file
6.1.3 Features used by the sample applicationThe following table indicates which features provided by the JavaScript libraries are used by the sample application.
Library Feature Used by the sample application
Camera control Start/stop camera Y
Register/remove marker detection Y
Retrieve ID and rectangular coordinates of detectedmarker
Y
Log Output log Y
OS control Report click coordinate to native Y
Display specified URL content N
Check operation mode Y
Call settings screen N
- 87 -

Library Feature Used by the sample application
AR rendering Operate rendering object: Retrieve N
Operate rendering object: Add Y
Operate rendering object: Remove Y
Operate rendering object: Remove all Y
Data management control Set server information Y
Set use of offline storage Y
Communicate with the AR processing server:Retrieve
Y
Communicate with the AR processing server:Register
Y
Communicate with the AR processing server:Remove
N
Clear offline storage Y
6.2 Preparing the sample applicationThis section explains how to install and configure the server for running the sample application.
Point
The sample application displays PDF files, therefore you must ensure beforehand that they can be viewed on the smartdevice.
6.2.1 Installing and configuring the serverInstall and configure Interstage AR Processing Server - refer to the Installation Guide for details.
6.2.2 Deploying the web applicationCreate a sample web application and deploy it so that it can be accessed from a smart device.
1. Use the command prompt to redirect to the webapp directory.
2. Use jar provided by JDK to create a webapp.war file. The directory structure when jar is deployed depends on thecurrent directory, so redirect to the webapp directory before running the command. Refer to the JDK manual provided by Oracle Corporation for details on jar.
Example
"C:\Program Files\Fujitsu\common\jdk7\bin\jar" cvf ..\webapp.war *
3. Execute arsvadmin to deploy the webapp.war file.
Example
Deploying to the AR processing server
Execute arsvadmin to deploy the application:
"installDir\bin\arsvadmin" deploy "installDir\samples\quickstart\webapp.war"
- 88 -

Undeploying from the AR processing server
To cancel deployment after the sample is run, execute the following command:
"installDir\bin\arsvadmin" undeploy webapp
See
Refer to the Operator's Guide for details on deployment.
6.2.3 Installing the native applicationInstall the native application of the sample application provided by Interstage AR Processing Server to a smart device.
The Android version of the native application is stored in the following location:
- Windows:installDirmobileclient\android\ARClientDev.apk
- Linux:/opt/FJSVar/mobileclient/android/ARClientDev.apk
Example
Installing the Android version of the native application via a USB connection
The example below installs the application on the smart device by connecting to a PC via USB (the USB connectionmethod varies between smart devices - refer to the smart device manual for details).
1. Copy the sample native application to a PC.
2. Select Applications from unknown source on the smart device.
- Android 3.2:On the Settings screen, tap Applications, and then select Unknown sources.
- Android 4.x (4.0 / 4.1):On the Settings screen, tap Security, and then select Unknown sources.
3. Connect the smart device to the PC using a USB cable. If the PC does not recognize the driver, then install it.
4. On the PC, select the smart device using Windows Explorer - if the PC does not recognize the smart device, refer tothe smart device manual.
5. Copy ARClientDev.apk to the desired location in the smart device.
6. On the PC taskbar, select Safely remove hardware and eject media and release the mounted device.
7. Start the application with the file management feature and select ARClientDev.apk. If there is no application with afile management feature, then install one.
8. The installation screen will be displayed. Start the installation.
9. Upon completion, on the Settings screen, Security menu, clear Unknown sources.
Note
The sample native application is not offered, because Apple Inc. does not permit distribution of executable files. To executethe sample native application on iOS, the client company must enter into a contract with Apple Inc. and build the applicationbefore it can be used.
Refer to the Developer's Guide for details on how to build an iOS version of the application.
- 89 -

6.2.4 Configuring the native applicationConfigure the native application. Refer to the Installation Guide for details.
Point
In the AR server account settings explained in the Installation Guide, set the AR server account used in the sample application.
6.3 Managing data of the sample applicationUse the data management console to register data in the system. Follow the procedure below to register data:
1. Assign the AR marker.Assign the AR marker to be used in the sample application.
2. Register a scenario.Register data for the scenario used in the sample application.
3. Register scenes.Register the scenes used in the sample application.
4. Register files.Register the image files to be used in the sample application.
5. Authoring.Register AR overlay definitions to be used in the sample.
6. Create a user-defined table.Create a user-defined table to be used in the sample application.
See
Refer to the Operator's Guide for details on how to use the data management console.
Note
- If you enter different values for the data to be used by the sample application, the application may not operate properly.Enter the data exactly as described in this chapter.
- You can change the scenario ID to be used by changing the value of Apl.useScenarioId in apl.js.
- Do not change the scene IDs or marker IDs.
- The sample application does not use the data entered for assigning a marker, so it runs even if you do not enter any data.
- AR overlay definition names are used for embedding user-defined data, so a null check is performed. If you leave thenames blank, nothing is displayed. You should therefore always enter names.
6.3.1 Assigning the AR markerUse the data management console to edit the AR marker with ID1, download it, and then print it.
Table 6.1 Content to be entered for the AR marker (AR marker ID1)
Item Content to be entered
AR marker name Job sample_Equipment A
Location Basement 1, Kawasaki Plant
State Change to Used.
- 90 -

Point
Alias is optional, so you need not enter it to the sample application.
6.3.2 Registering a scenarioUse the data management console to register the following scenario data.
Table 6.2 Content to be entered for the scenario (inspection work)
Item Content to be entered
Scenario ID 1
Scenario name Inspection work
Description Job sample_Inspection work scenario
6.3.3 Registering scenesUse the data management console to register the following scenes for the Inspection work scenario:
Table 6.3 Scene list in inspection work
Item Content to be entered
Scene ID 1 2 3 4
Scenename
Operate valves Check interior Check value Enter temperature
Description
Turn the valveclockwise.
Open the door andcheck the interior.
Check the monitorvalue.
Enter the temperature.
6.3.4 Registering filesUse the data management console to register the following files in the server. These files are used for authoring, so recordthe URLs of registered files.
Table 6.4 Files to be registered
File name MIME type
INPUT.png image/png
MANUAL.pdf application/pdf
MANUALPOP.png image/png
MOVIE.mp4 video/mp4
MOVIEPOP.png image/png
PICTURE.jpg image/jpeg
THUMBNAIL.jpg image/jpeg
6.3.5 AuthoringUse server authoring from the data management console to create AR overlay definitions in the sample application.
6.3.5.1 Operate valves scene1. Click the Inspection work scenario.
2. On the scene list, click Operate valves.
- 91 -

3. Create the following AR overlay definitions:
Figure 6.2 Example overlay for operating valves
Add "Job sample_valve arrow"
Click Add shape and enter the following content:
Item Content to be entered
Basic information AR overlay definition name Job sample_valve arrow
AR marker ID 1
Select shape
Position information Projection 2D
Translation x 1.5
y 2.5
z 0.0
Rotation x 0.0
y 0.0
z 0.0
Scale x 0.2
y 0.2
z 0.2
Other Use tap action No
Add "Job sample_valve step"
Click Add text and enter the following content:
- 92 -

Item Content to be entered
Basic information AR overlay definition name Job sample_valve step
AR marker ID 1
Text information Text Step 1: Turn the valve clockwise
Font size 20
Font color #[B00000] Transparency 255
Background color #[FFC0C0] Transparency 255
Text wrapping Enabled
Area height 80
Area width 160
Position information Projection 2D
Translation x 4.0
y 1.5
z 0.0
Rotation x 0.0
y 0.0
z 0.0
Scale x 1.0
y 1.0
z 1.0
Other Use tap action Yes
Script action Apl.shiftScene(true)
Add "Job sample_manual"
Click Add file and enter the following content:
Item Content to be entered
Basic information AR overlay definition name Job sample_manual
AR marker ID 1
Select file URL URL of MANUALPOP.png
Position information Projection 2D
Translation x 1.0
y 0.0
z 0.0
Rotation x 0.0
y 0.0
z 0.0
Scale x 0.5
y 0.5
z 0.5
Other Use tap action Yes
- 93 -

Item Content to be entered
URL action URL of MANUAL.pdf
6.3.5.2 Check interior scene1. Click the Inspection work scenario.
2. On the scene list, click Check interior.
3. Create the following AR overlay definitions:
Figure 6.3 Example overlay for checking the interior
Add "Job sample_check int arrow"
Click Add shape and enter the following content:
Item Content to be entered
Basic information AR overlay definition name Job sample_check int arrow
AR marker ID 1
Select shape
Position information Projection 2D
Translation x 0.0
y 2.0
z -0.5
Rotation x 0.0
y 0.0
z 90.0
Scale x 0.2
- 94 -

Item Content to be entered
y 0.2
z 0.2
Other Use tap action No
Add "Job sample_check int step"
Click Add text and enter the following content:
Item Content to be entered
Basic information AR overlay definition name Job sample_check int step
AR marker ID 1
Text information Text Step 2: Open the door and check the interior
Font size 20
Font color #[B00000] Transparency 255
Background color #[FFC0C0] Transparency 255
Text wrapping Enabled
Area height 80
Area width 160
Position information Projection 2D
Translation x 4.0
y 1.5
z 0.0
Rotation x 0.0
y 0.0
z 0.0
Scale x 1.0
y 1.0
z 1.0
Other Use tap action Yes
Script action Apl.shiftScene(true)
Add "Job sample_check interior"
Click Add file and enter the following content:
Item Content to be entered
Basic information AR overlay definition name Job sample_check interior
AR marker ID 1
Select file URL URL of MOVIEPOP.png
Position information Projection 2D
Translation x 4.0
y -1.0
z 0.0
Rotation x 0.0
- 95 -

Item Content to be entered
y 0.0
z 0.0
Scale x 0.5
y 0.5
z 0.5
Other Use tap action Yes
URL action URL of MOVIE.mp4
6.3.5.3 Check value scene1. Click the Inspection work scenario.
2. On the scene list, click Check value.
3. Create the following AR overlay definitions:
Figure 6.4 Example overlay for checking the value
Add "Job sample_check value step"
Click Add text and enter the following content:
Item Content to be entered
Basic information AR overlay definition name Job sample_check value step
AR marker ID 1
Text information Text Step 3: Check the monitor value
Font size 20
Font color #[B00000] Transparency 255
Background color #[FFC0C0] Transparency 255
- 96 -

Item Content to be entered
Text wrapping Enabled
Area height 80
Area width 160
Position information Projection 2D
Translation x 4.0
y 1.5
z 0.0
Rotation x 0.0
y 0.0
z 0.0
Scale x 1.0
y 1.0
z 1.0
Other Use tap action Yes
Script action Apl.shiftScene(true)
Add "Job sample_check value"
Click Add file and enter the following content:
Item Content to be entered
Basic information AR overlay definition name Job sample_check value
AR marker ID 1
Select file URL URL of THUMBNAIL.jpg
Position information Projection 2D
Translation x 2.0
y -1.0
z 0.0
Rotation x 0.0
y 0.0
z 0.0
Scale x 0.5
y 0.5
z 0.5
Other Use tap action Yes
URL action URL of PICTURE.jpg
6.3.5.4 Enter temperature scene1. Click the Inspection work scenario.
2. On the scene list, click Enter temperature.
3. Create the following AR overlay definitions:
- 97 -

Figure 6.5 Example overlay for entering the temperature
Add "Job sample_enter inspect val"
Click Add File and enter the following content:
Item Content to be entered
Basic information AR overlay definition name Job sample_enter inspect val
AR marker ID 1
Select file URL URL of INPUT.png
Position information Projection 2D
Translation x 1.5
y 0.0
z 0.0
Rotation x 0.0
y 0.0
z 0.0
Scale x 0.5
y 0.5
z 0.5
Other Use tap action Yes
Script action Apl.changeCommentpage()
Add "Job sample_enter insp val step"
Click Add Text and enter the following content:
Item Content to be entered
Basic information AR overlay definition name Job sample_enter insp val step
- 98 -

Item Content to be entered
AR marker ID 1
Text information Text Step 4: Enter the temperature
Font size 20
Font color #[B00000] Transparency 255
Background color #[FFC0C0] Transparency 255
Text wrapping Enabled
Area height 80
Area width 160
Position information Projection 2D
Translation x 4.0
y 1.5
z 0.0
Rotation x 0.0
y 0.0
z 0.0
Scale x 1.0
y 1.0
z 1.0
Other Use tap action Yes
Script action Apl.shiftScene(true)
Add "Job sample_inspection value"
Click Add Text and enter the following content:
Item Content to be entered
Basic information AR definition data name Job sample_inspection value
AR marker ID 1
Text information Text Not registered
Font size 20
Font color #[000080] Transparency 255
Background color #[AFEEEE] Transparency 255
Text wrapping Enabled
Area height 80
Area width 160
Position information Projection 2D
Translation x 4.0
y -1.5
z 0.0
Rotation x 0.0
y 0.0
- 99 -

Item Content to be entered
z 0.0
Scale x 1.0
y 1.0
z 1.0
Other Use tap action No
6.3.6 Create a user-defined tableUse the data management console to create the following user-defined table usr_sample.
Table 6.5 Attributes of the user-defined table usr_sample
Attribute name Data type
ar_id LONG
ar_name STRING
ar_description STRING
ar_registrationtime LONG
ar_modificationtime LONG
usr_name STRING
usr_temperature LONG
6.4 Running the sample applicationUse the smart device to run the overlay application. The sample application enables you to trial online jobs and offline jobs.
If you click AR Client Authoring at startup, you can call the client authoring tool from the sample application.
6.4.1 Printing the AR marker location sheetPrint the AR marker location sheet (background.pdf) and place the AR marker in the specified location.
6.4.2 Online jobsFollow the procedure below to run online jobs:
1. Put the smart device online.
2. Start the sample application that you installed.
3. Tap Overlay application.
4. Enter the URL where you placed the overlay application to the ServerURL input form.
Example
- If using SSL encryption for communications on Model A:
https://arServerName:httpsListenerPortNumber/webapp/index.html
- If not using SSL encryption for communications on Model A:
http://arServerName:httpListenerPortNumber/webapp/index.html
- 100 -

- If using SSL encryption for communications on Model B/C/D:
https://webServerName:webServerHttpsPort/webapp/index.html
- If not using SSL encryption for communications on Model B/C/D:
http://webServerName:webServerHttpPort/webapp/index.html
5. Tap Start AR and ensure that index.html is displayed.
6. In index.html, perform the following tasks:
- Ensure that Server Connection Mode is displayed.
- Click Inspection work to redirect to prework.html.
- 101 -

7. In prework.html, click Start work.
8. When work.html is displayed, perform the following tasks.
1. Scene 1
1. Hold the smart device up to the AR marker.
2. Ensure that Step 1: Operate valves is displayed at the top of the screen.
3. Tap View manual to display the manual.
- 102 -

4. Click Next.
2. Scene 2
1. Hold the smart device up to the AR marker.
2. Ensure that Step 2: Check interior is displayed at the top of the screen.
3. Tap View video to display a video.
4. Click Next.
3. Scene 3
1. Hold the smart device up to the AR marker.
2. Ensure that Step 3: Check value is displayed at the top of the screen.
3. Tap View image to display an image.
4. Click Next.
4. Scene 4
1. Hold the smart device up to the AR marker.
2. Ensure that Step 4: Enter temperature is displayed at the top of the screen.
3. Tap Enter inspection value to redirect to comment.html.
9. In comment.html, enter the inspection value.
10. In work.html, ensure that the inspection result you just entered is overlaid.
6.4.3 Offline jobsFollow the procedure below to run offline jobs:
1. Put the smart device online.
2. Start the sample application that you installed.
3. Tap Overlay application.
- 103 -

4. Enter the URL where you placed the overlay application to the ServerURL input form.
Example
- If using SSL encryption for communications on Model A:
https://arServerName:httpsListenerPortNumber/webapp/index.html
- If not using SSL encryption for communications on Model A:
http://arServerName:httpListenerPortNumber/webapp/index.html
- If using SSL encryption for communications on Model B/C/D:
https://webServerName:webServerHttpsPort/webapp/index.html
- If not using SSL encryption for communications on Model B/C/D:
http://webServerName:webServerHttpPort/webapp/index.html
5. Tap Start AR and ensure that index.html is displayed.
6. In index.html, perform the following tasks:
- Ensure that Server Connection Mode is displayed.
- Click Inspection work to redirect to prework.html.
7. In prework.html, click Prepare work.
8. Ensure that a download message is displayed, and close the application.
9. Set the smart device to flight mode to put it offline (refer to the relevant smart device manual for details).
10. Start the sample application again.
11. In index.html, perform the following tasks:
- Ensure that Stand-alone Mode is displayed.
- 104 -

- Click Inspection work to redirect to prework.html.
12. In work.html, perform the following tasks:
1. Scene 1
1. Hold the smart device up to the AR marker.
2. Ensure that Step 1: Operate valves is displayed at the top of the screen.
3. Tap View manual to display the manual.
4. Click Next.
2. Scene 2
1. Hold the smart device up to the AR marker.
2. Ensure that Step 2: Check interior is displayed at the top of the screen.
3. Tap View video to display a video.
4. Click Next.
3. Scene 3
1. Hold the smart device up to the AR marker.
2. Ensure that Step 3: Check value is displayed at the top of the screen.
3. Tap View image to display an image.
4. Click Next.
4. Scene 4
1. Hold the smart device up to the AR marker.
2. Ensure that Step 4: Enter temperature is displayed at the top of the screen.
3. Tap Enter inspection value to redirect to comment.html.
13. In comment.html, enter the inspection value.
- 105 -

14. Click OK and ensure that a dialog box prompting you to upload the data in server connection mode is displayed.
- 106 -