developer’s guide to building vapps and virtual · pdf filelinux ‐based virtual ......
TRANSCRIPT
Developer’s Guide to Building vAppsand Virtual Appliances
VMware Studio 2.0
EN-000207-00
VMware, Inc.3401 Hillview Ave.Palo Alto, CA 94304www.vmware.com
2 VMware, Inc.
Developer’s Guide to Building vApps and Virtual Appliances
You can find the most up-to-date technical documentation on the VMware Web site at:
http://www.vmware.com/support/
The VMware Web site also provides the latest product updates.
If you have comments about this documentation, submit your feedback to:
© 2008-2009 VMware, Inc. All rights reserved. This product is protected by U.S. and international copyright and intellectual property laws. VMware products are covered by one or more patents listed at http://www.vmware.com/go/patents.
VMware, the VMware “boxes” logo and design, Virtual SMP, and VMotion are registered trademarks or trademarks of VMware, Inc. in the United States and/or other jurisdictions. All other marks and names mentioned herein may be trademarks of their respective companies.
VMware, Inc. 3
Contents
About This Book 7
1 Introduction to VMware Studio 9Overview 9
What is a vApp? 9
What is a Virtual Appliance? 10
Audience for VMware Studio 10
Key Features 11
Architecture of VMware Studio 12
Virtual Appliance Management Infrastructure (VAMI) 12
Build System 13
VMware Studio Plugin for Eclipse 13
Integration with VMware Update Manager 14
Roadmap of This Manual 14
Linux and Eclipse Developers 14
Windows Developers 14
Developers Planning to Build vApps 14
Automating Builds from the Command Line 14
ISVs Shipping Virtual Appliances 14
2 Getting Started with VMware Studio 15Prerequisites 15
Deploying VMware Studio 16
Deployment Options 16
Supported Distribution Formats 17
Deployment Procedure 18
Security of Self‐Signed SSL Certificate 18
Modifying the Network and Time Zone Settings 19
Choosing Between DHCP and Static Network Addresses 19
Configuring Static IP Addresses 19
Configuring the Network Proxy 19
Configuring DHCP 20
Setting the Time Zone 20
Using VMware Studio Web Console 20
Accessing the VMware Studio Web Console 20
Shutting Down the VMware Studio Appliance 20
Setting Time Zone in the Web Console 21
Network Configuration 21
3 Building VMs and vApps Using VMware Studio 23Outline of VM Build Procedure 23
Outline of vApp Build Procedure 23
Acquiring the OS ISO 24
Requirements for Building 64‐Bit VMs 24
Output Formats 24
Supported Products to Run Generated VMs and vApps 24
VMware vSphere User Privileges for Provisioning 25
Developer’s Guide to Building vApps and Virtual Appliances
4 VMware, Inc.
Developing a Linux‐Based VM
4 Creating a Linux‐Based VM 29Overview 29
Prerequisites – OS and Application 29
Accessing the Web Console 29
Operating System ISO Image 30
Application Packages 30
Creating a VM Build Profile 31
Web Console Tab Reference 32
Description Tab 33
Hardware Tab 34
OS Tab 35
Application Tab 36
Management Tab 36
Output Tab 38
Build Settings Tab 39
Building a VM from the Build Profile 41
Testing the Generated VM 41
Reiterating the Build Process 42
Using Existing VM as Input 42
Migrating Build Profiles from VMware Studio 1.0 42
VMware Tools Installed in a Generated VM 43
5 Packaging a Linux Application 45VMware Studio Make Package (mkpkg) Tool 45
Options of the Make Package Tool 45
Example of Creating a DEB Package 46
Example of Creating an RPM Package 47
Operating System Native Tools 48
DEB Native Packaging 48
RPM Native Packaging 48
TAR Archive as Input Format 49
6 Adding a Linux Management Service 51VMware Studio Management Service 51
Default Management Services 52
Creating a Management Service 52
service.xml 53
view.xml 53
Management Services with Eclipse 54
Importing a Management Service 54
7 Managing the Linux Update Repository 55Overview of Updates 55
Generating an Update 56
Updates on CDROM 57
Updates Requiring Reboot 58
Publishing an Update 58
Publishing an Update Repository from ZIP 58
Testing Against a Staging Update Repository 59
Update Repository Format 60
Supporting Central Updates with VMware Update Manager 60

VMware, Inc. 5
Contents
8 Using the VMware Studio Plugin for Eclipse 61Requirements of VMware Studio Plugin for Eclipse 61
Getting Started with VMware Studio Plugin for Eclipse 61
Packaging Applications to Run In a Virtual Machine 62
Creating Management Services 63
Additional Eclipse Features 63
Uninstalling the Eclipse Plugin 64
Developing a Windows‐Based VM
9 Creating a Windows‐Based VM 67Overview 67
Prerequisites – OS and Application 67
Accessing the Web Console 67
Operating System ISO Image 68
Windows Application Packages 68
Creating a VM Build Profile 68
Additional Fields for Windows Reference 69
OS Tab 69
Application Tab 71
Building a VM from the Build Profile 72
Testing the Generated VM 72
Reiterating the Build Process 73
10 Packaging a Windows Application 75About VMware Studio Package for Windows 75
Repository of Windows Application Packages 75
Creating a Windows Application Package 76
Registered Exit Codes 77
Environment Variables when installing Packages 77
Developing a vApp for vSphere
11 Creating a vApp from VM Builds 81Introduction to Building a vApp 81
Prerequisites 81
Creating a vApp Build Profile 81
Web Console Tab Reference 82
Description Tab 83
VMs Tab 83
Start Order Tab 84
Resources Tab 84
Output Tab 84
Building a vApp Build Profile 85
Testing the Generated vApp 86
Importing vApp Profiles 86
Developer’s Guide to Building vApps and Virtual Appliances
6 VMware, Inc.
12 Guidelines for Creating Virtual Appliances 87Outline of Virtual Appliance Build Procedure 87
VMware Recommendations 88
Choosing OVF Version 88
Choosing Virtual Hardware Version 88
User Accounts 88
Include Update Agent 88
Partitioning Disk for System and User Data 88
13 Building from the Command Line 89Using the Command Line 89
Managing Builds 91
Old Builds 91
Appendixes
A Management Services Web API 95Root Object 95
VAMI Container 95
vami.container.navigate 95
vami.container.logout 95
vami.container.newHistoryItem 96
vami.container.isLogin 96
vami.container.getUser 96
vami.container.getSessionID 96
VAMI Container Callbacks 96
vami.container.registerOnShowCallback 96
vami.container.registerOnHideCallback 97
vami.container.registerOnNavigateCallback 97
VAMI I/O 97
vami.io.httpGet 97
vami.io.httpPost 98
VAMI Log 98
vami.log.info 98
vami.log.warn 98
vami.log.error 99
B Security with SSH and SSL 101Installing SSH on Windows 101
Workstation 6.5 and Server 1.0 101
Checking Veracity of an SSL Certificate 102
C Editing XML Build Profiles 105Introduction 105
Structure of VM XML Build Profiles 106
Useful Attributes Not Displayed in the VMware Studio Web Console 113
Customizing the Footer in the Web Console 113
Creating Virtual Disks, Partitions, and Virtual Devices 114
Structure of vApp XML Build Profiles 116
D Troubleshooting 119Resolving VMware Studio Issues 119
Resolving Eclipse Plugin Issues 122
VMware, Inc. 7
VMware® Studio is an integrated development tool that takes existing software applications and packages
them into virtual machines and vApps that are ready to run and optimized for VMware product platforms.
This book, the Developer’s Guide to Building vApps and Virtual Appliances, provides information about creating
virtual machines and vApps using VMware Studio 2.0.
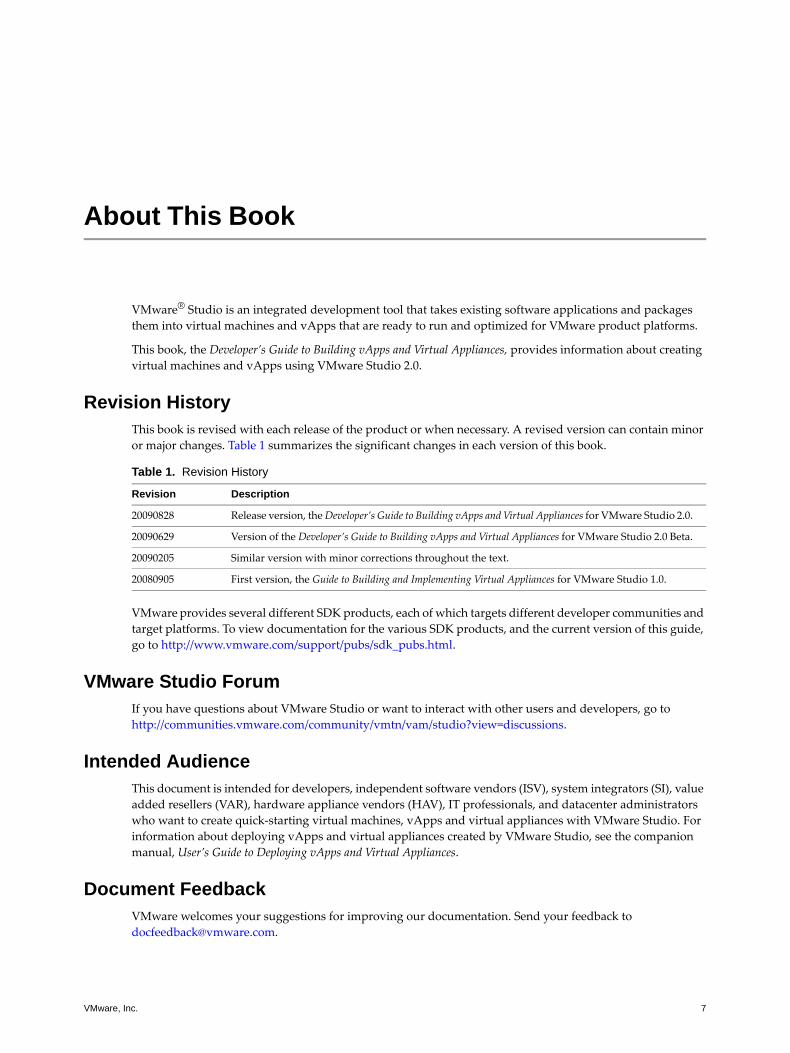
Revision HistoryThis book is revised with each release of the product or when necessary. A revised version can contain minor
or major changes. Table 1 summarizes the significant changes in each version of this book.
VMware provides several different SDK products, each of which targets different developer communities and
target platforms. To view documentation for the various SDK products, and the current version of this guide,
go to http://www.vmware.com/support/pubs/sdk_pubs.html.
VMware Studio ForumIf you have questions about VMware Studio or want to interact with other users and developers, go to
http://communities.vmware.com/community/vmtn/vam/studio?view=discussions.
Intended AudienceThis document is intended for developers, independent software vendors (ISV), system integrators (SI), value
added resellers (VAR), hardware appliance vendors (HAV), IT professionals, and datacenter administrators
who want to create quick‐starting virtual machines, vApps and virtual appliances with VMware Studio. For
information about deploying vApps and virtual appliances created by VMware Studio, see the companion
manual, User’s Guide to Deploying vApps and Virtual Appliances.
Document FeedbackVMware welcomes your suggestions for improving our documentation. Send your feedback to
About This Book
Table 1. Revision History
Revision Description
20090828 Release version, the Developer’s Guide to Building vApps and Virtual Appliances for VMware Studio 2.0.
20090629 Version of the Developer’s Guide to Building vApps and Virtual Appliances for VMware Studio 2.0 Beta.
20090205 Similar version with minor corrections throughout the text.
20080905 First version, the Guide to Building and Implementing Virtual Appliances for VMware Studio 1.0.

Developer’s Guide to Building vApps and Virtual Appliances
8 VMware, Inc.
Technical Support and Education ResourcesThe following sections describe the technical support resources available to you. To access the current versions
of other VMware books, go to http://www.vmware.com/support/pubs.
Online and Telephone Support
To use online support to submit technical support requests, view your product and contract information, and
register your products, go to http://www.vmware.com/support.
Support Offerings
To find out how VMware support offerings can help meet your business needs, go to
http://www.vmware.com/support/services.
VMware Professional Services
VMware Education Services courses offer extensive hands‐on labs, case study examples, and course materials
designed to be used as on‐the‐job reference tools. Courses are available onsite, in the classroom, and live
online. For onsite pilot programs and implementation best practices, VMware Consulting Services provides
offerings to help you assess, plan, build, and manage your virtual environment. To access information about
education classes, certification programs, and consulting services, go to http://www.vmware.com/services.
VMware, Inc. 9
1
This chapter includes the following topics:
“Overview” on page 9
“Architecture of VMware Studio” on page 12
“Roadmap of This Manual” on page 14
OverviewVMware Studio is an integrated development tool that takes existing software applications and packages them
into virtual machines and vApps that are ready to run and optimized for VMware product platforms.
VMware Studio can build both Linux‐based VMs and Windows‐based virtual machines and vApps, running
single tier or multitier applications.
Linux‐based virtual machines that VMware Studio generates contain an in‐guest management agent with a
Web console that an ISV can brand and ship as part of a customized virtual appliance. VMware Studio serves
as an extension to the ISV’s build system, generating automated builds of virtual machines and vApps
containing the latest software binaries. Virtual machines and vApps generated by VMware Studio are in an
industry‐standard format, enabling them to run on many virtualization platforms.
What is a vApp?
VMware recently introduced the vApp, a software solution optimized for the cloud OS. A vApp is a logical
entity composed of one or more virtual machines, which can be managed as a unit. The vApp specifies and
encapsulates components of a multitier application as well as the operational policies and service levels
associated with it. The vApp gives application owners a standard way to describe operational policies for an
application, which the cloud OS can consistently interpret and run. The vApp is a broad category of virtual
applications that are built by ISVs, system integrators, value‐added resellers, and onsite IT administrators.
The Open Virtualization Format (OVF) standard 1.0 is employed to represent a single virtual machine or
combination of multiple virtual machines. As implemented, draft OVF standard 0.9 cannot represent more
than one virtual machine. You can deploy a vApp through vCenter Server with the vSphere Client, or with
ovftool. VirtualCenter 2.5 and ESX/ESXi 3.5 supported OVF 0.9 only. You can run all or part of a vApp on ESX/ESXi 3.5 if you deploy the vApp through vCenter Server 4.
See http://www.vmware.com/appliances/learn/ovf.html for details about the OVF standard (DMTF DSP0243).
From a management perspective, a vApp acts like a virtual machine object. It has power operations, networks,
datastores, and its resource use can be configured. See the vApp chapter of vSphere Basic System Administration
for vApp management information.
From an implementation perspective, a vApp container is a specialized resource pool that is extended with
compute resources, product information, and importability. In the VMware vSphere API Reference, VirtualApp (the managed object type for vApp) contains virtual machines.
Introduction to VMware Studio 1
Developer’s Guide to Building vApps and Virtual Appliances
10 VMware, Inc.
What is a Virtual Appliance?
Virtual appliances are prebuilt software solutions, comprising one or more virtual machines and applications,
which are packaged, updated, maintained, and managed as a unit. Unlike traditional hardware appliances,
software appliances let customers easily acquire and deploy preintegrated solution stacks.
With virtual appliances, ISVs can create a single application stack, reducing the cost and complexity of
deployment and management. It is possible to ship preinstalled, preconfigured solutions that allow customers
to plug solutions into their computing environments. For customers, deploying and managing software is
easier when the applications are delivered in a virtual appliance. The following items summarize the benefits
of virtual appliances:
Accelerate time to market – Customers can quickly download and power‐on your virtual appliance.
Reduce distribution overhead – The same virtual appliance runs on most VMware product platforms.
Increase reliability – VMware Studio builds an optional update repository for automatic patching.
Enhance security – Appliances are less vulnerable to security breaches than a general‐purpose OS.
Lower support costs – Virtual appliances require little configuration and no maintenance.
Audience for VMware Studio
If you are a software developer at an ISV, VMware Studio can assist you in delivering your applications as
virtual appliances, quickly and effectively. If you are an information‐technology professional or system
administrator, VMware Studio can help you package existing operating systems and applications for your
virtualized datacenter for use within the enterprise. VMware Studio can build both Linux‐based VMs and
Windows‐based virtual machines and vApps, running single tier or multitier applications.
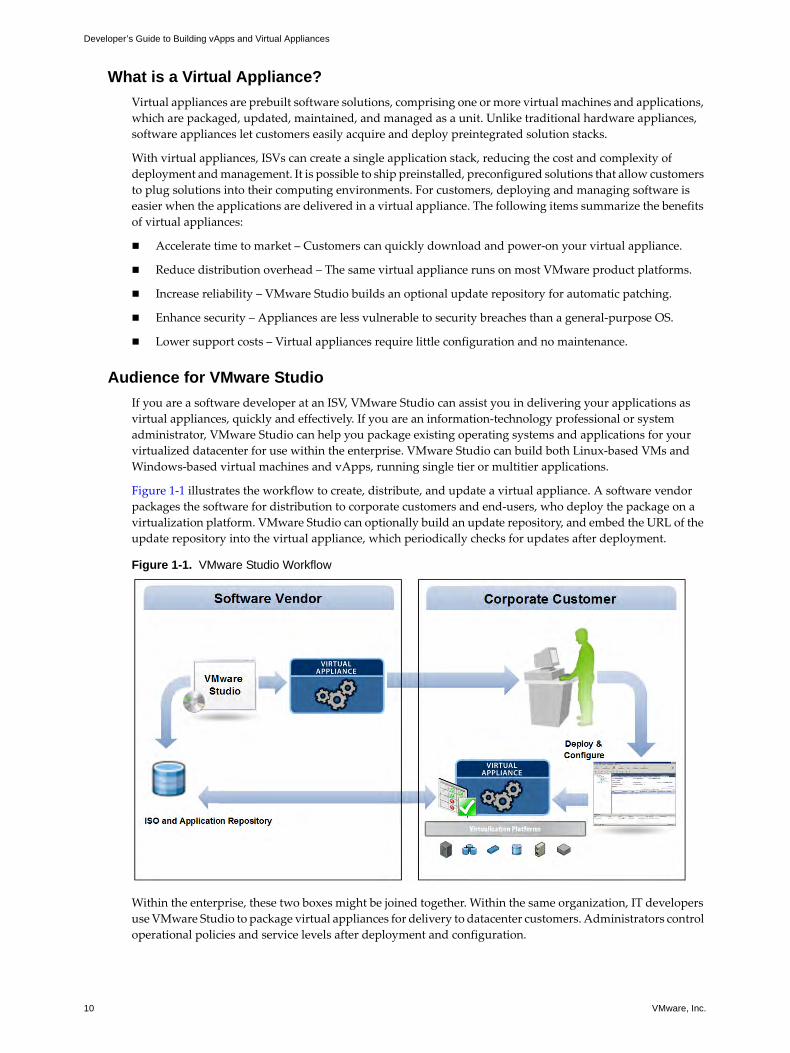
Figure 1‐1 illustrates the workflow to create, distribute, and update a virtual appliance. A software vendor
packages the software for distribution to corporate customers and end‐users, who deploy the package on a
virtualization platform. VMware Studio can optionally build an update repository, and embed the URL of the
update repository into the virtual appliance, which periodically checks for updates after deployment.
Figure 1-1. VMware Studio Workflow
Within the enterprise, these two boxes might be joined together. Within the same organization, IT developers
use VMware Studio to package virtual appliances for delivery to datacenter customers. Administrators control
operational policies and service levels after deployment and configuration.
VMware, Inc. 11
Chapter 1 Introduction to VMware Studio
Key Features
VMware Studio has interesting capabilities for ISVs building single or multiple‐VM appliances and for
developers who plan to create a standardized development environment by packaging the right version of
application stack components and tools into a virtual machine or vApp.
Build virtual appliances.
If you have an existing application or you are building a new application, VMware Studio can help you
virtualize it. If you are an ISV, you can create production‐ready virtual appliances that follow the best
practices and guidelines set by VMware. You can reach new markets and reduce the scope of hardware
platform tests by shipping your software as a virtual appliance.
Build vApps.
If you have multitier applications, it is not efficient to package them in a single virtual machine. As would
be the case with a physical environment, such applications must be packaged as a vApp. VMware Studio
enables creation of a vApp that can contain one or more virtual machines. VMware Studio allows you to
define the startup and shutdown order of these virtual machines, thereby enabling one‐click deployment
and power‐on of these virtual machines. VMware Studio permits you to define properties that are visible
to all the virtual machines contained in a vApp. For example in a multitier environment, a virtual machine
containing the application server must be aware of the IP address of a virtual machine containing the
database server. VMware Studio also allows you to define resource limits on these virtual machines.
Extend the in‐guest management framework.
VMware Studio 1.0 embedded a CIM‐based in‐guest management framework in Linux‐based VMs.
VMware Studio 1.0 provided an out‐of‐box network and proxy service, and an update service, as part of
this framework, the Virtual Appliance Management Infrastructure (VAMI). VMware Studio services were
accessible from the command line as well as from the Web console. VMware Studio 1.0 allowed authors
to rebrand and customize the look and feel of this Web console.
With VMware Studio 2.0, the VAMI framework and its Web console interface is now extensible. You can
plug your custom management service into the virtual machine or virtual appliance that you are building,
as required by your application. If your service has an associated Web interface, you can add this interface
so it is visible in the Web console. VMware Studio 2.0 provides this ability so appliance vendors can have
a single Web‐based console for appliance and application configuration and management. In addition,
this Web console can have a link to a Web application that you can package in the appliance.
Package complex applications for virtual environments.
Complex multitier applications can span across virtual machines, as they can span physical machines.
Components can run on different operating systems, communicating over the network. VMware Studio
helps you package multitier applications into a vApp that runs efficiently under VMware vSphere.
Automatically resolve package dependencies.
VMware Studio builds a VM starting from its minimal OS footprint. VMware Studio can inspect
application packages and, if they contain the correct set of OS package dependencies as specified, it
installs those packages into the virtual machine being built. Additionally if these OS packages have more
dependencies on other OS packages, VMware Studio makes sure that all required packages get installed,
provided they are available in the ISO image of the OS.
VMware Studio Plugin for Eclipse IDE.
Eclipse and other IDEs provide various tools required during application development, the last phase
being compilation of binaries. Developers traditionally copy these binaries by hand into their test
environment. In the example of multitier application server and database, this involves copying twice.
Testing is an iterative process during development. To aid these processes, VMware Studio is now also
available as a plugin to the popular Eclipse IDE. The Studio plugin for Eclipse enables developers to
package their application binaries and deploy them quickly into a virtual machine or a vApp. The
VMware Studio Plugin for Eclipse helps developers automate the deployment process, moving forward
toward integration of development and test environments.
Developer’s Guide to Building vApps and Virtual Appliances
12 VMware, Inc.
Existing VM as input.
VMware Studio 2.0 provides the unique ability of not requiring developers to build a virtual machine
from the beginning each time. After you have a virtual machine built with VMware Studio 2.0, it can serve
as input for the next build, if you so choose. This ability saves time when you change only the contents
(or application mix) of a virtual machine.
Support for a wide range of VMware provisioning engines.
VMware Studio 1.0 required VMware Server 1.0.x to be installed for building virtual machines. With
VMware Studio 2.0, you can now use many other existing VMware virtualization products to generate
automated builds of virtual machines and virtual appliances: VMware Server, VMware Workstation,
ESX/ESXi hosts, VMware Infrastructure, and new vSphere environments.
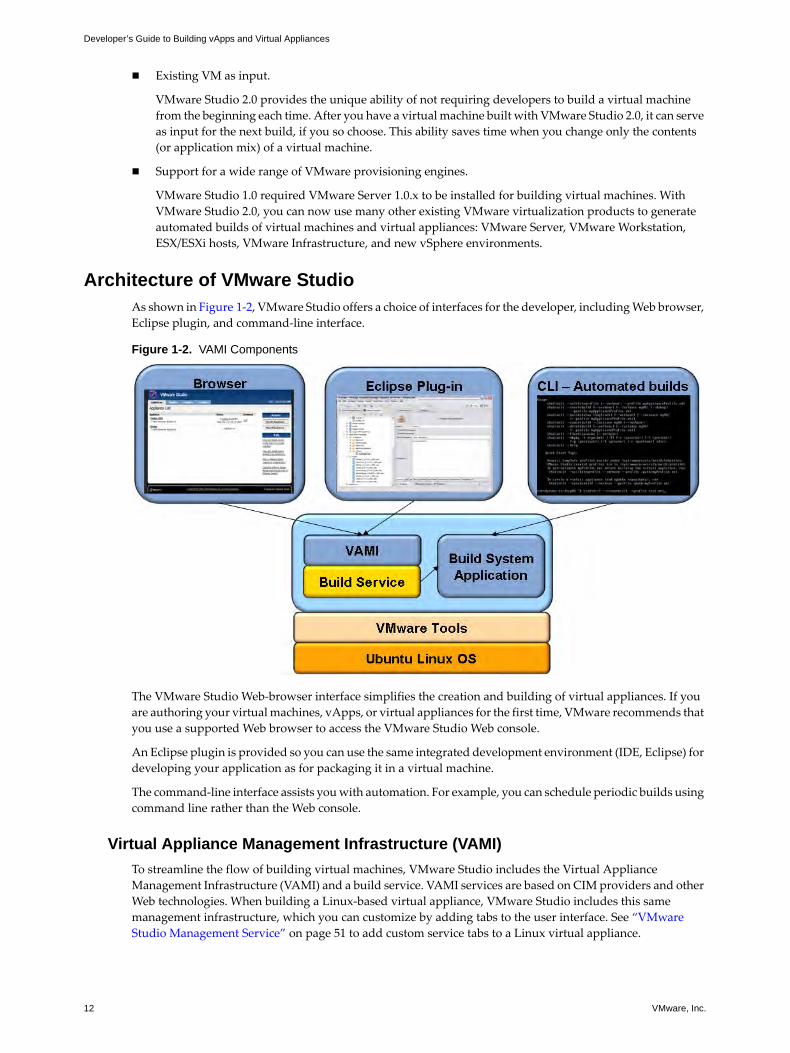
Architecture of VMware StudioAs shown in Figure 1‐2, VMware Studio offers a choice of interfaces for the developer, including Web browser,
Eclipse plugin, and command‐line interface.
Figure 1-2. VAMI Components
The VMware Studio Web‐browser interface simplifies the creation and building of virtual appliances. If you
are authoring your virtual machines, vApps, or virtual appliances for the first time, VMware recommends that
you use a supported Web browser to access the VMware Studio Web console.
An Eclipse plugin is provided so you can use the same integrated development environment (IDE, Eclipse) for
developing your application as for packaging it in a virtual machine.
The command‐line interface assists you with automation. For example, you can schedule periodic builds using
command line rather than the Web console.
Virtual Appliance Management Infrastructure (VAMI)
To streamline the flow of building virtual machines, VMware Studio includes the Virtual Appliance
Management Infrastructure (VAMI) and a build service. VAMI services are based on CIM providers and other
Web technologies. When building a Linux‐based virtual appliance, VMware Studio includes this same
management infrastructure, which you can customize by adding tabs to the user interface. See “VMware
Studio Management Service” on page 51 to add custom service tabs to a Linux virtual appliance.

VMware, Inc. 13
Chapter 1 Introduction to VMware Studio
Build System
To create a VM or a vApp, you formulate a build profile using the VMware Studio Web console or Eclipse
interface. The build profile specifies the ISO image of a Linux or Windows operating system and the software
applications to run on that operating system. For a Linux‐based VM, the build profile also specifies in‐guest
services, in other words VAMI. The left side of Figure 1‐3 shows inputs to the build system.
Figure 1-3. VMware Studio Architecture
Before you build a VM or vApp, VMware Studio validates the build profile. To provision a VM, the build
system uses a VMware product platform to create a virtual machine from the operating system ISO and the
application set you specify. A successful VM build is exported to a network‐accessible location on the VMware
Studio appliance. This VM contains the OS and application packages as defined in build profile. The VM also
has boot scripts configured, the in‐guest management framework embedded, and is customized according to
specifications of your build profile.
On VMware product platforms that support the vSphere API (formerly the VIM API), the build system uses
the ovftool to create and transport the VM. On VMware product platforms that do not support the vSphere
API, the build system uses the VIX API to create and transport the VM.
To create a vApp, the build system takes a set of VM build profiles or successfully built VMs, and packages
them together with an OVF descriptor. As the developer of a vApp, you can specify start order and resource
allocation for the constituent VMs and applications, but many aspects of the vApp remain flexible until the
administrator decides at deployment time, including where various parts of the vApp run and how their
network connections are made.
VMware Studio Plugin for Eclipse
VMware Studio 2.0 provides an optional plugin for Eclipse that can be used with the Eclipse IDE. The plugin
serves as a bridge between the Eclipse IDE and VMware Studio to create VMs and vApps that include software
binaries that you compile in the Eclipse environment. To get started using the Eclipse interface, see Chapter 8,
“Using the VMware Studio Plugin for Eclipse,” on page 61.

Developer’s Guide to Building vApps and Virtual Appliances
14 VMware, Inc.
Integration with VMware Update Manager
VMware Update Manager (VUM) integrates with VMware Studio’s update service to enable centralized
management of virtual appliance updates. VUM 3.5 and later provide default virtual‐appliance upgrade
baselines to scan and upgrade a virtual appliance to the latest released or critical‐update version. VUM also
lets you create virtual‐appliance upgrade baselines. Similar statements are true for the updating of vApps.
In the VUM documentation, vApps are treated as container objects of virtual machines or virtual appliances.
For more information about VUM 4.0, see http://www.vmware.com/support/pubs/vum_pubs.html.
Roadmap of This ManualTo deploy and configure VMware Studio, read Chapter 2, “Getting Started with VMware Studio,” on page 15.
To get an overview of the inputs to and results of the build system and the build process in general, read
Chapter 3, “Building VMs and vApps Using VMware Studio,” on page 23.
Linux and Eclipse Developers
Linux developers can continue with Chapter 4, “Creating a Linux‐Based VM,” on page 29. To create Linux
packages for inclusion in this Linux‐based VM, see Chapter 5, “Packaging a Linux Application,” on page 45.
Developers who want to create custom management services for inclusion in the appliance Web console of the
Linux‐based VM can read Chapter 6, “Adding a Linux Management Service,” on page 51.
Developers familiar with the Eclipse IDE can use the VMware Studio Plugin for Eclipse to easily package
applications in the form of virtual appliances. Development, testing, and packaging can be done with the
Eclipse IDE. To learn more, see Chapter 8, “Using the VMware Studio Plugin for Eclipse,” on page 61.
Windows Developers
Windows developers can continue instead with Chapter 9, “Creating a Windows‐Based VM,” on page 67.
To create Windows application packages for inclusion in this Windows‐based VM, see Chapter 10, “Packaging
a Windows Application,” on page 75.
Developers Planning to Build vApps
Developers planning to build multiple‐VM vApps should in addition read Chapter 11, “Creating a vApp from
VM Builds,” on page 81.
Automating Builds from the Command Line
Developers and ISVs wanting to generate nightly builds of virtual machines, vApps, and virtual appliances
with their latest application software binaries should read Chapter 13, “Building from the Command Line,”
on page 89.
ISVs Shipping Virtual Appliances
ISVs planning to build virtual appliances should read, in addition to other relevant chapters, Chapter 12,
“Guidelines for Creating Virtual Appliances,” on page 87. When shipping virtual appliances, ISVs might plan
on establishing an update repository to remotely publish patches for virtual appliances deployed in customer
environments. To create the update repository and learn details about the update process, read Chapter 7,
“Managing the Linux Update Repository,” on page 55.

VMware, Inc. 15
2
This chapter describes how to deploy and configure VMware Studio, and contains the following topics:
“Prerequisites” on page 15
“Deploying VMware Studio” on page 16
“Modifying the Network and Time Zone Settings” on page 19
“Using VMware Studio Web Console” on page 20
PrerequisitesTo run VMware Studio and provision virtual appliances, the following are required:
You can download the VMware Studio software package from the VMware Web site, in your choice of
formats: OVF 0.9, OVF 1.0, OVA, or ZIP. You must use ZIP for hosted products like VMware Server and
VMware Workstation. Optionally, if you are using Eclipse, you can download the VMware Studio Plugin
for Eclipse. See http://www.vmware.com/support/developer/studio for the download location.
VMware Studio supports one of these virtualization product platforms for building (provisioning) VMs.
The provisioning platform that you use to create a VM must be capable of running the finished VM.
VMware ESX/ESXi 4.0
VMware ESX/ESXi 3.5 U3
For ESXi 4.0 and ESXi 3.5 U4 or later, an evaluation or paid license is required. The free ESXi license
does not provide the capabilities that Studio needs for provisioning.
VMware Workstation 6.5.1
VMware Server 2.0
VMware Server 1.0.x
Prerequisites if you are provisioning with VMware Workstation 6.5:
An SSH daemon (SSHD) must be enabled on the host of VMware Workstation. If Workstation is
hosted on a Windows system, see “Installing SSH on Windows” on page 101.
Ports 7 and 22 must be open.
If your VMware Workstation is running on a Windows host, start the SSHD service (on the Windows
host) with the option Allow service to interact with desktop.
You must designate the user who is currently logged into your host running VMware Workstation as
the provisioning user for VMware Studio.
Getting Started with VMware Studio 2

Developer’s Guide to Building vApps and Virtual Appliances
16 VMware, Inc.
Prerequisites if you are provisioning with VMware Server 1.0.x:
An SSH daemon (SSHD) must be enabled on the host of VMware Server. If the VMware Server is
hosted on a Windows system, see “Installing SSH on Windows” on page 101.
Ports 7 and 22 must be open.
Approximately 32GB of available storage space where you deploy VMware Studio.
The following ports on the VMware Studio appliance are used to access the Web console and build VMs:
22 ssh tcp
80 http tcp
5480 https tcp
5488 http 5489 https tcp (for internal communication between lighttpd and SFCB)
VMware Studio requires the following ports to be open on the host running the provisioning product:
7 echo tcp, 22 ssh tcp (for VMware Server 1.0.x and VMware Workstation). On most Linux hosts port
22 is open by default, but port 7 is not, but you can edit /etc/sysconfig/iptables to open port 7. On Windows you can add a firewall exception for echo on port 7 and ssh on port 22.
443 https tcp (for VMware ESX/ESXi and VirtualCenter or vCenter Server)
902 vix tcp
8333 https tcp (for VMware Server 2.0)
Supported browsers:
Internet Explorer 6 or 7
Mozilla Firefox 2 or 3
Deploying VMware StudioHow you deploy VMware Studio depends on the provisioning platform you use.
Deployment Options
For simplicity of configuration, you can deploy VMware Studio on the same virtualization product platform
that you plan to use for building VMs. You can also deploy VMware Studio on a different virtualization
platform than the one used for building VMs. For example, if you are running VMware Studio on 32‐bit
hardware, but you are building a 64‐bit virtual machine, you can set the provisioning platform to a remote
64‐bit system. As another example, the remote system might be lightly loaded and capable of faster builds.
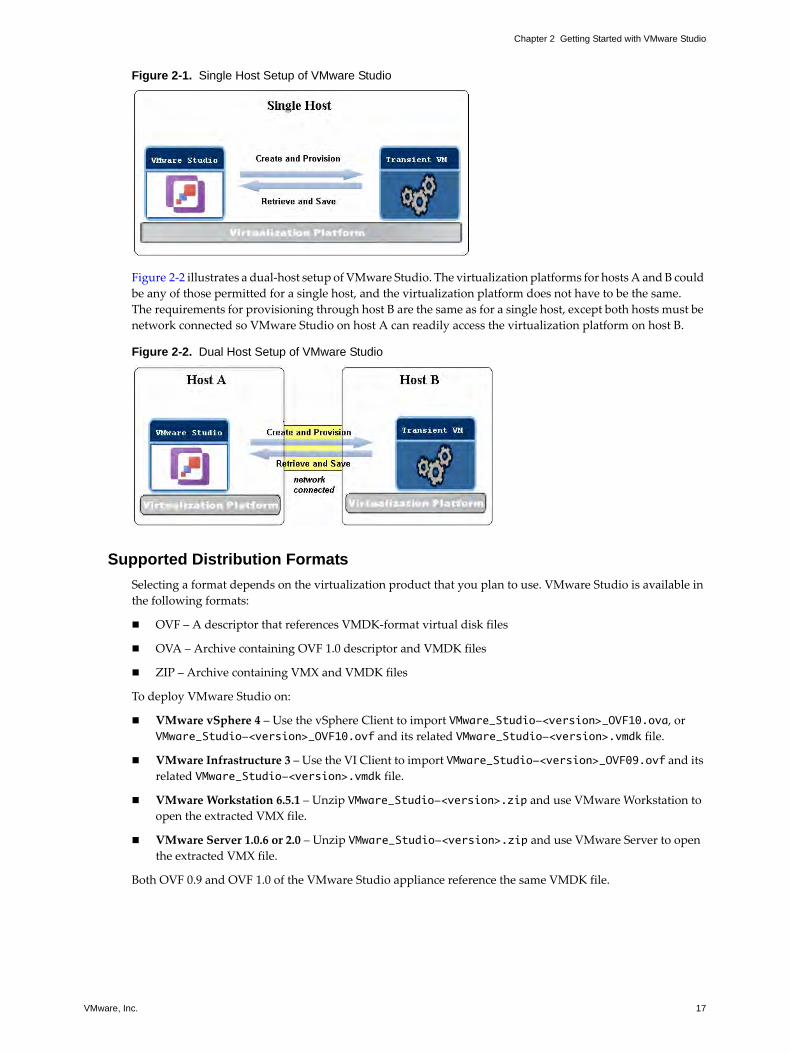
Figure 2‐1 illustrates the simplest setup of VMware Studio. The virtualization platform could be a VMware
vCenter Server, ESX/ESXi, VMware Server (Linux or Windows), or VMware Workstation (Linux or Windows).
For VMware Server 1.0.x and VMware Workstation, a key requirement is an SSH server on the platform’s host
to allow SSH and SCP operations by VMware Studio. VMware vCenter Server and ESX/ESXi hosts do not
impose a requirement to set up an SSH server; the only requirement is a user with adequate permissions for
provisioning. See “VMware vSphere User Privileges for Provisioning” on page 25 for a list of privileges.
VMware, Inc. 17
Chapter 2 Getting Started with VMware Studio
Figure 2-1. Single Host Setup of VMware Studio
Figure 2‐2 illustrates a dual‐host setup of VMware Studio. The virtualization platforms for hosts A and B could
be any of those permitted for a single host, and the virtualization platform does not have to be the same.
The requirements for provisioning through host B are the same as for a single host, except both hosts must be
network connected so VMware Studio on host A can readily access the virtualization platform on host B.
Figure 2-2. Dual Host Setup of VMware Studio
Supported Distribution Formats
Selecting a format depends on the virtualization product that you plan to use. VMware Studio is available in
the following formats:
OVF – A descriptor that references VMDK‐format virtual disk files
OVA – Archive containing OVF 1.0 descriptor and VMDK files
ZIP – Archive containing VMX and VMDK files
To deploy VMware Studio on:
VMware vSphere 4 – Use the vSphere Client to import VMware_Studio-<version>_OVF10.ova, or VMware_Studio-<version>_OVF10.ovf and its related VMware_Studio-<version>.vmdk file.
VMware Infrastructure 3 – Use the VI Client to import VMware_Studio-<version>_OVF09.ovf and its related VMware_Studio-<version>.vmdk file.
VMware Workstation 6.5.1 – Unzip VMware_Studio-<version>.zip and use VMware Workstation to
open the extracted VMX file.
VMware Server 1.0.6 or 2.0 – Unzip VMware_Studio-<version>.zip and use VMware Server to open
the extracted VMX file.
Both OVF 0.9 and OVF 1.0 of the VMware Studio appliance reference the same VMDK file.

Developer’s Guide to Building vApps and Virtual Appliances
18 VMware, Inc.
Deployment Procedure
The procedure for deploying VMware Studio is different for the OVF or OVA package than for the ZIP file.
To deploy VMware Studio from OVF or OVA
1 The OVF or OVA format of VMware Studio can be deployed directly from the VMware download Web
server. Alternatively the VMware Studio OVA, or OVF and its associated VMDK file, can be downloaded
to a local Web server or Windows machine where the VMware vSphere or VMware Infrastructure Client
can access it for deploying the appliance. If you decide to download the OVF format of VMware Studio
appliance to a local machine, place the OVF and its associated VMDK file in the same directory.
2 For VMware vSphere 4, run the VMware vSphere Client and select menu File > Deploy OVF Template.
For VMware Infrastructure, run the VMware Infrastructure Client and select
File > Virtual Appliance > Import. In either case, a wizard guides you through deployment.
3 Power on the VMware Studio virtual machine.
4 As the virtual machine starts, the VMware Studio end‐user license agreement (EULA) appears on the
virtual machine console. Press the space bar to continue displaying more pages. At the end, type yes and press Enter to accept the EULA.
5 When it asks you to enter a new password for the root account, type a password. Retype the password at
the second prompt. VMware Studio requires the root (superuser) account to build virtual machines.
The VMware Studio welcome screen appears. By default VMware Studio tries to acquire an IP address
from a DHCP server. If you prefer a static IP address, see “Configuring Static IP Addresses” on page 19.
6 Write down the IP address that appears there, Interfaces to VMware Studio: [Web] http://<IP.address>,
because you need this URL to access the VMware Studio Web console. The given http URL redirects to https port 5480.
7 You might want to set a network proxy, change the time zone, or configure a static IP address. For details,
see “Modifying the Network and Time Zone Settings” on page 19.
To deploy VMware Studio from ZIP
1 Download VMware_Studio-<version>.zip to the host of VMware Server or VMware Workstation,
extract the ZIP file to a directory, for example
/var/lib/vmware/VirtualMachines/VMware_Studio-2.0.0 on a Linux host or C:\MyVirtualMachines\VMware_Studio-2.0.0 on a Windows host.
2 In VMware Workstation or the VMware Server Console application, select menu File > Open.
3 Click Browse, navigate to the directory where you extracted the VMware Studio virtual machine, select
VMware_Studio-<version>.vmx and click Open.
4 Power on the VMware Studio virtual machine.
5 Continue with Step 4 of the OVF or OVA deployment.
You are now ready to begin developing with VMware Studio.
Security of Self-Signed SSL Certificate
The VMware Studio appliance is delivered with a self‐signed SSL certificate. If you are developing on a trusted
network, you can choose accept the certificate without verification.
To verify the authenticity of the network connections you are making when developing with VMware Studio,
see “Checking Veracity of an SSL Certificate” on page 102.
VMware, Inc. 19
Chapter 2 Getting Started with VMware Studio
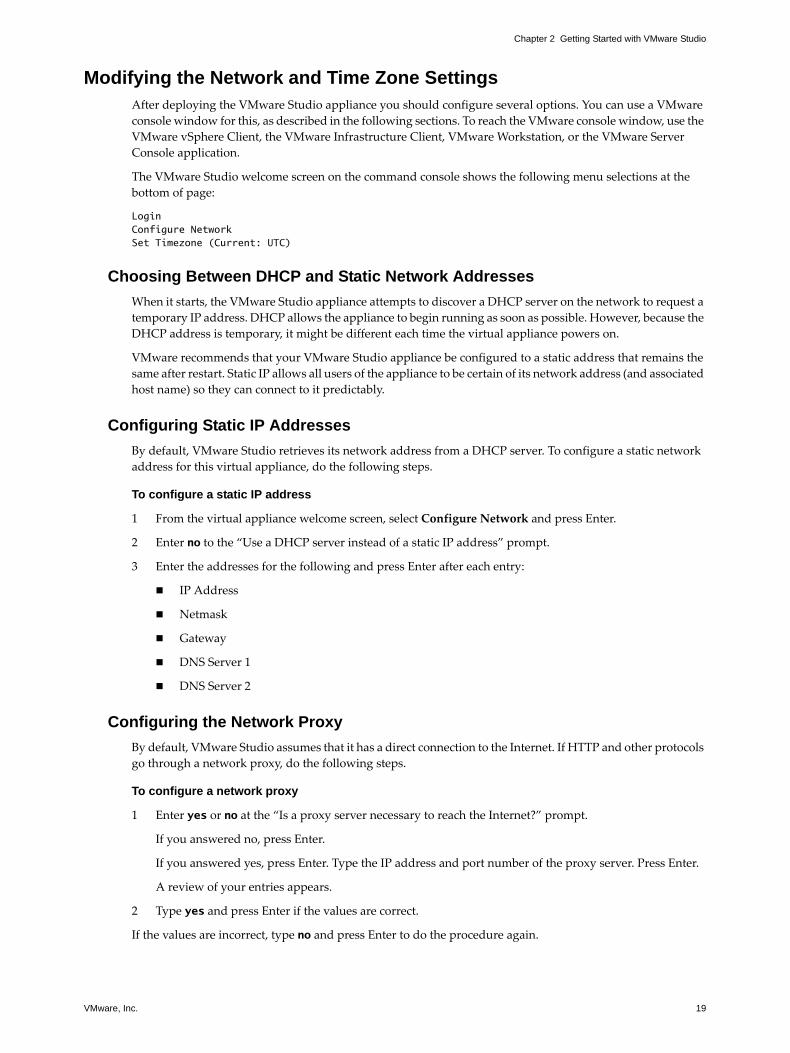
Modifying the Network and Time Zone SettingsAfter deploying the VMware Studio appliance you should configure several options. You can use a VMware
console window for this, as described in the following sections. To reach the VMware console window, use the
VMware vSphere Client, the VMware Infrastructure Client, VMware Workstation, or the VMware Server
Console application.
The VMware Studio welcome screen on the command console shows the following menu selections at the
bottom of page:
LoginConfigure NetworkSet Timezone (Current: UTC)
Choosing Between DHCP and Static Network Addresses
When it starts, the VMware Studio appliance attempts to discover a DHCP server on the network to request a
temporary IP address. DHCP allows the appliance to begin running as soon as possible. However, because the
DHCP address is temporary, it might be different each time the virtual appliance powers on.
VMware recommends that your VMware Studio appliance be configured to a static address that remains the
same after restart. Static IP allows all users of the appliance to be certain of its network address (and associated
host name) so they can connect to it predictably.
Configuring Static IP Addresses
By default, VMware Studio retrieves its network address from a DHCP server. To configure a static network
address for this virtual appliance, do the following steps.
To configure a static IP address
1 From the virtual appliance welcome screen, select Configure Network and press Enter.
2 Enter no to the “Use a DHCP server instead of a static IP address” prompt.
3 Enter the addresses for the following and press Enter after each entry:
IP Address
Netmask
Gateway
DNS Server 1
DNS Server 2
Configuring the Network Proxy
By default, VMware Studio assumes that it has a direct connection to the Internet. If HTTP and other protocols
go through a network proxy, do the following steps.
To configure a network proxy
1 Enter yes or no at the “Is a proxy server necessary to reach the Internet?” prompt.
If you answered no, press Enter.
If you answered yes, press Enter. Type the IP address and port number of the proxy server. Press Enter.
A review of your entries appears.
2 Type yes and press Enter if the values are correct.
If the values are incorrect, type no and press Enter to do the procedure again.
Developer’s Guide to Building vApps and Virtual Appliances
20 VMware, Inc.
Configuring DHCP
If you configured VMware Studio to use a static IP address, but you must restore the configuration to retrieve
its network address from a DHCP server, do the following steps.
To configure use of DHCP service
1 From the virtual appliance welcome screen, select Configure Network and press Enter.
2 Enter yes to the “Use a DHCP server instead of a static IP address” prompt.
3 Enter yes or no at the “Is a proxy server necessary to reach the Internet?” prompt.
If you answered no, press Enter.
If you answered yes, press Enter. Type the IP address and port number of the proxy server. Press Enter.
A review of your entries appears.
4 Type yes and press Enter if the values are correct.
If the values are incorrect, type no and press Enter to do the procedure again.
Setting the Time Zone
To change the time zone for VMware Studio appliance, do the following steps.
To set the time zone
1 From the virtual appliance welcome screen, select Set Timezone and press Enter.
2 In the Geographic area screen, select your continent or region and press Enter.
3 In the Time zone screen, select a city or area in your time zone and press Enter.
The time zone is set and the welcome screen appears.
Using VMware Studio Web ConsoleThis section outlines procedures to change network settings, shut down, and reboot the VMware Studio
appliance from the Web console. These procedures also work generally for Linux‐based virtual machines that
VMware Studio created, because VAMI provides the tabs described here.
Accessing the VMware Studio Web Console
The Web console is the best way to begin using VMware Studio.
To access the VMware Studio Web console
1 In the section “Deploying VMware Studio” on page 16, the URL to access the VMware Studio Web console
is displayed in Step 6 of the process. With one of the supported Web browsers, go to that location.
2 Type root as the User name. Type the password that you specified in Step 5 of the process “Deploying
VMware Studio” on page 16. Press Enter or click Login.
Shutting Down the VMware Studio Appliance
Click the System tab in the Web console.
On the Information page you see the virtual appliance vendor, appliance name, appliance version, computer
host name, operating system name, operating system version, and OVF environment (if any).
The Reboot and Shutdown buttons are under the Actions heading on the right side of the window.
To stop the virtual appliance, click the Shutdown button.
To restart the virtual appliance, click the Reboot button.
VMware, Inc. 21
Chapter 2 Getting Started with VMware Studio
Setting Time Zone in the Web Console
Click the System tab in the Web console.
On the Time Zone page is a drop‐down menu to select among time zones of the world, if you did not already
do so on the Server Console. Click the Save Settings button to make a change.
If you do not explicitly set the time zone, the default is UTC, Coordinated Universal Time.
Network Configuration
Click the Network tab in the Web console. This tab offers pages for the following operations:
Status – Shows network status information, such as the interface name, whether DHCP was used, the
IP address, netmask, gateway IP address, and DNS servers. You can click the Refresh button under the
Actions heading (on the right side) to obtain the current information.
Address – Allows you to specify static IP information or to retrieve the IP settings from a DHCP server.
Click Save Settings to accept changes that you make to the IP settings. Click Cancel Changes to discard
changes. You can configure DHCP from this interface, as you did with the Server Console in “Configuring
DHCP” on page 20. If you set a static IP address and disabled DHCP, you must enter values in all the
following fields:
IP Address – IP address of the Studio virtual appliance.
Netmask – Network mask for the virtual appliance.
Gateway – IP address of the gateway (network router).
Preferred DNS Server – IP address of the primary DNS server.
Alternate DNS Server – IP address of the secondary DNS server.
Proxy – Allows you to specify a proxy server and port for accessing external networks (for example, the
wide‐area Internet). Click Save Settings to accept changes that you make to the proxy settings. Click
Cancel Changes to discard changes. You can configure a network proxy from this interface, as you did
using the Server Console in “Configuring the Network Proxy” on page 19. If you check the check box next
to Use a Proxy Server, you must enter values in the following fields:
Proxy Server – Host name or IP address for the proxy server.
Proxy Port – Proxy server communications port.
Proxy User name – A valid user name, if the proxy server requires authentication.
Proxy Password – The valid password, if the proxy server requires authentication.

Developer’s Guide to Building vApps and Virtual Appliances
22 VMware, Inc.
VMware, Inc. 23
3
This chapter provides an overview of building VMs and vApps with VMware Studio, and contains the
following topics:
“Outline of VM Build Procedure” on page 23
“Outline of vApp Build Procedure” on page 23
“Acquiring the OS ISO” on page 24
“Requirements for Building 64‐Bit VMs” on page 24
“Output Formats” on page 24
“Supported Products to Run Generated VMs and vApps” on page 24
Outline of VM Build ProcedureYou begin building a virtual machine by creating a build profile that defines a container for the base OS
configuration and the included software packages.
To build a VM with VMware Studio
1 Define a build profile with the features you want. You select an operating system for the VM, virtual
hardware, and application packages to include. For Linux‐based VMs, you can also configure the
welcome screen, first boot script, and subsequent boot scripts.
2 Build the VM. VMware Studio relies on a VMware virtualization product platform to assemble the
necessary files to build (provision) your virtual machine.
3 Deploy your VM to the appropriate systems and test.
After a Linux‐based VM is deployed, users can manage it from the management Web console, installed in the
virtual appliance as part of VAMI, or from VMware vCenter. Users can also check for and install updates with
the management Web console, if the developer enabled update service and populates the update repository.
Administrators can centrally manage multiple virtual appliances with VMware vCenter.
Outline of vApp Build ProcedureYou begin building a vApp by creating a build profile that defines a container and its constituent VMs.
To build a vApp with VMware Studio
1 Define a build profile containing one or more VMs. You can mix both Linux‐based and Windows‐based
VMs in a vApp. You can specify the power‐on order of the VMs, the CPU and memory resources and
reservations allocated for each, IP assignment policy, OVF properties, and distribution format.
2 Build the vApp. It is required for the VMs in a vApp to be packaged in OVF 1.0 or OVA output format.
3 Deploy your vApp to the appropriate supported systems and test.
Building VMs and vApps Using VMware Studio 3

Developer’s Guide to Building vApps and Virtual Appliances
24 VMware, Inc.
Acquiring the OS ISOVMware recommends that you download the OS ISO image to the local disk of the VMware Studio appliance,
in /opt/vmware/www/ISV/ISO. For example, you can download the Ubuntu 8.04.1 release by running the
following commands on the VMware console or ssh command line:
cd /opt/vmware/www/ISV/ISOwget http://cdimage.ubuntu.com/releases/8.04.1/release/ubuntu-8.04.1-dvd-i386.iso
If NFS is available on your local area network, a good alternative is to remote mount a network partition where
you have downloaded a collection of ISO images suitable for building VMs, as in the following command run
from the VMware Studio appliance command line:
mount nfs-server.example.com:/vol0/images/iso /opt/vmware/www/ISV/ISO
Requirements for Building 64-Bit VMsThe resource requirements of a guest operating system cannot exceed the hardware capacity of the host
system. If you create a virtual machine from a 64‐bit operating system image, it cannot run on 32‐bit hardware.
See the Knowledge Base article 1901 Hardware and Firmware Requirements for 64‐Bit Guest Operating Systems at
http://kb.vmware.com for detailed information about 64‐bit virtual machines.
Output FormatsWhen you are finished testing and packaging, you can make the VM and vApp builds accessible to customers.
You can provide a VM or vApp in one or more distribution formats:
OVF 1.0 files can describe a vApp and deploy only through vCenter Server 4.
OVA files, essentially OVF 1.0 archives for easier distribution, deploy only through vCenter Server 4.
OVF 0.9 files deploy on Workstation 6.5.1, ESX/ESXi 3.5, and through VirtualCenter 2.5 and later.
ZIP files deploy on VMware Server 2.0 or 1.0.x, Workstation 6.5.1, and Player 2.5 or 2.0.x.
Supported Products to Run Generated VMs and vAppsVMs and vApps generated by VMware Studio can run on following VMware product platforms:
VMware vCenter Server 4 VMware vCenter Server supports both OVF 0.9 and 1.0, VM and vApp, with
virtual hardware versions 4 or 7.
VMware VirtualCenter 2.5 VMware VirtualCenter 2.5 supports OVF 0.9, VM only, with virtual hardware
version 4.
VMware ESX/ESXi 4 VMware ESX/ESXi 4 supports both OVF 0.9 and 1.0, VM only (vApps when deployed
through vCenter Server) with virtual hardware versions 4 or 7.
VMware ESX/ESXi 3.5 U3 VMware ESX/ESXi 3.5 supports OVF 0.9, VM only (vApps when deployed
through vCenter Server) with virtual hardware version 4.
VMware Server 2.0 VMware Server 2.0 supports virtual hardware versions 4 and 7, VM only.
VMware Server 1.0.x VMware Server 1.0.x supports virtual hardware version 4, VM only.
VMware Workstation 6.5.1 VMware Workstation 6.5.1 supports OVF 0.9, VM only, with virtual hardware
versions 4 or 7.
VMware Player 2.0.4 VMware Player 2.0.4 supports a VM with virtual hardware version 4.
VMware Player 2.5 VMware Player 2.5 supports a VM with virtual hardware versions 4 and 7.
VMware, Inc. 25
Chapter 3 Building VMs and vApps Using VMware Studio
VMware vSphere User Privileges for Provisioning
For provisioning on ESX/ESXi hosts or through vCenter Server, you could create a provisioning user with
fewer privileges than the root login or the Administrator role. You must have Administrator permission to
complete the following procedures.
To create a less-privileged user role in vCenter Server
1 Start the vSphere Client and connect to the vCenter Server.
2 Click Administration > Role > Add.
3 Give a name (for example vmstudio) to the new role and assign to it the required privileges listed below.
To assign a provisioning role to a user in vCenter Server
1 Create a new user on the system where the vCenter Server is running.
2 Start the vSphere Client and connect to the vCenter Server.
3 Right‐click the vCenter object (in the Hosts and Clusters tree view) and select Add Permission.
4 In the Assign Permissions dialog, add the new user you created in Step 1 to the Users and Groups list, and
select the new role created (for example vmstudio) as its Assigned Role.
To create a less-privileged user role in ESX/ESXi
1 Start the vSphere Client and connect to the ESX/ESXi host.
2 Click Home > Roles > Add Role.
3 Give a name (for example vmstudio) to the new role and assign to it the required privileges listed below.
To assign a provisioning role to a user in ESX/ESXi
1 Create a new user on the ESX/ESXi host. You can do this with the vSphere Client. Connect to the host,
navigate to the User & Groups tab, right click Add, and type the required information into the dialog box.
2 Right click the ESX/ESXi host object (in the Inventory tree view) and select Add Permission.
3 In the Assign Permissions dialog, add the new user you created in Step 1 to the Users and Groups list, and
select the new role created (for example vmstudio) as its Assigned Role.
Obviously these steps do not apply if you are content to provision with a user who has the vCenter Server
Administrator role, or ESX/ESXi root permission.
ESX/ESXi and vCenter Server User Privileges
Here are the user privileges necessary for VMware Studio to provision a VM or vApp on vCenter Server or on
ESX/ESXi 4.0 (vSphere 4):
Datastore
Allocate space
Browse datastore
Low level file operations
Host – Local operations
Create virtual appliance
Delete virtual appliance
Reconfigure virtual appliance
Host profile
View

Developer’s Guide to Building vApps and Virtual Appliances
26 VMware, Inc.
Network
Assign network
Resource
Assign vApp to resource pool
Assign virtual machine to resource pool
Migrate
Query VMotion
vApp
Full permissions
Virtual machine
Full permissions
Set these permissions on the target provisioning platform, not on the VMware Studio host. For example, if
VMware Studio runs on ESX/ESXi 3.5 but provisions on ESX/ESXi 4.0, set user privileges for vSphere 4 on the
provisioning ESX/ESXi 4.0 host.
ESX/ESXi and VirtualCenter User Privileges
Here are the user privileges necessary for VMware Studio to provision a VM on VirtualCenter server or on
ESX/ESXi 3.5 (VMware Infrastructure 3):
Datastore
Browse datastore
File management
Host – Local operations
Create virtual machine
Delete virtual machine
Resource
Assign virtual machine to resource pool
Migrate
Query VMotion
Virtual machine
Full permissions
VMware, Inc. 27
Developing a Linux-Based VM

Developer’s Guide to Building vApps and Virtual Appliances
28 VMware, Inc.

VMware, Inc. 29
4
This chapter describes how to create a Linux‐based virtual machine using the VMware Studio Web console.
Early sections outline the procedures for creating a VM, middle sections cover the build profile configuration
fields, and later sections document advanced topics.
“Overview” on page 29
“Operating System ISO Image” on page 30
“Application Packages” on page 30
“Creating a VM Build Profile” on page 31
“Web Console Tab Reference” on page 32
“Building a VM from the Build Profile” on page 41
“Testing the Generated VM” on page 41
“Reiterating the Build Process” on page 42
“Using Existing VM as Input” on page 42
“Migrating Build Profiles from VMware Studio 1.0” on page 42
“VMware Tools Installed in a Generated VM” on page 43
OverviewVMware Studio supports the creation of virtual machines containing a Linux‐based operating system,
user‐provided applications, and the Virtual Appliance Management Infrastructure (VAMI) agent. It also
allows customization of the VAMI Web interface if you are shipping the virtual machine as a virtual appliance
and want to rebrand the Web console for your virtual appliance.
Prerequisites – OS and Application
This chapter assumes that you have downloaded the VMware Studio software onto a supported virtualization
product platform, as described in “Deploying VMware Studio” on page 16. You also need:
An ISO image from the list of Linux distributions in “Operating System ISO Image” on page 30.
Your application packaged for the chosen Linux distribution, as outlined in “Application Packages” on
page 30.
Accessing the Web Console
To access the Web console with your browser, navigate to the IP address of the VMware Studio appliance.
The access URL appears at install time, as described in “Deploying VMware Studio” on page 16.
Creating a Linux-Based VM 4

Developer’s Guide to Building vApps and Virtual Appliances
30 VMware, Inc.
Operating System ISO ImageTable 4‐1 lists the Linux distributions that VMware Studio supports. The following Linux distributions and
versions are supported to ensure compatibility when installing the VAMI agent.
Linux operating system images are widely available on the Internet. When possible, URLs are provided in
Table 4‐1 to help you find and acquire the ISO images. Linux releases and download locations change
frequently, so it is best to use a search engine to find the required ISO image. MD5 checksums are provided to
help ensure validity.
Application PackagesVMware Studio uses the native packaging mechanism for each supported operating system to install and
update software in the virtual machine. RHEL, CentOS, and SUSE use RPM packaging, whereas Ubuntu uses
DEB packaging. VMware Studio includes the mkpkg command‐line tool for creating packages of either type,
RPM or DEB. See Chapter 5, “Packaging a Linux Application,” on page 45 for information about using mkpkg.
VMware Studio supports the automatic conversion of compressed TAR (tar.gz, tgz) files into RPM or DEB files. You can use the VMware Studio Plugin for Eclipse to package your application in a compressed TAR file.
See Chapter 8, “Using the VMware Studio Plugin for Eclipse,” on page 61 for more information.
A build profile contains a list of Application Package Repositories with packages to be downloaded from an
HTTP server and installed in the virtual machine. You can include external HTTP servers, at some penalty in
reliability and performance. To include additional packages, add either the URL of a directory containing one
or more packages (VMware Studio resolves installation order), the URL of a RPM or DEB package, or the name
of a compressed TAR file.
Table 4-1. Linux Operating System ISO Images
Operating System Name Arch ISO Image Name MD5 Checksum
http://cdimage.ubuntu.com/releases/
Ubuntu 8.04.1 32‐bit ubuntu‐8.04.1‐dvd‐i386.iso 5fddb647c1945b20055d751576dea8fc
Ubuntu 8.04 32‐bit ubuntu‐8.04‐dvd‐i386.iso 088b5d9e656dd89483dbb1b845b96fb9
Ubuntu 7.10 32‐bit ubuntu‐7.10‐dvd‐i386.iso b5d9aaa45af862b4c804530734216a15
Ubuntu 7.04 32‐bit ubuntu‐7.04‐dvd‐i386.iso ca609edf086eea0c821ba34a5c0a709d
http://download.novell.com
SLES 10 SP2 32‐bit SLES‐10‐SP2‐DVD‐i386‐GM‐DVD1.iso 2b91efeb8a62e2824302bf9269080252
64‐bit SLES‐10‐SP2‐DVD‐x86_64‐GM‐DVD1.iso dab2c4b8fc9939b33535ab2d321f3f2e
http://www.redhat.com
RHEL 5.332‐bit rhel‐5.3‐server‐i386‐dvd.iso 371c62851611fd32ead440df6f24a296
64‐bit rhel‐5.3‐server‐x86_64‐dvd.iso c5ed6b284410f4d8212cafc78fd7a8c5
RHEL 5.232‐bit rhel‐5.2‐server‐i386‐dvd.iso b5af5c38856a331f95ac6ad40c085f9c
64‐bit rhel‐5.2‐server‐x86_64‐dvd.iso 5390f9f703e083cf1470fb438ea49082
RHEL 5.1 32‐bit rhel‐5.1‐server‐i386‐dvd.iso 4380325824d389e2c202477c9d5b2855
http://centos.org
CentOS 5.3 32‐bit CentOS‐5.3‐i386‐bin‐DVD.iso 997638cd72a559e38f9fd1955a368231
64‐bit CentOS‐5.3‐x86_64‐bin‐DVD.iso 6d4fd59688ed8644514010316d6a5698
CentOS 5.2 32‐bit CentOS‐5.2‐i386‐bin‐DVD.iso 1539bad48e984ae1441052dc074c0995
64‐bit CentOS‐5.2‐x86_64‐bin‐DVD.iso 644f9f63f208ebee36ae5e2cdcc58721
CentOS 5.0 32‐bit CentOS‐5.0‐i386‐bin‐DVD.iso b5633ee6ee3b2e10d92672c74e594d75
VMware, Inc. 31
Chapter 4 Creating a Linux-Based VM
Before creating a VM, make certain that you have all of the appropriate operating system and third‐party
packages that your application requires. You can install multiple application packages, and you can control
the installation order to define priority in case of conflicting package files. Consider these points when you
assemble packages and determine dependencies:
VMware Studio installs packages in the order you give in the Application Package Repositories list
(see Table 4‐5) while resolving and installing any dependent packages.
If you include packages in the Application Package Repositories list that depend on other packages,
VMware Studio resolves dependencies between them and packages included in the OS ISO.
If your application depends upon packages that are not available on the OS ISO, identify them
beforehand. Dependent packages include system security updates and third‐party packages. If your
application depends upon a specific version of a package that is not present in the ISO, obtain it separately.
For example, your application might depend on the latest version of Apache, but the OS distribution you
select contains an older version of Apache. Place the latest version in the application packages directory
before starting the build process.
By default the Application Package Repositories list contains one URL that refers to a local directory on the
VMware Studio appliance. This URL contains the string [VADK.localIP] to represent the IP address of the local VMware Studio appliance. The following URL and directory path refer to the same location:
URL of the application package repository – http://[VADK.localIP]/ISV/appliancePackages
Local directory on VMware Studio appliance – /opt/vmware/www/ISV/appliancePackages
You can place your application packages in a different local directory on the VMware Studio appliance, or on
another HTTP server. If you supply the URL of a directory or package on another HTTP server, it must be
network‐accessible. Check that directory indexing is enabled in the HTTP server (for example, Options +Index specified in the Apache configuration file) because VMware Studio requires directory indexing for file discovery.
If your URL points to an HTTP server directory, any .tgz or tar.gz file in that directory is considered a package and will be installed.
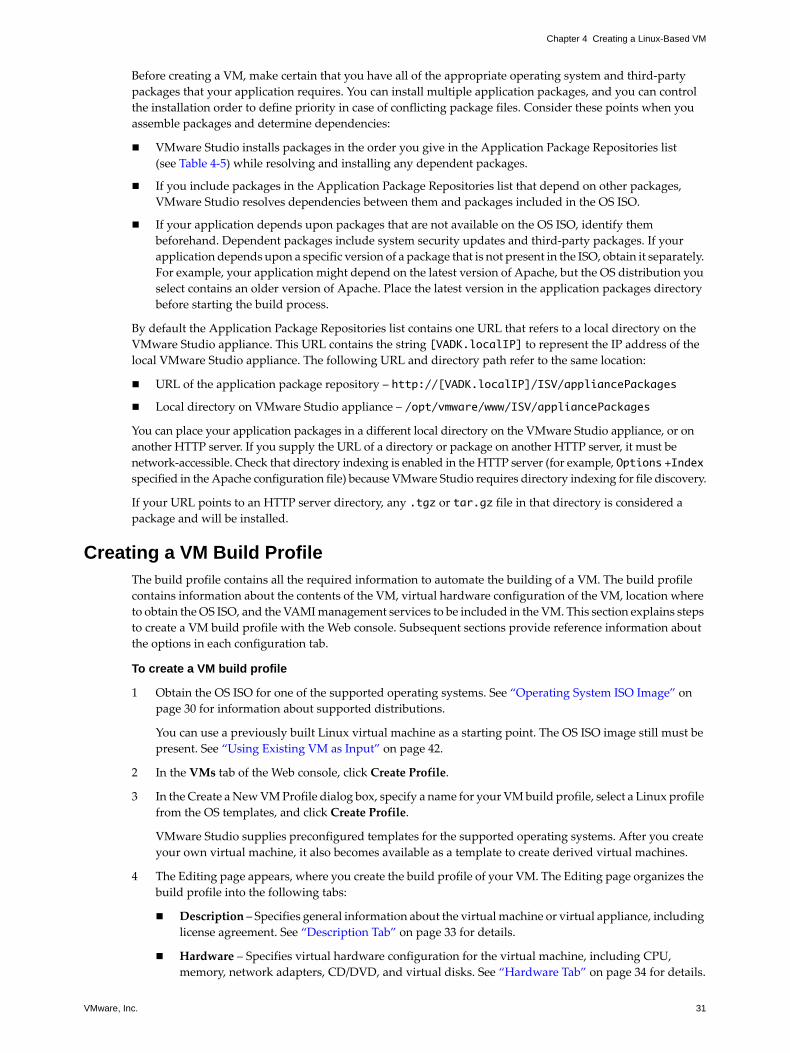
Creating a VM Build ProfileThe build profile contains all the required information to automate the building of a VM. The build profile
contains information about the contents of the VM, virtual hardware configuration of the VM, location where
to obtain the OS ISO, and the VAMI management services to be included in the VM. This section explains steps
to create a VM build profile with the Web console. Subsequent sections provide reference information about
the options in each configuration tab.
To create a VM build profile
1 Obtain the OS ISO for one of the supported operating systems. See “Operating System ISO Image” on
page 30 for information about supported distributions.
You can use a previously built Linux virtual machine as a starting point. The OS ISO image still must be
present. See “Using Existing VM as Input” on page 42.
2 In the VMs tab of the Web console, click Create Profile.
3 In the Create a New VM Profile dialog box, specify a name for your VM build profile, select a Linux profile
from the OS templates, and click Create Profile.
VMware Studio supplies preconfigured templates for the supported operating systems. After you create
your own virtual machine, it also becomes available as a template to create derived virtual machines.
4 The Editing page appears, where you create the build profile of your VM. The Editing page organizes the
build profile into the following tabs:
Description – Specifies general information about the virtual machine or virtual appliance, including
license agreement. See “Description Tab” on page 33 for details.
Hardware – Specifies virtual hardware configuration for the virtual machine, including CPU,
memory, network adapters, CD/DVD, and virtual disks. See “Hardware Tab” on page 34 for details.

Developer’s Guide to Building vApps and Virtual Appliances
32 VMware, Inc.
OS – Specifies location of the OS ISO image, root password, additional users, and boot script
customization. See “OS Tab” on page 35 for details.
Application – Specifies the application package repository and operating system packages to install
into the virtual machine. See “Application Tab” on page 36 for details.
Management – Specifies VAMI management services to include in the virtual machine, and details
about the optional update service repository. See “Management Tab” on page 36.
Output – Specifies the type of distribution format (OVF, OVA, or ZIP) for the virtual machine.
See “Output Tab” on page 38 for details.
Build Settings – Specifies setup of the build environment, such as connection information to one of
many possible provisioning platforms. See “Build Settings Tab” on page 39 for details.
Use the Next and Back buttons to navigate between the tabs until you have specified all required fields.
If you try to navigate to the next page without specifying a required field, an error message appears in red
next to the field showing where you must fix a problem before continuing.
Each field in the build profile has a help icon (i in a circle) on the right side. Clicking the help icon toggles
between display of contextual help and a list of frequently asked questions (FAQ).
Attempting to navigate off the editing page produces a confirmation dialog box asking if you want to
discard your edits.
5 After you complete editing a build profile, you can take one of the following actions by clicking a button
on the right side of the window:
Validate – After completion of a build profile, checks the configuration to help you avoid build errors.
A window appears to show the validations that it performs.
Save and Build – Saves your build profile and displays the Build Summary dialog box for review.
To build the VM and begin provisioning, click Build VM. A progress icon appears with a build log
that shows status as the build progresses.
Save and Close – Saves your build profile and closes the editing page. The build profile appears in
the VM List, so you can choose to edit or build it later.
Close Without Saving – Closes the editing page and discards changes. A warning appears asking if
you are sure you want to discard changes made during the current session.
After creating a VM profile, you are ready to build the VM. Proceed to “Building a VM from the Build Profile”
on page 41.
Web Console Tab ReferenceThese sections document all fields in different tabs of the Web Console.
“Description Tab” on page 33
“Hardware Tab” on page 34
“OS Tab” on page 35
“Application Tab” on page 36
“Management Tab” on page 36
“Output Tab” on page 38
“Build Settings Tab” on page 39
NOTE If you have an existing build profile that you created with VMware Studio 1.0, you can use it with
VMware Studio 2.0. See “Migrating Build Profiles from VMware Studio 1.0” on page 42.
VMware, Inc. 33
Chapter 4 Creating a Linux-Based VM
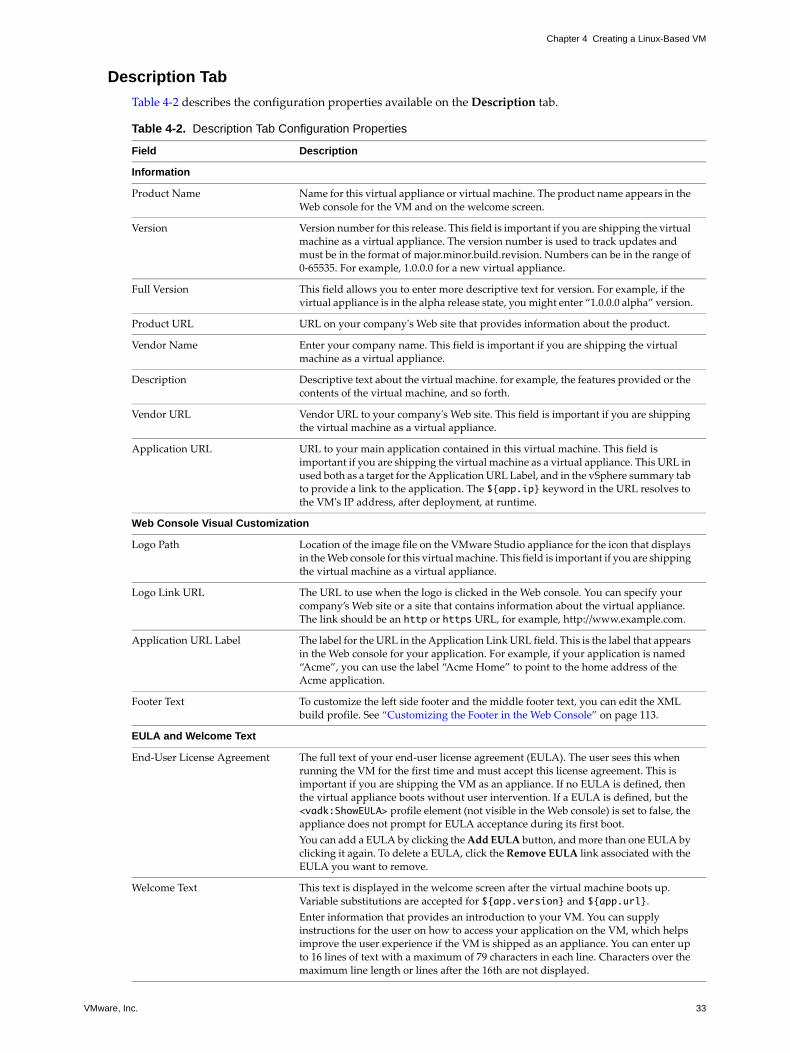
Description Tab
Table 4‐2 describes the configuration properties available on the Description tab.
Table 4-2. Description Tab Configuration Properties
Field Description
Information
Product Name Name for this virtual appliance or virtual machine. The product name appears in the Web console for the VM and on the welcome screen.
Version Version number for this release. This field is important if you are shipping the virtual machine as a virtual appliance. The version number is used to track updates and must be in the format of major.minor.build.revision. Numbers can be in the range of 0‐65535. For example, 1.0.0.0 for a new virtual appliance.
Full Version This field allows you to enter more descriptive text for version. For example, if the virtual appliance is in the alpha release state, you might enter “1.0.0.0 alpha” version.
Product URL URL on your companyʹs Web site that provides information about the product.
Vendor Name Enter your company name. This field is important if you are shipping the virtual machine as a virtual appliance.
Description Descriptive text about the virtual machine. for example, the features provided or the contents of the virtual machine, and so forth.
Vendor URL Vendor URL to your companyʹs Web site. This field is important if you are shipping the virtual machine as a virtual appliance.
Application URL URL to your main application contained in this virtual machine. This field is important if you are shipping the virtual machine as a virtual appliance. This URL in used both as a target for the Application URL Label, and in the vSphere summary tab to provide a link to the application. The ${app.ip} keyword in the URL resolves to the VMʹs IP address, after deployment, at runtime.
Web Console Visual Customization
Logo Path Location of the image file on the VMware Studio appliance for the icon that displays in the Web console for this virtual machine. This field is important if you are shipping the virtual machine as a virtual appliance.
Logo Link URL The URL to use when the logo is clicked in the Web console. You can specify your company’s Web site or a site that contains information about the virtual appliance. The link should be an http or https URL, for example, http://www.example.com.
Application URL Label The label for the URL in the Application Link URL field. This is the label that appears in the Web console for your application. For example, if your application is named “Acme”, you can use the label “Acme Home” to point to the home address of the Acme application.
Footer Text To customize the left side footer and the middle footer text, you can edit the XML build profile. See “Customizing the Footer in the Web Console” on page 113.
EULA and Welcome Text
End‐User License Agreement The full text of your end‐user license agreement (EULA). The user sees this when running the VM for the first time and must accept this license agreement. This is important if you are shipping the VM as an appliance. If no EULA is defined, then the virtual appliance boots without user intervention. If a EULA is defined, but the <vadk:ShowEULA> profile element (not visible in the Web console) is set to false, the appliance does not prompt for EULA acceptance during its first boot.
You can add a EULA by clicking the Add EULA button, and more than one EULA by clicking it again. To delete a EULA, click the Remove EULA link associated with the EULA you want to remove.
Welcome Text This text is displayed in the welcome screen after the virtual machine boots up. Variable substitutions are accepted for ${app.version} and ${app.url}.
Enter information that provides an introduction to your VM. You can supply instructions for the user on how to access your application on the VM, which helps improve the user experience if the VM is shipped as an appliance. You can enter up to 16 lines of text with a maximum of 79 characters in each line. Characters over the maximum line length or lines after the 16th are not displayed.

Developer’s Guide to Building vApps and Virtual Appliances
34 VMware, Inc.
Hardware Tab
Table 4‐3 describes the configuration properties available on the Hardware tab.
Table 4-3. Hardware Tab Configuration Properties
Field Description
VMware Hardware Version
Hardware Version Sets the virtual hardware version for the VM. See the Guest Operating System Installation Guide, “SMP Support and Virtual Hardware” on the www.vmware.com Web site for more information about hardware version.
Virtual hardware version 4 is for ESX 3 or later, and Workstation 5 or later.
Virtual hardware version 7 is for Workstation 6.5, Fusion 2, Server 2, and ESX 4.
Compatibility Shows VMware product platforms compatible with the hardware version selected.
Virtual CPU and Memory
Virtual Processors Select the number of virtual CPUs. The number must be less than or equal to the number of CPUs in the provisioning platform used to create the virtual machine.
Memory (MB) The amount of virtual memory (in megabytes) allocated to this virtual machine. Enter a value in 4 MB increments (4, 16, 256, 512 and so on). The default for most Linux virtual machines is 256MB. The default is 512MB for RHEL 5.3 (32‐bit or 64‐bit). This amount of memory must be less than or equal to the memory of the provisioning platform.
Virtual Devices
Network Adapters Number of virtual network adapters to be configured for this VM. The VAMI agent provides console and Web console interfaces to manage only the first network adapter (eth0) if more than one adapter is defined.
CD/DVD Drives Number of optical disc drives to be configured for this VM.
Virtual Hard Disks
Name Name of the virtual disk, used when naming VMDK files.
Size (GB) Size in gigabytes of the virtual disk, as a floating point number with two optional decimal places, for example 2.33, 4.6, or 5.
If you require only one hard disk, you may change the disk size, but you should not alter values in the Partitions section. On Linux the /boot partition must come first. Adding or removing partitions in the first hard disk is not recommended. Click the Modify Disk Layout link to alter the Partition specifications.
If you require more than one hard disk, click the Add Disk button.
To remove an additional virtual disk, click the Remove Disk link.
Partitions
Mount Point Mount point for the partition.
Maximum Size Check the box to specify that this partition automatically uses the maximum size available. Only the last partition of a disk should be marked as Maximum Size.
Size (MB) Size in megabytes of the partition.
Filesystem File system format, either ext3 or swap.
Bootable Check this box if you want to be able to boot from the partition.
VMware, Inc. 35
Chapter 4 Creating a Linux-Based VM
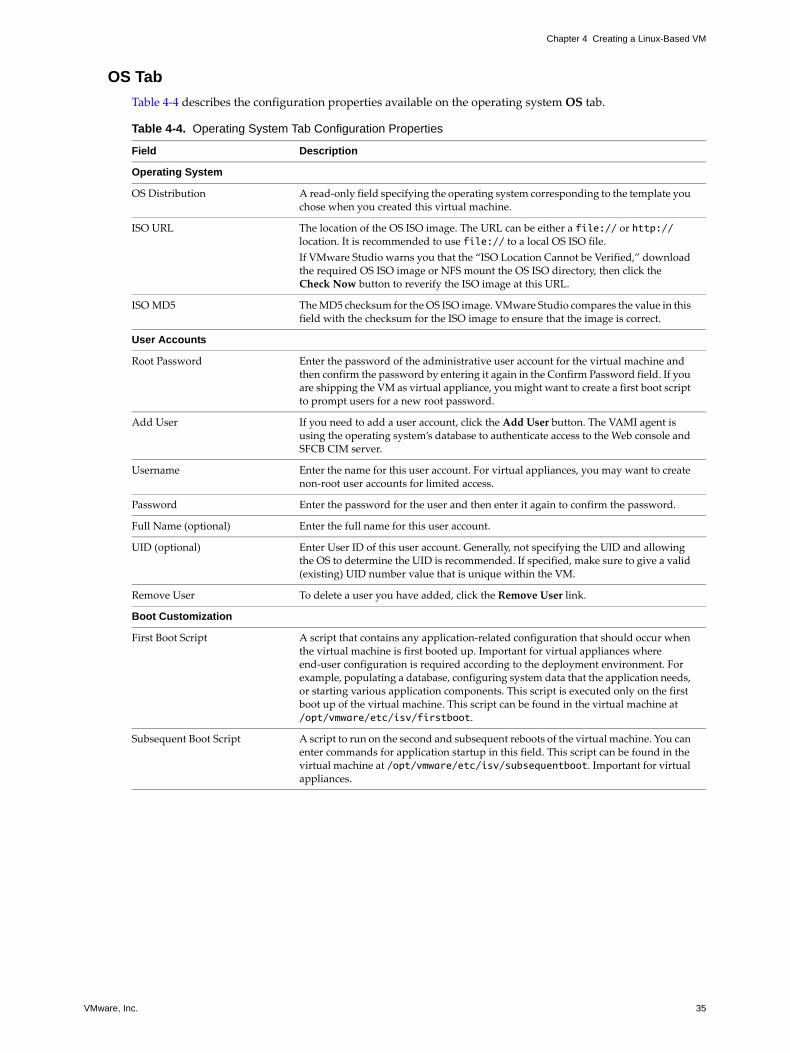
OS Tab
Table 4‐4 describes the configuration properties available on the operating system OS tab.
Table 4-4. Operating System Tab Configuration Properties
Field Description
Operating System
OS Distribution A read‐only field specifying the operating system corresponding to the template you chose when you created this virtual machine.
ISO URL The location of the OS ISO image. The URL can be either a file:// or http:// location. It is recommended to use file:// to a local OS ISO file.
If VMware Studio warns you that the “ISO Location Cannot be Verified,” download the required OS ISO image or NFS mount the OS ISO directory, then click the Check Now button to reverify the ISO image at this URL.
ISO MD5 The MD5 checksum for the OS ISO image. VMware Studio compares the value in this field with the checksum for the ISO image to ensure that the image is correct.
User Accounts
Root Password Enter the password of the administrative user account for the virtual machine and then confirm the password by entering it again in the Confirm Password field. If you are shipping the VM as virtual appliance, you might want to create a first boot script to prompt users for a new root password.
Add User If you need to add a user account, click the Add User button. The VAMI agent is using the operating system’s database to authenticate access to the Web console and SFCB CIM server.
Username Enter the name for this user account. For virtual appliances, you may want to create non‐root user accounts for limited access.
Password Enter the password for the user and then enter it again to confirm the password.
Full Name (optional) Enter the full name for this user account.
UID (optional) Enter User ID of this user account. Generally, not specifying the UID and allowing the OS to determine the UID is recommended. If specified, make sure to give a valid (existing) UID number value that is unique within the VM.
Remove User To delete a user you have added, click the Remove User link.
Boot Customization
First Boot Script A script that contains any application‐related configuration that should occur when the virtual machine is first booted up. Important for virtual appliances where end‐user configuration is required according to the deployment environment. For example, populating a database, configuring system data that the application needs, or starting various application components. This script is executed only on the first boot up of the virtual machine. This script can be found in the virtual machine at /opt/vmware/etc/isv/firstboot.
Subsequent Boot Script A script to run on the second and subsequent reboots of the virtual machine. You can enter commands for application startup in this field. This script can be found in the virtual machine at /opt/vmware/etc/isv/subsequentboot. Important for virtual appliances.
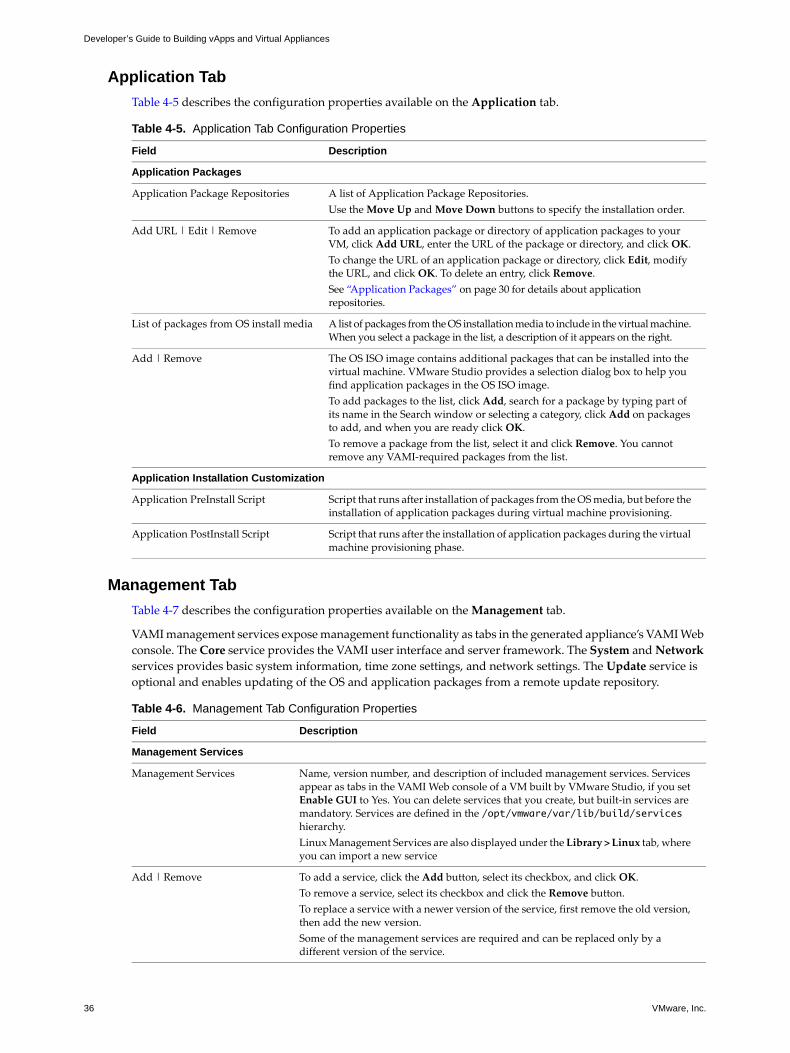
Developer’s Guide to Building vApps and Virtual Appliances
36 VMware, Inc.
Application Tab
Table 4‐5 describes the configuration properties available on the Application tab.
Management Tab
Table 4‐7 describes the configuration properties available on the Management tab.
VAMI management services expose management functionality as tabs in the generated appliance’s VAMI Web
console. The Core service provides the VAMI user interface and server framework. The System and Network
services provides basic system information, time zone settings, and network settings. The Update service is
optional and enables updating of the OS and application packages from a remote update repository.
Table 4-5. Application Tab Configuration Properties
Field Description
Application Packages
Application Package Repositories A list of Application Package Repositories.
Use the Move Up and Move Down buttons to specify the installation order.
Add URL | Edit | Remove To add an application package or directory of application packages to your VM, click Add URL, enter the URL of the package or directory, and click OK.
To change the URL of an application package or directory, click Edit, modify the URL, and click OK. To delete an entry, click Remove.
See “Application Packages” on page 30 for details about application repositories.
List of packages from OS install media A list of packages from the OS installation media to include in the virtual machine. When you select a package in the list, a description of it appears on the right.
Add | Remove The OS ISO image contains additional packages that can be installed into the virtual machine. VMware Studio provides a selection dialog box to help you find application packages in the OS ISO image.
To add packages to the list, click Add, search for a package by typing part of its name in the Search window or selecting a category, click Add on packages to add, and when you are ready click OK.
To remove a package from the list, select it and click Remove. You cannot remove any VAMI‐required packages from the list.
Application Installation Customization
Application PreInstall Script Script that runs after installation of packages from the OS media, but before the installation of application packages during virtual machine provisioning.
Application PostInstall Script Script that runs after the installation of application packages during the virtual machine provisioning phase.
Table 4-6. Management Tab Configuration Properties
Field Description
Management Services
Management Services Name, version number, and description of included management services. Services appear as tabs in the VAMI Web console of a VM built by VMware Studio, if you set Enable GUI to Yes. You can delete services that you create, but built‐in services are mandatory. Services are defined in the /opt/vmware/var/lib/build/services hierarchy.
Linux Management Services are also displayed under the Library > Linux tab, where you can import a new service
Add | Remove To add a service, click the Add button, select its checkbox, and click OK.
To remove a service, select its checkbox and click the Remove button.
To replace a service with a newer version of the service, first remove the old version, then add the new version.
Some of the management services are required and can be replaced only by a different version of the service.
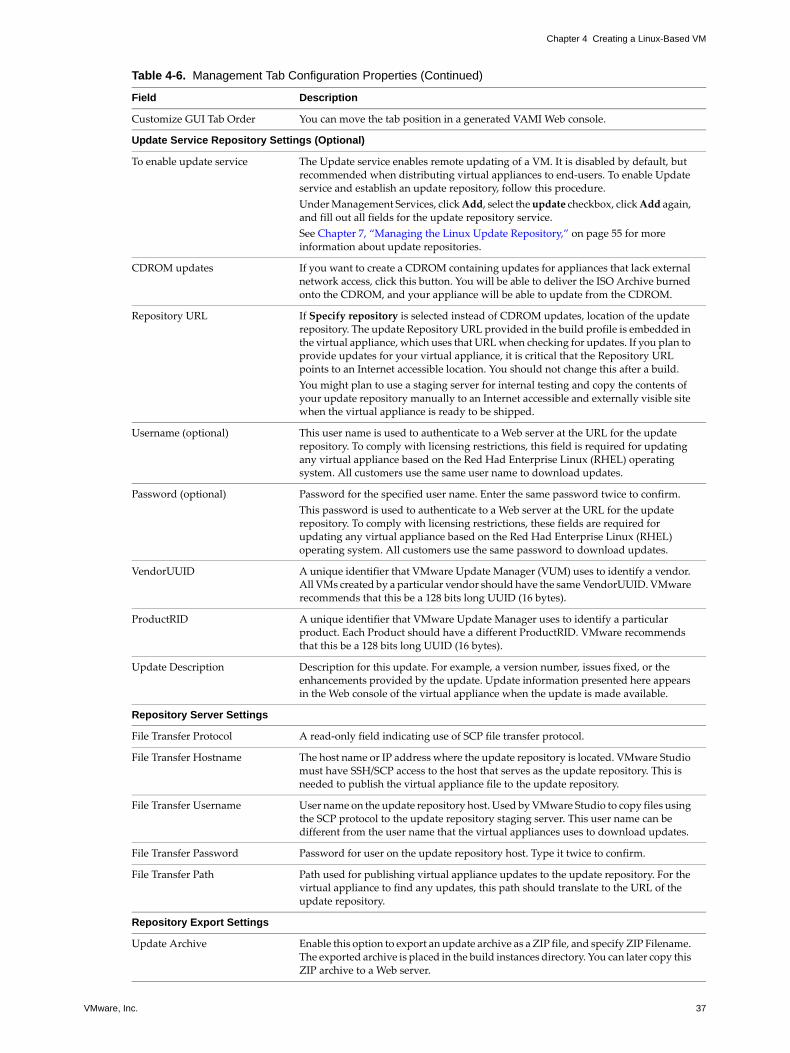
VMware, Inc. 37
Chapter 4 Creating a Linux-Based VM
Customize GUI Tab Order You can move the tab position in a generated VAMI Web console.
Update Service Repository Settings (Optional)
To enable update service The Update service enables remote updating of a VM. It is disabled by default, but recommended when distributing virtual appliances to end‐users. To enable Update service and establish an update repository, follow this procedure.
Under Management Services, click Add, select the update checkbox, click Add again, and fill out all fields for the update repository service.
See Chapter 7, “Managing the Linux Update Repository,” on page 55 for more information about update repositories.
CDROM updates If you want to create a CDROM containing updates for appliances that lack external network access, click this button. You will be able to deliver the ISO Archive burned onto the CDROM, and your appliance will be able to update from the CDROM.
Repository URL If Specify repository is selected instead of CDROM updates, location of the update repository. The update Repository URL provided in the build profile is embedded in the virtual appliance, which uses that URL when checking for updates. If you plan to provide updates for your virtual appliance, it is critical that the Repository URL points to an Internet accessible location. You should not change this after a build.
You might plan to use a staging server for internal testing and copy the contents of your update repository manually to an Internet accessible and externally visible site when the virtual appliance is ready to be shipped.
Username (optional) This user name is used to authenticate to a Web server at the URL for the update repository. To comply with licensing restrictions, this field is required for updating any virtual appliance based on the Red Had Enterprise Linux (RHEL) operating system. All customers use the same user name to download updates.
Password (optional) Password for the specified user name. Enter the same password twice to confirm.
This password is used to authenticate to a Web server at the URL for the update repository. To comply with licensing restrictions, these fields are required for updating any virtual appliance based on the Red Had Enterprise Linux (RHEL) operating system. All customers use the same password to download updates.
VendorUUID A unique identifier that VMware Update Manager (VUM) uses to identify a vendor. All VMs created by a particular vendor should have the same VendorUUID. VMware recommends that this be a 128 bits long UUID (16 bytes).
ProductRID A unique identifier that VMware Update Manager uses to identify a particular product. Each Product should have a different ProductRID. VMware recommends that this be a 128 bits long UUID (16 bytes).
Update Description Description for this update. For example, a version number, issues fixed, or the enhancements provided by the update. Update information presented here appears in the Web console of the virtual appliance when the update is made available.
Repository Server Settings
File Transfer Protocol A read‐only field indicating use of SCP file transfer protocol.
File Transfer Hostname The host name or IP address where the update repository is located. VMware Studio must have SSH/SCP access to the host that serves as the update repository. This is needed to publish the virtual appliance file to the update repository.
File Transfer Username User name on the update repository host. Used by VMware Studio to copy files using the SCP protocol to the update repository staging server. This user name can be different from the user name that the virtual appliances uses to download updates.
File Transfer Password Password for user on the update repository host. Type it twice to confirm.
File Transfer Path Path used for publishing virtual appliance updates to the update repository. For the virtual appliance to find any updates, this path should translate to the URL of the update repository.
Repository Export Settings
Update Archive Enable this option to export an update archive as a ZIP file, and specify ZIP Filename. The exported archive is placed in the build instances directory. You can later copy this ZIP archive to a Web server.
Table 4-6. Management Tab Configuration Properties (Continued)
Field Description
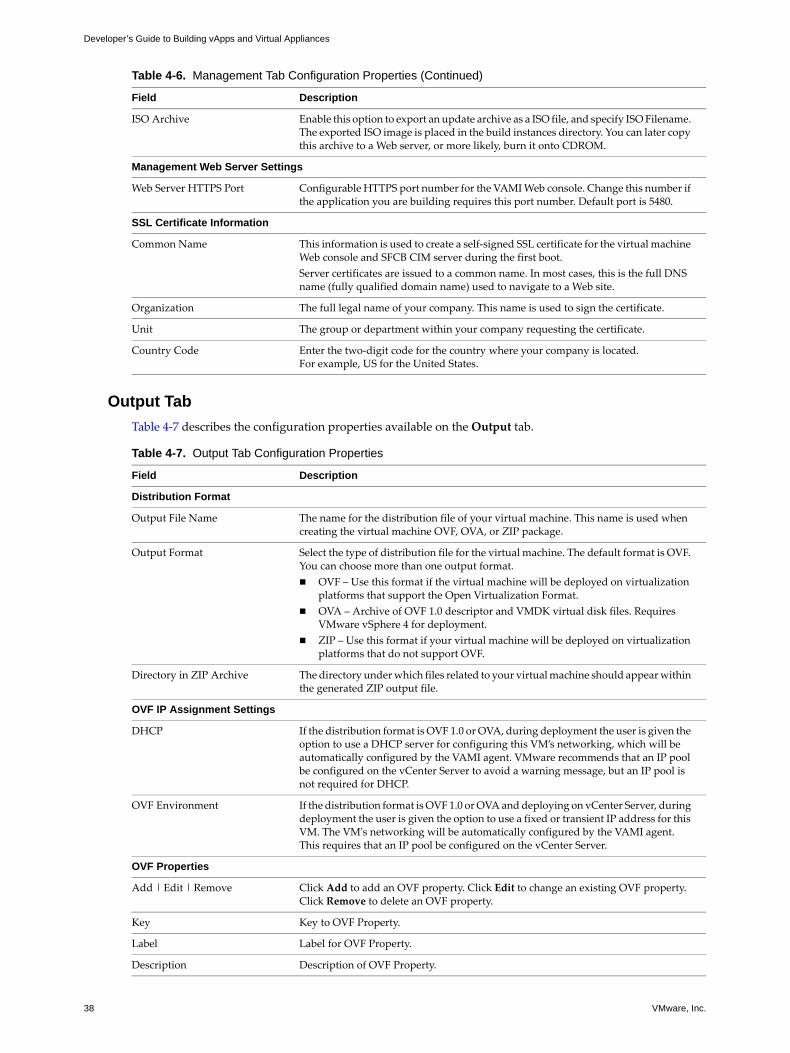
Developer’s Guide to Building vApps and Virtual Appliances
38 VMware, Inc.
Output Tab
Table 4‐7 describes the configuration properties available on the Output tab.
ISO Archive Enable this option to export an update archive as a ISO file, and specify ISO Filename. The exported ISO image is placed in the build instances directory. You can later copy this archive to a Web server, or more likely, burn it onto CDROM.
Management Web Server Settings
Web Server HTTPS Port Configurable HTTPS port number for the VAMI Web console. Change this number if the application you are building requires this port number. Default port is 5480.
SSL Certificate Information
Common Name This information is used to create a self‐signed SSL certificate for the virtual machine Web console and SFCB CIM server during the first boot.
Server certificates are issued to a common name. In most cases, this is the full DNS name (fully qualified domain name) used to navigate to a Web site.
Organization The full legal name of your company. This name is used to sign the certificate.
Unit The group or department within your company requesting the certificate.
Country Code Enter the two‐digit code for the country where your company is located. For example, US for the United States.
Table 4-6. Management Tab Configuration Properties (Continued)
Field Description
Table 4-7. Output Tab Configuration Properties
Field Description
Distribution Format
Output File Name The name for the distribution file of your virtual machine. This name is used when creating the virtual machine OVF, OVA, or ZIP package.
Output Format Select the type of distribution file for the virtual machine. The default format is OVF. You can choose more than one output format.
OVF – Use this format if the virtual machine will be deployed on virtualization platforms that support the Open Virtualization Format.
OVA – Archive of OVF 1.0 descriptor and VMDK virtual disk files. Requires VMware vSphere 4 for deployment.
ZIP – Use this format if your virtual machine will be deployed on virtualization platforms that do not support OVF.
Directory in ZIP Archive The directory under which files related to your virtual machine should appear within the generated ZIP output file.
OVF IP Assignment Settings
DHCP If the distribution format is OVF 1.0 or OVA, during deployment the user is given the option to use a DHCP server for configuring this VM’s networking, which will be automatically configured by the VAMI agent. VMware recommends that an IP pool be configured on the vCenter Server to avoid a warning message, but an IP pool is not required for DHCP.
OVF Environment If the distribution format is OVF 1.0 or OVA and deploying on vCenter Server, during deployment the user is given the option to use a fixed or transient IP address for this VM. The VMʹs networking will be automatically configured by the VAMI agent. This requires that an IP pool be configured on the vCenter Server.
OVF Properties
Add | Edit | Remove Click Add to add an OVF property. Click Edit to change an existing OVF property. Click Remove to delete an OVF property.
Key Key to OVF Property.
Label Label for OVF Property.
Description Description of OVF Property.
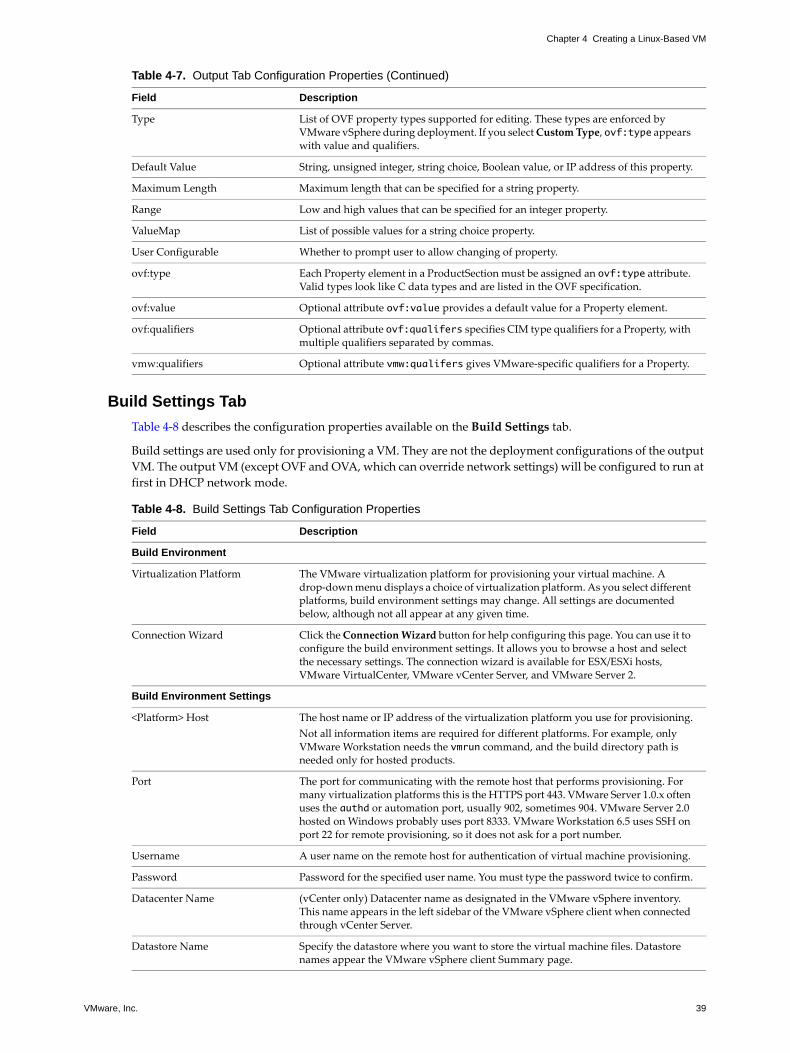
VMware, Inc. 39
Chapter 4 Creating a Linux-Based VM
Build Settings Tab
Table 4‐8 describes the configuration properties available on the Build Settings tab.
Build settings are used only for provisioning a VM. They are not the deployment configurations of the output
VM. The output VM (except OVF and OVA, which can override network settings) will be configured to run at
first in DHCP network mode.
Type List of OVF property types supported for editing. These types are enforced by VMware vSphere during deployment. If you select Custom Type, ovf:type appears with value and qualifiers.
Default Value String, unsigned integer, string choice, Boolean value, or IP address of this property.
Maximum Length Maximum length that can be specified for a string property.
Range Low and high values that can be specified for an integer property.
ValueMap List of possible values for a string choice property.
User Configurable Whether to prompt user to allow changing of property.
ovf:type Each Property element in a ProductSection must be assigned an ovf:type attribute. Valid types look like C data types and are listed in the OVF specification.
ovf:value Optional attribute ovf:value provides a default value for a Property element.
ovf:qualifiers Optional attribute ovf:qualifers specifies CIM type qualifiers for a Property, with multiple qualifiers separated by commas.
vmw:qualifiers Optional attribute vmw:qualifers gives VMware‐specific qualifiers for a Property.
Table 4-7. Output Tab Configuration Properties (Continued)
Field Description
Table 4-8. Build Settings Tab Configuration Properties
Field Description
Build Environment
Virtualization Platform The VMware virtualization platform for provisioning your virtual machine. A drop‐down menu displays a choice of virtualization platform. As you select different platforms, build environment settings may change. All settings are documented below, although not all appear at any given time.
Connection Wizard Click the Connection Wizard button for help configuring this page. You can use it to configure the build environment settings. It allows you to browse a host and select the necessary settings. The connection wizard is available for ESX/ESXi hosts, VMware VirtualCenter, VMware vCenter Server, and VMware Server 2.
Build Environment Settings
<Platform> Host The host name or IP address of the virtualization platform you use for provisioning.
Not all information items are required for different platforms. For example, only VMware Workstation needs the vmrun command, and the build directory path is needed only for hosted products.
Port The port for communicating with the remote host that performs provisioning. For many virtualization platforms this is the HTTPS port 443. VMware Server 1.0.x often uses the authd or automation port, usually 902, sometimes 904. VMware Server 2.0 hosted on Windows probably uses port 8333. VMware Workstation 6.5 uses SSH on port 22 for remote provisioning, so it does not ask for a port number.
Username A user name on the remote host for authentication of virtual machine provisioning.
Password Password for the specified user name. You must type the password twice to confirm.
Datacenter Name (vCenter only) Datacenter name as designated in the VMware vSphere inventory. This name appears in the left sidebar of the VMware vSphere client when connected through vCenter Server.
Datastore Name Specify the datastore where you want to store the virtual machine files. Datastore names appear the VMware vSphere client Summary page.
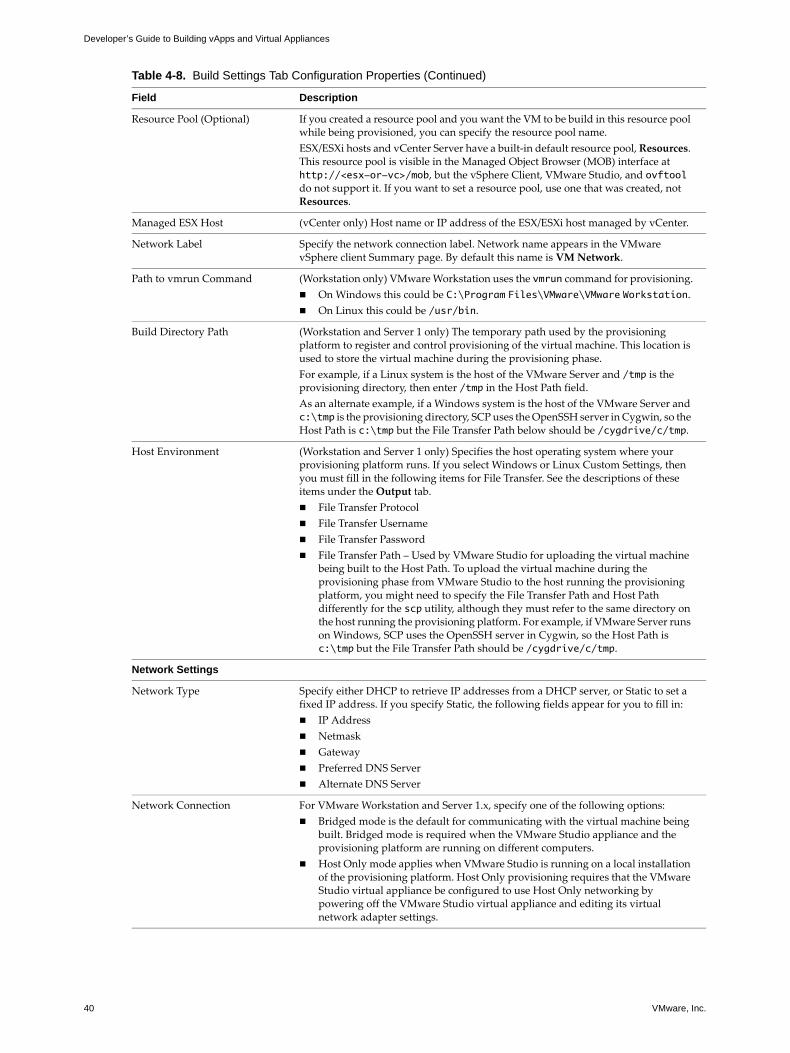
Developer’s Guide to Building vApps and Virtual Appliances
40 VMware, Inc.
Resource Pool (Optional) If you created a resource pool and you want the VM to be build in this resource pool while being provisioned, you can specify the resource pool name.
ESX/ESXi hosts and vCenter Server have a built‐in default resource pool, Resources. This resource pool is visible in the Managed Object Browser (MOB) interface at http://<esx-or-vc>/mob, but the vSphere Client, VMware Studio, and ovftool do not support it. If you want to set a resource pool, use one that was created, not Resources.
Managed ESX Host (vCenter only) Host name or IP address of the ESX/ESXi host managed by vCenter.
Network Label Specify the network connection label. Network name appears in the VMware vSphere client Summary page. By default this name is VM Network.
Path to vmrun Command (Workstation only) VMware Workstation uses the vmrun command for provisioning.
On Windows this could be C:\Program Files\VMware\VMware Workstation.
On Linux this could be /usr/bin.
Build Directory Path (Workstation and Server 1 only) The temporary path used by the provisioning platform to register and control provisioning of the virtual machine. This location is used to store the virtual machine during the provisioning phase.
For example, if a Linux system is the host of the VMware Server and /tmp is the provisioning directory, then enter /tmp in the Host Path field.
As an alternate example, if a Windows system is the host of the VMware Server and c:\tmp is the provisioning directory, SCP uses the OpenSSH server in Cygwin, so the Host Path is c:\tmp but the File Transfer Path below should be /cygdrive/c/tmp.
Host Environment (Workstation and Server 1 only) Specifies the host operating system where your provisioning platform runs. If you select Windows or Linux Custom Settings, then you must fill in the following items for File Transfer. See the descriptions of these items under the Output tab.
File Transfer Protocol
File Transfer Username
File Transfer Password
File Transfer Path – Used by VMware Studio for uploading the virtual machine being built to the Host Path. To upload the virtual machine during the provisioning phase from VMware Studio to the host running the provisioning platform, you might need to specify the File Transfer Path and Host Path differently for the scp utility, although they must refer to the same directory on the host running the provisioning platform. For example, if VMware Server runs on Windows, SCP uses the OpenSSH server in Cygwin, so the Host Path is c:\tmp but the File Transfer Path should be /cygdrive/c/tmp.
Network Settings
Network Type Specify either DHCP to retrieve IP addresses from a DHCP server, or Static to set a fixed IP address. If you specify Static, the following fields appear for you to fill in:
IP Address
Netmask
Gateway
Preferred DNS Server
Alternate DNS Server
Network Connection For VMware Workstation and Server 1.x, specify one of the following options:
Bridged mode is the default for communicating with the virtual machine being built. Bridged mode is required when the VMware Studio appliance and the provisioning platform are running on different computers.
Host Only mode applies when VMware Studio is running on a local installation of the provisioning platform. Host Only provisioning requires that the VMware Studio virtual appliance be configured to use Host Only networking by powering off the VMware Studio virtual appliance and editing its virtual network adapter settings.
Table 4-8. Build Settings Tab Configuration Properties (Continued)
Field Description

VMware, Inc. 41
Chapter 4 Creating a Linux-Based VM
Building a VM from the Build ProfileAfter you have completed a build profile, you can build your VM. First click Validate to verify the contents of
the build profile. If the VM profile validates, click Save and Build. Then in the Build Summary dialog box, click
Build VM. This starts building a transient VM on the provisioning platform.
To retain the transient VM without cleaning up after the build, in the Build Summary dialog box, click
Advanced Build Settings. This makes visible a check box saying “Retain transient VM on the virtualization
platform and skip provisioning cleanup.” Clicking the check box allows you to test the VM on the provisioning
platform before deploying it elsewhere.
When the build starts, a status icon appears to indicate that the build is in progress. As provisioning continues,
a build log appears to inform you of each completed step in VM provisioning. To cancel a build in progress,
click Cancel under the status icon.
Watching the VM provisioning can help greatly if something goes wrong.
If you encounter problems when building a virtual machine, see “Troubleshooting VM Builds” on page 119
for diagnostic information.
After a build, you can view various logs to see what happened during the build. In the list of VM profiles, select
a VM and click Build Log to see a recap of build progress.
To see the VM build summary and verbose log, click Previous Builds > Build Status > Finished (or Failed, or
Canceled). The Details dialog box appears, with the following tabs:
Build Summary – provides details of the build profile configuration.
Verbose Log – provides a detailed log of each completed phase of the build process.
Debug Log – provides details of each completed build phase, including debugging information.
Install Log—provides a log of the installation messages as each OS and application package is installed
into the virtual machine. Reviewing the install log can help when troubleshooting package dependency
errors if more packages are required.
Each build is stored in the VMware Studio appliance’s file system. You can delete older builds when they are
no longer needed. See “Reiterating the Build Process” on page 42 for more information.
Testing the Generated VMAfter you have successfully built a VM, you can obtain the virtual machine distribution file by clicking on the
ZIP or OVF link (depending upon which type of output file you specified) in the Download column of the
VM’s Previous Build list.
You should click on your virtual machine distribution file and test the completed VM by deploying it into the
intended environment to ensure that the VM and any applications that it contains work properly. You can
download a ZIP file for testing. Do not download an OVF for testing, because if you do, you get only the OVF
and not the associated VMDK files. Instead, test the OVF by right clicking on the URL, copying it, and pasting
it into the Import Appliance or Deploy OVF Template dialog boxes of ESX 3.5 or 4.0, respectively.
Verify that all application packages are installed correctly and that your boot scripts run correctly. Check that
your application starts correctly.
If you plan to distribute this virtual machine as a virtual appliance to your customers, see the User’s Guide to
Deploying vApps and Virtual Appliances for information about deploying your virtual appliance for testing.
IMPORTANT You can monitor the installation of the Linux OS and your applications on the console of the
provisioning server. To do this, start either the VMware vSphere Client, the VMware Infrastructure Client, the
VMware Server Console application, or VMware Workstation. Select the VM that you specified in the profile
you created, which should power on, and click Console (if not already displayed).
Developer’s Guide to Building vApps and Virtual Appliances
42 VMware, Inc.
Reiterating the Build ProcessMany developers find that an easy way to a create a Linux VM is to build it initially containing only the
operating system, and add application packages and dependencies in successive builds. Each successful build
occupies space, but you can delete them.
To delete a build using the VMware Studio console, select a VM profile from the list of VM profiles and click
Previous Builds > Instance > Delete. You can also delete a build using the studiocli -d command.
Using Existing VM as InputThis feature can save time otherwise spent waiting for virtual machines to get built and operating systems to
get installed. For example, if you expect to have multiple builds before you can finalize the VM, you can first
create a base build profile and build the base VM. Then create a new profile (existing‐VM‐as‐input profile)
using the base profile, and build the VM again. Finally use VMware Studio to add your application packages
incrementally, rebuilding as many times as necessary from the base profile VM.
On Linux the existing‐VM‐as‐input feature allows you to install new packages, upgrade packages, remove or
add management services, change the root password, and add new users. The feature does not alter virtual
hardware, remove installed packages, downgrade packages, remove existing users, nor does it work with
Windows.
Existing VM provisioning differs from regular provisioning. Regular provisioning creates a fresh VM in which
it installs the operating system from the beginning. Existing VM provisioning takes an existing VM (in which
the operating system and possibly some packages are installed) as its base, and creates a new VM with the
modifications you request.
For an existing VM as input: from the Web console, during Create Profile select a profile from which a Linux
VM has already been built. This enables a checkbox, “Use an existing build of the selected profile as a starting
point for your VM.” If you click this checkbox, then the profile is used as a base profile to create a new build
profile (existing VM build profile).
Various tabs impose restrictions on what you can change and not change.
You can modify fields such as EULA and welcome text in the Description tab.
The fields in the Hardware tab are disabled, because these settings are inherited from the existing build
and cannot be modified.
Under the OS tab the ISO location can be changed, but the bits must match, or MD5 checksum checking
would fail. You can also change the root password or add users.
The Applications tab shows any package information that is stored in the base VM build profile. You can
also add packages to be installed in the new VM.
You can add Services with the Management tab.
You can also modify fields in the Output and the Build Settings tabs such as OVF property and
provisioning engine.
Migrating Build Profiles from VMware Studio 1.0You can import build profiles into VMware Studio in the following circumstances:
When you upgrade to a newer version of VMware Studio.
When you manually create a build profile.
When using a build profile created by another user on another VMware Studio appliance.
If you have an existing build profile that you want to bring into VMware Studio you can import the profile.
However you cannot use, nor successfully import, a Studio 2.0 Beta profile into Studio 2.0 GA. Instead, you
must start from a pre‐existing 2.0 template, or import a VMware Studio 1.0 profile.
VMware, Inc. 43
Chapter 4 Creating a Linux-Based VM
To import an existing build profile
1 Place the build profile on the host where the Web browser runs.
2 Open the VMware Studio Web console to the VMs page and click Import Profile.
3 A dialog box appears where you enter a name for the profile and location of the build profile to import.
Click the Browse button to help find the build profile on your computer.
4 Click Import Profile. VMware Studio creates a new build profile based on the imported one, and adds it
to the VM List. You can select the newly imported VM and build it, or edit its profile.
VMware Tools Installed in a Generated VMThe VMware Tools software packages (vmware-open-vm-toolsDEB or RPM packages) that VMware Studio
installs in Linux‐based VMs are of the VMware Operating System Specific Packages (OSP) packaging format,
versioned ESX 4.0. They are currently available at http://packages.vmware.com/tools/esx/4.0/index.html.
End‐of‐life Ubuntu 7.04 and Ubuntu 7.10 are exceptions because their OSP VMware Tools are not available.
After deploying a VM with this type of VMware Tools installed, users should not run Install VMware Tools
on their virtualization platform, because doing so overwrites the existing VMware Tools in the VM, and the
differences in format could cause installation failure or runtime errors.
If users choose to upgrade the VMware Tools in a VM, they can use the dpkg or rpm command to manually
uninstall the vmware-open-vm-tools* DEB or RPM package, then either run Install VMware Tools on their virtualization platform, or install a newer version of the vmware-open-vm-tools* DEB or RPM package. Unfortunately, any end‐user changes to software packages in the VM, including VMware Tools, could thwart
the appliance update facility of VMware Studio.

Developer’s Guide to Building vApps and Virtual Appliances
44 VMware, Inc.
VMware, Inc. 45
5
This chapter contains the following sections:
“VMware Studio Make Package (mkpkg) Tool” on page 45.
“Operating System Native Tools” on page 48.
“TAR Archive as Input Format” on page 49
VMware Studio Make Package (mkpkg) ToolYou can provide application bits in various formats to be installed on the virtual machine. If you have a binary
image of your software, you can specify copy commands as part of your preinstall or postinstall scripts.
You can also specify the application bits in TAR format.
For better lifecycle management of the virtual machine contents, VMware recommends that your application
be packaged in the native packaging format of the operating system (RPM or DEB). If the virtual machine is
delivered as a virtual appliance, native packaging guarantees that the ISV can update the application in a
consistent fashion after a customer deploys the virtual appliance. Automatic updates, version tracking,
dependency resolution, and complete virtual appliance manifests are the benefits of requiring that
applications be delivered in the native operating system packaging format.
VMware Studio provides a command line tool, mkpkg, to assist in the creation of application packages. Using the mkpkg tool you can create either DEB or RPM application packages. In addition, the VMware Studio Plugin
for Eclipse is capable of creating packages, in a way equivalent to mkpkg. For more information, see Chapter 8,
“Using the VMware Studio Plugin for Eclipse,” on page 61.
Options of the Make Package Tool
The following list shows the Linux operating systems that VMware Studio supports, and the package format
for each operating system:
CentOS – RPM
Redhat – RPM
SLES – RPM
Ubuntu – DEB
For DEB packages, creation of the preinstall and postinstall scripts is specified and used at the time of building
the package. For RPM packages, creation of the preinstall and postinstall scripts is done at the time of creating
the control.spec file. The preinstall and postinstall scripts are inserted into the generated template
control.spec so they must be specified when you run mkpkg -t rpm -T.
Packaging a Linux Application 5
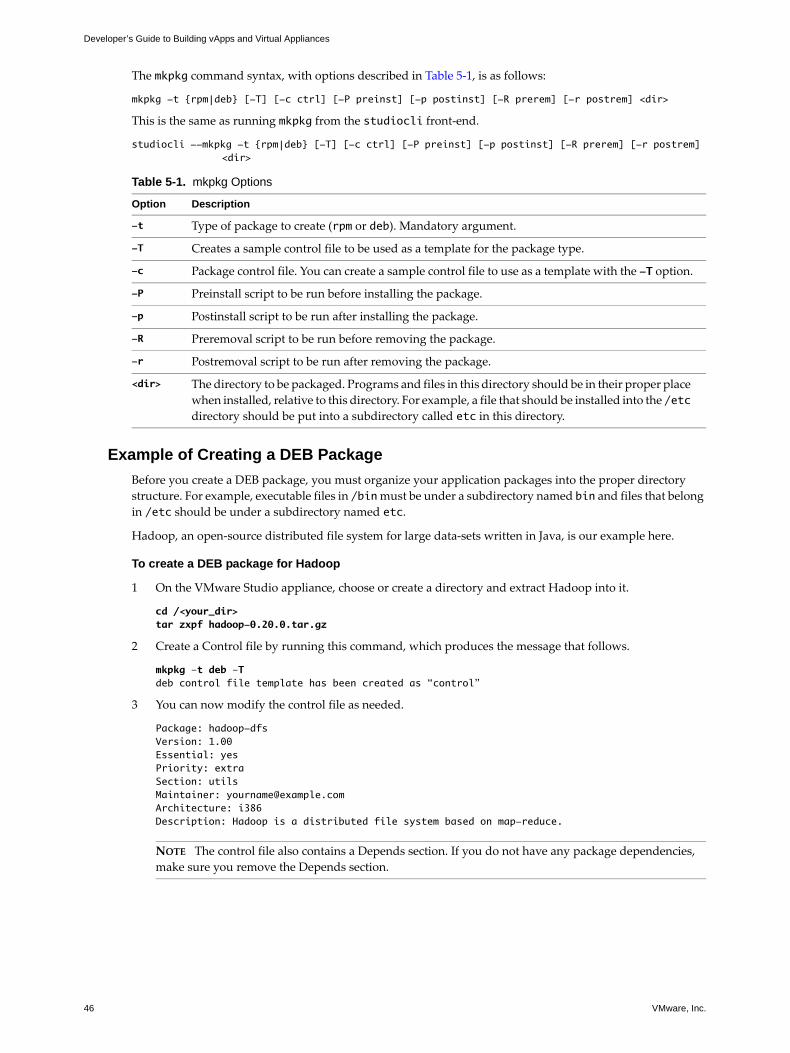
Developer’s Guide to Building vApps and Virtual Appliances
46 VMware, Inc.
The mkpkg command syntax, with options described in Table 5‐1, is as follows:
mkpkg -t {rpm|deb} [-T] [-c ctrl] [-P preinst] [-p postinst] [-R prerem] [-r postrem] <dir>
This is the same as running mkpkg from the studiocli front‐end.
studiocli --mkpkg -t {rpm|deb} [-T] [-c ctrl] [-P preinst] [-p postinst] [-R prerem] [-r postrem] <dir>
Example of Creating a DEB Package
Before you create a DEB package, you must organize your application packages into the proper directory
structure. For example, executable files in /bin must be under a subdirectory named bin and files that belong in /etc should be under a subdirectory named etc.
Hadoop, an open‐source distributed file system for large data‐sets written in Java, is our example here.
To create a DEB package for Hadoop
1 On the VMware Studio appliance, choose or create a directory and extract Hadoop into it.
cd /<your_dir>tar zxpf hadoop-0.20.0.tar.gz
2 Create a Control file by running this command, which produces the message that follows.
mkpkg –t deb –Tdeb control file template has been created as “control”
3 You can now modify the control file as needed.
Package: hadoop-dfsVersion: 1.00Essential: yesPriority: extraSection: utilsMaintainer: [email protected]: i386Description: Hadoop is a distributed file system based on map-reduce.
Table 5-1. mkpkg Options
Option Description
-t Type of package to create (rpm or deb). Mandatory argument.
-T Creates a sample control file to be used as a template for the package type.
-c Package control file. You can create a sample control file to use as a template with the -T option.
-P Preinstall script to be run before installing the package.
-p Postinstall script to be run after installing the package.
-R Preremoval script to be run before removing the package.
-r Postremoval script to be run after removing the package.
<dir> The directory to be packaged. Programs and files in this directory should be in their proper place
when installed, relative to this directory. For example, a file that should be installed into the /etc directory should be put into a subdirectory called etc in this directory.
NOTE The control file also contains a Depends section. If you do not have any package dependencies,
make sure you remove the Depends section.

VMware, Inc. 47
Chapter 5 Packaging a Linux Application
4 You can create preinstall, postinstall, preremoval, and postremoval scripts for your application.
These scripts can contain commands that you would run while installing your application. In this
example we name our preinstall and postinstall scripts preinst and postinst. Similar naming could be
followed for the preremoval and postremoval scripts. Run the following command:
mkpkg –t deb –c control –P preinst.sh –p postinst.sh hadoop-0.20.0
If your command syntax is correct, you get a message similar to the following:
109737 blocksdpkg-deb: building package ‘hadoop-dfs’ in /<your_home>/hadoop-dfs-1.00_i386.deb’
5 Copy the generated DEB file to /opt/vmware/www/ISV/appliancePackages with the cp command:
cp hadoop-dfs_1.00_i386.deb /opt/vmware/www/ISV/appliancePackages
Example of Creating an RPM Package
Before you create an RPM package, you must organize your application packages into the proper directory
structure. For example, executable files in /bin must be under a subdirectory named bin and files that belong in /etc should be under a subdirectory named etc.
SugarCRM, an open‐source software solution for customer relationship management, is our example here.
To create an RPM package for SugarCRM
1 On the VMware Studio appliance, choose or create a directory and extract SugarCRM into it.
cd /<your_dir>unzip SugarCD-5.1.0c.zip
2 Create a Control file by running this command, which produces the message that follows
mkpkg –t rpm –Trpm control file template has been created as “control.spec”
Unlike for DEB, mkpkg for RPM places the preinstall and postinstall scripts within the control file.
3 You can now modify the control.spec file as needed.
Summary: Sample SugarCRM packageName: SugarCRMVersion: 5.1.0cRelease: 11License: CommercialVendor: SugarCRMGroup: System Environment/DaemonsURL: http://www.sugarcrm.comBuildArchitectures: noarch#Requires:%description
The following is an example of a SugarCRM package:
%post#!/bin/bashchown -R wwwrun /opt/SugarCE-Full-5.1.0c/## Do not put anything below the %defattr line; the list of files# in this package is automatically written there.#%files%config /opt/SugarCE-Full-5.1.0c/config.php%defattr(-,root,root)
The %config section lists configuration files that you do not want overwritten during an update.
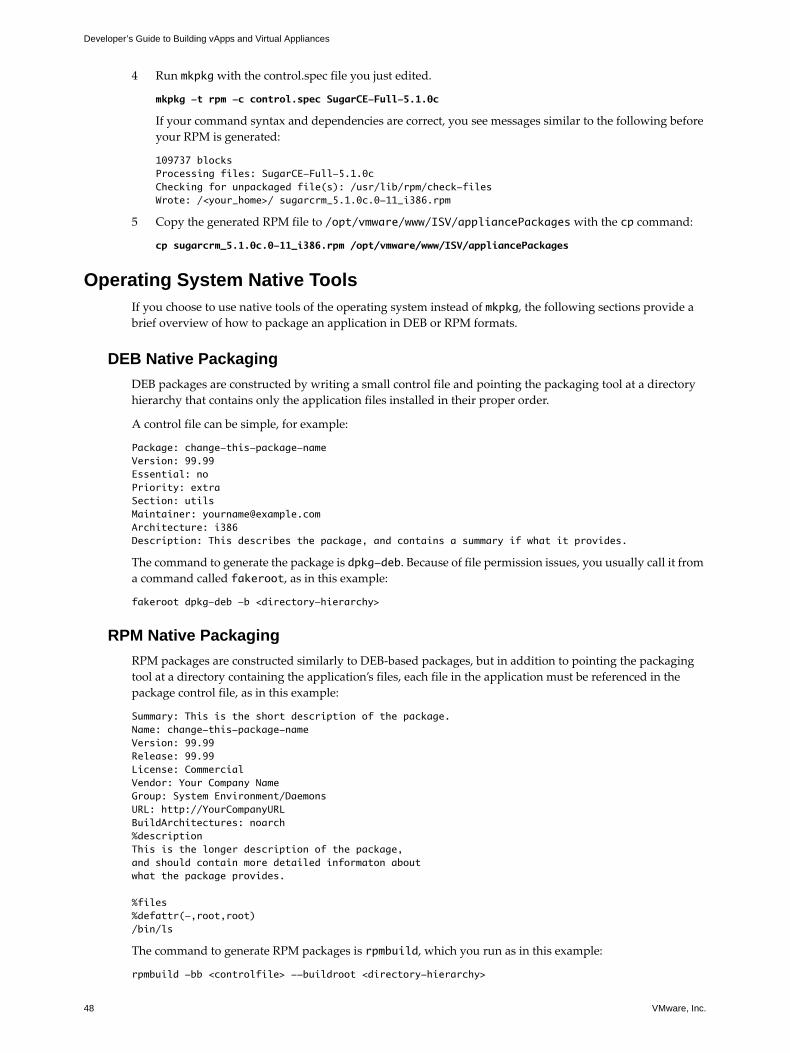
Developer’s Guide to Building vApps and Virtual Appliances
48 VMware, Inc.
4 Run mkpkg with the control.spec file you just edited.
mkpkg -t rpm -c control.spec SugarCE-Full-5.1.0c
If your command syntax and dependencies are correct, you see messages similar to the following before
your RPM is generated:
109737 blocksProcessing files: SugarCE-Full-5.1.0cChecking for unpackaged file(s): /usr/lib/rpm/check-filesWrote: /<your_home>/ sugarcrm_5.1.0c.0-11_i386.rpm
5 Copy the generated RPM file to /opt/vmware/www/ISV/appliancePackages with the cp command:
cp sugarcrm_5.1.0c.0-11_i386.rpm /opt/vmware/www/ISV/appliancePackages
Operating System Native ToolsIf you choose to use native tools of the operating system instead of mkpkg, the following sections provide a
brief overview of how to package an application in DEB or RPM formats.
DEB Native Packaging
DEB packages are constructed by writing a small control file and pointing the packaging tool at a directory
hierarchy that contains only the application files installed in their proper order.
A control file can be simple, for example:
Package: change-this-package-nameVersion: 99.99Essential: noPriority: extraSection: utilsMaintainer: [email protected]: i386Description: This describes the package, and contains a summary if what it provides.
The command to generate the package is dpkg-deb. Because of file permission issues, you usually call it from
a command called fakeroot, as in this example:
fakeroot dpkg-deb -b <directory-hierarchy>
RPM Native Packaging
RPM packages are constructed similarly to DEB‐based packages, but in addition to pointing the packaging
tool at a directory containing the application’s files, each file in the application must be referenced in the
package control file, as in this example:
Summary: This is the short description of the package.Name: change-this-package-nameVersion: 99.99Release: 99.99License: CommercialVendor: Your Company NameGroup: System Environment/DaemonsURL: http://YourCompanyURLBuildArchitectures: noarch%descriptionThis is the longer description of the package,and should contain more detailed informaton aboutwhat the package provides.
%files%defattr(-,root,root)/bin/ls
The command to generate RPM packages is rpmbuild, which you run as in this example:
rpmbuild -bb <controlfile> --buildroot <directory-hierarchy>
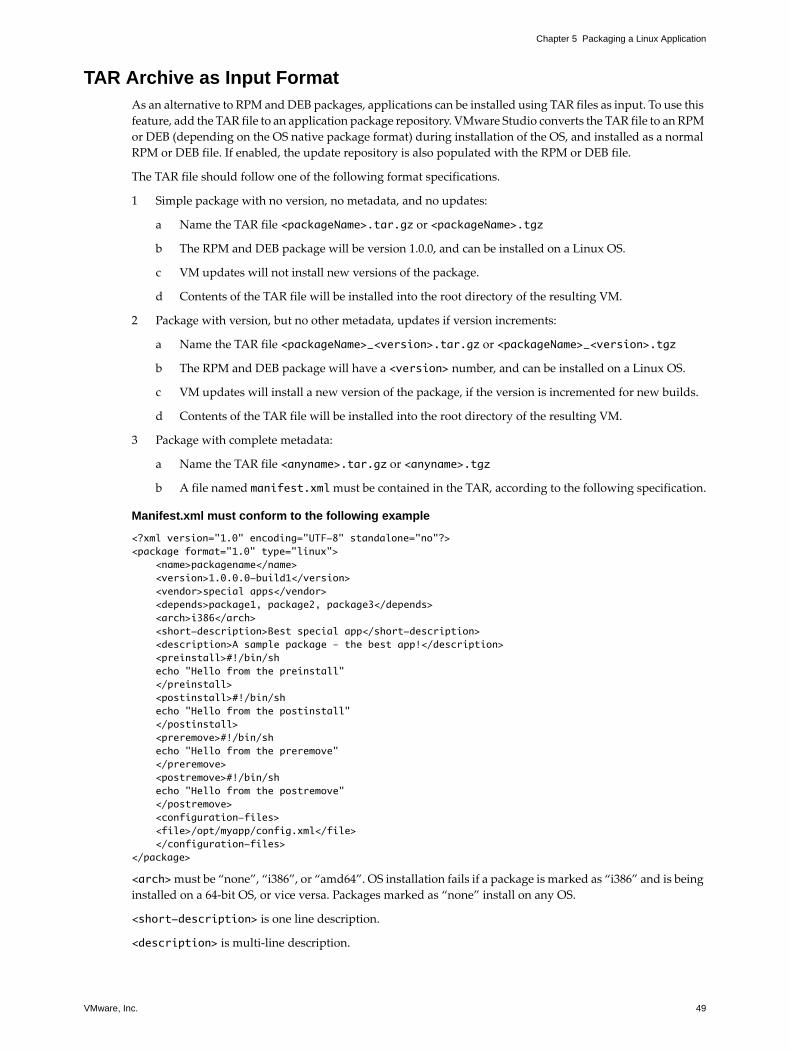
VMware, Inc. 49
Chapter 5 Packaging a Linux Application
TAR Archive as Input FormatAs an alternative to RPM and DEB packages, applications can be installed using TAR files as input. To use this
feature, add the TAR file to an application package repository. VMware Studio converts the TAR file to an RPM
or DEB (depending on the OS native package format) during installation of the OS, and installed as a normal
RPM or DEB file. If enabled, the update repository is also populated with the RPM or DEB file.
The TAR file should follow one of the following format specifications.
1 Simple package with no version, no metadata, and no updates:
a Name the TAR file <packageName>.tar.gz or <packageName>.tgz
b The RPM and DEB package will be version 1.0.0, and can be installed on a Linux OS.
c VM updates will not install new versions of the package.
d Contents of the TAR file will be installed into the root directory of the resulting VM.
2 Package with version, but no other metadata, updates if version increments:
a Name the TAR file <packageName>_<version>.tar.gz or <packageName>_<version>.tgz
b The RPM and DEB package will have a <version> number, and can be installed on a Linux OS.
c VM updates will install a new version of the package, if the version is incremented for new builds.
d Contents of the TAR file will be installed into the root directory of the resulting VM.
3 Package with complete metadata:
a Name the TAR file <anyname>.tar.gz or <anyname>.tgz
b A file named manifest.xml must be contained in the TAR, according to the following specification.
Manifest.xml must conform to the following example
<?xml version="1.0" encoding="UTF-8" standalone="no"?><package format="1.0" type="linux">
<name>packagename</name><version>1.0.0.0-build1</version><vendor>special apps</vendor><depends>package1, package2, package3</depends><arch>i386</arch><short-description>Best special app</short-description><description>A sample package – the best app!</description><preinstall>#!/bin/shecho "Hello from the preinstall"</preinstall><postinstall>#!/bin/shecho "Hello from the postinstall"</postinstall><preremove>#!/bin/shecho "Hello from the preremove"</preremove><postremove>#!/bin/shecho "Hello from the postremove"</postremove><configuration-files><file>/opt/myapp/config.xml</file></configuration-files>
</package>
<arch> must be “none”, “i386”, or “amd64”. OS installation fails if a package is marked as “i386” and is being
installed on a 64‐bit OS, or vice versa. Packages marked as “none” install on any OS.
<short-description> is one line description.
<description> is multi‐line description.

Developer’s Guide to Building vApps and Virtual Appliances
50 VMware, Inc.
<configuration-files> may contain any number of configuration files in <file> elements. These files
must already exist in the TAR, and will be marked as Config files in the RPM and DEB package. If a file is listed,
it is not replaced when the package is upgraded.
File permissions and owners are preserved from the contents of the TAR, however all users and groups must
exist on the VMware Studio appliance, otherwise file ownership defaults to root, group root.

VMware, Inc. 51
6w
This chapter explains the following topics:
“VMware Studio Management Service” on page 51
“Default Management Services” on page 52
“Creating a Management Service” on page 52
“Importing a Management Service” on page 54
VMware Studio contains several default management services, and it allows you to create new ones.
VMware Studio Management ServiceFigure 6‐1 shows the implementation framework of Virtual Appliance Management Infrastructure (VAMI)
services on top of CIM providers.
Figure 6-1. VAMI Services
VMware Studio‐built virtual machines carry an in‐guest management component, the Virtual Appliance
Management Infrastructure (VAMI). All management services provided by VAMI are implemented as
common information model (CIM) providers. VAMI services use the small footprint CIM broker (SFCB) as a
CIM manager. CIM is a standard from Distributed Management Task Force (DMTF). VAMI services can be
underpinned as tabs in the Web console.
Adding a Linux Management Service 6
Developer’s Guide to Building vApps and Virtual Appliances
52 VMware, Inc.
VAMI has the following components:
HTTP Server – A lightweight Web server using LIGHTTPD to host the management Web console.
CIM Server – The small footprint CIM broker (SFCB) acts as the management agent for the VM. CIM is a
standard from the Distributed Management Task Force (DMTF); see http://www.dmtf.org for details.
VAMI UI Framework – Provides a container for the VAMI service Web interface, which is shown as a tab
in the Web console.
VAMI Services – VAMI services are used to expose a Web interface to manage the VM. A VAMI service
can contain a Web interface, the CIM provider, additional files, and Web server configuration. The Web
interface can optionally use a JavaScript API for better integration with the VAMI UI framework.
Authentication – The pluggable authentication module (PAM) is used to authenticate access to the
management Web console and CIM APIs. The authentication module creates a session file for each user,
which is stored at /opt/vmware/var/lib/vami/core/session as a file. The time‐out for sessions is
controlled by the environment variable VAMI_AUTHENTICATION_TIMEOUT and specified in number of
minutes. The default setting is one day (1440 minutes).
Default Management ServicesVMware Studio comes with a default set of management services that can be included with any Linux‐based
virtual machine. When you log into the VMware Studio Web console and click the Library > Linux tabs, this
list appears showing the default management services:
core – The VAMI framework and Web container to hold other services.
system – Displays basic system information, and has an interface to shutdown or reboot the VM.
network – Allows end‐users to configure their network and proxy settings.
update – If you are planning to ship a virtual appliance, VMware highly recommends that you include
this service as part of your build profile. Update service simplifies the maintenance of virtual appliances
by automatically or manually applying updates from a ISV‐managed update repository. The update
service integrates with VMware Update Manager to allow centralized management of updates through
VMware vSphere. For more details, see http://www.vmware.com/support/pubs/vum_pubs.html.
The following packages are installed on the VMware Studio appliance to support the VAMI framework:
vmware-studio-appliance-config-2.0.0.0-090708120832vmware-studio-init-2.0.0-090616223929vmware-studio-vami-2.0.0-090616224643vmware-studio-vami-core-2.0.0.0-0vmware-studio-vami-network-2.0.0.0-0vmware-studio-vami-servicebase-2.0.0-090616224643vmware-studio-vami-system-2.0.0.0-0vmware-studio-vami-update-2.0.0.0-0
Creating a Management ServiceVMware Studio lets you add your own management services in the virtual machine, with their Web interface
appearing as tabs in the Web console of the generated virtual machine. These management services are
packaged in a tar or tar.gz file and imported into VMware Studio.
You can package management services using the VMware Studio Plugin for Eclipse (see “Management
Services with Eclipse” on page 54) or create them manually as described in this section. Management services
can be made part of your Linux‐based virtual machine by specifying them in the build profile.

VMware, Inc. 53
Chapter 6 Adding a Linux Management Service
When you create a management service, the service must be encapsulated in a tar or tar.gz file with the
following directory structure:
service.xml – Contains service name, version number, and description of the management service.
Installed in the /opt/vmware/var/lib/vami/${servicename}/ directory.
conf/lighttpd.conf – LIGHTTPD configuration settings for this service. Settings are appended to the
original lighttpd.conf file and installed in /opt/vmware/var/lib/vami/${servicename}/conf.
provider/*.reg – CIM provider registration files. At build time, VMware Studio installs this file into the
/opt/vmware/var/lib/sfcb/stage/regs/ directory.
provider/*.mof – CIM provider managed object format (MOF) files. Installed into the
/opt/vmware/var/lib/sfcb/stage/mofs/root/cimv2 directory.
provider/*.so – CIM provider shared libraries. Installed into /opt/vmware/lib.
system-root/* – Content of the service that must reside in (get copied to) the system root directory of
the VM’s operating system.
view/view.xml – Describes the tab title to show in the Web console, contains information about the tabʹs
content. Installed in the /opt/vmware/share/htdocs/service/${servicename}/ directory.
view/* – All view‐specific files for this service. Contains HTML, JavaScript, and images. Installed in the
/opt/vmware/share/htdocs/service/${servicename}/ directory.
web-root/* – The view directory contains service‐specific Web user interface files. Additional files that
must be placed at the Web root level of LIGHTTPD. Installed in /opt/vmware/share/htdocs.
Of the above files, only service.xml is mandatory, and view.xml is needed for its associated user interface. The following section describes the format of these two files.
service.xml
This file describes the identity and dependencies of the service. The following code block describes the
service.xml format:
<service><name>ServiceName</name><version>1.0.0.0</version><description>This provides the build service to create new appliance</description><requires>
<packages>rpm_or_dep_package_dependencies separated by commas</packages><services>other_service_dependencies separated by commas</services>
</requires></service>
view.xml
This file describes the Web interface properties, including the tab title and contents of the tab. Content can be
of two types, url or html. When content type is url, it is the location of the file that appears in the UI tab.
The following code block describes the view.xml format when content type is url:
<service><title>ServiceTitle</title><content type="url" url="index.html"/>
</service>
If the URL is prefixed with a slash (for example /index.html), the URL location is relative to the document
root of the Web server, /opt/vmware/share/htdocs. Otherwise the URL location is relative to where the
service views are installed, /opt/vmware/share/htdocs/service/${servicename}.

Developer’s Guide to Building vApps and Virtual Appliances
54 VMware, Inc.
The following code block describes the view.xml format when content type is html:
<service><title>ServiceTitle</title><Content type="html">
<![CDATA[Hello world or other important html content]]>
</Content></service>
See “Management Services Web API” on page 95, for extended JavaScript API support with basic navigation,
communication, authentication and logging.
Management Services with Eclipse
VMware Studio provides an Eclipse plugin for packaging your management service. For more information,
see Chapter 8, “Using the VMware Studio Plugin for Eclipse,” on page 61, especially “Creating Management
Services” on page 63.
Importing a Management ServiceYou can include any of the existing VMware Studio management services into your build profile. You can also
include a management service that you have created in a newly built VM.
To import a management service
1 Log into the VMware Studio Web console and click the Library > Linux tabs.
2 Click the Import Service button. Browse to the location of the tar or tar.gz file that you created for your management service. Click Import Service.
3 If correctly created, your new service appears in the list, with its version and description. VMware Studio
maintains the management services repository under /opt/vmware/var/lib/build/services.
4 Follow instructions for creating a new VM, or for editing an existing VM.
5 On the Management page under Management Services, click the Add button, select the new service from
a list, and click Add.
6 Optionally, click Customize GUI Tab Order, which allows you to adjust the order of the tabs.
7 Save and build the VM.
This service is installed as RPM or DEB package in the resulting VM and appears as a tab (if it contains a UI
component) in the VM management Web console.
VMware, Inc. 55
7
If you are an ISV shipping a virtual appliance, VMware highly recommends creating an Update Repository for
your virtual appliance. This enables you to remotely update virtual appliances deployed at customer sites.
This chapter describes how to publish updates to your virtual appliance and includes the following topics:
“Overview of Updates” on page 55
“Generating an Update” on page 56
“Publishing an Update” on page 58
“Testing Against a Staging Update Repository” on page 59
“Update Repository Format” on page 60
“Supporting Central Updates with VMware Update Manager” on page 60
Overview of UpdatesAfter a virtual appliance is built and released, you might need to publish an update for it. VMware Studio
defines an update as a set of RPM or DEB packages. The VMware Studio update repository contains these
packages and a manifest file that describes the contents of a particular version of the virtual appliance. In the
virtual appliance model, the ISV creates and publishes updates to the repository.
A virtual appliance deployed at a customer site can “phone home” to an update repository to retrieve updates,
which might include:
Operating System updates – You can download OS updates from the OS provider’s Web site.
Application updates – You can provide your own application updates.
To update a virtual appliance
1 Build your first virtual appliance so it can receive updates from an update repository hosted at an ISV site.
In VMware Studio (see “Management Tab” on page 36) enable the update service before a build. When
you enable updates for a VM, VMware Studio creates an update repository after the VM build.
2 After the appliance is shipped, monitor updates for its OS in addition to the application stack components
that are present in your virtual appliance.
3 Analyze the changes and select applicable updates for your virtual appliance.
4 Generate the update in the form that your virtual appliance understands. For generating updates using
VMware Studio, see “Generating an Update” on page 56.
5 Test the updates to make sure that your application continues to work as before in the virtual appliance.
6 Publish the update. See “Publishing an Update” on page 58.
You have a choice of several publication methods, as summarized in “Testing Against a Staging Update
Repository” on page 59.
Managing the Linux Update Repository 7

Developer’s Guide to Building vApps and Virtual Appliances
56 VMware, Inc.
Figure 7‐1 shows VMware Studio creating an update repository for a virtual appliance VM on a staging server.
The ISV also has the option of exporting the update repository as a ZIP file or as an ISO image for distribution.
Figure 7-1. VMware Studio Update Repository
Figure 7‐2 shows the different channels where a virtual appliance VM can retrieve updates. Both the ZIP file
and ISO image contain the complete update repository that the ISV builds. The ZIP can be deployed to a local
Web server within the customer’s local area network, whereas the ISO can provide off‐network updates if the
VM is configured with a CD drive.
Figure 7-2. Virtual Appliance Update Retrieval
Generating an UpdateFigure shows the flow of creating a virtual appliance and its update repository. When the update management
service for a VM is enabled, an update repository is created at the end of the VM build. An update repository
cannot be created without building the VM.
Figure 7-3. Update Flow During VM Build
During a VMware Studio update build, the port 7 open requirement (“Prerequisites” on page 15) applies to
the host of the Update Repository, in other words the repository server or staging server.
VMware, Inc. 57
Chapter 7 Managing the Linux Update Repository
To generate an update from the VMware Studio Web console
1 Log into the VMware Studio Web console.
2 In the VM List, select the virtual appliance for which you want to generate an update.
3 Under Actions, click Edit Profile.
4 In the Description tab, change the version number in the profile for the VM. This is the key indicator that
an update was generated for an existing virtual appliance. The Version is a number in N.N.N.N format,
where N must be a number between 0 and 65535.
5 In the Management tab, click Add and enable the update service. A new Update Service section appears
on the page, with a section for Update Service Repository Settings.
6 Choose and type a Repository URL to establish an update site for your virtual appliances in the field.
The Repository URL should be on a publicly accessible Web site.
After you establish a Repository URL, you should not change it during the life cycle of a virtual appliance.
If you do change the URL, you would have to instruct end‐users (for example in the Update Description
field) to reboot the virtual appliance after updating so the new URL can take effect. You would also have
to place the update containing the new Repository URL on your old update server as well as on your new
update server. Only then could the new Repository URL be used for future updates.
7 Provide an Update Description so the end‐user knows what this update contains. The VendorUUID and
ProductRID are mandatory for use with VMware Update Manager.
8 Complete the details for Repository Server Settings, where the update archive gets copied after a build.
If you plan to copy the update from a staging server to the update repository on an external production
Web site, make sure the Repository URL points to that external production Web site, not to the internal
staging server. After the build completes, copy the entire staging server update to the external production
Web site. To ease the task of copying all the update files, under Repository Export Settings you can click
Update Archive and specify a ZIP Filename.
VMware Studio creates a new manifest with the new version number specified in the build profile, and
updates the repository. VMware Studio marks the new version of the virtual appliance as the latest version
and copies the new and changed packages to the update repository. If you remove a package from the build
profile, the newly generated manifest reflects this removal. The VAMI agent does not delete packages when
updating an appliance, but you can add a preupdate or postupdate script to remove packages.
Updates on CDROM
If you are building an appliance that lacks external network access, or if your customers prefer, you can deliver
updates on CDROM.
To generate an update from the VMware Studio Web console
1 Follow the general procedure for “Generating an Update” on page 56.
2 In Step 6, select CDROM updates instead of Specify repository.
Fields for Repository URL, Username, and Password become dimmed out.
3 Under Repository Export Settings, click ISO Archive and specify the ISO Filename to create.
4 After the build succeeds, the update is copied to the File Transfer Path on the File Transfer Hostname.
5 Burn the ISO Filename to CDROM for delivery to your customers.
Alternately, you can make the ISO image available at a location on your production repository Web server,
and let customers download it and burn the CDROM themselves.
NOTE Changing the virtual appliance name, VendorUUID, or ProductRID in the build profile while
generating updates might affect integration with VMware Update Manager. See “Supporting Central
Updates with VMware Update Manager” on page 60 for more information.
Developer’s Guide to Building vApps and Virtual Appliances
58 VMware, Inc.
Updates Requiring Reboot
The application might require a reboot after applying the update. If the update requires a reboot of the whole
virtual appliance, you should provide that information in the Update Description field. This field is displayed
to the end‐user before the update is downloaded on the deployed virtual appliance.
VMware Studio automatically detects if kernel packages are being updated. End‐users are notified during an
update if that is the case. Users are asked to reboot their appliance after the update completes.
Publishing an UpdateAfter the fields are modified in the build profile, click Save and Build to build your virtual appliance with the
updates. As part of the build process, the update repository is updated with a new manifest. You can see that
manifest-latest.xml is updated to reflect the update, and additional packages are copied to the repository.
Test the generated virtual appliance to ensure it works as expected with the updates. Once you are ready to
make the updates visible to end‐users, you can copy the entire contents to your external Web server that hosts
the update repository. Because deployed virtual appliances at customer sites have the URL of this Web server
embedded, the following actions can occur:
Virtual appliances flag an update‐available, if automatic check for update is enabled.
The end‐user can manually check for updates to view available updates.
The end‐user can see the Update Description and react to critical information it contains. For example, you
can include this advisory message: “You must reboot the virtual appliance after applying this update.”
Publishing an Update Repository from ZIP
The repository information that you configure in the Web console persists in the build profile. Additionally,
VMware Studio can create a ZIP archive of each update when you enable Update Archive Export. You can use
Update Archive Export to control publishing of updates by manually copying the archive and extracting the
update files to a remote Web server. During the build, VMware Studio creates the following update ZIP file:
/opt/vmware/www/build/<buildNumber>/exports/zip/<exportFile>.zip
To publish an update from the ZIP archive created using Repository Export, extract the contents of the file in
the document root of the URL that was specified as the update URL. For example, if you set the update URL
to http://<your-server>/updates/ and set the document root in the Web server to /var/www/htdocs/, then you would extract the contents of the ZIP file into /var/www/htdocs/updates/ on <your-server>. Virtual appliance end‐users could now retrieve and install the update from your Web server.
The following example is for Linux‐based Web servers.
To publish an update from the ZIP archive
1 Connect with SSH to your production update server, in this example support.example.com:
ssh support.example.com
2 Run scp to secure copy from the VMware Studio virtual appliance <vmwStudio> into /tmp:
scp root@<vmwStudio>:/opt/vmware/www/build/<buildNumber>/exports/zip/<exportFile>.zip /tmp
NOTE It is not possible to publish updates for a vApp in a single unit. The ISV must create a separate update
repository for each constituent VM in the vApp.
CAUTION During the time when you are publishing an update into a previously existing updates directory,
users downloading the update might encounter data corruption. A best practice for Web sites is to publish your
update first on a staging server, and later sync it to the production server during off hours. Another solution
is to make the repository update procedure more atomic: copy the new update repository to a new directory,
and simply rename the directory when the upload is complete.

VMware, Inc. 59
Chapter 7 Managing the Linux Update Repository
If the production update server has HTTP access to your virtual appliance, you could instead run:
cd /tmp; wget --no-proxy http://<vmwStudio>/build/<buildNumber>/exports/zip/<exportFile>.zip
If your network does have a proxy, wget takes it from the http_proxy environment variable.
3 Create a directory for updates on your Web server:
mkdir -p /var/www/htdocs/updates/productXYZcd /var/www/htdocs/updates/productXYZ
The path you specify must be in the Web server document root (in this example, /var/www/htdocs) and must correspond to the repository URL specified for the appliance during the build.
4 If this directory contains files from a previous update archive, the previous update manifest XML file,
manifest-latest.xml, should be renamed as a backup file. The name of this backup file is arbitrary. For
example, you can embed its creation date in the format yyyymmdd for year, month, and date. To make your
backup of the old update manifest file, run a command like the following. If you ever need to revert your
update server to an older update version, you can overwrite the manifest-latest.xml file with the
contents of a previous manifest backup file.
mv ./manifest/manifest-latest.xml ./manifest/manifest-<yyyymmdd>.xml
5 Run the following commands to extract the update archive contents into the productXYZ directory:
unzip /tmp/<exportFile>.zip
Testing Against a Staging Update RepositoryWhen building a virtual appliance, it is not a requirement to publish updates from a ZIP archive. That is only
one mechanism. In this example, the Update Repository URL in the build profile points to a HTTP or HTTPS
location on the production server, while the update File Transfer Hostname and File Transfer Path point to a
directory on the staging server. This setup is shown in Figure 7‐1.
As an ISV you have three ways to deliver updates:
From a Web server on the public Internet, called Production Server in the Figure 7‐1 diagram. In the VM
build profile, Update Repository URL refers to the update location on this Web server.
By delivering a ZIP file to your customers, who unzip the revised software into the update repository on
their local Web server, and set their virtual appliance to update from the URL of the update repository on
this local Web server. The middle of Figure 7‐2 shows this delivery mechanism.
By delivering a CDROM to your customers, who place the disc in a CD drive accessible to the appliance
and enable update from CDROM. The bottom of Figure 7‐2 shows this delivery mechanism.
With the staging server setup, here is how you can test updates against the staging (not production) repository
from your virtual appliances. Doing so avoids manual installation of any RPM or DEB update packages.
Open a terminal to the appliance of interest and follow these steps:
1 Edit /opt/vmware/var/lib/vami/update/provider/provider-deploy.xml and change repositoryAddress, replacing the URL pointing to the update repository on the production server with
the URL of update repository on the staging server. Obviously this is only for internal testing.
2 Run this command to restart the CIM broker:
/etc/init.d/vami-sfcb restart
3 Run this command to check for update availability:
/opt/vmware/bin/vamicli update --check
4 Run this command to install the update.
/opt/vmware/bin/vamicli update --install latest
5 Run the desired tests to verify that the expected updates occurred in the appliance.

Developer’s Guide to Building vApps and Virtual Appliances
60 VMware, Inc.
Update Repository FormatThe update repository has a specific format. Each time you publish an update to the update repository, new
packages (and new versions of existing packages) are added to the repository. The old manifest is moved to
manifest-<version>.xml, the new manifest-latest.xml replaces the old one, and manifestrepo.xml is updated to reflect any new packages in the repository. Examine the manifest-latest.xml file to verify that your update was published to the repository. The update repository file structure is the following:
<Update Repository URL>package-pool
package1-version1.{rpm|deb}package1-version2.{rpm|deb}package2-version1.{rpm|deb}...
manifestmanifest-latest.xmlmanifest-repo.xmlmanifest-<version1>.xmlmanifest-<version2>.xml...
Supporting Central Updates with VMware Update ManagerThe updates that are published for an appliance can be applied by the end‐user either using the Web console
of the virtual appliance or using the centralized update management provided by VMware Update Manager.
VMware Update Manager allows users to create a baseline that controls updates to all virtual appliances, or a
baseline for a particular appliance, or a baseline for appliances from a given vendor, and so forth. Any
baselines specified using the vendor name or product names are internally referenced with the VendorUUID
and the ProductRID fields. VMware Update Manager can retrieve the VendorUUID and ProductRID from
virtual appliances.
The VendorUUID and ProductRID fields are mandatory in build profiles with the update repository enabled.
VMware Update Manager requires the VendorUUID and ProductRID while referencing the appliances in the
baselines. If the vendor name or appliance name were to change for a future version of a virtual appliance,
then any baselines created by the user would become invalid. To avoid invalid baselines, VMware requires that
you enter your VendorUUID and ProductRID when creating update repository information.
VendorUUID – The globally unique identifier for your company or organization. The UUID can be a
Windows GUID (Globally Unique Identifier).
ProductRID – Unique product identifier, which should be unique across all appliances from a vendor.
VMware, Inc. 61
8
The VMware Studio Plugin for Eclipse can help you package applications and develop Linux‐based virtual
appliances and vApps. This chapter contains the following sections
“Requirements of VMware Studio Plugin for Eclipse” on page 61
“Getting Started with VMware Studio Plugin for Eclipse” on page 61
“Packaging Applications to Run In a Virtual Machine” on page 62
“Creating Management Services” on page 63
“Additional Eclipse Features” on page 63
Using the VMware Studio Plugin for Eclipse, you can control the user interface portions of VMware Studio
like an application under development. The VMware Studio Plugin for Eclipse is also useful for packaging
Linux‐based applications. The VMware Studio Plugin for Eclipse is also useful for making your own
management services, which create new tabs in the Studio Web console. See Chapter 6, “Adding a Linux
Management Service,” on page 51 for more information about management services.
Requirements of VMware Studio Plugin for EclipseThe VMware Studio Plugin for Eclipse has the following prerequisites.
VMware Studio 2.0 already installed.
Eclipse 3.4 (Ganymede) or 3.5 (Galileo). To install, visit the http://www.eclipse.org/downloads Web site.
The Java IDE and Apache Ant 1.7 are included in Eclipse 3.4 and 3.5.
On all Eclipse platforms (Linux, Mac, Windows) check for either of the following:
Access to the VMware Studio for Eclipse update site, http://<StudioIPaddr>/eclipse/update/
The VMwareStudioForEclipse-2.0.0.*.zip package downloaded from VMware.com
Getting Started with VMware Studio Plugin for EclipseThe VMware Studio Plugin for Eclipse must be installed into the Eclipse framework.
To get started with VMware Studio Plugin for Eclipse
1 If you are running Eclipse behind a firewall, set the proxy in Eclipse. This is because Eclipse uses the HTTP
proxy when looking at dependencies for the VMware Studio plugin during installation.
a Select Window > Preferences > General > Network Connections > Manual proxy configuration, or
use the system proxy configuration if available.
b Set the HTTP proxy for Eclipse and possibly the SSL proxy.
Using the VMware Studio Plugin for Eclipse 8
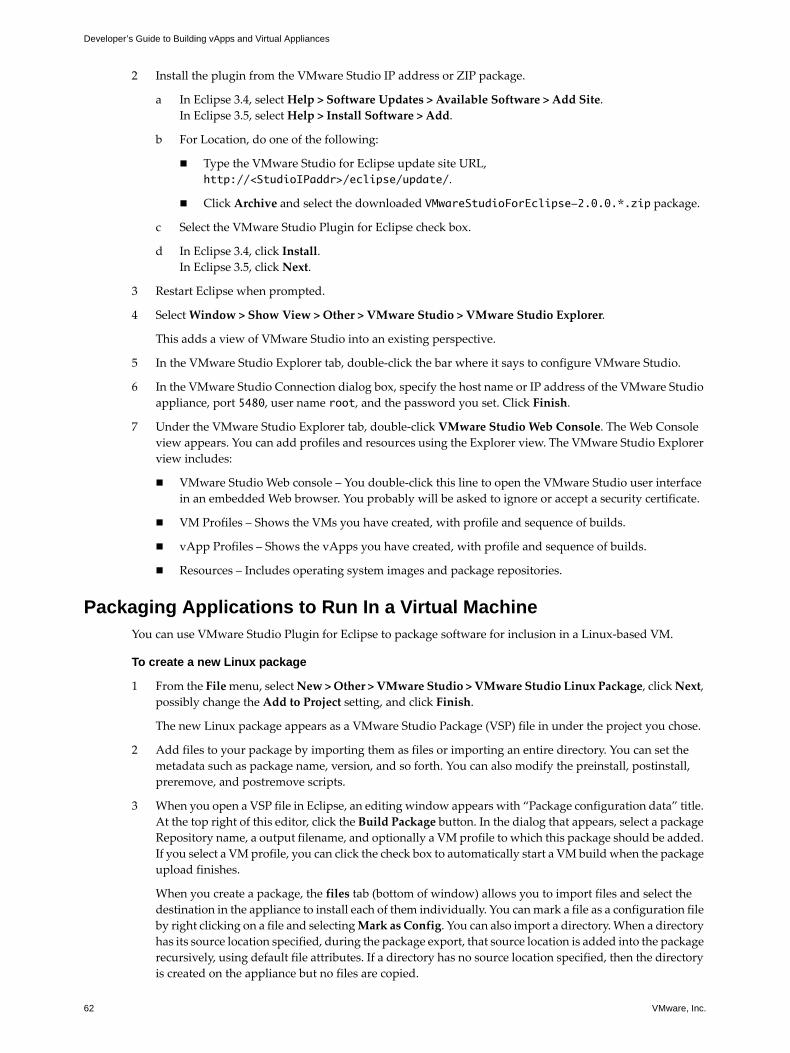
Developer’s Guide to Building vApps and Virtual Appliances
62 VMware, Inc.
2 Install the plugin from the VMware Studio IP address or ZIP package.
a In Eclipse 3.4, select Help > Software Updates > Available Software > Add Site.
In Eclipse 3.5, select Help > Install Software > Add.
b For Location, do one of the following:
Type the VMware Studio for Eclipse update site URL,
http://<StudioIPaddr>/eclipse/update/.
Click Archive and select the downloaded VMwareStudioForEclipse-2.0.0.*.zip package.
c Select the VMware Studio Plugin for Eclipse check box.
d In Eclipse 3.4, click Install.
In Eclipse 3.5, click Next.
3 Restart Eclipse when prompted.
4 Select Window > Show View > Other > VMware Studio > VMware Studio Explorer.
This adds a view of VMware Studio into an existing perspective.
5 In the VMware Studio Explorer tab, double‐click the bar where it says to configure VMware Studio.
6 In the VMware Studio Connection dialog box, specify the host name or IP address of the VMware Studio
appliance, port 5480, user name root, and the password you set. Click Finish.
7 Under the VMware Studio Explorer tab, double‐click VMware Studio Web Console. The Web Console
view appears. You can add profiles and resources using the Explorer view. The VMware Studio Explorer
view includes:
VMware Studio Web console – You double‐click this line to open the VMware Studio user interface
in an embedded Web browser. You probably will be asked to ignore or accept a security certificate.
VM Profiles – Shows the VMs you have created, with profile and sequence of builds.
vApp Profiles – Shows the vApps you have created, with profile and sequence of builds.
Resources – Includes operating system images and package repositories.
Packaging Applications to Run In a Virtual MachineYou can use VMware Studio Plugin for Eclipse to package software for inclusion in a Linux‐based VM.
To create a new Linux package
1 From the File menu, select New > Other > VMware Studio > VMware Studio Linux Package, click Next,
possibly change the Add to Project setting, and click Finish.
The new Linux package appears as a VMware Studio Package (VSP) file in under the project you chose.
2 Add files to your package by importing them as files or importing an entire directory. You can set the
metadata such as package name, version, and so forth. You can also modify the preinstall, postinstall,
preremove, and postremove scripts.
3 When you open a VSP file in Eclipse, an editing window appears with “Package configuration data” title.
At the top right of this editor, click the Build Package button. In the dialog that appears, select a package
Repository name, a output filename, and optionally a VM profile to which this package should be added.
If you select a VM profile, you can click the check box to automatically start a VM build when the package
upload finishes.
When you create a package, the files tab (bottom of window) allows you to import files and select the
destination in the appliance to install each of them individually. You can mark a file as a configuration file
by right clicking on a file and selecting Mark as Config. You can also import a directory. When a directory
has its source location specified, during the package export, that source location is added into the package
recursively, using default file attributes. If a directory has no source location specified, then the directory
is created on the appliance but no files are copied.
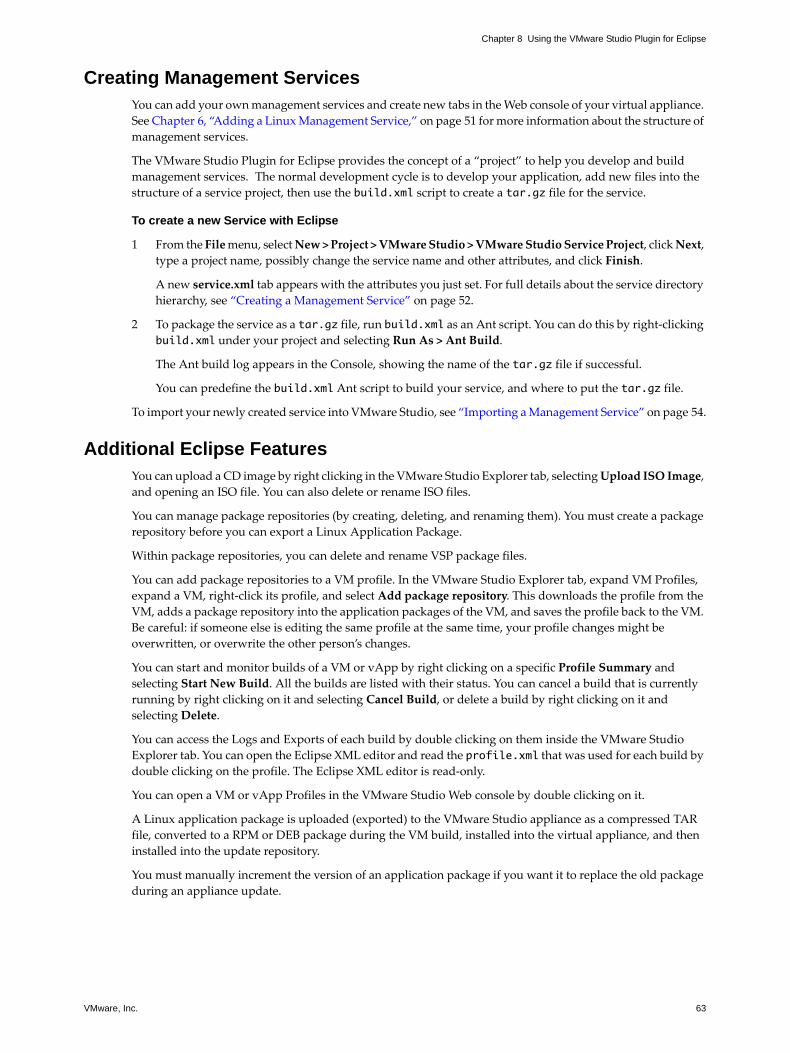
VMware, Inc. 63
Chapter 8 Using the VMware Studio Plugin for Eclipse
Creating Management ServicesYou can add your own management services and create new tabs in the Web console of your virtual appliance.
See Chapter 6, “Adding a Linux Management Service,” on page 51 for more information about the structure of
management services.
The VMware Studio Plugin for Eclipse provides the concept of a “project” to help you develop and build
management services. The normal development cycle is to develop your application, add new files into the
structure of a service project, then use the build.xml script to create a tar.gz file for the service.
To create a new Service with Eclipse
1 From the File menu, select New > Project > VMware Studio > VMware Studio Service Project, click Next,
type a project name, possibly change the service name and other attributes, and click Finish.
A new service.xml tab appears with the attributes you just set. For full details about the service directory
hierarchy, see “Creating a Management Service” on page 52.
2 To package the service as a tar.gz file, run build.xml as an Ant script. You can do this by right‐clicking build.xml under your project and selecting Run As > Ant Build.
The Ant build log appears in the Console, showing the name of the tar.gz file if successful.
You can predefine the build.xml Ant script to build your service, and where to put the tar.gz file.
To import your newly created service into VMware Studio, see “Importing a Management Service” on page 54.
Additional Eclipse FeaturesYou can upload a CD image by right clicking in the VMware Studio Explorer tab, selecting Upload ISO Image,
and opening an ISO file. You can also delete or rename ISO files.
You can manage package repositories (by creating, deleting, and renaming them). You must create a package
repository before you can export a Linux Application Package.
Within package repositories, you can delete and rename VSP package files.
You can add package repositories to a VM profile. In the VMware Studio Explorer tab, expand VM Profiles,
expand a VM, right‐click its profile, and select Add package repository. This downloads the profile from the
VM, adds a package repository into the application packages of the VM, and saves the profile back to the VM.
Be careful: if someone else is editing the same profile at the same time, your profile changes might be
overwritten, or overwrite the other person’s changes.
You can start and monitor builds of a VM or vApp by right clicking on a specific Profile Summary and
selecting Start New Build. All the builds are listed with their status. You can cancel a build that is currently
running by right clicking on it and selecting Cancel Build, or delete a build by right clicking on it and
selectingDelete.
You can access the Logs and Exports of each build by double clicking on them inside the VMware Studio
Explorer tab. You can open the Eclipse XML editor and read the profile.xml that was used for each build by
double clicking on the profile. The Eclipse XML editor is read‐only.
You can open a VM or vApp Profiles in the VMware Studio Web console by double clicking on it.
A Linux application package is uploaded (exported) to the VMware Studio appliance as a compressed TAR
file, converted to a RPM or DEB package during the VM build, installed into the virtual appliance, and then
installed into the update repository.
You must manually increment the version of an application package if you want it to replace the old package
during an appliance update.

Developer’s Guide to Building vApps and Virtual Appliances
64 VMware, Inc.
Uninstalling the Eclipse Plugin
You can uninstall the VMware Studio Eclipse plugin.
To uninstall the Eclipse plugin
1 Do one of the following:
In Eclipse 3.4, select Help > Software Updates > Installed Software.
In Eclipse 3.5, select Help > About Eclipse > Installation Details > Installed Software.
2 Select VMware Studio Plugin for Eclipse and click Uninstall.
3 Restart Eclipse when prompted.
VMware, Inc. 65
Developing a Windows-Based VM

Developer’s Guide to Building vApps and Virtual Appliances
66 VMware, Inc.
VMware, Inc. 67
9
This chapter describes how to create a Windows‐based VM using the VMware Studio Web console.
“Overview” on page 67
“Operating System ISO Image” on page 68
“Windows Application Packages” on page 68
“Creating a VM Build Profile” on page 68
“Additional Fields for Windows Reference” on page 69
“Building a VM from the Build Profile” on page 72
“Testing the Generated VM” on page 72
“Reiterating the Build Process” on page 73
OverviewVMware Studio supports the creation of virtual machines containing a Windows‐based Server operating
system and user‐provided applications.
Windows‐based VMs built by VMware Studio do not have the Virtual Appliance Management
Infrastructure (VAMI) agent.
Prerequisites – OS and Application
This chapter assumes that you have downloaded the VMware Studio software onto a supported virtualization
product platform, as described in “Deploying VMware Studio” on page 16. You also need:
An ISO image from the list of Windows operating systems in “Operating System ISO Image” on page 68.
A valid license key for the Windows operating system you select.
Your application shared on a Microsoft Network Folder, or packaged as a VMware Studio Package (VSP)
for Windows, as outlined in “Windows Application Packages” on page 68.
Accessing the Web Console
To access the Web console with your browser, navigate to the IP address of the VMware Studio appliance. The
access URL appears at install time, as described in “Deploying VMware Studio” on page 16.
Creating a Windows-Based VM 9
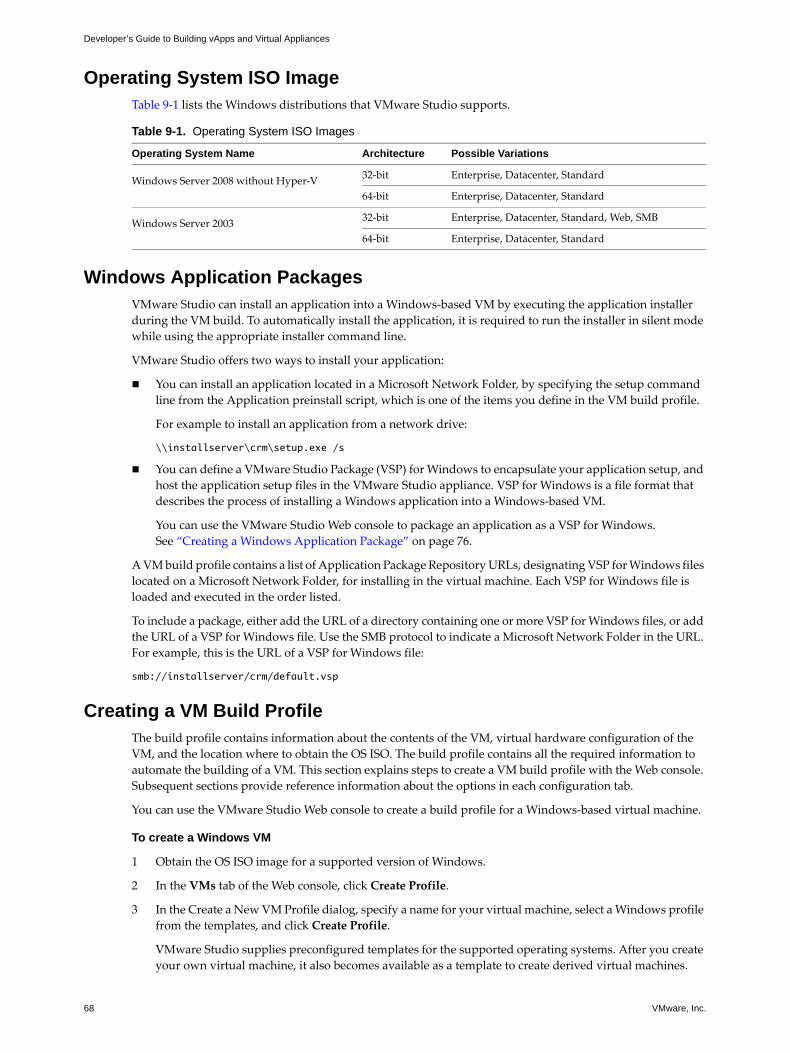
Developer’s Guide to Building vApps and Virtual Appliances
68 VMware, Inc.
Operating System ISO ImageTable 9‐1 lists the Windows distributions that VMware Studio supports.
Windows Application PackagesVMware Studio can install an application into a Windows‐based VM by executing the application installer
during the VM build. To automatically install the application, it is required to run the installer in silent mode
while using the appropriate installer command line.
VMware Studio offers two ways to install your application:
You can install an application located in a Microsoft Network Folder, by specifying the setup command
line from the Application preinstall script, which is one of the items you define in the VM build profile.
For example to install an application from a network drive:
\\installserver\crm\setup.exe /s
You can define a VMware Studio Package (VSP) for Windows to encapsulate your application setup, and
host the application setup files in the VMware Studio appliance. VSP for Windows is a file format that
describes the process of installing a Windows application into a Windows‐based VM.
You can use the VMware Studio Web console to package an application as a VSP for Windows.
See “Creating a Windows Application Package” on page 76.
A VM build profile contains a list of Application Package Repository URLs, designating VSP for Windows files
located on a Microsoft Network Folder, for installing in the virtual machine. Each VSP for Windows file is
loaded and executed in the order listed.
To include a package, either add the URL of a directory containing one or more VSP for Windows files, or add
the URL of a VSP for Windows file. Use the SMB protocol to indicate a Microsoft Network Folder in the URL.
For example, this is the URL of a VSP for Windows file:
smb://installserver/crm/default.vsp
Creating a VM Build ProfileThe build profile contains information about the contents of the VM, virtual hardware configuration of the
VM, and the location where to obtain the OS ISO. The build profile contains all the required information to
automate the building of a VM. This section explains steps to create a VM build profile with the Web console.
Subsequent sections provide reference information about the options in each configuration tab.
You can use the VMware Studio Web console to create a build profile for a Windows‐based virtual machine.
To create a Windows VM
1 Obtain the OS ISO image for a supported version of Windows.
2 In the VMs tab of the Web console, click Create Profile.
3 In the Create a New VM Profile dialog, specify a name for your virtual machine, select a Windows profile
from the templates, and click Create Profile.
VMware Studio supplies preconfigured templates for the supported operating systems. After you create
your own virtual machine, it also becomes available as a template to create derived virtual machines.
Table 9-1. Operating System ISO Images
Operating System Name Architecture Possible Variations
Windows Server 2008 without Hyper‐V32‐bit Enterprise, Datacenter, Standard
64‐bit Enterprise, Datacenter, Standard
Windows Server 200332‐bit Enterprise, Datacenter, Standard, Web, SMB
64‐bit Enterprise, Datacenter, Standard
VMware, Inc. 69
Chapter 9 Creating a Windows-Based VM
4 The Editing page appears, where you edit the build profile of your virtual machine. VMware Studio
shows different items to edit for a Windows virtual machine than for a Linux virtual machine, as noted.
The VM editing page organizes the build profile into the following tabs:
Description – Specifies general information about the virtual machine. See “Description Tab” on
page 33 for details. Web Console Visual Customization and Welcome Text fields are not supported in
Windows‐based VM. The end‐user license agreement (EULA) is supported only when packaging the
Windows‐based virtual machine as OVF or OVA, and is displayed at deployment time.
Hardware – Specifies hardware configuration, such as CPU, memory, and disks, for the virtual
machine. See “Hardware Tab” on page 34 for details. Use the drive field to assign a drive letter to a
disk partition.
OS – Specifies information about the operating system for the virtual machine. See “OS Tab” on
page 35 for details. (Operating System Configuration included, see “OS Tab” on page 69.)
Application – Specifies the list of VSP for Windows files to install into the virtual machine. See
“Application Tab” on page 71 for details.
Output – Specifies the type of distribution format (OVF, OVA, or ZIP) for the virtual machine. ZIP is
for deployment on older VMware product platforms. OVF is for deployment on ESX/ESXi hosts or
VMware vSphere, and OVA for VMware vSphere. See “Output Tab” on page 38 for details.
Build Settings – Specifies setup of the build environment, such as connection information to many
possible provisioning platforms. See“Build Settings Tab” on page 39 for details.
Use the Next and Back buttons to navigate between the tabs, filling‐in the required and optional fields.
If you attempt to navigate to the next page without specifying a required field, an error message appears
in red next to the field showing where you must fix a problem before continuing.
Each field in the build profile has a help icon (i in a circle) on the right side. Clicking the help icon toggles
between display of contextual help and a list of frequently asked questions (FAQ).
Tabs below the purple VMware Studio logo (top left) navigate to other interfaces in the Web console.
Attempting to navigate off the editing page produces a dialog asking if you want to discard your edits.
5 After you configure a build profile, you can take one of the following actions by clicking a button on the
right side of the window:
Validate – After completing a build profile, you can validate its configuration before building the
virtual machine. Click the Validate button on the right side of the window to check the build profile.
Save and Build – Validates and saves your build profile and displays the build summary dialog box.
To begin the build provisioning process, click Build VM in this dialog box. A progress icon appears
and a build log is available to view the status of the build as it progresses.
Save and Close – Validates and saves your build profile, and closes the editing session. The build
profile appears in the VM List, and you can choose to edit or build the virtual machine at a later time.
Close Without Saving – Closes the editing page and discards changes. A warning appears asking if
you are sure you want to discard changes made during the current session.
Additional Fields for Windows ReferenceThis section describes the new items that are required for a Windows build profile.
OS Tab
The OS Tab contains the basic settings to install Windows in unattended mode. VMware Studio creates an
unattended setup file with settings from the ‘Operating System Installation Configuration’ section, and
provides it to the Windows.
Table 9‐2 describes the new configuration properties in the operating system OS tab.
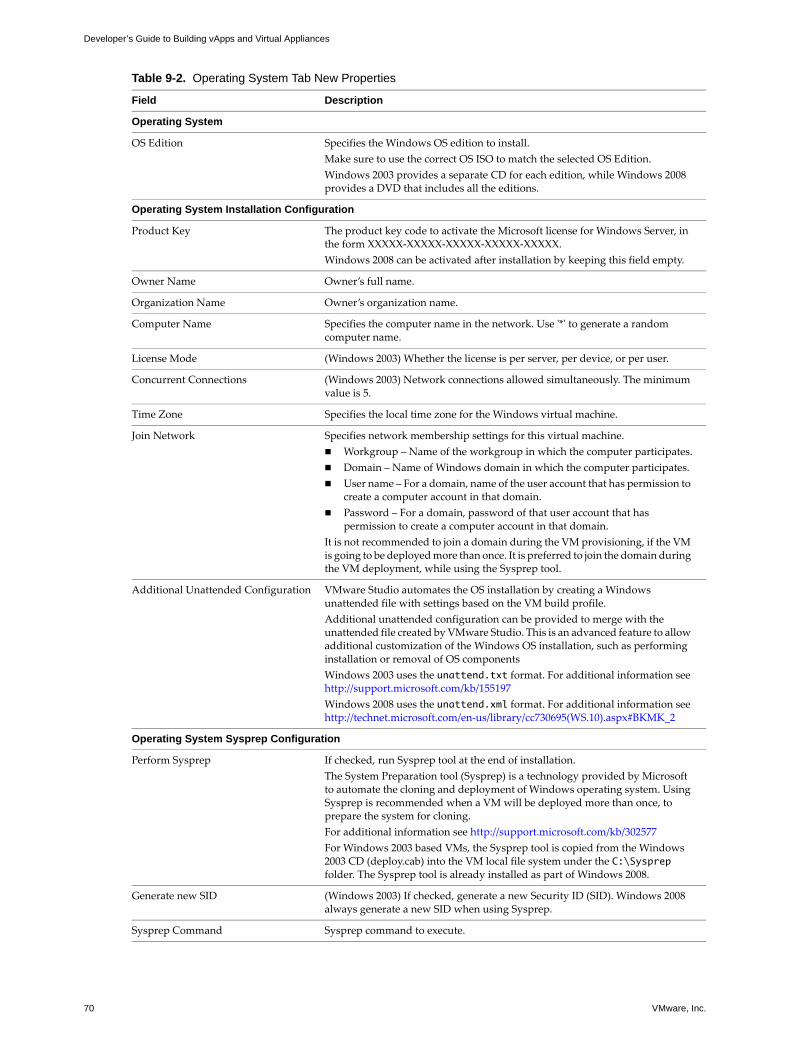
Developer’s Guide to Building vApps and Virtual Appliances
70 VMware, Inc.
Table 9-2. Operating System Tab New Properties
Field Description
Operating System
OS Edition Specifies the Windows OS edition to install.
Make sure to use the correct OS ISO to match the selected OS Edition.
Windows 2003 provides a separate CD for each edition, while Windows 2008 provides a DVD that includes all the editions.
Operating System Installation Configuration
Product Key The product key code to activate the Microsoft license for Windows Server, in the form XXXXX‐XXXXX‐XXXXX‐XXXXX‐XXXXX.
Windows 2008 can be activated after installation by keeping this field empty.
Owner Name Owner’s full name.
Organization Name Owner’s organization name.
Computer Name Specifies the computer name in the network. Use ʹ*ʹ to generate a random computer name.
License Mode (Windows 2003) Whether the license is per server, per device, or per user.
Concurrent Connections (Windows 2003) Network connections allowed simultaneously. The minimum value is 5.
Time Zone Specifies the local time zone for the Windows virtual machine.
Join Network Specifies network membership settings for this virtual machine.
Workgroup – Name of the workgroup in which the computer participates.
Domain – Name of Windows domain in which the computer participates.
User name – For a domain, name of the user account that has permission to create a computer account in that domain.
Password – For a domain, password of that user account that has permission to create a computer account in that domain.
It is not recommended to join a domain during the VM provisioning, if the VM is going to be deployed more than once. It is preferred to join the domain during the VM deployment, while using the Sysprep tool.
Additional Unattended Configuration VMware Studio automates the OS installation by creating a Windows unattended file with settings based on the VM build profile.
Additional unattended configuration can be provided to merge with the unattended file created by VMware Studio. This is an advanced feature to allow additional customization of the Windows OS installation, such as performing installation or removal of OS components
Windows 2003 uses the unattend.txt format. For additional information see http://support.microsoft.com/kb/155197
Windows 2008 uses the unattend.xml format. For additional information see http://technet.microsoft.com/en‐us/library/cc730695(WS.10).aspx#BKMK_2
Operating System Sysprep Configuration
Perform Sysprep If checked, run Sysprep tool at the end of installation.
The System Preparation tool (Sysprep) is a technology provided by Microsoft to automate the cloning and deployment of Windows operating system. Using Sysprep is recommended when a VM will be deployed more than once, to prepare the system for cloning.
For additional information see http://support.microsoft.com/kb/302577
For Windows 2003 based VMs, the Sysprep tool is copied from the Windows 2003 CD (deploy.cab) into the VM local file system under the C:\Sysprep folder. The Sysprep tool is already installed as part of Windows 2008.
Generate new SID (Windows 2003) If checked, generate a new Security ID (SID). Windows 2008 always generate a new SID when using Sysprep.
Sysprep Command Sysprep command to execute.
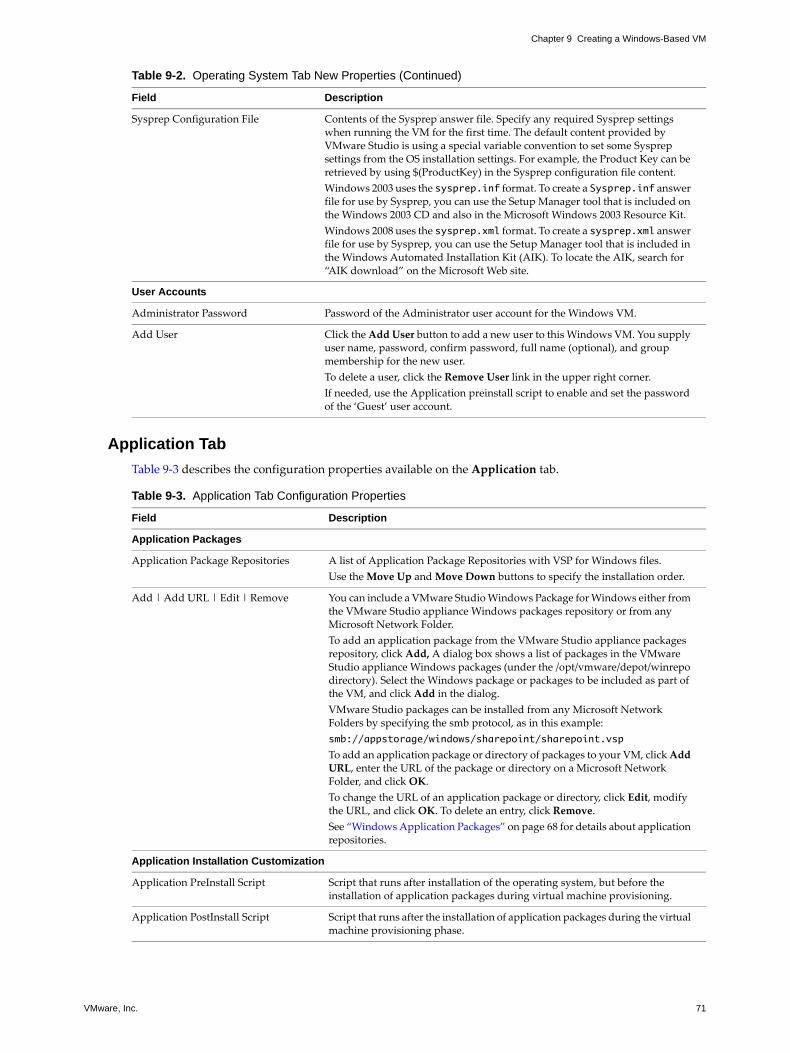
VMware, Inc. 71
Chapter 9 Creating a Windows-Based VM
Application Tab
Table 9‐3 describes the configuration properties available on the Application tab.
Sysprep Configuration File Contents of the Sysprep answer file. Specify any required Sysprep settings when running the VM for the first time. The default content provided by VMware Studio is using a special variable convention to set some Sysprep settings from the OS installation settings. For example, the Product Key can be retrieved by using $(ProductKey) in the Sysprep configuration file content.
Windows 2003 uses the sysprep.inf format. To create a Sysprep.inf answer file for use by Sysprep, you can use the Setup Manager tool that is included on the Windows 2003 CD and also in the Microsoft Windows 2003 Resource Kit.
Windows 2008 uses the sysprep.xml format. To create a sysprep.xml answer file for use by Sysprep, you can use the Setup Manager tool that is included in the Windows Automated Installation Kit (AIK). To locate the AIK, search for “AIK download” on the Microsoft Web site.
User Accounts
Administrator Password Password of the Administrator user account for the Windows VM.
Add User Click the Add User button to add a new user to this Windows VM. You supply user name, password, confirm password, full name (optional), and group membership for the new user.
To delete a user, click the Remove User link in the upper right corner.
If needed, use the Application preinstall script to enable and set the password of the ‘Guest’ user account.
Table 9-2. Operating System Tab New Properties (Continued)
Field Description
Table 9-3. Application Tab Configuration Properties
Field Description
Application Packages
Application Package Repositories A list of Application Package Repositories with VSP for Windows files.
Use the Move Up and Move Down buttons to specify the installation order.
Add | Add URL | Edit | Remove You can include a VMware Studio Windows Package for Windows either from the VMware Studio appliance Windows packages repository or from any Microsoft Network Folder.
To add an application package from the VMware Studio appliance packages repository, click Add, A dialog box shows a list of packages in the VMware Studio appliance Windows packages (under the /opt/vmware/depot/winrepo directory). Select the Windows package or packages to be included as part of the VM, and click Add in the dialog.
VMware Studio packages can be installed from any Microsoft Network Folders by specifying the smb protocol, as in this example:
smb://appstorage/windows/sharepoint/sharepoint.vsp
To add an application package or directory of packages to your VM, click Add URL, enter the URL of the package or directory on a Microsoft Network Folder, and click OK.
To change the URL of an application package or directory, click Edit, modify the URL, and click OK. To delete an entry, click Remove.
See “Windows Application Packages” on page 68 for details about application repositories.
Application Installation Customization
Application PreInstall Script Script that runs after installation of the operating system, but before the installation of application packages during virtual machine provisioning.
Application PostInstall Script Script that runs after the installation of application packages during the virtual machine provisioning phase.
Developer’s Guide to Building vApps and Virtual Appliances
72 VMware, Inc.
Building a VM from the Build ProfileAfter you have completed a build profile, you can build your VM. First click Validate to verify the contents of
the build profile. If the VM profile validates, click Save and Build. Then in the Build Summary dialog box, click
Build VM. This starts building a transient VM on the provisioning platform.
To retain the transient VM without cleaning up after the build, in the Build Summary dialog box, click
Advanced Build Settings. This makes visible a check box saying “Retain transient VM on the virtualization
platform and skip provisioning cleanup.” Clicking the check box allows you to test the VM on the provisioning
platform before deploying it elsewhere.
When the build starts, a status icon appears to indicate that the build is in progress. As provisioning continues,
a build log appears to inform you of each completed step in VM provisioning. To cancel a build in progress,
click Cancel under the status icon.
Watching the VM provisioning can help greatly if something goes wrong.
When the build completes or fails, VMware Studio informs you whether this build was successful or not. If you
encounter problems when building a virtual machine, see “Troubleshooting VM Builds” on page 119 for
diagnostic information.
After a build, you can view various logs to see what happened during the build. In the list of VM profiles, select
a VM and click Build Log to see a recap of build progress.
To see the VM build summary and verbose log, click Previous Builds > Build Status > Finished (or Failed, or
Canceled). The Details dialog box appears, with the following tabs:
Build Summary – Provides details of the build profile configuration.
Verbose Log – Provides a detailed log of each completed phase of the build process.
Debug Log – Provides details of each completed build phase with debugging information.
Install Log – Provides a log of the installation messages as each OS and application package is installed
into the virtual machine. Reviewing the install log can help when troubleshooting package dependency
errors if additional packages are required.
Each build is stored in the VMware Studio appliance’s file system. You can delete older builds when they are
no longer needed. See “Reiterating the Build Process” on page 73 for more information.
Testing the Generated VMAfter you have successfully built a VM, you can obtain the virtual machine distribution file by clicking on the
ZIP or OVF link (depending upon which type of output file you specified) in the Download column of the
VM’s Previous Build list.
You should click on your virtual machine distribution file and test the completed VM by deploying it into the
intended environment to ensure that the VM and any applications that it contains work properly. You can
download a ZIP file for testing. Do not download an OVF for testing, because if you do, you get only the OVF
and not the associated VMDK files. Instead, test the OVF by right clicking on the URL, copying it, and pasting
it into the Import Appliance or Deploy OVF Template dialog boxes of ESX 3.5 or 4.0, respectively.
Verify that all application packages are installed correctly and that your boot scripts run correctly. Check that
your application starts correctly.
If you plan to distribute this virtual machine as a virtual appliance to your customers, see the User’s Guide to
Deploying vApps and Virtual Appliances for information about deploying your virtual appliance for testing.
IMPORTANT You can monitor the installation of Windows and your applications on the console of the
provisioning server. To do this, start either the VMware vSphere Client, the VMware Infrastructure Client, the
VMware Server Console application, or VMware Workstation. Select the VM that you specified in the profile
you just created, which should power on, and click Console (if not already displayed).
VMware, Inc. 73
Chapter 9 Creating a Windows-Based VM
Reiterating the Build ProcessMany developers find that an easy way to a create a Windows VM is to build it initially just containing the
operating system, then add application packages and dependencies in successive builds. Each successful build
occupies space, but you can delete them.
To delete a build using the VMware Studio console, select a VM profile from the list of VM profiles and click
Previous Builds > Instance > Delete. You can also delete a build using the studiocli -d command.

Developer’s Guide to Building vApps and Virtual Appliances
74 VMware, Inc.

VMware, Inc. 75
10
This chapter contains the following sections:
“About VMware Studio Package for Windows” on page 75.
“Repository of Windows Application Packages” on page 75
“Creating a Windows Application Package” on page 76.
About VMware Studio Package for WindowsVMware Studio Package (VSP) for Windows is a file format that describes the process of installing a Windows
application into a Windows‐based VM. VSP for Windows works together with existing application installers,
and defines the command line and scripts to run the installer in silent mode. Using a VSP for Windows has the
following key features:
Supports all silent application installers (MSI, InstallShield, and others).
Provides a container for application setup files.
Allows multiple command lines and scripts (Shell, JScript, VBScript).
Handles execution errors.
Reboots the operating system as needed.
Permits reuse of the package definition with multiple VM build profiles.
VSP for Windows can also be used to perform simple application installation tasks, such as copying files and
updating the registry. For example, you can provide a shell script to copy files from the package folder to the
VM’s local file system. Usually the installer (such as MSI) updates the registry. VSP for Windows should not
be used as a replacement for existing application installation technologies.
The VSP for Windows file format is similar but not identical to the VSP for Linux produced by VMware Studio
Plugin for Eclipse.
Repository of Windows Application PackagesThe VMware Studio appliance contains a Windows package repository that hosts user‐defined VSP for
Windows, for installing in Windows‐based VMs. Each Windows package is assigned a directory, which
contains the VSP file format and additional files used to install the application. Such as executables, scripts,
MSI files, and so forth.
A VSP for Windows is placed on the VMware Studio appliance under the folder:
/opt/vmware/depot/winrepo
VMware Studio contains a Samba server to allow remote access to the Windows packages repository. Using
root user credentials, you can access it for uploading setup files in the following Microsoft Network Folder:
\\<studio-address>\depot\winrepo
Packaging a Windows Application 10
Developer’s Guide to Building vApps and Virtual Appliances
76 VMware, Inc.
Creating a Windows Application PackageUse the Library tab to create a VSP for Windows.
To package a Windows application
1 Identify the application setup files and the required command to run the silent installer.
2 In the VMware Web console, click Library > Windows > Create Package.
3 In the Create a New Windows Package dialog box, specify a name for your package. Spaces are not
allowed. Select a template from the list, use the ‘Other’ template for a clean package definition.
Click Create. After you create a Windows package, it becomes available as another template in this list.
4 On the Editing page, optionally provide a description of the package.
5 Upload all files required to install your application into the package folder, which can be reached either
locally on the VMware Studio appliance, or remotely as a Microsoft Network Folder by authenticating as
the VMware Studio root user.
VMware Studio Appliance Folder: /opt/vmware/depot/winrepo/<package-name>Microsoft Network Folder: \\<studio-address>\depot\winrepo\<package-name>
6 Within the Command 1 section, define the appropriate executable or script to install the application in
silent mode. Several command types are supported.
Program – Execute the program defined in the command field.
Shell – Run the shell script defined in the script field using the Command Interpreter (CMD).
VBScript – Run the VBScript defined in the script field using Windows Script Engine.
JScript – Run the JScript defined in the script field using Windows Script Engine.
For example, the following command executes the Firefox installer from the package directory:
“Firefox Setup 3.0.6.exe” -ms
As another example, the following commands kicks off an MSI‐based installation:
msiexec /i crm.msi ADDLOCAL=ALL /NoRestart /Passive
During package installation, the package Microsoft Network Folder is mapped as a network drive and
used as the working directory of the executed commands and scripts. Use relative paths in the commands
and scripts to access files in the package directory.
7 For various command exit codes, add the action to perform in that case. Define any additional exit‐code
handling that your application requires by clicking the Add Result button. Use the asterisk (*) exit code to define a default action for exit codes that are not listed. When defining actions, you can choose from the
following list of available actions.
OK – successful execution.
Reboot immediately – reboot now before continuing to the next command or package.
Reboot on installation end – reboot after installing all packages.
Reboot on package installation end – reboot after all commands in the current package are executed.
Reboot immediately and repeat command – reboot now and re‐execute the current command.
Fail ‐ execution failed.
To add exit codes, and for a list of registered exit codes, see “Registered Exit Codes” on page 77.
8 If installation of your application requires another command, click Add Command and type it under
Command 2 (and up). Repeat this step for as many commands as you need.
9 Click Save and Close to retain your changes. Your application appears in the list of Windows Packages.

VMware, Inc. 77
Chapter 10 Packaging a Windows Application
Registered Exit Codes
These are the registered exit codes that define the default behavior. Click Add Result to register new exit
codes to override the default behavior.
0 – OK – successful execution.
1641 – Reboot immediately – reboot now before continuing to the next command or package.
3010 – Reboot on installation end – reboot after installing all packages.
* (Other) – Fail – execution failed.
Environment Variables when installing Packages
VMware Studio supports the following environment variables in commands and scripts:
PACKAGEDIR – Location of current package folder.
This example shows using an absolute path to the MSI file:
msiexec /i “%PACKAGEDIR%\application.MSI” /Passive
REPOSITORYDIR – Location of the VMware Studio Windows packages repository.
This example shows using MSI file from another package:
msiexec /i “%REPOSITORYDIR%\crm\application.MSI” /Passive
LOGDIR – Location of the logging directory. Log files created under this directory are copied to the status directory of the VM build instance in the VMware Studio appliance.
This example enables the log file during MSI:
msiexec /i CRM.msi /Lime "%LOGDIR%\crm.log" ADDLOCAL=ALL /NoRestart /Passive

Developer’s Guide to Building vApps and Virtual Appliances
78 VMware, Inc.
VMware, Inc. 79
Developing a vApp for vSphere

Developer’s Guide to Building vApps and Virtual Appliances
80 VMware, Inc.

VMware, Inc. 81
11
This chapter documents use of the VMware Studio Web console for building a vApp.
“Introduction to Building a vApp” on page 81
“Applications in a vApp” on page 82
“Importing vApp Profiles” on page 86
“Web Console Tab Reference” on page 82
“Building a vApp Build Profile” on page 85
“Testing the Generated vApp” on page 86
A vApp is a prebuilt software solution, consisting of one or more virtual machines (VMs) and applications,
which are potentially operated, maintained, monitored, and updated as a unit. The OVF 1.0 standard is
required to represent the combination of multiple virtual machines and applications.
Introduction to Building a vAppThe vApp unifies a set of VMs and applications, defining their dependencies and interfunctionality, including
packaging, start order, and resource allocation.
You can mix Linux‐based VMs and Windows‐based VMs together in a vApp.
Prerequisites
You must have one or more virtual machine build profile. If a virtual machine is not built, the vApp build
process attempts to build it. For VM build procedures, see Chapter 4, “Creating a Linux‐Based VM,” on
page 29 and Chapter 9, “Creating a Windows‐Based VM,” on page 67.
To run a vApp, you need a virtualization product platform that supports OVF 1.0, such as VMware vSphere.
Creating a vApp Build ProfileJust as you created and built virtual machines using the VMs tab of the VMware Studio Web console, you
create and build vApps using the vApps tab.
To create a vApp
1 In the vApps tab of the Web console, click Create Profile. In the Create a New vApp Profile dialog box,
choose a name for your vApp, select a template from the list, even if only one appears, and click
Create Profile. After you successfully save a vApp profile, it becomes available in this list and can be used
as a starting point to define another vApp build profile.
2 The vApp wizard appears, where you can edit the build profile of your vApp. This wizard organizes the
build profile into the following tabs:
Description – General information about the vApp. See “Description Tab” on page 83 for details.
Creating a vApp from VM Builds 11
Developer’s Guide to Building vApps and Virtual Appliances
82 VMware, Inc.
VMs – The virtual machines to include in the vApp. See “VMs Tab” on page 83 for details.
Start Order – Start order of virtual machines in this vApp. See “Start Order Tab” on page 84 for
details.
Resources – Controls vSphere resources for virtual machines in this vApp. See “Resources Tab” on
page 84 for details.
Output – Selects output format, virtual machine which holds the Application URL, and OVF settings.
See “Output Tab” on page 84 for details.
3 In the Description tab, specify the product name and version, at minimum.
4 In the VMs tab, click Add VMs, select at least one VM build profile, and click Add.
Do this at least once. Most vApps contain more than one VM.
5 In the Start Order tab, you can control power on and power off sequence of the VMs by placing virtual
machines into different boot groups and specifying start/stop delay.
6 In the Resources tab, you can control the CPU and memory shares that vSphere allocates for each VM.
For information about boot groups, CPU shares, and memory shares, see the vSphere documentation.
7 In the Output tab, you must specify a File Name for the resulting vApp. You can also enable OVA archive
in addition to OVF, control the method of IP assignment, and add new OVF properties.
8 (Optional) Click Validate to check your settings.
9 To build the vApp, click Save and Build and in the Build Summary dialog box, click Build vApp.
The Save and Close button writes to disk the settings you created. The Close Without Saving button
discards your settings.
If the build is successful, your new vApp appears in the list of vApp profiles under the vApps tab. If the build
fails, diagnostic messages appear in the Build Summary dialog box.
Applications in a vApp
A vApp is a prebuilt software solution consisting of one or more virtual machines (VMs).
You include Linux applications by specifying them in the Application Package Repositories list for one of the
child Linux VMs of this vApp, as described in “Application Packages” on page 30.
You include Windows applications by using the Library > Windows tab to create packages for applications,
or to import existing packages for one of the child Windows VMs of this vApp, as described in “Creating a
Windows Application Package” on page 76.
Web Console Tab ReferenceThese sections document all fields in different tabs of the Web Console.
“Description Tab” on page 83
“VMs Tab” on page 83
“Start Order Tab” on page 84
“Resources Tab” on page 84
“Output Tab” on page 84
NOTE Any vApp must be represented according to the OVF 1.0 standard. The OVF 0.9 specification did not
allow multiple virtual machines to be represented in a collection.
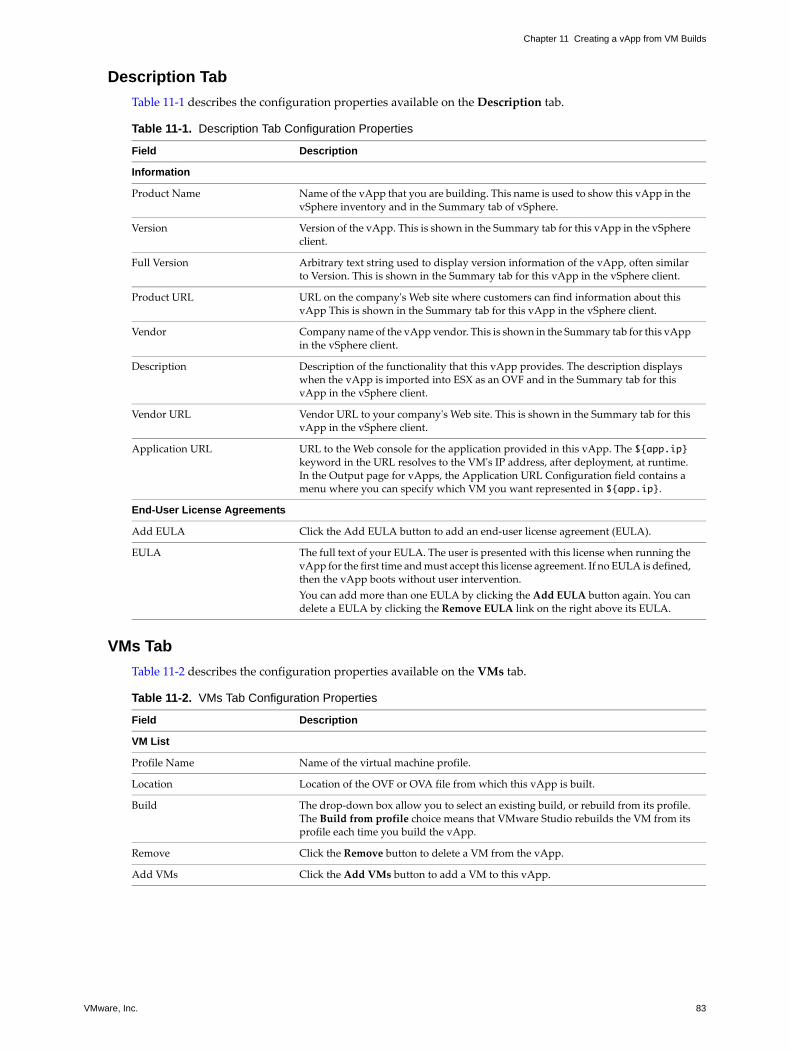
VMware, Inc. 83
Chapter 11 Creating a vApp from VM Builds
Description Tab
Table 11‐1 describes the configuration properties available on the Description tab.
VMs Tab
Table 11‐2 describes the configuration properties available on the VMs tab.
Table 11-1. Description Tab Configuration Properties
Field Description
Information
Product Name Name of the vApp that you are building. This name is used to show this vApp in the vSphere inventory and in the Summary tab of vSphere.
Version Version of the vApp. This is shown in the Summary tab for this vApp in the vSphere client.
Full Version Arbitrary text string used to display version information of the vApp, often similar to Version. This is shown in the Summary tab for this vApp in the vSphere client.
Product URL URL on the companyʹs Web site where customers can find information about this vApp This is shown in the Summary tab for this vApp in the vSphere client.
Vendor Company name of the vApp vendor. This is shown in the Summary tab for this vApp in the vSphere client.
Description Description of the functionality that this vApp provides. The description displays when the vApp is imported into ESX as an OVF and in the Summary tab for this vApp in the vSphere client.
Vendor URL Vendor URL to your companyʹs Web site. This is shown in the Summary tab for this vApp in the vSphere client.
Application URL URL to the Web console for the application provided in this vApp. The ${app.ip} keyword in the URL resolves to the VMʹs IP address, after deployment, at runtime. In the Output page for vApps, the Application URL Configuration field contains a menu where you can specify which VM you want represented in ${app.ip}.
End-User License Agreements
Add EULA Click the Add EULA button to add an end‐user license agreement (EULA).
EULA The full text of your EULA. The user is presented with this license when running the vApp for the first time and must accept this license agreement. If no EULA is defined, then the vApp boots without user intervention.
You can add more than one EULA by clicking the Add EULA button again. You can delete a EULA by clicking the Remove EULA link on the right above its EULA.
Table 11-2. VMs Tab Configuration Properties
Field Description
VM List
Profile Name Name of the virtual machine profile.
Location Location of the OVF or OVA file from which this vApp is built.
Build The drop‐down box allow you to select an existing build, or rebuild from its profile. The Build from profile choice means that VMware Studio rebuilds the VM from its profile each time you build the vApp.
Remove Click the Remove button to delete a VM from the vApp.
Add VMs Click the Add VMs button to add a VM to this vApp.
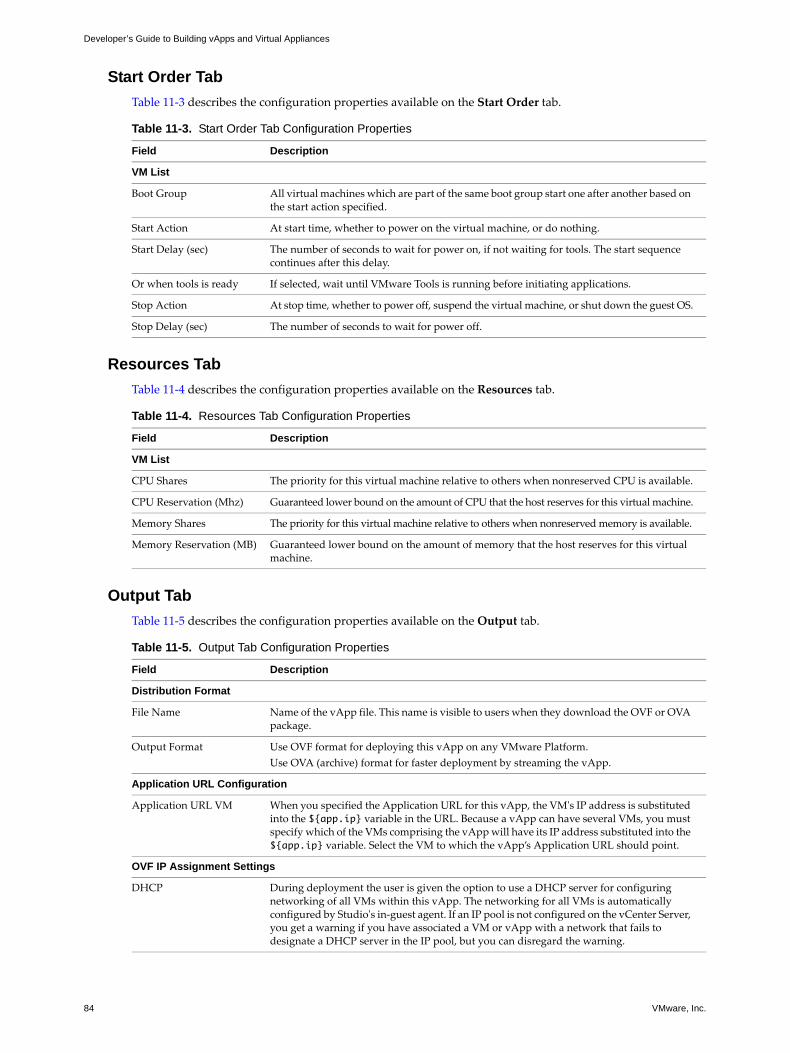
Developer’s Guide to Building vApps and Virtual Appliances
84 VMware, Inc.
Start Order Tab
Table 11‐3 describes the configuration properties available on the Start Order tab.
Resources Tab
Table 11‐4 describes the configuration properties available on the Resources tab.
Output Tab
Table 11‐5 describes the configuration properties available on the Output tab.
Table 11-3. Start Order Tab Configuration Properties
Field Description
VM List
Boot Group All virtual machines which are part of the same boot group start one after another based on the start action specified.
Start Action At start time, whether to power on the virtual machine, or do nothing.
Start Delay (sec) The number of seconds to wait for power on, if not waiting for tools. The start sequence continues after this delay.
Or when tools is ready If selected, wait until VMware Tools is running before initiating applications.
Stop Action At stop time, whether to power off, suspend the virtual machine, or shut down the guest OS.
Stop Delay (sec) The number of seconds to wait for power off.
Table 11-4. Resources Tab Configuration Properties
Field Description
VM List
CPU Shares The priority for this virtual machine relative to others when nonreserved CPU is available.
CPU Reservation (Mhz) Guaranteed lower bound on the amount of CPU that the host reserves for this virtual machine.
Memory Shares The priority for this virtual machine relative to others when nonreserved memory is available.
Memory Reservation (MB) Guaranteed lower bound on the amount of memory that the host reserves for this virtual machine.
Table 11-5. Output Tab Configuration Properties
Field Description
Distribution Format
File Name Name of the vApp file. This name is visible to users when they download the OVF or OVA package.
Output Format Use OVF format for deploying this vApp on any VMware Platform.
Use OVA (archive) format for faster deployment by streaming the vApp.
Application URL Configuration
Application URL VM When you specified the Application URL for this vApp, the VMʹs IP address is substituted into the ${app.ip} variable in the URL. Because a vApp can have several VMs, you must specify which of the VMs comprising the vApp will have its IP address substituted into the ${app.ip} variable. Select the VM to which the vApp’s Application URL should point.
OVF IP Assignment Settings
DHCP During deployment the user is given the option to use a DHCP server for configuring networking of all VMs within this vApp. The networking for all VMs is automatically configured by Studioʹs in‐guest agent. If an IP pool is not configured on the vCenter Server, you get a warning if you have associated a VM or vApp with a network that fails to designate a DHCP server in the IP pool, but you can disregard the warning.
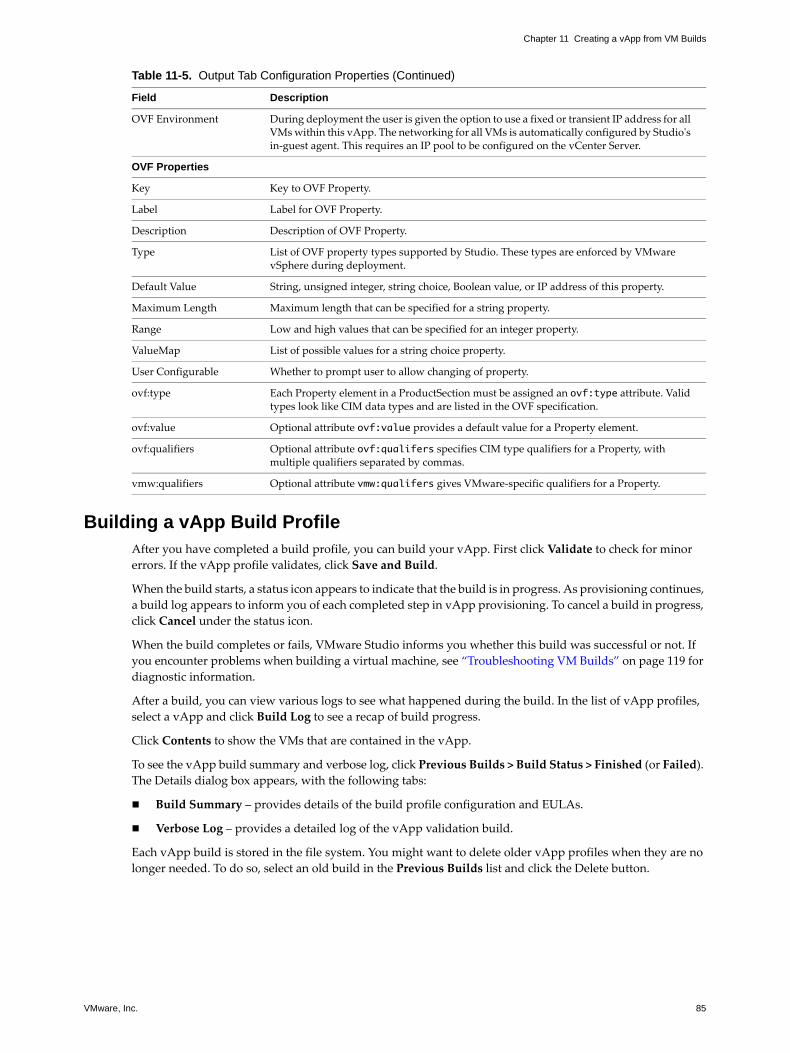
VMware, Inc. 85
Chapter 11 Creating a vApp from VM Builds
Building a vApp Build ProfileAfter you have completed a build profile, you can build your vApp. First click Validate to check for minor
errors. If the vApp profile validates, click Save and Build.
When the build starts, a status icon appears to indicate that the build is in progress. As provisioning continues,
a build log appears to inform you of each completed step in vApp provisioning. To cancel a build in progress,
click Cancel under the status icon.
When the build completes or fails, VMware Studio informs you whether this build was successful or not. If
you encounter problems when building a virtual machine, see “Troubleshooting VM Builds” on page 119 for
diagnostic information.
After a build, you can view various logs to see what happened during the build. In the list of vApp profiles,
select a vApp and click Build Log to see a recap of build progress.
Click Contents to show the VMs that are contained in the vApp.
To see the vApp build summary and verbose log, click Previous Builds > Build Status > Finished (or Failed).
The Details dialog box appears, with the following tabs:
Build Summary – provides details of the build profile configuration and EULAs.
Verbose Log – provides a detailed log of the vApp validation build.
Each vApp build is stored in the file system. You might want to delete older vApp profiles when they are no
longer needed. To do so, select an old build in the Previous Builds list and click the Delete button.
OVF Environment During deployment the user is given the option to use a fixed or transient IP address for all VMs within this vApp. The networking for all VMs is automatically configured by Studioʹs in‐guest agent. This requires an IP pool to be configured on the vCenter Server.
OVF Properties
Key Key to OVF Property.
Label Label for OVF Property.
Description Description of OVF Property.
Type List of OVF property types supported by Studio. These types are enforced by VMware vSphere during deployment.
Default Value String, unsigned integer, string choice, Boolean value, or IP address of this property.
Maximum Length Maximum length that can be specified for a string property.
Range Low and high values that can be specified for an integer property.
ValueMap List of possible values for a string choice property.
User Configurable Whether to prompt user to allow changing of property.
ovf:type Each Property element in a ProductSection must be assigned an ovf:type attribute. Valid types look like CIM data types and are listed in the OVF specification.
ovf:value Optional attribute ovf:value provides a default value for a Property element.
ovf:qualifiers Optional attribute ovf:qualifers specifies CIM type qualifiers for a Property, with multiple qualifiers separated by commas.
vmw:qualifiers Optional attribute vmw:qualifers gives VMware‐specific qualifiers for a Property.
Table 11-5. Output Tab Configuration Properties (Continued)
Field Description
Developer’s Guide to Building vApps and Virtual Appliances
86 VMware, Inc.
Testing the Generated vAppAfter you have successfully built a vApp, you can obtain the vApp distribution by clicking in the Download
column of the vApp list on the OVF 1.0 or OVA link (depending upon which type of output file you specified
for build output). Likewise, you can obtain the OVF or OVA files for old builds in the Previous Builds list.
You can test the completed vApp by deploying it in the intended environment and verifying that the vApp
and any applications that it contains work properly. Check that your application starts correctly. Ensure that
all packages are deployed properly and that boot scripts run correctly.
Importing vApp ProfilesYou can import vApp build profiles/templates into VMware Studio in the following circumstances:
When you upgrade to a newer version of VMware Studio.
When you manually create a vApp build profile.
Using a profile created by another user on another VMware Studio appliance.
To import an existing vApp profile into VMware Studio
1 Place the vApp build profile on the host where the Web browser runs.
2 In the VMware Studio Web console, click the vApps tab and click the Import Profile button.
3 A dialog box appears where you must enter the name of the vApp. You can click the Browse button to
find the profile on your computer.
4 Click Import Profile. VMware Studio creates a new vApp profile based on the imported build profile, and
adds it to the list of vApps.
5 VM build profiles that are referenced by this vApp build profile must be imported into VMware Studio
before you can build this vApp.
NOTE It is not possible to publish vApp updates as a unit. You must separately update the constituent VMs
of a vApp.

VMware, Inc. 87
12
VMware Studio allows developers to create VMs and vApps that you can ship as virtual appliances.
This chapter describes the best practices for creating virtual appliances.
“Outline of Virtual Appliance Build Procedure” on page 87
“VMware Recommendations” on page 88
Outline of Virtual Appliance Build ProcedureYou begin building a virtual appliance the same way that you create a VM or a vApp: by creating a profile that
defines a container and its included software packages.
To manage the virtual appliance life cycle
1 Define a build profile with the features you want. Select an operating system for the VM, the virtual
hardware, and application packages to include. You can configure the welcome screen, first boot script,
and subsequent boot scripts.
2 VMware recommends that you select virtual hardware version 4. Version 4 virtual machines are
compatible across all VMware virtualization products, which is an important criteria for acceptance of
virtual appliances. However there are good reasons for selecting virtual hardware version 7.
3 VMware recommends that you include the update agent when creating virtual appliance. Follow the
steps for establishing an update repository using the “Management Tab” on page 36.
4 Build the VM. VMware Studio relies on a virtualization product platform to assemble the files required
to build (or provision) your virtual appliance.
5 If you are building a multiple‐VM appliance, called a vApp, follow the above steps to create other VMs.
When you have the set of VMs that you need, package them together in vApp container by defining a
vApp build profile and building the vApp.
6 Distribute the output as OVA or OVF.
7 On an ongoing basis, you might be required to release patches for your virtual appliances and vApps that
are deployed at customer sites.
After a virtual appliance is deployed, end‐users can manage it from the VMware Studio Web console or from
VMware vCenter Server. They can also check for and install updates with the Web console, if you enabled the
update service and established an update repository. Using VMware vCenter Server, administrators can
centrally manage multiple virtual appliances.
Guidelines for Creating Virtual Appliances 12

Developer’s Guide to Building vApps and Virtual Appliances
88 VMware, Inc.
VMware RecommendationsThe following sections give suggestions or recommendations for choices you make during the creation of a
virtual appliance or vApp. Some choices are a trade‐off of portability for new functionality.
Choosing OVF Version
VMware suggests delivering OVF 0.9 output files so your virtual appliance can run on older VMware product
platforms such as ESX/ESXi 3.5 and VirtualCenter. If you create a vApp with multiple VMs, you must deliver
OVF 1.0 or OVA output files, and the vApp can run only on VMware vSphere.
The downside of OVF 0.9 is that it loses any OVF properties you have defined, and your virtual appliance
cannot benefit from automatic network configuration that OVF 1.0 deployment into VMware vSphere
provides. Fortunately VMware Studio generates both OVF 0.9 and OVF 1.0 descriptors when you select OVF
output, so you can easily deliver both formats to customers.
Choosing Virtual Hardware Version
VMware recommends specifying virtual hardware version 4 (vmx-4) in the VMs > Hardware tab. This virtual hardware version can run on all current and most recent VMware platforms. If your virtual appliance requires
more than four processors or more than 64GB memory and is designed to run on ESX/ESXi 4.0, you should
select virtual hardware version 7. VMware Workstation 6.5 and VMware Server 2 are limited to 8 GB memory
even with virtual hardware version 7.
User Accounts
VMware recommends that you not give away the root password for your appliance. You can write a postinstall
script that allows the end‐user to change the root password at deployment time. Alternatively, you can create
additional user accounts that have non‐root privileges. Give those accounts to customers and provide limited
access to the virtual appliance.
Include Update Agent
When building Linux‐based VMs, VMware strongly recommends enabling the update repository. You do this
in VMware Studio 2.0 on the VMs > Management tab by adding the update service to the list of management
services. Then follow procedures in Chapter 7, “Managing the Linux Update Repository,” on page 55.
Windows‐based VMs do not allow the option of an update repository.
Partitioning Disk for System and User Data
VMware recommends that you keep user and configuration data on separate disks. This aids in upgrading the
appliance to a newer version. You can decommission the virtual appliance after unmounting the data disks
and mounting them on the new virtual appliance.
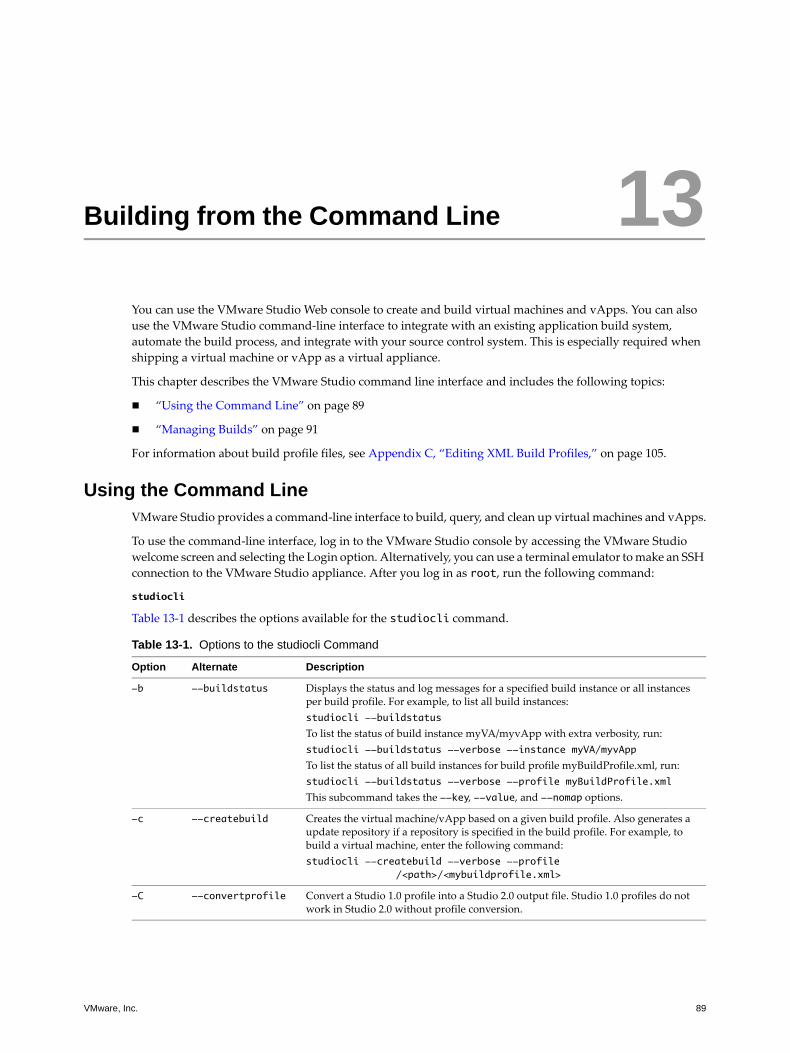
VMware, Inc. 89
13
You can use the VMware Studio Web console to create and build virtual machines and vApps. You can also
use the VMware Studio command‐line interface to integrate with an existing application build system,
automate the build process, and integrate with your source control system. This is especially required when
shipping a virtual machine or vApp as a virtual appliance.
This chapter describes the VMware Studio command line interface and includes the following topics:
“Using the Command Line” on page 89
“Managing Builds” on page 91
For information about build profile files, see Appendix C, “Editing XML Build Profiles,” on page 105.
Using the Command LineVMware Studio provides a command‐line interface to build, query, and clean up virtual machines and vApps.
To use the command‐line interface, log in to the VMware Studio console by accessing the VMware Studio
welcome screen and selecting the Login option. Alternatively, you can use a terminal emulator to make an SSH
connection to the VMware Studio appliance. After you log in as root, run the following command:
studiocli
Table 13‐1 describes the options available for the studiocli command.
Building from the Command Line 13
Table 13-1. Options to the studiocli Command
Option Alternate Description
-b --buildstatus Displays the status and log messages for a specified build instance or all instances per build profile. For example, to list all build instances:
studiocli --buildstatus
To list the status of build instance myVA/myvApp with extra verbosity, run:
studiocli --buildstatus --verbose --instance myVA/myvApp
To list the status of all build instances for build profile myBuildProfile.xml, run:
studiocli --buildstatus --verbose --profile myBuildProfile.xml
This subcommand takes the --key, --value, and --nomap options.
-c --createbuild Creates the virtual machine/vApp based on a given build profile. Also generates a update repository if a repository is specified in the build profile. For example, to build a virtual machine, enter the following command:
studiocli --createbuild --verbose --profile /<path>/<mybuildprofile.xml>
-C --convertprofile Convert a Studio 1.0 profile into a Studio 2.0 output file. Studio 1.0 profiles do not work in Studio 2.0 without profile conversion.
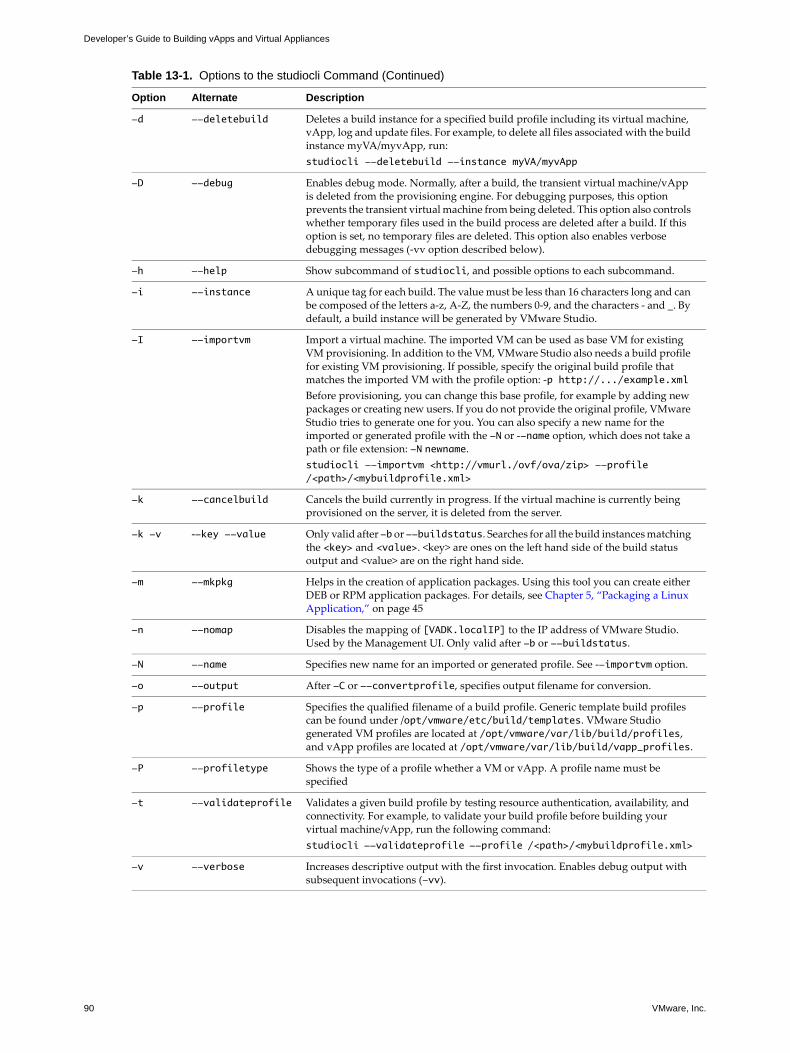
Developer’s Guide to Building vApps and Virtual Appliances
90 VMware, Inc.
-d --deletebuild Deletes a build instance for a specified build profile including its virtual machine, vApp, log and update files. For example, to delete all files associated with the build instance myVA/myvApp, run:
studiocli --deletebuild --instance myVA/myvApp
-D --debug Enables debug mode. Normally, after a build, the transient virtual machine/vApp is deleted from the provisioning engine. For debugging purposes, this option prevents the transient virtual machine from being deleted. This option also controls whether temporary files used in the build process are deleted after a build. If this option is set, no temporary files are deleted. This option also enables verbose debugging messages (‐vv option described below).
-h --help Show subcommand of studiocli, and possible options to each subcommand.
-i --instance A unique tag for each build. The value must be less than 16 characters long and can be composed of the letters a‐z, A‐Z, the numbers 0‐9, and the characters ‐ and _. By default, a build instance will be generated by VMware Studio.
-I --importvm Import a virtual machine. The imported VM can be used as base VM for existing VM provisioning. In addition to the VM, VMware Studio also needs a build profile for existing VM provisioning. If possible, specify the original build profile that matches the imported VM with the profile option: ‐p http://.../example.xml
Before provisioning, you can change this base profile, for example by adding new packages or creating new users. If you do not provide the original profile, VMware Studio tries to generate one for you. You can also specify a new name for the imported or generated profile with the -N or ‐-name option, which does not take a path or file extension: -N newname.
studiocli --importvm <http://vmurl./ovf/ova/zip> --profile /<path>/<mybuildprofile.xml>
-k --cancelbuild Cancels the build currently in progress. If the virtual machine is currently being provisioned on the server, it is deleted from the server.
-k -v ‐-key --value Only valid after -b or --buildstatus. Searches for all the build instances matching the <key> and <value>. <key> are ones on the left hand side of the build status output and <value> are on the right hand side.
-m --mkpkg Helps in the creation of application packages. Using this tool you can create either DEB or RPM application packages. For details, see Chapter 5, “Packaging a Linux Application,” on page 45
-n --nomap Disables the mapping of [VADK.localIP] to the IP address of VMware Studio. Used by the Management UI. Only valid after -b or --buildstatus.
-N --name Specifies new name for an imported or generated profile. See ‐-importvm option.
-o --output After -C or --convertprofile, specifies output filename for conversion.
-p --profile Specifies the qualified filename of a build profile. Generic template build profiles can be found under /opt/vmware/etc/build/templates. VMware Studio generated VM profiles are located at /opt/vmware/var/lib/build/profiles, and vApp profiles are located at /opt/vmware/var/lib/build/vapp_profiles.
-P --profiletype Shows the type of a profile whether a VM or vApp. A profile name must be specified
-t --validateprofile Validates a given build profile by testing resource authentication, availability, and connectivity. For example, to validate your build profile before building your virtual machine/vApp, run the following command:
studiocli --validateprofile --profile /<path>/<mybuildprofile.xml>
-v --verbose Increases descriptive output with the first invocation. Enables debug output with subsequent invocations (-vv).
Table 13-1. Options to the studiocli Command (Continued)
Option Alternate Description
VMware, Inc. 91
Chapter 13 Building from the Command Line
Managing BuildsFor every build of a virtual machine, VMware Studio maintains a build instance number and the logs for that
build. For example, build instance 1 stores logs in the following directory:
/opt/vmware/www/build/1/status/
This directory contains three important log files for each build:
verbose.log – High level information of the build process.
postinstall.log – Information about the build of the virtual machine including package installation.
debug.log – Detailed information about the build including ISO management, network communications,
and provisioning information.
Build logs are accessible using the Studio Web console to troubleshoot build failures.
Old Builds
VMware Studio stores and logs all the virtual machines that it builds. Unneeded build instances should be
removed and older build instances should be archived away to recover free disk space for VMware Studio.
You can obtain a list of all builds by running this command:
studiocli --buildstatus
You can obtain information about a specific build by specifying its profile or instance number:
studiocli --buildstatus --profile myVirtualMachinestudiocli --buildstatus --instance profileABC.7
To delete just one instance of a build, run the following command:
studiocli --deletebuild --instance profileABC.7 --verbose

Developer’s Guide to Building vApps and Virtual Appliances
92 VMware, Inc.
VMware, Inc. 93
Appendixes

Developer’s Guide to Building vApps and Virtual Appliances
94 VMware, Inc.

VMware, Inc. 95
Aw
This appendix documents the management services JavaScript API, which you can use to create a custom user
interface as a tab in the Linux virtual machine Web console. This tab is the on‐screen representation of a
management service.
“Root Object” on page 95
“VAMI Container” on page 95
“VAMI Container Callbacks” on page 96
“VAMI I/O” on page 97
“VAMI Log” on page 98
As shown in “Creating a Management Service” on page 52, a UI can be specified in the view.xml both as a <Content type="html"> and as <Content type=”url”>. This JavaScript API can be used in both cases.
Root ObjectThe root object vami has over a dozen methods to navigate within a Web container, communicate with the
LIGHTTPD Web server, and log information for debugging purposes. To obtain the vami root object within
JavaScript, call the parent:
var vami = parent.vami;
VAMI ContainerThe following functions can be called on the root vami object.
vami.container.navigate
Requests that the container navigate to a page. Returns true if the container is able to navigate.
boolean navigate(String token)
Parameter:
token – A string representing the destination page, in the form ServiceName.PageName where PageName is optional. If PageName is not present, it goes to the first page in the Service.
Example:
vami.container.navigate('network.Status');
vami.container.logout
Logs out the current user.
void logout()
Management Services Web API A

Developer’s Guide to Building vApps and Virtual Appliances
96 VMware, Inc.
vami.container.newHistoryItem
Adds a new browser history item.
void newHistoryItem(String historyToken)
Parameter:
historyToken – The token assoicated with the history item.
Example to record a history change:
vami.container.newHistoryItem('myservice.InternalPage');
vami.container.isLogin
Checks to see if the user is logged in. Returns true if the user is still logged in.
public boolean isLogin()
vami.container.getUser
Gets the name of user who is currently logged in. Returns the user name of the current login.
public String getUser()
vami.container.getSessionID
Returns the current session ID, which is used for authentication with PAM or to communicate with sfcbd.
public String getSessionID()
Example to authenticate a user on the server side using Python:
# import required librariesimport syssys.path.append('/opt/vmware/lib/python/site-packages/')import pywbem# returns true if we are able to authenticatedef authenticate(user, sessionid):
try:# connect to cimom with username and sessionid, make CIM callcliconn = pywbem.WBEMConnection('http://localhost:5488', (user, sessionid))cliconn.EnumerateInstanceNames('VAMI_ComputerSystem')return True
except Exception, e:return False
VAMI Container CallbacksVAMI Web container provides callbacks for services to register and get notified of various navigational events.
vami.container.registerOnShowCallback
Registers a callback function with the container for execution when the Service is displayed. The callback
function you pass will then receive the token for the current page.
public void registerOnShowCallback(JavaScriptObject callback)
Parameter:
callback – Function that gets executed when the Service is displayed. This function will receive the token for
the current page.
Example to register a callback function:
function myOnShow(token){alert(token);
vami.container.registerOnShowCallback(myOnShow);
VMware, Inc. 97
Appendix A Management Services Web API
vami.container.registerOnHideCallback
Registers a callback function with the container for execution when the Service is hidden and the user moves
to another Service. The callback function you pass will then receive the token for the page to be navigated.
public void registerOnHideCallback(JavaScriptObject callback)
Parameter:
callback – Function that gets executed when the Service is hidden. This function will receive the token for
the pending page to where the user is navigating.
Example to register a callback function:
function myOnHide(pendingToken){return confirm(pendingToken);
}vami.container.registerOnHideCallback(myOnHide);
vami.container.registerOnNavigateCallback
Registers a callback function with the container for execution when the container navigates to the current
Service. The callback function you pass will then receive the token to indicate navigation.
public void registerOnNavigateCallback(JavaScriptObject callback)
Parameter:
callback – Function that gets executed when the Service is hidden. This function will receive the token for
the current page. Callback function should be in this format:
functionName(token);
Example to register a callback function:
function myOnNavigate(pendingToken){alert(token);
}vami.container.registerOnNavigateCallback(myOnNavigate);
VAMI I/OThe VAMI Web container provides a vami.io object to communicate with the LIGHTTPD Web server.
vami.io.httpGet
Make an HTTP GET request for the provided URL, and feed the result to the callback function. Because of
Same Origin Policy (SOP) restrictions, this API cannot make calls to any other server other than the server from
which this page is loaded.
public void httpGet(boolean authenticate, boolean blocking, String description, String url, JavaScriptObject callback)
Parameters:
authenticate – True if you want to use HTTP basic access authentication on the currently logged in
username and password. See the Wikipedia article about Basic Access Authentication.
blocking – True to indicate to the container that this is a blocking request.
description – Description of the request, to be shown in the user interface.
url – Relative or full HTTP URL for this request.
callback – JavaScript callback function that takes a string as its argument. The returned content from the
request is passed to this callback function.
Example to request a file:
vami.io.httpGet(false, false, 'Get XML file', '/VAMI.xml', alert);
Developer’s Guide to Building vApps and Virtual Appliances
98 VMware, Inc.
Example to request a JavaScript Object Notation (JSON) object and parse that object:
function evaluateJSON(json){eval(json);
}vami.io.httpGet(false,false,'Get JSON Object','/RESTInterface',evaluateJSON);
vami.io.httpPost
Make an HTTP POST request for the provided URL, and feed the result to the callback function. Because of
Same Origin Policy (SOP) restrictions, this API cannot make calls to any other server other than the server from
which this page is loaded.
httpPost public void httpPost(boolean authenticate, boolean blocking, String description, String url, String content, JavaScriptObject callback)
Parameters:
authenticate – True if you want to use HTTP basic access authentication on the currently logged in
username and password. See the Wikipedia article about Basic Access Authentication.
blocking – True to indicate to the container that this is a blocking request.
description – Description of the request, to be shown in the user interface.
url – Relative or full HTTP URL for this request.
content – Content to post for the URL, usually for HTTP GET request this is part of the request URL.
callback – JavaScript callback function that takes a string as its argument. The returned content from the
request is passed to this callback function.
Example to request a call to the sfcb:
var cimXML; //fill cimXML with the CIM XML that you want to post to CIMOMvami.io.httpPost(true,false,'Making CIMOM Call','/cimom', cimXML, evaluateJSON);
VAMI LogTo enable logging for a virtual machine Web console, use <webconsoleurl>?log=info&logwindow=true. This shows a small visible window that displays all messages that are logged using vami.log object. Other options for the log parameter are warn and error.
vami.log.info
Logs an informational message.
public void info(String message, JavaScriptException exception)
Parameters:
message – Message string to log.
exception – JavaScript exception. Optional.
vami.log.warn
Logs a warning message.
public void warn(String message, JavaScriptException exception)
Parameters:
message – Message string to log.
exception – JavaScript exception. Optional.
VMware, Inc. 99
Appendix A Management Services Web API
vami.log.error
Logs an error message.
public void error(String message, JavaScriptException exception)
Parameters:
message – Message string to log.
exception – JavaScript exception. Optional.

Developer’s Guide to Building vApps and Virtual Appliances
100 VMware, Inc.

VMware, Inc. 101
B
This appendix contains the following sections:
“Installing SSH on Windows” on page 101.
“Checking Veracity of an SSL Certificate” on page 102
Installing SSH on WindowsVMware Studio requires the secure shell (SSH) protocol to communicate with some provisioning platforms,
including VMware Workstation 6.5.1 and VMware Server 1.0.x. With most other provisioning platforms,
VMware Studio uses HTTPS instead. When Workstation 6.5.1 or Server 1.0.x run on Linux, the SSH protocol
is available by default. When they run on Windows, you must install SSH.
Workstation 6.5 and Server 1.0
Because Windows systems do not ordinarily include support for this protocol, when VMware Workstation or
VMware Server 1.0.x is hosted on Windows, you must install SSH.
To install the SSH daemon on a Windows system
1 Download the OpenSSH 4.2p1‐1 for Windows Binary Installer from http://sshwindows.webheat.co.uk/.
2 Run the installer, setupssh.exe.
3 After installation, create a working directory for provisioning virtual machines, for example:
mkdir C:\vmware_studio-tmp
4 Select a username and password to use in the script below.
5 The following script uses the net user command to create a user named vmware_studiouser with
password VMware. Later it uses the cacls command to control ACLs for the C:\vmware_studio-tmp directory you just created. Either create a batch script containing the following commands, or run these
commands sequentially in a command prompt window:
net user vmware_studiouser VMware /addC:cd \"Documents and Settings"mkdir vmware_studiouser\.sshcacls vmware_studiouser /T /P everyone:Fcd \cacls vmware_studio-tmp /G everyone:F
Security with SSH and SSL B
NOTE This particular version of OpenSSH works best on Windows XP. You should consider installing
recent version of Cygwin and utilize its SSH services if you are running other Windows operating system.
NOTE c:\vmware_studio-tmp translates to /cygdrive/c/vmware_studio-tmp when you set the
VMware Server File Transfer Path.

Developer’s Guide to Building vApps and Virtual Appliances
102 VMware, Inc.
cd \Program Files\OpenSSH\binmkgroup -l > ..\etc\groupmkpasswd -l > ..\etc\passwd
6 Launch the OpenSSH daemon by running the net start command:
net start opensshd
7 Disable any firewall, or preferably, create an exception in the Windows system firewall to avoid blocking
the SSH connection with VMware Studio (both TCP and UDP protocols on port 22).
Checking Veracity of an SSL CertificateThis procedure helps you verify that the host to which you are connecting is indeed the host you intended.
To display and validate SSL and SSH fingerprints
1 From the main VAMI screen on local console, make a note of the URL displayed on the [Web] line, and select Login.
2 Log in as root using the password you selected during first boot of the VMware Studio appliance.
3 Run the following command to display the SHA‐1 fingerprint of the x.509v3 (SSL) certificate for the
VMware Studio HTTP server:
/usr/bin/openssl x509 -fingerprint -sha1 -noout -in /opt/vmware/etc/lighttpd/server.pem
Summary of options:
x509 – Use x.509 certificate mode (no leading dash).
-fingerprint – Display fingerprint.
-sha1 – Display SHA‐1 hash value for fingerprint.
-noout – Do not output the entire certificate.
‐in <infile> – Use the specified file as the source file.
4 Run the following command to display the fingerprint of the SSH2 or RSA key for the SSH server:
/usr/bin/ssh-keygen -l -f /etc/ssh/ssh_host_rsa_key.pub
Summary of options:
-l – List (show) fingerprint.
-f <infile> ‐‐ Use the specified file as the source file.
5 Using your choice of supported Web browser, go to the URL you noted down in Step 1.
The HTTP listener on port 80/tcp redirects to an HTTPS (HTTP with SSL) listener on port 5480/tcp.
Awarning appears, explaining that the SSL Certificate could not be validated using existing information.
6 Fetch the certificate, view the certificate summary, locate the SHA‐1 fingerprint, and compare it to the
SHA‐1 fingerprint you generated in Step 3.
7 If the SHA‐1 fingerprints match, confirm the security exception. You can choose to store it permanently.
If the SHA‐1 fingerprints do not match, you might be experiencing a man‐in‐the‐middle security attack.
If you confirm the security exception, your Web browser proceeds to the VMware Studio login screen.
8 To verify the fingerprint of the SSH2 or RSA key for the SSH server, choose either “To confirm with
Interactive SSH” on page 103, or “To confirm with SCP or SFTP” on page 103.

VMware, Inc. 103
Appendix B Security with SSH and SSL
To confirm with Interactive SSH
1 Using your choice of SSH client (for example PuTTY 0.60), or the ssh command on Linux, connect to the
IP address within the URL that you noted down in Step 1. The SSH client prompts you to accept or reject
the key presented (in the case of PuTTY, a 2048 bit RSA key over SSH v2).
2 Compare this fingerprint to the SSH2 or RSA fingerprint you generated in Step 4.
3 If the fingerprints match, accept a trust relationship. You can choose to cache your decision permanently,
rather than for this SSH session only.
4 The SSH client proceeds with session initiation. After the VMware Studio message, a root shell appears.
To confirm with SCP or SFTP
1 Using your choice of SCP client (for example WinSCP 4.x), or the scp command on Linux, connect to the
IP address within the URL that you noted down in Step 1. The SCP client prompts you to accept or reject
the key presented (in the case of WinSCP, a 2048 bit RSA key over SSH v2).
2 Compare this fingerprint to the SSH2 or RSA fingerprint you generated in Step 4.
3 If the fingerprints match, accept a trust relationship. You can choose to cache your decision permanently,
rather than for this SCP session only.
4 The SCP client proceeds with session initiation.

Developer’s Guide to Building vApps and Virtual Appliances
104 VMware, Inc.
VMware, Inc. 105
C
This chapter can help you edit XML build profiles. It contains the following sections:
“Introduction” on page 105
“Structure of VM XML Build Profiles” on page 106
“Useful Attributes Not Displayed in the VMware Studio Web Console” on page 113
“Customizing the Footer in the Web Console” on page 113
“Creating Virtual Disks, Partitions, and Virtual Devices” on page 114
“Structure of vApp XML Build Profiles” on page 116
IntroductionVMware Studio creates a build profile that defines a virtual machine.
The XML schemas for the build profiles are located in the /opt/vmware/etc/build/schemas directory inside VMware Studio. It is never necessary or required to look at these schemas for the construction of build
profiles. VMware recommends that you use the VMware Studio Web console to create build profiles. Once
created, you can edit the build profile and build or rebuild the VM or vApp.
The VMware Studio Web console saves build profiles in the following locations for a VM and a vApp:
/opt/vmware/var/lib/build/profiles/<VMprofileName>.xml/opt/vmware/var/lib/build/vapp_profiles/<vAppProfileName>.xml
VMware Studio includes preconfigured build profile templates, located in the following directories:
/opt/vmware/etc/build/templates/<OS>/<release>/<version>/build_profile.xml/opt/vmware/etc/build/vapp_template/vapp_template.xml
Build profiles conform to an early version of the OVF 0.9 draft specifications. For more information about OVF,
see http://www.vmware.com/appliances/learn/ovf.html.
Editing XML Build Profiles C
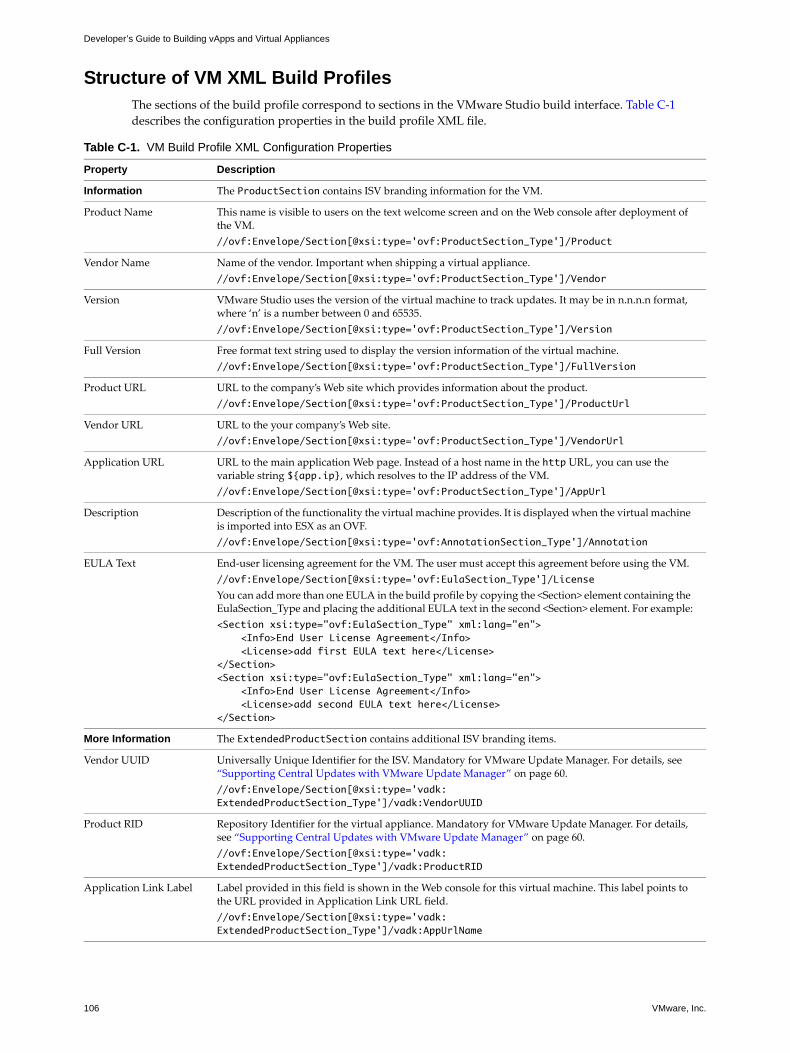
Developer’s Guide to Building vApps and Virtual Appliances
106 VMware, Inc.
Structure of VM XML Build ProfilesThe sections of the build profile correspond to sections in the VMware Studio build interface. Table C‐1
describes the configuration properties in the build profile XML file.
Table C-1. VM Build Profile XML Configuration Properties
Property Description
Information The ProductSection contains ISV branding information for the VM.
Product Name This name is visible to users on the text welcome screen and on the Web console after deployment of the VM.
//ovf:Envelope/Section[@xsi:type='ovf:ProductSection_Type']/Product
Vendor Name Name of the vendor. Important when shipping a virtual appliance.
//ovf:Envelope/Section[@xsi:type='ovf:ProductSection_Type']/Vendor
Version VMware Studio uses the version of the virtual machine to track updates. It may be in n.n.n.n format, where ‘n’ is a number between 0 and 65535.
//ovf:Envelope/Section[@xsi:type='ovf:ProductSection_Type']/Version
Full Version Free format text string used to display the version information of the virtual machine.
//ovf:Envelope/Section[@xsi:type='ovf:ProductSection_Type']/FullVersion
Product URL URL to the company’s Web site which provides information about the product.
//ovf:Envelope/Section[@xsi:type='ovf:ProductSection_Type']/ProductUrl
Vendor URL URL to the your company’s Web site.
//ovf:Envelope/Section[@xsi:type='ovf:ProductSection_Type']/VendorUrl
Application URL URL to the main application Web page. Instead of a host name in the http URL, you can use the variable string ${app.ip}, which resolves to the IP address of the VM.
//ovf:Envelope/Section[@xsi:type='ovf:ProductSection_Type']/AppUrl
Description Description of the functionality the virtual machine provides. It is displayed when the virtual machine is imported into ESX as an OVF.
//ovf:Envelope/Section[@xsi:type='ovf:AnnotationSection_Type']/Annotation
EULA Text End‐user licensing agreement for the VM. The user must accept this agreement before using the VM.
//ovf:Envelope/Section[@xsi:type='ovf:EulaSection_Type']/License
You can add more than one EULA in the build profile by copying the <Section> element containing the EulaSection_Type and placing the additional EULA text in the second <Section> element. For example:
<Section xsi:type="ovf:EulaSection_Type" xml:lang="en"> <Info>End User License Agreement</Info> <License>add first EULA text here</License>
</Section> <Section xsi:type="ovf:EulaSection_Type" xml:lang="en">
<Info>End User License Agreement</Info> <License>add second EULA text here</License>
</Section>
More Information The ExtendedProductSection contains additional ISV branding items.
Vendor UUID Universally Unique Identifier for the ISV. Mandatory for VMware Update Manager. For details, see “Supporting Central Updates with VMware Update Manager” on page 60.
//ovf:Envelope/Section[@xsi:type='vadk:ExtendedProductSection_Type']/vadk:VendorUUID
Product RID Repository Identifier for the virtual appliance. Mandatory for VMware Update Manager. For details, see “Supporting Central Updates with VMware Update Manager” on page 60.
//ovf:Envelope/Section[@xsi:type='vadk:ExtendedProductSection_Type']/vadk:ProductRID
Application Link Label Label provided in this field is shown in the Web console for this virtual machine. This label points to the URL provided in Application Link URL field.
//ovf:Envelope/Section[@xsi:type='vadk:ExtendedProductSection_Type']/vadk:AppUrlName

VMware, Inc. 107
Appendix C Editing XML Build Profiles
Logo Path Icon displayed in the Web console for the virtual machine. Specify the location of an image file that you have copied into a directory in VMware Studio.
//ovf:Envelope/Section[@xsi:type='vadk:ExtendedProductSection_Type']/vadk:Logo
Logo URL URL to your company’s Web site.
//ovf:Envelope/Section[@xsi:type='vadk:ExtendedProductSection_Type']/vadk:LogoUrl
Welcome Text Welcome text for the virtual machine shown in the welcome screen. The welcome text must be 16 lines or less, with a maximum of 79 characters in each line. Any lines or characters greater than these limits will not display in the virtual machine console.
//ovf:Envelope/Section[@xsi:type='vadk:ExtendedProductSection_Type']/vadk:WelcomeText
SSL Certificate The SSLCertificateSection provides details about the appliance’s SSL certificate.
Common Name Server certificates are issued to a common name. In most cases, this is the full DNS name used when navigating a Web site.
//ovf:Envelope/Section[@xsi:type='vadk:SSLCertificateSection_Type']/vadk:CommonName
Organization Legal name of your organization. It is used to sign the certificate.
//ovf:Envelope/Section[@xsi:type='vadk:SSLCertificateSection_Type']/vadk:OrganizationName
Organizational Unit Department or section of your organization. This information is used in the creation of the certificate.
//ovf:Envelope/Section[@xsi:type='vadk:SSLCertificateSection_Type']/vadk:OrganizationalUnitName
Country Code Two letter country code representing the country in which the organization or unit is based. This information is used in the creation of the certificate.
//ovf:Envelope/Section[@xsi:type='vadk:SSLCertificateSection_Type']/vadk:CountryName
Management The VAMISection describes the management services in this VM.
Service Name Name of the service. These are either VAMI services or services created and added by the user.
//ovf:Envelope/Section[@xsi:type='vadk:VAMISection_Type']/vadk:Service/@vadk:name
Service Version Specifies the version of the added services.
//ovf:Envelope/Section[@xsi:type='vadk:VAMISection_Type']/vadk:Service/@vadk:version
Service TabOrder Order in which the added services appear in the generated VM.
//ovf:Envelope/Section[@xsi:type='vadk:VAMISection_Type']/vadk:Service/@vadk:tabOrder
Web Server Port Configurable port number for the lighthttpd Web server. This is the port number to access your VM from the Web browser.
//ovf:Envelope/Section[@xsi:type='vadk:VAMISection_Type']/vadk:WebServer/@vadk:httpsPort
Footer and Copyright Left side footer and copyright in middle section of the footer.
//ovf:Envelope/Section[@xsi:type='vadk:VAMISection_Type']/vadk:Service/@vadk:ViewCustomization
Show EULA Boolean flag for prompting EULA acceptance in the first boot of the generated VM.
//ovf:Envelope/Section[@xsi:type='vadk:VAMISection_Type']/vadk:ShowEULA
Application The ApplicationSection describes package content and output format.
File Name Name of the virtual machine file. This name is visible to users when they download the virtual machine ZIP or OVF package.
//ovf:Envelope/Section[@xsi:type='vadk:ApplicationSection_Type']/vadk:VMXFilename
Table C-1. VM Build Profile XML Configuration Properties (Continued)
Property Description

Developer’s Guide to Building vApps and Virtual Appliances
108 VMware, Inc.
Distribution Format Use OVF format if your virtual machine is going to be deployed on any VMware ESX Platform. ZIP format will work on any one of VMwareʹs hosted products.
//ovf:Envelope/Section[@xsi:type='vadk:ApplicationSection_Type']/vadk:DistributionFormat/@vadk:format
OVF Filename Name of the vApp OVF or OVA output file.
//ovf:Envelope/Section[@xsi:type='vadk:ApplicationSection_Type']/vadk:DistributionFormat/@vadk:file
ZIP Archive Directory Directory under which all files related to virtual machine should appear within the generated archive. It is applicable for ZIP output only.
//ovf:Envelope/Section[@xsi:type='vadk:ApplicationSection_Type']/vadk:DistributionFormat/@vadk:directory
Application Packages List of repository URLs where application packages are available. You can copy application packages onto the VMware Studio appliance (/opt directory on the first line), which is made available at the following URL (second line):
/opt/vmware/www/ISV/appliancePackages
http://[VADK.localIP]/ISV/appliancePackages
//ovf:Envelope/Section[@xsi:type='vadk:ApplicationSection_Type']/vadk:ApplicationPackages
OS Package List The packages added by the user through the GUI are added in the Application Section. These are the additional OS packages required by the ISV’s application.
//ovf:Envelope/Section[@xsi:type='vadk:ApplicationSection_Type']/vadk:OSPackages
First Boot Script Shell script that runs when the virtual machine boots up for the first time.
//ovf:Envelope/Section[@xsi:type='vadk:ApplicationSection_Type']/vadk:BootActions/vadk:FirstBoot
Subsequent Boot Script Shell script that runs when the virtual machine boots up each time except for the first time.
//ovf:Envelope/Section[@xsi:type='vadk:ApplicationSection_Type']/vadk:BootActions/vadk:SubsequentBoot
Root Password Password for the administrative user account for the virtual machine.
//ovf:Envelope/Section[@xsi:type='vadk:ApplicationSection_Type']/vadk:Users/vadk:User[@vadk:username='root']/@vadk:password
OVF IP Assignment The IpAssignmentSection describes how OVF controls IP assignment.
DHCP Enable the option of using the DHCP server for configuring networking of the VM.
//ovf:Envelope/Section[@xsi:type='vadk:IpAssignmentSection_Type']/vmw:IpAssignmentSection[@vmw:schemes=”dhcp”]
OVF Environment Enable the option of using a fixed or a transient IP address for the VM.
//ovf:Envelope/Section[@xsi:type='vadk:IpAssignmentSection_Type']/vmw:IpAssignmentSection[@vmw:schemes=”ovfenv”]
OVF Property The PropertySection sets OVF properties.
Key Key to the OVF Property.
//ovf:Envelope/Section[@xsi:type='vadk:PropertySection_Type']/Property/@ovf:key
Label Label for the OVF property.
//ovf:Envelope/Section[@xsi:type='vadk:PropertySection_Type']/Property/Label
Description Description for the OVF property.
//ovf:Envelope/Section[@xsi:type='vadk:PropertySection_Type']/Property/Description
Type Type of the OVF property
//ovf:Envelope/Section[@xsi:type='vadk:PropertySection_Type']/Property/@ovf:type
Default Value Value of the OVF property according to the type.
//ovf:Envelope/Section[@xsi:type='vadk:PropertySection_Type']/Property/@ovf:value
Table C-1. VM Build Profile XML Configuration Properties (Continued)
Property Description
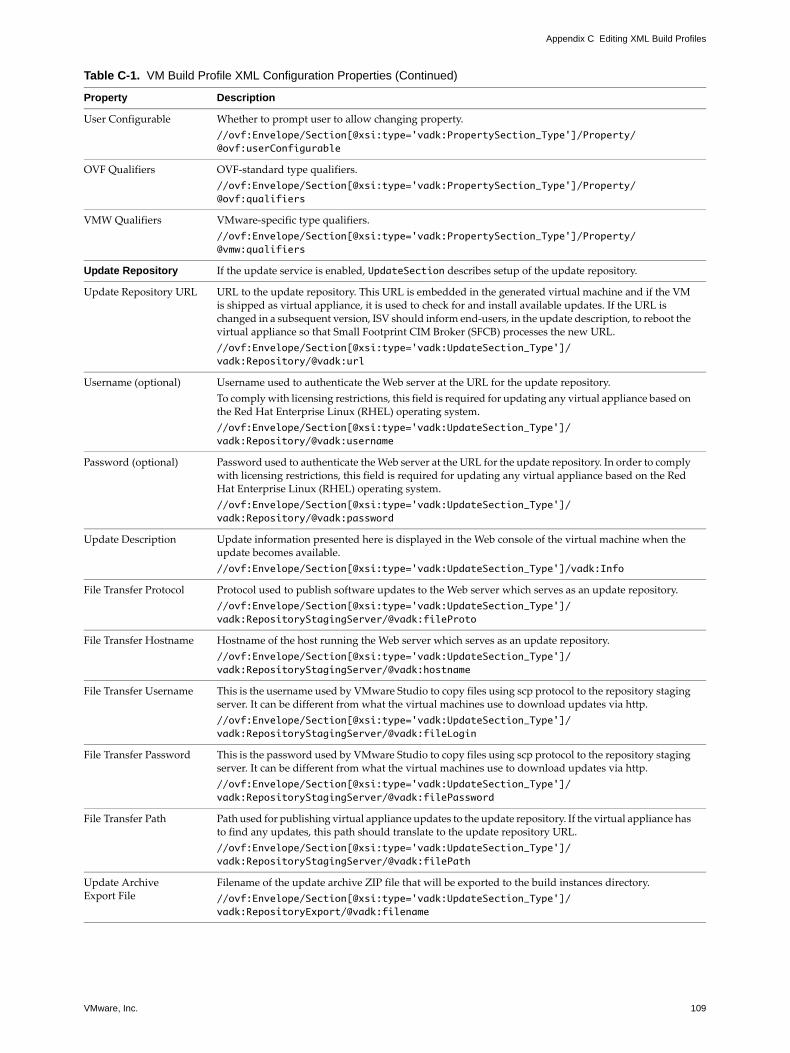
VMware, Inc. 109
Appendix C Editing XML Build Profiles
User Configurable Whether to prompt user to allow changing property.
//ovf:Envelope/Section[@xsi:type='vadk:PropertySection_Type']/Property/@ovf:userConfigurable
OVF Qualifiers OVF‐standard type qualifiers.
//ovf:Envelope/Section[@xsi:type='vadk:PropertySection_Type']/Property/@ovf:qualifiers
VMW Qualifiers VMware‐specific type qualifiers.
//ovf:Envelope/Section[@xsi:type='vadk:PropertySection_Type']/Property/@vmw:qualifiers
Update Repository If the update service is enabled, UpdateSection describes setup of the update repository.
Update Repository URL URL to the update repository. This URL is embedded in the generated virtual machine and if the VM is shipped as virtual appliance, it is used to check for and install available updates. If the URL is changed in a subsequent version, ISV should inform end‐users, in the update description, to reboot the virtual appliance so that Small Footprint CIM Broker (SFCB) processes the new URL.
//ovf:Envelope/Section[@xsi:type='vadk:UpdateSection_Type']/vadk:Repository/@vadk:url
Username (optional) Username used to authenticate the Web server at the URL for the update repository.
To comply with licensing restrictions, this field is required for updating any virtual appliance based on the Red Hat Enterprise Linux (RHEL) operating system.
//ovf:Envelope/Section[@xsi:type='vadk:UpdateSection_Type']/vadk:Repository/@vadk:username
Password (optional) Password used to authenticate the Web server at the URL for the update repository. In order to comply with licensing restrictions, this field is required for updating any virtual appliance based on the Red Hat Enterprise Linux (RHEL) operating system.
//ovf:Envelope/Section[@xsi:type='vadk:UpdateSection_Type']/vadk:Repository/@vadk:password
Update Description Update information presented here is displayed in the Web console of the virtual machine when the update becomes available.
//ovf:Envelope/Section[@xsi:type='vadk:UpdateSection_Type']/vadk:Info
File Transfer Protocol Protocol used to publish software updates to the Web server which serves as an update repository.
//ovf:Envelope/Section[@xsi:type='vadk:UpdateSection_Type']/vadk:RepositoryStagingServer/@vadk:fileProto
File Transfer Hostname Hostname of the host running the Web server which serves as an update repository.
//ovf:Envelope/Section[@xsi:type='vadk:UpdateSection_Type']/vadk:RepositoryStagingServer/@vadk:hostname
File Transfer Username This is the username used by VMware Studio to copy files using scp protocol to the repository staging server. It can be different from what the virtual machines use to download updates via http.
//ovf:Envelope/Section[@xsi:type='vadk:UpdateSection_Type']/vadk:RepositoryStagingServer/@vadk:fileLogin
File Transfer Password This is the password used by VMware Studio to copy files using scp protocol to the repository staging server. It can be different from what the virtual machines use to download updates via http.
//ovf:Envelope/Section[@xsi:type='vadk:UpdateSection_Type']/vadk:RepositoryStagingServer/@vadk:filePassword
File Transfer Path Path used for publishing virtual appliance updates to the update repository. If the virtual appliance has to find any updates, this path should translate to the update repository URL.
//ovf:Envelope/Section[@xsi:type='vadk:UpdateSection_Type']/vadk:RepositoryStagingServer/@vadk:filePath
Update ArchiveExport File
Filename of the update archive ZIP file that will be exported to the build instances directory.
//ovf:Envelope/Section[@xsi:type='vadk:UpdateSection_Type']/vadk:RepositoryExport/@vadk:filename
Table C-1. VM Build Profile XML Configuration Properties (Continued)
Property Description
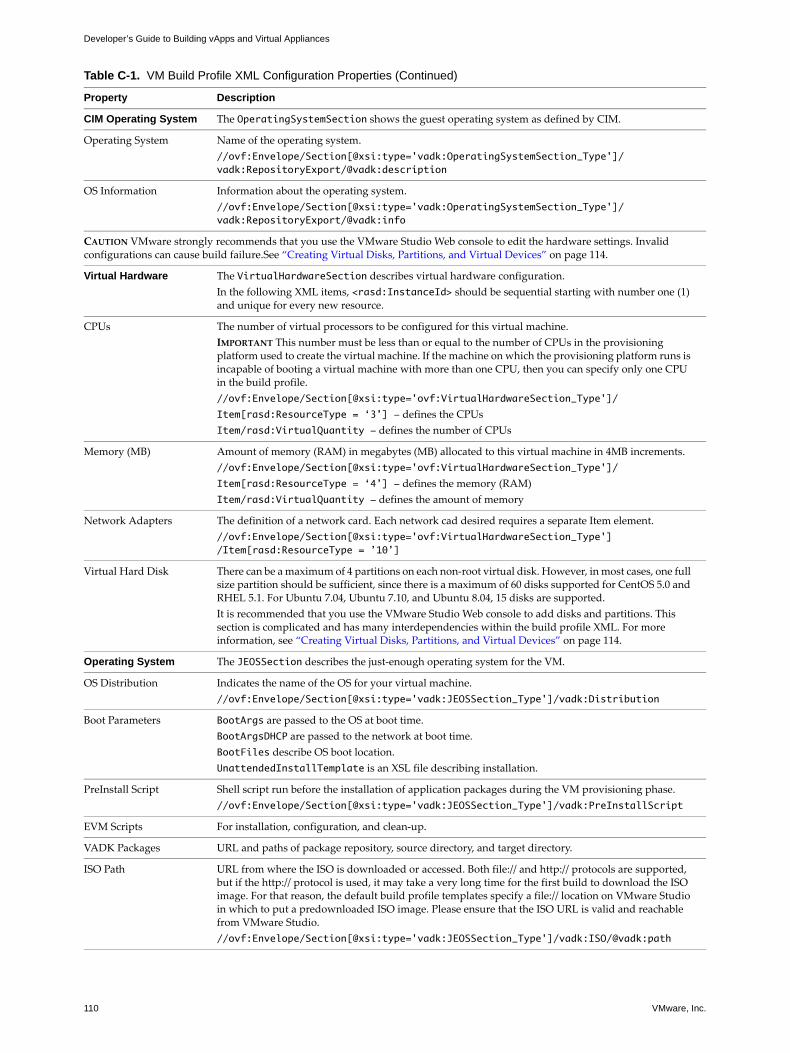
Developer’s Guide to Building vApps and Virtual Appliances
110 VMware, Inc.
CIM Operating System The OperatingSystemSection shows the guest operating system as defined by CIM.
Operating System Name of the operating system.
//ovf:Envelope/Section[@xsi:type='vadk:OperatingSystemSection_Type']/vadk:RepositoryExport/@vadk:description
OS Information Information about the operating system.
//ovf:Envelope/Section[@xsi:type='vadk:OperatingSystemSection_Type']/vadk:RepositoryExport/@vadk:info
CAUTION VMware strongly recommends that you use the VMware Studio Web console to edit the hardware settings. Invalid configurations can cause build failure.See “Creating Virtual Disks, Partitions, and Virtual Devices” on page 114.
Virtual Hardware The VirtualHardwareSection describes virtual hardware configuration.
In the following XML items, <rasd:InstanceId> should be sequential starting with number one (1) and unique for every new resource.
CPUs The number of virtual processors to be configured for this virtual machine.
IMPORTANT This number must be less than or equal to the number of CPUs in the provisioning platform used to create the virtual machine. If the machine on which the provisioning platform runs is incapable of booting a virtual machine with more than one CPU, then you can specify only one CPU in the build profile.
//ovf:Envelope/Section[@xsi:type='ovf:VirtualHardwareSection_Type']/
Item[rasd:ResourceType = ‘3’] - defines the CPUs
Item/rasd:VirtualQuantity - defines the number of CPUs
Memory (MB) Amount of memory (RAM) in megabytes (MB) allocated to this virtual machine in 4MB increments.
//ovf:Envelope/Section[@xsi:type='ovf:VirtualHardwareSection_Type']/
Item[rasd:ResourceType = ‘4’] - defines the memory (RAM)
Item/rasd:VirtualQuantity - defines the amount of memory
Network Adapters The definition of a network card. Each network cad desired requires a separate Item element.
//ovf:Envelope/Section[@xsi:type='ovf:VirtualHardwareSection_Type']/Item[rasd:ResourceType = ’10’]
Virtual Hard Disk There can be a maximum of 4 partitions on each non‐root virtual disk. However, in most cases, one full size partition should be sufficient, since there is a maximum of 60 disks supported for CentOS 5.0 and RHEL 5.1. For Ubuntu 7.04, Ubuntu 7.10, and Ubuntu 8.04, 15 disks are supported.
It is recommended that you use the VMware Studio Web console to add disks and partitions. This section is complicated and has many interdependencies within the build profile XML. For more information, see “Creating Virtual Disks, Partitions, and Virtual Devices” on page 114.
Operating System The JEOSSection describes the just‐enough operating system for the VM.
OS Distribution Indicates the name of the OS for your virtual machine.
//ovf:Envelope/Section[@xsi:type='vadk:JEOSSection_Type']/vadk:Distribution
Boot Parameters BootArgs are passed to the OS at boot time.
BootArgsDHCP are passed to the network at boot time.
BootFiles describe OS boot location.
UnattendedInstallTemplate is an XSL file describing installation.
PreInstall Script Shell script run before the installation of application packages during the VM provisioning phase.
//ovf:Envelope/Section[@xsi:type='vadk:JEOSSection_Type']/vadk:PreInstallScript
EVM Scripts For installation, configuration, and clean‐up.
VADK Packages URL and paths of package repository, source directory, and target directory.
ISO Path URL from where the ISO is downloaded or accessed. Both file:// and http:// protocols are supported, but if the http:// protocol is used, it may take a very long time for the first build to download the ISO image. For that reason, the default build profile templates specify a file:// location on VMware Studio in which to put a predownloaded ISO image. Please ensure that the ISO URL is valid and reachable from VMware Studio.
//ovf:Envelope/Section[@xsi:type='vadk:JEOSSection_Type']/vadk:ISO/@vadk:path
Table C-1. VM Build Profile XML Configuration Properties (Continued)
Property Description

VMware, Inc. 111
Appendix C Editing XML Build Profiles
ISO MD5 Any ISO downloaded from the ISO URL must have the same MD5 checksum shown here.
//ovf:Envelope/Section[@xsi:type='vadk:JEOSSection_Type']/vadk:ISO/@vadk:md5sum
Distribution Vendor, release number, architecture, package format, package manager, and package repository.
//ovf:Envelope/Section[@xsi:type='vadk:JEOSSection_Type']/vadk:Distribution
OS Package List List of packages from the OS install media to be included in the virtual machine. No packages can be removed from the required list of packages.
//ovf:Envelope/Section[@xsi:type='vadk:JEOSSection_Type']/vadk:OSPackages
Build Settings The BuildSection controls provisioning of the VM.
VM Network Connection Network Connection allows you to specify either Bridged or Host‐only option. The network mode is always reset to bridged prior to ZIP and OVF packaging. The Network Connection can also specify the network label for VMware vSphere, VM Network for example.
//ovf:Envelope/Section[@xsi:type='vadk:BuildSection_Type']/vadk:ProvisioningSettings/vadk:NetworkConnection
VM Network Type VMware Studio provides two options for obtaining IP addresses for the virtual machine being built during provisioning, using DHCP or by specifying a static IP address. Specify one of the following:
DHCP
Static, which necessitates the items below.
//ovf:Envelope/Section[@xsi:type='vadk:BuildSection_Type']/vadk:ProvisioningSettings/vadk:NetworkType
IP Address – the static IP address to be used for the virtual machine during provisioning.
//ovf:Envelope/Section[@xsi:type='vadk:BuildSection_Type']/vadk:ProvisioningSettings/vadk:IP
Netmask – The netmask to be used for the virtual machine during provisioning. A netmask enables the recipient of IP packets to distinguish the network ID and host ID portions of the IP address. Netmasks normally are of the format 255.x.x.x.
//ovf:Envelope/Section[@xsi:type='vadk:BuildSection_Type']/vadk:ProvisioningSettings/vadk:Netmask
Gateway – The IP Address of the designated gateway for this network.
//ovf:Envelope/Section[@xsi:type='vadk:BuildSection_Type']/vadk:ProvisioningSettings/vadk:Gateway
Preferred DNS Server (Optional) – The primary DNS server to be used for the virtual machine during provisioning. A name server is responsible for mapping IP addresses to names.
//ovf:Envelope/Section[@xsi:type='vadk:BuildSection_Type']/vadk:ProvisioningSettings/vadk:DNS1
Alternate DNS Server (Optional) – The alternate DNS server to be used for the virtual machine during provisioning. A name server is responsible for mapping IP addresses to names.
//ovf:Envelope/Section[@xsi:type='vadk:BuildSection_Type']/vadk:ProvisioningSettings/vadk:DNS2
Host Name(provisioning platform)
The host name or IP address of the virtualization platform you use for provisioning.
Not all information items are required for different platforms. For example, only VMware Workstation needs the vmrun command, and the build directory path is needed only for hosted products.
//ovf:Envelope/Section[@xsi:type='vadk:BuildSection_Type']/vadk:ProvisioningEngine/vadk:VmhostLan/@vadk:hostname
Port The port for communicating with the remote host that performs provisioning. For many virtualization platforms this is the HTTPS port 443. VMware Server 1.0.x often uses the authd or automation port, usually 902, sometimes 904. VMware Server 2.0 hosted on Windows probably uses port 8333. VMware Workstation 6.5 uses SSH on port 22 for remote provisioning, so it does not ask for a port number.
//ovf:Envelope/Section[@xsi:type='vadk:BuildSection_Type']/vadk:ProvisioningEngine/vadk:VmhostLan/@vadk:port
Host OS The operating system of the provisioning platform.
//ovf:Envelope/Section[@xsi:type='vadk:BuildSection_Type']/vadk:ProvisioningEngine/vadk:VmhostLan/@vadk:hostOS
Username A user name on the remote host for authentication of virtual machine provisioning.
//ovf:Envelope/Section[@xsi:type='vadk:BuildSection_Type']/vadk:ProvisioningEngine/vadk:VmhostLan/@vadk:login
Table C-1. VM Build Profile XML Configuration Properties (Continued)
Property Description
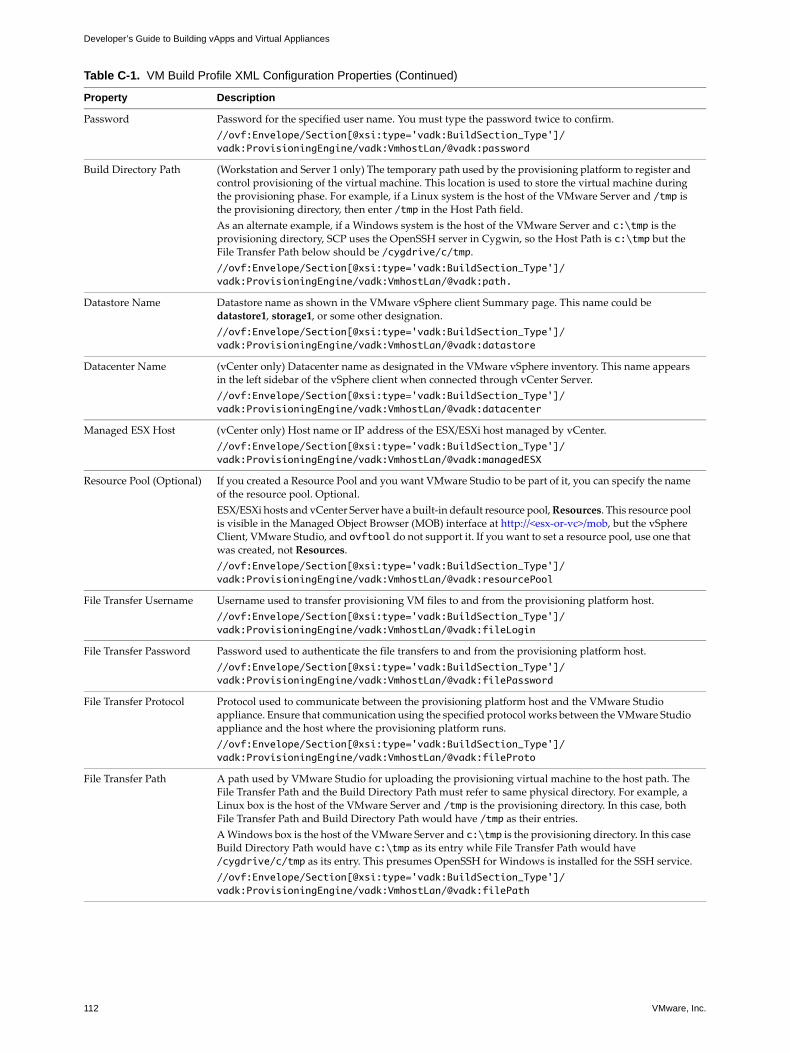
Developer’s Guide to Building vApps and Virtual Appliances
112 VMware, Inc.
Password Password for the specified user name. You must type the password twice to confirm.
//ovf:Envelope/Section[@xsi:type='vadk:BuildSection_Type']/vadk:ProvisioningEngine/vadk:VmhostLan/@vadk:password
Build Directory Path (Workstation and Server 1 only) The temporary path used by the provisioning platform to register and control provisioning of the virtual machine. This location is used to store the virtual machine during the provisioning phase. For example, if a Linux system is the host of the VMware Server and /tmp is the provisioning directory, then enter /tmp in the Host Path field.
As an alternate example, if a Windows system is the host of the VMware Server and c:\tmp is the provisioning directory, SCP uses the OpenSSH server in Cygwin, so the Host Path is c:\tmp but the File Transfer Path below should be /cygdrive/c/tmp.
//ovf:Envelope/Section[@xsi:type='vadk:BuildSection_Type']/vadk:ProvisioningEngine/vadk:VmhostLan/@vadk:path.
Datastore Name Datastore name as shown in the VMware vSphere client Summary page. This name could be datastore1, storage1, or some other designation.
//ovf:Envelope/Section[@xsi:type='vadk:BuildSection_Type']/vadk:ProvisioningEngine/vadk:VmhostLan/@vadk:datastore
Datacenter Name (vCenter only) Datacenter name as designated in the VMware vSphere inventory. This name appears in the left sidebar of the vSphere client when connected through vCenter Server.
//ovf:Envelope/Section[@xsi:type='vadk:BuildSection_Type']/vadk:ProvisioningEngine/vadk:VmhostLan/@vadk:datacenter
Managed ESX Host (vCenter only) Host name or IP address of the ESX/ESXi host managed by vCenter.
//ovf:Envelope/Section[@xsi:type='vadk:BuildSection_Type']/vadk:ProvisioningEngine/vadk:VmhostLan/@vadk:managedESX
Resource Pool (Optional) If you created a Resource Pool and you want VMware Studio to be part of it, you can specify the name of the resource pool. Optional.
ESX/ESXi hosts and vCenter Server have a built‐in default resource pool, Resources. This resource pool is visible in the Managed Object Browser (MOB) interface at http://<esx‐or‐vc>/mob, but the vSphere Client, VMware Studio, and ovftool do not support it. If you want to set a resource pool, use one that was created, not Resources.
//ovf:Envelope/Section[@xsi:type='vadk:BuildSection_Type']/vadk:ProvisioningEngine/vadk:VmhostLan/@vadk:resourcePool
File Transfer Username Username used to transfer provisioning VM files to and from the provisioning platform host.
//ovf:Envelope/Section[@xsi:type='vadk:BuildSection_Type']/vadk:ProvisioningEngine/vadk:VmhostLan/@vadk:fileLogin
File Transfer Password Password used to authenticate the file transfers to and from the provisioning platform host.
//ovf:Envelope/Section[@xsi:type='vadk:BuildSection_Type']/vadk:ProvisioningEngine/vadk:VmhostLan/@vadk:filePassword
File Transfer Protocol Protocol used to communicate between the provisioning platform host and the VMware Studio appliance. Ensure that communication using the specified protocol works between the VMware Studio appliance and the host where the provisioning platform runs.
//ovf:Envelope/Section[@xsi:type='vadk:BuildSection_Type']/vadk:ProvisioningEngine/vadk:VmhostLan/@vadk:fileProto
File Transfer Path A path used by VMware Studio for uploading the provisioning virtual machine to the host path. The File Transfer Path and the Build Directory Path must refer to same physical directory. For example, a Linux box is the host of the VMware Server and /tmp is the provisioning directory. In this case, both File Transfer Path and Build Directory Path would have /tmp as their entries.
A Windows box is the host of the VMware Server and c:\tmp is the provisioning directory. In this case Build Directory Path would have c:\tmp as its entry while File Transfer Path would have /cygdrive/c/tmp as its entry. This presumes OpenSSH for Windows is installed for the SSH service.
//ovf:Envelope/Section[@xsi:type='vadk:BuildSection_Type']/vadk:ProvisioningEngine/vadk:VmhostLan/@vadk:filePath
Table C-1. VM Build Profile XML Configuration Properties (Continued)
Property Description
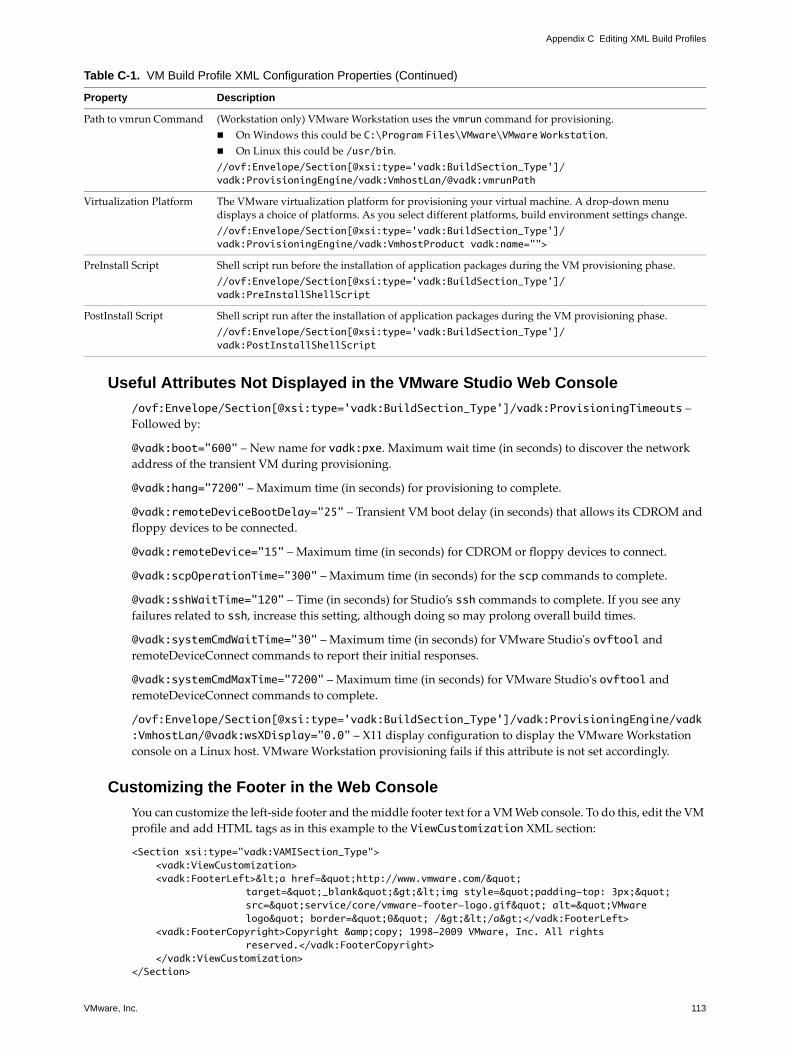
VMware, Inc. 113
Appendix C Editing XML Build Profiles
Useful Attributes Not Displayed in the VMware Studio Web Console
/ovf:Envelope/Section[@xsi:type='vadk:BuildSection_Type']/vadk:ProvisioningTimeouts – Followed by:
@vadk:boot="600" – New name for vadk:pxe. Maximum wait time (in seconds) to discover the network
address of the transient VM during provisioning.
@vadk:hang="7200" – Maximum time (in seconds) for provisioning to complete.
@vadk:remoteDeviceBootDelay="25" – Transient VM boot delay (in seconds) that allows its CDROM and
floppy devices to be connected.
@vadk:remoteDevice="15" – Maximum time (in seconds) for CDROM or floppy devices to connect.
@vadk:scpOperationTime="300" – Maximum time (in seconds) for the scp commands to complete.
@vadk:sshWaitTime="120" – Time (in seconds) for Studio’s ssh commands to complete. If you see any
failures related to ssh, increase this setting, although doing so may prolong overall build times.
@vadk:systemCmdWaitTime="30" – Maximum time (in seconds) for VMware Studioʹs ovftool and remoteDeviceConnect commands to report their initial responses.
@vadk:systemCmdMaxTime="7200" – Maximum time (in seconds) for VMware Studioʹs ovftool and remoteDeviceConnect commands to complete.
/ovf:Envelope/Section[@xsi:type='vadk:BuildSection_Type']/vadk:ProvisioningEngine/vadk:VmhostLan/@vadk:wsXDisplay=”0.0” – X11 display configuration to display the VMware Workstation
console on a Linux host. VMware Workstation provisioning fails if this attribute is not set accordingly.
Customizing the Footer in the Web Console
You can customize the left‐side footer and the middle footer text for a VM Web console. To do this, edit the VM
profile and add HTML tags as in this example to the ViewCustomization XML section:
<Section xsi:type="vadk:VAMISection_Type"><vadk:ViewCustomization><vadk:FooterLeft><a href="http://www.vmware.com/"
target="_blank"><img style="padding-top: 3px;" src="service/core/vmware-footer-logo.gif" alt="VMware logo" border="0" /></a></vadk:FooterLeft>
<vadk:FooterCopyright>Copyright &copy; 1998-2009 VMware, Inc. All rights reserved.</vadk:FooterCopyright>
</vadk:ViewCustomization></Section>
Path to vmrun Command (Workstation only) VMware Workstation uses the vmrun command for provisioning.
On Windows this could be C:\Program Files\VMware\VMware Workstation.
On Linux this could be /usr/bin.
//ovf:Envelope/Section[@xsi:type='vadk:BuildSection_Type']/vadk:ProvisioningEngine/vadk:VmhostLan/@vadk:vmrunPath
Virtualization Platform The VMware virtualization platform for provisioning your virtual machine. A drop‐down menu displays a choice of platforms. As you select different platforms, build environment settings change.
//ovf:Envelope/Section[@xsi:type='vadk:BuildSection_Type']/vadk:ProvisioningEngine/vadk:VmhostProduct vadk:name="">
PreInstall Script Shell script run before the installation of application packages during the VM provisioning phase.
//ovf:Envelope/Section[@xsi:type='vadk:BuildSection_Type']/vadk:PreInstallShellScript
PostInstall Script Shell script run after the installation of application packages during the VM provisioning phase.
//ovf:Envelope/Section[@xsi:type='vadk:BuildSection_Type']/vadk:PostInstallShellScript
Table C-1. VM Build Profile XML Configuration Properties (Continued)
Property Description
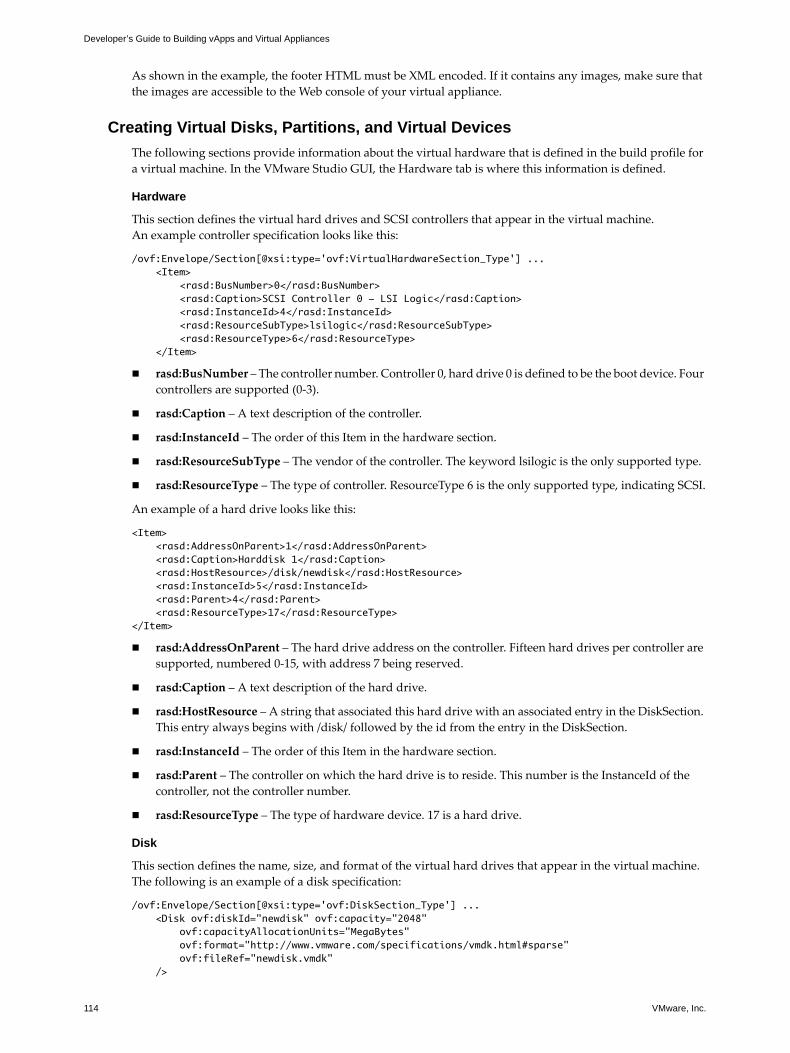
Developer’s Guide to Building vApps and Virtual Appliances
114 VMware, Inc.
As shown in the example, the footer HTML must be XML encoded. If it contains any images, make sure that
the images are accessible to the Web console of your virtual appliance.
Creating Virtual Disks, Partitions, and Virtual Devices
The following sections provide information about the virtual hardware that is defined in the build profile for
a virtual machine. In the VMware Studio GUI, the Hardware tab is where this information is defined.
Hardware
This section defines the virtual hard drives and SCSI controllers that appear in the virtual machine.
An example controller specification looks like this:
/ovf:Envelope/Section[@xsi:type='ovf:VirtualHardwareSection_Type'] ...<Item>
<rasd:BusNumber>0</rasd:BusNumber><rasd:Caption>SCSI Controller 0 - LSI Logic</rasd:Caption><rasd:InstanceId>4</rasd:InstanceId><rasd:ResourceSubType>lsilogic</rasd:ResourceSubType><rasd:ResourceType>6</rasd:ResourceType>
</Item>
rasd:BusNumber – The controller number. Controller 0, hard drive 0 is defined to be the boot device. Four
controllers are supported (0‐3).
rasd:Caption – A text description of the controller.
rasd:InstanceId – The order of this Item in the hardware section.
rasd:ResourceSubType – The vendor of the controller. The keyword lsilogic is the only supported type.
rasd:ResourceType – The type of controller. ResourceType 6 is the only supported type, indicating SCSI.
An example of a hard drive looks like this:
<Item><rasd:AddressOnParent>1</rasd:AddressOnParent><rasd:Caption>Harddisk 1</rasd:Caption><rasd:HostResource>/disk/newdisk</rasd:HostResource><rasd:InstanceId>5</rasd:InstanceId><rasd:Parent>4</rasd:Parent><rasd:ResourceType>17</rasd:ResourceType>
</Item>
rasd:AddressOnParent – The hard drive address on the controller. Fifteen hard drives per controller are
supported, numbered 0‐15, with address 7 being reserved.
rasd:Caption – A text description of the hard drive.
rasd:HostResource – A string that associated this hard drive with an associated entry in the DiskSection.
This entry always begins with /disk/ followed by the id from the entry in the DiskSection.
rasd:InstanceId – The order of this Item in the hardware section.
rasd:Parent – The controller on which the hard drive is to reside. This number is the InstanceId of the
controller, not the controller number.
rasd:ResourceType – The type of hardware device. 17 is a hard drive.
Disk
This section defines the name, size, and format of the virtual hard drives that appear in the virtual machine.
The following is an example of a disk specification:
/ovf:Envelope/Section[@xsi:type='ovf:DiskSection_Type'] ...<Disk ovf:diskId="newdisk" ovf:capacity="2048"
ovf:capacityAllocationUnits="MegaBytes"ovf:format="http://www.vmware.com/specifications/vmdk.html#sparse"ovf:fileRef="newdisk.vmdk"
/>
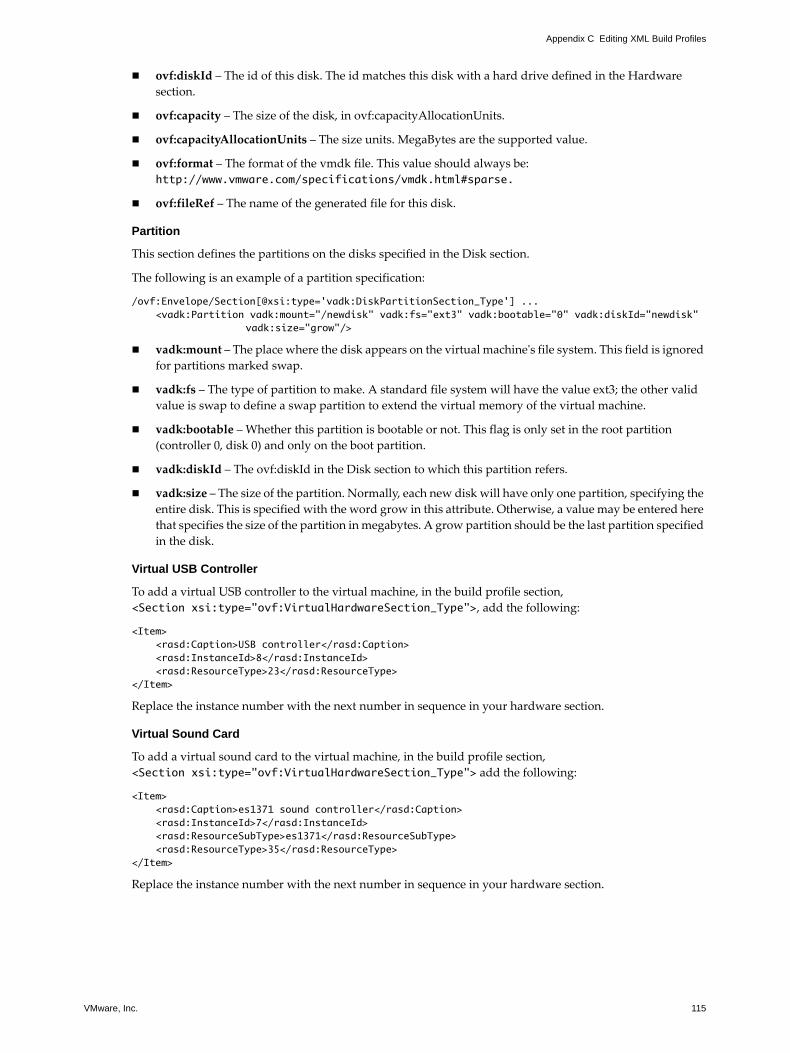
VMware, Inc. 115
Appendix C Editing XML Build Profiles
ovf:diskId – The id of this disk. The id matches this disk with a hard drive defined in the Hardware
section.
ovf:capacity – The size of the disk, in ovf:capacityAllocationUnits.
ovf:capacityAllocationUnits – The size units. MegaBytes are the supported value.
ovf:format – The format of the vmdk file. This value should always be:
http://www.vmware.com/specifications/vmdk.html#sparse.
ovf:fileRef – The name of the generated file for this disk.
Partition
This section defines the partitions on the disks specified in the Disk section.
The following is an example of a partition specification:
/ovf:Envelope/Section[@xsi:type='vadk:DiskPartitionSection_Type'] ...<vadk:Partition vadk:mount="/newdisk" vadk:fs="ext3" vadk:bootable="0" vadk:diskId="newdisk"
vadk:size="grow"/>
vadk:mount – The place where the disk appears on the virtual machineʹs file system. This field is ignored
for partitions marked swap.
vadk:fs – The type of partition to make. A standard file system will have the value ext3; the other valid
value is swap to define a swap partition to extend the virtual memory of the virtual machine.
vadk:bootable – Whether this partition is bootable or not. This flag is only set in the root partition
(controller 0, disk 0) and only on the boot partition.
vadk:diskId – The ovf:diskId in the Disk section to which this partition refers.
vadk:size – The size of the partition. Normally, each new disk will have only one partition, specifying the
entire disk. This is specified with the word grow in this attribute. Otherwise, a value may be entered here
that specifies the size of the partition in megabytes. A grow partition should be the last partition specified
in the disk.
Virtual USB Controller
To add a virtual USB controller to the virtual machine, in the build profile section,
<Section xsi:type="ovf:VirtualHardwareSection_Type">, add the following:
<Item><rasd:Caption>USB controller</rasd:Caption><rasd:InstanceId>8</rasd:InstanceId><rasd:ResourceType>23</rasd:ResourceType>
</Item>
Replace the instance number with the next number in sequence in your hardware section.
Virtual Sound Card
To add a virtual sound card to the virtual machine, in the build profile section,
<Section xsi:type="ovf:VirtualHardwareSection_Type"> add the following:
<Item><rasd:Caption>es1371 sound controller</rasd:Caption><rasd:InstanceId>7</rasd:InstanceId><rasd:ResourceSubType>es1371</rasd:ResourceSubType><rasd:ResourceType>35</rasd:ResourceType>
</Item>
Replace the instance number with the next number in sequence in your hardware section.

Developer’s Guide to Building vApps and Virtual Appliances
116 VMware, Inc.
Structure of vApp XML Build ProfilesAfter you build a vApp, you can find its XML profile in this location on the VMware Studio appliance:
/opt/vmware/var/lib/build/vapp_profiles/<vAppProfileName>.xml
Table C‐2 describes the configuration properties in the vApp build profile XML file.
Table C-2. vApp Build XML Configuration Properties
Property Description
vApp Information Items in the ProductSection for the ISV.
vApp Name Name of the vApp. This name is displayed as vApp in vSphere. //vadk:MultiVM/ovf:VirtualSystemCollection/ovf:ProductSection/ovf:Product
Version Version of the vApp. This version is displayed in the Summary tab in vSphere client.
//vadk:MultiVM/ovf:VirtualSystemCollection/ovf:ProductSection/ovf:Version
Full Version Free text used to display the full version of the vApp.
//vadk:MultiVM/ovf:VirtualSystemCollection/ovf:ProductSection/ovf:FullVersion
Product URL Product URL to the company’s Web site which provides information about this vApp.
//vadk:MultiVM/ovf:VirtualSystemCollection/ovf:ProductSection/ovf:ProductUrl
Vendor Name of the vApp vendor.
//vadk:MultiVM/ovf:VirtualSystemCollection/ovf:ProductSection/ovf:Vendor
Description Description of the functionality this vApp provides. It is displayed in the summary tab in vSphere client.
//vadk:MultiVM/ovf:VirtualSystemCollection/ovf:AnnotationSection/ovf:Annotation
Vendor URL Vendor URL to the company’s Web site.
//vadk:MultiVM/ovf:VirtualSystemCollection/ovf:ProductSection/ovf:VendorUrl
Application URL URL to the main application Web page. The {$app.ip} keyword in the URL is resolved to the IP address of the VM.
//vadk:MultiVM/ovf:VirtualSystemCollection/ovf:ProductSection/ovf:AppUrl
EULA Text end‐user licensing agreement for the vApp. The user must accept this agreement before using the vApp. You can add more than one EULA in the build profile by copying the <EulaSection>.
//vadk:MultiVM/ovf:VirtualSystemCollection/ovf:EulaSection/ovf:License
VM Information You can specify more than one virtual machine in VMCollection.
Profile Name Specifies the profile name of the VM.
//vadk:MultiVM/vadk:VMCollection/vadk:VM/@vadk:profile
Location If specified, it is used to select an existing build of a VM. If vadk:location is specified, then the VM at that location is used. Otherwise, the VM is built from the profile specified in the vadk:profile.
//vadk:MultiVM/vadk:VMCollection/vadk:VM/@vadk:location
Id This is the identification of the VM, used in the Startup Section. This id is auto‐generated by the UI.
//vadk:MultiVM/vadk:VMCollection/vadk:VM/@vadk:ovfid
Start Order The StartupSection describes power‐on order for the vApp.
Id Specify the id of the VM. This matches the vadk:ovfid in the VMCollection Section.
//vadk:MultiVM/ovf:VirtualSystemCollection/ovf:StartupSection/ovf:Item/@ovf:id
Boot Group Specify the boot group to order the startup and shutdown of the VMs.
//vadk:MultiVM/ovf:VirtualSystemCollection/ovf:StartupSection/ovf:Item/@ovf:order
Start Action Action to perform on the VM while starting the vApp. It can either be specified as powerOn or ignored.
//vadk:MultiVM/ovf:VirtualSystemCollection/ovf:StartupSection/ovf:Item/@ovf:startAction
Stop Action Action to be performed on the VM while shutting down the vApp.
//vadk:MultiVM/ovf:VirtualSystemCollection/ovf:StartupSection/ovf:Item/@ovf:stopAction
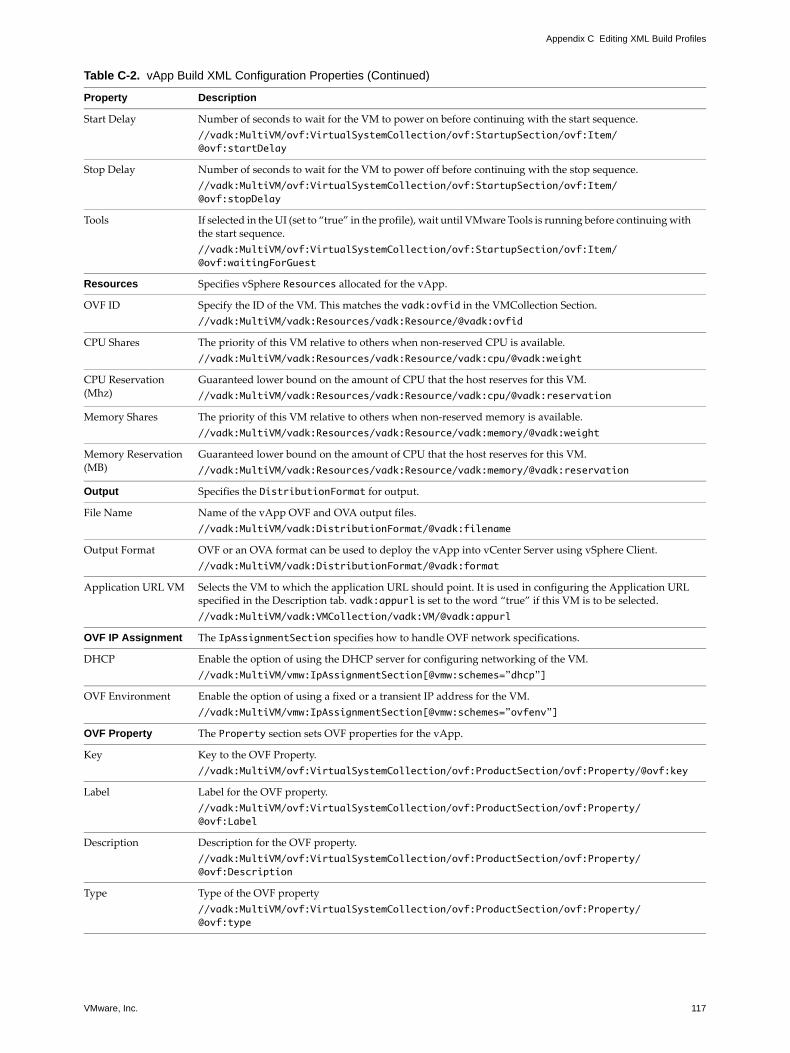
VMware, Inc. 117
Appendix C Editing XML Build Profiles
Start Delay Number of seconds to wait for the VM to power on before continuing with the start sequence.
//vadk:MultiVM/ovf:VirtualSystemCollection/ovf:StartupSection/ovf:Item/@ovf:startDelay
Stop Delay Number of seconds to wait for the VM to power off before continuing with the stop sequence.
//vadk:MultiVM/ovf:VirtualSystemCollection/ovf:StartupSection/ovf:Item/@ovf:stopDelay
Tools If selected in the UI (set to “true” in the profile), wait until VMware Tools is running before continuing with the start sequence.
//vadk:MultiVM/ovf:VirtualSystemCollection/ovf:StartupSection/ovf:Item/@ovf:waitingForGuest
Resources Specifies vSphere Resources allocated for the vApp.
OVF ID Specify the ID of the VM. This matches the vadk:ovfid in the VMCollection Section.
//vadk:MultiVM/vadk:Resources/vadk:Resource/@vadk:ovfid
CPU Shares The priority of this VM relative to others when non‐reserved CPU is available.
//vadk:MultiVM/vadk:Resources/vadk:Resource/vadk:cpu/@vadk:weight
CPU Reservation (Mhz)
Guaranteed lower bound on the amount of CPU that the host reserves for this VM.
//vadk:MultiVM/vadk:Resources/vadk:Resource/vadk:cpu/@vadk:reservation
Memory Shares The priority of this VM relative to others when non‐reserved memory is available.
//vadk:MultiVM/vadk:Resources/vadk:Resource/vadk:memory/@vadk:weight
Memory Reservation(MB)
Guaranteed lower bound on the amount of CPU that the host reserves for this VM.
//vadk:MultiVM/vadk:Resources/vadk:Resource/vadk:memory/@vadk:reservation
Output Specifies the DistributionFormat for output.
File Name Name of the vApp OVF and OVA output files.
//vadk:MultiVM/vadk:DistributionFormat/@vadk:filename
Output Format OVF or an OVA format can be used to deploy the vApp into vCenter Server using vSphere Client.
//vadk:MultiVM/vadk:DistributionFormat/@vadk:format
Application URL VM Selects the VM to which the application URL should point. It is used in configuring the Application URL specified in the Description tab. vadk:appurl is set to the word “true” if this VM is to be selected.
//vadk:MultiVM/vadk:VMCollection/vadk:VM/@vadk:appurl
OVF IP Assignment The IpAssignmentSection specifies how to handle OVF network specifications.
DHCP Enable the option of using the DHCP server for configuring networking of the VM.
//vadk:MultiVM/vmw:IpAssignmentSection[@vmw:schemes=”dhcp”]
OVF Environment Enable the option of using a fixed or a transient IP address for the VM.
//vadk:MultiVM/vmw:IpAssignmentSection[@vmw:schemes=”ovfenv”]
OVF Property The Property section sets OVF properties for the vApp.
Key Key to the OVF Property.
//vadk:MultiVM/ovf:VirtualSystemCollection/ovf:ProductSection/ovf:Property/@ovf:key
Label Label for the OVF property.
//vadk:MultiVM/ovf:VirtualSystemCollection/ovf:ProductSection/ovf:Property/@ovf:Label
Description Description for the OVF property.
//vadk:MultiVM/ovf:VirtualSystemCollection/ovf:ProductSection/ovf:Property/@ovf:Description
Type Type of the OVF property
//vadk:MultiVM/ovf:VirtualSystemCollection/ovf:ProductSection/ovf:Property/@ovf:type
Table C-2. vApp Build XML Configuration Properties (Continued)
Property Description

Developer’s Guide to Building vApps and Virtual Appliances
118 VMware, Inc.
Default Value Value of the OVF property according to the type.
//vadk:MultiVM/ovf:VirtualSystemCollection/ovf:ProductSection/ovf:Property/@ovf:value
User Configurable Whether to prompt user to allow changing property.
//vadk:MultiVM/ovf:VirtualSystemCollection/ovf:ProductSection/ovf:Property/@ovf:userConfigurable
OVF Qualifiers OVF‐standard type qualifiers.
//vadk:MultiVM/ovf:VirtualSystemCollection/ovf:ProductSection/ovf:Property/@ovf:qualifiers
VMW Qualifiers VMware‐specific type qualifiers.
//vadk:MultiVM/ovf:VirtualSystemCollection/ovf:ProductSection/ovf:Property/@vmw:qualifiers
Table C-2. vApp Build XML Configuration Properties (Continued)
Property Description

VMware, Inc. 119
D
This appendix contains two sections:
“Resolving VMware Studio Issues” on page 119
“Resolving Eclipse Plugin Issues” on page 122
Resolving VMware Studio IssuesTable D‐1 lists problems that you might encounter when using VMware Studio, and provides possible
resolutions for these problems.
Troubleshooting D
Table D-1. Troubleshooting information for VMware Studio
Problem Resolution
Troubleshooting VM Builds
Windows build fails with an “account already exists” error.
Windows Server already has a guest user account. If you try to create one, it causes builds to fail.
The build of a VM or vApp hangs or times out without any specific error.
Check the provisioning engine console to see if user input is needed or if there is a specific failure. This can happen because you specified an OS package in the build profile that does not exist as part of the ISO; in that case, remove the OS package.
VMware Studio times out waiting for IP information from the provisioning VM during build.
This problem has several possible causes:
1 Your DHCP server might be having trouble issuing an IP address. The alternative is to use a static IP address during provisioning. Obtain an IP address in your network, and update the virtual machine Network Type.
2 If you try to provision a 64‐bit OS on a 32 bit ESXi host, VMware Studio times out waiting for IP information from the VM, which cannot power on. The message on the console of the provisioning machine would be “Your CPU does not support long mode. Use a 32‐bit distribution.”
3 When an ESX/ESXi host is managed by vCenter Server, and you provision directly on the ESX/ESXi host, not through vCenter Server, the provisioning might fail. This is not a supported configuration: next time provision through vCenter Server.
A build fails and prints many messages including:
Error: unable to open NFC target disk.
This could be a permissions problem. When network shares serve files and directories owned by different users, remote build transfer can fail. Try building to local disk instead of building to a network. share.
Provisioning a 64‐bit OS fails when using 32‐bit hardware to run a virtualization product platform. The verbose log contains this error message: “THE CHOSEN PROVISIONING ENGINE DOES NOT APPEAR TO BE CAPABLE OF RUNNING 64‐BIT GUESTS; THE BUILD MAY NOT BE SUCCESSFUL.”
You must use 64‐bit hardware to provision a virtual machine with 64‐bit guest operating system. If the CPU is an Intel or AMD processor, it must be capable of executing 64‐bit instructions. Intel processors must have VT (virtualization technology, which Intel cpuid documentation also calls the VMX bit) enabled. Sometimes this setting is in the BIOS.
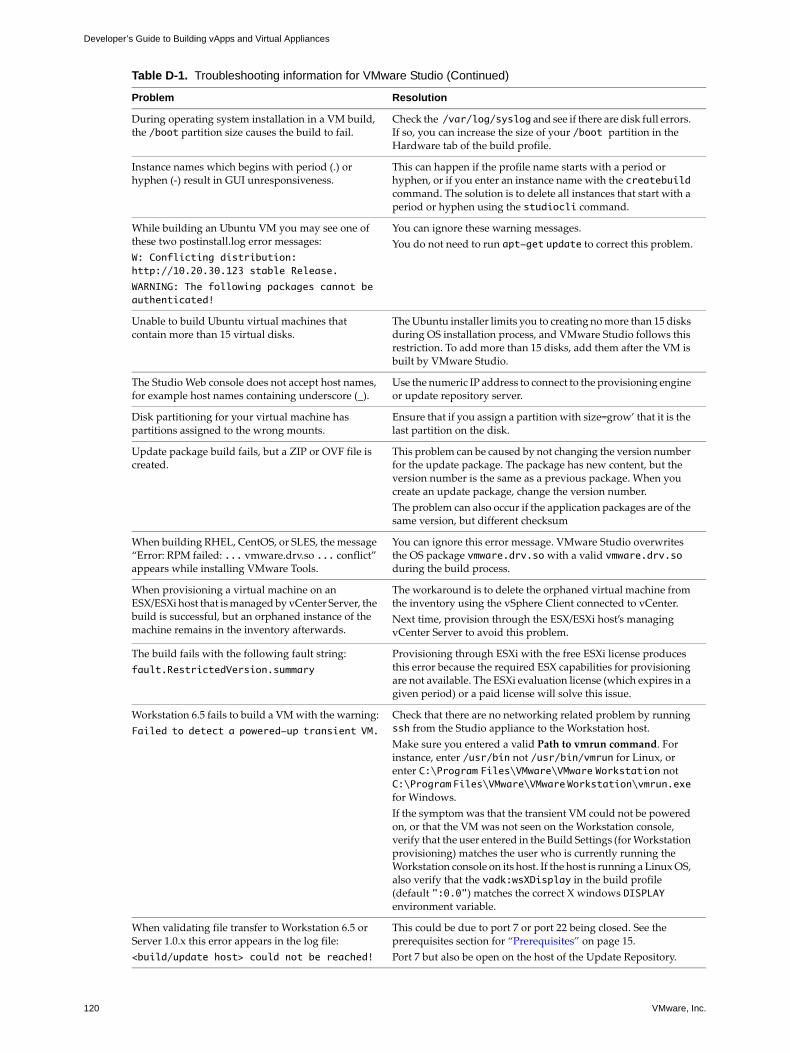
Developer’s Guide to Building vApps and Virtual Appliances
120 VMware, Inc.
During operating system installation in a VM build, the /boot partition size causes the build to fail.
Check the /var/log/syslog and see if there are disk full errors. If so, you can increase the size of your /boot partition in the Hardware tab of the build profile.
Instance names which begins with period (.) or hyphen (‐) result in GUI unresponsiveness.
This can happen if the profile name starts with a period or hyphen, or if you enter an instance name with the createbuild command. The solution is to delete all instances that start with a period or hyphen using the studiocli command.
While building an Ubuntu VM you may see one of these two postinstall.log error messages:
W: Conflicting distribution: http://10.20.30.123 stable Release.
WARNING: The following packages cannot be authenticated!
You can ignore these warning messages.
You do not need to run apt-get update to correct this problem.
Unable to build Ubuntu virtual machines that contain more than 15 virtual disks.
The Ubuntu installer limits you to creating no more than 15 disks during OS installation process, and VMware Studio follows this restriction. To add more than 15 disks, add them after the VM is built by VMware Studio.
The Studio Web console does not accept host names, for example host names containing underscore (_).
Use the numeric IP address to connect to the provisioning engine or update repository server.
Disk partitioning for your virtual machine has partitions assigned to the wrong mounts.
Ensure that if you assign a partition with size=grow’ that it is the last partition on the disk.
Update package build fails, but a ZIP or OVF file is created.
This problem can be caused by not changing the version number for the update package. The package has new content, but the version number is the same as a previous package. When you create an update package, change the version number.
The problem can also occur if the application packages are of the same version, but different checksum
When building RHEL, CentOS, or SLES, the message “Error: RPM failed: ... vmware.drv.so ... conflict” appears while installing VMware Tools.
You can ignore this error message. VMware Studio overwrites the OS package vmware.drv.so with a valid vmware.drv.so during the build process.
When provisioning a virtual machine on an ESX/ESXi host that is managed by vCenter Server, the build is successful, but an orphaned instance of the machine remains in the inventory afterwards.
The workaround is to delete the orphaned virtual machine from the inventory using the vSphere Client connected to vCenter.
Next time, provision through the ESX/ESXi host’s managing vCenter Server to avoid this problem.
The build fails with the following fault string:
fault.RestrictedVersion.summary
Provisioning through ESXi with the free ESXi license produces this error because the required ESX capabilities for provisioning are not available. The ESXi evaluation license (which expires in a given period) or a paid license will solve this issue.
Workstation 6.5 fails to build a VM with the warning:
Failed to detect a powered-up transient VM.
Check that there are no networking related problem by running ssh from the Studio appliance to the Workstation host.
Make sure you entered a valid Path to vmrun command. For instance, enter /usr/bin not /usr/bin/vmrun for Linux, or enter C:\Program Files\VMware\VMware Workstation not C:\Program Files\VMware\VMware Workstation\vmrun.exe for Windows.
If the symptom was that the transient VM could not be powered on, or that the VM was not seen on the Workstation console, verify that the user entered in the Build Settings (for Workstation provisioning) matches the user who is currently running the Workstation console on its host. If the host is running a Linux OS, also verify that the vadk:wsXDisplay in the build profile (default ":0.0") matches the correct X windows DISPLAY environment variable.
When validating file transfer to Workstation 6.5 or Server 1.0.x this error appears in the log file:
<build/update host> could not be reached!
This could be due to port 7 or port 22 being closed. See the prerequisites section for “Prerequisites” on page 15.
Port 7 but also be open on the host of the Update Repository.
Table D-1. Troubleshooting information for VMware Studio (Continued)
Problem Resolution
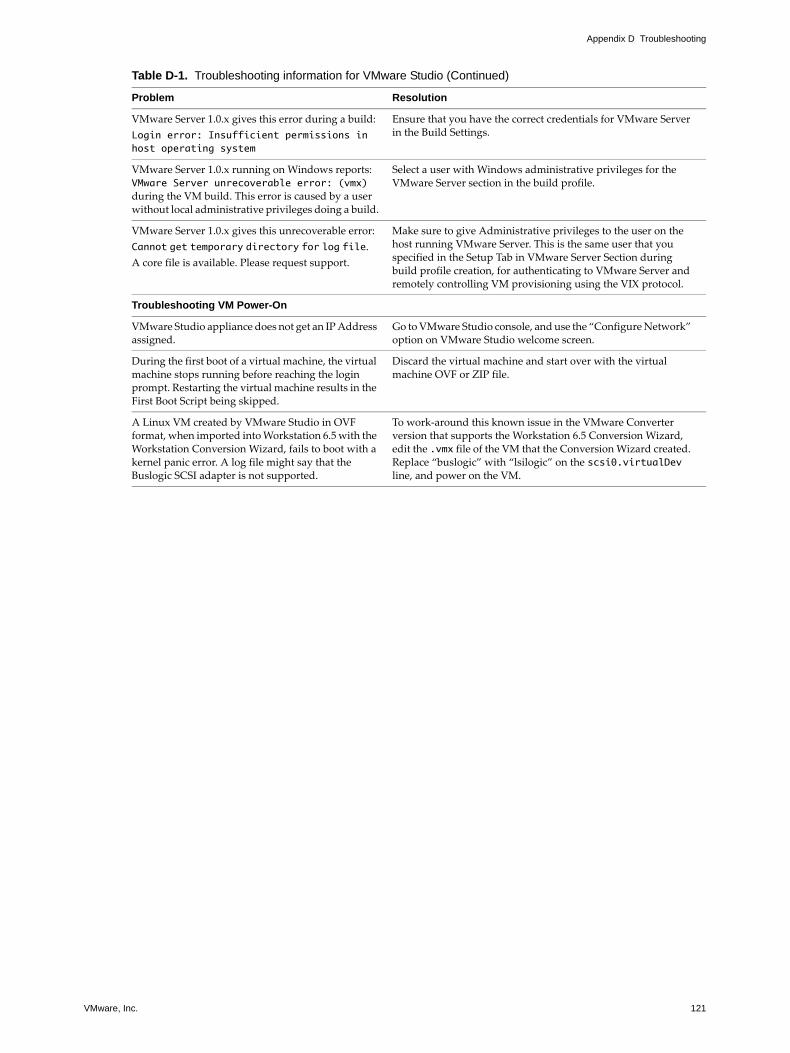
VMware, Inc. 121
Appendix D Troubleshooting
VMware Server 1.0.x gives this error during a build:
Login error: Insufficient permissions in host operating system
Ensure that you have the correct credentials for VMware Server in the Build Settings.
VMware Server 1.0.x running on Windows reports: VMware Server unrecoverable error: (vmx) during the VM build. This error is caused by a user without local administrative privileges doing a build.
Select a user with Windows administrative privileges for the VMware Server section in the build profile.
VMware Server 1.0.x gives this unrecoverable error:
Cannot get temporary directory for log file.
A core file is available. Please request support.
Make sure to give Administrative privileges to the user on the host running VMware Server. This is the same user that you specified in the Setup Tab in VMware Server Section during build profile creation, for authenticating to VMware Server and remotely controlling VM provisioning using the VIX protocol.
Troubleshooting VM Power-On
VMware Studio appliance does not get an IP Address assigned.
Go to VMware Studio console, and use the “Configure Network” option on VMware Studio welcome screen.
During the first boot of a virtual machine, the virtual machine stops running before reaching the login prompt. Restarting the virtual machine results in the First Boot Script being skipped.
Discard the virtual machine and start over with the virtual machine OVF or ZIP file.
A Linux VM created by VMware Studio in OVF format, when imported into Workstation 6.5 with the Workstation Conversion Wizard, fails to boot with a kernel panic error. A log file might say that the Buslogic SCSI adapter is not supported.
To work‐around this known issue in the VMware Converter version that supports the Workstation 6.5 Conversion Wizard, edit the .vmx file of the VM that the Conversion Wizard created. Replace “buslogic” with “lsilogic” on the scsi0.virtualDev line, and power on the VM.
Table D-1. Troubleshooting information for VMware Studio (Continued)
Problem Resolution
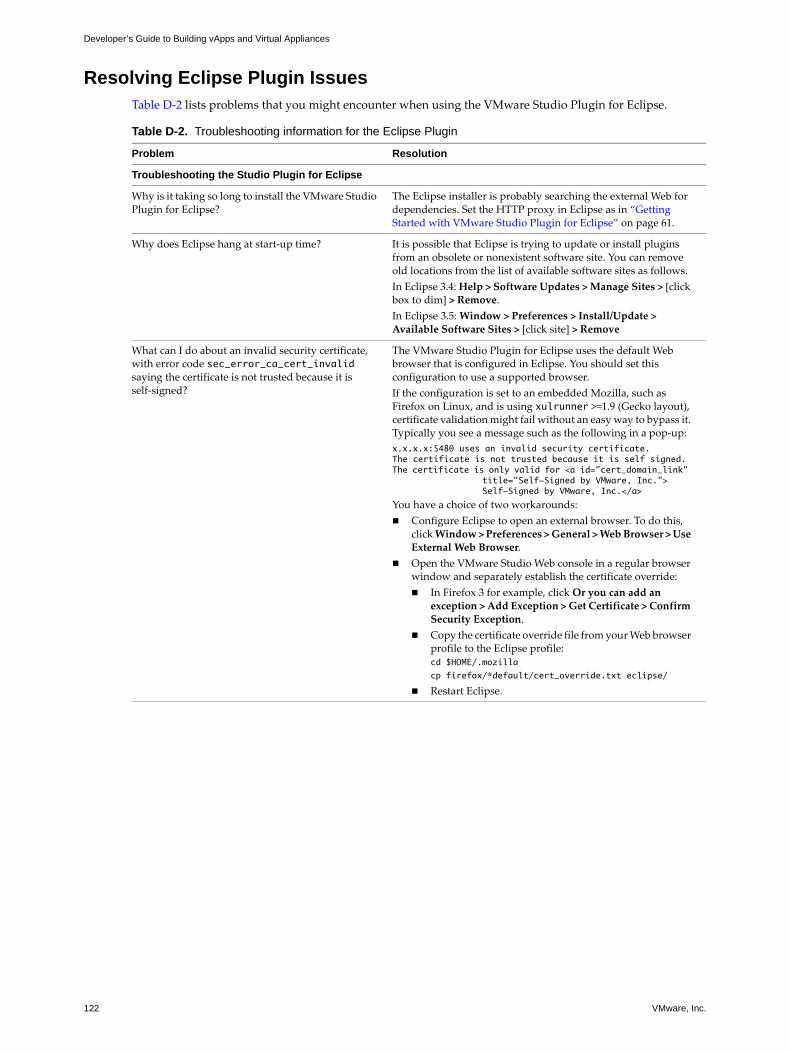
Developer’s Guide to Building vApps and Virtual Appliances
122 VMware, Inc.
Resolving Eclipse Plugin IssuesTable D‐2 lists problems that you might encounter when using the VMware Studio Plugin for Eclipse.
Table D-2. Troubleshooting information for the Eclipse Plugin
Problem Resolution
Troubleshooting the Studio Plugin for Eclipse
Why is it taking so long to install the VMware Studio Plugin for Eclipse?
The Eclipse installer is probably searching the external Web for dependencies. Set the HTTP proxy in Eclipse as in “Getting Started with VMware Studio Plugin for Eclipse” on page 61.
Why does Eclipse hang at start‐up time? It is possible that Eclipse is trying to update or install plugins from an obsolete or nonexistent software site. You can remove old locations from the list of available software sites as follows.
In Eclipse 3.4: Help > Software Updates > Manage Sites > [click box to dim] > Remove.
In Eclipse 3.5: Window > Preferences > Install/Update > Available Software Sites > [click site] > Remove
What can I do about an invalid security certificate, with error code sec_error_ca_cert_invalid saying the certificate is not trusted because it is self‐signed?
The VMware Studio Plugin for Eclipse uses the default Web browser that is configured in Eclipse. You should set this configuration to use a supported browser.
If the configuration is set to an embedded Mozilla, such as Firefox on Linux, and is using xulrunner >=1.9 (Gecko layout), certificate validation might fail without an easy way to bypass it. Typically you see a message such as the following in a pop‐up:
x.x.x.x:5480 uses an invalid security certificate.The certificate is not trusted because it is self signed.The certificate is only valid for <a id="cert_domain_link"
title="Self-Signed by VMware, Inc."> Self-Signed by VMware, Inc.</a>
You have a choice of two workarounds:
Configure Eclipse to open an external browser. To do this, click Window > Preferences > General > Web Browser > Use External Web Browser.
Open the VMware Studio Web console in a regular browser window and separately establish the certificate override:
In Firefox 3 for example, click Or you can add an exception > Add Exception > Get Certificate > Confirm Security Exception.
Copy the certificate override file from your Web browser profile to the Eclipse profile:cd $HOME/.mozillacp firefox/*default/cert_override.txt eclipse/
Restart Eclipse.