developing your stm32vldiscovery application … · september 2010 doc id 17875 rev 1 1/19 um0985...
TRANSCRIPT
September 2010 Doc ID 17875 Rev 1 1/19
UM0985User manual
Developing your STM32VLDISCOVERY applicationusing the IAR Embedded Workbench software
IntroductionThis document provides an introduction on how to use IAR Embedded Workbench® for ARM software development toolchain (EWARM version 5.40 and later) with the STM32VLDiscovery board.
It provides novice users of the IAR Embedded Workbench with some guidelines to build and run a sample program provided with this document. This should provide them with the skills required to create and build their own applications.
The DISCOVER project, referenced in this document, corresponds to the demo Flashed into the STM32VLDISCOVERY board during production. The project is available within the STM32VLDISCOVERY firmware package available at http://www.st.com/stm32vldiscovery.
Although this application note cannot show all the topics relevant to IAR Embedded Workbench tool, it demonstrates the first basic steps necessary to get started with the compiler/debugger.
www.st.com

Contents UM0985
2/19 Doc ID 17875 Rev 1
Contents
1 About IAR Embedded Workbench for ARM toolchain . . . . . . . . . . . . . . 3
2 Starting an existing IAR Embedded Workbench project . . . . . . . . . . . . 4
3 Creating your first application . . . . . . . . . . . . . . . . . . . . . . . . . . . . . . . . . 9
3.1 Source file management . . . . . . . . . . . . . . . . . . . . . . . . . . . . . . . . . . . . . . 9
3.2 Project options configuration . . . . . . . . . . . . . . . . . . . . . . . . . . . . . . . . . . 12
4 Revision history . . . . . . . . . . . . . . . . . . . . . . . . . . . . . . . . . . . . . . . . . . . 18

UM0985 About IAR Embedded Workbench for ARM toolchain
Doc ID 17875 Rev 1 3/19
1 About IAR Embedded Workbench for ARM toolchain
The IAR Embedded Workbench for ARM is a window-based software development platform that combines a robust and modern editor with a project manager and make facility tool. It integrates all the tools needed to develop embedded applications including C/C++ compiler, macro assembler, linker/locator, and a HEX file generator. The IAR Embedded Workbench helps expedite the development process of embedded applications by providing the following:
● Integrated development environment with project management tools and editor.
● Highly optimizing C and C++ compiler for ARM.
● Automatic checking of MISRA C rules (MISRA C:2004).
● ARM EABI and CMSIS compliance.
● Run-time libraries including source code.
● Relocating ARM assembler.
● Linker and librarian tools.
● C-SPY® debugger with ARM simulator, JTAG support and support for RTOS-aware debugging on hardware.
● RTOS plugins available from IAR Systems and RTOS vendors.
● User and reference guides in PDF format.
● Context-sensitive online help.

Starting an existing IAR Embedded Workbench project UM0985
4/19 Doc ID 17875 Rev 1
2 Starting an existing IAR Embedded Workbench project
Installing the IAR Embedded Workbench toolchain (using the default settings) results in the toolchain being installed in C:\Program Files\IAR Systems\Embedded Workbench 5.4 on the PC’s local hard disk. To start an existing project, follow these steps:
1. Open IAR Embedded Workbench from the Start menu. Figure 1 shows the names of the windows referred to in this document.
Figure 1. IAR Embedded Workbench windows
Files window
Workspace window
Build window

UM0985 Starting an existing IAR Embedded Workbench project
Doc ID 17875 Rev 1 5/19
2. Select Open -> Workspace... from the File menu.
Figure 2. Open workspace
3. From the Open Workspace dialog box, browse and find DISCOVER.eww.
Figure 3. Find Discover.eww
Starting an existing IAR Embedded Workbench project UM0985
6/19 Doc ID 17875 Rev 1
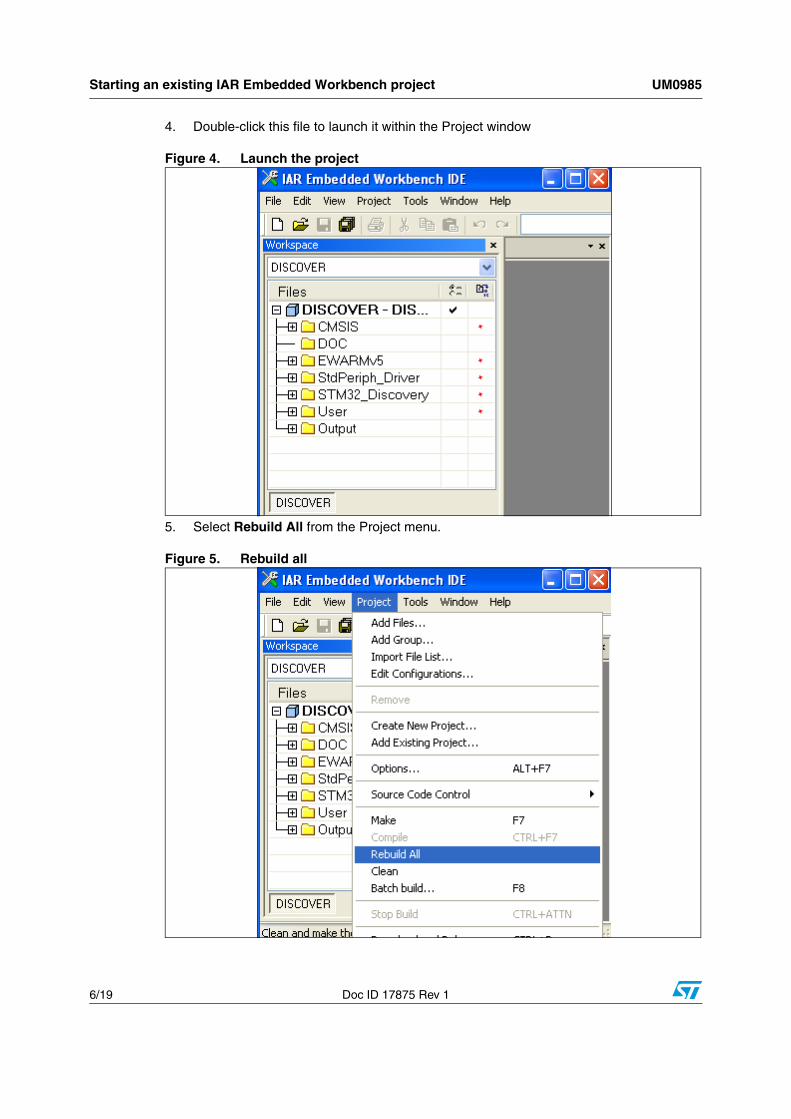
4. Double-click this file to launch it within the Project window
Figure 4. Launch the project
5. Select Rebuild All from the Project menu.
Figure 5. Rebuild all
UM0985 Starting an existing IAR Embedded Workbench project
Doc ID 17875 Rev 1 7/19
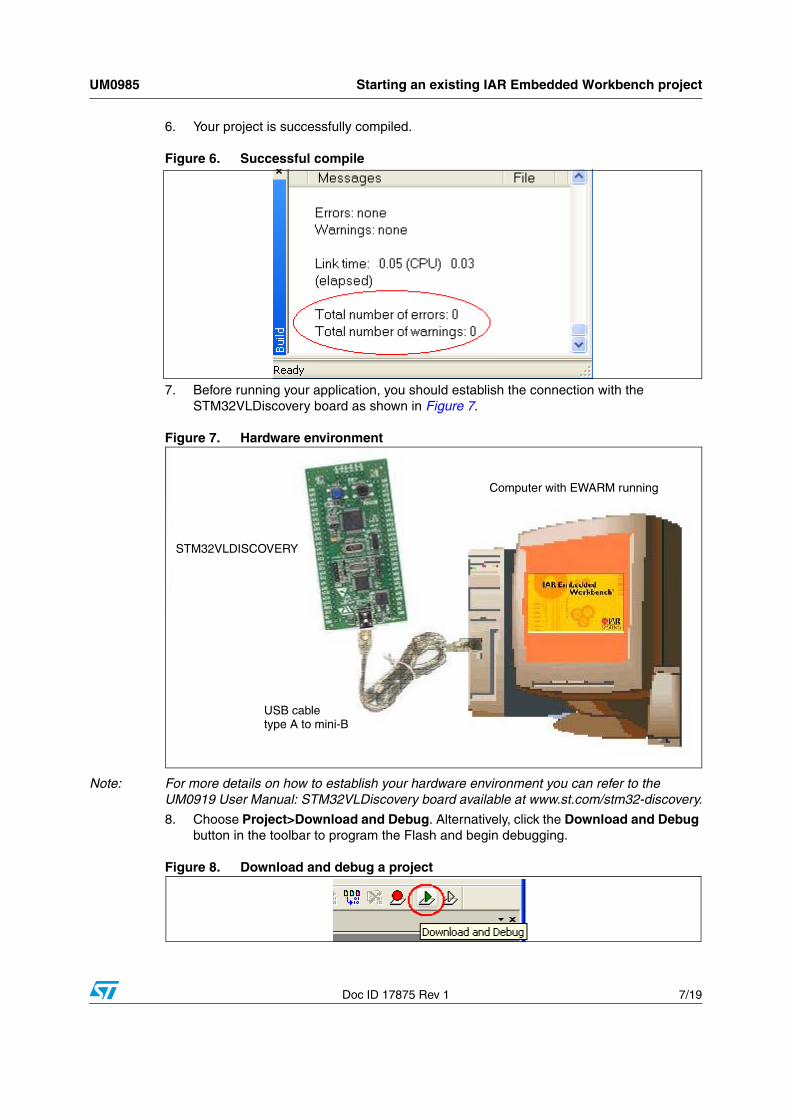
6. Your project is successfully compiled.
Figure 6. Successful compile
7. Before running your application, you should establish the connection with the STM32VLDiscovery board as shown in Figure 7.
Figure 7. Hardware environment
Note: For more details on how to establish your hardware environment you can refer to the UM0919 User Manual: STM32VLDiscovery board available at www.st.com/stm32-discovery.
8. Choose Project>Download and Debug. Alternatively, click the Download and Debug button in the toolbar to program the Flash and begin debugging.
Figure 8. Download and debug a project
Computer with EWARM running
USB cabletype A to mini-B
STM32VLDISCOVERY

Starting an existing IAR Embedded Workbench project UM0985
8/19 Doc ID 17875 Rev 1
9. The debugger in IAR Embedded Workbench allows for source code debugging at C and assembly levels, breakpoint setting, individual variables monitoring and watching during the code execution.
Figure 9. Debug screens
10. Choose Debug>Go. Alternatively, click the Go button in the toolbar to run your application.
Figure 10. Go button
If everything is working correctly, LED3 should be blinking. Every time the user button is pressed, the LED3 blinking frequency changes and LED4 turns on.

UM0985 Creating your first application
Doc ID 17875 Rev 1 9/19
3 Creating your first application
3.1 Source file management1. Select Create New Project from the Project menu.
Figure 11. Create New Project
2. Click on OK.
Figure 12. Create New Project OK

Creating your first application UM0985
10/19 Doc ID 17875 Rev 1
3. Name the project newproj.ewp.
4. Click on Save.
Figure 13. Save newproj.ewp
5. The IDE interface is displayed.
Figure 14. IDE

UM0985 Creating your first application
Doc ID 17875 Rev 1 11/19
6. You may create a new source file with the menu File – New – File. This opens an empty editor window where you can enter your source code. IAR Embedded Workbench enables the C color syntax highlighting when you save your file with the dialog File – Save As… under a filename with the extension *.c . We are saving our example file under the name main.c.
Figure 15. Main.c
7. Once you have created your source file you can add this file to your project by selecting Add -> Add “main.c”.
Figure 16. Add Files
Your main.c file is successfully added.

Creating your first application UM0985
12/19 Doc ID 17875 Rev 1
Figure 17. Successful creation of main.c..
3.2 Project options configuration1. Right-click on the project name in the Project window.
2. Select Options.
Figure 18. Select options
3. Select General Options - Target.
Figure 19. Target options

UM0985 Creating your first application
Doc ID 17875 Rev 1 13/19
4. Select Device - ST -STM32F100xB.
Figure 20. Select device

Creating your first application UM0985
14/19 Doc ID 17875 Rev 1
5. Select Linker - Config.
Figure 21. Linker configuration options
6. Check Override default linker.
7. Click on Edit.
8. Set the .intvec.start at 0x08000000.
Figure 22. Save vector table
9. Fill memory regions.
Figure 23. Define memory regions
10. Click on Save to save the linker settings. The linker file is saved automatically under the project directory.

UM0985 Creating your first application
Doc ID 17875 Rev 1 15/19
11. If your source files include header files, you should specify their paths in the project settings as shown in Figure 24.
Figure 24. Include header files
12. The path of the include directory is a relative path, it always starts by the project directory location referenced by $PRO J_D IR$
13. Select Debugger - Set up.
14. Choose ST-Link from the Driver menu
Figure 25. Select ST-Link
15. Select Download and check the Use Flash loader(s) case.
Figure 26. Use Flash loader(s)

Creating your first application UM0985
16/19 Doc ID 17875 Rev 1
16. Select ST-Link and SWD as connection protocol.
Figure 27. Select SWD protocol
17. Click on OK to save the project settings.
18. Build your project using Project -Rebuild All.
19. IAR Embedded Workbench then asks you to save your workspace. Save it under the name newproj.eww.
Figure 28. Save workspace

UM0985 Creating your first application
Doc ID 17875 Rev 1 17/19
20. In the Build window it should report “0 Errors (s), 0 Warnings”’.
Figure 29. Success
21. Before running your application, you should establish the connection with the STM32VLDiscovery board as shown in Figure 7: Hardware environment.
22. Choose Project>Download and Debug to program the Flash and begin debugging.
23. Now you can start debugging your application.

Revision history UM0985
18/19 Doc ID 17875 Rev 1
4 Revision history
Table 1. Document revision history
Date Revision Changes
09-Sep-2010 1 Initial release.

UM0985
Doc ID 17875 Rev 1 19/19
Please Read Carefully:
Information in this document is provided solely in connection with ST products. STMicroelectronics NV and its subsidiaries (“ST”) reserve the right to make changes, corrections, modifications or improvements, to this document, and the products and services described herein at any time, without notice.
All ST products are sold pursuant to ST’s terms and conditions of sale.
Purchasers are solely responsible for the choice, selection and use of the ST products and services described herein, and ST assumes no liability whatsoever relating to the choice, selection or use of the ST products and services described herein.
No license, express or implied, by estoppel or otherwise, to any intellectual property rights is granted under this document. If any part of this document refers to any third party products or services it shall not be deemed a license grant by ST for the use of such third party products or services, or any intellectual property contained therein or considered as a warranty covering the use in any manner whatsoever of such third party products or services or any intellectual property contained therein.
UNLESS OTHERWISE SET FORTH IN ST’S TERMS AND CONDITIONS OF SALE ST DISCLAIMS ANY EXPRESS OR IMPLIED WARRANTY WITH RESPECT TO THE USE AND/OR SALE OF ST PRODUCTS INCLUDING WITHOUT LIMITATION IMPLIED WARRANTIES OF MERCHANTABILITY, FITNESS FOR A PARTICULAR PURPOSE (AND THEIR EQUIVALENTS UNDER THE LAWS OF ANY JURISDICTION), OR INFRINGEMENT OF ANY PATENT, COPYRIGHT OR OTHER INTELLECTUAL PROPERTY RIGHT.
UNLESS EXPRESSLY APPROVED IN WRITING BY AN AUTHORIZED ST REPRESENTATIVE, ST PRODUCTS ARE NOT RECOMMENDED, AUTHORIZED OR WARRANTED FOR USE IN MILITARY, AIR CRAFT, SPACE, LIFE SAVING, OR LIFE SUSTAINING APPLICATIONS, NOR IN PRODUCTS OR SYSTEMS WHERE FAILURE OR MALFUNCTION MAY RESULT IN PERSONAL INJURY, DEATH, OR SEVERE PROPERTY OR ENVIRONMENTAL DAMAGE. ST PRODUCTS WHICH ARE NOT SPECIFIED AS "AUTOMOTIVE GRADE" MAY ONLY BE USED IN AUTOMOTIVE APPLICATIONS AT USER’S OWN RISK.
Resale of ST products with provisions different from the statements and/or technical features set forth in this document shall immediately void any warranty granted by ST for the ST product or service described herein and shall not create or extend in any manner whatsoever, any liability of ST.
ST and the ST logo are trademarks or registered trademarks of ST in various countries.
Information in this document supersedes and replaces all information previously supplied.
The ST logo is a registered trademark of STMicroelectronics. All other names are the property of their respective owners.
© 2010 STMicroelectronics - All rights reserved
STMicroelectronics group of companies
Australia - Belgium - Brazil - Canada - China - Czech Republic - Finland - France - Germany - Hong Kong - India - Israel - Italy - Japan - Malaysia - Malta - Morocco - Philippines - Singapore - Spain - Sweden - Switzerland - United Kingdom - United States of America
www.st.com