development of a gas electron multiplier for ion beam
TRANSCRIPT

Simulation, Design and Construction of a Gas Electron Multiplier for Particle Tracking
By
Andrej Sipaj
A Thesis Submitted in Partial Fulfillment
Of the Requirements for the Degree of
Master of Applied Science
In
Nuclear Engineering
Faculty of Energy Systems and Nuclear Science Program
University of Ontario Institute of Technology
December, 2012
©Andrej Sipaj, 2012

2
Abstract
The biological effects of charged particles is of interest in particle therapy,
radiation protection and space radiation science and known to be dependent on both
absorbed dose and radiation quality or LET. Microdosimetry is a technique which uses a
tissue equivalent gas to simulate microscopic tissue sites of the order of cellular
dimensions and the principles of gas ionization devices to measure deposited energy.
The Gas Electron Multiplier (GEM) has been used since 1997 for tracking particles and
for the determination of particle energy. In general, the GEM detector works in either
tracking or energy deposition mode. The instrument proposed here is a combination of
both, for the purpose of determining the energy deposition in simulated microscopic
sites over the charged particle range and in particular at the end of the range where
local energy deposition increases in the so‐called Bragg‐peak region. The detector is
designed to track particles of various energies for 5 cm in one dimension, while
providing the particle energy deposition every 0.5 cm of its track. The reconfiguration of
the detector for different particle energies is very simple and achieved by adjusting the
pressure of the gas inside the detector and resistor chain. In this manner, the detector
can be used to study various ion beams and their dose distributions to tissues. Initial
work is being carried out using an isotopic source of alpha particles and this thesis will
describe the construction of the GEM‐based detector, computer modelling of the
expected gas‐gain and performance of the device as well as comparisons with
experimentally measured data of segmented energy deposition.

3
Table of Contents
Abstract…………………………………………………………………………… ……………………………………………2
Acknowledgment……………………………………………………………………………………………………………5
List of Figures…………………………………………………………………………………………………………………6
List of Tables…………………………………………………………………………………………………………………..9
Nomenclature………………………………………………………………………………………………………………10
Acronyms..........................................................................................................................11
1 Chapter ...................................................................................................................... 12
1.1 Introduction ........................................................................................................ 12
1.2 Gas Electron Multiplier ....................................................................................... 14
1.3 Thesis Objective ................................................................................................. 17
1.4 Past Trials of GEM Detectors for Tracking and Energy Measurements ............. 18
1.5 Outline of Thesis ................................................................................................. 20
2 Chapter: Background and Theory ............................................................................. 22
2.1 Background and Theory of Charged Particle Energy Loss in Gases ................... 22
2.1.1 Ionization by Alpha Particles ....................................................................... 22
2.1.2 Stopping Power ........................................................................................... 23
2.1.3 Electron Multiplication in Gases ................................................................. 24
2.1.4 Penning Transfer ......................................................................................... 26
2.1.5 Drift Velocity of Electrons ........................................................................... 27
2.1.6 Diffusion of Electrons .................................................................................. 28
2.1.7 Electron Attachment ................................................................................... 28
2.2 Background to Computer Simulation Software ................................................. 29
2.2.1 Garfield++ .................................................................................................... 29
2.2.2 Gmsh and Elmer .......................................................................................... 31
2.2.3 Maxwell ....................................................................................................... 32
3 Chapter: Physical Design and Settings of the Detector ............................................ 33
3.1 Sensitive Volume ................................................................................................ 34
3.2 Entrance Window with a Collimator .................................................................. 36
3.3 Main board with Pre‐amplifier ........................................................................... 37
3.4 Voltage and Current Divider ............................................................................... 38

4
3.5 Collection Plate Switch ....................................................................................... 40
3.6 Selection of Gas and Pressure ............................................................................ 41
4 Chapter: Computer Simulation ................................................................................. 45
4.1 General Principles and Settings of Simulation ................................................... 45
4.1.1 Geometry and Boundary Conditions .......................................................... 45
4.1.2 Gas Settings ................................................................................................. 46
4.1.3 Initial Particle Setting .................................................................................. 46
4.2 Drift Field Simulation .......................................................................................... 46
4.3 GEM Field Simulation ......................................................................................... 51
4.4 Induction Field Simulation ................................................................................. 52
4.5 Summary of Computer Simulation ..................................................................... 61
5 Results of Detector Prototype Tests ......................................................................... 63
5.1 Prototype Overview ........................................................................................... 63
5.2 Energy Tracking of an Alpha Particle .................................................................. 66
Stability of the Detector Pulse Height .......................................................................... 68
6 Chapter: Conclusion and Future Developments ....................................................... 70
6.1 Future Developments and Recommendations .................................................. 73
7 Appendix A: Example of Garfield++ Code ................................................................. 76
8 Appendix B: Input File with Ion Mobilities................................................................ 82
9 Appendix C: MCNPX Code For Obtaining Stopping Power Curve ............................. 83
10 Appendix D: Garfield ++ Installation ......................................................................... 85
11 Appendix E: Schemas of Custom Made Parts ........................................................... 87
12 References ................................................................................................................ 90

5
Acknowledgment
First, I would like to thank Dr. Anthony Waker for his constant support and
encouragement in my research and the writing of this thesis. I sincerely appreciate his
guidance and support during the period of this work and most of all, his patience and
understanding.
I would like to thank to Dr. Heinrich Schindler for his help, patience and time
with the Garfield++ simulation problems that I faced and to Fawaz Ali for his MCNPX
model contribution.
I would also like to thank all my professors, colleagues and friends who gave me
generous support throughout my time at UOIT.
I am grateful to the University Network of Excellence in Nuclear Engineering
(UNENE) and the Natural Science and Engineering Council of Canada (NSERC) for their
financial contributions to this project.
Lastly, I am thankful to my family, especially my parents, Frantisek and Helena
Sipaj, and my sister, Katarina Sipaj for helping me through the difficult times and for
being a source of inspiration during the course of my research and throughout my
university education.

6
List of Figures
Figure 1.1: Drawing of typical GEM foil with dimension is micrometers ........................ 15
Figure 1.2: Simulated field settings of a GEM ................................................................... 17
Figure 1.3: Resulting image of a single alpha particle by GEM scintillation using gas
Ar/CF4 (95/5) ..................................................................................................................... 19
Figure 1.4: Energy resolution of single GEM with single PCB readout board, FWHM ~18%
at 5.9 keV .......................................................................................................................... 20
Figure 2.1: Example of Bragg curve .................................................................................. 24
Figure 2.2: Basic building block of a GEM detector .......................................................... 30
Figure 3.1: General schema of GEM detector for the measurement of charged particle
energy deposition track stucture ...................................................................................... 34
Figure 3.2: Image of segmented collection plate ............................................................. 36
Figure 3.3: Schematic of collimation and collimator with dimensions ............................ 37
Figure 3.4: Schematic of a pre‐amplifier board ................................................................ 38
Figure 3.5: Schema of voltage divider with voltage equations ........................................ 39
Figure 3.6: Schematic of a current divider resistor .......................................................... 40
Figure 3.7: Image of connected collection plate switch ................................................... 41
Figure 3.8: GEM gains based on different voltage potentials cross GEM at various
pressures ........................................................................................................................... 42
Figure 3.9: SRIM simulation of Am‐241 alpha particle range for detector design ........... 43
Figure 4.1: Experimental ion chamber readings at different voltage potentials ............. 47

7
Figure 4.2: Electron cross sections of carbon dioxide gas ................................................ 48
Figure 4.3: Garfield simulation of electron attachment between two parallel plates of an
ion chamber at different electric strengths ...................................................................... 49
Figure 4.4: Electric field vectors representing different curvature of field lines in drift
region. ............................................................................................................................... 50
Figure 4.5: Garfield electron transparency simulation ..................................................... 50
Figure 4.6: Garfield electron gain simulation across GEM at 250 Torr and Ar/CO2 (80/20)
gas ..................................................................................................................................... 51
Figure 4.7: Electric field simulation of the GEM detector with electric field vectors ...... 52
Figure 4.8: Electric field vectors representing different curvature of field lines.............. 53
Figure 4.9: Garfield simulation of GEM foil transparency based on the induction field
strength ............................................................................................................................. 54
Figure 4.10: Garfield simulation of electrons contribution from GEM (350 V) and
induction region to the overall avalanche ........................................................................ 55
Figure 4.11: Garfield simulation of electron collection with GEM potential set to 350 V 56
Figure 4.12: Garfield simulation of electron collection with GEM potential set to 400 V 56
Figure 4.13: Garfield simulation of distribution of collected electrons............................ 58
Figure 4.14: Garfield simulation of collection plate charge distribution based on number
of electrons and negative ion ........................................................................................... 59
Figure 4.15: Garfield simulation of collection time for negative Ions with distribution for
GEM potential 350 and 400 V ........................................................................................... 60
5.1: Example of pulse from the GEM detector ................................................................. 64

8
Figure 5.2: Image of the internal parts of the physical detector ...................................... 65
Figure 5.3: Image of general setup of an experiment ...................................................... 66
Figure 5.4: Measured and simulated stopping power of an alpha particle ..................... 67
Figure 5.5: Example of peak obtained during the stability measurements ..................... 69

9
List of Tables
Table 3‐1: Density of Ar and CO2 gas ................................................................................ 44
Table 5‐1: Settings of the prototype detector .................................................................. 63
Table 5‐2: Detector stability statistics .............................................................................. 69

10
Nomenclature
Electric Field (V/cm)
E Energy (MeV)
G Gain
P Pressure (Torr)
S Stopping Power (MeV/mm)
VD Drift Region Voltage Drop (V)
VGEM GEM Region Voltage Drop (V)
VI Induction Region Voltage Drop (V)
Ƿ Density (g/cm3)
XD Thickness of Drift Region 1.3 (mm)
XI Thickness of Induction Region 9.1 (mm)
Cross Section (barn)
vd Drift Velocity (mm/sec)
D Diffusion coefficient

11
Acronyms
GEM Gas Electron Multiplier
HVS High Voltage Supply
LLD Lower-Level Discriminator
MCA Multi Channel Analyser
MCNPX Monte Carlo N‐Particle eXtended
MWPC Multi Wire Proportional Counter
PCB Printed Circuit Board
PRR Proton Range Radiography
RT Radiation Therapy
SRIM Stopping and Range of Ions in Matter\
ULD Upper-Level Discriminator

12
1 Chapter
1.1 Introduction
Since the discovery of x‐rays by Wilhelm Rontgen in the 1895 [1], the
development of various kinds of radiation detectors began to play a key role in
describing and analyzing different properties of radiation and interactions with matter.
Initially, the detectors where only capable of counting the number of particles passing
through the detector and measuring radiation particle energy, as of today complex Time
Projection Chamber detectors are capable of tracking a single low energy electron its
velocity and measuring the energy that is being deposited at any point of the particle
track.
The evolution of radiation detectors starts with J. J. Thomson’s detector just a
few months after the initial discovery of the unknown x‐rays [2]. Even though the design
was relatively simple, an ion chamber that has one positive and one negative flat
electrode separated by air, and the readings from the chamber were obtained by
measuring the current cross the two electrodes, it provided major discoveries and the
fundamentals of radiation interactions with matter. Some of the major findings were
that the air, normally an isolating material, can turn conductive when a radiation
particle passes though the detector sensitive volume, and that by increasing the voltage
drop across the electrodes increases the number of electrons that are being collected
up to certain point after which the number stays constant.

13
The observation of John Townsend, that a significant increase in an ion
chamber’s current is produced at reduced gas pressures when the high voltage is
increased well beyond that at which the saturation current is reached, led to the
invention of the first counting tubes (today known as proportional counters) by
Rutherford and Hans Geiger in 1908 [2]. Townsend’s explanation was that the increased
velocity of the electrons traveling to the collecting electrode permitted them to ionize
the air molecules. It was this additional ionization that produced pulses large enough to
be counted. Shortly after the invention of the proportional counter the voltage across
the electrodes have been increased even further what gave a base for the creation of
Geiger Mueller tubes with one large pulse in 1928.
Even though the possibility of light output from a barium platinocyanide screen
when exposed to X‐rays has been know since the 1895, it was not until the Manhattan
Project that activities contributed to the development of new kind of radiation detector,
the scintillator detector, in 1944 [3]. Around the same time, Bell Laboratories invented
the semiconductor detector that uses the reverse biased p‐n junction to detect alpha
particles [4].
From these times, independent of the size, shape and purpose of any radiation
detector, all detectors can be divided into three main groups. Gas filled detectors, solid
state detectors and scintillation detectors. Radiation detectors in general have been
continuously improving and developing since these early times by studying the same
basic principles that were discovered and used in these first detector prototypes.

14
During more recent years (1968), the invention of the Multi Wire Proportional
Counter (MWPC) at CERN stands out in gas detector development [5]. The MWPC
provided a breakthrough in particle detection as it is capable of both particle tracking
and energy reading. For this reason, the inventor Georges Charpak was awarded the
Nobel Prize in Physics in 1992. However, the signal from MWPC is extremely low for low
energy particles and could not be picked up by data acquisition systems. The problem
initiated the search for a new device that could multiply the signal (the electrons from
primary ionizations) prior to the MWPC. As a result for this given need the Gas Electron
Multiplier (GEM) was invented [6].
1.2 Gas Electron Multiplier
The Gas Electron Multiplier (GEM) is a relatively new concept of particle
detection which was invented by Fabio Sauli in the 1997 at the Gas Detectors
Development Group (CERN). The initial idea was to create a component that would help
to increase electron gain in a Multi‐Step Chamber before entering the main detecting
element which at that time was the Parallel Plate and Multi‐Wire Proportional Counter
in order to detect a single low energy photon. With rapid improvements of the
production techniques over the first few years the initial gain of 10 increased to the
order of 104 [7], [8], [9]. With the high gains, current detection systems no longer
needed a proportional counter collection system but instead printed circuit collection
plates can be sufficient for certain situations.

15
A typical GEM foil consists of two 5 µm thick layers of copper that are separated
by 50 µm kapton foil [10]. The kapton is a plastic material with high resistivity (1011
Ω/mm) and dielectric strength (126 kV/mm) that can be produced at extremely small
thicknesses [11]. The foil is chemically pierced by a high density pattern of holes, from
50 to 100 holes per mm2 based on needs while each hole has a bi‐conical shape, see
Figure 1.1. Currently, the area of GEM foils produced at the CERN ranges from 25 cm2 up
to a 1000 cm2 [10].
Figure 1.1: Drawing of typical GEM foil with dimension is micrometers [12]
In general, all GEM detectors work with the same principle. The system consists
of a drift field where all the initial gas ionization takes place. One of the GEM copper
layers acts as an anode and one external electrode acts as a cathode. The drift should
operate as an ion chamber where no recombination of the newly created ion‐pairs can
occur. The electrons from the ion‐pairs drift towards the anode, the GEM foil, and the
electric field that is being created around the GEM holes redirects the electrons to the
holes rather than to the copper metal. The electric field around the GEM is created by
applying different voltages between the two layers of copper. The shape of the field

16
mainly depends on the applied voltage and the shape of the holes. Since the geometry
of all holes and the voltage across the GEM is uniform, the electric field within each hole
is uniform. As the dimensions of the foil are extremely small in the order of
micrometers, potentials up to 100 kV/cm are possible within a normal range of the GEM
operation where the potential of 100 to 650 V is applied based on the needs of the
electron pre‐amplification [9]. Each of the holes acts as a small proportional amplifier
while the stability of the gain is obtained by compact size of amplification region.
On exit from the GEM the created electron avalanche is forced to drift towards
the induction region where, similar to that drift region, an external electrode, acting as
an anode, is added to guide the electron to the collection system. The induction region
should also operate in the ion chamber region therefore, no additional electron
multiplication can occur, in order to sustain the stability of the overall gain of the
system. The Figure 1.2 shows lines of electric field distribution in red and equipotential
lines in blue. The drift is located above and induction region bellow the GEM.

17
Figure 1.2: Simulated field settings of a GEM [12]
1.3 Thesis Objective
Proton Therapy is a type of particle therapy which uses a beam of protons to
irradiate diseased tissue or tumour for treatment of cancers. In contrast to the
traditional radiotherapy such as photon or electron treatment, the energy deposited
increases near the end of the particle track (in Bragg peak) while the beam has a finite
depth. Therefore, the healthy cells that are located before the tumour cells (from beam
direction) receive a lower dose and the healthy cells behind receive no or very small
dose. Overall, the main advantage of proton therapy is that it enables the treatment of
tumours with a dose distribution that spares healthy tissues or prevents damage to
sensitive tissues in proximity to the tumour.
The energy deposition, stopping power, of the proton beam must be precisely
known and tested in order to deliver the highest dose to a specific location. The tests
are done with Proton Range Radiography (PRR) that consists of range telescope made

18
with a stack of scintillators [13]. As the beam passes perpendicular through the stack it
deposits its energy into each scintillator at different depth. This kind of device could be
replaced by GEM detector that can directly track the energy distribution of the proton
beam to very precise locations.
Particle tracking is also important in building discriminating detectors that can
measure low energy beta particles from tritium against a background of longer range
electrons from gamma‐rays, which is a problem of particular significance in CANDU
power plant radiation protection.
For these reasons, the main objective of this thesis is to construct a simple GEM to
test and understand the performance of these devices for particle tracking and energy
measurements. For simplicity, the charged particle was chosen to be a 5.5 MeV alpha
particles from Americium‐241.
A secondary objective of this work was to provide a general guidance manual for
the construction of GEM detectors which uses PCB as a collection electrode since the
GEM foils are a relatively new concept in radiation detection and there is interest in
looking for possible new applications for this kind of device.
1.4 Past Trials of GEM Detectors for Tracking and Energy
Measurements
Understanding tracking and stopping power experiments conducted with GEM
detectors in the past is essential to developing a good detector understanding as well as
understanding the properties governing how a heavy charged particle interact with
19
matter. Since the direct stopping power measurements with GEM detectors that uses
PCB collection board have not been done, findings from two papers are combined to
provide a general working principal and the feasibility of using the proposed detector.
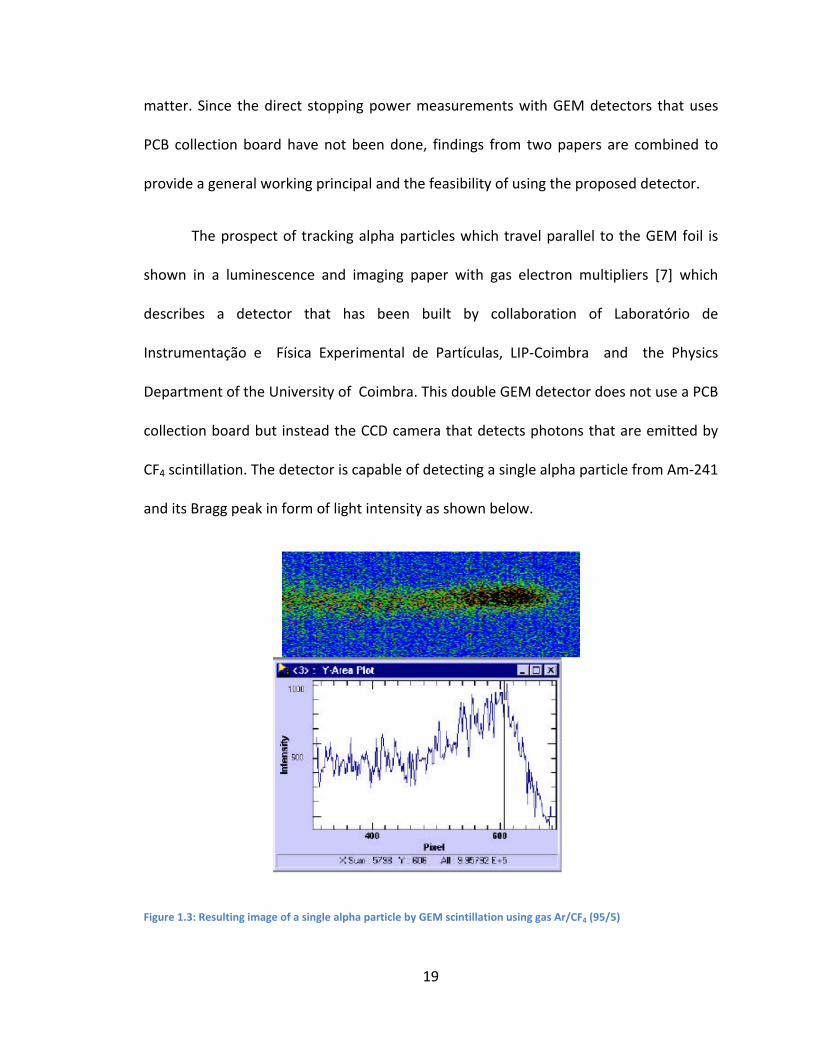
The prospect of tracking alpha particles which travel parallel to the GEM foil is
shown in a luminescence and imaging paper with gas electron multipliers [7] which
describes a detector that has been built by collaboration of Laboratório de
Instrumentação e Física Experimental de Partículas, LIP‐Coimbra and the Physics
Department of the University of Coimbra. This double GEM detector does not use a PCB
collection board but instead the CCD camera that detects photons that are emitted by
CF4 scintillation. The detector is capable of detecting a single alpha particle from Am‐241
and its Bragg peak in form of light intensity as shown below.
Figure 1.3: Resulting image of a single alpha particle by GEM scintillation using gas Ar/CF4 (95/5)

20
The initial GEM detectors needed a MWPC in order to obtain position or energy
read out due to the low gain obtained by the GEM foil. However, as the production
technology of GEMs improved, MWPC have been replaced by simple PCB read‐out
boards. One of the first examples that uses one large collection plate, that is segmented
into 200 µm stripes while all segments are still connected together for a GEM + PCB is
presented in Further Development of the Gas Electron Multiplier report [14]. The GEM
detector in this case has sufficiently high gain for the pre‐amplifier to picked up signal
and provide good energy resolution
Figure 1.4: Energy resolution of single GEM with single PCB readout board, FWHM ~18% at 5.9 keV
Combing knowledge of these two papers suggest that it is possible to build a
tracking detector that not only tracks an alpha particle that travels parallel to the GEM
detector but also obtain the alpha particle energy by PCB collection board.
1.5 Outline of Thesis
This thesis will cover the principles of alpha particle energy deposition in a
medium, the ionization multiplication processes, the effects of various electric fields on

21
the avalanche based on which, an Am‐241 detectors will be built. Chapter 2 will cover
the background to the properties of alpha particles mainly their interactions with matter
and electron multiplication properties such as Townsend coefficient, penning transfer,
electron drift velocity, diffusion coefficient and electron attachment. Moreover, an
introduction to the simulation software used will be given. Chapter 3 explains the
physical design of the GEM detector where each part of the detector (sensitive volume,
collimator with window, pre‐amplifier and its board, voltage and current divider and the
collection plate switch) is discussed in detail while physical dimensions of the detector
are also provided. The selection of the multiplication gas and the required pressure for
the given system can also be found here. Chapter 4 is dedicated to simulation of the
electron avalanche. The results of the simulation help to understand the general
properties of the GEM detector under various conditions and help to select ideal
settings for the proposed detector. Chapter 5 will discuss results from a constructed
prototype. The results for Am‐241 stopping power are shown and compared to a basic
MCNP model. The conclusion in Chapter 6 will summarize research methods and the
development of the techniques over the course of this investigation. Moreover, future
development and improvements of the system as well as future use for the proposed
detector will be addressed.

22
2 Chapter: Background and Theory
2.1 Background and Theory of Charged Particle Energy Loss in Gases
2.1.1 Ionization by Alpha Particles
As an alpha particle travels through matter, it causes ionization and excitation of
the atoms of the material irradiated. Both of these processes result mainly from the
Coulomb force as the alpha particle charge pulls the electron from its origin. Depending
on the proximity of the encounter, this impact due to the Coulomb force may be
sufficient either to raise the electron to a higher laying shell within the absorber atom
(excitation) or to remove the electron completely from the atom (ionization) [15].
Therefore, a charged particle that traverses the gas of a drift chamber leaves a track of
ionization along its trajectory. The energy that is transferred to the electron must come
from the energy of the alpha particle, therefore the velocity of the latter decreases.
As the encounters with the gas atoms are purely random, they can be
characterized by a mean free flight path, which is commonly denoted as λ ε . The
mean free flight path between ionizing encounters is given by the ionization cross‐
section per electron σ ε and the number density n of electrons [16]:
λ ε (2.1)
From the definition above, it follows that the mean free flight path of the alpha
particle (and ultimately its range) can be simply changed by adjusting the density or
pressure of the gas.

23
As the maximum energy that can be transferred by a single collision is 4Em0/m,
where the mo is rest mass of an electron and m the mass of the alpha particle, the alpha
particle must collide many times before reaching thermal equilibrium (m0 << m).
2.1.2 Stopping Power
As discussed before, an alpha particle can lose its energy only by ionization and
excitation of molecules along its track. This loss is not linear due to the change of
velocity and particle charge. Therefore, the concept of stopping power has been
introduced in order to characterize the rate at which a charged particle loses its kinetic
energy. The energy loss as a function of particle energy and atomic number is given by
the Bethe‐Bloch‐formula [17]:
| |4 2
ln2
1
(2.2)
where is the number density of the electrons of the target material, is the
elementary electric charge, is the electron mass, is the particle velocity, is the
particle velocity in units of speed of light, m is the mass of projectile and <I> is the mean
ionization potential of the atoms in the stopping medium, and is the effective
charge empirically approximated by Barkas [18]. At high energies, all projectiles are
stripped of their electrons and the effective charge equals to the atomic number. At
small energies (close to the end of the trajectory – Bragg peak region) electrons are
collected from the target atoms and the effective charge of the projectile decreases,

24
becoming close to zero when the particles stop. The change of is the main reason
for the sharp decrease of the energy loss at lower energies [19]. As the rest of the
variables in the equation are relatively constant, the initial increase of the stopping
power is primarily due to the velocity decrease of the particle as a result of the energy
loss. The rate at which the alpha particle loses its energy can be best shown by the
Bragg curve. Initially the particle loses energy at lower rates, and then at significantly
higher rates near the end of its track (creates the Bragg peak) and then the rate of
energy loss drastically decreases at the very end of particle track.
Figure 2.1: Example of Bragg curve [20]
2.1.3 Electron Multiplication in Gases
Electron multiplication is based on the mechanism of an electron avalanche. At
increasing electric fields, the energy distribution of the drifting electrons extends
beyond the thresholds of inelastic collisions, resulting in excitation and ionization of the
gas molecules. In excitation, the molecules initially gain extra energy from electron

25
collisions and afterwards release the additional energy in the form of a photon until
they reach their ground state. During the ionization process an electron produces an
electron‐ion pair and the two electrons, original and one from the pair, can cause
further ionizations. The number of electrons hence grows exponentially with time until
all electrons are collected at the anode.
The probability for an electron of energy ε to create an ion pair depends on the
ionization cross‐section σi(ε). Under the assumption that the ionizing collisions are
independent of each other, the mean free path for ionization λi relates to the cross‐
section given in equation 2.2 [16].
The mean number of ionizations per unit length is called the Townsend
coefficient or collisional rate and is defined as:
σ ε 1/λ ε (2.3)
In practice, it is more helpful to know the Townsend coefficient at a given value of the
electric field E and σ ε should be integrated over the electron energy
distribution p E, ε :
σ E p E, ε∞
σ ε dε (2.4)
The multiplication factor, or gain, can be calculated from the Townsend
coefficient. Let N(x) be the number of electrons present in the avalanche after a drift
over a distance x along the field E(x). After a path dx, the increase of the number in
electrons is proportional to N(x) and dx [16]:

26
σ E x dx (2.5)
with σ(E(x)) being the Townsend coefficient at the field experienced by the electrons
over the path dx. After a distance Δx = x1‐x0, the avalanche size is obtained by
integrating the previous equation:
N Δx N eσ
(2.6)
where N0 is the number of electrons at xo. The gain in an arbitrary field configuration
can be simply expressed as:
G Δx N Δx /N eσ
(2.7)
2.1.4 Penning Transfer
The actual electron multiplication in gas based detectors sometimes far exceeds
the gain calculated using the Townsend coefficient alone. The most notable case is
when a gas with a low ionisation potential is added to a gas with higher‐energy
excitation states. The additional gain is accounted for by the transformation of
excitation energy into ionisations:
∗ →
The Townsend coefficient must be therefore corrected by the Penning transfer
coefficient:
σ E σ E 1 r 2.8

27
where r is the probability that an excited state is transformed to an ionised state while
vexc and vion are the excitation and ionisation frequencies (collisions per time interval,
generally in MHz) [21]. These frequencies are defined by the mean free path of the
particle and its drift velocity for both ionizations and excitations of the molecules of the
gas.
2.1.5 Drift Velocity of Electrons
The force on a charge q moving with velocity vd in the presence of an electric and
magnetic fields of strength E and B, respectively, is given by the Langevin equation [16]:
(2.9)
where is the friction force or stochastic force resulting from collisions. When
applying constant electric filed and no magnetic field (B=0) the electron does not change
its drift velocity 0 due to constant scattering. For this reason, the Equation 2.9
at constant electric field without magnetic field can be rewritten as . Since
, when vd (the drift velocity) is constant and no magnetic field is applied the
equation can be futher simplified to:
(2.10)
where τ is the mean time between collisions, given as ,
When taking into account the balance between energy acquired from the
electric field and collision losses, drift equation has to be changed to:

28
(2.11)
to include ε in an elastic collision term (mean fraction of energy lost by an electron).
The derivation of this equation can be found in Particle Detection with Drift Chambers
[22].
2.1.6 Diffusion of Electrons
When electrons drift though a gas under the influence of magnetic or electric
field, they do not strictly follow the field lines as they scatter with gas molecules. The
electrons scatter almost isotropically in space in a direction of random motion after
each collision, and diffuse transversally. However, they still generally following direction
of the field lines in longitudinal diffusion.
Assuming a Gaussian distribution function for electrons, the diffusion coefficient
can be obtained from the continuity equation for electron current in the following form
[23], [24]:
(2.12)
The Dc diffusion coefficient comes from the current continuity equation and the
stands for the mobility of the gas.
2.1.7 Electron Attachment
Electron attachment is a side effect of the electron drift processes. This process
must be controlled in order to preserve significant signal over noise as the negative ions

29
travel significantly slower than the electrons [25]. In general, electron attachment is a
process where a free electron can attach to a molecule of gas and create a negative ion
of this molecule or its fragments. The probability of the attachment is given by the
electron cross‐section at given energies. The process of electron attachment is shown
below:
e‐ + AB ‐> AB‐* ‐> A + B‐
where, AB is a diatomic or polyatomic molecule and A and B are fragments that can be
either a single or molecular radical. Dissociative electron attachment is energetically
possible if fragment B has a positive electron affinity and can form a stable negative ion.
As the total energy of the reaction is positive, the transient ion AB‐* is unstable. It can
be stabilized by autodetaching the extra electron (elastic or inelastic electron scattering)
or by dissociating thus transferring its excess energy to the dissociation process [26].
2.2 Background to Computer Simulation Software
2.2.1 Garfield++
Garfield++ is a computer simulation tool kit that was developed at CERN in 1984
by Rob Veenhof as there was a need for simulation of complex MWPC and micro‐
pattern drift chambers. The tool kit allows the user to not only track some primary
particles but also secondary particles, due to its implementation of various software
such as Magboltz (calculates properties of gases) and Heed (simulate ionisation of gas

30
molecules). Moreover, the program can simulate the behaviour of the particles under
the influence of either electric or magnetic fields.
The program itself can only calculate electric or magnetic field distributions for
flat plate or wire geometries. Therefore, description of fields generated in more
complex geometries (like the GEM) must be imported from other software like Ansys,
Elmer (freeware was used in this work) and CST. The general rule is to pick a simple
building block that can be replicated to create the whole geometry, as it significantly
speeds up the calculation times by reducing the number of nodes. The building block for
a basic GEM detectors is shown below:
Figure 2.2: Basic building block of a GEM detector
The treatment of electron transport in gases is done by the Magboltz software
which is part of the Garfield++ toolkit. All necessary parameters such as energy, drift
velocity and diffusion are calculated here, by the use of its electron cross section
databases and the equations presented in the previous section. In case of ion transport

31
properties, the tool kit cannot calculate ion mobility in gases and therefore the mobility
must be also imported manually.
Moreover the new version, Garfield++ (GARFIELD is the original) was rewritten in
the more common C++ language and built on the ROOT platform which allows the user
to easily view the drift lines of electrons and ions, and also to do basic filtration of data
by adding user‐made functions to the final code. The example of the running code with
running instructions can be found in Appendix A.
As previously mentioned, Garfield++ tool kit includes Heed software which
generates ionization patterns of fast charged particles. The core of Heed is a photo‐
absorption and ionization model. It also provides atomic relaxation processes and
dissipation of high‐energy electrons. However, the program does not support tracking of
alpha particles, and therefore, full simulation of the detector with this tool kit is not
possible.
2.2.2 Gmsh and Elmer
As previously said, the Garfield++ is not capable of calculating more complex
geometries of electric field and therefore software packages Gmsh and Elmer have to be
used. The Gmsh is a CAD tool that creates geometries and provides some post‐
processing features like meshing. In order to create the structure of electric field the
mesh is imported to Elmer, which is an open source multi‐physics simulation software
that includes physical model electromagnetism. The electric field is solved by partial
differential equations which Elmer solves by the Finite Element Method. As the

32
programs in Linux can be interconnected, one script can be used to create field files
needed by Garfield++ as the user sets the geometry and applied voltage to electrodes
simultaneously.
2.2.3 Maxwell
The Maxwell program is a combination of Gmsh and Elmer and it has a full
graphical interface that allows the user to study the electrical fields visually. Moreover,
the program can work in 2D mode and show the field vectors and create equipotential
lines at any location which is highly convenient when only small changes are done to the
structure of the field. However, the program is only compatible with the old version of
GARFIELD and not with Garfield++.

33
3 Chapter: Physical Design and Settings of the Detector
The topic of radiation detection is very wide and involves multiple variables that
can be investigated (e.q. the type of particles to be detected, their energy, etc.).
Therefore, every detector must be built for a very specific purpose. Following this
approach, the detector proposed in this work is designed to read energy deposition
values from an Am‐241 source. Moreover, the main focus is on obtaining a clear and
high signal when compared to the noise.
All single PCB GEM detector systems consist of three main parts: drift electrode,
GEM foil and Induction electrode. However, the properties of the electrical fields, such
as strength, size and shape, created in the system must be set correctly in order to make
the detector work while the optimization of the system increases the signal to noise
ratio as well as the probability of detection.
The general design can be divided into a number of main parts; vacuum chamber,
sensitive volume, voltage divider, collimator with window (as the alpha source is
isotropic), main board with pre‐amplifier and collection plate switch. The schematic
below represents the main structure of the detector. The green box represent the
voltage divider, red the sensitive volume, yellow the collimator, blue the collection plate
switch and black the main board with pre‐amplifier.
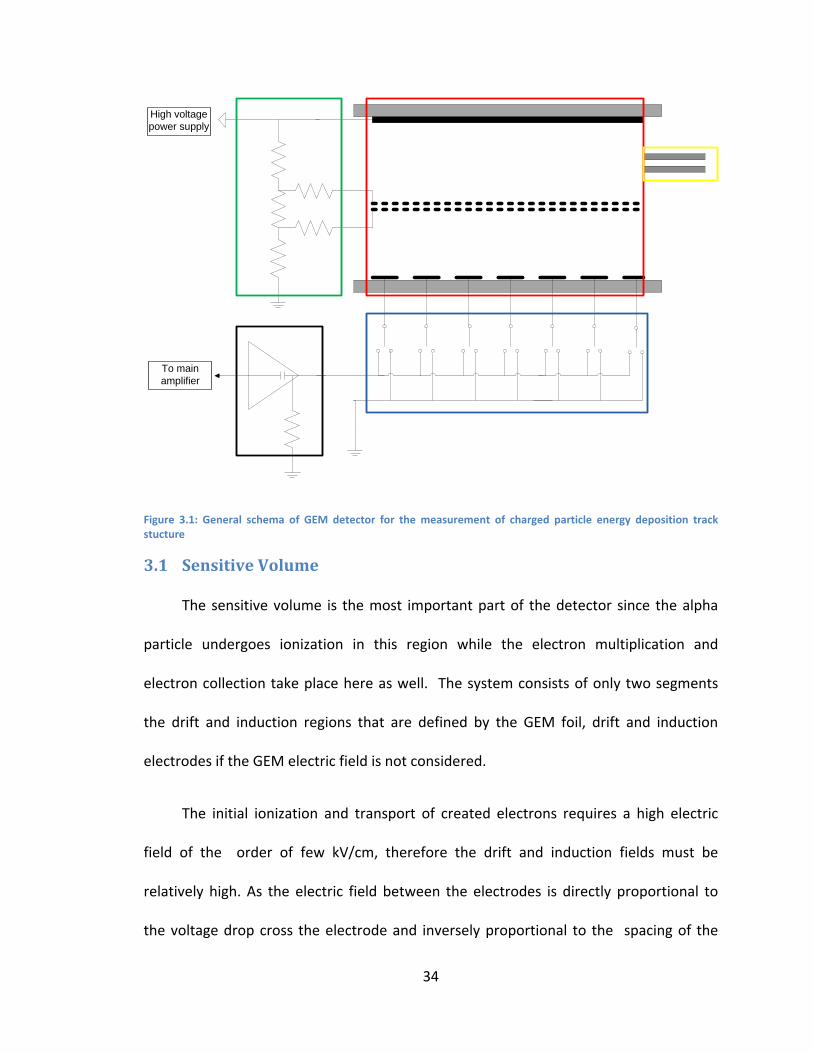
34
Figure 3.1: General schema of GEM detector for the measurement of charged particle energy deposition track stucture
3.1 Sensitive Volume
The sensitive volume is the most important part of the detector since the alpha
particle undergoes ionization in this region while the electron multiplication and
electron collection take place here as well. The system consists of only two segments
the drift and induction regions that are defined by the GEM foil, drift and induction
electrodes if the GEM electric field is not considered.
The initial ionization and transport of created electrons requires a high electric
field of the order of few kV/cm, therefore the drift and induction fields must be
relatively high. As the electric field between the electrodes is directly proportional to
the voltage drop cross the electrode and inversely proportional to the spacing of the
To mainamplifier
High voltage power supply

35
electrodes, the high fields can be obtained by utilizing a small dd (thickness of drift field)
and di (thickness of induction field) while applying a voltage difference between them.
Moreover, smaller dd and di values improve the spatial resolution and reduce electron
absorption due to attachment as the electrons have to travel shorter distances. For
these reasons the di is set to 1.3 mm, GEM frame is set to 0.6 mm and a spacer is set to
0.7 mm since only a small space is required for collection plate cable connections.
However, since the selected alpha particle source (Am‐241) is isotropic collimation of
the source is necessary in order to create a narrow beam that could fit between the drift
plate and GEM foil. A dd of 9.1 mm is selected as the most reasonable value when using
a 28 mm collimator with 2 mm diameter bore and considering the fact that scattering of
the alpha particle is not taken into account. If the scattering of the alpha particle would
be considered then dd would need to be three times bigger, and this would require three
times higher voltage drop, in order to keep the same intensity of the electric field.
The area of the sensitive volume is given by the size of the GEM foil, 50 X 50 mm
in our case. The drift and induction electrodes are of the same size located directly
below and above the GEM respectively, in order to create uniform field. The drift
electrode is made out of a solid copper plate, while the induction (collection) electrode
has 10 individual segments with 4.8 mm width each that are spaced by 200 µm as
showed in figure below. The alpha particle track is represented by the arrow. This allows
the user to pick either an individual segment or the whole plate for detection.

36
Figure 3.2: Image of segmented collection plate
3.2 Entrance Window with a Collimator
The detector is designed to detect an alpha source from outside of the vacuum
chamber, this means that a user is not required to open the detector and place the
source inside in order to run an experiment. The window is made out of 13 µm
polyethylene terephthalate that is glued by epoxy resin to a bronze NPT fitting with a
small 3 mm hole in middle. In case of window breakage, as the material is extremely
thin and must withstand full atmospheric pressure across when under vacuum, the NPT
fitting can be unscrewed and fully replaced. The window is placed 2.7 mm inside the
fitting due to the mounting mechanism while the radiation source is not damaged by its
surface touching anything. The teflon collimator is mounted directly to the NPT fitting
reaching all the way to the sensitive volume of the detector as shown on the figure
below (dimensions are not scaled). The diameter of the collimator is chosen to be 2 mm
to collimate the isotropic source to a beam of maximum 9.1 mm thickness.

37
Figure 3.3: Schematic of collimation and collimator with dimensions
3.3 Main board with Pre‐amplifier
As the expected signal from the collection plate of the detector is very small, the
pre‐amplifier is placed inside of the vacuum chamber which also acts as a Faraday cage.
By doing so, the noise from outside of the chamber in the form of electromagnetic
waves does not contribute to the detector signal.
A charge sensitive pre‐amplifier is required to detect energy deposition by the
collection of charge with good resolution for charged participle spectroscopy. For this
reason, the Cremat CR‐110 charge sensitive pre‐amplifier was chosen since it has the
highest gain in its class (1.4 volts /pC) in order to obtain a stable and high signal from the
detector. Moreover, the compact size (22 X 23 X 3 mm) allows it to be placed within the
prebuilt vacuum chamber, while still being mounted on top of the main board. The main
board Cremat CR‐150 AC provides stable AC coupling to the detector while it is directly
compatible with the 8 pin pre‐amplifier and provides all electronics for proper operation
of the pre‐amplifier chip (such as stable power supply to prevent fluctuation of the
gain) and input capacitor. An older version (version 5) of the board is used as it is

38
significantly smaller than the newer versions. On the other, hand it does not contain an
input for a test pulser. The diagram of the pre‐amplifier connection is presented below.
Figure 3.4: Schematic of a pre‐amplifier board
3.4 Voltage and Current Divider
Different electrodes (induction, drift and both GEM electrodes) require different
voltages to be applied to them based on the required electric field. Since only the
different voltage potentials have to be applied between different plates, a simple
resistor chain divider is used with one polarity. The resistors are connected in series,
while each resistor reduces the voltage by the voltage drop across it. The values of the
resistors are set based on the required electric field which needs to be created in any
region of the detector, while the value of resistance in MΩ gives the same voltage drop
value in volts when the sum of the needed voltage is applied by the high voltage source.
39
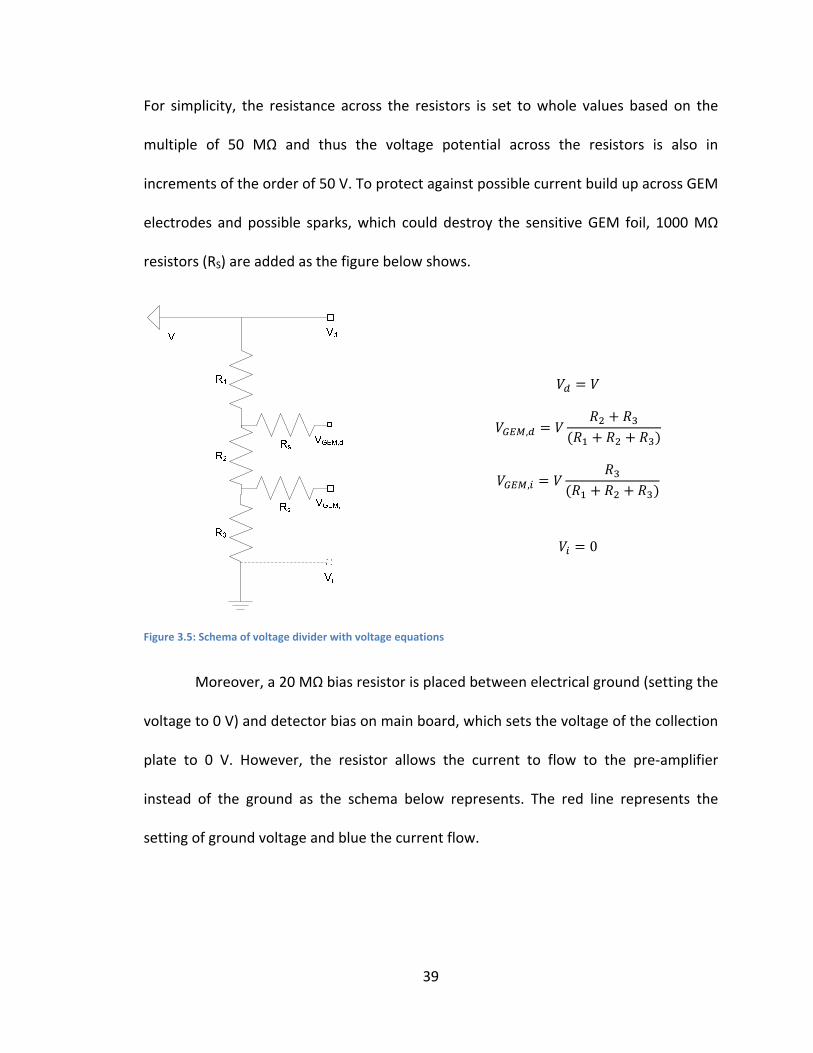
For simplicity, the resistance across the resistors is set to whole values based on the
multiple of 50 MΩ and thus the voltage potential across the resistors is also in
increments of the order of 50 V. To protect against possible current build up across GEM
electrodes and possible sparks, which could destroy the sensitive GEM foil, 1000 MΩ
resistors (RS) are added as the figure below shows.
,
,
0
Figure 3.5: Schema of voltage divider with voltage equations
Moreover, a 20 MΩ bias resistor is placed between electrical ground (setting the
voltage to 0 V) and detector bias on main board, which sets the voltage of the collection
plate to 0 V. However, the resistor allows the current to flow to the pre‐amplifier
instead of the ground as the schema below represents. The red line represents the
setting of ground voltage and blue the current flow.

40
Figure 3.6: Schematic of a current divider resistor
3.5 Collection Plate Switch
In order to obtain an energy reading from ten individual collection plate segments
by one pre‐amplifier, main amplifier and multichannel analyzer, a collection plate switch
is placed between the pre‐amplifier and the readout stripes. Therefore the switch has
ten inputs and only two outputs while the user can select any of the ten collection strips
for the energy analysis. The two outputs go to either pre‐amplifier or to the ground
which provides ground voltage (0 V) to the unselected collection strips. By doing so, the
induction field of the detector remains uniform which provides more accurate readings
than having a floating voltage over the unselected read out stripes (the selected
segments are set to 0 V as well by the current divider resistor that is placed before the
pre‐amplifier bias input).
The switch is made out of ten relays that are mounted on a custom PCB board as
Shown in Figure 3.7. Due to the limited space in the existing vacuum chamber micro
SPDT MOSFET solid state relays (LCC110P) have been chosen. The controller for these
switches is located outside of the chamber, therefore the user can select any collection

41
segment without opening the vacuum chamber. Moreover, the controller provides
adjusted voltage and current for the relays as they are both current and voltage
sensitive.
Figure 3.7: Image of connected collection plate switch
In order to reduce the noise, wires and controller are placed in an aluminum case
which acts as a Faraday cage, while the controller is directly powered by the pre‐
amplifier voltage source. By doing so, the two systems (the pre‐amplifier and controller
with switch) are harmonized and the electrical noise is further reduced.
3.6 Selection of Gas and Pressure
The selection of the gas plays an important role as all the ionizations, scattering
and multiplication process take place in gas. There are different types of gases and gas

42
mixtures that can be used in GEM detectors. As the main criterion for the filling gases
are to provide stable gain, not to have high electron attachment and to have too low
ionization energies, the most used gases are P10, Ar/CO2 and Xe/CO2 of which the
Ar/CO2 gas at two ratios 70/30 and 80/20 are the most common ones. Based on the
paper written by F. Sauli [27], the inventor of the GEM, the 80/20 ratio was picked due
to the GEM foil known break down point at various pressures and the higher availability
of the argon over xenon gas. The break down points is located at the end of each
pressure line at higher voltages shown in Figure 3.8.
Figure 3.8: GEM gains based on different voltage potentials cross GEM at various pressures

43
The pressure of, Ar/CO2 gas, has to be calculated based on the range of the Am‐
241 which emits 5.5 MeV alpha particles. As the alpha source is placed outside of the
detector volume, the particle must first travel through a 2.6 mm air gap before reaching
the 0.013 mm thick polyethylene terephthalate window prior to entering the gas
volume. Ideally the particle should thermilize at the end of the collection plate, while
most of its energy is released in the collection plate range. Therefore, the particle
should still travel up to 8.4 cm in the gas, collimator and the GEM sensitive volume.
Figure 3.9: SRIM simulation of Am‐241 alpha particle range for detector design
SRIM Monte Carlo software has been used to find the density of the Ar/CO2
(80/20) at the given geometry and energy of alpha particle that would reach the end of
the collection plate. The result is density of 0.00056 g/cm3 and is used to calculate the
required pressure of the gas, see Table 3.1.

44
Molecule Argon Carbon dioxide
Density at 760 torr (in g/cm3)
0.001661 0.001842
Ratio 80 20
Density of mixture at 760 torr (in g/cm3)
0.001697
Table 3‐1: Density of Ar and CO2 gas
0.001697
0.00056 760 ≅ 250
250 80 200 250 20 50
The overall pressure has been calculated to be 250 torr and partial pressure of Ar
and CO2 to be 200 and 50 torr respectively. The gas pressure of the detector is relatively
close to the value of 0.3 atm (228 torr), the pressure line from the Figure 3.8 with
breaking point of the GEM foil at 380 V. Therefore, based on the scaling of the
pressures, the actual voltage can be set slightly higher than the one measured by Sauli
what allows an applied voltage as high as 400 V cross the GEM foil.

45
4 Chapter: Computer Simulation
4.1 General Principles and Settings of Simulation
The Garfield++ simulation works like any other Monte Carlo simulation and
requires certain parameters like the geometry and boundary of the system, gas
properties and initial particle properties to be set. As most of these settings do not
change during the simulations in this chapter, they are only mentioned in this section.
The changed variables for each individual simulation are provided for each simulation
separately.
Moreover, the data from the simulations are only for orientation to show trends
and not precise values, as the calculation times are extremely long. For this reason, only
1000 runs are averaged to create one data point in this work and therefore the error
analysis of calculations is not conducted.
4.1.1 Geometry and Boundary Conditions
The geometry simulation settings are exactly the same as the physical settings
discussed in Chapter 2 where the drift region is 9.1 mm wide and induction region 1.3
mm. The standard GEM foil dimensions are used with 50 µm thick kapton and 5 µm
thick copper electrodes. The copper rim (hole through electrodes) has diameter of 70
µm and the outer and inner diameter of the bi‐conical hole though kapton are set to 70
µm and 50 µm respectively. The boundary conditions of the simulation are set to
contain the whole height of the sensitive volume with 1.5 by 1.5 mm cross section. This

46
cross section is sufficiently big enough to accommodate the electron diffusion at low
electric fields.
4.1.2 Gas Settings
Similarly to the previous section the gas setting of gas properties is obtained
from Chapter 2. The gas is defined as argon and carbon dioxide with ratio 80/20 with
room temperature 293.15 K at 250 Torr. Since the program cannot calculate and does
not have a database for the penning transfer of the mixture, it is set manually to 0.51.
This value is determined by gain curve fits as describe by Sahin [28]. Similarly, mobility
of negative ions (O‐), created by electron attachment, must be imported manually. For
this reason, data of (O‐) in CO2 was obtained from Transport Properties of Gaseous Ions
over a Wide Energy Range paper [29] and are presented in Appendix B.
4.1.3 Initial Particle Setting
Due to the inability of alpha particle tracking in Garfield++, the simulations are
done by placing electrons that would be created from the alpha particle ionization into
the drift region. The electron is set to have a 0.1 eV energy with randomized initial
location as the alpha particle can move anywhere within the trajectory of the beam
while the initial direction of the electron is also randomized.
4.2 Drift Field Simulation
The drift field in the GEM detector must be carefully chosen in order to ensure
stable gain of the whole system since the ionization of the Ar/CO2 gas by the initial alpha
particle take place in this region. Even small irregularities in electron production from

47
ionization and their subsequent transfer to the GEM will cause large irregularities of the
overall detector signal as electrons will get multiplied. Therefore, the drift field must be
set in the ion chamber region where the potential difference between the GEM foil and
the drift electrode is strong enough to overcome recombination of the ion pair right
after the ionization, but not to cause further ionization by the electrons (secondary
ionisation).
For this reason, an ion chamber experiment was set up so to take place between
the drift electrode and the GEM drift copper electrode. The voltage potential between
the electrodes was varied as the pressure was set to the same operational pressure of
the GEM detector (250 Torr) and Ar/CO2 concentration (80/20).
Figure 4.1: Experimental ion chamber readings at different voltage potentials
The figure above shows that the energy reading from the detector initially
increases with the increasing voltage difference as less ion recombination takes place at
50
52
54
56
58
60
62
64
66
68
70
0 100 200 300 400 500 600
Chan
nel N
umber
Ion Chamber Potential (V)
Ion Chamber Reading of Am‐241

48
higher voltages. However, after around 400 V the detector reads lower energies for the
same 5.5 MeV alpha particle. This is due to the higher electron absorption of the CO2
gas, as more electrons reach higher energies laying within 3.1 ‐ 10.05 eV CO2 electron
attachment regions as the figure below suggests.
Figure 4.2: Electron cross sections of carbon dioxide gas
Garfield simulation of the ion chamber region shows a consistent result with the
discussion above where more electron attachments occur at higher drift potentials. As
a full simulation of the initial ionization is not possible in Garfield, the simulation of ion
electron recombination is also not possible. Electron attachment at different drift fields
is presented in Figure 4.2 with two different electron drift distances of 4.5 and 9 mm
(distance from initial ionization to the collection plate). The electron attachment
fraction stands for how many electrons have been attached to the gas molecules when
compared to the initial number of placed electrons to the gas mixture. Moreover at high
electric fields some of the electrons undergo to further ionization of the gas and create

49
additional electrons. For this reason, the electron attachment fraction can be above 1 as
there are more electrons (that could be attached) created by secondary ionizations
when compared to the originally placed electrons.
Figure 4.3: Garfield simulation of electron attachment between two parallel plates of an ion chamber at different electric strengths
A second important feature of the drift field is to transfer the electrons towards
and through the GEM foil. In general, the electrons follow the field lines when not
considering transversal diffusion and scattering of the electrons. The shape of the field
lines is strongly linked to the voltage potential difference between the drift electrode
and GEM foil due to the small GEM channels. As the voltage difference in the drift
region increases, the field lines curve less towards the GEM channels and tend to curve
inwards at lower voltages as shown is Figure 4.4. The drift voltage difference is set to
300 V on left and 600 V on right.
0
0.2
0.4
0.6
0.8
1
1.2
1.4
0 500 1000 1500 2000 2500 3000 3500
Electron Attachment Fraction
Drift Field(V/cm)
Electron Attachment of Ion chamber
9 mm
4.5 mm

50
Figure 4.4: Electric field vectors representing different curvature of field lines in drift region.
Consequently, the GEM is less transparent to the electrons as they do not drift
towards the holes, but to the copper foil, at higher voltages. The electrons collected on
the copper foil no longer contribute to electron avalanches, and this weakens the
detector output signal. Garfield simulations show consistent results with the proposed
theory in Figure 4.5. Moreover, the graphs shows important feature of the electric field
on the transparency of the GEM foil, the dependence on location of the initial ionization
(electron creation point). The further away from the GEM foil the ionization takes place,
the better the GEM foil’s transparency appears at high drift potentials.
Figure 4.5: Garfield electron transparency simulation
00.020.040.060.080.1
0.120.140.160.180.2
0 50 100 150 200 250
Fraction of Electron Colleted on GEM
Drift Potential (V)
GEM Foil Opacity
9 mm
4.5 mm

51
4.3 GEM Field Simulation
The GEM can be considered as an analog signal multiplier where electrons coming
from an ion chamber, the drift field, are multiplied before they are collected in induction
region. The strength of electric field between the GEM copper foils is only dependent on
the voltage difference between the two foils as the distance is fixed. Therefore, the
electron multiplication directly depends on the applied voltages a cross this section as
well as on the type of gas and its pressure. The electron avalanche size as a function of
the applied voltage potential cross the GEM is presented in figure below, where all the
electrons are comprised of the part of the avalanche which passes though the foil,
together with electrons that land on the kapton and copper foils. GEM potentials higher
than 400 V are not applicable due to the physical limitations of the foil for a given gas
type and its pressure.
Figure 4.6: Garfield electron gain simulation across GEM at 250 Torr and Ar/CO2 (80/20) gas
y = 0.1411e0.0238x
R² = 0.9994
1
10
100
1000
10000
0 100 200 300 400 500
Avalanche size
GEM Potential (V)
GEM Gain

52
The high gain of the detector is possible due to high electric field that is
produced between the GEM electrodes. The Maxwell software shows that the electric
field in middle of the GEM can reach almost 100 kV/cm at potential 400 V. Moreover,
the model shows that any electron relatively close to the GEM induction electrode
would get collected by it as the eclectic field vectors are directly pointing to GEM.
Figure 4.7: Electric field simulation of the GEM detector with electric field vectors
4.4 Induction Field Simulation
The purpose of the induction field is to transport the electrons to the collection
plate (induction electrode). Similar to that in the drift field, the shape of the field lines
and the electron attachment directly depend on the strength of the electric field in the
induction region. Moreover, at high electron gains, electrons diffuse closer to the
induction GEM copper foil and can be collected by it. The field lines in this case should
be as much extending to the collection plate as much as possible so that electrons
would not follow along the field line to the GEM induction copper foil. This is achieved

53
by applying a high potential difference between the GEM and the induction electrode
and creating a strong electric field. Figure 4.8 shows how the direction of the field lines
changes with increased induction fields. The induction voltage difference is set to 500
(top left), 2000 (top right) , 3000 (bottom left), 9000 V (bottom right).
Figure 4.8: Electric field vectors representing different curvature of field lines
As the induction field is significantly weaker than the GEM field, it does not
influence the size of avalanche within the GEM. However more electrons, which are
created within the GEM region, reach the collection plate at higher induction potentials
due to the field line change of direction as Figure 4.9 shows. These values already
consider the increase probability of electron attachment at higher induction fields.

54
Figure 4.9: Garfield simulation of GEM foil transparency based on the induction field strength
The electrons leaving the GEM foil have various energies as electron energy
varies based on the field that the electrons drift through, the distance from its previous
ionization and the energy that they lost during the ionization process. The upper limit of
the electron energies, leaving the GEM at a distance of 20 µm, is around 30 to 35 eV. As
this value is relatively high and part of the strong GEM field reaches to induction field
area there is a significant additional multiplication happening within this region. In case
of a GEM with potential 350 V the ratio of induction electrons to GEM electron slightly
increases with induction field strength from 36:64 to 40:60 as Figure 4.10 represents.
Similarly for GEM with 400 V voltage drop the ratio changes from 43:57 to 47:53. This is
mainly due to higher electron energies obtained in the stronger induction fields which
allow them to do further ionizations and contribute to the overall electron production.
10
100
1000
10000
0 100 200 300 400
Number of electrons
Induction Potential (V)
GEM Transparency Based on Induction Field
Electrons collected, V(GEM) = 350 V
Electrons created, V(GEM) = 350 V
Electron collected, V(GEM) = 400 V
Electrons created, V(GEM) = 400 V

55
Figure 4.10: Garfield simulation of electrons contribution from GEM (350 V) and induction region to the overall avalanche
When considering only the electrons that are used for signal build up (the
electrons that reach the collection electrode) the distribution of 1:1 ratio is found at
lower induction values and increases slightly to 3:4 (GEM electrons to Induction
electron). This can be seen on a figure bellow, which shows the composition of the
electron that contributes to overall number of electrons collected. The figures also
represent the overall useful gain of the GEM detector with GEM potential of 350 V and
400 V at various induction potentials.
0%
10%
20%
30%
40%
50%
60%
70%
80%
90%
100%
50 100 150 200 250 300
Contribution (%)
Induction Potential (V)
Contribution of GEM and Induction Region Electrons to the Overall Electron Production
Electrons from induction region
Electron from GEM region

56
Figure 4.11: Garfield simulation of electron collection with GEM potential set to 350 V
Figure 4.12: Garfield simulation of electron collection with GEM potential set to 400 V
On the other hand, these high values of additional multiplication over a larger
distance (the thickness of induction field), when compared to the thickness of the GEM
0
50
100
150
200
250
50 100 150 200 250 300
Electron Count per Avalnche
Induction Potential (V)
Electron Collection at VGEM = 350 V
Induction electrons
GEM electrons
0
100
200
300
400
500
600
700
50 100 150 200 250 300
Electron Count per Avalnche
Induction Potential (V)
Electron Collection at VGEM = 400 V
Induction electrons
GEM electrons

57
foil, leads to less stable gains and therefore broader measured energy distributions at
higher induction fields. When applying higher potential drops across the GEM foil the
higher gains produce more electrons which have sufficiently high energies leaving the
GEM to produce further ionizations even in the induction field. Moreover, Figure 4.13
shows that the gain fluctuation increases at higher gains which means longer
measurement times in order to get the same statistics.

58
Figure 4.13: Garfield simulation of distribution of collected electrons
1
11
21
31
41
51
61
71
81
91
101
10 210 410 610 810 1010 1210 1410 1610
Frequency
Size of Effective Gain
Single Electron Effective Gain Size Probability Distribution Based on 1000 Runs
GEM = 350 V, Induction = 50 V
GEM = 350 V, Induction = 150 V
GEM = 350 V, Induction = 300 V
GEM = 400 V, Induction = 50 V
GEM = 400 V, Induction = 150 V
GEM = 400 V, Induction = 300 V

59
Moreover, the higher induction fields increase the average energy of the drifting
electrons closer to the electron attachment energy range of the gas, which leads to a
high number of electrons that escape the useful detector gain. These electrons get
attached primarily to the CO2 molecules, as its electron attachment cross section is
significantly higher than that of Ar and they create an unstable CO2‐* ion (the CO2
molecule has much higher electron affinity than Ar due to the oxygen fragment) [30].
The CO2‐* further dissociates into a stable C0 and O‐ molecule. In overall charge
contribution to the collection plate the negative ions O‐ can contribute to it by up to 13
% in both cases with the GEM potential set to 350 and 400 V. The results are shown in
figure bellow while the data are identical for both cases of GEM potential. This could
possibility lead to detector noise at high particle rates.
Figure 4.14: Garfield simulation of collection plate charge distribution based on number of electrons and negative ion
1%
2%
3%
6%
13%
25%
50%
100%
50 100 150 200 250 300
Ratio (%)
Induction Potential (V)
Contribution of Negative Ions and Electrons to Overall Charge on the Collection Plate
Electrons from Avalanche
Negative Oxygen Ions

60
As the negative ions O‐ drift significantly slower to the collection plate than
electrons from the avalanche, they arrive at the collection plate considerably later than
the electrons. However, the collection time distribution for negative ions is much
greater than the one for electrons. The figure below (Figure 4.15) shows different
collection times for negative ions from a single avalanche and their standard distribution
with manually inputted ion mobility of O‐ in CO2 gas (see Appendix B). Moreover, the
autodetachment of the extra electron from O‐ molecule is not possible since the
induction field is well below 22.5 kV/cm (given by 90 V/cm Torr) [32].
Figure 4.15: Garfield simulation of collection time for negative Ions with distribution for GEM potential 350 and 400 V
In the case of electron collection, the mean collection time is much shorter around
110 ns with standard deviation of around 50 ns. For this reason, the negative ions might
not create any noise or very low level noise, even with shorter collection times and
0
0.1
0.2
0.3
0.4
0.5
0.6
0.7
0.8
0 50 100 150 200 250 300 350
Time (ms)
Induction Potentail (V)
Collection Time for Negative Ions with Distribution

61
smaller standard deviation as seen at the higher induction fields. However, the negative
ions might cause significant noise at high count rates.
4.5 Summary of Computer Simulation
The simulations of various conditions has been carried out by the use of the
Garfield++ tool kit in order to save time and mainly to avoid possible equipment
destruction (such as damaging the sensitive GEM foil). Based on the data obtained from
the previous part of this chapter, the general characterization of the system can be
made.
The drift region needs the lowest electric field possible as the electron absorption
and GEM transparency increase at high electric field. However, the field must be strong
enough to overcome recombination of the ion and electrons created from the initial
alpha particle ionization. By considering both requirements, the drift region is set to 450
V a cross the electrodes.
The GEM foil should be set to the highest value possible but below the value at
which avalanche becomes unstable or sparking through GEM foil occurs. In our detector
configuration, the limiting value of volatege on GEM foil is 350 V but, it could possibly be
as high as 400 V because our experimental conditions are different from those that Dr.
Sauli (referring to Figure 10 in Chapter 2). Since the computer simulation can not
simulate sparking or stability of avalanche, both of the above mentioned voltage values
need to be tested.

62
A similar situation emerges in defining the induction field where higher voltages
provide additional gain, but on the other hand increase electron attachment. This does
not only decrease the size of the avalanche and creates broader peaks but could be a
possible source of noise from the created negative ions. For this reason, high and low
induction fields should be tested as the computer simulation can not predict the
sensitivity of the pre‐amplifier to the slow negative ions.

63
5 Results of Detector Prototype Tests
5.1 Prototype Overview
A GEM energy tracking detector has been constructed based on the parts describe
in Chapter 3. However, during the preliminary testing of the device, sparking occurred a
cross the GEM copper electrodes and partially destroyed the GEM foil. Unfortunately,
due to extremely long waiting periods for new framed GEM foil, the current prototype
operates with a GEM that can only support 200 V at the designed detector condition
(pressure). This value is significantly lower than the detector design criteria which
assumed to use 350 and possibly try 400 V and leads to a decrease of detector gain to
around 10 instead of 250 (VGEM= 350 V) or possibly 650 (VGEM= 400 V). For this reason,
the detector has been set to a higher induction field, as this can provide additional gain
when compared to a lower induction field. The possibility of creating large quantities of
negative ions is suppressed by the low gain. The set up of the detector resistor board
with voltage drops across the various regions with its input high voltage is presented in
the table below.
Field Voltage drop (V) Resistor (MΩ) HVS (V)
Drift 450 450 950
GEM 200 200
Induction 300 300 Table 5‐1: Settings of the prototype detector
Even though the detector suffers from the low gain some measurements were
still possible due to the very low levels of detector noise (around 7 mV) which have been
achieved by precise wiring of the detector and the use of a high sensitivity pre‐amplifier.

64
An example of pulse shape from the detector before being amplified by the main
amplifier is presented below with the detector noise.
5.1: Example of pulse from the GEM detector
Furthermore, the collimator has been slightly modified during the testing due to
charge build up on the Teflon tube over the time (approximately 3 hours at 450 V drift
potential)), which was producing negative voltage peaks instead of stable voltage
output. The problem was fixed by a reduction of the outer diameter of the collimator
while the inner diameter remained the same.
However, this mechanical collimation is still not ideal mainly due to extremely
low count rates, around 1 count every 10 second with the available Am‐241 source with
an activity of 3.867 kBq (January 2011) . For this reason, any kind of measurement with
this detector and source takes a significant amount of time in order to get reasonable
statistics.

65
Overall, besides the change of detector gain the rest of the detector is identical
to the proposed and explained design. The inside of the detector prototype with its
electronics is presented below. The stack of drift, GEM and collection plate is located
under the resistor chain board. The collection plate switches consist of two boards that
are stack on top of each other, while each of them has 5 relays (on the figure they look
like small computer chips). The pre‐amplifier board with the pre‐amplifier chip are
occupying the rest of the space of the aluminum chamber.
Figure 5.2: Image of the internal parts of the physical detector
During the experimental measurements the detector is fixed by two G‐clamps
which provide stability to a detector due to is feed though at the bottom and right side

66
and straight horizontal surface for the Am‐241 source which is freely placed on top of
the detector entrance window. The Figure 5.3 shows the standard setup of the system
with connected oscilloscope which provides visual understanding of the detector status
and is used for problem detection like noise, charge build up or possible sparks.
Figure 5.3: Image of general setup of an experiment
5.2 Energy Tracking of an Alpha Particle
As the main goal of this work is to obtain measurements of alpha particle stopping
power, an experiment with this prototype have been conducted. However, due to the
detector lack of gain some data could not be measured as the pulse height did not
exceed the detector noise. However, the main problem during the measurement was
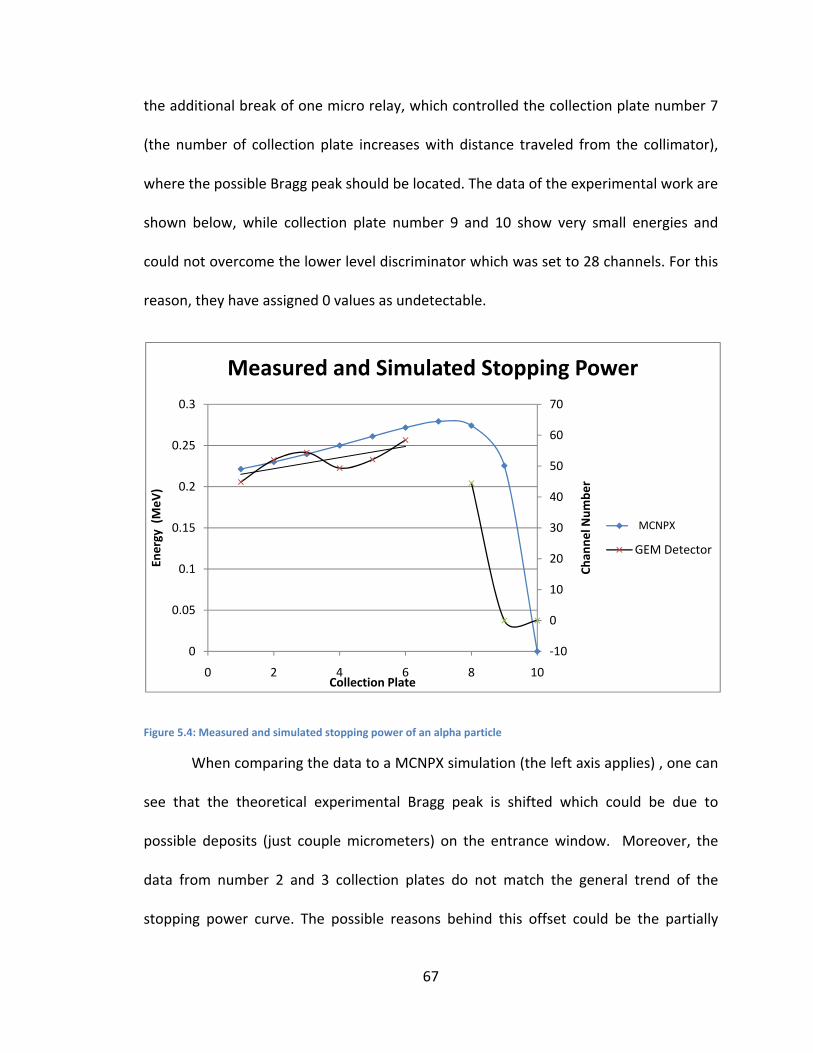
67
the additional break of one micro relay, which controlled the collection plate number 7
(the number of collection plate increases with distance traveled from the collimator),
where the possible Bragg peak should be located. The data of the experimental work are
shown below, while collection plate number 9 and 10 show very small energies and
could not overcome the lower level discriminator which was set to 28 channels. For this
reason, they have assigned 0 values as undetectable.
Figure 5.4: Measured and simulated stopping power of an alpha particle
When comparing the data to a MCNPX simulation (the left axis applies) , one can
see that the theoretical experimental Bragg peak is shifted which could be due to
possible deposits (just couple micrometers) on the entrance window. Moreover, the
data from number 2 and 3 collection plates do not match the general trend of the
stopping power curve. The possible reasons behind this offset could be the partially
‐10
0
10
20
30
40
50
60
70
0
0.05
0.1
0.15
0.2
0.25
0.3
0 2 4 6 8 10
Chan
nel N
umber
Energy (MeV)
Collection Plate
Measured and Simulated Stopping Power
MCNP
GEM Detector
MCNPX

68
destroyed GEM or small scratch on the collection plate. Unfortunately, data for
collection plate number 7 are not possible, due to the unexpected breakdown of its
switch. However, based on the general trend of the measured stopping power, initially
the energy slightly increasing with alpha particle travelled distance and by the end
sharply decreases, one could expect the Bragg peak to be located in this region.
Stability of the Detector Pulse Height
In order to ensure the stable performance of the detector 2 measurement have
been taken over a time period of 72 hours from the initial gas fill up, one at the
beginning and one at the end of the energy tracking experiment. Each time the detector
was set to perform long tests to provide reasonable statistics of the measurements.
Prior to these experiments the detector has been degassed for 3 days and refilled two
times.
The detector was set up to collect energy reading from the whole collection
plate, the segmentation was turned off by the collection plate switch, in order to get
highest peak possible. Moreover, 300 V voltage drop have been selected for the
induction region as it provides highest gain based on the computer simulation since the
gain of the GEM foil is already reduced.
The table below shows the data obtained from the 2 readings with times of the
experiment, overall number of counts, energy peak reading and the resolution of the
given reading.

69
Time form Gas Filling (days)
Number of counts Peak channel reading
FWHM
Test I 0 471 154 10
Test II 3 482 155 15 Table 5‐2: Detector stability statistics
The detector shows very small drift over the 3 days, only by one channel which
can be considered negligible. An example of one of this data set is in Figure 5.5. The long
left shoulder statistics on the left side of peak in mainly due to the scattering of alpha
particle in the collimator and from the source itself.
Figure 5.5: Example of peak obtained during the stability measurements
70
6 Chapter: Conclusion and Future Developments
The main objective of this work was achieved by simulation, design and
construction of a GEM detector for particle tracking using an Am‐241 source. This study
was also aimed at improving an understanding of the working principles of GEM
detectors, mainly the transport of electron from primary ionization to the collection
region and to give a general guidance for the construction of similar kinds of detector.
The Monte Carlo and field simulation studies provided a strong understanding of
the GEM detector general design while it also helped to understand particular
behaviours of the detector.
The final prototype was unfortunately not completely capable of fulfilling the task
of measurement of the alpha particle track by stopping working mainly due to a
malfunction of one collection plate relay. Moreover, the detector was not capable of
achieving simulated and designed gains due to the breakdown of the sensitive GEM foil
(during the preliminary testing periods). The GEM foil could not be replaced due to the
long time required to obtain a new foil from CERN workshop while the relay was not
replaced due to the complexity of the custom made switching board.
Overall, the feasibility of using a GEM detector with segmented PCB collection
plate for stopping power measurement was partially showed by the experimental work
which provided similar trends to an MCNPX simulation.
This chapter provides a discussion of the most important accomplishments presented
throughout this thesis and suggests possible future improvements.

71
The following conclusions and recommendations can be drawn from his work:
When designing a GEM detector for alpha particle energy tracking, the range of
the particle should be selected one collection segment shorter than the full
length of the collection plate to ensure that the particle deposits all its energy
before reaching this point. The pressure of the detector gas has to be
determinate based on this required range.
The intensity of the drift field has to be set high enough to overcome ion
electron recombination from the initial ionization which can be measured
experimentally by connecting the pre‐amplifier to the copper electrode facing
the drift region. However, setting the drift field too high leads to possible
attachment of the initial electrons by the gas molecules and the signal from the
initial ionizations diminishes. Moreover, the opacity of the GEM holes also
increases at high drift fields as the drift field lines curve more towards the GEM
copper electrode and less towards the GEM holes.
Even though the GEM foil field should be set as high as possible to achieve high
gain, reaching the maximum values is not reasonable due to the possibility of
sparking between the GEM electrodes and obtaining unstable gains as the
photon absorption of the quenching gas is limited. However, the high GEM gains
produce more electrons that have sufficiently high energies leaving GEM to
produce further ionizations in the lower fields of the induction region. Moreover,
the maximum GEM voltage drop strongly depends on the gas pressure and

72
therefore it is highly recommended to find data that states the maximum GEM
voltage for a given gas at a given pressure.
The simulation of the induction field shows that higher induction fields are
preferable for the transport of electrons towards the collection plate due to the
improved direction of the field lines. Furthermore, the induction field
contributes to additional electron multiplication, starting at 50% of the whole
effective gain, as the electrons are still further multiplying between the GEM and
induction electrode due to electrons at high energy levels leaving the GEM
region. On the other hand, the increased gain created by the induction field
strongly decreases the energy resolution of the detector as the electrons are
multiplying over a larger distance (the thickness of the induction field) which also
leads to increased fluctuations of the gain. It also contributes to increased
electron attachments which subsequently lead to an increased production of
negative ions, when quenching with a gas that has a large electron attachment
cross section. In addition, the collection time of the negative ion is slow, and
their collection time distribution deceases. At higher induction fields this could
lead to the creation of noise at high count rates.
During the construction of the detector a decrease in the levels of electronic
noise was achieved by ensuring that the all the wires carrying the charge
information did not come in contact with any other wires. The pre‐amplifier
board can also lead to the creation of high frequency noise when incorrectly
grounded; the output ground (ground of the pre‐amplifier output which leads to
73
the main amplifier) must be grounded independently of the general ground of
the board. Moreover, the high voltage wires should have sufficient insulation as
their can create charge build up on the insulation and create a negative pulse
when discharging.
Charge build up on a collimator is also possible when the collimator is located to
close the sensitive volume electrodes. This is not necessarily visible immediately
after applying high voltage to the electrodes but after some time becomes
apparent by the occurrence of negative pulses.
The power supply of the collection plate switch, like any additional electronics
inside the detector, must be connected with the overall power supply of the
detector, which otherwise will create electrical noise, even when the individual
circuits are synchronized by connecting a common ground for the two circuits
together.
6.1 Future Developments and Recommendations
Conclusions drawn from Chapter 5 established that the current prototype
detector is not capable of measuring the stopping power of alpha particle precisely and
cannot track the particle throughout its full collection region. However, the results
shows that the tracking of the alpha particle is possible by this detector while applying
obvious changes to the detector such as replacing the broken MOSFED relay and
installing a new GEM foil. By doing so, the detector will have full capacity of tracking the
heavy charge particles over the full collection plate range with wider energy spectra
(mainly the lower energy deposition levels).

74
Moreover, a calibration technique for this device must be developed in order to
obtain precise measurements from each individual collection segment due to possible
shift of signal intensity over the electronic and the geometrical combination of the GEM
foil and the collection segments. Such a technique could use a precise photon emitter
like Fe‐55, emitting photon with 5.9 KeV energy, and the commonly used gas mixture of
Ar/CO2/CF4 [33], [34].
Since the constructed detector does not have assigned any particular use besides
preliminary measurements and investigations of particle energy and tracking future
developments are possible:
Use of different filling gas with lower electron attachment cross section such as
P‐10 gas for applications when higher gains are required. For microdosimetry
purposes, the detector can be filled with tissue equivalent gas.
Improve stopping power sensitivity by replacing the current 10 segment
collection plate by a higher number segment collection plate.
Improve the scattering effect of the current collimator by the use of magnetic or
electric collimator.
Ultimately, replace the collection switch by multiple preamplifiers which will
enable real time measurement of all segments at the same time.
Replace the current charge sensitive pre‐amplifier with PreShape32 chip for
different particle discrimination [35], [36].

75
Create a full computer simulation of the detector by combination of Garfield++
and Geant4. The Geant4 could calculate location, energy and time of created
electrons from primary ionizations under a uniform electric field [37], as the drift
field is relatively uniform except locations near the GEM foil. The output data
would be afterwards imported in Garfield++ which would create the electron
avalanche for each electron from the Geant4 simulation.

76
7 Appendix A: Example of Garfield++ Code
#include <iostream> #include <fstream> #include <cmath> #include <iomanip> #include <time.h> #include <TApplication.h> #include <TCanvas.h> #include <TH1F.h> #include <TGeoManager.h> #include <TGeoMaterial.h> #include <TGeoMedium.h> #include <TGeoVolume.h> #include <TGeoBBox.h> #include <TGeoTube.h> #include <TGeoPcon.h> #include <TGeoHalfSpace.h> #include <TGeoMatrix.h> #include <TGeoCompositeShape.h> #include "ComponentAnsys123.hh" #include "ViewField.hh" #include "MediumMagboltz.hh" #include "Sensor.hh" #include "AvalancheMicroscopic.hh" #include "AvalancheMC.hh" #include "Random.hh" #include "Plotting.hh" using namespace Garfield; using namespace std; int main(int argc, char * argv[]) { TApplication app("app", &argc, argv); plottingEngine.SetDefaultStyle(); const bool debug = true; // Load the field map. ComponentElmer * elm = new ComponentElmer("gemcell/mesh.header","gemcell/mesh.elements","gemcell/mesh.nodes", "gemcell/dielectrics.dat","gemcell/gemcell.result","cm"); elm->EnablePeriodicityX(); elm->EnableMirrorPeriodicityY(); elm->SetMedium(0,gas); elm->PrintRange(); // Dimensions of the GEM const double pitch = 0.014;

77
const double kapton = 50.e-4; const double metal = 5.e-4; const double outdia = 70.e-4; const double middia = 50.e-4; // Setup the gas. MediumMagboltz* gas = new MediumMagboltz(); // Specify the gas mixture (Ar/CO2 80:20) gas->SetComposition("ar", 80., "co2", 20.); // Set the temperature (K) gas->SetTemperature(293.15); // Set the pressure (Torr) gas->SetPressure(250.); // Set maximum electron energy gas->SetMaxElectronEnergy(150.); gas->EnableDebugging(); gas->Initialise(); gas->DisableDebugging(); // Set the Penning transfer efficiency. const double rPenning = 0.51; const double lambdaPenning = 0.; gas->EnablePenningTransfer(rPenning, lambdaPenning, "ar"); // Load Ion mobility file gas->LoadIonMobility("IonMobility_O-_CO2.txt"); // Associate the gas with the corresponding field map material. const int nMaterials = elm->GetNumberOfMaterials(); for (int i = 0; i < nMaterials; ++i) { const double eps = elm->GetPermittivity(i); if (fabs(eps - 1.) < 1.e-3) elm>SetMedium(i, gas); } elm->PrintMaterials(); // Create files to which data will be written ofstream outfile; ofstream rradius; ofstream ttime; ofstream rratio; ofstream ddatai; ofstream ddatae; outfile.open ("outfile.txt"); rradius.open ("radius.txt"); ttime.open ("time.txt"); rratio.open ("ratio.txt"); ddatai.open ("datai.txt"); ddatae.open ("datae.txt"); // Select area of interest Sensor* sensor = new Sensor();

78
sensor->AddComponent(elm); sensor->SetArea(-30 * pitch, -30 * pitch, -0.13, 30 * pitch, 30 * pitch, 0.91); // Selecting electron avalanche and ion drift function AvalancheMicroscopic* aval = new AvalancheMicroscopic(); aval->SetSensor(sensor); AvalancheMC* drift = new AvalancheMC(); drift->SetSensor(sensor); drift->SetDistanceSteps(2.e-4); // Set number of run const int nEvents = 125; for (int i = nEvents; i--;) { if (debug || i % 10 == 0) std::cout << i << "/" << nEvents << "\n"; float timeused = (float)clock()/CLOCKS_PER_SEC; cout<<"Avalanche " << i << " started at " << timeused << " sec" << endl; // Set initial electron position double r = 0; double PointZ = 0.0033 + RndmUniform() * 0.9 ; double PointX = RndmUniform() * pitch / 2; double PointY = 0; std::cout << PointX << "\t" << PointY << "\t" << PointZ << "\n"; // Set needed constants double sumElectronsTotal = 0.; double sumElectronsPlastic = 0.; double sumElectronsUpperMetal = 0.; double sumElectronsLowerMetal = 0.; double sumElectronsTransfer = 0.; double sumElectronsOther = 0.; int NII = 0; int NEE = 0; int EMUGC = 0; int EMLGC = 0; int EMIC = 0; int EMUG = 0; int EMLG = 0; int EMI = 0; int AUG = 0; int ALG = 0; int AI = 0; int NICG = 0; int NICI = 0; // Initial position double x0 = PointX; double y0 = PointY; double z0 = PointZ; double t0 = 0.;

79
double e0 = 0.1; // Run electron avalanche aval->AvalancheElectron(x0, y0, z0, t0, e0, 0., 0., 0.); int ne = 0, ni = 0; aval->GetAvalancheSize(ne, ni); const int np = aval->GetNumberOfElectronEndpoints(); double xe1, ye1, ze1, te1, e1; double xe2, ye2, ze2, te2, e2; double xi1, yi1, zi1, ti1; double xi2, yi2, zi2, ti2; int status; int statuss; // Filtrate electrons endpoints data for (int j = np; j--;) { aval->GetElectronEndpoint(j, xe1, ye1, ze1, te1, e1, xe2, ye2, ze2, te2, e2, status); ddatae <<xe1<< "\t" << ye1<< "\t" << ze1<< "\t" << te1<< "\t" << e1<< "\t" << xe2<< "\t" << ye2<< "\t" << ze2<< "\t" << te2<< "\t" << e2<< "\t" << status << "\n"; sumElectronsTotal += 1.; if (ze2 > -kapton / 2. && ze2 < kapton / 2.) { sumElectronsPlastic += 1.; } else if (ze2 >= kapton / 2. && ze2 <= kapton / 2. + metal) { sumElectronsUpperMetal += 1.; } else if (ze2 <= -kapton / 2. && ze2 >= -kapton / 2. - metal) { sumElectronsLowerMetal += 1.; } else if (ze2 < -0.129) { sumElectronsTransfer += 1.; rradius << te2 << "\n"; NEE+= 1; if (ze1 > 0 && ze1 < kapton / 2. + metal) { // electron multiplication in upper gem collected EMUGC+= 1; } if (ze1 > -kapton / 2. - metal && ze1 <= 0) { // electron multiplication in lower gem collected EMLGC+= 1; } if (ze1 <= -kapton / 2. - metal && ze1 > -0.13) { // electron multiplication in induction collected EMIC+= 1; } } else { sumElectronsOther += 1.; } if (ze1 > 0 && ze1 < kapton / 2. + metal) { // electron multiplication in upper gem EMUG+= 1;

80
} if (ze1 > -kapton / 2. - metal && ze1 <= 0) { // electron multiplication in lower gem EMLG+= 1; } if (ze1 <= -kapton / 2. - metal && ze1 > -0.13) { // electron multiplication in induction EMI+= 1; } if (status == -7) { drift->DriftIon(xe2, ye2, ze2, te2); drift->GetIonEndpoint(0, xi1, yi1, zi1, ti1, xi2, yi2, zi2, ti2, statuss); ddatai << xi1 << "\t" << yi1 << "\t" << zi1 << "\t" << ti1 << "\t" << xi2 << "\t" << yi2 << "\t" << zi2 << "\t" << ti2 << "\t" << statuss << "\n"; if (zi1 > 0 && zi1 < kapton / 2. + metal) { //absorbtion in upper gem AUG+= 1; } if (zi1 > -kapton / 2. - metal && zi1 <= 0) { //absorbtion in lower gem ALG+= 1; } if (zi1 <= -kapton / 2. - metal && zi1 > -0.13) { // absorbtion in induction AI+= 1; } if (zi2 < -0.129) { NII+= 1; if (zi1 > -kapton / 2. - metal && zi1 < kapton / 2. + metal) { // number of ion collected from gem NICG+= 1; } if (zi1 <= -kapton / 2. - metal && zi1 > -0.13) { // number of ion collected from induction NICI+= 1; } ttime << ti2 << "\n"; } } } outfile << "\t" << sumElectronsTotal << "\t" << "\t" << sumElectronsTransfer << "\t" << "\t" << sumElectronsOther << "\t" << "\t" << sumElectronsPlastic << "\t" << "\t" << sumElectronsUpperMetal << "\t" << "\t" << sumElectronsLowerMetal << "\n"; rratio << NEE << "\t" << "\t" << NII << "\t" << "\t" << EMUGC << "\t" << "\t" << EMLGC << "\t" << "\t" << EMIC << "\t" << "\t" << EMUG <<

81
"\t" << "\t" << EMLG << "\t" << "\t" << EMI <<"\t" << "\t" << AUG << "\t" << "\t" << ALG <<"\t" << "\t" << AI << "\t" << "\t" << NICG << "\t" << "\t" << NICI << "\n"; std::cout << "Event" << "\t" << "TotalE" << "\t" << "\t" << "TransE" << "\t" << "\t" << "OtherE" << "\t" << "\t" << "PlastE" << "\t" << "\t" << "UpMetE" << "\t" << "\t" << "LoMetE \n"; std::cout << i << "\t" << sumElectronsTotal << "\t" << "\t" << sumElectronsTransfer << "\t" << "\t" << sumElectronsOther << "\t" << "\t" << sumElectronsPlastic << "\t" << "\t" << sumElectronsUpperMetal << "\t" << "\t" << sumElectronsLowerMetal << "\n"; } // Close data files outfile.close(); ttime.close(); rradius.close(); rratio.close (); ddatae.close(); ddatai.close(); std::cout << " END \n"; app.Run(kTRUE);

82
8 Appendix B: Input File with Ion Mobilities
# ----------------------------------------------------------------- # Mobility of CO2+ ions in CO2 measured for T=30 K # Accuracy: 7 % # Data from Atomic Data and Nuclear Data Tables 60, 37-95 (1995) # L.A.Viehland and E.A.Mason # Electric Field in Td (E/N) (multiply by 250 for V) # The negative sign in from of the drift velocity represents opposite # direction of the velocity as the program normally consider input for # positive ions # E/N (10^17 V/cm^2) Vd (10^4 cm/sec) # ----------------------------------------------------------------- # E/N Vd 50 -1.26 60 -1.25 70 -1.25 80 -1.24 100 -1.21 120 -1.19 140 -1.16 170 -1.12 200 -1.08 250 -1.03 300 -1.00 350 -0.96 400 -0.94 500 -0.89 600 -0.85 800 -0.79 1000 -0.75 1200 -0.75
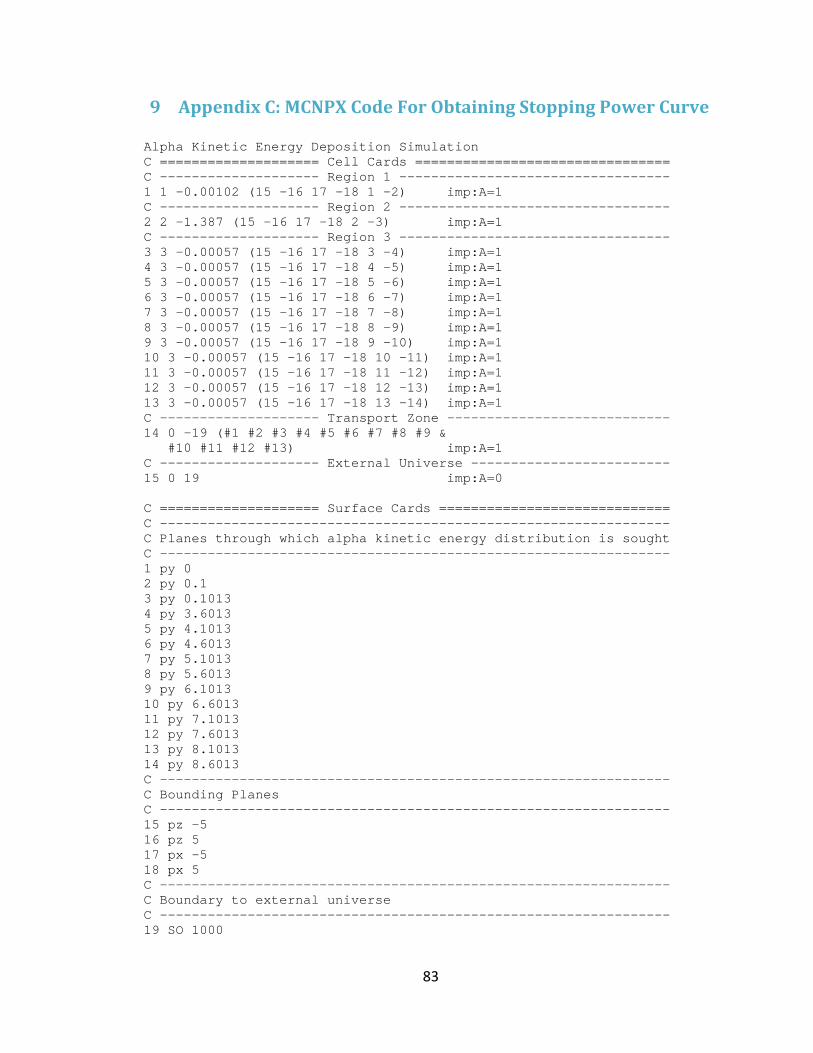
83
9 Appendix C: MCNPX Code For Obtaining Stopping Power Curve
Alpha Kinetic Energy Deposition Simulation C ==================== Cell Cards ================================ C -------------------- Region 1 ---------------------------------- 1 1 -0.00102 (15 -16 17 -18 1 -2) imp:A=1 C -------------------- Region 2 ---------------------------------- 2 2 -1.387 (15 -16 17 -18 2 -3) imp:A=1 C -------------------- Region 3 ---------------------------------- 3 3 -0.00057 (15 -16 17 -18 3 -4) imp:A=1 4 3 -0.00057 (15 -16 17 -18 4 -5) imp:A=1 5 3 -0.00057 (15 -16 17 -18 5 -6) imp:A=1 6 3 -0.00057 (15 -16 17 -18 6 -7) imp:A=1 7 3 -0.00057 (15 -16 17 -18 7 -8) imp:A=1 8 3 -0.00057 (15 -16 17 -18 8 -9) imp:A=1 9 3 -0.00057 (15 -16 17 -18 9 -10) imp:A=1 10 3 -0.00057 (15 -16 17 -18 10 -11) imp:A=1 11 3 -0.00057 (15 -16 17 -18 11 -12) imp:A=1 12 3 -0.00057 (15 -16 17 -18 12 -13) imp:A=1 13 3 -0.00057 (15 -16 17 -18 13 -14) imp:A=1 C -------------------- Transport Zone ---------------------------- 14 0 -19 (#1 #2 #3 #4 #5 #6 #7 #8 #9 & #10 #11 #12 #13) imp:A=1 C -------------------- External Universe ------------------------- 15 0 19 imp:A=0 C ==================== Surface Cards ============================= C ---------------------------------------------------------------- C Planes through which alpha kinetic energy distribution is sought C ---------------------------------------------------------------- 1 py 0 2 py 0.1 3 py 0.1013 4 py 3.6013 5 py 4.1013 6 py 4.6013 7 py 5.1013 8 py 5.6013 9 py 6.1013 10 py 6.6013 11 py 7.1013 12 py 7.6013 13 py 8.1013 14 py 8.6013 C ---------------------------------------------------------------- C Bounding Planes C ---------------------------------------------------------------- 15 pz -5 16 pz 5 17 px -5 18 px 5 C ---------------------------------------------------------------- C Boundary to external universe C ---------------------------------------------------------------- 19 SO 1000

84
C ==================== Data Cards ================================ C -------------------- MODE Card --------------------------------- MODE A C -------------------- Pencil Beam of Am-241 Alpha Source -------- SDEF POS = 0 -6 0 VEC = 0 1 0 DIR = 1 PAR = A ERG = 5.5 C -------------------- CUT Card for Alpha Particles -------------- CUT:A J 0.001 J J J $Transport Alpha particles down to 1 keV C -------------------- Material Cards ---------------------------- C Region 1 Material m1 6000 0.01 8000 23.18 7000 75.53 18000 1.28 C Region 2 Material m2 6000 45.45 8000 18.18 1000 36.36 C Region 3 Material m3 18000 80 6000 6.67 8000 13.33 C -------------------- Source Intensity Card --------------------- NPS 100000 C -------------------- PTRAC Card -------------------------------- PTRAC FILE = ASC MAX = 20000000 WRITE = ALL EVENT=SUR & TYPE = A

85
10 Appendix D: Garfield ++ Installation
10.1 Requirements
The Garfield++ requires the following software:
Scientific Linux 5.X
GCC 4.3.2 compiler
ROOT
10.1.1 Scientific Linux
The Garfield++ took kit runs on 64 bit Scientific Linux 5.X only (SL 5.6 was used in this work) and can be downloaded from the link below, while it can be installed on a separate partition. It is recommended to select the AFS open client when asked to customize the software as it installs the AFS port, which could be needed in case of a GCC 4.3.2 compiler problem. https://www.scientificlinux.org/distributions Note, the computer graphic card should be set to “Discrete Graphics” which can be done in BIOS if the X‐server (the graphical interface) does not load.
10.1.2 GCC 4.3.2 Compiler
10.1.2.1 Option 1: Install and Download
As the Garfield++ needs the GCC 4.3.2 compiler, which SL 5.6 does not have, and can be found in:
http://gcc.gnu.org/releases.html
The general installation guide for GCC compiler can be also found at:
http://www.faqs.org/docs/ldev/0130091154_71.htm
Since the installation might not replace the existing old GCC libraries, one can copy all files from the newly installed GCC lib64 (in our case /home/opt/gcc‐4.3.2/lib 64) to the /usr/lib64/.
10.1.2.2 Option 2
The second possibility is to connect to existing gcc 4.3.2 libraries via AFS, which is significantly easier than the instantiation option but can take time and can be unstable, by copy and paste the command below. This command must br applied every time after computer shutdown or placed to “bashrc” file (/etc/) and therefore is applied automatically every single system booting.

86
$ . /afs/cern.ch/sw/lcg/external/gcc/4.3.2/x86_64‐slc5/setup.sh
10.1.3 ROOT
Garfield++ is made on ROOT platform and therefore installation of ROOT is also needed. The executables can be directly downloaded from ROOT website.
http://root.cern.ch/drupal/content
The program must be set by code which can be also applied every single time or placed to “barhrc” file
$ . <directory where root folder is located>/root/bin/thisroot.sh
If program is set up correctly with the GCC 4.3.2 compiler, it should open after typing “root” anywhere in terminal
10.2 Installation
The installation procedure and manual is provided on Garfield++ website
http://garfieldpp.web.cern.ch
10.3 Running the Software
The Garfield++ code is written in C++ language, where general properties of the gas must be selected, number of run and locations of the initial (release) electrons. The electric field map is loaded from the Elmer or Ansys output files. Very clear example files for the field creation for both Elmer and Ansys can be found of the Garfield++ website. It is important to place these files within the same folder where the Garfield++ code for specific simulation is located together with any other files that the simulation should read, like mobility of ions or initial location of the releasing electrons. The example of the used Garfield++ code can be found in Appendix A together with its explanation. The simulation code must be compiled first with its makafile that can be easily downloaded from the Garfield++ website in examples and GEM simulation directory. After the C file (the file must end with .C) is converted into an executable file. It is highly recommended to obtain access to multi‐core computer system or network (such as SHARCNET) due to extremely long computation times

87
11 Appendix E: Schemas of Custom Made Parts
11.1 Collection Plate
Dimensions are in millimetres

88
11.2 Drift Plate
Dimensions are in millimetres

89
11.3 Collection Plate Switch Board
11.4 Connection Plate Switch Controller Board

90
12 References
1. Upton, A.C. Health Effects of Low‐Level Ionizing Radiation. 8, s.l. : Physics Today, 1991,
Vol. 44.
2. Frame, P. W. A History of Radiation Detectrion Instrumentation. 88(6), s.l. : Health
Physics, 2005.
3. Petersen, D. Los Alamos Radiation Detectors. 23, s.l. : Los Alamos Science, 1995.
4. Heijne, E. H.M. Semiconductor Detectors in the Low Countries. s.l. : Nuclear
Instruments and Methods in Physics Research A, 2003, Vol. 509.
5. Frass, William. Particle Detectors. Michaelmas : Oxford Physics, 2009.
6. Bouclier, Roger, et al. The Gas Electron Multiplier (GEM). s.l. : CERN, 1996.
7. F.A.F. Fraga, L.M.S. Margato, S.T.G. Fetal, M.M.F.R. Fraga, R. Ferreira Marques, A.J.P.L.
Policarpo. Luminescence and Imaging with Gas Electron Multipliers. s.l.: Nuclear
Instruments and Methods in Physics Research A, 2003, Vol. 513.
8. Bouclier, Roger, et al. New Observations with the Gas Electron Multiplier (GEM). s.l. :
CERN, 1997. CERN‐PPE‐97‐032.
9. Benlloch, J M, et al. Further Developments of the Gas Electron Multiplier (GEM). s.l. :
CERN, 1998. CERN‐EP‐98‐050.
10. Gas Electron Myltiplier. The Gas Detectors Development Group. [Online] CERN.
http://gdd.web.cern.ch/GDD/
11. Polyimide Film. Circleville : DuPont Kapton, 2012.
http://www2.dupont.com/Kapton/en_US/assets/downloads/pdf/Gen_Specs.pdf
12. Hasterok, Constanze. GEM Simulation Studies. Dresden, : DESY, 2011.
13. U. Amaldi, W. Hajdas, S. Iliescu, N. Malakhov, J. Samarati, F. Sauli, D. Watts.
Advanced Quality Assurance for CNAO. s.l. : Nuclear Instruments and Methods in Physics
Research A, 2010, Vol. 617.
14. J. Benlloch, A. Bressan, M. Capeáns, M. Gruwé+, M. Hoch, J.C. Labbé, A. Placci, L.
Ropelewski, F. Sauli. Further Developments of the Gas. Geneva, Switzerland :CERN,
1998, Vols. CERN‐EP/98‐50.

91
15. Knoll, Glenn F. Radiation Detection and Measurement . s.l. : John Wiley & Sons, Inc.,
2010.
16. Chefdeville, M.A. Development of Micromegas‐like Gaseous Detectors Using a Pixel
Readout Chip as Collecting. s.l. : DARE, 2009.
17. Jamshid Soltani‐ Nabipour, Gheorghe Cata‐Danil. Monte Carlo Computation of the
Energy Deposited by Heavy Charged Particles in Soft and Hard Tissues. 3, s.l. : U.P.B. Sci.
Bull, 2008, Vol. 70.
18. Barkas, W H. Nuclear Research Emulsions. s.l. : Academic Press, 1963.
19. J. Soltani‐Nabipour, G. Cata‐Danil. Monte Carlo Computation of the Energy
Deposited by Heavy Charged Particles in Soft and Hard Tissues. U.P.B. Sci. Bull. Series A,
2008, Vol. 70.
20. F. Nava!, P. Vanni!, C. Lanzieri, C. Canali. Epitaxial Silicon Carbide Charge Particle
Detectors. Nuclear Instruments and Methods in Physics Research A. 1999, Vol. 437.
21. O. Sahin et. Penning Transfer in Argon‐based Gas Mixtures. s.l. : Journal of
Instrumentation, 2010.
22. Blum, Walter, Riegler, Werner, Rolandi, Luigi. Particle Detection with Drift Chambers.
s.l. : Springer, 2008.
23. Charge Transport in a GEM. Garfield++. [Online] January 2011.
http://garfieldpp.web.cern.ch/garfieldpp/examples/gem/GemTransport.pdf.
24. James H. Parker, Jr. and John J. Lowke.Theory of Eletron Diffusion Parallel to Electric
Field. s.l. : Physical Review, 1969, Vol. 181.
25. Dinner, R. Electron Attachment in Gasious Detectors. Bachelor thesis (MIT). 2000.
26. I. Cedaz, R.I. Hall, M. Laudau,F Pichou. Electron Attachment to Molecules and Tts
Use for Molecular Spectroscopy. Acta Chim. Slov. 2004, Vol. 51, pp. 11‐21.
27. Bondar, A. High‐ and Low‐pressure Operation of the Gas Electron Multiplier. s.l. :
Nuclear Instruments and Methods in Physics Research Section , Vol. 419.
28. Ö Şahina, İ Tapana, E N Özmutlua and R Veenhofb.Penning Transfer in Argon‐based
Gas Mixtures. s.l. : Journal of Instrumentation, 2010, Vol. 5.

92
29. H. W. Ellis, R. Y. Pa and E. W. McDaniel.Transport Properties of Gaseous Ions over a
Wide Energy Range. s.l. : Atomic Data and Nuclear Data Table, 1976, Vol. 17.
30. C. D. Cooper, R. N. Compton. Electron Attachment to Cyclic Anhydrides and Related
Compounds . J. Chem. Phys. 1973, Vol. 59, 7.
31. Bawdekar, Vaman. Carbon Dioxide Quench Action in a Beryllium Proportional
Counter. IEEE Transactions on Nuclear Science. 1975, Vol. 22, 1.
32. Loeb, L. B. Basic Processes of Gaseous Electronics. Berkeley, CA : University of
California Press, 1961.
33. Ostling, Janina. New Efficient Detector for Radiation Therapy. Imaging using Gas
Electron Multiplier. s.l. : Department of Medical Radiation Physics. Karolinska Institutet
& Stockholm University, 2006.
34. P. Colas, A. Delbart, J. Derre, I. Giomataris, F. Jeanneau, V. Lepeltier. Electron Drift
Velocity Measurements at High Electric Felds. s.l. : Nuclear Instruments and Methods in
Physics Research A, 2002, Vol. 478.
35. M. Killenberg. Lotze, A. Munnich, S. Roth, M. Weber. Development of a GEM‐based
High Resolution TPC for the Internation Linear Collider. Hamburg, : DESY, 2005.
36. Witold Matysiak, A. Hanu, A. J. Waker. Multi‐element Tissue Equivalent Proportional
Counter (METEPC) for Dosimetry in Particle Therapy, s.l. : University of Florida Proton
Therapy Institute, McMaster University, UOIT.
37. Cortes‐Giraldo, Miguel A GEANT4 Microdosimetry Study of Ionising Radiation Effects
in Digital ASIC’s.. s.l. : NUCLEAR SCIENCE and TECHNOLOGY, 2011, Vol. 2.