development tutorial with free-form ile rpg development tutorial with free... · smartpad4i ©...
TRANSCRIPT
SmartPad4i © SystemObjects 2015 – Release version 2.1 Page: 1/55
Development Tutorial With Free-Form ILE RPG

SmartPad4i © SystemObjects 2015 – Release version 2.1 Page: 2/55
This tutorial is provided to create quickly and simply your first applications with SmartPad4i (SP4i). The language used in this document is Free-Form ILE RPG. If you prefer Fixed-Form ILE RPG, please read “SP4I Development tutorial.pdf” in “c:\systemobjects\smartpad4i\Docs” directory. In this tutorial, we use an Apache Tomcat server. This means the “Document-root” of the server should be C:\Program Files\Apache Software Foundation\Tomcat 7.0\webapps. If you are running an IBM HTTP Server or IBM IWAS (Integrated Web Application Server), then you should replace the above path with the own one of your server.
The document-root directory of IBM HTTP Server is set in the “httpd.conf” file of the product. It should be “C:\Program Files\ IBM\ HTTPServer\ htdocs” or “C:\Program Files\ IBM\ HTTPServer\ htdocs\[language dir]” directory.
The document root directory of IBM IWAS (Integrated Web Application), IFS /root seen as Y drive in Windows Explorer, is Y:\www\sp4i\lwi\apps\eclipse\plugins.
We will use the database file COUNTRY in SP4I library. We will do three programs:
display the COUNTRY records,
add a new country entry,
modify a record. Before to begin, please make sure that two sub-systems CO406JTCP and SP4I are running on IBM i: Work with Active Jobs SYSOBJ
11/10/15 14:37:16
CPU %: .8 Elapsed time: 03:14:16 Active jobs: 209
Current
Opt Subsystem/Job User Type CPU % Function Status
CO406JTCP QSYS SBS .0 DEQW
CO406JSVR QSECOFR ASJ .0 PGM-SERVSOCKET TIMW
…
SP4I QSYS SBS .0 DEQW
SP4IMSGW QUSER ASJ .0 PGM-SP4IMSGW MSGW
More...
===>
F21=Display instructions/keys
The sub-system CO406JTCP is started with the command:

SmartPad4i © SystemObjects 2015 – Release version 2.1 Page: 3/55
STRSBS CO406J/CO406JTCP In this subs-system, the job CO406JSVR is the sever program that listens on port 19004. This program must be running. The sub-system SP4I is started with the command:
STRSBS SP4I/SP4I In this sub-system, the job SP4IMSGW waits for any SmartPad4i eventual error message occurred in *SYSOPR message-queue in order to prevent the user.

SmartPad4i © SystemObjects 2015 – Release version 2.1 Page: 4/55
How to create an application
The general process to create an application is the following:
Create your HTML document with all your presentation and fields,
Publish this page to your web server, in the C:\Program Files\Apache Software Foundation\Tomcat 7.0\webapps\smartpad4i\html\TUTORIAL directory. The C:\Program Files\Apache Software Foundation\Tomcat 7.0\webapps\smartpad4i\html\ directory exists already. Create sub-directory TUTORIAL. TUTORIAL must be uppercase.
On the IBM i, create library TUTORIAL,
Use SmartPad4i Designer and describe your active components,
From SmartPad4i Designer, deploy the application to the IBM i. This action will create IBM i objects like I/O external data structures and program skeleton,
From SmartPad4i Designer, deploy the application to your web server,
Use PDM in your IBM i to add the logic program inside the SmartPad4i generated program,
Compile your program,
Run your application.

SmartPad4i © SystemObjects 2015 – Release version 2.1 Page: 5/55
Create”Display the COUNTRY records” application
If you run DSPFFD SP4I/COUNTRY, you will see the file description as follows:
Record format . . . . . . . . . . . . . . . : COUNTRY
Format level identifier . . . . . . . . . . : 381CBE4ECAF4B
Number of fields . . . . . . . . . . . . . : 4
Record length . . . . . . . . . . . . . . . : 74
Field Level Information
Data Field Buffer Buffer Field Column
Field Type Length Length Position Usage Heading
C_NAME CHAR 40 40 1 Both C_NAME
C_CON00001 CHAR 20 20 41 Both C_CONTINENT
C_DATE DATE 10 10 61 Both C_DATE
LANGID CHAR 4 4 71 Both LANGID
We create then a HTML file that we name country.html and we place this file in the
C:\Program Files\Apache Software Foundation\Tomcat 7.0\webapps\smartpad4i \html\TUTORIAL directory.
This country.html file can contain all features such as company logo, background image, background color, images, CSS. These features will not be used by the IBM i program.
What we need in this file is a table of five columns to display database file records:
a check box to select the record to modify,
a column for C_NAME,
a column for C_CON00001,
a column for C_DATE,
a column for LANGID.
And
a button for adding new record entry,
a button for modifying selected record,
a button for application exit.
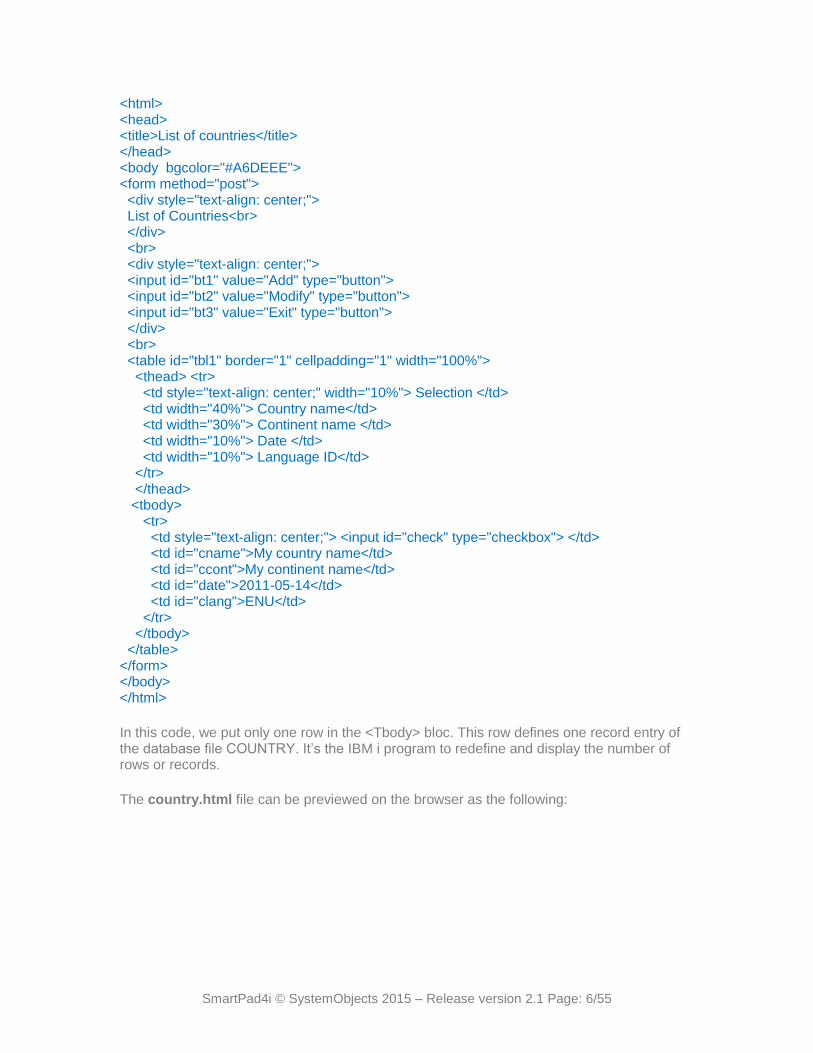
So we create the file as the following code:
SmartPad4i © SystemObjects 2015 – Release version 2.1 Page: 6/55
<html> <head> <title>List of countries</title> </head> <body bgcolor="#A6DEEE"> <form method="post"> <div style="text-align: center;"> List of Countries<br> </div> <br> <div style="text-align: center;"> <input id="bt1" value="Add" type="button"> <input id="bt2" value="Modify" type="button"> <input id="bt3" value="Exit" type="button"> </div> <br> <table id="tbl1" border="1" cellpadding="1" width="100%"> <thead> <tr> <td style="text-align: center;" width="10%"> Selection </td> <td width="40%"> Country name</td> <td width="30%"> Continent name </td> <td width="10%"> Date </td> <td width="10%"> Language ID</td> </tr> </thead> <tbody> <tr> <td style="text-align: center;"> <input id="check" type="checkbox"> </td> <td id="cname">My country name</td> <td id="ccont">My continent name</td> <td id="date">2011-05-14</td> <td id="clang">ENU</td> </tr> </tbody> </table> </form> </body> </html>
In this code, we put only one row in the <Tbody> bloc. This row defines one record entry of the database file COUNTRY. It’s the IBM i program to redefine and display the number of rows or records.
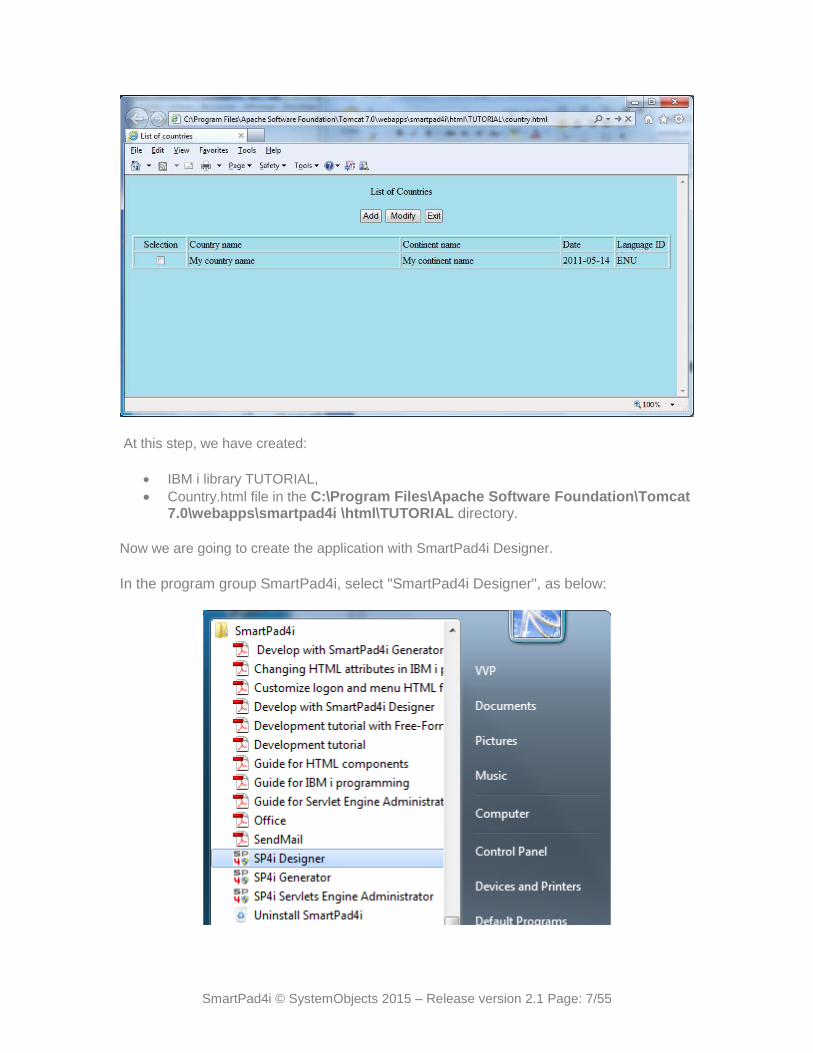
The country.html file can be previewed on the browser as the following:
SmartPad4i © SystemObjects 2015 – Release version 2.1 Page: 7/55
At this step, we have created:
IBM i library TUTORIAL,
Country.html file in the C:\Program Files\Apache Software Foundation\Tomcat 7.0\webapps\smartpad4i \html\TUTORIAL directory.
Now we are going to create the application with SmartPad4i Designer.
In the program group SmartPad4i, select "SmartPad4i Designer", as below:

SmartPad4i © SystemObjects 2015 – Release version 2.1 Page: 8/55
SmartPad4i Designer will open as the following:
On the menu bar select "File" and "New Project" like in the screen below:
In the window as below, select the directory where you want to save your project and type the name of your project, for example “tutorial”, in the same directory of the country.html file (C:\Program Files\Apache Software Foundation\Tomcat
7.0\webapps\smartpad4i\html\TUTORIAL):

SmartPad4i © SystemObjects 2015 – Release version 2.1 Page: 9/55
Click on the "Open" button. the following screen will shown so you can set the IBM i IP address and its CCSID code.

SmartPad4i © SystemObjects 2015 – Release version 2.1 Page: 10/55
(You can obtain the above screen with Menu bar/options/IBM i)
IP Address: Type IP address of the IBM i, example 192.168.4.8
Port Number: 19004. This value is also set in the data-area TCPPORTSRV in the CO406J library.
Timeout: In milliseconds, time to connect to IBM i, Default value is 30000 milliseconds.
CCSID: CCSID of your IBM i.
Charset for DBCS: this information concerns Japanese language. Example x-sjis.
Click on the button "Check Connection» to be sure that the input values are correct.
You should be prompted to the “Sign on” screen to connect to your IBM i:
Type your User ID, your password and click on OK button.
If the connection to your IBM i is successful, you will receive the message "Connection Test Successful" on the screen. See the screen below:

SmartPad4i © SystemObjects 2015 – Release version 2.1 Page: 11/55
Click on “Select” button, you should be prompted again to the “Sign on” screen to connect to your IBM i:
Type your User ID, your password and click on OK button You return to SmartPad4i Designer main screen.
On the menu bar select "Options" and "Select Html File Pathname". You will get a screen like the screen below:

SmartPad4i © SystemObjects 2015 – Release version 2.1 Page: 12/55
Select C:\Program Files\Apache Software Foundation\Tomcat 7.0\webapps\ smartpad4i\ html\TUTORIAL directory, as shown in the following screen:
Click on Choose. You come back to the SmartPad4i as follows:

SmartPad4i © SystemObjects 2015 – Release version 2.1 Page: 13/55
On the menu bar select "Options" and "Select WebServer deployment Root".
Select “C:\Program Files\Apache Software Foundation\Tomcat 7.0\webapps”, as below:
Click on “Choose” button. You come back to the Smarpad4i Designer main screen:

SmartPad4i © SystemObjects 2015 – Release version 2.1 Page: 14/55
Now click on the button of the toolbar. You will get the following screen:
Open country.html file. You will come back to the SmarPad4i Designer main menu as follows:

SmartPad4i © SystemObjects 2015 – Release version 2.1 Page: 15/55
Enter:
IBM i Name IBM i Length Action Usage
BT1 AD
BT2 UP
BT3 F3
CHECK Input
CNAME 40
CCONT 20
DATE 10
CLANG 4
The result on the screen should be the following:

SmartPad4i © SystemObjects 2015 – Release version 2.1 Page: 16/55
Click on the button to save the project
On the menu bar select "Deployment" and "Deploy Project to the IBM i", as shown on the following screen:
You will get a screen like the screen below:

SmartPad4i © SystemObjects 2015 – Release version 2.1 Page: 17/55
Type “country” in the “IBM i program Name” and press Enter. The word “country” becomes “COUNTRY”. Check ILE RPG, check Free Format and click on Deploy button. The SmartPad4i Designer generates source code in the TUTORIAL library and after all shows the following report:

SmartPad4i © SystemObjects 2015 – Release version 2.1 Page: 18/55
Click OK button.
On the menu bar select "Deployment" and "Deploy Project to WebServer”, the SmartPad4i Designer generates result to the Apache Tomcat Server and shows the following report:
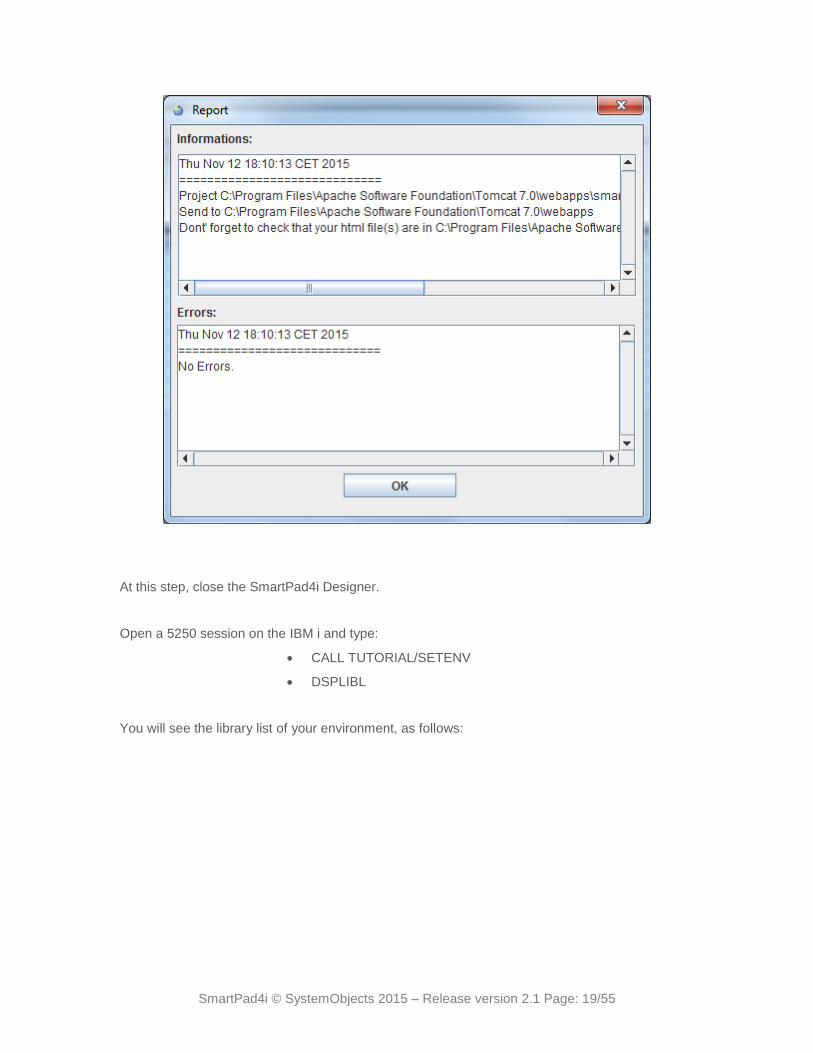
SmartPad4i © SystemObjects 2015 – Release version 2.1 Page: 19/55
At this step, close the SmartPad4i Designer.
Open a 5250 session on the IBM i and type:
CALL TUTORIAL/SETENV
DSPLIBL
You will see the library list of your environment, as follows:

SmartPad4i © SystemObjects 2015 – Release version 2.1 Page: 20/55
Type STRPDM and select option 3. Work with members.

SmartPad4i © SystemObjects 2015 – Release version 2.1 Page: 21/55
Line 14 contains F010 // <YOURCODE>. Insert one line after line 15 and define database file COUNTRY as the following:

SmartPad4i © SystemObjects 2015 – Release version 2.1 Page: 22/55
Line 28 contains ---> // YOUR D SPECIFICATIONS (2). Add after line 28 the following code to define some working fields: dcl-s count packed(4:0); dcl-s myindice packed(4:0); Line 455 contains C510B // <YOURCODE>. Modify line 457 from “---> SPL102 = 0;” to “---> SPL102 = 1;” Insert after line 457 the following code: *in50=*off; count=0; dow *in50 = *off; read fcountry; if %eof(); *in50 = *on; leave; endif; count = count + 1; %occur(soof02) = count; ocname = c_name; occont = c_con00001; odate = c_date; oclang = langid; enddo;

SmartPad4i © SystemObjects 2015 – Release version 2.1 Page: 23/55
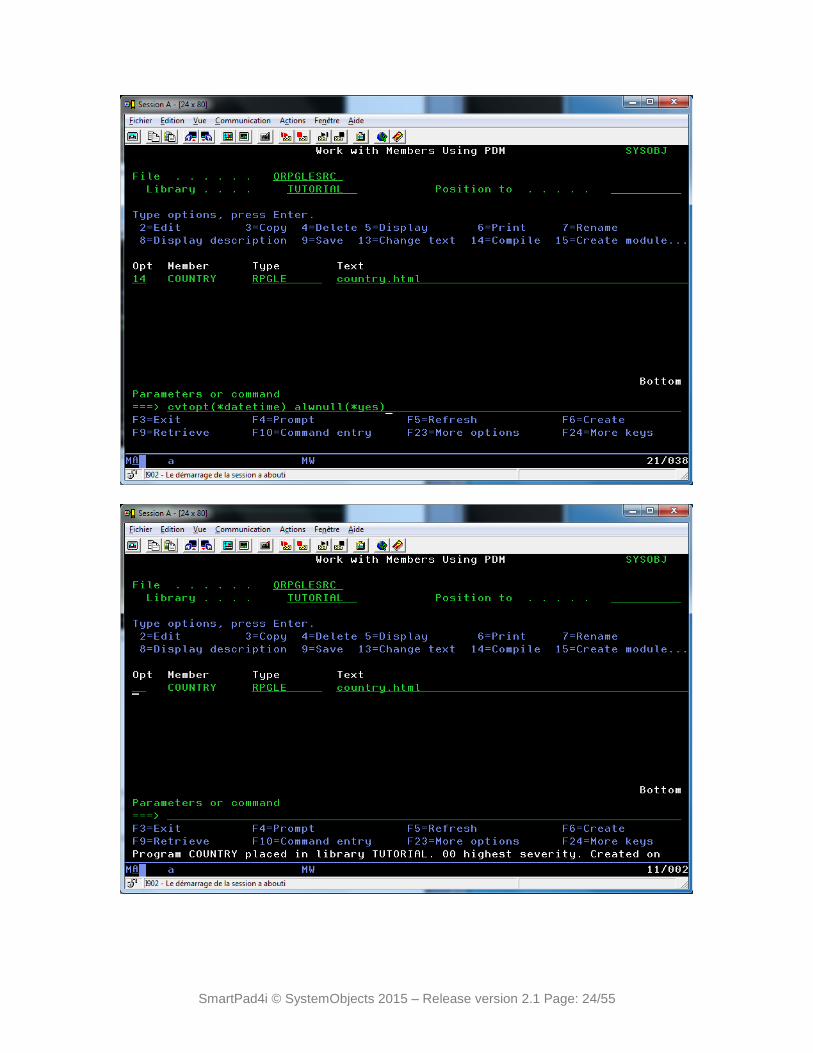
Modify line 458 from “---> SPL902 = 0;” to “---> SPL102 = count;” The screen should look like the following:
In this code, we read and display all the existing records in the database file COUNTRY. The variable SPL102 indicates the first record in the data-structure SOOF02 and SPL902 indicates the last record to show. Because in our code we intend to show all the records, so we set the value SPL902 to the value of COUNT. We can also decide to do a loop for only 20 times to display 20 records and then to prepare two buttons on the screen for page-up and page-down and we need to manage the pagination in the code by changing SPL102 and SPL902 fields. Press F3 and save the member (with Resequence member=N in order to conserve line numbers of the source code. We will continue below to locate our source code with original line numbers). Create the program in the library Tutorial, with options CVTOPT(*DATETIME) and ALWNULL(*YES), as follows:
SmartPad4i © SystemObjects 2015 – Release version 2.1 Page: 24/55
SmartPad4i © SystemObjects 2015 – Release version 2.1 Page: 25/55
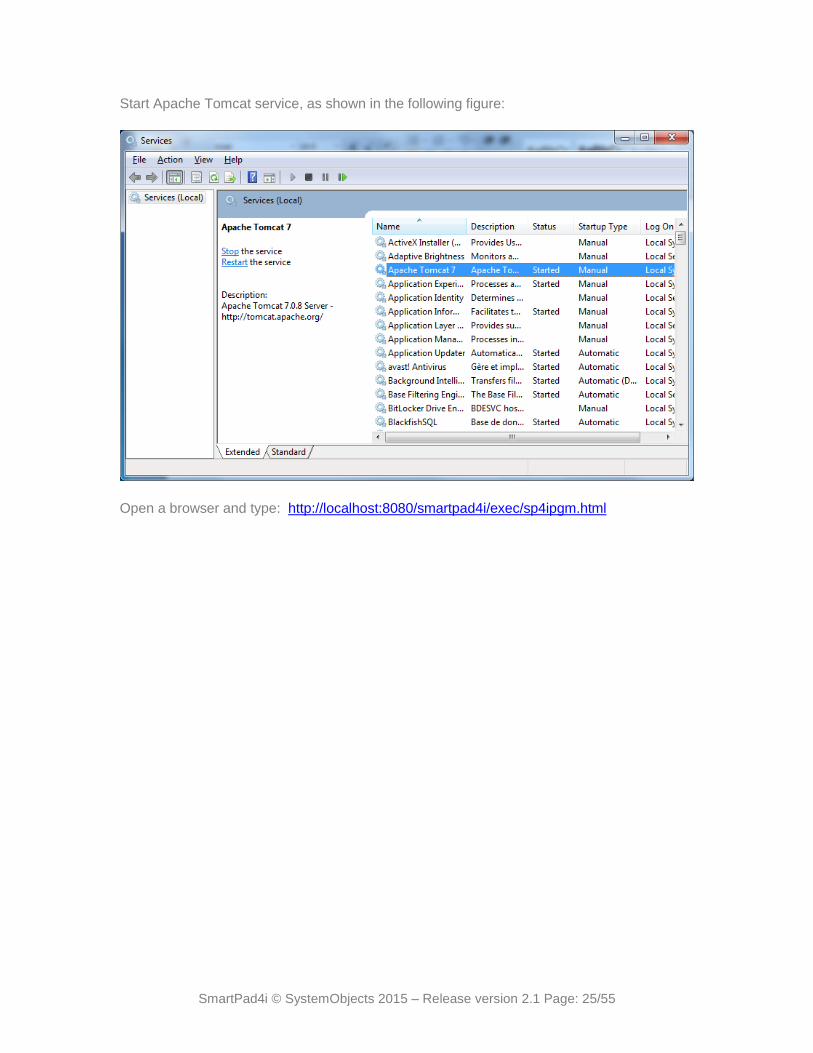
Start Apache Tomcat service, as shown in the following figure:
Open a browser and type: http://localhost:8080/smartpad4i/exec/sp4ipgm.html

SmartPad4i © SystemObjects 2015 – Release version 2.1 Page: 26/55
Enter :
your IBM i user profile,
your password,
program to Start: COUNTRY,
environment Library: TUTORIAL.
As shown in the following figure:

SmartPad4i © SystemObjects 2015 – Release version 2.1 Page: 27/55
Press Enter, you will get the result as the following:

SmartPad4i © SystemObjects 2015 – Release version 2.1 Page: 28/55
At this step, we have not yet work with three buttons Add, Modify and Exit.
In the SmartPad4i Designer, we have defined an action code for each of these buttons:
AD for Add,
UP for Modify,
F3 for Exit.
We need to implement in the RPG code to say what the program must do when it receives these action codes.
We can decide to say when the action code is AD or UP, the COUNTRY program will call a program that we name UPDCTRY with parameters:
Code action,
Country name,
Continent name,
Date,
Lang ID
result

SmartPad4i © SystemObjects 2015 – Release version 2.1 Page: 29/55
So we return to PDM and modify the COUNTRY member.
Line 123 contains “D030 // <YOURCODE>”. Insert after this line the following code to declare program UPDCTRY and its parameters:
DCL-PR UPDCTRY EXTPGM('UPDCTRY'); action char(2); wcname char(40); wcont char(20); wdate char(10); wlang char(4); result char(2); END-PR; dcl-s action char(2); dcl-s wcname char(40); dcl-s wcont char(20); dcl-s wdate char(10); dcl-s wlang char(4); dcl-s result char(2);
Like the following:
SmartPad4i © SystemObjects 2015 – Release version 2.1 Page: 30/55
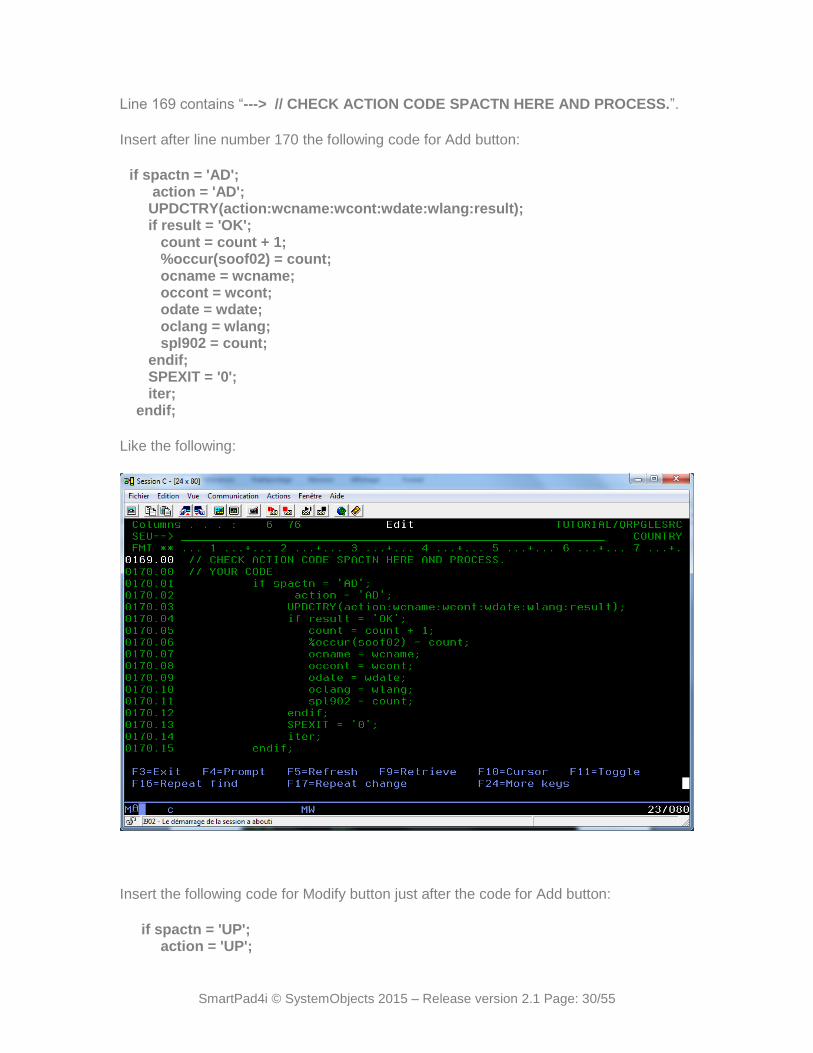
Line 169 contains “---> // CHECK ACTION CODE SPACTN HERE AND PROCESS.”.
Insert after line number 170 the following code for Add button:
if spactn = 'AD'; action = 'AD'; UPDCTRY(action:wcname:wcont:wdate:wlang:result); if result = 'OK'; count = count + 1; %occur(soof02) = count; ocname = wcname; occont = wcont; odate = wdate; oclang = wlang; spl902 = count; endif; SPEXIT = '0'; iter; endif;
Like the following:
Insert the following code for Modify button just after the code for Add button:
if spactn = 'UP'; action = 'UP';

SmartPad4i © SystemObjects 2015 – Release version 2.1 Page: 31/55
for myindice=1 to count; %occur(soif02) = myindice; if icheck = '1'; %occur(soof02) = myindice; wcname = ocname; wcont = occont; wdate = odate; wlang = oclang; leave; endif; endfor; UPDCTRY(action:wcname:wcont:wdate:wlang:result); if result = 'OK'; ocheck = '0'; ocname = wcname; occont = wcont; odate = wdate; oclang = wlang; spl902 = count; endif; SPEXIT = '0'; iter; endif;
Like the following:

SmartPad4i © SystemObjects 2015 – Release version 2.1 Page: 32/55
In the above code, line “ocheck = '0';’ is intended to clear the check button on the selected country for modification.
Insert the following code for Exit button just after the code for Modify button:
if spactn = 'F3'; leave; endif;
Press F3 and save the member. Create again the program in the library Tutorial, with options CVTOPT(*DATETIME) and ALWNULL(*YES).
Now to continue, we have to develop the program UPDCTRY.

SmartPad4i © SystemObjects 2015 – Release version 2.1 Page: 33/55
Create UPDCTRY application
First, we need to create updctry.html file in the C:\Program Files\Apache Software Foundation\Tomcat 7.0\webapps\smartpad4i \html\TUTORIAL directory. The code is the following:
<html> <head> <title>Manage Country Record</title> </head> <body bgcolor="#A6DEEE"> <form method="post"> <div style="text-align: center;"> <span id="Title">Add/Update Country Record </span><br> </div> <br> <div style="text-align: center;"> <input id="bt1" value="OK" type="button"> <input id="bt2" value="Cancel" type="button"> </div> <br> <table border="1" cellpadding="1" width="100%"> <tbody> <tr> <td>Country name</td> <td><input id="cname" value="" type="text" size=40 maxlength=40> </td> </tr> <tr> <td>Continent name</td> <td><input id="ccont" value="" type="text" size=20 maxlength=20> </td> </tr> <tr> <td>Date</td> <td><input id="date" value="" type="text" size=10 maxlength=10> </td> </tr> <tr> <td>Lang ID</td> <td><input id="clang" value="" type="text" size=4 maxlength=4> </td> </tr> </tbody> </table> </form> </body> </html>
That gives a presentation on the browser as below:

SmartPad4i © SystemObjects 2015 – Release version 2.1 Page: 34/55
Now we are going to create the application UPDCTRY with SmartPad4i Designer.
In the program group SmartPad4i, select "SmartPad4i Designer", as below:

SmartPad4i © SystemObjects 2015 – Release version 2.1 Page: 35/55
SmartPad4i Designer will open as the following:
On the menu bar select "File" and "Open Project" like in the screen below:

SmartPad4i © SystemObjects 2015 – Release version 2.1 Page: 36/55
Select and open tutorial.jdp project. You need to sign in with your user profile and password:

SmartPad4i © SystemObjects 2015 – Release version 2.1 Page: 37/55
Now click on the button of the toolbar. You will get the following screen:
Open updctry.html file. You will come back to the SmarPad4i Designer main menu as follows:

SmartPad4i © SystemObjects 2015 – Release version 2.1 Page: 38/55
Here we can see that the fields CNAME, CCONT, DATE and CLANG have already a length, they are respectively 40, 20, 10 and 4. We have these lengths because in the updctry.html file, the Maxlength parameters are defined. We need now define the length for TITLE field and action codes for BT1 and BT2 button. Enter:
IBM i Name IBM i Length Action Usage
TITLE 30 Output
BT1 OK Input
BT2 12 Input
CNAME 40 Both
CCONT 20 Both
DATE 10 Both
CLANG 4 Both
The result on the screen should be the following:

SmartPad4i © SystemObjects 2015 – Release version 2.1 Page: 39/55
Click on the button to save the project
Be sure that the updctry.html file is selected. On the menu bar select "Deployment" and "Deploy File to the IBM i", as shown on the following screen:
You will get a screen like the screen below:

SmartPad4i © SystemObjects 2015 – Release version 2.1 Page: 40/55
Reply Yes. You get the following screen:
Type “updctry” in the “IBM i program Name” and press Enter. The word “updctry” becomes “UPDCTRY”. Check ILE RPG and click on Deploy button. The SmartPad4i Designer generates source code in the TUTORIAL library and after all shows the following report:

SmartPad4i © SystemObjects 2015 – Release version 2.1 Page: 41/55
Click OK button.
On the menu bar select "Deployment" and "Deploy Project to WebServer”, the SmartPad4i Designer generates result to the Apache Tomcat Server and shows the following report:
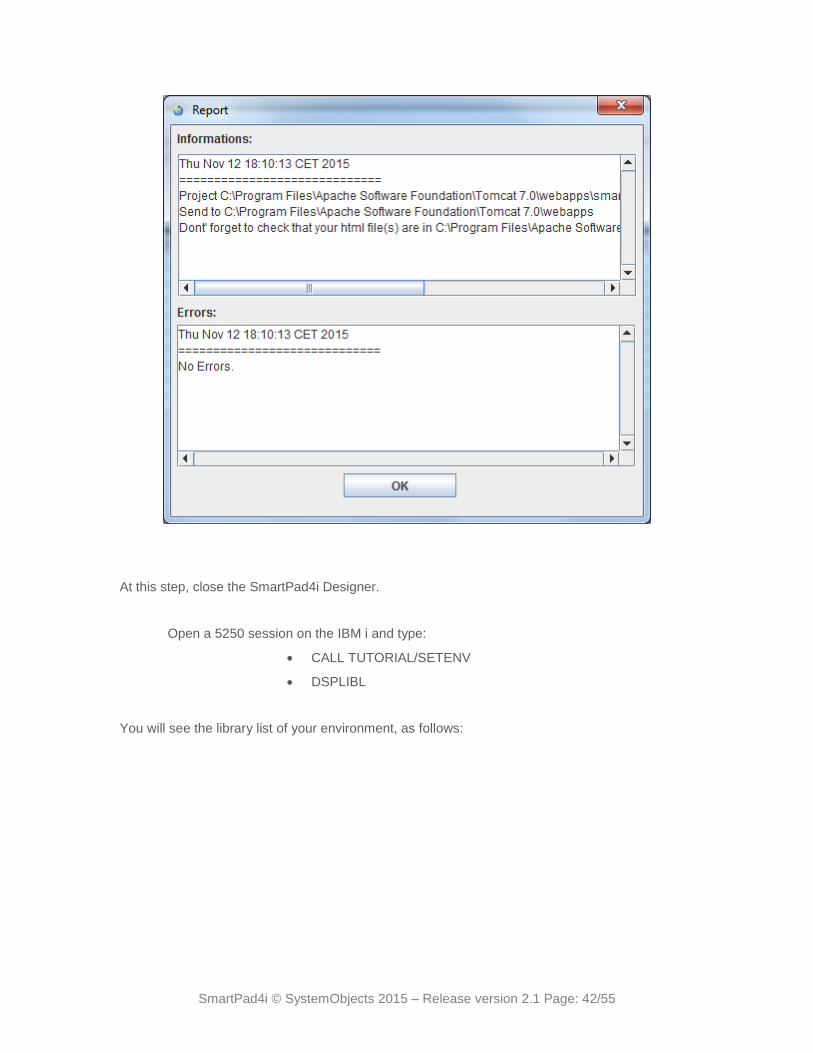
SmartPad4i © SystemObjects 2015 – Release version 2.1 Page: 42/55
At this step, close the SmartPad4i Designer.
Open a 5250 session on the IBM i and type:
CALL TUTORIAL/SETENV
DSPLIBL
You will see the library list of your environment, as follows:

SmartPad4i © SystemObjects 2015 – Release version 2.1 Page: 43/55
Type STRPDM and select option 3. Work with members.

SmartPad4i © SystemObjects 2015 – Release version 2.1 Page: 44/55
Change Type=RPGLE to SQLRPGLE for UPDCTRY member, as follows:

SmartPad4i © SystemObjects 2015 – Release version 2.1 Page: 45/55
(NB. Using SQL is not mandatory for SmartPad4i) Edit UPDCTRY member.
Line 120 contains “D030 // <YOURCODE>” Insert after line 120 the following code to define parameters:
DCL-PR UPDCTRY EXTPGM('UPDCTRY'); action char(2); wcname char(40); wcont char(20); wdate char(10); wlang char(4); result char(2); END-PR; DCL-PI UPDCTRY; action char(2); wcname char(40); wcont char(20); wdate char(10); wlang char(4); result char(2); END-PI;
Like the following screen:

SmartPad4i © SystemObjects 2015 – Release version 2.1 Page: 46/55
Insert at line 359, in the YRINIT sub-routine, the following code to initialize fields before showing the screen:
if action = 'AD'; otitle = 'Add a new country'; clear ocname ; clear occont ; clear odate ; clear oclang ; endif; if action = 'UP'; otitle = 'Modify country record'; ocname = wcname; occont = wcont; odate = wdate; oclang = wlang; endif; Like in the following screen:

SmartPad4i © SystemObjects 2015 – Release version 2.1 Page: 47/55
In the SmartPad4i Designer, we have defined an action code for each of these buttons:
OK for OK button,
12 for Cancel button.
We need to implement in the RPG program code to say what the program must do when it receives these action codes.
Line 166 contains “---> // CHECK ACTION CODE SPACTN HERE AND PROCESS.”
Insert after line number 167 the following code for OK and Cancel buttons:
if spactn = 'OK'; if action = 'AD'; exsr addrecord; endif; if action = 'UP'; exsr updrecord; endif; result = 'OK'; wcname = icname; wcont = iccont; wdate = idate; wlang = iclang;

SmartPad4i © SystemObjects 2015 – Release version 2.1 Page: 48/55
endif; if spactn = '12'; result = '12'; endif
As the following:
We need to create now two sub-routines:
addrecord to insert a country,
updrecord to modify a record entry.
Insert the following sub-routines before the last line of the member. The code to insert is the following:
// ---------------------------------------------------------- // Insert record //----------------------------------------------------------- BEGSR addrecord; EXEC SQL INSERT INTO COUNTRY (C_NAME, C_CONTINENT, C_DATE, LANGID) VALUES (:ICNAME, :ICCONT, :IDATE, :ICLANG) ; ENDSR; // ---------------------------------------------------------- // Update record // ---------------------------------------------------------- BEGSR updrecord;

SmartPad4i © SystemObjects 2015 – Release version 2.1 Page: 49/55
EXEC SQL UPDATE COUNTRY SET C_NAME=:ICNAME, C_CONTINENT=:ICCONT, C_DATE=:IDATE, LANGID=:ICLANG WHERE C_NAME=:WCNAME ; ENDSR;
Like the following:
Press F3 and save the member. Create the program in the library TUTORIAL, with options COMMIT(*NONE) as shown in the following screen:
(NB. COMMIT(*NONE) because this database file is not journaled.)

SmartPad4i © SystemObjects 2015 – Release version 2.1 Page: 50/55
Start Apache Tomcat service, as shown in the following figure:

SmartPad4i © SystemObjects 2015 – Release version 2.1 Page: 51/55
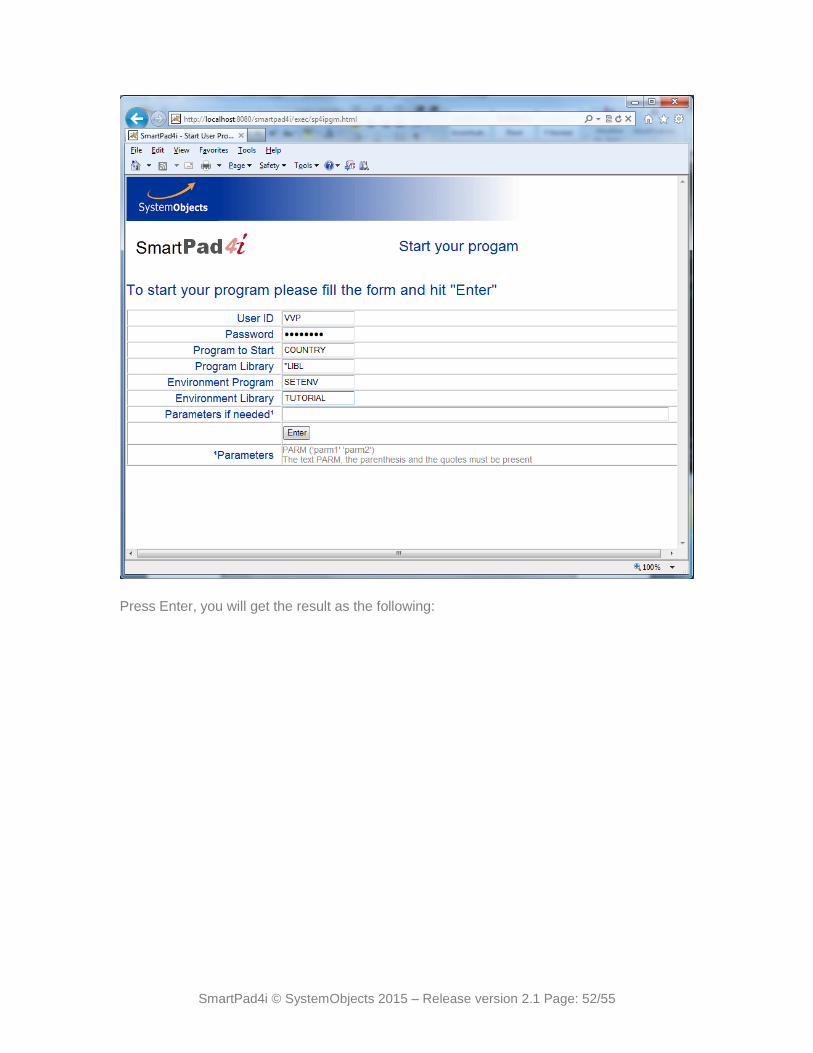
Open a browser and type: http://localhost:8080/smartpad4i/exec/sp4ipgm.html
Enter :
your IBM i user profile,
your password,
program to Start: COUNTRY,
environment Library: TUTORIAL.
As shown in the following figure:
SmartPad4i © SystemObjects 2015 – Release version 2.1 Page: 52/55
Press Enter, you will get the result as the following:

SmartPad4i © SystemObjects 2015 – Release version 2.1 Page: 53/55
Click on Add button:

SmartPad4i © SystemObjects 2015 – Release version 2.1 Page: 54/55
Enter:
Country name = My country 1
Continent name = Europe
Date = 2011-05-19
Lang ID = FRF Click on OK button, the new record is added in the bottom of the List of countries:
Check SINGAPORE and click Modify button.

SmartPad4i © SystemObjects 2015 – Release version 2.1 Page: 55/55
Modify Date=2011-05-19 and click on OK.
Click on Exit button:
End of tutorial.