device utility 2 software - pelco...c2984m (5/11) 3 description the device utility 2 software...
TRANSCRIPT

I N S T A L L A T I O N / O P E R A T I O N
C2984M (5/11)
For Pelco IP Devices
Device Utility 2 Software

2 C2984M (5/11)
ContentsDescription. . . . . . . . . . . . . . . . . . . . . . . . . . . . . . . . . . . . . . . . . . . . . . . . . . . . . . . . . . . . . . . . . . . . . . . . . . . . . . . . . . . . . . . . . . . . . . . . . . . . . . . . . . . 3
System Requirements . . . . . . . . . . . . . . . . . . . . . . . . . . . . . . . . . . . . . . . . . . . . . . . . . . . . . . . . . . . . . . . . . . . . . . . . . . . . . . . . . . . . . . . . . . . . . . . . . . 3
Installation . . . . . . . . . . . . . . . . . . . . . . . . . . . . . . . . . . . . . . . . . . . . . . . . . . . . . . . . . . . . . . . . . . . . . . . . . . . . . . . . . . . . . . . . . . . . . . . . . . . . . . . . . . . 4
Operation . . . . . . . . . . . . . . . . . . . . . . . . . . . . . . . . . . . . . . . . . . . . . . . . . . . . . . . . . . . . . . . . . . . . . . . . . . . . . . . . . . . . . . . . . . . . . . . . . . . . . . . . . . . . 5Logging On . . . . . . . . . . . . . . . . . . . . . . . . . . . . . . . . . . . . . . . . . . . . . . . . . . . . . . . . . . . . . . . . . . . . . . . . . . . . . . . . . . . . . . . . . . . . . . . . . . . . . . 5Creating a Project . . . . . . . . . . . . . . . . . . . . . . . . . . . . . . . . . . . . . . . . . . . . . . . . . . . . . . . . . . . . . . . . . . . . . . . . . . . . . . . . . . . . . . . . . . . . . . . . . 5Logging Off . . . . . . . . . . . . . . . . . . . . . . . . . . . . . . . . . . . . . . . . . . . . . . . . . . . . . . . . . . . . . . . . . . . . . . . . . . . . . . . . . . . . . . . . . . . . . . . . . . . . . . 5Using Help. . . . . . . . . . . . . . . . . . . . . . . . . . . . . . . . . . . . . . . . . . . . . . . . . . . . . . . . . . . . . . . . . . . . . . . . . . . . . . . . . . . . . . . . . . . . . . . . . . . . . . . 5Locating Information About DU2 . . . . . . . . . . . . . . . . . . . . . . . . . . . . . . . . . . . . . . . . . . . . . . . . . . . . . . . . . . . . . . . . . . . . . . . . . . . . . . . . . . . . . 5
Manage Devices Tab . . . . . . . . . . . . . . . . . . . . . . . . . . . . . . . . . . . . . . . . . . . . . . . . . . . . . . . . . . . . . . . . . . . . . . . . . . . . . . . . . . . . . . . . . . . . . . . . . . . 6Device Finding Controls . . . . . . . . . . . . . . . . . . . . . . . . . . . . . . . . . . . . . . . . . . . . . . . . . . . . . . . . . . . . . . . . . . . . . . . . . . . . . . . . . . . . . . . . . . . . 7
Creating a New Device Group . . . . . . . . . . . . . . . . . . . . . . . . . . . . . . . . . . . . . . . . . . . . . . . . . . . . . . . . . . . . . . . . . . . . . . . . . . . . . . . . . . . 7Adding a New Device . . . . . . . . . . . . . . . . . . . . . . . . . . . . . . . . . . . . . . . . . . . . . . . . . . . . . . . . . . . . . . . . . . . . . . . . . . . . . . . . . . . . . . . . . 7Using Advanced Search. . . . . . . . . . . . . . . . . . . . . . . . . . . . . . . . . . . . . . . . . . . . . . . . . . . . . . . . . . . . . . . . . . . . . . . . . . . . . . . . . . . . . . . . 8
Device Grid . . . . . . . . . . . . . . . . . . . . . . . . . . . . . . . . . . . . . . . . . . . . . . . . . . . . . . . . . . . . . . . . . . . . . . . . . . . . . . . . . . . . . . . . . . . . . . . . . . . . . . 8Using Keyboard and Mouse Shortcuts . . . . . . . . . . . . . . . . . . . . . . . . . . . . . . . . . . . . . . . . . . . . . . . . . . . . . . . . . . . . . . . . . . . . . . . . . . . . 9
Device Settings Panel. . . . . . . . . . . . . . . . . . . . . . . . . . . . . . . . . . . . . . . . . . . . . . . . . . . . . . . . . . . . . . . . . . . . . . . . . . . . . . . . . . . . . . . . . . . . . 10Applying Scripts. . . . . . . . . . . . . . . . . . . . . . . . . . . . . . . . . . . . . . . . . . . . . . . . . . . . . . . . . . . . . . . . . . . . . . . . . . . . . . . . . . . . . . . . . . . . . 11Updating Firmware . . . . . . . . . . . . . . . . . . . . . . . . . . . . . . . . . . . . . . . . . . . . . . . . . . . . . . . . . . . . . . . . . . . . . . . . . . . . . . . . . . . . . . . . . . 11Removing Devices . . . . . . . . . . . . . . . . . . . . . . . . . . . . . . . . . . . . . . . . . . . . . . . . . . . . . . . . . . . . . . . . . . . . . . . . . . . . . . . . . . . . . . . . . . . 11Restoring Defaults . . . . . . . . . . . . . . . . . . . . . . . . . . . . . . . . . . . . . . . . . . . . . . . . . . . . . . . . . . . . . . . . . . . . . . . . . . . . . . . . . . . . . . . . . . . 11Restarting Devices. . . . . . . . . . . . . . . . . . . . . . . . . . . . . . . . . . . . . . . . . . . . . . . . . . . . . . . . . . . . . . . . . . . . . . . . . . . . . . . . . . . . . . . . . . . 11Using the Configuration Panel. . . . . . . . . . . . . . . . . . . . . . . . . . . . . . . . . . . . . . . . . . . . . . . . . . . . . . . . . . . . . . . . . . . . . . . . . . . . . . . . . . 12
Configure DU2 Tab. . . . . . . . . . . . . . . . . . . . . . . . . . . . . . . . . . . . . . . . . . . . . . . . . . . . . . . . . . . . . . . . . . . . . . . . . . . . . . . . . . . . . . . . . . . . . . . . . . . . 13Project Settings. . . . . . . . . . . . . . . . . . . . . . . . . . . . . . . . . . . . . . . . . . . . . . . . . . . . . . . . . . . . . . . . . . . . . . . . . . . . . . . . . . . . . . . . . . . . . . . . . . 13Scripts . . . . . . . . . . . . . . . . . . . . . . . . . . . . . . . . . . . . . . . . . . . . . . . . . . . . . . . . . . . . . . . . . . . . . . . . . . . . . . . . . . . . . . . . . . . . . . . . . . . . . . . . . 13
Adding and Modifying Scripts . . . . . . . . . . . . . . . . . . . . . . . . . . . . . . . . . . . . . . . . . . . . . . . . . . . . . . . . . . . . . . . . . . . . . . . . . . . . . . . . . . 13Deleting Scripts . . . . . . . . . . . . . . . . . . . . . . . . . . . . . . . . . . . . . . . . . . . . . . . . . . . . . . . . . . . . . . . . . . . . . . . . . . . . . . . . . . . . . . . . . . . . . 14
Device Groups. . . . . . . . . . . . . . . . . . . . . . . . . . . . . . . . . . . . . . . . . . . . . . . . . . . . . . . . . . . . . . . . . . . . . . . . . . . . . . . . . . . . . . . . . . . . . . . . . . . 14Smart Group Settings . . . . . . . . . . . . . . . . . . . . . . . . . . . . . . . . . . . . . . . . . . . . . . . . . . . . . . . . . . . . . . . . . . . . . . . . . . . . . . . . . . . . . . . . 14Managing Groups . . . . . . . . . . . . . . . . . . . . . . . . . . . . . . . . . . . . . . . . . . . . . . . . . . . . . . . . . . . . . . . . . . . . . . . . . . . . . . . . . . . . . . . . . . . 15
DU2 Users . . . . . . . . . . . . . . . . . . . . . . . . . . . . . . . . . . . . . . . . . . . . . . . . . . . . . . . . . . . . . . . . . . . . . . . . . . . . . . . . . . . . . . . . . . . . . . . . . . . . . . 15Update Firmware . . . . . . . . . . . . . . . . . . . . . . . . . . . . . . . . . . . . . . . . . . . . . . . . . . . . . . . . . . . . . . . . . . . . . . . . . . . . . . . . . . . . . . . . . . . . . . . . 16Auditing Preferences . . . . . . . . . . . . . . . . . . . . . . . . . . . . . . . . . . . . . . . . . . . . . . . . . . . . . . . . . . . . . . . . . . . . . . . . . . . . . . . . . . . . . . . . . . . . . 16
Run Reports Tab. . . . . . . . . . . . . . . . . . . . . . . . . . . . . . . . . . . . . . . . . . . . . . . . . . . . . . . . . . . . . . . . . . . . . . . . . . . . . . . . . . . . . . . . . . . . . . . . . . . . . . 17Activity and Error Report Controls . . . . . . . . . . . . . . . . . . . . . . . . . . . . . . . . . . . . . . . . . . . . . . . . . . . . . . . . . . . . . . . . . . . . . . . . . . . . . . . . . . . 17Resolving Errors . . . . . . . . . . . . . . . . . . . . . . . . . . . . . . . . . . . . . . . . . . . . . . . . . . . . . . . . . . . . . . . . . . . . . . . . . . . . . . . . . . . . . . . . . . . . . . . . . 17
Appendix . . . . . . . . . . . . . . . . . . . . . . . . . . . . . . . . . . . . . . . . . . . . . . . . . . . . . . . . . . . . . . . . . . . . . . . . . . . . . . . . . . . . . . . . . . . . . . . . . . . . . . . . . . . 18Firewall Ports . . . . . . . . . . . . . . . . . . . . . . . . . . . . . . . . . . . . . . . . . . . . . . . . . . . . . . . . . . . . . . . . . . . . . . . . . . . . . . . . . . . . . . . . . . . . . . . . . . . 18Supported Devices . . . . . . . . . . . . . . . . . . . . . . . . . . . . . . . . . . . . . . . . . . . . . . . . . . . . . . . . . . . . . . . . . . . . . . . . . . . . . . . . . . . . . . . . . . . . . . . 18

DescriptionThe Device Utility 2 software enables efficient advanced configuration, maintenance, and troubleshooting of supported Pelco network devices. This software helps you fine-tune your devices and network. The Device Utility 2 software supports the following functions:
• Checking overall system attributes
• Updating device software, individually or by groups of devices
• Checking device status
• Identifying devices
• Adding and removing devices
• Viewing devices by groups
• Generating reports
• Setting up system preferences
System RequirementsBefore installing the software, make sure the computer meets or exceeds the following minimum system requirements:
Processor: Intel® Pentium® III or equivalent processor, 800 MHz
Operating System: Microsoft® Windows® XP SP3, Windows Vista® (Enterprise or Ultimate), or Windows 7 (Enterprise or Ultimate)
Memory: 128 MB RAM (256 MB recommended)
NOTES:
• The Device Utility 2 is not designed for actual camera operation.
• You must have administrative permissions for the computer you are using to install Device Utility 2.
C2984M (5/11) 3

Installation1. Close all open programs.
2. Insert the supplied resource disc into the CD drive of your computer. The installation software starts automatically. If the installation software does not start automatically, perform one of the following options:
• Windows users: Access the CD from the Start menu and run the DU2Installer.exe program. The Welcome dialog box appears.
• Mac users: Access the CD from the Finder and run the DU2Installer.exe program. The Welcome dialog box appears.
NOTE: If you do not have a resource disc, go to www.pelco.com to download the Device Utility 2 software.
3. Click the Next button to display the License Agreement dialog box.
4. Read through the license agreement and click the “I accept the terms of the license agreement” button.
5. Click the Next button to display the Choose Installation Location dialog box.
6. The default installation folder is Device Utility 2 within the Pelco directory. To install the software in a different folder, either enter the folder with its complete path or use the Browse button to create or locate the desired installation folder.
7. Click the Next button to display the Confirm Installation dialog box.
• If the install directory is correct, click the Next button to install the software onto your hard drive. The Installing dialog box shows installation progress.
• If the install directory is not correct, click the Back button to return to the Choose Installation Location dialog box and locate the correct installation folder.
As soon as the installation is complete, a dialog box appears stating that the software has been installed.
8. Click the Finish button. The installation program closes and the Device Utility 2 logon dialog box appears.
NOTE: If you need to reinstall the Device Utility 2 software for troubleshooting purposes, you must first uninstall the existing Device Utility 2 software from your system. If you are using Windows 7 or Windows Vista and user account control (UAC) is enabled, the Device Utility 2 file remains on your system even after you uninstall the software. To resolve this issue, you must perform a manual search for pelcodu2.db and delete the file. Refer to the user’s manual shipped with your computer for more information about searching for and deleting files.
4 C2984M (5/11)

Operation
LOGGING ON1. Open the Device Utility 2 program using one of the following options:
• Windows users: Open your computer’s Start menu and click Device Utility 2. The Device Utility 2 logon dialog box appears.
• Mac users: Open your computer’s Application directory and click Device Utility 2. The Device Utility 2 logon dialog box appears.
2. Type your user name and password.
NOTES:
• If you are logging onto the software as the administrator for the first time, the default User name and Password are admin (all lowercase). For security purposes, be sure to change the password after you log on for the first time.
• The Device Utility 2 has its own user name and password. This is not related to any user name you may have established on a Pelco camera or video management system.
3. Choose a project from the drop down list or create a new project (refer to Creating a Project). The default project is My Project.
4. Click the Enter DU2 button. The Device Utility 2 software opens.
CREATING A PROJECTProjects allow you to group devices to easily manage and perform bulk operations on multiple devices.
NOTES:
• You must choose a project to log on to the Device Utility 2.
• A device cannot be included in more than one project at a time.
To create a new project:
1. Type your Device Utility 2 user name and password into the appropriate boxes.
2. Click the Add New button. The Create New Project dialog box opens.
3. Type a name into the Project Name box.
4. Click the Enter DU2 button. The Device Utility 2 software opens.
Projects can be renamed, modified, and deleted from the Configure DU2 tab (refer to Configure DU2 Tab on page 13).
LOGGING OFF
To log off from a project without closing the software, click the Logout button located in the upper-right corner of the window. The logon dialog box appears.
To close the software:
• Click the Close button in the upper-right corner of the application window.
• Click the Exit button on the logon dialog box.
USING HELPTo access information about operating the Device Utility 2 software, click the Help button located in the upper-right corner of the window. The Help information appears in a new window.
WARNING: Logging off or closing the software before all actions are complete may cause a loss of data or incomplete updates. When possible, allow all Restore Defaults, Restart, and Update Firmware actions to complete for all devices before logging off or closing the software.
C2984M (5/11) 5

LOCATING INFORMATION ABOUT DU2To locate information about the Device Utility 2, such as the version and support information, click the About DU2 button located in the upper-right corner of the window. The About DU2 dialog appears.
Manage Devices Tab
Figure 1. Manage Devices Tab
Device Finding Controls
Device Grid
Device Settings Panel
6 C2984M (5/11)

DEVICE FINDING CONTROLS
Figure 2. Device Finding Controls
CREATING A NEW DEVICE GROUP1. Select the devices in the device grid that you want to be a part of the group.
2. Click the Create New Device Group button. A dialog box opens.
3. Type a unique, user-friendly group name.
4. Click the Create Group button to place the selected devices into the new group.
ADDING A NEW DEVICEDevices might not be automatically discovered if they are on a different VLAN; therefore, you might need to add the new device manually:
1. Click the Add New Device button. A dialog box opens.
2. Use one of the following methods to locate a device:
• Enter IP address: An asterisk may be used as a wildcard character in the C and D address ranges. For example, “85.4.6.* or 85.4.*.*”
• Add all devices within range: A start and end address must be entered. No wildcard characters are permitted.
• Enter MAC Address: You must enter the complete MAC address to discover a device on the local network. This method can only be used if the device is on the same VLAN as the computer that is running the DU2 software.
NOTE: Locating a device might take several minutes, especially when searching a wide range of IP addresses.
3. Click the Add Device button to search for the devices specified. Each supported device that is found is added to the device grid.
Device Error Icon: Displays when one or more devices has an error. Click the device error icon to display a filtered list of all devices with errors.NOTES:• To display the full unfiltered list of devices again, you must click the device error icon a second time.
• The selections made for problem devices in the Smart Groups section of the Configure DU2 tab affect whether or not the device error icon is displayed (refer to Smart Group Settings on page 14).
Show Group Drop Down List: Filters the devices displayed in the device grid based on the group to which they are assigned.
Create New Device Group Button: Assigns the selected devices to a newly created group.
Add New Device Button: Adds new devices to the device grid by specifying an IP address or IP address range. This allows you to view and configure devices located on different virtual local area networks (VLAN).
Search Box: Filters and displays all devices that match the search criteria. Click the Search button to filter the device grid. Click the Cancel button to stop the filter and display the original list.
Advanced Search Button: Refines the search criteria to locate the devices in the device grid.
Refresh Button: Updates the device grid and initiates a network discovery request to check for any new devices.
C2984M (5/11) 7
USING ADVANCED SEARCHIf you have a large number of devices to administer, the advanced search feature allows you to easily locate devices by specific attributes such as model, firmware version, or IP address range.
To perform an advanced search:
1. Click the Advanced Search button. A dialog box opens.
2. Type the necessary information into as many of the following boxes as needed to refine the search:
Device Name: Filters the results by the device name. Partial matches are permitted.
Device Type: Filters the results by the device type (camera, encoder, and so forth) from the drop-down list.
Firmware: Filters the results by the firmware version from the drop-down list.
IP Address: Filters the results by IP address range. Asterisks can be used as wildcard characters in the C and D address ranges. For example, “85.4.6.* or 85.4.*.*”
Model: Filters the results by the model number from the drop-down list.
Serial Number: Filters the results by the serial number. Partial matches and asterisk wildcard characters are permitted.
MAC Address: Filters the results by the MAC address. Partial matches are permitted.
Status: Filters the results by the device status.
NOTE: As you enter data, the list of devices in the device grid is immediately filtered.
3. To remove the filters and display all devices in the device grid, the search criteria boxes must be cleared by clicking the Clear All Fields button or by collapsing the Advanced Search dialog box.
DEVICE GRIDThe device grid shows the list of devices both automatically discovered and manually added.
NOTE: The device grid may be empty the first time the application is opened.
To display a list of devices by performing a refresh, refer to Device Finding Controls on page 7. To display a list of devices by adding devices manually, refer to Adding a New Device on page 7. In the device grid, columns can be sorted by clicking a column title. Columns can also be resized by dragging the vertical column separators. The following settings and information are displayed in the device grid:
Select: Selects devices and displays related information. Click the check box in the Select column before performing an operation on the corresponding device. Additional information about the selected device is displayed in the configuration panel (refer to Using the Configuration Panel on page 12). Multiple devices can be selected at one time. Select all devices by clicking the check box above the Select column.
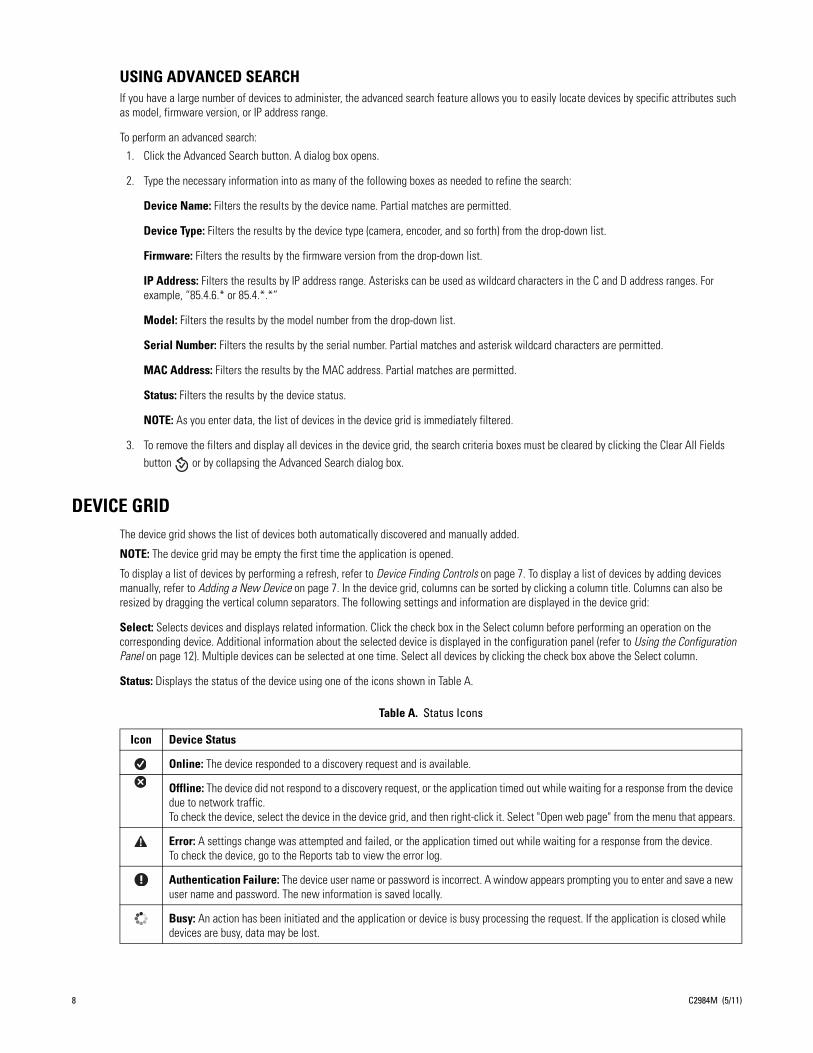
Status: Displays the status of the device using one of the icons shown in Table A.
Table A. Status Icons
Icon Device Status
Online: The device responded to a discovery request and is available.
Offline: The device did not respond to a discovery request, or the application timed out while waiting for a response from the device due to network traffic.To check the device, select the device in the device grid, and then right-click it. Select "Open web page" from the menu that appears.
Error: A settings change was attempted and failed, or the application timed out while waiting for a response from the device.To check the device, go to the Reports tab to view the error log.
Authentication Failure: The device user name or password is incorrect. A window appears prompting you to enter and save a new user name and password. The new information is saved locally.
Busy: An action has been initiated and the application or device is busy processing the request. If the application is closed while devices are busy, data may be lost.
8 C2984M (5/11)

Video: A thumbnail snapshot from the device. The snapshot is updated when the device is initially discovered and when the grid is refreshed.
Device Name: The user-friendly name assigned to the device through the device Web page.
IP Address: The current IP address of the device.
MAC Address: The factory-programmed Media Access Control (MAC) address of the device.
Model: The model number of the device.
Firmware: The current firmware version of the device.
Serial Number: The serial number of the device.
Device Type: A brief description of the device (for example, camera or encoder).
USING KEYBOARD AND MOUSE SHORTCUTSTo use keyboard shortcuts:
1. Press the up and down arrow keys to move up and down through the device grid.
2. Press the space bar to select a device. Press the space bar a second time to cancel the selection.
3. Press the Tab key to move between fields.
4. Press the Enter key to select the default option in a dialog box.
To use mouse shortcuts:
1. While in the device grid, right-click to display a menu of commonly used action tools.
2. Press the ESC key to close the menu.
C2984M (5/11) 9

DEVICE SETTINGS PANELThe device settings panel is used to view a video snapshot, perform basic actions, and make configuration changes to selected devices from the device grid.
Figure 3. Device Settings Panel
Video: A JPEG snapshot from the device. The snapshot is automatically refreshed two times per second.NOTE: Video is only displayed when a single device is selected. When multiple devices are selected, the number of selected devices appears in place of the video.
Action Tools:
Apply Script: Make configuration changes to the selected devices using scripts. Script templates are supplied by Pelco to perform specific actions. Scripts can be edited and saved in the Configure DU2 tab (refer to Applying Scripts on page 11 and Scripts on page 13).
Update Firmware: Update the firmware on a single device or multiple devices at one time. When multiple devices are selected, they can be a mixed group of models and firmware versions.
Remove Device: Remove selected devices from the device grid. If the removed devices are on an internal local area network (LAN), they can be rediscovered automatically by clicking Refresh. If the devices are on an external LAN and were added using the Add New Device button, they will be removed from the device grid until they are manually added again.
Restore Defaults: Restore all device settings to the factory-default settings.
Restart: Restart the selected devices. This function does not change any device configuration settings.
Configuration Panel: Quickly modify selected devices from the configuration panel. The device Web page can be opened from the configuration panel to allow you to change settings not available in the Device Utility 2 (for example, fine-tuning the imaging settings or configuring analytics).
10 C2984M (5/11)

APPLYING SCRIPTSNOTE: To apply a script, you must first create a script on the Configure DU2 tab (refer to Scripts on page 13). If no scripts have been created, the Apply Scripts button is disabled.
1. Select the devices to which you want to apply scripts.
2. Click the Apply Script button, or right-click the device grid and select “Apply script.” The Apply Script dialog box appears.
3. Select the desired script from the Choose Script drop-down list.
4. Click the Apply Script button.
The affected devices will be busy for a period of time. You will not be able to view video through the Device Utility 2 or change any settings on those devices until the script has been applied.
UPDATING FIRMWARE1. Select the devices on which you want to install updated firmware.
2. Click the Update Firmware button, or right-click the device grid and select “Update firmware.” The Update Firmware dialog box appears.
3. Select the firmware package to be loaded by model number from the list of package.
NOTES:
• If you don’t see the required version in the list of packages, click the “Add new file” button. Select the desired firmware package, and then click the Open button to add the firmware package to the list in the Update Firmware dialog box. Click the Apply Selected Updates button.
• You may install an older version of firmware on a device, but there is a risk that the device may not function correctly. You should only downgrade firmware when troubleshooting recently updated devices.
4. Click the Apply Selected Updates button.
The affected devices will be busy for a period of time. You will not be able to view video or change any settings on those devices until the firmware has been updated.
REMOVING DEVICES1. Select the devices you want to remove from the device grid.
2. Click the Remove Devices button, or right-click the device grid and select “Remove devices from list.”
RESTORING DEFAULTS1. Select the devices to which you want to restore factory defaults.
2. Click the Restore Defaults button, or right-click the device grid and select “Restore defaults.”
The affected devices will be busy for a period of time. You will not be able to view video or change any settings on those devices until the defaults have been restored.
RESTARTING DEVICESPerforming a device restart turns off the devices and then turns them on again without affecting the configuration settings.
1. Select the devices to be restarted.
2. Click the Restart Devices button, or right-click the device grid and select “Restart device.”
The affected devices will be busy for a period of time. You will not be able to view video or change any settings on those devices until the devices have restarted.
C2984M (5/11) 11

USING THE CONFIGURATION PANEL1. Select the device or devices to be configured.
2. Make changes to the settings in the configuration panel (refer to Table B).
3. Click Save to save the configuration changes, or click Cancel to cancel the configuration changes.
NOTE: When multiple devices are selected, the changes will be applied to all devices.
Table B. Configuration Panel Settings
Setting DescriptionAvailable when multiple devices are selected
Device Name Modify the device name and display it in the device grid. If several devices are selected but the devices have no common features, the term “Mixed” appears.
No
Assign to Group Quickly assign the selected device to an existing group from the drop-down list. Click the + button to create a new group.
Yes
MAC Address This is a read-only field. If several devices are selected but the devices have no common features, the term “Mixed” appears.
—
Model This is a read-only field. If several devices are selected but the devices have no common features, the term “Mixed” appears.
—
Firmware Version This is a read-only field. If several devices are selected but the devices have no common features, the term “Mixed” appears.
—
Serial Number This is a read-only field. If several devices are selected but the devices have no common features, the term “Mixed” appears.
—
DHCP/Static Select DHCP if the selected device is connected to a Dynamic Host Configuration Protocol (DHCP) server. If DHCP is selected, the IP address is automatically assigned and the remaining fields are unavailable.Select Static if you are using a fixed IP address.
—
IP Address Enter a fixed IP address for the selected device. If several devices are selected but the devices have no common features, the term “Mixed” appears.NOTE: Contact your network administrator to avoid any network conflicts before setting/changing the IP address of the device. If two devices are accidentally assigned the same IP address, you may lose communication to one or both of the devices.
No
Set IP Range Enable the IP addresses of multiple selected devices to be set in sequential order.
Yes
Subnet Mask The IP address of the subnet mask. If several devices are selected but the devices have no common features, the term “Mixed” appears.
Yes
Gateway The IP address of the local gateway mask. If several devices are selected but the devices have no common features, the term “Mixed” appears.
Yes
DNS Server The IP addresses of the primary and secondary Domain Name System (DNS) servers. If several devices are selected but the devices have no common features, the term “Mixed” appears.
Yes
Open Web Page Open the Web page of the device in the default browser, and authenticate the user name and password for this device.
No
12 C2984M (5/11)

Configure DU2 TabPROJECT SETTINGS
Projects are groups of devices that can be managed separately. You do not have to create separate projects, but it is helpful if you are supporting multiple sites with large numbers of cameras. For example, you might want to create a project for Customer A and another for Customer B. These projects might have different user names and passwords, and they might reside on different networks.
NOTE: A device cannot be included in more than one project at a time.
The following project settings are available:
Project Name: Displays the current project name. Change the project name by highlighting the text and typing a new name.
Delete Project and Log Out: Allows you to delete or log off from a project. Click this button to delete all of the device and configuration information for the project. The logon screen appears and you must log on to another project or create a new one.
Log Out Automatically: Logs off a user automatically based on the length of time that a project goes without activity. Select the After check box and specify the number of minutes in the “minutes without activity” box. Select the Never check box to disable automatic logoff.
Show Warning Dialogs: Displays or hides all warning dialog messages in the application. It is recommended that warning dialogs be left on until you are familiar with the Device Utility 2 software.
Poll for New Devices Every: Controls the interval at which devices are automatically discovered. With a shorter interval, more network traffic is created, but devices are discovered more frequently. With a longer interval, less network traffic is created, but devices are not discovered as quickly.
Timeout: Defines the amount of time, after a request is made to the device, that the application will wait before setting the device status to off line or as having an error. In networks with large numbers of devices and high traffic, you may need to set this to a higher number.
Default User Name: Sets the default user name that will be used when communicating with devices in the project. If the device does not recognize this default name, you will be prompted to enter a different user name to connect to and configure that device.
Default Password: Sets the default password that will be used when communicating with devices in the project. If the device does not recognize this default password, you will be prompted to enter a new password.
NOTE: Changing the default user name or default password does not change the settings stored on the individual devices. It changes only the credentials used by the Device Utility 2 software when discovering a new device and attempting to connect to it.
SCRIPTSYou can make configuration changes to selected devices using scripts. Script templates are supplied by Pelco to perform specific actions. Script templates are read-only, but the templates can be modified and saved as new user-defined script files. Script templates can be combined in a single user-created script to configure multiple attributes at the same time. Script files are shared between projects, so they can be reused when configuring different installations.
In the Scripts section, the list of available scripts displays in the left pane. The list will be empty if no scripts have been added. Scripts can be applied to devices through the Manage Devices tab (refer to Applying Scripts on page 11).
ADDING AND MODIFYING SCRIPTS
1. Click the Add Script button. The Add New Script dialog box appears.
2. Select the script template you want to add by selecting the check box next to the script name.
NOTE: You can select multiple script templates and combine them into one script. The default script name displayed matches the name of the first script template you selected.
3. Click the Add Script button to add the script to your list, or click Cancel to return to the previous window.
4. Change the script name to a user-friendly name by typing it in the Script Name text box. Certain characters are not permitted in the filename (including /,\,:,*,?,",<,>,|).
WARNINGS:• Only advanced users should create, modify, and apply scripts.
• Test your scripts on individual devices before applying them to multiple devices.
C2984M (5/11) 13
5. Click Save.
6. Select the User-Created Script name from the left pane, and type a name into the Script Name text box.
NOTE: The name you create is the name that will display in the Manage Devices tab later, so it should be something that will remind you of its purpose.
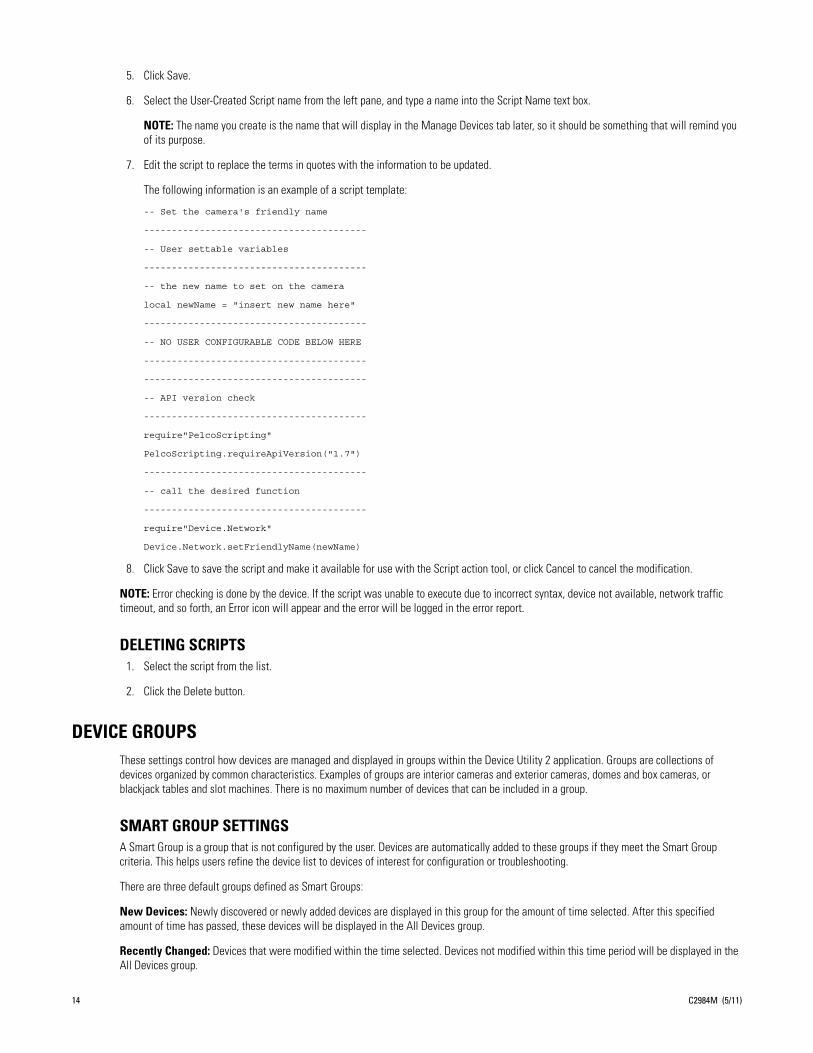
7. Edit the script to replace the terms in quotes with the information to be updated.
The following information is an example of a script template:
-- Set the camera's friendly name
----------------------------------------
-- User settable variables
----------------------------------------
-- the new name to set on the camera
local newName = "insert new name here"
----------------------------------------
-- NO USER CONFIGURABLE CODE BELOW HERE
----------------------------------------
----------------------------------------
-- API version check
----------------------------------------
require"PelcoScripting"
PelcoScripting.requireApiVersion("1.7")
----------------------------------------
-- call the desired function
----------------------------------------
require"Device.Network"
Device.Network.setFriendlyName(newName)
8. Click Save to save the script and make it available for use with the Script action tool, or click Cancel to cancel the modification.
NOTE: Error checking is done by the device. If the script was unable to execute due to incorrect syntax, device not available, network traffic timeout, and so forth, an Error icon will appear and the error will be logged in the error report.
DELETING SCRIPTS1. Select the script from the list.
2. Click the Delete button.
DEVICE GROUPSThese settings control how devices are managed and displayed in groups within the Device Utility 2 application. Groups are collections of devices organized by common characteristics. Examples of groups are interior cameras and exterior cameras, domes and box cameras, or blackjack tables and slot machines. There is no maximum number of devices that can be included in a group.
SMART GROUP SETTINGSA Smart Group is a group that is not configured by the user. Devices are automatically added to these groups if they meet the Smart Group criteria. This helps users refine the device list to devices of interest for configuration or troubleshooting.
There are three default groups defined as Smart Groups:
New Devices: Newly discovered or newly added devices are displayed in this group for the amount of time selected. After this specified amount of time has passed, these devices will be displayed in the All Devices group.
Recently Changed: Devices that were modified within the time selected. Devices not modified within this time period will be displayed in the All Devices group.
14 C2984M (5/11)

Problem Devices: Devices that display the selected problems. Devices that do not meet the criteria selected will be displayed in the All Devices group.
After changing the Smart Group settings, click Save to save the changes or Cancel to revert back to the previously saved settings.
MANAGING GROUPSIf you prefer to create groups without first selecting the devices to populate it, use the Manage Group section. Unlike the Manage Devices tab, this feature allows you to create empty groups. This feature also allows you to edit the user-created group names and delete groups.
If a device is not part of a user-created group, it will appear when the user selects the No Group filter. This is helpful when setting up the user-created groups.
To add a group:
1. Click the Add Group button. A new user-created group is added to the list.
2. Change the name of the group:a. Double-click the “New Group” label, and type over the text with a meaningful group name.
b. Press the Enter key to save the new group name, or press the ESC key to return to the previous name.
To delete a group:
1. Click the group that you want to delete.
2. Click the Delete Group button.
NOTE: Any device that is in a group when the group name is deleted will be added to the No Group and All Devices groups.
DU2 USERSThis section allows you to manage the user names and passwords used to log on to the Device Utility 2. All users have administrator privileges with access to all features and functions.
The list of available users are shown on the left pane of the application window. Select a user to view the detailed information for that particular user.
To add a user:
1. Click the Add User button. A new user is added to the list of available users.
2. Edit the user name, password, and other attributes in the text boxes on the right.
3. Click the Save button to update the user information, or click the Cancel button to clear the information.
To delete a user:
1. Select the desired user name from the list of available users.
2. Click the Delete button to remove the selected user and all of the respective user settings.
C2984M (5/11) 15
UPDATE FIRMWAREThe Update Firmware section of the Configure DU2 tab is used to manage the device firmware files that are stored locally. The firmware files can be managed, archived, and exported from this section. Firmware files are shared between projects.
You should have a current set of firmware files for all of your devices, so you can download them to devices using the Firmware Update button (refer to Updating Firmware on page 11). To avoid confusion, you should have only the current version of firmware (or one earlier version) available for downloading. Older versions should be archived to minimize clutter.
Firmware files can be downloaded from www.pelco.com to a convenient folder on your local computer, a removable memory device, or other server on your network. Once the firmware files are local, they can be managed using the Firmware Update section of the Configure DU2 tab.
The sortable list displays the firmware files available by model number, version, release date, and the number of devices that are using that version.
The following are the functions available through the Update Firmware section:
Add New File: Browse the local hard drive and other storage locations to select firmware files to add to the list.
View Files in a Finder: Open a window that displays the files stored in the firmware directory.
Move to Archive: Move the selected firmware files to the Firmware Archive folder on the local hard drive. This reduces the number of firmware files displayed.
Show Archive: Show a list of the archived firmware.
Export To: Copy the selected firmware files to another folder or memory device. The export feature can be useful if you want to transfer the latest updates to a computer at a different site.
AUDITING PREFERENCESThe Device Utility 2 maintains the history of recent activities and events to support tracking and reporting. The Auditing Preferences section allows you to customize the audit settings. The audit settings that you choose determine what information is displayed on the Run Reports tab (refer to Run Reports Tab on page 17).
To customize the audit settings:
1. Select the duration of the audit history to be saved in the “Retain activity information for” combo box. After the selected duration expires, the audit information will be deleted.
2. Select the desired check boxes in the Auditing Preferences section to record all of the selected activities that occur from the current time until the selected duration expires. Clearing a check box stops the recording of that particular activity from the current time forward.
3. Click Save to update the preferences, or click Cancel to return to the previous selections.
16 C2984M (5/11)

Run Reports TabYou can view and export reports through the Run Reports tab. There are two reports available: Activity and Error reports. While viewing the reports, you can sort the information by clicking the column title. You can also enter a start and end date to limit the information displayed to a specified date range.
ACTIVITY AND ERROR REPORT CONTROLSExport to Disk: Saves the report in CSV file format. If the report is refined by date range or search values, the export will also be limited.
Search: Filters the data to records that match the entered value. Enter a search term and click the magnifying glass to filter the data. Click the X button to cancel the search and remove the filter.
Start Date: Filters the current data to the start date selected.
End Date: Filters the current data to the end date selected.
RESOLVING ERRORSMost errors listed in the Error report can be corrected in one of the following ways:
• Restart the device.
• Ensure that all of the device wiring is installed correctly.
If these instructions fail to solve your problem, contact Pelco Product Support at 1-800-289-9100 (USA and Canada) or+1-559-292-1981 (international) for assistance. Be sure to have the device’s serial number available when calling.
Do not try to repair devices yourself. Leave maintenance and repairs to qualified technical personnel only.
C2984M (5/11) 17

Appendix
FIREWALL PORTSThe ports in Table C are used by the Device Utility 2 and devices. If there are problems with device discovery or communication with devices, ask your network administrator to make these ports accessible.
SUPPORTED DEVICESThe Pelco devices and functions listed in Table D are supported by the Device Utility 2.
Table C. Firewall Ports
Port Number Protocol Service Name Purpose
22 TCP SSH Securely log on to the device to gain advanced access.
80 TCP WWW Access the device's Web application, which allows configuration and control.
161 UDP SNMP Obtain the device's network and diagnostic status.
389 TCP LDAP Network and API access control (camera only).
443 TCP HTTPS Secure access to the device's Web application, which allows configuration and control.
554 TCP RTSP Streaming video and audio from the device.
799 UDP SYSLOG Advanced device debugging.
1900, 2901 UDP UPNP Discovering the device and querying device attributes such as UUID.
5353 UDP MDNS Discovery of the device by MDNS.
6700–6900 UDP RTCP Keep the RTSP stream session alive by client.
491152, 49153 TCP SOAP Retrieve information from IP110, IP3701, Spectra® IV IP, and Spectra Mini IP devices.
Table D. Supported Devices
Device
Firm
war
e Ve
rsio
n
Dis
cove
ry
Firm
war
e U
pdat
e
Link
to W
eb P
age
Chan
ge N
etw
ork
Setti
ngs
Rest
art
Rese
t to
Defa
ults
Chan
ge D
evic
e N
ame
(Scr
ipt)
Scrip
ts
IP110 Series All • • •
IP3701 Series All • • •
Spectra IV IP Series All • • •
Spectra Mini IP Series All • • •
Sarix® IX, ID, IE, IM, Spectra HD, TXB-N, NET540X Series
<1.7 • • •
1.7 or later • • • • • • • •
18 C2984M (5/11)

PRODUCT WARRANTY AND RETURN INFORMATION
WARRANTYPelco will repair or replace, without charge, any merchandise proved defective inmaterial or workmanship for a period of one year after the date of shipment.
Exceptions to this warranty are as noted below:• Five years:
– Fiber optic products– Unshielded Twisted Pair (UTP) transmission products– CC3701H-2, CC3701H-2X, CC3751H-2, CC3651H-2X, MC3651H-2, and
MC3651H-2X camera models• Three years:
– Fixed network cameras and network dome cameras with Sarix® technology– Sarix thermal imaging products (TI and ESTI Series)– Fixed camera models (CCC1390H Series, C10DN Series, C10CH Series, and
IP3701H Series)– EH1500 Series enclosures– Spectra® IV products (including Spectra IV IP)– Spectra HD dome products– Camclosure® Series (IS, ICS, IP) integrated camera systems– DX Series video recorders (except DX9000 Series which is covered for a
period of one year), DVR5100 Series digital video recorders, Digital Sentry®
Series hardware products, DVX Series digital video recorders, and NVR300Series network video recorders
– Endura® Series distributed network-based video products– Genex® Series products (multiplexers, server, and keyboard)– PMCL200/300/400 Series LCD monitors– PMCL5xxF Series and PMCL5xxNB Series LCD monitors
• Two years:– Standard varifocal, fixed focal, and motorized zoom lenses– DF5/DF8 Series fixed dome products– Legacy® Series integrated positioning systems– Spectra III™, Spectra Mini, Spectra Mini IP, Esprit®, ExSite®, ExSite IP, and
PS20 scanners, including when used in continuous motion applications– Esprit Ti and TI2500 Series thermal imaging products– Esprit and WW5700 Series window wiper (excluding wiper blades)– CM6700/CM6800/CM9700 Series matrix– Digital Light Processing (DLP®) displays (except lamp and color wheel). The
lamp and color wheel will be covered for a period of 90 days. The air filter isnot covered under warranty.
• Six months:– All pan and tilts, scanners, or preset lenses used in continuous motion
applications (preset scan, tour, and auto scan modes)Pelco will warrant all replacement parts and repairs for 90 days from the date ofPelco shipment. All goods requiring warranty repair shall be sent freight prepaidto a Pelco designated location. Repairs made necessary by reason of misuse,alteration, normal wear, or accident are not covered under this warranty.
Pelco assumes no risk and shall be subject to no liability for damages or lossresulting from the specific use or application made of the Products. Pelco’s liabilityfor any claim, whether based on breach of contract, negligence, infringement ofany rights of any party or product liability, relating to the Products shall not exceedthe price paid by the Dealer to Pelco for such Products. In no event will Pelco beliable for any special, incidental, or consequential damages (including loss of use,loss of profit, and claims of third parties) however caused, whether by thenegligence of Pelco or otherwise.
The above warranty provides the Dealer with specific legal rights. The Dealer mayalso have additional rights, which are subject to variation from state to state.
If a warranty repair is required, the Dealer must contact Pelco at (800) 289-9100 or(559) 292-1981 to obtain a Repair Authorization number (RA), and provide thefollowing information:
1. Model and serial number2. Date of shipment, P.O. number, sales order number, or Pelco invoice number3. Details of the defect or problem
If there is a dispute regarding the warranty of a product that does not fall underthe warranty conditions stated above, please include a written explanation withthe product when returned.
Method of return shipment shall be the same or equal to the method by which theitem was received by Pelco.
RETURNSTo expedite parts returned for repair or credit, please call Pelco at (800) 289-9100or (559) 292-1981 to obtain an authorization number (CA number if returned forcredit, and RA number if returned for repair) and designated return location.
All merchandise returned for credit may be subject to a 20 percent restocking andrefurbishing charge.
Goods returned for repair or credit should be clearly identified with the assignedCA or RA number and freight should be prepaid.
Revised 5-6-11
REVISION HISTORY
Manual # Date CommentsC2984M 5/11 Original version.
Pelco, the Pelco logo, and other trademarks associated with Pelco products referred to in this publication are trademarks of Pelco, Inc. or its affiliates. © Copyright 2011, Pelco, Inc. All other product names and services are the property of their respective companies. All rights reserved.Product specifications and availability are subject to change without notice.

Pelco by Schneider Electric 3500 Pelco Way Clovis, California 93612-5699 United StatesUSA & Canada Tel (800) 289-9100 Fax (800) 289-9150
International Tel +1 (559) 292-1981 Fax +1 (559) 348-1120
www.pelco.com