dfmt-ug-001 2.02 datgel fence and map tool gint reports user guide
DESCRIPTION
NONETRANSCRIPT

User Guide
Datgel
Fence and Map Tool gINT Reports
DFMT-UG-001 - 2.07
February 2013

Disclaimer The information in this publication is subject to change without notice and does not represent a commitment on the part of Datgel Pty Ltd. The software described in this document is furnished under a license agreement or nondisclosure agreement. The software must be used or copied only in accordance with the terms of the agreement.
Every effort was made to ensure accuracy of this information. However, Datgel Pty Ltd makes no warranty as to the correctness of this information or the supplied files.
Printed in Australia. All rights reserved worldwide. No part of this publication may be reproduced in any form or by any means without the prior written consent of Datgel Pty Ltd. Comments are welcome and become the property of Datgel Pty Ltd.
All products mentioned are trademarks of the respective producers.
Copyright © Datgel Pty Ltd 2013
Datgel Pty Ltd Suite 8, Level 1, The Hub 89 - 97 Jones Street Ultimo NSW 2007 Australia
Tel: +61 2 8202 8600 Fax: +61 2 8202 8606
Email: [email protected] Website: www.datgel.com

Fence and Map Tool gINT Reports Datgel User Guide i DFMT-UG-001 - 2.07- February 2013
Contents About the Product ................................................................................................................ ii
Support ........................................................................................................................................... ii System Requirements ..................................................................................................................... ii
gINT .............................................................................................................................................................. ii Hardware and Operating System .................................................................................................................. ii
Conventions and typography used in this guide ............................................................................. ii Field Colours .................................................................................................................................. iii
1 Installation ................................................................................................................... 1 1.1 Installation Overview ............................................................................................................. 1 1.2 Package Contents ................................................................................................................. 1 1.3 Before Installation .................................................................................................................. 1 1.4 Choose and Implement a Project Database Structure .......................................................... 1 1.5 Merge gINT Library Objects .................................................................................................. 1
2 Fences ........................................................................................................................ 4 2.1 Output ................................................................................................................................... 4 2.2 User Report Variables ........................................................................................................... 4
3 Site Map Reports ...................................................................................................... 10 3.1 Input .................................................................................................................................... 10 3.2 Output ................................................................................................................................. 10 3.3 User Report Variables ......................................................................................................... 11
4 Reports ..................................................................................................................... 13 4.1 Fence Reports ..................................................................................................................... 13 4.2 Site Map Reports................................................................................................................. 13
Figures
Figure 1 – Current gINT Library File Location .......................................................................................... 2 Figure 2 – Library Merge/Copy ................................................................................................................ 2 Figure 3 – Merge gINT Library Objects ................................................................................................... 3 Figure 4 – Example Fence Report ........................................................................................................... 4 Figure 5 – Fence Report User Report Variables ...................................................................................... 8 Figure 6 – Fence Post Legend Showing All Options ............................................................................... 9 Figure 7 – DG_COM_HOLE_TYPE Library Table ................................................................................. 10 Figure 8 – Site Map Report Data Marker Properties .............................................................................. 11 Figure 9 – Site Map Report User Report Variables ............................................................................... 12
Tables
Table 1 – Field Colours ........................................................................................................................... iii Table 2 – Fence User Report Variables .................................................................................................. 4 Table 3 – Site Map User Report Variables ............................................................................................ 11 Table 4 – Fence Reports ....................................................................................................................... 13 Table 5 – Site Map Reports ................................................................................................................... 13

Fence and Map Tool gINT Reports Datgel User Guide ii DFMT-UG-001 - 2.07- February 2013
About the Product The Datgel Fence and Map Tool gINT Reports is a collection of gINT reports and library objects which provide an extensive range of data presentation options, along with dynamically generated scales bars and legends/keys. The Tool is based on two databases structures: DGD and AGS RTA.
There are 5 major components of the Tool:
1. Fence reports, with numerous output time user defined data presentation options
2. Dynamic fence post legend
3. Map reports
4. Dynamic map key
5. Dynamic scale bars for both fence and map reports
You need to complete the installation procedure (see Installation on page 1 before you can use the Fence and Map Tool.
Support
12 months support and maintenance is included with the license purchase. For technical support please email [email protected] or call +61 2 8202 8600.
System Requirements
gINT
The product requires gINT 8.2.004 or higher to run. The tool comprises of Fence and Site Map reports that require gINT Professional.
Hardware and Operating System
Same system requirements as gINT 8.2, see: http://www.gintsoftware.com/products_requirements.html.
Conventions and typography used in this guide
Note: Tips and additional Information to help you.
> Used to indicate a series of menu commands.
e.g. Select File > Open.
| Used to indicate a gINT Application Group, Application, Table Group or Table , e.g. DATA DESIGN | Project Database
Bold Text Items you must select, command buttons, or items in a list.
e.g. Navigate to UTILITIES | Convert Projects (4th
tab).
Italics Emphasis Use to emphasize the importance of a point such as parameters.
e.g. Data Entry – Check Omit Must Save prompt when save is required
CAPITALS Names of keys on the keyboard. for example, SHIFT, CTRL, or ALT.
KEY+KEY Key combinations, for example CTRL+P, or ALT+F4.

Fence and Map Tool gINT Reports Datgel User Guide iii DFMT-UG-001 - 2.07- February 2013
Code Snippet Indicates a code snippet within a paragraph
Code sample Indicates a sample program codes inserted in user guide e.g.
public override string ToString ()
File name or path Used for formatting file name and paths e.g. di_lib.glb or
V:\10 gINT\Datgel Install Files\
Table_Name Database table name, e.g. POINT_TABLE.
Field_Name Database field name; e.g. PointID
Command line Command line, presented exactly as it must be entered e.g.
cdir
Field Colours
Each of the fields in the project tables have been coloured to improve the data entry process as indicated below in Table 1.
Table 1 – Field Colours
Field Colour Field Name and Explanation
Yellow gINT Key Field – mandatory data entry
Pastel Purple AGS Data – data associated with the AGS Data Interchange Format
Pastel Green Calculated Field – data is written to this field by Datgel’s code
Pastel Beige Data Entry Field – data should be entered into this field, or data in this field influences the calculation
Pastel Red Legacy Data Field – historic data entered here, is typically from an old database
Pastel Blue Output Option – used to control how data displays on a report
Pastel Orange Remark or Metadata Field – additional data associated with the primary information
Grey Read-only


Fence and Map Tool gINT Reports – Datgel User Guide 1 DFMT-UG-001 - 2.07- February 2013
1 Installation
1.1 Installation Overview
There are two parts to the installation process:
Choose database type
Merge gINT library objects
1.2 Package Contents
Your software purchase may have come with the following contents:
Application CD which normally has the following folders: \gINT Files
\Documentation
1.3 Before Installation
A few basic preparations can help ensure an effortless installation.
Make sure that the computer where you plan to install the program meets the minimum hardware and software requirements.
Note: If you’re in one of the following situations, then your gINT files have been set up already and you may proceed to Section 2.
In the trial version of the Fence and Map Tool, the library will be locked and you cannot merge any gINT Library Objects into your Library file, or make changes to this Library file. In this case, you have to use the locked library as-is.
Steps1.4 and 1.5 have already been completed by Datgel’s developers, yourself or a colleague.
If you don’t have existing gINT files then you may wish to just use the example Fence and Map Tool gINT Files provided on the DVD.
1.4 Choose and Implement a Project Database Structure
If you are already using a DGD or an AGS RTA type database then you do not need to modify your project database structure, and should use the library corresponding to your current database structure.
If you are not already using a DGD or an AGS RTA type database and associated library then you will have been supplied a standardised version of one of them when you purchased the Datgel Fence and Map Tool. It is advised that you use the supplied standard database structure to create your future project files, if you do not then the Datgel Fence and Map Tool will not work correctly.
1.5 Merge gINT Library Objects
If you have purchased the Fence and Map Tool gINT Reports, then you have full access to the library objects, and you may proceed with the following steps to merge the gINT Library components into your Library file.
1. Make a backup copy of your existing library file. By default this is located at:
C:\Users\Public\Documents\Bentley\gINT\libraries\

Fence and Map Tool gINT Reports – Datgel User Guide 2 DFMT-UG-001 - 2.07- February 2013
IMPORTANT: If you are not already using a DGD or an AGS RTA type database and associated library then you will have been supplied a standardised version of one of them when you purchased the Datgel Fence and Map Tool.
When you proceed to step 2 you must select the standardised DGD or AGS RTA type database and associated library. If you do not, the Datgel Fence and Map tool will not work correctly.
2. Start gINT and open the library and project file you wish to use with Datgel Fence and Map Tool gINT Reports.
The opened project and library files are displayed at the top of the gINT Window.
Figure 1 – Current gINT Library File Location
3. Select UTILITIES | Lib Merge/Copy
Figure 2 – Library Merge/Copy
4. Check the bullet that reads Merge From.
5. In the Source Library File pane, browse the installation CD for file
Datgel Fence and Map Tool lib #.##.glb where #.## is the version number.
6. Check the bullet that reads Select All.
7. Check the bullet that reads Query On Overwrite.

Fence and Map Tool gINT Reports – Datgel User Guide 3 DFMT-UG-001 - 2.07- February 2013
8. Click button to move all tables from the Available Source Tables pane on the left to the Tables to Merge/Copy pane on the right side.
Figure 3 – Merge gINT Library Objects
9. Click Execute. This process may take several minutes to complete.
Take care to read the overwrite dialog and click Yes if you wish to overwrite the file, ELSE click No.
This will merge in the reports, lookup lists, and other library objects which are related to the Tool.
10. Click OK to finish the merge.

Fence and Map Tool gINT Reports – Datgel User Guide 4 DFMT-UG-001 - 2.07- February 2013
2 Fences
2.1 Output
Fence Reports for range of page sizes and orientations have been set up, and they all operate the same way.
Figure 4 – Example Fence Report
2.2 User Report Variables
The user report variables can be used to define the details of the title block, the properties of the site map and how the entities are displayed on the Fence Report. A list of the user report variables and an explanation of how they are used is provided below in Table 2.
Table 2 – Fence User Report Variables
Name Value Notes
Title Subsurface Section Report title
Drawn Enter person’s initials/name
Date Drawn Enter date
Checked Enter person’s initials/name
Date Checked Enter date
Figure Number Enter text. If left blank, it will default to “Figure 1”.

Fence and Map Tool gINT Reports – Datgel User Guide 5 DFMT-UG-001 - 2.07- February 2013
Name Value Notes
Map Orientation B, N Sets the orientation of the site map. B = Baseline end points (default), N = North up
Override Sitemap Scale 1 (for 1:1000) Overrides the scale of the site map by the selected value. By default the site map scale is the same as the fence x axis
Sitemap Lower Left Corner East Overrides the coordinates of the lower left hand corner of the site map to the specified coordinates.
Sitemap Lower Left Corner North
Sitemap Angle Relative North CCW
Rotates the site map counter-clockwise through the specified angle. If the coordinates of the lower left corner are specified, the rotation is centred on the lower left corner, otherwise it is centred on the centre of the site map entities
Stick L L = Legend/material graphic (default)
S = Stick/line
GM = Geology Map Code colour
G1 = Geology Project Unit colour
G2 = Geology Project Unit 2 colour
GD = Geology Project Unit 1 and Geology Project Unit 2 OR = Origin colour C = CPT Soil Behaviour Type Colour (only if you’re licensed for the CPT Tool)
GU1 = Geology Project Unit 1 colour
GU2 = Geology Project Unit 2 colour
GU3 = Geology Project Unit 3 colour
GUD = Geology Project Unit 1 and Geology Project Unit 2 colour
Combinations such as “L G2” will show both graphics
Stick CPT S
Stick DCP S
Scope Geology Unit Legend Project, Current Fence Defines the scope of the geology unit legend
Coloured Graphic Log Black, General Symbol, Origin
Sets the graphic log colour source, leave blank for default colour.
Black: Override all colours to Black
General Symbol: General Symbols will be used instead of the default Material Symbols
Origin: Material Symbols set to origin colour
Depth Scale L# / R#
EOH Text Y Prints hole depth at bottom of fence post
Material Name L# / R# L entered in these fields will print the info on the left side of the fence posts and R will print the info on the right side; if data exists for that hole.
Enter a number after L or R to offset the entity in that direction by that number. For example, L10 will print the entity on the left side offset by 10 mm.
The Type of Core Column field determines which core photo column type to print on the fence posts. The available options are:
VSC (Visual Sketch Column)
CPC (Core Photo Column)
Graphic Name L# / R#
Origin Text L# / R# (AGS RTA only)
Formation Text L# / R# (DGD only)
Project Unit Text L# / R#
USCS Text L# / R#
qc Max Scale 5, 10, 20, 40
qc Rf Plot t, c
VS Text L# / R#
SPT N Text L# / R#
SPT N Plot L# / R#

Fence and Map Tool gINT Reports – Datgel User Guide 6 DFMT-UG-001 - 2.07- February 2013
Name Value Notes
SPT N and RQD Plot L# / R# DIC (Downhole Image Column)
VSC & CPC (Visual Sketch Column and Core Photo Column.
The Core Image Column field determines whether to print the core photo column on the left or right side of the fence posts. This field must be assigned a value when the type of Core Column field is assigned.
The Backfill field will print the piezometer column if data is found in the Piezometer table. Otherwise, it will print the well column from the Backfill/Well table.
Well Area Width defines the width of the backfill column
Pocket Penetrometer Text L# / R#
Sample Interval L# / R#
Sample Text L# / R#
DCP Plot L# / R#
Consistency Text L# / R#
Rock Strength Text L# / R#
Rock Strength Histogram Plot L# / R#
Rock Strength Bar Plot L# / R#
Display Point Load Test Y
Fracture Spacing Histogram (Average Defect Spacing)
L# / R#
Fracture Spacing Bar Chart L# / R#
Fracture Frequency Plot L# / R#
Weathering Text L# / R#
Weathering Histogram L# / R#
Weathering Bar Chart L# / R#
RQD Plot L# / R#
RQD Text L# / R#
Core Image Column Type VSC, CPC, DIC, VSC & CPC
Core Image Column Position L# / R#
Drilling Water Levels L# / R#
Piezo Levels L# / R#
Backfill L# / R#
Well Area Width (mm) #
In-situ Perm Text L# / R#
In-situ Perm K Plot L# / R#
In-situ Perm Lugeon Plot L# / R#
In-situ Density L# / R#
ASS Display Liming Rate Net Y Note: Scr cannot be shown with SPOS. If both Scr and SOS are checked, then Scr will be shown.
ASS Scr Y
ASS SPOS Y
ASS Net Acidity Y
ASS Potential Y
ASS Criteria Q,T Entering Q will post the QASSIT Criteria data on the fence posts, and entering T will post the ASS Types on the fence posts.
ASS Left Offset # Distance in mm the ASS entities on the left / right side of the post will offset, default is 0.
ASS Right Offset #
Lab USCS Text L# / R#
PSD Percent Fines Text L# / R#

Fence and Map Tool gINT Reports – Datgel User Guide 7 DFMT-UG-001 - 2.07- February 2013
Name Value Notes
PSD D50 Text L# / R#
PSD DMF Text L# / R#
Lab CBR Text L# / R#
RMR Histogram L# / R#
UCS Text L# / R#
Geotech Chem Plot Left Code Lookup
Geotech Chem Plot Left Test Type Lookup
Geotech Chem Plot Left Code Unit Lookup
Geotech Chem Plot Left Minimum #
Geotech Chem Plot Left Maximum #
Geotech Chem Plot Right Code Lookup
Geotech Chem Plot Right Test Type
Lookup
Geotech Chem Plot Right Code Unit
Lookup
Geotech Chem Plot Right Minimum
#
Geotech Chem Plot Right Maximum
#
Rock Tensile Strength Text L# / R#
Point Load Index Text L# / R#
Ten Percent Fines Text L# / R#
Emerson Class Text L# / R#
Moisture Content Text L# / R#
Dry Density Text L# / R#
Shrink-Swell Index Text L# / R#
Plasticity Index Text L# / R#

Fence and Map Tool gINT Reports – Datgel User Guide 8 DFMT-UG-001 - 2.07- February 2013
Figure 5 – Fence Report User Report Variables

Fence and Map Tool gINT Reports – Datgel User Guide 9 DFMT-UG-001 - 2.07- February 2013
Figure 6 – Fence Post Legend Showing All Options

Fence and Map Tool gINT Reports – Datgel User Guide 10 DFMT-UG-001 - 2.07- February 2013
3 Site Map Reports
3.1 Input
If your project has a high density of PointIDs, then you may have a problem with PointID labels overplaying on Site Map reports. By default the PointID label will display at 12 o’clock, i.e. above the data marker. You may manually override the PointID label position by setting the analogue clock position in the project field POINT.Map_Post_Position.
For example:
6 represent 6 o’clock and displays below the data marker
10:30 represents the time of 10:30 and displays to the top left the data marker
3.2 Output
Site maps of a range of page sizes and orientations have been set up, and they all operate the same way.
Data markers have been defined for each Hole Type in the DG_COM_HOLE_TYPE library table. gINT creates the map key based on the hole types in the given project and the info in the DG_COM_HOLE_TYPE library table.
Figure 7 – DG_COM_HOLE_TYPE Library Table

Fence and Map Tool gINT Reports – Datgel User Guide 11 DFMT-UG-001 - 2.07- February 2013
Sometimes you may need to change the way the data marker is displayed. You can do this, as a one off, in the OUTPUT Application group by:
1. Select the Properties button to bring up the Site Map Report Properties
2. Select the Data Representation Tab
3. Here you can edit data marker, height, colour, turn on and off the ID plotting and if the IDs are opaque (halo that prints around text)
Figure 8 – Site Map Report Data Marker Properties
3.3 User Report Variables
The user report variables can be used to define the details of the title block and the properties of the site map report. A list of the user report variables and an explanation of how they are used is provided below in Table 3.
Table 3 – Site Map User Report Variables
Name Value Notes
Title Site Map Report title
Drawn Enter person’s initials/name
Date Drawn Enter date
Checked Enter person’s initials/name
Date Checked Enter date
Figure Number Enter text. If left blank, it will default to “Figure 1”.
Scale 1 (for 1:1000) Overrides the scale of the site map by the selected value.
Min E (m) Overrides the coordinates of the lower left hand

Fence and Map Tool gINT Reports – Datgel User Guide 12 DFMT-UG-001 - 2.07- February 2013
Min N (m) corner of the site map to the specified coordinates.
Destination or Source D Defines if the Destination E/N (primary East and North fields) or Source N/E will be used by the map. Only applies to DGD databases.
Figure 9 – Site Map Report User Report Variables
Fence and Map Tool gINT Reports – Datgel User Guide 13 DFMT-UG-001 - 2.07- February 2013
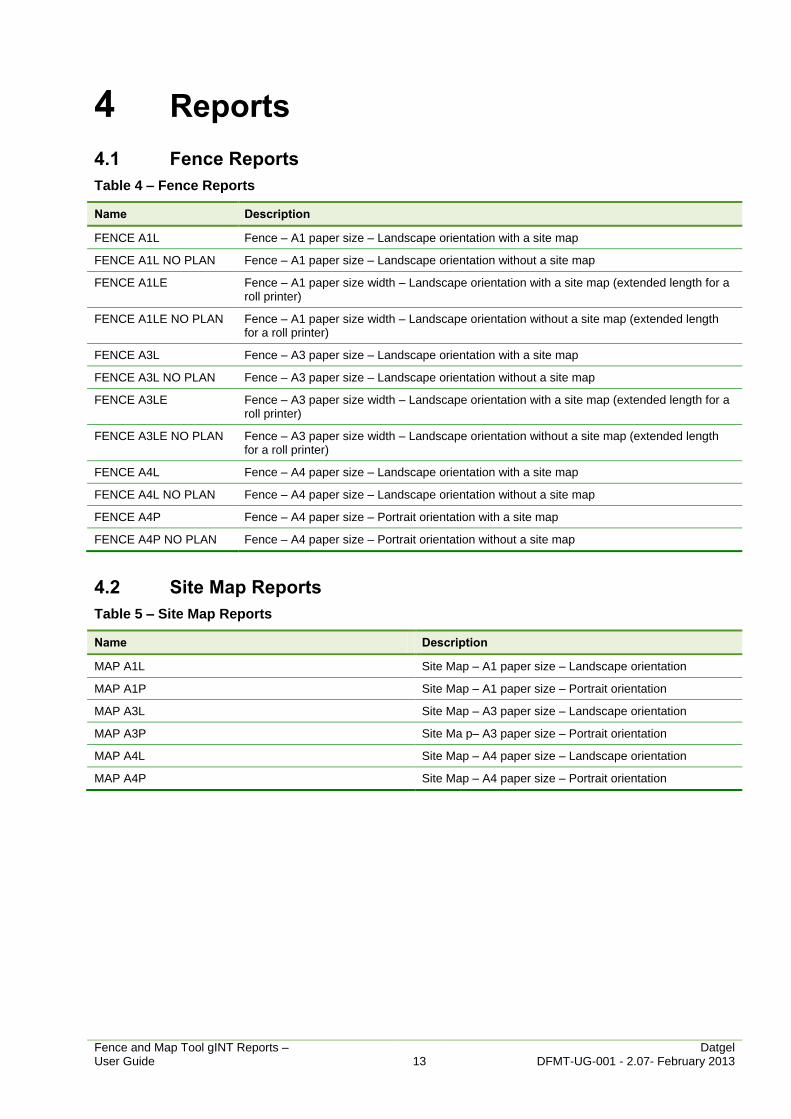
4 Reports
4.1 Fence Reports
Table 4 – Fence Reports
Name Description
FENCE A1L Fence – A1 paper size – Landscape orientation with a site map
FENCE A1L NO PLAN Fence – A1 paper size – Landscape orientation without a site map
FENCE A1LE Fence – A1 paper size width – Landscape orientation with a site map (extended length for a roll printer)
FENCE A1LE NO PLAN Fence – A1 paper size width – Landscape orientation without a site map (extended length for a roll printer)
FENCE A3L Fence – A3 paper size – Landscape orientation with a site map
FENCE A3L NO PLAN Fence – A3 paper size – Landscape orientation without a site map
FENCE A3LE Fence – A3 paper size width – Landscape orientation with a site map (extended length for a roll printer)
FENCE A3LE NO PLAN Fence – A3 paper size width – Landscape orientation without a site map (extended length for a roll printer)
FENCE A4L Fence – A4 paper size – Landscape orientation with a site map
FENCE A4L NO PLAN Fence – A4 paper size – Landscape orientation without a site map
FENCE A4P Fence – A4 paper size – Portrait orientation with a site map
FENCE A4P NO PLAN Fence – A4 paper size – Portrait orientation without a site map
4.2 Site Map Reports
Table 5 – Site Map Reports
Name Description
MAP A1L Site Map – A1 paper size – Landscape orientation
MAP A1P Site Map – A1 paper size – Portrait orientation
MAP A3L Site Map – A3 paper size – Landscape orientation
MAP A3P Site Ma p– A3 paper size – Portrait orientation
MAP A4L Site Map – A4 paper size – Landscape orientation
MAP A4P Site Map – A4 paper size – Portrait orientation