dg5 vhand user’s manual - dgtech engineering solutions · dg5 vhand user’s manual . 2 ......
TRANSCRIPT

DG5 VHand USER’S MANUAL

DGTech Engineering Solutions 2004
2

DGTech Engineering Solutions 2004
3
TABLE OF CONTENTS
INTRODUCTION 4
HARDWARE INSTALLATION 5
PACKAGE CONTENT 5 CONNECTIONS TO THE PC AND POWER SUPPLY 6 PUT ON THE GLOVE 7 PUT OFF THE GLOVE 8 HOW TO CLEAN THE GLOVE 9
MODES OF USE 10
SOFTWARE INSTALLATION 11
DRIVER AND SOFTWARE 11 GLOVE CONFIGURATION AND CALIBRATION 12
SOFTWARE OVERVIEW 14
MOUSE EMULATION 14 SOUND GLOVE LOOP STATION 15
FEATURES 16
MAIN FEATURES 16
OPTIONAL DEVICES OVERVIEW 17
PRECAUTIONS 18
TROUBLESHOOTING 19

DGTech Engineering Solutions 2004
4
INTRODUCTION
Congratulations! You have chosen a DGTech product. We feel that this product will encounter your satisfaction, supporting your business and your free time. Practical and economic, DG5-VHand is a professional and multipurpose Data Glove. The combination of a good resolution with a low price makes the DG5-VHand a perfect solution to expand and integrate your virtual reality project, telerobotic applications and motion capture tasks, or anything you can think it is possible to do with a data-glove. In order to facilitate the design of data glove oriented applications, DG5-VHand is integrated with a complete and elegant software suite.
Main Glove Applications: • Motion Capture • Virtual Reality • Games • Music • Robotic Manipulation

DGTech Engineering Solutions 2004
5
HARDWARE INSTALLATION Package Content Before to start to install the device, check if the package is arrived complete. The package must contain (refer to the below picture to help yourself finding the components): 1. the glove equipped with the sensors 2. the control board 3. the RS232 and power supply cables 4. the power supply 5. this manual 6. the CDROM containing the driver and the software 7. the extension cable

DGTech Engineering Solutions 2004
6
Connections to the PC and power supply
The control board is connected to the PC serial port and to the power supply with a unique cable. In the follow, the connection procedure is descripted step by step.
Plug the connection cable (4) to the control board.
Plug the RS232 tip of the connection cable to the PC COM port
Plug the power connector to the power supply.

DGTech Engineering Solutions 2004
7
Put on the Glove
Carefully, put on the glove. Due to the elstic nature of the glove, more it is used more it becomes comfort- table.
Carefully, dress up the bracelet of the control board and fix it on the forehand. The red led has to be placed on the right.
Plug the glove flat connector to the control board.
DGTech Engineering Solutions 2004
8
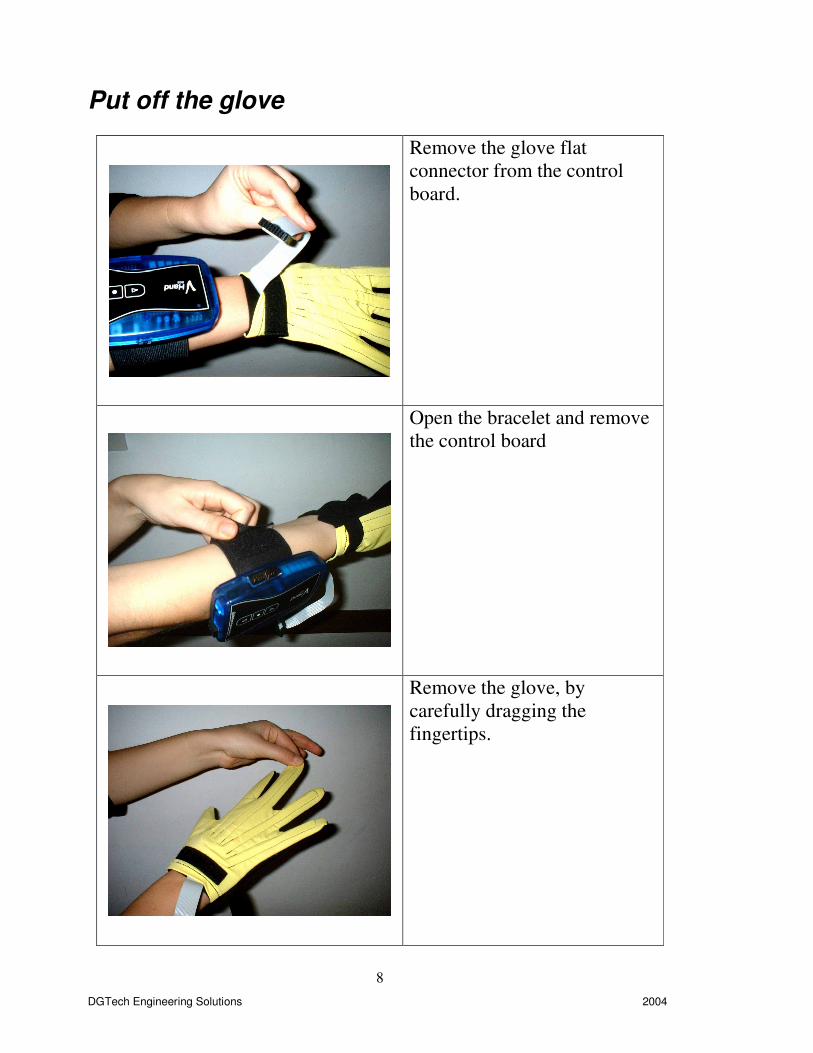
Put off the glove
Remove the glove flat connector from the control board.
Open the bracelet and remove the control board
Remove the glove, by carefully dragging the fingertips.

DGTech Engineering Solutions 2004
9
How to clean the glove
Very carefully, remove the bend sensors. Pay attention, do not stress the sensor cables. Drag the sensors from the bottom, do not drag directly the cable, otherwise the connections could be damaged.
Attach the male and female velcros of the glove belt together. This operation has to be performed in order to avoid damages of the glove cloth.
Wash the glove with cold water (max 30°)

DGTech Engineering Solutions 2004
10
Modes of Use
The control board can be mounted in different positions, depending on the applications. Some of the following configurations require the use of the extension cable. • on the forehand (standard mode) • on the forearm; • on the cincture (needs the extension cable) • on the desk (needs the extension cable)

DGTech Engineering Solutions 2004
11
SOFTWARE INSTALLATION Driver and software - Insert the CD (6) inside the CDROM and follow the setup information. If CD autostart does not work properly, open the CDROM in Resource of Computer and launch the installation program “Setup.exe”,then consider the following steps:
Click Next.
If you are an expert user, you can choose the installation folder and click Next, otherwise simply click Next, to install programs and drivers in the default folder.
Click Next again.
The installation is terminated. Drivers and the software suite have been successfully installed. Click Close.

DGTech Engineering Solutions 2004
12
Glove configuration and calibration
ATTENTION: the glove has to be turned on before to start ANY application which use it.
Launch the Vhand setup application from Start bar.
Choose the Glove version: left or right.
Click on Settings label and choose the COM Port where the glove is connected. Enable or disable to low pass filter by clicking on the relative button.

DGTech Engineering Solutions 2004
13
Click on the Calibrate label and start the guided calibration procedure. Follow the displayed instructions.
If necessary, click on the diagnosis label, in order to check the glove’s sensors and buttons functionalities.
Click OK if you want to exit the program and save the new settings or click Exit to keep the old settings.

DGTech Engineering Solutions 2004
14
SOFTWARE OVERVIEW REMEMBER: periodically check the glove web page (www.dg-tech.it/glove/) in order to download the latest versions of the software suite and new utilities and programs for the DG5-VHand data glove (completely free)
Mouse Emulation This program emulates the mouse behaviour. It is possible to freely choose the finger-action combinations. In example: the thumb can be associated to the horizontal pointer movements and the middle movements can be associated to the left mouse button.

DGTech Engineering Solutions 2004
15
Sound Glove Loop Station This program is intended for DJs and disco music fan. With the finger movements you can control playback of five track loops. It becomes really easy to perform sophisticated sound effects in real time, like fade in fade out, etc…

DGTech Engineering Solutions 2004
16
FEATURES
Main Features
• Sensors: 5 proprietary bend sensors, one per finger
• Resolution: 10 bit (1024 positions) • Transmission RS-232 38400 BAUD full
duplex • Frequency 100 Hz • Power Supply 12 V DC • Dimension One size fits many sizes. • Software Glove Control Panel, Sound Glove Loop
Station, Mouse Emulation, fully supported SDK
• OS Windows 95, 98, 2000, XP
DGTech Engineering Solutions 2004
17
Optional devices overview Please check the dgtech webpage to evaluate the device availability.
• 2 DOF roll and pitch sensor: it is an extremely low cost device which can be easily connected to the glove expansion port. It measures two orientation angles.
• 5 DOF ultrasonic tracker. This tracker measures the glove position plus two orientations (roll and pitch)
• Touch response unit. This device let the user to feel tactile response. • Pressure Device. This sensors acquire the fingertip pressure and
transmit it to an opportune software.
SPARE PARTS LIST It is possible to buy some part of the glove, to repair it. Contact us for a quotation of the different spare parts. Available spare parts: 1. Lycra Glove 2. Sensors 3. Cable set 4. Power Supply

DGTech Engineering Solutions 2004
18
PRECAUTIONS Handle the glove really carefully in order to extend the glove time of life. It is a fragile device. The use of the glove is intented for professional users. REMEMBER: the glove has to be turned on BEFORE to start any application which consider the glove usage. The power supply uses high tension,. Please manage it really carefully and keep it far from children. Does not put on the glove water or liquids. Do not put the hand in water when the glove is dressed up, both if it is turned off or on.

DGTech Engineering Solutions 2004
19
TROUBLESHOOTING
Problems Possible Solutions The glove does not turn on 1. check the power supply
connections; 2. check the control board switch
position The software starts but it does not see the glove.
1. check the power supply connections
2. the glove has to be turned on before the application is started. Try to restart the application with the glove on.
3. check the com port settings on the VHand setup program
4. check the serial connection The software does not start 1. contact the glove support via
email: [email protected] One or more fingers do not work correctly
1. be sure to have correctly calibrate the glove, try to recalibrate it with the VHand setup program.
2. Set on the low pass filter on the Vhand setup program.
3. check the glove sensor connections
If your problem does not appear in the previous table, please do not hesitate to contact us at [email protected].

DGTech Engineering Solutions 2004
20
ADVANCED SYSTEMS DESIGN
www.dg-tech.it