diamond machining technology ñ hayes memorial drive ... · pdf filediamond machining...
TRANSCRIPT

Diamond Machining Technology 85 Hayes Memorial Drive Marlborough MA 01752 USA • Tel: 508.481.5944 or 800.666.4DMT Fax: 508.485.3924 • www.dmtsharp.com
SHARPENING WITH DMT COPYRIGHT © 2008-2016 DMT
1 of 15
Basic and Tips A cutting edge is comprised of the intersection of two planes to form an edge. The angle formed by these two planes is the bevel angle. Sharpening is the removal of material from a bevel face to keep a well-defined edge. Sharp tools are as essential as anything to an outdoorsman/sports enthusiast, chef/home-chef, DIYer, woodworker, etc. and maintaining a sharp edge allows for a safer easier working environment. Keeping a sharp edge on your tools is quick and simple when using a DMT diamond stone in pocket and bench stone models. Using interrupted or polka-dot models, the diamonds remove material from the blade as it slides across the sharpener. The material is swept away by a water lubricant and caught in the recessed holes of the plastic polka-dot pattern and washed off after use. This polka-dot pattern is extremely efficient and great for blades with long cutting edges. DMT also produces a line of continuous diamond surfaced stone—Dia-Sharp
® models. This line offers a choice if a continuous surface is preferred and are
also ideal for tools with small points. DMT diamond stones come in four standard grits of extra-coarse, coarse, fine and extra-fine. Some models offer two additional grits: a 120 micron / 120 mesh extra extra coarse and a 3 micron / 8000 mesh extra extra fine. There are also 3 grits of diamond Dia-Paste™ (6 micron, 3 micron & 1 micron) and one in DiaSpray™ (.5 micron). The paste and spray are mainly used for polishing, such as backs and faces of chisels and plane blades. All grits are color coded and measured in microns. DMT’s grit chart follows and the demonstrator should study and possibly use as a handout in the sharpening seminar.
A few quick strokes when you notice your blade starts to dull and you will never be without a keen edge. Most people new to diamond sharpening tend to over sharpen their edges. About 30 strokes on a conventional sharpening stone is equivalent to about 5 or 6 strokes on a DMT diamond stone. This will save time and extend the life of your tool. You can also repair lost edges or nicks by starting with larger grit sizes and stepping down as the edge gets sharper. One thing to try to do is match the bevel with the sharpener when sharpening. Even more important than matching the bevel however is to keep a constant angle so you have a consistent edge.
TIP: Grit Selection Rough work = coarser grits; fine work = finer grits. If an edge is damaged, you need an aggressive grit to repair and then progress into finer grits based on the edge you need. You progress in the grits as far as the work dictates. Cutting rope or boxes, you want a bite to your edge, so coarse diamond is sufficient. Slicing tomatoes or planing wood or other fine cutting tasks, means finishing with fine or extra-fine diamond grits.
TIP: Quarter Trick An easy way to get this angle is to stack two quarters on top of each other and lay the blade on them. This angle is about 20°. (Good for bench stones / knives)
TIP: Paper Guide Another method to get a quick angle guide is to fold a small piece of paper in half on the diagonal, then in half again along the same edge. The paper edge goes from 90° to 45° to a self standing 22.5° guide. (Good for bench stones / knives)
TIP: Marker Trick Take a marker and color the bevel. Next do your best to match the bevel and take a stroke on the blade. If the mark on the bevel is still visible, adjust the angle until you remove the rest of the marker. (Good for all type sharpening stones / all bevels)
Quick Review Sharpening = removal of material.
Sharpening keeps tools safer and easier to use.
Recessed plastic Diamond Whetstone™ vs. Dia-Sharp® product line.
Start with larger grit sizes then step down.
Match bevel angle (but keep angle constant).
Color Coding, different micron and grit sizes.
Do not over sharpen.

Diamond Machining Technology 85 Hayes Memorial Drive Marlborough MA 01752 USA • Tel: 508.481.5944 or 800.666.4DMT Fax: 508.485.3924 • www.dmtsharp.com
SHARPENING WITH DMT COPYRIGHT © 2008-2016 DMT
2 of 15
Why DMT® Diamond?
DMT diamond sharpeners give many advantages over other types of sharpeners as well as other brands of diamond sharpeners. First of all, DMT uses mono-crystalline diamond: A type of diamond that is superior to poly-crystalline diamond, what many other brands of diamond sharpeners use.
The difference between the two is like an ice cube (mono-crystalline) and a snow-cone (poly-crystalline) where the mono-crystalline diamond is made up of one particle and holds its form while the poly-crystalline diamond is made up of many small particles that get sheared off during use.
Another advantage of diamonds over other types of sharpening stones is that you can be sure the diamonds are harder than any material you are sharpening. DMT products will sharpen even the hardest materials such as ceramic and tungsten carbide. Diamond works faster than conventional whetstones and yet, doesn’t take off as much material as an electric grinder, which can ruin the steel temper if burned during grind.
DMT products can be used dry or with water as a lubricant. Only a few sprays of a spray bottle and you are ready to sharpen. This avoids the mess caused by other products that need to be lubricated with oil or immersed in water before use.
DMT diamond stones are guaranteed to be flat. Most other brands are not flat when you purchase them and will hollow out in the middle after repeated use. Flatness is essential in sharpening all woodworking tools like chisels and plane irons. DMT manufactures the DiaFlat™ Lapping Plate to restore all conventional stones to a perfectly flat condition.
Quick Review-Why DMT® Diamond? DMT uses only mono-crystalline diamond.
Sharpen even the hardest materials with diamond.
Sharpens faster and easier and longer tool life
Lubricate with water.
Guaranteed flat.

Diamond Machining Technology 85 Hayes Memorial Drive Marlborough MA 01752 USA • Tel: 508.481.5944 or 800.666.4DMT Fax: 508.485.3924 • www.dmtsharp.com
SHARPENING WITH DMT COPYRIGHT © 2008-2016 DMT
3 of 15
DMT® Color Grit System
OTHER: Ceramic steel: 2200 mesh / 7 micron
Dia-Paste™ / Polishing Medium 6 micron, 3 micron, 1 micron DiaSpray™ (0.5 micron) Diamond paste and diamond spray for polishing, such as backs and faces of chisels and plane blades.

Diamond Machining Technology 85 Hayes Memorial Drive Marlborough MA 01752 USA • Tel: 508.481.5944 or 800.666.4DMT Fax: 508.485.3924 • www.dmtsharp.com
SHARPENING WITH DMT COPYRIGHT © 2008-2016 DMT
4 of 15
Basic Sharpening – Knife When sharpening a knife it is usually suggested that you use a 20° to 25° angle. It is not so much important that you get the exact 20° angle as it is that you keep the angle constant. A good way to get this angle is to stack two quarters on top of each other and lay the blade on them. This angle is about 20°. One way to find out if you have matched the bevel is to take a marker and color the bevel. Next do your best to match the bevel and take a stroke on the sharpener. If there are still parts of the bevel with marker on them, adjust the angle of the knife to remove the rest of the marker. (Note: You can use this to match all bevels, not just knives).
A fine stone is usually sufficient for sharpening the blade of a knife; the coarse stone can be used before fine if the blade has dulled. Knives can be sharpened on virtually all DMT® products. With the blade at a 20° angle slide it across the sharpening stone from heel to toe of the blade. This will ensure that you are sharpening a constant edge on the blade. Be sure not to roll the blade because this will change the angle of the bevel. Also make sure you take the same number of strokes per side to ensure the bevels are the same. Complete 5 to 6 strokes on a side and then alternate to the other side with 5 to 6 strokes.
Quick Review Use a DMT Diamond Whetstone™, DuoSharp® or DiaSharp® bench stone OR
Use any DMT portable sharpener: 70mm, 4”, Diafold®, Mini-Sharp®, Mini-Hone® models
Approximate 20° angle but keep it constant (two quarters).
Marker trick (can be used on all bevels, not just knives).
Usually 25 micron (fine) is enough (45 micron (coarse) if dull).
Heel to toe (don’t roll knife).
Same amount of strokes per side.
Use DMT Dia-Paste™, DiaSpray™ or Dia-Sharp® Extra Extra Fine 8” Bench Stone for a polished edge.

Diamond Machining Technology 85 Hayes Memorial Drive Marlborough MA 01752 USA • Tel: 508.481.5944 or 800.666.4DMT Fax: 508.485.3924 • www.dmtsharp.com
SHARPENING WITH DMT COPYRIGHT © 2008-2016 DMT
5 of 15
Basic Sharpening – Knife with DMT’s Diamond Steel™ Sharpener Sharpening is easy using the following instructions.
Maintain a constant angle. (Note: 20° is usually best, but not essential.)
All it takes is a few quick light, gentle strokes.
Practice makes perfect! If you aren’t satisfied with the result, try again. You’ll get the hang of it in no time!
1. With one hand hold the Sharpening steel point resting on a work surface. Use the color-coded tip guard that comes with the steel or rest the tip onto a towel. Using the other hand, hold the knife securely. (Shown above left picture.)
2. Lean the blade on the steel, approximately at a 20° angle.
3. Maintain the angle, and apply moderate pressure as you stroke by pushing the knife down and against the steel.* Repeat with the other side of the knife and the other side of the steel.
4. Alternate sides and stroke the knife evenly on both sides. The number of strokes will depend on how dull the knife was to begin with.
*Since we want to sharpen the entire blade edge, start the stroke near both handles and push the blade against the steel to end up at both tips. Note: An alternative method often preferred by more experienced sharpeners is to sharpen free hand.
All other tips apply – maintain the angle, moderate pressure with fluid strokes – not ‘hacking’. (Show above right picture.)
Quick Review Lighter strokes will produce a finer edge.
Never test edge on body.
Speed is not essential for good sharpening.
It is more important to maintain a constant angle.
Sharp knives are safer! A dull knife is more likely to slip than a sharp one.
Start

Diamond Machining Technology 85 Hayes Memorial Drive Marlborough MA 01752 USA • Tel: 508.481.5944 or 800.666.4DMT Fax: 508.485.3924 • www.dmtsharp.com
SHARPENING WITH DMT COPYRIGHT © 2008-2016 DMT
6 of 15
Basic Sharpening – Knife with DMT’s Aligner™ Guided Sharpener Attach the knife to the clamp assembly as follows:
Loosen thump screw on clamp.
Hold knife handle and place clamp on the middle of the knife, on the back edge of the knife spine.
Rest back side of clamp on a table and tighten thump screw until clamp securely grips knife.
Adjust guide rods at one of the 7 settings. Setting Guide Rods
The Aligner™ guide maintains a consistent angle when sharpening, with seven settings to adjust this angle for a perfect bevel. Setting the guide rods closer to the clamp decreases the bevel angle and produces an acutely sharp edge but less durable and one that will require regular sharpening. Extending the guide posts out for the clamp produces a steeper angle and a more durable edge although not as keen an edge. Always set both guide rods at the same setting (count notches between guide rods and clamp) and try to match the existing knife bevel whenever possible. Narrow blades may require that guide rods be set very close to the clamp.
Sharpening is inherently dangerous, use caution with sharp edges. Always hold the knife handle, not the clamp.
Start at point ‘a’; slide with light pressure to point ‘b’. Lift stone to ‘c’ and repeat stroke to‘d’.
Repeat on other side of knife; sharpen both sides equally.
Finish with one smooth long pass along each side of the blade.
Work down to finer grits to produce the sharpest edge.
Carefully loosen thumb screw and remove knife.
Guided Sharpening on a Bench Stone The Aligner clamp can also be used as a convenient honing guide with any of the DMT bench stones.
Use DMT Diamond Whetstone™, DuoSharp® or Dia-Sharp® bench stone models
Extend guide rods out two additional notches (if using Diamond Whetstone) and only one extra notch when using DuoSharp® and Dia-Sharp® bench stones and use as a skid on table top adjacent to the bench stone OR ensure the diamond surface and the skid surface are co-planer eliminating the need to extend the rods extra notches.
Match bevel
Long fluid strokes back and forth
Micro bevel (Done with a few strokes only at slightly greater angle – one more notch outward.)
Quick Review Secure clamp on knife spine.*
Select settings for guide rods – matching both sides
Stroke blade six to eight times per side
Start with coarser grit and work to finer.
Lighter pressure for a keener edge. *For longer knives, adjust clamp working down the spine to sharpen the entire blade.
Guide Rods
Keyhole

Diamond Machining Technology 85 Hayes Memorial Drive Marlborough MA 01752 USA • Tel: 508.481.5944 or 800.666.4DMT Fax: 508.485.3924 • www.dmtsharp.com
SHARPENING WITH DMT COPYRIGHT © 2008-2016 DMT
7 of 15
Basic Sharpening – Knife with Magna-Guide® Sharpening System Attach the knife to the clamp assembly as follows:
Loosen thump screw on clamp.
Hold knife handle and place clamp on the middle of the knife, on the back edge of the knife spine.
Rest back side of clamp on a table and tighten thump screw until clamp securely grips knife.
Adjust guide rods at one of the 7 settings. (Please refer to previous Aligner™ sharpening instruction page diagrams for guide rod settings.)
Setting Guide Rods
The Aligner™ guide maintains a consistent angle when sharpening, with seven settings to adjust this angle for a perfect bevel. Setting the guide rods closer to the clamp decreases the bevel angle and produces an acutely sharp edge but less durable and one that will require regular sharpening. Extending the guide posts out for the clamp produces a steeper angle and a more durable edge although not as keen an edge. Always set both guide rods at the same setting (count notches between guide rods and clamp) and try to match the existing knife bevel whenever possible. Narrow blades may require that guide rods be set very close to the clamp.
Attach the magnetic guide rod to the Diafold® double sided sharpener on the side of the finer grit of the two as you will start sharpening with the coarser grit and move to the finer. (So if you are working with the FWEF – Extra-Fine/Fine sharpener, place the magnetic guide rod on the green side first, as you will start sharpening with the red side.) Insert the magnetic guide rod into one of the keyholes on either guide rod and stroke gently 6 to 8 strokes on one side of the knife. Withdraw the magnetic guide rod from the keyhole, flip the Diafold® sharpener over and insert magnetic guide rod into the other keyhole slot on the other rod. Repeat 6 to 8 strokes on that side. Switch the magnetic guide rod to the other side of the double sided Diafold® sharpener to step to the finer grit and finish sharpening. (In our example, switch the magnetic rod to the red side to start sharpening on the green.) Continue as before with 6 to 8 strokes on a side. Finish with lighter pressure for a keener edge.
Quick Review Secure clamp on knife spine. (For longer knives, adjust the clamp working down the spine to sharpen the entire blade.)
Select settings for guide rods – matching both sides
Stroke blade six to eight times per side
Start with coarser grit and work to finer.
Lighter pressure for a keener edge.
Sharpening is inherently dangerous, use caution with sharp edges. Always hold the knife handle, not the clamp.

Diamond Machining Technology 85 Hayes Memorial Drive Marlborough MA 01752 USA • Tel: 508.481.5944 or 800.666.4DMT Fax: 508.485.3924 • www.dmtsharp.com
SHARPENING WITH DMT COPYRIGHT © 2008-2016 DMT
8 of 15
Basic Sharpening – Serrated Knife Sharpening a serrated knife is easily accomplished using the DMT Diafold® Serrated Knife Sharpener with its tapered diamond file from ¼” to 1/16” in diameter. Using the same technique shown for sharpening scissors or shears, rest the tip of the knife blade on a table edge under an overhead light and pivot the knife so that the serrations reflect light back at your brightly. This ensures the serrations are level (parallel) to the tabletop. Match the diameter of the sharpener to the diameter of the serrations and stroke back and forth gently using about ½” of the rod while slightly rotating the sharpener. Sharpen all the same size serrations first, then move the sharpening rod to the next size and sharpen those.
This is a versatile sharpener and not confined for use with serrated knives. For in the field, it can serve as mini-steel for sharpening straight edges. It is perfect for sharpening a bread knife, karambit knife, gut hook knife, kukri knife or kukri machete, sickle or any concave curved edge blade or tool.
Quick Review Rest back edge of knife on table top edge.
Level the bevel.
Match rod diameter to serration diameter.
Short back and forth strokes while rotating rod.

Diamond Machining Technology 85 Hayes Memorial Drive Marlborough MA 01752 USA • Tel: 508.481.5944 or 800.666.4DMT Fax: 508.485.3924 • www.dmtsharp.com
SHARPENING WITH DMT COPYRIGHT © 2008-2016 DMT
9 of 15
Basic Sharpening – Scissors or Shears Contrary to popular belief, sharpening scissors is quite easy. When sharpening a pair of scissors or shears, it is helpful to understand that the bevel angle is much steeper than the average knife. The bevel angle is approximately 75° to 80°, and it is easily sharpened with a couple of helpful tips. Any hand-held DMT sharpener is a good choice for sharpening scissors or shears. For micro-shears, use the Diafold® Flat File or Mini-Hone® Sharpeners that are better suited for narrow clearances.
Level the Bevel
Always hold the handle of the scissor blade you are about to sharpen in order to maintain control of the blade. Hold the handle of the scissor in your left hand. Rest the tip of the back edge on the edge of a table at a compfortable height. Working directly underneath a bright light, angle the handle of the scissor clockwise (10° to 15°) until the bevel reflects the overhead light back to you brightly. Rotate back and forth slightly until you have the angle that results in the brightest reflection; at this point the bevel is level (parallel) to the tabletop. Hold the Diafold® (or Mini-Sharp® or Mini-Hone® or other pocket DMT® whetstone) sharpener parallel to the tabletop and stroke into and across the scissor bevel from the hinge joint to the tip of the scissor blade (using the magic marker trick will ensure you have sharpened the entire bevel surface). Usually 5 to 6 strokes will refresh a dulled edge and you may find it useful to progress from the coarse to fine grits especially for scissors intended for fine work. Rotate the scissors clockwise 180° and grasping the other handle, repeat the process for the other scissor blade.
Marker Trick Take a marker and color the bevel. Next do your best to match the bevel and take a stroke on the blade. If the mark on the bevel is still visible, adjust the angle until you remove the rest of the marker.
Quick Review Hold the handle of the blade you are sharpening.
Level the bevel.
Match the bevel.
Long fluid strokes into the cutting edge.
Five to six strokes on each side.

Diamond Machining Technology 85 Hayes Memorial Drive Marlborough MA 01752 USA • Tel: 508.481.5944 or 800.666.4DMT Fax: 508.485.3924 • www.dmtsharp.com
SHARPENING WITH DMT COPYRIGHT © 2008-2016 DMT
10 of 15
Basic Sharpening – Pruners There are two different pruners used for two different purposes. Bypass pruners are designed for pruning live plant growth and function very similarly to scissors in that one blade (the single bevel blade) bypasses another (the anvil blade). The other style of pruner is termed an anvil style which is intended for trimming dead wood. In the anvil style, a double bevel blade closes down on a flat anvil stop. The method of sharpening each style of pruner is slightly different. DMT’s Diafold® Single Sided or Flat File, Mini-Hone® or Mini-Sharp® sharpeners are great for sharpening the more narrow profile of pruners. The double sided model is good for larger shears or loppers that have a wider profile for sharpening.
Bypass Pruner
In sharpening bypass pruners which only have a single bevel, the method is as taught previously with scissors: rest the tip of the blade on a tabletop edge and ‘level the bevel’. Once you have accomplished this, stroke into the cutting edge 6 to 7 times from heel to toe as shown below.
Anvil Pruner
In sharpening the double bevel anvil pruners, start by stroking away from the cutting edge for 6 to 7 strokes. Then, turn the pruners over (rotate 180°) and finish by stroking into the cutting edge. This removes the wire edge burr you may have produced by stroking away from the cutting edge in step one. Since the cutting edge of the anvil pruners closes down on a flat surface, it is important to remove an even amount of material from the entire length of the cutting edge. If more material is sharpened away from one area of the blade, it will not close down completely on the anvil and therefore, will not cut cleanly.
Quick Review There are two different pruner designs: bypass and anvil.
Bypass pruners are single bevel; anvil pruners are double bevel.
Sharpen bypass style similarly to scissors, but only one cutting edge.
Sharpen anvil style first away from the edge, then into the edge.
Anvil Pruner

Diamond Machining Technology 85 Hayes Memorial Drive Marlborough MA 01752 USA • Tel: 508.481.5944 or 800.666.4DMT Fax: 508.485.3924 • www.dmtsharp.com
SHARPENING WITH DMT COPYRIGHT © 2008-2016 DMT
11 of 15
Basic Sharpening – Chisel and Plane Iron Flatten the Back (for a new or damaged chisel or plane iron)
When sharpening a new chisel or plane iron you are going to need to flatten the back— only the last ½” or so— before you sharpen the bevel. This is done by lubricating an extra-coarse Diamond Whetstone™, DuoSharp
® or Dia-Sharp® Bench Stone with water and
placing the chisel back down on the sharpener. Push downward on the back and move the chisel from one end of the diamond stone to the other the long way with long fluid strokes. Once a uniform scratch pattern has been established using the extra-coarse stone, step down through the grits to extra fine. Use the same procedure as with the extra-coarse stone. After all the diamond grits have been used you may step down into the Dia-Paste™, a diamond compound for polishing. Spread this paste on a substrate such as close-grained hard wood, MDF, cast iron, or glass and repeat the same procedure over the paste to achieve a true polished finish. Be certain to carefully clean all traces of paste off the chisel before stepping to finer micron size. This will give the back a mirror, polished finish. After the back is flattened (and polished) the bevel can be sharpened.
Sharpen the Bevel
Cradle the chisel or plane iron as shown below. Holding the chisel and iron in this manner simplifies keeping the angle constant. Make long fluid strokes back and forth pushing the face of the blade downward onto the stone. Use a fine diamond stone unless the blade is very dull or chipped, in which case start with a coarse diamond stone.
After sharpening the bevel, you may want to put a micro bevel on the end of the blade. This is done by holding the chisel in the same manner and matching the bevel to an extra-fine diamond stone. Now lift the chisel up a small amount to an angle about 1 or 2 degrees greater than the bevel. Only a few strokes and you have a sharp micro bevel. Finally, lay the back down flat again and give two quick strokes to take the wire burr off the back side.
Quick Review Flatten back of new/damaged chisel or plane iron.
Use a DuoSharp® or Dia-Sharp® Bench Stone or DMT® Diamond Whetstone™.
Thumb and fingers are easy makeshift jig.
Match bevel.
Long fluid strokes back and forth.
Micro bevel (few strokes at slightly greater angle if desired).
Two final strokes on the back to take off burr.
Chisel – sharpening – across the stone’s surface
Plane Iron – sharpening – across the stone’s surface

Diamond Machining Technology 85 Hayes Memorial Drive Marlborough MA 01752 USA • Tel: 508.481.5944 or 800.666.4DMT Fax: 508.485.3924 • www.dmtsharp.com
SHARPENING WITH DMT COPYRIGHT © 2008-2016 DMT
12 of 15
Basic Sharpening – In-Cannel Gouge An in-cannel gouge is a bit tricky because it cannot be sharpened on a flat bench stone. It is rather simple however using either a fine Diafold® Serrated Knife Sharpener or the appropriate size Diamond Honing Cone to match the radius of the gouge or the DMT Diamond Wave™. Take the sharpener and match it to the bevel (see marker technique). To hold the gouge, cradle it from underneath in your hand with the bevel facing toward you (see illustration following). Usually gouges have about a 20° bevel (Either hold the gouge at 20° and the sharpener horizontal or vice versa). Run the sharpener up and down the bevel gradually moving from one side to the other. Finally, take the burr off the outside by laying the gouge flat on a DMT Diamond Whetstone™, DuoSharp® or Dia-Sharp® Bench Stone. Drag it lightly across the stone while rolling the gouge left to right to get the burr off the entire bevel.
Quick Review Use conical sharpener that matches radius.
Match bevel (usually 20°).
Run sharpener up and down bevel all the way across.
Deburr on DMT Diamond Whetstone™, DuoSharp® or Dia-Sharp® Bench Stone.
Diamond Machining Technology 85 Hayes Memorial Drive Marlborough MA 01752 USA • Tel: 508.481.5944 or 800.666.4DMT Fax: 508.485.3924 • www.dmtsharp.com
SHARPENING WITH DMT COPYRIGHT © 2008-2016 DMT
13 of 15
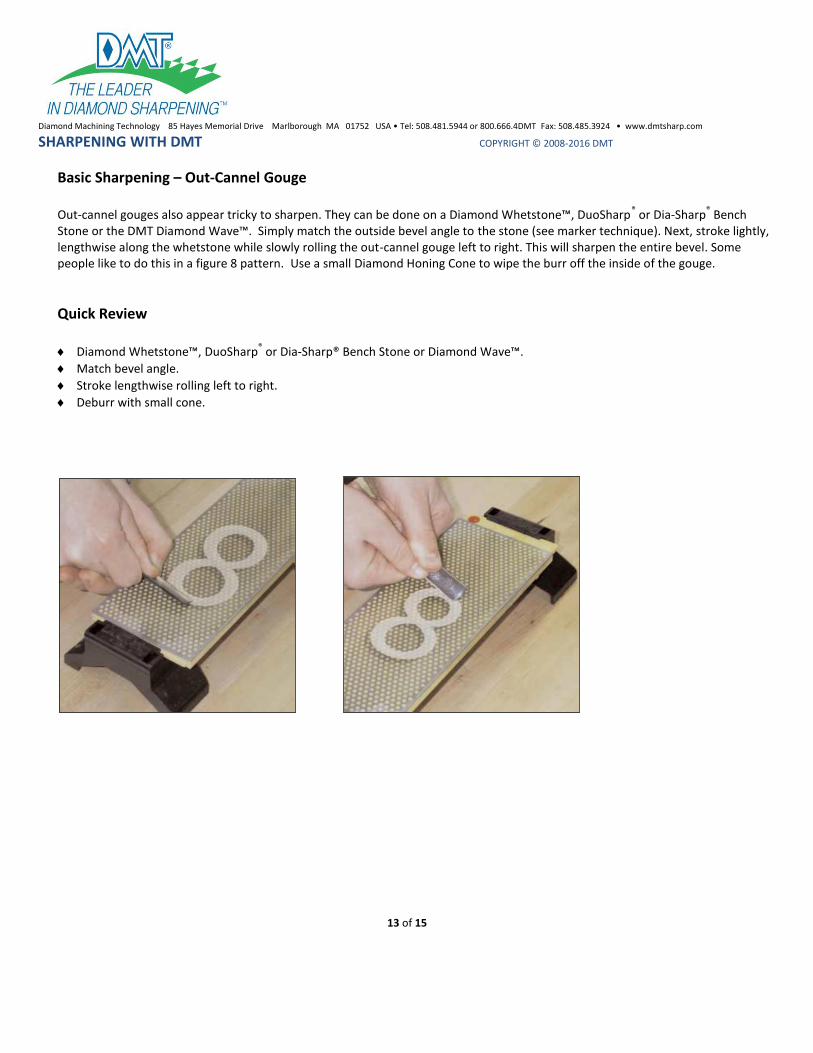
Basic Sharpening – Out-Cannel Gouge Out-cannel gouges also appear tricky to sharpen. They can be done on a Diamond Whetstone™, DuoSharp
® or Dia-Sharp
® Bench
Stone or the DMT Diamond Wave™. Simply match the outside bevel angle to the stone (see marker technique). Next, stroke lightly, lengthwise along the whetstone while slowly rolling the out-cannel gouge left to right. This will sharpen the entire bevel. Some people like to do this in a figure 8 pattern. Use a small Diamond Honing Cone to wipe the burr off the inside of the gouge.
Quick Review Diamond Whetstone™, DuoSharp
® or Dia-Sharp® Bench Stone or Diamond Wave™.
Match bevel angle.
Stroke lengthwise rolling left to right.
Deburr with small cone.

Diamond Machining Technology 85 Hayes Memorial Drive Marlborough MA 01752 USA • Tel: 508.481.5944 or 800.666.4DMT Fax: 508.485.3924 • www.dmtsharp.com
SHARPENING WITH DMT COPYRIGHT © 2008-2016 DMT
14 of 15
Basic Sharpening — Concave / Convex Bevels with DMT Diamond Wave™ Match the radius of the concave or convex bevel to the matching radius on the Wave and use short (approximately 1”) strokes with light pressure to restore the edge.
If you have difficulty matching the original bevel angle, try coloring the bevel with a marker and take a single stroke to determine if you are at the correct angle, too high or too low.
Finish with lighter pressure to ensure a finer edge finish.
Some sweep and thumbnail gouges will not match the Wave surface exactly and will require some rotation during stroking to completely sharpen the entire bevel.
Quick Review Diamond Wave™ in fine or extra-fine
Use dry or with water for a lubricant.
Match radius using short strokes
Use light pressure only—let the diamonds do the work.
Clean after use and store dry.

Diamond Machining Technology 85 Hayes Memorial Drive Marlborough MA 01752 USA • Tel: 508.481.5944 or 800.666.4DMT Fax: 508.485.3924 • www.dmtsharp.com
SHARPENING WITH DMT COPYRIGHT © 2008-2016 DMT
15 of 15
Cleaning and Maintenance of DMT® Diamond Stones Cleaning and care of a DMT stone is simple and necessary for best performance. After using a DMT diamond stone simply wet it (if it is not already lubricated with water) and wipe the slurry off with a rag.
This slurry is evidence that the sharpener has done its job.
If the swarf is not wiped off the sharpener after use it may clog up the diamond and not allow it to sharpen as well as it could were it clean.
Also, once in a while it is a good idea to get a common cleaning agent (i.e. Comet or AJAX) and scrub the sharpener with a nylon brush or Scotch Brite pad. This will ensure the sharpener is not clogged with slurry and will allow for optimal sharpening.
Finally, make sure you store your sharpeners dry after you clean them off.
Quick Review Clean off with rag after use.
Not cleaning will result in clogging.
Scrub with cleaner periodically.
Store dry.