digital electronics combinational logic an overview
TRANSCRIPT

Digital Electronics
Combinational LogicAn Overview

Combinational Logic
2
This presentation will• Introduce the basics of combinational and
sequential logic.
• Present the logic symbol, logic expression, and truth table for the AND gate, OR gate, and INVERTER gate.
• Review the design for a simple combinational logic circuit.
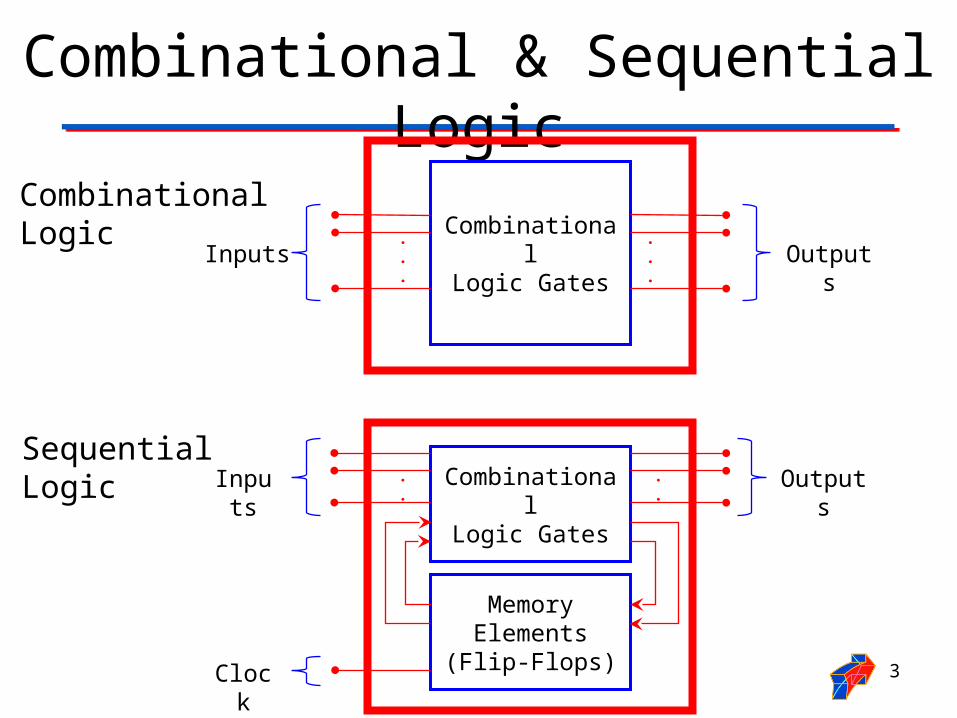
Combinational & Sequential Logic
3
CombinationalLogic Gates
Inputs Outputs...
.
.
.
CombinationalLogic Gates
.
.Inputs Outputs
Memory Elements
(Flip-Flops)
.
.
Clock
CombinationalLogic
SequentialLogic
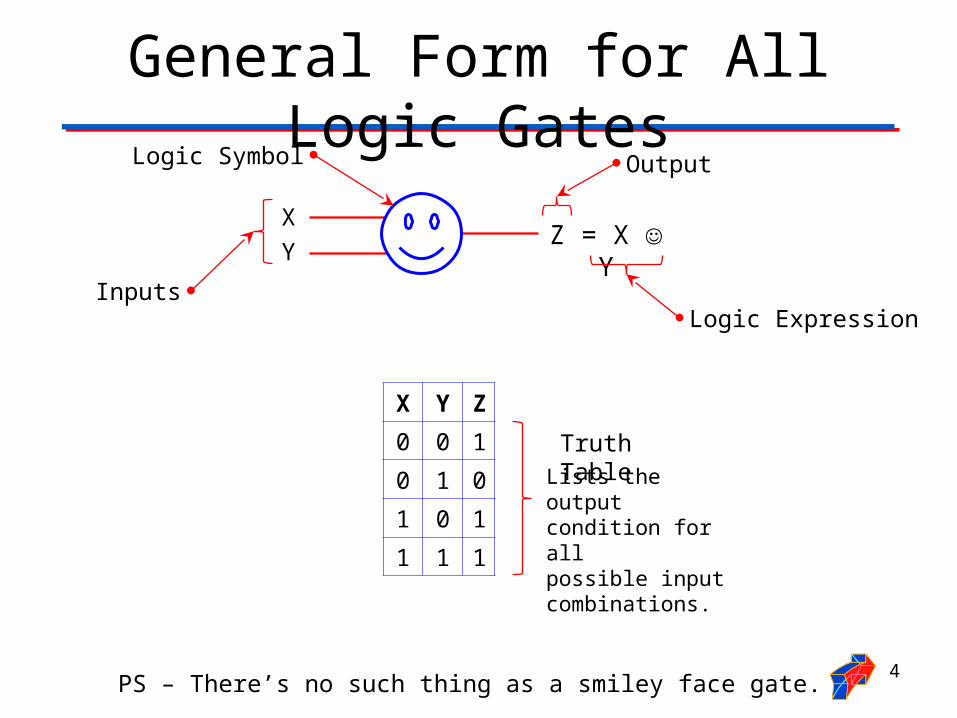
General Form for All Logic Gates
4
X Y Z
0 0 1
0 1 0
1 0 1
1 1 1
X
YZ = X Y
PS – There’s no such thing as a smiley face gate.
Logic Symbol
InputsLogic Expression
Output
Lists the output condition for all possible input combinations.
Truth Table
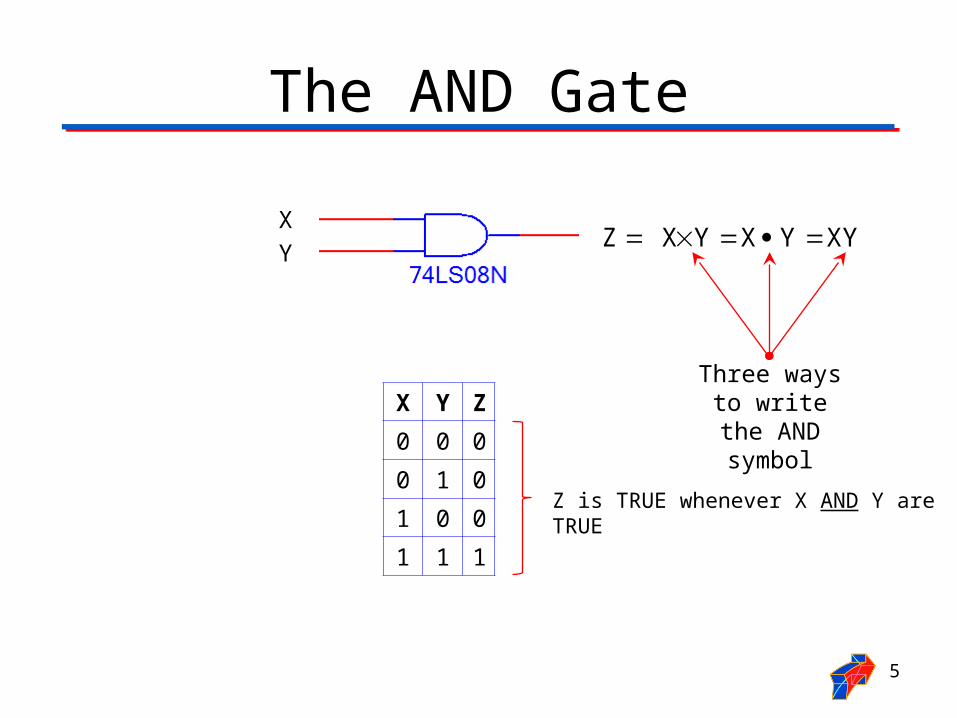
The AND Gate
5
X XYYXY XZ
Y
Three ways to write the
AND symbolX Y Z
0 0 0
0 1 0
1 0 0
1 1 1
Z is TRUE whenever X AND Y are TRUE

The OR Gate
6
XY XZ
Y
X Y Z
0 0 0
0 1 1
1 0 1
1 1 1
Z is TRUE whenever X OR Y are TRUE
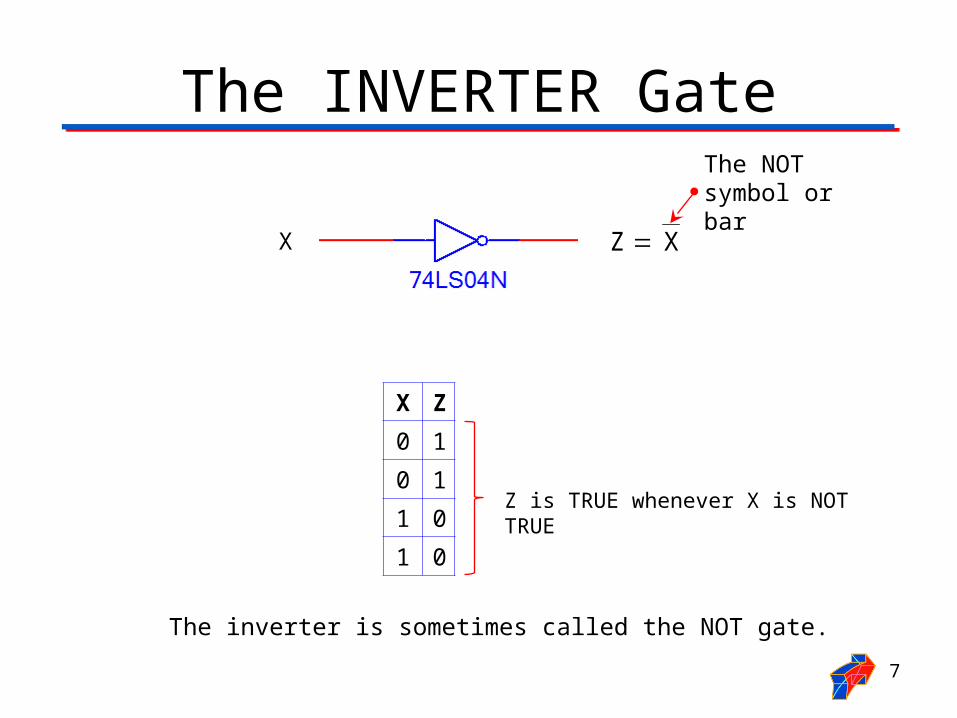
The INVERTER Gate
7
X X Z
X Z
0 1
0 1
1 0
1 0
Z is TRUE whenever X is NOT TRUE
The inverter is sometimes called the NOT gate.
The NOT symbol or bar

AOI Logic• Combinational logic designs implemented with AND
gates, OR gates, and INVERTER gates are referred to as AOI designs.
• AOI Logic is just one type of combinational logic. Unit 2 of this course will spend a significant amount of time exploring other forms of combinational logic and their applications.
• The purpose of this introduction is to provide a basis of understanding for the combinational logic subsection of the Board Game Counter design. 8
AND OR INVERT

Combinational Logic Design Example
The following is a review of the design and operation of a combinational logic circuit using AOI logic. This design controls the safety buzzer in a car and was designed to the following specifications:
The buzzer is On whenever the door is open OR the key is in the ignition AND the seat belt is NOT buckled.
9

Design Example: Truth Table
10
Car Buzzer – Truth Table
Seat Belt Key Door Buzzer
0 0 0 0
0 0 1 1
0 1 0 1
0 1 1 1
1 0 0 0
1 0 1 1
1 1 0 0
1 1 1 1
Seat Belt
Key
Door
Buzzer
0 : Door is NOT Open1 : Door is Open
0 : Key is NOT in the Ignition1 : Key is in the Ignition
0 : Buzzer is OFF1 : Buzzer in ON
0 : Seat Belt is NOT Buckled1 : Seat Belt is Buckled
The buzzer is On whenever • the door is open • OR • the key is in the ignition AND the seat belt is NOT buckled.

Design Example: Circuit Design
11

Design Example: Functional Test (1 of 8)
12
Seat Belt Key Door Buzzer
0 0 0 0
0 0 1 1
0 1 0 1
0 1 1 1
1 0 0 0
1 0 1 1
1 1 0 0
1 1 1 1Logic ‘0’Logic ‘1’

13
Seat Belt Key Door Buzzer
0 0 0 0
0 0 1 1
0 1 0 1
0 1 1 1
1 0 0 0
1 0 1 1
1 1 0 0
1 1 1 1
Design Example: Functional Test (2 of 8)
Logic ‘0’Logic ‘1’

14
Seat Belt Key Door Buzzer
0 0 0 0
0 0 1 1
0 1 0 1
0 1 1 1
1 0 0 0
1 0 1 1
1 1 0 0
1 1 1 1
Design Example: Functional Test (3 of 8)
Logic ‘0’Logic ‘1’

15
Seat Belt Key Door Buzzer
0 0 0 0
0 0 1 1
0 1 0 1
0 1 1 1
1 0 0 0
1 0 1 1
1 1 0 0
1 1 1 1
Design Example: Functional Test (4 of 8)
Logic ‘0’Logic ‘1’

16
Seat Belt Key Door Buzzer
0 0 0 0
0 0 1 1
0 1 0 1
0 1 1 1
1 0 0 0
1 0 1 1
1 1 0 0
1 1 1 1
Design Example: Functional Test (5 of 8)
Logic ‘0’Logic ‘1’

17
Seat Belt Key Door Buzzer
0 0 0 0
0 0 1 1
0 1 0 1
0 1 1 1
1 0 0 0
1 0 1 1
1 1 0 0
1 1 1 1
Design Example: Functional Test (6 of 8)
Logic ‘0’Logic ‘1’

18
Seat Belt Key Door Buzzer
0 0 0 0
0 0 1 1
0 1 0 1
0 1 1 1
1 0 0 0
1 0 1 1
1 1 0 0
1 1 1 1
Design Example: Functional Test (7 of 8)
Logic ‘0’Logic ‘1’

19
Seat Belt Key Door Buzzer
0 0 0 0
0 0 1 1
0 1 0 1
0 1 1 1
1 0 0 0
1 0 1 1
1 1 0 0
1 1 1 1
Design Example: Functional Test (8 of 8)
Logic ‘0’Logic ‘1’

Design Example: IC Component View
20
1 2
321
321

Design Example Using LEDs
21
LED – Light Emitting Diode

LED – Light Emitting Diode
22
To Turn an LED ON
• The ANODE must be at a higher voltage potential (1.5v) than the CATHODE.
• The amount of current flowing through the LED will determine how bright it is.
• The amount of current is controlled by a series resistor. (not shown)
CATHODE (‒) (+) ANODE
← Current Flow

LED Examples
23
Logic 1
5 volts
CATHODEANODE
CATHODEANODELogic 0
0 volts
The 180 resistor controls the current that flows through the LED. This in turn controls its brightness.
The ANODE is NOT at a higher voltage potential than the CATHODE; the LED is OFF.
The ANODE is at a higher voltage potential than the CATHODE; the LED is ON.