digital voice services residential user guide - murray · *11 broadworks anywhere *72 call...
TRANSCRIPT
Digital Voice Services
Residential User Guide

2 | P a g e
Feature Access Codes
*62 Voice Portal
*86 Direct Voice Mail Retrieval
*77 Anonymous Call Rejection Activation
*87 Anonymous Call Rejection Deactivation
*11 Broadworks Anywhere
*72 Call Forwarding Always Activation
*73 Call Forwarding Always Deactivation
*90 Call Forwarding Busy Activation
*91 Call Forwarding Busy Deactivation
*92 Call Forwarding No Answer Activation
*93 Call Forwarding No Answer Deactivation
*94 Call Forwarding Not Reachable Activation
*95 Call Forwarding Not Reachable Deactivation
#76 Call Forwarding Selective Activation
#77 Call Forwarding Selective Deactivation
*69 Call Return
*70 Call Waiting Deactivation Per Call
*31 Calling Line ID Delivery Blocking Activation All Calls
#31 Calling Line ID Delivery Blocking Deactivation All Calls
*67 Calling Line ID Delivery Blocking Activation Individual Calls
*65 Calling Line ID Delivery Activation Individual Calls
*78 Do Not Disturb Activation
*79 Do Not Disturb Deactivation
*66 Last Number Redial
*12 Shared Call Appearance Location Activation
*13 Shared Call Appearance Location Deactivation
*74 Speed Dial 8
*75 Speed Dial 100
Note: Some Feature Access Codes may not work on specific devices due to manufacturer specifications and configurations.

3 | P a g e
Welcome to Murray Electric Digital Voice Services We take pride in providing superior and reliable digital voice services to our
valued customers.
This booklet should answer any questions you may have regarding digital
voice services, including how it works, configuration instructions, and how to use some of the main features.
For information on additional features and options available, please go to
your online Account Portal at https://mesphone.murray-ky.net or call 270-753-5312.
My Digital Voice telephone number is:
____________________________________
My Account Portal username and password are:
____________________________________
____________________________________

4 | P a g e
Inside this Booklet Feature Access Codes ........................................................................... 2
General Information .............................................................................. 6
What is Digital Voice Services? ............................................................ 6
Making Calls with Digital Voice Services ................................................ 6
Important 911 Information.................................................................. 7
Getting Started .................................................................................... 8
Accessing the Account Portal ............................................................... 8
Voice Portal Quick Setup ..................................................................... 9
Accessing Voice Portal (*62) ............................................................ 9
Direct Voice Mail Retrieval (*86) ....................................................... 9
CommPilot Voice Portal Menu ......................................................... 10
Voicemail Main Menu ..................................................................... 10
Play Messages Menu ...................................................................... 10
Features of Digital Voice Services ......................................................... 11
Features Overview ........................................................................... 11
Flash Calls....................................................................................... 11
Three-Way Calling ......................................................................... 11
Call Hold ...................................................................................... 11
Anonymous Call Rejection (*77) ........................................................ 12
Automatic Callback ........................................................................... 13
Broadworks Anywhere (*11) ............................................................. 14
Call Forwarding Always (*72/*73) ...................................................... 15
Call Forwarding Busy (*90/*91)......................................................... 16
Call Forwarding No Answer (*92/*93) ................................................ 17
Call Forwarding Not Reachable (*94/*95) ........................................... 18
Call Forwarding Selective (#76/#77) .................................................. 19
Call Return (*69) ............................................................................. 20
Call Waiting ..................................................................................... 20
Calling Line ID Delivery Blocking (*31/#31/*67) ................................. 21
CommPilot Express .......................................................................... 22
Do Not Disturb (*78/*79) ................................................................. 23
Last Number Redial (*66) ................................................................. 23

5 | P a g e
Priority Alert .................................................................................... 24
Selective Call Acceptance .................................................................. 25
Selective Call Rejection ..................................................................... 26
Sequential Ring ............................................................................... 27
Simultaneous Ring Personal .............................................................. 29
Speed Dial 8 (*74) ........................................................................... 30
Speed Dial 100 (*75) ....................................................................... 31
Two-Stage Dialing ............................................................................ 32
Voicemail Management........................................................................ 33
Aliases ............................................................................................ 33
Greetings ........................................................................................ 34
Voicemail Management ..................................................................... 35
Voicemail Password .......................................................................... 36
Voice Portal ..................................................................................... 36
Home Office (SOHO) Features .............................................................. 37
Alternate Number ............................................................................ 37
Call Notify ....................................................................................... 38
Custom Ringback User ...................................................................... 39
Remote Office .................................................................................. 40
Shared Call Appearance (*12/*13) ..................................................... 41
Toolbar - Business ........................................................................... 42
Frequently Asked Questions ................................................................. 43
Contact Information ............................................................................ 46
6 | P a g e
General Information
What is Digital Voice Services?
Digital Voice Services allow you to make and receive calls through your broadband Internet connection while still using the same telephone
equipment you already have.
You can call anywhere at any time for less, and your phone number can go everywhere you do!
Making Calls with Digital Voice Services
You can make calls by dialing the number on your phone, as you always have.
For calls within your area code, you may dial 7, 10, or 11 digits.
Example: 555-1212, 859-555-1212, or 1-859-555-1212
When dialing outside your area code, you may use 10 or 11 digits. Example: 859-555-1212 or 1-859-555-1212
To active the International calling feature, you will need to contact Murray
Electric Customer Service at 270-753-5312 or email
To place international calls, dial just as you would with a standard analog telephone.
International Access Code + Country Code + City Code + Number Example: 011 + 39 (Italy) + 81 (Naples) + Number
To answer a call, pick up your phone’s handset like you always have.
7 | P a g e
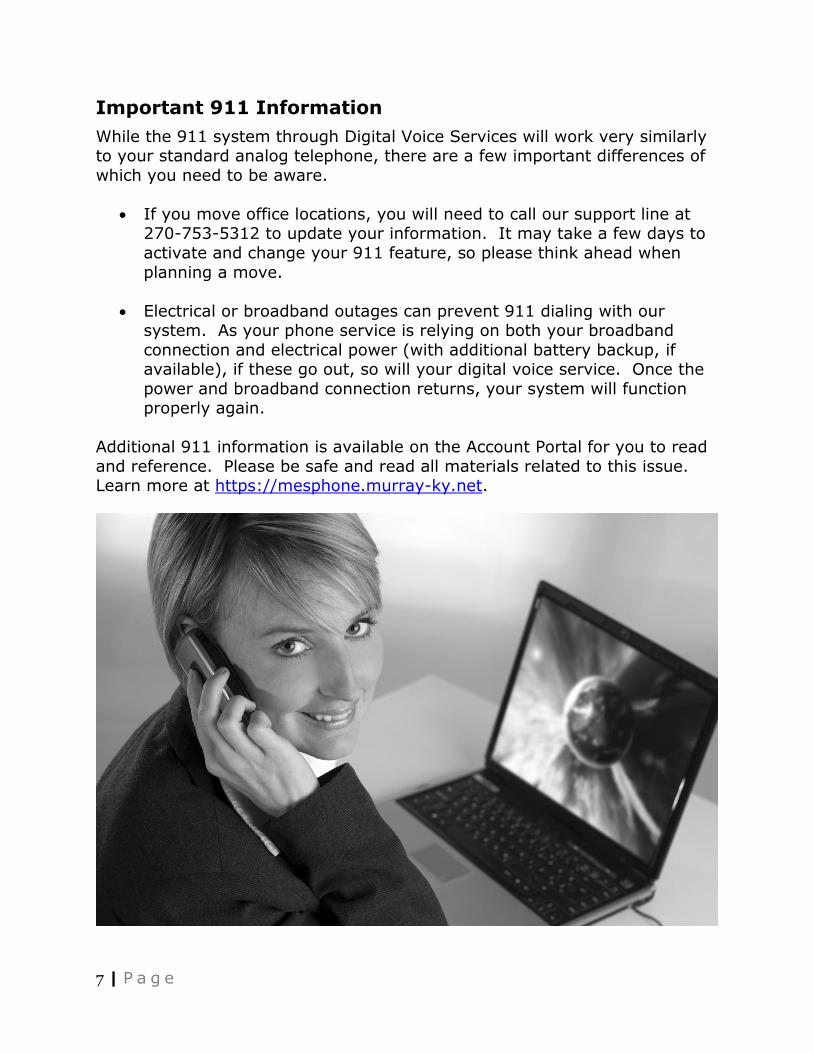
Important 911 Information
While the 911 system through Digital Voice Services will work very similarly to your standard analog telephone, there are a few important differences of
which you need to be aware.
If you move office locations, you will need to call our support line at 270-753-5312 to update your information. It may take a few days to
activate and change your 911 feature, so please think ahead when
planning a move.
Electrical or broadband outages can prevent 911 dialing with our system. As your phone service is relying on both your broadband
connection and electrical power (with additional battery backup, if available), if these go out, so will your digital voice service. Once the
power and broadband connection returns, your system will function properly again.
Additional 911 information is available on the Account Portal for you to read
and reference. Please be safe and read all materials related to this issue. Learn more at https://mesphone.murray-ky.net.

8 | P a g e
Getting Started
Accessing the Account Portal
You can access the account portal using either your phone number or your email address. You can login to your Account Portal and configure all the
User Features that Murray Electric Digital Voice Services has to offer by doing the following:
1. Open your web browser and point it to your account portal
(https://mesphone.murray-ky.net).
2. Enter the phone number or email address in the Username field and
your password in the Password field.
3. When you login for the first time, you will be prompted to create a 4-
digit CPNI security code.
4. After entering your CPNI code, you will be prompted to change your
password. The password must be at least 6 characters and contain at
least 1 number and one lower and uppercase letter.
5. You should now be on the Features Management page where you can
configure all the features available to you.
If you do not have your password when logging in for the first time, but do have your email address setup on the account, then you can utilize the
“Forgot Password?” link to get into your account by doing the following:
1. Open your web browser and point it to your account portal
(https://mesphone.murray-ky.net).
2. Select the “Forgot Password?” link on the left side of the screen.
3. In the Password Reset screen, enter your email address in the
Username field and click Submit.
4. Your password will be emailed to you within 30 minutes.
5. One you have received the email, you will want to click the link
provided and login to the user portal using the email address and the
temporary password. *If you do not use the link to confirm the Forgot
Password request, then the password will not be updated to the new
temporary one provided in the email.
6. When you login for the first time, you will be prompted to create a 4-
digit CPNI security code.
9 | P a g e
7. Once the CPNI code has been set, the Change Password screen will
prompt you to put in the current password (the temporary password)
and enter a new password. The new password must be at least 6
characters and contain 1 number, one lowercase letter, and one
uppercase letter.
8. You should now be on the Features Management page where you can
configure all the features available to you.
If you do not have an email address associated to the account, or do not
receive an email within 30 minutes, please contact us at 270-753-5312.
Voice Portal Quick Setup
All of your residential lines have voicemail service enabled by default. If any lines will not be utilizing voicemail, then the service can be deactivated from
the account portal.
Accessing Voice Portal (*62)
Follow the instructions below to record your personalized name for your
voicemail greeting and set your passcode in the voice portal.
1. Dial *62 from the phone number for which you are wishing to access
the voice portal.
2. Enter the passcode when prompted, the default passcode is 4227.
3. You will be prompted to enter a new passcode. It cannot contain all
repeated or consecutive digits (i.e. 0000 or 1234), the user’s own
extension or phone number, the user’s own extension or phone
number reversed, or a recent or reversed passcode.
4. Re-enter the new passcode a second time when prompted.
5. If your new passcode is accepted, you will hear “passcode has been
changed successfully”.
6. Follow the prompts to record your personized name.
7. Press * to go to the CommPilot Voice Portal where you can listen to
voicemail messages or configure additional settings.
Direct Voice Mail Retrieval (*86)
When you have new voicemail messages, you can go directly to your
voicemail box by dialing *86 from your phone.
10 | P a g e
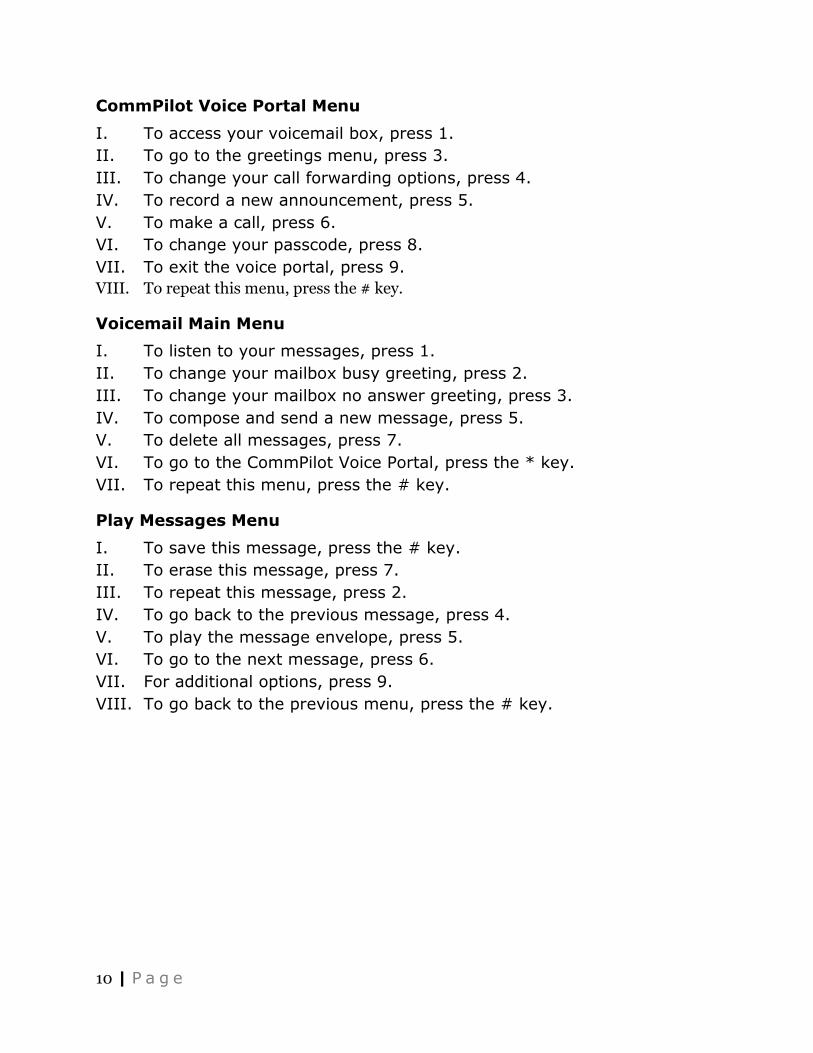
CommPilot Voice Portal Menu
I. To access your voicemail box, press 1.
II. To go to the greetings menu, press 3.
III. To change your call forwarding options, press 4.
IV. To record a new announcement, press 5.
V. To make a call, press 6.
VI. To change your passcode, press 8.
VII. To exit the voice portal, press 9.
VIII. To repeat this menu, press the # key.
Voicemail Main Menu
I. To listen to your messages, press 1.
II. To change your mailbox busy greeting, press 2.
III. To change your mailbox no answer greeting, press 3.
IV. To compose and send a new message, press 5.
V. To delete all messages, press 7.
VI. To go to the CommPilot Voice Portal, press the * key.
VII. To repeat this menu, press the # key.
Play Messages Menu
I. To save this message, press the # key.
II. To erase this message, press 7.
III. To repeat this message, press 2.
IV. To go back to the previous message, press 4.
V. To play the message envelope, press 5.
VI. To go to the next message, press 6.
VII. For additional options, press 9.
VIII. To go back to the previous menu, press the # key.

11 | P a g e
Features of Digital Voice Services
Features Overview
On the Home page of the Account Portal, there will be three sections, titled Basic Features, Advanced Features, and Voicemail Management. If you click
on one, it will expand to show you the available features that can be configured for your voice service.
The following pages contain instructions for configuring our most popular
features, like anonymous call rejection, call forwarding, call waiting, do not disturb, speed dial, etc. Please refer to the Account Portal for support and
information about additional features and options.
Flash Calls
Note: Flash calls are available on devices with flash functionality.
Three-Way Calling
Action Steps
To Start Three-Way Call
Note: If either of the two parties hangs
up, your call with the remaining party
is intact. If you started the call, the
other parties are disconnected when
you hang up.
While engaged in one call:
1. Press flash hook on phone. The initial call is
held.
2. Enter the phone number of the third party.
3. When the call is connected, press flash hook
again. All parties are now connected in a
three-way call.
4. To drop the add-on party, press the flash-
hook again.
Call Hold
Action Steps
To Use Call Hold
While engaged in one call:
1. Press flash hook on phone.
2. Press *22.
3. You can make a second call and toggle
between calls by pressing flash hook.
4. Hang up to disconnect your call with both
parties.
12 | P a g e
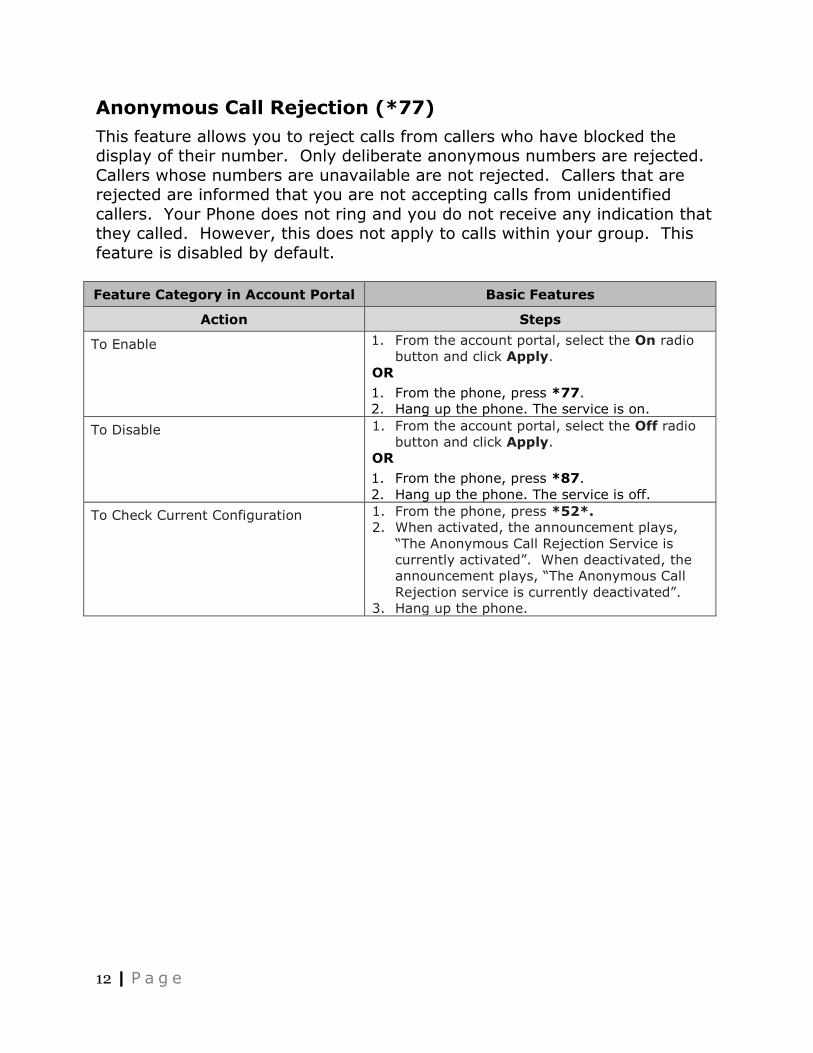
Anonymous Call Rejection (*77)
This feature allows you to reject calls from callers who have blocked the display of their number. Only deliberate anonymous numbers are rejected.
Callers whose numbers are unavailable are not rejected. Callers that are rejected are informed that you are not accepting calls from unidentified
callers. Your Phone does not ring and you do not receive any indication that they called. However, this does not apply to calls within your group. This
feature is disabled by default.
Feature Category in Account Portal Basic Features
Action Steps
To Enable 1. From the account portal, select the On radio
button and click Apply.
OR
1. From the phone, press *77.
2. Hang up the phone. The service is on.
To Disable 1. From the account portal, select the Off radio
button and click Apply.
OR
1. From the phone, press *87.
2. Hang up the phone. The service is off.
To Check Current Configuration 1. From the phone, press *52*.
2. When activated, the announcement plays,
“The Anonymous Call Rejection Service is
currently activated”. When deactivated, the
announcement plays, “The Anonymous Call
Rejection service is currently deactivated”.
3. Hang up the phone.

13 | P a g e
Automatic Callback
This feature allows you to request notification when a busy line becomes idle and connects you without having to redial the phone number. While the
feature is enabled, if you call a line and it is busy, you will be prompted to press 1 if you would like to be notified when the lines becomes available. A
distinctive ring will be used to notify you when the user is available and when you take the phone off hook you will be connected to the other party.
This feature is disabled by default.
Feature Category in Account Portal Basic Features
Action Steps
To Enable 1. From the account portal, select the On radio
button and click Apply.
To Disable 1. From the account portal, select the Off radio
button and click Apply.
To Access Automatic Callback Menu 1. From the phone, press #9.
2. Press * to cancel all outstanding Automatic
Callback (ACB) requests or select and
individual ACB request by pressing its
associated key.
3. Hang up the phone. Individual ACB requests
or all requests are cancelled or verified.
To Deactivate Automatic Callbacks 1. From the phone, press #8.
2. Hang up the phone. All pending ACB requests
are cancelled.

14 | P a g e
Broadworks Anywhere (*11)
Broadworks Anywhere extends your digital voice services so you can make and receive calls from any specified fixed phone, mobile phone, or soft client
just as if it were your primary device. It also allows you to pull active calls from one phone to another.
Feature Category in Account Portal Advanced Features
Action Steps
To Add A New Location 1. From the account portal, click the Add button.
2. Enter the phone number for the new phone.
3. Enter a description for the entry. (Optional)
4. Check ‘Enable this Location’ if you want the
service to be active immediately.
5. Click Apply.
To Enable Broadworks Anywhere 1. From the account portal, check ‘Enable this
Location’ and click Apply.
OR
1. From the remote phone, call your main line
and enter your voicemail passcode when
prompted, then when you hear a dial tone,
press *12.
To Disable Broadworks Anywhere 1. From the account portal, check ‘Enable this
Location’ and click Apply.
OR
1. From alternate phone, call your main line and
enter your voicemail passcode when
prompted, then when you hear a dial tone,
press *13.
To Pull Call from Main Line to Alternate
Line
1. On the alternate line, call your main number
and then enter your voicemail passcode when
prompted.
2. Another recording will state “please enter the
destination digits” and a second dial tone will
be heard - at this time enter *11.
3. The call will be connected on the alternate line
and disconnected from the main line.
To Pull Call from Alternate Line to Main
Line
1. From the main line, press *11.
2. The call will be connected on the main line
and disconnected from the alternate line.
**This is an add-on service, if you are unsure whether you have subscribed
to these service offerings - or wish to sign up for any of them - please contact us at 270-753-5312.

15 | P a g e
Call Forwarding Always (*72/*73)
Call Forwarding Always allows you to forward all your incoming calls to a different location, such as your home office, cell phone, or directly to
voicemail. You can also make your primary phone emit a short ring burst to inform you if you are next to your phone when the call is forwarded by using
the Ring Reminder. This is important when you have forgotten the service is turned on and you are at your primary phone waiting to receive calls. Note
that the location (number or extension) you forward your calls to must be
permitted by your outgoing calling plan. This feature can be configured via the account portal or from your phone using feature access codes. This
feature is disabled by default.
Feature Category in Account Portal Basic Features
Action Steps
To Enable CFA to Another Number 1. From the account portal, select the On radio
button, enter the number where you want
calls forwarded, and click Apply.
OR
1. From the phone, press *72, followed by the
number where you want calls forwarded.
2. Hang up the phone. The service is on.
To Disable CFA to Another Number 1. From the account portal, select the Off radio
button and click Apply.
OR
1. From the phone, press *73.
2. Hang up the phone. The service is off.
To Enable CFA to Voicemail 1. From the phone, press *21.
2. Hang up the phone. The service is on.
To Disable CFA to Voicemail 1. From the phone, press #21.
2. Hang up the phone. The service is off.
To Check Current Configuration 1. From the phone, press *21*. When
activated, the announcement plays “The Call
Forwarding Always service is currently
activated. The current forwarding destination
is <Phone Number>.”
16 | P a g e
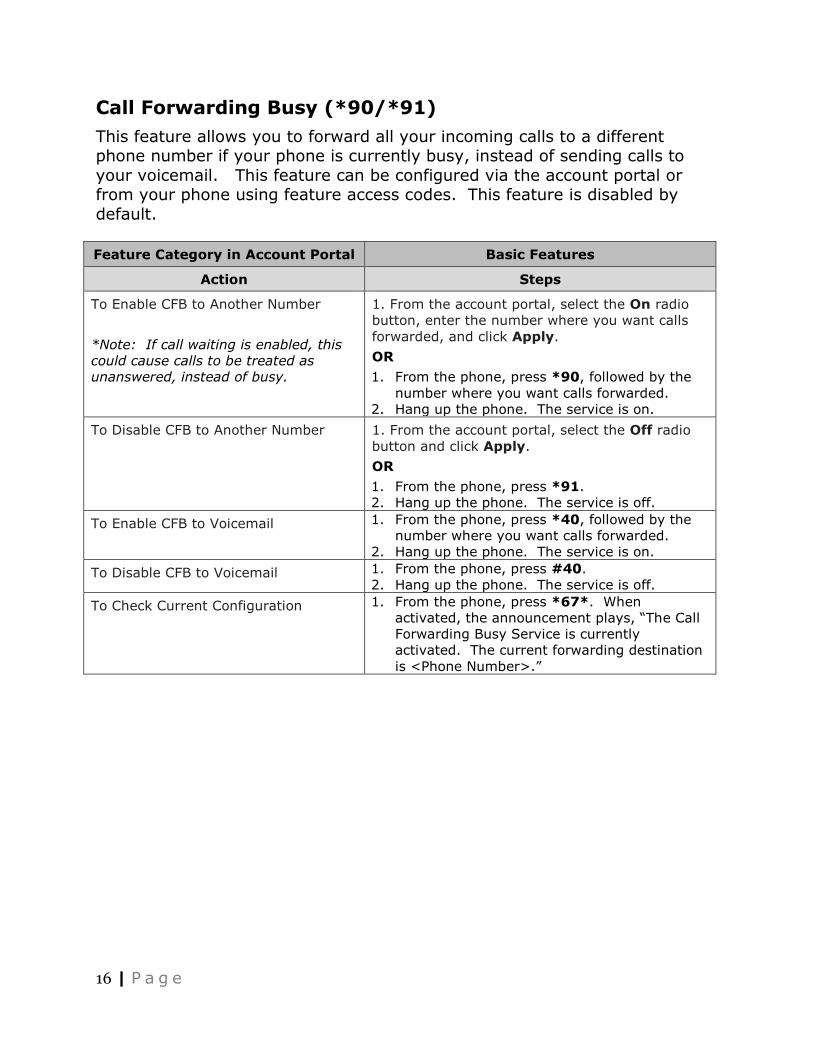
Call Forwarding Busy (*90/*91)
This feature allows you to forward all your incoming calls to a different phone number if your phone is currently busy, instead of sending calls to
your voicemail. This feature can be configured via the account portal or from your phone using feature access codes. This feature is disabled by
default.
Feature Category in Account Portal Basic Features
Action Steps
To Enable CFB to Another Number
*Note: If call waiting is enabled, this
could cause calls to be treated as
unanswered, instead of busy.
1. From the account portal, select the On radio
button, enter the number where you want calls
forwarded, and click Apply.
OR
1. From the phone, press *90, followed by the
number where you want calls forwarded.
2. Hang up the phone. The service is on.
To Disable CFB to Another Number 1. From the account portal, select the Off radio
button and click Apply.
OR
1. From the phone, press *91.
2. Hang up the phone. The service is off.
To Enable CFB to Voicemail 1. From the phone, press *40, followed by the
number where you want calls forwarded.
2. Hang up the phone. The service is on.
To Disable CFB to Voicemail 1. From the phone, press #40.
2. Hang up the phone. The service is off.
To Check Current Configuration 1. From the phone, press *67*. When
activated, the announcement plays, “The Call
Forwarding Busy Service is currently
activated. The current forwarding destination
is <Phone Number>.”

17 | P a g e
Call Forwarding No Answer (*92/*93)
Call Forwarding No Answer allows you to forward all of your calls to a different number when you do not answer the phone, instead of sending
calls to your voicemail. This feature can be configured via the account portal or from your phone using feature access codes. This feature is disabled by
default.
Feature Category in Account Portal Basic Features
Action Steps
To Enable CFNA to Another Number 1. From the account portal, select the On radio
button, enter the number where you want calls
forwarded, and click Apply.
OR
1. From the phone, press *92, followed by the
number where you want calls forwarded.
2. Hang up the phone. The service is on.
To Disable CFNA to Another Number 1. From the account portal, select the Off radio
button and click Apply.
OR
1. From the phone, press *93.
2. Hang up the phone. The service is off.
To Enable CFNA to Voicemail 1. From the phone, press *41.
2. Hang up the phone. The service is on.
To Disable CFNA to Voicemail 1. From the phone, press #41.
2. Hang up the phone. The service is off.
To Check Current Configuration 1. From the phone, press *61*. When
activated, the announcement plays, “The Call
Forwarding No Answer service is currently
activated. The current call forwarding
destination is <Phone Number>.”

18 | P a g e
Call Forwarding Not Reachable (*94/*95)
Call Forwarding Not Reachable automatically forwards your incoming calls to a different number if the device your phone is connected to loses contact
with our Digital Voice System. This feature is disabled by default.
Feature Category in Account Portal Basic Features
Action Steps
To Enable 1. From the account portal, select the On radio
button, enter the number where you want calls
forwarded, and click Apply.
OR
1. From the phone, press *94, followed by the
number where you want calls forwarded.
2. Hang up the phone. The service is on.
To Disable 1. From the account portal, select the Off radio
button and click Apply.
OR
1. From the phone, press *95.
2. Hang up the phone. The service is off.
To Check Current Configuration 1. From the phone, press *63*. When
activated, the announcement plays, “The Call
Forwarding No Answer service is currently
activated. The current call forwarding
destination is <Phone Number>.”

19 | P a g e
Call Forwarding Selective (#76/#77)
Call Forwarding Selective allows you to forward specific calls matching your pre-defined criteria to a different phone number. The criteria for each Call
Forwarding Selective entry can be a list of up to 12 phone numbers and a specified time schedule. All criteria for an entry must be satisfied for an
inbound call to be forwarded (phone number, day of week, and time of day). If the call is not forwarded, it continues as if the service was not turned on.
This feature is disabled by default.
Feature Category in Account Portal Basic Features
Action Steps
To Add a Call Forwarding Selective
Entry
*Note: If you are using the ‘Default
Forward’ option, then a ‘Default Call
Forward to phone number’ has to be
entered first and applied before you
can add an entry using that option.
1. From the account portal, enter a Name for the
entry in the Description field.
2. Select a Time Schedule from the drop down:
either ‘Every Day All Day’ or a preconfigured
Time Schedule.
3. Select and configure a ‘Forwarding to:’ option.
4. Select and configure a ‘Calls from:’ option.
5. Click Add.
To Update A Call Forwarding Selective
Entry
1. Click Edit beside the entry you want to
update.
2. The existing configuration will auto populate
into the fields. Make the required changes to
the configuration.
3. Click Update.
To Remove A Call Forwarding Selective
Entry
1. Click Edit beside the entry you want to
remove and click the Delete button.
To Enable 1. From the account portal, select the On radio
button and click Apply.
OR
If at least 1 CFS entry and a default call forward
number have been configured in the account
portal, then you can activate from the phone by
doing the following:
1. From the phone, press #76.
2. Hang up the phone. The service is on.
To Disable 1. From the account portal, select the Off radio
button and click Apply.
OR
1. From the phone, press #77.
2. Hang up the phone. The service is off.
Call Return (*69)
Use this feature to call the last party who called your number, whether or
not the call was answered.
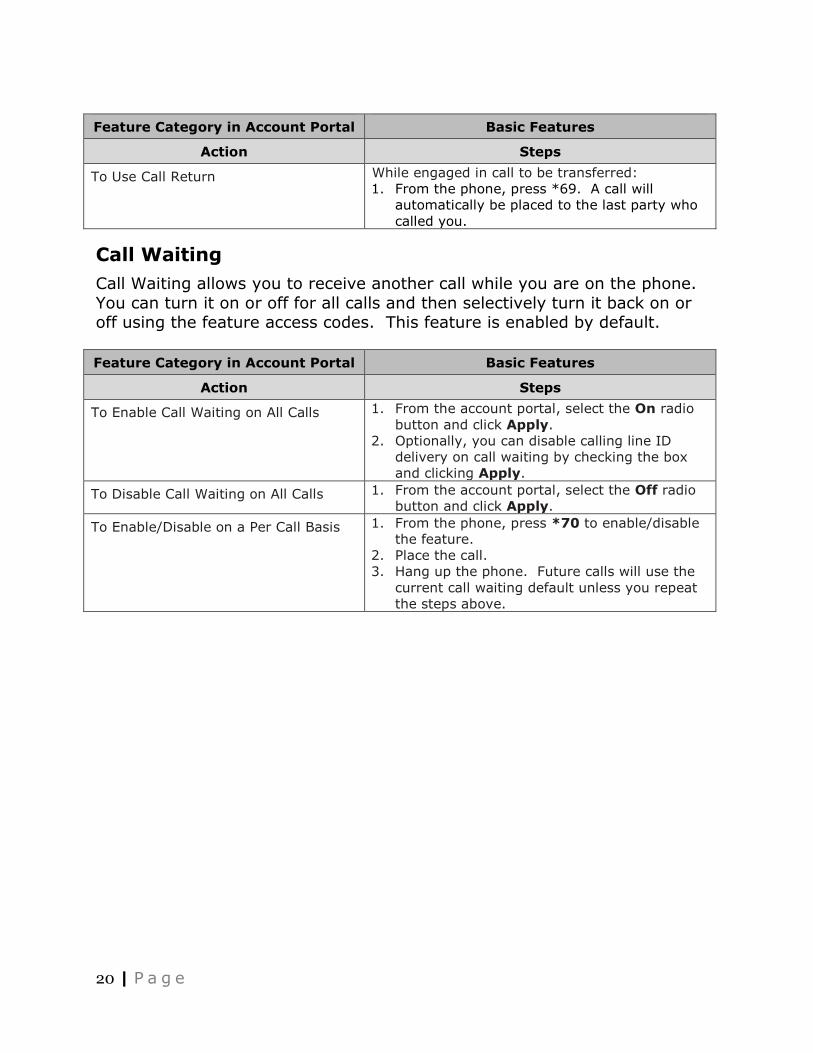
20 | P a g e
Feature Category in Account Portal Basic Features
Action Steps
To Use Call Return While engaged in call to be transferred:
1. From the phone, press *69. A call will
automatically be placed to the last party who
called you.
Call Waiting
Call Waiting allows you to receive another call while you are on the phone.
You can turn it on or off for all calls and then selectively turn it back on or off using the feature access codes. This feature is enabled by default.
Feature Category in Account Portal Basic Features
Action Steps
To Enable Call Waiting on All Calls 1. From the account portal, select the On radio
button and click Apply.
2. Optionally, you can disable calling line ID
delivery on call waiting by checking the box
and clicking Apply.
To Disable Call Waiting on All Calls 1. From the account portal, select the Off radio
button and click Apply.
To Enable/Disable on a Per Call Basis 1. From the phone, press *70 to enable/disable
the feature.
2. Place the call.
3. Hang up the phone. Future calls will use the
current call waiting default unless you repeat
the steps above.

21 | P a g e
Calling Line ID Delivery Blocking (*31/#31/*67)
Calling Line ID Delivery Blocking allows you to block your number from being shown when calling other numbers. Members of your group can still see
your number when they are called. You have the choice of turning it on or off for all calls and then selectively turning it back on or off using the feature
access codes. This feature is disabled by default.
Feature Category in Account Portal Basic Features
Action Steps
To Enable Calling Line ID Delivery on
All Calls
1. From the account portal, select the On radio
button and click Apply.
OR
1. From the phone, press *31.
2. Hang up the phone. The service is on.
To Disable Calling Line ID Delivery on
All Calls
1. From the account portal, select the Off radio
button and click Apply.
OR
1. From the phone, press #31.
2. Hang up the phone. The service is off.
To Enable/Disable on a Per Call Basis 1. From the phone, press *67 to enable/disable
the feature.
2. Place the call.
3. Hang up the phone. Future calls will use the
current Calling Line ID Delivery default unless
you repeat the steps above.
To Check Current Configuration 1. From the phone, press *54*. When
activated, the announcement plays, “Your
phone number is currently blocked from the
party you are calling”. When deactivated, the
announcement plays, “Your phone number is
currently available to the party you are
calling.”

22 | P a g e
CommPilot Express
CommPilot Express allows you to pre-configure four profiles to control your inbound calls. These profiles can quickly be changed using the web or phone
when you leave your desk or when you are at a remote location. If you use CommPilot Express, it takes precedence over some of your other service
settings associated with processing incoming calls.
Feature Category in Account Portal Basic Features
Action Steps
To Configure 1. From the account portal, enter the required
information for any/all of the following
profiles:
Available - In the Office
Available - Out of the Office
Busy
Unavailable
2. Click Apply.
To Enable 1. Select the ‘Current Profile’ you want enabled
from the dropdown menu and click Apply.
To Disable 1. Select None from the ‘Current Profile’
dropdown menu and click Apply.
**The availability of this feature is dependent on your current service package. If you are unsure whether you have subscribed to these service
offerings - or wish to sign up for any of them - please contact us at 270-
753-5312.
23 | P a g e
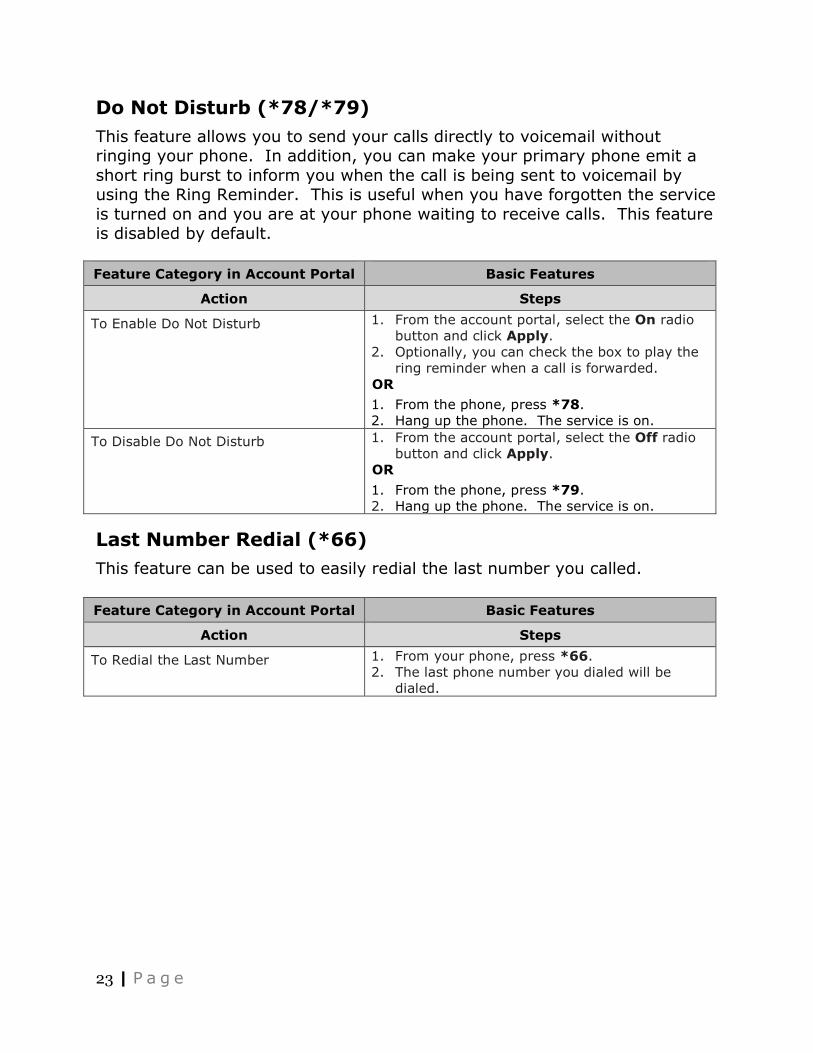
Do Not Disturb (*78/*79)
This feature allows you to send your calls directly to voicemail without ringing your phone. In addition, you can make your primary phone emit a
short ring burst to inform you when the call is being sent to voicemail by using the Ring Reminder. This is useful when you have forgotten the service
is turned on and you are at your phone waiting to receive calls. This feature is disabled by default.
Feature Category in Account Portal Basic Features
Action Steps
To Enable Do Not Disturb 1. From the account portal, select the On radio
button and click Apply.
2. Optionally, you can check the box to play the
ring reminder when a call is forwarded.
OR
1. From the phone, press *78.
2. Hang up the phone. The service is on.
To Disable Do Not Disturb 1. From the account portal, select the Off radio
button and click Apply.
OR
1. From the phone, press *79.
2. Hang up the phone. The service is on.
Last Number Redial (*66)
This feature can be used to easily redial the last number you called.
Feature Category in Account Portal Basic Features
Action Steps
To Redial the Last Number 1. From your phone, press *66.
2. The last phone number you dialed will be
dialed.
24 | P a g e
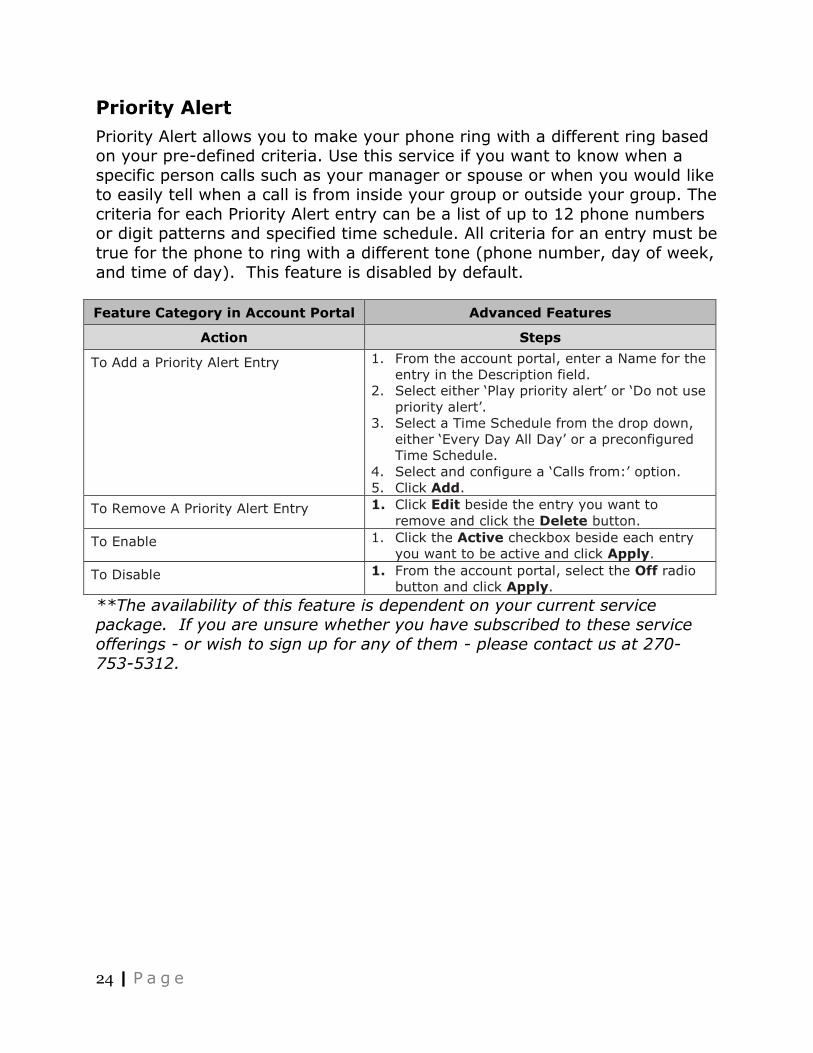
Priority Alert
Priority Alert allows you to make your phone ring with a different ring based on your pre-defined criteria. Use this service if you want to know when a
specific person calls such as your manager or spouse or when you would like to easily tell when a call is from inside your group or outside your group. The
criteria for each Priority Alert entry can be a list of up to 12 phone numbers or digit patterns and specified time schedule. All criteria for an entry must be
true for the phone to ring with a different tone (phone number, day of week,
and time of day). This feature is disabled by default.
Feature Category in Account Portal Advanced Features
Action Steps
To Add a Priority Alert Entry 1. From the account portal, enter a Name for the
entry in the Description field.
2. Select either ‘Play priority alert’ or ‘Do not use
priority alert’.
3. Select a Time Schedule from the drop down,
either ‘Every Day All Day’ or a preconfigured
Time Schedule.
4. Select and configure a ‘Calls from:’ option.
5. Click Add.
To Remove A Priority Alert Entry 1. Click Edit beside the entry you want to
remove and click the Delete button.
To Enable 1. Click the Active checkbox beside each entry
you want to be active and click Apply.
To Disable 1. From the account portal, select the Off radio
button and click Apply.
**The availability of this feature is dependent on your current service package. If you are unsure whether you have subscribed to these service
offerings - or wish to sign up for any of them - please contact us at 270-753-5312.
25 | P a g e
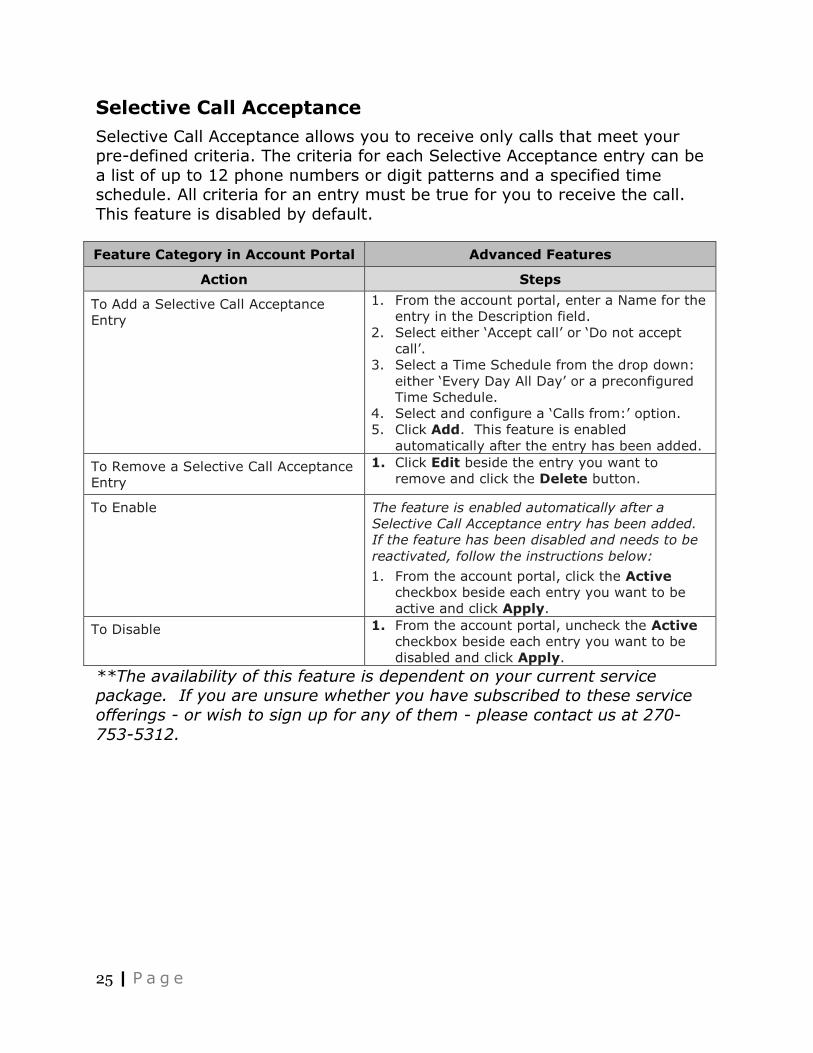
Selective Call Acceptance
Selective Call Acceptance allows you to receive only calls that meet your pre-defined criteria. The criteria for each Selective Acceptance entry can be
a list of up to 12 phone numbers or digit patterns and a specified time schedule. All criteria for an entry must be true for you to receive the call.
This feature is disabled by default.
Feature Category in Account Portal Advanced Features
Action Steps
To Add a Selective Call Acceptance
Entry
1. From the account portal, enter a Name for the
entry in the Description field.
2. Select either ‘Accept call’ or ‘Do not accept
call’.
3. Select a Time Schedule from the drop down:
either ‘Every Day All Day’ or a preconfigured
Time Schedule.
4. Select and configure a ‘Calls from:’ option.
5. Click Add. This feature is enabled
automatically after the entry has been added.
To Remove a Selective Call Acceptance
Entry
1. Click Edit beside the entry you want to
remove and click the Delete button.
To Enable The feature is enabled automatically after a
Selective Call Acceptance entry has been added.
If the feature has been disabled and needs to be
reactivated, follow the instructions below:
1. From the account portal, click the Active
checkbox beside each entry you want to be
active and click Apply.
To Disable 1. From the account portal, uncheck the Active
checkbox beside each entry you want to be
disabled and click Apply.
**The availability of this feature is dependent on your current service package. If you are unsure whether you have subscribed to these service
offerings - or wish to sign up for any of them - please contact us at 270-
753-5312.

26 | P a g e
Selective Call Rejection
Selective Call Rejection allows you to reject calls that meet your pre-defined criteria. These callers will be given an announcement that you cannot be
reached. Use this feature to prevent nuisance calls from people you would rather not talk to. The criteria for each Selective Call Rejection entry can be
a list of up to 12 phone numbers or digit patterns and a specified time schedule. All criteria for an entry must be true to reject the call. This
feature is disabled by default.
Feature Category in Account Portal Advanced Features
Action Steps
To Add a Selective Call Rejection Entry 1. From the account portal, enter a Name for the
entry in the Description field.
2. Select either ‘Reject call’ or ‘Do not reject
call’.
3. Select a Time Schedule from the drop down:
either ‘Every Day All Day’ or a preconfigured
Time Schedule.
4. Select and configure a ‘Calls from:’ option.
5. Click Add. This feature is enabled
automatically after the entry has been added.
To Remove a Selective Call Rejection
Entry
1. Click Edit beside the entry you want to
remove and click the Delete button.
To Enable The feature is enabled automatically after a
Selective Call Rejection entry has been added. If
the feature has been disabled and needs to be
reactivated, follow the instructions below:
1. From the account portal, click the Active
checkbox beside each entry you want to be
active and click Apply.
To Disable 1. From the account portal, uncheck the Active
checkbox beside each entry you want to be
disabled and click Apply.
**The availability of this feature is dependent on your current service
package. If you are unsure whether you have subscribed to these service offerings - or wish to sign up for any of them - please contact us at 270-
753-5312.

27 | P a g e
Sequential Ring
Sequential Ring allows you to sequentially ring up to 5 locations in addition to the base location for a specified number of rings. The 5 locations can be
either a phone number or an extension. The feature applies to calls matching your pre-defined criteria. This service can be used to ring calls from your
manager, a family member, or an important customer on your cell phone, alternate business phone, or home phone. The criteria for each Sequential
Ring entry can be a list of up to 12 phone numbers or digit patterns and a
specified time schedule. All criteria for an entry must be satisfied for the call to enter Sequential Ring (phone number, day of week, and time of day). If
the criteria do not match, the call continues as if this service was not turned on. This feature is disabled by default.
Feature Category in Account Portal Advanced Features
Action Steps
To Add a Sequential Ring Entry
Note: The feature is enabled
automatically after a Sequential Ring
entry has been added, even if no
additional phone numbers have been
added as locations.
1. From the account portal, enter a Name for the
entry in the Description field.
2. Select either ‘Use sequential ring’ or ‘Do not
use sequential ring’.
3. Select a Time Schedule from the drop down:
either ‘Every Day All Day’ or a preconfigured
Time Schedule.
4. Select and configure a ‘Calls from:’ option.
5. Click Add. This feature is enabled
automatically after the entry has been added.
6. Optional: Select ‘Use Base Location first’ if
you want calls to ring to main line before
ringing other locations.
7. Optional: Select ‘Enable caller to skip search
process. Assumes forwarding or messaging is
enabled’ if you want callers to have the option
to go directly to voicemail or use forwarding
instead of ringing additional locations.
8. Enter 1 to 5 phone numbers in the phone
number field for each location. Select number
of rings and whether you want an answer
confirmation for these locations.
9. Click Apply.
To Remove a Sequential Ring Entry 1. Click Edit beside the entry you want to
remove and click the Delete button.

28 | P a g e
To Enable The feature is enabled automatically after a
Sequential Ring entry has been added, even if no
additional phone numbers have been added as
locations. If the feature has been disabled and
needs to be reactivated, follow the instructions
below:
1. From the account portal, click the Active
checkbox beside each entry you want to be
active and click Apply.
To Disable 2. From the account portal, uncheck the Active
checkbox beside each entry you want to be
disabled and click Apply.
**The availability of this feature is dependent on your current service package. If you are unsure whether you have subscribed to these service
offerings - or wish to sign up for any of them - please contact us at 270-753-5312.

29 | P a g e
Simultaneous Ring Personal
Simultaneous Ring Personal allows you to list up to 10 phone numbers you would like to ring in addition to your primary phone when you receive a call.
This feature is helpful when you are not at your phone but you would like your cell phone to ring when you get a call. You can also turn off
simultaneous ring when you are at your desk on a call. The criteria for each Simultaneous Ring entry can be a list of up to 12 phone numbers or digit
patterns, a specified time schedule, and a specified holiday schedule. All
criteria for an entry must be satisfied for the call to enter Simultaneous Ring (phone number, day of week, and time of day). If the criteria do not match,
the call continues as if this service was not turned on. This feature is disabled by default. *Note: if your cell phone or other phone has voice mail
that picks up before your digital voice messaging picks up, your voice mails could be on your cell phone messaging system.
Feature Category in Account Portal Advanced Features
Action Steps
To Add a Simultaneous Ring Personal
Entry
1. From the account portal, enter a Name for the
entry in the Description field.
2. Select either ‘Use simultaneous ring personal’
or ‘Do not use simultaneous ring personal’.
3. Select a Time Schedule from the drop down:
either ‘Every Day All Day’ or a preconfigured
Time Schedule.
4. Select and configure a ‘Calls from:’ option.
5. Click Add. This feature is enabled
automatically after the entry has been added.
To Remove a Simultaneous Ring
Personal Entry
1. Click Edit beside the entry you want to
remove and click the Delete button.
To Enable 1. From the account portal, select the On radio
button.
2. Optional: Check ‘Do not ring my Simultaneous
Ring Numbers if I’m already on a call’.
3. Enter the phone numbers of the lines you
want to simultaneous ring when you receive
inbound calls to your digital voice service line.
4. Optional: Check ‘Answer confirmation
required’.
5. Click Apply.
To Disable 1. From the account portal, select the On radio
button.
2. Click Apply.
**The availability of this feature is dependent on your current service
package. If you are unsure whether you have subscribed to these service offerings - or wish to sign up for any of them - please contact us at 270-
753-5312.

30 | P a g e
Speed Dial 8 (*74)
Speed Dial 8 allows you to set up to eight speed dial numbers that can be called with the push of a button. Enter the number as you would normally
dial it and then just hit that number on your touch pad to call it. You can also program your speed dial using your phone and the star code for Speed
Dial.
Feature Category in Account Portal Basic Features
Action Steps
To Add a Speed Dial 8 Entry
1. From the account portal, enter the phone
number and name in the appropriate field
beside the Speed Dial Entry you want to use.
2. Click Apply.
OR
1. From the phone, dial *74.
2. You will hear a recall dial tone (three quick
beeps then a regular dial tone). Dial the
single digit speed code you want to setup,
followed by the 10-digit phone number you
want to be associated to it, then press #.
3. You will hear a confirmation announcement.
4. Hang up the phone. The entry has been
added.
To Remove a Speed Dial 8 Entry
1. From the account portal, delete the phone
number and name in the appropriate field
beside the Speed Dial Entry you want to
remove.
2. Click Apply.
To Call using a Speed Dial 8 Entry 1. From your phone, press the single code
assigned for the entry. You can either wait for
the digit timer to expire or press # to finish
dialing.
2. The system will dial the associated 10-digit
phone number.

31 | P a g e
Speed Dial 100 (*75)
Speed Dial 100 allows you to set up to 100 speed dial phone numbers that can be called with the push of a few buttons. Enter the number as you would
normally dial it and then just hit the speed code prefix and number on your touch pad to call it. You can also program your speed dial using your phone
and the star code for Speed Dial 100.
Feature Category in Account Portal Basic Features
Action Steps
To Add a Speed Dial 100 Entry
1. From the account portal, click the Add button.
2. Optional: Check ‘Allow Activation with any
user address.’
3. Enter the 10-digit phone number for your cell
or landline that you want setup for Two-Stage
Dialing.
4. Click Apply.
OR
1. From the phone, dial *75.
2. You will hear a recall dial tone (three quick
beeps then a regular dial tone). Dial the 2-
digit speed code you want to setup, followed
by the 10-digit phone number you want to be
associated to it, then press #.
3. You will hear a confirmation announcement.
4. Hang up the phone. The entry has been
added.
To Remove a Speed Dial 100 Entry
1. From the account portal, click the box under
the ‘Delete’ column beside the entry you want
to remove.
2. Click Delete.
To Call using a Speed Dial 100 Entry 1. From your phone, press # and the 2-digit
code assigned for the entry.
2. The system will dial the associated 10-digit
phone number.

32 | P a g e
Two-Stage Dialing
The Two-Stage Dialing service allows you to integrate a cell or landline with your digital voice services. It allows you to dial your digital voice phone
number from your cell or landline followed by additional digits, and then use the additional digits for call origination attempts as if you called from your
Murray Electric phone. This service is enabled by default, but will not work until a phone number has been configured.
Feature Category in Account Portal Advanced Features
Action Steps
To Configure Two-Stage Dialing
Note: If you uncheck the ‘Allow
Activation with any user address’
feature, direct calls to any other phone
number within your group will still
display the caller ID information of
your main line, but if you call your
main line and try to utilize extension
dialing or feature access codes, you will
not be able to. Instead, the call will go
to your voice portal like it would if you
called your phone number from your
main line.
1. From the account portal, select the On radio
button if it isn’t already selected.
2. Check ‘Allow Activation with any user
address.’
3. Enter the 10-digit phone number for your cell
or landline that you want setup for Two-Stage
Dialing.
4. Click Apply.
To Disable Two-Stage Dialing
1. From the account portal, select the Off radio
button.
2. Hang up the phone.
To Make a Two-Stage Dialing Call from
Your Cell or Landline
Note: If you do not enter anything
after dialing your main line, you will
get the following message: “Your call
cannot be completed as dialed, please
check the number and dial again.”
1. From your cell or landline, dial your digital
voice services phone number.
2. You will hear silence; dial the number,
extension or feature access code you are
trying to reach.
3. The call will be processed the same as if you
called from your main line.
**The availability of this feature is dependent on your current service package. If you are unsure whether you have subscribed to these service
offerings - or wish to sign up for any of them - please contact us at 270-753-5312.
33 | P a g e
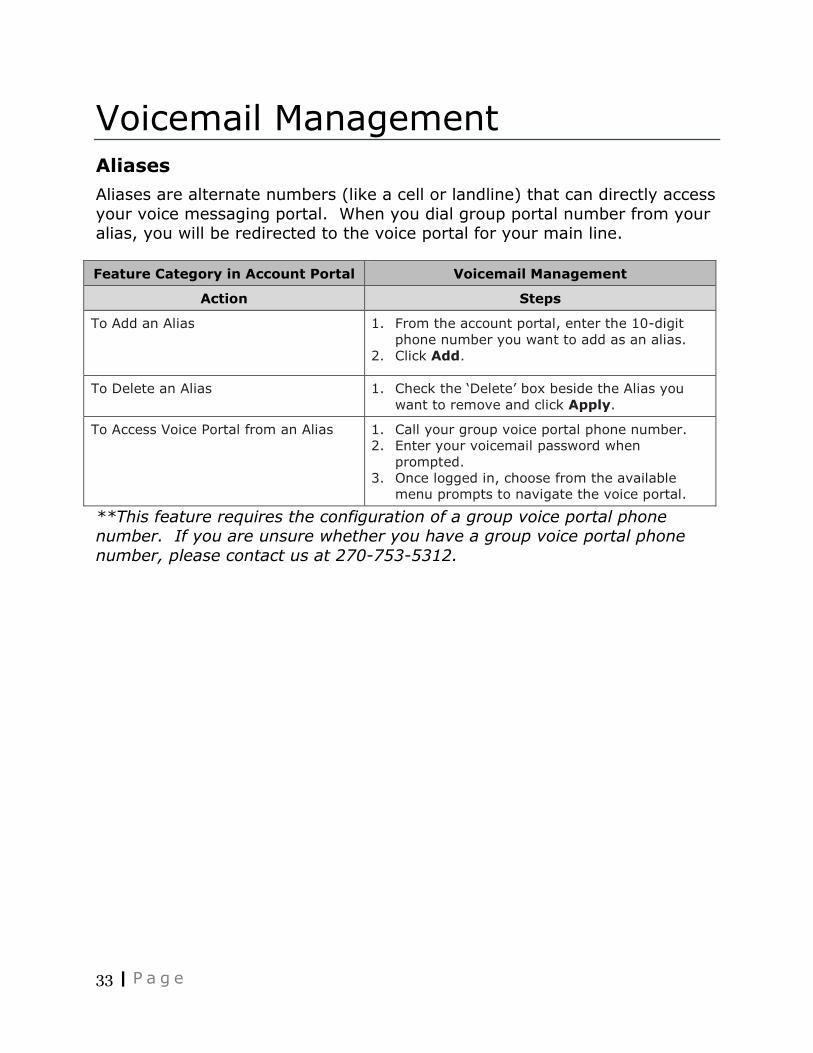
Voicemail Management Aliases
Aliases are alternate numbers (like a cell or landline) that can directly access
your voice messaging portal. When you dial group portal number from your alias, you will be redirected to the voice portal for your main line.
Feature Category in Account Portal Voicemail Management
Action Steps
To Add an Alias
1. From the account portal, enter the 10-digit
phone number you want to add as an alias.
2. Click Add.
To Delete an Alias 1. Check the ‘Delete’ box beside the Alias you
want to remove and click Apply.
To Access Voice Portal from an Alias 1. Call your group voice portal phone number.
2. Enter your voicemail password when
prompted.
3. Once logged in, choose from the available
menu prompts to navigate the voice portal.
**This feature requires the configuration of a group voice portal phone number. If you are unsure whether you have a group voice portal phone
number, please contact us at 270-753-5312.

34 | P a g e
Greetings
You can configure the individual greetings heard when a caller is redirected to voicemail on busy and no answer. You can also configure 3 additional
alternate no answer greetings. This is useful to save a greeting that you can reuse, like when you are out of the office or traveling. These greetings can
also be recorded from the voice messaging portal. You can specify the number of rings before the caller is redirected to voicemail from this menu.
Feature Category in Account Portal Voicemail Management
Action Steps
To Configure Busy Greeting
1. From the account portal, select the ‘Personal
greeting’ radio button.
2. Click Choose File and select the .wav file you
want to use for your busy greeting.
3. Click Apply.
To Configure No Answer Greeting 1. From the account portal, select the
‘Unavailable greeting’ radio button.
2. Click Choose File and select the .wav file you
want to use for your busy greeting.
3. Click Apply.
To Upload Alternate No Answer
Greetings
1. From the account portal, type a name for the
Alternate No Answer greeting in the Greeting
Name field.
2. Click Choose File and select the .wav file you
want to use for your alternate greeting.
3. Click Apply.
To Configure Number of Rings Before
Greeting.
1. Select the number of rings you want the caller
to hear from the ‘Number of rings before
greeting’ dropdown.
2. Click Apply.
To Use an Alternate No Answer
Greeting
1. From the account portal, select the radio
button beside the Alternate Greeting that you
have configured and want to be heard by
callers who are redirected to voicemail on no
answer.
2. Click Apply.
To Record Greetings from the Voice
Portal
1. From your phone, dial *62.
2. Enter your passcode when prompted.
3. Press 3 to go to the Greetings Menu.
4. Follow the prompts to listen to current
greetings, record new greetings, and save
your greetings.
5. Hang up the phone.

35 | P a g e
Voicemail Management
From the Voicemail Management screen, you can configure the handling your voice messages. Use can enable Unified Messaging if you want to use
your phone to retrieve voice messages. You can also just choose to send a .wav file of the voicemail to an email address and not use Unified Messaging.
Voicemail with Unified Messaging is enabled by default.
Feature Category in Account Portal Voicemail Management
Action Steps
To Enable and Configure Voice
Messaging
1. From the account portal, select the On radio
button.
2. Check the box for the call you want sent to
voicemail:
Send All Calls to Voicemail
Send Busy Calls to Voicemail
Send Unanswered Calls to Voicemail
3. Select where you want to receive voice
messages:
Use unified messaging (with the option of
enabling the Phone Message Waiting
Indicator)
Forward it to the email address you
specify - this option will not save
voicemails in the voice messaging portal,
they will be .wav files attached to the
email notification.
4. Select any additional options you want
enabled:
Notify me by email of the new voice
message at the email address you specify
Email a carbon copy of the voice message
to the email address you specify.
Transfer on ‘0’ to the phone number you
specify.
5. Click Apply.
To Disable Voice Messaging 1. From the account portal, select the Off radio
button.
2. Click Apply.
36 | P a g e
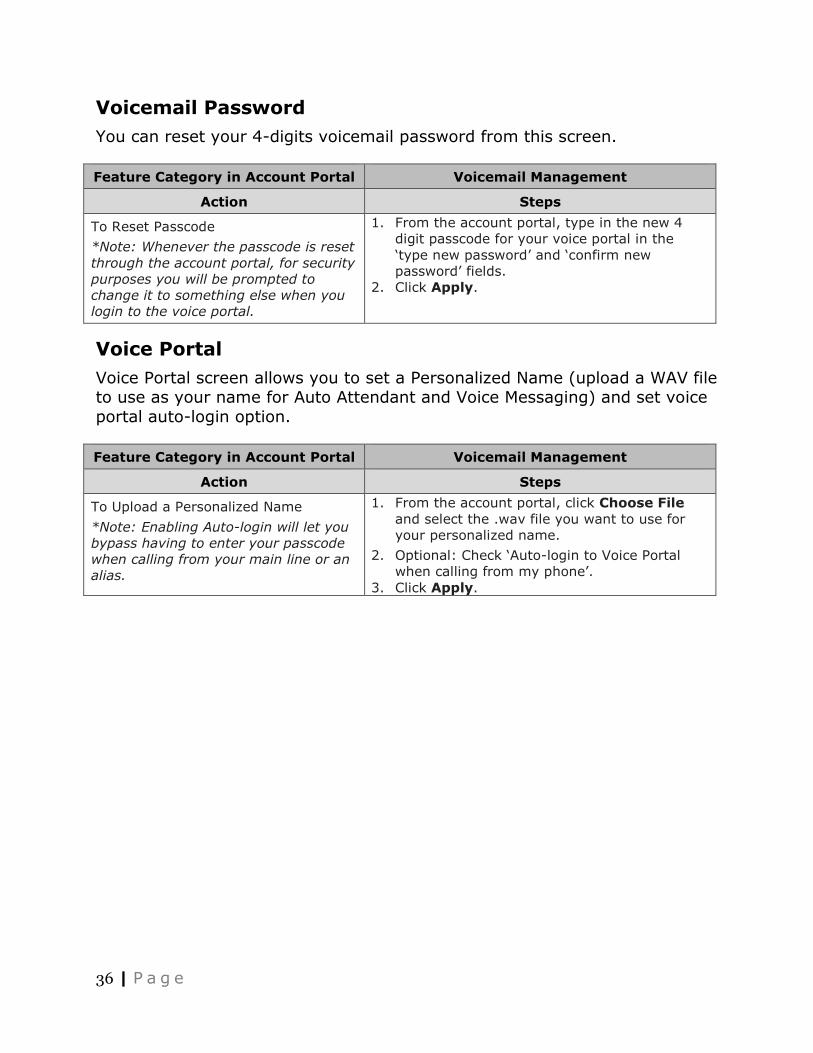
Voicemail Password
You can reset your 4-digits voicemail password from this screen.
Feature Category in Account Portal Voicemail Management
Action Steps
To Reset Passcode
*Note: Whenever the passcode is reset
through the account portal, for security
purposes you will be prompted to
change it to something else when you
login to the voice portal.
1. From the account portal, type in the new 4
digit passcode for your voice portal in the
‘type new password’ and ‘confirm new
password’ fields.
2. Click Apply.
Voice Portal
Voice Portal screen allows you to set a Personalized Name (upload a WAV file to use as your name for Auto Attendant and Voice Messaging) and set voice
portal auto-login option.
Feature Category in Account Portal Voicemail Management
Action Steps
To Upload a Personalized Name
*Note: Enabling Auto-login will let you
bypass having to enter your passcode
when calling from your main line or an
alias.
1. From the account portal, click Choose File
and select the .wav file you want to use for
your personalized name.
2. Optional: Check ‘Auto-login to Voice Portal
when calling from my phone’.
3. Click Apply.

37 | P a g e
Home Office (SOHO) Features The Home Office (SOHO) add-on allows you to utilize business level features
on your residential digital voice services line. If you would like more details on these features, or would like to add this service offering, please contact
us at 270-753-5312.
Alternate Number
This feature enables up to ten additional numbers and/or extensions to be
assigned users. The usual ringing is provided for incoming calls to the primary phone number and users have the option of enabling a distinctive
ring for calls to their second and third phone numbers. For outgoing calls from the user, the user’s primary phone number is the calling line identity.
**This is an add-on service, if you are unsure whether you have subscribed to these service offerings - or wish to sign up for any of them - please
contact us at 270-753-5312.
38 | P a g e
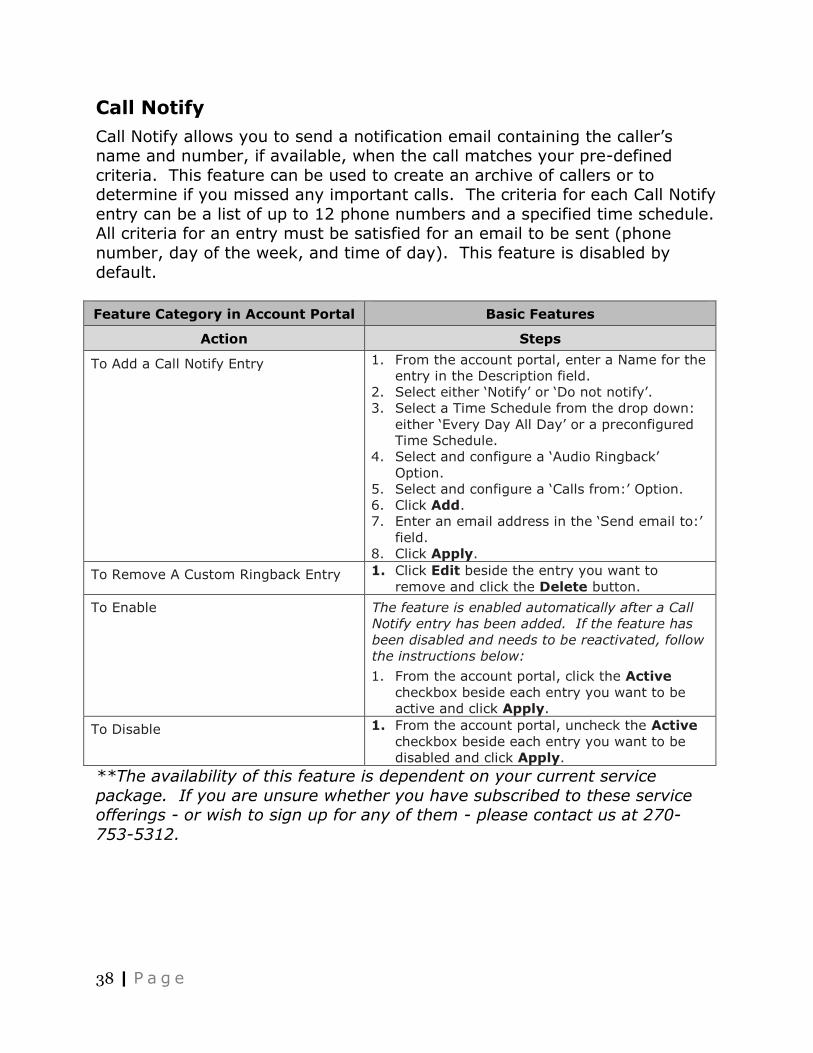
Call Notify
Call Notify allows you to send a notification email containing the caller’s name and number, if available, when the call matches your pre-defined
criteria. This feature can be used to create an archive of callers or to determine if you missed any important calls. The criteria for each Call Notify
entry can be a list of up to 12 phone numbers and a specified time schedule. All criteria for an entry must be satisfied for an email to be sent (phone
number, day of the week, and time of day). This feature is disabled by
default.
Feature Category in Account Portal Basic Features
Action Steps
To Add a Call Notify Entry 1. From the account portal, enter a Name for the
entry in the Description field.
2. Select either ‘Notify’ or ‘Do not notify’.
3. Select a Time Schedule from the drop down:
either ‘Every Day All Day’ or a preconfigured
Time Schedule.
4. Select and configure a ‘Audio Ringback’
Option.
5. Select and configure a ‘Calls from:’ Option.
6. Click Add.
7. Enter an email address in the ‘Send email to:’
field.
8. Click Apply.
To Remove A Custom Ringback Entry 1. Click Edit beside the entry you want to
remove and click the Delete button.
To Enable The feature is enabled automatically after a Call
Notify entry has been added. If the feature has
been disabled and needs to be reactivated, follow
the instructions below:
1. From the account portal, click the Active
checkbox beside each entry you want to be
active and click Apply.
To Disable 1. From the account portal, uncheck the Active
checkbox beside each entry you want to be
disabled and click Apply.
**The availability of this feature is dependent on your current service
package. If you are unsure whether you have subscribed to these service offerings - or wish to sign up for any of them - please contact us at 270-
753-5312.

39 | P a g e
Custom Ringback User
Custom Ringback User allows you to specify the ringback to be played to your callers, for specific calls matching your pre-defined criteria. Use this
service to play a different ringback to your manager, a family member, or a customer. The criteria for each Custom Ringback Selective entry can be a
list of up to 12 phone numbers and a specified time schedule. All criteria for an entry must be satisfied for the ringback to be played (phone number, day
of week, and time of day). Otherwise, regular ringback is played to the
caller, as if this service was not used. This feature is disabled by default.
Feature Category in Account Portal Basic Features
Action Steps
To Add a Custom Ringback Entry 1. From the account portal, enter a Name for the
entry in the Description field.
2. Select either ‘Play custom ringback’ or ‘Do not
play custom ringback’.
3. Select a Time Schedule from the drop down,
either ‘Every Day All Day’ or a preconfigured
Time Schedule.
4. Select and configure an ‘Audio Ringback’
Option.
5. Select and configure a ‘Calls from:’ option.
6. Click Add. This feature is enabled
automatically after the entry has been added.
To Remove a Custom Ringback Entry 1. Click Edit beside the entry you want to
remove and click the Delete button.
To Enable The feature is enabled automatically after a
custom ringback entry has been added. If the
feature has been disabled and needs to be
reactivated, follow the instructions below:
1. From the account portal, click the Active
checkbox beside each entry you want to be
active and click Apply.
To Disable 1. From the account portal, uncheck the Active
checkbox beside each entry you want to be
disabled and click Apply.
**The availability of this feature is dependent on your current service
package. If you are unsure whether you have subscribed to these service offerings - or wish to sign up for any of them - please contact us at 270-
753-5312.
40 | P a g e
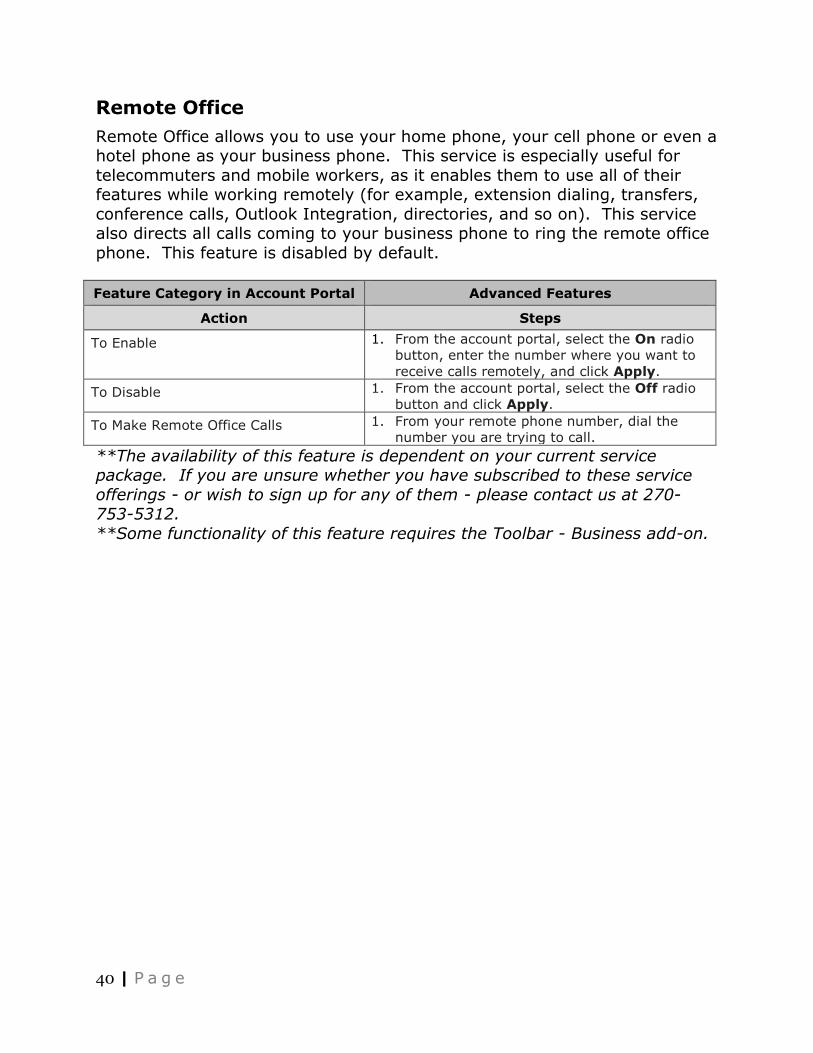
Remote Office
Remote Office allows you to use your home phone, your cell phone or even a hotel phone as your business phone. This service is especially useful for
telecommuters and mobile workers, as it enables them to use all of their features while working remotely (for example, extension dialing, transfers,
conference calls, Outlook Integration, directories, and so on). This service also directs all calls coming to your business phone to ring the remote office
phone. This feature is disabled by default.
Feature Category in Account Portal Advanced Features
Action Steps
To Enable 1. From the account portal, select the On radio
button, enter the number where you want to
receive calls remotely, and click Apply.
To Disable 1. From the account portal, select the Off radio
button and click Apply.
To Make Remote Office Calls 1. From your remote phone number, dial the
number you are trying to call.
**The availability of this feature is dependent on your current service package. If you are unsure whether you have subscribed to these service
offerings - or wish to sign up for any of them - please contact us at 270-753-5312.
**Some functionality of this feature requires the Toolbar - Business add-on.
41 | P a g e
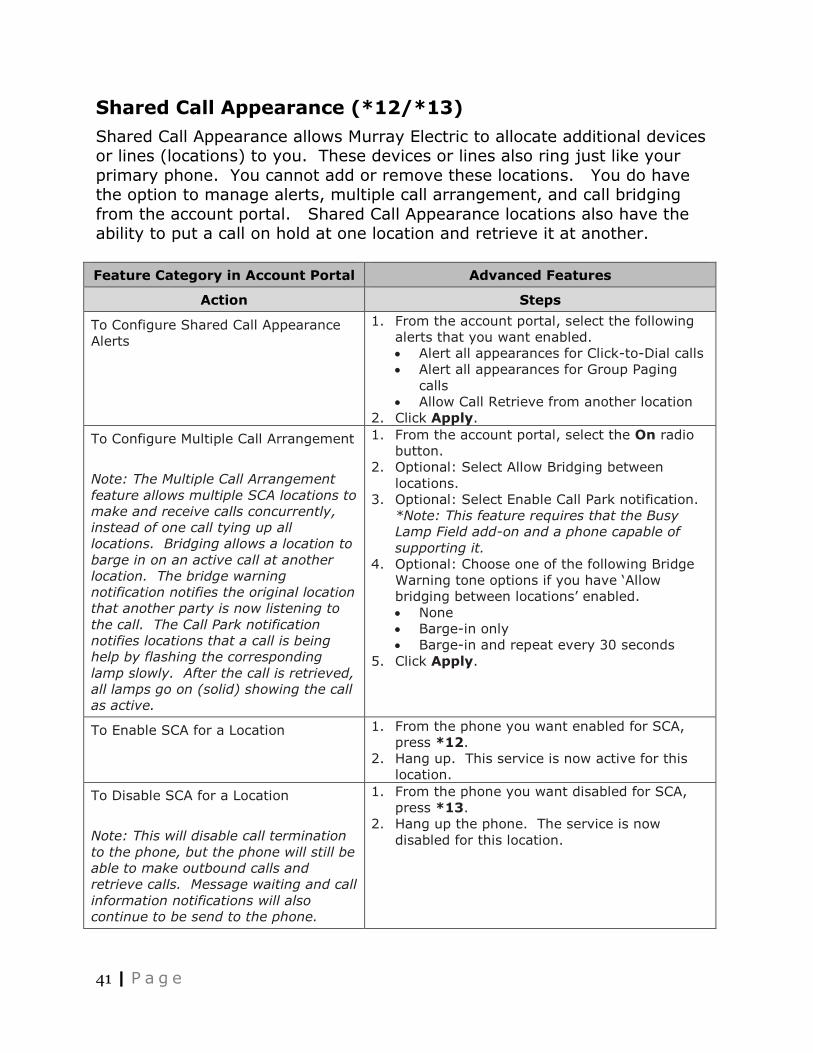
Shared Call Appearance (*12/*13)
Shared Call Appearance allows Murray Electric to allocate additional devices or lines (locations) to you. These devices or lines also ring just like your
primary phone. You cannot add or remove these locations. You do have the option to manage alerts, multiple call arrangement, and call bridging
from the account portal. Shared Call Appearance locations also have the ability to put a call on hold at one location and retrieve it at another.
Feature Category in Account Portal Advanced Features
Action Steps
To Configure Shared Call Appearance
Alerts
1. From the account portal, select the following
alerts that you want enabled.
Alert all appearances for Click-to-Dial calls
Alert all appearances for Group Paging
calls
Allow Call Retrieve from another location
2. Click Apply.
To Configure Multiple Call Arrangement
Note: The Multiple Call Arrangement
feature allows multiple SCA locations to
make and receive calls concurrently,
instead of one call tying up all
locations. Bridging allows a location to
barge in on an active call at another
location. The bridge warning
notification notifies the original location
that another party is now listening to
the call. The Call Park notification
notifies locations that a call is being
help by flashing the corresponding
lamp slowly. After the call is retrieved,
all lamps go on (solid) showing the call
as active.
1. From the account portal, select the On radio
button.
2. Optional: Select Allow Bridging between
locations.
3. Optional: Select Enable Call Park notification.
*Note: This feature requires that the Busy
Lamp Field add-on and a phone capable of
supporting it.
4. Optional: Choose one of the following Bridge
Warning tone options if you have ‘Allow
bridging between locations’ enabled.
None
Barge-in only
Barge-in and repeat every 30 seconds
5. Click Apply.
To Enable SCA for a Location 1. From the phone you want enabled for SCA,
press *12.
2. Hang up. This service is now active for this
location.
To Disable SCA for a Location
Note: This will disable call termination
to the phone, but the phone will still be
able to make outbound calls and
retrieve calls. Message waiting and call
information notifications will also
continue to be send to the phone.
1. From the phone you want disabled for SCA,
press *13.
2. Hang up the phone. The service is now
disabled for this location.

42 | P a g e
To Retrieve a Held Call 1. If a call has been put on hold at one location,
you can press *11 from any other location to
retrieve the call.
**This is an add-on service, if you are unsure whether you have subscribed
to these service offerings - or wish to sign up for any of them - please contact us at 270-753-5312.
Toolbar - Business
The Toolbar chooses the best options of the Account Portal into a handy easy toolbar that is present while in Microsoft Internet Explorer, Mozilla Firefox,
and Microsoft Outlook. The Toolbar acts as a shortcut to many of the Business Line features, and also includes a helpful call history report. Please
reach out to Murray Electric for instructions on how to download and
configure this application.
**This is an add-on service, if you are unsure whether you have subscribed to these service offerings - or wish to sign up for any of them - please
contact us at 270-753-5312.

43 | P a g e
Frequently Asked Questions
Do I need to have my computer turned on when I talk on the phone? Your computer does not need to be turned on when using Murray Electric
Digital Voice Services.
Do the people I call need a computer? No, they only need a working phone. They will not be aware that you are
using Murray Electric Digital Voice Services unless you tell them.
Must I speak through a computer to use Digital Voice Services? No, you speak through an ordinary touch-tone telephone connected to
Murray Electric provided adapter. (Note: Soft phone software is available that allows you to make calls through your computer using a microphone
and speakers.)
Does the person I am calling need to have Murray Electric Digital
Voice Services too? No. You can call anyone at any phone number using Murray Electric service.
What types of telephones work with your service?
Any touch tone telephone can be used with Murray Electric Digital Voice Services. Corded and cordless telephones both work well.
Can I use a fax machine with Murray Electric service?
Murray Electric customers have experienced high success in placing and receiving fax transmissions, however Murray Electric Digital Voice Services
have not yet certified support for fax usage.
Do you offer roll-over service?
Yes. If you have multiple telephone numbers and would like roll-over from the main line to another line, it is possible to set that up. If you require this
service, please contact our customer service center.
44 | P a g e
Can I use the Digital Voice Services for point-of-sale merchant
processing? We highly recommend that you convert this to an IP service (if available).
However, for normal processing levels, you should experience no issues. If you are doing this type of merchant processing, contact our customer
service center, as some special settings may be required. Can I still use the Internet while making calls?
Yes. Your computer and Murray Electric Digital Voice Services can share an Internet connection.
Can I use Murray Electric Digital Voice Services with my business
alarm system or personal emergency response services company? You may connect any telephone communication device to your Murray
Electric Digital Voice Services adaptor. We recommend keeping a traditional phone line for home or personal emergency response devices. The service
depends upon your broadband Internet connection and electrical power. If
your Internet connection or power is not available, you will not be able to make or receive calls, nor will your alarm system. Please consult with a
qualified alarm system technician before connecting your alarm system to a Murray Electric Digital Voice Services line.
How is dialing 911 using Murray Electric Digital Voice Services
different from dialing 911 on a regular land line? Murray Electric routes your call to your local emergency response center
over the 911 network determined by the physical address you supplied when you activated 911. If we do not have the correct address, your call cannot
be routed to the corresponding emergency response center for your area. You will also need to state the nature of your emergency promptly and
clearly, which may include providing your location and telephone number, as the local emergency response center personnel may not be able to see the
information Murray Electric sends along with your call.
In the event 911 methods are unavailable or fail, Murray Electric sends your
911 call to national emergency response center. Trained emergency response agents will then route the call to local authorities.

45 | P a g e
Which VoIP codecs are currently supported by Murray Electric Digital
Voice Services? Murray Electric Digital Voice Services currently supports the G711 (80k) and
the G729 (32k).
What are your customer service hours and how do I contact you with questions?
Our customer service is available 24 hours a day, 7 days a week at 270-753-5312, or via email at [email protected].
What is a CPNI?
CPNI stands for Customer Proprietary Network Information. It is information about your account that cannot be accessed without a four digit security
pass code, providing additional security for you.
46 | P a g e
Contact Information
Our customer service representatives are available 24 hours a day, 7 days a week at 270-753-5312 or via email at [email protected] to
answer your questions.