dinosaur extinction earthquakes - destination education, …shopgpn.com/guides/711_0011g.pdf ·...
TRANSCRIPT

Teacher�s Guide
DinosaurExtinction
Earthquakes

Table ofContents
Introduction _______________________________________ 3How to use the CD-ROM _______________________________ 4
Dinosaur ExtinctionUnit Overview and Bibliography _________________________ 7Background ___________________________________________ 8Video Segments ________________________________________ 9Multimedia Resources ___________________________________ 9Unit Assessment Answer Key ____________________________ 9Unit Assessment ______________________________________ 10Activity One � Meteorite Strike _________________________ 11
Lesson Plan ______________________________________ 12Activity Sheet ____________________________________ 14
Activity Two � Secrets in the Earth ______________________ 15Lesson Plan ______________________________________ 16Activity Sheet ____________________________________ 18
Activity Three � Bones and Stones_______________________ 19Lesson Plan ______________________________________ 20Activity Sheet ____________________________________ 22
EarthquakesUnit Overview and Bibliography ________________________ 23Background __________________________________________ 24Video Segments _______________________________________ 25Multimedia Resources __________________________________ 25Unit Assessment Answer Key ___________________________ 25Unit Assessment ______________________________________ 26Activity One � Finding Faults __________________________ 27
Lesson Plan ______________________________________ 28Activity Sheet ____________________________________ 30
Activity Two � Slip Slidin� Away ________________________ 31Lesson Plan ______________________________________ 32Activity Sheet ____________________________________ 34
Activity Three � Getting Centered _______________________ 35Lesson Plan ______________________________________ 36Activity Sheet ____________________________________ 38

Educational materials developed under a grant from the National Science Foundation — 3
IntroductionWelcome to the Newton’s AppleMultimedia Collection™!
The Newton�s Apple MultimediaCollection is designed to be used by ateacher guiding a class of students.Because the videos on the CD-ROMare intended to be integrated withyour instruction, you may find ithelpful to connect your computer toa projection system or a monitor thatis large enough to be viewed by theentire class. We have included avideotape of the segments so that youcan use a VCR if it is more conve-nient. Although the CD-ROM wasdesigned for teachers, it can also beused by individuals or cooperativegroups.
With the help of many classroomscience teachers, the staff at Newton�s
Apple has developed a set of lessons,activities, and assessments for eachvideo segment. The content andpedagogy conform with the Na-tional Science Education Standardsand most state and local curriculumframeworks. This Teacher�s Guidepresents lessons using an inquiry-based approach.
If you are an experienced teacher,you will find material that will helpyou expand your instructionalprogram. If you are new to inquiry-based instruction, you will findinformation that will help youdevelop successful instructionalstrategies, consistent with theNational Science Education Stan-dards. Whether you are new toinquiry-based instruction or havebeen using inquiry for years, thisguide will help your studentssucceed in science.
WE SUPPORT THEWE SUPPORT THEWE SUPPORT THEWE SUPPORT THEWE SUPPORT THENANANANANATIONAL SCIENCE EDUCATIONAL SCIENCE EDUCATIONAL SCIENCE EDUCATIONAL SCIENCE EDUCATIONAL SCIENCE EDUCATION STTION STTION STTION STTION STANDANDANDANDANDARDSARDSARDSARDSARDS
The National Science Education Standards published by theNational Research Council in 1996 help us look at science
education in a new light. Students are no longer merely passivereceivers of information recorded on a textbook page or
handed down by a teacher. The Standards call for students tobecome active participants in their own learning process, with
teachers working as facilitators and coaches.
Newton’s Apple’s goal is to provide you with sound activities
that will supplement your curriculum and help you integratetechnology into your classroom. The activities have been field-
tested by a cross section of teachers from around the country.Some of the activities are more basic; other activities are more
challenging. We don’t expect that every teacher will use everyactivity. You choose the ones you need for your educational
objectives.
Drawing from material shown onpublic television�s Emmy-award-winning science series, the multimediacollection covers a wide variety oftopics in earth and space science,physical science, life science, andhealth. Each module of the Newton�sApple Multimedia Collection contains aCD-ROM, a printed Teacher�s Guide,a video with two Newton�s Apple ®
segments and a scientist profile, and atutorial video.
The Teacher�s Guide provides threeinquiry-based activities for each of thetopics, background information,assessment, and a bibliography ofadditional resources.
The CD-ROM holds a wealth ofinformation that you and yourstudents can use to enhance sciencelearning. Here�s what you�ll find onthe CD-ROM:
● two full video segments fromNewton�s Apple
● additional visual resources for eachof the Newton�s Apple topics
● background information on eachtopic
● a video profile of a living scientistworking in a field related to theNewton�s Apple segments
● an Adobe Acrobat® file containingthe teacher�s manual along withstudent reproducibles
● UGather® and UPresent® softwarethat allows you and your studentsto create multimedia presentations
● QuickTime® 3.0, QuickTime® 3Pro, and Adobe Acrobat® Reader3.0 installers in case you need toupdate your current software

4 — Introduction
Teacher’sGuideWe suggest you take a few minutes to lookthrough this Teacher�s Guide to familiarizeyourself with its features.Each lesson follows the same format. Thefirst page provides an overview of the activ-ity, learning objectives, a list of materials,and a glossary of important terms. The nexttwo pages present a lesson plan in threeparts: ENGAGE, EXPLORE, and EVALUATE.
● ENGAGE presents discussion questions toget the students involved in the topic.Video clips from the Newton�s Applesegment are integrated into this section ofthe lesson.
● EXPLORE gives you the information youneed to facilitate the student activity.
● EVALUATE provides questions for thestudents to think about following theactivity. Many of the activities in thecollection are open-ended and provideexcellent opportunities for performanceassessment.
GUIDE ON THE SIDE and TRY THIS are fea-tures that provide classroom managementtips for the activity and extension activities.
Using the CD-ROMUsing the CD-ROMUsing the CD-ROMUsing the CD-ROMUsing the CD-ROMWhen you run the Newton’s Apple CD-ROM,you will find a main menu screen that allowsyou to choose either of the two Newton’sApple topics or the scientist profile. Simplyclick on one of the pictures to bring up themenu for that topic.
Once you have chosen your topic, use thenavigation buttons down the left side of thescreen to choose the information you want todisplay.
The Background button brings up a shortessay that reviews the basic science con-cepts of the topic. This is the same essay thatis in the Teacher’s Guide.
Main Menu
Topic Menu

Educational materials developed under a grant from the National Science Foundation — 5
PlaPlaPlaPlaPlaying the Videoying the Videoying the Videoying the Videoying the VideoThe Video button allows you to chooseseveral different clips from the video seg-ment. We have selected short video clips tocomplement active classroom discussionsand promote independent thinking andinquiry. Each video begins with a shortintroduction to the subject that asks severalquestions. These introductory clips canspark discussion at the beginning of thelesson. The Teacher’s Guide for eachactivity presents specific strategies that willhelp you engage your students beforeshowing the video. Each of the individualclips are used with the lesson plans for theactivities. The lesson plan identifies whichclip to play with each activity.
Once you select a video and it loads, you’llsee the first frame of the video segment.The video must be started with the arrow atthe left end of the scroll bar. As you playthe video, you can pause, reverse, oradvance to any part of the video with thescroll bar. You can return to the Clips Menuby clicking on the Video button.
MultimediaToolsThe Newton�s Apple staff has designed aproduct that is flexible, so that you canuse it in many different ways. All ofthe video clips used in the program areavailable for you to use outside theprogram. You may combine them withother resources to create your ownmultimedia presentations. You willfind all the video clips in folders on theCD-ROM. You may use these clips forclassroom use only. They may not berepackaged and sold in any form.
You will also find a folder forUGather� and UPresent�. These twopieces of software were developed bythe University of Minnesota. Theyallow you to create and store multime-dia presentations. All of the informa-tion for installing and using the soft-ware can be found in the folder. Thereis an Adobe Acrobat® file that allowsyou to read or print the entire user�smanual for the software. We hope youwill use these valuable tools to enhanceyour teaching. Students may also wishto use the software to create presenta-tions or other projects for the class.
Video Menu

IntegraIntegraIntegraIntegraIntegratingtingtingtingtingMultimediaMultimediaMultimediaMultimediaMultimediaWe suggest that you have the CD-ROMloaded and the program running beforeclass. Select the video and allow it to load.The video usually loads within a couple ofseconds, but we recommend pre-loadingit to save time.
All of the video segments are captioned inEnglish. The captions appear in a box atthe bottom of the video window. You canchoose to play the clips in either Englishor Spanish by clicking one of the buttonsat the bottom right of the screen. (You canalso choose Spanish or Englishsoundtracks for the scientist profile.)
The Resources button provides you withfour additional resources. There areadditional video clips, charts, graphs, slideshows, and graphics to help you teachthe science content of the unit.
The other navigation buttons on the leftside of the window allow you to go backto the Main Menu or to exit the program.
TechnicalInformationRefer to the notes on the CD-ROM casefor information concerning system re-quirements. Directions for installing andrunning the program are also providedthere.
Make sure you have the most currentversions of QuickTime® and AdobeAcrobat® Reader installed on your harddrive. The installation programs forQuickTime 3, QuickTime Pro, andAcrobat Reader 3.0 can be found on theCD-ROM. Double-click on the iconsand follow the instructions for installa-tion. We recommend installing theseapplications before running the Newton�sApple Multimedia program.
TroubleShootingThere are several Read-Me files on theCD-ROM. The information found therecovers most of the problems that youmight encounter while using the pro-gram.
6 — Introduction
Resources Menu

Educational materials developed under a grant from the National Science Foundation — 7
Dinosaur ExtinctionTeacher�s Guide
More Information
Follow That FossilWhen did dinosaurs live on Earth and when did theydisappear? What ever happened to dinosaurs?Why did they become extinct? How do scientistsuncover information about animals that lived 65million years ago. What are fossils?
Themes and Conceptsl geological periodsl fossil remainsl ecosystems
National Science Education Content StandardsContent Standard A: Students should develop abilities necessary to doscientific inquiry.Content Standard C: Students should develop an understanding ofpopulations and ecosystems.Content Standard D: Students should develop an understanding ofEarth�s history.
Activities1. Meteorite Strike�Approx. 10 min. prep; 50 min. class timeHow could a giant meteorite affect life on earth? What kind of damagewould it do? Students simulate a meteorite crash on Earth to demon-strate the impact it would have.
2. Secrets in the Earth�Approx. 10 min. prep; 60 min. class timeHow do paleontologists and sedimentologists study the layers of theEarth? What can scientists learn from their research? Students takecore samples of a simulated Earth strata and discover the secrets theyhold.
3. Bones and Stones�Approx. 30 min. prep; two class sessions approx. 40 min. eachWhat are fossils and what can we learn from them? How can you recover afossil from the earth? Students �create� fossils, bury them in plaster ofParis, then extract them with common tools.
InternetNewton’s Applehttp://www.ktca.org/newtons(The official Newton’s Apple web sitewith information about the show and asearchable database of science ideasand activities.)
Dinosaurs on the Internet-TexasChristian Universityhttp://www.tcu.edu/sed/science/dino.html(This site has links to hundreds ofdinosaur sites on the Internet.)
Internet Search Wordspaleontologydinosaur extinctionmeteorites

Dinosaur Extinction
8 — Dinosaur Extinction
Books and ArticlesAlvarez, W. and Asaro, F. An Extrater-restrial Impact. Scientific American. Oct.1990: 78–84.
Courtillot, Vincent. A Volcanic Eruption.Scientific American. Oct. 1990: 85–92.
Crenson, J. Dinosaurs. Mount Washing-ton: Mount Washington Press, 1991.
Dixon, D. and Matthews, R. The Illus-trated Encyclopedia of Prehistoric Life.New York: Smithmark, 1992.
Community ResourcesMuseums with dinosaur exhibits
Geology and paleontology departmentsat local colleges and universities.
BackgroundYou�ve seen them thundering across the screen at the movies and ontelevision. You may have seen their fossilized remains at a museum, ormarveled at animatronic versions in a traveling exhibit. From all of thisevidence, you know that dinosaurs once roamed the Earth and that atsome point they all became extinct. What happened to the mightydinosaurs?
There are several theories about what killed off the dinosaurs, and thesetheories differ a lot on the specific cause of the mass extinction. Theleading theory holds that the extinction was caused when a huge asteroidor comet smashed into the earth. An older theory that still has supporterscontends that a strong period of volcanic eruption killed the dinosaurs.
Almost all scientists agree that global climatic change took place aroundthe time of the extinction. The warm, dinosaur-friendly environment ofthe Mesozoic era changed to a cooler climate in the Cenozoic. Scientistsalso agree that at the end of the Cretaceous period, the last period of thereign of the dinosaurs, something happened on the surface of the earththat sent dust, debris, and ashes into the atmosphere. This materialblocked sunlight, dramatically cooling the planet, and then trapped heat,causing a long period of global warming.
Another point on which scientists agree is that climatic change is at theroot of the extinction of marine and land animals. Evidence of some sortof dramatic event is found in a geographical bookmark dating back to theend of the Cretaceous and the beginning of the Tertiary. This point intime, known as the K-T boundary, occurred about 65 million years ago.The bookmark is a thin layer of iridium found everywhere on Earth atprecisely that point in the geological record. Iridium, a metal, is verycommon deep within the Earth and in asteroids and meteors, but it israre on the surface of our planet. Something dramatic happened to causea layer of iridium to be spread across the surface of the globe.
Other scientists believe the extinction of the dinosaurs wasn�t caused by asingle, killer meteorite, but happened more gradually by intense volcanicactivity triggered by plate tectonics, or continental drift. Volcanoeswould have carried iridium from the interior of the Earth to the surface,accounting for the K-T boundary iridium layer. Add earthquakes to themix and the dinosaurs� world would have undergone an intense, andeventually fatal change.
Dinosaurs reigned for 140 million years, many millions of years longerthan humans have been on the planet. Perhaps dinosaurs were wiped outin a sudden catastrophe, or maybe they died off because of a moregradual change in Earth�s environment. There is a lesson here�life onEarth is fragile and not guaranteed, no matter how big and ferocious youare.
Educational materials developed under a grant from the National Science Foundation — 9
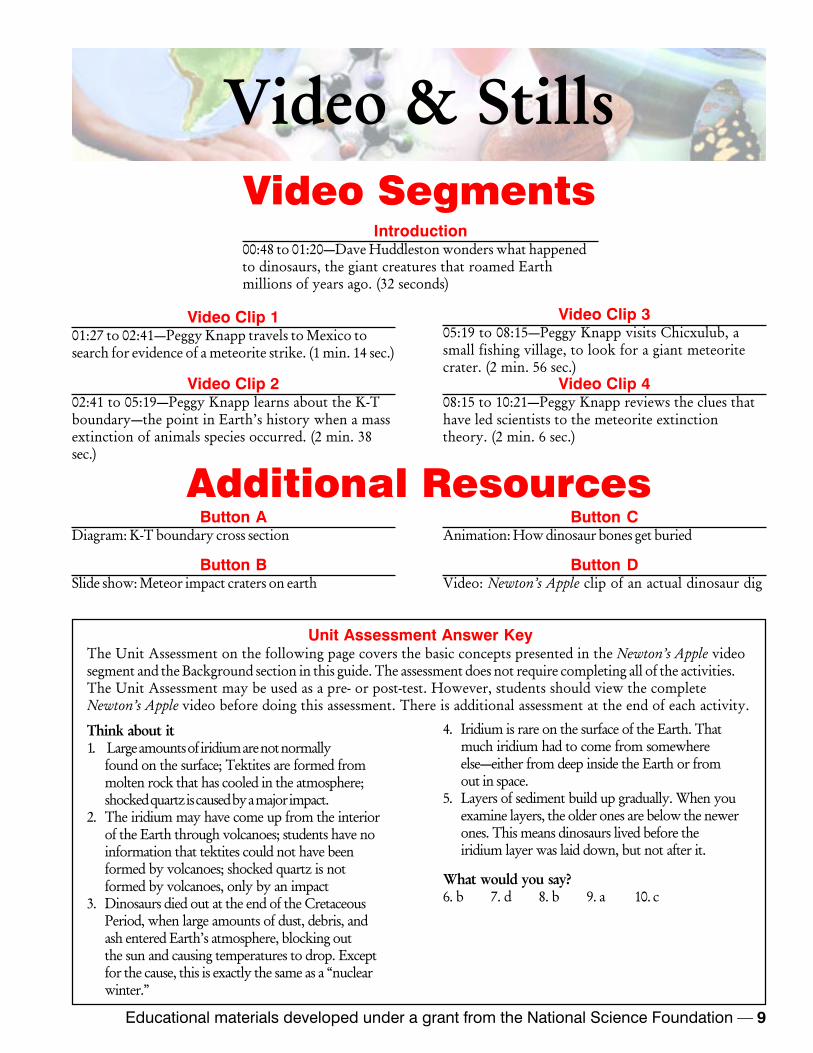
Video & StillsVideo Segments
Introduction00:48 to 01:20�Dave Huddleston wonders what happenedto dinosaurs, the giant creatures that roamed Earthmillions of years ago. (32 seconds)
Video Clip 101:27 to 02:41�Peggy Knapp travels to Mexico tosearch for evidence of a meteorite strike. (1 min. 14 sec.)
Video Clip 202:41 to 05:19�Peggy Knapp learns about the K-Tboundary�the point in Earth�s history when a massextinction of animals species occurred. (2 min. 38sec.)
Video Clip 305:19 to 08:15�Peggy Knapp visits Chicxulub, asmall fishing village, to look for a giant meteoritecrater. (2 min. 56 sec.)
Video Clip 408:15 to 10:21�Peggy Knapp reviews the clues thathave led scientists to the meteorite extinctiontheory. (2 min. 6 sec.)
Additional ResourcesButton A
Diagram: K-T boundary cross section
Button BSlide show: Meteor impact craters on earth
Button CAnimation: How dinosaur bones get buried
Button DVideo: Newton�s Apple clip of an actual dinosaur dig
Unit Assessment Answer KeyThe Unit Assessment on the following page covers the basic concepts presented in the Newton�s Apple videosegment and the Background section in this guide. The assessment does not require completing all of the activities.The Unit Assessment may be used as a pre- or post-test. However, students should view the completeNewton�s Apple video before doing this assessment. There is additional assessment at the end of each activity.
Think about it1. Large amounts of iridium are not normally
found on the surface; Tektites are formed frommolten rock that has cooled in the atmosphere;shocked quartz is caused by a major impact.
2. The iridium may have come up from the interiorof the Earth through volcanoes; students have noinformation that tektites could not have beenformed by volcanoes; shocked quartz is notformed by volcanoes, only by an impact
3. Dinosaurs died out at the end of the CretaceousPeriod, when large amounts of dust, debris, andash entered Earth�s atmosphere, blocking outthe sun and causing temperatures to drop. Exceptfor the cause, this is exactly the same as a �nuclearwinter.�
4. Iridium is rare on the surface of the Earth. Thatmuch iridium had to come from somewhereelse�either from deep inside the Earth or fromout in space.
5. Layers of sediment build up gradually. When youexamine layers, the older ones are below the newerones. This means dinosaurs lived before theiridium layer was laid down, but not after it.
What would you say?6. b 7. d 8. b 9. a 10. c

Unit Assessment
Cop
yrig
ht ©
Tw
in C
ities
Pub
lic T
elev
isio
n &
GP
N. P
erm
issi
on g
rant
ed to
rep
rodu
ce fo
r cl
assr
oom
use
.
10 — Dinosaur Extinction
What do you know aboutDinosaur Extinction?
Write the answers in your journal or on a separate sheet of paper.
Think about it1. Name three pieces of evidence that a large meteorite
struck the Earth between the Cretaceous andTertiary Periods.
2. Look at your answers to the previous question.Which of the pieces of evidence could have beenproduced by volcanoes rather than by a meteoriteimpact? Explain.
3. Many scientists believe that the powerful explosionsof a nuclear war would send large amounts ofdebris into the atmosphere, causing a �nuclearwinter.� How is that similar to what happened to thedinosaurs?
What would you say?6. At the end of the Cretaceous Period�
a. only the dinosaurs became extinct.b. over half the species on Earth became extinct.c. some species of dinosaurs became extinct.d. every species on Earth became extinct.
7. Where do tektites come from?a. They formed from an asteroid.b. Workers in Mexico shaped them that way.c. They were formed from lava deep within Earth.d. They formed when molten rock sprayed intothe air and solidified before it reached the ground.
4. Why does the iridium found at the K-T boundaryindicate that something cataclysmic occurred onEarth�s surface?
5. Dinosaur fossils are found below the iridium layer,but not above it. Why does this mean the dinosaursbecame extinct when the iridium layer was formed?
8. Why is one form of quartz called �shockedquartz�?a. It attracts electrical currents.b. It contains microscopic cracks caused by a hugeshock.c. It causes an electrical shock if you touch it.d. It may have shocked the dinosaurs into extinction.
9. The crater at Chicxulub is underground because�a. sediment formed new land on top of it.b. after the meteorite hit, the ground collapsedaround it.c. the Gulf of Mexico was larger 65 million yearsago.d. the meteorite struck Earth with great force.
10. The ring of cenotes indicates�a. the center of the underground crater.b. the exact spot the meteorite struck.c. the edge of an underground crater.d. the place where the last dinosaurs lived.

Educational materials developed under a grant from the National Science Foundation — 11
Activity 1
Important Terms
Meteorite StrikeWhat would be the effect of a giant meteorite hitting Earth? How would it affect lifeon this planet? How would scientists look for evidence of a meteorite strike?
Getting Readyejecta — Material that is thrown out ofthe earth as the result of the impact of ameteorite or thrown out of a volcano.
extinction — The process of dying outand ceasing to exist.
meteorite — A solid piece of rock ormetal from outer space that has fallen tothe surface of the earth without beingvaporized; a fragment of a meteor.
OverviewMany scientists believe that an enormous meteorite struck Earthsome 65 million years ago, raising dust and debris into the air andresulting in the extinction of many forms of life, including thedinosaurs. In this activity students simulate the crash of a meteoriteinto our planet, and observe the behavior of the ejecta.
ObjectivesAfter completing this activity, students will be able to�l explain the theory of how a meteorite may have been responsible
for the extinction of dinosaursl explain how ejecta from a meteorite strike travelsl discuss the ecological consequences of a disaster such as the crash
of a large meteorite on the Earth.
Time NeededPreparation: Approx. 20 minutesClassroom: Approx. 50 minutes
MaterialsFor each group of students:l enough black construction paper to form an area of about one
meter squarel tapel compassl pencill 1 small, light metal nut and one large, heavy onel 2 pieces of thread about a 1.5 meters in lengthl talcum powderl scissorsl damp sponge

Guide on the Side
Dinosaur Extinction
Here’s How
12 — Dinosaur Extinction
Preparationl Set up the computer to play the CD-ROM (or set up the VCR
and cue the tape).l Gather the materials for each team of students.l Make a copy of Activity Sheet 1 for each student.l Review the information in the Background on page 8.
Video Clip 101:27 to 02:41—Peggy Knapp travels
to Mexico to search for evidence of ameteorite strike. (1 min. 14 sec.)
Engage (Approx. 15 min.)Ask students if they are familiar with any animals that are in danger ofextinction. (Certain tigers, certain species of crane, and pandas are ex-amples.) Ask students for reasons for the threat to the survival of somespecies of animals. (Changes in a species� environment�includingclimate and other conditions of the animal�s natural habitat.) Askstudents what some causes of these changes are. (There are human andnonhuman origins of environmental changes. Pollution is often causedby humans. A volcanic eruption is an example of a natural phenom-enon that may cause environmental changes.)
Ask students what they think might happen if a large meteorite struckEarth. Ask them what both the immediate and long-term effectswould be. Accept all answers. Would the effect be like that of avolcanic eruption? Would the meteorite change the environment?Show Video Clip 1 [01:27 to 02:41]. Ask students how a meteoritemay have been responsible for the extinction of dinosaurs.
l You may wish to begin thelessonby viewing the Introduction from theVideo Menu on the CD-ROM [00:48 -01:20]. Find what students alreadyknow about dinosaur extinction. As aclass, discuss the questions posed byDave Huddleston.l It is especially important thatstudents clean up between trials.Talcum powder from a previous trialmay make it difficult to make accuratemeasurements of successive trials.Sponges that are slightly damp willhelp remove all traces of talcumpowder.l Students should avoid breathing inthe talcum powder. Any students withrespiratory problems should use dustmasks.l Students may also be interested indropping other objects onto thetalcum powder. Small stones, wash-ers, and similar objects may be used.l Remind students to record theirobservations after each trial, espe-cially given the distances which mayoccur with different sizes (or perhapstypes) of “meteors.”l They should be encouraged tomake observations about any otherdifferences (the nut hit at an angle, sopowder flew farther in a certaindirection, etc.).l If it is appropriate, view the entireNewton’s Apple segment on dinosaurextinction after completing the activity.
Explore (Approx. 35 min.)Tell students they are going to create a simulated meteorite strike to findout what some of the effects of a giant meteorite strike on Earthmight be.
Have students work in small groups. Tell each group to select oneperson to record data and one person to drop the meteor. The othersin the group help set up the activity.
Tell students to tape together pieces of construction paper until theyhave a sheet at least one meter square. With the compass, have themdraw a circle 10 cm in diameter in the middle of the square. Next,have them place the paper on the floor, and put a table or a chairalmost over the circle.

Educational materials developed under a grant from the National Science Foundation — 13
Try This
Activity 1
Have a student loop one end of a 1.5 meter piece of thread throughthe smallest and lightest nut, fasten it with a knot, and then place thenut in the center of the circle. Have the meteorite dropper run thethread over the table or chair above the circle so that pulling the stringraises the nut directly over the center of the circle. Have anotherstudent spread a 1-cm thick layer of talcum powder in the circle onthe black construction paper. Next, tell the meteorite dropper to cutthe thread, releasing the nut so that it falls into the talcum powder.Students observe the results and the recorder measures how far thetalcum powder has spread outside the circle. Students clean up thearea, suspend a heavier nut, re-form the circle of talcum powder, andrepeat the experiment, recording the results again.
Discuss the results of the activity. Which nut spread the talcumpowder the farthest? (The largest and heaviest nut.) What does thetalcum powder represent? (It represents Earth�s surface being struckby the meteorite.) The meteorite that struck Chicxulub was 10kilometers in diameter. How far would the ejecta probably have beenspread? (It would have spread dozens or even hundreds of miles.)
Evaluate1. Name two ways in which your model differs from an actual meteoritestrike. (Answers will vary. Possible answers: talcum powder is much finerthan dirt; the scale of the project is much smaller than the original; the nutdropped much more slowly than the meteorite would have dropped ontothe Earth.)
2. The talcum powder stayed entirely within your classroom. Howcould a meteorite strike have affected organisms around the world?(In reality, ejecta would have been thrown many miles into the air.Winds could have carried it around the globe.)
3. How might the dirt and ash spread by a meteorite impact havecaused the extinction of the dinosaurs? (In the air, it would haveblocked the energy from the sun; if it stayed in the air long enough, itcould have lowered temperatures on Earth, transforming the ecosys-tem almost instantly. Dinosaurs and other organisms might not havebeen able to adapt so quickly.)
Perform a variation of this experiment,testing to see how high the ejecta isthrown. The same setup can be used ina darkened room, with flashlights tohelp you detect talcum powder in theair.
If there is a sand pit at your school’sathletic field or a sand box at a nearbyplayground, compare the size andspeed of a meteorite with the size of thecrater it makes. Drop rocks of varyingsizes from varying heights into thesand. Use a stepladder to help increaseheight from which the rocks aredropped.

14 — Dinosaur Extinction
Meteorite StrikeNameNameNameNameName ______________________________________ Class Period______________________________________ Class Period______________________________________ Class Period______________________________________ Class Period______________________________________ Class Period _______________________________________________________
Activity Sheet 1
Copyright © Twin Cities Public Television & GPN. Permission granted to reproduce for classroom use.
WhaWhaWhaWhaWhat you�re going to dot you�re going to dot you�re going to dot you�re going to dot you�re going to doYou�re going to investigate the effect of a meteorite crash on the Earth to get an idea of the destruc-tive power of the phenomenon.
How to do it1.1.1.1.1. Work with a group of classmates. You will need someone to be the
meteorite dropper and the data recorder. Members of your group alsoneed to help set up the activity.
2.2.2.2.2. Tape sheets of black construction paper together untilyou have a large sheet about one meter square. Using a
compass, draw a circle 10 cm in diameter in the centerof the paper. Next, loop the end of a 1.5 meter
piece of thread through the smallest nut andplace it in the center of the circle. Run the
other end of the thread over the top of a desk ora chair near the circle. When you pull on the
thread, the nut should be suspended over thecenter of the circle. Finally, fill the circle with 1cm
of talcum powder.
3.3.3.3.3. Pull on the thread to raise the nut about onemeter above the talcum powder. When the nut has stopped swinging, cut the thread and release thenut. Record the distance from the center of the circle that the talcum powder is thrown. Note thegreatest distance the talcum powder spread. Also, estimate the average distance that the talcumpowder traveled.
4. 4. 4. 4. 4. Clean up all traces of talcum powder with a damp sponge and repeat the procedure. This timeuse the heavier nut.
RecorRecorRecorRecorRecording your dading your dading your dading your dading your datatatatataMeasure the distance the talcum powder fallsfrom the circle for each of the trials, makingsure to check the entire circumference of thedrop. Record this information in your sciencejournal.
Trial No. _____
Greatest distance: _____ cm
Approx. average distance : _____ cm
Other observations:
WhaWhaWhaWhaWhat did you find out?t did you find out?t did you find out?t did you find out?t did you find out?Which nut threw the talcum powder the far-thest?
How does this setup simulate a meteoritestrike?
Compare your results with those of othergroups. What might account for any differ-ences?
How could a meteorite strike affect organismson the other side of the world?

Educational materials developed under a grant from the National Science Foundation — 15
Activity 2
Important Terms
Secrets in the EarthWhat are Earth’s strata and what can you learn from them? How do strata reflect thehistory of the Earth? What are the Cretaceous and Tertiary periods in Earth’s history,and why does a layer of iridium separate these two layers? What is the K-Tboundary?
OverviewStudents learn about the layers of the Earth and how each layerreflects the history of a period of years. Students simulate the workof a paleontologist. They create a model of layers of the Earth,remove a core sample, and examine it for clues of the past.
ObjectivesAfter completing this activity, students will be able to�l explain how atmospheric phenomena can leave evidence in the
geological record;l explain the geological processes involved in the formation of the
strata.
Time NeededPreparation: 10 min.Classroom: 60 min.
MaterialsFor each group of students:l 3 or 4 blocks of play dough, each of a different colorl 1 small cardboard box at least 15 centimeters deep and large
enough to hold 3 layers of play dough (or alternately, thebottom half of a large milk carton or large plastic bottle.)
l cleaned chicken bonesl leavesl twigsl lots of newspapersl talcum powderl bread knife
artifact — Any object which representsa culture or a period of time.
fossils — Remains, traces, or impres-sions of an organism left in rock from apast geological age.
stratum (pl. strata) — A layer of dirt orrock.
Getting Ready

Dinosaur Extinction
16 — Dinosaur Extinction
Preparationl Set up the computer to play the CD-ROM (or set up the VCR
and cue tape).l Gather the materials for each team of students.l Make a copy of Activity Sheet 2 for each student.l Review the information in the Background on page 8.
Here’s HowVideo Clip 2
02:41 to 05:19—Peggy Knapp learnsabout the K-T boundary—the point in
Earth’s history when a mass extinctionof animals species occurred.
(2 min. 38 sec.)
Video Clip 305:19 to 08:15—Peggy Knapp visitsChicxulub, a small fishing village, to
look for a giant meteorite crater.(2 min. 56 sec.)
Engage (approx. 10 min.)Ask students if they have ever visited a local museum and seen artifacts thathave been recovered from sites in the area where they live. What were theartifacts? Ask them if they saw fossils. Explain that fossils are theremains, traces, or impressions of an organism from a past geologicalage. Ask students how fossils and artifacts get underground. Accept allanswers.
Explain to students how land forms. Explain that when lava spreadsover the land, it hardens into igneous rock. Sedimentary rock isformed from sediment�pieces of rock, shell, dead plants�that hassettled in a place for many years and hardened. Metamorphic rock isformed when heat or pressure or other phenomenon changes theexisting rocks.
Show students Video Clip 2 [02:41 to 05:19]. Ask students how thesegment defines the K-T boundary. Why does the K-T boundary suggest ameteorite struck the earth millions of years ago?
Ask students what the site of a meteorite strike might look like. Ask themif they have ever seen a crater. What does it look like? Ask them if theythink that a crater would remain today if a meteorite struck the earth 65million years ago. Show students Video Clip 3 [05:19 to 08:15]. Ask themto describe what happened to the crater created by the meteorite.
l You may wish to begin the lessonby viewing the Introduction from theVideo Menu on the CD-ROM [00:48 -01:20]. Find out what studentsalready know about dinosaur extinc-tion. As a class, discuss the questionsposed by Dave Huddleston.
l Resource Button A on the CD-ROMhas a diagram of a cross section ofthe K-T boundary.
l Resource Button B on the CD-ROMhas photos of meteorite craters onEarth.
l Boxes should be made of sturdycardboard or bottle plastic. Theyshould be at least 10 cm deep, butcan be deeper as they do not have tobe filled all the way.
l Remind students to record all data.They should include any unansweredquestions that may have developed,and perhaps some theories whichcould provide possible answers tothose questions.
l If it is appropriate, view the entirevideo segment on dinosaur extinctionafter completing the activity.
Guide on the Side

Educational materials developed under a grant from the National Science Foundation — 17
Activity 2
Try ThisTell students they are going to create rock strata and examine them forclues to the past. Have students work in small groups and plan how theyare going to organize their strata. Tell them to decide what order they willlay down the colored layers of play dough and which layers will containanimal fossils and plant fossils. They should also decide where thetalcum powder layer will be. One student in the group records all ofthe decisions and creates a diagram to use as a guide.
Using the guide, students in each group create their strata from layersof play dough. Some layers will have animal fossils (chicken bones) orplant fossils (twigs) pressed into them. When they want to lay downthe talcum powder layer, students should spread a large amount ofnewspaper on the floor and place their box in the middle of it. Theycan then sprinkle talcum powder a meter or so off the ground, and letit drift into their box.
Next, student groups exchange boxes. They gain access to their subjectstrata by slicing the play dough in half or by cutting a core sample outof the middle. They examine the strata, noting which layers are olderand which are newer, which contain fossils of different types, andwhere the talcum powder layer is. A group recorder writes down thegroup�s findings, which are then compared with the original guide forthose strata.
Discuss the results of the activity. Ask team members what difficultiesthey had in examining the strata. Were there any differences betweenthe analyses and the original guides? If so, what caused them?
Evaluate1. Which were the oldest layer of the strata you examined? Whichwere the newest? Explain. (Answers will vary. Sample answer: Theblue layer was the oldest, because it was on the bottom. The yellowlayer was the newest because it was on top.)
2. How might a large forest fire leave evidence of itself in the geologi-cal record? (Soot and ash might be found between or within layers ofrock.)
3. Imagine you were at a geological site where one layer of rock wasolder than a layer below it. How might you explain that? (Answerswill vary. Possible answers include landslides and earthquakes.)
Find a site where geological strata arevisible. Possibilities include an ar-chaeological dig, a highway cut througha hillside, an excavation, or even anaturally formed cliff face.
Devise a way to accurately model theformation of plant fossils. Rememberthat plants leave no parts of themselvesbehind, just impressions of themselvesin rock.
Explore (Approx. 50 min.)

Copyright © Twin Cities Public Television & GPN. Permission granted to reproduce for classroom use.18 — Dinosaur Extinction
Name ______________________________________ ______________________________________ ______________________________________ ______________________________________ ______________________________________ Class Period _______________________________________________________Activity Sheet 2
Secrets in the EarSecrets in the EarSecrets in the EarSecrets in the EarSecrets in the EarthththththWhaWhaWhaWhaWhat you�re going to dot you�re going to dot you�re going to dot you�re going to dot you�re going to doYou�re going to create a model of geological strata, and then examine the strata that your classmateshave created and try to discover the secrets they hold.
HoHoHoHoHow to do itw to do itw to do itw to do itw to do it1.1.1.1.1. Work with your group to determine the order in which youwill put the layers of play dough. Also, decide which layerswill contain plant fossils or animal fossils, and where a talcumpowder layer (K-T boundary) might go.
2.2.2.2.2. A group organizer keeps track of everyone�s suggestions.When the decisions are finalized, the organizer makes a dia-gram of the finished plan.
3.3.3.3.3. Build your strata in a box, using the organizer�s diagramas a guide. Use different colors of play dough for each of thevarious layers. Use chicken bones for animal fossils, and twigsfor plant fossils. Be sure to place them inside the layers as well as between layers. Before adding thetalcum powder layer, spread a lot of newspaper on the floor and put the box in the middle of it.Then sprinkle the talcum powder from about a meter above the box.
4.4.4.4.4. When your strata are completed, exchange them with another group. You can examine theother groups� strata by slicing the play dough in half, or by cutting a core sample out of the middleof it. Examine it to determine the relative age of each layer. Notice if there are any fossils, and whatlayer they are located in. Do the same for the talcum powder layer.
RecorRecorRecorRecorRecording your dading your dading your dading your dading your datatatatataMake observations about the sample you exam-ined. Record the following information in yourjournal.
Layers, from oldest to youngest:
Animal fossils? Yes NoIf yes, which layer?
Plant fossils? Yes NoIf yes, which layers?
Talcum power layer? Yes NoIf yes, between which layers?
WhaWhaWhaWhaWhat did you find out?t did you find out?t did you find out?t did you find out?t did you find out?Which stratum was the oldest? How do youknow?
What are the advantages of a core sampleover simply slicing the play dough in half?
What are the disadvantages?
What other things might be present in a realstratum? How would you model these thingsin your strata?

Educational materials developed under a grant from the National Science Foundation — 19
Activity 3
Important Terms
Bones and StonesWhat is a fossil? How are they discovered? How does a bone become a fossil?What surrounds it? What condition is it usually found in? What do paleontologistshave to do to bring the fossil to a lab or to a museum?
OverviewStudents learn how fossils are formed and discovered in the Earth.They �create� fossils and stimulate how they are discovered andretrieved.
ObjectivesAfter completing this activity students will be able to�l identify bones from well-known dinosaur speciesl describe the process involved in recovering a dinosaur bonel explain what a real fossil dig might be like
Time NeededPreparation: 30 min.Classroom: (Two sessions: approx. 40 min. each)
Materials:For the teacher:l poster or diagram of dinosaur skeletons
For each team of students:l large piece of chalk (like the kind used for drawing on pavement)l hobby knifel milk cartonl plaster of Parisl waterl plastic tubl screwdriverl flat-blade table knifel mallet
Getting Readyfossil — A rock that contains theremains, traces, or impressions of anorganism from a past geological age.
paleontologist — A scientist whostudies past geological periods.

Preparationl Set up the computer to play the CD-ROM (or set up the VCR
and cue the tape).l Gather the materials for each team of students.l Post a display of illustrations of dinosaur skeletons.l Make a copy of Activity Sheet 3 for each student.l Review the information in the Background on page 8.
Dinosaur Extinction
20 —Dinosaur Extinction
Here’s HowVideo Clip 4
08:15 to 10:21—Peggy Knapp reviewsthe clues that have led scientists to the
meteorite extinction theory.(2 min. 6 sec.)
Engage (Approx. 10 min.)Ask students about any fossils they have seen or handled. Were theyfossilized animals or plants? Explain that there can be two types offossils�an object itself, or an impression of an object. If a paleontolo-gist finds an impression of a leaf or a dinosaur�s footprint or a dino-saur bone, that object is usually embedded in rock. Ask the studentshow the fossils can be obtained from the rock. (Objects can be re-moved from rock; impressions can be used as molds to make modelsof the fossils.)
Ask students why fossilized dinosaur bones are found in various placesaround the world. Show Video Clip 4 [08:15 to 10:21], in which Peggyreviews what may have happened to dinosaurs after a 10 km-wide asteroidhit Earth.
Ask if any of the students have ever seen a dinosaur bone or the fossilizedremains of any other animal. Ask students if the bone that is removedfrom stone is the same as it was when it was a part of the dinosaur.(No.) What has happened to it? (The organic material in the bone hasbeen replaced by stone.) You may need to explain to some studentsthat over millions of years, bone material was replaced by stone.Draw an analogy to petrified wood, which is no longer wood, butrather stone. If a dinosaur bone is made of stone, how would thisaffect the paleontologist�s job? (It would make it harder.) Why? (If thefossil is made of the same material as the stone that surrounds it, it ismore difficult to remove the one without damaging the other.)
l You may wish to begin the lessonby viewing the Introduction from theMenu on the CD-ROM [00:48 - 01:20].Find out what students already knowabout dinosaur extinction. As a class,discuss the questions posed by DaveHuddleston.
l Resource Button C on the CD-ROMhas an animation of how dinosaurbones get buried and fossilize.
l Resource Button D on the CD-ROMhas a video clip showing work at adinosaur dig site in Wyoming.
l The second session should takeplace at last 24 hours after the firstsession so the plaster of Paris can dryand harden completely.
l Identification of the subject fossilwill probably be general. (For ex-ample: “Some sort of tail bone.”)Encourage students to developspecific theories.
l If it is appropriate, view the entirevideo segment on dinosaur extinctionafter completing the activity.
Guide on the Side

Educational materials developed under a grant from the National Science Foundation — 21
Activity 3Try ThisExplore (Two sessions: approx. 40 min. each)
Tell students they are going to create a �fossil,� set it in plaster of Paris,and then remove it to get a feeling of what it is like to do the work of apaleontologist.
Have students work with a group of classmates. One student in thegroup carves a fossil from chalk, and another is a data recorder. Othermembers of the group can help set the fossil in plaster of Paris andparticipate in its removal.
Students select a bone to represent with their fossil. They should consultreference materials and select a specific bone from a specific dinosaurspecies. Once the group has made its choice, the fossil carver uses thehobby knife to carve the chalk into the appropriate shape. Other groupmembers may help by creating sketches showing the bone from differentangles.
When the fossil is complete, students place it inside the milk carton. Theymix plaster of Paris according to the directions on the package, and thenpour it in the milk carton.
Day TwoIn the second session, students exchange the fossil they have set in plasterof Paris with that of another group. Using the screwdriver, the tableknife, the hammer, or whatever other tools seem safe and appropriate,they chip the fossil out of the plaster of Paris. When they have removedit as best they can, they examine it, noting its size, shape, and color.Referring to a chart or illustration of a dinosaur skeleton, students try todetermine what bone or type of bone the chalk fossil represents.
Discuss the results of the activity. Ask team members if they correctlyidentified their fossil. What was the hardest part of removing the fossil?What was the easiest? How could the task have been made easier? Whatcan paleontologists do to make the work of removing petrified bonesfrom rock easier?
Evaluate1. What bone did the fossil you excavated represent? (Answers will vary.Sample answer: The fossil we dug up represented a plate from astegosaurus�s back.)
2. What are some of the problems faced by paleontologists as they dig upfossils? (Answers will vary. Sample answer: Sometimes the materialthey�re trying to dig up is very similar in color and consistency to thematerial they�re trying to chip away.)
3. Name one way in which your fossil excavation differed from an actualfossil dig. (Answers will vary. Sample answer: Our fossil bone was tiny,and there was only one. At a real dig, there would likely be more fossils.)
Continue your work of creating andidentifying dinosaur bones. Using playdough, select and model variousbones, then ask friends or classmatesto identify the bones created.
Perform a real dig. After securing thepermission of the school or a localproperty owner, spend an afternoondigging for artifacts, whether anthropo-logical or paleontological. Note theposition and depth of any artifact thatyou discover.

22 — Dinosaur Extinction Copyright © Twin Cities Public Television & GPN. Permission granted to reproduce for classroom use.
NameNameNameNameName ______________________________________ Cl______________________________________ Cl______________________________________ Cl______________________________________ Cl______________________________________ ClassPeriodassPeriodassPeriodassPeriodassPeriod _______________________________________________________Activity Sheet 3
Bones and StonesBones and StonesBones and StonesBones and StonesBones and StonesWhaWhaWhaWhaWhat you�re going to dot you�re going to dot you�re going to dot you�re going to dot you�re going to doYou are going to do investigate how fossils are recovered from the earth by simulating the work of apaleontologist.
HoHoHoHoHow to do itw to do itw to do itw to do itw to do it1.1.1.1.1. Work with a group of classmates. From a chart or illustrationof a dinosaur skeleton, select a dinosaur bone and carvethe piece of chalk to resemble the bone. Classmatescan help the carver by sketching what they think thebone should look like from different angles. Next,place the fossil bone in the milk carton. Mix upenough plaster of Paris to cover the bone.Pour the plaster of Paris over the chalkbone. Let the plaster of Paris set for at least24 hours.
2.2.2.2.2. In the second session, exchange yourcontainer of plaster of Paris with that ofanother group. Separate the carton from thehardened plaster of Paris, and find a spot wheresome of the fossil is visible. Using the screwdriver, table knife,hammer, or whatever other tools you think you need, remove thefossil from the plaster of Paris.
RecorRecorRecorRecorRecording your dading your dading your dading your dading your datatatatataMeasure the size of the recovered fossil. Sketchits shape. Use the reference materials to deter-mine what part of the dinosaur it came from.Then, if possible, decide what species it camefrom. Record your guesses.
Set up a table like this in your journal, andrecord the following information:length: __________height: __________width: __________color: __________bone: __________species: __________
WhaWhaWhaWhaWhat did you find out?t did you find out?t did you find out?t did you find out?t did you find out?What bone did the fossil you excavatedrepresent?
What was the most difficult part aboutremoving the fossil?
How could you have made the job easier?

Educational materials developed under a grant from the National Science Foundation — 23
EarthquakesTeacher�s Guide
More Information
On Shaky GroundWhat are earthquakes? Where do earthquakesoccur most frequently around the world? How doyou measure the intensity of an earthquake and whydo some earthquakes cause more damage thanothers? What triggers an earthquake and how canthey be predicted?
Themes and Conceptsl earthquakesl earth forcesl plate tectonicsl structure of the Earth
National Science Education Content StandardsContent Standard A: Students should develop abilities necessary to doscientific inquiry.Content Standard B: Students should develop an understanding ofmotions and forces and transfer of energy.Content Standard D: Students should develop an understanding of thestructure of the earth system.Content Standard G: Students should develop an understanding of thenature of science.
Activities1. Finding Faults�Approx. 15 min. prep; 60 min. class timeStudents discover why some areas of the world are prone to earthquakeswhile others only rarely get hit. Using a map of the world and positions ofrecent earthquakes, students perform a simple seismic survey andexplore the theory of plate tectonics.
2. Slip Slidin� Away�Approx. 15 min. prep; 55 min. class time.Students build and test a model fault block, which enables them todemonstrate why it�s so difficult to predict when earthquakes aregoing to occur.
3. Getting Centered�Approx. 10 min. prep; 60 min. class timeStudents discover how scientists determine the position of an earthquakeby using simulated seismograms to calculate an epicenter. They learn what ismeant by the Richter scale, how earthquake damage is measured, and whatfactors determine how damaging an earthquake will be.
InternetNewton’s Applehttp://www.ktca.org/newtons(The official Newton’s Apple web sitewith information about the show and asearchable database of science ideasand activities.)
National Geophysical Data Centerhttp://www.ngdc.noaa.gov//ngdc.html(A great source for current earthquakedata and other data sets.)
National Earthquake Information Centerhttp://www.usgs.gov/fact-sheets/neic/1.html
Surfing the Internet for Earthquake Data —University of Washingtonhttp://www.geophys.washington.edu/seismosurfing.html
Internet Search Wordsearthquake/earthquakesseismologygeologyRichter scalevolcano
Books and Articles

Earthquakes
24 — Earthquakes
Beatley, T. and Berke, P. “Time to shakeup earthquake planning.” Science andTechnology Magazine. Winter, 1992-93,pp 82-89. (Good overview of earth-quake hazards in construction andurban planning.)
Bolt, Bruce A. Earthquakes. (3rd. ed.),New York: W.H. Freeman, 1993.(Good overview of the causes ofearthquakes.)
Davidson, K. ”Predicting Earthquakes.”Earth Magazine . 1994, pp. 56-63. (Niceupdate on the status of earthquakeprediction.)
Keller, Edward. Active Tectonics:Earthquakes, Uplift and Landscapes.Upper Saddle River, NJ: Prentice Hall,1996. (Good overview on how tectonicprocesses shape the Earth.)
Lambert, David Earthquakes andVolcanoes.. New York: BookwrightPress, 1986. (Good summary onearthquakes and volcanoes for kids.)
Robinson, Andrew. Earth Shock: ClimateComplexity and the Force of Nature.London: Thames & Hudson, 1993.(Great Resource! Really gets to theheart of natural disasters!)
Community Resources
Local college or university geologydepartment
State geologic survey
BackgroundSince the beginning of recorded history, earthquakes have struck terror intothe hearts of people all around the world. Hitting without warning, a fewseconds of shaking from a strong earthquake can result in damage thatliterally takes a lifetime to rebuild.
In ancient times, people tied earthquakes to mythology The stories theycreated to explain the traumatic events were often fantastic. In ancient India,quakes were blamed on a giant elephant who held up the world on itsback. When the elephant shook his head, the ground would shake. In Japan,it was the namazu, a giant catfish buried in the mud below the surface whowould thrash about when angered. More often than not, though, mythsattributed earthquakes to angry gods who were unhappy with humanbehavior.
Today scientists believe that most earthquakes are the result of two ormore sections of Earth�s lithosphere moving past each other along afault, or crack, near the surface. Faults are rips in the lithospere oftenconcentrated along or near the boundaries of tectonic plates. These platesactually float on Earth�s semi-fluid upper mantle. Depending on theway they move in relation to each other, different types of faultboundaries are created�subduction zones, convergent zones, andstrike-slip faults.
In subduction zones, like the one off the west coast of South America,ocean crust is pushed underneath the lighter material of the South Ameri-can continent, producing long bands of deep earthquakes. In convergentzones like the Himalayas, the plates carrying two continents are collidinghead on. The collision continues to build the Himalayan mountains andtriggers particularly violent quakes. In areas like the San Andrea�s fault, twopieces of crust are sliding past each other in a �strike slip� motion that isresponsible for the severe earthquakes in California. Quakes do occur in themiddle of plates, but they are less frequent and usually less severe.
One theory being studied by scientists trying to predict earthquakes is called�elastic rebound.� It holds that two pieces of crust can grind together insuch a way as to �lock up� a fault. When a fault is in this �stuck� position,the forces from the plates build to a high level without any movement.When the forces become high enough, the fault snaps suddenly, triggering astrong earthquake. If this theory proves correct it might be used to helppredict when and where earthquakes are likely to occur. By looking at faultsections that haven�t moved in years and by measuring the strain on therock, scientists hope to be able to warn the public when the next �big one�will happen.

Educational materials developed under a grant from the National Science Foundation — 25
Video & StillsVideo Segments
Introduction44:31 to 45:04�SuChin Pak raises some earthshakingquestions, including: �Why do earthquakes happen?� (33 sec.)
Video Clip 145:09 to 46:57�Physicist Derrick Pitts explains whatcauses earthquakes and using a special globe, he demon-strates how the continents have shifted over time.(1 min. 48 sec.)
Video Clip 348:02 to 49:10�David Heil and Derrick Pitts simulatethe movement of an earthquake. (1 min 8 sec.)
Additional ResourcesButton A
Diagram: World map of the Earth�s tectonic platesButton C
Diagram: World map showing how triangulation isused to pinpoint the epicenter of an earthquake
The Unit Assessment on the following page covers the basic concepts presented in the Newton�s Apple video segmentand the Background section in this guide. The assessment does not require completing all of the activities. The UnitAssessment may be used as a pre- or post-test. However, students should view the complete Newton�s Apple videobefore doing this assessment. There is additional assessment at the end of each activity.
Unit Assessment Answer Key
Think about it1. Yes. In one place there may be few tall buildings,
or the buildings may have been built to withstand an earthquake. In another place, there maybe many people, and they may be completelyunprepared for an earthquake. Also, the time ofday may affect the number of fatalities caused byan earthquake. For instance, an earthquake atnight will find people unprepared to protectthemselves, An earthquake near mealtimes mayresult in many fires from cooking equipment.
2. Earthquakes and volcanoes are both the resultof activity deep below the surface of the Earth.
3. Earthquakes are fewer and less severe in themiddle of the plates. Most earthquakes occurnear where tectonic plates meet and exert forceupon each other.
4. There is no way to know for sure what istaking place deep below the surface of the Earth.
5. The movement of tectonic plates in one placepushes them into each other in another place.
What would you say?6. a 7. c 8. d 9. a 10. b
Video Clip 449:12 to 51:42�Derrick Pitts demonstrates the operationof a seismograph and talks about why some earthquakescause more damage than others. (2 min. 30 sec.)
Video Clip 246:57 to 48:01�Derrick Pitts shows how the epicen-ters of earthquakes plotted on a map indicate pattersof earthquake recurrence. (1 min. 4 sec.)
Button BDiagram: Cutaway view of Earth, showing primary andsecondary seismic waves
Button DIllustration: Ancient Chinese seismograph

26 — Earthquakes
Cop
yrig
ht ©
Tw
in C
ities
Pub
lic T
elev
isio
n &
GP
N. P
erm
issi
on g
rant
ed to
rep
rodu
ce fo
r cl
assr
oom
use
.
Unit Assessment
Think about it1. How could a 6.5 magnitude earthquake do more
damage in one place than in another?
2. Why do earthquakes and volcanoes often occurnear each other?
What do you knowabout Earthquakes?
3. In what areas would you expect the fewestnumber of earthquakes to occur? Why?
4. What makes earthquakes so unpredictable?
5. What is one result of tectonic plates moving apartfrom each other?
What would you say?6. Which is not a common form of earthquake
damage?a. Earthquakes split the ground and swallowpeople up.b. Earthquakes cause buildings to collapse.c. Earthquakes trigger massive landslides.d. Earthquakes cause tsunamis.
7. What is used to measure the energy of an earthquake?a. a gravimeterb. an anemometerc. a seismographd. a barometer
8. What is measured by the Richter scale?a. the distance to the epicenterb. the amount of destruction of an earthquakec. the length of time an earthquake lastsd. the energy released by an earthquake
9. Where do earthquakes occur most frequentlyon Earth?a. at the boundary between two crustal platesb. in the middle of a continental platec. in the middle of an oceanic plated. near rivers and large bodies of water
10.To predict earthquakes, scientists look for�a. movement on the seismograph.b. signs of strain near fault lines.c. separation of the continents.d. rising water levels.

Educational materials developed under a grant from the National Science Foundation — 27
Important Terms
Activity 1Finding Faults
What are earthquakes and how are they caused? Where do earthquakes occurmost frequently? How do earthquake locations support the theory of platetectonics? Which major cities of the world are facing the greatest earthquakedangers?
OverviewStudents research information about the causes of earthquakes andwhere they occur. Using a map and the longitude and latitude of recentearthquakes, students plot the epicenters of the earthquakes to discoverhow the occurrence of earthquakes is distributed around the world.
ObjectivesAfter completing this activity, students will be able to�l explain what earthquakes are and describe the forces that trigger
theml plot and interpret a series of earthquake locations on a mapl explain how the locations of earthquakes around the world
support the theory of plate tectonics
Time NeededPreparation: approx. 15 min.Classroom: approx. 60 min.
MaterialsFor the teacher:l a globe or map of the world with latitude and longitude lines
For each group of students:l blank map of the world with latitude and longitude
Getting Readycrust — The outermost layer of theEarth, composed of rigid rock.
fault — A break in Earth’s crust wheretwo sections can move past each other.
focus — The actual point of slippagewhere an earthquake occurs inside theEarth.
longitude — A location on the Earthmeasured in degrees east or west ofthe prime meridian. The prime meridianis an imaginary line that runs north andsouth through Greenwich, Great Britain.
latitude — A location on the Earthmeasured in degrees north or south ofthe equator. Lines of latitude runparallel to the equator.

Here’s How
28 — Earthquakes
Preparationl Set up the computer to play the CD-ROM (or set up the VCR
and cue the tape).l Gather the materials for each team of students.l Make a copy of Activity Sheet 1 for each student.l Review the information in the Background on page 24.
Video Clip 145:09 to 46:57
Physicist Derrick Pitts explains whatcauses earthquakes and using a
special globe, he demonstrates how thecontinents have shifted over time.
(1 min. 48 sec.)
Video Clip 246:57 to 48:01
Derrick Pitts shows how the epicentersof earthquakes plotted on a map
indicate patterns of earthquakerecurrence. (1 min. 4 sec.)
Engage (Approx. 15 min.)Show students a map of the world or a globe. Ask what they observeabout the shape of the continents. What do they observe about theshapes of the east coast of South America and the western coast ofAfrica? (The coast lines match, similar to puzzle pieces.) Ask them tothink about ways to explain this phenomenon, and then show VideoClip 1 [45:09 to 46:57].
Have the class look at the map or globe again. Are there any other places inthe world that look like they could have fit together at one time? (Europeand North America; and Africa and Madagascar.) Ask students howearthquakes might fit into this puzzle of moving continents. Accept allanswers.
Ask students why earthquakes seem to occur fairly often at certain placesaround the world and not in others. Is it reasonable to suggest that mostearthquakes would occur at or near the intersection of plate boundaries?Show Video Clip 2 [46:57 to 48:01], in which Derrick Pitts shows theepicenters of earthquakes on a map. Ask students if they see a pattern in allthe dots on the map. Accept all answers.
l You may wish to begin the lessonby viewing the Introduction from theVideo Menu on the CD-ROM [44:31 -45:04]. Find out what studentsalready know about earthquakes. Asa class, discuss the questions posedby SuChin Pak.
l Before doing the activity, you maywant to demonstrate how to plot apoint on a map given its longitude andlatitude.
l Remind students to double checktheir placement of epicenters. Indealing with longitude and latitude, itcan be easy to make mistakes.
l Based on their maps, have thestudents suggest locations around theworld that would be least likely tohave earthquakes.
l Based on their maps, have thestudents create an “EarthquakeHazard Map,” showing zones thathave high, medium, and low earth-quake potential.
l If it is appropriate, view the entireNewton’s Apple video on earthquakesafter completing the activity.
Guide on the Side
Earthquakes

Educational materials developed under a grant from the National Science Foundation — 29
Activity 1Try ThisExplore (Approx. 45 min.)
Tell students that they are going to do some seismic mapping�showingwhere earthquakes occur. Distribute the world outline maps with longitudeand latitude lines to the class and explain that they are going to plotlocations of earthquakes that have occurred recently around theworld. Tell the students that they should look for patterns. The datathat they are going to use is for earthquake epicenters. Remindstudents that the epicenter is the location on the surface of the earthabove which the actual earthquake has occurred. Frequently, anearthquake may occur several miles below the surface. The pointwhere the earth actually moves is called the focus.
Have the students work with a partner and review the data on theactivity sheet. Can students detect any patterns just by looking at thedata? Explain that in science, data often have little meaning until theyare plotted in a graph. Using the map of the world, ask the students tobegin plotting each earthquake epicenter based on its longitude andlatitude. The students should place a dot on the map to show the exactlocation of each epicenter, and then mark it with the number of theearthquake on the data sheet. After the students have completed theirmaps, discuss the results and compare student maps to a map of theworld showing crustal plate boundaries. How do they match? (Theearthquake locations should fall fairly close to the plate boundaries.)What might this indicate? (Earthquakes are caused by plate move-ment.)
Evaluate1. How does the distribution of earthquakes around the world helpsupport the idea that the earth�s crust is made up of many small platesmoving above or below each other? (The pattern of frequent earthquakesfalls along lines that could be the edges of plates.)
2. What kind of land form would be created if two continental platescrashed head on into each other? (Mountains would form.)
3. How might you explain a series of large earthquakes that have occurredin the middle of a continent? (There are small faults that run throughout allof the tectonic plates. The area could be on one of these faults.)
Keep an earth log of earthquakesaround the world and plot them on amap as an on-going project. You canget up-to-date information on earth-quake locations from the United StatesGeological Survey web site or the“Earth Chronicles” section of EarthMagazine.
Only in the last 20 years has platetectonic theory become accepted by thescientific community. Before that,scientists offered several different ideasto explain how mountains formed andwhy earthquakes occurred. Do someresearch on earthquake theories. Whatare some things that convinced peopleto finally accept the theory of platetectonics?
How well do the plates fit together?According to plate tectonic theory, all ofthe continents were together in onegiant mass called “Pangea” some 200million years ago. Try building your own“super-continent” by cutting out theland masses of the world and puttingthem back together according to theircoast lines. How well do they fit?

NameNameNameNameName Class Period Class Period Class Period Class Period Class Period
Copyright © Twin Cities Public Television & GPN. Permission granted to reproduce for classroom use.30 — Earthquakes
Activity Sheet 1
Finding FaultsFinding FaultsFinding FaultsFinding FaultsFinding FaultsWhaWhaWhaWhaWhat you�re going to dot you�re going to dot you�re going to dot you�re going to dot you�re going to doUse the longitude and latitude to plot the following earthquake locations on a map of the world. Then youcan decide how those earthquake locations may relate to one another.
HoHoHoHoHow to do itw to do itw to do itw to do itw to do itExamine the data in the table below. Use the longitude and latitude to locate the position of each epicenteron the map your teacher provided.
# Latitude Longitude
WhaWhaWhaWhaWhat did you find out?t did you find out?t did you find out?t did you find out?t did you find out?Examine your completed map of earthquake epicenters. What pattern do you ob-serve? What might account for this type of distribution?
Compare your map to a map showing the Earth�s crustal plates. Is there any observ-able relationship between the two? How does this relate to the theory of tectonicplates?
The area around the Pacific Ocean is often called the �Ring of Fire.� Based on yourmap, where do you think this name came from?
Recent Earthquakes
# Latitude Longitude
1 50 S 75 W2 30 N 9 W3 60 N 152 W4 25 S 75 W5 22 N 46 W6 49 N 129 W7 35 N 35 E8 42 N 21 E9 0 80 W10 41 N 30 W11 30 N 115 W12 1 N 30 W13 37 N 72 E14 17 N 98 W15 5 S 150 E
16 51 N 179 W17 40 N 24 E18 30 N 60 E19 10 S 105 E20 1 S 22 W21 15 N 105 W22 7 S 13 W23 20 N 75 W24 18 N 102 W25 50 N 158 E26 71 N 13 W27 33 S 73 W28 40 N 145 E29 36 N 22 E30 58 N 33 W
RecorRecorRecorRecorRecording your dading your dading your dading your dading your datatatatataWrite the number of eachepicenter from the table in thecorrect location on the map.

Educational materials developed under a grant from the National Science Foundation — 31
Activity 2
Important Terms
Slip Slidin’ AwayHow do moving plates cause earthquakes? Why is it so difficult to predict whenearthquakes will occur? How can planners help minimize earthquake damage?What type of construction techniques work best in earthquake zones?
OverviewStudents build and test a simple model to determine how the elasticrebound theory of earthquake prediction works. They find outwhy accurate earthquake predictions are so difficult to make.
ObjectivesAfter completing this activity students will be able to�l discuss how the elastic rebound theory works to explain the
occurrence of earthquakesl explain how two plates can shear passed each other and cause an
earthquakel explain why earthquakes are difficult to predict
Time NeededPreparation: approx. 15 min.Classroom: approx. 55 min.
MaterialsFor the teacher:l 2 sheets of thin foam core board 20 cm x 30 cm x 5 mml piece of rope approximately 5 meters (15 ft) longl non-folding chair without casters
For each team of students:l student activity sheetl wooden block approximately 8 cm x 8 cm x 3 cml staplerl sheets of medium sand paperl long thin rubber band (1/4 inch)l roll of cellophane tapel pair of scissorsl metric ruler
Getting Readyelastic rebound — A theory thatexplains earthquakes as the result ofstrain building up between two piecesof crust until the fault snaps and thecrust “rebounds.”
strain — The amount of pressure thatbuilds up between two sections of thecrust.

Here’s How
Earthquakes
32 — Earthquakes
Preparationl Set up the computer to play the CD-ROM (or set up the VCR
and cue the tape).l Gather the materials for each team of students.l Make a copy of Activity Sheet 2 for each student.l Review the information in the Background on page 24.l Before the class, tie one end of a long rope to the two front
legs of a chair and place it near the front of the room.
Video Clip 348:02 to 49:10—David Heil and Derrick
Pitts simulate the movement of anearthquake. (1 min. 8 sec.)
Engage (Approx. 15 min.)At the front of the class, have two students place the two sheets of foamboard next to each other flat on a desk so that the boards are touching.Have the volunteers stand facing each other and tell them that they aregoing to slowly push the two sheets together from opposite sides. Ask theclass to predict what will happen and then have the students begin. (Theboards should begin to bow up in the middle and, as the pressurecontinues, one board should suddenly slide over or under the other.)Explain that what they just witnessed is much like what happens tothe Earth�s crust during some types of earthquakes. Show Video Clip 3[48:02 to 49:10] as a further illustration of this concept.
Have two students help demonstrate elastic rebound effect. Ask the heavierstudent to sit in the chair that you have prepared. Have the other studentslowly pull the rope taut and hold it. Explain that as the pressure builds up,the chair with the student will finally slide. This release of pressure is what iscalled elastic rebound. In geological conditions, seismologists measure howmuch strain and displacement occurs in the rocks found in known faultzones, with the hope of predicting future earthquakes.
Explore (Approx. 40 min.)Tell the students they are going to build and test a simple model of a faultzone. They�ll use this model to try to come up with a way of predictingearthquakes along their fault.
In the model, the two crustal plates will be represented by a block ofwood and the desktop. The pressure or �strain� on the plates will beprovided by a stretched rubber band and the amount the block slides willrepresent the crustal displacement.
l You may wish to begin the lessonby viewing the Introduction from theVideo Menu on the CD-ROM [44:31 -45:04.] Find out what studentsalready know about earthquakes. Asa class, discuss the questions posedby SuChin Pak.l This is a very open-ended activity.Students won’t be able to come upwith a way that works consistently.This is the point of the activity—it isvery difficult to predict earthquakes.l To save class time, you may wantto prepare the sandpaper blocksbefore class.l Sometimes when you pull therubber band, the block will actually liftoff the sandpaper rather than slidingalong. To prevent this from happen-ing, students can place a small bookon top of the block to weigh it down.l You may want to have differentgroups use sandpaper of differentgrits to see how coarseness affectsthe results. Different lengths andthickness of rubber bands can alsointroduce another interesting variable.l In real fault zones, the rate ofslippage is often increased whenground water enters the fault andlubricates the contact between therocks. How might the studentssimulate this in their models?l If it is appropriate, view the entireearthquake video segment.
Guide on the Side

Educational materials developed under a grant from the National Science Foundation — 33
Try This
Activity 2Have your students work in small groups. Students should wrap thewooden block in a sheet of sandpaper so that the rough side is facingout, and attach it with staples. Tell the students to cut the rubber bandso that it forms one long piece, and have them staple one end of it tothe end of the wooden block as shown in the illustration on theactivity sheet. Next, have them tape the second piece of sandpaper tothe top of a desk so that the rough side is facing up.
Students place the wooden block at one end of the sandpaper, makingsure that the rough sides are in contact with each other. One member ofthe group should mark the point where the block rests on the paper.Another student slowly pulls the loose end of the rubber band so that itbegins to stretch. Have a third team member measure the distance therubber band stretches until the block finally begins to slip. Have studentsrecord the measurements in their journals.
Have students mark new starting spots for the block on the sandpaper andrepeat the experiment several times and record their data. Using theirdata, students should come up with a way of predicting when an�earthquake� will occur. They should test their theories and modifythem as necessary.
Have groups share their theories and discuss them with the entireclass.
Evaluate1. Consider the shearing action of the oceanic and continental plates andsuggest a reason why it is difficult to predict when an earthquake will occur.(Although it may be possible to measure the strain or pressure on a plate, itis not possible to know when the rocks will give in to the pressure andallow the two plates to pass by each other, causing a violent movement ofthe Earth.)
2. In the model fault activity, what does the tightened rubber band repre-sent? (The strain on tectonic plates.)
3. In addition to the unpredictability of the occurrence of a quake, themodel fault activity shows that another characteristic of an earthquake isnot predictable. What is it? (The amount of energy that the earthquakereleases, which is represented by the distance the block moves.)
What would you do if an earthquake hityour community? In places like Japanand California, earthquake prepared-ness is a fact of life, and beginning atan early age, school children take partin earthquake drills. Find out how toprepare for an earthquake and make aplan for your home or school.
Find out what the twelve levels ofdamage and destruction are in theMercalli scale. What were some of themost destructive earthquakes onrecord? Were there any uniqueconditions that made them so bad?
How do you “earthquake proof” abuilding? Investigate some of thetechniques being used today to reducethe damage caused by trembling. Buildyour own designs and test the theory.Share your design with the class.
In many areas of the world, scientistsare investigating the ability of animalsto predict earthquakes. Find out howsome animals may react when theysense an earthquake is about to occur.Report your findings to the class.

HoHoHoHoHow to do itw to do itw to do itw to do itw to do it1.1.1.1.1. Work with a small group of students. Followyour teacher�s instructions to make a blocklike the one shown in the illustration.
2.2.2.2.2. Place the sandpaper block at one end ofthe piece of sand paper taped to the desk, mak-ing sure that the rough sides are in contact witheach other. Mark the place where the block rests onthe paper. Next, very slowly pull the loose end of therubber band so that it begins to stretch. Measure thedistance the rubber band stretches before the block finallybegins to slip. Record this information and any other observations. Measure andrecord the distance the block slides on top of the sandpaper.
3.3.3.3.3. Repeat the activity several more times, recording the same information each time.
4.4.4.4.4. Use the data you gathered to come up with a way of predicting when an �earthquake� willoccur in the model. Test your theory and refine it.
Activity Sheet 2
Name __________________________________Name __________________________________Name __________________________________Name __________________________________Name __________________________________ Class Period ____________Class Period ____________Class Period ____________Class Period ____________Class Period ____________
Copyright © Twin Cities Public Television & GPN. Permission granted to reproduce for classroom use.34 — Earthquakes
Slip Slidin� ASlip Slidin� ASlip Slidin� ASlip Slidin� ASlip Slidin� AwwwwwaaaaayyyyyWhaWhaWhaWhaWhat you�re going to dot you�re going to dot you�re going to dot you�re going to dot you�re going to doYou�re going to build and test a simple model of a fault zone. Then you are going to try to come upwith a way of predicting earthquakes.
RecorRecorRecorRecorRecording your dading your dading your dading your dading your datatatatataSet up a data table in yourjournal to record the length ofthe stretched rubber band(strain) and the distance theblock moves (displacement).Record any other observationsyou may have.
WhaWhaWhaWhaWhat did you find out?t did you find out?t did you find out?t did you find out?t did you find out?In an actual earthquake zone, friction between the sides of thecrustal sections helps to �lock up� the fault. What provides thefriction in your model? What do you think would happen if youreduced the friction? How might you increase the friction be-tween the blocks? Try it in your model and see if it works.
What conditions in a real fault zone are not accounted for in yourmodel? How might you modify your model to account for those?
Were you able to come up with a way to consistently predictwhen an �earthquake� would occur in your model? Explain.
What does this activity show you about predicting real earth-quakes?

Educational materials developed under a grant from the National Science Foundation — 35
Activity 3
Getting Ready
Getting CenteredHow do scientists know the location and intensity of an earthquake? What is aseismograph and how does it work? What is the Richter scale and what does itmeasure? Why are some earthquakes more destructive than others?
OverviewStudents learn how the energy of an earthquake is measured and how aseismograph works. Students use simulated seismograms to locate theepicenter of an earthquake by employing triangulation.
ObjectivesAfter completing this activity, students will be able to�l explain how to locate the position of an earthquake�s epicenter
using three earthquake seismogramsl explain what is meant by the Richter scale and describe what it
measuresl explain why some earthquakes are more destructive than others
Time NeededPreparation: approx. 10 minutesClassroom: approx. 60 minutes
Materialsl pencill drawing compassl metric (cm) rulerl scale map of the United States
Important Terms
Mercalli scale — A scale used tomeasure the damage caused by anearthquake.
P-waves — Primary or compressionwaves that are the first to arrive from anearthquake.
Richter scale — A logarithmic scaleused to measure the intensity of anearthquake or the amount of energyreleased.
S-waves — Secondary or shear wavesthat are second to arrive from anearthquake.
seismogram — A recording producedby a seismograph showing the time ofarrival time of earthquake waves andtheir intensity.
triangulation — A technique usingthree data points to plot a location.

Here’s How
36 —Earthquakes
Earthquakes
Preparationl Set up the computer to play the CD-ROM (or set up the VCR
and cue the tape).l Gather the materials for each team of students.l Make a copy of Activity Sheet 3 for each student.l Review the information in the Background on page 24.
Video Clip 449:12 to 51:42
Derrick Pitts demonstrates the operationof a seismograph and talks about why
some earthquakes cause more damagethan others. (2 min. 30 sec.)
Engage (Approx. 15 min.)Write �Earthquakes don�t kill people. Buildings do!� on the board. Askstudents what they think this means. Accept all responses. Tell students that amild earthquake can sometimes cause more death and destruction than astronger quake. Ask how that could be. Have students explain their re-sponses. View Video Clip 4 [49:12 to 51:42]. Ask students to list some ofthe factors that determine how destructive an earthquake might be. (Thepopulation of an area, the height of buildings, the construction of build-ings, the time of day, the degree to which structures are fireproof, the localtopography and geological features, such as soil, etc.)
Ask the students how the energy of earthquakes was measured before theRichter scale was devised. (The Mercalli scale was used.) Ask what thecriteria were for the Mercalli scale. (There were 12 levels of damage: 1represented little or no damage, and 12 stood for total destruction.)
Explain that the movement of an earthquake travels in shock waves thatextend out in all directions. Because shock waves travel in all differentdirections from an earthquake, it is possible to use seismograms from threedifferent locations to plot the actual epicenter of an earthquake by aprocess called triangulation. Using three simulated seismograms, studentswill find the epicenter of an earthquake.
Explore (Approx. 45 min.)Have the students examine the three simulated seismograms on the activitysheet. Explain that when an earthquake occurs, several different types ofwaves are produced. The first waves to reach a seismograph are calledP-waves, or primary waves. The next waves are called S-waves, orsecondary waves. The S-waves can arrive either a few seconds orseveral minutes later, depending on how far away the earthquakeepicenter is. By calculating the difference in travel time betweenP-waves and S-waves on a seismogram, you can determine how faraway from an earthquake a seismograph recording station is.
Have students refer to the seismograms on Activity Sheet 3 andcalculate the difference in arrival times for the P- and S-waves for eachlocation, and then record them on a data chart.
l You may wish to begin the lessonby viewing the Introduction from theVideo Menu on the CD-ROM [44:31 -45:04]. Find out what studentsalready know about earthquakes. Asa class, discuss the questions posedby SuChin Pak.
l Copy Table 1 onto the board orprovide photocopies to each group.
l It may be helpful to demonstrateon the board how you would usetriangulation to plot a common point.
l You may extend the exercise byasking student partners to devise theparticulars of other earthquakes, thentrade those details with others whocan come up with the epicentersbased on those details.
l If it is appropriate, view the entireNewton’s Apple video segment onearthquakes after completing theactivity.
Guide on the Side

Educational materials developed under a grant from the National Science Foundation — 37
Activity 3Try This
Have students use Table 1 and calculate how many kilometers eachcity must be from the epicenter of the quake using the difference inarrival times for each location.
Have the students use a scale map of the United States and with a compassdraw a circle around Seattle, Harrisburg, and New Orleans with a radius equalto the distances they calculated. The students will see that the three circlesintersect at one point. This point is the epicenter of quake.
Example:For Phoenix, AZ the P-waves arrived at 6:05 and the S-waves arrived at 6:08and 30 seconds. The difference in arrival times is 3.5 minutes. On Table 1,three and a half minutes is equal to 2,200 km from the quake. Look at thescale on the map. Find out how many centimeters equal 2,200 km. Let�s saythat on your map 2 cm equals 1,100 km. Use your metric ruler to set the gapbetween the pencil and point on the compass to 4 cm. Place the point of thecompass at Phoenix and draw a circle that has a radius of 4 cm. Now do it forthe other two cities. The epicenter is where the three circles intersect.
Evaluate1. Why do you think the size of the shock wave created by an earthquake getssmaller the farther you are from the actual epicenter? (As the wave pushesthrough more and more rock, it loses some of its energy.)
2. Why do you need to have seismic data from three different stations tolocate the exact epicenter of the earthquake? (You need three points totriangulate.)
3. What are some of the factors that must be considered when buildings arebeing designed in earthquake prone areas? (The foundation, the constructionmaterial, the amount of glass, the height of a building, and the ground onwhich the structure is built.)
Over the years, many different deviceshave been used to try an measure therelative strength of an earthquake. Findout about the origins of the modern dayseismograph. Using the designs youfind, try building a working model ofyour own, or if you prefer, try designingyour own seismograph.
Who was Charles Richter and how didhe develop his famous scale? Whatwas the largest earthquake everrecorded on the Richter scale andwhere do the “big ones” usually occur.Where and when was the largestearthquake ever to occur in the UnitedStates? The answer may be surprising.
Earthquake wave travel time for P- and S-waves.
Difference in Arrival Times Distance From Epicenter(Km)
1.0 minutes1.5 minutes2.0 minutes2.5 minutes3.0 minutes3.5 minutes4.0 minutes4.5 minutes5.0 minutes5.5 minutes
500 km800 km1200 km1500 km1800 km2200km2500 km3000 km3500 km4000 km

Activity Sheet 3
Name____________________________________ Class Period ____________Name____________________________________ Class Period ____________Name____________________________________ Class Period ____________Name____________________________________ Class Period ____________Name____________________________________ Class Period ____________
38 — Earthquakes
Getting CenteredGetting CenteredGetting CenteredGetting CenteredGetting Centered
WhaWhaWhaWhaWhat you�re going to dot you�re going to dot you�re going to dot you�re going to dot you�re going to doYou�re going to calculate the locations of the epicenters of an earthquake.
HoHoHoHoHow to do itw to do itw to do itw to do itw to do it1.1.1.1.1. Study the seismograms. Calculate the difference in arrival times between P- and S-waves for eachlocation. Then refer to the table that your teacher provides. Calculate how many kilometers each city isfrom the epicenter of the quake.
2. 2. 2. 2. 2. Use a scale map of the United States. Use a compass to draw a circle around Seattle, Harrisburg, andNew Orleans with a radius equal to the distances you calculated. The three circles intersect at one point.This point is the epicenter of quake.
Time 7:05 7:06 7:07 7:08 7:09 7:10 7:11 7:12 7:13 7:14 7:15 7:16 7:17
Time 7:05 7:06 7:07 7:08 7:09 7:10 7:11 7:12 7:13 7:14 7:15 7:16 7:17
Seattle, WA
New Orleans, LA
Harrisburg, PA
p-waves
p-waves
p-waves
s-waves
s-waves
s-waves
Time 7:05 7:06 7:07 7:08 7:09 7:10 7:11 7:12 7:13 7:14 7:15 7:16 7:17
RecorRecorRecorRecorRecording your dading your dading your dading your dading your datatatatataSet up a data table in your journal that includes all of the following information:City, arrival time for P-wave, arrival time for S-wave, difference in arrival times, distance from epicenter (km).
WhaWhaWhaWhaWhat did you find out?t did you find out?t did you find out?t did you find out?t did you find out?Based on your calculations, what was the nearest major city to the earthquake epicenter?
Why did the P-waves arrive in Harrisburg after they arrived in Seattle?
If this were a real earthquake, how could you confirm that the projected location was the true epicenter?

Educational materials developed under a grant from the National Science Foundation — 39
CD-ROM PROJECT STAFFKTCA TV, NEWTON’SAPPLE MULTIMEDIA
Dr. Richard HudsonDirector of Science Unit
David HeathLee CareyCurriculum Development Managers
Cori PauletPaddy FaustinoCurriculum Development Coordinators
Edward VoellerLesson Editor
Jeffrey NielsenAdditional Resources Coordinator
Michael WatkinsSusan AhnSandy SchonningDavid YankoProduction Managers
Lisa BlackstoneErin RasmussenProducers
Steve FlynnProducer/Editor/Videographer
Lesley GoldmanDanika HansonKim MacDonaldAssociate Producers
Janet RaugustScreen Designer
Ben LangProduction Assistant
Linda Lory-BlixtField Test Coordinator
Michael JohnstonJoe DemuthShort Course Facilitators
Nick GhitelmanIntern
NEBRASKA EDUCATIONALTELECOMMUNICATIONS
John AnsorgeInteractive Media Project Manager
Andy FrederickInteractive Media Designer
Christian NoelInteractive Media Project Designer
Kate AnsorgeIntern
GREAT PLAINS NATIONALTom HendersonJackie ThoelkeDiane MillerDiedre MillerGuide Design and Production
NATIONALADVISORY BOARD
Rodger BybeeNational Academy of Sciences
Richard C. ClarkMinnesota Department of Education, Retired
Dave IversonImation Enterprises CorporationVadnais Heights, MN
Dr. Roger JohnsonUniversity of Minnesota
Dr. Mary MaleSan Jose State University
Dr. Carolyn NelsonSan Jose State University
Lori OrumEdison Language AcademySanta Monica, CA
Janet WalkerB.E.T.A. SchoolOrlando, FL
Michael WebbNew Visions for Public SchoolsNew York, NY
SENIOR ADVISORSDavid BeacomNational Geographic Society
Dr. Judy DiamondUniversity of Nebraska State Museum
Dr. Fred FinleyUniversity of Minnesota
Greg SalesSeward Learning Systems, Inc.Minneapolis, MN
LESSON WRITERSJon AndersonFred BortzSara BurnsPam BurtJim DawsonRuss DurkeeVickie HandyLorraine Hopping EaganSheryl JuenemannCheryl Lani JuarezMike MaasMike MogilBruce T. PaddockLinda RoachPhyllis RootZachary SmithSheron SnyderCaren StelsonSteve TomecekEdward VoellerAnne Welsbacher
REVIEWERSCharles AddisonMinnesota Earth Science Teacher’s Association
Micheal John AhernMentor Teacher, Science and MathRedwood, CA
Scott AlgerWatertown-Mayer Middle SchoolWatertown, MN
Zan AustinStrickland Middle SchoolDenton, TX
Jon BarberNorth Oaks, MN
Rebecca BiegonMacalester CollegeSt. Paul, MN
Juan CabanellaUniversity of Minnesota
Rolando CastellanosSt. Paul Academy and Summit SchoolSt. Paul, MN
Sarah ChadimaSouth Dakota Geological Survey
Dr. Orlando CharryUniversity of Minnesota - Dept. of Surgery
Kristine CraddockMexico High SchoolMexico, MO
Ruth DanielzukAmerican Cancer Society
Steve Dutczak, Ph.D.NASA
Richard ErdmanVenice High SchoolLos Angeles, CA
Bruce FisherFortuna ElementaryFortuna, CA
Mike GarciaUniversity of Hawaii
Chris Gregg, A.B.O.C.Inver Grove Heights Family Eye ClinicInver Grove Heights, MN
Rick GriggUniversity of Hawaii
Deborah HardenSan Jose State University
Gloriane HirataSan Jose Unified District
Margaret K. Hostetter, M.D.University of Minnesota
Neil F. HumphreyUniversity of Wyoming
Lisa Hunter, Ph.D.University of Minnesota
Sally JenkinsRoosevelt ElementaryMinot, ND
Bruce JonesThe Blake SchoolHopkins, MN
Leslie KlineMetcalf Junior HighBurnsville, MN
Tom KrinkeMaple Grove Junior HighMaple Grove, MN
Frank LuUniversity of Texas-Arlington
Cynthia MacLeodSabin Early Childhood Education CenterPortland, OR
Robert MarchUniversity of Wisconsin-Madison
Shannon Matta, Ph.D.Minneapolis Medical Research Foundation
Ken MeyerCoon Rapids High SchoolCoon Rapids, MN
Lou MonglerMexico High SchoolMexico, MO
Credits

Candy MussoVineland Elementary SchoolPueblo, CO
John MussoPueblo Technical AcademyPueblo, CO
Debbie NelsonBay Trail Middle SchoolPenfield, NY
Jack NetlandMaple Grove High SchoolMaple Grove, MN
Joyce NilsenTechnology Learning CampusRobbinsdale, MN
Ingrid NovodvorskyMountain View High SchoolTucson, AZ
Jon PedersenEast Carolina University
MaryBeth PetersonRoosevelt ElementaryMinot, ND
Alberto RamirezSpanish TranslatorMiami, FL
Bev RamolaeTechnology Learning CampusRobbinsdale, MN
Brad RandallOsseo Area SchoolsNorth Maple Grove, MN
Gina RoetkerStrickland Middle SchoolDenton, TX
Fernando RomeroUniversity of Houston
Dr. Lawrence RudnickUniversity of Minnesota
Hank RyanMounds View High SchoolArden Hills, MN
Jan SerieMaclester CollegeSt. Paul, MN
Larry SilverbergNorth Carolina State University
Jaine Strauss, Ph.D.Macalester CollegeSt. Paul, MN
Thomas Walsh, Ph.D.University of Minnesota
Steve WartburgFortuna ElementaryFortuna, CA
Randy YerrickEast Carolina University
FIELD TESTERSScott D. BellChaminade College PrepSt. Louis, MO
Laura S. BerryOrland Jr. HighOrland Park, IL
Lance BrandDriver Middle SchoolWinchester, IN
Lorene A. ChanceEast Ridge Middle SchoolRussellville, TN
Elizabeth CordleMontgomery Middle SchoolEl Cajon, CA
David EggebrechtKenosha UnifiedKenosha, WI
Dennis L. EngleEast Lawrence High SchoolTrinity, AL
Dave FleischmanSpring Valley Middle SchoolSpring Valley, CA
John FrugoniHillsdale Middle SchoolEl Cajon, CA
Linda FureyRising Star Middle SchoolFayetteville, GA
Rosemary GonzalesGreenfield Middle SchoolEl Cajon, CA
Liz HendricksonDriver Middle SchoolWinchester, IN
Bruce M. JonesThe Blake SchoolHopkins, MN
Dave KahlWadena-Dear Creek High SchoolWadena, MN
Theresa KistnerHelen C. Cannon Middle SchoolLas Vegas, NV
Craig KlawitterWadena-Dear Creek High SchoolWadena, MN
Linda LoveHillsdale Middle SchoolEl Cajon, CA
Virginia MadiganMontgomery Middle School-El CajonEl Cajon, CA
Steven D. McAninchPark Forest Middle SchoolState College, PA
Robert J. NicholsonVon Tobel Middle SchoolLas Vegas, NV
Jim ParkerSpring Valley Middle SchoolLas Vegas, NV
Joyce PerkinsWhatcom Day AcademyBellingham, WA
Sharon ReynoldsIndependence Secondary SchoolChristiansburg, VA
Judy StellatoJerling Jr. HighOrland Park, IL
Ralph V. ThomasHelen C. Cannon Middle SchoolLas Vegas, NV
Robin TomasinoMasconomet Regional Jr. HighTopsfield, MA
Donna TreeceEast Ridge Middle SchoolRussellville, TN
Darrell WarrenVon Tobel Middle SchoolLas Vegas, NV
Janis YoungMontgomery Middle SchoolEl Cajon, CA
SPECIAL THANKSPartners
American Psychological Association750 First Street, NEWashington, DC 20002(202) 336-5500http://www.apa.org
Minnesota Department of Children, Families andLearningCapitol Square Building550 Cedar CourtSt. Paul, MN 55101(651) 296-6104http://clf.state.mn.us
Fender Musical Instruments Corporation7975 North Hayden RoadSuite C-100Scottsdale, AZ 85258(606) 596-7242http://www.fender.com
W.L. Gore & Associates, Inc.551 Paper Mill Road, P.O. Box 9206Newark, DE 19714-9206(302) 738-4880http://www.gore.com
National Science Foundation4201 Wilson BoulevardArlington, VA 22230(703) 306-1234http://nsf.gov
Regents of the University of Minnesota, Twin CitiesGeneral Biology Programhttp://biomedia.umn.edu
WalthamConsumer Affairs, P.O. Box 58853Vernon, CA 90058(800) 525-5273http://www.waltham.com
ConsultantsDave ArlanderJohn Marshall High SchoolRochester, MN
Bobbie Faye FergusonNASA
Chuck LangUniversity of Nebraska
Maynard MillerJuneau Ice Field Research Project
John OlsonArlington High SchoolSt. Paul, MN
Dr. Helen M. ParkeEast Carolina University
Credits
40 — Credits

NOTES

NOTES

Order today!
AT LAST, a supplemental middle school science curriculum that helps you meet the challengesof today�s science classroom. The program engages students by incorporating segments fromthe award-winning Newton�s Apple television show into hands-on/minds-on activities. Eachlesson plan helps you integrate the technology using an inquiry-based approach. A variety ofassessment options allow you to gauge student performance. And the entire program is corre-lated to the National Science Education Standards.
EACH CURRICULUM MODULE CONTAINS:● a CD-ROM with two Newton�s Apple segments, a video profile of a working scientist,
and additional audio/visual resources● a teacher�s guide with lesson plans for six inquiry-based activities
● a Newton�s Apple videotape
38 topics in 19 modules!! Choose the curriculum modules that benefit your needs.Physical Science Life Science and Health Earth and Space ScienceAir Pressure/Domed Stadiums Antibiotics/Cancer Clouds/WeatheringElectric Guitars/Electricity Blood Typing/Bones Dinosaur Extinction/EarthquakesGravity/Rockets DNA/DNA Fingerprinting Everglades/SewersInfrared/Reflection Hearing/Human Eye Geothermal Energy/Glaciers
Nicotine/Smiles Greenhouse Effect/OzoneSports Physics Meteors/Solar EclipsesHang Gliders/Surfing Phases of the Moon/The SunHigh Wire/SkateboardsSpinning/Water-skiing
Individual Packages: $49.95 To order by mail: To order by phone, call toll-free:Three-CD collection: $119.45 1-800-228-4630Four-CD collection: $159.95 Fax your order to:
1-800-306-2330E-mail your order to:
P.O. Box 80669 [email protected], NE 68501-0669

Box 80669, Lincoln, Nebraska 68501 � 800-228-4630
Distributed by