discover your phone how to - download.p4c.philips.com
TRANSCRIPT

Long press and release ).
Enter your PIN code usingthe keypad and press , orL to confirm.
Press *. The MP3 keypadwill be locked. Press the *to unlock.
When the flip of the phone isopened, the keypad will beunlocked automatically,while the keys on the phone'sflip will be locked.
Enter the phone number usingthe keypad and press (.
Press ).
When the phone rings, press(.
Discover Your Phone
Philips continuously strives to improve itsproducts.Therefore, Philips reserves the rights to revisethis user guide or withdraw it at any time without priornotice. Philips provides this user guide “as is” and doesnot accept, except as required by applicable law,liability for any error, omission or discrepancy betweenthis user guide and the product described. The device ismeant to be connected to GSM/GPRS networks.
How to ...
Alphanumeric keypad
Microphone
262K colourTFT LCD
Navigation keys Hang up andon/off key
Left softkey Right softkey
Pick up key
Back of phone: Camera lens
Headset, charger,and data cable
connector
Infrared
Micro SD card slot
Switch the phone On/Off
Enter your PIN code
Lock the MP3 keypad
Lock the keypad
Make a call
End a call
Answer a call

1
list Press ( in idle mode.
Press + in idle mode.
s Press - in idle mode.
Press < in idle mode.
Press > in idle mode.
enu Press , or L in idle mode.
Press R in idle mode.
s Press R Back whenbrowsing menu or in editingmode.
to sing
Short press ).
Activate/deactivate handsfree mode
In idle mode, enter thephone number using thekeypad or select a contact inthe phonebook.Press , or L Options, thenselect call handsfree andpress ,.During a call, press , or LOptions to access thehandsfree option.When there is an incomingcall, long press (.
Mute a call When the phone rings, pressR.
Reject a call When the phone rings, press).
Adjust conversation volume
Press < and > keys to adjust thevolume during a call.
Adjust ringer volume
When the phone is in idlemode, press , > Settings >Sounds > Ring volume toadjust the ring volume of anincoming call.
Access all calls
Access WAP browser
Access Contact
Access My Files
Access Write Message
Access Main M
Access MP3
Go to previoumenu
Quickly returnidle when browmenus

Control Keys Softkeys
ft keys (L and R) are locatedrea. Pressing the soft keys allowsption displayed on the screen including options during a call.soft keys change according to the
the headset
tions are applicable to headsets
one number in idle mode, shorty to dial the number. To stope headset key. ress the headset key to record or
press to hang up the phone. oming call, press the headset keyng press to reject the call.
ferent features of your Philips 598in menu. The following tableure of the Main menu, what thee page number on which you canion regarding the menu functions.
2
There are three control keys on the outer cover of themobile phone: , , and .For each key, there are 4 modes:• Idle mode• MP3 mode• Incoming call mode• Handset mode during incoming callIn Idle mode, you can long press any one of the 3 keysto turn the sub-LCD on. Once the sub-LCD is turnon, press to activate music player.In MP3 mode, short press the to turn the volumedown, short press the to turn the volume up, andshort press the to pause or resume playing.In MP3 mode, long press the to go to the previoussong, long press the to go to the next song, and longpress the to turn off the MP3 function.In Incoming Call mode, short press either the orthe to silent the call. Long press either the or to reject the call. In Headset mode during incoming call, short press orlong press the to turn the volume down; short pressor long press the to turn the volume up.
The left and right soat the top of keypad ayou to select the odirectly above them,The functions of the current context.
Operations of
The following operawith only one key. When you enter a phpress the headset kedialling, long press thDuring a call, short pstop recording; long When there is an incto answer the call; lo
Main Menu
You can access the difphone from the masummarises the structicons represent and thobtain more informat

3
ut SIM
ve a SIM card, the number of mainfter entering the main screen is lesse laid out as follows:
Music Player
page 29
Camera My Files
page 33 page 47
Tools Settings
page 51 page 75
Press , in idle mode to access the main menu and press+, -, < or > to navigate through the icons and lists, or press0 - 9 keys, and * or # keys to access the optionsand functions directly. When navigating through a list,the scrolling bar on the right of the screen will indicateyour current position in the list. Press L Select or , toaccess the corresponding options of the selected item inthe list. Press R Back to return to the previous menu.Menu witho
If you do not hamenus you see athan 12. They ar
Entertainment Browser Music Player
page 25 page 26 page 29Camera Messages My Files
page 33 page 38 page 47Tools Contacts Profiles
page 51 page 62 page 66Connectivity Calls Settings
page 68 page 72 page 75
Entertainment
page 25
Connectivity
page 68

The default position of the menu is Messages if you
dify the idle screen (such as, new MMS, etc). Whenever
he phone will emit an audible reception of cell broadcastress L View to display thee list of unread SMS or MMS,it from the new events screen.
ly clear the new events from the Back.
& Symbols, Precautions,eshooting, Philips Authenticries, SAR information (if
le at the time of publication,ise included as a separateent), and finally the Limitedty information.
4
have inserted a SIM card. The default position of themenu is Camera if you have not inserted a SIM card.
How to use this manual
This user manual strives to provide you with conciseand complete information regarding your Philips 598phone. It includes the following: New Events
Some events may momissed calls, new SMSthere is a new event, talert (except for themessages). You can pmissed calls list, enter thetc. Press R Back to ex
At all times, you can onidle screen by pressing R
Discover your phone
This section presents an overview ofyour mobile phone and informationon the most commonly used features.
Chapter 1: Getting started
Information on how to set up yourmobile phone for the first time, such asinstallation of SIM card, battery, etc.
Chapter 2: Main features
How to make and answer calls, aswell as some frequently used callfunctions.
Chapter 3: Text entry
How to enter text using thealphanumeric keypad.
Chapters 4 to 15
Description of the main features ofthis phone.
Other sections
Icons TroublAccessoavailabotherwdocumWarran

5
shina & HK only) ........................... 16 call .................................................. 16
call ..................................................... 16 second call (Network dependent) 16Picture .............................................. 17d number entry ...................... 18thod .................................................. 18texts and numbers ........................ 18symbols ............................................ 19 .......................................................... 19............................................................. 19lish input .......................................... 19t input ............................................... 20ut ...................................................... 21put .................................................... 22put .................................................... 23inment ........................................... 25............................................................. 25............................................................. 25r ........................................................ 26............................................................. 26x ....................................................... 28
Table of content1. Getting Started ............................................8
Inserting the SIM card ......................................8Switching on the phone ................................ 10Charging the battery ..................................... 10Insert a micro SD Card ................................ 11Setting hotkeys ............................................... 11
2. Calling ............................................................. 13Switch on the phone ..................................... 13Switch off the phone ..................................... 13Make a call ....................................................... 13Options during a call ..................................... 13Mute or unmute a call ................................... 14Adjust speaker/earpiece volume ................ 14Call recording ................................................. 14End a call .......................................................... 14Make an international call ............................ 14Make an emergency call ............................... 15Make a second call (Network dependent) 15Make a Conference Call (Network dependent) ...................................................... 15Switch calls (Network dependent) ............ 16Call Handsfree ................................................ 16
IP Dial (CAnswer aReject a Answer aContact
3. Text anInput meEntering Entering Shift caseDelete ..T9® EngBasic texPinyin InpZhuyin InStroke in
4. EntertaGames .Java .......
5. BrowseWAP ....Push Inbo

6. Music ............................................................... 29 9. My Files ......................................................... 47................................................ 47................................................ 48................................................ 49................................................ 50................................................ 51................................................ 51................................................ 57................................................ 58................................................ 58............................................... 59ck ......................................... 59................................................ 60................................................ 60................................................ 60................................................ 61................................................ 62 .............................................. 62................................................ 63 ............................................. 64................................................ 64................................................ 65................................................ 66 .............................................. 67ings ....................................... 67
6
Tracks ............................................................... 29Artists ............................................................... 29Playlists ............................................................. 29Last played ....................................................... 30Now playing .................................................... 30Settings ............................................................. 31Using the music player control keys on the flip ......................................................... 31
7. Camera .......................................................... 33Camera mode ................................................. 33Video mode ..................................................... 35
8. Messages ....................................................... 38SMS .................................................................... 38MMS (network dependent) ......................... 39Inbox ................................................................. 40Outbox ............................................................. 41My favourites ................................................... 42Draft .................................................................. 43SIM archive ...................................................... 43Templates ........................................................ 44Voice mail ........................................................ 44Cell broadcast ................................................. 44Message Settings ............................................. 45
Pictures ............Videos ...............Sounds ..............Memory status
10. Tools ............Ladys planner .Calendar ...........Alarm ................Calculator ........Voice recorder International cloStop watch .......Unit converter Countdown .....Firewall .............
11. Contacts ....Create contactsView group ......Special numbersQuick call .........Advanced .........
12. Profiles ........Profile selectionPersonalise sett

7
13. Connectivity ............................................ 68Infrared ............................................................. 68Bluetooth ......................................................... 69USB function ................................................... 70Memory card ................................................... 71
14. Calls .............................................................. 72Call list .............................................................. 72Clear history ................................................... 72Call settings ..................................................... 72
15. Settings ........................................................ 75General ............................................................. 75Display .............................................................. 76Sounds .............................................................. 77Connectivity .................................................... 77
Icons & Symbols ............................................ 79
Precautions ....................................................... 82
Troubleshooting ............................................ 86
Philips Authentic Accessories .............. 88
Trademark Declaration ............................ 89
Specific Absorption Rate Information .. 90
Limited warranty .......................................... 92
Declaration of conformity ...................... 95

Getting Started
erye black holder located at the top
the battery and lift the battery up
8
1. Getting Started
Please read the safety instructions in the "Precautions"section before use.
Before you start using your phone, you must insert avalid SIM card supplied by your GSM operator orretailer. The SIM card contains your subscriptioninformation, your mobile telephone number, and asmall quantity of memory in which you can storephone numbers and messages (for more information,see “Contacts” on page 62). You can also insert a memory card. This provides youwith expanded memory capability, which allows youto store additional music, photo, and video filesseparate from the phone's built-in memory.
Inserting the SIM card
Remove the back coverMake sure that the phone is switched off. You need toremove the back cover of your phone before you caninsert the SIM card. Hold the phone with the frontfacing downwards as shown in the diagram and pushthe release catch located on the left side of the phone.Place your finger in the small hole above the releasecatch and lift up the back cover from its slot.
Remove the battPut your finger on thright hand corner of from its slot.

9
back coverthe back cover to the right side of thes down the back cover until it lockshe left side of the phone.
Getting Started
You may lose all your personal settings if you removethe battery when the phone is switched on.
Insert the SIM cardMake sure that the clipped corner of the SIM card isfacing the correct direction (clipped corner at upperleft) and the metallic contacts are facing downwards.Slide the SIM card into the card slot until it stops.When you remove your SIM card the first time, makesure that you smoothen the edges, otherwise you mayhave difficulty sliding in the card.
Replace the batteryWith the metallic contacts facing downwards, pressthe battery down into its slot until it locks into place.Note that the hinge should be at the bottom of thebattery.
Replace the Align and hook phone and presinto place with t

Getting Started
Once the battery and battery cover are installed, you. Plug in the connector as showne other end into an AC power
indicates the state of charge.e charge indicators will scroll; iturs to fully charge the battery.ars are steady, the battery is fullyn disconnect the charger.twork and condition of use, talke can go up to 4 hours* and 300
etwork conditions, user settings, actual results may differ.
10
When inserting the battery, be careful not to damagethe metallic connectors of the SIM card slot.
Switching on the phoneTo switch on the phone, long press and release the )key. Enter the PIN code if required (the 4 to 8 digit secretcode of your SIM card). It is preconfigured and providedto you by your network operator or retailer. For moreinformation on PIN code, see “Security” on page 76.
If you enter an incorrect PIN code 3 times in succession,your SIM card will be blocked. To unblock it, you mustobtain the PUK code from your network operator.
Charging the batteryYour phone is powered by a rechargeable battery. Thenew battery is partially charged. A sound alert will beemitted to warn you when the battery level becomes low.
We recommend that you do not remove the batterywhen the phone is switched on as you may lose all yourpersonal settings as a result. If you do remove it, thedate and time settings are only memorized for a shortwhile. As such, you need to reset the information afteryou have installed the battery back again.
can charge the phonebelow. Then plug thsocket.
The battery symbolDuring charging, thtakes around 2.5 hoWhen all the scroll bcharged. You can theDepending on the netime and stand-by timhours* respectively.
*Depending on the nmethod of use, etc the

11
hotkeysnfigure the numeric keys 2 - 9, +, -, <,R to access your favorite features. Oncebeen set, you can simply long press they to access the corresponding features.f the hotkeys have been preset andTo check the hotkey settings, go to Settings >hortcuts > Hotkey. To change the hotkeys the numeric key you wish to change andns > Change, then select a feature to beith the numeric key from the following list:
Flight mode
Games
mo Homepage
Infrared
Menu
r Music
My Files
s Profiles
Ringtones
Shortcuts
Getting Started
Keeping the charger plugged to the mobile phone whenthe battery is fully charged will not damage thebattery. The only way to turn off the charger is tounplug it, so it is advisable to use an easily accessibleAC power socket.
If you do not intend to use your phone for several days,we recommend that you remove the battery.
You can use the phone while it is charging (note thatthe vibra alert goes off when the charger is connected).If the battery is completely flat, the battery icon willonly reappear after a few minutes of charging.
Insert a micro SD Card1. Lift up the micro SD card cover on the left-hand
side of your phone. If held properly, the card’sgold contacts will be facing upwards.
2. Gently slip the card into the micro SD card slotand press it down until the card locks into place.
To remove the micro SD card, push down the cardinto its slot and release it. The card will spring out ofthe slot.
Setting You can co>, L and they have numeric keMajority oconfigured. General > Ssetting, presselect Optioassociated w Alarm
Calendar
Voice Me
Inbox
Bluetooth
Calculato
Firewall
Language
Call list
Camera
Getting Started
Club Philips Unit converter
12
Numeric keys 0, 1, # and * have beenpreconfigured as the default keys to enter “+”, accessvoice mailbox, activate Meeting profile and unlock thekeypad respectively, and cannot be modified.
Contacts Quick call
Create message Sound recorder
Create SMS Lady's planner
Create MMS

13
e permanently blocked and cannot beIf this happens, please contact yourr.
the phone can long press ) to switch off the
l
a call only when the network namereen.
one number.dial the number; or press L Optionsons menu, then select Dial > IP Dial,al, or IP Handsfree dial.
ring a callu can press L Options to carry out theons:ancel handsfreeluetooth headset (if applicable)mute the callll on hold number
Calling
2. CallingThis chapter describes the features and options relatedto making and receiving calls.
Switch on the phoneLong press ) to switch on the phone.You may set a security code (PIN code) on yourphone to protect it from unauthorised use. When youhave set a security code, you will be prompted to enterthe corresponding security code when you switchedon the phone. 1. Enter the PIN code. For security reasons, the
screen will display “*” to represent the numbersyou have entered. If you have entered the wrongnumber, press R Clear to clear it.
2. Press L OK. The phone will validate the PINcode and commence network registration.
3. Once a network name is displayed on the screen,you are ready to make or answer a call. If there isno network name on the screen, you need to re-register.
If you enter a wrong PIN code 3 times in succession,your SIM card will be blocked. To unblock it, youmust request the PUK code from your operator. If youenter a wrong PUK code 10 times in succession, your
SIM card will bused anymore. network operato
Switch off At all times, youphone.
Make a cal
You can make appears on the sc
1. Enter the ph2. Press ( to
to enter optiHandsfree di
Options duDuring a call, yofollowing operati
- Activate/c- Activate b- Mute/Un- Put the ca- Dial a new

Calling
- End the current call Call recordingL Options and select Record to
ng options; namely, Record both opposite party and Record ownrty calls or multi-party calls).cording, a recording icon willn. When you end the call, thend saved automatically in AMR > Sounds.
the length of the recording; thely when you press R key to stopthere is insufficient memory, ored.
o end a call.
national calltil "+"appears on the screen. code.de (normally without the 0 iny the phone number. irectly.
14
- Send SMS- Record phone conversation (which includes 3
sub-options: Record both, Record the oppositeparty and Record own)
- Access Contacts list
Mute or unmute a callDuring a call, press L Options and select Mute orUnmute. If you select Mute, the microphone will bedeactivated.When you switch from one call to another, mutingwill be cancelled.
Adjust speaker/earpiece volumeDuring a call, call on hold or call waiting, you canpress </> to increase or decrease the volume (if you arenot browsing the call options menu).When the volume has been set, the call volume willtake effect immediately and the settings will beapplied to your subsequent calls.
During a call, press access the 3 recordi(default), Record the(applicable to two-paWhen you start reappear on the screerecording will stop aformat under My Files
There is no limit torecording will stop onthe recording, when when the call has end
End a callPress R End or ) t
Make an inter1. Long press 0 un2. Enter the country3. Enter the area co
front), followed b4. Press ( to call d

15
ial Party B's number. Party A will beautomatically.
nference Call (Network )
ports multi-party call of up to fivescreen will display Conference call
i-party call. call waiting while you are already onan carry out the following operationsulti-party call:
answer the second call. The first calln hold automatically. rence Call from the call menu. The be combined and a conference call is
lti-party call, you can answer a newr add a new member to the call by
ember (the ongoing multi-party callold automatically). Once the call is
ct Establish conference call from the the new member to the multi-party up to five members).
Calling
Make an emergency callYou can make an emergency call anytime, irrespectiveof whether the mobile phone has been registered onthe network. 1. In idle mode, enter the emergency call number
(specific number in the caller's country)2. Press (.
Note that an emergency call will not be stored in thecall record.
3. Alternatively, after switching on the mobilephone and entering the PIN number, press RSOS to go to the emergency call screen. If there isno SIM card, pressing R SOS can also bring youto the emergency call screen, displaying the callnumber. Then press ( or the OK softkey todirectly make an emergency call and the dialanimation will be displayed.
Make a second call (Network dependent)
You can make a second call by putting the current callon hold: 1. During a call with Party A, you can enter Party's
B number using the keypad.
2. Press ( to dput on hold
Make a Codependent
Your phone supmembers. The during the multWhen there is athe phone, you cto establish the m1. Press ( to
will be put o2. Select Confe
two calls willestablished.
During the muincoming call odialing the new mwill be put on hestablished, selecall menu to addcall (you can add
Calling
If you wish to separate one member from the call, you Answer a call call.
all.
nd call (Network
Call waiting, you will be alertedd incoming call. You can: er the second call. The current hold automatically.
ct the second call and continuet call.ne active call and one call oness L Options to carry out theons: Establish
conference call Handsfree
Mute End held calls
Send SMS Record
16
can select Split conference Call during the multi-partycall. To disconnect a member from the call, select Endcall in conference.
Switch calls (Network dependent)When you have one active call and one call on hold,you can press L Options, then select Swap to switchbetween the 2 calls.
Call HandsfreeDuring a call, press L Options and select Handsfree.
When the headset is plugged into the phone, youcannot activate handsfree mode.
IP Dial (China & HK only)You may select IP dial. When you select IP dial option,the mobile phone will automatically add the IP specialservice number preset by you in front of the phonenumber and then make IP dial. You can also longpress ( to activate IP dial.
When you have entered several IP special servicenumbers, you will be prompted to verify them to avoidadding them repeatedly.
Press ( to answer a
Reject a callPress ) to reject a c
Answer a secodependent)
If you have activatedwhen there is a secon1. Press ( to answ
call will be put on2. Press ) to reje
with your curren3. When there is o
hold, you can prfollowing operati
Swap
Audio device (if applicable)
End active call
View contacts

17
CallingIf you press the numeric keys, the notepad editor willopened under call waiting mode.
Contact PictureThis feature allows you to link a contact in yourphonebook to a photo you have taken using theCamera function, or a picture you have downloadedvia WAP or data cable. During a call, if the otherparty's name card is linked to a picture, the incomingcall background will display the correspondingpicture. This feature is referred to as Contact picture.
Contact picture is only available on the phone memory.The photo size should not be larger than 128 x 160pixels.

Text and number entry
*During text editing, you can press * to switchus bar on the screen will displayt mode. represents Pinyin input mode; Chinese stroke input mode;Traditional Chinese BoPoMorepresents Traditional Chinese『en』 represents T9 English』 represents English alphabetsrepresents numeric input mode.press # to input punctuations.mbers the last input method youu exit the editing screen. Whenagain, it will automatically select you have used.
and numbersin the editor using: T9 Englishbets, Pinyin, Zhuyin, SimplifiedTraditional Chinese Stroke. Ino input methods for you to enterations. The icon displayed on theent input method. You can pressne mode to another. Long pressate T9. Short press # to enter press it to select input language.
18
3. Text and number entryInput methodYour mobile phone supports several input methods,which include:
input mode; the statyour current inpuSimplified Chineserepresents Simplified
represents input mode; stroke input mode; input mode; 『abcinput mode; 『123』In addition, you can The text editor remehave used before yoyou access the editor the last input method
Entering textsYou can input text input, English alphaChinese Stroke or addition, there are twnumbers and punctuscreen shows the curr* to switch from oto activate or deactivpunctuations or long
• T9 Pinyin: Enter chinese characters with T9Pinyin;
• T9 Traditional Chinese Zhuyin: EnterTraditional Chinese characters with T9Zhuyin;
• T9 Stroke: Enter Chinese characters with T9wubi and stroke components;
• T9 Traditional Chinese stroke: EnterTraditional Chinese characters with Wubi orstroke components;
• T9 English (T9eng/T9Eng): Enter Englishtext using T9 English;
• Multi-Tap (abc/Abc/ABC): Press the keysthat are marked with the corresponding letteryou wish to enter. Press once to get the firstletter on the key, press twice quickly to get thesecond letter and so on until the letter youwant is displayed on the screen.
• 123: Enter numbersThis phone supports T9 Simplified Chineseassociation input method as well.

19
ly once on the key corresponding tod to spell a word: keystrokes input are word suggested by T9® is displayedwindow. If there are more than 3roll bar is shown, press + or - tod choose from those proposed by thetionary (see example below). Afterhe word, press , or L to confirm.
t?mbols represented by each key are as
input letters.
rowse the last or next candidate word.
confirm the letter or word.
rt press to clear a letter, long press tor all entries.
ft case, select input mode. Long pressurn on/off T9 feature.
rt press to activate/deactivatectuation mode, long press to select
ut language.
Text and number entry
Entering symbolsIn any input mode, press # to open/close symbolsinput screen. If the symbols occupy more than onescreen, press +/- to scroll up/down the pages. Press ,to confirm the symbol input.
Shift casePress * to shift case in the English input editor.
DeleteWhen there are contents in the input row, press RClear to delete the rightmost character or symbol. Thecandidate area will be updated accordingly until theinput row is cleared. Long press R Clear to clear theinput row.When the input row is empty, press R Clear willdelete the character on the left of the cursor in the textarea. Long press R Clear to clear the contents in thetext area.
T9® English input
What is it?T9® predictive Text Input is an intelligent editingmode for messages, which includes a comprehensivedictionary. It allows you to quickly enter text. You
need to press oneach letter needeanalysed and theat the pop-up candidates, a scbrowse the list anT9® built-in dicyou have input t
How to use iAlphabets and syfollows:
0 to 9 To
+ or - To b
L OK To
R Clear Shoclea
* Shito t
# Shopuninp

Text and number entry
Example: How to enter the word "Home" Letters, numbers and symbols are located on each key
rs and numbers
1 @ _ # = < > ( ) & £ $ ¥
2 à ä å æ ç
3 é è ∆ Φ
4 Γ ì
5 Λ
o 6 ñ ò ö ø
s 7 β Π Θ Σ
8 ü ù
y z 9 Ω Ξ Ψ
t space
ch text input mode
t symbol
20
1. Press 4 6°6 3, the screen displays the firstword on the list: Good.
2. Press - to browse and select Home.3. Press L OK to confirm Home.
Basic text inputIf you wish to use basic text input mode, press * toselect "ABC" basic text input. This method requiresmultiple key presses to reach the desired character: theletter "h"is the second letter on the 4 key, so youmust press 4 twice to enter "h". Using this moderequires you to press a key as many times as is equal tothe order of the letter.To enter the word «Home» in basic text input mode,you should therefore key 4, 4 (GHI) 6, 6, 6(MNO), 6 (MNO), 3, 3 (DEF).
as follows:
Key Lette
1 Space
2 a b c3 d e f4 g h i5 j k l6 m n 7 p q r8 t u v9 w x 0 Inpu
* Swit
# Inpu

21
s of using Pinyin input method are as
letters 2 to 9
R Clear to clear
combination < or >
yin combination ,
candidate list < or > / + or -
(scroll list)
ction ,
ter association character, or return to
ew words.
Back to exit from association character
en press , to complete the editing.
Text and number entry
Pinyin InputPress * and select Pinyin input mode. Each Pinyinletter is represented by one of the numeric keys asshown below: (Note that Pinyin input mode is solelymeant for the input of Simplified Chinese characters.You cannot input Traditional Chinese characters).
The general stepfollows:
1 2 ABC 3 DEF
4 GHI 5 JKL 6 MNO
7 PQRS 8 TUV 9 WXYZ
* Mode 0 # Punctuation
1. Enter Pinyin
2. Select Pinyin
3. Confirm Pin
4. Select from
5. Confirm sele
6. Select and en
step 1 to enter n
7. Or press R
input mode, th

Text and number entry
Enter the pinyin letters accordingly. Press once on the Zhuyin Input inese Zhuyin
y corresponding to the Zhuyinving to consider its position onble Zhuyin combinations will bew. each key 0 - 9 are as follows:
Characters
ㄅㄈㄋㄚ
ㄍㄐㄞー
ㄓㄗㄢㄦ
ㄆㄉㄌㄛ
ㄎㄑㄟㄨ
ㄔㄘㄣㄤ
ㄇㄊㄜㄝ
ㄏㄒㄠㄡㄩ
ㄕㄖㄙㄥ
22
key corresponding to the pinyin letter without havingto consider its position on the key. Pinyin inputmethod will automatically select and list all possiblecombinations for you to select. For example, to input the character『王』 , with thePinyin letters『wang』, press 9 2 6 4 and use> to select the desired pinyin combination for『wang』 , then press , to confirm combination. As soon as you have selected and entered a character,the candidate list will be updated and a list ofassociation characters will be displayed. Press < or > toselect the desired association character and press , toconfirm entry. This speeds up the input processfurther.When you have finished editing a name on thephonebook or SMS, press R Back to exit fromassociation character input mode and press , toconfirm completion of the editing process.
T9 Traditonal ChInputPress once on the kecharacter without hathe key. All the possilisted on the input roCharacters located on
Key
1
2
3
4
5
6
7
8
9
23
f Stroke input are as follows:
stroke input is to dissect and separate a chinese character according to you wish to input the character, presssponding to the required strokesuence to get the desired character.
s 2 to 9
(excluding 3 and
7) R Clear to
clear.
candidate list < or > / + or -
( scroll list)
ection ,
enter association character, or
1 to enter new strokes.
Back to exit from association
mode, then press , to complete the
Text and number entry
When the zhuyin combination appears on the inputrow, press </> to move the selection box over thezhuyin combination and press , to enter characterselection mode. SelectionPress </> to move the selection box left or right, andpress +/- to scroll list. When the selection box is on thedesired character, press , to confirm the input and gointo association input mode. AssociationThe input area is empty and the candidate area displaysa list of association characters. Press the navigation keysto select an association character, or press a number keyto input a new zhuyin combination.
Stroke inputPress * to select stroke input mode. The strokes arerepresented on each key as follows:
The basic steps o
The principle ofevery stroke ofsequence. Whenthe keys correaccording to seq
1 2 Horizontal 3
4 Left-falling 5 Vertical 6 Right-falling
7 8 Over-down 9 Special
* Mode 0 # Punctuation
1. Enter stroke
2. Select from
3. Confirm sel
4. Select and
return to step
5. Or press R
character input
editing.

Text and number entry
The stroke input method in this phone classifies a Generally, you will be able to find a desired characterntering all the strokes. After youme of the phonebook or SMS,t from the association characternfirm completion of text editing.
Traditional chinese stroke andstroke are similar, with thecter coding.
24
chinese character into 5 basic strokes: (horizontal,vertical, left falling stroke, right falling stroke andover-down) as well as a special stroke. When thestroke you need does not correspond to the 5 basicstrokes, replace it with the special stroke. The examples below will give you a clearerunderstanding of how to use stroke input method:
1.木∶2 + 5 + 4 + 6
2.田∶5 + 8 + 2 + 5 + 2
+
3.加∶9 + 4 + 5 + 8 + 2
4.凉∶6 + 9 + 6 + 2 + 5 +
8 + 2 + 9 + 4 + 6
5. 陈∶9 + 5 + 2 + 9 + 9
+ 4 + 6
before you finished ehave entered the napress R Back to exilist and press , to co
The input mode forSimplified Chinese exception of the chara

Entertainment 25
4. Entertainment
This section describes the games and additional toolsinstalled on your mobile phone.
Some of the features described here are dependent onthe configuration of your mobile phone, the country inwhich you purchased your mobile phone, and/or yourservice provider.
Games
Default gamesThis menu features games that are pre-installed inyour mobile phone. Press , to enter the main menufrom idle mode and select Entertainment > Games.
Java Your mobile phone features a Java run-timeenvironment, which allows you to run Javaapplications, such as games downloaded from thenetwork. • Press Java > Launch to launch a new application
after you download it into the phone.

Browser
Homepageccess the homepage directly. Youmepage address in the settings
rent web page or the web pagesisit to the Bookmark list, manage
menu, a list of bookmark entriesnnect to the web address of a entry, select an entry using + or
ting entries, you can select theto add and manage your
the title and web address.
te or edit a bookmark entry.
26
5. Browser
Your phone comes with a WAP browser. You canobtain news, sports and weather information, as wellas services from the internet via the WAP browser.
This feature is available only if your subscriptionincludes WAP access services. The settings have beenpre-configured (depends on country variants) and youdo not need to modify them. For more information,please contact your network operator.
WAP
Normally, the phone would have been pre-configured.If you wish to add or modify the configurationparameters, you need to obtain the necessaryinformation from your network operator before youproceed. Philips is not liable to give prior notificationnor shall it bear any consequences for any failuresarising from changes of configuration made by you orby the network operator. Please check with yournetwork operator for the most updated information.
Select this menu to acan also set the homenu.
BookmarkYou can save the curthat you frequently vand organize them. When you enter the is displayed. To coparticular bookmark- and press ,.If there are no exisfollowing options bookmarks:
Add bookmark Edit
Manage bookmarks Dele

27
ws you to manage, organize andhe web pages you have previously
enter this menu, the web pages youusly visited will be listed.tions to access the following:
sdress and press L or , to connect, return to previous web page.
s you to configure the web settingsg. Your phone may have been pre- the settings of a specific networku are a subscriber of the network
ay start using your WAP browserherwise, you need to re-configure the
Save as
Send as MMS
Save as homepage
Exit
Setting
Browser
To add a new bookmark:
To edit a bookmark:
HistoryThis menu alloquickly access tvisited. 1. When you
have previo2. Press L Op
Enter addresEnter the web adpress R Back toSettingsThis menu allowfor web browsinconfigured withoperator. If yooperator, you mimmediately. Otsettings.
Go to Bookmark menu Press , to enter themain menu from idlemode and select Browser> Bookmark.
Select Add Bookmark Press ,.
Add a new bookmark Enter the Address andTitle of the newbookmark and press LSave.
Go to Bookmark menu Press , to enter themain menu from idlemode and select Browser> Bookmark.
Select Manage bookmarks
Press + or - and press ,.
Select a bookmark youwish to edit
Press + or - and press ,.
Select Edit Press + or - and press LSelect.
Edit the bookmark Edit the Address and Titleof the bookmark andpress L Save.
Homepage
Back
Forward
Refresh
Bookmark
Enter address

Browser
28Philips is not liable to give prior notification nor shallit bear any consequences for failures arising fromchanges in configuration made by you or by thenetwork operator, or changes in WAP address orcontents made by the internet content provider. Pleasecheck with your network operator and your internetcontent provider for the most updated information.
The following options are available:
Push InboxAllows you to check your Push messages and configureyour Push settings, such as select whether or not toaccept Push messages, delete push messages, etc.
Browser options
Allows you to configure the browserparameters, such as Show images,Enable Refresh, etc.
Cache Allows you to set the Cache modeand Clear cache.
Cookies Allows you to Enable cookies or Clearcookies.

29
ames is displayed on the screen. Youselect a certain artist and press L ortracks of the selected artist.tracks, use +/- to select the music file and then press L Options.
lists are displayed on the screen. Toaylist, select New playlist. Enter thed press ,. Then use +/- to select ad then press L to confirm and store
Description
Open the music player to play theselected track.
Open the playlist, select a playlistand add the selected track to theplaylist.
Delete the selected track.
Delete all tracks of the same artist.
View detailed information of theselected track.
Music
6. Music
This feature allows you to download music from thenetwork, save the audio files, edit your playlist, andplay music. The phone supports audio files in MP3and AAC format.
TracksThis feature allows you to play downloaded music inyour Phone memory or Memory card. From the listedtracks, use +/- to select the music file you want to playand then press L Options.
ArtistsA list of singer ncan press +/- to , to display all From the listed you want to play
PlaylistsThe stored playcreate a new plplaylist name anfile, press , , anthe playlist.
Options Description
Open Open the music player to play theselected track.
Add to playlist
Open the playlist, select a playlistand add the selected track to theplaylist.
Delete track Delete the selected track.
Details View detailed information of theselected track.
Options
Open
Add to playlist
Delete track
Delete artist
Details
Music
You can create up to 10 playlist. The available options Keys operations during music playback are as
o carry out the following
ation
press to Start/Pause/resumec playback. press to stop playback.
press to select the previousnext song. Long press to fastd/fast forward the track duringack.
st volume. Once you have setvolume, the settings will be until the next time you adjustin.
options menu.
playback.
rn to previous menu.
ause the selected audio file.
the playlist, select a playlist ande selected file to the playlist.
30
include:
Last playedList the last 10 tracks you have played, and the lastplayed track is displayed at the top of the list.
Now playing
The screen displays the file currently playing. If there is no file currently playing, a list of tracks played before exiting the playlist is displayed.
The keypad operationfollows:
Press L Options toperations:
Options Description
Open Open the music player to play thecurrently selected file.
Edit playlist Edit the playlist.
Rename playlist
Modify the playlist name.
Delete playlist
Delete the current playlist.
Tracks sequence
Modify the play sequence of thecurrent playlist.
Details View detailed information of theselected file.
Key Oper
, key ShortmusiLong
< or > Shortsong/rewinplayb
+ or - Adjuthe savedit aga
L Options Open
R Stop Stop
R Back Retu
Play/Pause Play/P
Add to playlist
Open add th

31
usic player control keys
the music player will stop playingthe flip of the phone during musics on your settings in the Flip exitn if you want to stop the music close the flip of the phone.
Shuffle: On or OffRepeat: None, Repeat Single orRepeat playlist.
Display descriptions on how to usethe music player.
All tracks stored in the phonememory and the memory Card willbe refreshed.
Music
Settings
The available options include:
Using the mon the flip
Whether or not when you close playback dependoption. Select Oplaying when you
Play mode Shuffle: On or OffRepeat: None, Repeat Single or Repeatplaylist.
Equalizer Select Bass boost, Dance, Hip-hop,Pop, R&B or Rock.
3D surround To activate the 3D surround sound(only available on applicable audiodevice).
Detail Display detailed information of theselected audio file.
Flip exit Select On or Off (default). If you selectOn, once you close the flip, you willexit from the music player.
Options Description
Equalizer Select Bass boost, Dance, Hip-hop,Pop, R&B or Rock.
3D surround To activate the 3D surround sound(only available on applicable audiodevice).
Play mode
Help
Refresh list

Music
When the flip of the phone is closed, whether or not
32
the keys on the flip can be operated depends on yoursetting as well.
When the flip is closed, the operations of the externalkeys are as follows:
Key Operation
Press twice to start MP3 playback.Short press to pause/resume, longpress to stop music playback.
or Short press: Turn the volume up/down.Long press: Select previous/next track.

33
ime, you can press ) key to cancelation and return to idle mode.
n menura mode is activated and before aou can change a number of settingsptions.
s Press +/-.
Brightness level is -3 to +3.Default level is 0.
Press ,.
The picture will beautomatically saved and storedin My Files > Pictures.
a e
Press ) key or R Back twice.
escription
it from Camera mode and switch todeo mode.
lect image size: 1280x1024,8x1024, 480x640 and 176x220.
Camera
7. Camera
Your mobile phone features a digital camera thatallows you to take pictures and record videos, storethem in your phone and memory card, use them aswallpaper or send them to your friends.
Please ensure that the camera lens is clean before youtake pictures, as small dust particles can strongly affectthe picture quality.
Camera modeConsult the table below on how to carry out somecommon operations with your camera.How to ...
At any point in tthe current oper
Camera optioWhen the camepicture is taken, yby pressing L OLaunch Camera Press , to enter the main
menu from idle mode andselect Camera.
Zoom in/out Press </>.
Only available for pictureresolution of 480*640 at x1.6,and 176*220 at x1.9.
Adjust brightnes
Take a picture
Exit from Camerand return to idlmode
Options D
Switch to video
ExVi
Pictureresolution
Se76

Camera
Photo preview option menuated the camera, simply press ,e picture is automatically savedscreen. You can press L Optionswing operations:
ough memory space, you will noticture and you will be promptedsage. You have to delete existingn store new ones.
iption
he picture:etooth, Via Infrared or Via MMS.
the current picture.
n to the viewfinder screen to take picture.
the picture to a contact in youre phone so that the picture will beyed when the contact calls you.
ble for picture resolution of 176 only.
e picture as a wallpaper in idle.
34
Once you have activto take a picture. Thand displayed on the to carry out the follo
When there is not enbe able to save the pwtih a warning mespictures before you ca
Picture Quality
Select image quality: Super fine, Fineand Normal.
The last selected value will remainactive until you change it again.
Viewpicture
Enter My Files > Pictures to view thepictures taken.
Mode Color effect: Off (default), B & W,Sepia or Blue.
The selected color efffect will bedisplayed on the screen in real time.
Night mode: On or OffSelf-timer: On or Off
The time limit is 8 seconds.
Multishot: On or Off
Three pictures can be taken at thesame time.
Advanced Storage location: Phone memory orMemory cardDefault name: modify the defaultname of the photo Anti-flicker: 50HZ or 60HZ
Options Descr
Send Send tVia Blu
Delete Delete
Capture Retura new
Set as contact picture
Link mobildispla
Availax 220
Set as wallpaper
Set thscreen
35
menuode is activated and before you start
an change a number of settings byns.
mode e
Press ) key or R Backtwice.
Description
Exit from Video mode and switchto Camera mode.
Select video quality: Fine or Normal
The last selected value will remainactive until you change it again.
Enter My Files > Videos to view therecorded videos.
Color effect: Off (default), B & W,Sepia or Blue
The selected color efffect will bedisplayed on the screen.
Video format: MPEG-4 or H263FPS: 5, 10 or 15 frame per second
Camera
Video mode
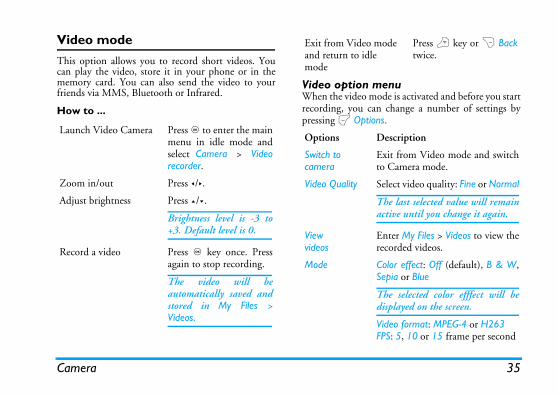
This option allows you to record short videos. Youcan play the video, store it in your phone or in thememory card. You can also send the video to yourfriends via MMS, Bluetooth or Infrared.
How to ...
Video option When the video mrecording, you cpressing L Optio
Launch Video Camera Press , to enter the mainmenu in idle mode andselect Camera > Videorecorder.
Zoom in/out Press </>.
Adjust brightness Press +/-.
Brightness level is -3 to+3. Default level is 0.
Record a video Press , key once. Pressagain to stop recording.
The video will beautomatically saved andstored in My Files >Videos.
Exit from Videoand return to idlmode
Options
Switch to camera
Video Quality
Viewvideos
Mode

Camera
Video Playbackted the video mode, simply press. Press again to stop recording.ically saved and the last recorded the screen. You can press Lhe following operations:
iption
he recorded video.g playback, you can: playback by pressing , Pause
Full to enlarge the display. e playback by pressing , or
ay. t volume by pressing +/-.ewind by pressing and holding <.rward by pressing and holding >. previous menu level by pressing
n to idle screen by pressing ).
he recorded video:etooth, Via Infrared and Via MMS.
e the recorded video.
36
Once you have activa, to start recordingThe video is automatscene is displayed onOptions to carry out t
Advanced Storage location: Phone memory orMemory cardDefault name: modify the defaultname of the videoMute: On or Off
If you select On, sound will not berecorded.
Video length: MMS (default) orUnlimited.
If you select MMS, the size of therecorded video will be smaller thanthe currently specified maximumMMS size. Recording will stopwhen reaching the maximumMMS size and the video will bestored automatically. If you selectUnlimited, there will be norestrictions on the size of therecorded video. The maximum sizeshall be determined by the memorycapacity of your mobile phone orthe memory card.
Options Descr
Playback Play tDurinPauseor LscreenResumL PlAdjusFast rFast foGo toR.Retur
Send Send tVia Blu
Delete Delet

37
CameraWhen there is not enough memory space, you will notbe able to save the recorded video and you will beprompted wtih a warning message.
Record new Return to video mode to record a newvideo clip.

Messages
1. In idle mode, press , to enter the main menu. Create Message > SMS and press
iting screen will appear. content in the SMS editor andns to carry out the following
nt successfully, you can resend it.be sent successfully after several if your SMS centre number has
for certain reasons (such as anf battery), you are forced to exitg screen before you managed tomessage successfully, the editedd automatically. The next time editor, the message will ben.
r the phone number of theient. You can also select it fromcts list or Groups. Press , to sendMS.
the SMS.
38
8. Messages
SMSSMS enables you to send text messages to the otherparty, which is a convenient and affordable mode ofcommunication. You can use the SMS menu to sendmessages to another handphone or a device that iscapable of receiving SMS. Your phone can store up to 1000 messages. Once youhave reached 1000 messages, the screen will flash anicon to alert you. You need to delete some messages inorder to receive new ones. 1. In idle mode, press , to enter the main menu.2. Select Messages > Create message > SMS and
press ,.
Create, edit and send SMSYou need to enter the correct message centre numberbefore you can send SMS. The number can beobtained from your network operator.
2. Select Messages >,. The SMS ed
3. Enter the SMS press L Optiooperations:
If your SMS is not seIf your SMS cannot attempts, please checkbeen set correctly.
When editing SMS,incoming call, out ofrom the SMS editinsend or save your message will be saveyou enter the SMSdisplayed on the scree
Continue EnterecipContathe S
Save Save

39
MS content in the MMS editor andptions to carry out the following
nter the phone number of theecipient. You can also select it fromontacts list or Groups. Press , to sendhe MMS.
nsert picture, video, melody, page orbject.
nly a picture, a melody and a videoan be inserted on one page. If 3 ofhem exist at the same time, only onean be saved.
t appears after you have insertedbjects. You can change these insertedbjects.
elete inserted objects.
review the current MMS.
et play time of the MMS slides. Theefault value is 3 seconds.
ave the MMS.
Messages
MMS (network dependent)Your phone allows you to send and receivemultimedia messages, known as MMS, which featurestexts, pictures, sound and video clips. MMS cancomprise one or several slides. Whether you send it toan e-mail address or to another mobile phone, theMMS will be played as a slide show. Your phone can support 50 MMS (maximum100KB). When the maximum of 50 MMS is reached,the screen will display a MMS icon to alert you. Youwill need to delete some old MMS in order to receivenew ones.1. In idle mode, press , to enter the main menu.2. Select Messages > MMS and press ,.
Before you can send MMS, you need to enter thecorrect MMS Center number and ensure that thenetwork profile of your MMS has been correctlyconfigured. You can obtain such information fromyour network operator.
Create, edit and send MMS1. In idle mode, press , to enter the main menu.2. Select Messages > Create Message > MMS and press
,. The MMS editing screen will appear.
3. Enter the Mpress L Ooperations:
Continue ErCt
Insert object Io
Octc
Change object
Ioo
Remove object D
Preview P
Page timing Sd
Save S

Messages
When there is more than one page, you can press </> to
er the next screen whereby the will be displayed. Press Lut the following operations:
en you select Forward, theents of the selected message willar in the message editor. You edit the message before sending.
ete the message from the Inbox.
ete all the messages in the Inbox.
the selected message to the SIM.
e the selected message to Myurites.
information of the message as date, time and sender.
act the sender's number frommessage and dial the number.
sender's number will be used asdestination number automatically you can select reply by SMS orS. Enter your reply in the editor
send the message.
40
view the different pages of the MMS. At the sametime, the title bar at the top of the screen will displaythe current page you are viewing and the total numberof pages in your MMS.
InboxThe Inbox stores the messages you have received. 1. In idle mode, press , to enter the main menu.2. Select Messages > Inbox and press ,.3. If there are messages in the Inbox, they will be
listed on the screen in the order they werereceived (the most recent message will appear atthe top of the list).
4. Press +/- to select a message. When a message isselected, its contents will be displayed on thescreen. Press L Options to carry out thefollowing operations: 5. Press , to ent
message detailsOptions to carry o
View View the selected message.
Reply The sender's number will be used asthe destination number automaticallyand the message editor will beactivated. Enter your reply and sendthe message.
Forward Whcontappemay
Delete Del
Delete all Del
Arhive to SIM Addcard
Move to my favourite
MovFavo
Details Viewsuch
Dial Extrthe
Reply Thethe andMMand

41
s you to save the messages you have and which you have chosen to save
e, press , to enter the main menu.ges > Outbox and press ,.messages in the Outbox, they will be
e screen. select a message. When a message is contents will be displayed on then you press L Options, you can carrywing operations:
You can select several messages oneby one or all at once. You can press, to select/cancel the operations onmultiple messages. Checkboxes willbe marked on the left of the selectedmessage. Press L Options to deletethe selected messages, or you canmove them to My Favourites.
iew the selected message.
esend the message to the recipient.
Messages
OutboxThe Outbox allowsent successfullybefore sending. 1. In idle mod2. Select Messa3. If there are
listed on th4. Press +/- to
selected, itsscreen. Wheout the follo
Forward When you select Forward, thecontents of the selected message willappear in the message editor. Youmay edit the message before sending.
Delete Delete the message from the Inbox.Extract numbers
Opens the list of numbers availablein the message. In this list, the Loption opens a pop-up windowshowing the following options:• Save • Dial • Send message
Archive to SIM Add the selected message to the SIMcard.
Move to my favourite
Move the selected message to MyFavourites.
Details View information of the messagesuch as date, time and sender.
Dial Extract the sender's number fromthe message and dial the number.
Select multiple
View V
Resend R

Messages
ll the messages received and saved via Move to my favourite option. ess , to enter the main menu. > My Favourites and press ,.sages in My Favourites, they willscreen. ct a message. When a message istent will be displayed on the
Options to carry out theions:
the message from the Outbox.
nformation of the message such and time.
he selected message.
nder's number will be used as thetion number automatically andessage editor will be activated.our reply and send the message.
you select Forward, the contents selected message will appear inessage editor. You may edit thee before sending.
42
5. Press , to enter the next screen whereby thedetails will be displayed.
My favouritesThis menu contains ain the phone memory1. In idle mode, pr2. Select Messages 3. If there are mes
be listed on the 4. Press +/- to sele
selected, its conscreen. Press Lfollowing operat
Forward When you select Forward, the contentsof the selected message will appear onthe message editor. You may edit themessage before sending.
Delete Delete the message from the Outbox.
Delete all Delete all the messages in Outbox.
Details View information of the message suchas date and time.
Select multiple
You can select several messages one byone or all at once. You can press , toselect/cancel the operations onmultiple messages. Checkboxes will bemarked on the left of the selectedmessage. Press L Options to deletethe selected messages, or you can movethem to My Favourites.
Resend Resend the message to the recipient.
Forward When you select Forward, the contentsof the selected message will appear onthe message editor. You may edit themessage before sending.
Delete Delete
Details View ias date
View View t
Reply The sedestinathe mEnter y
Forward Whenof thethe mmessag

43
that were created and saved but weressages that were automatically savedable to save or send them when youssage editor. from the Draft box and press LSend, Edit, Delete, Delete all, Details,If you select View, the subsequent be similar to the Inbox operations.
ou can see the read and unreadin the SIM Card. The available
elete the message from My Favourites.
iew information of the messagech as date, time and sender.
xtract the sender's number from theessage and dial the number.
escription
pen the current message and viewe detailed contents of the message.
Messages
5. Press , to enter the next screen whereby thedetails will be displayed. Press L Options tocarry out the following operations:
Draft
List the messagesnot sent, and mebefore you were exit from the meSelect a messageOptions to: View, Select multiple. procedures would
SIM archiveIn the menu, ymessages saved options include:
Delete Delete the message from My Favourites.
Delete all Delete all the messages in My Favourites.
Details View information of the message suchas date, time and sender.
Dial Extract the sender's number from themessage and dial the number.
Select multiple
You can select several messages one byone or all at once. You can press , toselect/cancel the operations on multiplemessages. Checkboxes will be marked onthe left of the selected message. Press LOptions to delete the selected messages.
Reply The sender's number will be used as thedestination number automatically andthe message editor will be activated.Enter your reply and send the message.
Forward When you select Forward, the contentsof the selected message will appear inthe message editor. You may edit themessage before sending.
Delete D
Details Vsu
Dial Em
Options D
View Oth

Messages
alls to your voice mailbox (thers to leave a message) via the
ice mail, the phone will sendthen call your voice mailbox voice mail. 1 to call your voice mailboxs empty, you will be prompted
in two sets of numbers from
ller to leave a message (thised for Call Forwarding)retrieve your voice messages
e which allows you to receivecontents, such as news, traffic, provided by the network to certain network area. If thisetwork will provide you withumbers. It gives you access to.
44
TemplatesYou can preset up to 10 frequently used messages.This menu allows you to send, add, modify and deleteyour preset messages.
Voice mailThis menu allows you to set your voice mailboxnumber and listen to voice messages yourcorrespondents have left for you.
You can forward your cphone number for calleCall forwarding feature.
Call voice mailWhen you receive a voyou an alert. You can number to retrieve yourIn idle mode, long pressdirectly. If the number ito enter the number. Voice mail number
Generally, you can obtayour network provider: • number for the ca
number can also us• number for you to
Cell broadcastThis is a network servictext messages of various etc. These messages arethe subscribers within aservice is available, the nthe broadcast channel nthe options listed below
Reply Reply the message.
Forward Forward the message to other recipients.
Delete Delete the message.
Delete all Delete all messages.
Details View information of the message,such as date, time and sender, etc.
Dial Call the sender of the message.
Select mutiple
You can press , to select/cancel theoperations on multiple messages.Checkboxes will be marked on the leftof the selected message. You candelete the selected messages.
45
ttings
> Settings > SMS to open the list ofress L Options > Edit to edit the
numbers you to save and edit the SMS servicef your home network. If the service empty, you will not be able to send
elect the duration by which yourstored in the service center. You canour, 12 hours, 1 day, 1 week and
t). Press < / > to select a value. useful when your recipient is not network and is not able to receivemediately.
bscription dependent.
Messages
ReceptionYou can set the reception of broadcast messsages On orOff. If you select Off, you will not receive any broadcastmessages, even if you have set the correspondingchannel numbers. When you received a broadcast message, the messagecontent will be displayed on the screen until you pressR Back. Broadcast messages will not be saved on yourmobile phone or your SIM card. Once you exit fromthe message screen, you will not be able to read it again.
To obtain the codes corresponding to the differenttypes, you must contact your operator.
Message Se
SMSSelect Messages SMS accounts. PSMS settings:Service center This menu allowcenter number ocenter number isany SMS.Validity periodAllows you to smessages will be select from: 1 hMaximum (defaulThis option is connected to theyour messages im
This feature is su
Options Description
Reception Select to turn on/off the reception ofnew cell broadcast messages.
Topics Add, change or delete channels.<Add new>: Press L Options to add anew channel.Change: Edit a channel number.Delete: Delete a channel in the channel list.

Messages
Delivery report Sender visibilityange to set this option On or off.ur identity will be visible when
u to set the priority level of yourw, Normal (default) or High.
ange to set this option On or off.port will be sent to notify you ifelivered to the recipient.
ange to set this option On or off.port will be sent to notify you ifead by the recipient.
he duration by which your MMS MMS center. You can chooseurs, 1 day, 1 week or Maximum
utomatic, Deferred, Auto in homeoading of MMS messages.
46
You can select L On or Off. This option allows you toset whether or not to notify you the send status ofyour messages: successfully sent to the recipient, ornot sent successfully.
This feature is subscription dependent.
SignatureYou can select L On or Off (Default is Off). If set toOn, it opens an editor where you can enter yoursignature. The signature will be added to the end ofyour message before it is sent to your recipient.
If the SMS is too long after adding the signature, thesignature will be ignored.
Storage locationYou can press L Change to select the preferredstorage location of your messages: SIM card (Default)or Mobile phone.
MMSThis menu allows you to set your MMS center andpersonalize your MMS settings. The options include: ProfilesYou can select or edit the parameters.
You can press L ChIt is used to set if yoMMS is sent.PriorityThis option allows yoMMS. You can set LoDelivery reportYou can press L ChWhen set to On, a rethe MMS has been dRead reportYou can press L ChWhen set to On, a rethe MMS has been rExpiry timeAllows you to select twill be stored in thefrom 6 hours, 12 ho(default). RetrievalAllows you to select Anetwork when downl

47
end the selected file: Via Infrared, Vialuetooth and Via MMS.
opy: Copy the selected file to anotherolder.ut: Similar to copy, but the originalile will be deleted.ename: Modify the name of theelected file.etails: Display detailed informationf the selected photo, such as lastodified date, file size, etc.
dd frame: Add a photo frame to theelected picture by pressing </>.vailable only when the picture size is76*220.
s contact ID: If you select this option,he phonebook list will be displayed.fter you have selected a contact from
he phonebook, press L Select tossociate the picture to the selectedontact.
nly available for picture of 176*220r smaller.
My Files
9. My Files
This menu allows you to store the files in differentfolders (Pictures, Videos, Sounds, Others) to facilitatemore efficient management of files in your phone andthe memory card. In addition, you can obtaininformation regarding your phone and memory card,such as number of files, memory utilised, percentage ofmemory utilised via the Memory status option.
PicturesWhen you enter this menu, the photos which youhave taken using the phone's camera as well aspictures you have downloaded via MMS, WAP, BT,Infrared or USB will be displayed in a list. 1. Select My files > Pictures and press , to enter the
menu.2. Press L Options to carry out the following
operations to a selected file:
Options Description
View View the picture in full screen.
Send Sb
Advanced CfCfRsDomAsA1
Use AtAtac
Oo

My Files
3. The folder options include:
menu, the videos which you havehone's camera as well as videosd via MMS, WAP, BT, Infraredyed as a list.Videos and press , to enter the
s to carry out the followinglected file:
se the selected folder.
e: Modify the name of theed folder.ls: View detailed information oflected folder.
e the selected folder.
List view or Grid view.
he pictures and folders by namee.
48
VideosWhen you enter this recorded using the pyou have downloadeor USB will be displa1. Select My files >
menu.2. Press L Option
operations to a se
As wallpaper: If the selected photo is176*220 or smaller, it will bedisplayed as wallpaper in its originalsize. If it is larger than 176*220, it willbe re-sized accordingly.
Delete Delete the selected picture.
Slide show If you select this option, the screenwill display the full screen view of allthe pictures in the form of slideshowevery 4 seconds. Press any key to exitfrom the slide show mode.
Change view You can select to view the pictures inList view, Grid view or Full screen.
Sort Sort the pictures and folders by name,date, or size.
Selectmultiple
Select one by one: select the pictureone by one and then Cut, Copy orDelete them.Select all: select all the pictures andthen Cut, Copy or Delete them.
Open Brow
Advanced RenamselectDetaithe se
Delete Delet
Change view Select
Sort Sort tor dat

49
ptions and their operations are theres menu. in the middle of the screen. A status
at the top of the screen. The keypad playing videos are as follows:
r this menu, the sounds which youdownloaded via MMS, WAP, BT, will be displayed in a list. s > Sounds and press , to enter the
tions to carry out the followingo a selected file:
Operation
Start/pause playback.
Long press to rewind.
Long press to fast forward.
Exit/return to an upper menu level.
Return to idle screen.
My Files
3. The folder osame as Pictu
Videos are playedbar is displayed operations when
SoundsWhen you entehave stored or Infrared or USB1. Select My file
menu.2. Press L Op
operations t
Options Description
Play/Pause Play the selected video.
Send Send the selected file: Via Infrared, Viabluetooth and Via MMS.
Advanced Copy: Copy the selected file to anotherfolder.Cut: Similar to copy, but the originalfile will be deleted.Rename: Modify the name of theselected file.Details: Display detailed informationof the selected video, such as lastmodified date, file size, etc.
Delete Delete the selected video.
Change view You can select to view the video filesin List view, Grid view.
Sort Sort the videos and folders by name,date, or size.
Selectmultiple
Select one by one: select the videos oneby one and then Cut, Copy or Deletethem.Select all: select all the videos and thenCut, Copy or Delete them.
Key
, or L
<
>
R
)

My Files
3. The folder options and their operations are theenu.
s, used memory capacity and freetween all memory capacity andile phone and memory card will
50
same as Pictures m
Memory statuAll memory capacitymemory capacity beused in both the mobbe displayed.
Play Play the selected audio file.
Send The available options are: ViaInfrared, Via bluetooth and Via MMS.
Advanced Copy: Copy the selected file toanother folderCut: Similar to copy, but the originalfile will be deletedRename: Modify the name of theselected fileDetails: Display detailed informationof the selected audio file, such as lastmodified date, file size, etc.
Use You can set the audio file: As incomingcall ringtone or As Contact ID.
Delete Delete the selected audio file.
Change view Select List view or Grid view.
Sort Sort the audios and folders by nameor date.
Select multiple Select one by one: select the audiofiles one by one and then Cut, Copyor Delete them.Select all: select all the audio files andthen Cut, Copy or Delete them.

51
nu.displays 3 input boxes. Press +/- toen the input boxes.
ptions to carry out the following
Enter the average days of yourovulation cycle (e.g. 28 days).
Enter the average days of yourperiod (e.g. 5 days).
Enter the first date of your lastperiod (DD/MM/YYYY).
Description
Show the dates of your possible highfertility risk periods and estimatedmenstrual period.
Show the current, previous and nextmonths’ conditions. Different coloror icon will be displayed to indicatedifferent conditions (e.g. Pinkrepresents menstrual period).
Tools
10. Tools
Ladys planner
The results generated by the various functions underLady's planner are for reference only, and may not beaccurate as the conditions of each individual may bedifferent. The results shall NOT be relied upon forhealth, medical, family or pregnancy planning ordecision making under whatever circumstances, andthe measurements shall NOT be regarded as areplacement for health checks by a medical practitioner.Philips phone is not a medical instrument or device.Users are advised to seek independent medical advicefor health and/or pregnancy related issues. Philips shallnot be held liable if users get pregnant or fail to getpregnant by relying on the female calendar.
Female calenderThis function allows you to check your estimatedmenstrual cycle and your possible high fertility riskperiods.
1. Enter the me2. The screen
switch betwe
3. Press L Ooperations:
Average menstrual cycle
Average menstrual days
1st day of last menstrual cycle
Options
Check

Tools
the top of the list. When a shopping list has expired, ith a grey icon.
s to carry out the following
g listcreate shopping list screen. You
of 30 shopping lists. itch between the various inputnter the following information:p, date, unit price, quantity,
s. r is in the date, unit price,
oxes, enter the values using ther decimal point for unit price,
ription
te a new shopping list.
details of the selected shopping
the selected shopping list.
te the selected shopping list.
te all the contents of theping list.
52
Shopping listShopping list provides a convenient way for you torecord the items you wish to buy. You can view, add,modify or delete the shopping list. 1. Enter the menu.2. The screen displays a list of items you have
already added to the list. If the list is empty, youwill be prompted to create it. Press L OK tocreate a shopping list. Press R Back to exit.
3. If a shopping list has been created, press + / - toselect a certain list.
The shopping list will be sorted according to its date ofcreation. The last created list will appear first andindicated with a green icon.
If the date of the shopping list is close to the currentsystem date ( 1 day limit), then the shopping list willbe moved to the top of the list and indicated with a redicon. For example, if today is 5 October and the dateof the shopping list is 6 October, and the system dateof your phone is 5 October, the list will be moved to
will be indicated wit
4. Press L Optionoperations:
Create a shoppinSelect New to enter can create a maximum1. Press + / - to sw
boxes. You can eItem name, shocompletion statu
2. When the cursoquantity input bkeypad. To entelong press #.
Warning To describe the female calendermenu.
Legend Show the meaning of the colors andicons displayed in the Warning menu.
Options Desc
New Crea
View Viewlist.
Edit Edit
Delete Dele
Delete all Deleshop

53
uct informationter create product information screen.te a maximum of 20 product
to switch between the various inputan enter the following information:, five store names and the
g prices at each of the store.ursor in the price input boxes, entersing the keypad. To enter decimal
it price, long press #.
ength of a store name is 40 characters.umber of digits for unit price is 10.
ave completed, press L Save or , touct information.
cription
ate a new product information.
w details of the selected product.
t the selected product information.
ete the selected product information.
ete all the product information in list.
Tools
3. When the cursor is in the completion status box,press < / > to select Yes or No (default).
The maximum length of a store name is 40 characters.The maximum number of digits for unit price is 10.
4. When you have finished, press L Save or , tosave the shopping list.
Please note that all the input boxes in the shopping listare mandatory and cannot be left empty.
Price comparison tableThis menu allows you to enter different prices for thesame product, so as to identify the store that sells theproduct at the lowest price. 1. Enter the menu.2. The screen displays a list of items you have
already added to the list. If the list is empty, youwill be prompted to create it. Press L OK tocreate a list. Press R Back to exit.
3. If a list has been created, press + / - to select aproduct.
4. Press L Options to carry out the followingoperations:
Create a prodSelect New to enYou can creainformation. 1. Press + / -
boxes. You cbrand, itemcorrespondin
2. When the cthe values upoint for un
The maximum lThe maximum n
3. When you hsave the prod
Options Des
New Cre
View Vie
Edit Edi
Delete Del
Delete all Delthe

Tools
3. Press L Clear to clear the results and continueulation.
u to manage your cards, such asnk cards, credit cards, debit cards,o carry your cards, you can use this card information or even enjoys, bonuses, etc you are entitled to.
ys a list of cards which you have is empty, you will be promptedess L OK to create a cards R Back to exit.
ion has been created, the screen card issuers and the type of cardthe left of the card list
ct a card and press L Options towing operations:
tion
a new card information.
etails of the selected card.
e selected card information.
54
Please note that all the input boxes are mandatory andcannot be left empty.
Discount ManagerThis menu allows you to calculate the discountedprice of an item. The calculation for discounted pricevaries according to the language settings. When the current language setting is Chinese, themethod of calculation is: Original $*(Discount rate/10)When the current language setting is English, themethod of calculation is: Original $*(100-Discount rate)/100As the method of calculation varies according tolanguage settings, the input boxes also vary. When the current language is Chinese, the screen willprompt you to enter the original price and n discountrate. 1. Press + / - to switch between the two input boxes.
The maximum length for original price is 10 digitsand the maximum length for n is 3 digits (includingdecimal point and the number after the decimalpoint). Long press # to enter decimal point.
2. Press L Count or , to display the results on thescreen.
with the next calcMy cardThis menu allows yomembership cards, baetc. When you forget tmenu to check youraccumulation of point1. Enter the menu.2. The screen displa
added. If the listto create it. Prinformation. Pres
If the card informatwill display the list ofwill be indicated on
3. Press + / - to selecarry out the follo
Options Descrip
New Create
View View d
Edit Edit th

55
ard informationr create new card information screen. maximum of 10 card information. o select a card type; after selection,o switch between the different inputissuer, card number, validity period,e number and remarks.
ength for name is 40 characters, carddigits, phone number is 41 digits,aracters.
ave finished, press L Save or , to information.
except for remarks and phone numberf the input boxes are mandatory andpty.
ass Indexmended method for measurement ofults. The borderline for overweight
etermined by BMI, which is closelyfat. You can measure your weight
BMI function. d by using the weight divided by thees. In the calculation, weight is in
Tools
4. The following shows the card categories:
The card information will be listed according to thedate of creation. The last created card will appear atthe top of the list.
If the effective date of the card relative to the system dateof the phone has expired, then the card will be moved tothe bottom of the list and will be indicated with an icon.
If the date of the card information is close to thecurrent system date (30-day limit), then the cardinformation will be moved to the top of the list andindicated with an icon. For example, if today is 1October and the expiry date of the card is 31 October,and the system date of your phone is 1 October, thecard will be moved to the top of the list until it expires.
Create new cSelect OK to enteYou can create a1. Press < / > t
press + / - tboxes: card contact phon
The maximum lnumber is 30 remarks is 60 ch
2. When you hsave the card
Please note that fields, the rest ocannot be left em
BMI-Body MBMI is the recomoverweight in adand obesity is dlinked to body index using the BMI is calculateheight in squar
Delete Delete the selected card information.
Delete all Delete all the card information in the list.
• Boutique • Supermarket
• Restaurant • Superstore
• Travel • Book shop
• Credit Card • Entertainment
• Beauty • Others
Tools
kilogrammes, while height is in metres. The formula
ne the calculation, press L Reset boxes and the calculation results,rform another calculation. Rate (BMR)ate is the minimal calorie to sustain life in a resting orat is not subject to the influencemuscular activities, ambient
lth conditions. Basal Metabolicidual's metabolic condition andas a reference for weight control of health.ulating BMR provided by yourHarris-Benedict formula, which
+ (9.6 x weight in kg) + (1.8 x age)3.7 x weight in kg) + (5 x height
d of calculation, the unit formes and the unit for height is in
25 - 29.99 OverweightObesityMorbid Obesity
56
is as follows: BMI= [weight (kg)]/ [(Height) metres x (Height)metres]1. Enter the menu.2. The cursor will be in the weight input box. Use the
keypad to enter your weight. Press + / - to switchthe cursor between weight and height input boxes.
The unit of measurement for weight is kilograms (kg)or pounds, and the measurement for height iscentimetres (cm). However, in the calculation of BMI,your height in centimetres will be converted to metres.
Weight ranges between 10 to 200 kg. Height rangesbetween 10 to 300 cm.
3. After you have entered the height and weight,press L Count or , to start calculation. Theresults will be displayed at the bottom of thescreen. Besides displaying your BMI, theinterpretation of your BMI results will also bedisplayed in the following manner:
4. After you have doto clear the inputso that you can pe
Basal MetabolicBasal Metabolic Rrequirement requiredsleeping individual thof stress, hunger, temperature and hearate reflects an indivhas been considered and the maintenanceThe formula for calcmobile phone is the is as follows: Female: BMR = 655height in cm) - (4.7 xMale: BMR = 66 + (1in cm) - (6.8 x age)In the above methoweight is in kilogramcentimetres.
16 or below Cacotrophia16 - 18.5 Underweight18.5 - 24.99 Normal weight
30 - 39.99
40 or higher

57
date and time of every event. If the time correspond with the date andt, the phone will emit an alarm (ife screen will display a prompt to
ew event has arrived. maximum of 30 events. The list willhe contents. Once you have selectedcan press , to view the detailed
nu. include: View day, View Week, Newdate, Advanced.nts will be displayed. When you add a need to enter the correspondingthe event, such as subject, location,time, end date, end time, reminderod.
pace for events is full, the phone will there is no more space.
ate and time, the phone will displayhe selected date and time. You canthem directly.
ength of an event is 40 characters.
Tools
Take for example a 68 kg, 168 cm tall, 21 year oldmale; his daily Basal Metabolic Rate (BMR) will be:66 + (13.7 x 68) + (5 x 168) - (6.8 x 21) = 66 + 932 +840 - 143 = 1695 calories.1. Enter the menu.2. The cursor will be in the gender selection box.
Press < / > to select gender (Male/Female), press +/ - to switch between age, weight, height inputboxes and enter the values using the keypad. Age is in years, height is in kilogrammes andweight is in centimetres.
Weight ranges between 10 to 200 kg, age ranges between1 to 200 and height ranges between 10 to 300 cm.
3. After you have entered the height and weight,press L Count or , to start calculation. Theresults will be displayed at the bottom of thescreen. After calculation, press L Clear to clearthe input boxes and the results of the calculationto perform another calculation.
CalendarThis menu displays the calendar. You can select Dayview, Week view or Month view. You can create newappointments, view appointments list, delete ormodify appointments in the calendar. The calendar
stores the alarmcurrent date andtime of the evenneeded), and thindicate that a nYou can create adisplay part of tan event, you information.1. Enter the me2. The options
event, Go to Add new eveThe list of eventnew event, youinformation of start date, start and repeat meth
If the memory sprompt you that
When editing dthe default or tedit or confirm
The maximum l

Tools
Alert type
time is reached, the alarm willne is switched off. Press any key and the mobile phone will beically.
as a built in calculator. Enter theypad.
urrent alarm rings according toay you specify in a week. Forle, if you press , to selecty and Monday, the alarm clockng every Sunday and Monday.
an alarm tone.
On or Off.
ription
tion
raction
tiplication
sion
58
No reminder, On time, 5 min. before, 15 min. before,1 hour before, 1 day before and other (the remindertime can be set by you).Repeat methodThe phone provides the following repeat methods:Once, Daily, Weekly, Monthly and Annually.
When you change the date and time of your phone, thenext alert will be repeated based on the modified dateand time of the phone.
When you switched off the phone, the organizer alert willbe postponed until the next time you switch on the phone.For repeated events, only the latest one will be alerted.
AlarmThis phone supports 24-hour alarm.The available options are:
When the set alarm ring even if your photo disable the alarmswitched off automat
CalculatorYour mobile phone hnumbers with the ke
Options Description
Simple alarm
A simple alarm rings only once. Set thealarm status to On or Off by pressingL Change. When set to On, you needto specify the alarm time and press ,or L OK to confirm.
Reccurent alarm
A recthe dexampSundawill ri
Alarm tone Select
Snooze Select
Options Desc
+ Addi
- Subt
> Mul
< Divi

59
al clockal clock allows you to check the timeies of the world. You can activate orlock display in the Clock status sub-g L Change to toggle between On
sime zone. The screen displays a worldcurrent date and time. A verticalen indicates the current zone on thear shows the display with ‘GMT’ and
s.ight with < / > key to update othereal time.he following options:
Choose the current time zone as thelocal setting.
Open time editor screen.
Turn summer time on or off.
Open an information screen with alist of cities in the currentlyhighlighted time zone.
Tools
The maximum length of the numbers and the result is10 digits. The result of the calculator is indicative.
Voice recorderThis menu allows you to record a voice memo.From the main menu, select Tools > Voice recorder.To start recording, press L Option and select Newepisode or ,. During the process, the recorded timewill be displayed in real time. To stop recording, pressR and the file will be saved in My files > Sounds.
InternationThe Internationof the major citdeactivate the cmenu by pressinand Off.
Local settingTo set the local tmap with the highlight in gremap, and a text bthe current citieMove the highlinformation in rYou can access t
, or L Options > Calculate
Equals.
* To toggle between negative andpositive figures.
L Options > %
Add a percentage symbol.
L Options > Modular
Calculate a remainders of a division.
# Add a decimal point.
Select
Set time
Daylight saving
City list

Tools
Foreign settings You need to enter the conversion Type, Amount 1,d Unit 2. Press + or - to switch input boxes.
imliar to the alarm clock, exceptd of the remaining time, and thealarm at the end of the count-e is the same as your alarm clock. is 1 minute. The format of the the maximum time input is 23
seconds. ntdown by pressing , key or L time timer. To stop countdown,set, press LOption to continueexit the menu by pressing the R
er will switch on automaticallyt the end of the count-down evenhed off.
60
To set the foreign time zone. The operations andoptions are the same as Local time zone. However, Settime option is not available in the menu.
Switch local/foreignSelect the L Change. Press L or OK to switch thetime between the local and foreign clocks.
Stop watchYour phone features a stop watch and the minimumunit is 0.1 second.The starting time is 00:00.0, in the format “mm:ss.n”,where mm stands for minutes of the watch, which canbe any number from 0 to 59; ss stands for seconds, anumber between 0 and 59; n stands for 0.x second, xbeing any number from 0 to 9. The stopwatch willstart the timing when you press L Start or ,. Youcan pause the timing, press L Pause, to resume LGo, to stop the timing, press R Stop.
Unit converterThis application allows you to convert many types ofunits such as exchange rate, area, energy, mass, power,pressure, temperature and volume.
Amount 2, Unit 1 anbetween the different
CountdownThis feature is very sthat you will be alertephone will emit an down. The alarm tonThe minimum timetime is hh:mm:ss, andhours 59 minutes 59You can start the couOption to start or editpress L Pause, to reor reset. and you can Back.
The count-down timand emit an alarm aif your phone is switc

61
- to select a particular number in thepress L Options to carry out theions:
pen the phone number editor, todit the selected number in the blackist.
elete the selected number in thelack list.
Tools
FirewallThis function provides a simple and quick method foryou to avoid nuisance calls and SMS. Blacklistcontains a list of phone numbers from which you donot wish to receive calls or SMS.Select Tools > Firewall > Enable and choose betweenthe following options:• SMS • Incoming call • SMS and incoming call• OffTo add phone numbers into the black list, select Blacklist, press LAdd or OK on Add new, then you cancarry out the following operations:
You can press +/black list, then following operat
Option Operation
New number Open the phone number editor,enter the new number and save thenumber into the black list.
Contacts Open the phonebook list and select aphone number for saving into theblack list.
Change Oel
Delete Db

Contacts
Create contacts/phone contact:
you must enter at least a phone
free-text, which means you canata using the text entry functionse (for more information on textnumber entry” on page 18).
Press , and select ViewContacts > <Add new>
Enter the following for SIMcard contacts. Name NumberEnter the following foronboard phonebook contacts: Name Mobile Home Office and etc
Press L Save.
62
11. Contacts
Your phone features two phonebooks. The SIMphonebook is located on your SIM card and thenumber of entries you can store depends on the SIMcard. The second phonebook (Smart phonebook) isintegrated in the phone memory and the maximumnumber of name cards you can store is 1000 (anamecard can consist of a name, 4 phone numbers,groups, email address, address, and postal code) etc.The SIM card is the default phonebook, but theentries in the two phonebooks are combined, sortedand displayed as a list. When you add a new contactto your phonebook, the new contact will only beadded to the phonebook you have selected.
You can store up to 1000 name cards, provided otherfeatures in the phone such as Organizer, Schedules,Sounds, Pictures, and Videos, etc. did not use up alarge amount of the phone's memory space.
To create a new SIM
To create a contact, number.
Most of the fields areenter alphanumeric dof your mobile phonentry, see “Text and
Enter New Contact
Enter contact details
Store the new contact
63
feature allows you to organize yourt you can associate images and/or group of contacts and send messagesers of the group. From the Contactsew group and the list of groups is
d press L Options > View to displaythe group.
imilar to copy, but the source recordill be deleted after copy.
imilar to copy, but the source recordill be deleted after copy.
dd a picture ID to the contact. Thisption is only available for contacts ine onboard phonebook.
elect one contact at a time or selectll contacts.
elect location for the new contact:IM card or Phone memory.
Contacts
Phonebook OptionsIn the phonebook, you can display the details of acontact by selecting it and pressing L Options tocarry out the following operations:
View groupThe View groupcontacts so tharingtones with ato all the membmenu, select Vidisplayed.
ViewSelect a group anthe members of
Options Description
View View the details of the selected contact.
Sendmessage
Send a SMS or MMS to the contact.
Dial Call the contact.
Delete Delete the contact.
Go to Go to the website in the record (ifavailable).
Default number
Set Mobile number, Home number orOffice number as the default number(if record is in the phone).
Send Contact
Send the selected record: via SMS, viaBluetooth or via Infrared.
Copy to SIM
Copy the phone entry to SIM card.
Copy to phone
Copy the SIM entry to phone.
Move to SIM
Sw
Move to phone
Sw
Add picture Aoth
Selectmultiple
Sa
Storage location
SS

Contacts
Group Options
u to set your 4 of your preferreddialled numbers. You can thenm by selecting the correspondinge screen, thereby eliminating thewse the contact list.f quick calls.
ay emergency phone number.
IP prefix of your networktor.
u Press , to enter themain menu from idlemode and select Contacts> Quick call.
n Press the navigationkeys.
e
the
L Add or R Back
64
Special numbersThis menu allows you to keep a list of useful numberssuch as your own numbers, service numbers,voicemail and SOS numbers.
Quick call This feature allows yoor most frequently quickly call one of theicon or picture on thneed to enter and broYou may edit a list o
Options Description
View Display the group members.
Rename Rename the group.
Send SMS Send an SMS to members of a group.
Reset Restore group to default settings.
Options Description
My number View, Edit or Delete your own phonenumber.
Service numbers
This entry of the SIM phonebookallow you to select one of the availableservices provided by your operator andto copy it into the selected phonebook.
Voice mail number
Dial the number for your voice mailservice provider.
SOS Displ
IP number (China & HK only)
Dial opera
Enter Quick call men
Go to the desired icoposition
Add a number to thselected location andthen display all the contacts or return tomain menu.

65
ove all the entries to Phone.
elete all contacts.
Contacts
AdvancedThis menu provides you with advanced features sothat you can view and edit your contacts:
Select a contact from the phonebook.
Press + or -.
Confirm the added contact and add picture or Cancel.
Press L Select orR Back.
Options Description
Choose contact list
Switch between SIM contacts, Phonecontacts or All SIM & phone contacts.If you select to display the contacts inSIM and phone, you will be asked toselect the new contact entry saved onthe SIM or phone memory.
Copy to SIM Copy all the entries to SIM.
Copy to phone
Copy all the entries to Phone.
Move to SIM
Move all the entries to SIM.
Move to phone
M
Delete all contacts
D

Profiles
Car Ring volume Level 8
ingtones Default
lert type Ring
ey sound Off
cklight level Maximum
ing volume Silence
ingtones Default
lert type Off
ey sound Off
cklight level High
ing volume Level 4
ingtones Default
lert type Ring
ey sound Off
cklight level High
66
12. Profiles
Your mobile phone has been preconfigured with thefollowing modes:
You can activate and modify all the modes, exceptFlight mode and Silent mode. These 2 modes can onlybe activated and viewed.The profiles and their respective parameters are asfollows:
Personal (default) Car Flight
Home Meeting Outdoors
Silent
Personal Ring volume Level 9
Ringtones Default
Alert type Ring
Key sound On
Backlight level High
R
A
K
Ba
Flight R
R
A
K
Ba
Home R
R
A
K
Ba

67
ctionent profile:
settingstions include:
Press , to enter the main menufrom idle mode and select Profiles.
Press + or -.
Press L Options. You may select:• Activate: To activate the profile.• Personalize: To modify the setting
in the profile.
Description
Select from 10 volume levels.
Select the ringtone for Contacts, Call,Other calls, Alarm, Appointments,Messages or Cell info.
Select an alert type: Ring only, Vibrateonly, Vibrate then ring or None.
Turn the key sound On or Off.
Select a backlight level: Maximum,High, Medium, Low
Profiles
Profile seleTo select a differ
PersonaliseThe available op
Meeting Ring volume Silence
Ringtones Default
Alert type Vibrate
Key sound Off
Backlight level Medium
Outdoors Ring volume Level 9
Ringtones Default
Alert type Ring
Key sound Off
Backlight level Maximum
Silent Ring volume Silence
Ringtones Default
Alert type None
Key sound Off
Backlight level Medium
Go to Profiles menu
Select the desired profile.
Enter the Options menu
Options
Ring volume
Ringtone
Alert type
Key sound
Backlight level

Connectivity
Device positioningeiving data to and from another correctly positioned relative to Make sure that the respectivefacing each other and are away from each other. Also maketructs the Infrared beam.
red from your mobile phone, youtem to be sent: for each categorytc), a sub-menu then gives youion.hone finds another Infrared-
communicate with, the sendinglace. Messages are displayed on
follow the process.
68
13. Connectivity
This menu provides you with more features to set upa connection with these external devices.
InfraredYour mobile phone features infrared technology (alsocalled IrDA), that allows you to send or receive data toand from other Infrared-compliant devices through awireless link (e.g., another mobile phone, a PC orPDA, a printer etc.). You can use Infrared to quicklysend a picture or voice recording to your friend’smobile phone, or receive pictures from their PDA.
This device is a Class 1 Laser product. Do not exposeyour eyes directly to the IR (infrared) beam, and neverallow it to interfere with other IR devices.
Files that are copyright-protected cannot be sent.When connecting with a PC, make sure you haveactivated its infrared option.
Before sending or recdevice, they must beyour mobile phone.Infrared ports are maximum of 50 cm asure that nothing obs
Sending data
To send data via Inframust first select the i(picture, ringtone, eaccess to the Send optAs soon as your pcompliant device to automatically takes pthe screen for you to

69
ll be cancelled if your phone is unableer device within a certain time limit,nk is broken, the size of the file sent isr phone, or if you cancel the process bykey.
ports Bluetooth wireless technology,ction to a compatible Bluetoothure interoperability between otherices, please check with theof other devices. The Bluetooth
be subjected to interference fromh as walls or other electronic devices.h connection, the device with whichtablish a connection must supporttion. Please contact the device's its accompanied documentation.luetooth connections , to enter the main menu from idleelect Connectivity > Bluetooth. On the, select Activate. Next, select Search
n the list of devices appears, press Lice you wish to establish a connection
Connectivity
If the phone finds several Infrared devices, a list isdisplayed on the screen for you to make a selection.Press , to confirm and send the selected data.
The sending will be cancelled if your phone is unableto detect the other device within a certain time limit,if the infrared link is broken, or if you cancel theprocess.
Receive dataTo receive data, select Connectivity > Infrared > Receive.Your mobile phone is then ready to receive an itemand waits for the other Infrared device to send it.During data transmission, a process bar is displayed.The received data will be automatically saved in MyFiles when the transmission is completed.If the received data is a picture file, it will be stored inMy files > Pictures. If the received data is a vCard, itwill be stored in the phonebook of the mobile phone.If several documents are received at the same time,where errors exist in some documents and they cannotbe received, the transmission will stop and thereceived documents are saved. If the file extension isnot recognized, the information screen Unsupportedtype. Saved to Others is displayed.
The receiving wito detect the othif the infrared litoo large for youpressing the R
BluetoothYour phone supallowing connedevice. To ensBluetooth devmanufactureres connection canobstructions sucTo use Bluetootyou want to esBluetooth funcmanufacturer orEstablish a BTo activate, presmode and then sBluetooth screenfor devices. Wheto select the devwith.
Connectivity
device, you are presented with acovered within the range of yourhone. As soon as you select aion is made, you are prompted toder to pair with the device. Thisy the manufacturer of the otherefer to its documentation forThe passkey feature ensures thatections are allowed to connect
or to the selected device.
u to connect your phone to a PCe feature:
lect Connectivity > USB drive. Thet the mobile phone to enable thiso remind the first time user.
to display more features:name: edit the name of theceility: choose to show or hide thece by select toggle On or Off
Profiles: lists the phone’slable profiles
70
If you do not intend to use the Bluetooth feature forsome time, you should deactivate it in order toconserve battery power.
Bluetooth menu
When searching for alist of any devices disBluetooth-enabled pdevice and a connectenter a passkey in orpasskey is supplied bBluetooth device. Rfurther information. only legitimate conneither to your device
USB functionThis feature allows yovia USB. To apply thFrom main menu, semessage Please restarfeature! is displayed t
Options Description
Activate Turn Bluetooth feature On or Off.
Search for devices
Search for the external devices thatyou can connect to.
My devices Display the bluetooth devices thatyou can connect to.You can select the desired device bypressing L in the devices list. Youcan also open the Options menu of thedevice. The options are: Connect/Disconnect (if applicable)Browse files (if applicable)Activate/Deactivate stereo (if applicable)RenameDelete
Settings Select• My
devi• Visib
devi• My
avai

71
ConnectivityYour mobile phone will then behave like a USB drive,or perform PC connections with the Mobile PhoneTools, respectively. If you connect your phone to thecomputer via USB drive, you can access your memorycard and the size of the file transfer is unlimited untilyour memory is full.This menu allows you to upload and download music(MP3 and Midi), videos and pictures via the USBcable.With it, PC software offers instant sychronizationbetween your mobile phone and your computer, andenables you to backup your mobile phone data on thecomputer and recover the data saved in the computer,upload and download files, send and receive SMS andedit your mobile phone contacts.
When the transfer is finished, please make sure thatyou safely remove your device by clicking .
Memory cardThe phone has a micro SD memory card slot toincrease the phone's memory. The phone supportsFAT16 and FAT32 format micro SD cards up to1GB. You can uninstall or format the memory card.
Calls
ou to clear the call history in:issed/Delete all. Press L Select
nd R Back to cancel deletion.
u to configure the call settings:
message to the selected number.n send by SMS or MMS.
the contacts list and edit ther if it is in the contacts list.
d the phone number into theist, see “Firewall” on page 61.
tion
uto answer on/off. When thisn is on, the incoming call will bed automatically after 10 seconds.
ny key answer on/off. When thisn is on, you can answerng calls by pressing any key,), R, and three controls keysouter cover.
72
14. Calls
Most options described in this chapter are operatorand/or subscription dependent and require either aPIN2 code or a phone code. For more information onPIN codes, see “Security” on page 76.
Call listThis menu provides you with a list of calls you havemissed, answered and made. The calls include All calls,Missed calls, Answered call and Outgoing calls, whichare displayed in chronological order with the mostrecent call at the top of the list. Select a call from oneof the lists and press OK, then press L Options toaccess the following:
Clear historyThis menu allows yOutgoing/Answered/Mto confirm deletion a
Call settingsThis menu allows yo
Options Description
Save Save the number if the number is notin the Contacts list.
Delete Delete the selected number from thelist.
Dial Call the selected number.
Send message
Send aYou ca
Edit number
Open numbe
Add to black list
To adblack l
Options Descrip
Auto answer
Turn Afunctioanswere
Any keyanswer
Turn Afunctioincomiexcept on the

73
Cost settings: This option is availableonly when the charge information isincluded in your SIM card. You canview information of the current calland all recent calls. You need to enterthe PIN2 code to manage,maximum cost credit and unit rate.
t the following call divert options: Allce calls, If out of reach, If no reply, Ifsy.
hen All voice calls is on, all incomingalls will be diverted to the pre-setumber without any reminder. hen If out of reach is on, incoming
alls will be diverted to the pre-setumber when the user is notonnected to the network.
hen If no reply is on, incoming callsill be diverted if the user does not
nswer. hen If busy is on, calls will be
iverted if the user is already onliner if the call is rejected.ou can also check the Status of yourall diverts or Cancel all call diverts.
Calls
Minutereminder
Select On or Off to activate or deactivatethe minute reminder during a call. Thedefault is Off and the default setting is45 seconds.
Call services
The available options include:• Call time: Display the duration of
your calls and their charges: Last call,Total incoming calls, Total outgoingcalls and Total calls.
• Call waiting: Select Enable or Cancel,or check Status.
This feature is network/ subscriptiondependent.
• Own ID: Select Show ID or Hide ID orSet by network to determine yourphone number or identity will bedisplayed or not to the called party.
• Caller ID: To check your operatorsetting of showing the identity ofyour caller.
This feature is network/ subscriptiondependent.
•
Call divert Sevoibu• W
cn
• Wcnc
• Wwa
• Wdo
• Yc

Calls
74Auto redialYou can set auto redial option On or Off. When set toOn and the party you wish to call is not connected,you will be asked to redial or not.
Call barring
This menu allows you to limit the useof your phone to specific calls bypreventing the reception or making ofdifferent types of calls. To activate callbarring, you need to enter acommunication limit code. This PIN2code will then be sent to the networkfor validation.
Note that this operation only supportsGSM calls.
The types of calls you can bar are asfollows:• All outgoing calls• All international calls• Only here & home• All incoming calls• Incoming if abroadYou can also check the Status of yourcall barring or Cancel all call barring.

75
t the display language of the phone.
Display time: Select On or Off.When you select On, the timeinformation will be displayed inidle screen.Time zone: Go to Internationalclock menu and change the timezone.Set time: Set the time in theformat HH:MM.Set date: Set the date.Time format: Set the time formatas 24 hours or 12 hours.Date format: Set the date format asYYY/MM/DD, YYYY.MM.DD,DD.MM.YYYY, YYYY-MM-DD orDD-MM-YYYY.Power-on time: Set a time for thephone to be switched on. You canselect On or Off. When you selectOn, you need to enter the time youwant your phone to be switched on. Power-off time: same as above.
Settings
15. Settings
You can configure your Philips 598 mobile phone tobest suit your usage preference. You can configure thefollowing settings: General, Display, Sounds andConnectivity.
GeneralThis menu allows you to configure some generalsettings:
Enter the menu Press , to enter the mainmenu from idle mode andselect Settings.
Select a settings menu Press < or >.
Enter the menu options Press + or -.
Options Description
Active flip Select On or Off. You can change thecurrent selection by pressing L.When you select On, you can answeran incoming call simply by openingthe flip.
Languages Se
Time & date
•
•
•
••
•
•
•
Settings
ur phone with different display
default storage location: Phoney or Memory card.
n check the memory status ofts, Messaging and My files. Youo check the memory status ofy card if it is inserted.
your phone settings to the values.
ption
allpaper display On or Off.
a theme for your phone.
rom 4 backlight levels. You canhe backlight level by pressing +ys. Press , or L to confirm.
backlight duration from 60s, 30 seconds and 15 seconds.
76
DisplayYou may configure yosettings:
Security • PIN protection: Select On or Off.When you select On, you need toenter the PIN code when youswitch on the phone.
The default PIN code is networkdependent on your service provider.Please contact your service operatorfor the PIN information.
• Change PIN: Modify the PIN code.• Change PIN2: Modify the PIN2
code.• Safeguard: You can safeguard
important information such asmessages, contacts on your phone byactivating safeguard. You can alsochange the safeguard password.
The default safeguard password is0000.
Shortcuts Displays a list of shortcut features.You can set a new shortcut key byestablishing a link between a certainfeature and a numeric or navigationkey. You can also change or delete anexisting shortcut key.
Defaultstorage
Set thememor
Memory status
You caContaccan alsmemor
Default settings
Restoredefault
Options Descri
Wallpaper Turn w
Themes Select
Backlight level
Select fselect tor - ke
Backlight duration
Select second
77
ty
ation, see “Call settings” on page 72.ingsmation, see “Message Settings” on
ingsame will be displayed on the idlene is not able to identify the network
display the country code and the the unknown network.krding to the search mode you have
select Automatic, the network will beatically. If you select Manual, theence only when you confirm to start
utomatic or Manual.worksrk list is stored in the SIM card. Itrity by which your phone will registeretwork during automatic registration.
Settings
SoundsYou can set your phone to operate with differentsound profiles. For details, see “Profiles” on page 66.
ConnectiviCall settingsFor more informMessage settFor more inforpage 45.
Network settThe network nscreen. If the phoname, it will network code ofSelect networIt will vary accoselected. If you searched automsearch will commsearching. Search modeYou can select APreferred NetPreferred netwospecifies the prioto the available n
Greeting Turn greetings On or Off. When you selectOn, you can edit the greetings message.
The maximum length of greetings is 20Chinese words or 50 English characters.
Options Description
Alert type You can select Ring only, Vibrate only,Vibrate then ring or None.
Ringtones Select the ringtone for Contacts calls,Appointments, Messages, Cell info,Alarm and Other calls.
Ring volume
Select from 10 volume levels.
Key sound Turn key sound On or Off.
Shutter sound
Select from 3 shutter sounds. You canalso select Off.
Low battery Turn warning On or Off.

Settings
1. In idle mode, press , to enter the main menu. • Profile name: A name to identify the server.umeric address of the server informat.ber on the server. The number
).RL of the homepage. duration your phone staysAP.TTP or WSP connection.
one of the CSD profiles.t one of the GPRS profiles.or GPRS.
78
2. Select Settings > Connectivity > Network settings >Preferred networks and press ,.
3. Press , or L Select to enter the preferrednetwork list. The most preferred network will beat the top of the list. L
4. Press +/- to select a certain network and press LOption.
5. You can then select to Insert, Add to end or Deletethe selected network.
Attach GPRSThis option allows you to set the GPRS attach modeduring PDP session. You can choose either one of thefollowing:• Always attached• AttachedBrowserVarious parameters relative to browser can be setunder this option, including WAP parameters andPush message.WAP profiles You can set up to 5 groups of WAP profiles. You canactivate and use one of the profiles. At the same time,you can edit or directly connect to the address. SelectEdit to access the following settings:
• IP address: The nnnn.nnn.nnn.nnn
• Port: The port numis usually 0 (=9201
• Homepage: The U• Linger time: The
connected to the W• Connection: Select H• CSD profiles: Select• GPRS profiles: Selec• Bearer: Select CSD

79
ther to log on GPRS - There are 2S status which are mutuallysive: GPRS network is available butn use; or GPRS network is availablen use. The icon will be displayed only you have logged on to GPRS.
- Indicates that you have at least oned message. The first icon indicates
the memory is full, while the secondindicates that there is unread SMS the memory is full.
- Indicates there is a MMS message.
mail- Indicates voice messages thatnot been heard.
Clock - Indicates that the alarm is activated.
tion - Your phone will vibrate when is an incoming call or when the clock rings.
call - Indicates there is a miss call.
Divert - Indicates that the call divertion is activated.
Icons & Symbols
Icons & SymbolsIn idle mode, several icons and symbols can bedisplayed on the sub-display and main screen. Thestatus, network and battery icons are displayed all thetime. The rest of the icons are displayed if the featureis available, and not displayed if the feature isunavailable.
If the network symbol is not displayed, it implies thatthe network is currently unavailable. You may be in abad reception area; moving to a different location mayhelp.
Network - Network icon comprises of 2portions. The left portion indicateswhether or not your phone is alreadyregistered with a network, and the rightportion indicates signal strength in 5levels (from no signal to strongest).
Battery - Indicates battery level with 5battery level indicator bars. Whencharging, a scrolling icon will be displayed.
International roaming - Displayed whenyour phone is registered to a networkother than your own.
WheGPRexclunot iand iwhen
SMS unreathat icon while
MMS
Voicehave
Alarmclock
Vibratherealarm
Miss
Call funct

Icons & Symbols
rt recording - Indicates OK to starteo recording.
p recording - Indicates OK to stopeo recording.
eo MMS on - Indicates video recordingMS size is on.
eo MMS off - Indicates video recordingMS size is off.
rm - Indicates the alarm is on.
ntdown timer - Indicates thentdown timer is due on thedisplay.
nt - Alerts you an organiser event is.
S - Indicates there is a SMS message.
all - Indicates the phone is in a call.
oming call - Indicates there is anoming call.
sic - Indicates the music feature is on.
80
Silence - Indicates that silent mode isactivated.
Auto answer - Indicates that Auto answeris on.
MP3 Key Locked - Indicates that the MP3key is locked.
Memory card - Indicates the memory cardis in use.
Bluetooth - Feature is activated.
Cameras multishot - Indicates camera willtake multiple 3 shots.
Cameras night mode- Indicates cameranight mode is on.
Cameras self-timer - Indicates camera’sself timer is on.
Capture - Indicates OK to capture photo.
Cameras zoom - Indicates zoom featureof the camera is on.
Stavid
Stovid
Vidin M
Vidin M
Ala
Coucousub
Evedue
SM
In c
Incinc
Mu

81
Icons & SymbolsOutgoing call - Indicates the phone is in anoutgoing call.
Reject call - Indicates there is a rejectedcall.
Silence incoming call ringer - Indicates thatthe incoming call ringer has been silenced.

Precautions
Keep your phone in a safe place and keep itl children's reach.ng down your PIN code. Try tot instead. and remove the battery if you aresed for a long time.ode after purchasing the phonestriction options.
of your phone complies with alllaws and regulations. Howevere may cause interference withonic devices. Consequently youlocal recommendations and
ing your cellular phone both atay. Regulations on the use of vehicles and aircraft are
t.een focused for some time on thefor users of cellular phones. Theadio wave technology, including, has been reviewed and safety
rawn up to ensure protection frome energy. Your cellular telephone
plicable safety standards and thed Telecommunications Terminal1999/5/EC.
82
PrecautionsRadio Waves
Your cellular mobile phone is a low powerradio transmitter and receiver. When it isoperating, it sends and receives radio waves.The radio waves carry your voice or data
signal to a base station that is connected to thetelephone network. The network controls the powerat which the phone transmits.• Your phone transmits/receives radio waves in the
GSM frequency (900 / 1800 / 1900 MHz).• The GSM network controls transmission power
(0.01 to 2 watts).• Your phone complies with all relevant safety
standards.• The CE mark on your phone shows compliancy
with European electromagnetic compatibility (Ref.89/336/EEC) and low voltage directives (Ref. 73/23/EEC).
Your cellular mobile phone is your responsibility. Toavoid damage to yourself, to others or to the phoneitself, read and follow all the safety instructions andmake them known to anyone borrowing yourphone.Furthermore to prevent unauthorized use ofyour phone:
out of smalAvoid writiremember i
Switch off the phonegoing to leave it unuChange your PIN cand to activate call re
The designapplicable your phonother electr
should follow all regulations when ushome and when awcellular phones inparticularly stringenPublic concern has bpossible health risks current research on rthe GSM technologystandards have been dexposure to radio wavcomplies with all apRadio Equipment anEquipment Directive

83
with the vehicle manufacturer thatnic equipment used in your vehiclet be affected by radio energy.
scemaker:e phone more than 15 cm from youren the phone is switched on, in ordertial interference.he phone in a breast pocket.posite to the pacemaker to minimizeterference.our phone if you suspect thattaking place.
aring aidsser of a hearing aid, consult yourhearing aid manufacturer to learnparticular device is susceptible toterference.
erformanceove the performance of your phone,energy emission, reduce batteryd ensure safe operation adhere to thelines:
Precautions
Always switch off your phoneInadequately protected or sensitive electronicequipment may be affected by radio energy. Thisinterference can lead to accidents.
Before boarding an aircraft and/or whenpacking the phone in your luggage: the useof mobile phones in an aircraft may be
dangerous for the operation of the aircraft, disrupt themobile phones network and may be illegal.
In hospitals, clinics, other health carecentres and anywhere else where you may bein the close vicinity of medical equipment.
In areas with a potentially explosiveatmosphere (e.g. petrol stations and alsoareas where the air contains dust particles,such as metal powders).
In a vehicle transporting flammable products (even ifthe vehicle is parked) or a vehicle powered by liquefiedpetroleum gas (LPG), check first that the vehiclecomplies with the applicable safety rules.In areas where you are requested to turn off radiotransmitting devices, such as quarries or other areaswhere blasting operations are in progress.
Check electrowill no
PacemakerIf you have a pa• Always keep th
pacemaker whto avoid poten
• Do not carry t• Use the ear op
the potential in• Switch off y
interference is
Users of heIf you are a uphysician and whether your cellular phone in
Improved pIn order to imprreduce radio consumption anfollowing guide

Precautions
For the optimal and satisfactory operation of Battery informationered by a rechargeable battery.er only.
pen the battery.al objects (such as keys in yourcuit the battery contacts.excessive heat (>60°C or 140°F), environments.d only use Philips authentic accessories, as the use of anysories may damage your phonee dangerous, and will make allfor your Philips phone null andncorrect type of battery may also
arts are replaced immediately by and that they are replaced withcement parts.
84
the phone, you are recommended to use thephone in the normal operating position(when not using in hands-free mode or witha hands-free accessory).
• Do not expose your phone to extreme temperatures.• Treat the phone with care. Any misuse will void the
International Guarantee.• Do not immerse the phone in any liquid; if your
phone is damp, switch it off, remove the battery.and let them dry for 24hrs before using them again.
• To clean the phone, wipe it with a soft cloth.• Placing and receiving calls consumes the same
amount of battery energy. However, the mobileconsumes less energy in idle screen when kept inthe same place. When in idle screen and while youare moving, your phone consumes energy totransmit updated location information to thenetwork. Setting the backlight for a shorter periodof time as well as avoiding unnecessary navigatingin the menus will also help to save the battery'senergy for longer phoning and stand-byperformances.
• Your phone is pow• Use specified charg• Do not incinerate.• Do not deform or o• Do not allow met
pocket) to short cir• Avoid exposure to
moisture or causticYou shoulbattery andother accesand may bguarantees
void. The use of an icause an explosion.Make sure damaged pa qualified techniciangenuine Philips repla

85
ntal careber to observe the local regulations
ng the disposal of the packagingls, exhausted batteries and old phonease promote recycling.ked the battery and packaging withls designed to promote recycling andosal of your eventual waste.
battery should not be disposed of general household waste.
labeled packaging material isclable.
ancial contribution has been madehe associated national packagingvery and recycling system (e.g.mballage in France).
materials are recyclable (alsotifies plastic material).
Precautions
Do not use your phone while driving
Speaking on the telephone while drivinglowers your concentration, which can bedangerous. Adhere to the followingguidelines:
• Give your full attention to driving. Pull off the roadand park before using the phone.
• Respect the local regulations in countries where youdrive and use your GSM phone.
• If you want to use your phone in a vehicle, install thehands-free car kit which is designed for that purpose.
• Ensure that your phone and car kit do not block anyair bags or other security devices fitted in your car.
The use of an alarm system to operate a vehicle's lightsor horn to indicate incoming phone calls is prohibitedon public roads in some countries. Check localregulations.
EN60950 NormIn case of hot weather or after a prolonged exposure tothe sun (e.g., behind a window or a windscreen), thetemperature of your phone's casing might increase,especially when featuring a metallic finish. Be verycareful in this case when picking up your phone and alsoavoid using it with an ambient temperature over 40°C.
EnvironmeRememregardimateriaand ple
Philips has marstandard symboappropriate disp
Thewith
Therecy
A finto trecoEcoE
Theiden
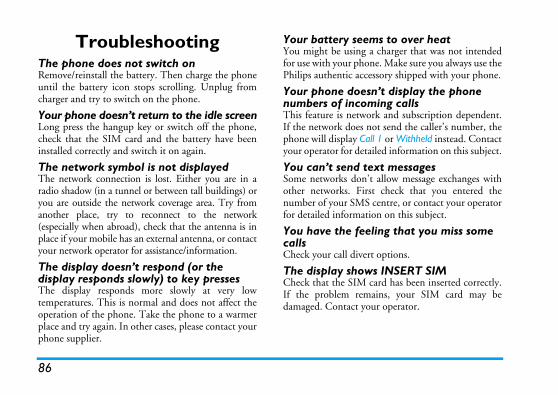
Your battery seems to over heata charger that was not intendedne. Make sure you always use theessory shipped with your phone.
nt display the phone ing calls
rk and subscription dependent.ot send the caller’s number, thell 1 or Withheld instead. Contact
ailed information on this subject.
ext messages’t allow message exchanges withst check that you entered the centre, or contact your operatorion on this subject.
ling that you miss some
t options.
s INSERT SIM card has been inserted correctly.ains, your SIM card may beur operator.
86
TroubleshootingThe phone does not switch onRemove/reinstall the battery. Then charge the phoneuntil the battery icon stops scrolling. Unplug fromcharger and try to switch on the phone.
Your phone doesnt return to the idle screenLong press the hangup key or switch off the phone,check that the SIM card and the battery have beeninstalled correctly and switch it on again.
The network symbol is not displayedThe network connection is lost. Either you are in aradio shadow (in a tunnel or between tall buildings) oryou are outside the network coverage area. Try fromanother place, try to reconnect to the network(especially when abroad), check that the antenna is inplace if your mobile has an external antenna, or contactyour network operator for assistance/information.
The display doesnt respond (or the display responds slowly) to key pressesThe display responds more slowly at very lowtemperatures. This is normal and does not affect theoperation of the phone. Take the phone to a warmerplace and try again. In other cases, please contact yourphone supplier.
You might be using for use with your phoPhilips authentic acc
Your phone doesnumbers of incomThis feature is netwoIf the network does nphone will display Cayour operator for det
You cant send tSome networks donother networks. Firnumber of your SMSfor detailed informat
You have the feecallsCheck your call diver
The display showCheck that the SIM If the problem remdamaged. Contact yo

87
When attempting to use a feature in the menu, the mobile displays NOT ALLOWEDSome features are network dependent. Therefore,they are only available if the network or yoursubscription supports them. Contact your operatorfor detailed information on this subject.
Your phone is not chargingIf your battery is completely flat, it might take severalminutes of pre-charge (up to 10 minutes in somecases) before the charging icon is displayed on thescreen.

88
Philips Authentic Accessories
Some accessories, such as a standard battery and acharger, are included as standard accessories in yourmobile phone package. Additional accessories mayalso be provided or sold separately. Package contentsmay therefore vary.
To maximize the performance of your Philips phoneand not to void the warranty, always purchase PhilipsAuthentic Accessories that are specially designed foruse with your phone. Philips Consumer Electronicscannot be held liable for any damages due to use withnon authorized accessories.
ChargerCharges your battery in any AC outlet. Small enoughto carry in a briefcase/handbag.
Data connect kitProvides easy data connection to your Philips mobilephone. The USB cable enables high-speedcommunication between your phone and yourcomputer. The provided software allows you todownload pictures and melodies and to synchronizeyour contacts and appointments.
Deluxe HeadsetThe integrated answer button offers you a simple wayto answer your calls. Simply answer an incoming callby pressing the button or long press to reject theincoming call.

89
Trademark Declaration
JAVA is a trademark of SunMicrosystems, Inc.
T9® is a trademark of TegicCommunications Inc.
Bluetooth™ is a trade-markowned by telefonaktiebolagetL M Ericsson, Sweden andlicensed to Philips.
Tegic Euro. Pat. App. 0842463

sorption Rate Information
mation
TIONS FOR EXPOSURE TO
ured not to exceed the limits forese recommendations have beenon (ICNIRP) and, the Instituteargin for assuring the protection
as the Specific Absorption Rate by the general public is 2.0W/tissue by IEEE Std 1528 for the
the mobile phone transmittingR is determined at the highest
e generally below the maximumvels so as to use only the powerna, the lower the power output.
various positions, they all meet
liance against the standard was
phone call duration or to use a the head and the body.
90 Specific Ab
Specific Absorption Rate InforInternational standards
THIS MOBILE PHONE MEETS THE INTERNATIONAL RECOMMENDARADIO WAVES
Your mobile phone is a radio transmitter and receiver. It is designed and manufactexposure to radio frequency (RF) energy defined by the international standards. Thestablished by the International Commission on Non-Ionizing Radiation Protectiof Electrical and Electronics Engineers (IEEE) that forecast a substantial safety mof all persons, regardless of age and health.
The exposure recommendations for mobile phones use a measurement unit known(SAR). The SAR limit recommended by the ICNIRP for the mobile phones usedkg averaged over ten grams of tissue and, is 1,6W/kg averaged over one gram of head.
Tests for SAR have been conducted using recommended operating positions withat its highest certified power level in all tested frequency bands. Although the SAcertified power level, the actual SAR levels of the mobile phone while operating arSAR value. This is because the phone is designed to operate at multiple power lerequired to reach the network. In general, the closer you are to a base station anten
While there may be differences between the SAR levels of various phones and atthe international protection standards for exposure to radio waves.
The highest SAR value for this Philips P598 model phone when tested for comp0,331W/kg for ICNIRP recommendation and 0,508W/kg for IEEE Std 1528.
For limiting the radio waves exposure, it is recommended to reduce the mobile headset. The purpose of those precautions is to take the mobile phone away from

91
or exposure to radio frequency (RF) The SAR limit recommended by the one gram of tissue for the head.tested for compliance against FCC
Specific Absorption Rate Information
USAYour mobile is also designed and manufactured not to exceed the limits fenergy defined by the Federal Communications Commission (FCC - USA).FCC for mobile phone used by the general public is 1,6W/kg averaged overThe highest FCC SAR value for this Philips P598 model phone when requirements was 0.215 W/kg.

Workmanship During The Limited Warranty
ed warranty period, Philips or itsice representative will, at itsair or replace, without charge for a materially defective Productfurbished parts or Product andired or replaced Product to theorking condition. Philips willarts, modules or equipment.
aced Product will be covered byrranty for the balance of thewarranty period or ninety (90)date of repair or replacement
nger. Repair or replacement ofilips’ option is your exclusive
ered By This Limited Warranty?
ranty does not cover:
t has been subjected to misuse,ipping or other physical damage,nstallation, abnormal operationeglect, inundation, fire, water or intrusion; or
92
Limited warranty1. What Does This Limited Warranty Cover?
Philips warrants to the original retail purchaser(“Consumer” or “You”) that this Philips cellularproduct and all accessories originally provided byPhilips in the sales package (“Product”) are freefrom defects in materials, design andworkmanship under normal use in accordancewith the operating instructions and pursuant tothe following terms and conditions. This limitedwarranty extends only to the Consumer forProducts purchased and used in the originalcountry of purchase. The limited warranty isvalid only in Philips’ intended country of sales ofthe product.
2. How Long is The Limited Warranty Period?
The limited warranty period for the Productextends for ONE (1) YEAR from the date ofpurchase of the Product, documented by validproof of purchase. The limited warranty fororiginal Philips rechargeable battery extends forsix (6) months from the date of purchase.
3. What Will Philips Do if The Product is Not FreeFrom Material Defects in Materials and
Period?
During the limitauthorized servoption either repparts or labour,with new or rereturn such repaConsumer in wretain defective p
Repaired or replthis limited waoriginal limited days from the whichever is loProduct, at Phremedy.
4. What is Not Cov
This limited war
a) Product thaaccident, shimproper ihandling, nother liquid

93
M card must be removed from thet before it is given to Philips. Philipss no liability for damaged or loss of card or the data contained therein.roduct failure is not covered by this warranty, or this limited warranty iscable, void or invalid due to anyand conditions stated herein, the
er will be charged for the cost ofr replacement of the Product and allelated cost incurred in repairing org the Product.
RTANT - you are required to returnduct together with a valid proof of
se which must identify the point ofse, date of purchase, Product modelduct serial number clearly.
tion: This Warranty is The Entire
FOR THE EXPRESSIES SET FORTH ABOVE ANDPLIED BY LAW AND WHICH
BE EXCLUDED OR MODIFIEDMENT, PHILIPS PROVIDES NOARRANTY WHETHER EXPRESSED (WHETHER BY STATUTE,HE OPERATION OF LAW OR
ISE) AND SPECIALLY DISCLAIMS
b) Product that has been damaged due torepair, alteration, or modification by anyonenot authorized by Philips; or
c) Product that has reception or operationproblems caused by signal conditions,network reliability or cable or antennasystems; or
d) Product defects or problems caused by useswith non-Philips products or accessories; or
e) Product which warranty/quality stickers,product serial number or electronic serialnumber has been removed, altered orrendered illegible; or
f) Product purchased, used, serviced, orshipped for repair from outside the originalcountry of purchase, or used for commercialor institutional purposes (including but notlimited to Products used for rentalpurposes); or
g) Product returned without valid proof ofpurchase or which proof of purchase hasbeen altered or is illegible.
h) Normal wear and tear or Force Majeure.
5. How Do You Get Warranty Service?
a) Return the Product to an authorized servicecenter of Philips. You may contact the localPhilips office for the location of the nearestauthorized service center.
b) The SIProducassumethe SIM
c) If the Plimitedinappliterms Consumrepair oother rreplacin
d) IMPOthe Propurchapurchaand Pro
6. Other LimitaAgreement.
EXCEPT WARRANTTHOSE IMCANNOT BY AGREEOTHER WOR IMPLIUNDER TOTHERW

ANY WARRANTY OF SATISFACTORY ADVISED OF THE POSSIBILTY OF SUCHESE LIMITATIONS SHALL
TWITHSTANDING THETHE ESSENTIAL PURPOSEED REMEDY.
rranty represents the completereement between the Consumer respect to this cellular Product
es all prior agreements betweenal or written, and all others between the parties relating toer of this limited warranty. Noagent, dealer, employee, thereof, Philips is authorized to make this limited warranty and youn any such representation.
arranty does not affect thetutory rights under applicableforce.
94
QUALITY MERCHANTABILITY ORFITNESS FOR A PARTICULAR PURPOSE.PHILIPS’ TOTAL LIABILITY FORDAMAGES RELATING TO OR ARISINGOUT OF THE PURCHASE OR USE OF THEPRODUCT, REGARDLESS OF THE TYPEOR CAUSE OF SUCH DAMAGE OR THEFORM OR CHARACTERISATION OF THECLAIM ASSERTED (E.G. CONTRACT ORTOPIT), SHALL NOT EXCEED THEORIGINAL PURCHASE PRICE PAID FORTHE PRODUCT.
HOWEVER IN NO EVENT SHALL PHILIPSBE LIABLE FOR ANY PUNITIVE, SPECIAL,INCIDENTAL, INDIRECT ORCONSEQUENTIAL DAMAGES (INCLUDINGBUT NOT LIMITED TO THE LOSS OFUSE, LOSS OF TIME, INCONVENIENCE,COMMERIAL LOSS, LOST PROFITS, LOSTBUSINESS OPPORTUNITIES, COST OFSUBSTITUTION OF GOODS ORSERVICES, INVESTMENTS, DAMAGE TOGOODWILL OR REPUTATION, OR LOSSOF DATA AND CLAIMS BY THIRDPARTIES) RESULTING FROM PURCHASEOR USE OF THE PRODUCT, TO THEFULLEST EXTENT ALLOWED BY LAW,WHETHER OR NOT PHILIPS HAS BEEN
DAMAGES. THAPPLY NOFAILURE OF OF ANY LIMIT
This limited waand exclusive agand Philips withand it supercedthe parties, orcommunicationthe subject mattcarrier, retailer, or employee ofmodifications toshould not rely o
This limited wConsumer’s stanational laws in

Declaration of conformity
We, Philips Electronics Hong Kong Ltd Business Group Mobile Phone5/F, Philips Electronics Building 5 Science Park AvenueShatin New Territories Hong Kong
declare under our sole responsibility that the productCT5988Cellular Mobile Radio GSM 900/1800/1900TAC number: 35255601
to which this declaration relates, is in conformity withthe following Standards:
Safety: ETSI EN 60950-1:2001, EMC: ETSI EN 301-489-1 V1.6.1; ETSI EN 301489-7 V1.3.1; ETSI EN 301 489-17 V1.2.1Radio: ETSI EN 301 511 V9.0.2; ETSI EN 300 328 V1.6.1;Health: EN 50360:2001; EN 50361:2001; IEC 62209-1:2005
We hereby declare that all essential radio test suiteshave been carried out and that the above namedproduct is in conformity to all the essentialrequirements of Directive 1999/5/EC.The conformity assessment procedure referred to inArticle 10 and detailed in Annex V of Directive 1999/5/EC has been followed related to articles 3.1 and 3.2with the involvement of the following Notified Body:BABT, Claremont House, 34 Molesey Road, Walton-on-Thames, Surrey, KT12 4RQ, UK.Identification mark: 0168
Nov 14th, 2006
Quality Manager