diy guitar and bass kit instruction manual bull...diy guitar and bass kit ... a wood block with fret...
TRANSCRIPT

DIY Guitar and Bass Kit Instruction Manual
Thank you for purchasing a guitar or bass kit from Pit Bull Guitars and welcome
to your new hobby.
Please take the time to read this Instruction Manual, which will give you
enough information, tips and tricks to ensure you enjoy the build process and
get the absolute best from your Pit Bull Guitars kit.
Please note: this Instruction Manual is a live document and will be updated as more processes are added and
processes are updated to reflect the best methods and techniques.
If you find any errors, or questionable content, please post your feedback on this Forum thread:
http://www.buildyourownguitar.com.au/forum/showthread.php?t=8027
Acknowledgements Many thanks to Forum member Dedman, for taking on the huge task of collating, compiling and writing this Instruction Manual. Huge thanks also to all our Community Forum members who contributed to this collaborative project.

DIY Guitar and Bass Kit Instruction Manual
2
Contents Introduction ............................................................................................................................................ 3
My Build Diary ......................................................................................................................................... 3
Before you Start ...................................................................................................................................... 4
Now, before we go any further, some advice: ....................................................................................... 5
What tools do I need? ............................................................................................................................. 5
Nice tools to have, but not essential: ..................................................................................................... 6
Really nice tools to have: ........................................................................................................................ 6
Building Your Pit Bull Guitars Kit ............................................................................................................. 7
“Mock Build” and Fitting the Bridge and Neck .................................................................................. 7
Test fit the parts ................................................................................................................................. 7
Fitting the Neck .................................................................................................................................. 7
Checking the Scale Length ................................................................................................................. 8
Fitting the Bridge/Tailpiece ............................................................................................................... 9
Test fitting the Neck ......................................................................................................................... 11
Checking neck alignment ................................................................................................................. 11
Preparing the neck ........................................................................................................................... 12
Painting or Staining. ......................................................................................................................... 17
Preparation for finish ....................................................................................................................... 17
Painting ............................................................................................................................................ 20
Staining ............................................................................................................................................ 21
Polishing ........................................................................................................................................... 23
Wiring and final Assembly ............................................................................................................... 23
Shielding ........................................................................................................................................... 23
Wiring ............................................................................................................................................... 24
Final Assembly ................................................................................................................................. 27
Mounting pickups and pick guards .................................................................................................. 28
Installing the Bridge ......................................................................................................................... 28
Installing the Tuners ........................................................................................................................ 29
Attaching the neck ........................................................................................................................... 30
Final Assembly, Tuning and Intonation ............................................................................................ 30
Fitting the strings ............................................................................................................................. 30
Tuning and setting the intonation. .................................................................................................. 30

DIY Guitar and Bass Kit Instruction Manual
3
Introduction Pit Bull Guitars offers such a wide range of kits; often with multiple options, that we are
unable to cover each and every model (and option) in “step-by-step” detail in one Manual.
So, this Manual focusses on the general DIY Kit building processes which are common to
most of our kits.
If you have specific issues during your build, we strongly urge you to join our Community
Forum.
Please note: All general build support is provided by the Community Forum, we are unable
to provide email or phone support for your build. This does not include warranty issues.
My Build Diary The very first thing you should do, as soon as you receive your kit (or even before), is to start
your build diary in the My Build Diary forum and post your build progress.
Simply register on our Community Forum and got to the My Build Diary Forum. Then simply
click on , give your Build a Title and post any questions you have.
Almost any build issue or modification will have been dealt with before by our experienced
Forum members.
Also, reading other members’ Build Diaries offers a gold mine of information, advice and
ideas for your own build.
Got a question, just ask!
Register on the Forum here: http://www.buildyourownguitar.com.au/forum/
And introduce yourself here:
http://www.buildyourownguitar.com.au/forum/forumdisplay.php?f=51

DIY Guitar and Bass Kit Instruction Manual
4
Before you Start First thing to know, these guitar kits are not “Ikea Guitars” that you simply paint and
assemble; they are the raw product from the same factory that produces guitars for some of
the world’s best-known brands. It is up to YOU to get the absolute best out of the kit you
have received.
Yes, there may be the odd scratch or dent, or glue spot to deal with, but these should just
sand out. You may even find small cracks or other imperfections, which can be filled with no
effect on the guitar’s tone. Any large cracks, especially at joins, should be reported
immediately, so we can replace or refund your kit.
OK, so the Postman has just left me a big box of bits… what do I do now?
Firstly, make sure everything is there. Our factory is very good at ensuring everything is
included in your kit, down to the very last screws, but it always pays to check.
If you think you are missing something, please double(triple)-check before contacting us.
Make sure small parts aren’t caught up in the paper or foam packaging material… make
sure you check all the filler materials before recycling.
Lay out the parts and ensure everything is there and nothing is broken.
Photo by Dedman
Check that all parts are present. A good way to do this is to put all the parts loosely on the
body and neck.
If you are not sure what a part is for, no problem. Take a quick photo of the part and post it
on the General Support Forum.

DIY Guitar and Bass Kit Instruction Manual
5
Now, before we go any further, some advice:
1. Work safe! Sharp tools, dust, glue and paints all have their own risks. Please read
the precautions on the packaging and be aware of your surroundings (heat, water,
electricity).
2. Measure twice, cut once. Make sure you mark, then measure again before cutting or
drilling anything.
3. If you aren't sure about something...STOP. Get advice from the Forum. Posting
pictures of your issue will make it much easier for members to give advice.
4. “Sand, sand, and sand again. Then, when you think you have sanded enough, sand
it some more.” – our Resident Luthier’s motto. Note: If your kit has a veneered top;
such as Spalted, Flame, or Quilted Maple, do not sand the veneer. The veneer is
less than a millimetre thick and is incredibly easy to sand through it.
5. Don't rush! Mistakes usually occur when we aren't concentrating, the more time you
put in the better the end result will be.
6. Always lubricate screws before putting them in. Have a block of bees wax or soap on
the bench and just wipe the thread of the screw along the edge of the block. This will
make the screw easier to drive in and will stop it binding and being difficult to remove
in the future.
7. Use quality screwdrivers, the $2 bargain ones will wreck the heads of your screws
making them ugly and hard to remove.
8. Use a drill size slightly smaller than the screw. If you hold the drill over the shaft of
the screw you should still be able to see the threads on both sides.
9. Work clean. If you get glue or paint on your hands, stop work. Clean them. There is
nothing worse than turning your master piece over and finding finger prints on the
back.
10. Enjoy yourself. If you are getting frustrated or tired, stop work, come back to it later.
What tools do I need? You will need the following tools:
• File or fine rasp
• Sandpaper (180 grit to 2000 grit)
• Steel wool (0000 grade)
• Coping saw (only if your kits head stock came unshaped)
• Electric Drill
• Drill bits, 1mm, 1.5mm, 2mm, and 3mm
• G Clamps
• Pit Bull Guitars Wood glue (for set neck kits)
• Screw drivers, both Phillips (sizes small 0 med 1 and large 2) and flat head
• Long straightedge (600mm rule) and tape measure
• Soldering iron
• Electronic solder (there is some included with your kit)
• Clean rags
• Pencil
• Eye protection
DIY Guitar and Bass Kit Instruction Manual
6
• Wire cutters
• Guitar Tuner
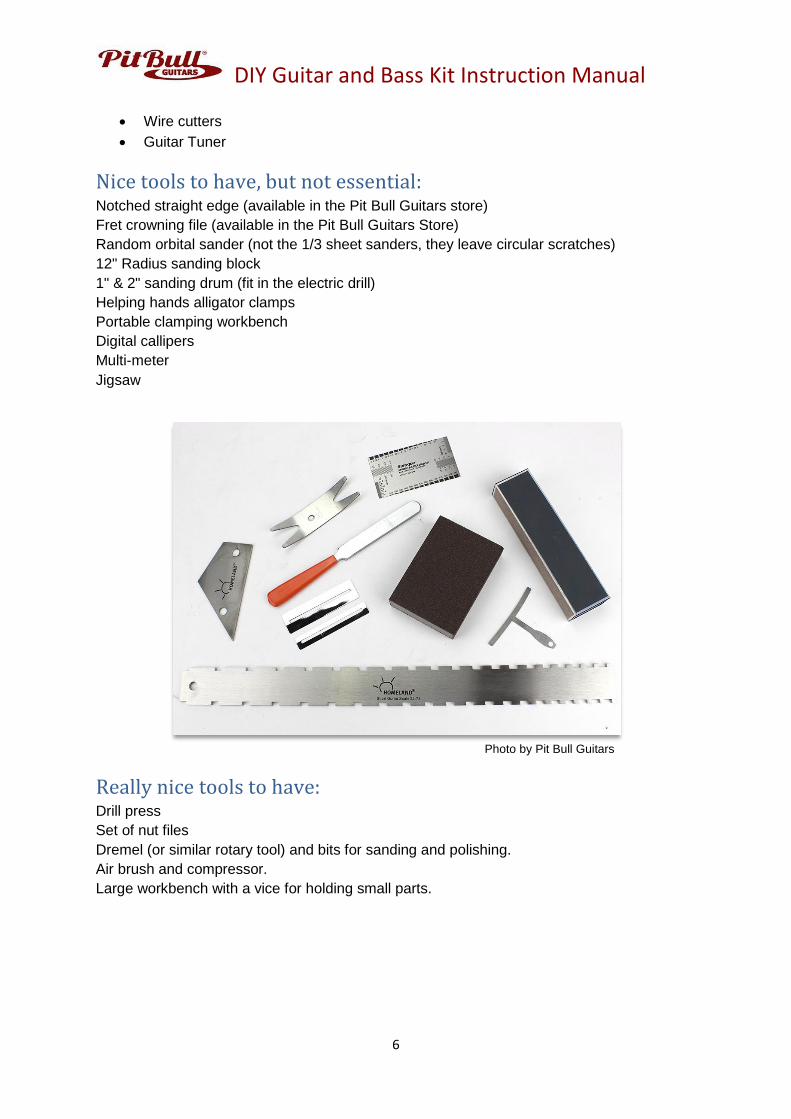
Nice tools to have, but not essential: Notched straight edge (available in the Pit Bull Guitars store)
Fret crowning file (available in the Pit Bull Guitars Store)
Random orbital sander (not the 1/3 sheet sanders, they leave circular scratches)
12" Radius sanding block
1" & 2" sanding drum (fit in the electric drill)
Helping hands alligator clamps
Portable clamping workbench
Digital callipers
Multi-meter
Jigsaw
Photo by Pit Bull Guitars
Really nice tools to have: Drill press
Set of nut files
Dremel (or similar rotary tool) and bits for sanding and polishing.
Air brush and compressor.
Large workbench with a vice for holding small parts.

DIY Guitar and Bass Kit Instruction Manual
7
Building Your Pit Bull Guitars Kit
“Mock Build” and Fitting the Bridge and Neck
Test fit the parts Now that we know we have everything, we can do a “Mock build”; also known as Dry Build
or Test Fit.
This is an important step, as it is now that we check that everything fits as it's supposed to.
Now is also the time to make any adjustments for upgrades you have planned; such as
different tuners, bridges or pickups.
It is far easier to make any adjustments or modifications before applying any finish.
• Fit the tuners, finger tight (no need to drill the fixing screw holes just yet).
• Test fit the pickups (again no need to drill the holes just yet, just make sure they fit in
the cavity).
• Place the pick guard in position and check for fit. Have a look at some of the finished
guitars on our Forum if you are not sure how the pickguard should be placed.
• If you are using aftermarket switches and volume/tone pots, you will probably find the
holes are too small. The best tool to enlarge the holes is a reamer. If you don't have
one you can use an electric drill going in reverse at slow speed. This will help avoid
any tear out. Alternatively, you could use a round file, or sandpaper wrapped around
a thin rod.
Doing all the fitting and measuring now, before any finish is applied, is far easier and avoids
any slips or scuffs ruining your work. So, basically, we loosely assemble the guitar, then take
it apart again before applying our paint or stain.
Fitting the Neck
Gently seat the neck heel in the pocket.
Hopefully you have a nice tight fit in place, and maybe you even need to do some sanding to
get the neck in place. Sand the neck pocket rather than the neck heel, using a sanding
block to keep things straight. Don't sand the floor of the neck pocket or the heel of the neck,
there is a "break angle" incorporated into the routing that we don't want to modify as it sets
the string angle over the fret board.
Lightly clamp the neck in place being sure to put some padding (cardboard or soft foam), or
a wood block with fret grooves cut, between the clamps jaws and the frets and the underside
of the neck pocket. See following image:

DIY Guitar and Bass Kit Instruction Manual
8
Photo by Kick
Neck clamped with wooden block, with grooves cut top protect the frets.
Checking the Scale Length
Now comes some important measuring. Find the scale length for your instrument. Most Pit
Bull Guitars 6 string guitar kits are either 25.5 inches (648mm) or 24.75 inches (628mm) and
most bass kits are 34 inches (864 mm). It should say in the Product Description what scale
length your kit is. If in doubt, please ask the Forum.
If you measure from the inside (face) of the nut to the top of the 12th fret, then double that
measurement, you will have the scale length of your neck.
The bridge needs to be situated so the saddles are at a position that allows them to be
adjusted for setting the intonation later, so set the saddles to the middle of their adjustment
and check that it is approximately at the end of your scale length.
Protip: you will hear a lot of guitarists say, “the distance from the inside of the nut to
the 12th fret should be the same as the 12th fret to bridge saddle distance”.
It’s not quite that simple. You will see that on all guitars (electric and acoustic) that
the bridge is on an angle. The reason for this is that the thicker strings (EAD), require
more distance (from the 12th fret to the bridge saddles than the thinner strings (GBE).
This compensates for the vibration characteristics of the thicker strings. See image
below:

DIY Guitar and Bass Kit Instruction Manual
9
Now might be a good time to sit back and watch our video on scale length, featuring Gavin
Bramley for Bramley Guitars. Check it out here:
https://www.youtube.com/watch?v=YJTQLLnscgg&t=7s
Fitting the Bridge/Tailpiece
Fitting the bridge/tailpiece/tremolo will depend on which kit you have.
Tune-O-Matic® style:
Don't press in the threaded inserts yet. Instead
wrap either multiple layers of masking tape or
some plastic tubing around the posts and push
them into the post holes in the body. We aren't
going for a precision fit, just something to hold
them in place while we do some measuring.
Trapeze style bridges:
Measure the guitar body width at various points
and mark the centre line with a soft pencil. Do this
on both sides, which will give you a centre line.
Mark it onto the edge (side) of the body by joining
the first two lines. Now, take the small plate part
of the trapeze tailpiece and mark where it will go
(the centre hole will be on the line). Mark all 3
holes and then drill with a 2mm drill. Attach the
2nd part of the trapeze tailpiece and lightly screw
the 3 screws in.
If your guitar has the fixed style bridge (with the
saddles), wrap some tape or rubber tube around
the posts and slip them gently into the holes, don't
install the threaded bushings into the body yet.
Bigsby® Style tremolo:
The same process applies for the Bigsby® style tremlo,
mark a centre line in the body and on the string bar of the
tremlo, line them up, drill and lightly screw in place. The
bridge itself can be held in place as per the Tune-o-matic®
style.

DIY Guitar and Bass Kit Instruction Manual
10
Floyd Rose® (Genuine or Licensed) Tremolo:
The Floyd Rose® tremolo balances on 2 posts; the holes for
which are pre-drilled. For the point of this exercise (preparing to fit
the neck) it can simply sit in place in its cavity with a steel rule
under the back to hold it up.
Strat® style tremolo:
Much like the Floyd Rose® except it has 6 fixing
screws across the front. At this stage, we don't
need to drill them.
Telecaster® style bridge:
Mark a centreline on the body and on the bridge and line them up. Make sure the saddles are in the middle of their movement range. The bridge is held in place by the screws at the back of the bridge, mark the positions when you have the centre of the saddles at the end of your scale length. If you are using an aftermarket bridge pickup and possibly even the factory one you may find that the cavity is too far back and needs to be opened up
for it to fit. If you have a router, it's a small job to open the cavity up a bit. If you don't (like most of us), a sanding drum on a rotary (dremel) tool or cordless drill will also do the job... so will good old sand paper and elbow grease. (aren't power tools wonderful?) Bass bridges: Most bass bridges can use the Telecaster® instructions or the Tune-o-matic® top instructions.

DIY Guitar and Bass Kit Instruction Manual
11
Test fitting the Neck
With the neck lightly clamped in place and the tuners for both E strings in place, install those
2 E strings (the thickest and thinnest). No need to tune them yet, just put enough tension on
them to be tight.
Now check that the strings are running parallel to the neck with equal space between the
sting and the edge of the fretboard, as in the following images.
Photo by Dedman
*note this clamp has soft jaws in place, if yours doesn't have them use a piece of cardboard, soft foam or wood
(with fret grooves cut) to protect the frets and neck.
Photo by Marcel
Set (Glued) Neck clamped by the extended heel.
Checking neck alignment If things don't line up, check you have the neck heel properly seated in the pocket. Some
kits may have a bit of “wiggle room” in the pocket, so try moving the neck until you have the
strings correct aligned along the fretboard. In some cases, you may even need to do some
very careful sanding on the neck pocket until the string do correctly align.

DIY Guitar and Bass Kit Instruction Manual
12
Also, while you are here, check the break angle of the neck… the strings should clear the
frets but not by much. Remember, the bridge when installed properly will have string height
adjustment.
If your kit has a bolt on neck, you can take a suitable size drill, check how deep the holes
need to be (you don't want to be drill through the fret board). Don’t forget to account for the
neck plate thickness.
Put some tape around the drill bit as a depth marker and drill the neck mounting holes.
Don't install the neck yet, we have work to do on it yet!
If your kit has a set (glued in) neck, you need to decide whether you glue the neck in now or
after sanding and finishing.
It is much easier to work on the guitar while it's in 2 pieces. However, if you want a
seamless join between neck and body, it's better to glue it before final finishing.
You can, of course, fit it sometime in between. Much will depend on the type of finish you
decide on (ie, stain versus solid colour).
Preparing the neck Depending on which kit you have, you may need to shape the headstock. Many of our kits
come with a “Paddle” headstock. This means the factory has left you a blank canvas to
shape your own headstock.
6 Inline “Paddle” Headstock 3-a-side “Paddle” Headstock

DIY Guitar and Bass Kit Instruction Manual
13
If you have a “Paddle” headstock, then the design is entirely up to you.
You can design something completely original or use a Brand design; like a Fender or
Gibson style headstock1.
A quick Google search will come up with plenty of PDF files you can print out and use as a
template if you want a Brand shape.
If you design your own, please remember the strings exert a lot of force on the headstock
(especially basses), so leave plenty of wood around the tuner holes.
Once you have decided on a design, make a card board template and trace it onto your
headstock and cut it out. A jigsaw works well, as does a coping saw. Don't try to cut right on
the line, leave some space then file and sand back to the line making sure to keep the edges
parallel.
Photo by Dedman
Use a stiff cardboard template to trace your design
Photo by Pit Bull Guitars
Cutting with a jigsaw
1 It is legal for you to shape your headstock in the style of Brand name guitars, for your own personal use. However, it is illegal if you put that Brand’s logo on the headstock and attempt to sell the guitar as a genuine Brand guitar.

DIY Guitar and Bass Kit Instruction Manual
14
Check out our YouTube Video for shaping the headstock here:
https://www.youtube.com/watch?v=YPNvCnhUiYY
Next step. We need to check if the neck has any bow in it. A notched straight edge is the
quickest easiest way to do this.
If the neck has a concave bow, then turning the truss rod nut to the right (clockwise) tightens
the rod and straightens the neck out (and if it is continued to be turned, will finally introduce a
convex bow).
If your neck has a convex bow, then turning the truss rod nut to the left (anti-clockwise) will
reduce the amount of bow, then hopefully straighten the neck and then introduce a concave
bow.
Protip: your kit should arrive with a slight convex bow. If this is the case, there is no
need to adjust the truss rod now; as when you attach the neck and install and tension
the strings, this convex bow should flatten perfectly.
Minor adjustments can be made once the strings are installed and tensioned.

DIY Guitar and Bass Kit Instruction Manual
15
Using a Notched straight edge
Photo by Dedman
Photo by Dedman
Don't be too critical on the neck bow just yet, as the string tension will change the curve
once it's all set up.
For the next step, we need either a 12” radius sanding block or a large straight edge. A
builder’s level, about 600mm (2ft), is also ideal.
Mask up the fret board with tape, leaving the frets visible.
Use a felt pen or Sharpie® to draw a line on the top of each fret, then, with some fine (400)
wet and dry sandpaper wrapped tightly around your straight edge make a few passes over
the frets. Any high frets will immediately lose their marking.

DIY Guitar and Bass Kit Instruction Manual
16
Photo by Dedman
marking frets with marker pen
Photo by Dedman
light sanding shows the high spots
Check that the fret is properly seated. If it is clearly sitting a little high (proud), it can be
given a few taps with a plastic hammer or a small block of wood on the fret. Usually, a few
more passes with the sandpaper and straight edge will see all the frets shiny and the marker
gone.
Of course, now we have flattened the tops and need to recrown the frets.
You can purchase a Fret Crowning File from our Shop, here, or crowning frets can be done
with patience and a small triangular file.
Pay extra attention the ends of the frets. You can then finish polishing the frets with 000 steel
wool or 2000 wet and dry paper. Do keep plenty of layers of masking tape over the fret
board during the process, so any slips don't end up as a gouged fretboard.
If you don’t want to use masking tape, fretboard protectors and fret files are available from
the Pitbull store, here.

DIY Guitar and Bass Kit Instruction Manual
17
Take your time and be patient. Time spent here will make the world of difference to how
your instrument plays.
The final finish on the fret board will depend on what timber it is. Rosewood and Ebony are
usually left bare and given a coat of lemon oil or Dingotone Guitar Wax.
Maple boards can be given a clear coating of Dingotone (neck kit) or Tru Oil to seal them.
For fretless basses, a couple of coats of super thin CA glue (supa glue), sanded with very
fine paper between coats will provide a hard smooth surface.
Painting or Staining.
Preparation for finish
Now we must decide on how our finished guitar is going to look. Basically, there are 2
choices, a solid painted colour or a stain, with either clear coats or some form of oiled finish
over the top. Either will require a good foundation to give the best result, and that foundation
is... sanding.
Don't skimp on cheap sand paper, it's false economy as you will get much more use from
good quality product as well as a better job.
If your kit has a veneered top such as Spalted, Flame, or Quilted Maple, DO NOT
SAND THE TOP! The veneer is less than a millimetre thick and it is incredibly easy to sand
through it.
If your kit has binding, it is best to mask it up with masking tape as deep sandpaper
scratches will draw in stains or paints later and be difficult to clean up.
Sandpaper grades given here are ISO/FEPA, as used in Australia and Europe. USA grades
differ, Wikipedia has a conversion chart.
On solid body guitars start with 120p or 180p grit to remove the worst machining marks
(basswood is soft and 180 is a good place to start).
Always sand with the grain of the timber and use a sanding block to keep the paper flat on
the surface.
You can use a random orbital sander at this stage. These are usually the circular pad type.
Avoid the 1/3rd sheet rectangular sanders as they tend to leave circular scratches in the
surface that require even more sanding to get out.

DIY Guitar and Bass Kit Instruction Manual
18
Always sand in the direction of the grain.
Photo by Dedman
Sand in the direction of the grain
The edges and cutaways usually require the most sanding. Various diameter cardboard
tubing or even aerosol cans are great for using as sanding blocks in cutaways. Do the edges
by hand to get a nice rounded feel.
After the initial sanding it's time to check for glue marks or cracks. Small cracks or dents can
be filled with a wood filler matching your final finish.
Glue spots (glue from the factory, usually in “spots”, left on the body or neck) are only a
concern if you are staining rather than using a solid colour. The best way to check for glue
marks left by the factory is to run over the body and neck with a damp rag (damp, not wet)
glue will show up as whitish marks.
You especially need to check for glue spots on veneered tops and kits with binding, stains
will not soak into or adhere to glue.
On the back and sides of a solid body, glue spots can usually be sanded out and filler
applied, if necessary.
On veneers the best method found so far seems to be a product called "Goof Off". Applied to
the glue spots and rubbed until the glue is dissolved. Using a very small soft wire brush
(tooth brush size) will also help, but be very, very careful on those thin veneers.
Don't sand beyond 220 grit, as we need the surfaces to have some "tooth" for the finishes to
stick to and sanding too fine will polish the wood and stop stains from penetrating evenly.

DIY Guitar and Bass Kit Instruction Manual
19
Holding the body for finishing
Photo by Dedman
Photo by Dedman
A handy way of holding a body for painting or staining is a piece of timber attached in place
of the neck. (notice the tooth picks used to block screw holes)

DIY Guitar and Bass Kit Instruction Manual
20
Photo by Dedman
or a dowel in the output jack hole.
Mask any binding with masking tape (the plastic pin striping tape curves nicely and forms a
better seal on the edges). For hollow body guitars, stuff the body with crumpled paper to
avoid drops landing inside the F holes.
Also mask the neck cavity and heel on set (glue in) neck kits, as any paint or stain will
prevent glue from penetrating. Advanced painting, such as bursts and paint effects, will be
covered in future Forum tutorials.
Check out our Sanding video here:
https://www.youtube.com/watch?v=NE40TZ38nmU
Painting
Painting is probably the easiest finish to do, but getting that glassy, mirror-like finish you see
on Factory guitars. It is a skill that can take years to master… ask any Auto Repairer.
For painting, you can choose from enamels, auto acrylic or special nitrocellulose guitar
finishes; either in aerosols or requiring a compressor and spray gun.
One thing they all have in common is that the top coat will only be as good as the ones
under it. You can get a good finish with a brush if you are prepared to do the prep work and
sanding. We strongly recommend you buy the best brush available and keep it clean.
A sanding/grain filler or a diluted slurry of filler like "Timbermate" will fill the grain of the
timber leaving a smooth base for your paints. Apply, then sand to 320 grit.
DIY Guitar and Bass Kit Instruction Manual
21
Start with the recommended primer for the paint you are using.
Spray cans that say they don't need primer are generally made for use on steel, ask the
retailer for suitable primer for wood.
Put on a thin coat of primer and allow it to dry for at least 24 hours. Then, sand it back with
320 grit sandpaper. Yup, you sanded through the primer, back to bare wood on the edges
and some other spots. That is good!
Now, apply another coat of primer, doing the edges first, paint the body, then give the edges
another coat. Allow to dry for another 24 hours, sand and repeat, then again and sand with
400 grit paper.
You should be able to sand it silky smooth now with no high spots and no grain showing.
Allow to dry for several days, preferably a week before applying top coats.
Top coats are a repeat of the priming process. The first coat mostly gets sanded off quickly
showing any low or high spots you had missed. 4 to 6 coats with sanding between coats is
generally enough.
Finally we get to apply the clear coats. This isn't necessary on solid colours but does add
that glassy depth to the finish. Apply at least 4 coats as the clear coats will get sanded quite
a lot to get that glassy finish. Move up to 600 grit paper between coats and allow to dry for at
least a week. Try the sniff test, if it still smells like fresh paint, it isn't ready for polishing.
It is VERY important to use compatible primer, top and clear coats. Mixing acrylics and
enamels will cause chemical reactions leading to bubbling, head banging on the work bench
and ....more sanding.
Check out our Spray painting videos here: Part 1 https://www.youtube.com/watch?v=IlJs-JCKRKE
Part 2
https://www.youtube.com/watch?v=yEoqbB5E8vg
Staining
If you want to bring out the best of a nice grain pattern on your body; like any Pit Bull Guitars
kit with a veneered top; staining is the way to go.
There are countless brands and types of timber stains on the market. Just like with painting
make sure that your final clear coats are compatible with the type of stain you choose.
Pit Bull Guitars sells and recommends Dingotone finishes.
Made right here in Australia from 100% natural ingredients, this finish is both safe to use and
even has a pleasant citrus smell... something to consider if you are building your kit in an
apartment.

DIY Guitar and Bass Kit Instruction Manual
22
Dingotone is available in a wide range of colours and comes with a comprehensive set of
instructions. There is even a sub-forum just for Dingotone questions, tips and tricks.
Check out our Dingotone Application videos here:
Part 1
https://www.youtube.com/watch?v=KSfFbCbYxBk
Part 2
https://www.youtube.com/watch?v=RIieP-qpRrA
There are many alternatives to hardware store stains; like timber dyes, fountain pen inks,
even homemade mad scientist mixtures of tea, coffee and other strange substances can be
used if you are confident of what you are doing. Beginners are best to stick with commercial
products.
Regardless of which type of stain, follow the manufacturer's directions for applying it.
Clear coats will depend on what stain you have used. Again, follow manufacturer's
directions. How many coats to apply will depend on the final finish you want. If you want the
grain texture to show and the clear to simply seal the timber, then 4 thin coats will usually do
the job. If you want a glassy finish, be prepared to do many, many more coats, with sanding
in between.
For example, the double cut body with spalted maple top, used in some photos in this
manual received 30 thin coats of Tru-Oil wiped on, with sanding after every 10 coats. (the
actual veneer top was never sanded, the layers of Tru-Oil filled and levelled the surface)
Patience has its rewards!.
Photo by Dedman
30 coats of Tru-Oil

DIY Guitar and Bass Kit Instruction Manual
23
Polishing
If you thought sanding was fun, wait till you try polishing!
Now that we have our guitar stained or painted and our final top coats on, it's time to make it
shine.
Start wet sanding at about 1000 grit wet and dry paper, then work up to 1200 then 2000. If
your local hardware store doesn't carry these finer grades; an auto accessory store will have
them.
You don't need to rub too hard, even these fine papers can bite right through the surface if
you aren't careful, especially on the edges. If you see colour on your paper, stop! Put some
more clear coats on!
It's a good idea to fill any screw holes for pick guards or pick up rings with toothpicks while
wet sanding, this prevents water from getting under the edge of the paint and swelling the
timber.
The ideal result of your sanding will be that the surface looks completely flat, but slightly
matte finish when dry, and super glossy when wet. You could keep sanding with micro mesh
pads all the way up to 10000 grit, this is up to you and the availability of said pads in your
area.
Next up we use a good quality cutting compound available from auto accessory stores. Give
the whole body, back of the neck and the headstock a good hard polish with the cutting
compound, you should notice a nice gloss developing.
Finish off with a high-quality auto polish, sit back and watch your reflection. Have cup or
glass of your favourite beverage and congratulate yourself on a job well done.
Wiring and final Assembly.
Shielding Before we begin wiring our guitar, we first need to shield the pickup and switch cavities. This
prevents electrical noise from fluorescent lights and other electrical equipment causing
humming that gets picked up and amplified by the guitar. There are special shielding paints,
but we recommend using copper shielding tape (available here). It is easy to install and less
messy.
Simply cut strips to size, peel the backing paper off and stick to the insides of your pickup
and switch cavities. Be sure to do the back of loaded pickguard models (like the ST kits) and
the back of switch cover plates on other styles. Leave a slight over hang on the cavity tape
so that it contacts the copper on the cover. A drop of solder between strips will ensure a
complete earthed circuit.

DIY Guitar and Bass Kit Instruction Manual
24
Photo by Dedman
Photo by Dedman
Sheilded switch cavity and pickup cavities
Wiring
Possibly the most intimidating part of construction for many kit builders is the wiring.
The wiring is really not that dificult if you take your time and have the right tools. On some
kits (like the ST, TL, JM, JB and PB models), most of the wiring is done for you at the
factory, just leaving you to solder the pick up connections, bridge earth and output jack
connections. Other models, where you need to do all the wiring, are more involved.
Wiring diagrams are available on the PitBull website here :
http://www.pitbullguitars.com/wiring-diagrams/
If you have never soldered before, don’t panic, it is really not that had… and is really a lot of
fun.

DIY Guitar and Bass Kit Instruction Manual
25
Check out our Intro to Soldering video here:
https://www.youtube.com/watch?v=ievAbBV0Alc
Individual kit model soldering videos are available here:
https://www.youtube.com/user/PitBullGuitars/videos
Wiring on S type and Floyd style bridges
https://www.youtube.com/watch?v=XUL7T21mJxk
If we don’t have a video on wiring your kit, please ask on on our Forum, or have a search
online, as there are many great wiring videos on the web.
Please note: the factory does change the wiring colours without notice at times, so if the
wiring you have doesn't match the diagrams, please ask on the forums and someone will be
able to advise you. Note that wiring diagrams are drawn looking at the back of the pots.
On kits that don't have a pickguard or control panel that the pots and switches attach to, it's
a good idea to make a cardboard copy of your control layout and do your wiring there first.
Then you can simply take the whole wiring “loom” and place it into your guitar after you are
confident the wiring is done correctly and the wires are the right length.
With humbucker pickups; note the thickness of the fitted mounting rings. The thicker one
goes at the bridge, the thinner one at the neck. the neck pick up will also have longer wires,
as it has longer to travel to get to the controls.
A few useful tips:
Lead free solder is easier to work with.
Tin your wires before soldering. Tinning is simply melting a small amount of solder onto the
wire before trying to solder it to a connector. This will hold all the strands of the wire together
(avoiding a stray strand shorting your circuit) as well as melting quicker on the contact.
Sand the back of pots before soldering earth wires to it. A quick rub with some 400 or
coarser dry paper will remove any grease from the manufacturing process and provide some
"tooth" for solder to stick to on the back of pots.
Photo by Dedman
A quick rub with fine paper to remove grease and create a "tooth" for solder to stick to.

DIY Guitar and Bass Kit Instruction Manual
26
Photo by Dedman
As a rule…
Pots marked A are for Volume, Pots marked B are for Tone. Usually 250K pots are used
with single coil pickups, 500k with Humbuckers.
Capacitors: .022 caps are used with single coil pickups and .047 with Humbuckers.
On hollow body guitars getting your pots inside the body and through their holes is difficult.
One solution is to build the loom on a sheet of cardboard then use aquarium tubing fed in
through the holes to pull the pots through the body ( after feeding the loom in through the F-
holes). String can also be used but the tubing has less chance of slipping off.
Photo by Gavin Bramley
Using aquarium tubing to manoeuvre pots in hollow body kits

DIY Guitar and Bass Kit Instruction Manual
27
The most common mistake made in wiring up guitars is getting the jack socket wired
backwards. The "hot" wire goes to the tip, the earth to the centre ring. If you look carefully on
the sides of the jack you can see the tips connector is insulated under the earth connector,
as in this image:
Photo by Dedman
Don't forget to run an earth wire to the bridge.
On stop tail bridges there will be a hole from the post hole leading to the switch cavity, on TL
styles and many Bass Kits there is a hole on the top of the guitar behind the pickup cavity
and on ST style kits, the wire will run from the tremolo cavity to the switch cavity. Hollow
body kits will require a small hole drilled behind where the tailpiece attaches to the body.
Once wired up, you can test your work by plugging the guitar in to your amp and softly
tapping the pickups with the end of a screwdriver. Try each setting on your switch. You
should be able to hear the tapping through your amp.
Final Assembly
With our guitar now wired, we can begin final assembly. Don't forget to lubricate the screws
with bees wax or soap as you go. It will make them easier to put in and get out again later.

DIY Guitar and Bass Kit Instruction Manual
28
Photo by Dedman
A little beeswax or even soap will make the screws easier to put in and take out later.
Mounting pickups and pick guards
For kits with pickups and/or switches mounted on the pick guard or on chrome panels, these
can now be attached to the body. Use a 1mm drill for the pick guard screws, remember the
screws are only short so they don't need much of a hole. Use a manual screwdriver;
cordless ones are overkill for delicate work and can easily over tighten screws or even
worse… tear the head off. The screws just need to be snug.
For kits with the pickups mounted in plastic rings, the fitting is similar. Make sure the pickups
are mounted square to the body/neck/bridge. Drill the 4 mounting holes and screw the
mounting screws in.
Fitting a scratch plate video here:
https://www.youtube.com/watch?v=nUNkloMOggY
Humbucker Pickups and Bridge install video here:
https://www.youtube.com/watch?v=Vv0tav6YBP4
Installing the Bridge For Tune-o-matic® style bridges and tail pieces, we can now gently tap the bushings into
their holes. Use a soft face hammer or a piece of soft timber between hammer and bushing
and tap gently. Don't forget to strip off a section of the earth wire we ran earlier and wrap it
around the bushing before tapping it in.
Once the bushes are in place you can screw in the bridge and tail piece.
Humbucker Pickups and Bridge install video here:
https://www.youtube.com/watch?v=Vv0tav6YBP4

DIY Guitar and Bass Kit Instruction Manual
29
For Floyd style tremolo kits, follow this video:
https://www.youtube.com/watch?v=Ty_kiI8GbOg
TL style bridges video:
https://www.youtube.com/watch?v=zJnIlMXiI4c
ST style bridge video:
https://www.youtube.com/watch?v=11hqPf3_rDY&t=42s
Installing the Tuners
Before installing the neck, install the tuners. Place them in position and loosely tighten the
collar nuts. For 6 inline tuners, hold a straight edge or metal ruler under the bodies of the
tuners to make sure they are in line as in the photo.
Then with a 1 mm drill bit, drill the mounting hole for the screws. Be VERY careful, mark the
depth on your drill bit, as it is all too easy to drill right through the headstock.
The screws do not need to be super tight, just snug, their only job is to prevent the tuner
from twisting. Once in place, you can tighten up the nut on the other side.
Photo by Dedman
Use a straight edge or metal ruler to line up tuners before drilling the holes.
Installing tuners video:
3-a-side
https://www.youtube.com/watch?v=tQ4XYxzurZ4
6 inline
https://www.youtube.com/watch?v=0d7VCoM798c

DIY Guitar and Bass Kit Instruction Manual
30
Attaching the neck As we had drilled our holes and aligned the neck earlier, it is now just a matter of installing
the screws and plate. If you have a glue in neck and have left it until now to install, allow the
glue a couple of days or even a week to dry before putting any tension on the strings.
Bolt on neck video
https://www.youtube.com/watch?v=-azQ5FMzeXA
Final Assembly, Tuning and Intonation
Well our kit is finally looking like a guitar, just a few more steps to go and it will be ready to
play!
Install the strap buttons; these just require a hole drilled and screwing in. The rear one is
generally on the centre line of the body, the front one in a position on the top horn of the
body that will offer good balance.
https://www.youtube.com/watch?v=8EhrP5O6G5U
Fitting the strings This video covers fitting strings to most models as well as fitting the string trees on 6 inline
headstock kits.
https://www.youtube.com/watch?v=LEC4RC-W6LY
Tuning and setting the intonation.
Intonation is vitally important if your guitar is going to be in tune as you move up and down
the fretboard. Your bridge saddles have built in adjustment to set this.
The video linked below will explain. For guitars with floating wooden bridges the same
applies, but you move the entire bridge in tiny increments, the bridge saddles themselves
have built in intonation (notice they aren't in a straight line).
These videos will walk you through setting string height, tuning and intonation.
Set up:
https://www.youtube.com/watch?v=ad4Xs8h6gwk
Intonation:
https://www.youtube.com/watch?v=5nZD_9SY1dI
Now all that remains is for you to enjoy your new guitar!
We hope you enjoyed the experience of building your own guitar and that it brings you years
of playing pleasure.