diy split kit instructions - voile.com · diy splitboard hardware voile.com. a. locate clip flush...
TRANSCRIPT

Voilé Split Kit Instructions
Note:Read all instructions completely before you begin. If you do not feel confident to perform any of the steps contact Voile directly at 801-973-8622 or [email protected].
Snowboard should be a wood-core board. Foam-core boards are not suitable for the touring binding.
Mark center of board
A. On the base side, mark midpoint of board along horizontal center of board with a marker. Place dots every 2-3 inches.
B. Using a flexible straight edge, align marked dots to draw a line at the exact center of the board.
C. Prepare to cut board.
D. Attach board with clamps off edge of work bench. Cutting the board is similar to cutting a piece of plywood.
Be sure to wear safety glasses, as boards are composed of wood, paint, and laminates.
Watch your fingers, and follow all safety procedures.
E. Using a carbide blade circular saw, cut board in half. Attach a shop vac to the saw to collect dust.
F. Using a flat file and sanding block, sand the exposed edge of board. File petex edge at a 45° bevel. Round off the corners of the tip and tail. Seal cut edge well with varnish, varathane, or enamel paint. Allow to dry completely before mounting binding.
Clamp board to work bench
File, sand, bevel, and seal edges
CUTTING THE SNOWBOARD
Tool ListCircular Saw with Carbide Tip BladeDrill Bits:1/8”, 3/16”, 19/64”3/4” Wood Paddle Bit82º Countersink Bit3/8” Nut Driver#3 Phillips Head ScrewdriverC-clampsTape MeasureEdge FileSanding BlockCenter PunchBall Pein HammerEpoxyVarnish, Varathane, or EnamelPaintParts List2 Tip Clips2 Tip Clip Deflector Bushings4 Tip Clip Rivets2 Tip Clip Sticker Templates4 Board Hooks8 Board Hook Screws8 Board Hook Nuts4 Board Hook Bushings1 Board Scraper1 1/8” Hex Wrench Tool2 Board Hook Templates2 Plastic Pin Guides2 Touring Brackets6 M6 Round Bottom T-nuts - Touring Bracket6 M6 x 12mm Screws - Touring Bracket6 Petex Disks2 Dual Climbing Heels2 Climbing Heel Shims2 55mm Climbing Wires
4 M6 x 16mm Screws - Climbing Heel4 M6 Round Bottom T-nuts - Climbing Heel4 Petex Disks
1 Paper Jig for Touring Bracket & Climbing Heel4 Pucks2 Puck Templates 8 M6 Round Bottom T-nuts - Pucks8 M6 x 12mm Truss-Head Screws - Pucks8 Petex Disks8 Rectangular Binding Mount T-nuts2 Annodized Slider Tracks2 Slider Pins w/ steel cable lanyard1 Instructions
2 75mm Climbing Wires
voilésplitkitdiy splitboard hardware
DIYSAW YOUR OLD BOARD KIT
DO IT YOURSELF
voile.com
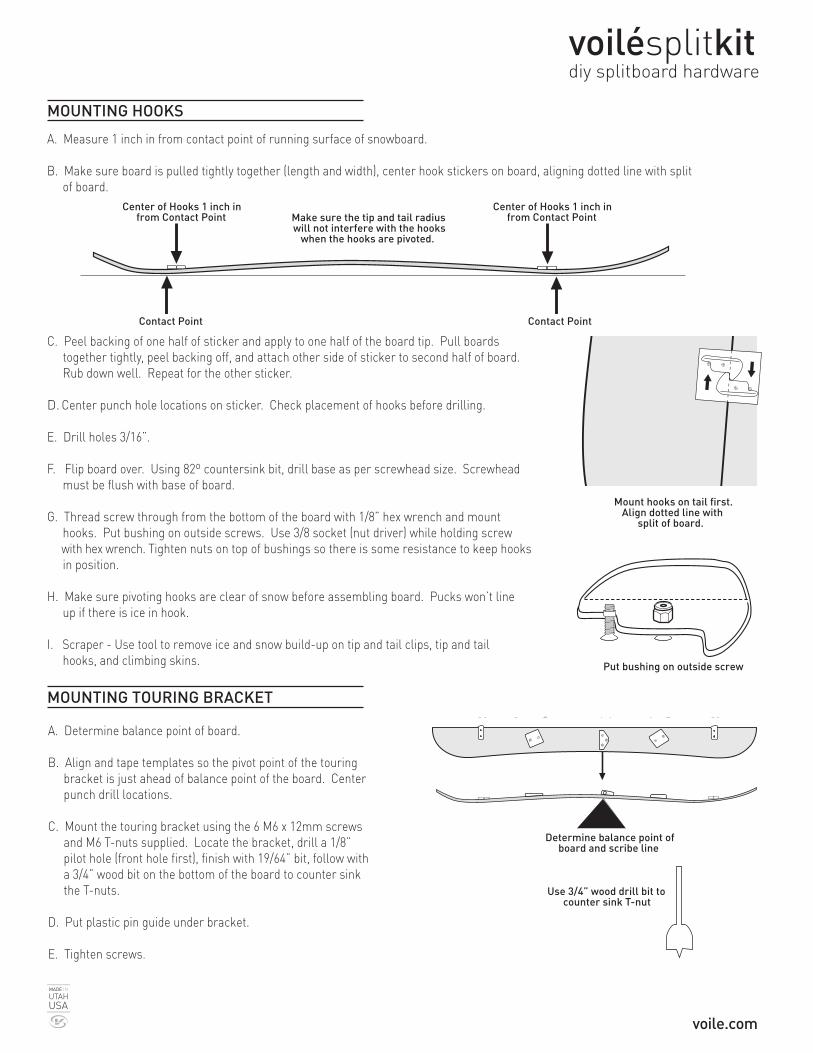
A. Measure 1 inch in from contact point of running surface of snowboard.
B. Make sure board is pulled tightly together (length and width), center hook stickers on board, aligning dotted line with split of board.
MOUNTING HOOKS
Contact Point Contact Point
Center of Hooks 1 inch in from Contact Point
Center of Hooks 1 inch in from Contact Point Make sure the tip and tail radius
will not interfere with the hooks when the hooks are pivoted.
C. Peel backing of one half of sticker and apply to one half of the board tip. Pull boards together tightly, peel backing off, and attach other side of sticker to second half of board. Rub down well. Repeat for the other sticker.
D. Center punch hole locations on sticker. Check placement of hooks before drilling.
E. Drill holes 3/16”.
F. Flip board over. Using 82º countersink bit, drill base as per screwhead size. Screwhead must be flush with base of board.
G. Thread screw through from the bottom of the board with 1/8” hex wrench and mount hooks. Put bushing on outside screws. Use 3/8 socket (nut driver) while holding screw
with hex wrench. Tighten nuts on top of bushings so there is some resistance to keep hooks in position.
H. Make sure pivoting hooks are clear of snow before assembling board. Pucks won’t line up if there is ice in hook.
I. Scraper - Use tool to remove ice and snow build-up on tip and tail clips, tip and tail hooks, and climbing skins.
Mount hooks on tail first.Align dotted line with
split of board.
Put bushing on outside screw
MOUNTING TOURING BRACKET
A. Determine balance point of board.
B. Align and tape templates so the pivot point of the touring bracket is just ahead of balance point of the board. Center punch drill locations.
C. Mount the touring bracket using the 6 M6 x 12mm screws and M6 T-nuts supplied. Locate the bracket, drill a 1/8” pilot hole (front hole first), finish with 19/64” bit, follow with a 3/4” wood bit on the bottom of the board to counter sink the T-nuts.
D. Put plastic pin guide under bracket.
E. Tighten screws.
Determine balance point of board and scribe line
Use 3/4” wood drill bit to counter sink T-nut
voilésplitkitdiy splitboard hardware
voile.com
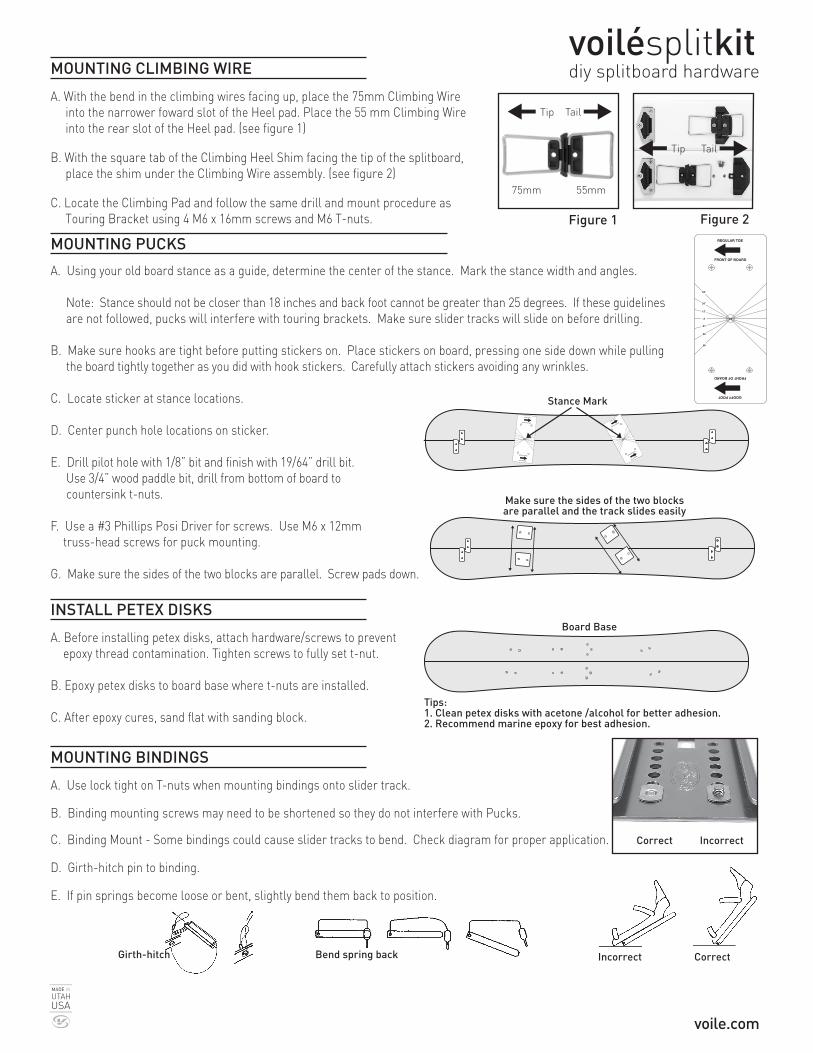
A. With the bend in the climbing wires facing up, place the 75mm Climbing Wire into the narrower foward slot of the Heel pad. Place the 55 mm Climbing Wire into the rear slot of the Heel pad. (see figure 1)
B. With the square tab of the Climbing Heel Shim facing the tip of the splitboard, place the shim under the Climbing Wire assembly. (see figure 2) C. Locate the Climbing Pad and follow the same drill and mount procedure as Touring Bracket using 4 M6 x 16mm screws and M6 T-nuts.
MOUNTING CLIMBING WIRE
A. Using your old board stance as a guide, determine the center of the stance. Mark the stance width and angles.
Note: Stance should not be closer than 18 inches and back foot cannot be greater than 25 degrees. If these guidelines are not followed, pucks will interfere with touring brackets. Make sure slider tracks will slide on before drilling.
B. Make sure hooks are tight before putting stickers on. Place stickers on board, pressing one side down while pulling the board tightly together as you did with hook stickers. Carefully attach stickers avoiding any wrinkles.
C. Locate sticker at stance locations.
D. Center punch hole locations on sticker.
E. Drill pilot hole with 1/8” bit and finish with 19/64” drill bit. Use 3/4” wood paddle bit, drill from bottom of board to
countersink t-nuts.
F. Use a #3 Phillips Posi Driver for screws. Use M6 x 12mm truss-head screws for puck mounting.
G. Make sure the sides of the two blocks are parallel. Screw pads down.
MOUNTING PUCKS
Make sure the sides of the two blocks are parallel and the track slides easily
Stance Mark
Correct Incorrect
A. Use lock tight on T-nuts when mounting bindings onto slider track.
B. Binding mounting screws may need to be shortened so they do not interfere with Pucks.
C. Binding Mount - Some bindings could cause slider tracks to bend. Check diagram for proper application.
D. Girth-hitch pin to binding.
E. If pin springs become loose or bent, slightly bend them back to position.
MOUNTING BINDINGS
Incorrect CorrectGirth-hitch Bend spring back
A. Before installing petex disks, attach hardware/screws to prevent epoxy thread contamination. Tighten screws to fully set t-nut.
B. Epoxy petex disks to board base where t-nuts are installed.
C. After epoxy cures, sand flat with sanding block.
INSTALL PETEX DISKSBoard Base
Tips: 1. Clean petex disks with acetone /alcohol for better adhesion. 2. Recommend marine epoxy for best adhesion.
Tip Tail
TailTip
75mm 55mm
Figure 1 Figure 2
voilésplitkitdiy splitboard hardware
voile.com

A. Locate Clip flush with the tip/ tail of the board.B. Position Clip mounting sticker on board and use center punch to mark drill locations on template. C. Drill the 2 mounting holes with a size 3/16” drill bit. If the Rivets are not long enought to flare over, you can counter sink the holes on the base side of the board. Drill the smaller hole for the plastic Clip Deflector Bushing locating pin using a size 1/8” drill bit. Drill to a depth of 1/8” only! Wrap masking tape around the drill bit to mark the correct depth of 1/8” to prevent drilling through your board.
D. Install Rivet and plastic Clip Deflector Bushing from the top of board on the slotted side of the clip.
E. Using a ball pein hammer and/or the tapered end of the Slider Pin, carefully flare the rivet on the base side of the board. Finish rolling over the rivet end with ball pein hammer. Take care not to over tighten and crush the plastic Clip Deflector Bushing.
F. Install rivet & clip in remaining hole and flare the rivet.
MOUNTING TIP & TAIL CLIPS
Deflector Bushing
Rivets
Flush
A. Line up lower hooks.
B. Line up upper hooks.
C. Push down.
TIP
READ THIS WARNINGThe Voilé splitboard is a high performance special terrain snowboard con-tructed to withstand the most demanding, extreme conditions and is fully warrantied against defects in materials and workmanship. However, if the snowboard is mounted imporoperly or is abused through poor technique, poor judgement or improper terrain selection, warranty claim will be subject to review and possible rejection.
Backcountry snowboarding is an inherently dangerous sport in which there is always the possibility of bodily injury and death. The manufacturer, dis-tributor, wholesaler, and retailer hereby expressly disclaim any liability for personal injuries sustained by use or mis-use of this product. The user of this product is personally responsible for learning proper skiing/snow-boarding techniques, avalanche awareness, and exercising good judgment.
A. Climbing skins should not exceed length of the running surface of the board.
B. If length is exceeded, shorten to proper length by cutting with razor blade or scissors.
CLIMBING SKIN LENGTH AND USE
Tail
Skin should not exceed this point
Tip
C. Climbing Skins - Fold in half for storage to keep from contaminating glue. While
snowboarding, keep skins inside coat to keep glue tacky. Use your hip to hold
ski in place to stretch skin taut while applying skin to ski. Smooth down firmly,
align skin closer to the inside edge on wide boards.
D. Voilé recommends the straight edge on the inside for the most efficient skinning.
Always rotate the interlocking hooks clear of the edge of the board half.Best for touring
voilésplitkitdiy splitboard hardware
2636 S. Constitution Blvd.Salt Lake City, UT 84119
801.973.8622 voile.com