diy tool bench - resene.com · instil the diy spirit in your kids with this cool tool bench made...
TRANSCRIPT
114 Little Treasures Aug/Sept 2013
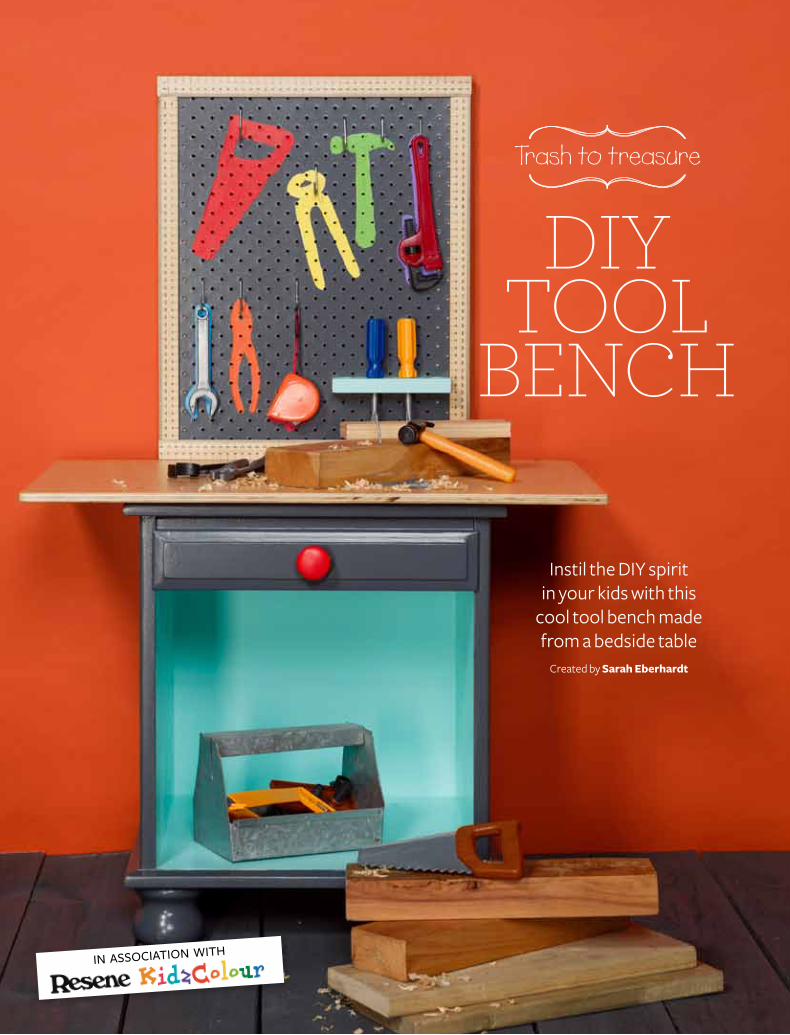
Instil the DIY spirit in your kids with this
cool tool bench made from a bedside table
Created by Sarah Eberhardt
DIY tool
bench
PHO
TOG
RAPH
S m
ike
ROO
ke b
AueR
STu
diO
Trash to treasure
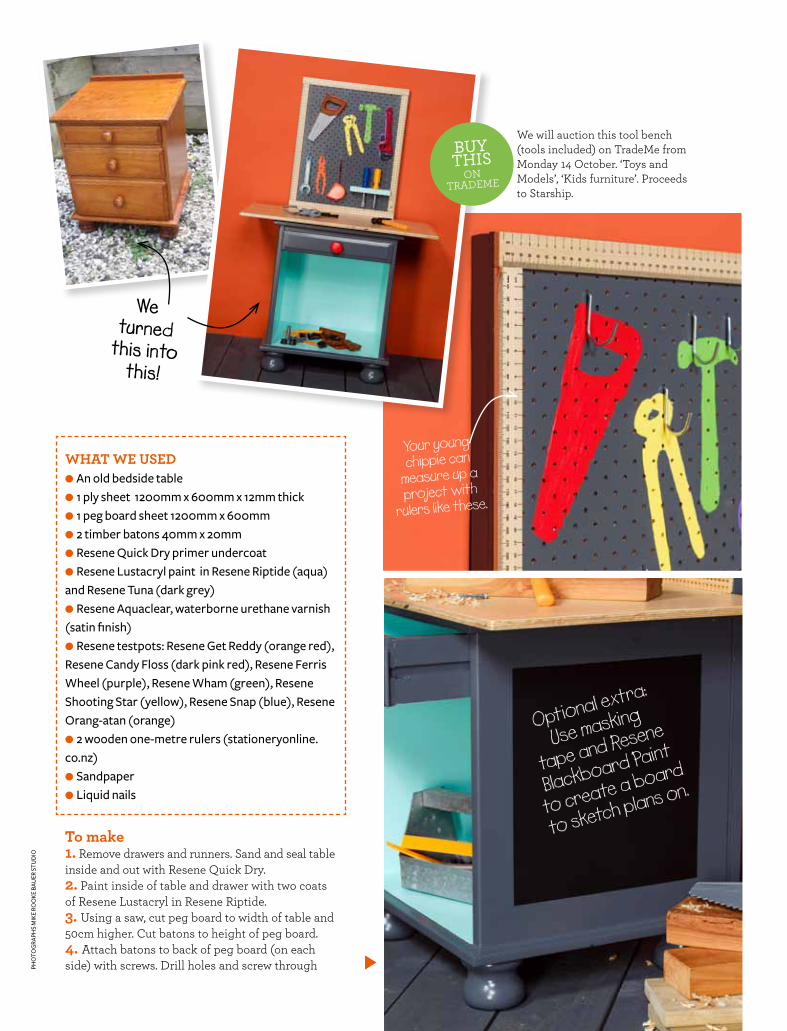
what we usedl An old bedside tablel 1 ply sheet 1200mm x 600mm x 12mm thick l 1 peg board sheet 1200mm x 600mm l 2 timber batons 40mm x 20mml Resene Quick dry primer undercoat l Resene Lustacryl paint in Resene Riptide (aqua) and Resene Tuna (dark grey)l Resene Aquaclear, waterborne urethane varnish (satin finish) l Resene testpots: Resene Get Reddy (orange red), Resene Candy Floss (dark pink red), Resene Ferris Wheel (purple), Resene Wham (green), Resene Shooting Star (yellow), Resene Snap (blue), Resene Orang-atan (orange)l 2 wooden one-metre rulers (stationeryonline.co.nz)l Sandpaperl Liquid nails
to make1. Remove drawers and runners. Sand and seal table inside and out with Resene Quick Dry.2. Paint inside of table and drawer with two coats of Resene Lustacryl in Resene Riptide. 3. Using a saw, cut peg board to width of table and 50cm higher. Cut batons to height of peg board.4. Attach batons to back of peg board (on each side) with screws. Drill holes and screw through
We turned
this into this!
We will auction this tool bench (tools included) on TradeMe from Monday 14 October. ‘Toys and Models’, ‘Kids furniture’. Proceeds to Starship.
Optional extra:
Use masking
tape and Resene
Blackboard Paint
to create a board
to sketch plans on.
BUY this
ONTRADEME
Your young chippie can
measure up a project with
rulers like these.
in ASSOCiATiOn WiTH
114 Little Treasures Aug/Sept 2013
Instil the DIY spirit in your kids with this
cool tool bench made from a bedside table
Created by Sarah Eberhardt
DIY tool
bench
PHO
TOG
RAPH
S m
ike
ROO
ke b
AueR
STu
diO
Trash to treasure
what we usedl An old bedside tablel 1 ply sheet 1200mm x 600mm x 12mm thick l 1 peg board sheet 1200mm x 600mm l 2 timber batons 40mm x 20mml Resene Quick dry primer undercoat l Resene Lustacryl paint in Resene Riptide (aqua) and Resene Tuna (dark grey)l Resene Aquaclear, waterborne urethane varnish (satin finish) l Resene testpots: Resene Get Reddy (orange red), Resene Candy Floss (dark pink red), Resene Ferris Wheel (purple), Resene Wham (green), Resene Shooting Star (yellow), Resene Snap (blue), Resene Orang-atan (orange)l 2 wooden one-metre rulers (stationeryonline.co.nz)l Sandpaperl Liquid nails
to make1. Remove drawers and runners. Sand and seal table inside and out with Resene Quick Dry.2. Paint inside of table and drawer with two coats of Resene Lustacryl in Resene Riptide. 3. Using a saw, cut peg board to width of table and 50cm higher. Cut batons to height of peg board.4. Attach batons to back of peg board (on each side) with screws. Drill holes and screw through
We turned
this into this!
We will auction this tool bench (tools included) on TradeMe from Monday 14 October. ‘Toys and Models’, ‘Kids furniture’. Proceeds to Starship.
Optional extra:
Use masking
tape and Resene
Blackboard Paint
to create a board
to sketch plans on.
BUY this
ONTRADEME
Your young chippie can
measure up a project with
rulers like these.
in ASSOCiATiOn WiTH
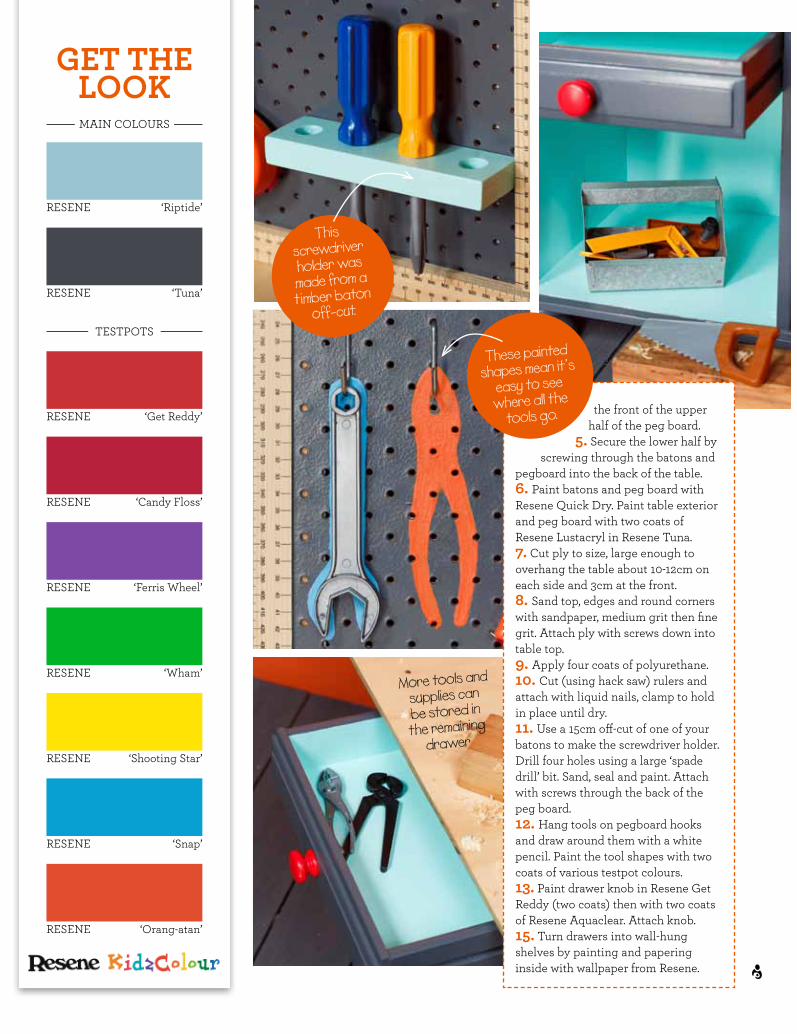
the front of the upper half of the peg board.
5. Secure the lower half by screwing through the batons and
pegboard into the back of the table.6. Paint batons and peg board with Resene Quick Dry. Paint table exterior and peg board with two coats of Resene Lustacryl in Resene Tuna.7. Cut ply to size, large enough to overhang the table about 10-12cm on each side and 3cm at the front.8. Sand top, edges and round corners with sandpaper, medium grit then fine grit. Attach ply with screws down into table top.9. Apply four coats of polyurethane.10. Cut (using hack saw) rulers and attach with liquid nails, clamp to hold in place until dry.11. Use a 15cm off-cut of one of your batons to make the screwdriver holder. Drill four holes using a large ‘spade drill’ bit. Sand, seal and paint. Attach with screws through the back of the peg board. 12. Hang tools on pegboard hooks and draw around them with a white pencil. Paint the tool shapes with two coats of various testpot colours.13. Paint drawer knob in Resene Get Reddy (two coats) then with two coats of Resene Aquaclear. Attach knob.15. Turn drawers into wall-hung shelves by painting and papering inside with wallpaper from Resene.
This screwdriver holder was made from a timber baton
off-cut.
These painted
shapes mean it’s easy to see where all the
tools go.
More tools and supplies can be stored in the remaining
drawer
Get the look
RESENE ‘Riptide’
RESENE ‘Orang-atan’
RESENE ‘Tuna’
RESENE ‘Get Reddy’
RESENE ‘Candy Floss’
RESENE ‘Ferris Wheel’
RESENE ‘Wham’
RESENE ‘Shooting Star’
RESENE ‘Snap’
MAiN COLOURS
TESTPOTS