dlver creating your first web dynpro application
TRANSCRIPT

8/3/2019 Dlver Creating Your First Web Dynpro Application
http://slidepdf.com/reader/full/dlver-creating-your-first-web-dynpro-application 1/22
Creating Your First Web Dynpro Application
Task
In the following tutorial, you will be introduced step by step to the basic concepts involved byimplementing an elementary Web Dynpro application. The user interface for this Webapplication will consist of only two views and will allow you to switch between them. In the firstview, the user should be able to enter his or her name in an input field and navigate to the nextview using a Go button. This name should then be added dynamically to a text field and displayedin the welcoming text in the second view.
In the following sections, you will get to know each of these stages in turn: Creating a suitableproject framework; designing the UI; implementing the event handlers; defining data binding for UI elements; and finally, deploying and executing the Welcome application on the J2EE server.
User Interface template:
ObjectivesBy the end of this tutorial, you will be able to:
! Create a project for a Web Dynpro application and its associated development objects
! Create views and define a navigation scheme for the application
! Create actions for the views and implement simple event handlers
! Design a simple view layout
! Define data binding for UI elements using context attributes
! Deploy and run a Web Dynpro application
8/3/2019 Dlver Creating Your First Web Dynpro Application
http://slidepdf.com/reader/full/dlver-creating-your-first-web-dynpro-application 2/22
Prerequisites
Systems, installed applications, and authorizations
The SAP NetWeaver Developer Studio is installed on your computer.
You have access to the SAP J2EE Engine.
Knowledge
Basic knowledge of Java would be an advantage – as always.
Creating a Web Dynpro Project
To manage local development objects, you need a project in the Developer Studio. For thisreason, you will use the appropriate wizard to generate a suitable project structure for the newWeb Dynpro project. Once you have set up this structure, you can create the specificcomponents of the Welcome project, define them, and implement the source code.
Prerequisites<> You have launched the SAP NetWeaver Developer Studio.
Procedure...
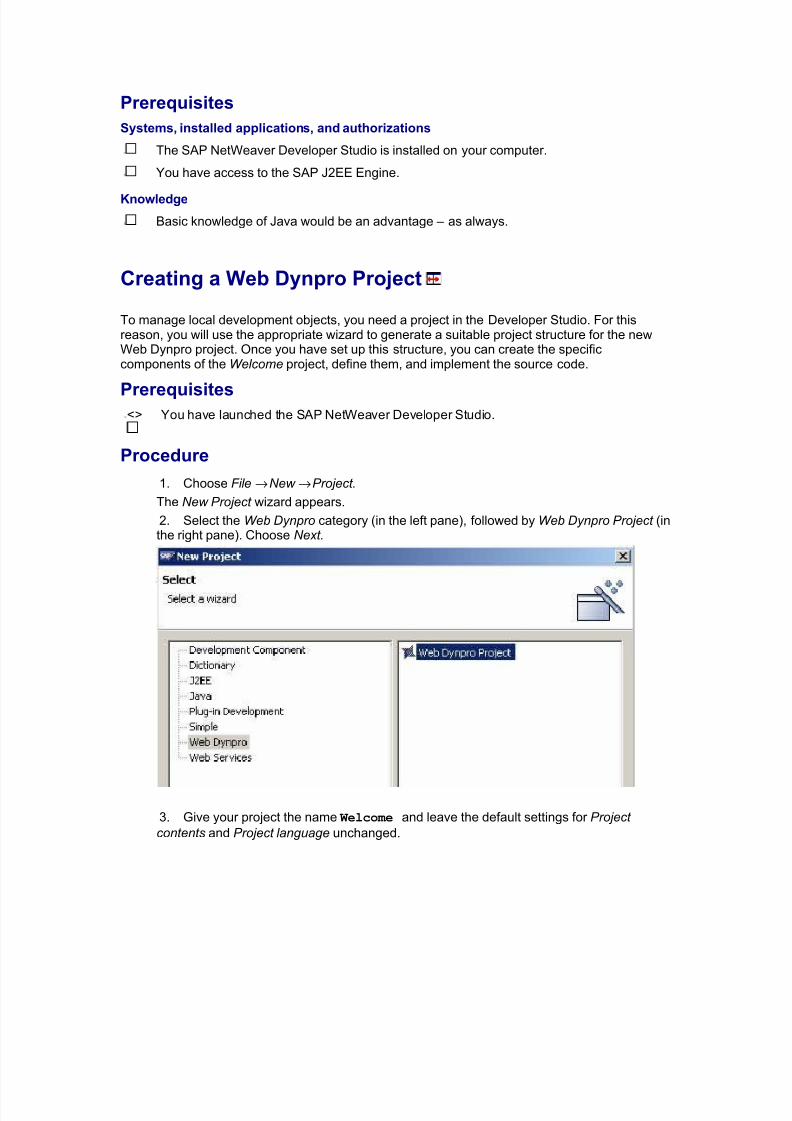
1. Choose File → New → Project .
The New Project wizard appears.
2. Select the Web Dynpro category (in the left pane), followed by Web Dynpro Project (inthe right pane). Choose Next .
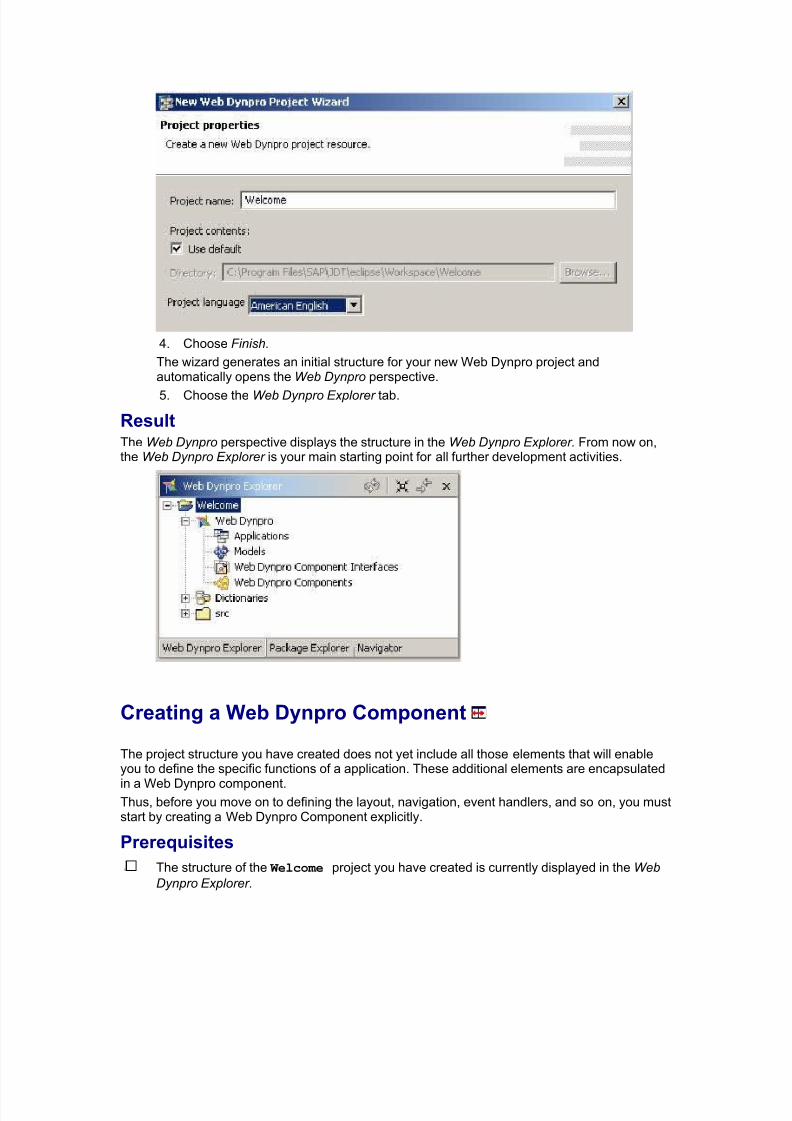
3. Give your project the name Welcome and leave the default settings for Project
contents and Project language unchanged.
8/3/2019 Dlver Creating Your First Web Dynpro Application
http://slidepdf.com/reader/full/dlver-creating-your-first-web-dynpro-application 3/22
4. Choose Finish.
The wizard generates an initial structure for your new Web Dynpro project andautomatically opens the Web Dynpro perspective.
5. Choose the Web Dynpro Explorer tab.
ResultThe Web Dynpro perspective displays the structure in the Web Dynpro Explorer. From now on,the Web Dynpro Explorer is your main starting point for all further development activities.
Creating a Web Dynpro Component
The project structure you have created does not yet include all those elements that will enableyou to define the specific functions of a application. These additional elements are encapsulated
in a Web Dynpro component.Thus, before you move on to defining the layout, navigation, event handlers, and so on, you muststart by creating a Web Dynpro Component explicitly.
Prerequisites
The structure of the Welcome project you have created is currently displayed in the Web
Dynpro Explorer .

8/3/2019 Dlver Creating Your First Web Dynpro Application
http://slidepdf.com/reader/full/dlver-creating-your-first-web-dynpro-application 4/22
Procedure1. ......
1.Expand the Web Dynpro node and open the context menu for Web Dynpro Components.
2.To open the wizard, choose Create Web Dynpro Component .
3.Enter the name WelcomeComponent for your Web Dynpro component and specify the
package name (such as com.sap.examples.welcome) for the Java classes that will begenerated.
4.Enter StartView for the view name.
5.Accept the other suggested values and choose Finish.
6.Save the new project data by choosing the icon from the toolbar.
ResultThe wizard performs several generation routines. Once it has finished, it automatically opens theData Modeler view (on the right pane) and inserts an additional substructure for the new WebDynpro component WelcomeComponent in the Web Dynpro Explorer.
Since our Web Dynpro component possesses views, which provide a visual representation of theapplication, a Window containing the initial view is also created. Provided you accepted the

8/3/2019 Dlver Creating Your First Web Dynpro Application
http://slidepdf.com/reader/full/dlver-creating-your-first-web-dynpro-application 5/22
default settings in step 5, the window has the same name as the component( WelcomeComponent).
Creating further Views
Users need elements within the user interface to interact with the application. The Web Dynproconcept allows you to split the user interface into an arrangement of views. You can think of eachof these views as an entity encompassing the elements of a UI that belong together.
You will split the user interface of the Welcome application into two views, the StartView (which
was just created in the last step) and the ResultView.
Prerequisites
You have created a Web Dynpro Component ( WelcomeComponent) for your project.
The structure of your project ( Welcome) is currently displayed in the Web Dynpro Explorer .
Procedure1. ...
...
1.Expand the node Web Dynpro → Web Dynpro Components → WelcomeComponent →
Windows.
2.Double-click the window node WelcomeComponent to start the Diagram View of the
standard window.
3.Choose the icon for Embed View from the palette (on the left of the screen).
4.Position the cursor within the diagram pane and drag a rectangle area to the required size.
5.In the wizard that appears, select the Embed new View option and choose Next .

8/3/2019 Dlver Creating Your First Web Dynpro Application
http://slidepdf.com/reader/full/dlver-creating-your-first-web-dynpro-application 6/22
6.Enter the name ResultView for the view you are about to create and choose Finish.
ResultThe diagram pane displays two areas representing the two views. In this case, the first view youcreated, the StartView is displayed as the active view (dark blue area). When the Web Dynpro
application is launched, the active view is always accessed.
Specifying the Navigation Schema
To define the navigation between the views, you need to create exit and entry points for each
view using outbound and inbound plugs. Only then you can specify the navigation flow usingnavigation links.
Prerequisites
You have created the two views StartView and ResultView for the Web Dynpro
component and assigned them to the Window.
The structure of your Welcome project is currently displayed in the Web Dynpro Explorer .
ProcedureThe following procedure is split into two parts. First you create the outbound and inbound plugs
for both views. You then connect them using navigation links.
Creating outbound and inbound plugs...
1. If you have not already done so, find Windows in the tree structure, and double-clickthe WelcomeComponent node.
The Diagram View appears with two rectangles representing the two views.
2. Select the rectangle for the first view, StartView, and open the context menu.
3. Choose Create Outbound Plug .
8/3/2019 Dlver Creating Your First Web Dynpro Application
http://slidepdf.com/reader/full/dlver-creating-your-first-web-dynpro-application 7/22
The appropriate wizard appears.
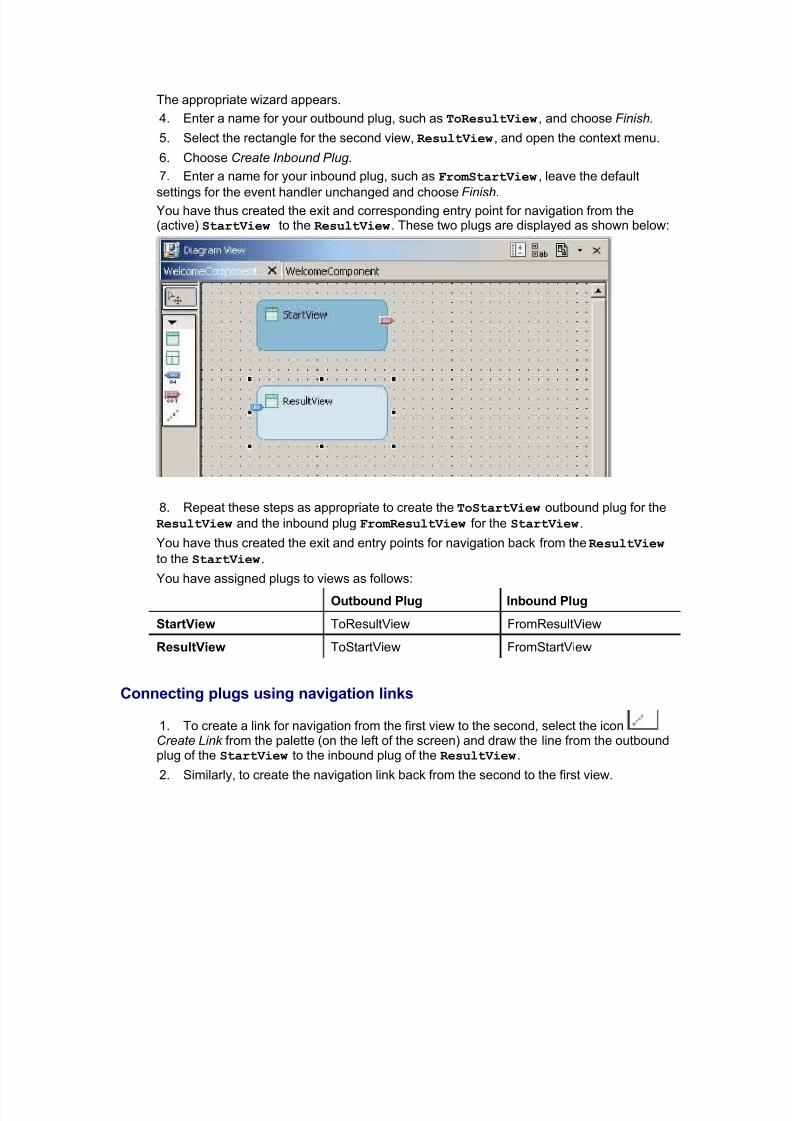
4. Enter a name for your outbound plug, such as ToResultView, and choose Finish.
5. Select the rectangle for the second view, ResultView, and open the context menu.
6. Choose Create Inbound Plug .
7. Enter a name for your inbound plug, such as FromStartView, leave the default
settings for the event handler unchanged and choose Finish.You have thus created the exit and corresponding entry point for navigation from the(active) StartView to the ResultView. These two plugs are displayed as shown below:
8. Repeat these steps as appropriate to create the ToStartView outbound plug for the
ResultView and the inbound plug FromResultView for the StartView.
You have thus created the exit and entry points for navigation back from the ResultView
to the StartView.
You have assigned plugs to views as follows:
Outbound Plug Inbound Plug
StartView ToResultView FromResultView
ResultView ToStartView FromStartView
Connecting plugs using navigation links...
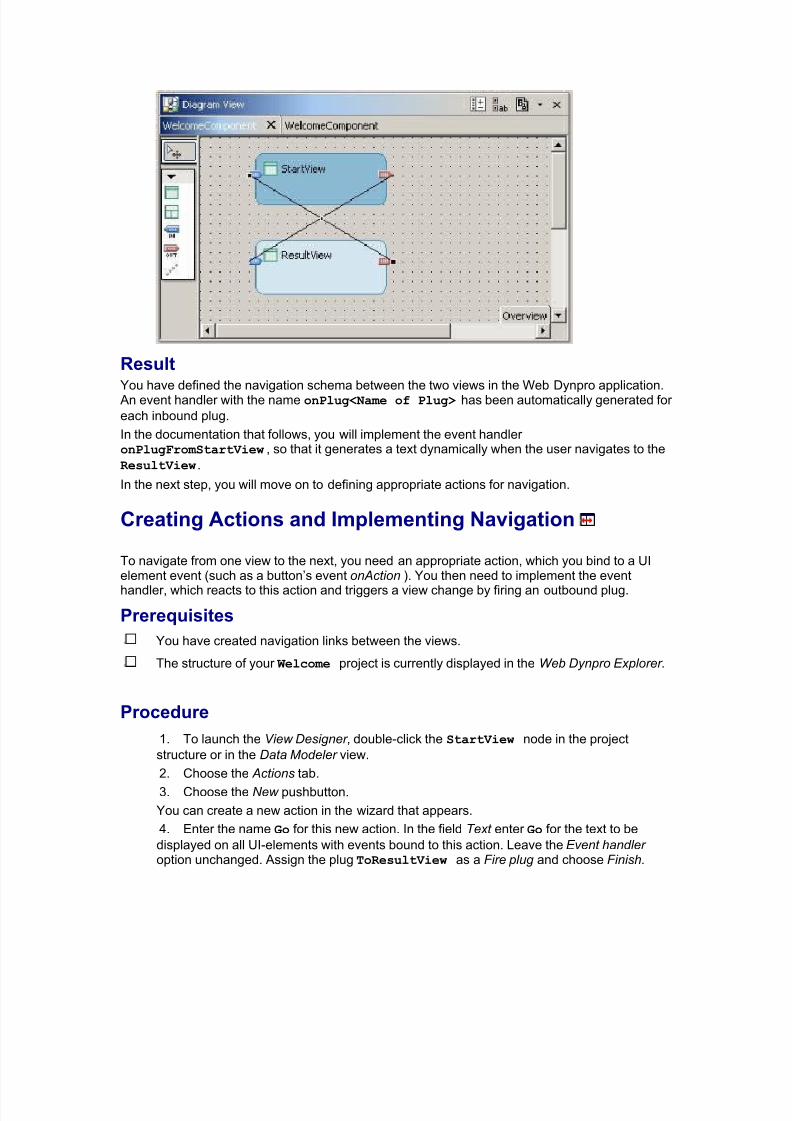
1. To create a link for navigation from the first view to the second, select the iconCreate Link from the palette (on the left of the screen) and draw the line from the outboundplug of the StartView to the inbound plug of the ResultView.
2. Similarly, to create the navigation link back from the second to the first view.
8/3/2019 Dlver Creating Your First Web Dynpro Application
http://slidepdf.com/reader/full/dlver-creating-your-first-web-dynpro-application 8/22
Result
You have defined the navigation schema between the two views in the Web Dynpro application.An event handler with the name onPlug<Name of Plug> has been automatically generated for
each inbound plug.
In the documentation that follows, you will implement the event handler onPlugFromStartView, so that it generates a text dynamically when the user navigates to the
ResultView.
In the next step, you will move on to defining appropriate actions for navigation.
Creating Actions and Implementing Navigation
To navigate from one view to the next, you need an appropriate action, which you bind to a UIelement event (such as a button’s event onAction ). You then need to implement the event
handler, which reacts to this action and triggers a view change by firing an outbound plug.
Prerequisites
You have created navigation links between the views.
The structure of your Welcome project is currently displayed in the Web Dynpro Explorer .
Procedure...
1. To launch the View Designer , double-click the StartView node in the project
structure or in the Data Modeler view.
2. Choose the Actions tab.
3. Choose the New pushbutton.
You can create a new action in the wizard that appears.
4. Enter the name Go for this new action. In the field Text enter Go for the text to be
displayed on all UI-elements with events bound to this action. Leave the Event handler option unchanged. Assign the plug ToResultView as a Fire plug and choose Finish.

8/3/2019 Dlver Creating Your First Web Dynpro Application
http://slidepdf.com/reader/full/dlver-creating-your-first-web-dynpro-application 9/22
The new action, Go, and its associated event handler onActionGo are displayed in the
list of actions.
5. Repeat the above steps as appropriate to create the Back action for the
ResultView, this time assigning the plug ToStartView as a Fire plug and entering
Back in the Text field.
6. Save the new metadata by choosing the icon (Save All Metadata) from the toolbar.

8/3/2019 Dlver Creating Your First Web Dynpro Application
http://slidepdf.com/reader/full/dlver-creating-your-first-web-dynpro-application 10/22
ResultYou have created the Go and Back actions. The implementation of the navigation was
automatically inserted to the associated event handlers.
To check the generated source code for event handler onActionGo(), choose the
Implementation tab for the StartView. The method contains only the single line
wdThis.wdFirePlug<Name_of_Outbound_Plug>()./** declared validating event handler */
public void onActionGo(com.sap.tc.webdynpro.progmodel.api.IWDCustomEvent wdEvent )
{
//@@begin onActionGo(ServerEvent)
wdThis.wdFirePlugToResultView();
//@@end
}
To trigger navigation from the StartView to the ResultView using the outbound plug
ToResultView, the application calls the outbound plug method
wdFirePlugToResultView(). The predefined private variable wdThis is used for this method
call. ThewdThis
variable is always required whenever you need to make method calls to the
view controller’s private interface IPrivate<Name_of_View>.
To check the generated source code for event handler onActionBack(), choose the
Implementation tab for the ResultView.
/** declared validating event handler */
public void onActionBack(com.sap.tc.webdynpro.progmodel.api.IWDCustomEvent wdEvent )
{
//@@begin onActionBack(ServerEvent)
wdThis.wdFirePlugToStartView();
//@@end
}
In the next step, you need only assign these actions to the appropriate buttons in the view layoutand the navigation part of your Welcome application will have been defined completely.
Designing a View Layout
You can now start creating the layout for your user interface. You will add UI elements to the twoviews according to the UI template and then assign the appropriate element attributes.
Prerequisites
You have created the necessary actions, Go and Back.
The structure of your Welcome project is currently displayed in the Web Dynpro Explorer .
Procedure
Designing a layout for the StartView.

8/3/2019 Dlver Creating Your First Web Dynpro Application
http://slidepdf.com/reader/full/dlver-creating-your-first-web-dynpro-application 11/22
1. If you have not already done so, launch the View Designer by double-clicking theStartView node in the project structure.
The Layout tab in the View Designer shows the StartView with a predefined default text.
Simultaneously, the Outline view displays a list of the UI elements included. All the UIelements are arranged under a root node and are represented in order in the tree in thelayout. If you select an element in the Outline view or on the Layout tab, its associated
element properties are shown in the Properties view – provided you have previouslyselected the Properties tab that is at the bottom of your screen.
2. Choose the root element RootUIElementContainer in the Outline view and give itthe following properties:
Property Value
layout GridLayout
cellPadding 5
colCount 3
You cannot change all the values for element properties by editing them directly in theassociated Value column. The values are often predefined and can be selected from a
dropdown box (to the right of the Value column). Alternatively, you can access thepredefined values using the arrow button and confirm the value chosen using Enter.

8/3/2019 Dlver Creating Your First Web Dynpro Application
http://slidepdf.com/reader/full/dlver-creating-your-first-web-dynpro-application 12/22
3. Choose the DefaultTextView that has been generated and give it the followingproperties:
Property Value
design header2
text Welcome to your first Web Dynpro application.
colSpan 3
4. In the Outline view, select the root element RootUIElementContainer and choose
Insert Child from the context menu.
5. Enter the Id label, choose the type Label ; then choose Finish.
6. Create two other UI elements: name (with the type InputField ); a Button with the Id go.
7. Assign the following property values to these new elements:
Property Value
For the label label
text Your name
labelFor name
paddingTop large
For the input field name
tooltip Enter your name here
value <Leave this property blank. You will enter the value in the next step>
For the button go
tooltip Go to the next view
Event > onAction Go
The View Designer displays the following layout for the StartView
8/3/2019 Dlver Creating Your First Web Dynpro Application
http://slidepdf.com/reader/full/dlver-creating-your-first-web-dynpro-application 13/22
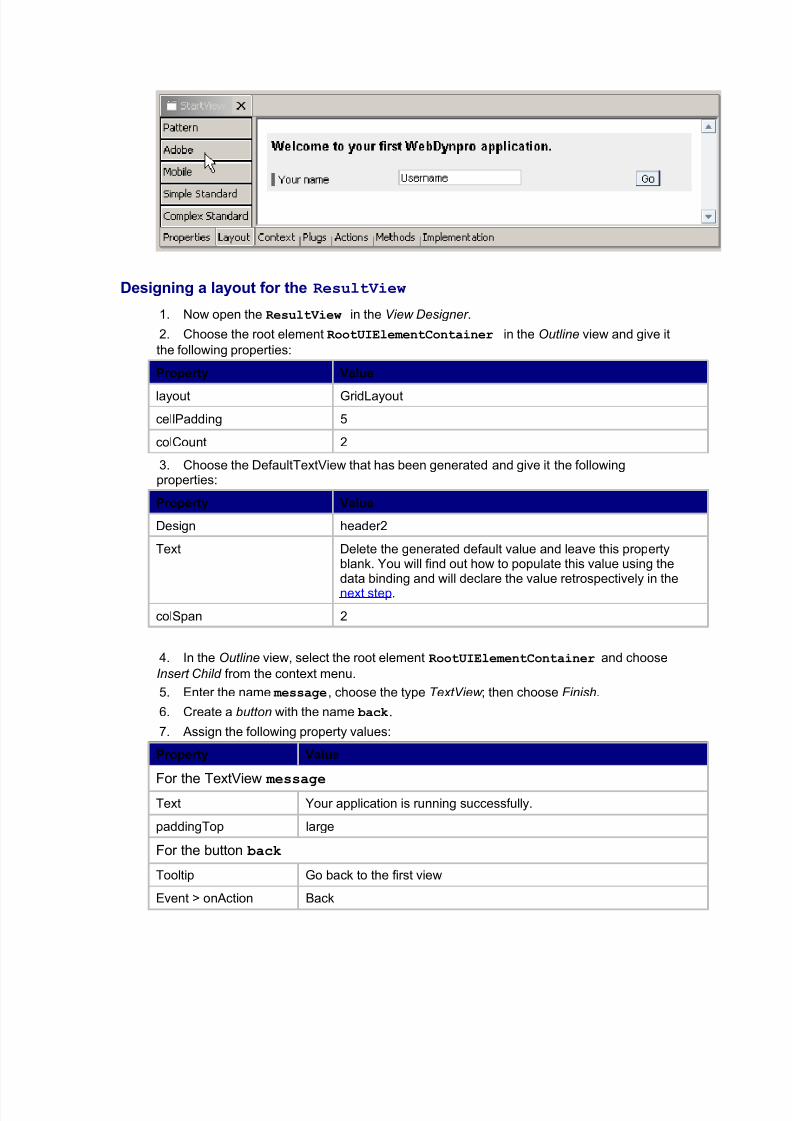
Designing a layout for the ResultView...
1. Now open the ResultView in the View Designer .
2. Choose the root element RootUIElementContainer in the Outline view and give it
the following properties:
Property Value
layout GridLayout
cellPadding 5
colCount 2
3. Choose the DefaultTextView that has been generated and give it the followingproperties:
Property Value
Design header2
Text Delete the generated default value and leave this propertyblank. You will find out how to populate this value using thedata binding and will declare the value retrospectively in thenext step.
colSpan 2
4. In the Outline view, select the root element RootUIElementContainer and choose
Insert Child from the context menu.
5. Enter the name message, choose the type TextView ; then choose Finish.
6. Create a button with the name back.
7. Assign the following property values:
Property Value
For the TextView messageText Your application is running successfully.
paddingTop large
For the button back
Tooltip Go back to the first view
Event > onAction Back

8/3/2019 Dlver Creating Your First Web Dynpro Application
http://slidepdf.com/reader/full/dlver-creating-your-first-web-dynpro-application 14/22
The View Designer displays the following layout for the ResultView:
8. Save the new metadata by choosing the icon (Save All Metadata) from the toolbar.
Result
You have now developed the basic parts of your application successfully. Now you simply needto make sure that the value from the input field in the StartView is used when the welcome text
is generated dynamically in the ResultView. However, you do not need implement a data
transport explicitly. The Web Dynpro concept allows you to implement this in a user-friendly way,using data binding to a context.
Defining Data Binding for UI ElementsTo implement data transports across several views, you use data binding. You can do this only if the UI elements involved have properties that can be bound. If so, the reference to theappropriate context element is assigned to this kind of property as a value. You use thisassignment to bind the UI element to the context of the associated view controller. This fulfills theprerequisites for transporting data to or from this UI element.
You may want to know why you need to do this (as well as what to do). If so, the followinginformation may be helpful.
A short digression on context theory
You use the term context to refer to a structured repository for saving controller data.
Every view always possesses a controller, which saves its local data in a context, known as theview context.
A UI element can be bound to this context only if it belongs to the same view. In general,however, the lifetime of a view context is too short, and its visibility too restricted for it to besuitable for saving data used across several views. This is where the standard context of the WebDynpro application comes into play. This standard context belongs to the controller of the WebDynpro component. Its lifetime is determined by the lifetime of the whole component. Moreover,this context can be made visible to some of the view controllers and not others. So that you do
not have to copy data explicitly between two contexts, you can map the relevant elements of thetwo contexts to each other. This is known as context mapping. Whenever an element of a viewcontext is mapped to the corresponding element of the component context, the data is stored inthe (global) component context, not in the (local) view context.

8/3/2019 Dlver Creating Your First Web Dynpro Application
http://slidepdf.com/reader/full/dlver-creating-your-first-web-dynpro-application 15/22
Prerequisites
The structure of your Welcome project is currently displayed in the Web Dynpro Explorer .
Procedure
The following procedure is split into several parts. You start by creating a global data storagespace using the component context; you create the necessary view contexts; you then mapelements to elements of the component context that you have created. Finally you ensure that theview context elements are bound to suitable UI elements using the properties.
Creating a component context...
1. In the project structure, expand the node Web Dynpro → Web Dynpro Components →WelcomeComponent .
2. Double-click the Component Controller node.
3. In the editor that appears, choose the Context tab.
4. Open the context menu for the root node Context and choose the option New → Value Attribute.
You can create a new value attribute in the wizard that appears.
5. Enter the name Username and choose Finish.
The value attribute is added to the root node of the context.
You will use the context definition for the Web Dynpro component later, to implement adata transfer beyond the local view context.
Mapping the context for the StartView to the component context...
1. Open the Data Modeler for the WelcomeComponent . In the project structure, choose
the WelcomeComponent node, and choose Open Data Modeler from the context menu.

8/3/2019 Dlver Creating Your First Web Dynpro Application
http://slidepdf.com/reader/full/dlver-creating-your-first-web-dynpro-application 16/22
2. In the left toolbar, choose Create a data link .
3. Starting above the StartView rectangle, press the left mouse button, and keep itpressed.
4. Draw a line to the Component Controller rectangle and release the left mouse button.
In the wizard that appears you can map the new view context element to the componentcontext element.
5. Drag the UserName node in the context of the component controller to the root nodeof the view controller context, and drop it.
6. In the new wizard window that appears, check the new created element UserName(left pane) and edit Name as a new name for the view context element (right pane).
7. Confirm with OK .
8. Choose Finish.
You have now created the a new element for the view context and mapped it to the
corresponding component context element.
Creating a context for the ResultView...
1. If you have not already done so, open the Data Modeler for the WelcomeComponent.
2. In the left toolbar, choose Create a data link .
3. Starting above the ResultView rectangle, press the left mouse button, and keep itpressed.
4. Draw a line to the Component Controller rectangle and release the left mouse button.

8/3/2019 Dlver Creating Your First Web Dynpro Application
http://slidepdf.com/reader/full/dlver-creating-your-first-web-dynpro-application 17/22
5. In the wizard that appears open the context menu for the root node Context and
choose the option New → Value Attribute.
6. Enter a name HeaderText for the new context attribute and choose Finish.
In this case, however, do not map to the context.
...
The Data Modeler looks now as follows:
Binding UI elements to a context...
1. Open the View Designer for the StartView again.
2. Choose the Layout tab.
3. Select the input field name.
4. In the Properties window, assign the value property to the appropriate context
attribute by choosing the Value properties and then clicking (on the right).
In the dialog box that appears, choose the context attribute Name and confirm by choosing
OK .
5. Do the same for ResultView, this time assigning the appropriate context element,
HeaderText, to the text property for the DefaultTextView.
The View Designer displays the following layout for the ResultView:

8/3/2019 Dlver Creating Your First Web Dynpro Application
http://slidepdf.com/reader/full/dlver-creating-your-first-web-dynpro-application 18/22
You have now created a data binding between UI elements and the corresponding context valueattributes.
Generating a line of text dynamically using data binding...
1. Open the View Designer for the ResultView again. 2. Choose the Implementation tab.
3. Add the following lines to the event handler method onPlugFromStartView():
public void onPlugFromStartView (com.sap.tc.webdynpro.progmodel.api.IWDCustomEvent wdE
{
//@@begin onPlugFromStartView(ServerEvent)
String headerText = "Congratulations ";
headerText +=wdThis.wdGetWelcomeComponentController().wdGetContext().currentContextElement().getU
headerText += "!";
wdContext.currentContextElement().setHeaderText(headerText);
//@@end
}
The event handler for the inbound plug, onPlugFromStartView(), is called when the
program enters the ResultView. You use this method to generate a text content
dynamically. The dynamic value is saved across local view contexts, and made availableby means of the associated context element.
To enter the source code, you can avail of the Code Assist functions provided by theDeveloper Studio:

8/3/2019 Dlver Creating Your First Web Dynpro Application
http://slidepdf.com/reader/full/dlver-creating-your-first-web-dynpro-application 19/22
4.
Save the new metadata by choosing the icon (Save All Metadata) from the toolbar.
ResultYou have now established that a data transport can take place between UI elements that are partof different views.
Creating a Web Dynpro Application
Before you trigger the compilation of your complete project followed by its deployment to theJ2EE Engine, you first need an object that can be used to address and display the Web Dynprocomponent in the Web browser. This is why you create a Web Dynpro application.
PrerequisitesThe structure of your Welcome project is currently displayed in the Web Dynpro Explorer .
Procedure...
1. To open the relevant wizard, choose Create Application from the context menu of the Applications node .
2. Enter a name for your Web Dynpro application, such as WelcomeApplication, and
specify the package name (such as com.sap.examples.welcome) for the Java classes
that will be generated. Then choose Next .
3. In the next dialog window, choose the default setting Use existing component andchoose Next .
4.
In the next dialog, assign the default values for all three dropdown box fields.

8/3/2019 Dlver Creating Your First Web Dynpro Application
http://slidepdf.com/reader/full/dlver-creating-your-first-web-dynpro-application 20/22
5. Choose Finish.
ResultThe generated Web Dynpro application object completes your project structure. You are now in aposition to trigger deployment. WelcomeApplication enables you to address the Web
application as a whole, when you launch this complete application in the next step.
Building, Deploying, and Running Your Application
You have now reached the last stage in this tutorial. However, some preparations are essential,before you can deploy and run the application successfully.
Prerequisites
You have made sure that the SAP J2EE Engine and Software Deployment Manager (SDM)the has been launched.
To do this, refer to Starting and Stopping the SAP J2EE Engine
You have checked that the J2EE server is correctly selected in the Developer Studio.
To check the server settings, choose the menu path Window → Preferences → SAP J2EE Engine.
Procedure
Building the project...
1. If you have not already done so, save the metadata for your Welcome project in their current state.
2. In the Web Dynpro Explorer , from the context menu of the project node Welcome,
choose Rebuild Project .
Make sure that the Tasks view does not display any errors for your Welcome project.
Deploying and launching the application...
1. In the Web Dynpro Explorer, open the context menu for the application objectWelcomeApplication.
2. Choose Deploy New Archive and Run.
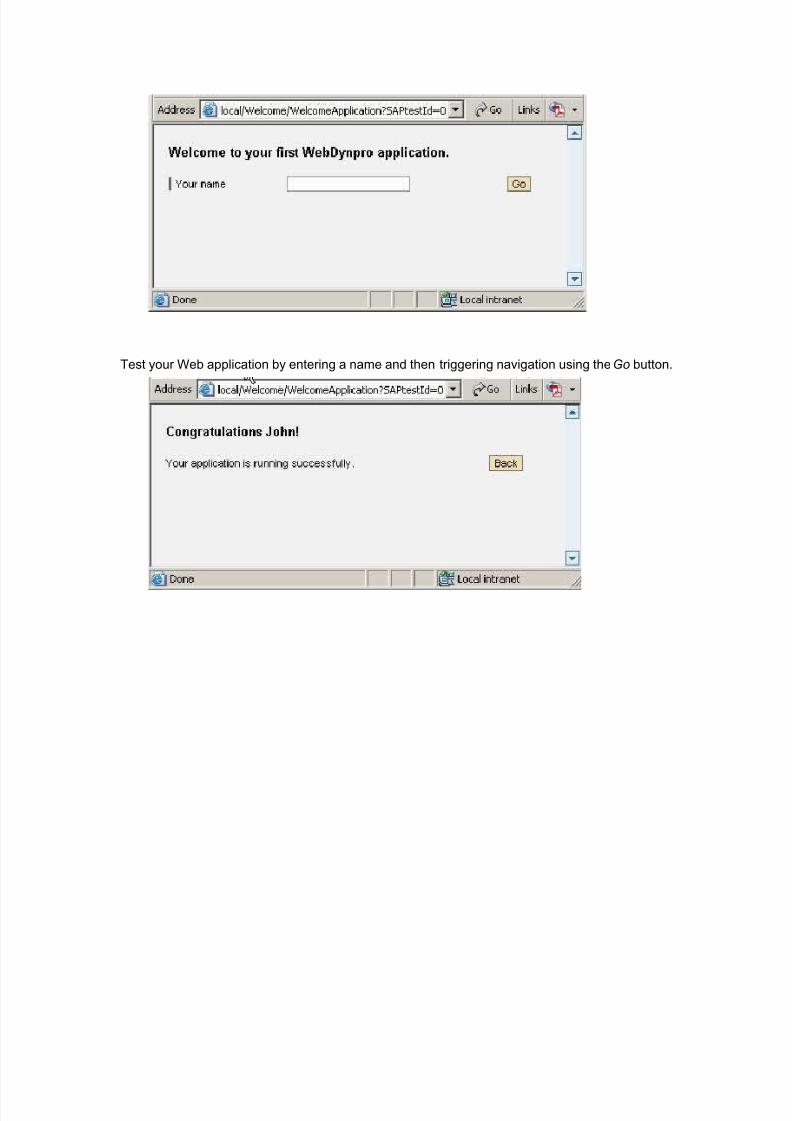
ResultThe Developer Studio launches the Web browser and chooses the active view StartView .
8/3/2019 Dlver Creating Your First Web Dynpro Application
http://slidepdf.com/reader/full/dlver-creating-your-first-web-dynpro-application 21/22

8/3/2019 Dlver Creating Your First Web Dynpro Application
http://slidepdf.com/reader/full/dlver-creating-your-first-web-dynpro-application 22/22