dmx-controlled smd led strobe - afx - home page · dmx-controlled smd led strobe . pro-strobe code...
TRANSCRIPT
©Copyright LOTRONIC 2016 PRO-STROBE 1
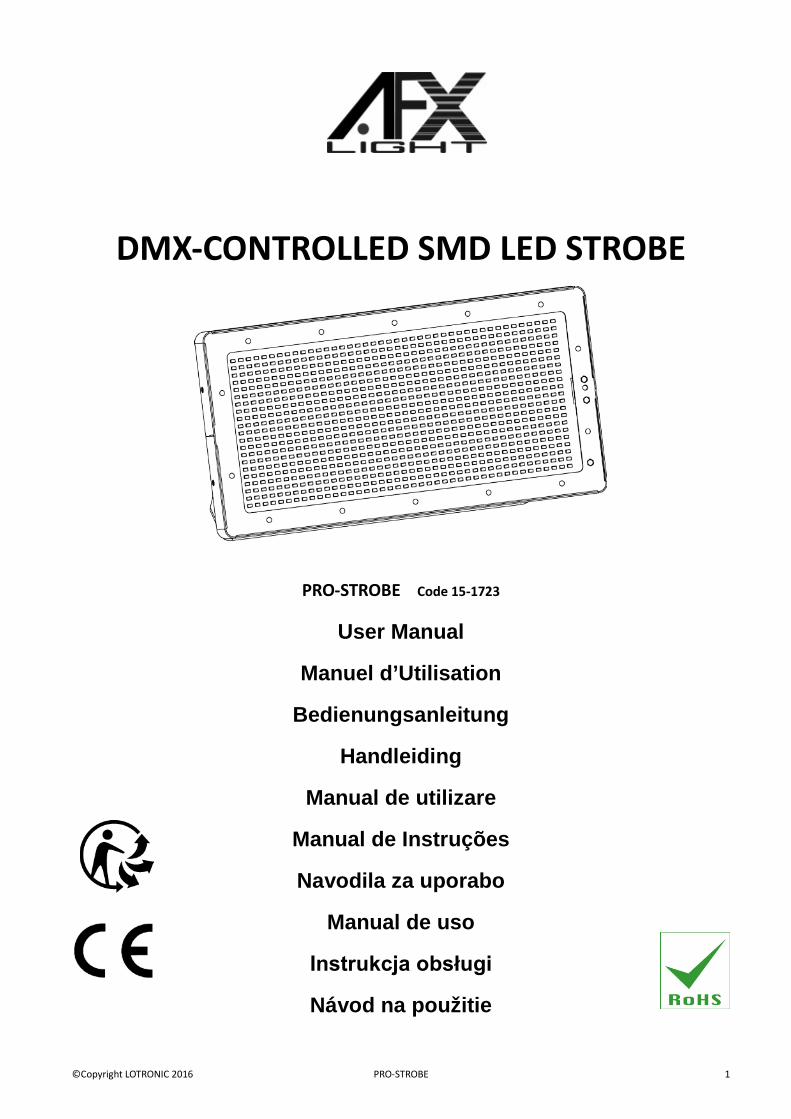
DMX-CONTROLLED SMD LED STROBE
PRO-STROBE Code 15-1723
User Manual
Manuel d’Utilisation
Bedienungsanleitung
Handleiding
Manual de utilizare
Manual de Instruções
Navodila za uporabo
Manual de uso
Instrukcja obsługi
Návod na použitie

©Copyright LOTRONIC 2016 PRO-STROBE 2
1. Safety Instructions
• Please keep this User Manual for future reference. If you sell the unit to another user, be sure that he also receives this instruction booklet.
• Unpack and check the unit carefully that it has not been damaged during transport before using the unit. • Before operating, ensure that the voltage and frequency of power supply match the power requirements of the unit. • The unit should be connected to a main socket outlet with a protective earth connection
• The unit is for indoor use only in a dry location. • The unit must be installed in a location with adequate ventilation, at least 0.5m from adjacent surfaces. Be sure that
no ventilation slots are blocked.
• Disconnect mains power before fuse replacement or servicing. • Replace fuse only with the same type. • Make sure there are no inflammable materials close to the unit during operation. • Use safety cable when fixing this unit. • In the event of serious operating problem, stop using the unit immediately. • Never try to repair the unit by yourself. Repair carried out by unskilled people can lead to damage or malfunction.
Please contact the nearest authorized technical assistance center and always use the same type of spare parts.
• Do not touch any wires during operation as high voltage might be causing electric shock. • The product is for decorative purposes only and not suitable as a household room illumination. DISCONNECT DEVICE Where the MAINS plug or an appliance coupler is used as the disconnect device, the disconnect device shall remain readily operable.
2. Specifications Supply Voltage: ............................................................................................. AC100~240V 50/60HZ Power: ...................................................................................................................................... 200W Light source: .................................................................................................... 882x white SMD LEDs Fuse: .............................................................................................................................................. 3A DMX channels ............................................................................................................................ 4 / 10 Operating modes: ......................... DMX, Auto-run, Sound Control, Master-slave + remote control Dimensions: ....................................................................................................... 435 x 105 x 260mm Weight: ..................................................................................................................................... 3.5kg
3. Installation The unit should be mounted via its screw holes on the bracket. Always ensure that the unit is firmly fixed to avoid vibration and slipping while operating. Always ensure that the structure to which you are attaching the unit is secure and able to support a weight of 10 times of the unit’s weight. Also always use a safety cable that can hold 12 times the weight of the unit when installing the fixture. The equipment must be fixed by professionals at a place where is out of the reach of people and where nobody can pass by or under it.
GB
©Copyright LOTRONIC 2016 PRO-STROBE 3
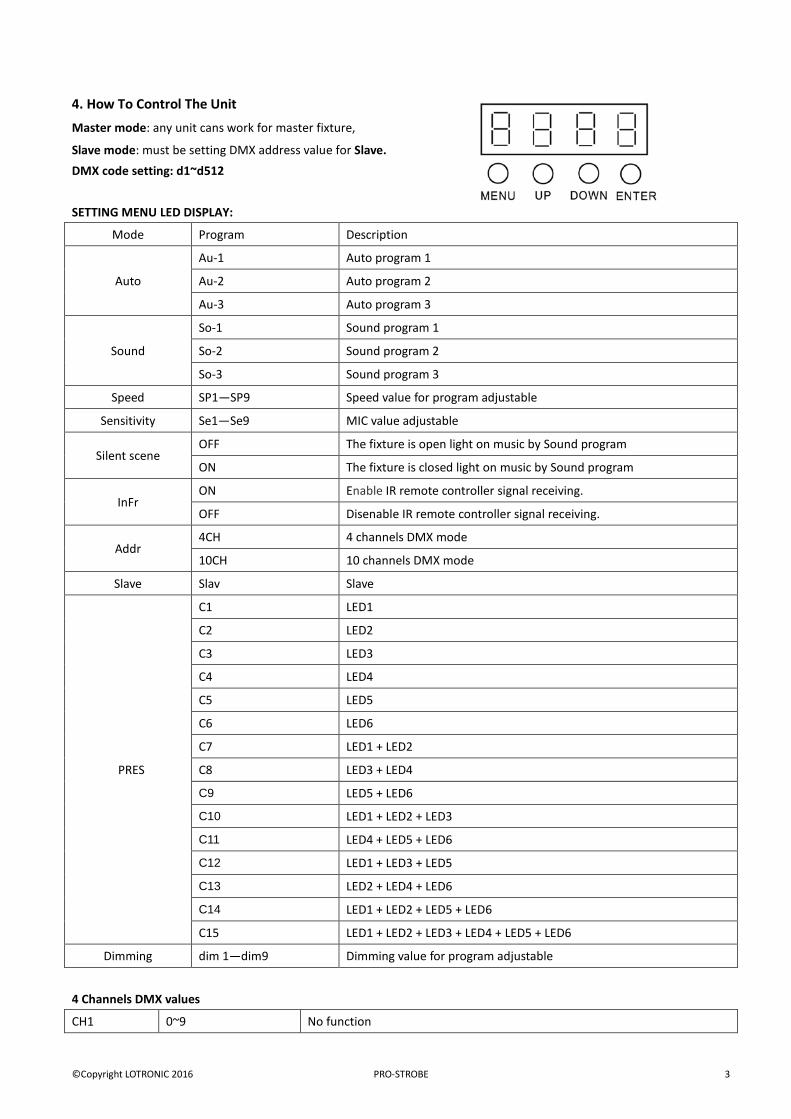
4. How To Control The Unit
Master mode: any unit cans work for master fixture,
Slave mode: must be setting DMX address value for Slave. DMX code setting: d1~d512 SETTING MENU LED DISPLAY:
Mode Program Description
Auto
Au-1 Auto program 1
Au-2 Auto program 2
Au-3 Auto program 3
Sound
So-1 Sound program 1
So-2 Sound program 2
So-3 Sound program 3
Speed SP1—SP9 Speed value for program adjustable
Sensitivity Se1—Se9 MIC value adjustable
Silent scene OFF The fixture is open light on music by Sound program
ON The fixture is closed light on music by Sound program
InFr ON Enable IR remote controller signal receiving.
OFF Disenable IR remote controller signal receiving.
Addr 4CH 4 channels DMX mode
10CH 10 channels DMX mode
Slave Slav Slave
PRES
C1 LED1
C2 LED2
C3 LED3
C4 LED4
C5 LED5
C6 LED6
C7 LED1 + LED2
C8 LED3 + LED4
C9 LED5 + LED6
C10 LED1 + LED2 + LED3
C11 LED4 + LED5 + LED6
C12 LED1 + LED3 + LED5
C13 LED2 + LED4 + LED6
C14 LED1 + LED2 + LED5 + LED6
C15 LED1 + LED2 + LED3 + LED4 + LED5 + LED6
Dimming dim 1—dim9 Dimming value for program adjustable
4 Channels DMX values
CH1 0~9 No function
©Copyright LOTRONIC 2016 PRO-STROBE 4
10~19 LED1
20~29 LED2
30~39 LED3
40~49 LED4
50~59 LED5
60~69 LED6
70~79 LED1 +LED2
80~89 LED1 + LED3
90~99 LED1 + LED4
100~109 LED1 + LED5
110~119 LED1 + LED6
120~129 LED2 +LED3
130~139 LED2 + LED4
140~149 LED2 +LED5
150~159 LED2 +LED6
160~169 LED3 + LED4
170~179 LED3 +LED5
180~189 LED3 +LED6
190~199 LED4 +LED5
200~209 LED4 +LED6
210~219 LED5 +LED6
220~229 LED1 +LED2 +LED3
230~239 LED1 + LED3 + LED5
240~259 LED2 + LED4 +LED6
250~255 LED1 +LED2 +LED3 + LED4 +LED5 +LED6
CH2 0~9 No function
10~255 LED Strobe (From slow to fast)
CH3
0~9 No function
10~199 Auto DMX
200~255 Sound DMX
CH4 0~255 Auto DMX Speed (From slow to fast)
10 Channels DMX values
CH1 0~255 LED1
CH2 0~255 LED2
CH3 0~255 LED3
CH4 0~255 LED4
CH5 0~255 LED5
CH6 0~255 LED6
CH7 0~255 Dimming
CH8 0~9 No function
©Copyright LOTRONIC 2016 PRO-STROBE 5
10~255 LED Strobe (From slow to fast)
CH9
0~9 No function
10~199 Auto DMX
200~255 Sound DMX
CH10 0~255 Auto DMX Speed (From slow to fast)/ sound mic sensitivity from low -> high
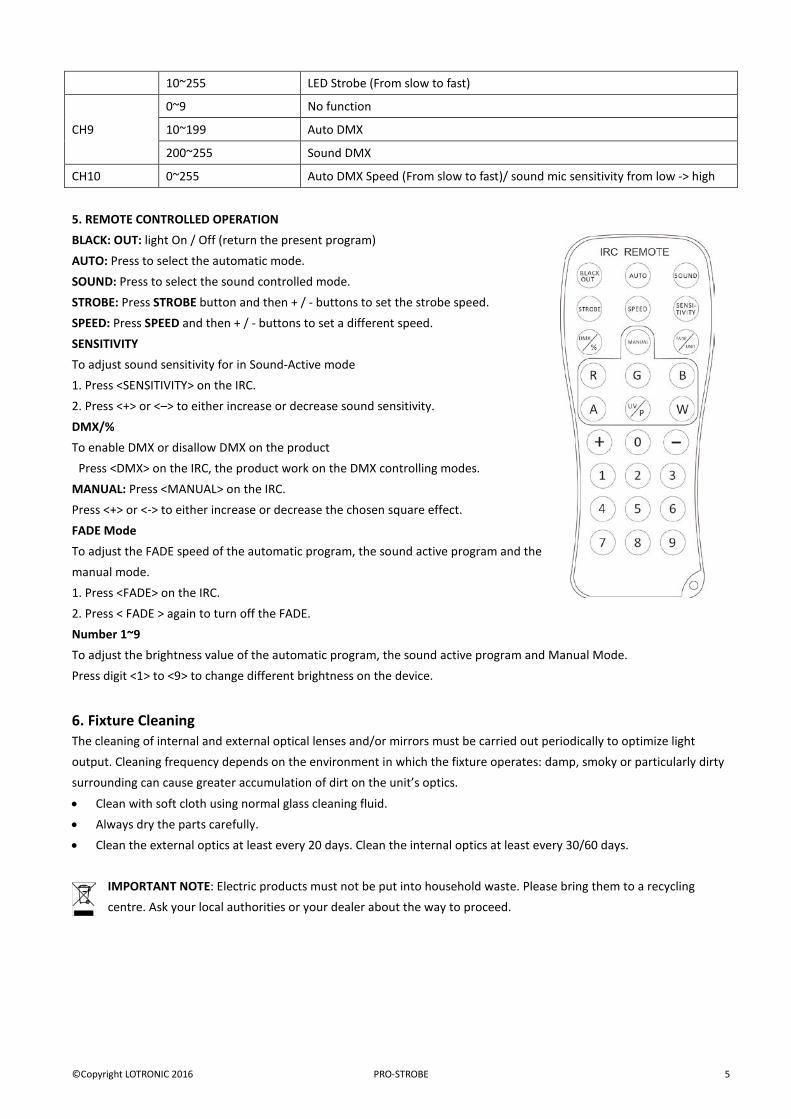
5. REMOTE CONTROLLED OPERATION BLACK: OUT: light On / Off (return the present program) AUTO: Press to select the automatic mode. SOUND: Press to select the sound controlled mode. STROBE: Press STROBE button and then + / - buttons to set the strobe speed. SPEED: Press SPEED and then + / - buttons to set a different speed. SENSITIVITY To adjust sound sensitivity for in Sound-Active mode 1. Press <SENSITIVITY> on the IRC. 2. Press <+> or <–> to either increase or decrease sound sensitivity. DMX/% To enable DMX or disallow DMX on the product Press <DMX> on the IRC, the product work on the DMX controlling modes. MANUAL: Press <MANUAL> on the IRC. Press <+> or <-> to either increase or decrease the chosen square effect. FADE Mode To adjust the FADE speed of the automatic program, the sound active program and the manual mode. 1. Press <FADE> on the IRC. 2. Press < FADE > again to turn off the FADE. Number 1~9 To adjust the brightness value of the automatic program, the sound active program and Manual Mode. Press digit <1> to <9> to change different brightness on the device.
6. Fixture Cleaning The cleaning of internal and external optical lenses and/or mirrors must be carried out periodically to optimize light output. Cleaning frequency depends on the environment in which the fixture operates: damp, smoky or particularly dirty surrounding can cause greater accumulation of dirt on the unit’s optics.
• Clean with soft cloth using normal glass cleaning fluid. • Always dry the parts carefully. • Clean the external optics at least every 20 days. Clean the internal optics at least every 30/60 days.
IMPORTANT NOTE: Electric products must not be put into household waste. Please bring them to a recycling centre. Ask your local authorities or your dealer about the way to proceed.
©Copyright LOTRONIC 2016 PRO-STROBE 6
Lire attentivement les consignes de sécurité qui contiennent des informations importantes concernant l’installation, le fonctionnement
1. Consignes de sécurité
• Dès réception de l’appareil, ouvrez le carton et vérifiez que le contenu est complet et en bon état. • Assurez-vous que la tension secteur convient à cet appareil et qu’elle ne dépasse pas la tension d’alimentation
indiquée sur la plaque signalétique de l’appareil..
• Uniquement pour utilisation à l’intérieur à un endroit sec! • Installez l’appareil à un endroit bien ventilé à une distance minimum de 0,5m de toute surface. Assurez-vous que les
fentes de ventilation ne sont pas bloquées.
• Débranchez l’appareil du secteur avant toute manipulation ou entretien. • Lorsque vous remplacez le fusible, utilisez uniquement un fusible qui présente exactement les mêmes
caractéristiques que l’ancien.
• Vérifiez qu’aucun matériau inflammable ne se trouve à proximité de l’effet pendant le fonctionnement. • Fixez l’appareil avec un câble de sécurité. • En cas de dysfonctionnement, arrêtez immédiatement l’appareil et débranchez-le du secteur. • N’essayez jamais de réparer l’appareil par vous-même. Une réparation mal faite peut entraîner des dommages et des
dysfonctionnements. Contactez un service technique agréé. Utilisez uniquement des pièces détachées identiques aux pièces d’origine.
• Ne pas toucher de fils électriques pendant le fonctionnement car les tensions élevées peuvent provoquer une électrocution.
• L’appareil fait partie des appareils électriques de CLASSE I ce qui signifie qu’il doit être relié à la terre. Il faut le brancher
sur une prise secteur pourvu d’un contact de terre.
• Le luminaire ne doit servir qu’à des fins décoratives et ne convient pas comme éclairage domestique normal. DISPOSITIF DE COUPURE: Lorsqu’une fiche SECTEUR ou un coupleur sont utilisés pour déconnecter l’appareil du secteur, ce dispositif doit rester facilement accessible à tout moment
2. Caractéristiques techniques Alimentation: ............................................................................................... AC100~240V 50/60HZ Consommation: ....................................................................................................................... 200W LED: ............................................................................................................... 882 LED SMD blanches Fusible: ........................................................................................................................................ F3A Modes de fonctionnement: ..................................... DMX, Automatique, contrôlé par la musique, .................................................................................................. Maître-esclave ou la télécommande Dimensions: ....................................................................................................... 435 x 105 x 260mm Poids: ........................................................................................................................................ 3,5kg
3. Installation Fixez l’appareil sur l’étrier au moyen des trous de vis. Assurez-vous que l’appareil est solidement fixé afin d’éviter des vibrations et des mouvements pendant le fonctionnement. Vérifiez que le support sur lequel vous allez installer l’appareil est solide et capable de supporter au moins 10 fois le poids de l’appareil. Lors de l’installation utilisez toujours un câble de sécurité supplémentaire qui peut porter 12 fois le poids le d’appareil. Cet appareil doit être installé par des professionnels. Il doit être installé à un endroit où il est hors de portée des personnes et où personne ne peut passer en-dessous.
F

©Copyright LOTRONIC 2016 PRO-STROBE 7
4. Contrôle de l’appareil
Mode Maître: Chaque appareil peut être désigné comme maître
Mode esclave: il faut régler l’appareil comme Slave. Adresse DMX: d1~d512 Menu de réglage:
Mode Programme Description
Auto
Au-1 Programme automatique 1
Au-2 Programme automatique 2
Au-3 Programme automatique 3
Sound
So-1 Programme active par le son 1
So-2 Programme active par le son 2
So-3 Programme active par le son 3
Speed SP1—SP9 Vitesse
Sensitivity Se1—Se9 Sensibilité du microphone
Silent scene OFF La lumière reste allumée pendant une période de silence en mode musical
ON La lumière est éteinte pendant une période de silence en mode musical
InFr ON Activation du récepteur du signal IR de la télécommande
OFF Désactivation du récepteur du signal IR de la télécommande
Addr 4CH Mode 4 canaux DMX
9CH Mode 10 canaux DMX
Slave Slav Esclave
PRES
C1 LED1
C2 LED2
C3 LED3
C4 LED4
C5 LED5
C6 LED6
C7 LED1 + LED2
C8 LED3 + LED4
C9 LED5 + LED6
C10 LED1 + LED2 + LED3
C11 LED4 + LED5 + LED6
C12 LED1 + LED3 + LED5
C13 LED2 + LED4 + LED6
C14 LED1 + LED2 + LED5 + LED6
C15 LED1 + LED2 + LED3 + LED4 + LED5 + LED6
Dimming dim 1—dim9 Variation ajustable pour le programme
4 canaux DMX
CH1 0~9 Pas de fonction
10~19 LED1
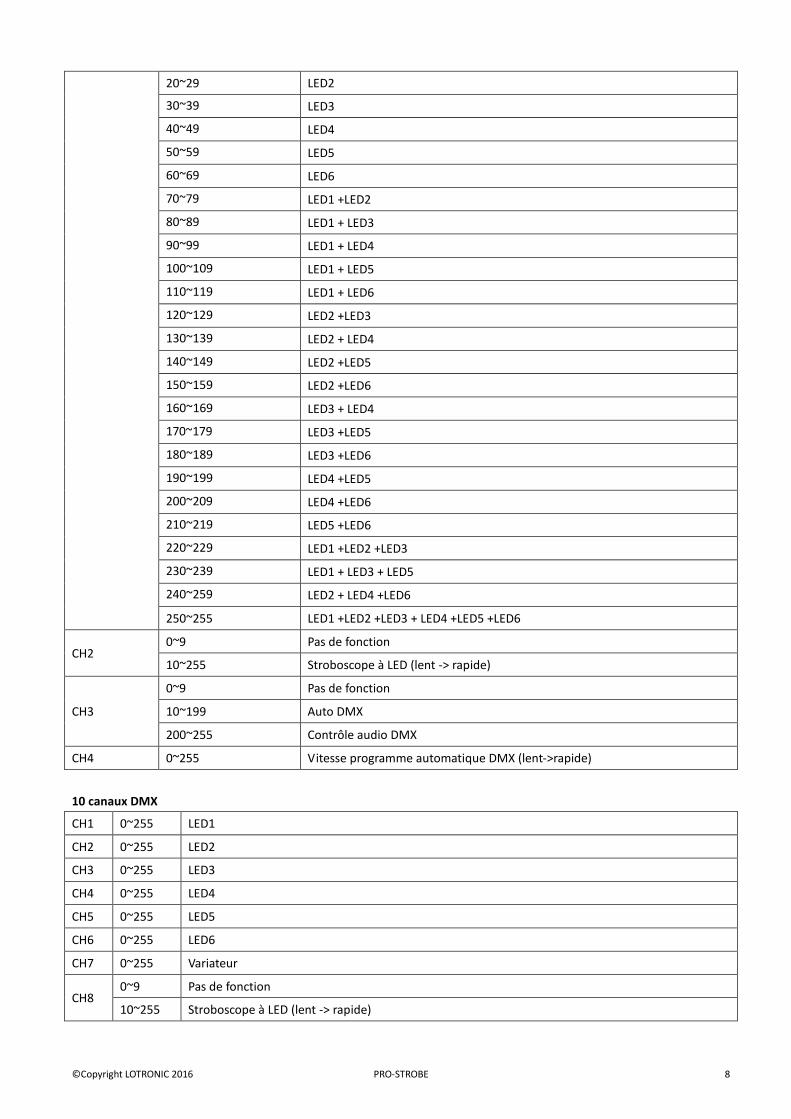
©Copyright LOTRONIC 2016 PRO-STROBE 8
20~29 LED2
30~39 LED3
40~49 LED4
50~59 LED5
60~69 LED6
70~79 LED1 +LED2
80~89 LED1 + LED3
90~99 LED1 + LED4
100~109 LED1 + LED5
110~119 LED1 + LED6
120~129 LED2 +LED3
130~139 LED2 + LED4
140~149 LED2 +LED5
150~159 LED2 +LED6
160~169 LED3 + LED4
170~179 LED3 +LED5
180~189 LED3 +LED6
190~199 LED4 +LED5
200~209 LED4 +LED6
210~219 LED5 +LED6
220~229 LED1 +LED2 +LED3
230~239 LED1 + LED3 + LED5
240~259 LED2 + LED4 +LED6
250~255 LED1 +LED2 +LED3 + LED4 +LED5 +LED6
CH2 0~9 Pas de fonction
10~255 Stroboscope à LED (lent -> rapide)
CH3
0~9 Pas de fonction
10~199 Auto DMX
200~255 Contrôle audio DMX
CH4 0~255 Vitesse programme automatique DMX (lent->rapide)
10 canaux DMX
CH1 0~255 LED1
CH2 0~255 LED2
CH3 0~255 LED3
CH4 0~255 LED4
CH5 0~255 LED5
CH6 0~255 LED6
CH7 0~255 Variateur
CH8 0~9 Pas de fonction
10~255 Stroboscope à LED (lent -> rapide)
©Copyright LOTRONIC 2016 PRO-STROBE 9
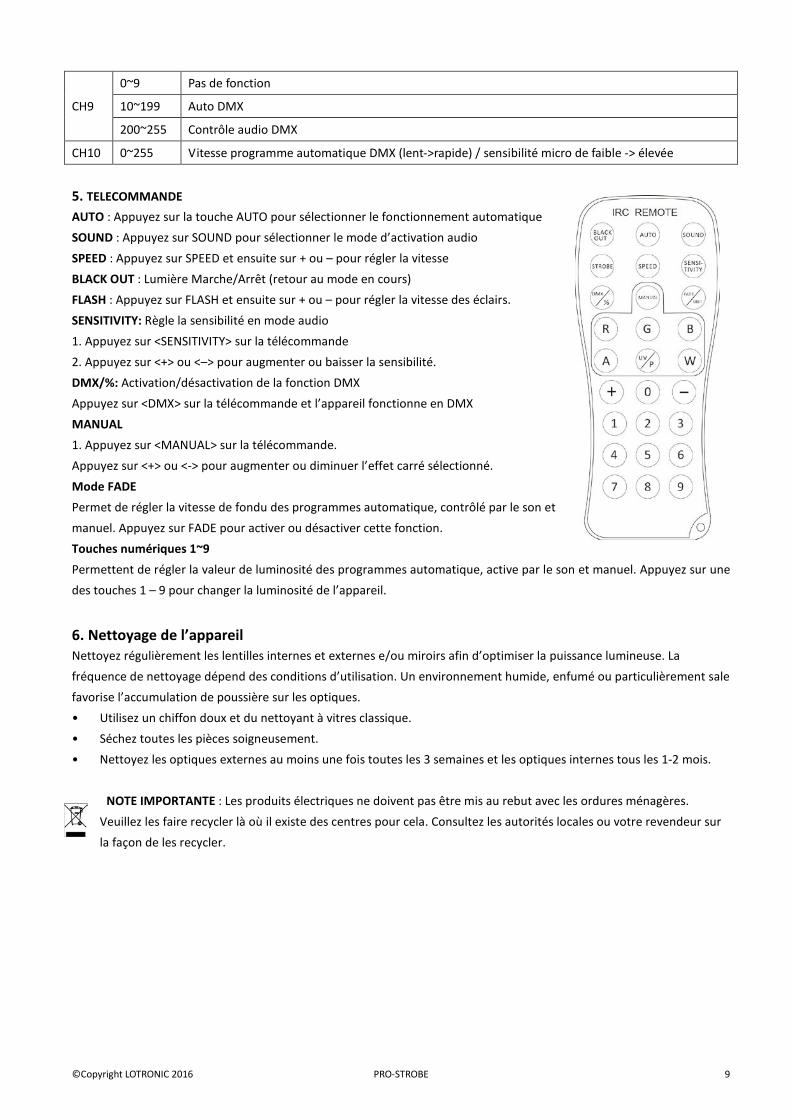
CH9
0~9 Pas de fonction
10~199 Auto DMX
200~255 Contrôle audio DMX
CH10 0~255 Vitesse programme automatique DMX (lent->rapide) / sensibilité micro de faible -> élevée
5. TELECOMMANDE AUTO : Appuyez sur la touche AUTO pour sélectionner le fonctionnement automatique SOUND : Appuyez sur SOUND pour sélectionner le mode d’activation audio SPEED : Appuyez sur SPEED et ensuite sur + ou – pour régler la vitesse BLACK OUT : Lumière Marche/Arrêt (retour au mode en cours) FLASH : Appuyez sur FLASH et ensuite sur + ou – pour régler la vitesse des éclairs. SENSITIVITY: Règle la sensibilité en mode audio 1. Appuyez sur <SENSITIVITY> sur la télécommande 2. Appuyez sur <+> ou <–> pour augmenter ou baisser la sensibilité. DMX/%: Activation/désactivation de la fonction DMX Appuyez sur <DMX> sur la télécommande et l’appareil fonctionne en DMX MANUAL 1. Appuyez sur <MANUAL> sur la télécommande. Appuyez sur <+> ou <-> pour augmenter ou diminuer l’effet carré sélectionné. Mode FADE Permet de régler la vitesse de fondu des programmes automatique, contrôlé par le son et manuel. Appuyez sur FADE pour activer ou désactiver cette fonction. Touches numériques 1~9 Permettent de régler la valeur de luminosité des programmes automatique, active par le son et manuel. Appuyez sur une des touches 1 – 9 pour changer la luminosité de l’appareil.
6. Nettoyage de l’appareil Nettoyez régulièrement les lentilles internes et externes e/ou miroirs afin d’optimiser la puissance lumineuse. La fréquence de nettoyage dépend des conditions d’utilisation. Un environnement humide, enfumé ou particulièrement sale favorise l’accumulation de poussière sur les optiques. • Utilisez un chiffon doux et du nettoyant à vitres classique. • Séchez toutes les pièces soigneusement. • Nettoyez les optiques externes au moins une fois toutes les 3 semaines et les optiques internes tous les 1-2 mois.
NOTE IMPORTANTE : Les produits électriques ne doivent pas être mis au rebut avec les ordures ménagères. Veuillez les faire recycler là où il existe des centres pour cela. Consultez les autorités locales ou votre revendeur sur la façon de les recycler.
©Copyright LOTRONIC 2016 PRO-STROBE 10
Aufmerksam die Sicherheitshinweise lesen. Sie enthalten wichtige Informationen bez. der Installation, des Betriebs und der Instandhaltung.
Sicherheitshinweise
• Nach Empfang die Verpackung öffnen und prüfen, ob der Inhalt vollständig und in gutem Zustand ist. • Prüfen, ob die Netzspannung der angegebenen Betriebsspannung entspricht. • Das Gerät muss an eine geerdete Netzsteckdose angeschlossen werden. • Nur für Innengebrauch in einer trockenen Umgebung! • Das Gerät an einem gut belüfteten Ort in einer Mindestentfernung von 0,5m zur nächsten Fläche anbringen. Die
Belüftungsschlitze dürfen weder blockiert noch verstopft sein.
• Das Gerät vor Reparatur- und Wartungsarbeiten vom Netz trennen. • Die Sicherung nur durch eine Sicherung mit denselben technischen Daten ersetzen. • Während des Betriebs dürfen sich keine brennbaren Materialien in der Nähe des Geräts befinden. • Das Gerät zusätzlich mit einem Sicherheitskabel befestigen. • Im Störfall sofort das Gerät ausschalten und vom Netz trennen. • Niemals das Gerät selbst reparieren. Dadurch können Schäden und Betriebsstörungen entstehen. Das Gerät nur von
einem anerkannten Techniker reparieren lassen und nur Ersatzteile benutzen, die mit den Originalteilen identisch sind.
• Während des Betriebs nicht das Gerät berühren, denn die hohen Spannungen können einen Stromschlag verursachen.
• Der Lichteffekt ist nur für dekorative Zwecke und eignet sich nicht als normale Haushaltsbeleuchtung. Netztrennungsvorrichtungen Wenn das Gerät über den Netzstecker ausgeschaltet wird, muss die Steckdose jederzeit leicht zugänglich bleiben
2. Technische Daten Versorgung: ................................................................................................. AC100~240V 50/60HZ Verbrauch: ............................................................................................................................... 200W LED: .................................................................................................................. 882 weiße SMD LEDs Sicherung: ................................................................................................................................... F3A Betriebsarten: ........................... DMX, Automatik, Musiksteuerung, Master-Slave, Fernbedienung Abmessungen: ................................................................................................... 435 x 105 x 260mm Gewicht: .................................................................................................................................... 3,5kg
3. Installation Den Haltebügel am Gerät befestigen. Das Gerät muss fest und sicher installiert werden, um Erschütterungen und Spielraum während der Bewegungen zu vermeiden. Die Montagefläche muss stabil sein und mindestens 10-mal das Gewicht des Geräts tragen können. Bei der Montage das Gerät immer zusätzlich durch ein Sicherheitskabel absichern, dass mindestens 12-mal das Gewicht des Geräts tragen kann. Das Gerät darf nur von einem Fachmann installiert werden. Es muss an einer Stelle installiert werden, wo es für Menschen unzugänglich ist und niemand unter dem Montagebereich stehen oder gehen kann.
4. Betrieb Master Betrieb: Jedes Gerät kann als Master programmiert werden
Slave Betrieb: Die Slave Geräte müssen auf den DMX Wert für Slave eingestellt
D
©Copyright LOTRONIC 2016 PRO-STROBE 11
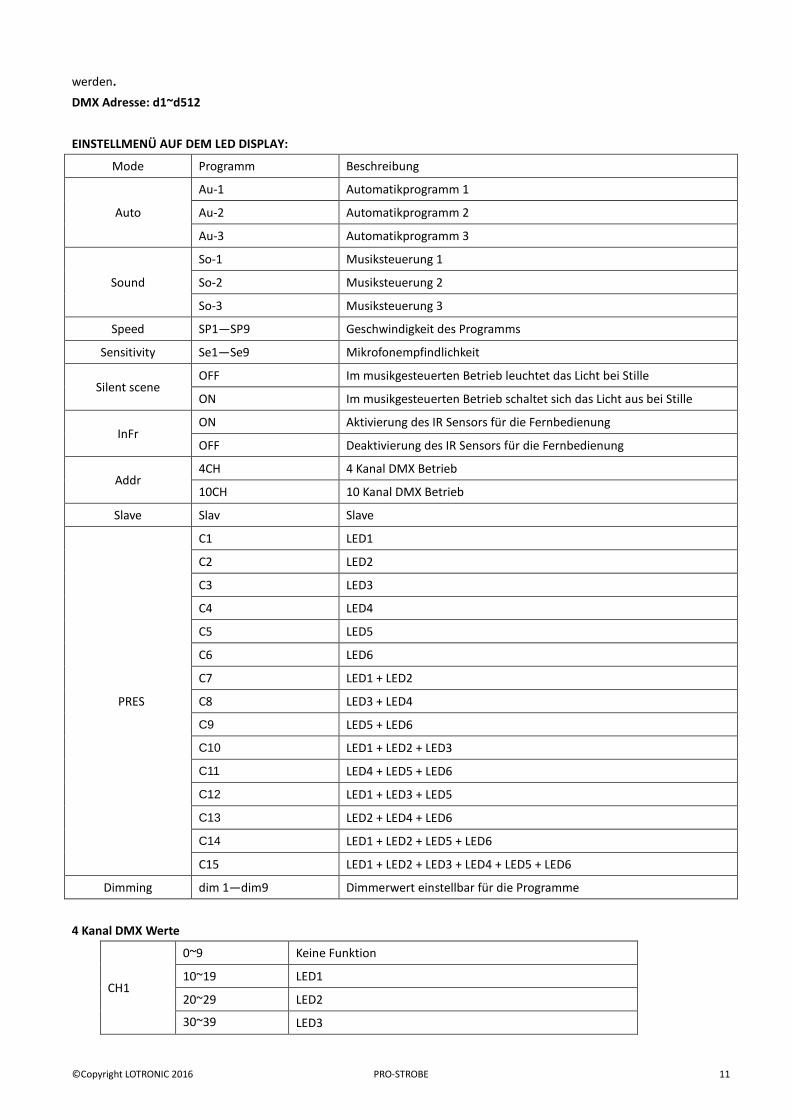
werden. DMX Adresse: d1~d512 EINSTELLMENÜ AUF DEM LED DISPLAY:
Mode Programm Beschreibung
Auto
Au-1 Automatikprogramm 1
Au-2 Automatikprogramm 2
Au-3 Automatikprogramm 3
Sound
So-1 Musiksteuerung 1
So-2 Musiksteuerung 2
So-3 Musiksteuerung 3
Speed SP1—SP9 Geschwindigkeit des Programms
Sensitivity Se1—Se9 Mikrofonempfindlichkeit
Silent scene OFF Im musikgesteuerten Betrieb leuchtet das Licht bei Stille
ON Im musikgesteuerten Betrieb schaltet sich das Licht aus bei Stille
InFr ON Aktivierung des IR Sensors für die Fernbedienung
OFF Deaktivierung des IR Sensors für die Fernbedienung
Addr 4CH 4 Kanal DMX Betrieb
10CH 10 Kanal DMX Betrieb
Slave Slav Slave
PRES
C1 LED1
C2 LED2
C3 LED3
C4 LED4
C5 LED5
C6 LED6
C7 LED1 + LED2
C8 LED3 + LED4
C9 LED5 + LED6
C10 LED1 + LED2 + LED3
C11 LED4 + LED5 + LED6
C12 LED1 + LED3 + LED5
C13 LED2 + LED4 + LED6
C14 LED1 + LED2 + LED5 + LED6
C15 LED1 + LED2 + LED3 + LED4 + LED5 + LED6
Dimming dim 1—dim9 Dimmerwert einstellbar für die Programme
4 Kanal DMX Werte
CH1
0~9 Keine Funktion
10~19 LED1
20~29 LED2
30~39 LED3
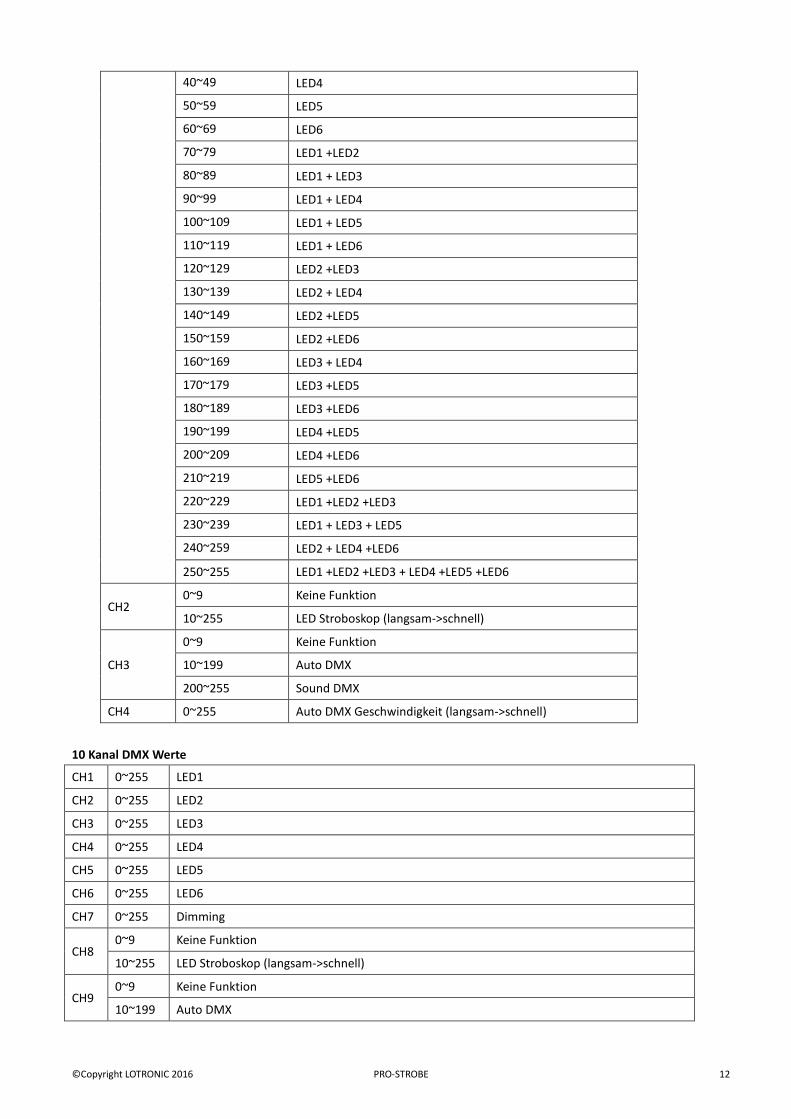
©Copyright LOTRONIC 2016 PRO-STROBE 12
40~49 LED4
50~59 LED5
60~69 LED6
70~79 LED1 +LED2
80~89 LED1 + LED3
90~99 LED1 + LED4
100~109 LED1 + LED5
110~119 LED1 + LED6
120~129 LED2 +LED3
130~139 LED2 + LED4
140~149 LED2 +LED5
150~159 LED2 +LED6
160~169 LED3 + LED4
170~179 LED3 +LED5
180~189 LED3 +LED6
190~199 LED4 +LED5
200~209 LED4 +LED6
210~219 LED5 +LED6
220~229 LED1 +LED2 +LED3
230~239 LED1 + LED3 + LED5
240~259 LED2 + LED4 +LED6
250~255 LED1 +LED2 +LED3 + LED4 +LED5 +LED6
CH2 0~9 Keine Funktion
10~255 LED Stroboskop (langsam->schnell)
CH3
0~9 Keine Funktion
10~199 Auto DMX
200~255 Sound DMX
CH4 0~255 Auto DMX Geschwindigkeit (langsam->schnell)
10 Kanal DMX Werte
CH1 0~255 LED1
CH2 0~255 LED2
CH3 0~255 LED3
CH4 0~255 LED4
CH5 0~255 LED5
CH6 0~255 LED6
CH7 0~255 Dimming
CH8 0~9 Keine Funktion
10~255 LED Stroboskop (langsam->schnell)
CH9 0~9 Keine Funktion
10~199 Auto DMX
©Copyright LOTRONIC 2016 PRO-STROBE 13
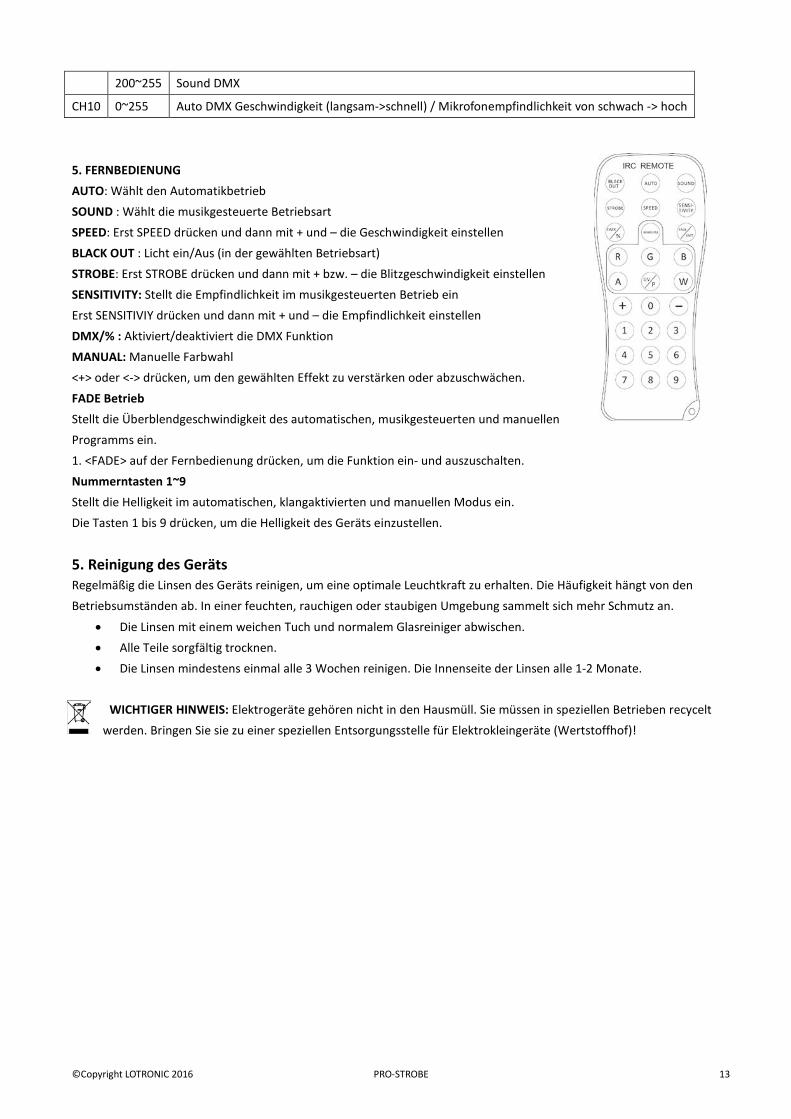
200~255 Sound DMX
CH10 0~255 Auto DMX Geschwindigkeit (langsam->schnell) / Mikrofonempfindlichkeit von schwach -> hoch
5. FERNBEDIENUNG AUTO: Wählt den Automatikbetrieb SOUND : Wählt die musikgesteuerte Betriebsart SPEED: Erst SPEED drücken und dann mit + und – die Geschwindigkeit einstellen BLACK OUT : Licht ein/Aus (in der gewählten Betriebsart) STROBE: Erst STROBE drücken und dann mit + bzw. – die Blitzgeschwindigkeit einstellen SENSITIVITY: Stellt die Empfindlichkeit im musikgesteuerten Betrieb ein Erst SENSITIVIY drücken und dann mit + und – die Empfindlichkeit einstellen DMX/% : Aktiviert/deaktiviert die DMX Funktion MANUAL: Manuelle Farbwahl <+> oder <-> drücken, um den gewählten Effekt zu verstärken oder abzuschwächen.
FADE Betrieb Stellt die Überblendgeschwindigkeit des automatischen, musikgesteuerten und manuellen Programms ein. 1. <FADE> auf der Fernbedienung drücken, um die Funktion ein- und auszuschalten. Nummerntasten 1~9 Stellt die Helligkeit im automatischen, klangaktivierten und manuellen Modus ein. Die Tasten 1 bis 9 drücken, um die Helligkeit des Geräts einzustellen.
5. Reinigung des Geräts Regelmäßig die Linsen des Geräts reinigen, um eine optimale Leuchtkraft zu erhalten. Die Häufigkeit hängt von den Betriebsumständen ab. In einer feuchten, rauchigen oder staubigen Umgebung sammelt sich mehr Schmutz an.
• Die Linsen mit einem weichen Tuch und normalem Glasreiniger abwischen. • Alle Teile sorgfältig trocknen. • Die Linsen mindestens einmal alle 3 Wochen reinigen. Die Innenseite der Linsen alle 1-2 Monate.
WICHTIGER HINWEIS: Elektrogeräte gehören nicht in den Hausmüll. Sie müssen in speziellen Betrieben recycelt werden. Bringen Sie sie zu einer speziellen Entsorgungsstelle für Elektrokleingeräte (Wertstoffhof)!
©Copyright LOTRONIC 2016 PRO-STROBE 14
Lees aandachtig de veiligheidsinstructies. Ze omvatten belangrijke informaties inzake installatie, bediening en onderhoud.
1. Veiligheidsinstructies
• Bewaar deze handleiding ter latere raadpleging op. Indien u het toestel aan en andere gebruiker verkocht, wees zeker dat hij deze handleiding ook ontvangt.
• Verwijder de verpakking en controleer dat het toestel niet tijdens transport wordt beschadigd alvorens u het toestel gebruikt.
• Let erop dat de netspanning niet hoger is dan degene die wordt vermeld aan het einde van deze gebruiksaanwijzing.. • Dit apparaat behoort tot beschermingsklasse I. Het moet dus verplicht worden geaard. • Alleen voor gebruik binnenshuis en in een droge ruimte. • Installeer het toestel in een goed geluchte ruimte, in tenminste 0,5m afstand van andere oppervlakten. Wees zeker
dat de ventilatie openingen niet geblokkeerd zijn.
• Trek de stekker uit het stopcontact alvorens u het toestel reinigt of de zekering vervangt. • Vervang de zekering alleen door een identieke zekering. • Wees zeker dat geen ontvlambare materialen naast het toestel tijdens de werking zijn. • Bevestig het toestel met veiligheidskabels • Nooit het toestel zelf repareren. Alle reparaties moeten van een ervarene technicus doorgevoerd worden. Alleen
originele onderdelen voor alle reparties gebruiken.
• Tijden de werking geen draden aanraken omdat hoge spanningen elektrische schokken kunnen veroorzaken. • Het lichtnetsnoer van dit toestel is niet vervangbaar. Indien het beschadigd is, moet het toestel worden gegooid. • Het product is voor decoratieve doeleinden en niet geschikt als huishoudelijke verlichting Ontkoppeling van het net Indien het toestel via het stopcontact wordt uitgeschakeld, moet de contactdoos altijd gemakkelijk bereikbaar zijn
2. Specificaties Aansluitspanning:.......................................................................................... AC100~240V 50/60HZ Vermogen: ............................................................................................................................... 200W Lichtbron: ........................................................................................................ 882x witte SMD LEDs Zekering: ....................................................................................................................................... 3A Werkingsmodi: ............ DMX, automatisch, muziek gestuurd, master-slave, via afstandsbediening Afmetingen: ....................................................................................................... 435 x 105 x 260mm Gewicht: .................................................................................................................................... 3,5kg
3. Installatie Bevestig het toestel via de schroef gaten op de houder. Wees zeker dat het toestel vast geïnstalleerd is om trillingen en afglijden tijdens de werking te vermijden. Wees zeker dat de truss waaraan u het toestel bevestigd, stabiel is en 10 keer het gewicht van het toestel kan dragen. Tijdens de montage, gebruik altijd een veiligheidskabel dat 12 keer het gewicht kan dragen. Het toestel moet van een vakman op een plaats monteert worden waar het buiten het bereik van mensen is en niemand onder kan staan.
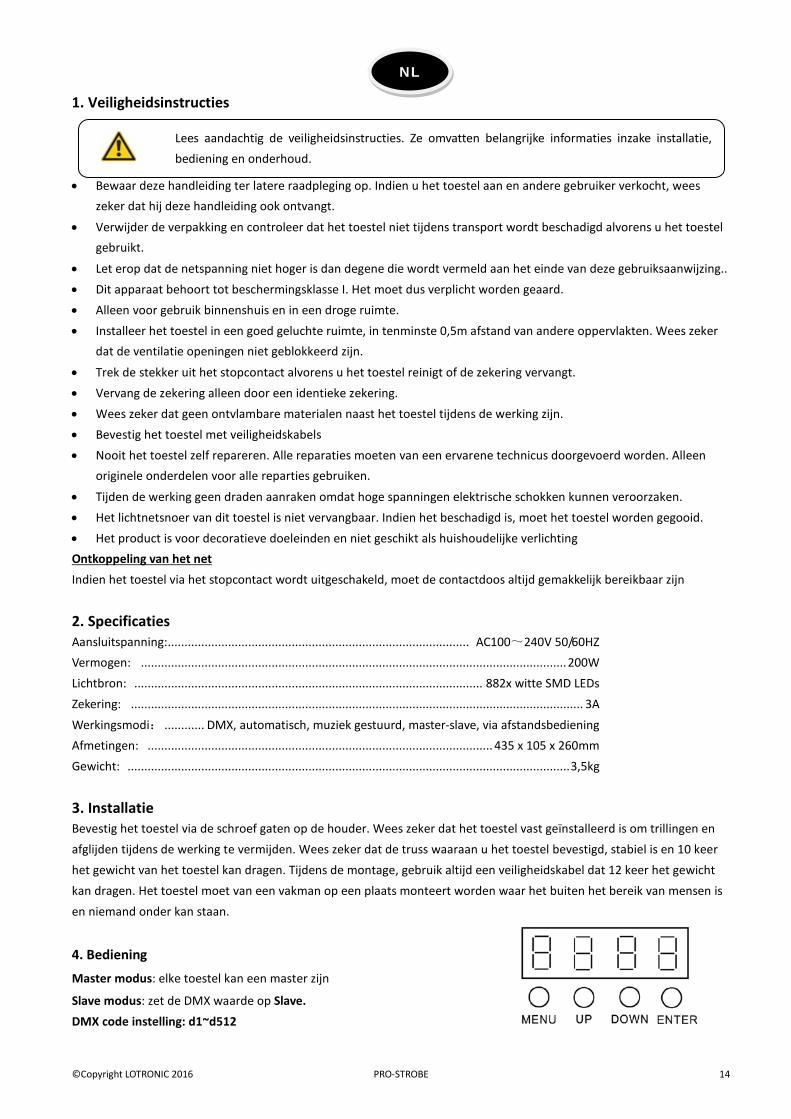
4. Bediening
Master modus: elke toestel kan een master zijn
Slave modus: zet de DMX waarde op Slave. DMX code instelling: d1~d512
NL

©Copyright LOTRONIC 2016 PRO-STROBE 15
INSTELMENU:
Mode Programma Omschrijving
Auto
Au-1 Auto programma 1
Au-2 Auto programma 2
Au-3 Auto programma 3
Sound
So-1 Sound programma 1
So-2 Sound programma 2
So-3 Sound programma 3
Speed SP1—SP9 Instelbare snelheid
Sensitivity Se1—Se9 Gevoeligheid van de microfoon
Silent scene OFF In sound programma is de licht bij stille ingeschakeld
ON In sound programma is de licht bij stille uitgeschakeld
InFr ON Activering van de IR sensor om het IR signaal van de afstandsbediening te ontvangen
OFF Deactivering van de IR sensor om het signaal van de afstandsbediening te ontvangen
Addr 4CH 4 kanaals DMX modus
10CH 10 kanaals DMX modus
Slave Slav Slave
PRES
C1 LED1
C2 LED2
C3 LED3
C4 LED4
C5 LED5
C6 LED6
C7 LED1 + LED2
C8 LED3 + LED4
C9 LED5 + LED6
C10 LED1 + LED2 + LED3
C11 LED4 + LED5 + LED6
C12 LED1 + LED3 + LED5
C13 LED2 + LED4 + LED6
C14 LED1 + LED2 + LED5 + LED6
C15 LED1 + LED2 + LED3 + LED4 + LED5 + LED6
Dimming dim 1—dim9 Dimming waarde van het programma
4 kanaal DMX waarden
CH1
0~9 Geen functie
10~19 LED1
20~29 LED2
30~39 LED3
40~49 LED4
50~59 LED5
60~69 LED6
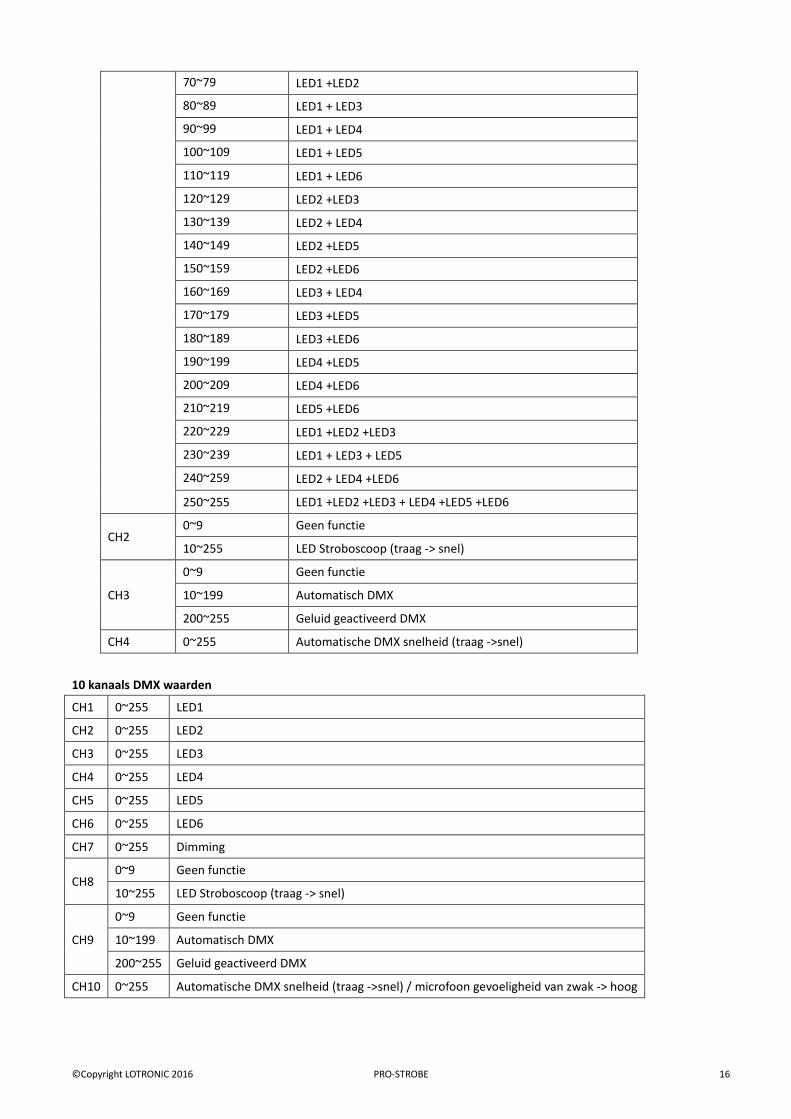
©Copyright LOTRONIC 2016 PRO-STROBE 16
70~79 LED1 +LED2
80~89 LED1 + LED3
90~99 LED1 + LED4
100~109 LED1 + LED5
110~119 LED1 + LED6
120~129 LED2 +LED3
130~139 LED2 + LED4
140~149 LED2 +LED5
150~159 LED2 +LED6
160~169 LED3 + LED4
170~179 LED3 +LED5
180~189 LED3 +LED6
190~199 LED4 +LED5
200~209 LED4 +LED6
210~219 LED5 +LED6
220~229 LED1 +LED2 +LED3
230~239 LED1 + LED3 + LED5
240~259 LED2 + LED4 +LED6
250~255 LED1 +LED2 +LED3 + LED4 +LED5 +LED6
CH2 0~9 Geen functie
10~255 LED Stroboscoop (traag -> snel)
CH3
0~9 Geen functie
10~199 Automatisch DMX
200~255 Geluid geactiveerd DMX
CH4 0~255 Automatische DMX snelheid (traag ->snel)
10 kanaals DMX waarden
CH1 0~255 LED1
CH2 0~255 LED2
CH3 0~255 LED3
CH4 0~255 LED4
CH5 0~255 LED5
CH6 0~255 LED6
CH7 0~255 Dimming
CH8 0~9 Geen functie
10~255 LED Stroboscoop (traag -> snel)
CH9
0~9 Geen functie
10~199 Automatisch DMX
200~255 Geluid geactiveerd DMX
CH10 0~255 Automatische DMX snelheid (traag ->snel) / microfoon gevoeligheid van zwak -> hoog
©Copyright LOTRONIC 2016 PRO-STROBE 17
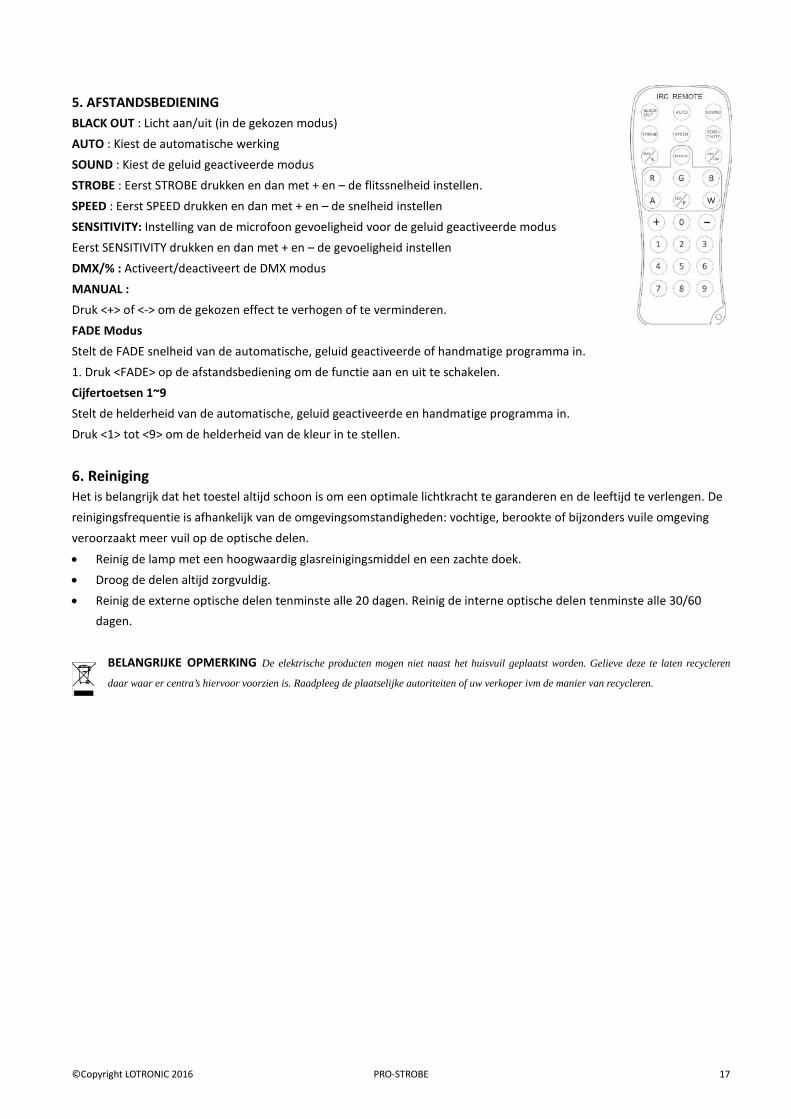
5. AFSTANDSBEDIENING BLACK OUT : Licht aan/uit (in de gekozen modus) AUTO : Kiest de automatische werking SOUND : Kiest de geluid geactiveerde modus STROBE : Eerst STROBE drukken en dan met + en – de flitssnelheid instellen. SPEED : Eerst SPEED drukken en dan met + en – de snelheid instellen SENSITIVITY: Instelling van de microfoon gevoeligheid voor de geluid geactiveerde modus Eerst SENSITIVITY drukken en dan met + en – de gevoeligheid instellen DMX/% : Activeert/deactiveert de DMX modus MANUAL : Druk <+> of <-> om de gekozen effect te verhogen of te verminderen. FADE Modus Stelt de FADE snelheid van de automatische, geluid geactiveerde of handmatige programma in. 1. Druk <FADE> op de afstandsbediening om de functie aan en uit te schakelen. Cijfertoetsen 1~9 Stelt de helderheid van de automatische, geluid geactiveerde en handmatige programma in. Druk <1> tot <9> om de helderheid van de kleur in te stellen.
6. Reiniging Het is belangrijk dat het toestel altijd schoon is om een optimale lichtkracht te garanderen en de leeftijd te verlengen. De reinigingsfrequentie is afhankelijk van de omgevingsomstandigheden: vochtige, berookte of bijzonders vuile omgeving veroorzaakt meer vuil op de optische delen.
• Reinig de lamp met een hoogwaardig glasreinigingsmiddel en een zachte doek. • Droog de delen altijd zorgvuldig. • Reinig de externe optische delen tenminste alle 20 dagen. Reinig de interne optische delen tenminste alle 30/60
dagen.
BELANGRIJKE OPMERKING De elektrische producten mogen niet naast het huisvuil geplaatst worden. Gelieve deze te laten recycleren
daar waar er centra’s hiervoor voorzien is. Raadpleeg de plaatselijke autoriteiten of uw verkoper ivm de manier van recycleren.
©Copyright LOTRONIC 2016 PRO-STROBE 18
1. Varnostna navodila
• Prosimo, hranite navodila za nadaljnjo uporabo. Če prodajate napravo drugemu uporabniku, se prepričajte, da prejme
tudi navodila za uporabo.
• Odstranite embalažo in preverite napravo previdno, da ni bila poškodovana med prevozom, pred uporabo naprave. • Pred prvo uporabo se prepričajte, da napetost in frekvenca oskrbe z električno energijo ustrezajo porabi energije
enote.
• Pomembno je, da ozemljite napravo z rumeno / zelenim kablom, da bi se izognili električnemu šoku. • Naprava je samo za notranjo uporabo v suhem prostoru. • Naprava mora biti postavljena v prostor z ustreznim prezračevanjem, vsaj 0,5m od sosednjih površin. Bodite
prepričani, da niso blokirani zračniki.
• Izvlecite napajalni kabel pred zamenjavo varovalke ali servisiranjem. • Varovalko zamenjajte samo z istim tipom. • Prepričajte se, da ni vnetljivih snovi v bližini naprave med obratovanjem. • Uporabite varnostno vrv pri fiksiranju te enote. • V primeru resnega problema delovanja, prenehajte z uporabo naprave takoj. • Nikoli ne poskušajte popravljati sami. Popravila nekvalificiranih ljudi, lahko povzroči poškodbe ali okvare. Prosimo, da
se obrnite na najbližji pooblaščeni tehnični center za pomoč in vedno uporabljajo isto vrsto rezervnih delov.
• Ne dotikajte se nobenih žic med obratovanjem, visoka napetost, lahko povzroči električni šok. • Izdelek je za dekorativne namene in niso primerni kot razsvetljavo prostorov v gospodinjstvu ODKLOP NAPRAVE Če je naprava povezana preko eletričnega vtiča ali sponke, odklop, naprava mora biti biti enostavnen in dostopen.
2. Tehnični podatki Napajanje: ..................................................................................................... AC100~240V 50/60HZ Poraba: ..................................................................................................................................... 200W Vir svetlobe: ..................................................................................................... 882 × beli SMD LED’s Varovalka: ...................................................................................................................................... 3A Načini delovanja: ............. DMX, Samodejno, Zvočna aktivacija, master-slave, daljinski upravljalnik Mere: ................................................................................................................. 435 x 105 x 260mm Teža: .......................................................................................................................................... 3,5kg
3. Namestitev Naprava mora biti nameščena s svojimi luknjami na vijake na nosilcu. Vedno poskrbite, da je enota trdno nameščena, da se prepreče vibracije in zdrs med delovanjem. Vedno poskrbite, da je podlaga, na katero pritrdite napravo varna in sposobna prenesti 10-kratno težo naprave. Prav tako vedno uporabljajte varnostno vrv, ki lahko prenese 12-kratno težo enote. Mesto namestitvemora določiti strokovnjak, obvezno mora biti izven dosega ljudi.
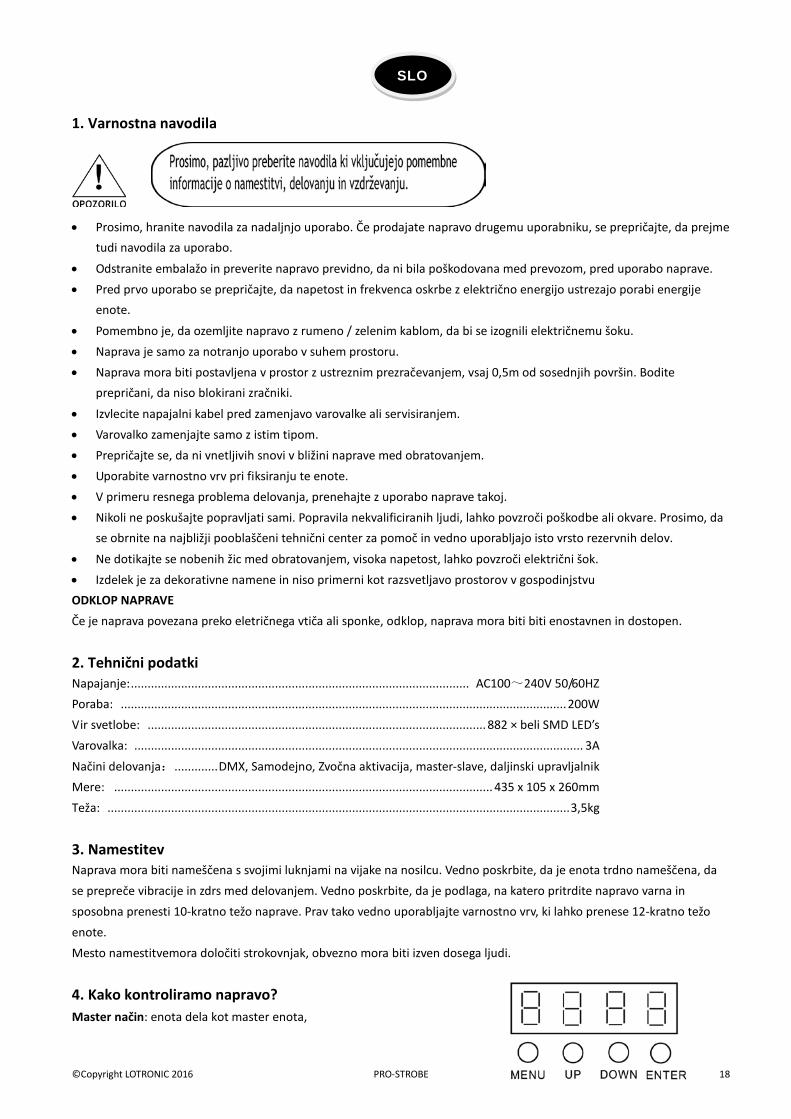
4. Kako kontroliramo napravo? Master način: enota dela kot master enota,
SLO
©Copyright LOTRONIC 2016 PRO-STROBE 19
Slave način: potrebna določitev vrednosti DMX adrese za Slave. DMX nastavitev: d1~d512 NASTAVITEV MENIJA LED ZASLONA:
Način Program Opis
Auto
Au-1 Samodejni program 1
Au-2 Samodejni program 2
Au-3 Samodejni program 3
Sound
So-1 Zvočni program 1
So-2 Zvočni program 2
So-3 Zvočni program 3
Speed SP1—SP9 Vrednost hitrosti za prilagoditev programa
Sensitivity Se1—Se9 MIC prilagoditev vrednosti
Silent scene OFF Naprava odpre luč v Zvočnem programu
ON Naprava zapre luč v Zvočnem programu
InFr ON Omogoči IR daljinski upravljalnik sprejem signala.
OFF Onemogoči IR daljinski upravljalnik sprejem signala.
Addr 4CH 4 kanalni DMX način
10CH 10 kanalni DMX način
Slave Slav Slave
PRES
C1 LED1
C2 LED2
C3 LED3
C4 LED4
C5 LED5
C6 LED6
C7 LED1 + LED2
C8 LED3 + LED4
C9 LED5 + LED6
C10 LED1 + LED2 + LED3
C11 LED4 + LED5 + LED6
C12 LED1 + LED3 + LED5
C13 LED2 + LED4 + LED6
C14 LED1 + LED2 + LED5 + LED6
C15 LED1 + LED2 + LED3 + LED4 + LED5 + LED6
Zatemnitev dim 1—dim9 Vrednost zatemnitev za program nastavljivo
4 Kanalne DMX vrednosti
CH1
0~9 Ni funkcije
10~19 LED1
20~29 LED2
30~39 LED3

©Copyright LOTRONIC 2016 PRO-STROBE 20
40~49 LED4
50~59 LED5
60~69 LED6
70~79 LED1 + LED2
80~89 LED1 + LED3
90~99 LED1 + LED4
100~109 LED1 + LED5
110~119 LED1 + LED6
120~129 LED2 + LED3
130~139 LED2 + LED4
140~149 LED2 + LED5
150~159 LED2 +LED6
160~169 LED3 + LED4
170~179 LED3 + LED5
180~189 LED3 +LED6
190~199 LED4 + LED5
200~209 LED4 +LED6
210~219 LED5 +LED6
220~229 LED1 + LED2 + LED3
230~239 LED1 + LED3 + LED5
240~259 LED2 + LED4 +LED6
250~255 LED1 + LED2 + LED3 + LED4 + LED5 +LED6
CH2 0~9 Ni funkcije
10~255 LED Strobe (počasi - hitro)
CH3
0~9 Ni funkcije
10~199 Auto DMX
200~255 Zvok DMX
CH4 0~255 Auto DMX hitrost (počasi - hitro)
10 Kanalne DMX vrednosti
CH1 0~255 LED1
CH2 0~255 LED2
CH3 0~255 LED3
CH4 0~255 LED4
CH5 0~255 LED5
CH6 0~255 LED6
CH7 0~255 Zatemnitev
CH8 0~9 Ni funkcije
10~255 LED Strobe(počasi - hitro)
CH9 0~9 Ni funkcije
10~199 Auto DMX
©Copyright LOTRONIC 2016 PRO-STROBE 21
200~255 Zvok DMX
CH10 0~255 Auto DMX hitrost(počasi - hitro)/ zvočna občutljivost mic nizka - visoka
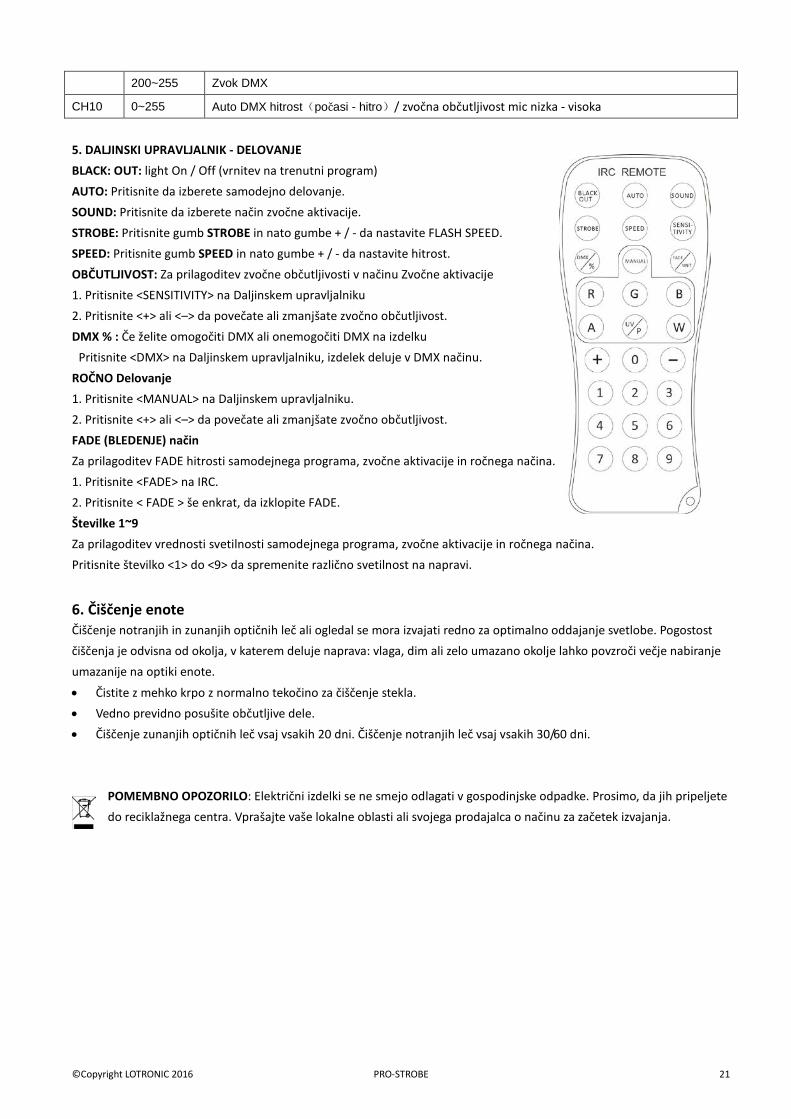
5. DALJINSKI UPRAVLJALNIK - DELOVANJE BLACK: OUT: light On / Off (vrnitev na trenutni program) AUTO: Pritisnite da izberete samodejno delovanje. SOUND: Pritisnite da izberete način zvočne aktivacije. STROBE: Pritisnite gumb STROBE in nato gumbe + / - da nastavite FLASH SPEED. SPEED: Pritisnite gumb SPEED in nato gumbe + / - da nastavite hitrost. OBČUTLJIVOST: Za prilagoditev zvočne občutljivosti v načinu Zvočne aktivacije 1. Pritisnite <SENSITIVITY> na Daljinskem upravljalniku 2. Pritisnite <+> ali <–> da povečate ali zmanjšate zvočno občutljivost. DMX % : Če želite omogočiti DMX ali onemogočiti DMX na izdelku Pritisnite <DMX> na Daljinskem upravljalniku, izdelek deluje v DMX načinu. ROČNO Delovanje 1. Pritisnite <MANUAL> na Daljinskem upravljalniku. 2. Pritisnite <+> ali <–> da povečate ali zmanjšate zvočno občutljivost. FADE (BLEDENJE) način Za prilagoditev FADE hitrosti samodejnega programa, zvočne aktivacije in ročnega načina. 1. Pritisnite <FADE> na IRC. 2. Pritisnite < FADE > še enkrat, da izklopite FADE. Številke 1~9 Za prilagoditev vrednosti svetilnosti samodejnega programa, zvočne aktivacije in ročnega načina. Pritisnite številko <1> do <9> da spremenite različno svetilnost na napravi.
6. Čiščenje enote Čiščenje notranjih in zunanjih optičnih leč ali ogledal se mora izvajati redno za optimalno oddajanje svetlobe. Pogostost čiščenja je odvisna od okolja, v katerem deluje naprava: vlaga, dim ali zelo umazano okolje lahko povzroči večje nabiranje umazanije na optiki enote.
• Čistite z mehko krpo z normalno tekočino za čiščenje stekla. • Vedno previdno posušite občutljive dele. • Čiščenje zunanjih optičnih leč vsaj vsakih 20 dni. Čiščenje notranjih leč vsaj vsakih 30/60 dni.
POMEMBNO OPOZORILO: Električni izdelki se ne smejo odlagati v gospodinjske odpadke. Prosimo, da jih pripeljete do reciklažnega centra. Vprašajte vaše lokalne oblasti ali svojega prodajalca o načinu za začetek izvajanja.
©Copyright LOTRONIC 2016 PRO-STROBE 22
Lire attentivement les consignes de sécurité qui contiennent des informations importantes concernant l’installation, le fonctionnement
1. Instrucciones de seguridad
• A la recepción del equipo, abra el embalaje y verifique que el contenido este completo y en buen estado. • Asegúrese de que la tensión del enchufe es la correcta para este equipo. No se exceda de la tensión indicada en el
equipo.
• Este equipo ha de estar conectado a tierra, para evitar descargas eléctricas. • Únicamente para su utilización en interiores y en lugares secos ¡ • Instale el equipo en un lugar bien ventilado a una distancia mínima de 0,5m de cualquier superficie. Asegúrese de
que las rejillas de ventilación, no quedan obstruidas.
• Desenchufe el equipo del enchufe antes cualquier manipulación o limpieza. • Cuando reemplace un fusible, utilice únicamente uno de las mismas características exactamente que el original. • Verifique que ningún material inflamable se encuentra próximo al equipo durante su funcionamiento. • Fije el equipo firmemente e instálele un cable de seguridad. • En caso de mal funcionamiento, pare inmediatamente el equipo y desenchúfelo de la corriente. • No intente reparar nunca el equipo por usted mismo. Una reparación mal hecha puede provocar daños y mal
funcionamiento del equipo. Contacte con un servicio técnico autorizado. Utilice solo recambios originales.
• No toque los cables eléctricos durante el funcionamiento ya que las corrientes elevadas pueden provocar una electrocución.
• El producto es para fines decorativos y no adecuados como la iluminación de una estancia doméstica DISPOSITIVO DE CORTE: Cuando un enchufe o un interruptor sean utilizados para desconectar el equipo, estos dispositivos han de permanecer fácilmente accesibles en todo momento.
2. Características técnicas Alimentación: ............................................................................................... AC100~240V 50/60HZ Consumo: ................................................................................................................................. 200W LED: ................................................................................................................. 882x LED SMD blanco Fusible: ........................................................................................................................................ F3A Modos de funcionamiento: ...................................... DMX, Automático, controlado por la música, ............................................................................................. Maestro-esclavo o el mando a distancia Dimensiones: ..................................................................................................... 435 x 105 x 260mm Peso: ......................................................................................................................................... 3,5kg
3. Instalación Fije el aparato al soporte mediante los tornillos incluidos. Asegúrese de que el equipo está firmemente fijado para evitar vibraciones y movimientos durante su funcionamiento. Verifique que el lugar de instalación es fuerte y sólido y capaz de soportar al menos diez veces el peso del equipo. Una vez instalado, asegure el equipo con un cable de seguridad, sujeto a otro punto, que aguante al menos 12 veces el peso del equipo. Este equipo ha de ser instalado por profesionales. Debe ser instalado en un lugar donde este fuera del alcance de las personas y que las personas no puedan pasar debajo de él.
E
©Copyright LOTRONIC 2016 PRO-STROBE 23
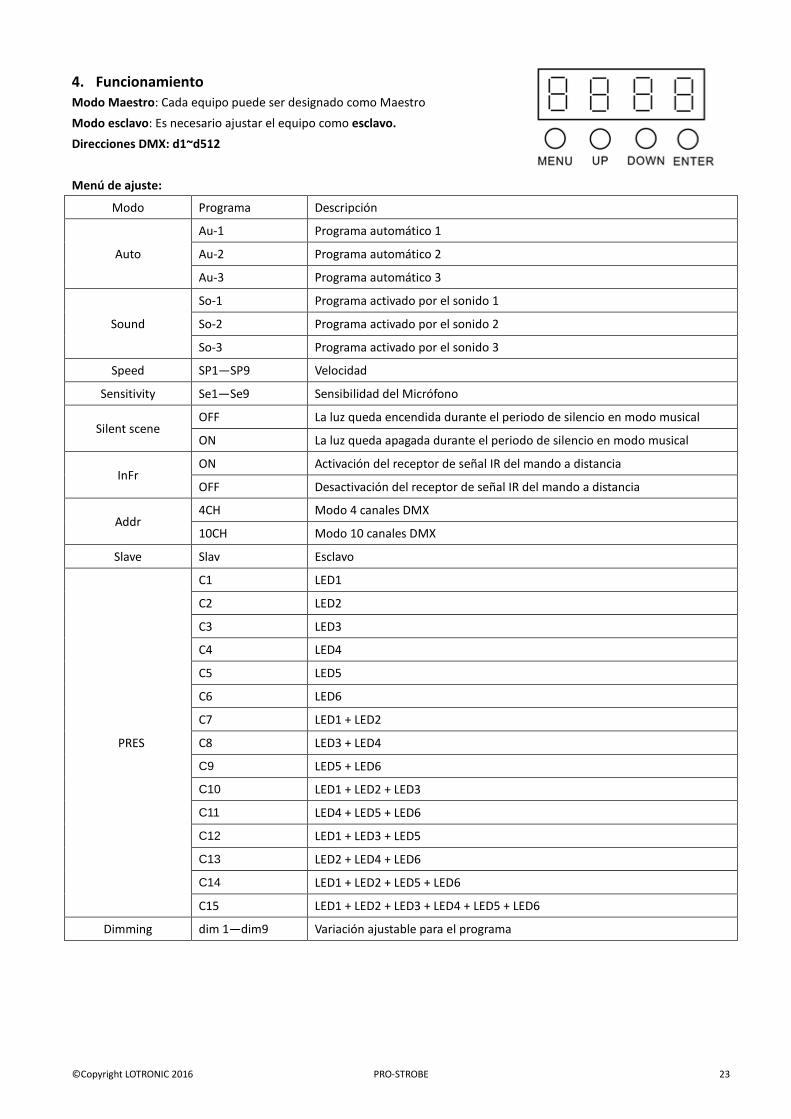
4. Funcionamiento Modo Maestro: Cada equipo puede ser designado como Maestro Modo esclavo: Es necesario ajustar el equipo como esclavo. Direcciones DMX: d1~d512 Menú de ajuste:
Modo Programa Descripción
Auto
Au-1 Programa automático 1
Au-2 Programa automático 2
Au-3 Programa automático 3
Sound
So-1 Programa activado por el sonido 1
So-2 Programa activado por el sonido 2
So-3 Programa activado por el sonido 3
Speed SP1—SP9 Velocidad
Sensitivity Se1—Se9 Sensibilidad del Micrófono
Silent scene OFF La luz queda encendida durante el periodo de silencio en modo musical
ON La luz queda apagada durante el periodo de silencio en modo musical
InFr ON Activación del receptor de señal IR del mando a distancia
OFF Desactivación del receptor de señal IR del mando a distancia
Addr 4CH Modo 4 canales DMX
10CH Modo 10 canales DMX
Slave Slav Esclavo
PRES
C1 LED1
C2 LED2
C3 LED3
C4 LED4
C5 LED5
C6 LED6
C7 LED1 + LED2
C8 LED3 + LED4
C9 LED5 + LED6
C10 LED1 + LED2 + LED3
C11 LED4 + LED5 + LED6
C12 LED1 + LED3 + LED5
C13 LED2 + LED4 + LED6
C14 LED1 + LED2 + LED5 + LED6
C15 LED1 + LED2 + LED3 + LED4 + LED5 + LED6
Dimming dim 1—dim9 Variación ajustable para el programa
©Copyright LOTRONIC 2016 PRO-STROBE 24
4 canales DMX
CH1
0~9 Sin función
10~19 LED1
20~29 LED2
30~39 LED3
40~49 LED4
50~59 LED5
60~69 LED6
70~79 LED1+LED2
80~89 LED1+LED3
90~99 LED1+LED4
100~109 LED1+LED5
110~119 LED1+LED6
120~129 LED2+LED3
130~139 LED2+LED4
140~149 LED2+LED5
150~159 LED2+LED6
160~169 LED3+LED4
170~179 LED3+LED5
180~189 LED3+LED6
190~199 LED4+LED5
200~209 LED4+LED6
210~219 LED5+LED6
220~229 LED1+LED2+LED3
230~239 LED1+LED3+LED5
240~259 LED2+LED4+LED6
250~255 LED1+LED2 +LED3+ LED4 +LED5+LED6
CH2 0~9 Sin función
10~255 Estroboscopio de LED (lento -> rápido)
CH3
0~9 Sin función
10~199 Auto DMX
200~255 Control audio DMX
CH4 0~255 Velocidad del programa automático DMX (lento->rápido)
10 canales DMX
CH1 0~255 LED1
CH2 0~255 LED2
CH3 0~255 LED3
CH4 0~255 LED4
CH5 0~255 LED5
CH6 0~255 LED6
CH7 0~255 Variador
©Copyright LOTRONIC 2016 PRO-STROBE 25
CH8 0~9 Sin función
10~255 Estroboscopio de LED (lento -> rápido)
CH9
0~9 Sin función
10~199 Auto DMX
200~255 Control audio DMX
CH10 0~255 Velocidad del programa automático DMX (lento->rápido) / Sensibilidad Micrófono de control de sonido de baja a alta
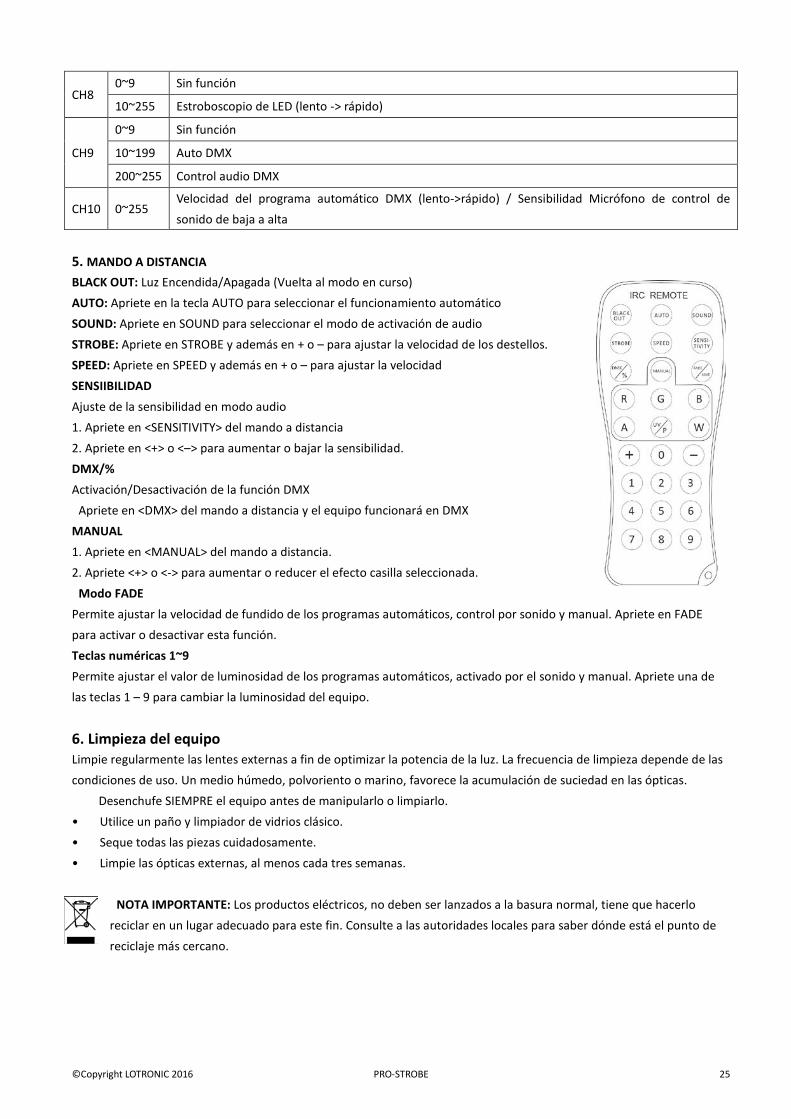
5. MANDO A DISTANCIA BLACK OUT: Luz Encendida/Apagada (Vuelta al modo en curso) AUTO: Apriete en la tecla AUTO para seleccionar el funcionamiento automático SOUND: Apriete en SOUND para seleccionar el modo de activación de audio STROBE: Apriete en STROBE y además en + o – para ajustar la velocidad de los destellos. SPEED: Apriete en SPEED y además en + o – para ajustar la velocidad SENSIIBILIDAD Ajuste de la sensibilidad en modo audio 1. Apriete en <SENSITIVITY> del mando a distancia 2. Apriete en <+> o <–> para aumentar o bajar la sensibilidad. DMX/% Activación/Desactivación de la función DMX Apriete en <DMX> del mando a distancia y el equipo funcionará en DMX MANUAL 1. Apriete en <MANUAL> del mando a distancia. 2. Apriete <+> o <-> para aumentar o reducer el efecto casilla seleccionada. Modo FADE Permite ajustar la velocidad de fundido de los programas automáticos, control por sonido y manual. Apriete en FADE para activar o desactivar esta función. Teclas numéricas 1~9 Permite ajustar el valor de luminosidad de los programas automáticos, activado por el sonido y manual. Apriete una de las teclas 1 – 9 para cambiar la luminosidad del equipo.
6. Limpieza del equipo Limpie regularmente las lentes externas a fin de optimizar la potencia de la luz. La frecuencia de limpieza depende de las condiciones de uso. Un medio húmedo, polvoriento o marino, favorece la acumulación de suciedad en las ópticas. Desenchufe SIEMPRE el equipo antes de manipularlo o limpiarlo. • Utilice un paño y limpiador de vidrios clásico. • Seque todas las piezas cuidadosamente. • Limpie las ópticas externas, al menos cada tres semanas.
NOTA IMPORTANTE: Los productos eléctricos, no deben ser lanzados a la basura normal, tiene que hacerlo reciclar en un lugar adecuado para este fin. Consulte a las autoridades locales para saber dónde está el punto de reciclaje más cercano.
©Copyright LOTRONIC 2016 PRO-STROBE 26
Návod na použitie 1. Bezpečnostné pokyny
2. Uchovajte si tento návod pre budúce použitie. 3. Po rozbalení prístroj skontrolujte či nebol pri preprave poškodený. 4. Pred uvedením do prevádzky skontrolujte či napájacie napätie a frekvencia súhlasí s požiadavkami prístroja. 5. Prístroj pripájajte iba do zásuvky s ochranným zemnením.
6. Prístroj je určné na vnútorné použitie na suchom mieste. 7. Prístroj musí byť inštalovaný v mieste s dostatočnou ventiláciou minimálne 0,5m od susedných plôch. Neblokujte
ventilačné otvory na prístroji. 8. Pred výmenou poistky odpojte napájací kábel. 9. Poistku vymieňajte vždy za rovnaký typ. 10. Uistite sa že počas prevádzky niesú na blízku žiadne horľavé materiály. 11. V prípade vážnych prevádzkových problémov prestaňte prístroj používať. 12. Nepokúšajte sa prístroj opraviť, ale zverte toto skúsenému technikovi alebo servisnému stredisku. 13. Počas prevádzka sa nedotýkajte vodičov, pretože môže dôjsť k úrazu el. Prúdom.
Produkt slúži na dekoratívne účely a nie ako osvetlenie miestností
2. Specifications Napájanie: ..................................................................................................... AC100~240V 50/60HZ Príkon: ...................................................................................................................................... 200W Sveteľný zdroj: .................................................................................................. 882x white SMD LED Poistka: .......................................................................................................................................... 3A Operačné módy:............................ DMX, Auto-run, Sound Control, Master-slave + remote control Rozmery: ............................................................................................................ 435 x 105 x 260mm Hmotnosť: ................................................................................................................................. 3.5kg
3. Inštalácia Prístroj by mal byť namontovaný pomocou otvorov na skrutky v držiaku. Uistite sa že je dobre upevnené aby sa zabránilo vybráciám alebo kĺzaniu počas prevádzky. Uistite sa že štruktúra ku ktorej prístroj upevňujete udrží aspoň 10 násobok hmotnosti prístroja. Používajte bezpečnostný kábel ktorý udrží aspoň 12 násobok hmotnosti prístroja.
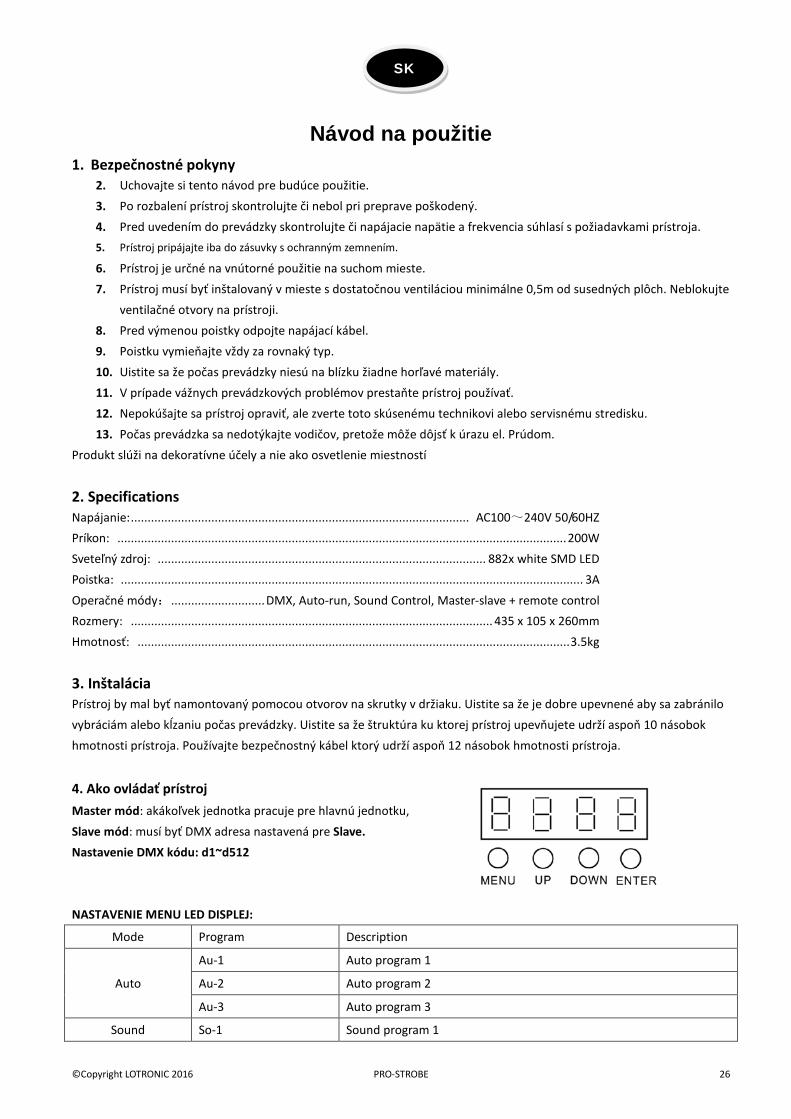
4. Ako ovládať prístroj Master mód: akákoľvek jednotka pracuje pre hlavnú jednotku, Slave mód: musí byť DMX adresa nastavená pre Slave. Nastavenie DMX kódu: d1~d512 NASTAVENIE MENU LED DISPLEJ:
Mode Program Description
Auto
Au-1 Auto program 1
Au-2 Auto program 2
Au-3 Auto program 3
Sound So-1 Sound program 1
SK
©Copyright LOTRONIC 2016 PRO-STROBE 27
So-2 Sound program 2
So-3 Sound program 3
Speed SP1—SP9 Nastaviteľná hodnota rýchlosti
Sensitivity Se1—Se9 Nastaviteľná hodnota citlivosti mikrofónu
Silent scene OFF Svetlo je pripravené na svietenie podľa zvukového programu
ON Svetlo nie je pripravené na svietenie podľa zvukového programu
InFr ON Zapnutie príjmu IR signálu
OFF Vypnutie príjmu IR signálu
Addr 4CH 4 channels DMX mód
9CH 9 channels DMX mód
Slave Slav Slave
PRES
C1 LED1
C2 LED2
C3 LED3
C4 LED4
C5 LED5
C6 LED6
C7 LED1 + LED2
C8 LED3 + LED4
C9 LED5 + LED6
C10 LED1 + LED2 + LED3
C11 LED4 + LED5 + LED6
C12 LED1 + LED3 + LED5
C13 LED2 + LED4 + LED6
C14 LED1 + LED2 + LED5 + LED6
C15 LED1 + LED2 + LED3 + LED4 + LED5 + LED6
Dimming Dim1 – dim9 Nastaviteľná hodnota stmievania
4 kanálový DMX mód
CH1
0~9 Bez funkcie
10~19 LED1
20~29 LED2
30~39 LED3
40~49 LED4
50~59 LED5
60~69 LED1 +LED2
70~79 LED1 + LED3
80~89 LED1 + LED4
90~99 LED1 + LED5
100~109 LED2 + LED3
©Copyright LOTRONIC 2016 PRO-STROBE 28
110~119 LED2 + LED4
120~129 LED2 +LED5
130~139 LED3 + LED4
140~149 LED3 +LED5
150~159 LED4 +LED5
160~169 LED1 + LED2 + LED3
170~179 LED1 + LED2 + LED4
180~189 LED1 + LED2 + LED5
190~199 LED1 + LED3 + LED4
200~209 LED1 + LED3 + LED5
210~219 LED2 + LED3 + LED4
220~229 LED2 + LED3 + LED5
230~239 LED3 + LED4 + LED5
240~259 LED1 + LED2 + LED3 + LED4
250~255 LED1 +LED2 +LED3 + LED4 +LED5
CH2 10~255 LED Strobe(od pomalého po rýchle)
CH3 10~199 Auto DMX
200~255 Sound DMX
CH4 0~255 Auto DMX Speed (od pomalého po rýchle)
10 kanálový DMX mód
CH1 0~255 LED1
CH2 0~255 LED2
CH3 0~255 LED3
CH4 0~255 LED4
CH5 0~255 LED5
CH6 0~255 LED6
CH7 0~255 Dimming
CH8 0~9 No function
10~255 LED Strobe (od pomalého po rýchle)
CH9
0~9 Bez fukcie
10~199 Auto DMX
200~255 Sound DMX
CH10 0~255 Auto DMX Speed (od pomalého po rýchle) / sound mic sensitivity from low -> high
©Copyright LOTRONIC 2016 PRO-STROBE 29
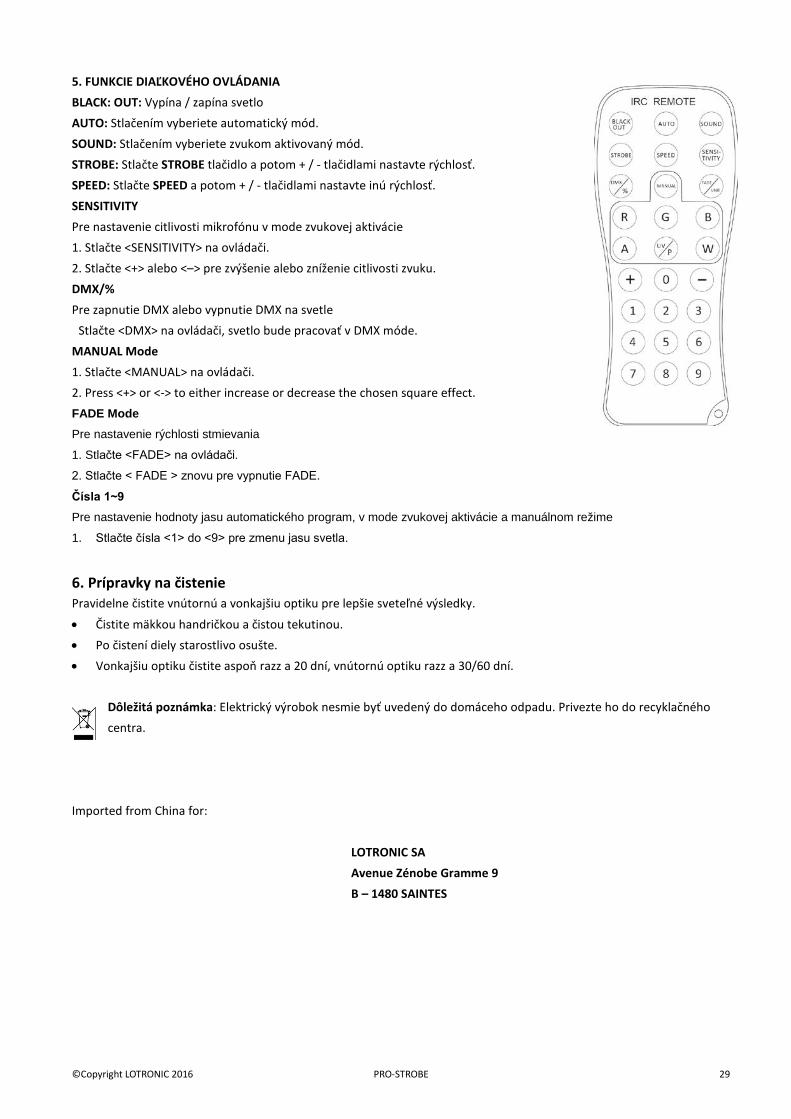
5. FUNKCIE DIAĽKOVÉHO OVLÁDANIA BLACK: OUT: Vypína / zapína svetlo AUTO: Stlačením vyberiete automatický mód. SOUND: Stlačením vyberiete zvukom aktivovaný mód. STROBE: Stlačte STROBE tlačidlo a potom + / - tlačidlami nastavte rýchlosť. SPEED: Stlačte SPEED a potom + / - tlačidlami nastavte inú rýchlosť. SENSITIVITY Pre nastavenie citlivosti mikrofónu v mode zvukovej aktivácie 1. Stlačte <SENSITIVITY> na ovládači. 2. Stlačte <+> alebo <–> pre zvýšenie alebo zníženie citlivosti zvuku. DMX/% Pre zapnutie DMX alebo vypnutie DMX na svetle Stlačte <DMX> na ovládači, svetlo bude pracovať v DMX móde. MANUAL Mode 1. Stlačte <MANUAL> na ovládači. 2. Press <+> or <-> to either increase or decrease the chosen square effect. FADE Mode Pre nastavenie rýchlosti stmievania
1. Stlačte <FADE> na ovládači.
2. Stlačte < FADE > znovu pre vypnutie FADE.
Čísla 1~9 Pre nastavenie hodnoty jasu automatického program, v mode zvukovej aktivácie a manuálnom režime
1. Stlačte čísla <1> do <9> pre zmenu jasu svetla.
6. Prípravky na čistenie Pravidelne čistite vnútornú a vonkajšiu optiku pre lepšie sveteľné výsledky.
• Čistite mäkkou handričkou a čistou tekutinou. • Po čistení diely starostlivo osušte. • Vonkajšiu optiku čistite aspoň razz a 20 dní, vnútornú optiku razz a 30/60 dní.
Dôležitá poznámka: Elektrický výrobok nesmie byť uvedený do domáceho odpadu. Privezte ho do recyklačného centra.
Imported from China for:
LOTRONIC SA Avenue Zénobe Gramme 9 B – 1480 SAINTES