dn-900r user guide…5 user guide (english) introduction thank you for purchasing the dn-900r. at...
TRANSCRIPT

User Guide English (5–77)
Appendix English (78–80)

2
Table of Contents
Introduction .............................................................................................................. 5
Box Contents ........................................................................................................ 5
Support ................................................................................................................. 5
Setup ......................................................................................................................... 6
Required for Setup ............................................................................................... 6
System Connections Example .............................................................................. 6
Audio Connections ............................................................................................... 7
Connecting the Power Cord ................................................................................. 7
Inserting an SD Card ............................................................................................ 7
Operation .................................................................................................................. 8
Preparing for Recording ....................................................................................... 8
Recording ............................................................................................................. 9
Default Settings .................................................................................................... 9
Playing Back Recorded Files .............................................................................. 10
Features .................................................................................................................. 10
Front Panel ......................................................................................................... 10
Rear Panel .......................................................................................................... 11
Display .................................................................................................................... 13
Display Properties (Playback/Pause/Search/Stop) ............................................. 15
Display Properties (Recording/Paused) .............................................................. 16

3
System Setting Menu ............................................................................................ 18
Utility Menu ............................................................................................................ 23
Selecting Media ..................................................................................................... 25
Files and Folders .................................................................................................... 26
Selecting a File or Folder .................................................................................... 26
Menu Operations.................................................................................................... 30
Preset Settings ....................................................................................................... 30
Renaming Presets .................................................................................................. 37
Recording ............................................................................................................... 38
Operations During Recording ............................................................................. 42
Playback ................................................................................................................. 43
Operations During Playback ............................................................................... 44
Program List ........................................................................................................... 47
Hot Start ................................................................................................................. 50
Editing Files ............................................................................................................ 52
Combine ............................................................................................................. 52
Divide .................................................................................................................. 52
Copy ................................................................................................................... 53
Move ................................................................................................................... 54
Undo ................................................................................................................... 54
Connecting to a Network ...................................................................................... 55
Dante Connection .................................................................................................. 56

4
Web Remote ........................................................................................................... 57
Password ............................................................................................................ 57
Main Screen ........................................................................................................ 58
Control Screen .................................................................................................... 59
Program Screen .................................................................................................. 62
File List Screen ................................................................................................... 63
Hot Start ............................................................................................................. 64
System Setting Screen ....................................................................................... 65
Utility Screen ...................................................................................................... 67
Preset Setting Screen ......................................................................................... 68
Play Timer ........................................................................................................... 69
Record Timer ...................................................................................................... 70
Archive Settings .................................................................................................. 71
Archive Files ....................................................................................................... 73
Serial Remote Control Function ........................................................................... 74
Troubleshooting...................................................................................................... 77
Appendix (English) ...................................................................................................... 78 Technical Specifications ....................................................................................... 78 Trademarks & Licenses ......................................................................................... 80

5
User Guide (English) Introduction
Thank you for purchasing the DN-900R. At Denon Professional, performance and reliability mean as much to us as they do to you. That’s why we design our equipment with only one thing in mind—to make your performance the best it can be.
Box Contents
DN-900R
Power Cable
Quickstart Guide
(4) Security screws for SD card door
Safety & Warranty Manual
Support
For the latest information about this product (documentation, technical specifications, system requirements, compatibility information, etc.) and product registration, visit denonpro.com.
For additional product support, visit denonpro.com/support.

6
SD Card
Headphones
USB device
Serial RemoteController
RS-232CStraight cable
Microphones
LAN cable
ModemPC Server (NAS/FTP)
Router
Audio cable(XLR/RCA)
Audio cable(XLR/RCA)Player (DN-700C)
OutputInput
MixerAmplifier
Dante Network Router
Setup Required for Setup Items not listed under Introduction > Box Contents are sold separately.
• SD Card
• USB device
• Headphones
• Microphones
• PC
• Modem
• Router
• Server (NAS/FTP)
• Audio cable (XLR/RCA)
• Serial Remote Controller (RS-232C Straight cable)
• Screws for mounting the DN-900R on a rack
System Connections Example

7
Audio Connections Analog Connection (Balanced Connection) Connect line-level analog inputs/outputs to the analog (balanced) input/output terminals for playback or recording. Connecting the Power Cord Insert the power cord when all other connections are completed. Be sure to connect the ground wire also. Notes:
• Be sure to insert the power plug firmly into the AC outlet. If the plug is not properly inserted, it could cause a malfunction or noise.
• Do not unplug the power cord while the unit is operating.
• Do not use a power cord other than the cord supplied with this unit.
Inserting an SD Card 1. Open the SD card door in the direction indicated by the arrow. The
screen will display SD# DOOR OPEN (where # is the selected SD card slot number).
2. The SD card can only be inserted one way – label up and connector first. Insert the SD card fully into the SD card slot until a "click" sound is heard.
3. Close the SD card door.
If the SD card door does not close with a "click," check that the SD card is fully inserted into the slot.
MIC/LINE
SETTING VIA MENU
UNBAL. COAXIAL
AES/EBU
UNBBAL.
AUDIO
RLOUT
AUDIO
RLIN
1:GND2:Hot3:Cold
CDR/CD
AmpMixer
Preamp
SD card door
SD card
LAN DANTE 2X2
RS-232C
AC IN
NETWORK SD/USB RECORDERDN-900RCOAXIAL
AES/EBU
To AC outlet
European, UK and Asia/Pacific models
To AC outlet
U.S.A. and Canada models
Power cord(supplied)

8
Operation Preparing for Recording Note:
• Be sure to set the clock before use.
• Before recording to an SD card, format the SD card on this unit. To open the Utility menu
1. Press the power switch to turn on DN-900R.
2. While playback/recording is stopped, press Menu to display the menu list.
3. Turn the jog dial to select Utility and press Enter. To set the Time/Date
1. Press Menu to display the menu list.
2. Select Utility and turn the jog dial to select Time/Date, then press Enter.
3. Turn the jog dial to select the input position (year/month/day/hour/minute), and press Enter.
4. Turn the jog dial to change the setting, then press Enter to confirm.
5. When all settings have been entered, they will be automatically saved and the Utility menu will be displayed. If only some of the settings have been changed, but not all, press Back twice. Fix and Discard will be shown on the display.
6. Turn the jog dial to select Fix and press Enter to confirm the settings. Select Discard to discard the changes.
To format an SD card
1. Press Menu to display the menu list.
2. Select Utility and turn the jog dial to select Format Media, then press Enter. The list of media devices will be shown on the display.
3. Turn the jog dial to select the desired media, then press Enter.
4. Turn the jog dial to select OK, then press Enter.
Formatting will be shown on the display during formatting, and Completed will be shown when the formatting is complete.
You can also perform a speed check to test the read and write speed of the currently used media.
1. Press Menu to display the menu list.
2. Select Utility, then select Speed Check. A list of media devices will be shown on the display.
3. Turn the jog dial to select the desired media, then press Enter.
4. Rotate jog dial to highlight OK and press Enter to confirm selection.
9
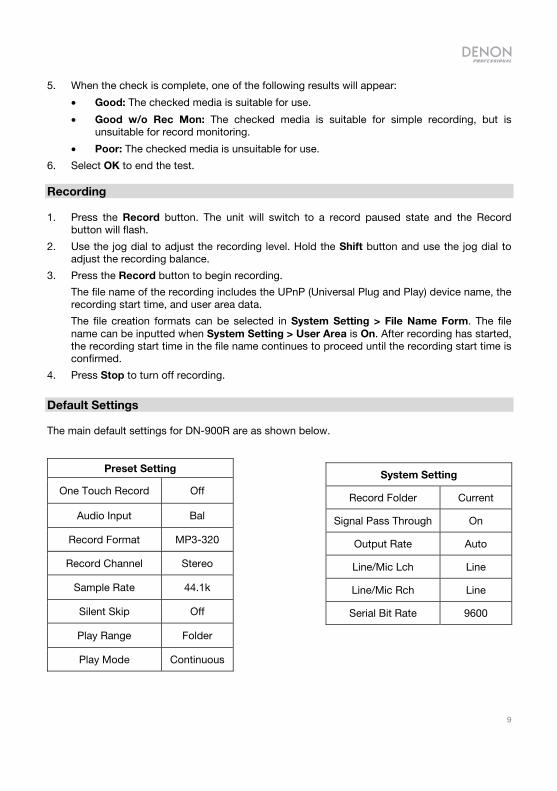
5. When the check is complete, one of the following results will appear:
• Good: The checked media is suitable for use.
• Good w/o Rec Mon: The checked media is suitable for simple recording, but is unsuitable for record monitoring.
• Poor: The checked media is unsuitable for use.
6. Select OK to end the test. Recording 1. Press the Record button. The unit will switch to a record paused state and the Record
button will flash.
2. Use the jog dial to adjust the recording level. Hold the Shift button and use the jog dial to adjust the recording balance.
3. Press the Record button to begin recording.
The file name of the recording includes the UPnP (Universal Plug and Play) device name, the recording start time, and user area data.
The file creation formats can be selected in System Setting > File Name Form. The file name can be inputted when System Setting > User Area is On. After recording has started, the recording start time in the file name continues to proceed until the recording start time is confirmed.
4. Press Stop to turn off recording.
Default Settings The main default settings for DN-900R are as shown below.
Preset Setting
One Touch Record Off
Audio Input Bal
Record Format MP3-320
Record Channel Stereo
Sample Rate 44.1k
Silent Skip Off
Play Range Folder
Play Mode Continuous
System Setting
Record Folder Current
Signal Pass Through On
Output Rate Auto
Line/Mic Lch Line
Line/Mic Rch Line
Serial Bit Rate 9600

10
Playing Back Recorded Files 1. Press Play to start playback.
2. To pause playback, press the Pause button. When Play is pressed again, playback will resume.
3. To stop playback, press the Stop button.
Features Front Panel
1. Power Switch: Press this switch to turn DN-900R on/off. The unit will go into Network
Standby mode when powered on for low power operation with network access (if previously enabled in the System Setting menu). If Network Standby is not enabled in System Setting, the unit will go into Standby mode without network access when powered on. Make sure the AC Input is properly connected to a power outlet. Do not turn the unit off during media recording or playback—doing so could damage your media.
2. Headphone Level: Turn this knob to adjust the level of the headphone output.
3. Headphone Output: Connect headphones to this 1/4" (6.35 mm) TRS output.
4. USB Drive Port: Connect a mass-storage-class USB device to this port.
5. SD Card Slots: Open the security doors to insert an SD/SDHC card into the slot. The doors can be fastened for security by removing the plastic pin retainers and inserting the included screws.
6. Shift: Press this button to access secondary functions, printed under each button.
7. Move/Dimmer: Press this button to move the file of the current track. Hold Shift and press this button to change the brightness of the display and LEDs.
8. Copy/Rec Mon: Press this button to copy the file of the selected track. Hold Shift and press this button to turn the recording monitor on or off.
9. Combine/Mark: Press this button to combine the selected track with another track. Hold Shift and press this button to add a mark to the current playback or recording position.
10. Divide/Mark –: Press this button to divde the selected track at the current playback or recording position. Hold Shift and press this button to jump to the mark prior to the current playback position.
3
5
6 10 1112
1
2
4
7 8 9
13
14 15 16 17 18
19
22 20212324

11
11. Undo/Mark +: Press this button to undo the last edit. Hold Shift and press this button to
jump to the next mark after to the current playback position.
12. Display/Text: Press this button to change the view on the display. Hold Shift and press this button to scroll text on the display.
13. Display: This screen indicates the unit's current operation. See Display for more information.
14. Record: Press this button to start or prepare for recording. The button will be lit when recording, and flashing when recording is paused.
15. Stop: Press this button to stop playback or recording.
16. Pause: Press this button to pause playback or recording.
17. Play: Press this button to start playback.
18. Back: Press this button to return to the previous menu. When viewing the file list, hold Shift and press this button to move the cursor to the top of the list.
19. Jog Dial/Enter: During playback, turn this dial to skip tracks. Press this dial to confirm a menu selection. When stopped, hold Shift and turn the jog dial to adjust the recording level or recording balance. Select whether the Shift function controls the recording level or recording balance from the Preset Setting > Rec Level Type menu.
20. Fast Forward/Pitch +: Press this button to fast forward the track. In Frame mode, press this button to jump forward by frames. Hold Shift and press this button to set the pitch.
21. Rewind/Pitch –: Press this button to rewind the track. In Frame mode, press this button to jump backward by frames. Hold Shift and press this button to set the pitch.
22. Frame/Pitch: Press this button to switch the function of the Fast Forward and Rewind buttons between Frame mode and Search mode. Hold Shift and press this button to turn Pitch control on or off.
23. Menu/Lock: Press this button to open the menu. To restrict key use, hold the Shift button, then hold the Menu/Lock button for about 1 second until “keys restricted” is displayed on the screen. Once keys are restricted, hold the Shift button, then hold the Menu/Lock button for about 1 second until “All Keys Locked" is displayed on the screen. Once all keys are locked, hold the Shift button, then hold the Menu/Lock button for about 1 second until “All Keys Unlocked" is displayed on the screen.
24. List/Media: Press this button to show the file list on the display. Hold Shift and press this button to show the media list on the display.

12
Rear Panel
1. Analog Input, Balanced XLR: Use standard XLR cables to connect these inputs to your
sound souce, such a microphone.
2. Analog Input, Unbalanced RCA: Use standard RCA stereo cables to connect these inputs to your sound source, such as a CD player.
3. Digital Input, Digital XLR: Use a digital XLR cable (IEC60958 Type I, AES/EBU) to connect this input to your sound source.
4. Digital Input, Digital RCA: Use digital RCA cables (IEC60958 Type II, S/PDIF coaxial) to connect this input to your sound source.
5. Analog Output, Balanced XLR: Use standard XLR cables to connect these outputs to external speakers, a sound system, etc.
6. Analog Output, Unbalanced RCA: Use standard RCA stereo cables to connect these outputs to external speakers, a sound system, etc.
7. Digital Output, Digital XLR: Use a digital XLR cable (IEC60958 Type I, AES/EBU) to connect this output to your sound system.
8. Digital Output, Digital RCA: Use digital coaxial RCA cables (IEC60958 Type II, S/PDIF coaxial) to connect this output to your sound system.
9. LAN Port: Use a standard Ethernet cable (IEEE 802.3u (3.3V I/O) / 10/100 Base-T(X) / RJ-45) to connect this port to a network switch or router.
10. Dante Port: Use a standard Ethernet cable to connect DN-900R to a Dante network from this port. Dante channel routing is set using the Dante Control software, available for download at audinate.com/products/software/dante-controller.
11. RS-232C Terminal: Use a 9-pin D-sub connector to connect a host device such as a computer to DN-900R to control it using serial commands.
Note: Visit the DN-900R product page at denonpro.com to download the Serial Protocol Guide for more information.
12. AC Input: Use the included power cable to connect this input to a power outlet.
3 5 6 10
11121 2 4 7 8 9

13
Display The playback status and information about various media is displayed on the DN-900R display. Details of the display differ depending on the operating status (stopped/recording/playing) of the DN-900R.
1. Playback Range: Displays the current playback range, with the configured settings selected in Preset Setting > Play Range. Select FLD to display the current folder; select ALL to display all folders.
2. Playback Mode: Displays the settings configured in Preset Setting > Play Mode. Select CNT for continuous playback; select SGL for single track playback.
3. Repeat Playback: Displays the settings configured in Preset Setting > Repeat. Select RPT to display repeat playback.
4. Random Playback: Displays the settings configured in Preset Setting > Random. Select RND to display random playback.
5. Programmed Playback: Displays the settings configured in Preset Setting > Program. Select PRG to display programmed playback.
6. Status: Displays the operating status.
Stop
Cue CUE
Pause ǁ
Audible Pause ǁ
Search
Play
Record Pause ǁ
Record
7. Folder Name: Displays the path to the selected folder.
8. Track Name: Displays the selected track name.

14
9. Remaining Time: Displays the remaining time for the current track. The display format can be set in Preset Setting > Time Display. When the selected track is VBR (Variable Bit Rate) format, the estimated remaining time is displayed.
10. Elapsed Time: Displays the elapsed time for the currently selected track. The display format can be set in Preset Setting > Time Display.
11. Time/Date: Displays the current date and time when playback is stopped. During playback, the date and time when the selected track was created are displayed. The display format can be set in the System Setting menu.
12. Playback Level: Displays the playback level with a three-second peak hold.
13. Recording Monitor: Displays the recording’s monitor status. “R.MON” is displayed when the recording monitor is on.
14. Sampling Rate: Displays the sampling rate of the audio output (“44k”, “48k”, “96k”). When EXT is selected, the system uses the recovered (AES/EBU) clock as the system sample rate, and EXT flashes in the display.
15. End of Track Notification: “EOM” is displayed when nearing the end of the playback track.
16. Timer Display: “TMR” flashes while executing a Timer playback or Timer record.
17. Archive Display: “ARC” is displayed when a setting other than Off is set in Archive Setting > Archive Mode. “ARC” flashes while archiving is being executed.
18. Phantom Power: Displayed when the phantom power setting is turned on in System Setting > Phantom Lch (PL) and System Setting > Phantom Rch (PR).
19. Ethernet: Displayed when the Ethernet port is in use.
20. Remote Serial Connection: Displayed when remote serial commands are being received.
21. Pitch: Displays the On/Off status of the pitch function, master key, and playback speed (percentage). “M” is displayed when the master key is on.
22. Track Number: The right side displays the total number of tracks on the selected media, and the left side displays the selected track number.
23. Media display: Displays the type of currently selected media (SD1/SD2/USB/NET) and the amount of free space. The currently selected media is set in the upper part with “P” displayed in front of the media. The backup media (dual recording) is set in the lower part (when applicable) with “B” displayed in front of the media. When a secondary media (relay recording) is set, “S” is displayed in front of the media. “1” indicates the currently selected media. If there is no free space on the selected media, “Media Full” is displayed. If the media reaches 2000 tracks, “Track Full” is displayed. If writing is prohibited to the media, “Write Lock” is displayed. The free space is not displayed when the media is “Net”.

15
Display Properties (Playback/Pause/Search/Stop)
1. Track Number/File Name: Displays the selected track number and file name. The path to the folder in which the file is stored is displayed in parentheses.
2. Date/Time Display: Displays the date and time when the selected track was created. The display format can be set in the System Setting menu.
3. Track Recording Information: Displays the sampling rate, channel, St: stereo / Mo: monaural, and bit rate.
4. Artist Name: The artist name within the ID3 tag is displayed for MP3 files.
Note: If the text information does not fit in the display, hold Shift and press Text to scroll and display the hidden text.

16
Display Properties (Recording/Paused)
Press Display to switch to an enlarged level meter display.
1. Recording Input: Displays the selected Preset Setting > Audio Input. Select from UBAL:
Unbalanced / BAL: Balanced, AES: AES/EBU, Dante: Dante Network, and COAX: Coaxial.
2. Recording File: Displays the selected Preset Setting > Rec Format. Select from MP3 and WAV.
3. Recording Format: Displays the Preset Setting > Rec Format. Select from MP3: Bit rate and WAV: Number of quantization bits.
4. Recording Channel: Displays the Preset Setting > Rec Channel. Select from ST: Stereo, MONO: Mono (LCh), and MIX: LCh RCh Mix.
5. Auto Track: Displays ATK when Preset Setting > Auto Track is on.
6. Status Display: Displays the operating status.
Stop
Cue CUE
Pause ǁAudible Pause ǁ
Search Play
Record Pause ǁ Record

17
7. Folder Name: Displays the path to the selected folder.
8. Track Name: Displays the progress bar when set to anything other than off in the Auto Track > Preset Setting.
9. Remaining Time: Displays the remaining recordable time on the selected media. The display format can be set in Preset Setting > Time Display. “---:--:--” is displayed if the format cannot be applied to the remaining time display.
10. Elapsed Time: Displays the elapsed recording time for the current track. The display format can be set in Preset Setting > Time Display.
11. Time/Date: The recording start date and time are displayed during the recording operation.
12. Recording Level Meter: Displays the recording level with a 3 second peak hold.
13. Recording Monitor: Displays the recording’s monitor status. “R.MON” is displayed when the recording monitor is on.
14. Recording Sample Rate: The current sample rate is displayed here. When a sampling rate is not applied when Ext (AES/EBU) is used, “EXT” flashes on the display. The recording sample rate is set in Preset Setting > Sample Rate.
15. Silent Skip: Displays “S.S.” when turned on in the Preset Setting > Silent Skip menu.
16. Timer: “TMR” is displayed when the Preset Setting > Rec Timer or Preset Setting > Play Timer is set.
17. Archive: “ARC” is displayed when a setting other than “Off” is set in Archive Setting > Archive Mode. “ARC” will flash while archiving is being executed.
18. Phantom Power: Displayed when phantom power is on. Select this in System Setting > Phantom Lch (PL) and System Setting > Phantom Rch (PR).
19. Ethernet: Displayed when the Ethernet is in use.
20. Remote Serial Connection: Displayed when the remote serial command is being received.
21. Pitch: Displays the On/Off status of the pitch function, master key, and playback speed (percentage). “M” is displayed when the master key is on.
22. Track Number: The right side displays the total number of tracks on the selected media, and the left side displays the selected track number.
23. Media display: Displays the type of currently selected media (SD1/SD2/USB/NET) and the amount of free space. “1” indicates the currently selected media. The currently selected media is set in the upper part and “P” is displayed in front of the media. The backup media (dual recording) is set in the lower part (when applicable) and “B” is displayed in front of the media. When a secondary media (relay recording) is set, “S” is displayed in front of the media. If there is no free space on the selected media, “Media Full” is displayed. If the selected media reaches 2000 tracks, “Track Full” is displayed. If writing is prohibited to the selected media, “Write Lock” is displayed. The free space is not displayed when the media is “Net”.

18
System Setting Menu Timer Priority: Sets the priority for timer playback.
• Off: Timer playback only starts in the standby, stop, or cue state.
• On: Timer playback starts any time other than when recording.
Rec Folder: Sets the folder where data is saved when recording.
• Current: Recorded data is saved into the currently selected folder.
• Fixed: Recorded data is saved into a fixed folder directly below the root folder.
A folder is automatically created if there is no folder, with the default folder name “DMH_REC”.
Note: When Play Range in the Preset Setting menu is set to “All”, data is saved to the root folder.
Signal Pass Thru: Sends the input signal to the audio outputs when recording or when recording is paused. The input signal will always be heard from the headphone output regardless of the Signal Pass Thru setting.
• Off: The input signal is not passed through to the audio outputs.
• On: The input signal is passed through unchanged to the audio outputs.
User Area: Sets the character string (user area) added to the recorded file name.
• Off: User area is not used.
• On: User area is used.
File Name Form: Sets the file name creation format when recording.
• MN_DT_UA: Machine name_recording start time_user area.zzz
• MN_UA_DT: Machine name_user area_recording start time.zzz
• DT_MN_UA: Recording start time_machine name_user area.zzz
• DT_UA_MN: Recording start time_user area_machine name.zzz
• UA_MN_DT: User area_machine name_recording start time.zzz
• UA_DT_MN: User area_recording start time_machine name.zzz
Mono Play: Sets monaural playback.
• Off: Channels are output based on the input source.
• On: Channels are summed and output as monaural.

19
Output Rate: Sets the sampling rate for the audio.
• Auto: Audio output is based on the rate of the input media or file.
• 44.1k: Audio is output at 44.1 kHz.
• 48k: Audio is output at 48 kHz.
• Ext (AES): Uses an external clock (AES/EBU) to output audio.
Note: When the external clock is 96 kHz, audio is output according to the sampling rate of the playback file if the playback file has a sampling rate other than 96 kHz.
Note: DN-900R converts the output sample rate sent to Dante back to the Dante sample rate.
Line/Mic Lch: Sets the mode for the XLR left channel.
• Line: Set to the line input.
• Mic: Set to the microphone input.
Line/Mic Rch: Sets the mode for the XLR right channel.
• Line: Set to the line input.
• Mic: Set to the microphone input.
Phantom Lch: Sets phantom power (+48V) for the Line/Mic Lch.
• Off: Turns phantom power off for the left channel.
• On: Turns phantom power on for the left channel. However, when Line/Mic Lch is set to Line, phantom power will be off.
Phantom Rch: Sets phantom power (+48V) for Line/Mic Rch.
• Off: Turns phantom power off for the right channel.
• On: Turns phantom power on for the right channel. However, when Line/Mic Rch is set to Line, phantom power will be off.
Mic In Sens Lch: Adjusts the XLR mic input sensitivity for the left channel in 1 dBu increments.
• -16 dBu / -40 dBu / -60 dBu
Mic In Sens Rch: Adjusts the XLR microphone input sensitivity for the right channel in 1 dBu increments.
• -16 dBu / -40 dBu / -60 dBu
Volume Input: Sets the analog recording input level.
• Fixed (0 dB): The recording input level is fixed at 0 dB.
• Variable: The recording input level may be adjusted from -60 / 0 / 10 dBu in 0.1 dB increments.

20
Ref (XLR/RCA): Sets the input/output standard level.
• +24 dBu/+10 dBV: XLR = +24 dBu / RCA = +10 dBV
• +20 dBu/+6 dBV: XLR = +20 dBu / RCA = +6 dBV
• +18 dBu/+4 dBV: XLR = +18 dBu / RCA = +4 dBV
Input Trim Lch: Adjusts the analog input for the left channel in 0.1 dB increments.
• +2.0 dB / 0 dB / -2.0 dB
Input Trim Rch: Adjusts the analog input for the right channel in 0.1 dB increments.
• +2.0 dB / 0 dB / -2.0 dB
Output Trim Lch: Adjusts the analog output for the left channel in 0.1 dB increments.
• +2.0 dB / 0 dB / -2.0 dB
Output Trim Rch: Adjusts the analog output for the right channel in 0.1 dB increments.
• +2.0 dB / 0 dB / -2.0 dB
Time Form: Sets the type of the current time display.
• 12h: Switches to the 12-hour display (AM/PM).
• 24h: Switches to the 24-hour display.
Date Form: Sets the display order of the date.
• MDY: Displays the date in Month/Day/Year order.
• DMY: Displays the date in Day/Month/Year order.
• YMD: Displays the date in Year/Month/Day order.
Display Contrast: Sets the contrast of the display.
• 1 - 5: 1 is the darkest, 5 is the brightest.
Serial Bit Rate: Sets the serial communication bit rate for RS-232C.
• 9600: 9600 bps
• 38400: 38400 bps
Machine Name: Displays the UPnP device name (maximum 12 characters).
21
IP Address
• Auto: DHCP is assigned automatically.
• Static: Specify a fixed IP address to be displayed.
Subnet Mask
• None: The Subnet Mask is not displayed when the IP Address is set to Auto. It can be set for any setting other than Auto.
• Static: 0.0.0.0 to 255.255.255.255. (When Auto is set: 255.255.255.0)
Gateway
• None: The Gateway is not displayed when the IP Address is set to Auto. It can be set for any setting other than Auto.
• Static: 0.0.0.0 to 255.255.255.255. (When Auto is set: 0.0.0.0)
DNS Server
• None: The DNS is not displayed when the IP Address is set to Auto. It can be set for any setting other than Auto.
• Static: 0.0.0.0 to 255.255.255.255. (When Auto is set: 0.0.0.0)
IP Control Port:
• 0 to 65535: Sets the IP control port number.
IP Control Auth
• Off: Password authentication is not required for IP control.
• On: Password authentication is required for IP control.
Network Standby
• Off: The Power switch will put the unit in a very low power mode with no network access.
• On: The Power switch will put the unit in a low power mode with network access.
NTP: Displays the NTP server address. Press Enter to enter the address. Then select the cycle of NTP.
• Off: NTP is not used.
• On: NTP is used.

22
Syslog: The Syslog server address is displayed. Press Enter to enter the address.
• Off: Event information is not sent to the server.
• On: Event information is sent to the server.
Time Zone: Set the offset time in 15-minute increments.
• –12:00 - +14:00 (00:00)
Daylight Saving: Sets daylight saving time.
• Off: Daylight saving time is not applied.
• On: Daylight saving time is applied.
Set the start and end date of daylight saving time and the offset time of up to six hours in 15-minute increments.
Admin Passwd: Sets the Admin Password for when Web Remote, IP Control, or System Setting is used.
• ****: Set the password between 6 to 12 characters.
Operator Passwd: Sets the Operator Password for when Web Remote or IP Control is used.
• ****: Set the password between 6 to 12 characters.
Observer Passwd: Sets the Observer Password for when Web Remote or IP Control are used.
• ****: Set the password between 6 to 12 characters.
Auto Reboot
• Off: Does not automatically reboot.
• On: Reboots automatically if the main processor freezes.
Default: Resets all of the system settings to the defaults.
Auto Power Off
• Off: No Auto Power Off
• On: Unit will automatically power off after 30 minutes of inactivity if Network Standby is off.

23
Dante Reset: Performs a factory reset and reboot of the Dante device wiping:
• User-defined device name
• User-defined channel labels
• Clock configuration (clock master / external clock master setting)
• Static IP addresses
• Sample rate setting (including pull-up/down)
• Latency setting
• Any existing audio routes
Utility Menu Time/Date: Set the current time and date. The time must be set before using the unit because the set time is used as the recorded file name. If the unit is connected to a network and System Setting > NTP is set to On, the current time settings do not need to be configured.
To set the Time/Date
1. Press Menu to display the menu list.
2. Select Utility and rotate the jog dial to select Time/Date, then press Enter.
3. Rotate the jog dial to select the input position (year/month/day/hour/minute), and press Enter.
4. Rotate the jog dial to select the setting item, and press Enter.
5. Select the time display type (12-hour display/24-hour display) in System Setting > Time Form.
6. Select the display order for the date (year/month/date) in System Setting > Date Form.
When all settings are entered, they will automatically be saved in the Utility menu.
To cancel Time/Date changes
1. Press Back twice.
2. Rotate the jog dial to select Discard, and press Enter.
Load Setting: Reads the preset setting file stored in the root directory of the currently used media (SD1/SD2/USB), and changes the settings of the unit accordingly.
1. Press Menu to display the menu list.
2. Select Utility and rotate the jog dial to select Load Setting, then press Enter.
3. Select OK with the jog dial when “Load Preset?” is displayed, then press Enter.
The “DN-xxxx.ini” file on the currently used media is read, and the unit's settings are updated. When the update is finished, “Completed” is displayed.

24
Save Setting: Saves the current preset settings in the root directory of the currently used media (SD1/SD2/USB).
1. Press Menu to display the menu list.
2. Select Utility and rotate the jog dial to select Save Setting, then press Enter.
3. Select OK with the jog dial when “Save Preset?” is displayed, then press Enter.
The “DN-xxxx.ini” file is saved in the root directory of the currently used media. When the update is finished, “Completed” is displayed.
Firmware Version: Displays the firmware version of the device.
1. Press Menu to display the menu list.
2. Select Utility and rotate the jog dial to select Firmware Version, then press Enter to view the firmware version.
Network Status: Displays network setting information.
1. Press Menu to display the menu list.
2. Select Utility and rotate the jog dial to select Network Status, then press Enter. Network IP/Mask, MAC, Gateway, and DNS are displayed.
Dante Status: Displays network setting information.
1. Press Menu to display the menu list.
2. Select Utility and rotate the jog dial to select Dante Status, then press Enter. Dante Name, IP/Mask, MAC, and connection Status are displayed.
Format Media: Erases the SD card.
1. Press Menu to display the menu list.
2. Select Utility and turn the jog dial to select Format Media, then press Enter. The list of media devices will be shown on the display.
3. Turn the jog dial to select the desired media, then press Enter.
4. Turn the jog dial to select OK, then press Enter.
Formatting will be shown on the display during formatting, and Completed will be shown when the formatting is complete.

25
Speed Check: Checks the selected media to verify the media is suitable for recording.
1. Select OK with the jog dial, and press Enter. Media check starts and “Check Speed ...” is displayed.
The following results are displayed when the speed check is complete.
• Good: The checked media is suitable for recording.
• Good w/o Rec Mon: The checked media is suitable for recording but is unsuitable for monitoring the audio while recording.
• Poor: The checked media is unsuitable for recording.
2. Select OK and press Enter.
Selecting Media Displaying the media list and selecting media
1. When in the stopped state, hold down Shift and press Media. The media list is displayed.
• Current: The currently selected media is shown.
• Dual: Backup media is shown as set in Preset Setting > Dual Rec.
• Relay: Secondary media is shown as set in Preset Setting > Relay Rec.
2. Rotate the jog dial to select the media, and press Enter. The selected media becomes the currently selected media, and the unit returns to the stopped state.
Displaying and selecting a media server
1. When in the stopped state, hold down Shift and press Media. The media list is displayed.
2. Rotate the jog dial to select Net, and press Enter to display the media server list.
3. Rotate the jog dial to select the media server or PC to playback, and press Enter.
Notes:
• When playing back from a media server, playback operates using the “Folder” setting even if Preset Setting > Play Range is set to “All”.
• Data cannot be recorded to a media server or PC on the network.
The following restrictions apply to files and folders on the network:
• Files cannot be deleted/divided/merged and folders cannot be created/moved/deleted.
• File names/folder names cannot be changed.
• Files cannot be moved from the network to media connected to the unit.
• Folders cannot be copied from media connected to the unit to the network.
26
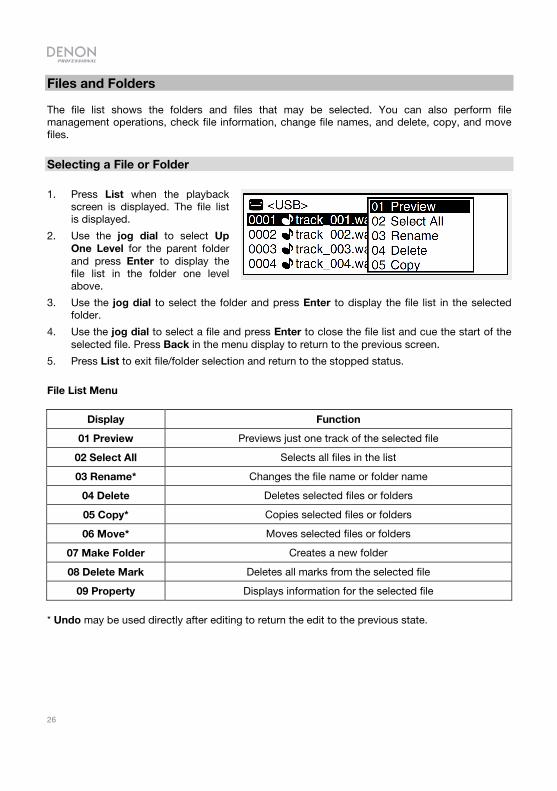
Files and Folders The file list shows the folders and files that may be selected. You can also perform file management operations, check file information, change file names, and delete, copy, and move files.
Selecting a File or Folder
1. Press List when the playback screen is displayed. The file list is displayed.
2. Use the jog dial to select Up One Level for the parent folder and press Enter to display the file list in the folder one level above.
3. Use the jog dial to select the folder and press Enter to display the file list in the selected folder.
4. Use the jog dial to select a file and press Enter to close the file list and cue the start of the selected file. Press Back in the menu display to return to the previous screen.
5. Press List to exit file/folder selection and return to the stopped status.
File List Menu
Display Function
01 Preview Previews just one track of the selected file
02 Select All Selects all files in the list
03 Rename* Changes the file name or folder name
04 Delete Deletes selected files or folders
05 Copy* Copies selected files or folders
06 Move* Moves selected files or folders
07 Make Folder Creates a new folder
08 Delete Mark Deletes all marks from the selected file
09 Property Displays information for the selected file
* Undo may be used directly after editing to return the edit to the previous state.

27
Playing Files (Preview)
To play a preview of the selected file
1. Rotate the jog dial to select Preview, and press Enter.
2. Press Stop or Enter to stop playback and return to the file list menu.
Selecting all files for copying, moving, or deleting
Rotate the jog dial to select Select All, and press Enter. All files are selected and the display returns to the file list. Check marks are added to the front of the files.
If all files were selected, this deselects all files. If the folder is changed, the selected state is cleared.
Selecting multiple files to copy, move, or delete
In the file list, hold down Shift and press Enter. The file or folder on the cursor is selected and a check mark is added in front of it.
Only files within the same folder may be selected. To deselect a file or folder, perform the selection operation again.
Renaming the file name or folder name
1. Select Rename in the folder list menu, and press Enter. Up to 252 characters may be entered.
2. Place the cursor in the position to insert characters using the << and >> buttons.
3. Rotate the jog dial to select a character and press Enter.
4. Repeat steps 2 and 3 to enter all of the characters.
5. When finished entering the characters, press Enter to save the entered characters.
To return to the previous screen without saving the changes, press Back.
If a space is entered at the start or end of the file name or folder name, the space is deleted when the file name or folder name is saved.
Deleting files and folders
1. Select Delete in the folder list menu, and press Enter.
2. Select OK by pressing Enter to delete the file when “Delete?” is displayed.
To cancel the file deletion and return to the file list menu, select “Cancel” and press Enter.

28
Copying files and folders
1. Select Copy in the folder list menu, and press Enter. A media list for selecting the copy destination is displayed.
2. Rotate the jog dial to select the copy destination media, and press Enter. The folder list is displayed.
3. Rotate the jog dial to select Copy Here? in the copy destination folder level, and press Enter to start the copy process. During copying, “Executing ... zzz%” (z: progress status) is displayed. When the copying is complete, “Completed” is displayed.
To cancel copying, select Cancel and press Enter.
Copying cannot be performed in the following situations:
• When the media is write-prohibited
• When there is not enough free space on the media
• When there is same file name / folder name
Moving files
1. Select Move in the folder list menu, and press Enter. A media list for selecting the move destination is displayed.
2. Select the move destination media and press Enter. The folder list is displayed.
3. Rotate the jog dial to select Move Here? in the move destination folder level, and press Enter to start the move process. During moving, “Executing ... zzz%” (z: progress status) is displayed. When the moving is complete, “Completed” is displayed.
Select “Cancel” and press Enter to cancel moving.
Files cannot be moved to other media in the following situations:
• When the media is write-prohibited
• When there is not enough free space on the media
29
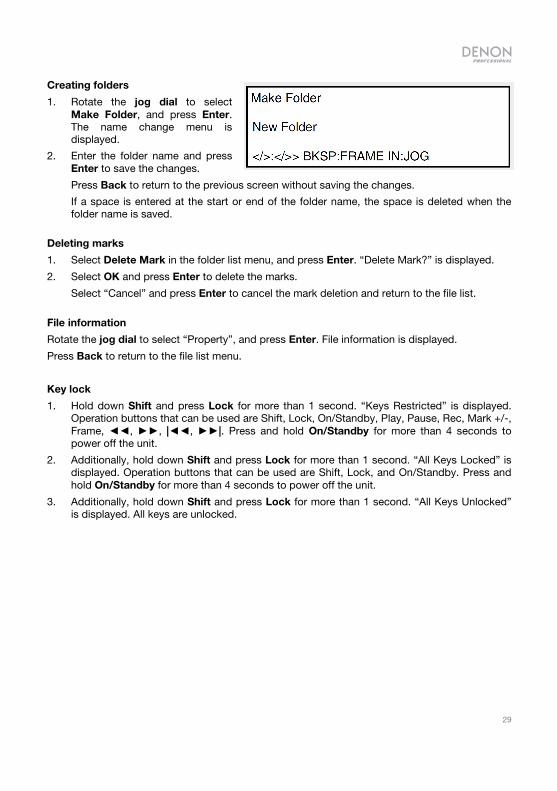
Creating folders
1. Rotate the jog dial to select Make Folder, and press Enter. The name change menu is displayed.
2. Enter the folder name and press Enter to save the changes.
Press Back to return to the previous screen without saving the changes.
If a space is entered at the start or end of the folder name, the space is deleted when the folder name is saved.
Deleting marks
1. Select Delete Mark in the folder list menu, and press Enter. “Delete Mark?” is displayed.
2. Select OK and press Enter to delete the marks.
Select “Cancel” and press Enter to cancel the mark deletion and return to the file list.
File information
Rotate the jog dial to select “Property”, and press Enter. File information is displayed.
Press Back to return to the file list menu.
Key lock
1. Hold down Shift and press Lock for more than 1 second. “Keys Restricted” is displayed. Operation buttons that can be used are Shift, Lock, On/Standby, Play, Pause, Rec, Mark +/-, Frame, , , |, |. Press and hold On/Standby for more than 4 seconds to power off the unit.
2. Additionally, hold down Shift and press Lock for more than 1 second. “All Keys Locked” is displayed. Operation buttons that can be used are Shift, Lock, and On/Standby. Press and hold On/Standby for more than 4 seconds to power off the unit.
3. Additionally, hold down Shift and press Lock for more than 1 second. “All Keys Unlocked” is displayed. All keys are unlocked.

30
Menu Operations 1. With the unit powered on, press the Menu button. The menu list is displayed.
2. Rotate the jog dial to select the desired menu and press Enter.
Note: If an Admin password is set for System Setting, the password needs to be entered.
3. Rotate the jog dial to select the setting that requires change, and press Enter.
4. Rotate the jog dial to select the setting detail that requires change, and press Enter.
To continue to set other items, perform the operation in step 1-4 again. To return to the upper level menu from the menu item currently being set, press Back.
Press Menu to save the changed settings.
To cancel settings, press Stop. The display will show “Exit without Saving?”. Rotate the jog dial to select OK, and press Enter to cancel the settings.
Preset Settings These settings are performed independently for each of the 3 presets (Preset 1, Preset 2, Preset 3). Select Presets from the Menu.
Note: You can restore the defaults for each of the presets using the Web Remote. Select the "Current Preset No" and press Default and then press Save. You can also restore defaults via the front panel Menu > Preset Setting Preset1 > Default.
Preset Title: Changes the preset name.
Shift Mode: Sets operation for the Shift button.
• Momentary: Switches to the shift function when holding down the Shift button along with a secondary function button.
• Lock: Switches to the shift function when the Shift button is pressed and released and a secondary function is pressed. In this case, the Shift button will illuminate.
Power On: Sets the operation when the unit is powered on.
• Stop: The unit stops when the power is switched on.
• Resume Play: Playback starts from the track that was played last.
• Play First: Playback starts from the first track in the folder that was played last.
• Rec: Starts recording in the folder of the currently selected media. Settings for the save folder may be configured in System Setting > Rec Folder.

31
Dual Rec: Sets the backup media for dual recording.
• Off: Turns dual recording off.
• SD1: Selects SD1 as the backup media.
• SD2: Selects SD2 as the backup media.
• USB: Selects USB as the backup media.
Relay Rec: Sets the media (secondary media) on which recording continues when relay recording is used.
• Off: Turns relay recording off.
• SD1: Selects SD1 as the secondary media.
• SD2: Selects SD2 as the secondary media.
• USB: Selects USB as the secondary media.
Rec Level Type: Sets the jog dial selection method for the recording level.
• Master/Bal: Adjusts the input level and balance of the left and right channels.
• Separate L/R: Adjusts the input level of the left and right channels individually.
ALC: Sets ALC (Auto Level Control).
• Off (Preset 1/2): Turns ALC off.
• Mix: Sets the same ALC for the left and right channels.
• Separate (Preset 3): Sets ALC for the left and right channels individually.
One Touch Rec: Sets the Record button operation.
• Off (Preset 1/2): Press the REC button once to pause recording; press it again to start recording.
• On (Preset 3): Press the REC button once to start recording.
Audio Input: Selects the audio input source for recording.
• Bal: Records the XLR analog input source.
• UnBal: Records the RCA analog input source.
• AES / EBU: Records the XLR digital input source.
• Coaxial: Records the RCA digital input source.
• Dante: Records the Dante digital input source.

32
Rec Format: Selects the audio recording format (MP3 or PCM)
• Preset 1: MP3-128 / MP3-64 / PCM-16
• Preset 2: MP3-320 / MP3-256 / MP3-192
• Preset 3: PCM-24
Notes:
• You can restore the defaults for each of the presets using the Web Remote. Select the "Current Preset No" and press Default and then press Save. You can also restore defaults via the front panel Menu > Preset Setting Preset1 > Default.
• Indicated bit rate values are those used to record as a stereo file.
• Select the bit rate for the MP3 format.
• Select the quantized bit number for the PCM format.
• MP3 cannot be selected when the Sample Rate is 96k.
Rec Channel: Select whether to record as a stereo file or a monaural file.
• Stereo: Records as a stereo (2-channel) file.
• Mono (L): Records as a monaural (left channel) file.
• MonoMix: Mixes as stereo (2-channel) and records as a -3 dB file.
Sample Rate: Selects the sampling frequency for recording.
Note: This is only enabled for recording from the analog input.
• 44.1k (Preset 1/2): Records at 44.1 kHz.
• 48k: Records at 48 kHz.
• 96k (Preset 3): Records at 96 kHz. 96k cannot be selected when the “Rec Format” is MP3.
• Ext (AES): Records with an external clock (AES/EBU).
Note: Digital input sources record at the digital input sample rate.
Pre-Record: When recording is started from the recording paused status, recording starts retroactively for this set amount of time.
• Off: Turns pre-recording off.
• 1 sec / 2 sec / 3 sec / 4 sec / 5 sec
33
Auto Track: Creates a new file for each recording time set and continues recording.
• Off: Record without creating a new file.
• 1 min / 5 min / 10 min / 15 min / 30 min / 1 hour / 2 hour / 6 hour / 8 hour / 12 hour / 24 hour
Note: When the size of a recorded file reaches 2 GB, recording automatically switches to a new file and continues. There could be sound cutoffs for a short period of time between files depending on the capacity of a recorded file.
Auto Mark: If an input that is below the level set in “Silent Level” continues for longer than the time set in “Silent Time” marking information is written in the file.
• Off: Turns the auto mark function off.
• On: Turns the auto mark function on.
A maximum of 30 marks may be written to one file. Marking numbers are attached in numerical order starting from 1.
Silent Skip: If an input that is below the level set in “Silent Level” continues for longer than the time set in “Silent Time”, recording is paused. Recording is restarted when input above the set level is received again.
• Off: Turns the silent skip function off.
• On: Turns the silent skip function on. The S.S. icon is shown on the display (“Silent skip recording”).
If the recording is temporarily stopped because of the silent skip function, “S.S.” will flash on the display.
When “Silent Skip” is “On”, a maximum 0.5 second pre-recording is added before starting recording from the recording paused state.
Silent Level: Sets the silent level when “Auto Mark” or “Silent Skip” is set to on. (-60 dB, -54 dB, -38 dB, -20 dB)
Silent Time: Set the silence judgment time for silent skip recording (1 sec / 2 sec / 3 sec / 4 sec / 5 sec)
Play Range: Sets the track playback range.
• All: Plays back all of the tracks in all folders.
• Folder: Plays back all of the tracks in the selected folder.
Note: “All” is only enabled for SD card and USB device playback. If “All” is selected for NET playback, this operates with the “Folder” setting.
34
Play Mode: Sets the track playback mode.
• Continuous: Continuously plays the tracks within the selected folder or within all folders (according to the “Play Range” setting).
• Single: Plays back only 1 track.
Random: Sets random playback.
• On: Random order playback is performed.
• Off: Random order playback is not performed.
Program: Sets programmed playback. • On: Plays back tracks in the set order (programmed playback).
• Off: Programmed playback is not performed.
Finish Mode: Sets the operation when playback is stopped.
• Stop: Playback stops.
• Next: When playback is stopped, the next track is cued.
• Recue: Playback stops and returns to the cue point.
Repeat: Sets repeat playback.
• On: Repeat playback is performed.
• Off: Repeat playback is not performed.
Auto Cue: Sets the auto cue function. The auto cue function temporarily stops playback at the point where playback restarts after skipping the silent portion at the beginning of a file.
• Off: Turns the auto cue function off.
• -48 dB/-42 dB/-36 dB: After the track has been selected, audio in the beginning of the track that is below the set volume level is skipped and temporarily stops playback.
Note: If the silent portion cannot be detected at the beginning of a file even after 20 seconds, playback will temporarily stop at the beginning of the file.
Skip Back: The track skips back at the set amount of time during playback or when paused, and plays back or remains paused.
• 0.5 sec / 2 sec / 60 sec: Set the skip back time for a track that is currently being played back to 0.5 second intervals between 0.5 and 10 seconds, or 5 second intervals between 10 and 60 seconds.

35
Search Mode: Sets the search mode.
• Normal: Plays back audio at 2x normal speed when searching, but does not play back audio at faster playback speeds.
• Silent: Audio is not played back when searching.
Auto Fade In: Sets the fade in time at the start of playback.
• Off: Does not function.
• 0.5 sec / 1.0 sec / 3.0 sec: The volume gradually increases for the set time.
Auto Fade Out: Sets the fade out time when playback is stopped.
• Off: Does not function.
• 0.5 sec / 1.0 sec / 3.0 sec: The volume gradually decreases for the set time
Start Delay: Sets the playback start timing.
• Off: Does not function. Playback starts immediately.
• 100 ms / 200 ms / 300 ms: Playback starts after the set time.
End Of Message: Sets how the “EOM” is illuminated in the display.
• Off: Does not function.
• 0 sec: Flashes for 0.5 seconds when the track ends.
• 5 sec / 10 sec / 15 sec / 20 sec / 30 sec / 60 sec: Flashes for the set amount of time before the track ends.
Master Key: Sets the master key for the pitch control function.
• Off: Disabled.
• On: Enabled.
Time Display: Sets how the playback and recording time are displayed.
• HH:MM:SS: Displayed in hours/minutes/seconds.
• MMM:SS:FF: Displayed in minutes/seconds/frames.
File Sort: Selects the sorting method for the file list order.
• Name: Sorts files in order of symbols, numbers, and alphabetical order.
• Date: Sorts files in date order.
Note: Sorting cannot be used when the media is “NET”. Files are sorted by folder.
36
Dimmer: Turns the Display Dimmer and LED Dimmer settings on/off.
• Off: Turns off the dimmer functions.
• On: Turns on the dimmer functions.
Display Dimmer: Sets the brightness of the display.
• 100%: Normal brightness.
• 75%: 75% of the normal brightness.
• 50%: 50% of the normal brightness.
• 25%: 25% of the normal brightness.
• 0%: Off in the standby status, and 25% of the normal brightness during operation.
LED Dimmer: Sets the LED brightness.
• 100%: Normal brightness.
• 75%: 75% of the normal brightness.
• 50%: 50% of the normal brightness.
• 25%: 25% of the normal brightness.
Screen Saver: Sets the screen saver.
• Off: The screen saver does not function.
• On: The screen saver starts when there is no operation for 30 minutes.

37
Renaming Presets To rename a Preset title, follow the steps below to change the characters. A maximum of 32 characters may be used in the name. Entering Characters
1. Select the preset number to rename in the Menu > User Preset Sel.
2. Select Preset Setting > Preset Title.
3. Place the cursor in the position to insert characters using the << and >> buttons.
4. Rotate the jog dial to select a character and press Enter.
5. Repeat steps 3 and 4 to enter all of the characters.
6. When finished entering the characters, press Enter to save the entered characters.
Deleting Characters
1. Place the cursor to the right of the character to delete using the << and >> buttons.
2. Press Frame to delete a character to the left of the cursor. By default, presets have a name that is eight characters long. To rename an existing name, delete the currently set characters first and then enter a new name.
3. To cancel without saving the entered characters, press the Back button before saving.
The following characters and symbols may be entered.
A B C D E F G H I J K L M N O P Q R S T U V W X Y Z a b c d e f g h i j k l m n o p q r s t u v w x y z (space)! # $ % & ’ ( ) + , – ; = @ [ ] ^ _ ’ « » ~0 1 2 3 4 5 6 7 8 9 ¡ ¢ £ ¤ ¥ ¦ § ¨ © ª ” ¬ ® ¯ °±² ³´ μ¶ · ¸ ¹ º ” ¼ ½ ¾ ¿ À Á Â Ã Ä Å Æ Ç Đ È É Ê Ë Ì Í Î Ï Ñ Ô Ỗ Ó Ò Õ Ö× Ø Ù Ú Û Ü Ý Þ ß ä ã â à á å æ ç è é é ê ë ì í î ï ñ ö ő ô ó ò ÷ ø ù ú û ü ý þ ÿ The characters above from ¡ to ÿ are Latin alphabets.

38
Recording Select the recording folder: When “Current” is selected in System Setting > Rec Folder, the recorded file is stored in the selected folder. To store in a different folder, select a different folder. However, when “All” is selected in Preset Setting > Play Range, files are stored in the root folder. When “Fixed” is selected in System Setting > Rec Folder, a fixed folder is automatically created directly below the root folder. The default folder name is “DMH_REC”.
Note: To record on an SD card, be sure to format it on the unit before recording. If the SD card is formatted on a computer or is used for recording without formatting it, this could result in sound cutoffs during recording.
The following results are displayed for media that cannot be recorded on.
• No Format: The media is unformatted has an unsupported formatting.
• Write Inhibited: The media is write-protected.
• Media Full: The recordable free space is less than 2MB.
Note: If the recordable space on the media falls below 2MB, recording will stop.
• Track Full: The number of files exceeds 2000.
Recording monitor: Hold Shift and press Copy to turn the recording monitor function on/off. When the recording monitor is turned on, the audio file as it is being recorded and stored on the media will be heard from the audio outputs. This is useful to check what the final quality of the recorded file sounds like.
Note: There will be a delay in the audio signal heard through the outputs when Rec Mon is turned on.
Signal pass thru monitor: When Signal Pass Thru is set to On in System Setting, the input signal selected in Preset Setting > Audio Input is sent to the outputs. Monitoring is performed regardless of whether the headphone setting is on or off. Signal pass thru monitoring will work during recording and when recording is paused.
39
Recording
1. Press Rec. The unit switches to the recording paused state, and the Rec buttons flashes and the Pause button illuminates. When “On” is selected in Preset Setting > One Touch Rec, recording starts immediately when Rec is pressed.
2. Adjust the recording level and recording balance. Select “Variable” in System Setting > Volume Input. The input level may only be adjusted when ALC is set to “Off” and Audio Input is set to “Bal” or “UnBal” in Preset Setting.
3. Select Preset Setting > Rec Level Type.
• Master/Bal: The input level may be adjusted using the jog dial. Also, hold down Shift and turn the jog dial to adjust the input level balance for the left and right channels.
• Separate L/R: The input level of the left channel may be adjusted using the jog dial. Also, hold down Shift and turn the jog dial to adjust the input level balance for the right channel.
4. Press Rec to start recording.
• Pre-recording: When the pre-recording time is set in Preset Setting > Pre Record, when recording is started, the recording starts retroactively for the set amount of time.
• Press Pause to pause the recording. Press Rec again to resume recording on the same file.
• When Auto Mark in the preset menu is set to On, a mark is added at the point where the recording is resumed from the paused status.
• If the directory in which the recording is saved is the root directly, the total number of folders and files is limited to 512 by the FAT16 file system.
5. Press Stop to stop recording. Press Play to playback the recorded file.
Dual recording: The selected media and backup media may be recorded simultaneously.
1. Select the media to record.
2. Select the backup media. Dual recording is given priority when both Dual Rec and Relay Rec are selected in Preset Setting.
3. Start recording using the same operation as detailed in the Recording section. Recording starts simultaneously for the selected media and backup media.
• The Backup Media file is stored in the folder set in System Setting > Date Form.
• During recording, if the free space is fully used in the selected media first, recording to both the selected media and backup media stops.
• During recording, if the free space is fully used in the backup media first, recording to the backup media stops but continues to the selected media.
• When the selected media and backup media are the same media, dual recording is canceled, and normal recording starts.
• When the record monitoring is on, normal recording starts only for the selected media.
40
Relay recording: Data is recorded to the first selected media, and when the remaining space on that media falls below 2MB, recording stops on that media and starts on the secondary media (media for continual recording).
1. Select the media for current recording.
2. Select the secondary media. Dual recording is given priority when both “Dual Rec” and “Relay Rec” are selected in Preset Setting.
3. Start recording using the same operation as detailed in the Recording section. Recording starts first on the selected media. The Relay media file is stored in the folder set in System Setting > Date Form.
• When recording is complete on the selected media, recording starts on the secondary media.
• When recording is complete on the secondary media, recording stops and relay recording is complete.
• If the selected media and backup media are the same media, relay recording is canceled, and normal recording starts.
Timer Recording: Recording is performed for the set amount of time from the specified time. The recording start time specification (schedule type) may be set by day of week/time or time/date. A maximum of 30 recording timers may be set.
Recording timer menu
Edit Enter or edit the timer information
Insert Enter new timer information before the selected timer
Clear Deletes the selected timer information
All Clear Deletes all of the timer information
Timer On Turns the selected timer on
Timer Off Turns the selected timer off
41
To set the timer recording start time and recording time settings
1. While the unit is stopped, press Menu. The menu list is displayed.
2. Rotate the jog dial to select Rec Timer, and press Enter. The recording timer list is displayed.
3. Rotate the jog dial to select Empty, and press Enter. The recording timer list menu is displayed.
4. Rotate the jog dial to select Edit, and press Enter. The type of recording schedule is displayed.
5. Rotate the jog dial to select the type of schedule, and press Enter.
The types of recording start schedules are:
• Day of Week: Specify the day and time.
• Date Time: Specify the date and time.
6. Enter the Day of Week
i. Rotate the jog dial to select the input position, and press Enter.
ii. Rotate the jog dial to select the recording day, and press Enter. A check mark is added in front of the selected day.
iii. After selecting the day, rotate the jog dial to select Exit, and press Enter. The recording start schedule is fixed. Repeat this process to select more than one day.
7. Enter the Date Time
i. Rotate the jog dial to select the input position, and press Enter.
ii. Rotate the jog dial to select the “year”, and press Enter.
iii. Rotate the jog dial to select the “month”, and press Enter.
iv. Rotate the jog dial to select the “date”, and press Enter. The recording start schedule is set.
Note: The display order of the date (year/month/day) may be selected in System Setting > Date Form.
8. Rotate the jog dial to select the recording start time (hour/minute) or select “Every Hour” to have recording performed every hour, and press Enter.
Note: The current time display type (12-hour display/24-hour display) may be selected in System Setting > Time Form.
9. Rotate the jog dial to select the recording time (hours/minutes), and press Enter.
Note: The recording timer can set up to 99 hours and 59 minutes of recording time.
10. Enter characters to label the file. These will be included in the user area of the file name when the file is created. The file name of the recording includes the device name, the recording start time/date, and user area data.
Turning timer recording on/off
1. In the recording timer list, rotate the jog dial to select the recording timer to turn on or off, and press Enter.
2. Rotate the jog dial to select Timer On or Timer Off, and press Enter.
42
Editing timer recording information
In the recording timer list, rotate the jog dial to select the recording timer to edit, and press Enter. The recording timer list menu is displayed.
Changing the start time or end time of a selected recording timer
In the recording timer list, rotate the jog dial to select Edit, and press Enter.
Inserting a new recording timer in front of the selected recording timer
In the recording timer list, rotate the jog dial to select Insert, and press Enter. If the number of recording timers exceeds 30, the last timer data is overwritten.
Deleting the selected recording timer
1. In the recording timer list, rotate the jog dial to select Clear, and press Enter.
2. Rotate the jog dial to select OK, and press Enter. The selected recording timer is deleted and the recording timer list is displayed.
Deleting all recording timers
1. Rotate the jog dial to select All Clear, and press Enter.
2. Rotate the jog dial to select OK, and press Enter. All recording timers are deleted and the recording timer list is displayed.
Operations During Recording Adding a file during recording
The manual track function divides tracks at the desired place during recording. Recording continues as a new file. Press Divide or Rec during recording. The file is cut at the point where the button is pressed, and recording continues in a new file. Files may also be divided at a specified amount of time.
Note: There could be sound cutoffs for a short period of time between files depending on the capacity of a recorded file.
If the size of a file being recorded reaches 2 GB, recording is continued by automatically switching to a new file. The manual track function is not available for two seconds after starting recording.
Adding marks
During playback it is possible to search for marks and start playback from specific locations. By using this method, you can create specific search points within files without splitting files. Hold Shift and press Mark during recording to add a mark at the point where the button was pressed.
• A maximum of 30 marks may be written to one file.
• Marks may also be added automatically.

43
Silent skip recording
When recording starts, silent sections during the recording may be detected and the recording paused during the silent sections.
• Set Silent Skip to On in Preset Setting.
• Set the silence finding level in Preset Setting > Silent Level.
• Set the silence finding time in Preset Setting > Silent Time.
If the recording input level is at a level lower than that selected in Silent Level and continues for a length of time that exceeds the time selected in Silent Time, recording to the media is paused and the S.S. indicator flashes. Subsequently, when a recording input level that exceeds the level selected in Silent Level is detected, recording starts again. If Preset Setting > Pre Record is set at this time, the pre-recording function operates. If Preset Setting > Auto Mark is “On”, a mark is recorded when the recording starts.
Playback
Selecting from the Media List
1. Press On/Standby. When in the stopped state, hold down Shift and press Media.
2. While the unit is stopped, press List.
3. Select a file and press Play.
To pause playback, press Pause during playback. When Play is pressed again, playback is restarted. To stop playback, press Stop.
Note: If Preset Setting > Finish Mode is set to Next, the next track will be cued when playback is stopped. If Preset Setting > Finish Mode is set to Recue, the file will return to the cue point when playback is stopped. Note: This unit can play back VBR (Variable Bit Rate) format files. The remaining time is displayed only as an estimated time when VBR (Variable Bit Rate) format files are played back.

44
Operations During Playback Changing files
Rotate the jog dial during playback or while stopped. Rotating in a clockwise direction switches to the next file. Rotating in the counter-clockwise direction switches to the start of the current file, and then to previous files.
Fast forward and fast rewind (Search)
• Press >> or << during playback or in the stopped state.
• Press << for fast rewind playback.
• Press >> for fast forward playback.
The search speed changes each time the button is pressed. When “Silent” is selected in Preset Setting > Search Mode, sound is not output at speeds 2x and above. When fast forward search is used to the end of the last file, or when fast rewind search is used to the start of the first file, the file pauses.
Note: Search cannot be performed on files that are recorded using VBR. If a VBR file is found during the search process, the search ends at the VBR file.
Exiting fast forward and fast rewind (search)
Press Play or Pause during search. When Play is pressed, playback continues from the position where search was exited. When Pause is pressed, playback is paused at the position where search was exited.
Jumping by frames (Frame jump)
1. Press Frame during playback, cue, or pause to switch to the Audible Pause state.
2. Press << or >>, or rotate the jog dial. Pressing << moves 1 frame in the reverse direction. Pressing >> moves 1 frame in the forward direction. When rotating the jog dial, one click moves one frame.
Press Frame to cancel frame search and return to the playback paused state.
Note: A frame equals 1/75 second.
Rewind a specified amount of time and playback (Skip back) During playback or pause, the track returns to a set amount of time from the playback position, and is then played back or paused from that position. This function can be controlled using Web Remote and Serial Remote. Set the time in Preset Setting > Skip Back.
Notes: • Skip back cannot be operated from the front panel buttons. • Files recorded in VBR cannot be skipped back.

45
Playback pitch adjustment (Pitch control)
The playback speed may be adjusted within a range of -16% to +16%.
1. Press Pitch while holding down Shift during playback, cue, or when stopped. The pitch adjustment is enabled.
2. Press Pitch + or Pitch – while holding down Shift. The pitch changes by 0.1% each time the pitch button is pressed.
To cancel the pitch control, press Pitch again while holding down the Shift button.
When the playback speed is adjusted using the pitch control, the musical interval changes according to the playback speed.
When the master key function is on, the playback sound is played back without changing the musical interval even if the pitch is adjusted.
Add marks (marking)
During playback or in the stopped state, hold down Shift and press Mark. A mark is added at the point. When a mark is added, “Mark z” (z: number of marks) is displayed.
Up to 30 marks can be added to a file.
Note: Marks are not supported for MP3 files that are not recorded by this unit. Marks are not supported when files are recorded in VBR.
Searching for marks
During playback, cue or in the stopped state, hold down Shift and press Mark + or Mark –.
When Mark + is pressed, the track is forwarded to the next marked point and paused.
When Mark – is pressed, the system returns to the previous marked point and is paused.
Marks may only be searched within the current file.
Random playback
Set Preset Setting > Random to On.
Press Play. Tracks are selected at random and playback starts.
Program playback
A maximum of 99 tracks may be registered to a program. The program may be saved to the media and may be read later. See the Program List section for more details.

46
Playback Timer
Edit Enter or edit the timer information.
Insert Enter new timer information before the selected timer
Clear Deletes the selected timer information.
All Clear Deletes all of the timer information.
Timer On Turns the selected timer on.
Timer Off Turns the selected timer off.
Timer playback start time and playback file settings
1. While the unit is stopped, press Menu. The menu list is displayed.
2. Rotate the jog dial to select Play Timer, and press Enter. Displays the playback timer list.
3. Rotate the jog dial to select the file to use for timer playback, and press Enter. When the timer settings are complete, the set timer turns on.
Turning timer playback on/off
1. In the playback timer list, rotate the jog dial to select the playback timer to turn on or off, and press Enter. Displays the playback timer list menu.
2. Rotate the jog dial to select Timer On or Timer Off, and press Enter. The playback timer list is displayed.
Editing timer playback information
In the playback timer list, rotate the jog dial to select the playback timer to edit, and press Enter.
Changing the start time or end time of a selected playback timer
Rotate the jog dial to select Edit, and press Enter.
Inserting a new playback timer in front of the selected playback timer
Rotate the jog dial to select Insert, and press Enter. The last timer data is deleted.
Deleting the selected playback timer
1. Rotate the jog dial to select Clear, and press Enter. “Clear?” is displayed.
2. Rotate the jog dial to select OK, and press Enter. The selected playback timer is deleted and the playback timer list is displayed.

47
Deleting all playback timers
1. Rotate the jog dial to select All Clear, and press Enter. “All Clear?” is displayed.
2. Rotate the jog dial to select OK, and press Enter. All playback timers are deleted and the playback timer list is displayed.
Press Back to cancel editing.
Using timer playback
1. Set the timer playback information and turn the timer on.
2. Load a timer playback media to the current playback media. The timer playback priority for when the playback start time is reached may be set in System Setting > Timer Priority. However, the timer does not operate when the menu or file list, etc., is displayed or during recording.
3. When the unit is in standby, the power will turn on and start playback. If other operations are performed during timer playback, timer playback is cancelled.
Program List
Preview Previews the selected file
Insert Enter a program or enter a new program in front of the selected program
Remove Deletes the selected program
Remove All Deletes all programs
Load Reads the programs on the selected media
Save Saves the programs on the selected media
Creating a program
1. While the unit is stopped or in cue, press Menu. The menu list is displayed.
2. Rotate the jog dial to select Program List, and press Enter. The program list is displayed.
3. Rotate the jog dial to select Empty, and press Enter. The program list menu is displayed.
4. Rotate the jog dial to select Insert, and press Enter. The file list is displayed.
5. Rotate the jog dial to select the file to program, and press Enter.
6. Rotate the jog dial to select Execute, and press Enter. The program is entered.
7. Rotate the jog dial to select Preview, and press Enter. Preview playback of the selected file starts.
8. Press Stop to exit playback.

48
Previewing programmed files
1. Place the cursor on the programmed file in the program list menu, and press Enter. The program list menu is displayed.
2. Rotate the jog dial to select Preview, and press Enter. Preview playback of the selected file starts.
3. Press Stop to end playback and return to the program list menu.
Program playback
1. Set Preset Setting > Program to On.
2. Press Play. Tracks are played back in the created program order. If there are no program settings, tracks are played in normal playback.
Details for the program, play range, and random settings:
Program Random Play Range Playback Content
On Off – Program playback in the set track order.
On On – Random playback within the program.
Off Off All
Plays back all tracks in all sub folders from the root folder in the order set in Preset Setting > File Sort.
Off On All Random playback within all files.
Off Off Folder Plays back all tracks in the selected folder.
Off On Folder
Plays back all tracks in the selected folder in random order.

49
Editing the program
1. Rotate the jog dial in the program list and place the cursor on the program to insert the program, and press Enter. The program list menu is displayed.
2. Rotate the jog dial to select Insert, and press Enter. The file list is displayed. When the number of programs exceeds 99, the last program is deleted.
Deleting the selected program file
1. Rotate the jog dial in the program list and place the cursor on the program to delete, and press Enter. The program list menu is displayed.
2. Rotate the jog dial to select Remove, and press Enter.
3. Rotate the jog dial to select OK, and press Enter. The selected program file is deleted, and the program list is displayed.
Deleting all program files
1. Press Enter on the program list. The program list menu is displayed.
2. Rotate the jog dial to select Remove All, and press Enter.
3. Rotate the jog dial to select OK, and press Enter. All program files are deleted, and the program list is displayed. Press Back to cancel editing.
Saving program data
1. Press Enter on the program list. The program list menu is displayed.
2. Rotate the jog dial to select Save, and press Enter.
3. Rotate the jog dial to select Save Here? on the folder to save the file, and press Enter.
4. Rotate the jog dial to select OK, and press Enter.
5. Enter the file name of the program to be saved, and press Enter. The program is saved in the specified folder, and the program list is displayed.
Reading the program from the selected media
1. Press Enter on the program list. The program list menu is displayed.
2. Rotate the jog dial to select Load, and press Enter.
3. Rotate the jog dial to select the file to read, and press Enter.
4. Rotate the jog dial to select OK, and press Enter. The program is displayed in the program list.
Timer playback
• Playback is performed from the specified time for the set file.
• The playback start time specification (schedule type) may be set as the day of week and time or date and time.
• A maximum of 30 playback timers may be set.

50
Hot Start
The unit may be controlled from other devices using Web Remote and serial commands. When a button is pressed, this function instantly starts playback of a pre-selected file. Hot start may be set for 20 tracks.
Hot list menu
Preview Previews the selected file.
Auto Mapping 20 tracks are automatically set to the hot list.
Set Sets or resets the selected hot list.
Remove Deletes the selected hot list.
Remove All Deletes all hot lists.
Load Reads the hot lists on the selected media.
Save Saves the hot lists on the selected media.
Registering tracks to a hot list
1. While device is stopped or in cue, press Menu.
2. Rotate the jog dial to select Hot List, and press Enter.
3. Rotate the jog dial to select Empty, and press Enter.
4. Rotate the jog dial to select Set, and press Enter.
5. Rotate the jog dial to select the file to select for hot start, and press Enter.
6. Rotate the jog dial to select Execute, and press Enter. Hot start is entered.
Previewing a hot start file
1. Press Menu and rotate the jog dial to select Preview, and press Enter. Preview playback of the selected file starts.
2. Press Stop to exit playback.
Automatically registering tracks to a hot start list
Press Menu and rotate the jog dial to select Auto Mapping, and press Enter. A 20-track hot list is automatically registered. Files are registered in order from the first file based on the settings in Preset Setting > Play Range.

51
Previewing files registered in the hot start list
1. Place the cursor on a hot start file in the Hot Start list, and press Enter. The hot list menu is displayed.
2. Rotate the jog dial to select Preview, and press Enter. Preview playback of the selected file starts.
3. Press Stop to end playback and return to the Hot Start list.
Saving a hot list
1. Press Menu and rotate the jog dial to select Hot List, and press Enter.
2. Rotate the jog dial in the hot list menu to select Save, and press Enter.
3. Rotate the jog dial to select Save Here? for the media and folder in which you want to save the hot list, and press Enter. “Save?” is displayed.
4. Rotate the jog dial to select OK, and press Enter.
5. Enter the file name of the hot list to be saved, and press Enter.
Loading a hot list
1. Press Menu and rotate the jog dial to select Hot List, and press Enter.
2. Press Enter on the hot list. The hot list menu is displayed.
3. Rotate the jog dial to select Load, and press Enter. The hot list is displayed.
4. Rotate the jog dial to select the hot list to read, and press Enter. “Load?” is displayed.
5. Rotate the jog dial to select OK, and press Enter.
Removing a hot list file
1. Press Menu.
2. Rotate the jog dial to select Hot List, and press Enter.
3. Rotate the jog dial in the Hot List menu and place the cursor on the hot list that you want to delete, and press Enter. The hot list menu is displayed.
4. Rotate the jog dial to select Remove, and press Enter. “Remove” is displayed.
5. Rotate the jog dial to select OK, and press Enter. The selected hot list is deleted.
Removing all hot list files
1. Press Menu.
2. Rotate the jog dial to select Hot List, and press Enter. The hot list menu is displayed.
3. Rotate the jog dial to select Remove All, and press Enter. “Remove All?” is displayed.
Note: Press Back to cancel editing.
4. Rotate the jog dial to select OK, and press Enter. All hot lists are deleted.

52
Editing Files Combine
Combine the selected file with another file on the same media to create a new file.
1. Press Combine when the combine source files are cued or paused.
2. Rotate the jog dial to select the combine target file, and press Enter.
The file name of the file created by combining source files is created according to the same rules as recording. Files stored on other media cannot be combined. During combining, “Executing ... zzz%” (z: progress status) is displayed. When the combination is complete, “Completed” is displayed. Select “Cancel” and press Enter to cancel combining. The combined file is stored in the combination source folder. The files used in the combination remain unchanged.
• Combining cannot be performed in the following situations.
• When the selected media is write-prohibited
• When there is not enough free space on the selected media
• The maximum file size is 2 GB
• When the file format is a format other than WAV
• When the total number of files reaches 2000
• When the number of bits differs
• When the number of channels differs
• When the sampling rate differs
Divide
The selected file can be split into 2 files at the current playback or recording position. The original file used in the division remains unchanged. 1. Press Divide during playback, cue, or pause. Displays “Divide?”.
2. Rotate the jog dial to select OK, and press Enter. Division starts.
During the division, “Executing ... zzz%” (z: progress status) is displayed. When the division is complete, “Completed” is displayed. Select Cancel and press Enter to cancel the division.
“_A” is added to the previous file name for the first part of the divided file. (Example: When aaa.mp3 is divided -> aaa_A.mp3) “_B” is added to the previous file name for the second part of the divided file. (Example: When aaa.mp3 is divided -> aaa_B.mp3)

53
Dividing cannot be performed in the following situations:
• When the selected media is write-prohibited
• At the start point or end point of a file
• When the file format is a format other than WAV or MP3
• When the number of files reaches 1999
• When there is not enough free space on the selected media
• When the file name after division already exists
Copy
Copy the selected file to a folder on the same or different media.
1. Press Copy on the file that you
want to copy, with the unit stopped, cued, or paused. A media list for selecting the copy destination is displayed.
2. Rotate the jog dial to select the copy destination media, and press Enter. The folder list is displayed.
3. Rotate the jog dial to select Copy Here? in the copy destination folder level, and press Enter. Copying begins.
During copying, “Executing ... zzz%” (z: progress status) is displayed. When the copying is complete, “Completed” is displayed. Select Cancel and press Enter to cancel copying.
Copying cannot be performed in the following situations:
• When the media is write-prohibited
• When there is not enough free space on the media

54
Move
Moves the selected file to a folder on the same or different media.
1. Press Move when the file that you want to move is stopped, cued, or paused. A media list for selecting the move destination is displayed.
2. Select the move destination media and press Enter. The folder list is displayed.
3. Rotate the jog dial to select Move Here? in the move destination folder level, and press Enter. Moving begins.
During moving, “Executing ... zzz%” (z: progress status) is displayed. When the moving is complete, “Completed” is displayed. Select Cancel and press Enter to cancel moving.
• Files cannot be moved to other media in the following situations.
• When the media is write-prohibited
• When there is not enough free space on the media
Undo
Returns the edit operation performed immediately prior to the previous state.
Undo may be used on Combine, Divide, Copy, Move, and file and folder renaming operations.
1. Press Undo directly after making an edit. Displays “Undo?”.
2. Rotate the jog dial to select OK, and press Enter. When the operation is finished, “Completed” is displayed.
Note: When the edit is cancelled using Undo, the file cannot be returned to its previous state.

55
Connecting to a Network
When connected to a network that has a DHCP function, settings for the DN-900R such as the IP address are configured automatically. When connected to a network that does not have a DHCP function, you need to configure settings such as the IP address and DNS server in the System Setting menu.
Note: When configuring the network settings manually, contact your network administrator for the necessary setting details.
Required equipment:
• Broadband Internet connection (only required if connecting to an NTP time server)
• Router: We recommend using a router equipped with a built-in DHCP server and a built-in 100BASE-TX switch. When connecting multiple devices, we recommend a switching hub with a speed of 100 Mbps or greater.
• Ethernet cable (CAT-5 or greater recommended): Use only a shielded STP or ScTP LAN cable.
If you are using an Internet service on which network settings are made manually or with no DHCP function, adjust the settings directly from the Network Setup menu. When adjusting network settings manually, confirm the settings with your network administrator.
Do not connect the Ethernet cable from DN-900R directly to the LAN port/Ethernet connector on your computer. When connecting to a network that has no DHCP function, manually adjust the settings in the System Setting menu.
To manually set up a static network connection (no DHCP)
1. Connect a shielded-type Ethernet cable. If a flat-type cable or unshielded-type cable is used, other devices could be affected by noise.
2. Power on DN-900R.
3. Press Menu. The menu list is displayed.
4. Rotate the jog dial to select System Setting, and press Enter.
5. Set the IP Address to Static. The currently set IP Address is displayed.
6. Specify the appropriate IP address, turning the jog dial and using the Search+ and Search- to move the cursor. Press Frame to delete the previously entered number. Press Back to cancel the settings.
7. Press Enter when finished entering the numbers. The screen returns to the System Setting menu.
In the same way, enter the “Subnet Mask”, “Gateway” and “DNS Server” addresses. When the network settings are adjusted, press the Menu button. The unit will restart automatically after the network settings are changed.
56
Dante Connection
DN-900R can be used to connect to dedicated Dante networks, often used for recording studios, live sound, and professional audio installations. The Dante Controller software available from audinate.com enables you to route audio and configure devices on a Dante network. A complete list of Dante Controller features is available at: audinate.com/products/software/dante-controller.
Note: If the “Identify Device” feature is activated in Dante Controller, the DN-900R will display the message “Dante Locate”.
The menu Utility > Dante Status shows the following:
• Device name
• IP/Mask
• MAC Address
• Streaming Status
The menu System Setting > Dante Reset can be used to reset the Dante device back to the factory defaults.

57
Web Remote You can control and configure settings for the DN-900R through your computer’s web browser with the Web Remote application.
To connect to the DN-900R via the Web Remote, launch your web browser and type the IP address of the DN-900R (found in Menu > Utility > Network Status) into the address bar.
Password
1. Launch the Web Remote application and enter the password in the password screen to proceed to the Web Remote. The password screen is displayed if a password is set in the preset menu (“Admin Passwd”). If a password is not set in the preset menu, the screen will proceed directly to the control screen.
• Alphabetic characters (upper and lower case), numbers, and symbols may be used in the password.
• The password shall be between 6 to 12 characters in length.
2. Select the user name and enter the password in the “Password” text box.
3. Click Go.

58
Main Screen
The Main screen is the first screen displayed when the Web Remote is launched.
This screen consists of:
1. Model Name: Displays the connected device name.
2. Date/Time Information Display: Displays the month/day/year and time originating from the device.
3. Operation: Shows the Control and Hot Start software options.
4. Settings Screen: Shows the software options for Preset Setting, Archive Setting, Rec Timer, Play Timer, Program, and System Setting.
5. Others: Shows the software option for the Utility menu.
1 2
3
4 5

59
User IDs and Operating Permissions
There are three types of user IDs, and the operating permissions differ depending on the ID.
Passwords are set for each of the user IDs in DN-900R’s System Setting.
User ID Admin Operator Observer
Password Admin Passwd Operator Passwd Observer Passwd
View status and settings
Yes Yes Yes
Control operations Yes Yes No
Hot start operations Yes Yes No
Preset setting operations
Yes Yes No
Archive setting operations
Yes Yes No
Record timer operations
Yes Yes No
Play timer operations Yes Yes No
Program operations Yes Yes No
Utility operations Yes Yes No
System setting operations
Yes No No
Login user list Yes No No

60
Control Screen
In the Control screen, the current track list is displayed (Maximum number of files: 2000).
1
2
3
45
6
78
9 10
11
13
12

61
1. Track List: The DN-900R play list. The file name and size of MP3 and WAV data is
displayed.
2. Record Level and Record Balance: Control the recording level and balance.
3. Download Button: Downloads the selected file to the computer.
4. Back Button: Press to cancel the edited settings.
5. Enter Button: Press to confirm the edited settings.
6. Load Button: The file selected in the track list is loaded in the DN-900R.
7. Rename: Rename the selected track in the list.
8. Delete: Delete the selected track from the list.
9. Time and Operating Status Display: Information about time, track number, operating status and the volume level meter are displayed. Over (OV) is indicated when it reaches -1 dB.
10. Transport Controls
11. File Upload: Load a file into the unit.
12. Pitch: Adjusts the pitch for the track playback.
13. Panel Lock Button: All buttons are locked other than Power, Lock, and Shift.

62
Program Screen
Configure the program (List) settings (Maximum number of program files: 99)
• Changes can only be made when the unit is stopped.
• Files can be deleted and added to the program list.
• Press the Insert File button to display the File List screen and select tracks to insert.
• The files selected in Insert File are inserted one line above the selected line. To insert a file last, select the EOL line.
1. Program Playback: Displays the track list to be played.
2. Remove All Button: Removes all files in program.
3. Remove File Button: Deletes the selected line.
4. Insert File Button: Switches to the file list. Files selected in the file list are inserted above the line selected in the program playback track list.
5. Program Mode: Turns Program mode on or off.
12
3
45
63
File List Screen
Press the Mapping button in the Hot Start screen or press the Insert File button in the Program screen to display the DN-900R file list and select files. 1. File List: Displays the list of files to be played.
2. Enter Folder Button: Enters the selected folder in the list.
3. Select File Button: The selected file is added to the program playback track list in the program screen or the Hot Start list in the Hot Start screen.
4. Back: Exits out of the current folder.
5. Cancel: Stops the current operation.
1
2
34
5

64
Hot Start
1. Track Display: Shows the track time and level for the playing track.
2. Hot Start Buttons: Press these buttons to start playback of an assigned track.
3. Hot Start Track List: Shows the list of tracks, file size, folder path, and assigned Hot Start number.
4. Remove Button: Cancels assignment of the selected Hot Start number.
5. Remove All: Cancels assignment of all Hot Start tracks.
6. Mapping Button: Individually assigns a file to the number selected in the Hot Start list. Press this button to display the file list and select a file you want to assign to Hot Start.
7. Auto Mapping Button: Automatically assigns up to 20 files to Hot Start from the top of the current file list.
1
2
3467
5

65
System Setting Screen
1. Save: Press to save the changes made in the System menu.
2. Cancel: Press to discard the changes made in the System menu.
3. Default: Press to reset the System menu settings to defaults.
4. General Settings: Sets the Play Timer Priority.
5. Record Settings: Adjusts settings for folder name, recording folder location, and user area mode.
6. Playback Settings: Adjusts settings for mono playback and output rate.
7. Audio I/O Settings: Adjusts input volume, input trim, phantom power, and output trim.
8. Display Settings: Adjusts the time format, date format, and display contrast.
9. Remote Settings: Adjusts the serial bit rate.
1 2 34
5
6
7
8
9

66
10. Network Settings
11. Dante Settings
12. Time Zone Settings
13. Administration Settings
10
11
12
13

67
Utility Screen
1. Software Version: Displays the current software version for DN-900R.
2. Software Update: Select the downloaded firmware update file to send to DN-900R.
3. Preset File: Select a preset file to upload or download to DN-900R.
4. Date/Time: Set the date and time for the unit.
5. Log File: Download the recording log file.
6. Format Media: Format the SD card.
7. Speed Check: Checks the recording capabilities of the SD card.
8. Log-off: Disconnects the Operator or Observer from the Web interface.
9. Power Control: Turn this option on to put the unit in Standby mode.
1
2
3
4
567
8
9

68
Preset Setting Screen
1. Preset Number: Selects the preset file to use.
2. General Settings: Shows the Preset name, Shift function, and power-on function.
3. Record Setting: Select the various settings for recording.
4. Playback Settings: Select the various settings for playback.
5. Display Settings: Select the settings for the time, dimmer, and screensaver.
1
2
3
4
5

69
Play Timer
1. File List: Displays the list of titles to be played.
2. Edit: Enter or edit the timer information.
3. Insert: Enter new timer information before the selected timer location.
4. Clear: Deletes the selected timer information.
5. All Clear: Deletes all of the timer information.
6. Play Timer Settings: Edit the playback timer mode settings, scheduling date, time, and file name.
1
2345
6

70
Record Timer
1. File List: Displays the list of titles scheduled to be recorded.
2. Edit: Enter or edit the timer information.
3. Insert: Enter new timer information before the selected timer location.
4. Clear: Deletes the selected timer information.
5. All Clear: Deletes all of the timer information.
6. Record Timer Settings: Edit the record time settings for timer mode, schedule type, date, time, duration, and user specified characters added to the filename.
1
2345
6

71
Archive Settings
Archive Mode
• Off: No archiving.
• Auto: Recorded files are automatically archived when recording is complete.
• Timed: Recorded files are archived according to a set schedule when recording is complete.
Archive Schedule
Sets the schedule to archive. This option is only displayed when “Timed” is selected as the Archive mode.
• Day of Week: Sets the day and time (hours, minutes).
• Date/Time: Sets the date and time (year, month, date, hours, minutes).

72
Server
Sets the IP address and credentials of the FTP server.
• IP Address: 0.0.0.0 to 255.255.255.255 (default setting is 0.0.0.0).
• User ID: Input the user ID for the computer/server which will contain the archived files.
• Password: Input the password for the user name.
• Folder: Select the folder to archive to the server.
Notes:
• If the user is part of a domain then input the domain\user name.
• Alpha-numeric characters can be used along with most special characters.
Clear After Arc.
Set to automatically delete the files after archiving is complete.
• Off: Files are not deleted after archiving is complete.
• On: Files are automatically deleted after archiving is complete.
Auto Deletion
When in the stopped state, archived files are deleted in order from the oldest onwards when the free recording space on the media is less than the set time.
• Off: No files will be deleted.
• 24h: Archived files are deleted when the recording free space is less than 24 hours.
• 12h: Archived files are deleted when the recording free space is less than 12 hours.
• 6h: Archived files are deleted when the recording free space is less than 6 hours.
• 3h: Archived files are deleted when the recording free space is less than 3 hours.
• 1h: Archived files are deleted when the recording free space is less than 1 hours.
Connection Test
Performs a communication test with the FTP server.
Default
Initializes the archive setting details back to defaults.

73
Archive Files
This backup function sends recorded files from the currently selected media (SD or USB) to a FTP server.
1. While device is stopped, press Menu. The menu list is displayed.
2. Rotate the jog dial to select Archive Setting, and press Enter. The archive setting items are displayed.
Note: When Clear After Arc is on, the files on the selected media are deleted after being archived to the FTP server.
3. Rotate the jog dial to select the item that you want to change, and press Enter. When archiving is started, “Now Archiving...” is displayed. When archiving is complete, “Archive Completed” is displayed.
Archiving is not performed in the following conditions even if archive is set to “Auto” or “Timed”:
• During playback
• When the record monitoring is operating during recording
• During dual recording
• During WAV recording with a 96 kHz sampling rate
• When the selected media is write-prohibited
• When the menu screen is being displayed
74
Serial Remote Control Function In the Serial Remote Control function, a host such as a computer is connected to the unit. By sending control commands from the host to the unit, the unit can be operated, and the status information of the unit can be checked both on the unit and host. There are 2 methods for connecting the host and unit, RS-232C control and IP Control.
Note: Visit the DN-900R product page at denonpro.com to download the Serial Protocol Guide for more information.
RS-232C control
You will be able to perform three control functions from the host by connecting an RS-232C straight cable to the RS-232C serial terminal (9-pin D-sub) connector. The three control functions are:
1. Controlling the DN-900R externally.
2. Sending the status information to the host when DN-900R receives a status request command from the host.
3. Automatically sending the status information to the host when there is a change to the DN-900R status.
About Connections
• Transmission System: Asynchronous full duplex transmission
• Compatible connector: 9-pin D-sub (male)
• Communication speed: 9,600/38,400 bps selectable (System Setting: Serial Bit Rate)
• Data bit: 8 bit
• Parity: None
• Start bit: 1 bit
• Stop bit: 1 bit
• Flow control: None
Pin arrangement
Pin number Signal name 1 Ground
6 NC 2 TxD
7 RTS* 3 RxD
8 NC 4 NC
9 NC 5 S. Ground * 4V, 500mA power supply can be used for RTS.

75
IP Control (Ethernet) You will be able to perform the three control functions from the host by connecting an Ethernet cable to the Ethernet connector. (Connector type: RJ-45 (10BASE-T/100BASE-TX) Communication format
• Communication system: Full duplex
• Communication speed: 10 Mbps/100 Mbps
• Communication port: TCP port 23 (telnet)
• Communication data length: 135 bytes (maximum)
Connecting the DN-900R and host directly
Connecting DN-900R and host via a switch/router
RS-232C straight cable
Host
Ethernet straight cable
Host
Ethernet crossover cable
Ethernet straight cable
Switch/Router

76
Troubleshooting
Error message Cause/Solution
No Media Cannot detect media.
Unformat
The media is formatted in an unsupported format. Format the media on DN-900R or set the format to FAT16 or FAT32.
Media Full The remaining space on the media is running low. Replace the media with a new one or delete files that are no longer required.
Track Full The number of files on the selected media exceeds 2000. Recording cannot be performed if the number of files exceeds 2000. Replace the media with a new media or delete unneeded files.
Write Inhibited The selected media is write-prohibited. Remove the write-protection from the media.
File Not Found Target file does not exist. Check the file.
Track Not Found The target track does not exist. Check the media.
Already Exists A file with the same name already exists. • Copy, Move, Divide: Check the folder. • Rename: Change the file name before entering the name.
Err Media XX Not supported on this unit. Replace the media.
VBR
This error message appears when a VBR file search is performed. Search cannot be performed on VBR files. When the selected track is VBR format, the estimated remaining time is displayed.
Not Allowed Not Available
This appears when an invalid operation is performed. The operation may be disabled due to other setting items such as the preset menu, etc. Check the details of the operation.
No Mark There are no marks for the mark jump. Set marks.
Some files are skipped There is a file with the same name in the copy or move location. Files with the same name cannot be copied or moved.
ALC The Rec Level cannot be changed when the ALC settings are enabled. Turn the ALC settings off to change the Rec Level.
Registered The file that have been added to a program, hot start, or timer playback list. Files registered to these lists cannot be edited.

77
Error message Cause/Solution
No Backup Media (XXX) Backup media cannot be detected.
Media Write Inhibited (XXX) The backup media is write-prohibited. Remove the write-protection from the media.
Backup Media Full (XXX)
There is no free space on the backup media. Replace the media with a new media or delete unneeded files.
Dual Rec Canceled (W01)
The selected media is the same as the backup media set in the preset settings. Dual recording is canceled, and normal recording is performed.
Dual Rec Canceled (W02)
The record monitoring is on. Dual recording is canceled, and normal recording is performed.
No Secondary Media (XXX) The secondary media cannot be detected.
Secondary Media Write Inhibited (XXX)
The secondary media is write-prohibited. Remove the write-protection from the media.
Secondary Media Full (XXX)
There is no free space on the secondary media. Replace the media with a new media or delete unneeded files.
Server Not Found The server is not connected, or the server cannot be found.
Account Error Cannot log in to the server.
Folder Not Found Cannot find the archive destination folder.
Err Media XXX Cannot obtain information from the selected media.
Server Media Full The server capacity is full.
Err Network An error has occurred while transferring the data.
Not Connected Check if it is properly connected to DN-900R. If this message persists, replace the cable.
No Media The media inserted in DN-900R has not been detected. Eject and insert the media again.
* XXX: SD1, SD2, USB

78
Appendix (English) Technical Specifications
Inputs Mic/Line In (2 XLR connectors), Line In (2 RCA connectors), Digital In (1 AES/EBU,1 S/PDIF), Dante Digital In (RJ-45 connector)
Balanced Analog In L/R Type: XLR (1:GND, 2:Hot, 3:Cold) Line setting input level: +4 dBu Maximum input level: +24 dBu/+20 dBu/+18 dBu Input impedance: 20 kΩ Mic setting input level: -60 to 16 dBu Input impedance: 5 kΩ EIN: Less than -127 dBu (Rs = 150 Ω) CMRR: <80 dB
Unbalanced Analog In L/R Type: RCA terminal Input level: -10 dBV Maximum input level: +10 dBV/+6 dBV/4 dBV Input impedance: 10 kΩ
Unbalanced Digital In
Type: RCA terminal Input impedance: 75 Ω Standard input level: 0.5 Vp-p Format IEC-60958 (Coaxial)
Balanced Digital In
Type: XLR (1:GND, 2:Hot, 3:Cold) Input impedance: 110 Ω Standard input level: 3.5 Vp-p Format: IEC-60958 (AES/EBU)
Dante Digital In Type: 100 Mbps Ethernet RJ-45 connector Format: 24 bit; 48, 44.1 kHz sampling rates, uncompressed
Outputs Balanced Analog Out L/R (XLR), Unbalanced Out L/R (RCA), Balanced Digital Out (AES/EBU), Unbalanced Digital Out (S/PDIF), Headphone Output (1/4" / 6.35 mm), Dante Digital Out (RJ-45 connector)
Balanced Analog Out L/R Type: XLR (1:GND, 2:Hot, 3:Cold) Load impedance: Over 600 Ω Output level: +4 dBu at 600 Ω load Maximum output level: +24 dBu/+20 dBu/+18 dBu
Unbalanced Analog Out L/R Type: RCA terminal Load impedance: Over 10 kΩ Output level: -10 dBV Maximum output level: +10 dBV/+6 dBV/+4 dBV
Balanced Digital Out Type: XLR (1:GND, 2:Hot, 3:Cold) Output impedance: 110 Ω Standard output level: 3.0 Vp-p Format: IEC-60958 (AES/EBU)
Unbalanced Digital Out Type: RCA terminal Output impedance: 75 Ω Standard output level: 0.5 Vp-p Format: IEC-60958 (Coaxial)

79
Dante Digital Out Type: 10/100 Ethernet RJ-45 connector Format: 24 bit, 48, 44.1 kHz sampling, uncompressed
Dante Network Audio Latency: Less than 1 ms (excluding auxiliary signal paths) Sample rate: DN-900R uses SRC on its output to Dante to convert recorder sample rate to Dante Network sample rate. Sample bit depth: 24 bit
Compatible Media SD/USB memory/USB HDD
Headphone Out 1/4” (6.35 mm) 20 mW/32 Ω
Storage Maximum storage capacity: Up to 2 TB Maximum file size: 2 GB Maximum number of files: 2000 files (for 1 folder) Maximum number of folders: 1000 folders Maximum number of folder hierarchies: 8 (under the root directory)
File System FAT16, FAT32, HFS+, exFAT
File Format Specifications
Compatible media: SD, SDHC, USB memory, USB HDD Extension: WAV, AIFF, AIF Resolution: 16 bit, 24 bit Sampling frequency: 44.1k, 48k, 96k
Playable MP3 Format Extension: MP3 Bit rate: 32 - 320 kbps, VBR Sampling frequency: 44.1k, 48k
Playable AAC Format Extension: M4A Compression method: AAC-LC Bit rate: 64 - 320 kbps, VBR Sampling frequency: 44.1k, 48k
Number of Channels 2 (stereo), 1 (mono)
Audio Frequency Characteristics Line / Mic (-16 dBu) (+0.5 dB / -1 dB)
S/N Ratio <89 dB (A-weighted)
Total Harmonic Distortion Less than 0.01%
Dynamic Range <106 dB (for 24 bit WAV playback)
Channel Separation > -90 dB
Variable Pitch Width -16% to +16%
Variable Trim Adjustment Width +/-2.0 dB
Power Connection: Standard IEC (switching power supply)
Input voltage: 120V AC, 60 Hz (US and Canada models) 230V AC, 50/60 Hz (EU, UK, Asia/Pacific models)
Power consumption: 30 W, 0.4 W (standby), 3.4W (Network standby)
Environmental Conditions Operating temperature: 41 to 95 °F Operating humidity: 25–85%, non-condensing Storage temperature: -4 to 140 °F

80
Dimensions (width x depth x height)
16.92” x 9.48” x 1.68” / 430 x 241 x 43 mm
Weight 5.7 lbs. / 2.6 kg
Specifications are subject to change without notice.
Trademarks & Licenses Denon is a trademark of D&M Holdings Inc., registered in the U.S. and other countries. Denon Professional products are produced by inMusic Brands, Inc., Cumberland, RI 02864, USA. Dante® is a registered trademark of Audinate Pty Ltd. iOS is a registered trademark of Cisco in the U.S. and other countries and is used under license. Android is a registered trademark of Google Inc. SD and SDHC are registered trademarks of SD-3C, LLC. All other product names, company names, trademarks, or trade names are those of their respective owners.

81

denonpro.com
Manual Version 1.0