do-it-yourself septic system inspection field guide ... · pdf fileaccompany the...
TRANSCRIPT
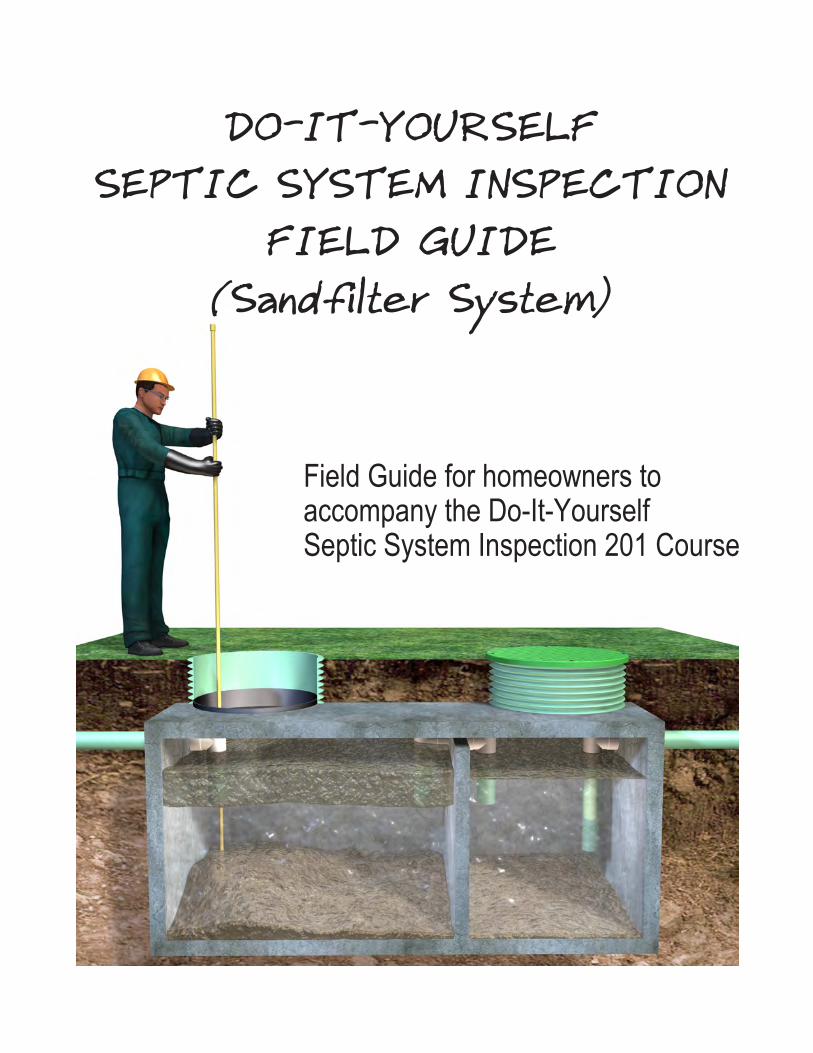
DO-IT-YOURSELF SEPTIC SYSTEM INSPECTION
FIELD GUIDE(Sandfilter System)
Field Guide for homeowners to accompany the Do-It-Yourself Septic System Inspection 201 Course

PAGE 2
Septic system owners are ultimately responsible for the operation, monitoring, and maintenance of their onsite septic system. Washington State and local public health regulations require septic system owners to have a complete evaluation of their septic system performed every one to three years (depending on the type of system) and to report the condition of their system to the local health jurisdiction.
The do-it-yourself (DIY) septic system inspection training program is designed to teach homeowners how to perform a basic inspection of their home septic system. If the homeowner finds that their system is malfunctioning, it will be necessary for them to contact a licensed professional with the necessary skills and equipment to repair the system. Septic system repairs require a permit from the local health jurisdiction and must conform with state and local public health codes that regulate septic system repair. This program is not intended as training for onsite professionals or for the inspection of community or commercial septic systems. Any mention of trade names, private companies, or commercial products in this training program is for illustrative purposes and does not constitute an endorsement by the State of Washington or Clallam County.
Inspecting or maintaining a septic system can be dangerous. If you choose to inspect or maintain your septic system, you do so at your own risk and are personally responsible for your own safety. You may be exposed to health hazards including, but not limited to, infectious diseases, hazardous gases, and electrical shock. Sewage carries harmful bacteria, viruses, and parasites that can cause infection and illness, especially in people with weakened immune systems, pregnant women, children, and the elderly. Proper hygiene, protective clothing, and safe work practices help reduce exposure risks. A homeowner performing a DIY septic system inspection is responsible for taking all necessary precautions to minimize the risks of illness or injury associated with the inspection or maintenance of the system.
If at any time you are concerned about your ability to safely inspect or maintain your septic system, you should stop what you are doing and hire a licensed professional to perform the work. Contact your local health jurisdiction for a list of licensed professionals working in your area.
In consideration for using this field guide, you understand and agree that the State of Washington and Clallam County, its officers, employees, agents or volunteers are not liable or responsible for any injuries or damage which may result from your using the materials or ideas, or from your performing the procedures depicted in this field guide. If you do not agree, do not use this guide.
DISCLAIMER
PAGE 3
Introduction • • • • • • • • • • • • • • • • • • • • • • • • • • • • • • • • • • • • • • • • • • • • • • • • • • • • • 4Identify The Parts Of Your System • • • • • • • • • • • • • • • • • • • 5Locate Your Septic System • • • • • • • • • • • • • • • • • • • • • • • • • • • • • • 6Inspection Tools & Materials List • • • • • • • • • • • • • • • • • • • • • • 7Making Your Scum Stick • • • • • • • • • • • • • • • • • • • • • • • • • • • • • • • • • 8Making Your Sludge Stick • • • • • • • • • • • • • • • • • • • • • • • • • • • • • • • 9Septic Inspection Safety • • • • • • • • • • • • • • • • • • • • • • • • • • • • • • • • • • 10Inspecting A Septic Tank • • • • • • • • • • • • • • • • • • • • • • • • • • • • • • • • • • 11 -18Inspecting A Pump Tank • • • • • • • • • • • • • • • • • • • • • • • • • • • • • • • • • • 19 - 20Inspecting A Sand Filter • • • • • • • • • • • • • • • • • • • • • • • • • • • • • • • • • • • 21 - 23Inspecting A Pressure Drainfield • • • • • • • • • • • • • • • • • • • • • • 24Inspecting A Gravity Drainfield • • • • • • • • • • • • • • • • • • • • • • • • • 25 - 26Inspecting A Distribution Box (D-Box) • • • • • • • • • • • • • • 27 - 28Cleaning Up • • • • • • • • • • • • • • • • • • • • • • • • • • • • • • • • • • • • • • • • • • • • • • • • • • • 29Reporting: Make It Official • • • • • • • • • • • • • • • • • • • • • • • • • • • • • • • 30Septic Care • • • • • • • • • • • • • • • • • • • • • • • • • • • • • • • • • • • • • • • • • • • • • • • • • • • • 31Glossary of Terms • • • • • • • • • • • • • • • • • • • • • • • • • • • • • • • • • • • • • • • • • • • • 32 -34Attribution • • • • • • • • • • • • • • • • • • • • • • • • • • • • • • • • • • • • • • • • • • • • • • • • • • • • • • • • 35
CONTENTS
PAGE 4
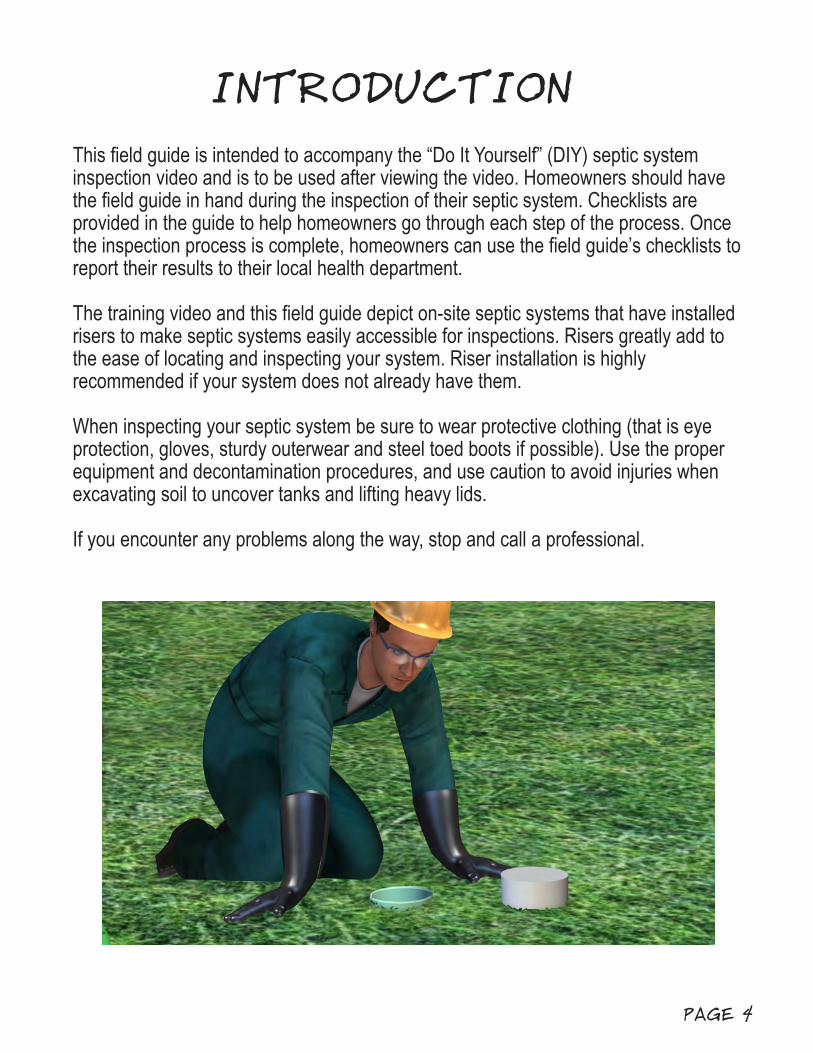
INTRODUCTIONThis field guide is intended to accompany the “Do It Yourself” (DIY) septic system inspection video and is to be used after viewing the video. Homeowners should have the field guide in hand during the inspection of their septic system. Checklists are provided in the guide to help homeowners go through each step of the process. Once the inspection process is complete, homeowners can use the field guide’s checklists to report their results to their local health department.
The training video and this field guide depict on-site septic systems that have installed risers to make septic systems easily accessible for inspections. Risers greatly add to the ease of locating and inspecting your system. Riser installation is highly recommended if your system does not already have them.
When inspecting your septic system be sure to wear protective clothing (that is eye protection, gloves, sturdy outerwear and steel toed boots if possible). Use the proper equipment and decontamination procedures, and use caution to avoid injuries when excavating soil to uncover tanks and lifting heavy lids.
If you encounter any problems along the way, stop and call a professional.
PAGE 5
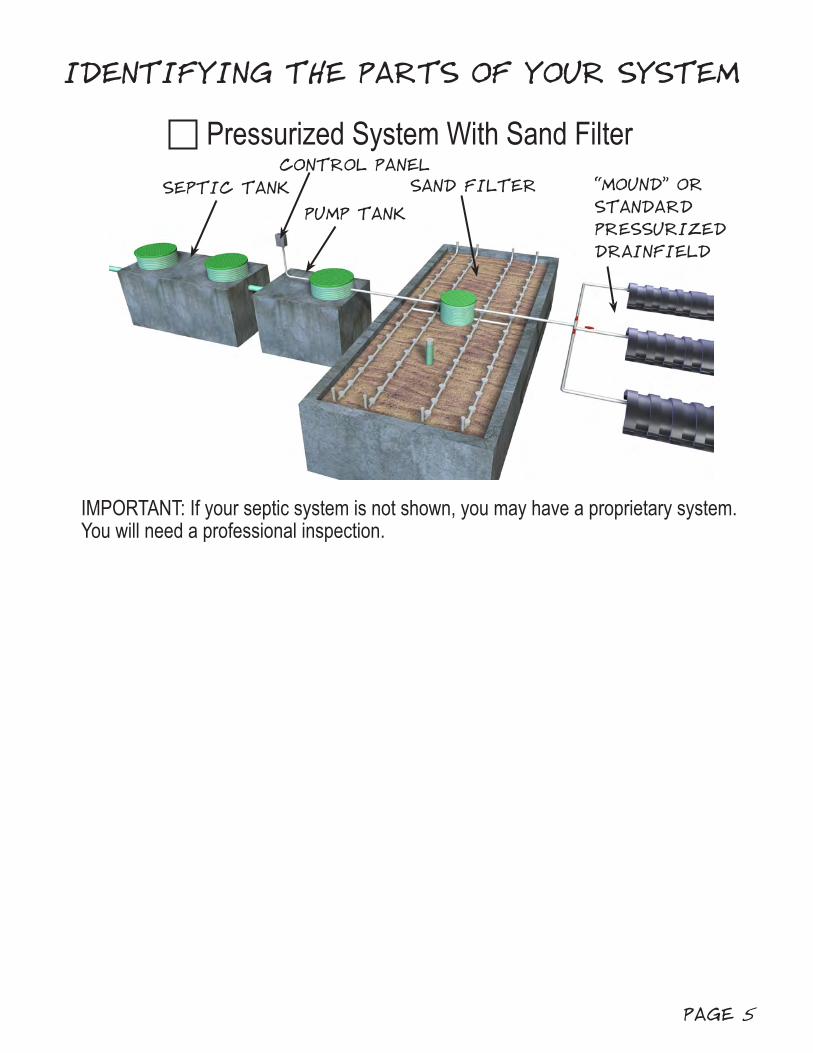
SEPTIC TANK “MOUND” OR STANDARD PRESSURIZED DRAINFIELD
IDENTIFYING THE PARTS OF YOUR SYSTEM
Pressurized System With Sand Filter
PUMP TANKSAND FILTER
IMPORTANT: If your septic system is not shown, you may have a proprietary system. You will need a professional inspection.
CONTROL PANEL

PAGE 6
LOCATING YOUR SYSTEM
SEPTIC TANK RISER LIDS
DRAINFIELD INSPECTIONPORTS
CLEANOUT
PIPE EXITS BASEMENT OR CRAWL SPACE.
SEPTIC SYSTEM“AS-BUILT” DRAWING(A.K.A. RECORD DRAWING)
Three Ways To Locate Your System: 1. Look for lids or a series of lids in your yard. 2. Get your septic system “as-built” drawing from your local health department. 3. Call a professional to locate your system.
PAGE 7
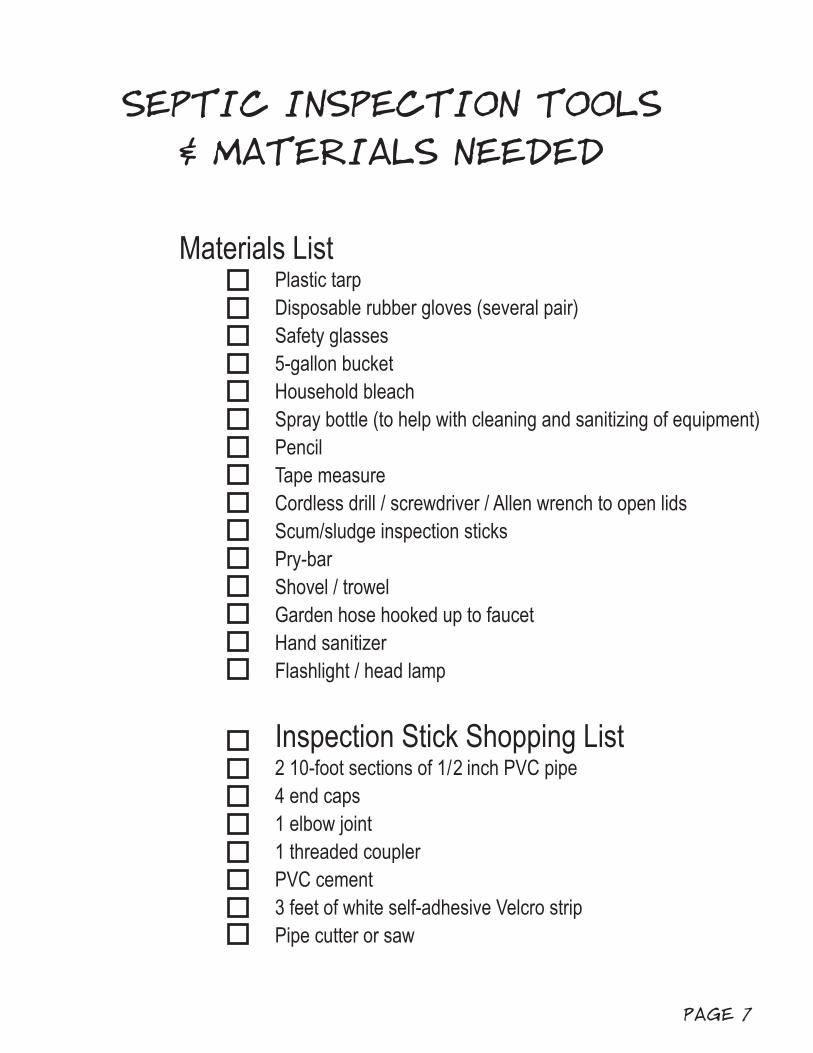
SEPTIC INSPECTION TOOLS& MATERIALS NEEDED
Materials List • Plastic tarp • Disposable rubber gloves (several pair) • Safety glasses • 5-gallon bucket • Household bleach • Spray bottle (to help with cleaning and sanitizing of equipment) • Pencil • Tape measure • Cordless drill / screwdriver / Allen wrench to open lids Scum/sludge inspection sticks • Pry-bar • Shovel / trowel • Garden hose hooked up to faucet • Hand sanitizer • Flashlight / head lamp Inspection Stick Shopping List • 2 10-foot sections of 1 / 2 inch PVC pipe • 4 end caps • 1 elbow joint • 1 threaded coupler • PVC cement • 3 feet of white self-adhesive Velcro strip • Pipe cutter or saw
PAGE 8
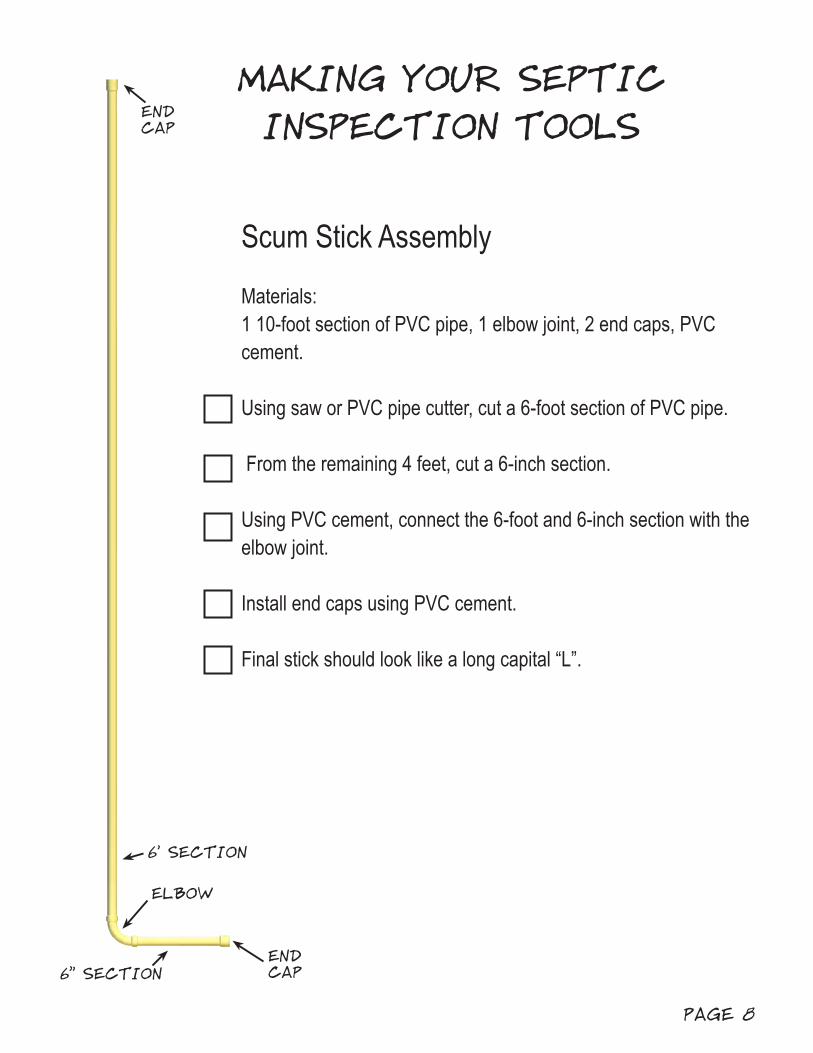
MAKING YOUR SEPTICINSPECTION TOOLS
Scum Stick Assembly
Materials: 1 10-foot section of PVC pipe, 1 elbow joint, 2 end caps, PVC cement.
Using saw or PVC pipe cutter, cut a 6-foot section of PVC pipe.
From the remaining 4 feet, cut a 6-inch section. Using PVC cement, connect the 6-foot and 6-inch section with the elbow joint. Install end caps using PVC cement.
Final stick should look like a long capital “L”.
END CAP
ELBOW
END CAP6” SECTION
6’ SECTION

PAGE 9
Sludge Stick AssemblyMaterials: 1 10-foot section of PVC pipe, 1 threaded coupler, 2 end caps, PVC cement, 3 feet of white self-adhesive Velcro tape.
Cut remaining 10-foot section in half, creating two 5-foot sections.
Install one end of the threaded coupler to each section with PVC cement.
Install end caps using PVC cement. Separate the Velcro tape. Discard the rough or “tooth” side.
Remove the plastic backing from the 3-foot long Velcro tape. Starting at one end cap, adhere the soft or “loop” side of the Velcro tape up the length of the stick. This will be the bottom of the Sludge Stick. Make sure Velcro extends to the bottom of the stick (to the bottom of end cap), as shown.
When cement is dry, connect the 2 5-foot sections with the threaded coupler.
After use and cleaning, stick can be unscrewed for easier storage.
MAKING YOUR SEPTICINSPECTION TOOLS
END CAPS
THREADEDCOUPLER
VELCRO TAPE
PAGE 10
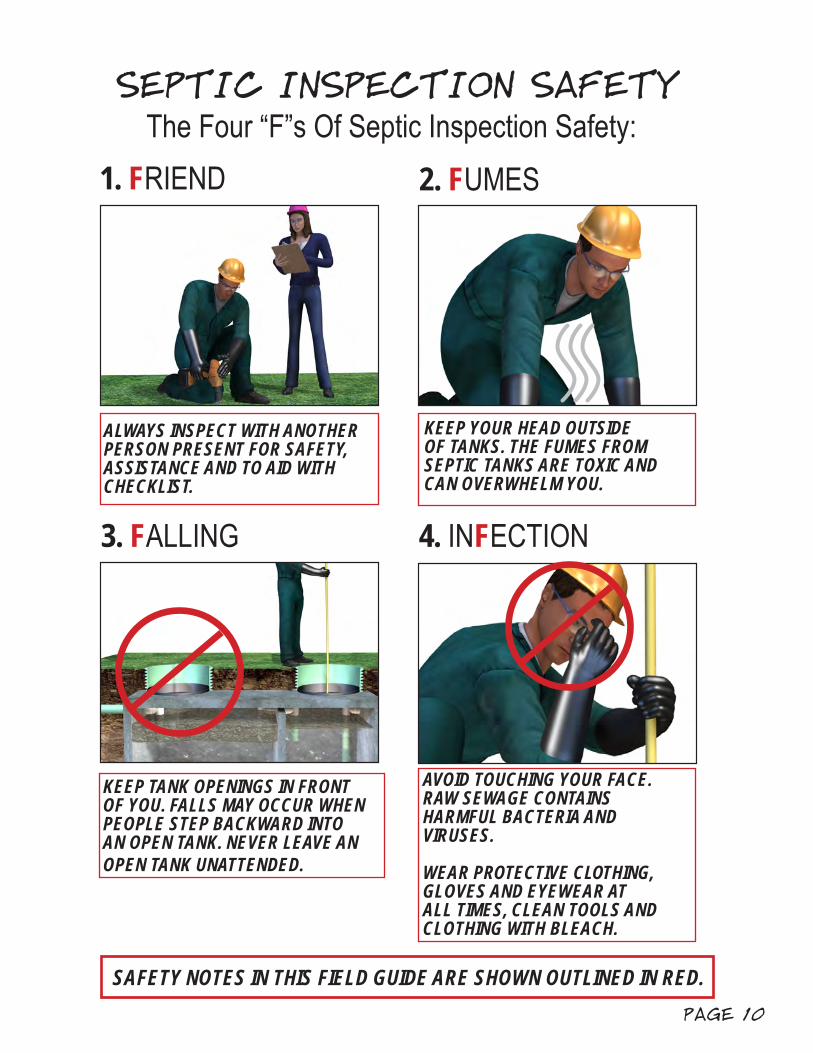
SEPTIC INSPECTION SAFETY
ALWAYS INSPECT WITH ANOTHER PERSON PRESENT FOR SAFETY, ASSISTANCE AND TO AID WITH CHECKLIST.
SAFETY NOTES IN THIS FIELD GUIDE ARE SHOWN OUTLINED IN RED.
The Four “F”s Of Septic Inspection Safety: 1. FRIEND 2. FUMES
KEEP YOUR HEAD OUTSIDE OF TANKS. THE FUMES FROM SEPTIC TANKS ARE TOXIC AND CAN OVERWHELM YOU.
3. FALLING
KEEP TANK OPENINGS IN FRONT OF YOU. FALLS MAY OCCUR WHEN PEOPLE STEP BACKWARD INTO AN OPEN TANK. NEVER LEAVE AN OPEN TANK UNATTENDED.
4. INFECTION
AVOID TOUCHING YOUR FACE. RAW SEWAGE CONTAINS HARMFUL BACTERIA AND VIRUSES.
WEAR PROTECTIVE CLOTHING, GLOVES AND EYEWEAR AT ALL TIMES, CLEAN TOOLS AND CLOTHING WITH BLEACH.

PAGE 11
ACCESS RISER SCUM LAYER
SLUDGE LAYER
OUTLETBAFFLE
CENTER WALLWITH BAFFLE PIPES(SOME TANKS)
INLET BAFFLE
INOUT
Common Septic TankNote: Some tanks will have plastic baffles, and others will have concrete baffles, depending on the age of the system.
INSPECTING YOUR SEPTIC TANK(MOST SYSTEMS)
OUTLETBAFFLEFILTER

PAGE 12
Check risers for watertightness. Run hose around outside of each riser to see if water seeps into tank. Does the riser appear to be watertight with no visible leaks?
Yes No Risers Not Present
Carefully remove inside lid if present (the lid may be very heavy and require prying, avoid back strain)
11
12
13
14
OPENING YOUR SEPTIC TANK
SAFETY CHECK: WEAR PROTECTIVE CLOTHING, EYE PROTECTION AND GLOVES. AVOID TOUCHING YOUR FACE.
SAFETY CHECK: INSPECT WITH ANOTHER PERSON PRESENT.
Clear away dirt and debris from access riser lid area. (Note: Some tanks do not have risers. Dirt will need to be removed to access tank. Use caution lifting lids.)
Remove riser lid.
SAFETY CHECK: KEEP OPEN LIDS IN FRONT OF YOU. FALLS MAY OCCUR WHEN PEOPLE STEP BACKWARDS INTO AN OPEN TANK.
SAFETY CHECK: DON’T LEAVE OPEN TANKS UNATTENDED.
CHECKBOXES
Note: If your tank has 2 chambers, perform all steps on both the inlet and outlet sides of the septic tank.
IF YOU ANSWERED “NO” TO ANY OF THE ABOVE QUESTIONS, STOP YOUR INSPECTION AND CONTACT A PROFESSIONAL.
PAGE 13
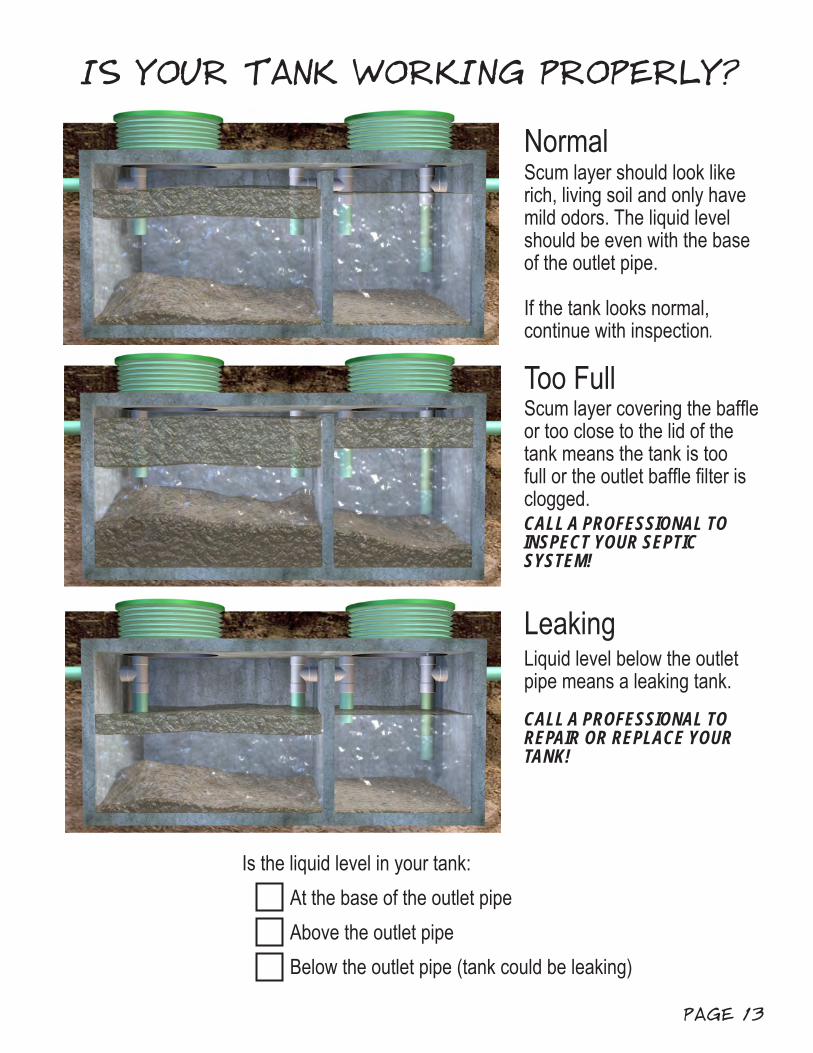
Scum layer should look like rich, living soil and only have mild odors. The liquid level should be even with the base of the outlet pipe.
If the tank looks normal, continue with inspection.
Scum layer covering the baffle or too close to the lid of the tank means the tank is too full or the outlet baffle filter is clogged. CALL A PROFESSIONAL TO INSPECT YOUR SEPTIC SYSTEM!
Liquid level below the outlet pipe means a leaking tank.
CALL A PROFESSIONAL TO REPAIR OR REPLACE YOUR TANK!
Normal
Too Full
Leaking
IS YOUR TANK WORKING PROPERLY?
Is the liquid level in your tank: At the base of the outlet pipe Above the outlet pipe Below the outlet pipe (tank could be leaking)
PAGE 14
11
12
13
14
OBSERVING YOUR SEPTIC TANK
SAFETY CHECK: KEEP HEAD OUT OF RISER AND TANK WHEN CHECKING.
Check Odor: Is the tank free of strong, overpowering odor?
Yes No
Are risers free of cracks or visible damage?
Yes No Riser Not Present
Does scum layer look like living, healthy soil? Yes No
Can you clearly see baffles above scum layer?
Yes No
Is scum layer well below lid opening?
Yes No
SCUM
BAFFLE
Are baffles free of clogs and leaks around the seals to the tank? If the baffle is con-crete, is it intact and not corroded? Yes No
Note: If your tank has 2 chambers, perform all steps on both the inlet and outlet sides of the septic tank.
IF YOU ANSWERED “NO” TO ANY OF THE ABOVE QUESTIONS, STOP YOUR INSPECTION AND CONTACT A PROFESSIONAL.
PAGE 15
11
12
13
14
MEASURE THE SCUM LAYER
SAFETY CHECK: KEEP HEAD OUT OF RISER AND TANK WHEN CHECKING.
Place scum stick on top of scum layer.
Mark scum stick even with top of riser.
Make a hole in the scum layer and lower scum stick through hole.
Pull scum stick up until you feel the resistance of the scum layer.
Mark scum stick again, even with top of riser.
Remove the scum stick and place on a tarp.
Measure the distance between the two marks.Mark the distance here:
Outlet Scum Depth (inches) IF SCUM LAYER IS MORE THAN 6 INCHES HAVE YOUR TANK PUMPED
Note: If your tank has 2 chambers, perform all steps on both the inlet and outlet sides of the septic tank.
Inlet Scum Depth (inches)
PAGE 16
Add the scum depth (previous page) and sludge depth.
11
12
13
MEASURE THE SLUDGE LAYER
SAFETY CHECK: KEEP HEAD OUT OF RISER AND TANK WHEN CHECKING.
Carefully insert sludge stick into hole in scum or through baffle.
Lower sludge stick to bottom of tank and wait 3 minutes.
Carefully remove the sludge stick and place on a tarp.
Measure the length of the sludge stain on the Velcro.
Mark the distance here:
Inlet Scum Depth (inches)Inlet Sludge Depth (inches)Inlet Total Depth (inches)
4
IF THE TOTAL DEPTH IS MORE THAN 18 INCHES, HAVE YOUR TANK PUMPED.
IF THE SCUM DEPTH IS MORE THAN 6 INCHES, HAVE YOUR TANK PUMPED. IF THE SLUDGE DEPTH IS MORE THAN 12 INCHES, HAVE YOUR TANK PUMPED.
Note: If your tank has 2 chambers, perform all steps on both the inlet and outlet sides of the septic tank.
Outlet Sludge Depth (inches) Inlet Sludge Depth (inches)
Outlet Scum Depth (inches)Outlet Sludge Depth (inches)
Does Your Tank Need Pumping? Yes NoOutlet Total Depth (inches)
PAGE 17
11
12
13
14
REMOVE & CLEAN OUTLET BAFFLE FILTER
SAFETY CHECK: DO NOT REMOVE ENTIRE OUTLET BAFFLE FILTER ALL AT ONCE!
Locate the filter inside the outlet baffle.
Note: Not all systems have filters. We recommend you have one installed. Ask your local health department if a permit is required to add an outlet baffle filter.
Raise outlet filter half way and let sit for 15 minutes.
This prevents any backed up effluent or loose solids from exiting the tank and damaging your drainfield.
When effluent has settled, remove the filter completely.
SAFETY CHECK: AVOID SPLASHING AND CONTACT WITH SEWAGE WHILE RINSING FILTERS.
If you have a yellow “Tuf-Tite” filter, fill a bucket with water and dip filter into bucket.
Turn over and rinse.
OUTLETFILTER
REMOVEFILTER
RAISE HALFWAY & WAIT
Note: If the liquid level is above the outlet pipe, contact a professional to clean the filter.
Continued on next page...
PAGE 18
15
16
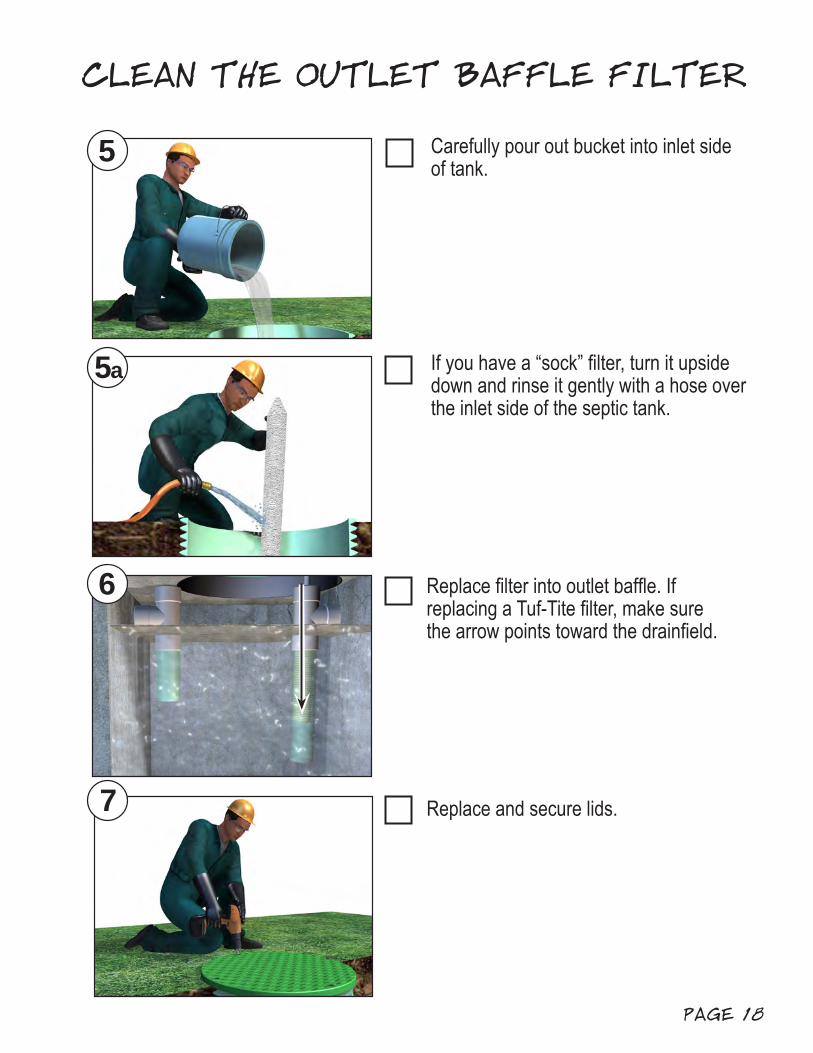
CLEAN THE OUTLET BAFFLE FILTER
Carefully pour out bucket into inlet side of tank.
If you have a “sock” filter, turn it upside down and rinse it gently with a hose over the inlet side of the septic tank.
Replace filter into outlet baffle. If replacing a Tuf-Tite filter, make sure the arrow points toward the drainfield.
15a
17 Replace and secure lids.
PAGE 19
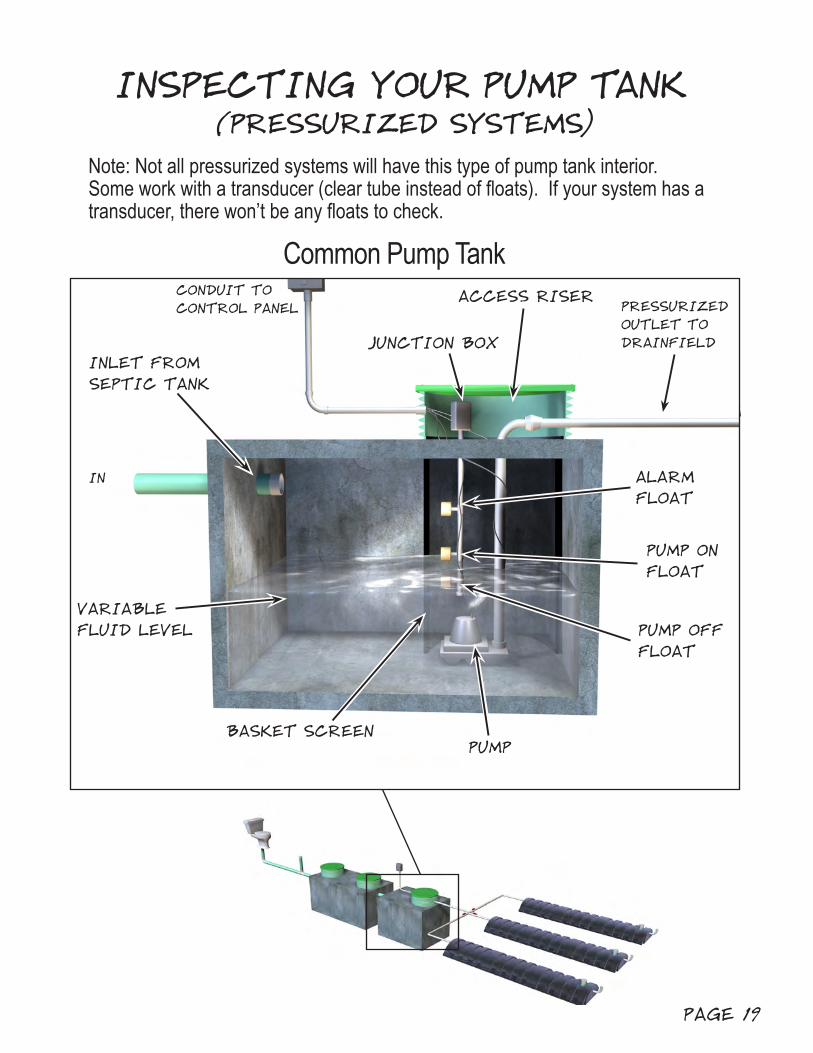
Common Pump TankACCESS RISER
VARIABLEFLUID LEVEL
ALARMFLOAT
INLET FROM SEPTIC TANK
IN
INSPECTING YOUR PUMP TANK(PRESSURIZED SYSTEMS)
PUMP ONFLOAT
PUMP OFFFLOAT
PUMP
CONDUIT TO CONTROL PANEL PRESSURIZED
OUTLET TO DRAINFIELDJUNCTION BOX
Note: Not all pressurized systems will have this type of pump tank interior. Some work with a transducer (clear tube instead of floats). If your system has a transducer, there won’t be any floats to check.
BASKET SCREEN
PAGE 20
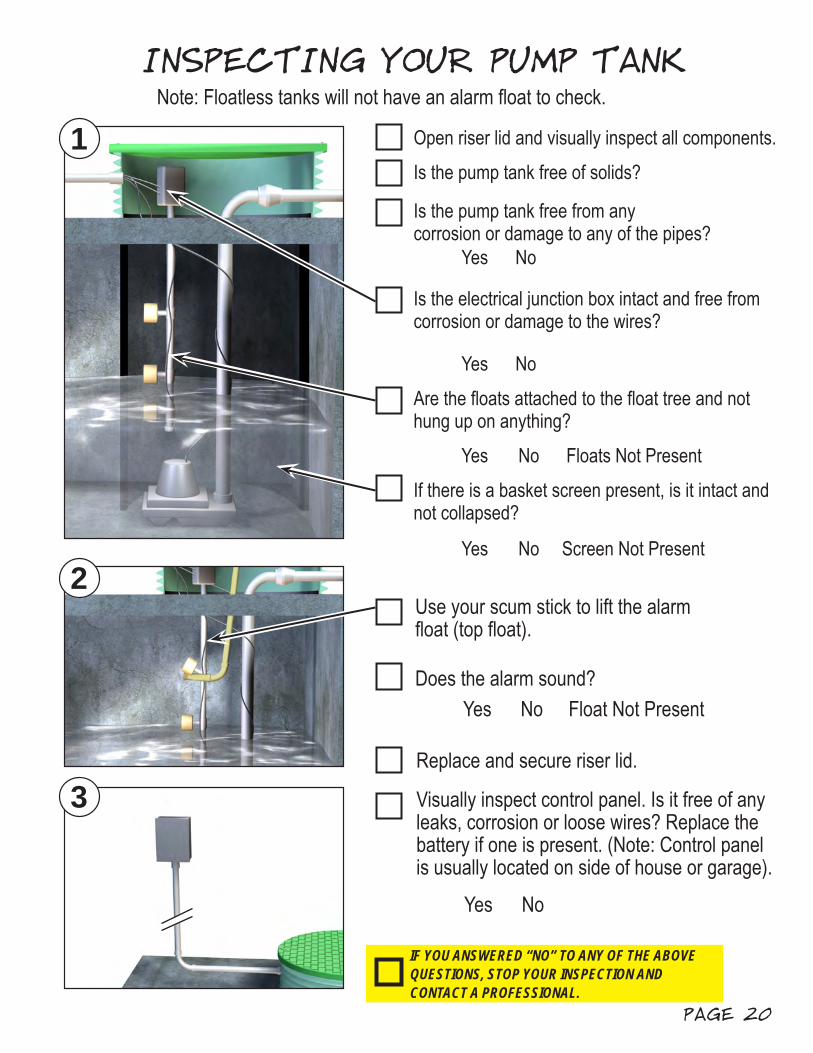
11
13
INSPECTING YOUR PUMP TANK
Open riser lid and visually inspect all components.Is the pump tank free of solids?
Is the pump tank free from any corrosion or damage to any of the pipes? Yes No
Is the electrical junction box intact and free from corrosion or damage to the wires? Yes NoAre the floats attached to the float tree and not hung up on anything? Yes No Floats Not Present If there is a basket screen present, is it intact and not collapsed? Yes No Screen Not Present
Use your scum stick to lift the alarm float (top float).
Does the alarm sound? Yes No Float Not Present
Replace and secure riser lid.
12
Visually inspect control panel. Is it free of any leaks, corrosion or loose wires? Replace the battery if one is present. (Note: Control panel is usually located on side of house or garage).
Yes No
IF YOU ANSWERED “NO” TO ANY OF THE ABOVE QUESTIONS, STOP YOUR INSPECTION AND CONTACT A PROFESSIONAL.
Note: Floatless tanks will not have an alarm float to check.
PAGE 21
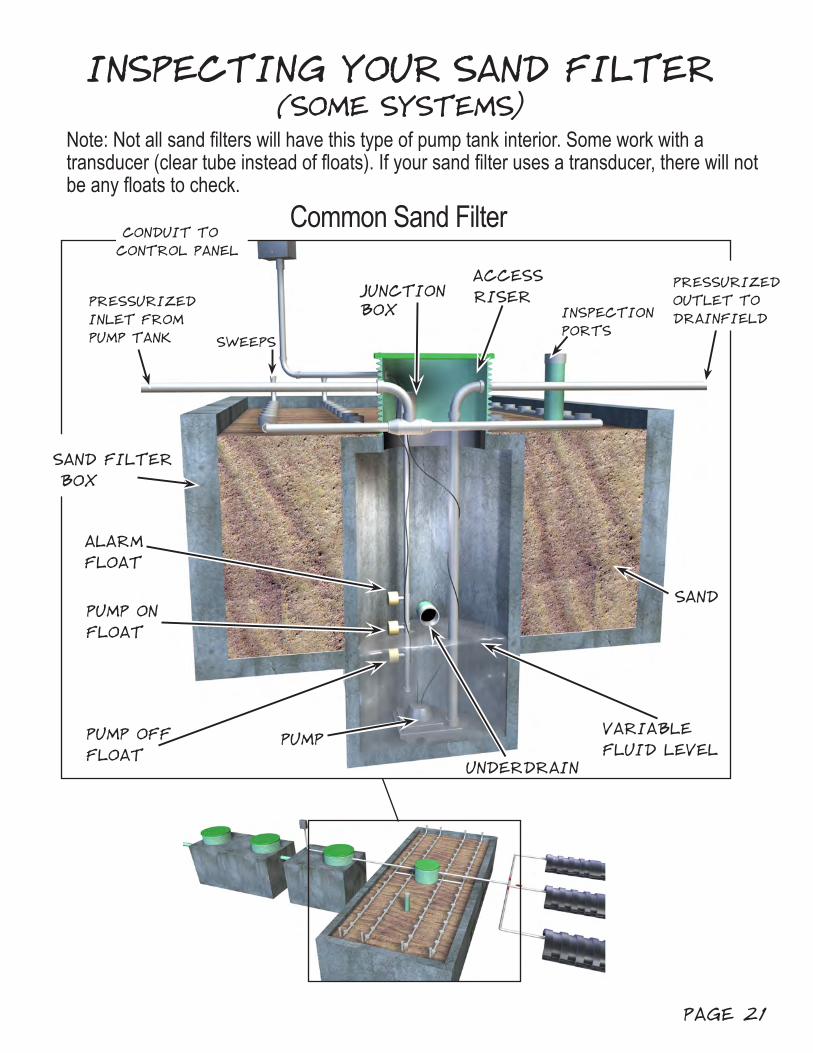
SAND FILTER BOX
Common Sand Filter
VARIABLEFLUID LEVEL
ALARMFLOAT
INSPECTING YOUR SAND FILTER(SOME SYSTEMS)
PUMP ONFLOAT
PUMP OFFFLOAT
PUMP
CONDUIT TO CONTROL PANEL
PRESSURIZED OUTLET TO DRAINFIELD
JUNCTION BOXPRESSURIZED
INLET FROM PUMP TANK
ACCESS RISER
UNDERDRAIN
SAND
SWEEPS
INSPECTION PORTS
Note: Not all sand filters will have this type of pump tank interior. Some work with a transducer (clear tube instead of floats). If your sand filter uses a transducer, there will not be any floats to check.
PAGE 22
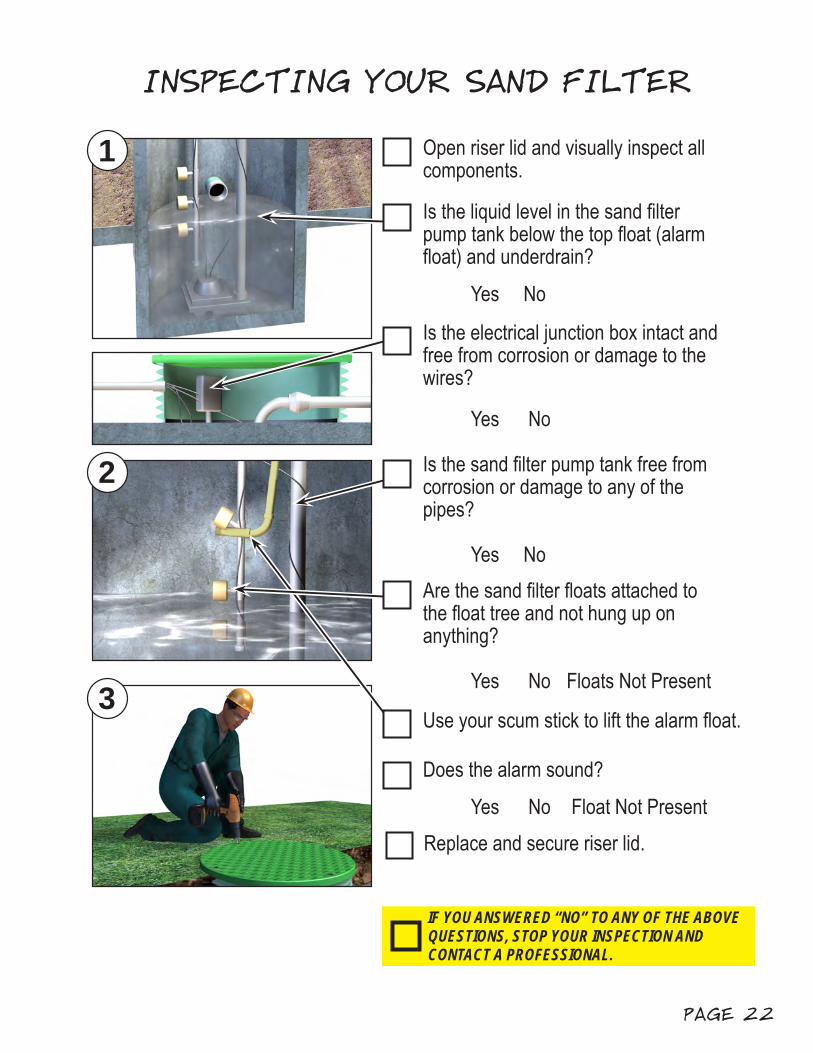
11
INSPECTING YOUR SAND FILTER
12
IF YOU ANSWERED “NO” TO ANY OF THE ABOVE QUESTIONS, STOP YOUR INSPECTION AND CONTACT A PROFESSIONAL.
Open riser lid and visually inspect all components.
Is the liquid level in the sand filter pump tank below the top float (alarm float) and underdrain?
Yes No
Is the electrical junction box intact and free from corrosion or damage to the wires?
Yes No
Is the sand filter pump tank free from corrosion or damage to any of the pipes?
Yes NoAre the sand filter floats attached to the float tree and not hung up on anything?
Yes No Floats Not Present
Use your scum stick to lift the alarm float.
Does the alarm sound?
Yes No Float Not Present
13
Replace and secure riser lid.

PAGE 23
INSPECTING YOUR SAND FILTER
14
Open and look inside each inspection port (some systems). You may need a flashlight.
If there is water inside the inspection ports, the system may have just been dosed. Wait 2 hours.
Is there standing water inside the inspection ports 2 hours later?
Yes No Inspection Ports Not Present
Replace the inspection port caps.
IF YOU ANSWERED “YES” TO ANY OF THE ABOVE QUESTIONS, STOP YOUR INSPECTION AND CONTACT A PROFESSIONAL.
Is there surfacing effluent over the sand filter?
Yes No

PAGE 24
11
12
13
INSPECTING YOUR DRAINFIELD
Walk across entire drainfield checking for odors and damp areas.
Are there any mushy or swampy areas or surfacing effluent?
Yes No
Are there any strong odors?
Yes No
(PRESSURIZED SYSTEMS)
Open and look inside each inspection port (some systems). You may need a flashlight.
If there is water inside the inspection ports, the system may have just been dosed. Wait 2 hours.
Is there standing water inside the inspection ports 2 hours later?
Yes No Inspection Ports Not Present
Replace inspection port caps.
IF YOU ANSWERED “YES” TO ANY OF THE ABOVE QUESTIONS, STOP YOUR INSPECTION AND CONTACT A PROFESSIONAL.
Note: Some older pressurized systems may not have inspection ports.
PAGE 25
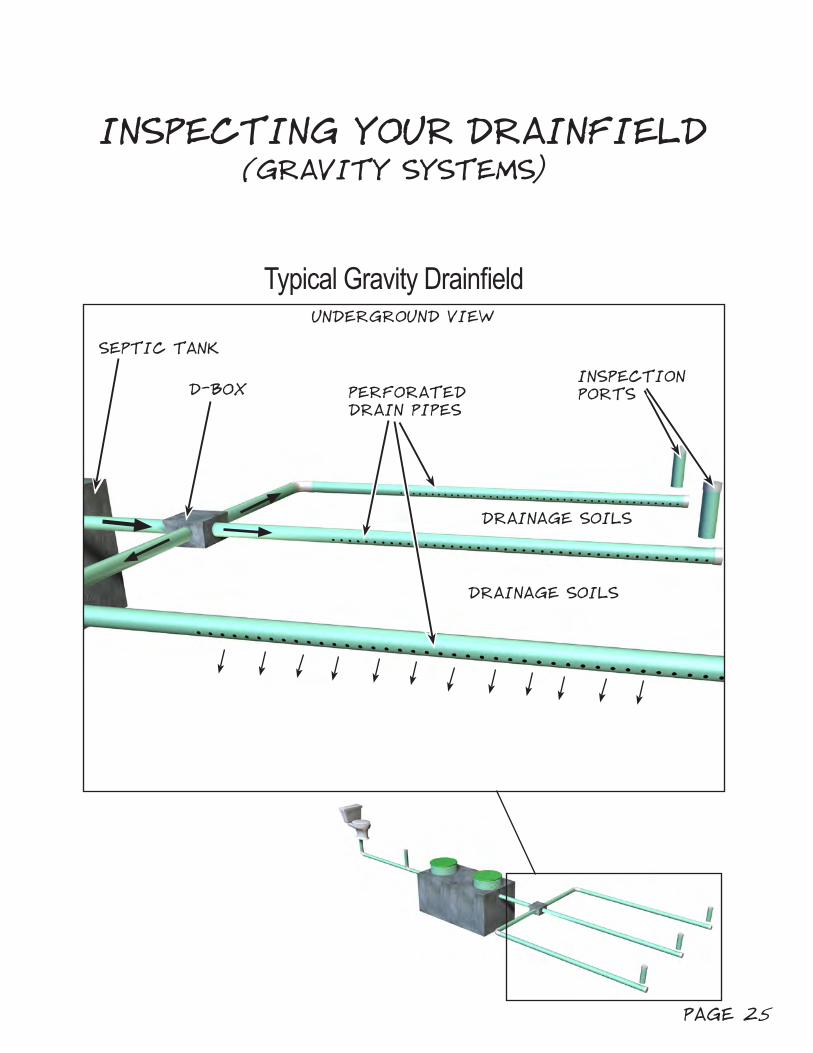
Typical Gravity Drainfield
SEPTIC TANK
D-BOX PERFORATED DRAIN PIPES
INSPECTING YOUR DRAINFIELD (GRAVITY SYSTEMS)
DRAINAGE SOILS
INSPECTIONPORTS
UNDERGROUND VIEW
DRAINAGE SOILS
PAGE 26
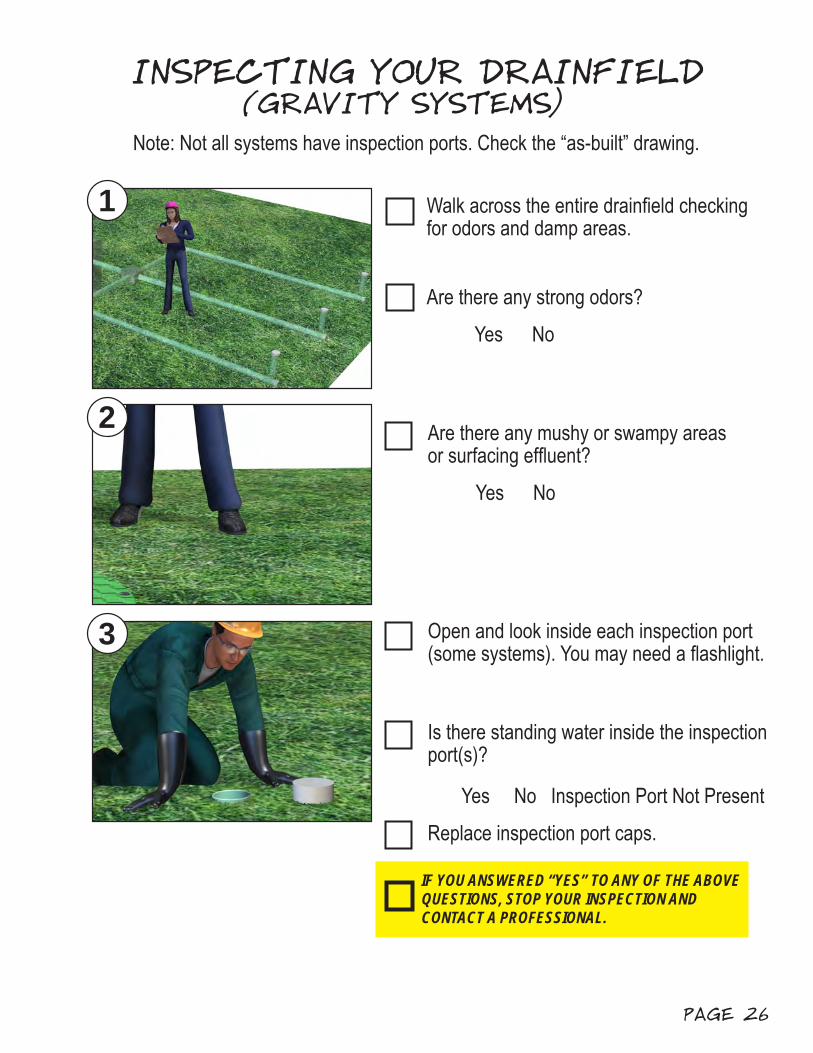
11
12
13
INSPECTING YOUR DRAINFIELD
Walk across the entire drainfield checking for odors and damp areas.
Are there any mushy or swampy areas or surfacing effluent?
Yes No
Are there any strong odors?
Yes No
Open and look inside each inspection port (some systems). You may need a flashlight.
Is there standing water inside the inspection port(s)?
Yes No Inspection Port Not Present
Replace inspection port caps.
(GRAVITY SYSTEMS)
IF YOU ANSWERED “YES” TO ANY OF THE ABOVE QUESTIONS, STOP YOUR INSPECTION AND CONTACT A PROFESSIONAL.
Note: Not all systems have inspection ports. Check the “as-built” drawing.

PAGE 27
Typical D-Box
SEPTIC TANKD-BOX
PIPES TODRAINFIELD
D-BOXLID
INSPECTING YOUR DISTRIBUTION BOX(GRAVITY SYSTEMS ONLY)
Note: Not all gravity systems have a distribution box (D-box). Check the “as-built” drawing to determine if a D-box is used. Not all D-boxes are accessible; inspect it only if you have access to it. If it’s not accessible, consider having a professional uncover the D-box and install a riser for ease of inspection. We do not recommend a homeowner dig up their D-box. Some counties will require a permit for installing risers over D-boxes – check with your local health department.

PAGE 28
11
12
13
INSPECTING YOUR D-BOX
SAFETY CHECK: USE TWO PEOPLE TO LIFT D-BOX LID.
Remove D-Box access riser lid.
Remove D-Box lid.
Note: If your D-Box does not have an access riser, have one professionally installed. In some systems a D-Box will not be present.
Is the D-Box free of solid waste and clogs?
Yes No D-Box Not Accessible/Present
Is the D-Box free from cracks and leaks?
Yes No D-Box Not Accessible/Present
Does the effluent appear to be flowing evenly into all drain pipes?
Yes No D-Box Not Accessible/Present
Gently replace D-Box lid ensuring you don’t pinch fingers or disturb the D-Box.
Replace and secure riser lid.
IF YOU ANSWERED “NO” TO ANY OF THE ABOVE QUESTIONS, STOP YOUR INSPECTION AND CONTACT A PROFESSIONAL.
PAGE 29
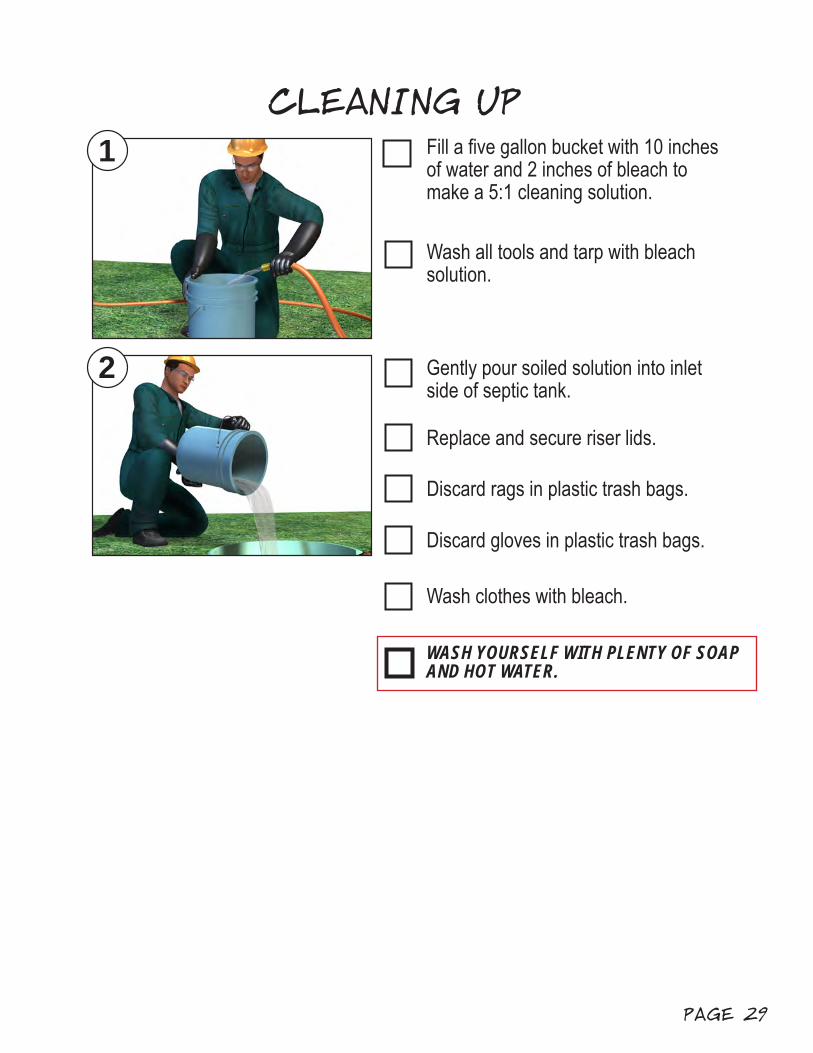
CLEANING UP11 Fill a five gallon bucket with 10 inches
of water and 2 inches of bleach to make a 5:1 cleaning solution.
Wash all tools and tarp with bleach solution.
12 Gently pour soiled solution into inlet side of septic tank.
Replace and secure riser lids.
Discard gloves in plastic trash bags.
Wash clothes with bleach.
WASH YOURSELF WITH PLENTY OF SOAP AND HOT WATER.
Discard rags in plastic trash bags.
PAGE 30
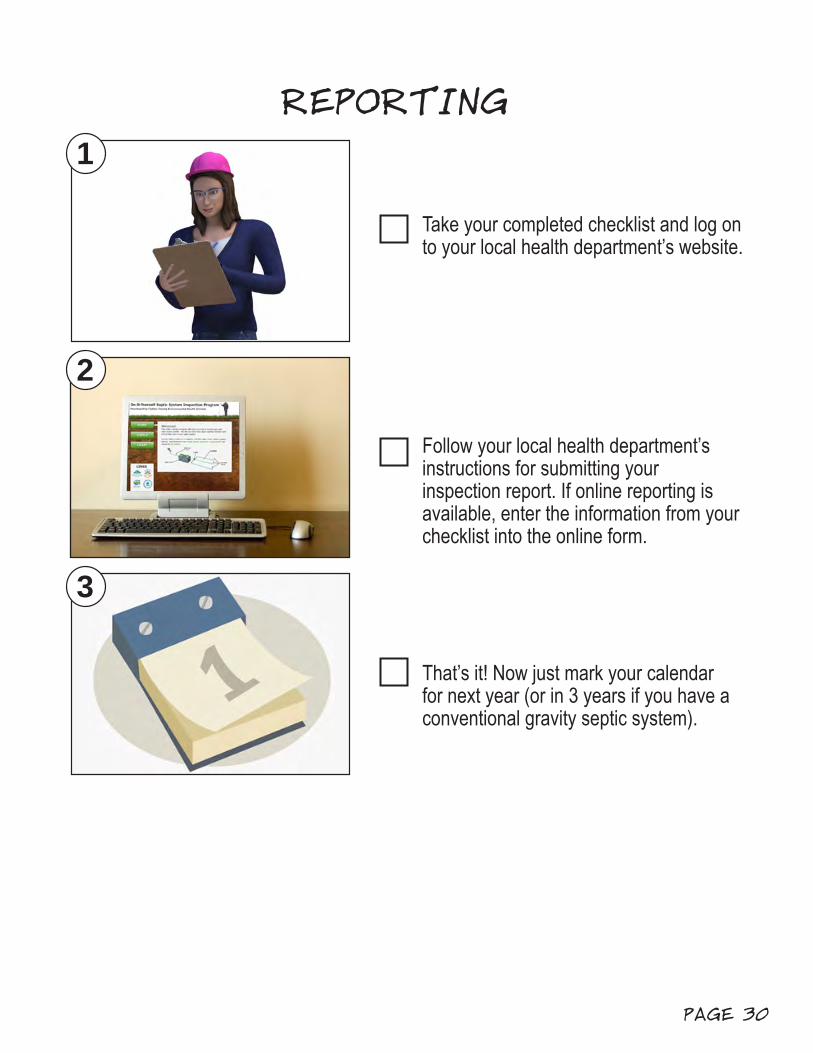
REPORTING11
12
13
Take your completed checklist and log on to your local health department’s website.
Follow your local health department’s instructions for submitting your inspection report. If online reporting is available, enter the information from your checklist into the online form.
That’s it! Now just mark your calendar for next year (or in 3 years if you have a conventional gravity septic system).
PAGE 31
SEPTIC SYSTEM CARE
11
12
13
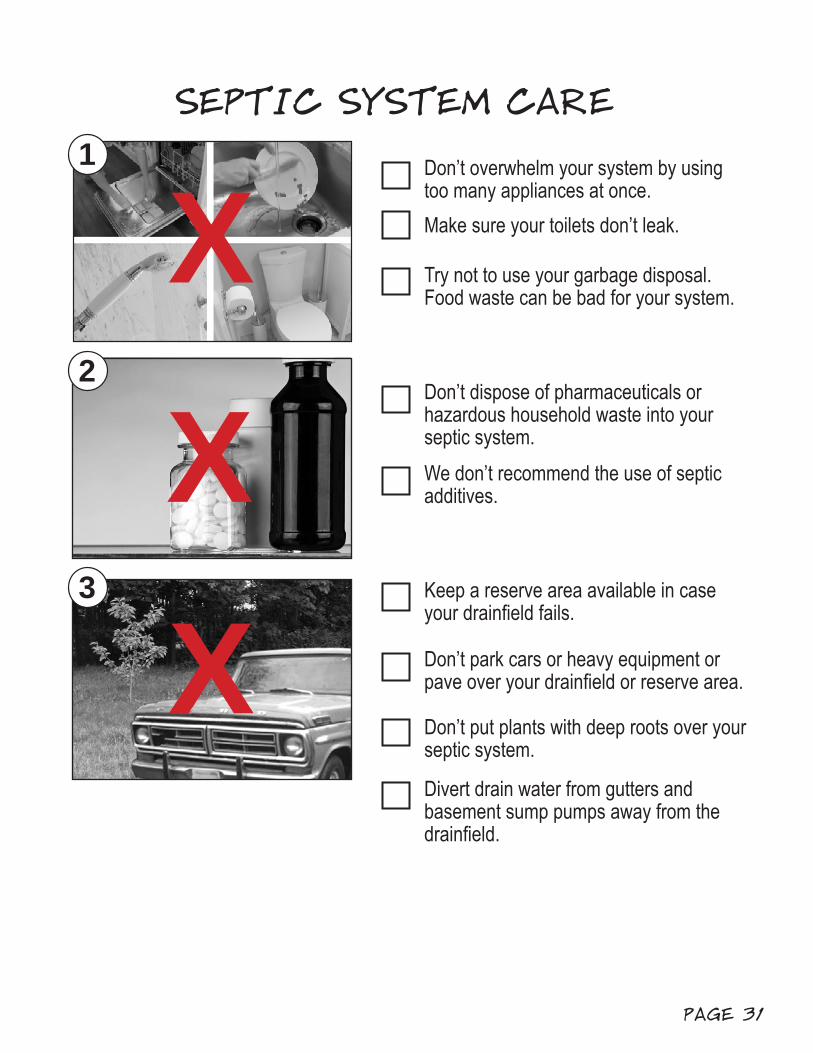
Don’t overwhelm your system by using too many appliances at once.Make sure your toilets don’t leak.
Try not to use your garbage disposal. Food waste can be bad for your system.
Don’t dispose of pharmaceuticals or hazardous household waste into your septic system.We don’t recommend the use of septic additives.
Keep a reserve area available in case your drainfield fails.
Don’t park cars or heavy equipment or pave over your drainfield or reserve area.
Don’t put plants with deep roots over your septic system.
Divert drain water from gutters and basement sump pumps away from the drainfield.
XX X
PAGE 32
As-built or record drawing: A map available from the county that has the approximate location of permitted septic tanks and drainfield for your property.
Baffle: A short piece of vertical pipe attached to the inlets and outlets of the septic tank that prevents most solids from exiting.
Baffle Filter: A plastic filter placed in the outlet side of the septic tank that prevents small particles from entering the pump tank or drainfield.
Center Baffle: A baffle and pipe inside septic tanks that have multiple chambers which allows fluids to pass from compartment to compartment.
Distribution box (D-Box): A concrete or plastic box with a single inlet pipe and multiple outlet pipes that allows effluent (clear fluids) to be distributed evenly into different pipes in the conventional gravity drainfield.
Drainfield: A series of pipes in trenches which disperses wastewater into the surrounding soil for further treatment before it reaches the groundwater or a restrictive layer (such as hard pan or clay soil).
Effluent: The fluid that exits a septic tank, ideally clear fluids.
Float: A device that floats inside a pump tank and activates the pump via a timer or when the water level rises.
Gravity System: A septic system where effluent flows by gravity from the septic tank into the drainfield. Some gravity systems use a distribution box to distribute the effluent evenly to the drainfield trenches.
Inlet: The pipe coming from the home into the septic tank.
Inlet baffle: A pipe or plastic tee which is connected to the inlet pipe in the septic tank. The inlet baffle slows wastewater as it enters the tank and discharges sewage into the tank at the mid-point allowing solids to begin to settle out.
Mound System: An above-ground type of septic system which uses sand to pre-treat wastewater before discharging to the native soil.
Glossary of Septic System Terms(Non-Technical)
PAGE 33
On-site septic system: A septic tank and drainfield system for wastewater treatment located on properties not connected to a municipal sewer system.
Outlet: The pipe that allows fluid to exit a tank.
Outlet Baffle: A pipe or plastic tee connected to the outlet pipe in a septic tank that prevents waste solids from entering the pump tank and drainfield.
Professional: Companies or individuals that are licensed by counties and perform necessary repairs, maintenance or pumping of septic systems.
Pressure System: A septic system that uses a pump to distribute effluent evenly throughout the drainfield.
Pumping: Professional service that pumps excess solids from the septic tank.
Pump Alarm: A light and/or buzzer that warns when there is a problem in the pump tank, such as a person is using too much water, there is ground water intrusion or the pump is not operating properly. The alarm is activated by a float or a transducer (clear tube) in the pump tank.
Pump Tank: A secondary septic tank that houses an electric pump for pressurized septic systems. Sometimes needed for systems where the drainfield is uphill from the septic tank.
Riser: An extension that rises above a septic tank lid to allow easier access.
Sand filter: A pre-treatment component that is either in ground or above ground which consists of a constructed box containing a series of distribution pipes over a mix of sand and gravel. The sand filter treats the wastewater and sends treated wastewater via a pump tank to a drainfield.
Scum: The layer of solid material that floats to the top of the wastewater in a septic tank.
Scum Stick: An L-shaped stick used to measure the depth of the floating scum layer in a septic tank.
Septic Tank: An underground wastewater collection tank that allows solids to separate from wastewater so clear liquids can pass into a drainfield.
Sewage: Untreated wastewater
Sludge: The layer of solids that has sunk to the bottom of the septic tank.
PAGE 34
Sludge Stick: A long stick or pipe with 3 feet of Velcro tape at the bottom, used to measure the depth of sludge solids in the bottom of a septic tank.
Solids: Particles that separate from wastewater in a septic tank and either sink or float.
Wastewater: Any fluids and that drain from the house into the septic tank.

PAGE 35
Major funding for this guide is provided by the Centennial Clean Water Fund and Section 319 Nonpoint Source Fund through a grant from Washington State Department of
Ecology. Funding is also provided by Washington State Department of Health.
Clallam County wishes to acknowledge Jones Advertising for production, Kitsap County Health District for some of the illustration source material, and numerous stakeholders
and onsite professionals in both government and private industry for their objective reviews and comments in developing this inspection guide.