docave 6 job monitor reference guidedocave® 6 job monitor . reference guide. service pack 10,...
TRANSCRIPT

DocAve® 6 Job Monitor Reference Guide
Service Pack 10, Cumulative Update 1 Issued April 2018
The Enterprise-Class Management Platform for SharePoint® Governance

DocAve® 6 Job Monitor 1
Table of Contents
What’s New in this Guide ............................................................................................................................................ 4
About Job Monitor ........................................................................................................................................................ 5
Submitting Documentation Feedback to AvePoint ............................................................................................... 6
Before You Begin ........................................................................................................................................................... 7
AvePoint’s Testing Policy and Environment Support ........................................................................................................ 7 Supported Software Environments ..................................................................................................................................... 7 Supported Hardware ................................................................................................................................................................ 7 Supported Backup and Recovery ......................................................................................................................................... 8
Configuration .................................................................................................................................................................................... 8
Agents .................................................................................................................................................................................................. 8
Getting Started ............................................................................................................................................................... 9
Launching Job Monitor ................................................................................................................................................................. 9
Navigating DocAve ...................................................................................................................................................................... 10
Understanding Job Monitor ..................................................................................................................................................... 11 Job Monitor Interface ............................................................................................................................................................ 11 Job Monitor vs. Scheduled Job Monitor ........................................................................................................................ 12
Configuring the Viewing Pane ................................................................................................................................................ 12 Changing Views and the Time Zone ................................................................................................................................ 12 Filtering Jobs by Date Range or Module ....................................................................................................................... 13
Searching Jobs ............................................................................................................................................................. 14
Managing Jobs ............................................................................................................................................................. 15
Operations in the Job Monitor Tab ....................................................................................................................................... 15 Viewing, Downloading, and Deleting Job Information ............................................................................................ 15 Performing Actions on Jobs ................................................................................................................................................ 17 Changing the Report Location ........................................................................................................................................... 18 Job Pruning and Job Performance Alerts ...................................................................................................................... 19
Operations in the Scheduled Job Monitor Tab ................................................................................................................ 19 Enabling or Disabling Scheduled Jobs ............................................................................................................................ 19 Filtering Scheduled Jobs by Date Range or Module ................................................................................................. 19
Integrated Job Monitor ............................................................................................................................................. 20

DocAve® 6 Job Monitor 2
Additional Job Monitor Features in SharePoint Migration .......................................................................................... 27
Additional Job Monitor Features in Granular Backup and Restore .......................................................................... 28 Re-Sync Jobs ............................................................................................................................................................................. 28 Deleting Job and Backup Data ........................................................................................................................................... 28 Repairing Backup Jobs .......................................................................................................................................................... 28
Additional Job Monitor Features in Platform Backup and Restore .......................................................................... 29 Maintenance Jobs ................................................................................................................................................................... 29 Repair Jobs ................................................................................................................................................................................. 30 Re-Sync Jobs ............................................................................................................................................................................. 30 Deleting Job and Backup Data ........................................................................................................................................... 30
Additional Job Monitor Features in Platform Backup and Restore for NetApp Systems ................................ 31 Maintenance Jobs ................................................................................................................................................................... 31 Deleting Job and Backup Data ........................................................................................................................................... 32 Force Stopping a Hung Job ................................................................................................................................................ 33
Additional Job Monitor Features in SQL Server Data Manager ................................................................................. 33 Deleting Job and Temporary Database .......................................................................................................................... 33 Stop Jobs .................................................................................................................................................................................... 34
Additional Job Monitor Features in VM Backup and Restore .................................................................................... 34 Deleting Job and Backup Data ........................................................................................................................................... 34
Additional Job Monitor Features in Administrator ......................................................................................................... 35 Admin Search or Security Search Jobs ........................................................................................................................... 35 Delete Orphan Site Jobs ....................................................................................................................................................... 35 Deactivated Account Cleaner Jobs ................................................................................................................................... 35 Import Configuration File Jobs .......................................................................................................................................... 36 Search Web Part Jobs ............................................................................................................................................................ 36 Search Duplicate Files Jobs ................................................................................................................................................. 37
Additional Job Monitor Features in Content Manager ................................................................................................. 37 Content Manager Jobs .......................................................................................................................................................... 37 Content Manager Move Jobs ............................................................................................................................................. 38 Content Manager Merge Jobs ........................................................................................................................................... 38 Content Manager Repair Jobs............................................................................................................................................ 38 Deleting Job and Backup Data ........................................................................................................................................... 39
Additional Job Monitor Features in Deployment Manager ......................................................................................... 39 Viewing Details of Deployment Manager Jobs ........................................................................................................... 39 Deployment Manager Rollback Jobs ............................................................................................................................... 39 Downloading SPCAF Report ............................................................................................................................................... 40
Additional Job Monitor Features in Replicator ................................................................................................................. 40 Replicator Deployment Jobs ............................................................................................................................................... 40 Replication Jobs ....................................................................................................................................................................... 40
Additional Job Monitor Features in eDiscovery ............................................................................................................... 41

DocAve® 6 Job Monitor 3
SharePoint Search or Archiver Search Jobs .................................................................................................................. 41 Downloading Search Results Jobs .................................................................................................................................... 41
Additional Job Monitor Features in Report Center ......................................................................................................... 42 Usage Reports .......................................................................................................................................................................... 42 Storage Analyzer Jobs from Infrastructure Reports .................................................................................................. 42 Best Practice Reports Jobs from Administration Reports ....................................................................................... 42 Compliance Reports ............................................................................................................................................................... 43
Notices and Copyright Information ....................................................................................................................... 45
DocAve® 6 Job Monitor 4
What’s New in this Guide • General improvements for enhanced functionality.

DocAve® 6 Job Monitor 5
About Job Monitor Job Monitor allows you to view the status or details of jobs, download reports, and manage the jobs all from a central interface.
Job Monitor is also integrated into other DocAve products, which enables you to manage the jobs inside its corresponding modules with additional features specific to the product itself. These additional features are also available in the stand-alone Job Monitor module.

DocAve® 6 Job Monitor 6
Submitting Documentation Feedback to AvePoint AvePoint encourages customers to provide feedback regarding our product documentation. You can Submit Your Feedback on our website.
DocAve® 6 Job Monitor 7
Before You Begin Refer to the sections for system and farm requirements that must be in place prior to installing and using DocAve Job Monitor for SharePoint.
AvePoint’s Testing Policy and Environment Support
Supported Software Environments AvePoint is committed to testing against all major versions and service packs of SharePoint as well as the latest versions of Windows Server and SQL Server, as Microsoft announces support and compatibility.
*Note: AvePoint does not recommend or support installing DocAve on client operating systems.
Supported Hardware AvePoint is committed to maintaining a hardware agnostic platform to ensure that DocAve operates on common Windows file sharing and virtualization platforms. To ensure that DocAve is hardware agnostic, AvePoint tests hardware that is intended to support SharePoint and DocAve infrastructure, storage targets, and hardware-based backup and recovery solutions, as supported by AvePoint’s partnerships. AvePoint directly integrates with the following platforms: any Net Share, FTP, Amazon S3, AT&T Synaptic, Box, Caringo Storage, Cleversafe, DELL DX Storage, Dropbox, EMC Atmos, EMC Centera, Google Drive, HDS Hitachi Content Platform, IBM Spectrum Scale Object, IBM Storwize Family, Microsoft Azure Storage, NetApp Data ONTAP, NFS, OneDrive, Rackspace Cloud Files, and TSM.
All other hardware platforms that support UNC addressable storage devices are supported.
*Note: AvePoint has ended the test and development for Caringo Storage and DELL DX Storage in DocAve since DocAve 6 SP7 CU1, as the providers of these two platforms have stopped the platform maintenance.
*Note: Due to changes in the IBM Tivoli Storage Manager API, DocAve 6 Service Pack 6 and later versions require that TSM Client version 7.1.2 is installed on the Control Service and Media Service servers.
*Note: Most of the hardware partnerships referenced in this guide are intended to make use of advanced functionality (such as snapshot mirroring, BLOB snapshots, indexing, long-term storage, WORM storage, etc.), and are not indications that any changes to the product are required for basic support. In most cases, hardware can be supported with no change to the product.

DocAve® 6 Job Monitor 8
Supported Backup and Recovery DocAve supports BLOB backup storage according to the list of hardware platforms above. BLOB snapshot function, however, is currently only supported on OEM versions and NetApp hardware.
DocAve supports SQL content and Application database backups via the SharePoint Volume Shadow Copy Service (VSS) on all Windows and SQL server platforms listed above. DocAve also supports snapshot-based SharePoint VSS on all hardware listed above where the hardware partner has certified support with Microsoft.
DocAve supports application and configuration server backups for all the supported software environments listed above. DocAve 6 SP5 or later supports VM backup via Hyper-V/VMWare for the following operating systems: Windows Server 2008 R2, Windows Server 2012, Windows Server 2012 R2, and Microsoft Hyper-V Server 2012 R2.
Configuration In order to use DocAve Job Monitor for SharePoint, the DocAve 6 platform must be installed and configured properly on your farm. Job Monitor will not function without DocAve 6.
Agents SharePoint Agents are responsible for running DocAve jobs and interacting with the SharePoint object model. DocAve Agents enable DocAve Manager to communicate with the respective servers, allowing for Job Monitor commands to function properly.
*Note: The use of system resources on a server increases when the installed agent is performing actions. This may affect server performance. However, if the agent installed on a server is not being used, the use of system resources is very low; therefore, the effect on server performance is negligible.
For instructions on installing DocAve Platform, DocAve Manager, and DocAve module Agents, see the DocAve 6 Installation Guide.

DocAve® 6 Job Monitor 9
Getting Started Refer to the sections below for important information on getting started with Job Monitor, including launching the module, understanding the interface, configuring your view, and searching for jobs.
Launching Job Monitor To launch Job Monitor and access its functionality, follow the instructions below:
1. Log in to DocAve. If you are already in the software, click the DocAve tab.
2. From the DocAve tab, click Job Monitor to launch the module.
3. Alternatively, you can click the Job Monitor icon ( ) from anywhere within the DocAve software to launch Job Monitor.
Figure 1: DocAve module launch window.

DocAve® 6 Job Monitor 10
Navigating DocAve DocAve mimics the look and feel of many Windows products, making for an intuitive and familiar working environment. While there are many windows, pop-up displays, and messages within DocAve products, they share similar features and are navigated in the same ways.
Below is a sample window in DocAve. It features a familiar, dynamic ribbon, and a searchable, content list view.
Figure 2: Navigating DocAve.
Ribbon Tabs – Allows users to quickly navigate between major DocAve modules.
Ribbon Panes – Allows users to access the functionality of the active DocAve module.
Manage columns ( ) – Allows users to manage which columns are displayed in the list. Click the manage columns ( ) button, and then select the checkbox next to the column name in the drop-down list.
Filter the column ( ) – Allows users to filter the information in the List View. Click the filter the column ( ) button next to the column and then select the checkbox next to the column name.
Hide the column ( ) – Allows users to hide the selected column.

DocAve® 6 Job Monitor 11
Search – Allows users to search the List View pane for a keyword or phrase. You can select Search all pages or Search current page to define the search scope.
*Note: The search function is not case sensitive.
Management Pane – Displays the actionable content of the DocAve module.
Understanding Job Monitor Job Monitor provides you with a number of ways to customize the way your jobs are displayed so you can more efficiently manage them. The following two sections will cover the different viewing options.
Job Monitor Interface The interface in Job Monitor contains the following four areas:
1. Tabs – Switch between the Job Monitor and Scheduled Job Monitor interface.
2. Ribbon – Toolbar where you can customize the view, perform actions on selected jobs, configure report location settings, and configure advanced settings on jobs.
3. Search – Search tool for filtering the displayed jobs.
4. Viewing pane – List of jobs displayed according to the filters you configure.
Figure 3: Job Monitor User Interface.

DocAve® 6 Job Monitor 12
Job Monitor vs. Scheduled Job Monitor The Job Monitor module interface contains two tabs:
• Job Monitor – Displays all current and previous jobs.
• Scheduled Job Monitor – Allows you to exclusively access jobs that are scheduled to run in the future.
*Note: Job Monitor differentiates between scheduled jobs (jobs scheduled to run in the future) and recurring jobs. Scheduled jobs will only show up on the Scheduled Job Monitor tab. Recurring jobs will show up on both tabs.
*Note: Any scheduled jobs that are overdue to run will be skipped and displayed in the Job Monitor tab.
Configuring the Viewing Pane In both the Job Monitor and Scheduled Job Monitor tabs, there is a View toolbar and a Filter toolbar on the ribbon with further configurable options to help you more efficiently manage your current and previous jobs.
Changing Views and the Time Zone The View toolbar allows you to display your jobs in List View or Calendar View:
List View displays your jobs in a table. You can add or remove a column to customize your view by clicking the Manage columns ( ) button. Select the desired column for this view by selecting the checkbox next to its name in the drop-down menu. Click OK to save your choices, or click Cancel to close the drop-down menu without saving your choices.
Calendar View displays your jobs in a calendar. You can configure Calendar View to display in Day, Week, or Month format by clicking the respective button on the upper-right corner. To see detailed information about a job, place your mouse cursor over its time slot.
You can also configure the Time Zone in this toolbar by specifying one of the options below to display in the job information.
• Default – Displays the time zone of the machine where the Control service is installed. In the Scheduled Job Monitor tab, the default time zone is based on the time zone configured for each schedule.
• Local – Displays the time zone that the Internet Explorer (IE) browser used to access DocAve.
The time zone for job information is set to the Default option, as described above. To change this to your local time zone, click the drop-down menu, and select Local.

DocAve® 6 Job Monitor 13
*Note: In the Calendar View, the time zone is set to Local and cannot be altered.
Filtering Jobs by Date Range or Module The Filter toolbar allows you to filter the jobs listed in the viewing pane by Date Range or Module.
Date Range allows you to limit the jobs displayed by specifying a time frame.
Module allows you to limit the jobs displayed by specifying the module where the jobs are run.
*Note: As DocAve transitions away from the use of Silverlight, some module specific features will only be available using the job monitor link in that module.

DocAve® 6 Job Monitor 14
Searching Jobs Job Monitor also allows you to search for jobs. The search interface is located under the toolbar ribbon. Select the corresponding radio button to either Search all pages or Search current page. Placing your cursor over the Search text box will bring up a tooltip informing you of the searchable parameters.
*Note: The search function is not case-sensitive.
Since a Job ID includes the start time of the job, you can search for a job by its start time. Enter the time as a numerical string in the text box, and then click the magnifying glass ( ) button to search (for example: search for 2015-01-01 17:05:10 by typing 20150101170510 in the Search text box).

DocAve® 6 Job Monitor 15
Managing Jobs The Job Monitor tab and the Scheduled Job Monitor tab offer different sets of tools suitable for managing the different types of jobs.
*Note: If one tool is not supported for the selected job of the specified product, the corresponding button of this tool will be grayed out and not selectable.
Operations in the Job Monitor Tab The Job Monitor tab provides you with a number of tools that allow you to perform actions to jobs you are currently running or have run in the past. By default, jobs are displayed in List View in the Job Monitor tab.
*Note: The tools explained here only cover the general ones in Job Monitor. To access the tools that are specific to DocAve products, you can access the Integrated Job Monitor in each of the DocAve products. You can also access Job Monitor from the welcome page, click the Module button, select the specified module by selecting the appropriate checkbox, and then choose from jobs run by that module. For details about tools specific to each DocAve product, see the Integrated Job Monitor section of this guide.
Viewing, Downloading, and Deleting Job Information This toolbar provides you with the following functionality:
• View Details – Allows you to view a job report of the selected job. Select the job by selecting the corresponding checkbox. Click View Details on the ribbon. The Job Details tab appears with the job report displayed in the viewing pane with the Summary tab selected. The Summary tab displays general information about the job. For more in-depth information, click the corresponding Details tabs in the viewing pane.
Click Download to download the job report. Select TXT, CSV, XLS or XLSX as the format for the report, select the objects to export by selecting Successful, Failed, and/or Others, then select to download the Current columns or All columns from the corresponding Details tab, and then click OK to download the report, or Cancel to return to the Job Details tab.
*Note: High level logs for Platform Backup and Restore jobs (except Test Run jobs) that fail, stop, or finish with exception are collected and downloaded together with the job report.
*Note: The Details tabs are specific to DocAve products. For more information, you can access the Job Monitor in each of the DocAve products.

DocAve® 6 Job Monitor 16
• Download – Allows you to download the job details and job logs of the selected job to a specified location. Select the corresponding checkboxes next to the jobs you want to download, click Download on the ribbon and choose an option from the drop-down menu.
*Note: If the number of characters of the specified location and the report name exceed 255, the report name will be pruned.
o Select the Download Job Details option from the drop-down menu. You have the option to set the Report Format to download in TXT, CSV, XLS or XLSX format.
*Note: High level logs for Platform Backup and Restore jobs (except Test Run jobs) that fail, stop, or finish with exception are collected and downloaded together with the job report.
You can also set the Object Status to select the objects to export by selecting Successful, Failed, and/or Others.
*Note: The Object Status section is not available for SQL Server Data Manager, High Availability, Administrator, eDiscovery, Vault, and Report Center.
o Select the Download Job Logs option from the drop-down menu. A Log Manager job will run automatically. DocAve collects all of the logs for the Control service, Media service (if used in the job), and Report service (if used in the job) with common logs and the job related logs in the related Agents.
When the Log Manger job finishes, you can find the logs in the following ways:
A pop-up window appears when the Log Manager job finishes. You can save the logs to a desired place.
Select the Log Manager job, click Download on the ribbon and select the Download Job Details from the drop-down menu, and then select a desired place to save the logs.
By default, the logs will be stored in the …\AvePoint\DocAve6\Manager\Work\TempLogFile directory.
*Note: The Download Job Logs option is only visible and clickable for the login user who is a member of the System Group or Administrators Group. Only these users have the permission to view the corresponding Log Manager jobs.

DocAve® 6 Job Monitor 17
*Note: For Platform Backup and Restore jobs, DocAve collects all of the logs for the Control service, Media service (if used in the job), and Report service (if used in the job) together with common logs and all of the Platform Backup and Restore jobs’ logs in the related Agent.
*Note: Prior to downloading the job report, make sure the Internet Explorer (IE) download settings are configured properly. You can configure the download settings for IE by following the steps in the Configuring Internet Explorer Download Settings section of this guide.
• Delete – Deletes job information of the selected jobs. Click Delete, and then select Delete Job from the drop-down menu.
*Note: To delete a job, the current user must have permission to the farms used in the job.
Configuring Internet Explorer Download Settings
1. Navigate to Internet Explorer > Tools > Internet Options.
2. Select the Security tab and select a zone.
3. Click the Custom level button inside the Security level for this zone field.
4. Scroll down to the Downloads setting.
5. Change the detailed settings according to Figure 4.
Figure 4: IE Security Settings.
Performing Actions on Jobs This toolbar provides you with the following possible actions for your selected job(s): Rerun, Rerun with Debug Logging, Pause, Resume, Stop, and Start.
There are two actions in the Rerun drop-down menu, Rerun and Rerun with Debug Logging.

DocAve® 6 Job Monitor 18
Rerun is highlighted and clickable on the ribbon when you select one or more failed, stopped, skipped, finished, or finished with exception jobs.
• Rerun – This action is selectable in the Rerun drop-down menu when one or more failed, stopped, skipped, finished, or finished with exception jobs are selected. The corresponding plan, rule, or settings of the selected jobs will be rerun. The new jobs will collect logs in the log level configured in the Log Manager. The jobs will be marked by adding a “(Rerun)” suffix to the job IDs.
• Rerun with Debug Logging – This action is selectable in the Rerun drop-down menu when one job with the failed, stopped, skipped, finished, or finished with exception status is selected. The selected job’s corresponding plan, rule, or settings will be rerun. The new job will collect Information, Warning, Error, and Debug level logs. The job will be marked by adding a “(Rerun)” suffix to the job ID.
*Note: For the Control Service, Media Service, and Report Service, the Debug level logs will be generated when running the rerun job. The jobs that run with the same Control service, Media service, and Report service at this time will also generate the Debug level logs. The jobs that run after the rerun job finishes will use the original log level configured in Log Manager. For the Agent that is used to run the rerun job, the original log level configured in the Log Manager will be kept. However, the Agent logs that are related to this rerun job will be the Debug level logs.
*Note: These two actions are supported by the majority of DocAve modules except the following modules: SQL Server Data Manager, Vault, Health Analyzer, and Control Panel.
The Pause, Resume, Stop, and Start actions are not available for every DocAve module job.
Changing the Report Location This toolbar provides access to the Report Location tool that allows you to specify a location for storing the reports generated after running the jobs. If you do not configure this tool, the job reports will be stored in the default location (...\AvePoint\DocAve6\Manager\work).
To store the job reports on a network share:
1. Select the Use the Net Share path as the report location checkbox.
2. Enter the UNC path.
3. Select a managed account profile from the drop-down menu.
4. Click Save.
*Note: If the folder in the UNC path does not exist, it will be created automatically.

DocAve® 6 Job Monitor 19
For detailed information on managed account profiles, refer to the Managed Account Profile section in the DocAve 6 Control Panel Reference Guide.
Job Pruning and Job Performance Alerts This toolbar provides access to the Job Pruning that allows you to set up pruning rules for all job records across your farms. When a job record is pruned, it will be deleted from the Job Monitor and the DocAve Control database.
This toolbar also provides access to the Job Performance Alert that allows you to configure the settings of the job performance alert for the unresponsive jobs across your farm. When a job is not responded for the configured time, a notification e-mail will be sent about this issue.
Refer to the Job Pruning and Job Performance Alert sections in the DocAve 6 Control Panel Reference Guide for information on Job Pruning and Job Performance Alert.
Operations in the Scheduled Job Monitor Tab The Scheduled Job Monitor tab provides you with two toolbars that allow you to perform actions to jobs that you have scheduled to run in the future. By default, the jobs are displayed in the Calendar View in the Scheduled Job Monitor tab. The following sections explain what these tools do in detail.
*Note: The tools explained here only cover those in the main Job Monitor module. For details about tools specific to Job Monitor that are integrated into other DocAve products, see Integrated Job Monitor section of this guide.
Enabling or Disabling Scheduled Jobs This toolbar provides the following actions for a scheduled job:
• Enable – If the status of the selected jobs are disabled, you will have the option to click this button to enable them.
• Disable – If the status of the selected jobs are enabled, you will have the option to click this button to disable them.
Filtering Scheduled Jobs by Date Range or Module This toolbar provides the following filter options for a scheduled job:
• Date Range – Allows you to limit the jobs displayed by specifying a time frame.
• Module – Allows you to limit the jobs displayed by specifying the module where the jobs are run.

DocAve® 6 Job Monitor 20
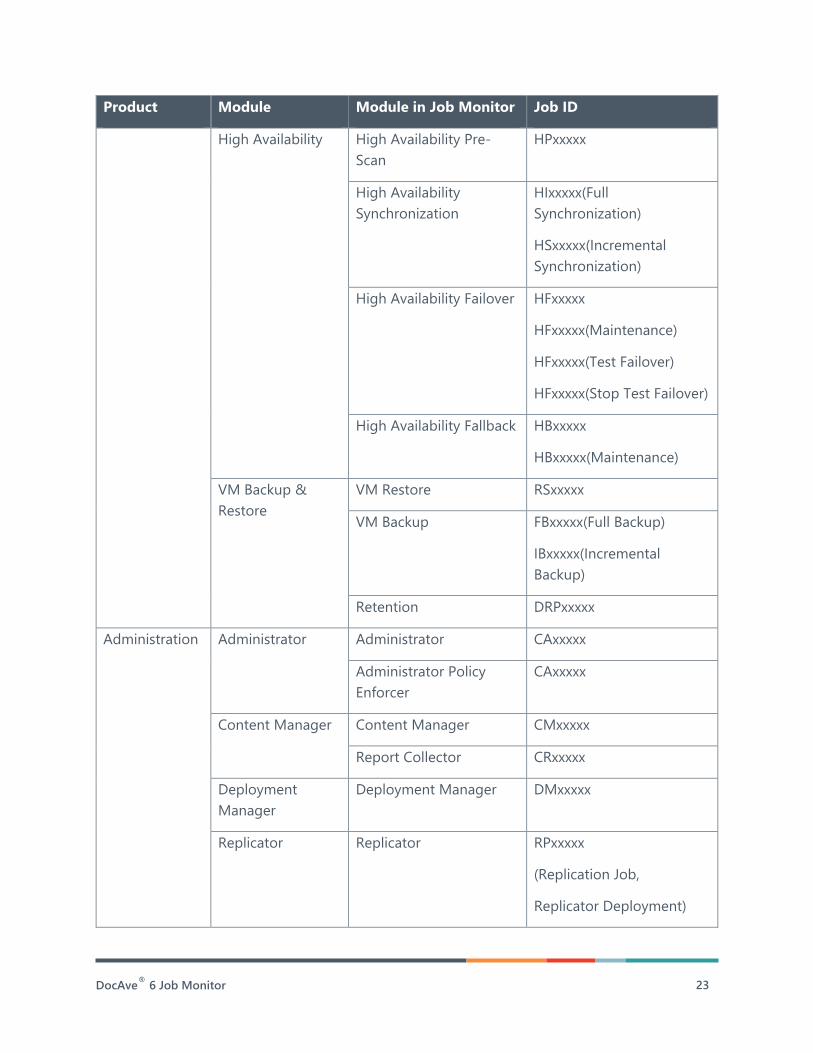
Integrated Job Monitor While Job Monitor is able to access and organize jobs across different DocAve products, it is also integrated into the products in order to provide easy access and additional functionalities tailored to each product and its modules. When Job Monitor is accessed from the interface of a given product’s module, it only displays jobs executed by that module and allows you to access related jobs without leaving your current interface. The integrated Job Monitor modules contain all of the same functionalities of the stand-alone Job Monitor module. The following modules include integrated Job Monitor:
Product Module Module in Job Monitor Job ID
Migration
SharePoint Migration
SharePoint Migration FBxxxxx(Export: Full Migration)
IBxxxxx(Export: Incremental Migration)
RSxxxxx(Import)
MDxxxxx(Online Migration)
SharePoint High Speed Migration
MHxxxxx
File System Migration
File System Migration FMxxxxx
File System High Speed Migration
HFMxxxxx
eRoom Migration
eRoom Migration EMxxxxx
eRoom High Speed Migration
HEMxxxxx
Lotus Notes Migration
Lotus Notes Migration LMxxxxx
Lotus Notes High Speed Migration
HLMxxxxx
Livelink Migration
Livelink Migration LLxxxxx
Livelink High Speed Migration
HLLxxxxx

DocAve® 6 Job Monitor 21
Product Module Module in Job Monitor Job ID
Exchange Public Folder Migration
Exchange Public Folder Migration
PFxxxxx
Quickr Migration Quickr Migration QMxxxxx
EMC Documentum Migration
EMC Documentum Migration
MCxxxxx
EMC High Speed Migration
HMCxxxxx
Data Protection
Granular Backup & Restore
Granular Backup FBxxxxx(Full Backup)
IBxxxxx(Incremental Backup)
DBxxxxx(Differential Backup)
Granular Restore RSxxxxx
End-User Granular Restore
ERxxxxx
Data Synchronization DGSxxxxx
Retention DRGxxxxx
Platform Backup & Restore
Platform Backup FBxxxxx(Full Backup)
FBxxxxx(Test Run)
IBxxxxx(Incremental Backup)
DBxxxxx(Differential Backup)
Platform Restore RSxxxxx
RSxxxxx(End User Restore)
Farm Rebuild & Repair PFRxxxxx
Platform Maintenance Manager
PMxxxxx

DocAve® 6 Job Monitor 22
Product Module Module in Job Monitor Job ID
Platform Index Migration PIMxxxxx
Platform Database Migration
PDMxxxxx
Data Synchronization DPSxxxxx
Retention DRPxxxxx
Farm Clone PFCxxxxx
Platform Backup and Restore for NetApp Systems
Platform Backup for NetApp Systems
FBxxxxx(Full Backup)
FBxxxxx(Test Run)
FBxxxxx(Rerun)
Platform Restore for NetApp Systems
RSxxxxx
Farm Rebuild & Repair for NetApp Systems
PFRxxxxx
Platform Maintenance Manager for NetApp Systems
PMxxxxx
Platform Database Migration for NetApp Systems
PDMxxxxx
Platform Index Migration for NetApp Systems
PIMxxxxx
Retention DRPxxxxx
Farm Clone for NetApp Systems
PFCxxxxx
SQL Server Data Manager
Analyze SQL Server Data DMAxxxxx
Restore SQL Server Data DMRxxxxx
Retention DMARxxxxx
DocAve® 6 Job Monitor 23
Product Module Module in Job Monitor Job ID
High Availability High Availability Pre-Scan
HPxxxxx
High Availability Synchronization
HIxxxxx(Full Synchronization)
HSxxxxx(Incremental Synchronization)
High Availability Failover HFxxxxx
HFxxxxx(Maintenance)
HFxxxxx(Test Failover)
HFxxxxx(Stop Test Failover)
High Availability Fallback HBxxxxx
HBxxxxx(Maintenance)
VM Backup & Restore
VM Restore RSxxxxx
VM Backup FBxxxxx(Full Backup)
IBxxxxx(Incremental Backup)
Retention DRPxxxxx
Administration
Administrator Administrator CAxxxxx
Administrator Policy Enforcer
CAxxxxx
Content Manager Content Manager CMxxxxx
Report Collector CRxxxxx
Deployment Manager
Deployment Manager DMxxxxx
Replicator Replicator RPxxxxx
(Replication Job,
Replicator Deployment)

DocAve® 6 Job Monitor 24
Product Module Module in Job Monitor Job ID
FBxxxxx
(Replication Backup Job)
Compliance eDiscovery eDiscovery EDxxxxx
Vault Vault VAxxxxx
Report Center Usage Reports Report Center Usage Reports
RCxxxxx
Infrastructure Reports
Report Center Infrastructure Reports
RCxxxxx
Administration Reports
Report Center Administration Reports
RCxxxxx
Compliance Reports
Report Center Compliance Reports
RCxxxxx
DocAve Reports Report Center DocAve Reports
RCxxxxx
Item Caching Service
Report Center Common Collector
RCxxxxx
Usage Pattern Alerting
Report Center Usage Pattern Alerting
RCxxxxx
Usage Activity Web Parts
Report Center Usage Pattern Alerting
RCxxxxx
Settings Report Center Activity History Pruning
RCxxxxx
Report Center Audit Controller
RCxxxxx
Report Center Audit Pruning
RCxxxxx
Storage Optimization
Real-time Storage Manager
Convert Stub To Content CSxxxxx
Clean Up Orphan BLOBs SRxxxxx
Storage Report SAxxxxx

DocAve® 6 Job Monitor 25
Product Module Module in Job Monitor Job ID
Export Storage Report SAExxxxx
Scheduled Storage Manager
Scheduled Storage Manager
Full Job
ESxxxxx
Scheduled Storage Manager Incremental Job
ESIxxxxx
Convert Stub To Content CSxxxxx
Clean Up Orphan BLOBs SRxxxxx
Storage Report SAxxxxx
Export Storage Report SAExxxxx
Connector
Cloud Connect
Connector CRxxxxx
COxxxxx(Inventory Report)
Convert Stub To Content CSxxxxx
Clean Up Orphan BLOBs SRxxxxx
Export Storage Report SAExxxxx
Storage Report SAxxxxx
Archiver Archiver ARxxxxx
Scan task ends with S; Archive task ends with A0; Merge Index task ends with M0.
VEO Merge ARxxxxxV0
End-User Archiver EAxxxxx
Archiver Full Text Index AIxxxxx
Archiver Restore RSxxxxx

DocAve® 6 Job Monitor 26
Product Module Module in Job Monitor Job ID
End-User Archive Restore
ERxxxxx
Archiver Retention RTxxxxx
Approval Alert MAAxxxxx
Approval Center Export MAExxxxx
Archiver Pre-Scan Retention
PRTxxxxx
Archiver E-mail Alert ARExxxxx
File System Archiver
File System Archiver FSAxxxxx
File System Archive task ends with A; Merge Index task ends with M.
Download Archived Data FSAxxxxx
File System Archiver Full Text Index
FAIxxxxx
Control Panel
Job Pruning JPxxxxx
Log Manager LMxxxxx
Data Manager DIxxxxx
License Manager LICxxxxx
Office 365 Auto Scan OASxxxx
Health Analyzer
Health Analyzer Health Analyzer HARxxxxx

DocAve® 6 Job Monitor 27
Additional Job Monitor Features in SharePoint Migration In Job Monitor, you can run a repair job on any Finished with Exception SharePoint Migration job with the migration database configured. When you select a Finished with Exception SharePoint Migration job, the Repair option is available in the Actions group. Clicking Repair starts the job. The repair job migrates failed content in the original job to the destination.

DocAve® 6 Job Monitor 28
Additional Job Monitor Features in Granular Backup and Restore In Job Monitor, selecting certain types of Granular Backup & Restore jobs will provide you with additional features.
Re-Sync Jobs In Job Monitor, certain Granular Backup jobs in Granular Backup & Restore allow you to click Re-Sync on the ribbon. This button allows you to sync the backup data from the Primary Storage Group to the Secondary Storage Group specified in the corresponding logical device for the second time.
*Note: The Re-Sync button will only be highlighted and clickable when the Granular Backup job is Finished/Finished with Exception, the corresponding Data Sync job is Failed, and the corresponding logical device is configured with the Redundant backup data storage device radio button selected.
Deleting Job and Backup Data In Job Monitor, certain Granular Backup jobs in Granular Backup & Restore allow you to click Delete Job and Backup Data on the ribbon. This button allows you to delete the selected jobs and the related backup data. There are two conditions according to the job type you select to delete:
• If the selected job is an incremental backup job, the jobs and the related backup data before the next full/differential backup job of the same cycle will also be deleted. The same situation also occurs when deleting the differential backup jobs and data.
• If the selected job is a full backup job, all the jobs and the related backup data of the same cycle will be deleted.
*Note: This option is only available for the jobs whose statuses are Finished/Finished with Exception. The related backup data is deleted by the Retention job that runs automatically in Job Monitor. The selected backup jobs in Job Monitor will be deleted immediately after the related backup data is deleted.
*Note: To delete a Granular Backup job, the current user must have permission to the farms used in the job.
Repairing Backup Jobs In Job Monitor, certain Granular Backup jobs in Granular Backup & Restore allow you to click Repair on the ribbon. This button allows you to repair the failed objects in both container and content levels for the selected backup job. Only the last full backup job and the subsequent backup jobs of a plan can be repaired.

DocAve® 6 Job Monitor 29
*Note: The Repair button is only available for the Granular Backup jobs whose statuses are Finished with Exception.
Additional Job Monitor Features in Platform Backup and Restore In Job Monitor, selecting certain types of Platform Backup & Restore jobs will provide you with additional features.
Maintenance Jobs If you select a platform backup job in Job Monitor, the Maintenance appears on the ribbon. If you click the Maintenance button, the Maintenance tab opens, allowing you to configure the following settings:
• Maintenance Action – Select the maintenance actions for this job by selecting one of the following checkboxes:
o Transfer snapshot data to media server
o Generate granular index
o Verify database backup data
• Staging SQL Server – Choose to use the SQL Server for backup or choose Customize SQL Server to use a custom SQL server as the staging SQL server.
*Note: This field will appear after you select the Generate granular index or Verify database backup data checkbox.
• Granular Index Method – Choose how the granular index will be generated. Sequential will generate the index one database at a time on each SQL server, minimizing the resource requirements for generating an index. Parallel will index multiple databases simultaneously on each SQL server.
*Note: This field appears after you select the Generate granular index checkbox.
• Maintenance Notification – Configure the notification settings for this job. Select a previously configured notification profile from the Select a profile drop-down list, or create a new e-mail notification profile by clicking the New Notification Profile link. Click View to view the detailed configuration of the selected notification profile.
When you are finished configuring settings in the Maintenance tab, click OK to save the configurations, or click Cancel to close the Maintenance tab without saving any changes.

DocAve® 6 Job Monitor 30
Repair Jobs In Job Monitor, you can run a repair job on any Finished with Exception full Platform Backup job. Select a Finished with Exception full Platform Backup job, and the Repair option is available in the Actions group. You can click Repair to start a repair job to back up the objects that fail to be backed up in the full backup job. The objects that support the backup repair are: SharePoint Configuration Database, SharePoint Central Administration Web Application and its content database, custom databases, content databases, service applications and their related databases.
*Note: If you want to repair a Finished with Exception full Platform Backup job to back up failed objects, you must perform a repair backup as soon as possible to ensure the objects will be restored successfully using the backup data. Otherwise, you must rerun the backup job and perform a restore with the rerun-backup data.
Re-Sync Jobs In Job Monitor, certain platform backup jobs in Platform Backup & Restore allow you to click Re-Sync on the ribbon. This button allows you to sync the backup data from the Primary Storage Group to the Secondary Storage Group specified in the corresponding logical device for the second time.
*Note: The Re-Sync button will only be highlighted and clickable when the platform backup job is Finished/Finished with Exception, the corresponding Data Sync job is Failed, and the corresponding logical device is configured with the Redundant backup data storage device radio button selected.
Deleting Job and Backup Data In Job Monitor, certain platform backup jobs in Platform Backup & Restore allow you to click Delete Job and Backup Data on the ribbon. This button allows you to delete the selected jobs and the related backup data. There are two conditions according to the job type you select to delete:
• If the selected job is an incremental backup job, the jobs and the related backup data before the next full/differential backup job of the same cycle will also be deleted. The same situation also occurs when deleting the differential backup jobs and data.
• If the selected job is a full backup job, all the jobs and the related backup data of the same cycle will be deleted.
*Note: This option is only available for the jobs whose statuses are Failed/Stopped/Finished/Finished with Exception. The selected jobs and related backup data

DocAve® 6 Job Monitor 31
are deleted by the Retention job that runs automatically in Job Monitor. The selected jobs and backup data will be deleted immediately after the Retention job finished successfully.
*Note: To delete a platform backup job, the current user must have permission to the farms used in the job.
Additional Job Monitor Features in Platform Backup and Restore for NetApp Systems In Job Monitor, selecting certain types of Platform Backup and Restore for NetApp Systems jobs will provide you with addition features.
Maintenance Jobs If you select a Platform Backup and Restore for NetApp Systems job in Job Monitor, the Maintenance button appears on the ribbon. The Maintenance function generates an index of the selected job’s backup data, which enables item-level restore of the data. After clicking Maintenance on the ribbon, the Maintenance tab opens, which is where you can configure maintenance settings.
• Maintenance Options – Select the maintenance option for this job by selecting one of the following checkboxes:
o Generate index – Use this option to generate for the first time a granular index for a selected database, or to replace an existing corrupted index.
*Note: Except for the Maintenance Notification field, the following fields are only configurable after you select the Generate index checkbox.
o Clone database on SnapMirror destination – Use this option to clone a database based upon the Snapshot copy on the SnapMirror destination volume.
o Clone database on SnapVault destination – Use this option to use the remote backup to perform the clone operation. Snapshots saved in SnapVault primary storage are considered Local Backups and snapshots saved in SnapVault secondary storage are considered Remote Backups.
o Granularity index server or index server group – Choose the verification and index server or server group used for generating the granular level restore index. To generate the granular level index, DocAve uses the SQL Server that contains the data to be backed up by default. You can click the New Index Server or Index Server Group link in the drop-down list to create a new index server. For more information, refer to the About the Verification and Index Policy section in the DocAve 6 Platform Backup and Restore for NetApp Systems User Guide.

DocAve® 6 Job Monitor 32
o Assign Mount Point – If you do not want to use the default mount point directory, use this option to specify the mount point directory on which a backup set will be mounted while generating the granular level restore index. For example: C:\mountpoint.
*Note: A volume mount point is a drive or volume in Windows that is mounted to a folder that uses the NTFS file system. A mounted drive is assigned a drive path instead of a drive letter. Volume mount points enable you to exceed the 26 drive letter limitation. By using volume mount points, you can mount a target partition onto a folder on another physical disk.
• Granular Index Method – Choose how the granular index will be generated. Sequential will generate the index one database at a time on each SQL server, minimizing the resource requirements for generating an index. Parallel will index multiple databases simultaneously on each SQL server.
• BLOB Settings – Select which options to perform on the device that stores the original BLOB data after the BLOB backup completes, Update SnapMirror for device after operation or Update SnapVault for device after operation.
• Storage Policy Settings – Select which options to perform on the device configured in the storage policy after the backup operation completes, Update SnapMirror for device after operation or Update SnapVault for device after operation.
• Maintenance Notification – Configure the notification settings for this job. Select a previously configured notification profile from the Select a profile drop-down list, or create a new e-mail notification profile by clicking the New Notification Profile link. Click View to view the detailed configuration of the selected notification profile.
When you are finished configuring settings in the Maintenance tab, click OK to save the configurations, or click Cancel to close the Maintenance tab without saving any changes.
*Note: This option is only available for jobs whose status is Finished/Finished with Exception and whose Index Status is Regenerated/Indexing/Not Started/Failed/None Level.
Deleting Job and Backup Data In Job Monitor, Platform Backup and Restore for NetApp Systems jobs allow you to click Delete Job and Backup Data on the ribbon. This button allows you to delete the selected jobs, related backup data, and related snapshot data.

DocAve® 6 Job Monitor 33
*Note: This option is only available for Platform Backup and Restore for NetApp Systems jobs with the following statuses: Failed/Stopped/Finished/Finished with Exception/Force Stop. Test Run jobs do not support this option.
The selected jobs, related backup data, and snapshot data are deleted by the Retention job, which runs automatically in Job Monitor. When the Retention job completes successfully, the selected backup jobs and related data are all deleted.
In addition, you can select the Delete SnapVault Destination Data option in the confirmation window after clicking Delete Job and Backup Data to delete the snapshots from the SnapVault destination.
*Note: To delete a Platform Backup and Restore for NetApp Systems job, the current user must have permission to the farms used in the jobs.
Force Stopping a Hung Job In Job Monitor, certain jobs in Platform Backup and Restore for NetApp Systems allow you to click Force Stop on the ribbon. The Force Stop option is used to terminate a hung job.
Normally, when you want to stop a Platform Backup and Restore for NetApp Systems job, you can click the Stop button on the ribbon; however, under certain circumstance, the process of stopping a job may hang and the status of the job in the Status column will remain Stopping. When this occurs the Control service will terminate the job and set the job status to Failed after 30 minutes.
The Force Stop button, terminates a hung job that has a status of Stopping, without having to wait 30 minutes for the job to stop. Select a job whose status is Stopping and click Force Stop to terminate it. After the Force Stop action, the job status will be set to Force Stopped.
*Note: This button is only clickable for the job whose status is Stopping.
Additional Job Monitor Features in SQL Server Data Manager In Job Monitor, selecting certain types of SQL Server Data Manager jobs will provide you with additional features.
Deleting Job and Temporary Database In Job Monitor, selecting Analyze SQL Server Data jobs allows you to click Delete Job and Temporary Database on the ribbon. This button allows you to delete the selected jobs and the related temporary databases. There are three conditions according to the job type you select to delete:
• If you delete the job records and the related temporary databases, you will not be able to restore the content in the selected analysis job.

DocAve® 6 Job Monitor 34
• If the selected jobs are currently being used by other jobs – for example, if you are running a restore job, the analyze job will be in use to provide information about the restore process – neither the job records nor the related temporary databases can be deleted.
• If the selected jobs were performed in previous versions of DocAve, only their job records can be deleted.
*Note: Delete Job and Temporary Database is only available for the jobs whose statuses are Failed/Skipped/Finished/Finished with Exception. The selected jobs, related temporary databases and the temporary files that contains information about the temporary databases are deleted by the Retention job that runs automatically in Job Monitor. The selected jobs, related temporary databases and the temporary files will be deleted immediately after the Retention job finished successfully.
Stop Jobs In Job Monitor, selecting one or more Restore SQL Server Data or Restore Data From Database jobs allow you to click Stop in the Actions group on the ribbon. This button allows you to stop the selected jobs.
*Note: The Stop action is only available for the jobs whose statuses are Started or In Progress.
Additional Job Monitor Features in VM Backup and Restore In Job Monitor, selecting certain types of VM Backup & Restore jobs will provide you with additional features.
Deleting Job and Backup Data
In Job Monitor, certain VM backup jobs from VM Backup & Restore can be deleted by clicking Delete Job and Backup Data on the ribbon. This button allows you to delete the selected jobs and the related backup data. There are two conditions according to the job type you select to delete:
• If the selected job is an incremental backup job, the job and the related backup data will also be deleted.
• If the selected job is a full backup job, all the jobs and the related backup data of the same cycle will be deleted.
*Note: This option is available for the jobs that has a status of Finished, Finished with Exception, Failed, or Stopped. The related backup data is deleted by the Retention job that runs automatically in Job Monitor. The selected backup jobs in Job Monitor will be deleted immediately after the related backup data is deleted.

DocAve® 6 Job Monitor 35
Additional Job Monitor Features in Administrator Job Monitor provides the following additional job types for Administrator: Admin Search or Security Search, Delete Orphan Site, Deactivated Account Cleaner, Import Configuration File, Search Web Part, and Search Duplicate Files. Refer to the following sections for a detailed description of each of these additional features.
Admin Search or Security Search Jobs
In Job Monitor, selecting an Admin Search job allows you to click Tools > View Search Result and Download Report on the ribbon. The View Search Result button brings you to the Management tab of Administrator. Here you can click Download Report to download the report of the selected job.
In Job Monitor, selecting a Security Search job allows you to click Tools > View Search Result, Download Result, and Export for Editing on the ribbon. The View Search Result button brings you to the Search Result Tools tab of Administrator. Here you can perform the following actions on the search results:
• Download Report
• Export for Editing
• Import Configuration File
For more details on these actions, refer to the DocAve 6 Administrator User Guide.
Delete Orphan Site Jobs In Job Monitor, selecting a Delete Orphan Site job allows you to click Tools > Orphan Sites Deletion on the ribbon. This button brings you to the Orphan Sites Deletion tab of Job Monitor where you can view and manage the orphan sites. Click Cancel on the ribbon to close the tab.
If you want to run an Orphan Site job, select the orphan sites you want to delete, and then click Next. Configure the Schedule and Notification settings for this deletion job, and then click Next. Review your configurations in the Overview page and click Finish to save these configurations, click Finish and Run Now to save these configurations and run the job immediately, or click Cancel to close the Orphan Sites Deletion tab without saving these configurations.
Deactivated Account Cleaner Jobs In Job Monitor, selecting a Deactivated Account Cleaner job allows you to click Tools > Deactivated Account Deletion on the ribbon. This button brings you to the Deactivated Account Deletion tab of Job Monitor where you can clone the Deactivated account’s permissions to other users. Click Cancel on the ribbon to close the tab.

DocAve® 6 Job Monitor 36
Select a deleted account to enable user permissions cloning and deactivated account cleaning, and then perform the following configuration:
1. In the Clone User Permissions text box for its respective account, enter the name of the users you want to clone the permissions to. Click the check names button ( ) to check the names, or click the browse button ( ) to browse for the users you want to clone the permissions to.
2. Click Next to save these configurations and configure Options for Transfer Permissions.
3. Permissions Option – Select Append to add the source permissions to the destination permissions, or Replace to substitute the destination permissions with the source permissions.
4. Include Alerts – Select Yes or No for whether or not to have the source user’s alerts sent to the destination user(s).
5. Change Metadata – Select Yes or No for whether or not to transfer the corresponding source user’s metadata to the destination user.
6. Permission Rule – Select the rules you want to apply. You can choose to Add target users to the source user’s group, or Clone source user’s group permission to target users directly.
7. Actions for My Site of Deactivated Users – Select Keep My Site or Delete My Site to choose how to manage My Site of the Deactivated account.
8. Remove User Profiles From the User Profile Service Application – Select Keep user profiles or Delete user profiles for whether or not to remove User Profiles of deactivated accounts from User Profile Service Application.
9. Schedule Selection – Select No Schedule or Configure the schedule myself for whether to run the plan immediately or at a later time.
10. E-mail Notification – Select a notification profile from the drop-down menu or click New Notification Profile to create a new one.
11. Click OK to save these configurations, or click Cancel to close the Deactivated Account Deletion tab without saving the configurations.
Import Configuration File Jobs In Job Monitor, selecting an Import Configuration File job allows you to click Tools > Rollback Changes on the ribbon. This feature can change permissions back to the state before a selected job was executed.
Search Web Part Jobs In Job Monitor, selecting a Search Web Part job allows you to click Tools > Web Part Management on the ribbon. This button brings you to the Web Part Management tab of Job

DocAve® 6 Job Monitor 37
Monitor where you can view information about the Web Parts in the selected job. Click Close on the ribbon to close the tab.
By default, the Search Result tab is selected in the viewing pane. Click the Web Part Usage tab to view the Web Parts by their usage information.
Select a Web Part, and then click Remove Web Part, Reset Web Part, or Close Web Part to perform the action on the selected Web Part(s). A popup window will appear to confirm the action. Click OK to proceed with the action, or Cancel to return to the Web Part Management tab.
Search Duplicate Files Jobs In Job Monitor, selecting a Search Duplicate Files job allows you to click Tools > Duplicate File Search on the ribbon. This button brings you to the Duplicate File Tool tab of Job Monitor where you can view information about the duplicate files in the selected job. Click Close on the ribbon to close the tab.
Click Search Conditions on the upper left-hand corner of the page, you can view the basic settings of the selected job.
In the viewing pane, you can customize how the Duplicate Files are displayed in the following ways:
• All Groups – Displays all the duplicate files in the selected job.
• File Names – Displays the detailed information about the selected duplicate file.
Select a Search Duplicate Files job and you can perform the following action:
• Click Download to download the job report. Select TXT, CSV, XLS or XLSX as the format for the report, then select to download the Current columns or All columns from the Details tab, and then click OK to download the report, or Cancel to return to the Duplicate File Tool page.
Additional Job Monitor Features in Content Manager In Job Monitor, selecting certain types of Content Manager jobs will provide you with additional features.
Content Manager Jobs In Job Monitor, certain Content Manager jobs allow you to configure rollback settings after the job has run. Select an appropriate Content Manager job, and then click Tools on the ribbon and choose Rollback from the drop-down menu. This button brings you to the Rollback pop-up window where you can configure the following settings:

DocAve® 6 Job Monitor 38
• Options – Select a rollback method for this job by selecting one of the following options:
o Overwrite
o Replace
• Rollback the Environment – Choose to roll back the source or destination environment to return the environment in the executed plan to its state before the job was executed by selecting the following checkbox:
o Source environment
o Destination environment
When you are finished configuring settings in the Rollback pop-up window, click OK to save the configurations, or click Cancel to close the Rollback pop-up window without saving any changes.
Content Manager Move Jobs In Job Monitor, certain Content Manager Move jobs will allow you to click Delete Content on the ribbon. Since move jobs are performed by first copying the content from the source node to the destination node then deleting the content from the source node, some move jobs can be configured to only execute the copying process then manually delete the content from the source node. Use this option only after you have verified that the copying process was successful.
Content Manager Merge Jobs In Job Monitor, certain Content Manager jobs allow you to merge the job reports. Select two or more Content Manager jobs, and then click Tools on the ribbon and choose Report Collector from the drop-down menu. This button brings you to the Report Aggregator pop-up window where you can configure the following settings:
• Schedule – Select to run the job immediately, or configure a start time for this job.
• Report Location – Specify a UNC path for storing the automatically-created job report that has merged the job information of the selected jobs. The job report named CRDateTime.zip.
• Status Filter – Select the object status that you want to be included in the automatically-generated job report.
Content Manager Repair Jobs In Job Monitor, you can run a repair job on any Failed and Finished with Exception Content Manager jobs. Select a Failed or Finished with Exception Content Manager job, the Repair

DocAve® 6 Job Monitor 39
option is available in the Actions group. Clicking Repair starts the job. The repair job migrates failed objects of both content level and container level in the original job to the destination.
Deleting Job and Backup Data In Job Monitor, certain Content Manager backup jobs can be deleted by clicking Delete Job and Backup Data on the ribbon. This button allows you to delete the selected backup jobs and the related backup data.
*Note: This option is available for jobs that have a status Finished, Finished with Exception, Failed, or Stopped. The related backup data is deleted by the Retention job that runs automatically in Job Monitor. The selected backup jobs in Job Monitor will be deleted immediately after the related backup data is deleted.
Additional Job Monitor Features in Deployment Manager In Job Monitor, selecting certain types of Deployment Manager jobs will provide you with additional features.
Viewing Details of Deployment Manager Jobs In Job Monitor, select a Deployment Manager job, and then click View Details. You will be brought to the Plan Details tab of Job Monitor with the Summary tab selected in the viewing pane. Here you can review general information about the Deployment Manager plan. Click the Queue tab in the viewing pane, select a job, and then click View Details on the ribbon. You will be brought to the Job Details tab of Job Monitor with the Summary tab selected in the viewing pane. Here you can review the general information about the selected job.
Deployment Manager Rollback Jobs Select a Deployment Manager job that Backup the destination environment is selected in the plan, which means the Plan Name displayed in Job Monitor contains _backup_JobID, Rollback in the Tools drop-down list will be clickable. Click Rollback, and a pop-up window appears displaying the following message:
Rollback will revert the destination site collection to the point in time BEFORE the Deployment Manager job was run. This means the data created AFTER the deployment will be lost after the rollback. Only proceed if this job has recently been run and user content has not been added during this time.
Enter Confirmed in the text box below to start the rollback after reading the warning message carefully.

DocAve® 6 Job Monitor 40
Downloading SPCAF Report In Job Monitor, selecting Deployment Manager Test Run with SPCAF jobs allows you to click Download SPCAF Report in the Download drop-down list. This button allows you to download the SPCAF report to a local location.
*Note: This option is available for Finished jobs.
Additional Job Monitor Features in Replicator Replicator has the following job types: Replicator Deployment Job and Replication Job.
Replicator Deployment Jobs Replicator Deployment jobs are used to update global mapping on each SharePoint Web front-end server. When a Sync Mode replication plan (which contains changes on real-time replication) or a Publishing Mode replication plan is created, edited, or deleted, a Replicator Deployment job is executed.
The following actions are unavailable to Replicator Deployment jobs:
• Stop
• Start
• Pause
• Resume
• Download Job Logs
Replication Jobs Replication jobs are used to replicate data from the source to the destination. Job Monitor provides the following additional features for replication jobs.
Viewing Mappings
In Job Monitor, selecting a replication job will allow you to click View Mappings on the ribbon. You will be brought to the View Mappings tab of Job Monitor where you can view information about the mappings in the selected job. Click Close on the ribbon to close the tab.
Select a mapping and choose from the following actions:
• Click View Details to see more information about the mapping. In the View Mappings tab, you can view general information about the mapping’s execution in the Summary tab, or click Details to see information about items within the mapping. Click Download to download the job report. Select TXT, XLS, XLSX or CSV as the format for the report, then select to download the Current columns

DocAve® 6 Job Monitor 41
or All columns from the Details tab, and then click OK to download the report, or Cancel to return to the View Mappings tab.
*Note: The Current columns option is grayed out and not selectable in the Download Job Report pop-up window currently.
• Click Download to download the job report. Select TXT, XLS, XLSX or CSV as the format for the report, then select to download the Current columns or All columns from the Details tab, and then click OK to download the report, or Cancel to return to the View Mappings tab.
*Note: The Current columns option is grayed out and not selectable in the Download Job Report pop-up window currently.
• Click Rollback to return the source and destination nodes to the state in the backup. Backup is configured in the Replicator plan configurations and is performed prior to the replication process.
Repair Jobs
The Repair button, on the ribbon in Job Monitor, is enabled when a Sync Mode Online Replicator job returns with a status of Finished with Exception. Clicking Repair starts a repair job, which replicates failed and skipped items, which were modified during the original job’s attempt to replicate them, from the selected job.
Additional Job Monitor Features in eDiscovery Job Monitor provides the following additional job type for eDiscovery: SharePoint Search, Archiver Search, Apply Legal Hold, Export the Search Result, Sync Data and Release Hold. Refer to the following section for a detailed description of the additional feature.
SharePoint Search or Archiver Search Jobs In Job Monitor, selecting a SharePoint Search job or an Archiver Search job allows you to click Search Result on the ribbon. This button brings you to the Search Results tab of the selected SharePoint Search or Archiver Search job. Here you can perform the following actions on the search results:
• Apply Legal Hold
• Export the Search Result
Downloading Search Results Jobs In Job Monitor, selecting a Download Search Results job allows you to click Download Search Results on the ribbon. This button allows you to download the report on the search results’

DocAve® 6 Job Monitor 42
information of the selected job to a desired location. The report’s default name is eDiscoverySearchResults_Date_Time.zip.
Additional Job Monitor Features in Report Center In Job Monitor, selecting certain Report Center jobs will provide you with additional options.
Usage Reports In Job Monitor, selecting a Usage Report job provides you with the following options depending on the type of Usage Report job that was run. Select one of the following types of reports:
• Workflow Status Report – Select the job, and then click Report Center Tools > View Workflow Status Reports. You will be brought to the Usage Reports tab of Report Center where you can review the information on workflow definitions and instances within the selected node of the selected job.
• SharePoint Alerts Report – Select the job, and then click Report Center Tools > View SharePoint Alerts Reports. You will be brought to the Usage Reports tab of Report Center where you can review the information on SharePoint alerts configured by end users within the selected node of the selected job.
• Last Accessed Time Report – Select the job, and then click Report Center Tools > View Last Accessed Time Reports. You will be brought to the Usage Reports tab of Report Center where you can review the information on when the selected site collections or sites were last accessed, and by whom for the selected job.
Storage Analyzer Jobs from Infrastructure Reports In Job Monitor, select a Storage Analyzer report job then click Report Center Tools > View Storage Analyzer Reports on the ribbon. You will be brought to the Infrastructure Reports tab of Report Center where you can review the size and location of the data in SharePoint databases and external devices for the selected plan.
Best Practice Reports Jobs from Administration Reports In Job Monitor, select a Best Practice Reports job, and then click Report Center Tools > View Best Practice Reports on the ribbon. You will be brought to the Administration Reports tab of Report Center where you can review the health report of the selected object in the selected job.

DocAve® 6 Job Monitor 43
Compliance Reports In Job Monitor, selecting a Compliance Report job provides you with the following options depending on the type of Compliance Report job that was run. Click Report Center Tools on the ribbon and select one of the following types of reports from the drop-down menu:
• User Lifecycle Report – Select the job, and then click View User Lifecycle Reports. You will be brought to the Compliance Reports tab of Report Center where you can review the action report for that user in the selected job.
• List Access Report – Select the job, and then click View List Access Reports. You will be brought to the Compliance Reports tab of Report Center where you can review what has happened to the specified lists in the selected job.
• Item Lifecycle Report – Select the job, and then click View Item Lifecycle Reports. You will be brought to the Compliance Reports tab of Report Center where you can review entire item life report for that item in the selected job.
• Site Access Report – Select the job, and then click View Site Access Reports. You will be brought to the Compliance Reports tab of Report Center where you can review what has happened to the specified sites in the selected job.
• List Deletion Report – Select the job, and then click View List Deletion Reports. You will be brought to the Compliance Reports tab of Report Center where you can review the deletion information report for that list in the selected job.
• Permission Changes Report – Select the job, and then click View Permission Changes Reports. You will be brought to the Compliance Reports tab of Report Center where you can review the report on permission changes in the selected job.
• Content Type Changes Report – Select the job, and then click View Content Type Changes Reports. You will be brought to the Compliance Reports tab of Report Center where you can review the changes made to content types in the selected job.
• Custom Report – Select the job, and then click View Custom Reports. You will be brought to the Compliance Reports tab of Report Center where you can review the report of the collected audit records based on your demand.
• Term Store Changes Report – Select the job, and then click View Term Store Changes Reports. You will be brought to the Compliance Reports tab of Report Center where you can review the information report for all managed metadata changes within the global and local term groups of the selected farm in the selected job.
• Content Type Usage Report – Select the job, and then click View Content Type Usage Reports. You will be brought to the Compliance Reports tab of Report

DocAve® 6 Job Monitor 44
Center where you can review the usage details for all of the available content types within the selected site collections or sites in the selected job.
• Upcoming Content Expiration – Select the job, and then click View Upcoming Content Expiration. You will be brought to the Compliance Reports tab of Report Center where you can review the details about items that have the configured information management policies and expiration dates within the selected Web applications, site collections, sites, or lists.
• Information Management Policies – Select the job, and then click View Information Management Policies. You will be brought to the Compliance Reports tab of Report Center where you can review the details about the configured information management policies for the content types within the selected Web applications, site collections, sites, or lists.

DocAve® 6 Job Monitor 45
Notices and Copyright Information Notice The materials contained in this publication are owned or provided by AvePoint, Inc. and are the property of AvePoint or its licensors, and are protected by copyright, trademark and other intellectual property laws. No trademark or copyright notice in this publication may be removed or altered in any way.
Copyright Copyright ©2012-2018 AvePoint, Inc. All rights reserved. All materials contained in this publication are protected by United States and international copyright laws and no part of this publication may be reproduced, modified, displayed, stored in a retrieval system, or transmitted in any form or by any means, electronic, mechanical, photocopying, recording or otherwise, without the prior written consent of AvePoint, 525 Washington Blvd, Suite 1400, Jersey City, NJ 07310, USA or, in the case of materials in this publication owned by third parties, without such third party’s consent. Notwithstanding the foregoing, to the extent any AvePoint material in this publication is reproduced or modified in any way (including derivative works and transformative works), by you or on your behalf, then such reproduced or modified materials shall be automatically assigned to AvePoint without any further act and you agree on behalf of yourself and your successors, assigns, heirs, beneficiaries, and executors, to promptly do all things and sign all documents to confirm the transfer of such reproduced or modified materials to AvePoint.
Trademarks AvePoint®, DocAve®, the AvePoint logo, and the AvePoint Pyramid logo are registered trademarks of AvePoint, Inc. with the United States Patent and Trademark Office. These registered trademarks, along with all other trademarks of AvePoint used in this publication are the exclusive property of AvePoint and may not be used without prior written consent.
Microsoft, MS-DOS, Internet Explorer, Office, Office 365, SharePoint, Windows PowerShell, SQL Server, Outlook, Windows Server, Active Directory, and Dynamics CRM 2013 are either registered trademarks or trademarks of Microsoft Corporation in the United States and/or other countries.
Adobe Acrobat and Acrobat Reader are trademarks of Adobe Systems, Inc.
All other trademarks contained in this publication are the property of their respective owners and may not be used without such party’s consent.
Changes The material in this publication is for information purposes only and is subject to change without notice. While reasonable efforts have been made in the preparation of this publication to ensure its accuracy, AvePoint makes no representation or warranty, expressed or implied, as to its completeness, accuracy, or suitability, and assumes no liability resulting from errors or omissions in this publication or from the use of the information contained herein. AvePoint reserves the right to make changes in the Graphical User Interface of the AvePoint software without reservation and without notification to its users.
AvePoint, Inc. 525 Washington Blvd Suite 1400 Jersey City, NJ 07310 USA