docker security workshop slides
TRANSCRIPT

Docker Security WorkshopDavid Lawrence
Riyaz FaizullabhoyViktor Stanchev

Goals of this workshop

Features
See what features are available in Docker
What do they do?
How do you use them?

Understanding
Look at some tools
See underlying implementation details
Learn best practices

Do!

Don’t!

Docker is additive to the security of your application ...

… even if you don’t use any of the techniques we cover
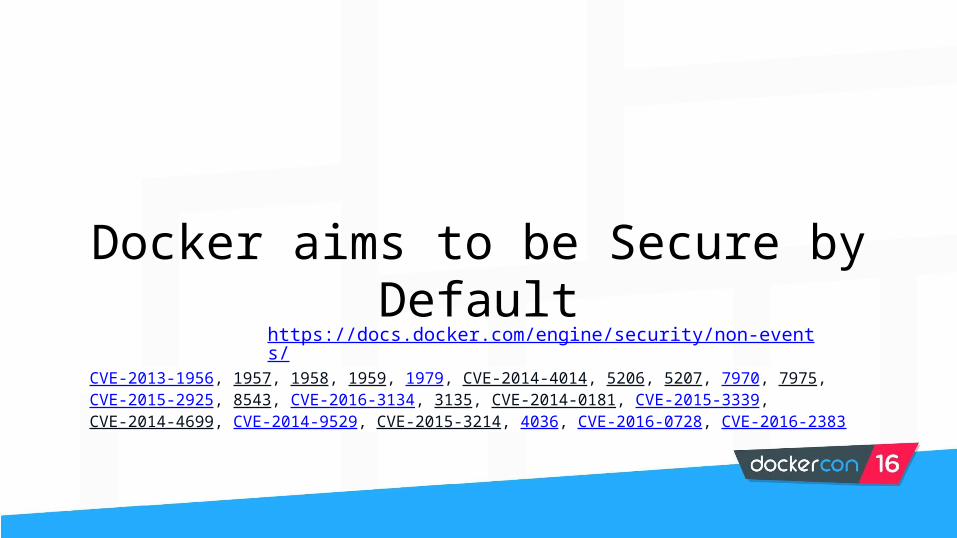
Docker aims to be Secure by Defaulthttps://docs.docker.com/engine/security/non-events/
CVE-2013-1956, 1957, 1958, 1959, 1979, CVE-2014-4014, 5206, 5207, 7970, 7975, CVE-2015-2925, 8543, CVE-2016-3134, 3135, CVE-2014-0181, CVE-2015-3339, CVE-2014-4699, CVE-2014-9529, CVE-2015-3214, 4036, CVE-2016-0728, CVE-2016-2383

Why?

How do we think about containers?

How we talk about Docker

How Docker Actually Works
systemd
docker
Host OS
alpine ubuntunginx
sh nginx bash
vimvi nginx

Where can we see this?
top

Anatomy of a Container

Namespaces: “what containers can see”
ls -la /proc/<pid>/ns/

What’s namespaced?
Cgroup CLONE_NEWCGROUP Cgroup root directory
IPC CLONE_NEWIPC System V IPC, POSIX message
queues
Network CLONE_NEWNET Network devices, stacks, ports, etc.
Mount CLONE_NEWNS Mount points
PID CLONE_NEWPID Process IDs
User CLONE_NEWUSER User and group IDs
UTS CLONE_NEWUTS Hostname and NIS domain name

Demo using namespaces directly
Create a shell process with pid and fs namespaces.
$ sudo unshare -fp
$ sudo unshare -fp --mount-proc

cgroups: “what containers can use”
Aka “Control Groups” - limit container resources!
CPU
Memory
PIDs

CPU 1 CPU 2 CPU 3 CPU 4
cgroups: “what containers can use”

CPU 1 CPU 2 CPU 3 CPU 4CPU 1
CPU 1 CPU 2
cgroups: “what containers can use”

:(){ :|: & };:
cgroups: “what containers can use”

git clone https://github.com/riyazdf/dockercon-workshop.git - cgroups directory
NOTE: Ubuntu 15.10 does not support PID limits, but 16.04 does if you have itSo DO NOT run the fork bomb unless you have another machine.
Set up your AWS instance - check your email!
chmod 400 <PATH_TO_FILE>/<name>.pemssh -i <PATH_TO_FILE>/<name>.pem ubuntu@<Public DNS>
Example: ssh -i riyaz.pem [email protected]
Hands-On Exercise

Securing Client-Engine Communications“My first 5 minutes…”

Docker Client Server Architecture
docker client docker engine
unix socket
tcp socket

Exposing your engine to the internet
Edit config at /lib/systemd/system/docker.service- ExecStart=/usr/bin/docker daemon -H fd://+ ExecStart=/usr/bin/docker daemon -H fd:// -H tcp://0.0.0.0:2376
Restart Docker$ sudo systemctl daemon-reload$ sudo systemctl restart docker

One Way TLS
- Same way we trust websites:- Server cert and key on engine- CA cert on client- client authenticates Docker engine
Docker client

Creating a CA
# use a strong passphrase!
$ openssl genrsa -aes256 -out ca-key.pem 4096
$ openssl req -new -x509 -days 365 -key ca-key.pem -sha256 -out ca.pem

Creating the daemon cert and key
$ openssl genrsa -out server-key.pem 4096
$ openssl req -subj "/CN=$HOSTNAME" -sha256 -new -key server-key.pem \ -out server.csr
$ echo subjectAltName = IP:10.10.10.20,IP:127.0.0.1 > extfile.cnf
$ openssl x509 -req -days 365 -sha256 -in server.csr -CA ca.pem \ -CAkey ca-key.pem -CAcreateserial -out server-cert.pem \ -extfile extfile.cnf
$ sudo cp ca.pem /root/.docker/ca.pem
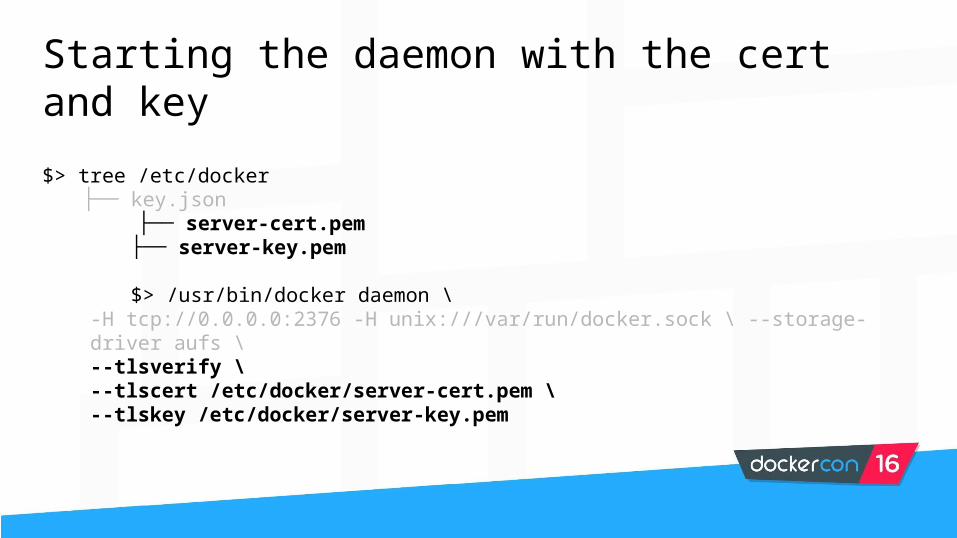
Starting the daemon with the cert and key
$> tree /etc/docker├── key.json
├── server-cert.pem├── server-key.pem
$> /usr/bin/docker daemon \-H tcp://0.0.0.0:2376 -H unix:///var/run/docker.sock \ --storage-driver aufs \--tlsverify \--tlscert /etc/docker/server-cert.pem \--tlskey /etc/docker/server-key.pem

Trusting the daemon’s cert on the client
$> tree ~/.docker├── config.json├── ca.pem
OR $> export DOCKER_CERT_PATH=~/my_cert_directory$> tree ~/my_cert_directory├── ca.pem

Secure by default: docker-machine
docker-machine does this automatically to set up TLS for you by default!

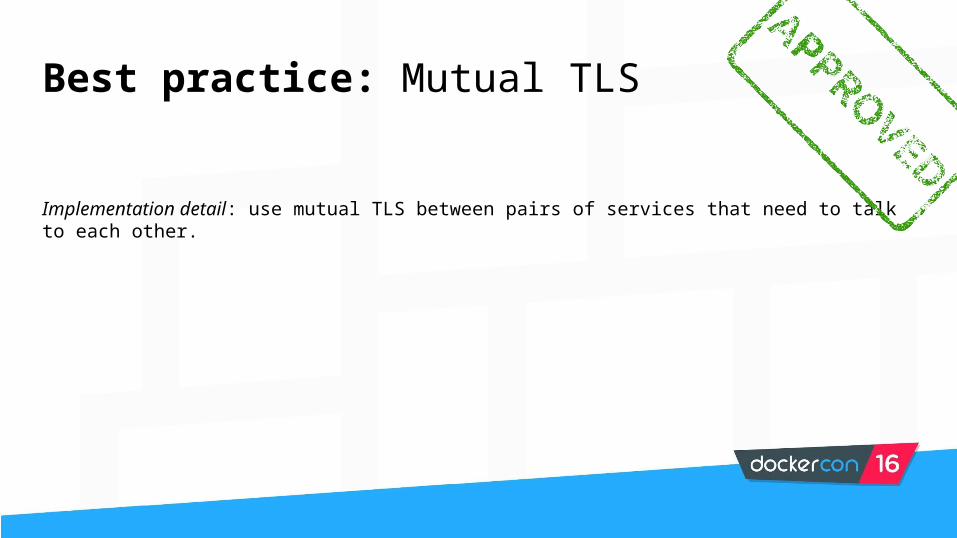
Best practice: Mutual TLS
Client also presents certificateSends after verifying server cert
Mutual authentication
Client CA on daemon (engine)
Docker client

Creating client cert and key
$ openssl genrsa -out key.pem 4096
$ echo extendedKeyUsage = clientAuth > extfile.cnf
$ openssl x509 -req -days 365 -sha256 -in client.csr -CA ca.pem \ -CAkey ca-key.pem -CAcreateserial -out cert.pem -extfile extfile.cnf

Trusting the client cert on the daemon$> tree /etc/docker
├── key.json├── server-cert.pem├── server-key.pem├── ca.pem
$> /usr/bin/docker daemon \-H tcp://0.0.0.0:2376 -H unix:///var/run/docker.sock \ --storage-driver aufs \--tlsverify \--tlscert /etc/docker/server-cert.pem \--tlskey /etc/docker/server-key.pem--tlscacert /etc/docker/ca.pem

Using the client certs on the client$> tree ~/.docker
├── config.json├── ca.pem├── cert.pem├── key.pem
OR
$> export DOCKER_CERT_PATH=~/my_cert_directory$> tree ~/my_cert_directory├── ca.pem├── cert.pem├── key.pem

Securing Engine-Registry Communications


What’s in an image:The Layered Filesystem

What is a layered filesystem?
Combine multiple directories to look like a single filesystem
Tombstoning/whiteout files to delete files from lower layers

Supported Implementations
Aufs
Btrfs
OverlayFS
Devicemapper
...

Copy-on-write

Best practice: “minimal” base images
alpine
~ 2 MB from hub (1 layer!)
musl libc and busybox
ubuntu
~ 50 MB from hub

Best practice: verify content
RUN apt-key adv \ --keyserver hkp://keyserver.ubuntu.com:80 \ --recv-keys BBEBDCB318AD50EC6865090613B00F1FD2C19886 \ && echo deb http://repository.spotify.com stable non-free \ | sudo tee /etc/apt/sources.list.d/spotify.list

Best practice: read only containers
$ docker run it --rm --read-only alpine sh
Mounts the container’s FS as read-only

Best practice: read-only Volumes
-v /data:/data:ro

Common mistake: mount host location as writable
$ docker run it --rm -v /:/host alpine sh

Best practice: minimal, read-only mounts
$ docker run it --rm -v /subdir/we/need:/dir:ro alpine sh

Networks

Isolate services
Control which services can talk to which other services
● Easier to audit

Links (legacy)
Allow 2 specific containers to talk to each other.
● Brittle: does not survive container restarts
docker run -d --name db mysql:latestdocker run -d --link db wordpress

Network Namespace
docker network create my_appdocker run -it --rm --net=my_app alpine sh
Links are dynamic, can be created to not yet created containers.

Best practice: Use Multiple Networks
nginx my_appInternalservice
RethinkDBProxy RethinkDB
RethinkDB
RethinkDB
load_balancer_net app_net db_net

Common Mistake: --net=host
Container can see ALL network traffic, including traffic on docker virtual networks

Common Mistake: ports exposed on host
Unnecessary
Creates conflicts
Best practice: Mutual TLS
Implementation detail: use mutual TLS between pairs of services that need to talk to each other.

User Management

Default runs as root
$ docker run -v /bin:/host/bin -it --rm alpine sh/ $ whoamiroot/ $ iduid=0(root) gid=0(root) / $ # WREAK HAVOC TIME! Please don’t do this/ $ rm /host/bin/sh # Again, please don’t do this

root in container == root outside container
We don’t want this to be the case!How can we change this?
0 (root) 1000 (user) 65534(nobody)

Step in the right direction: run as a user
# Use the --user flag with UID:GID argument$ docker run -v /bin:/host/bin --user 10000:10000 -it --rm alpine sh/ $ whoamiwhoami: unknown uid 10000/ $ iduid=10000 gid=10000/ $ rm /host/bin/shrm: can’t remove ‘sh’: Permission denied

But I still want “root” inside container
Perhaps we need to run a command that needs to look like it’s root in the container, but we don’t want to give it true root access to the underlying host
0 (root) 1000 (user) 65534(nobody)
10000 (docker)

$ docker daemon --userns-remap [uid[:gid]]
Enable user namespaces
0 (root) 1000 (user) 65534(nobody)
10000 (docker)
“0” “root”

$ docker daemon --userns-remap [uid[:gid]]Will need to re-pull images and re-create volumes due to container resource and image layer
permissions Leave this feature on in production; switching back and forth should only be done in
development
Enable user namespaces - common pitfalls
0 (root)
1000 (user) 65534(nobody)
10000 (docker)
“0” “root”

Hands-On Exercise && breakgithub.com/riyazdf/dockercon-workshop - userns directory

Image Distribution

Security Goals
Image Provenance and Trust● Provenance: who made this image?
○ Verify the publisher of the image● Trust: have the contents of this image been tampered with?
○ Verify the integrity of the image

Pulling by tag
$ docker pull alpine:latestName resolution takes place in registry to find content-address of image
$ docker pull alpineUsing default tag: latestNotice that the tag defaults to latest if no tags are given!

Pulling by digest
$ docker pull alpine@sha256:ea0d1389812...No name resolution!
Security best practice: pulling by digest to enforce consistent and “immutable” pulls because of content-addressability

Content Trust
$ export DOCKER_CONTENT_TRUST=1$ docker pull alpine:latestPull (1 of 1): alpine:latest@sha256:ea0d1389...Benefits of pull by digest with ease of pull by tag

docker pull alpine:latest
Without trust enabled: forward command through Docker Engine to registry to resolve tag to digest


Content Trust (on push)
$ export DOCKER_CONTENT_TRUST=1$ docker tag alpine:latest <user>/alpine:trust$ docker push <user>/alpine:trust
Looks the same as a regular push by tag!

Content Trust (it’s more than gpg)
The push refers to a repository [<user>/alpine]77f08abee8bf: Pushedtrust: digest: sha256:d5de850d728... size: 1355Signing and pushing trust metadataEnter passphrase for root key with ID e83f424:Enter passphrase for new repository key with ID f903fc9 (docker.io/<user>/alpine):Repeat passphrase for new repository key with ID f903fc9 (docker.io/<user>/alpine):Finished initializing "docker.io/<user>/alpine"Successfully signed "docker.io/<user>/alpine":trust

Content Trust (it’s more than gpg)
$ cat ~/.docker/trust/tuf/docker.io/alpine/metadata/timestamp.json | jq

Docker Content Trust / Notary Threat Model
● Key compromise?○ We can recover!
● Replay attacks?○ Not with our freshness guarantees!
● Untrusted registry?○ No problem! DCT/Notary do not root any trust in the underlying content store or transport○ Use signed TUF metadata to retrieve trusted hashes of content○ Don’t even need to trust Notary server after first pull - local metadata pins trust, tagging keys
are kept client-side for signing

Docker Pull
Only pull trusted imagesUse official images when possible!

Docker Security Scanning (Nautilus)

Docker Security Scanning (Nautilus)
https://hub.docker.com/r/library/alpine/tags/- All official images on hub are scanned for vulnerabilities, lobby upstream for fixes!- Can view scan results after logging into Docker Hub

Docker Security Scanning (Nautilus)
- Checks against CVE database for declared layers- Also performs binary scan to pick up on statically linked binaries- Official repos have been scanned since Nov 2015, are rescanned often

Hands-On Exercisegithub.com/riyazdf/dockercon-workshop - trust directory

Capabilities

Root vs Not Root
Capabilities breakdown root permissions into groups that can be individually allowed or blocked- Often don’t want or need all root permissions- Can reduce attack surface by reducing capabilities

Docker Default Capabilities
In whitelist:"CAP_CHOWN","CAP_DAC_OVERRIDE","CAP_FSETID","CAP_FOWNER","CAP_MKNOD","CAP_NET_RAW","CAP_SETGID","CAP_SETUID","CAP_SETFCAP","CAP_SETPCAP","CAP_NET_BIND_SERVICE","CAP_SYS_CHROOT","CAP_KILL","CAP_AUDIT_WRITE",
Not in whitelist:"CAP_AUDIT_CONTROL", "CAP_AUDIT_READ","CAP_BLOCK_SUSPEND", "CAP_DAC_READ_SEARCH",
"CAP_IPC_LOCK", "CAP_ICP_OWNER",
"CAP_LEASE", "CAP_LINUX_IMMUTABLE",
"CAP_MAC_ADMIN", "CAP_MAC_OVERRIDE",
"CAP_NET_ADMIN", "CAP_NET_BROADCAST",
"CAP_SYS_ADMIN", "CAP_SYS_BOOT",
"CAP_SYS_MODULE", "CAP_SYS_NICE",
"CAP_SYS_PACCT", "CAP_SYS_PTRACE",
"CAP_SYS_RAWIO", "CAP_SYS_RESOURCE",
"CAP_SYS_TIME", "CAP_SYS_TTY_CONFIG",
"CAP_SYSLOG", “CAP_WAKE_ALARM",
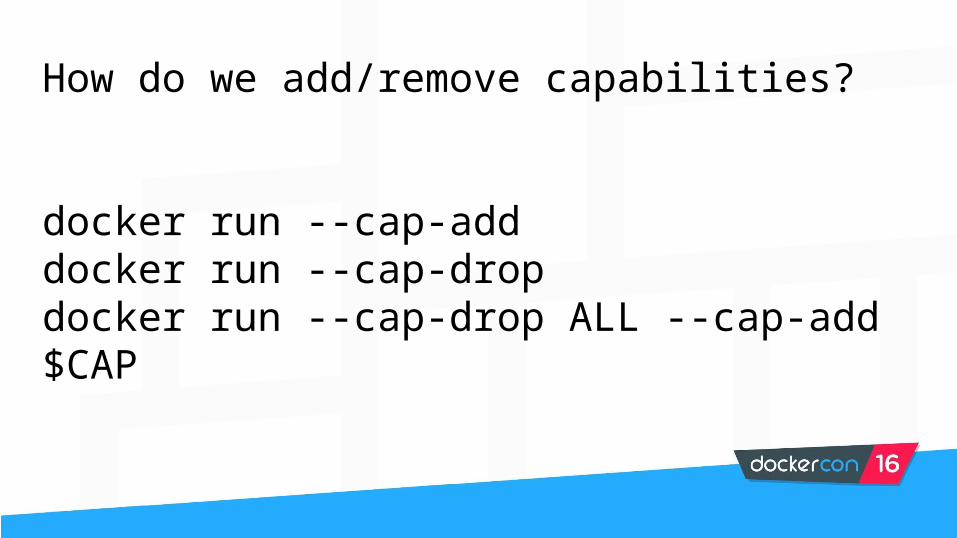
How do we add/remove capabilities?
docker run --cap-adddocker run --cap-dropdocker run --cap-drop ALL --cap-add $CAP

Configure capabilities in compose
cap_add: - CAP_NET_BROADCAST - CAP_NET_RAW
cap_drop: - ALL

What to watch out for
- Read the fine print for each capability!- man capabilities- i.e. removing CAP_KILL only requires permissions checks and enabling
bypasses permissions checks. It doesn’t generically enable/disable the ability to kill
- CAP_SYS_ADMIN is nearly root...

What to watch out for$ man capabilities...CAP_SYS_ADMIN * Perform a range of system administration operations including: quotactl(2), mount(2), umount(2), swapon(2), setdomainname(2); * perform privileged syslog(2) operations (since Linux 2.6.37, CAP_SYSLOG should be used to permit such operations); * perform VM86_REQUEST_IRQ vm86(2) command; * perform IPC_SET and IPC_RMID operations on arbitrary System V IPC objects; * override RLIMIT_NPROC resource limit; * perform operations on trusted and security Extended Attributes (see xattr(7)); * use lookup_dcookie(2); * use ioprio_set(2) to assign IOPRIO_CLASS_RT and (before Linux 2.6.25) IOPRIO_CLASS_IDLE I/O scheduling classes; * forge PID when passing socket credentials via UNIX domain sockets; * exceed /proc/sys/fs/file-max, the system-wide limit on the number of open files, in system calls that open files (e.g., accept(2), execve(2), open(2), pipe(2)); * employ CLONE_* flags that create new namespaces with clone(2) and unshare(2) (but, since Linux 3.8, creating user namespaces does not require any capability); * call perf_event_open(2); * access privileged perf event information; * call setns(2) (requires CAP_SYS_ADMIN in the target namespace); * call fanotify_init(2); * call bpf(2); * perform KEYCTL_CHOWN and KEYCTL_SETPERM keyctl(2) operations; * perform madvise(2) MADV_HWPOISON operation; * employ the TIOCSTI ioctl(2) to insert characters into the input queue of a terminal other than the caller's controlling terminal; * employ the obsolete nfsservctl(2) system call; * employ the obsolete bdflush(2) system call; * perform various privileged block-device ioctl(2) operations; * perform various privileged filesystem ioctl(2) operations; * perform administrative operations on many device drivers.

Capabilities and Docker
● No extended attributes in images -> no capabilities elevation normally possible● Use docker to reduce capabilities● Docker can’t grant capabilities to non-root users due to some limitations in older kernel versions

Capabilities and Docker
Your options from worst to best:1. Manual management within the container:
docker run --cap-add ALL2. Restricted capabilities (still root):
docker run --cap-drop ALL --cap-add ABC3. No capabilities:
docker run --user
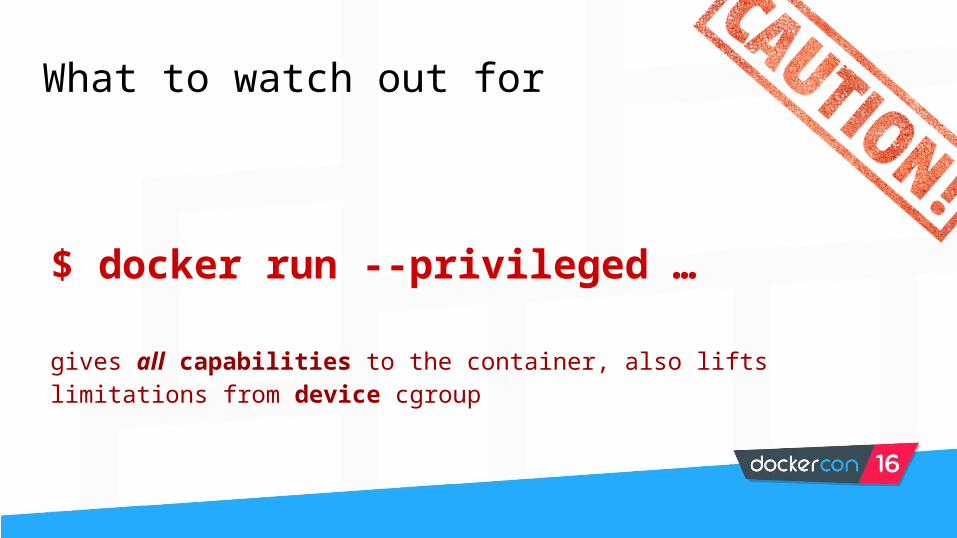
What to watch out for
$ docker run --privileged …
gives all capabilities to the container, also lifts limitations from device cgroup

Capabilities demo

More informationgithub.com/riyazdf/dockercon-workshop - capabilities directory

Seccomp

Original Seccomp
On-off feature that disabled all system calls except:
exit()
read()
write()
sigreturn()

Seccomp-BPF
Extension
Allows us to configure what system calls are allowed/blocked
Uses Berkeley Packet Filters (BPF)
Allows examining system calls in detail before making a decision

Is it enabled?
In the kernel:
$ grep SECCOMP /boot/config-$(uname -r) # or zgrep SECCOMP /proc/config.gzCONFIG_SECCOMP=yCONFIG_SECCOMP_FILTER=y
In docker:
$ docker run --rm alpine grep Seccomp /proc/self/status
In docker 1.12:
$ docker info

Default Whitelist
Lots of system calls, what’s excluded:
acctadd_key
adjtimex
bpfclock_adjtime
clock_settime
clone
create_moduledelete_module
finit_module
get_kernel_symsget_mempolicy
init_module
ioperm
ioplkcmp
kexec_file_load
kexec_load
keyctllookup_dcookie
mbind
mount
move_pagesname_to_handle_at
nfsservctl
open_by_handle_atperf_event_open
personality
pivot_root
process_vm_readvprocess_vm_writev
ptrace
query_module
quotactl
rebootrequest_key
set_mempolicy
setnssettimeofday
stime
swapon
swapoffsysfs
_sysctl
umountumount2
unshare
uselib
userfaultfd
ustat
vm86vm86old

The strace tool$ strace -c -f -S name ls 2>&1 1>/dev/null | tail -n +3 | head -n -2 | awk '{print $(NF)}'
accessarch_prctlbrkcloseexecvefstatgetdentsioctlmmapmprotectmunmapopenreadwrite

Docker seccomp profile DSLSeccomp policy example:{ "defaultAction": "SCMP_ACT_ERRNO", "architectures": [ "SCMP_ARCH_X86_64", "SCMP_ARCH_X86", "SCMP_ARCH_X32"
],"syscalls": [
{ "name": "accept", "action": "SCMP_ACT_ALLOW", "args": [] }, ...
]}
Possible actions:SCMP_ACT_KILLSCMP_ACT_TRAPSCMP_ACT_ERRNOSCMP_ACT_TRACESCMP_ACT_ALLOW

Docker seccomp profile DSL
More complex filters:"args": [
{"index": 0,"op": "SCMP_CMP_MASKED_EQ","value": 2080505856,"valueTwo": 0}]
2080505856 == 0x7C020000

Seccomp and the no-new-privileges option
Seccomp policies have to be applied before executing your container and be less specific unless you use:
--security-opt no-new-privileges
In this case you need to allow only futex stat execve.
This flag also disables setuid binaries:
$ sudo lssudo: effective uid is not 0, is /usr/bin/sudo on a file system with the 'nosuid' option set or an NFS file system without root privileges?

More informationgithub.com/riyazdf/dockercon-workshop - seccomp directory$ docker run --rm -it --security-opt seccomp=default-no-chmod.json alpine chmod 777 /chmod: /: Operation not permitted

Linux Security Modules

What is a LSM?
A plugin to the linux kernel that allows us to set policies to restrict what a process can do.
Mandatory Access Control: instead of using user-defined permissions to specify access, the underlying system describes permissions itself with labels

What is a LSM?Under the hood: each LSM implements a kernel interface that hooks into user-level syscalls about to access an important kernel object (inodes, task control blocks, etc.), either allowing them to pass through or denying them outright depending on the application profile

Available LSMs
AppArmor
SELinux
Smack
Tomoyo

Deep Dive - AppArmor
File Access Management
AppArmor uses globbing and deny syntax to express filepath restrictions● deny /sys/* rwklx Deny read/write/lock/link/execute on files in /sys/● deny /sys/** rwklx Deny on files in /sys/ and subdirectories

Deep Dive - AppArmor
Networking Management
Like firewall rules:● Can completely disable networking: deny network● Can deny certain permissions: deny network bind, inet● Can specify specific IP/ports : network tcp src 192.168.1.1:80 dst
170.1.1.0:80

Deep Dive - AppArmor
Capability Management
AppArmor can also deny capabilities with a simple syntax:● deny capability chown,● deny capability dac_override

Deep Dive - AppArmor
Composability
C-style include statements● include <abstractions/base> - built-in bundle of files ● include "/etc/apparmor.d/include/foo" - absolute path from file● include "../relative_path/bar" - relative path from file

Deep Dive - AppArmor
Tools for debugging and generating profiles (on Ubuntu):$ sudo apt install apparmor-utils
$ aa-complain <PATH_TO_PROFILE> # Watch AppArmor block things!$ aa-genprof <PATH_TO_BINARY> # Interactive profile generation!

Do I still need Seccomp and Cap-drop?
Why not? Docker sets a profile for each setting by default
● Some overlap but each feature still adds unique functionality
● Defense-in-depth

Common mistake: disabling profiles
SELinux: setenforce 0 (on daemon)http://stopdisablingselinux.com/
AppArmor: --security-opt apparmor:unconfined (on docker run)This one’s a little harder to do “by accident”
docker run --privileged

Hands-On Exercisegithub.com/riyazdf/dockercon-workshop - apparmor directory
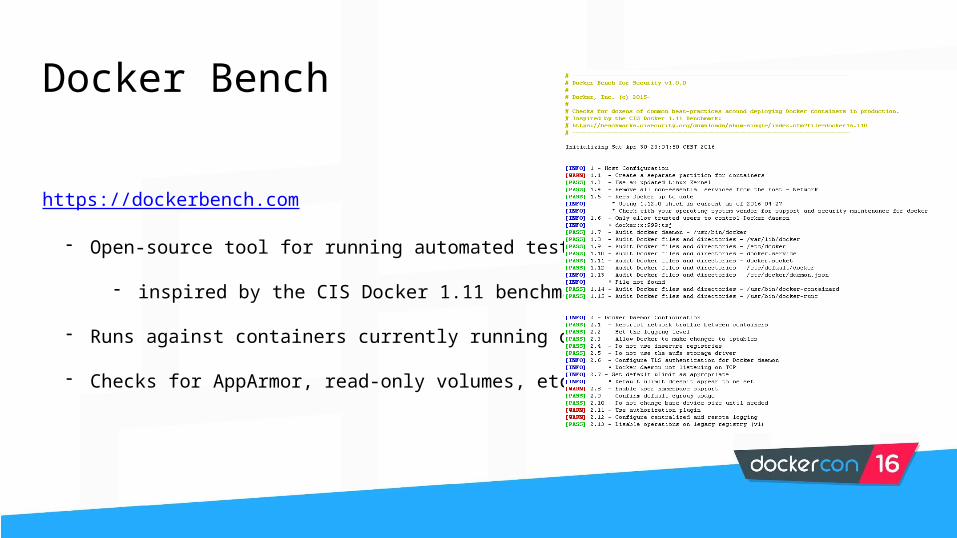
Docker Bench
https://dockerbench.com
- Open-source tool for running automated tests
- inspired by the CIS Docker 1.11 benchmark
- Runs against containers currently running on same host
- Checks for AppArmor, read-only volumes, etc...

View from 10,000 feet: Docker Security Checklist
Build:- Use minimal images (alpine)- Use official images- Using images pulled by content trust (fresh, pulled by digest from authors you trust)
Ship:- Push to your consumers with content trust- View results from Docker Security Scanning
Run:- Mutual TLS between client/engine- Read-only volumes and containers- User namespaces in the daemon- Limit resources with cgroups- Use the default apparmor/seccomp/capabilities, or your own tested profiles (not --privileged!)

Thank you!
- Please take the exercises home! We’ll accept issues and pull requests :)
- Learn more at
https://docs.docker.com/engine/security/security/

Advanced Topics“Extra for Experts”

AuthZ plugins

Running your own Notary
Deploy a notary$ git clone https://github.com/docker/notary.git$ cd notary$ docker-compose up
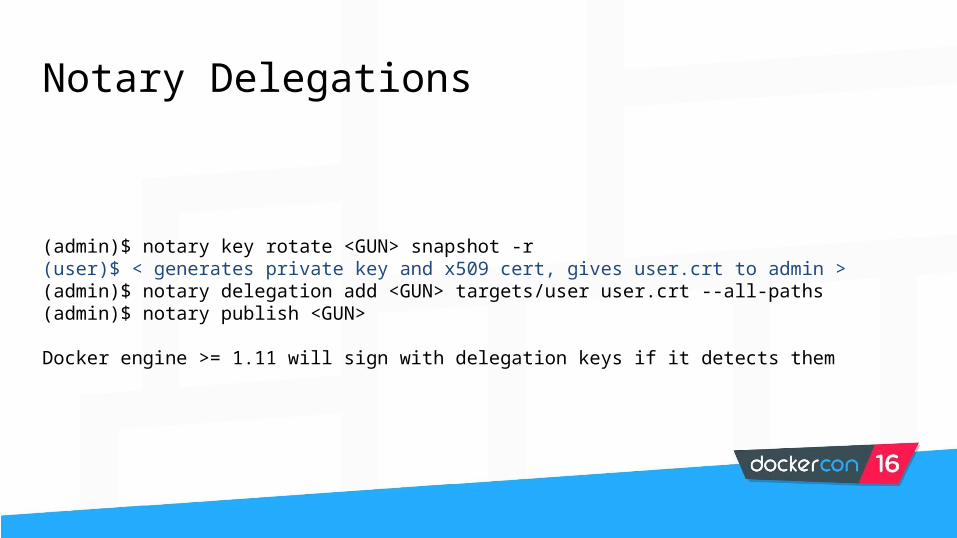
Notary Delegations
(admin)$ notary key rotate <GUN> snapshot -r(user)$ < generates private key and x509 cert, gives user.crt to admin >(admin)$ notary delegation add <GUN> targets/user user.crt --all-paths(admin)$ notary publish <GUN>
Docker engine >= 1.11 will sign with delegation keys if it detects them
