docman 10 pre-migration system reviewvignoble.asuscomm.com/dokuwiki/!churchdown/lib/exe/fetch... ·...
TRANSCRIPT

Pre-Migration Checks Copyright ©2000-2017 by PCTI Solutions Limited Page 1 of 17
Docman 10 Pre-Migration System Review
Prior to migrating to Docman 10, it will be beneficial for you to complete a few checks/reviews of the current state of your Docman application. All the checks below are listed in a particular order to ensure the full effect of the review to benefit your practice. Using the Admin log in (or a user with sufficient permissions) you will need to review the following items in this order. A user with working knowledge of the maintenance and configuration sections of Docman would be beneficial. User Permissions can be found in Settings > Maintain Lists > Users. Then click on the user's profile you wish to change. Please ensure you save your changes.
(1.0) (1.1) Permissions required for the checks required below: Workflow:
a. Administer – Will allow a user to create/edit/delete views
b. Bulk Reroute Workflows – Will allow a user to move workflows to another user en masse.
Maintenance: a. Modify Users – Allows a user to add/change the permissions/status of another user.
(1.3) (1.4)
NB: Please read through this document thoroughly, before attempting to make any changes.
If you do not feel confident to carry out these steps, please contact your CCG/CSU for further advice.

Pre-Migration Checks Copyright ©2000-2017 by PCTI Solutions Limited Page 2 of 17
Workflow & User Review
Step 1. Workflow tile > Manage tab: Move Workflows:
Check here to review the number of active workflows, in all users inboxes. Review the outstanding workflows
and who holds them, and make a note of any ex-users that need to be removed (also consider that workflows
may have been sent to a group, rather than an individual). Best Practice would be to clear down the active
workflows, ready for migration.
(2.0) (2.1)
(2.2)
Review the users with the quantity of active workflows.
(2.3)
NB: For Reference only at this time.
You will refer back to this later, at step 6 to make changes.

Pre-Migration Checks Copyright ©2000-2017 by PCTI Solutions Limited Page 3 of 17
Step 2. Settings tile > Maintain lists tile: Workflow section - Recipient Groups:
Review the users in the current groups, i.e. remove ex-users from groups (and possibly add new staff into existing
groups)
Check the users in each group - Amend contents of groups as required by following the prompts on screen to
add/remove users.
(3.0)
Select a group, double click/or click edit at the bottom of the screen, follow the prompts to add/remove users from
the group as required. Click Save before exiting.
If a group is no longer used, do NOT delete or make the group inactive yet.
Take Care! . You cannot save a group with no members. And, when amending users in groups, always click yes to the prompt 'Would you like the users to be reflected in the
active workflow list?'
Once the Groups have been reviewed and amended, move to step 3.

Pre-Migration Checks Copyright ©2000-2017 by PCTI Solutions Limited Page 4 of 17
Step 3. Settings tile> Maintain lists tile: Workflow section - Templates:
If your practice use Workflow Templates, please check these here to identify if any of the templates are going to
the wrong group/user (i.e. ex-users etc) & amend as necessary
(4.0)
Check any templates and ensure they are current, and being sent to the correct user/group - Amend/Delete/Make
inactive as required.
(4.1)
Please ensure that you check the Options tab to check for any priority/limitations to subsequent actions/due dates
and 'route before completion' settings.
Select a template, double click or click edit at the bottom of the screen, follow the prompts to check the recipient(s)
and options tab as required. Click Save before exiting.
Once the Groups have been reviewed and amended, move to step 4.

Pre-Migration Checks Copyright ©2000-2017 by PCTI Solutions Limited Page 5 of 17
Step 4. Settings tile > Maintain lists tile: Workflow section - Actions:
All actions need to be reviewed also. Actions are designed to be simple to use. Please check with Clinicians if
there are any they do not currently use. Remove any actions for ex-users or unused groups, and remove actions
no longer used.
Check that all Actions are being sent to the correct group/user - Amend/Delete as required. Try to limit any actions
that have 'Prompt for...' Settings, as these will not be as efficient as Actions with defined recipients.
(5.0)
Select an Action, double click/or click edit at the bottom of the screen, follow the prompts to check the recipients and
steps as required. Click Save before exiting.
Once the Actions have been reviewed and amended, move to step 5.

Pre-Migration Checks Copyright ©2000-2017 by PCTI Solutions Limited Page 6 of 17
Step 5. Workflow tile > Manage tab: Move Workflows:
After you have reviewed the details above you can revisit the Workflow screen and the Manage tab to reflect on
the outstanding active workflows. Now that the groups have been reviewed this should give a better idea of users
that can be made inactive and the workflows associated with their profiles.
Users' Workflow inbox must be empty if they are to be made inactive. Users that have left the practice, system &
generic users, and locums that will not return all need to be made inactive.
Review the remaining outstanding workflows in the relevant users - Move workflows from users that need to be
made inactive to users who will process the outstanding workflows.
(6.0)
You are now prompted to select a user to re-route from.
(6.1) (6.2)

Pre-Migration Checks Copyright ©2000-2017 by PCTI Solutions Limited Page 7 of 17
Choose the workflows to re-route and click Select. You are now prompted to select a user to re-route to. Choose a
user from the list.
(6.3)
The Move Workflows dialogue box opens, click Yes to confirm the re-route or click No to cancel.
Click on a user that you need to make inactive, you will have the option to move all the workflows, Click next, choose
a user that will have the selected workflows (you can only select another user using this tool, not a group), and you
will be prompted twice, and asked to complete a reason for the move. Repeat as required
Take Care! (6.3) A second dialogue box opens, as the action is irreversible without performing a database restore, it
is essential to check that you are confident in moving the workflows. Click Yes to confirm or No to cancel.
Select your pre-defined reason from the list that appears or add your own freetext reason (if no pre-defined reasons
are shown).
(6.4)
A dialogue box appears, advising you that the contents of your workflow intray have been moved successfully. Click
Close.
Once the Workflows have been reviewed and amended, move to step 6.

Pre-Migration Checks Copyright ©2000-2017 by PCTI Solutions Limited Page 8 of 17
Step 6. Settings tile > Maintain lists tile: Users:
You are now ready to ensure that the ex-users are marked as inactive.
Review Users that need to be made inactive
(7.0)
This displays all active user accounts set up within Docman. Double-click the user’s name in the list, or click their
name then the Edit button, to open the Edit User window.
(7.1)
Click the Security tab, then tick the User is In-active tickbox. Click Save.
(7.2)
After clicking Save, Docman returns you to the user list. You will notice that the now-inactive user no longer appears
on the list; inactive users are hidden from the list by default, to make user maintenance and organisation easier.
Add a reason if prompted. Continue until all ex-users have been marked as inactive.
Pre-Migration Checks Copyright ©2000-2017 by PCTI Solutions Limited Page 9 of 17
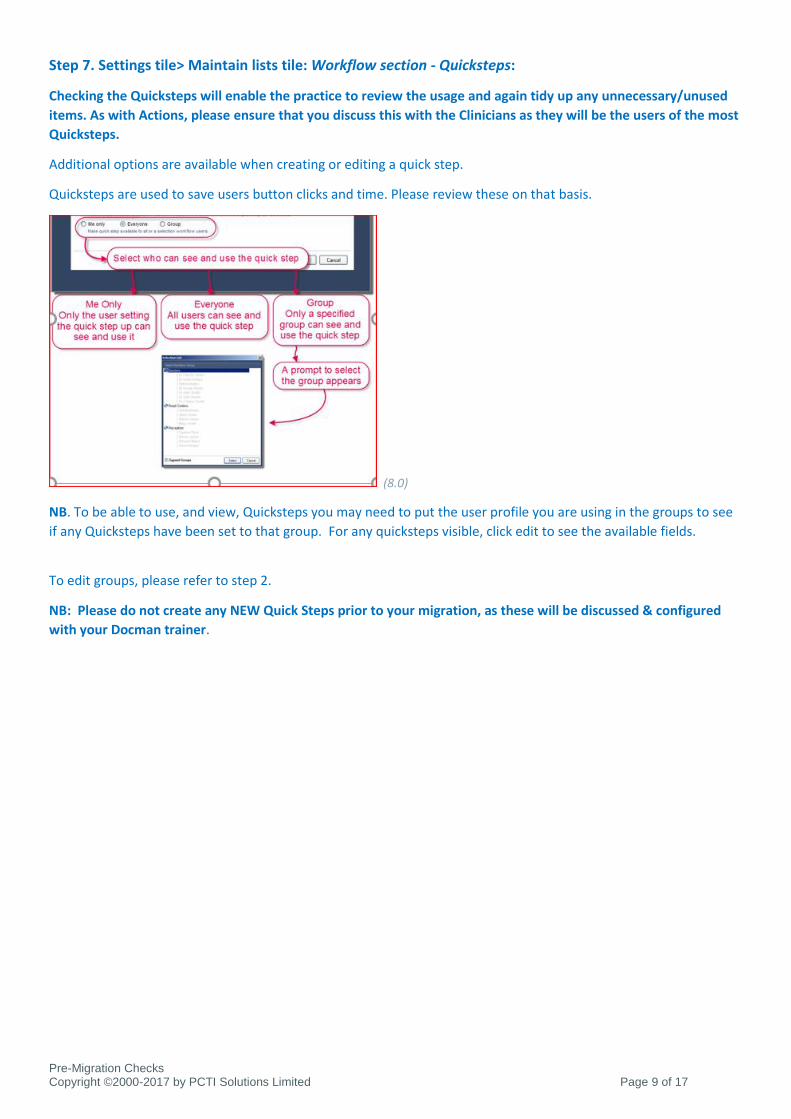
Step 7. Settings tile> Maintain lists tile: Workflow section - Quicksteps:
Checking the Quicksteps will enable the practice to review the usage and again tidy up any unnecessary/unused
items. As with Actions, please ensure that you discuss this with the Clinicians as they will be the users of the most
Quicksteps.
Additional options are available when creating or editing a quick step.
Quicksteps are used to save users button clicks and time. Please review these on that basis.
(8.0)
NB. To be able to use, and view, Quicksteps you may need to put the user profile you are using in the groups to see
if any Quicksteps have been set to that group. For any quicksteps visible, click edit to see the available fields.
To edit groups, please refer to step 2.
NB: Please do not create any NEW Quick Steps prior to your migration, as these will be discussed & configured
with your Docman trainer.

Pre-Migration Checks Copyright ©2000-2017 by PCTI Solutions Limited Page 10 of 17
Step 8. Settings tile> Maintain lists tile: Workflow section - Views:
Workflow Views: These are not as high priority for ensuring a tidy system, however they will need to be reviewed.
Review the views available to All Users/Groups. Check if they are all current, and not now showing inactive users.
(9.0)
NB: Please do not create any NEW views prior to your migration, as these will be discussed & configured with
your Docman trainer

Pre-Migration Checks Copyright ©2000-2017 by PCTI Solutions Limited Page 11 of 17
Filing Review
In addition to the details above, it would also be beneficial for you to review the content of the Filing screens to
streamline your current processes, alongside any potential benefits also associated with Docman 10.
In your current system, you are able to add content to the filing structure as you file. This is not possible in
Docman 10, therefore there needs to be a logical structure to the filing lists.
The filing lists are used by users that do not use Intellisense, or for handwritten documents. These lists can get quite
busy, and items can easily be duplicated, or simply entered into the wrong lists.
Step A. Settings tile> Maintain lists tile: Filing section - Lists:
Review the list items and amend if required. Ensure the content is not duplicated, or in the wrong lists. Folders are
allocated to Admin/Dept/Result lists.
Click into the Heading, Click on an entry that needs to be deleted, click delete. Repeat. This has to be done per entry.
Filing Lists: Without intellisense, the filing process uses templates and lists to categorise documents. When a
document is filed, Docman prompts for a selection from the filing templates list. Additional selection lists appear
based on the template selected. In the example below, the Clinical Letter template is selected. This template
prompts the user to make selections from the Hospital and Department lists to categorise the document.
(10.0)
Click Settings on the Docman main menu, then click Maintain Lists.
(10.1) (10.2)

Pre-Migration Checks Copyright ©2000-2017 by PCTI Solutions Limited Page 12 of 17
Ensure the totals are manageable, the list below is a ‘best practice’ list of the totals for each heading:
• Admin - 20-40 items (e.g. DVLA, Solicitors, Consent Forms, Letters from patients, Blue Badge info etc)
• Letter Types - 10-15 items (e.g. Discharge Summary, DNA, Letter from Consultant, Results, Letter from
Opticians etc)
• Depts - 80-100 items (i.e. actual departments where patient has been seen)
• Results - 30-50 items (Haematology, Radiology/XRay, Mammography, ECG/EEG etc)
• Hospitals/Organisations - will vary due to your location (i.e. this list should contain your local hospitals only
– all others should be under the “out of area hospitals” heading)
• Out Of Hours - 5-6 items (e.g. 111, ‘gotodoc’, Walk in centre, A&E, Out of Hours Centre etc)
Editing or Deleting Filing Items:
To edit an item, highlight the heading the item appears under, then highlight the item, then click Edit Item.
(10.3)
Editing or Deleting Filing Headings:
NB. Folders: Once all the items have been managed, the totals should reflect the above items a little closer. For all
items in the Admin/Department/Result headings, these all need folders allocating.
To Add a Folder: Click on an entry without a folder, click on the dropdown option, click on a relevant folder from the
pop out window. Click Save. And repeat.
Take extra Care! : To delete an item from a filing list, go to Edit Item and click Delete. Do not use the Delete option
under Edit Heading for a single filing item, as this will delete the heading and all items that appear under the
heading. This is not reversible and will require the heading list to be rebuilt manually.
NB. Deleting entries from these lists will not affect any documents filed using any entries prior to their deletion or
editing.

Pre-Migration Checks Copyright ©2000-2017 by PCTI Solutions Limited Page 13 of 17
Step B. Settings tile> Maintain lists tile: Filing section - Templates:
Do you use templates regularly? Amend if required. Empty templates, or items that prompt a user to pick from lists
for all fields will mean more manual work for users in Docman 10. Focus on populated templates.
(11.0)
Templates that are populated will be more useful in Docman 10. The above example shows from a list prompts, free
text fields will give better, more refined results in Docman 10, and will be useful for handwritten letters.
As all users will have access to Intellisense in Docman 10, the clarity of the Intellisense templates will be more
beneficial.

Pre-Migration Checks Copyright ©2000-2017 by PCTI Solutions Limited Page 14 of 17
Step C. Settings tile > Maintain lists tile: Filing section - Intellisense Templates:
Review the configuration of the templates. Keywords/Configuration of the template fields will be key to Docman 10
success for filing.
(12.0)
Intellisense Templates are used by the Intellisense filing system to decide on a filed document's details, based on the
text detected in the letter. New templates may be added, or existing templates edited or deleted.
Click Intellisense Templates (12.0) to open the list of Intellisense templates.
(12.1)
Double clicking a template presents the template configuration. It is possible to edit an existing Intellisense template
from here. (Single-clicking a template and clicking edit also opens the template and displays the template
configuration)
(12.2)

Pre-Migration Checks Copyright ©2000-2017 by PCTI Solutions Limited Page 15 of 17
Best practice examples of Hospital, department, result & letter type templates:
Hospital (12.3) Department (12.4) & Result type (12.5) templates:
(12.3)
(12.4)
(12.5)

Pre-Migration Checks Copyright ©2000-2017 by PCTI Solutions Limited Page 16 of 17
(12.6)
An example of a Letter Type template. Popularly used for DNA letters and Discharge Summary’s.
(12.7)
Intellisense provides further options for keyword matching when multiple keywords are in one template. You can
configure the template to suggest the filing match when one or more of the words appear in a document ("any of
the words can be detected"), or you can configure the template to only suggest the match if all the keywords are
present in the document ("all words must be detected"). "Any of the words" is selected by default.
(12.8)
Click Save to retain the changes made to the template, or Cancel to revert the template back to its original state and
remove the new keyword.
NB: Keywords need to be specific to the template. Avoid generic words, such as ‘department’, ‘hospital’, ‘NHS’,
‘result’, ‘report’. Using postcodes, hospital names and specialty names will aid Intellisense finding the correct
templates.

Pre-Migration Checks Copyright ©2000-2017 by PCTI Solutions Limited Page 17 of 17
A NOTE ABOUT FOLDERS:
In your current system, you have been able to add new folders as you file, which will have potentially resulted in
duplicate folders, and sub-folders within sub-folders, which have also been duplicated.
It is no longer possible to add folders as you file in Docman 10, therefore there needs to be some logical thought
to the folder structure.
Take Care ! The details below explain how you might tidy up your existing list, however, if you do not feel
comfortable doing this, the Docman trainer will talk this through with you, and will assist, if time allows.
The folders in Docman 10 will look clearer and work more efficiently, if there are no sub-folders.
Document Folders
To add or edit the folder list for a section, highlight the section and click Maintain.
The default document folders are arranged in a hierarchy. Top-level folders provide a general category, with more specific lower-level folders underneath them. Top-level folders can be selected during filing or used as a way to group the specific lower-level folders. To add a folder, click Add. To rename a folder, highlight the folder and click Rename. To move a folder to another location in the hierarchy, highlight the folder and click Move. To delete a folder, highlight the folder and click Delete.