dod civilian acquisition workforce personnel demonstration...
TRANSCRIPT

DoD Civilian Acquisition WorkforcePersonnel Demonstration Project
(AcqDemo)
CAS2Net forEmployees and Supervisors
New AcqDemo Organizations
Fall 2015
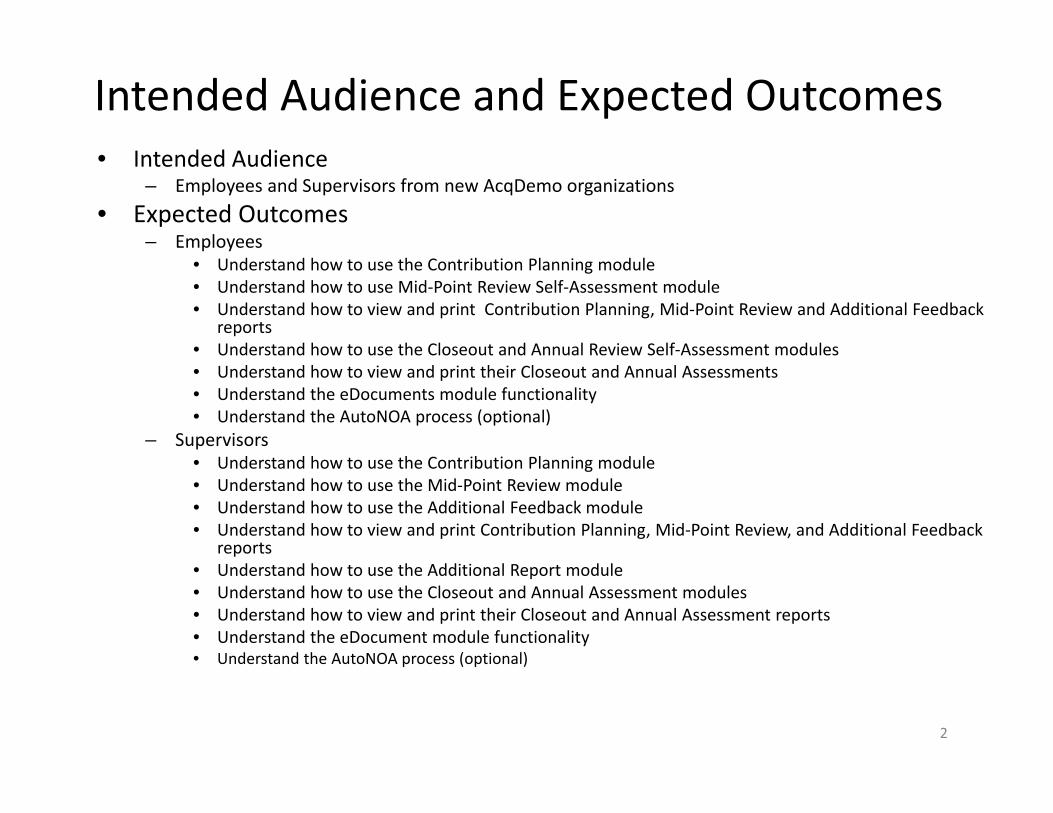
Intended Audience and Expected Outcomes• Intended Audience
– Employees and Supervisors from new AcqDemo organizations • Expected Outcomes
– Employees• Understand how to use the Contribution Planning module• Understand how to use Mid‐Point Review Self‐Assessment module• Understand how to view and print Contribution Planning, Mid‐Point Review and Additional Feedback
reports• Understand how to use the Closeout and Annual Review Self‐Assessment modules• Understand how to view and print their Closeout and Annual Assessments• Understand the eDocuments module functionality• Understand the AutoNOA process (optional)
– Supervisors• Understand how to use the Contribution Planning module• Understand how to use the Mid‐Point Review module• Understand how to use the Additional Feedback module• Understand how to view and print Contribution Planning, Mid‐Point Review, and Additional Feedback
reports• Understand how to use the Additional Report module• Understand how to use the Closeout and Annual Assessment modules• Understand how to view and print their Closeout and Annual Assessment reports• Understand the eDocument module functionality• Understand the AutoNOA process (optional)
2

AgendaThis training presents an overview of user functions within CAS2Net, as an Employee or Supervisor:
1. Access the CAS2Net website and Login to the system2. Use the Contribution Planning module3. Use of the Mid‐Point Review module 4. Use of the Additional Feedback module5. Use the Closeout Review module6. Use the Annual Appraisal module7. Review Reports8. Use the eDocuments Module9. Review the AutoNOA Process (optional)
3

Login
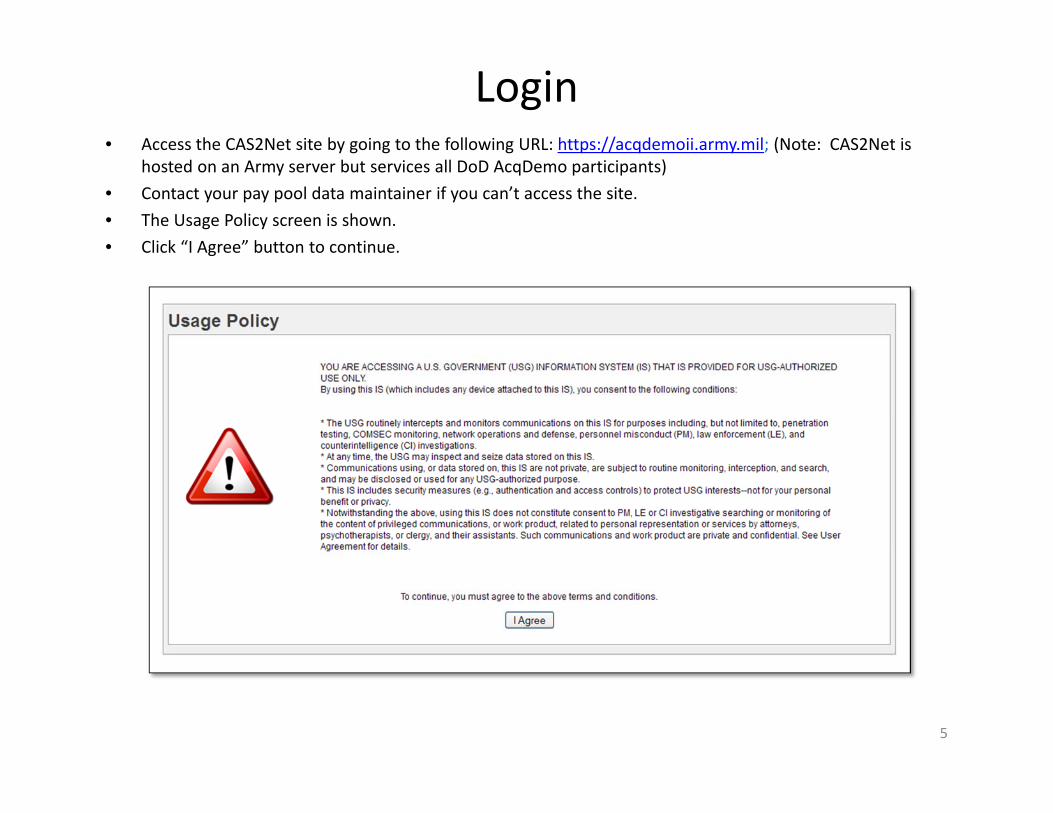
Login• Access the CAS2Net site by going to the following URL: https://acqdemoii.army.mil; (Note: CAS2Net is
hosted on an Army server but services all DoD AcqDemo participants)• Contact your pay pool data maintainer if you can’t access the site.• The Usage Policy screen is shown.• Click “I Agree” button to continue.
5

Login• Click the “CAC Login” button to sign‐in.
6

Login• Select one of your installed CAC digital certificates and click the OK button.
7
• If prompted, enter your CAC PIN.
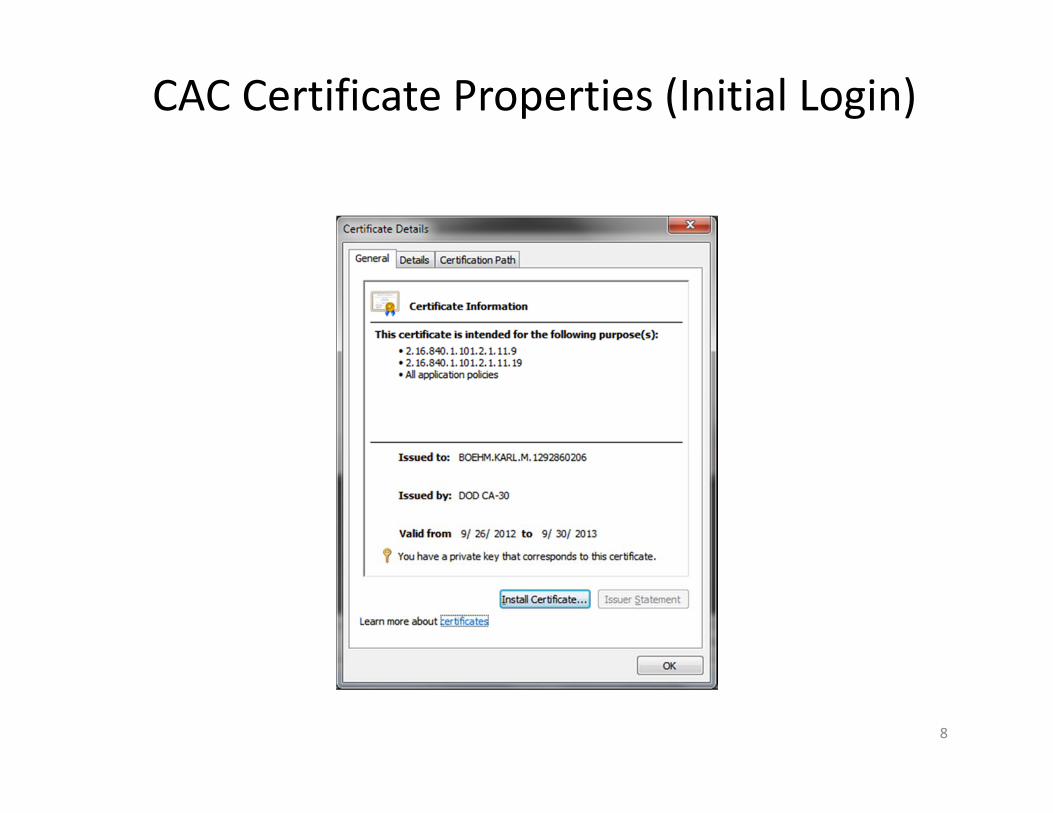
CAC Certificate Properties (Initial Login)
8

Access Disclaimer Popup
9
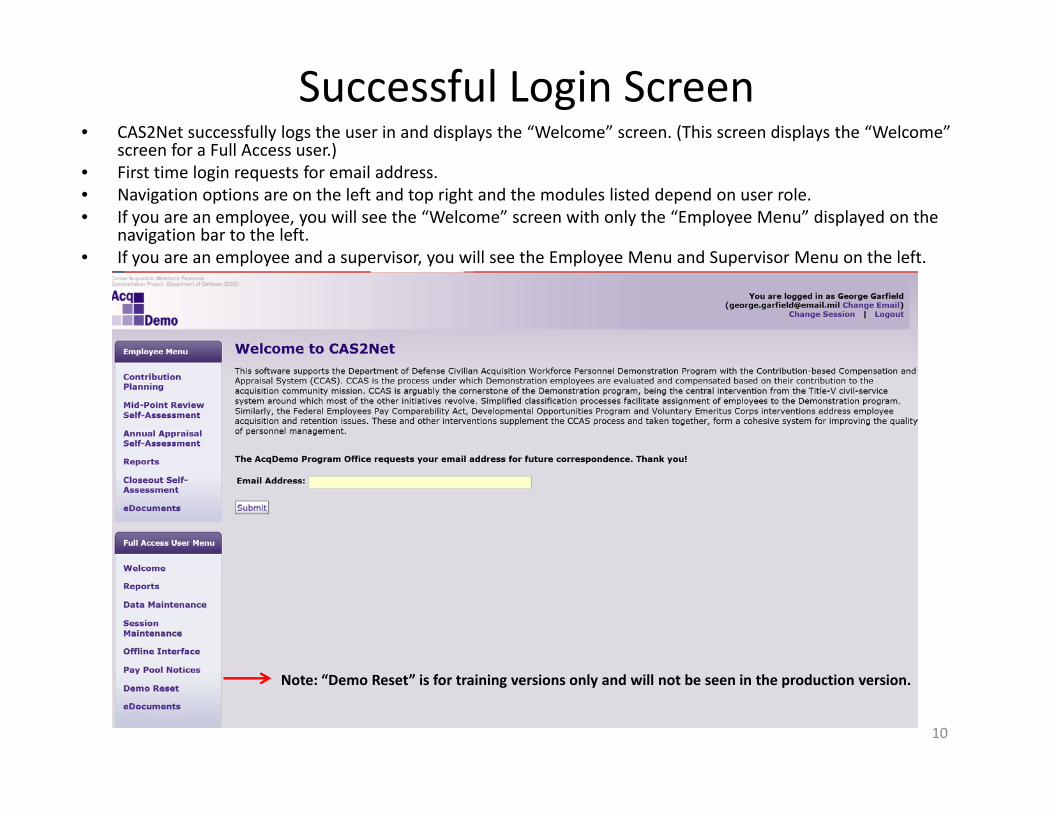
Successful Login Screen• CAS2Net successfully logs the user in and displays the “Welcome” screen. (This screen displays the “Welcome”
screen for a Full Access user.)• First time login requests for email address.• Navigation options are on the left and top right and the modules listed depend on user role.• If you are an employee, you will see the “Welcome” screen with only the “Employee Menu” displayed on the
navigation bar to the left.• If you are an employee and a supervisor, you will see the Employee Menu and Supervisor Menu on the left.
10
Note: “Demo Reset” is for training versions only and will not be seen in the production version.
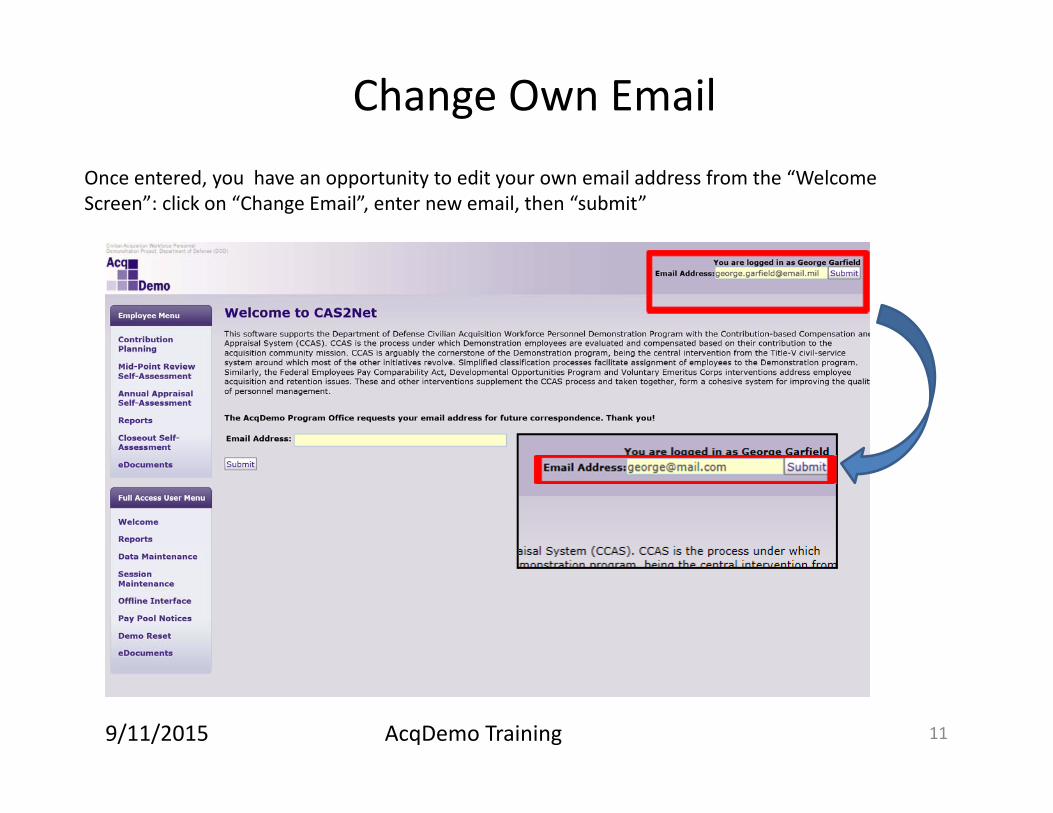
Change Own EmailOnce entered, you have an opportunity to edit your own email address from the “Welcome Screen”: click on “Change Email”, enter new email, then “submit”
119/11/2015 AcqDemo Training
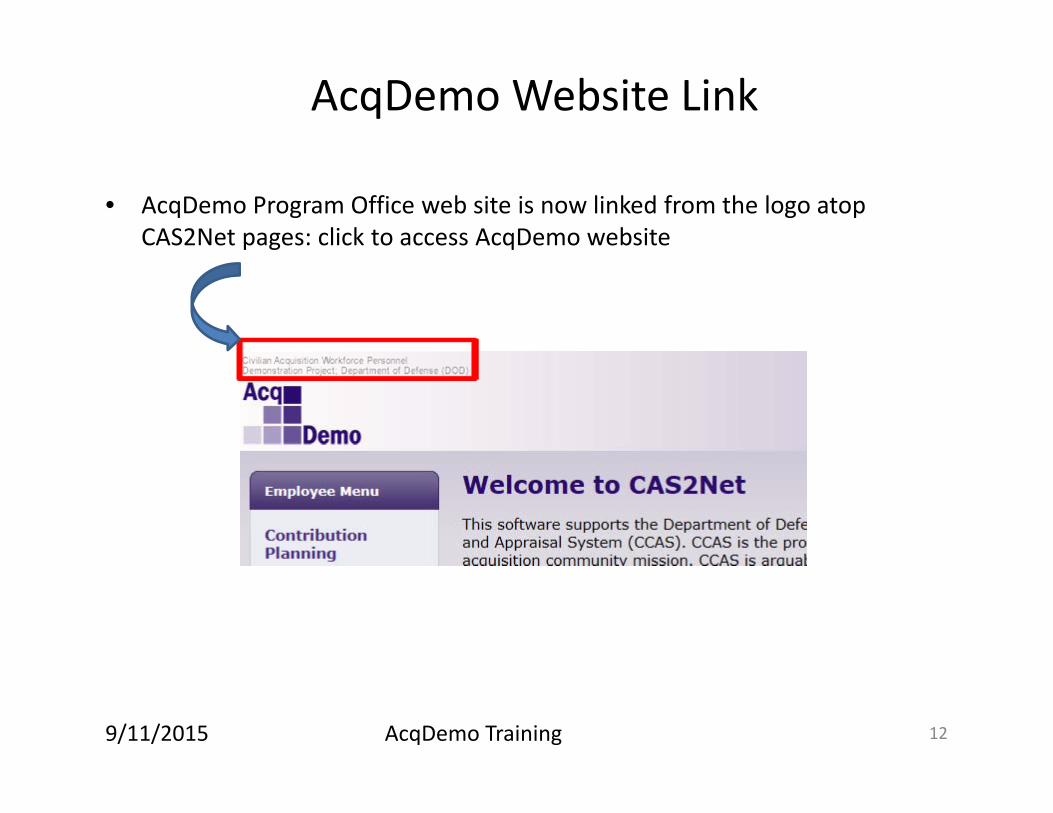
AcqDemo Website Link
• AcqDemo Program Office web site is now linked from the logo atop CAS2Net pages: click to access AcqDemo website
129/11/2015 AcqDemo Training
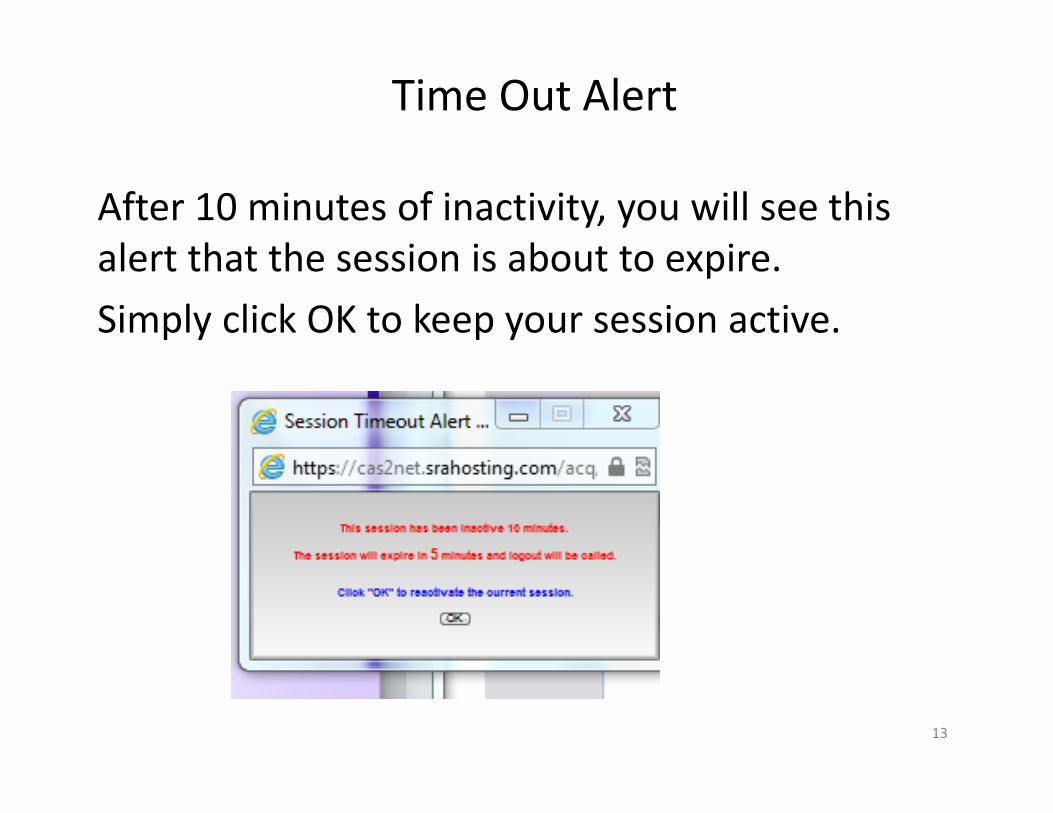
Time Out Alert
After 10 minutes of inactivity, you will see this alert that the session is about to expire. Simply click OK to keep your session active.
13

Contribution Planning

• Click “Contribution Planning” from the navigation bar. CAS2Net refreshes the screen to display the “Contribution Planning” screen. • After discussion with their supervisor, employees can initiate the Contribution Planning process if there is no current planning by
entering text and clicking on the Save button. This creates a draft plan that both employee and supervisor can view and edit. • Mandatory Objectives are read‐only to employees.
Contribution Planning – Employee
15
• Once employee is ready to submit the draft plan to their supervisor, the employee checks the Release to Supervisor box and clicks on Save to release the plan to the supervisor. Once released, modifications to existing plans must be initiated by the Supervisor.
• As long as status remains “In Progress”, the employee may later clear the “Release to Supervisor” checkbox and “Save” to let the supervisor know that employee input is incomplete. Once the supervisor finalizes the plan and submits it to employee, only the supervisor can modify the plan.

• Click “Contribution Planning” from the supervisor section of the navigation bar; CAS2Net refreshes the screen to display the “Contribution Planning Status” screen.
Contribution Planning – Supervisor
16

• The supervisor will see a list of employees assigned to him or her. The “Contribution Planning Status” column indicates whether the contribution plan is complete, incomplete, or no plan provided.
• Supervisor selects an employee name from the list provided.
Contribution Planning – Supervisor
17
CAS2Net lists employees assigned to the logged on supervisor along with Contribution Planning status information:• Employee Name• Employee Input Status• Contribution Planning Status
Status values for each column include:Green ‘checkmark’ = ‘Complete’Red ‘X’ = ‘Incomplete’ (In Progress)(blank) = Not Provided
Note: In this example, Amy Artis has completed her input to her supervisor and the supervisor needs to finalize her plan to complete the process.

Contribution Planning – Supervisor • CAS2Net refreshes screen with last
saved text for selected employee. • The supervisor edits and enters
text as needed for Mandatory and Individual Objectives.
• “Save” button will save changes to the “Contribution Planning” form.
18
• After the supervisor meets with the employee to review the “Contribution Planning” content, the supervisor selects the date and method of communication and clicks “Submit” indicating the “Contribution Planning” process is complete.
• Note: The “Submit” button is disabled until the date conducted is selected. Once the date is selected, the “Submit” button becomes active.
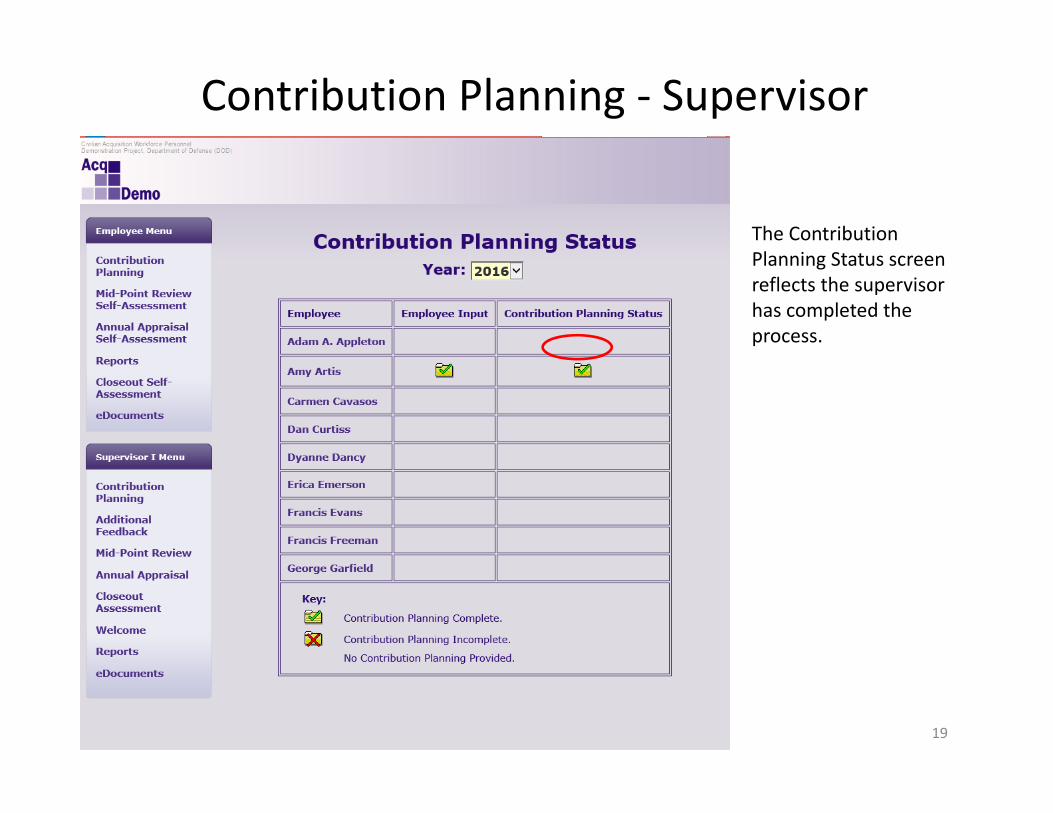
Contribution Planning ‐ Supervisor
The Contribution Planning Status screen reflects the supervisor has completed the process.
19
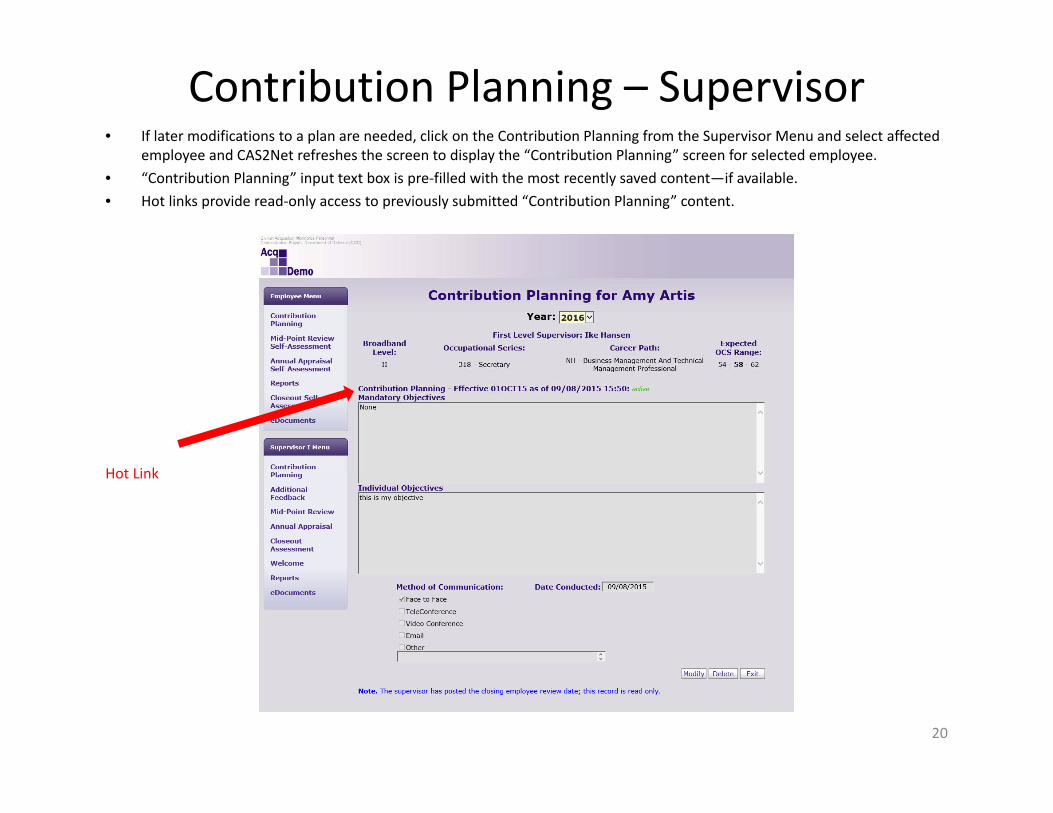
• If later modifications to a plan are needed, click on the Contribution Planning from the Supervisor Menu and select affected employee and CAS2Net refreshes the screen to display the “Contribution Planning” screen for selected employee.
• “Contribution Planning” input text box is pre‐filled with the most recently saved content—if available.• Hot links provide read‐only access to previously submitted “Contribution Planning” content.
Contribution Planning – Supervisor
20
Hot Link
Modifying a Contribution Plan ‐ Supervisor
21
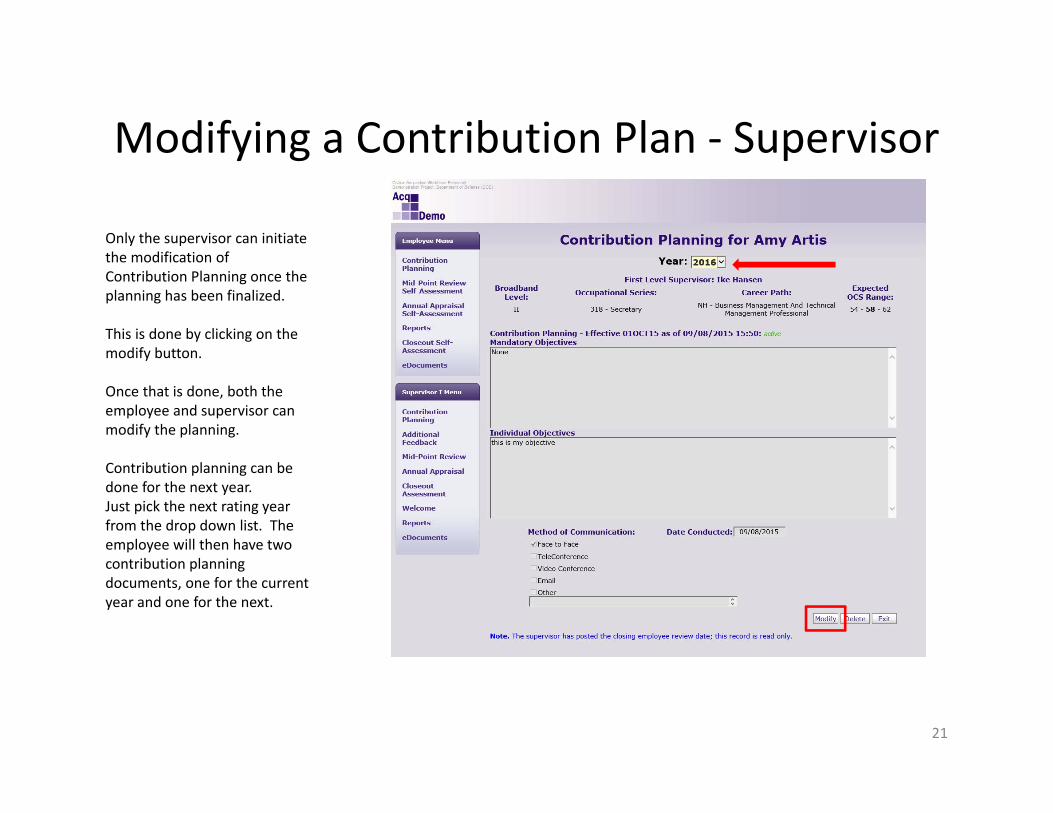
Only the supervisor can initiate the modification of Contribution Planning once the planning has been finalized.
This is done by clicking on the modify button.
Once that is done, both the employee and supervisor can modify the planning.
Contribution planning can be done for the next year.Just pick the next rating year from the drop down list. The employee will then have two contribution planning documents, one for the current year and one for the next.

Reports for Contribution Planning

Contribution Planning Report – Employee • Click “Reports” from the navigation bar. CAS2Net refreshes the screen to display the
“Employee Reports” list.• Click “Contribution Planning” from the reports list (first item on the list). Note: If a report is
not provided as a hotlink, it means the desired report is not accessible to you at that point in time.
23
Contribution Planning Report – Choose Year
24
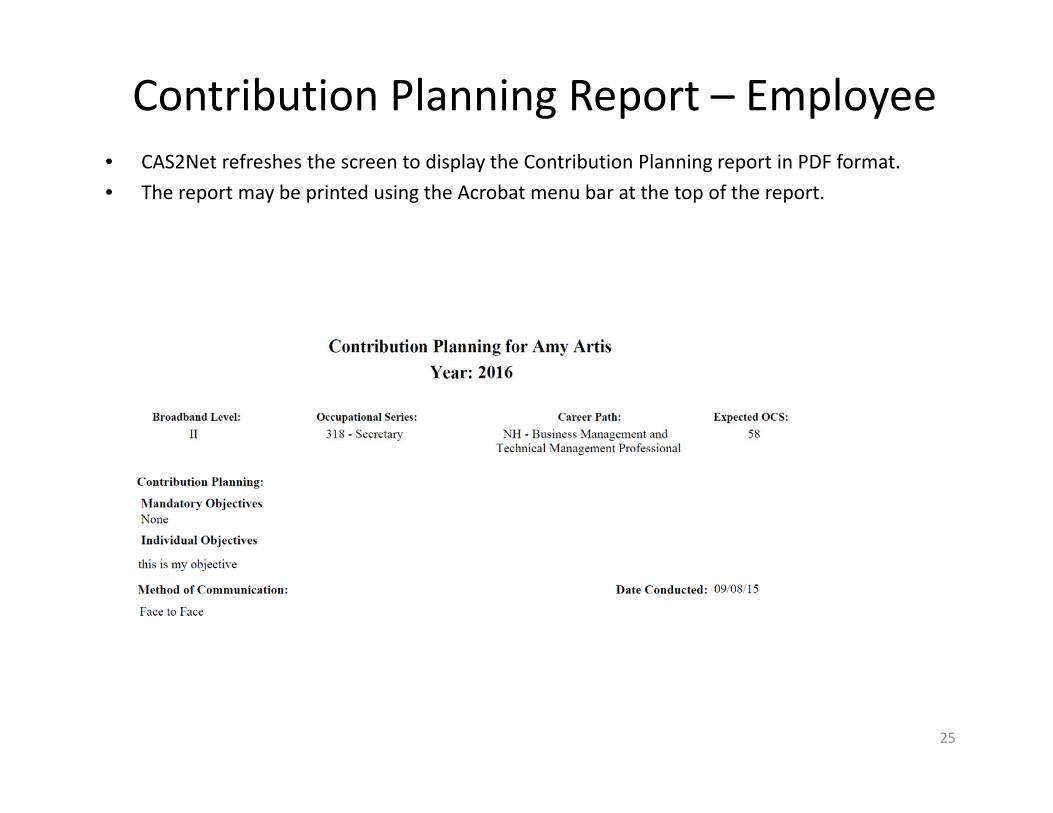
Contribution Planning Report – Employee • CAS2Net refreshes the screen to display the Contribution Planning report in PDF format.• The report may be printed using the Acrobat menu bar at the top of the report.
25
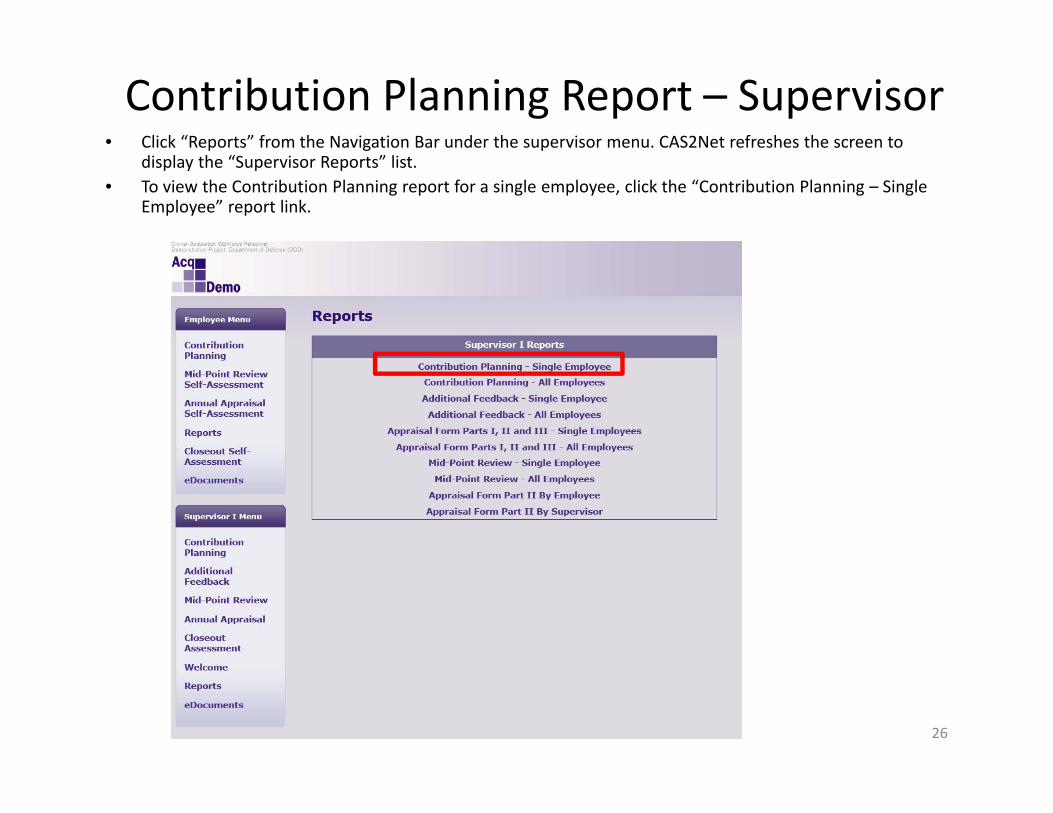
Contribution Planning Report – Supervisor • Click “Reports” from the Navigation Bar under the supervisor menu. CAS2Net refreshes the screen to
display the “Supervisor Reports” list.• To view the Contribution Planning report for a single employee, click the “Contribution Planning – Single
Employee” report link.
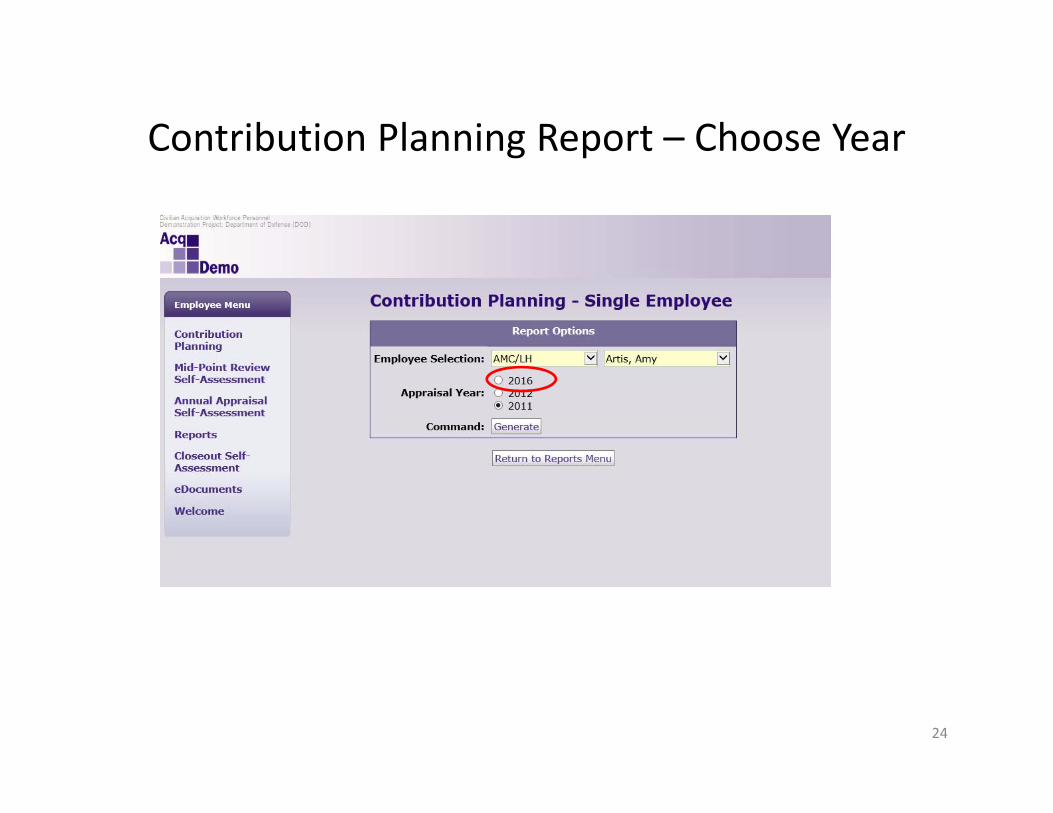
26

Contribution Planning Report – Supervisor • CAS2Net refreshes the screen to display the “Contribution Plan”, “Report Generation Options.”• Select the name of the employee from the “Employee Selection” dropdown.• Select the “Appraisal Year”.• Click the “Generate” button.
27
Only employees with Contribution Planning entries are included in dropdown list.
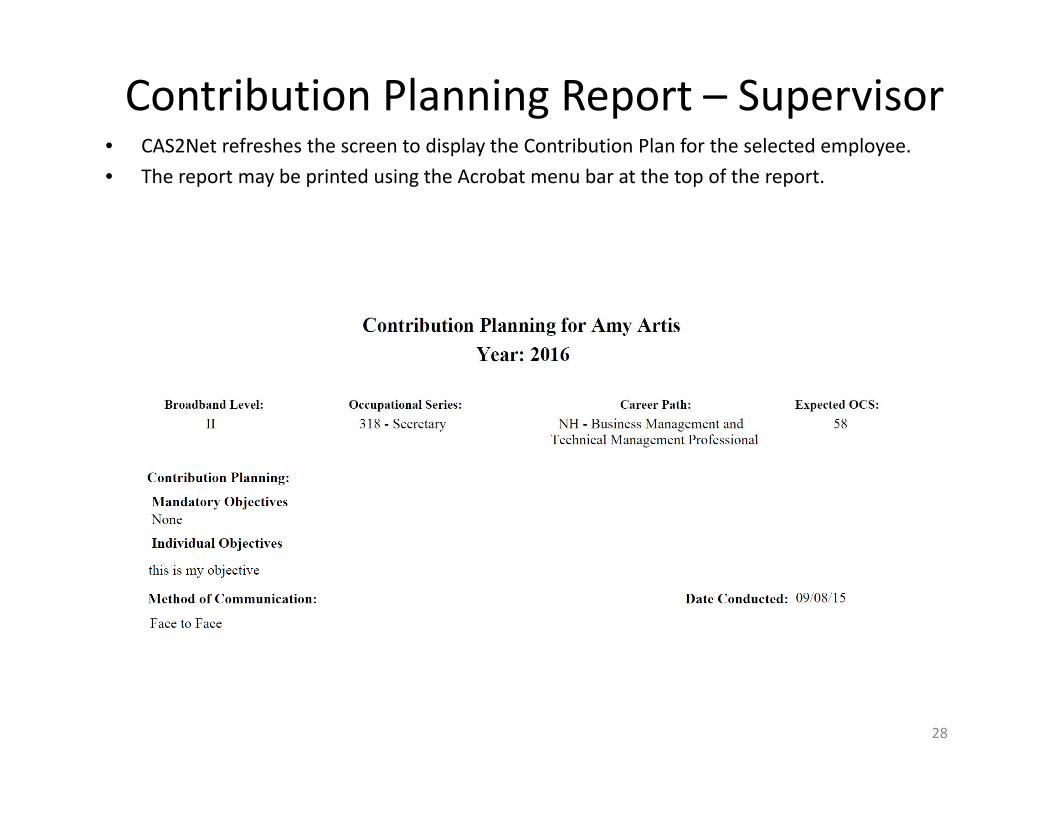
Contribution Planning Report – Supervisor • CAS2Net refreshes the screen to display the Contribution Plan for the selected employee.• The report may be printed using the Acrobat menu bar at the top of the report.
28

Mid‐Point Review
29

Mid‐Point Employee Self‐Assessment
30

Mid‐Point Self‐Assessment Report
31
Mid Point Review
32
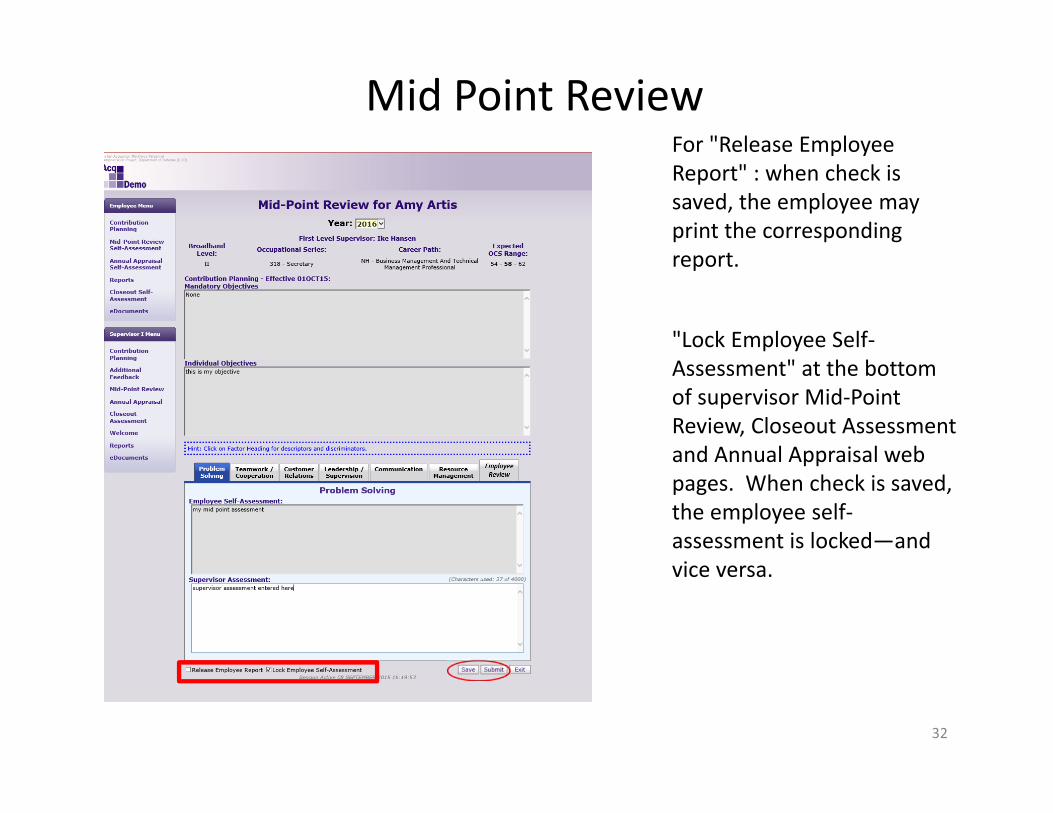
"Lock Employee Self‐Assessment" at the bottom of supervisor Mid‐Point Review, Closeout Assessment and Annual Appraisal web pages. When check is saved, the employee self‐assessment is locked—and vice versa.
For "Release Employee Report" : when check is saved, the employee may print the corresponding report.

Release Report
33
“Release” button on employee self‐assessment screens was removed. The supervisor should click “Reopen” then uncheck “Lock Employee Self‐Assessment” and click save to enable employee changes.
The supervisor should modify date conducted and method of communication.
.

Re‐opening a closed Mid‐Point Review
“Reopen Successful ” confirms the assessment is ready for update.
When done updating, from “Employee Review Date”, select Method of Communication and Date Conducted.
Click “Submit” to complete the process.
34

Mid‐Point Review Report
35

Additional Feedback

Additional Feedback ‐ Supervisor
37
• Click “Additional Feedback” from the navigation bar. CAS2Net refreshes the screen to display the “Additional Feedback Status” screen.
• The supervisor will see a list of employees assigned to him or her. The “ Additional Feedback Status” column indicates whether the additional feedback is complete, incomplete, or none provided.
• Supervisor selects an employee name from the list provided by clicking on the name.

Additional Feedback• After clicking on the name, CAS2Net refreshes the screen to display the “Additional Feedback” screen for
selected employee with an incomplete status.• “Contribution Planning” is automatically pre‐filled with the latest submitted content.
38
• Hot links provide read‐only access to any previously submitted Additional Feedback.
• Supervisor clicks on Create button to begin a new Additional Feedback session.
• Supervisor has option to input text boxes for Overall Supervisor Assessment or separately for Each Factor text box.
• Each Factor tab contains hot link to “Descriptions and Discriminators” for reference in providing feedback.
• Supervisor enters the supervisor assessment portions (overall or by factor) of the Additional Feedback .
Additional Feedback
39
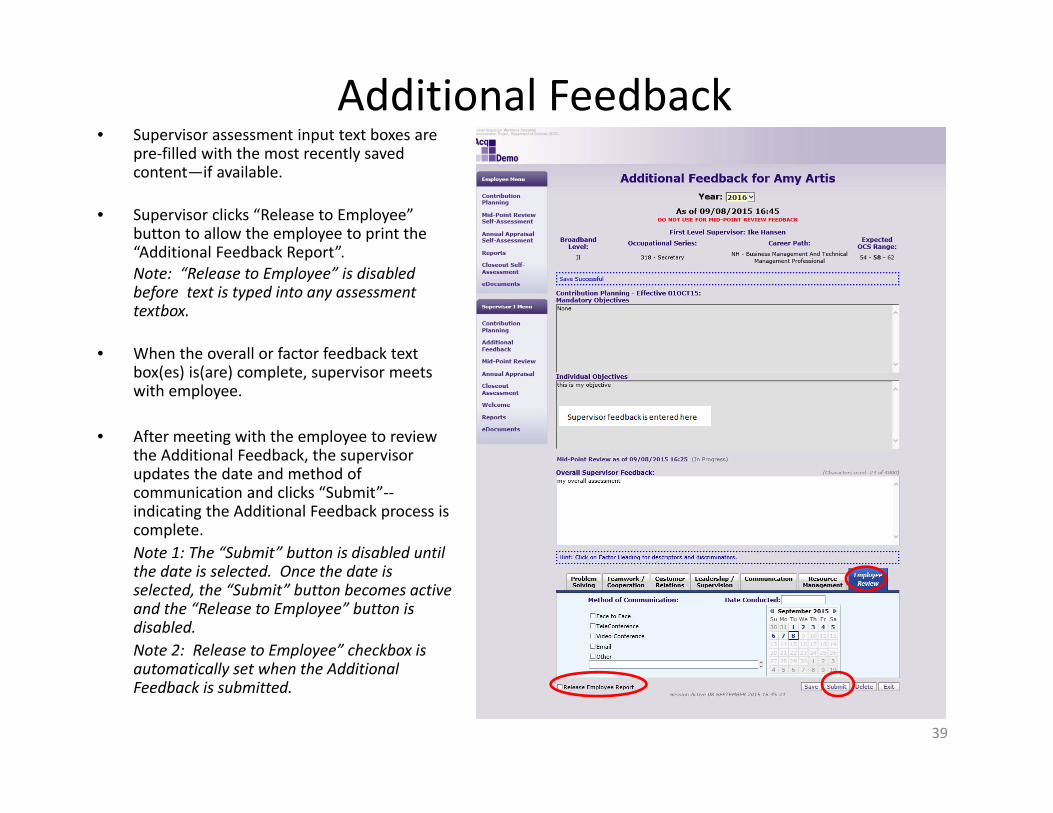
• Supervisor assessment input text boxes are pre‐filled with the most recently saved content—if available.
• Supervisor clicks “Release to Employee” button to allow the employee to print the “Additional Feedback Report”.Note: “Release to Employee” is disabled before text is typed into any assessment textbox.
• When the overall or factor feedback text box(es) is(are) complete, supervisor meets with employee.
• After meeting with the employee to review the Additional Feedback, the supervisor updates the date and method of communication and clicks “Submit”‐‐indicating the Additional Feedback process is complete.Note 1: The “Submit” button is disabled until the date is selected. Once the date is selected, the “Submit” button becomes active and the “Release to Employee” button is disabled. Note 2: Release to Employee” checkbox is automatically set when the Additional Feedback is submitted.

Reports for Additional Feedback

Additional Feedback Report – Employee • Click “Reports” from the navigation bar; CAS2Net refreshes the screen to display the “Employee
Reports” list.• Click “Additional Feedback” from the reports list.
Note: If a report is not provided as a hotlink, it means the desired report is not accessible to you at that point in time.
41
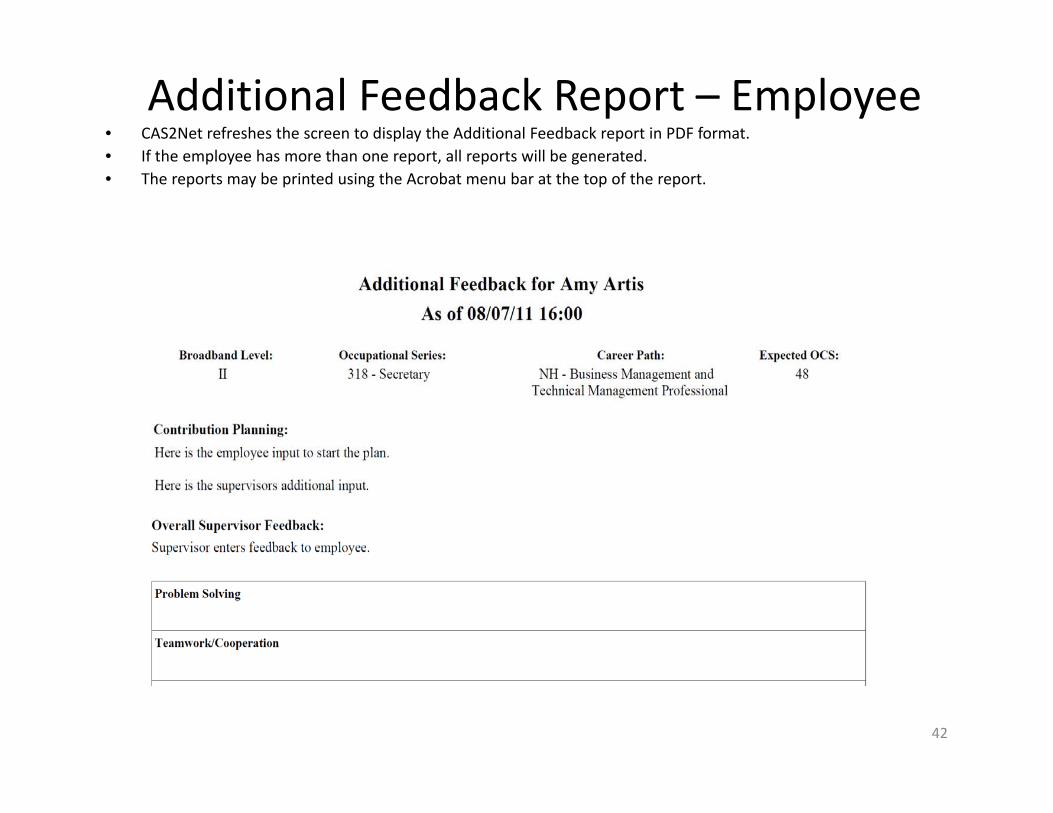
Additional Feedback Report – Employee
42
• CAS2Net refreshes the screen to display the Additional Feedback report in PDF format.• If the employee has more than one report, all reports will be generated.• The reports may be printed using the Acrobat menu bar at the top of the report.

Additional Feedback Report –Supervisor
43
• Click “Reports” from the Navigation Bar under the supervisor menu. CAS2Net refreshes the screen to display the Supervisor Reports list.
• To view the Additional Feedback report for a single employee, click the “Additional Feedback– Single Employee” report link.

Additional Feedback Report – Supervisor • CAS2Net refreshes the screen to display the “Additional Feedback”, “Report Generation Options”.• Select the name of the employee from the “Employee Selection” dropdown. • Select the “Appraisal Year”.• Click the “Generate” button.• All Feedback Reports for the employee will be generated in PDF format.
44

Additional Feedback Report – Supervisor • CAS2Net refreshes the screen to display the Additional Feedback reports for the selected employee.• The reports may be printed using the Acrobat menu bar at the top of the report.
45

Additional Feedback Report –Supervisor
46
• To view the Additional Feedback report for all reporting employees, click the “Additional Feedback– All Employees” report link.

Additional Feedback Report – Supervisor
• CAS2Net refreshes the screen to display the “Additional Feedback”, “Report Generation Options”.• The “Supervisor Selection” dropdown is defaulted to supervisor name.• Select “Supervisor Type” radio button to select all reporting employees under the selected supervisor type. E.g. All employees
reporting to the “First Level Supervisor”. • Select the “Assessment Year”.• Click the “Generate” button.
47

Additional Feedback Report – Supervisor • CAS2Net refreshes the screen to display the Additional Feedback reports for all of the employees
reporting to the previously selected supervisor. Note: Use the scroll bar to view the rest of the employee feedback report and the Acrobat up and down arrows to view other reports. The report may be printed using the Acrobat menu bar at the top of the report.
• Note that report will have several pages depending on the number of employees assigned to the supervisor. Each report for each employee starts on a new page.
48

Closeout Module
49

Closeout Module
50
• Click "Closeout Self‐Assessment" in Employee Menu. CAS2Net displays the "Closeout Self‐Assessment Status" screen.
• Closeout Self‐Assessment Status provides status of all Closeouts for the year selected in the dropdown at the top of the screen.

Closeout Module
51
A Warning message appears to ensure the user is using the correct module when clicking on “Closeout Self Assessment” menu button.
Employee’s Closeout Self‐Assessment
52
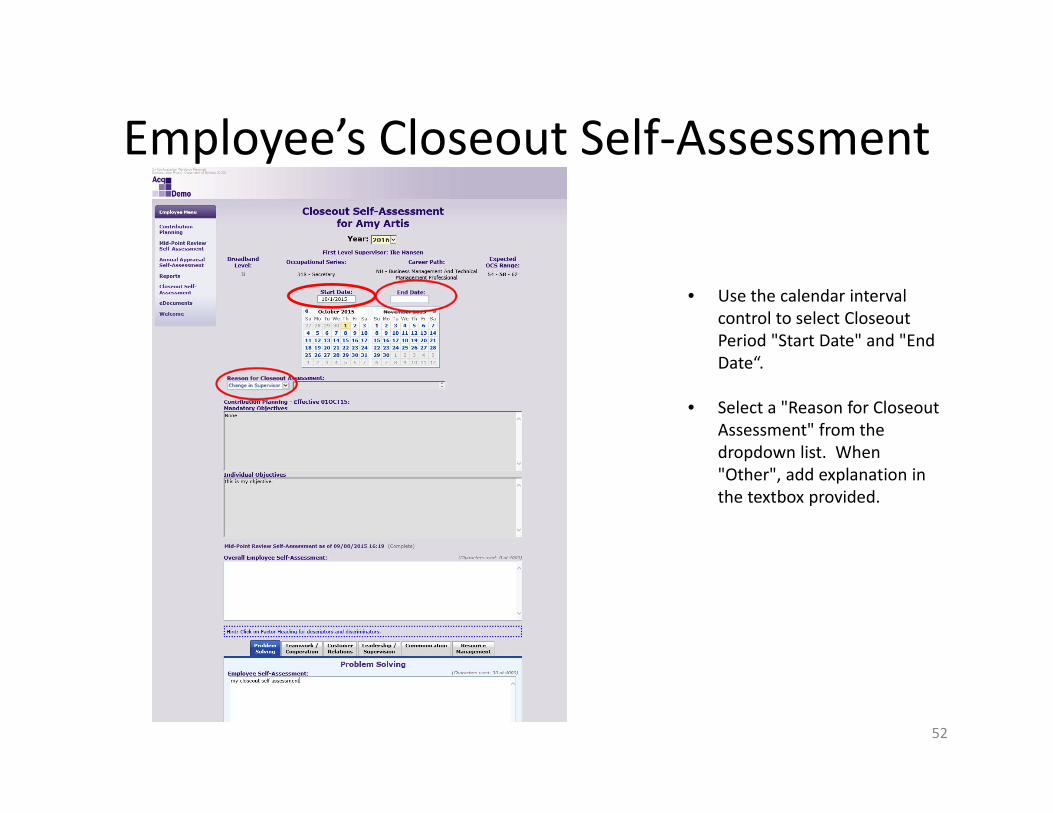
• Use the calendar interval control to select Closeout Period "Start Date" and "End Date“.
• Select a "Reason for Closeout Assessment" from the dropdown list. When "Other", add explanation in the textbox provided.
Employee’s Closeout Self‐Assessment
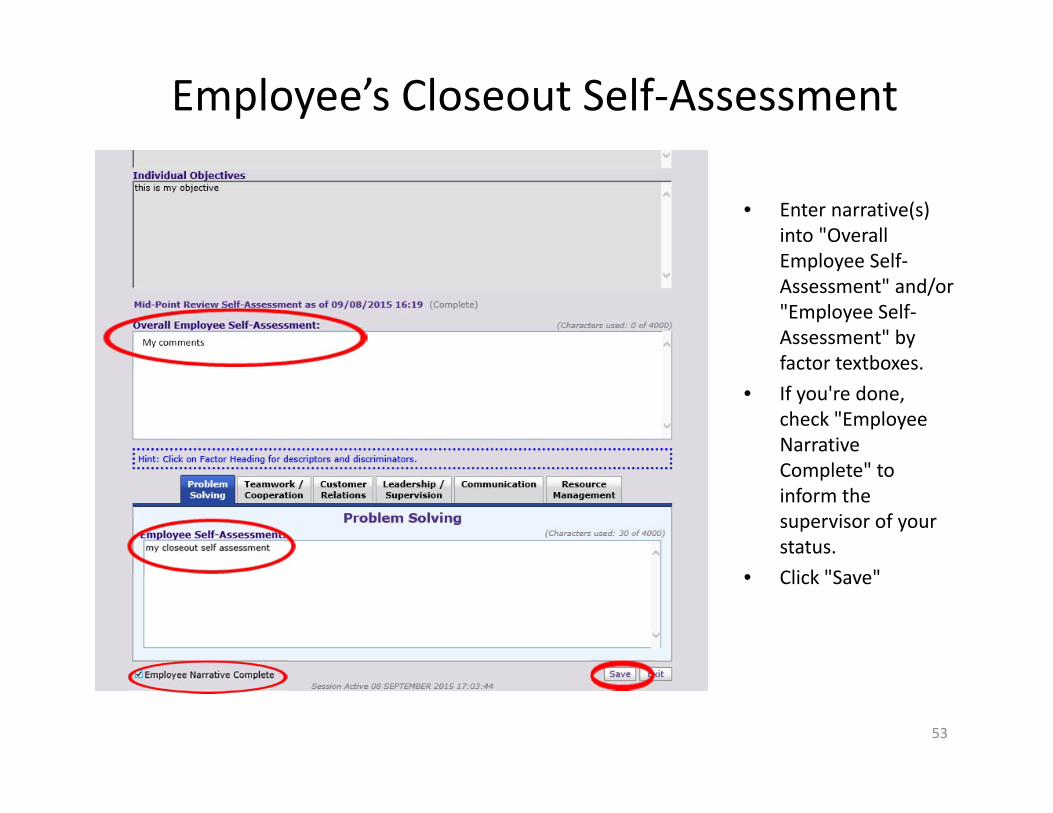
• Enter narrative(s) into "Overall Employee Self‐Assessment" and/or "Employee Self‐Assessment" by factor textboxes.
• If you're done, check "Employee Narrative Complete" to inform the supervisor of your status.
• Click "Save"
53
My comments

Employee Closeout Self‐Assessment Status
• The system refreshes the screen and shows closeout period selected.• The status key changes to “Closeout Self‐Assessment Complete”.
54

Supervisor’s Closeout Assessment
Supervisor selects “Closeout Assessment” from Supervisor menu.
55

Supervisor’s Closeout Assessment Status
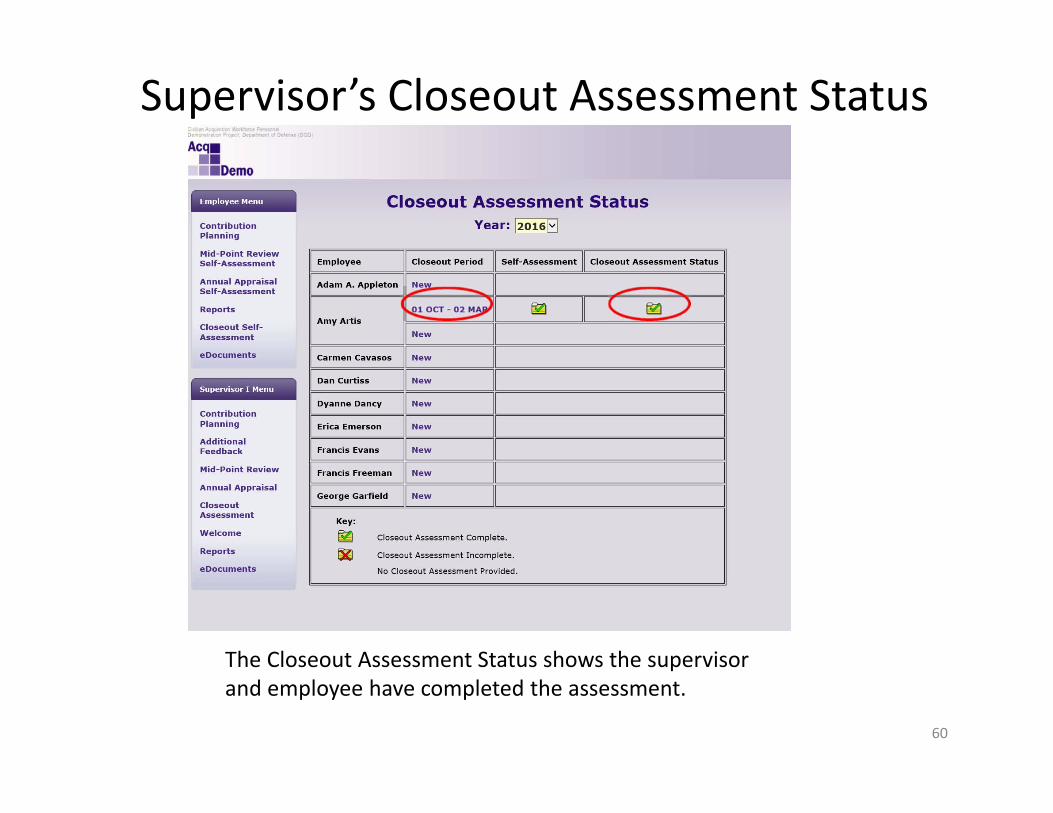
The closeout Assessment Status table tracks the closeout assessment completion status for each employee assigned to that supervisor in the selected year.
56

Supervisor’s Closeout Assessment Interface
The supervisor can save the assessment at any time when writing the assessment.
57

Supervisor’s Closeout Assessment Interface
58
• The supervisor enters narrative(s) into "Overall Supervisor Assessment" and/or "Supervisor Assessment" by factor textboxes.
• To enable the employee to print the "Closeout Assessment Report", check the "Release Employee Report" checkbox.
• To enable the employee to make changes to the Closeout Self‐Assessment", uncheck the "Lock Employee Self‐Assessment" checkbox.

Supervisor’s Closeout Assessment Release• After the supervisor has
reviewed the closeout with the employee, the supervisor selects an employee review date and a method of communication.
• The “Submit” button becomes available only when method of communication and date conducted fields are indicated.
• Click “Submit” to update the database.
• Neither supervisor nor employee may change an assessment after the date and method of communication have been “submitted”.
• The supervisor may click the “Reopen” button on the Closeout “Employee Review Tab” to reset the status and enable updates.
Note. “Reopen” is only shown when the assessment has been “submitted”.
59
Supervisor’s Closeout Assessment Status
60
The Closeout Assessment Status shows the supervisor and employee have completed the assessment.
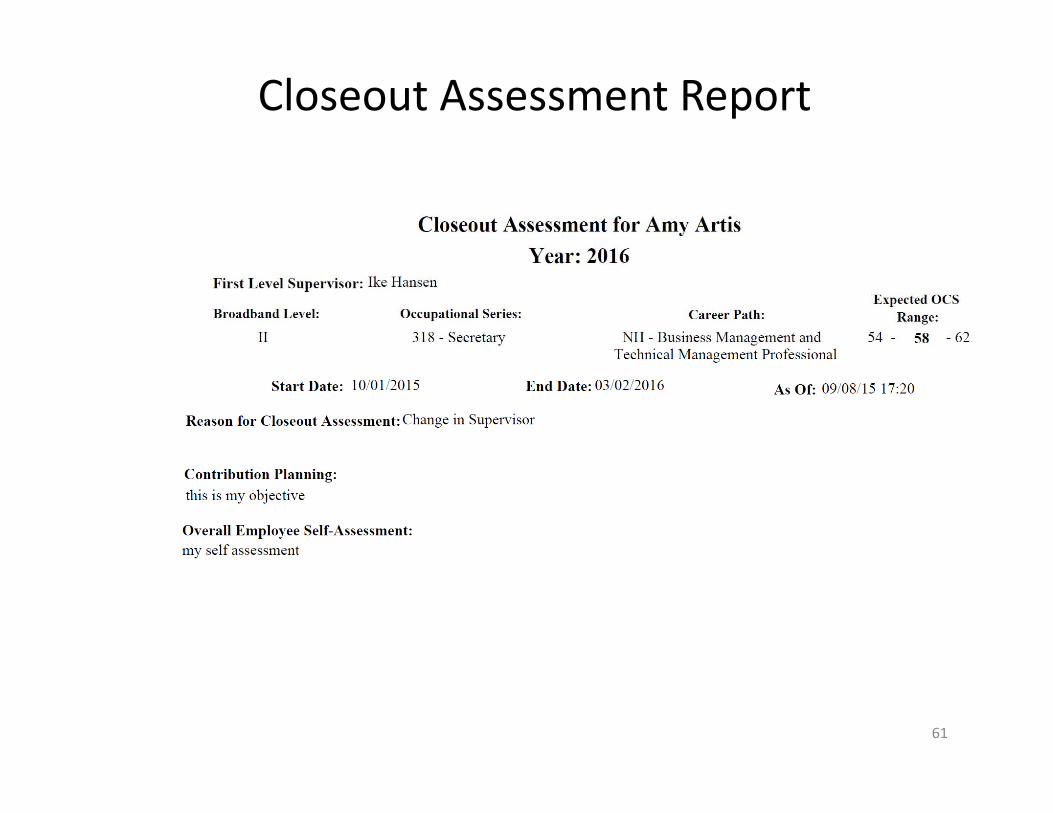
Closeout Assessment Report
61
Annual Assessment Module
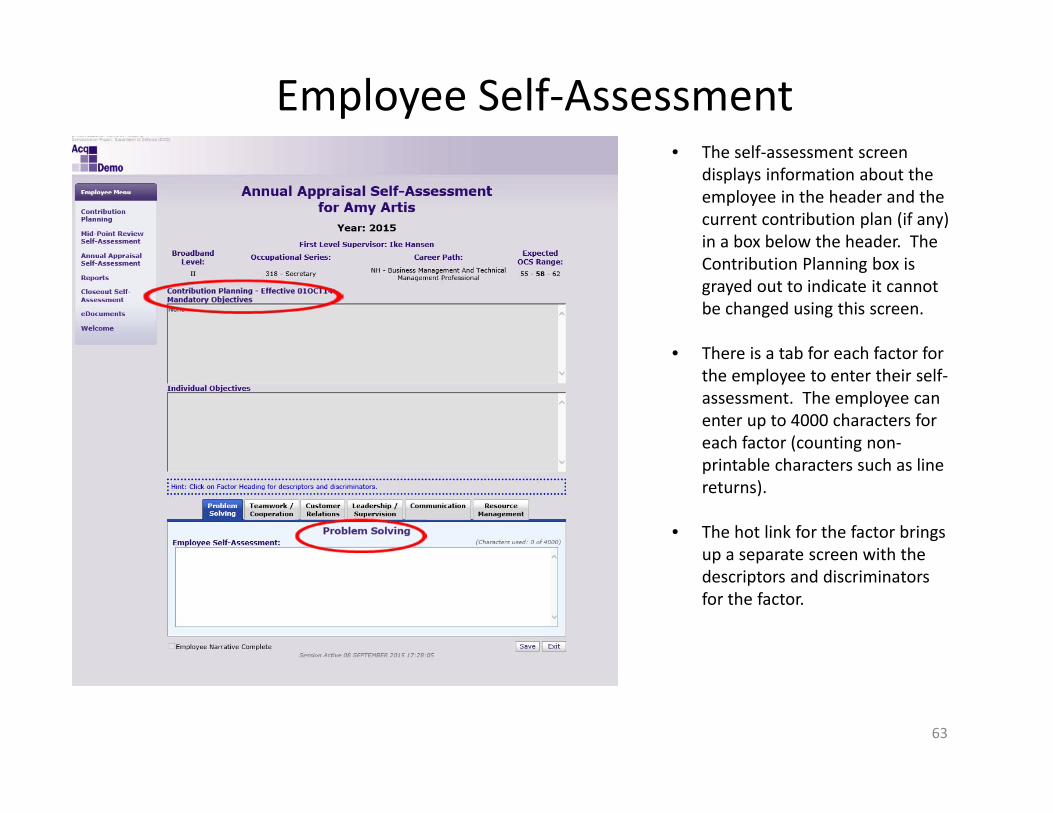
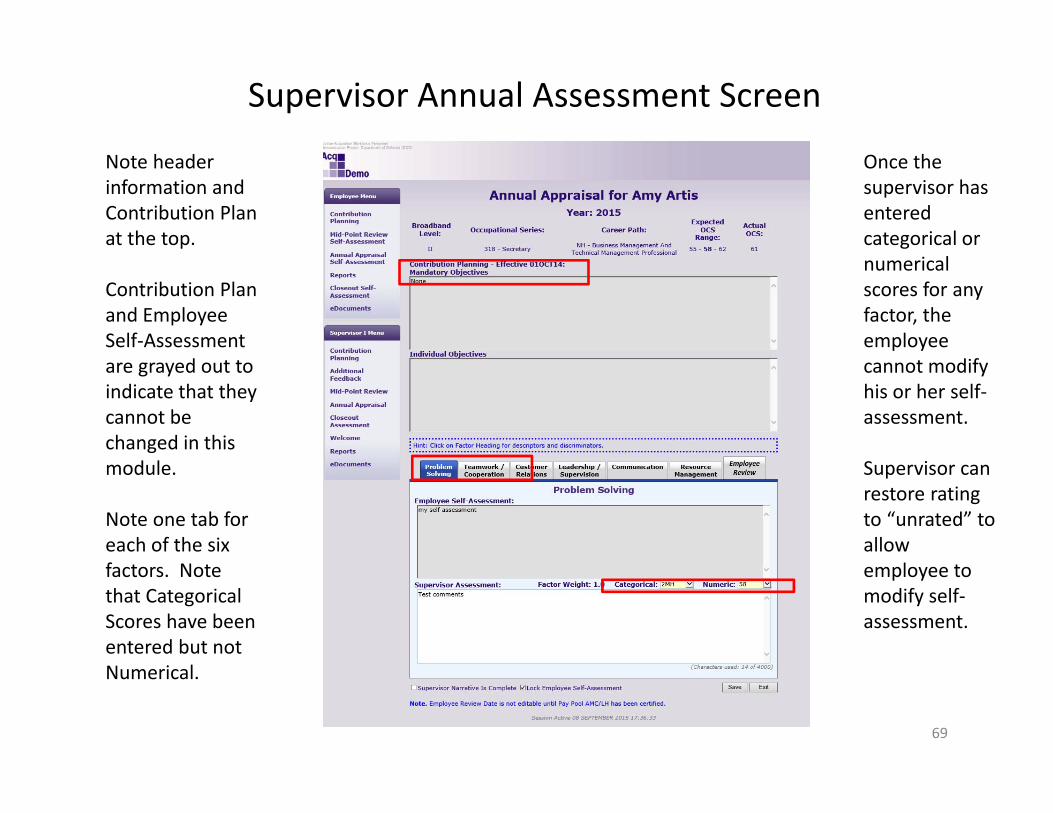
Employee Self‐Assessment• The self‐assessment screen
displays information about the employee in the header and the current contribution plan (if any) in a box below the header. The Contribution Planning box is grayed out to indicate it cannot be changed using this screen.
• There is a tab for each factor for the employee to enter their self‐assessment. The employee can enter up to 4000 characters for each factor (counting non‐printable characters such as line returns).
• The hot link for the factor brings up a separate screen with the descriptors and discriminators for the factor.
63

Factor Descriptors and Discriminators: Problem Solving
64
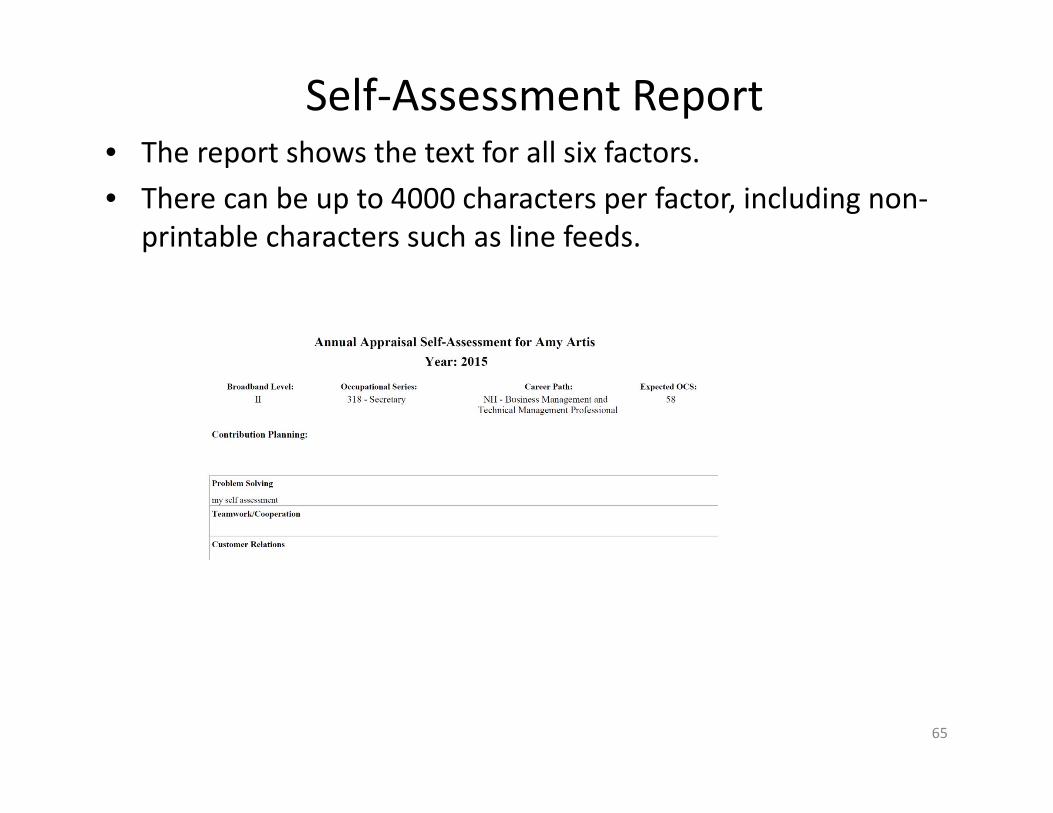
Self‐Assessment Report• The report shows the text for all six factors.• There can be up to 4000 characters per factor, including non‐
printable characters such as line feeds.
65

Supervisor Assessment Module

Supervisor Modules• Here is the Welcome Screen for a supervisor.• Click on the Annual Appraisal link to start the appraisal
process.
67
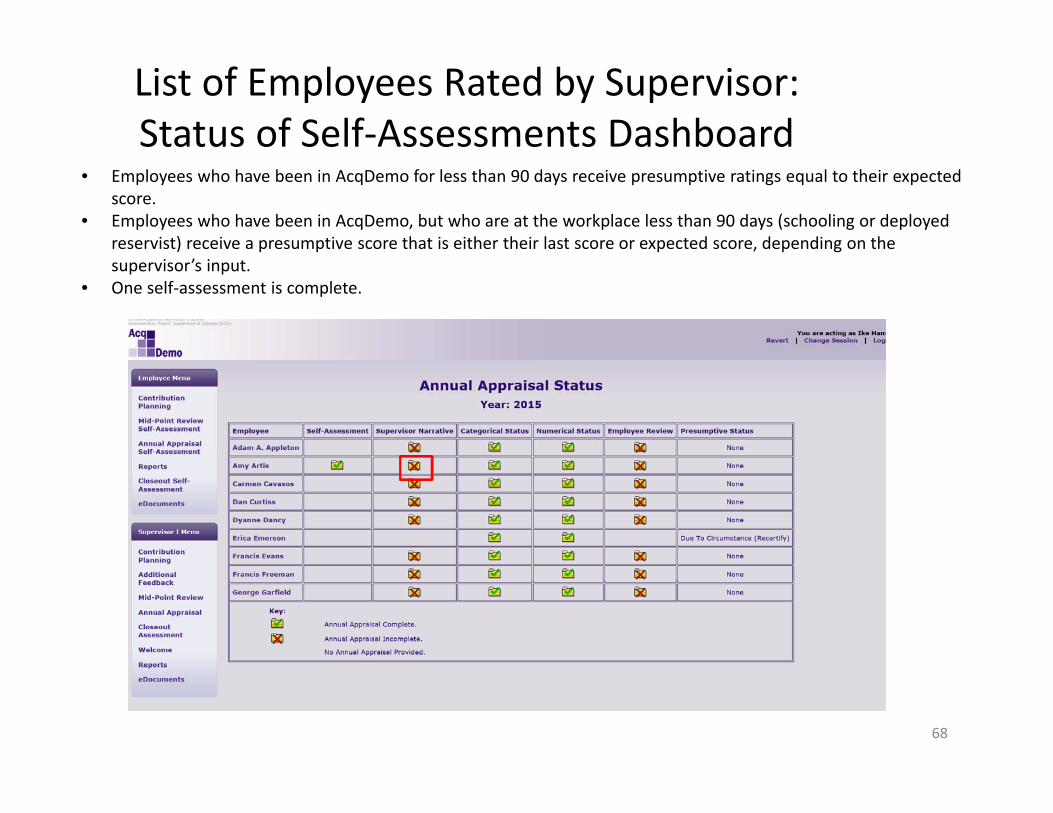
List of Employees Rated by Supervisor: Status of Self‐Assessments Dashboard
• Employees who have been in AcqDemo for less than 90 days receive presumptive ratings equal to their expected score.
• Employees who have been in AcqDemo, but who are at the workplace less than 90 days (schooling or deployed reservist) receive a presumptive score that is either their last score or expected score, depending on the supervisor’s input.
• One self‐assessment is complete.
68
Supervisor Annual Assessment Screen
Note header information and Contribution Plan at the top.
Contribution Plan and Employee Self‐Assessment are grayed out to indicate that they cannot be changed in this module.
Note one tab for each of the six factors. Note that Categorical Scores have been entered but not Numerical.
Once the supervisor has entered categorical or numerical scores for any factor, the employee cannot modify his or her self‐assessment.
Supervisor can restore rating to “unrated” to allow employee to modify self‐assessment.
69

Annual Appraisal
70
When check is saved, the supervisor annual appraisal status dashboard and reports will show this information.
Supervisor Annual Appraisal
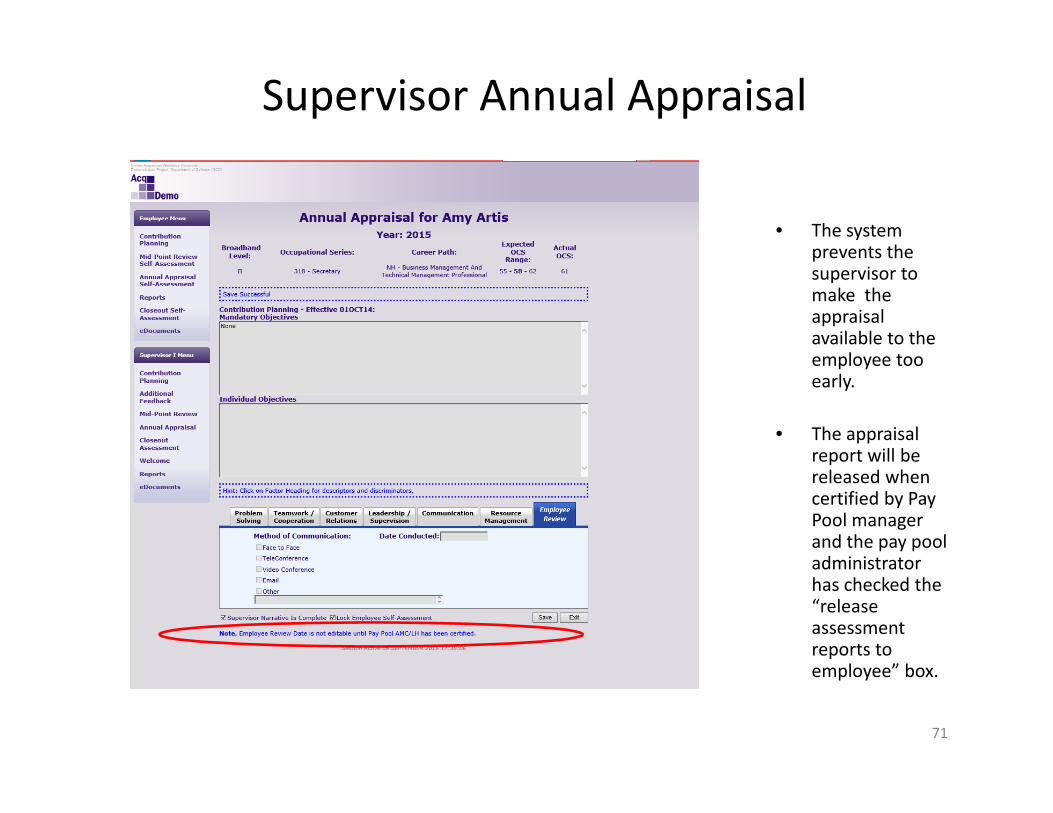
• The system prevents the supervisor to make the appraisal available to the employee too early.
• The appraisal report will be released when certified by Pay Pool manager and the pay pool administrator has checked the “release assessment reports to employee” box.
71
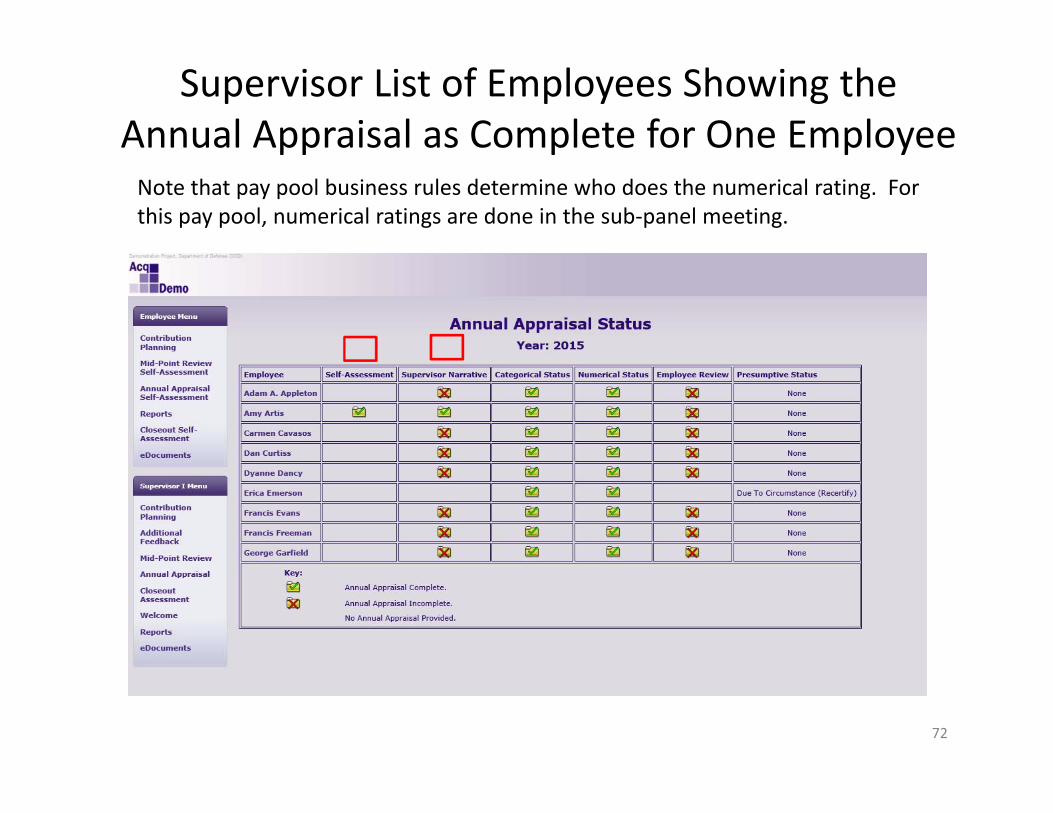
Supervisor List of Employees Showing the Annual Appraisal as Complete for One Employee
72
Note that pay pool business rules determine who does the numerical rating. For this pay pool, numerical ratings are done in the sub‐panel meeting.

Select Annual Appraisal Report
73
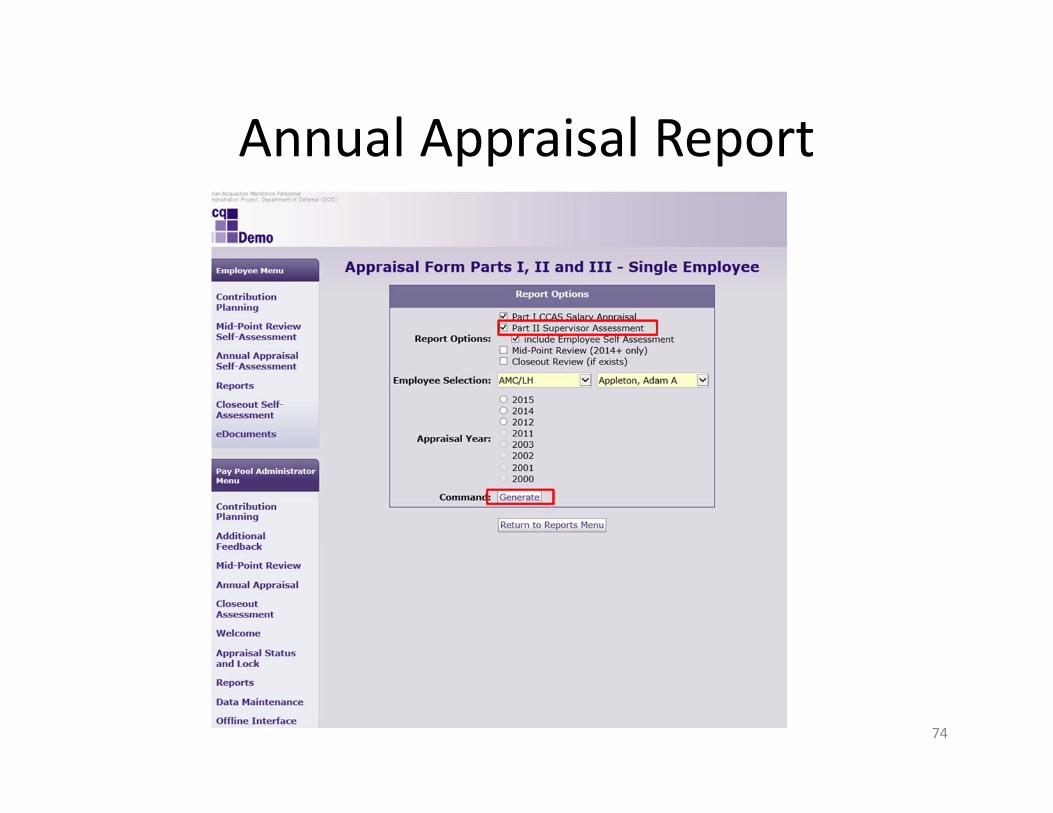
Annual Appraisal Report
74

Annual Appraisal: Part II FormSupervisor appraisal input
75

Annual Appraisal: Part III FormEmployee self‐assessment
76

eDocuments Module
77

eDocuments Module
78
Note that eDocumentswill be available once the pay pool results are approved and released at the end of the pay pool process.

eDocuments ModuleAt year end, the Employee and 1st Level Supervisor will sign the Annual Appraisal and save it in the CAS2Net Document Repository. A manager’s signature is optional. Users may click the eDocuments link in the navigation menu bar to access the CAS2Net Document Repository.
79
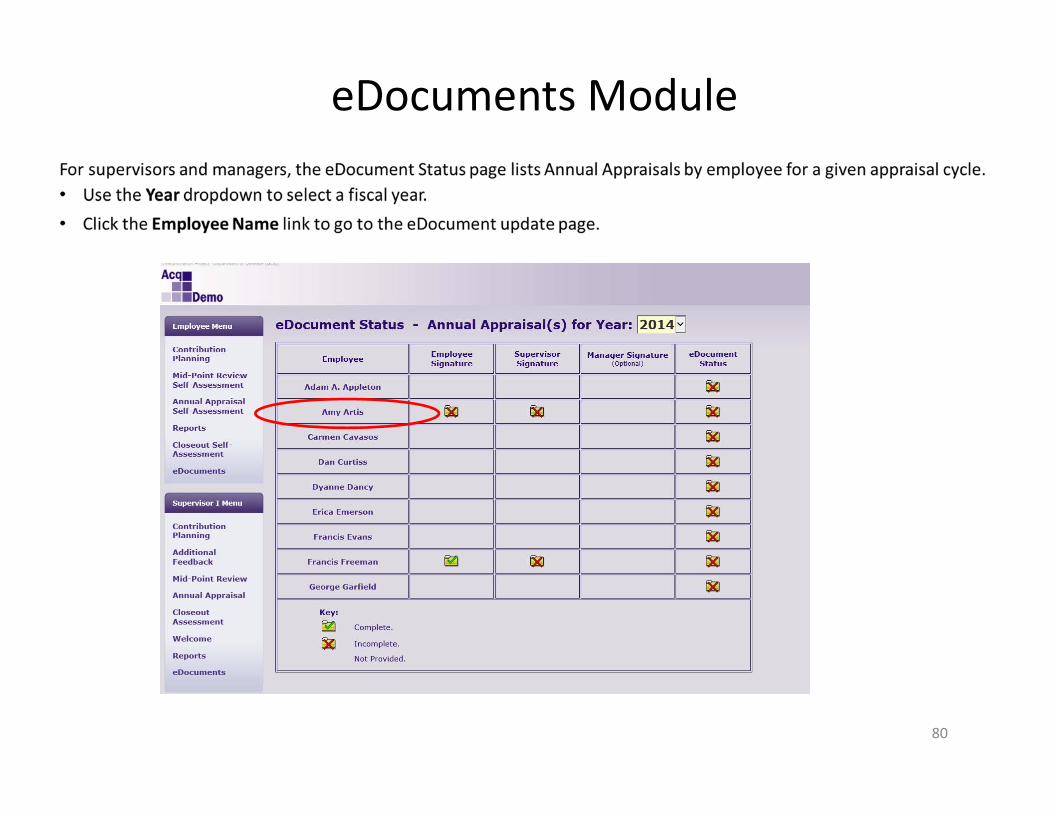
eDocuments Module
80
eDocuments Module
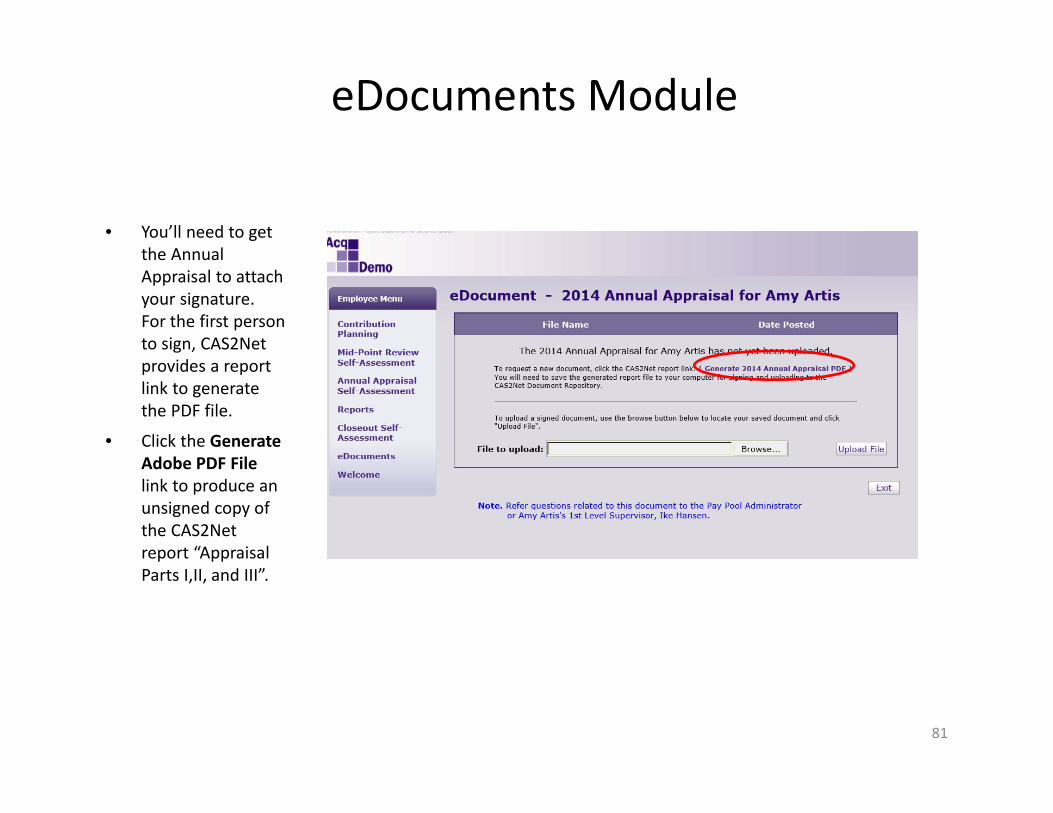
• You’ll need to get the Annual Appraisal to attach your signature. For the first person to sign, CAS2Net provides a report link to generate the PDF file.
• Click the Generate Adobe PDF Filelink to produce an unsigned copy of the CAS2Net report “Appraisal Parts I,II, and III”.
81

eDocuments Module
If a signed copy of the Annual Appraisal has already been saved, you’ll need to add your signature to same document.
Right click the File Name link to download the previously signed copy of the CAS2Net report “Appraisal Parts I,II, and III”.
This example will now follow “ Aaron Arndt” through the rest of the process.
82
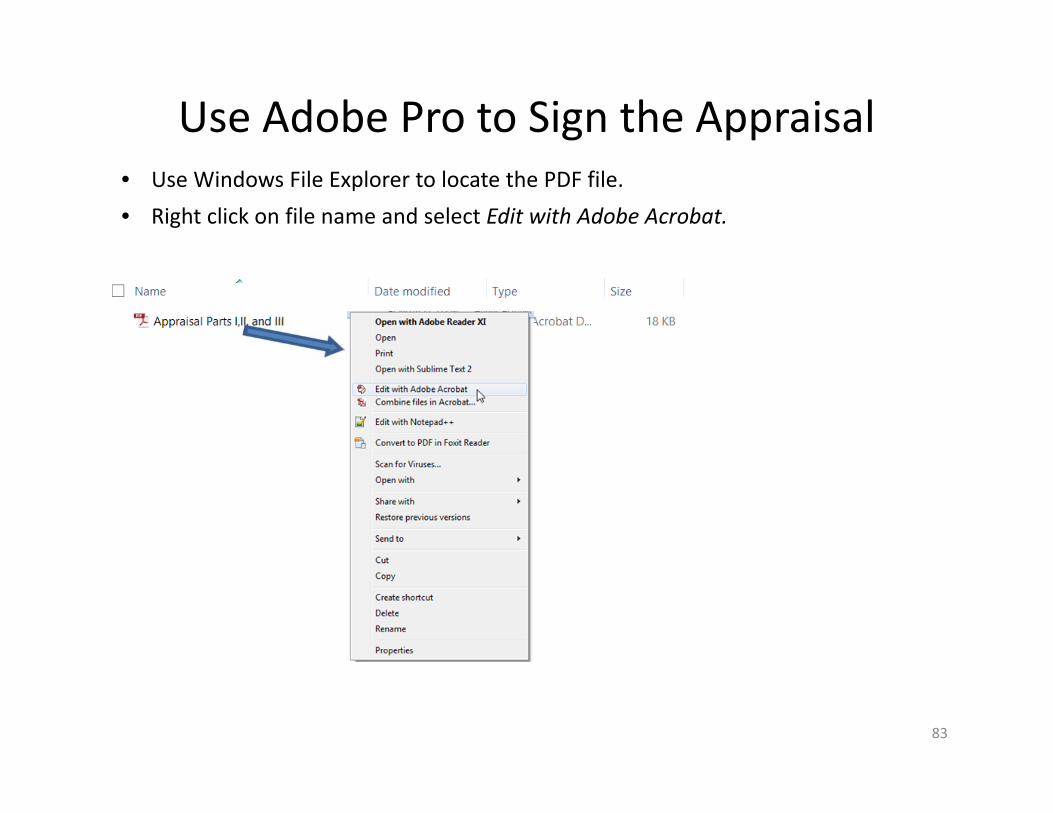
Use Adobe Pro to Sign the Appraisal
83
• Use Windows File Explorer to locate the PDF file. • Right click on file name and select Edit with Adobe Acrobat.
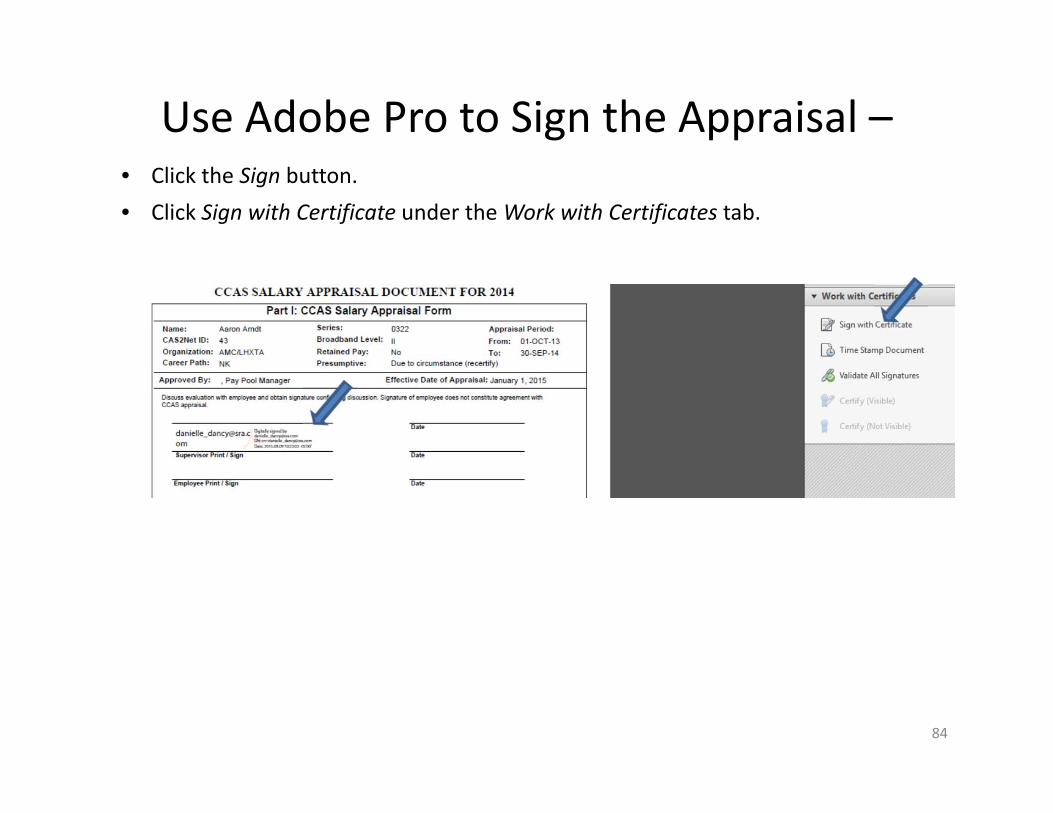
Use Adobe Pro to Sign the Appraisal –
84
• Click the Sign button. • Click Sign with Certificate under the Work with Certificates tab.

Use Adobe Pro to Sign the Appraisal –
85
The message box below appears.
• Click the Drag New Signature Rectangle … button.
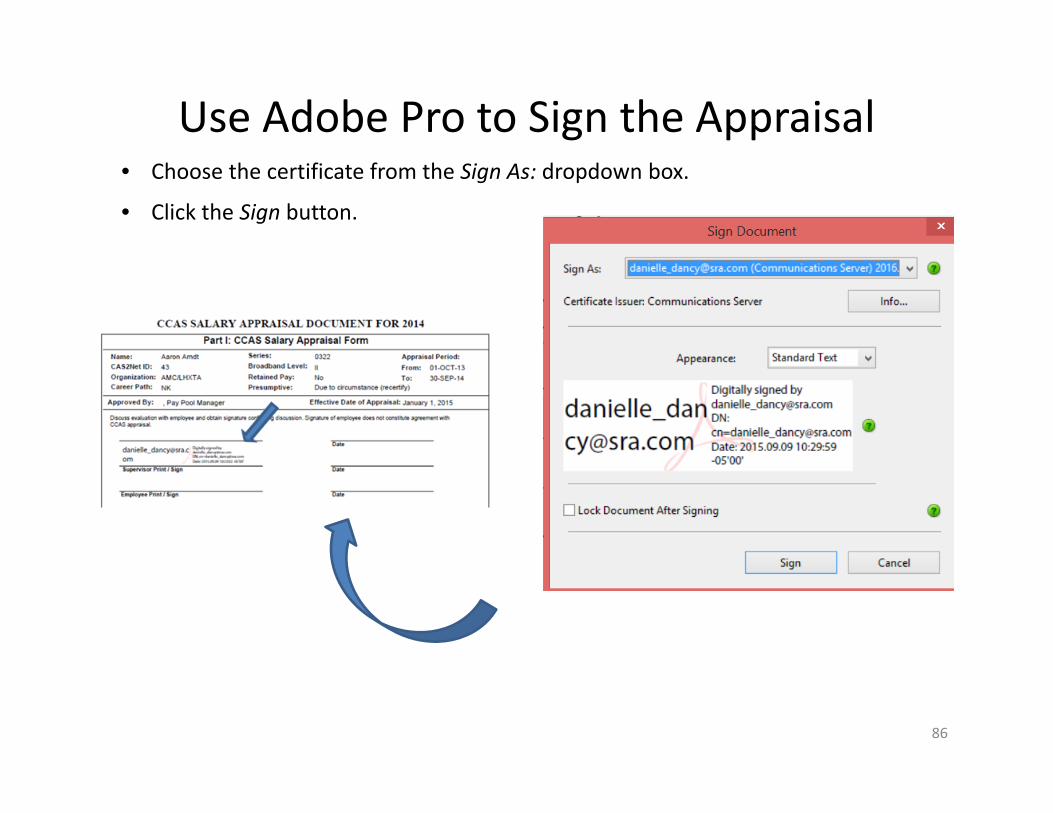
Use Adobe Pro to Sign the Appraisal
86
• Choose the certificate from the Sign As: dropdown box.
• Click the Sign button.

Use Adobe Pro to Sign the Appraisal
87
• If prompted, enter your CAC PIN.

Save the Signed File
88
• At the prompt to save, either leave the file name as is or choose a new one.
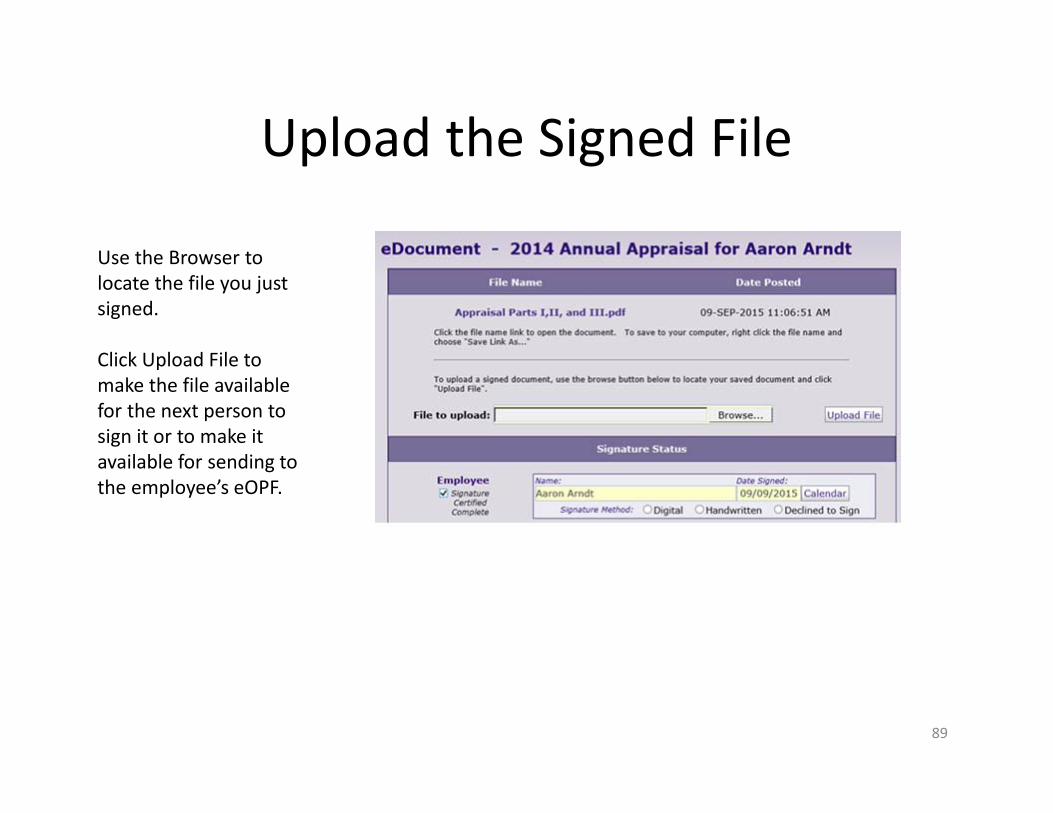
Upload the Signed File
Use the Browser to locate the file you just signed.
Click Upload File to make the file available for the next person to sign it or to make it available for sending to the employee’s eOPF.
89

AutoNOA Process

Background
• The AutoNOA process with CAS2Net can be considered a learning experience– Prove programs are portable across components– Quantity not enough to make an impact on cost– Within 3 years could be as many as 46,000 employees in AcqDemo
– To collect signed appraisal forms for AutoNOA, the new eDocuments module has been built into CAS2Net
• CAS2Net users must have Adobe Pro to digitally sign appraisal forms

AutoNOA Process Description
• Upload signed appraisal forms to eOPF via AutoNOA– AutoNOA staff will process documents to employees’ eOPF– No longer need to scan and process each appraisal form
individually– Army has access to eOPF for global Army users
• CAS2Net eDocuments Transfer module– Rename signed and uploaded appraisal forms to AutoNOA
specifications • SSN and date formatted as 8 digits is current naming format, but expect change to DoD ID and date in future
– Collect and compress signed appraisal forms in a zip file– No need for DCPDS region information

AutoNOA Process Description (continued)
• AutoNOA has a team managing incoming files• How do we send files to AutoNOA?
– Option 1: Secure FTP via ALTESS– Option 2: Give AutoNOA team access to CAS2Net software to pull files using Regional Notices module (CAS2Net currently does this for the DCPDS regions)

Timeline
• January 2016 is the target date for the first AutoNOA upload
• Trials and mock uploads will be tested throughout the end of cycle phase
• DCPDS transactions need to be completed a week after the first pay period in January 2016
• Incorporate any grievances if needed– For grievances: we’ll pull out the one that’s revised if needed, we don’t need to put the entire upload on hold; records can be revised individually after main upload

Questions?Contact your local
Pay Pool Administrator