dof 4.0 a depth of field calculator - dl-c.comdl-c.com/dof/dof_reference_manual.pdf · dof 4.0 –...
TRANSCRIPT

DoF 4.0 – A Depth of Field Calculator
Last updated: 20-Apr-2017
Introduction
When you focus a camera lens at some distance and take a photograph, the further subjects are from the focus point, the blurrier they look.
Depth of field is the range of subject distances that are acceptably sharp. It varies with aperture and focal length, distance at which the lens is focused, and the circle of confusion – a measure of how much blurring is acceptable in a sharp image. The tricky part is defining what acceptable means. Sharpness is not an inherent quality as it depends heavily on the magnification at which an image is viewed. When viewed from the same distance, a smaller version of the same image will look sharper than a larger one. Similarly, an image that looks sharp as a 4x6" print may look decidedly less so at 16x20".
All other things being equal, the range of in-focus distances increases with shorter lens focal lengths, smaller apertures, the farther away you focus, and the larger the circle of confusion. Conversely, longer lenses, wider apertures, closer focus, and a smaller circle of confusion make for a narrower depth of field.
Sometimes focus blur is undesirable, and sometimes it’s an intentional creative choice. Either way, you need to understand depth of field to achieve predictable results.
What is DoF?
DoF is an advanced depth of field calculator available for both Windows and Android.
What DoF Does
Even if your camera has a depth of field preview button, the viewfinder image is just too small to judge critical sharpness. Only when you open images on your computer and zoom in (or when you examine a film negative or positive with a powerful magnifier) can you see what is really sharp and what isn’t, and by then it’s usually too late to do anything about it. This is the kind of problem DoF is designed to help you avoid.
DoF's camera-like interface helps you develop an intuitive understanding of depth of field.
Here are some of the many questions DoF can answer about depth of field:
• What range of subject distances are in focus for a given camera, lens, f stop and focus distance?
This is the classical question addressed by most depth of field calculators. DoF computes the near and far focus limits as well as the hyperfocal distance – the closest distance you can focus at while keeping distant subjects sharp, taking both focus and diffraction blur into account.
• What f stop makes subjects in a given distance range as sharp as possible? How sharp?
Suppose you want to photograph a scene that includes a known range of camera-to-subject distances. If the distance range is narrow enough, you can use a large aperture to reduce diffraction and still get a sharp image. For wider ranges, you can reduce focus blur by stopping down to increase depth of field, but this increases diffraction blur, so what is the best f stop to use? It turns out that you get the sharpest possible image when focus blur and diffraction blur are equal. DoF can calculate this ideal f stop and show you how much the image is blurred both inside and outside the range.

• How does blur vary with subject distance for a given f stop?
DoF displays a visual representation of blur as a function of distance. This helps you previsualize how sharp in-focus areas are and how blurry out-of-focus areas are. It can determine how much the background will be blurred when you focus on a foreground subject and vice versa.
• Where should I focus to make a range of distances as sharp as possible?
Suppose you have two subjects at different distances from the camera that define a range you want to be as sharp as possible. The best distance at which to focus is the one that blurs both the near and far subjects equally. DoF can calculate this distance exactly. The rule of thumb of focusing 1/3 of the way into the range is almost always wrong.
• Using focus stacking, how many images, focused at what distances do I need to produce a sharp image?
Focus stacking is a software post-processing technique that combines multiple images of the same scene shot with different focus points to create a composite with a wider depth of field than any of the individual images. DoF can calculate the number of images you need to shoot, the best f stop to use, and the distances at which to focus each image to produce a sharp focus stacking result.
• What is the depth of field for macro photography?
Normal depth of field equations work for subjects far from the camera but become break down when the subject is too close. When this happens, a different calculation based on image magnification is more useful. DoF can calculate magnification from the width of the field of view (easily measured by photographing a ruler placed at the subject distance) and in turn compute the depth of field for macro photography.
Quantifying Sharpness - The Circle of Confusion
To compute depth of field, DoF needs a value for the diameter of the circle of confusion (sometimes abbreviated as CoC) which is in turn a measure of the maximum acceptable blur in a sharp image. Since the transition from sharp to blurry is gradual, the size of the circle of confusion is inherently imprecise. More importantly, percieved sharpness varies according to how much the image is magnified when you view it as well as other factors. For example, an image that looks sharp printed at postcard size may not be sharp at all when printed as a 16x20 and viewed up close. DoF lets you choose between two basic methods to calculate CoC size based on different methods for judging whether an image is sharp or not:
The Sharp Image method
This method is based on viewing the image on-screen at a magnification of 100% or greater (or examining a film positive or negative with a high-power loupe) which makes even the most minor blurring apparent. Using Sharp Image calculates the circle of confusion as the size of the smallest resolvable detail measured at the camera sensor (or film plane). Calculating depth of field using this method helps you produce images as sharp as your camera is capable of capturing. Reducing the circle of confusion beyond this point does not make images significantly sharper, but it does unnecessarily reduce the calculated depth of field.
The Sharp Print method
This method is based on a human observer viewing a standard size print at a standard distance. Of course the print size matters, as well as how closely you examine it, and how good your eyesight is. The standard definition of this method is based on an 8x12 inch print viewed from about 18 inches away by an observer with normal eyesight, the assumption being that larger prints are viewed from a proportionally greater difference. If you want to use a different print size or viewing distance, DoF lets you adjust the circle of confusion accordingly.
By international convention, the Sharp Print method (or a some variant of it) is used by camera manufacturers when they engrave depth of field marks on lens barrels, but the choice of circle of confusion (roughly 0.03mm for 35mm film format) dates back to a time when film emulsions had much less resolution than present day film or digital sensors. While this method remains somewhat valid for making 8x10 or 8x12 prints, it generally falls far short of producing truly sharp film or digital images using today's cameras or films.
While DoF can compute the circle of confusion using either the Sharp Image or the Sharp Print methods, they often produce very different results for depth of field. For example, a Nikon D810 has a 35mm wide sensor that resolves 7360 pixels across its larger dimension. This computes out to a circle of confusion of about 0.01mm for the Sharp Image method and a value for Sharp Print of about 0.03mm which is roughly 3 times larger! Photographs taken based on the larger circle of confusion can look like mush when viewing individual pixels and still produce acceptably sharp 8x12 inch prints viewed from 18 inches away. Thus, if all you want is prints that look sharp from a distance, you don't need nearly the resolution the camera can deliver. In other words, it can be OK if the digital image is blurry as long as it is reproduced at a size where that blur is invisible.

On the other hand, having invested in a camera with high resolution and quality optics, if you want to get the sharpest images it can take, you should use the Sharp Image method and accept the fact that your depth of field is actually much narrower than you may have thought. If you ever plan to crop your images before printing or make large prints of your images and want them to look good up close, you will need extra sharpness anyway. Sometimes you need more depth of field than this method allows and you need to make a deliberate trade-off.
DoF represents blur as a number: a blur of 1.0 or less means combined diffraction and focus blur is less than or equal to the circle of confusion for the current camera and thus that the image should be sharp according to the criteria you specified when you created the camera setting. The larger the blur value, the softer the image.
Just to make things even more complicated, it turns out the eye is much more sensitive to blur in high contrast subjects with sharp edges like black text on a white background or a photo of a skyscraper with lots of dark windows against light concrete. This is why such subjects are often used for resolution test charts. When photographing high contrast scenes depth of field should be calculated with a smaller circle of confusion (a smaller blur value). Conversely, low contrast subjects can tolerate a little blur and depth of field may be calculated with a larger circle of confusion (a larger blur value).
If you have been using the Sharp Print method to calculate depth of field and are getting images that are not critically sharp when you examine them closely, try using Sharp Image before blaming your equipment or technique. Personally, I mostly use the Sharp Image method and then decide on a case-by-case basis whether to accept blur values higher than 1.0 if I need extra depth of field. At blur level 2.0 images are still quite sharp – only above 3.0 or so do images start to deteriorate significantly. To get a sense of what different levels of blur look like, see Appendix B3 which illustrates test target images intentionally defocused so as to introduce calibrated amounts of blur.
Depth of Field and Magnification
Magnification is defined as the ratio of the size of a subject ot the size of the image of a subject the camera is focused on (as measured at the sensor or film plane). Photographs taken at the same magnification (i.e. where images of the same subject are the same size at the sensor or film plane) have the same depth of field, regardless of the lens focal length. To get the same magnification with a longer lens you of course need to move further away from the subject so the perspective is altered. For example, shooting a subject 10 feet away with a 50mm lens gives almost exactly the same depth of field as shooting the same subject 20 feet away with a 100mm lens.
Diffraction
Diffraction is a quantum effect resulting from the wave nature of light as it passes through a small aperture. While diffraction does not affect depth of field directly, it does limit the sharpness you can achieve at a given f stop. Since diffraction blur increases for smaller apertures (higher f stops), and focus blur increases for larger apertures (lower f stops), there is an optimal f stop that produces the smallest combined blur and thus the sharpest image for any given range of distances. Unlike focus blur, diffraction blur does not depend on subject distance and thus affects the entire image uniformly.
The amount of diffraction blur is proportional to the wavelength of light entering the lens. By convention, 550nm green light is used to calculate diffraction blur since the eye is most sensitive to this color and because green is in the middle of the range of visible wavelengths as shown below:
Red light causes about 20% more diffraction than green light and blue/violet light about 20% less. This can be significant for IR or UV photography. DoF lets you customize the wavelength used to calculate diffraction if you need to adjust the value for special situations.
Why Other Depth of Field Calculators Are Misleading
There are two reasons depth of field calculated the standard way may not lead to critically sharp images.
Ignoring diffraction
Diffraction effects can be important, especially for newer digital cameras with small, high resolution sensors. Even at larger apertures (lower f stops), diffraction blur adds to out-of-focus blur and narrows depth of field to some extent. At smaller apertures (larger f stops), diffraction blur can easily exceed the circle of confusion and consequently the image won't be acceptably sharp anywhere. For this reason, DoF often gives different results than other depth of field calculators that do not take diffraction into account.

Ignoring image resolution
The standard method for deciding if an image is sharp is based on viewing a print of the image, not by examining the digital image (or film) itself. Modern digital cameras can resolve a lot more detail than you can see in an 8x12 print seen from a normal viewing distance.
Both of these factors can lead you to overestimate depth of field and consequently your images will not be as sharp as possible, especially near the endpoints of the depth of field range. While you can configure DoF to calculate depth of field in the conventional manner, it can also calculate depth of field using more precise methods that account for both diffraction and sensor resolution.
The Problem with High Resolution Digital Cameras
To make the most of the high resolution sensor in your digital camera and get really sharp images, you should use the Sharp Image method and reconcile yourself to the fact that small apertures cause diffraction blur so the sharpest images require larger apertures (lower f stops) which then lead to a relatively narrow depth of field.
For example, using a Nikon D810 with a 50mm lens, diffraction reaches sensor resolution at around f/8 using the Sharp Image method. At f/8, the hyperfocal distance is about 100 ft. with a corresponding near focus of about 50 ft. Stopping down to get more depth of field blurs the entire image from diffraction. By contrast, using the Sharp Print method, diffraction is not a limiting factor even at f/22 which corresponds to a hyperfocal distance of about 12 ft. and a near focus of 6 ft. While you can make prints that look good when viewed from a distance when shooting at f/22, images shot at f/8 will be significantly sharper when examined closely, but the depth of field is much narrower.
Focusing Strategies for Sharp Images
There are several strategies for focusing a camera on a scene containing visual elements at a wide range of distances, such as a mountain in the background with flowers or foliage in the foreground.
Focus between the near and far distance
Assuming the near subject distance is Dn and the far subject distance is Df, if you focus at a distance of 2DfDn/(Df+Dn), subjects at both distances are equally blurred. If Df is ∞, focus at the hyperfocal distance. This is the standard method – it produces images in which subjects at the intermediate distance are optimally sharp while there is an acceptable loss of detail, as defined by the circle of confusion, at the near and far limits.
Focus at the far distance
This method, advocated by Harold Merklinger and others, suggests you are better off focusing at or near the far distance limit so distant objects appear sharper at the expense of a softer foreground. The rationale is that subjects in the distance appear smaller and will look blurrier if they are not critically sharp, and that viewers tolerate blurring in the foreground more than in the background.
Using a tilt and shift lens (or a view camera that allows tilt and shift adjustments)
This can extend depth of field in some situations by aligning the image plane with the subject, but DoF does not calculate depth of field for this special type of lens.
Focus Stacking
Another way to get really sharp images with a very wide depth of field – and this usually only works well for more or less stationary subjects – is focus stacking, a technique in which you take multiple photographs of a scene while varying the focus incrementally. The images are then combined afterwards using software that selects the sharpest parts of each one to create a composite image with a depth of field much wider than any of the individual images. Two popular examples of commercial focus stacking programs are Helicon Focus and Zerene Stacker, although there are many others. While focus stacking has long been used by macro and micro photographers, increasingly it is becoming an important tool for high quality landscape photography.
Unfortunately, focus stacking has limitations – for example, if the subject moves while you are taking the series of photos, the stacking software may have trouble merging the images cleanly and they will either require a lot of manual touch-up or may ultimately be unusable. When it works however, the results can be spectacular. If focus stacking is not an option, you have no choice but to stop down to the best f stop and accept some blur.
Distance Scale and Lens Markings
The distance scale DoF displays is graduated like the markings on a lens barrel, being much more compressed for distant subjects than for closer ones. The scale is created in such a way that the depth of field limit markers stay the same distance apart as you vary subject distance, and are equally spaced on either side of the focus distance. Equal

distances along this so-called harmonic distance scale correspond to equal rotations of the lens barrel when you use manual focus.
Useful Tips:
You can always find the best focus point bewteen a near and a far subject by rotating the focus ring half way between the focus points for the two subjects.
For focus stacking, intermediate focus points correspond to equal rotations of the lens barrel. Similarly, for a view camera, the best location for the front standard is halfway between the locations that produce sharp focus for the near and far ends of the range.
How Blur Varies with Distance
If you use a certain lens and f stop and focus at a given distance, how blurry are subjects at other distances? DoF displays blur as a function of distance, but the following graph illustrates how this works. It represents blur at different distances for a 45mm lens on an Olympus OM-D EM-1 set to f/8 and focused at a point 5 feet from the camera.
The graph shows the amount of blur in millimeters at the image plane. The red line represents focus blur, the blue line diffraction blur and the black line combined diffraction and focus blur. The gray line indicates the circle of confusion.
The points where the red line crosses the gray line represent depth of field, ignoring diffraction. Since the black line does not cross the gray line (because the f stop is above the diffraction limit of f/5.6 for this camera), there is no distance at which the image is critically sharp. Nonetheless, the image stays fairly sharp from about 4.5 to 5.5 feet.
The graph shows that blur increases much faster on the near side of the focus point than for distant subjects. We understand this intuitively when we move closer to a window screen to blur out its effect and let us see distant objects more clearly. Blur becomes infinite at subject distances less than or equal to the lens focal length.

Best F Stop for a Given Depth of Field
If you want to capture a specific range of distances, what f stop produces the sharpest image? DoF can find the f stop that produces the least combined diffraction and focus blur at the endpoints of the range.
To see how this works, consider a 45mm lens on an Olympus OM-D EM-1 (Sharp Image method), focused at a distance of 5 feet. The following graph illustrates how blurry a subject at 4.5 feet appears as you vary the f stop.
This graph measures the amount of blur in millimeters at the image plane. The blue line is diffraction blur which increases with f stop. The red line is focus blur which decreases with f stop. The black line is combined blur (computed as the geometric mean of diffraction and focus blur) which reaches its lowest point when diffraction blur and focus blur are equal. The gray line represents the circle of confusion for the camera, so in this case even at the best possible f stop, the image is not as sharp as the camera can capture, but it is nonetheless the best compromise. Generally, the image stays about as sharp for about one f stop on either side of the optimal value so it doesn't matter much if you are a little off, but beyond that point it starts to get less sharp fairly quickly.
Strategies for Selective Focus
Selective focus refers to blurring parts of an image intentionally, usually to remove a distracting background, create a sense of depth, or draw attention to the sharper parts of the image. This can be achieved in several ways.
To reduce depth of field, use a larger lens aperture (lower f stop) or a longer lens.
If you stitch images together to make a panorama, the depth of field of the resulting image is determined by the lens and aperture you are using, but the overall field of view is determined by how much of an angle the images cover. Thus it is possible to reduce depth of field while maintaining field of view by panoramic stitching. This is technique is known as the Brenizer Method.
You also have the option of selectively blurring an image post exposure with your computer, although this is likely to involve a painstaking masking process.
Selective Focus Achieved by Digital Posprocessing

Laser Range Finders
Knowing the range of in-focus distances is not particularly useful unless you have a way to measure how far subjects are from the camera. Since it is quite difficult to estimate distances accurately by eye, a range finder can be a useful aid in the field. Laser range finders work by projecting a laser beam onto the subject and observing the reflected light coming back. Some use visible red lasers while others use invisible IR lasers.
Laser range finders designed for building construction are small, safe, very accurate and not terribly expensive. They use visible lasers that project a red dot on the subject, but you need to be able to see the dot to know what you are measuring. This works indoors or at short distances, but outdoors in bright sunlight it can be nearly impossible to see the red dot. The Leica DISTO E7500i works better for outdoor photography as it is both very accurate and has a feature they call "point finder" that displays a zoomable image on its screen with a crosshair at the spot it is measuring so you don't have to be able to see the red dot to get a reading.
IR laser rangefinders designed for forestry, hunting or golf are usually integrated into a monocular and work very well outside. While they can measure out to great distances, they are usually only accurate to about a yard and cannot measure short distances at all. One exception is the new Laser Technology TruPulse 200X which measures both short and long distances to within a few inches – unfortunately it is a little bulky and rather expensive.
Leica 7500i TruPulse 200X
Accuracy
Many factors other than lack of focus and diffraction contribute to image blur, including lens aberrations, camera or subject motion during the exposure, sensor noise, antialiasing filters, sensor dithering patterns, lack of film flatness and so on. DoF ignores all of these. Furthermore, sharpness is ultimately subjective and the depth of field equations are approximate, so DoF results should not be considered precise. Also, subject distances are measured from the front nodal point of the lens which is difficult to locate accurately. This error is more significant for subjects close to the lens, in which case you should switch to the macro depth of field mode.
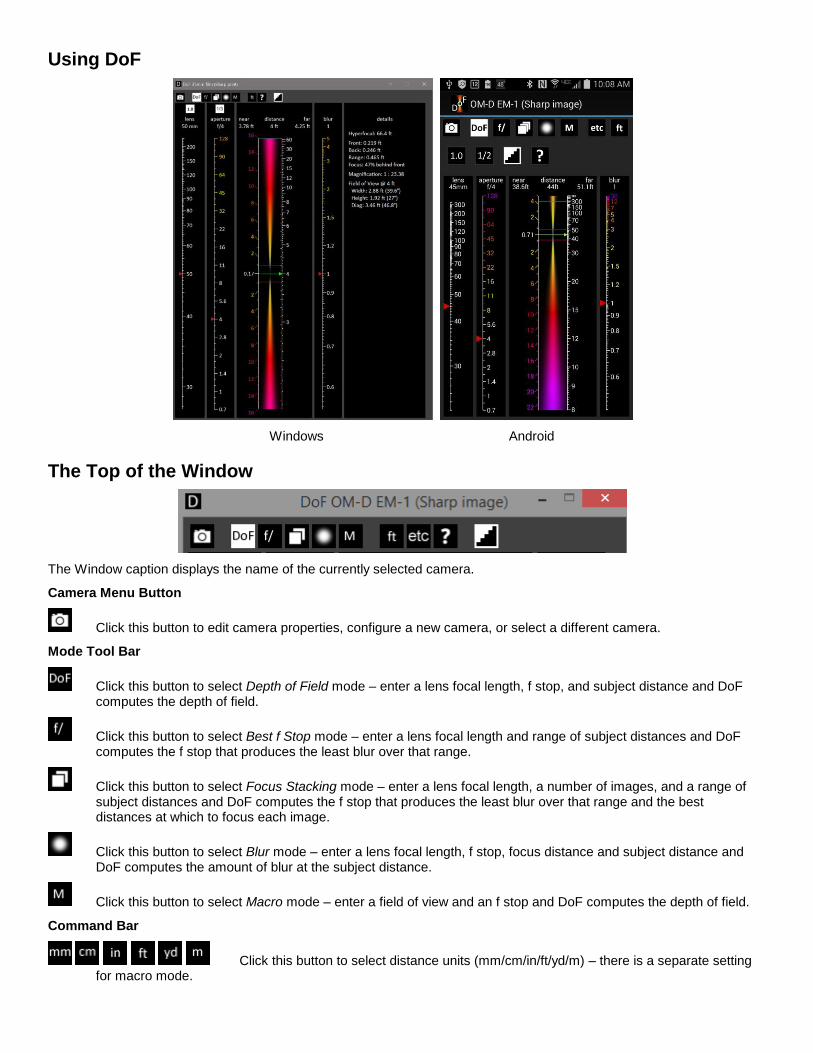
Using DoF
Windows Android
The Top of the Window
The Window caption displays the name of the currently selected camera.
Camera Menu Button
Click this button to edit camera properties, configure a new camera, or select a different camera.
Mode Tool Bar
Click this button to select Depth of Field mode – enter a lens focal length, f stop, and subject distance and DoF computes the depth of field.
Click this button to select Best f Stop mode – enter a lens focal length and range of subject distances and DoF computes the f stop that produces the least blur over that range.
Click this button to select Focus Stacking mode – enter a lens focal length, a number of images, and a range of subject distances and DoF computes the f stop that produces the least blur over that range and the best distances at which to focus each image.
Click this button to select Blur mode – enter a lens focal length, f stop, focus distance and subject distance and DoF computes the amount of blur at the subject distance.
Click this button to select Macro mode – enter a field of view and an f stop and DoF computes the depth of field.
Command Bar
Click this button to select distance units (mm/cm/in/ft/yd/m) – there is a separate setting for macro mode.

Click this button to display additional details for the current mode. Click the button again or click elsewhere on the screen to restore the normal display. This button is absent in the Windows version which displays the additional information continuously in an extra column at the right edge of the window.
Click this button for help commands.
About DoF Display About box Quick Start Display Quick Start Manual Reference Manual Display Reference Manual (this document)
Reset Scales Use this command to reset the focal length, aperture, distance and blur scales to default values in case you manage to accidentally scroll or zoom them out of range.
Snap Toggle
Click this button to toggle Snap on or off. When Snap is on, focal length, f stop and distance values are adjusted to round numbers which makes it easier to select exact values such as 15.0. When Snap is off, no rounding is performed.
Windows - The DoF window is resizable – scales are automatically lengthened or shortened to fill the height of the window, and the text size is increased or decreased to fill the window width.
Android - The text size is automatically scaled according to the device resolution.

Focal Length Scale
Use the focal length scale to set the lens focal length in millimeters. Select the actual focal length and not the 35mm equivalent (unless you have specified Enter 35mm equivalent in the Camera Dialog).
The red triangle marks the current setting whose value is also displayed at the top of the scale.
Drag the scale to change the focal length – the red marker stays fixed in the center.
Windows - Dragging the scale up or down with the right mouse button down zooms the scale so it becomes more or less compressed.
Android - Pinch to zoom the scale so it becomes more or less compressed.
If you are using a teleconverter, click the teleconverter button above the focal length scale and select the desired teleconverter magnification factor (1.4X or 2X). The teleconverter setting automatically adjusts the f stop so there is no need to do so yourself – just enter the aperture value indicated on the lens dial. For example, a 300mm lens at f/16 with a 2X teleconverter is automatically treated as a 600mm lens at f/32.
Aperture Scale
Use the aperture scale to set the f stop in Depth of Field, Blur or Macro mode. In the other modes, the f stop is calculated for you. If the triangle is white, this means the value is set by the program and cannot be modified. If the triangle is red, you can drag the marker to set the f stop manually.
Select the f stop as marked on the lens – do not attempt to correct for extension due to macro focusing as this is already taken into account by the formulas used to compute the depth of field.
The color of the f stop label indicates how much diffraction blur occurs at the corresponding aperture. White means 1.0 or less.
F stop values on cameras are approximate. For f stops that are not a power of 2, the displayed number may look a little off, but it is actually the precise f stop value.
Select whether you want to subdivide the scale in half or third stop increments by clicking the button at the top the aperture scale and selecting half or third stop increments from the menu.

Distance Scale
The numbers down the right side are subject distances in the current units.
The numbers down the left side are blur amounts. A blur of 1.0 means combined diffraction and focus blur is equal to the circle of confusion for the current camera and thus the image should be perfectly sharp according to the criteria you set up when you created the current camera setting. The larger the blur value, the softer the image. To see examples of how soft an image looks at different blur levels, see Appendix B3.
The middle part of the distance scale is an image that shows combined focus and diffraction blur, color coded to indicate what distances are blurred the most. The width of the line is proportional to the amount of blur – you can think of it as the blurred image of a very narrow vertical line.
A green line marks the focus distance. The blur number next to the green line is the amount of diffraction blur since focus blur is zero at this distance.
Red lines mark the near and far focus limits, taking both diffraction and focus blur into account, so they indicate the distances at which the combined blur is equal to the blur level as set on the blur scale. The red lines may not be visible if the f stop is too high.
A blue-green line marks the hyperfocal distance – the closest distance at which subjects at infinity are acceptably sharp. The blue line may not be visible if the hyperfocal distance is off-scale.
In this example, diffraction blur is 0.71. Subjects at distances between the two blur values of 1 (as indicated by the two red lines) will be critically sharp, taking both focus and diffraction blur into account. If the selected f stop is high enough to push diffraction blur above the blur level, then there are no distances at which subjects are critically sharp so the red lines disappear and the hyperfocal distance is infinity.
To see the distance range for a different blur level, set the Blur scale (see below) to the desired value. The red lines will then move either closer together or farther apart to indicate the change in depth of field range.
If there is a red or green triangle, you can drag it to adjust its distance value. If there is only a line and no triangle, the value is computed automatically and cannot be dragged.
In Depth of Field or Macro mode, click anywhere on the distance scale to set the focus distance.
In Best f Stop or Focus Stacking mode, drag either red line to set the camera to subject distance range.
In Blur mode, drag the green line to set the focus distance and drag the red line to set the subject distance.
Windows - Dragging the right side of the distance scale up or down with the right mouse button down zooms the scale so it becomes more or less compressed.
Android - Pinch to zoom the right side of the distance scale so it becomes more or less compressed.

In Focus Stacking mode, white lines mark the locations of any intermediate focus points. Drag either red line to set the camera to subject distance range.
Increase or decrease the number of focus points by clicking or . The more intermediate focus points you add, the more tightly you can limit blurring of the entire range. The Blur scale readout shows you the worst case blur between the focus limits.
Blur Scale
The color coded blur scale shows the amount of combined diffraction and focus blur at the near and far distance limits.
A blur of 1.0 means combined diffraction and focus blur is equal to the circle of confusion for the current camera and thus that the image should be perfectly sharp according to the criteria you specified when you created the camera setting. The larger the blur value, the softer the image. To see examples of how soft an image looks at different blur levels, see Appendix B3.
If you selected the Sharp Image method of calculating the circle of confusion, setting the blur value to 1.0 guarantees images about as sharp as your camera can capture, but the resulting depth of field may be impractically narrow. Increasing the blur value provides more depth of field at the expense of a softer image.
Making a deliberate tradeoff of a limited amount of blur for additional depth of field may be required in some situations. In Depth of Field or Macro mode, if the current f stop exceeds the diffraction limit, a blur level of 1.0 will result in no depth of field at all, so increasing the blur level in this case will be necessary.
In Depth of field or Macro modes, you can drag the blur scale up or down to set the acceptable blur level – the red marker remains centered.
Windows - Dragging the scale up or down with the right mouse button down zooms the scale so it becomes more or less compressed.
Android - Pinch to zoom the scale so it becomes more or less compressed.
In Best f stop mode, the blur scale is automatically set to the amount of blur at the focus limits. In this case it is a read-out only and cannot be adjusted.
In Blur mode, the blur scale is automatically set to the amount of blur at the subject distance. In this case it is a read-out only and cannot be adjusted.
In Focus stacking mode, the blur scale is automatically set to the amount of blur at the most out-or-focus point between the focus limits. In this case it is a read-out only and cannot be adjusted.

Blur Color Coding
Blur levels are color coded according to the following scheme:
Blur Level Color
less than 1 White between 1 and 2 Gradual transition from White to Yellow between 2 and 10 Gradual transition from Yellow to Red between 10 and 20 Gradual transition from Red to Magenta between 20 and 40 Gradual transition from Magenta to Blue above 40 Blue
Field of View Scale
In Macro mode, a field of view scale replaces the lens focal length scale.
Use the field of view scale to set the field of view in the current units, as measured by photographing a ruler at the desired subject distance.
The red triangle marks the current setting which is also displayed at the top of the scale.
Drag the scale to set the field of view – the red marker always stays in the center
Windows - Dragging the scale up or down with the right mouse button down zooms the scale so it becomes more or less compressed.
Android - Pinch to zoom the scale so it becomes more or less compressed.
Measuring Subject Distances
Subject distance is measured along the direction the camera is pointing. If the subject is off-center, you need to measure the distance to the plane passing through the subject perpendicular to the direction the camera is aimed.
Camera-to-subject distance is measured from the front nodal point of the lens which is normally located somewhere near the center of the front element or perhaps a little closer to the film plane. Since lens manufacturers rarely if ever mark this point on the lens, in practice you can just measure from the front element which is a conservative assumption. Unless you are doing macro photography, it does not make much difference what part of the camera you measure from since

any error will be a negligible fraction of the subject distance. Distance markings on lens barrels are measured from the film plane and not the front of the lens so they may not correspond exactly to the numbers used by DoF.

Camera Settings
When computing depth of field, one very important parameter is the size of the circle of confusion. When you select the camera to use with DoF, what you are really selecting is what value to use for the circle of confusion, based on the characteristics of the camera and various sharpness criteria.
The diameter of the circle of confusion defines what level of blur is considered out of focus, but in truth there is no right value since sharpness depends on how the image will be viewed and even then it is somewhat subjective.
You can think of the circle of confusion like this. Suppose you photograph a very bright but tiny spot of light such as a star in the night sky. In a perfect world, all the starlight entering the lens would focus at a single point. In practice, the image is spread out to some degree and can be approximated as a circular disk. The diameter of that disk is the circle of confusion.
For a digital camera, if the circle of confusion is the same size as or smaller than a single pixel on the sensor, the image will be more of less perfectly sharp. In practice, this is unrealistic since many factors conspire to prevent perfectly sharp images, including lens misalignment and distortion, antialiasing filters, sensor dithering patterns, camera vibration during the exposure, and so on. For this reason, reducing the diameter of the circle of confusion below roughly 2 pixel widths usually does not make the image any sharper.
The smaller the circle of confusion you require, the sharper the image, but the narrower the depth of field and the more you need to worry about diffraction. The circle of confusion can be calculated in various ways, each of which has its own rationale.
DoF provides three methods for deciding what circle of confusion to use.
• Sharp Image: captured images are about as sharp as the camera can produce.
In most cases, this is the most conservative method as it yields the sharpest images and the narrowest depth of field. The circle of confusion computed this way can be significantly smaller than for the Sharp Print method (see below). For film cameras, film resolution substitutes for digital sensor resolution, but otherwise the considerations are similar – using this method makes as sharp a film positive or negative as possible consistent with the film's resolution.
• Sharp Print: a print of a standard size looks sharp to a viewer with standard vision from a standard distance.
This is the method generally used by camera manufacturers to mark lens barrels. By somewhat arbitrary convention they assume a 12" print viewed from around 18". Since larger prints are normally viewed from a greater distance, this works reasonably well over a range of print sizes. Note that this method does not work very well if you crop the image significantly before printing it or if you examine your prints from a closer distance.
• Custom CoC: you enter a custom value for the circle of confusion.
To add a new camera, remove an existing camera or edit camera settings, click and select Edit Camera Properties… from the drop-down menu. This displays the Camera dialog box.
The information you supply in this dialog is used to calculate an appropriate circle of confusion value for any camera you want to use.
Inputs:
Name Enter a name for the camera settings. You can create multiple settings for the same camera if you want to use alternate methods for computing the circle of confusion – just assign each one a different name so you can tell which is which.
Method Select Sharp Image, Sharp Print, or Custom CoC, depending on the method you want to use to calculate the circle of confusion.
Type Select Digital or Film depending on the type of camera.
Focal Length Select Enter actual or Enter 35mm equivalent.
Most camera lenses are marked with their actual focal length in millimeters and you should use Enter actual in this case. However, a few cameras are marked with 35mm equivalent focal length (computed by multiplying the actual focal length by the crop factor). If you select Enter 35mm equivalent, DoF will divide the focal length you enter via the focal length scale by the camera crop factor to determine the actual focal length to use to compute depth of field. This option is provided as a convenience so you will not have to divide by the crop factor yourself. Note that the metadata stored in TIFF, JPEG or raw files always records the actual focal length and not the 35mm equivalent.

Frame width (mm) Enter the sensor width and height in mm. For example, for a full frame 36x24mm sensor, enter
Frame height (mm) 36.0 for the width and 24.0 for the height.
Some common frame sizes are listed below:
Name Dimensions Comments Crop Factor
1/2.5" 5.76x4.29 6.25X 1/2.3" 6.16x4.62 5.84X 1/2" 6.4x4.8 5.63X 1/1.7" 7.6x5.7 4.74X 1/1.6" 8x6 4.5X 1" 13.2x8.8 Nikon/Sony 2.7X 4/3" 17.3x13 Four Thirds and Micro Four Thirds 2.0X APS C 22.5x14.8 Canon 1.6X APS C 23.6x15.7 Nikon and others 1.5X 35mm 36x24 Full frame 35mm 1.0X 6x4.5 60x45 Medium format 0.6X 6x7 70x60 Medium format 0.52X 4x5 127x102 Large format 0.28X 5x7 178x127 Large format 0.20X 8x10 254x203 Large format 0.14X
For your camera's exact sensor dimensions, consult www.dpreview.com (locate the camera review and look at the Specifications page) or your camera manual.
Frame width (pixels) Enter the sensor width and height in pixels. For example, if your camera has a 6000x4000
Frame height (pixels) pixel sensor, enter 6000 for the width and 4000 for the height. For the exact dimensions of your camera's sensor in pixels, consult www.dpreview.com (locate the camera review and look at the Specifications page) or your camera manual. Or just check the width and height of the image files in pixels.
Film resolution Film resolution in line pairs/mm. (for film cameras only)
Typical values for high contrast targets vary from around 100 (Ektachrome) to 150 (Provia/Velvia) to 200 (Ektar 25). Values for low contrast targets are typically about half the high contrast values. Appendix A lists resolutions of a number of different print and slide film types. Using an average of the high and low contrast resolution numbers gives a typical value.
Custom CoC Custom circle of confusion in mm.
If you are using the Custom CoC method, this is where you enter the size of the circle of confusion you want to use.
Allowable blur Enter the maximum allowable blur in pixels or visually resolvable details. The standard value is about 2.0 or possibly as low as 1.5 to be very conservative. Using 1.0 is overkill since Bayer dithering and anti-aliasing filters make resolution at the pixel level impractical, and few if any lenses are sharp enough to actually resolve usable detail down to the size of an individual pixel. This parameter is a more or less arbitrary scale factor so it can be used to tweak the calculated circle of confusion size to suit personal preference.
Visual Resolution Enter the smallest angle in arc minutes resolvable by the observer. The value for this setting is approximately 1.0 for observers with normal eyesight. Smaller values reduce the size of the circle of confusion proportionally when using the Sharp Print method.
Print size Enter the larger dimension in any convenient units. For example, for an 8x12 print, enter 12.0.
Viewing distance Enter the viewing distance in the same units as the print size. Larger prints are usually viewed from a greater distance.
Wavelength Enter the wavelength of light in nanometers (nm) to use to compute diffraction effects. The default value of 550 nm is commonly used as it is roughly in the middle of the range of visible wavelengths. For ultraviolet or infrared photography, you may want to select values more appropriate for the wavelengths of light illuminating the subject.
The following outputs are computed and displayed when you click the Apply button
Circle of Confusion The calculated diameter of the circle of confusion in mm. This number is computed based on the other settings.

Diffraction Limit The f stop at which diffraction blur is equal to the circle of confusion. At f stops higher than this value, diffraction is the limiting factor in getting the sharpest possible image.
Crop Factor The ratio of the width of a standard 35mm film frame to the camera's frame width. This is the factor by which images need to be enlarged to match those from a full frame sensor camera.
Megapixels For digital cameras, this is the total number of pixels per frame in millions. For film cameras, this is the equivalent number of megapixels based on the film resolution in line pairs per millimeter, computed at two pixels per line pair.
Buttons:
Apply If you change any of the settings, you can click Apply to refresh the displayed Circle of Confusion, Diffraction Limit and Crop Factor.
Prev Clicking this button advances to the previous camera (if any).
Next Clicking this button advances to the next camera (if any).
New Clicking this button appends a new camera to the end of the list. Fill in the camera name and other data before continuing. As a convenience, the initial values for all the settings except the camera name are copied from the current camera. The camera list is automatically sorted alphabetically when you close the Camera dialog.
Delete Clicking this button deletes the current camera. You cannot delete the last camera since there must always be at least one set of camera settings available.
When you are done making changes, simply exit the dialog box to return to DoF.

Practical Considerations
What circle of confusion should I use?
Sharp Print
Use this method if your primarily interest is creating prints that will be viewed from a normal distance. If you plan to make prints that will stand up to close inspection, adjust the camera settings accordingly so the circle of confusion will be reduced.
Sharp Image
Use this method if you want your images to be tack sharp, right down to the pixel level. If the resulting depth of field is too narrow to be useful, you can always allow blur values greater then 1.0 and deliberately trade off some image sharpness for increased depth of field, or you can use focus stacking.
What mode should I use?
Depth of Field and Best f Stop Modes
Use Depth of Field mode when you know the focal length, f stop and focus distance you are going to use and you want to determine the range of distances that will be in focus. This is often the least useful mode because the desired depth of field is usually determined by the scene you are trying to photograph. In this case use Best f Stop mode which lets you work backwards from the required depth of field to determine the best f stop and focus distance for a given lens.
Focus Stacking Mode
Use this mode when you can't get enough depth of field with a single image and you plan to use focus stacking software to merge multiple images shot with different focus distances. After a while, you will develop a feel for the required intermediate focus points since they require rotating the focus ring by equal angle increments between the near and far focus limits.
Blur Mode
Use this mode when you want to determine how much blurring will occur at a given distance in front of or behind the focus plane. For example, if you want to compare two lenses for taking portraits to see which one blurs the background more. Or to determine what focal length and f stop combination to use to blur the background or foreground by a specific amount.
Macro Mode
Use this mode for macro photography, where camera-to-subject distances are short and magnifications are high. First photograph a ruler oriented horizontally across the entire width of the frame. Next, read off the width of the field of view from the image and enter it into DoF. Depth of field can then be computed from the magnification which in turn is computed from the frame width. In Macro mode, you do not need to enter the lens focal since the depth of field depends only on magnification.
What is the best distance to focus at?
The near focus limit, the far focus limit and the focus distance are related such that the values of any two determine the third. You can do this graphically by setting DoF to Best f Stop mode.
Case 1: given near and far focus limit, determine the focus distance
Drag the lower red line to the near focus limit and the upper red line to the far focus limit. The focus distance is indicated by the location of the green line.
Case 2: given the near focus limit and the focus distance, determine the far focus limit
Drag the lower red line to the near focus limit and drag the upper red line until the green line is located at the focus distance. The location of the upper red line now indicates the far focus limit.
Case 3: given the far focus limit and the focus distance, determine the near focus limit
Drag the upper red line to the far focus limit and drag the lower red line until the green line is located at the focus distance. The location of the lower red line now indicates the near focus limit.
What lens and f stop should I use?
Set DoF to Best f Stop mode and select your camera and lens focal length. Then position the two red lines according to the desired near and far focus limits.

DoF displays the f stop that yields the smallest combined diffraction and focus blur. The Blur scale shows you how much blurring occurs at the near and far focus limits. If the blur is unacceptable you may need to narrow the range between the near and far limits or use focus stacking. To explore focus stacking, switch to Focus Stacking mode and increase of decrease the number of images until the blur value becomes acceptable.
How blurry will be background be?
Set DoF to Blur mode and select your camera, lens focal length and f stop. Position the green line to the distance at which the lens is focused and the red line to the distance to the object whose blur you want to determine. DoF displays the amount of blur on the blur scale.
How do I use DoF for macro focus stacking?
Suppose you are using an automated macro slide that uses a stepper motor to advance the camera between shots, and you need to determine the required step size so the composite image will be uniformly sharp. First measure the field of view by photographing a ruler at the subject distance. Then, set DoF to Macro mode and select your camera, field of view, f stop and allowable blur. The required step size must be less than or equal to the total depth of field. If the step size comes out too small, you can try using a smaller aperture (higher f stop) or increasing the allowable blur, but be aware that you will be giving up some sharpness to diffraction, focus blur or both.
How do I compare multiple scenarios? (Windows version only)
You can launch multiple copies of DoF in different windows, and this can be useful for comparing the results from different sets of inputs. If you do this however, you need to be aware that the settings from the last window you close will overwrite those from any previous windows.
Synchronizing Camera Data and Settings (Windows version only)
All settings are saved in a file called dof.txt when you exit DoF and restored when you start it up again. When dof.txt is saved, a backup copy of the previous settings file, if any, is saved in a file called dof backup.txt.
If you have a Dropbox folder on your computer, settings are saved in a subfolder of the Dropbox folder named apps\DoF. This means that any changes such as adding a new camera or tweaking the advanced settings are automatically synchronized across multiple computers. If no Dropbox folder is present, settings are saved in C:\ProgramData\DoF and you must synchronize settings between computers manually.
Please do not edit dof.txt directly using a text editor as any error you accidentally introduce could cause DoF to become unstable or you may lose all your camera settings. Always make changes via the Camera dialog if possible. If dof.txt becomes corrupted, you can try using dof backup.txt to recover. If all else fails, delete the setttings file and DoF will use default settings the next time it runs.

Appendix A – Film Resolution
The best modern general purpose films resolve as many as 200 lines/mm when photographing high contrast test targets under ideal conditions, although for normal subjects of reduced contrast resolution is considerably lower. The following table lists the resolution of some commercially available films. The two numbers for the resolving power are for high contrast and low contrast test targets.
Print Films lp/mm Royal Gold 25/Ektar 25 200/80 Agfacolor Ultra 50 140/50 Konica Impresa 50 130/80 Agfacolor HDC 100 130/50 Agfacolor HDC 100 Plus 130/50 Fujicolor Superia Reala 100 125/63 Fujicolor Superia 100 125/63 Fujicolor Super G Plus 100 130/50 Kodacolor Gold Plus 100 100/50 Konica Color Centuria 100 125/63 Agfacolor Optima 125 140/50 Kodak Royal Gold 100/Ektar 125 160/NA Agfacolor Portrait XPS 160 150/60 Fujicolor NPS 160 Professional 125/63 Vericolor III 160 100/40 Konica SR-G 160 100/50 Agfacolor Optima 200 130/45 Agfacolor HDC 200 130/50 Agfacolor HDC 200 Plus 130/50 Fujicolor Superia 200 125/55 Fujicolor Super G Plus 200 100/50 Kodacolor Gold Super 200 100/50 Konica Color Centuria 200 100/50 Agfacolor Optima 400 100/50 Agfacolor HDC 400 100/50 Agfacolor HDC 400 Plus 130/50 Fujicolor Super G Plus 400 100/50 Fujicolor 400 Pro NPH 100/50 Fujicolor NPH 400 100/50 Fujicolor Superia 400 125/50 Konica Color Centuria 400 100/50 Kodak Gold 400 100/NA Fujicolor Super NHG II Pro 800 100/50 Fujicolor Superia X-Tra (800) 100/50 Konica Color Centuria 800 100/50 Kodak Royal Gold 1000/Ektar 1000 80/NA Kodacolor Gold 1600 80/NA Fujicolor Superia (1600) 90/45
General Purpose Slide Films lp/mm Kodachrome 25 100/63 Agfachrome RSX 50 125/55 Fujichrome Velvia 50 160/80 Ektachrome 64 125/50 Kodachrome 64 100/63 Agfachrome CT Precisia 100 130/50 Agfachrome RSX II Pro 100 125/50 Fujichrome MS 100/1000 135/55 Fujichrome Astia 100 135/55 Fujichrome Provia 100 140/60 Fujichrome Provia 100F 140/60 Fujichrome Sensia II 100 135/55 Imation Chrome 100 94/NA Ektachrome 100 100/50 Konica Chrome R-100 125/50 Agfachrome RSX II Pro 200 110/50 Agfachrome CT Precisia 200 120/50 Fujichrome Sensia II 200 125/50 Ektachrome 200 125/50 Kodachrome 200 100/50 Fujichrome Provia 400 125/40 Fujichrome Provia 400F 135/55 Fujichrome Sensia II 400 125/40 Imation Chrome 400 89/NA Fujichrome Provia 1600 100/40 Ektachrome P1600 Pro 80-63/NA
Tungsten Balanced Slide Films Kodachrome 40 100/63 Fujichrome 64 T 135/55 Ektrachrome 64T 125/50 Ektachrome 160T 125/50
Black and White Films Agfapan APX 25 200/NA Technical Pan 2415 320/100 Agfapan APX 100 150/NA Fortepan 100 90/NA T-MAX 100 200/63 Plus-X 125 125/50 Fortepan 200 85/NA Agfapan APX 400 110/NA Fortepan 400 80/NA Tri-X 400 100/50 T-MAX 400 125/50 T-MAX P3200 125/40
Special Purpose Films High Speed Infrared 80/32 Ektachrome Slide Dup 125/63 Ektachrome SO-366 125/63 Agfa Scala 200X 120/50 Polaroid Polachrome/HC 90/NA Polaroid Polapan 90/NA
Some film manufacturers rate film resolution by publishing an MTF curve instead of listing lines per mm. You can infer the resolution in lines per mm for high contrast subjects by looking at where the MTF curve drops to about 20%.

Appendix B - Real World Examples
The following examples are based on the Sharp Image method of computing circle of confusion and looking at the effects on fine image detail. An example based on the Sharp Print method would require printing the images and looking at them from the right distance, and this does not lend itself to presentation in an electronic document.
Appendix B1 - Depth of Field Blurring Example
To illustrate blurring caused by a subject being offset from the focus distance, I photographed a resolution test target using an Olympus OM-D EM-1 mounted on a copy stand. I attached a 45mm macro lens, set the aperture to f/4 to minimize diffraction, adjusted the distance from the camera to the target to 30”, and carefully focused the camera on the target. Then I took a series of photos, lowering the camera 1/8” at a time while leaving the camera focused at 30”.
According to DoF, the image should remain sharp up to 0.316” closer than the 30” focus distance. This predicts the images at 0.000”, 0.125”, 0.250”, and 0.375” front focus should all be sharp, with the last one perhaps being a little soft. Beyond this point the images should get progressively softer.
I shot raw files leaving the images completely unsharpened. As long as sharpening is applied consistently to all the images it shouldn’t make any difference to side-by-side comparisons, but I wanted to get the most accurate possible view of the sensor data. Normal image workflow would naturally produce slightly sharper images. I cropped the images down to just the central area (roughly 170x150 pixels) of each image as shown in red below:
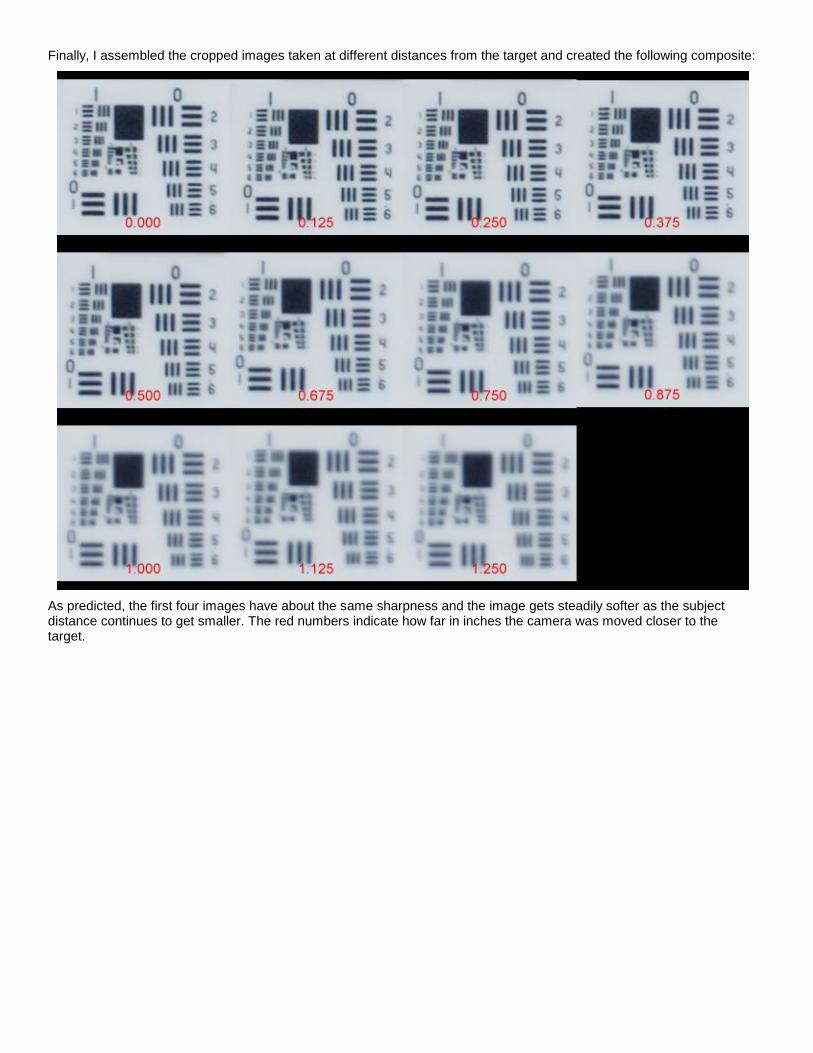
Finally, I assembled the cropped images taken at different distances from the target and created the following composite:
As predicted, the first four images have about the same sharpness and the image gets steadily softer as the subject distance continues to get smaller. The red numbers indicate how far in inches the camera was moved closer to the target.

Appendix B2 - Diffraction Blurring Example
To illustrate blurring caused by diffraction, I photographed the same resolution test target using the same camera and lens as in the previous example. In this case I varied the f stop from f/2.8 to f/22 (compensating by increasing the exposure time accordingly), holding the target distance fixed at 30” with the camera focused accurately on the target. As the f stop increases, so does diffraction blur. According to DoF, the values of diffraction blur are roughly:
f/2.8 0.47 f/4 0.67 f/5.6 0.93 f/8 1.33 f/11 1.83 f/16 2.56 f/22 3.66
Since diffraction blur only becomes visible at around 1.00 (i.e. when it is comparable to the circle of confusion), at f/2.8 and f/4 images should be sharp, at f/5.6 very slightly blurry, and the rest progressively softer.
The actual images (again from unsharpened RAW files) look like this:

Appendix B3 - What Different Amounts of Blurring Look Like
DoF displays a measure of how much images are blurred as compared to the circle of confusion, so values of 1.0 or lower should be acceptably sharp. To give you an idea of what images with larger amounts of blur look like, I did the following experiment.
First I set up an Olympus OM-D EM-1 with a 75mm lens (which is one of the sharpest available lens for this system), aperture f/4, 20 feet away from a test target taped to the wall. I had already calculated how much blur DoF predicts the image will exhibit for a subject at 20 feet,if the camera is focused at various distances less than 20 feet. I then focused on a series of targets at distances corresponding to various amounts of blur and then using that focus setting took photographs of the target 20 feet away. This produces a series of images of the same subject at the same size blurred by known amounts.
First, here is the overall scene:
As before, I processed raw files with no sharpening and cropped the images down to a central region containing just the target. The first image was focused exactly on the target and is thus about as sharp as the camera and lens can deliver. Due to diffraction, the predicted blur is 0.67. Subsequent images were focused at closer distances calculated so as to produce increasing amounts of blur as indicated by the red number in the upper left corner of each one:


Appendix C - Depth of Field Equations
Definitions
L = focal length in mm. A = focus at distance in mm. f = f stop (aperture/focal length) Dn = near focus distance in mm. Df = far focus distance in mm. H = hyperfocal distance in mm.
D = subject distance in mm. Bd = diffraction blur in mm. Bf = focus blur in mm. c = diameter of CoC in mm. m = magnification factor
Diffraction Blur in mm given f (for green light)
Bd = f/750
Focus Blur in mm given f, L, A, D
Bf = ∞ if A ≤ L Bf = 0 if A = D Bf = L2/(f*D) if A = ∞ Bf = L2/(f*(A – L)) if D = ∞ Bf = |(L2*(A – D))/(f*D*(A – L))|
f stop at which diffraction blur = circle of confusion
f = 750*c
A, Dn, Df given any 2 out of 3
A = 2*Dn*Df/(Dn + Df) Dn < Df , if Df = ∞, A = 2*Dn Dn = A*Df/(2*Df – A) A < 2*Df , if Df = ∞, Dn = A/2 Df = A*Dn/(2*Dn – A) A > Dn and A < 2*Dn, if Dn ≤ A/2, Df = ∞
Hyperfocal distance, near and far focus limits
H = L2/(f*c) + L Dn= (A*(H – L))/(H + A – 2*L) = A*L2/(L2 + f*c*(A – L)) Df = (A*(H – L))/(H – A) = A*L2/(L2 – f*c*(A – L))
f stop for best tradeoff between diffraction and focus
f = L*sqrt((750*(A – Dn))/(Dn*(A – L))) A > L and A > Dn
Distance range at which a given focus blur occurs
Dn = L2/(f*Bf) if A = ∞ Df = ∞ if A = ∞
Dn = A*L2/(L2 + f*Bf*(A – L)) A > L Df = A*L2/(L2 – f*Bf*(A – L)) A > L if Df < 0, Bf not reached even at ∞
Macro total depth of field for a given magnification
DOF = 2*f*c*(m + 1)/m2 m > 0
Harmonic and inverse harmonic scale given lower and upper limits
x = harmonic scale [0..1] y = linear distance [A..B]
y = A/(1 – (1 – A/B)*x) if B = ∞, y = A/(1 – x) x = (1 – A/y)/(1 – A/B) if B = ∞, x = 1 – A/y

Acknowledgements and References
Harold M. Merklinger, The Ins and Outs of Focus, available for download at:
http://www.trenholm.org/hmmerk/download.html
Norman Koren, Depth of Field and Diffraction:
http://www.normankoren.com/Tutorials/MTF6.html
Useful information can also be found in the Wikipedia articles on Depth of Field and Circle of Confusion.
Copyright 1995-2017, Digital Light & Color All Rights Reserved
Written by Jonathan M. Sachs [email protected]
http://www.dl-c.com