double 27 self- model no. cleaning built-in wall oven … · qualified service personnel. • do...
TRANSCRIPT
OWNER'S MANUAL
DOUBLE 27" SELF-CLEANING BUILT-INWALL OVEN WITHUPPER M ICROW,_VE
MODEL NO.
911.49485
911.49489
CAUTION:Before using this oven,read this manual and
follow all its Safety Rules
and OperatingInstructions.
• Safety Instructions• Operation• Care and Cleaning
Problem Solving
Sears, Roebuck and Co.5 Hoffman Estates, IL 60179 U.S.A.
229C4020P226.t (SR10425)

TABLEOFCONTENTS
SELF-CLEANINGBUlLT-INWALLOVENWITHMICROWAVE
Oven Safety ................................ 3-6
Removal of Packaging Tape ........... 6Features of Your Oven .................... 7Microwave Oven Control ................ 8Power Level ................................ 8-9Time Cook I ..................................... 9Time Cook Guide ............................ 9Time Cook II .................................. 10Time Defrost .................................. 10Add 30 Seconds ........................... 10Express Cook ................................ 10Auto Feature ................................. 10Timed Defrosting Guide ................ 11Humidity Sensor ............................ 12Popcorn ........................................ 12Reheat ........................................... 12Potato ....................... .................... 12Beverage ...................................... 13Snacks .......................................... 13Snacks Guide ............................... 13Cook .............................................. 13Cook Guide ................................... 13Upper Oven Clock ........................ 14Display On/Off .............................. 14Remirider ...................................... 14Delay Start .................................... 14Sound On/Off ................................ 14Lower Oven Control ...................... 15Lower Oven Display ...................... 15
Lower Oven Clock ........................ 16Lower Oven Kitchen Timer ........... 16Lower Oven Tones .................. 16-17Lower Oven F Codes .................... 17Lower Oven Cooking Tips ...... 18, 19Baking with Margarine .................. 18Baking ........................................... 20Broiling .......................................... 21Setting Special Features ............... 22
Self-Cleaning Cycle ................ 23-24Microwave Interior ........................ 25Microwave Oven Floor .................. 25Microwave Door Window .............. 25Microwave Shelf Accessory .......... 25Outside Oven Surfaces ................. 25Microwave Control Panel .............. 25Lower Oven Control Panel ............ 26Broiler Pan and Grid ..................... 26Oven Racks .................................. 26Walls of the Oven .......................... 26Glass ............................................. 26Oven Light Bulb ............................ 27Oven Door ..................................... 27Removable Oven Racks ............... 27
Before Calling forService .................................... 28-29Temperature Adjustment ............. 30Warranty ........................................ 31Consumer Service Numbers ......... 32
For your convenience and future reference, please write downyour model and serial numbers in the space provided. They arelocated on the inside of the microw_.ve on the right side.
MODEL NUMBER: SERIAL NUMBER:
2
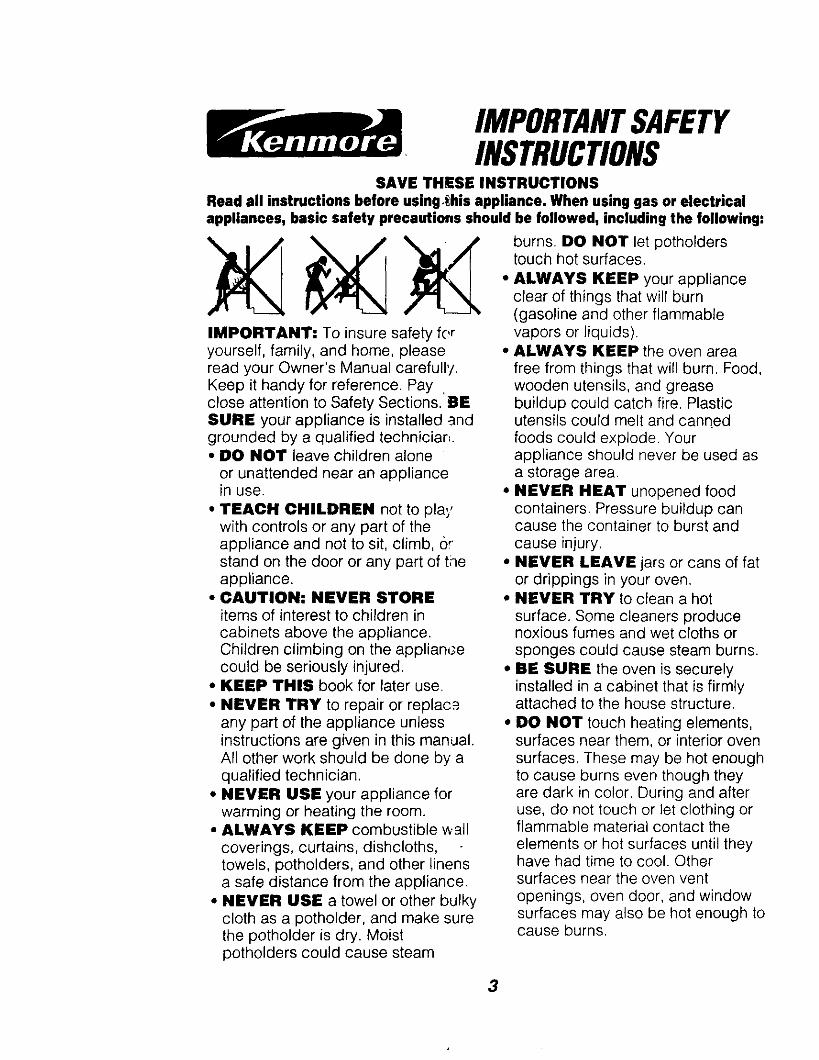
IMPORTANTSAFETYINSTRUCTIONS
SAVE THESE INSTRUCTIONS
Read all instructions before using°_his appliance. When using gas or electricalappliances, basic safety precautions should be followed, including the following:
IMPORTANT: To insure safety foryourself, family, and home, pleaseread your Owner's Manual carefully.Keep it handy for reference. Pay .close attention to Safety Sections. BESURE your appliance is installed andgrounded by a qualified technician.• DO NOT leave children alone
or unattended near an appliancein use.
• TEACH CHILDREN not to playwith controls or any part of theappliance and not to sit, climb, orstand on the door or any part of theappliance.
• CAUTION: NEVER STOREitems of interest to children in
cabinets above the appliance.Children climbing on the applian_._ecould be seriously injured.
• KEEP THIS book for later use.
• NEVER TRY to repair or replac_any part of the appliance unlessinstructions are given in this manual.All other work should be done by aqualified technician.
• NEVER USE your appliance forwarming or heating the room.
• ALWAYS KEEP combustible wall
coverings, curtains, dishcloths,towels, potholders, and other linensa safe distance from the appliance.
• NEVER USE a towel or other bulkycloth as a potholder, and make surethe potholder is dry. Moistpotholders could cause steam
burns. DO NOT let potholderstouch hot surfaces.
• ALWAYS KEEP your applianceclear of things that will burn(gasoline and other flammablevapors or liquids).
• ALWAYS KEEP the oven area
free from things that will burn. Food,wooden utensils, and greasebuildup could catch fire. Plasticutensils could melt and cannedfoods could explode. Yourappliance should never be used asa storage area.
• NEVER HEAT unopened foodcontainers. Pressure buildup cancause the container to burst andcause injury.
• NEVER LEAVE jars or cans of fator drippings in your oven.
• NEVER TRY to clean a hotsurface. Some cleaners producenoxious fumes and wet cloths orsponges could cause steam burns.
• BE SURE the oven is securelyinstalled in a cabinet that is firmlyattached to the house structure.
• DO NOT touch heating elements,surfaces near them, or interior ovensurfaces. These may be hot enoughto cause burns even though theyare dark in color. During and afteruse, do not touch or let clothing orflammable material contact theelements or hot surfaces until theyhave had time to cool. Othersurfaces near the oven vent
openings, oven door, and windowsurfaces may also be hot enough tocause burns.
3

known to the state to cause birth_lefects or ether reproductiveharm and requires businesses to_varn their customers of potentialIMPORTANTSAFETY ,,xposure to such substances. The
fiberglass insulation in a self-INSTRUCTIONS cleaning oven will give off a very
small amount of carbon monoxideduring the cleaning cycle.'_xposure can be_ninimized by
• PLACE OVEN RACKS in the desired _enting with an _l_en door orposition while the oven is cool. If racksmust be moved while oven is hot, do not window or using a ventilation fan
or hood.let potholder contact the hot ovenelement. _MPORTANT: The health of
• AFTER BROILING, always take the some birds is extremely sensitivebroiler pan and grid out of the oven and to the fumes given off during theclean them. Leftover grease in the self.cleaning cycle of any oven.broiler pan could catch fire the next time Move birds to another well-you use your oven. ventilated room.
• ALWAYS USE care when opening the READ AND UNDERSTANDovendoorLethotairandsteamescape THIS INFORMATION NOW!before moving foods.
Be sure everyone in your home• NEVER USE aluminum foil to line the knows what to do in case of fire.
oven bottom, Improper use of foil could [,lever use water on a grease fire;start a fire, or electrical shock could il will only spread the flames.result. OVEN FIRE:
• NEVER BLOCK the oven vent Do not try to move the pan!opening, li. Close the oven door and turn
controls off.2. If fire continues, carefully open the
• CLEAN ONLY the parts listed in this door, throw baking soda on the fire, ormanual. Follow all cleaning instructions, use a dry chemical, foam, or halon-Be sure to remove the broiler pan and type extinguisher.grid before self-cleaning
• NEVER RUB, move, or damage thedoor gasket on self-cleaning ovens.
• NEVER TRY to clean utensils, _ When using electrical
cookware, removable parts, or broiler _ appliances, basic safetypan and grid in the self-clean cycle, precautions should be
• DO NOT USE oven cleaners - No followed, including the following:commercial oven cleaner or protective WARNING: To reduce the risk ofcoating of any kind should be used in or bums, electric shock, fire, injuryaround any part of the oven. to persons, or exposure to
IMPORTANT SAFETY NOTICE! excessive microwave energy"The California Safe Drinking Water • Read all instructions beforeand Toxic Enforcement Act using this appliance.requires the governor of California • Read and follow the specific
to publish a list of substances 4 _ microwave safety instructions. ,

IMPORTANTSAFETYINSTRUCTIONS• THIS APPLIANCE must be
grounded. Connect only to properlygrounded outlet. See the GroundingInstructions in the InstallationInstructions.
• USE this appliance only for its intendeduse as described in this manual. Do notuse corrosive chemicals or vapors inthis appliance. This microwave oven isspecifically designed to heat or cookfood, and is not intended for laboratoryor industrial use.
• INSTALL or locate this appliance onlyin accordance with the providedInstallation Instructions.
• DO NOT cover or block any openingson the appliance.
• THIS MICROWAVE oven is not
approved or tested for marine use,• DO NOT operate this appliance if it is
not working properly or if it has beendamaged or dropped.
• AS WITH ANY APPLIANCE, closesupervision is necessary when used bychildren.
• DO NOT overcook food. Carefullyattend appliance if paper, plastic,or other combustible materials are
placed inside the oven to facilitatecooking.
• REMOVE wire twist-ties from paper orplastic bags before placing in the ovr.n.
• DO NOT use your microwave oven todry newspapers.
• DO NOT use recycled paper products.Recycled paper towels, napkins, andwaxed paper can contain metal fleckswhich may cause arcing or ignite. P_,perproducts containing nylon or nylonfilaments should be avoided.
• DO NOT heat food in closedcontainers, such as glass jars, whichmay explode.
• DO NOT pop popcorn in yourmicrowave unless you use popcornlabeled for use in microwave ovens.
• DO NOT overcook potatoes. Theycould dehydrate and catch fire, causingdamage to your oven.
• DO NOT operate the microwave oven ifit is empty.
• DO NOT use your microwave oven asa storage space.
• IF MATERIAL INSIDE the oven
should ignite, close the door, turn theoven off, and disconnect the power tothe appliance.
• OVERSIZED food or oversized metalcookware should not be used in amicrowave oven. Electrical shock or firecould occur.
• DO NOT clean with metal scouringpads. Pieces can break off the pad,causing electrical shock.
• DO NOT defrost frozen beverages thathave narrow-necked bottles. Pressurecould build up, causing the bottle toburst.
• USE POTHOLDERS when removingcookware from the oven, Cookwarecould become hot during cooking dueto the transferred heat from the food.
• BE CAREFUL touching the walls orthe oven bottom during or after cooking,The walls and floor could become hot.
• DO NOT boil eggs in a microwaveoven. Pressure will build up inside theegg yolk and will cause the egg to burst.
• USE PLASTIC containers that are
approved by the manufacturer formicrowave use. Do not allow children touse plastic containers unlesssupervised. Do not subject emptycontainers to microwaving.
5

IMPORTANTSAFETYINSTRUCTIONS• FOODS WITH UNBROKEN OUTER
SKIN, such as potatoes, sausages,tomatoes, apples, chicken liver, eggyolks, and other giblets, should bepierced to allow steam to escape duringcooking.
• MAKE SURE PLASTIC WRAPSused during microwave cooking areapproved for microwave use.
• SPONTANEOUS BOILING: Undercertain circumstances, liquids may startto boil during or shortly after removalfrom the oven. Stirring the liquid brieflybefore removing the container will helpprevent burns or splashing of liquids.
• DO NOT heat baby food in glass jars inthe microwave.
• BOILABLE COOKING POUCHES
and tightly closed plastic bags shouldbe slit, pierced, or vented as directed bypackage. If they are not vented in someway, pressure will cause them to burst.
• DO NOT attempt to operate this ovenwith the door open since open-dooroperation can result in harmful exposureto microwave energy. It is importantnot to defeat or tamper with thesafety interlocks.
• DO NOT place any object between theoven front face and the door or allow soilor cleaner residue to accumulate onsealing surfaces.
• THE OVEN should not be adjusted orrepaired by anyone except properlyqualified service personnel.
• DO NOT operate the oven if it isdamaged. It is particularly important thatthe oven door close properly and thatthere is no damage to the:1. door (bent)2. hinges and latches (broken or
loosened)3. door seals and sealing surfaces.
To remove the adhesive residue left from
packaging tape, use householddishwashing liquid, mineral oil, or cookingoil. With a soft cloth, rub into the area andallow to soak. Rinse and dry well. Repeat
procedure using an appliance polish toinsure n6 damage is done. This shouldbe done before the oven is turnedon for the first time. The tapecannot be removed once theoven has heated. Packaging tapemay be found in the following areas:E,oor Handle, Control Panel Area, Door-.rim, and Oven Area.
6
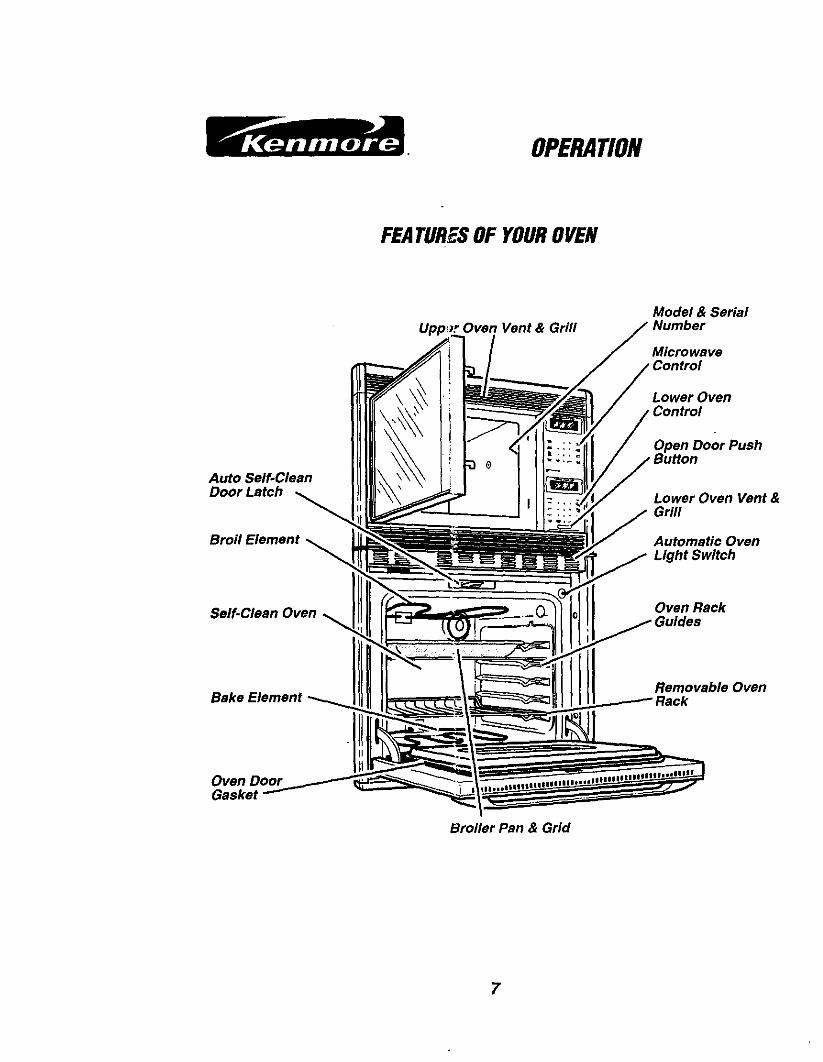
OPERATION
FEATURESOF YOUROVEN
Oven Vent & GrillModel & Serial
Microwave
Auto Self-CleanDoor Latch
Broil Element
Lower Oven;ontrol
Open Door Push
Lower Oven Vent &Grill
Automatic OvenLight Switch
Self-Clean Oven Oven Rack
Bake ElementRemovable Oven
Oven DoorGasket
Broiler Pan & Grid
7

UPPER MICROWAVE OVEN
SENSOR COOKING CONVENIENCE COOKING
GUIDE BEHIND DOOR
With your new Microwave Oven, you canmicrowave by time by using the Sensorfeatures, or by using the Auto features.
TIME COOK EXPRESS COOKTIME DEFROST ADD 30 SEC
TimeFeatures allow you to set the exactamount of time needed to prepare foods,up to 99 minutes and 59 seconds.
Below is a list of buttons that controlSensor features.
POPCORN SNACKSBEVERAGE POTATOREHEAT COOK
AUTO DEFROST
When using sensor cooking, the oven willautomatically adjust the cooking time foryou by detecting the humidity releasedduring cooking. The cooking time will varyaccording to the types and amounts offoods.
OPERATION
When power is restored, all digits inthe display will light up, then thedisplay will read RESET.
This feature adds flexibility tomicrowave cooking. Each level ofpower gives you microwave energy witha certain percent of the power.Such as:
1 = 10% of power2= 20% of power3= 30% of power4= 40% of power
5= 50% of power
6= 60% of power
7'= 70% of power
8= 80% of power
9= 90% of power
O= 100% of power
Most of your cooking will be done using100% of power. Foods will cook fasterbut will need to be stirred, rotated, or
turned over more frequently.
Using a lower level of power will cookfoods more evenly and need lessstirring or rotating. Some foods mayhave a better flavor, texture, orappearance if one of the lower powerlevels is used. A lower power is muchbetter for foods that have tendencies toboil over,
POWERLEVEL
lO7
5
2or3
1
FOODS
Fish, bacon, vegetables, boiling liquids
Meat, poultry, casseroles, or reheating
Stews, less tender cuts of meat
Defrosting, simmering
Keeping foods warm, softening butter
The power level may be entered or changedimmediately after entering the feature time,such as TIME COOK, TIME DEFROST,or EXPRESS COOK, The power level mayalso be changed during a time countdown.
8

OPERATION
1. Press the TIME COOK pad or the TIMEDEFROST pad.
2. Press the NUMBER pads to set acooking or defrosting time.
3. Press the POWER LEVEL pad.
4, Press a NUMBER pad to set the powerlevel you need.
5, Press the START pad.
TIME COOK 1 is automatically set forpower level 10,but you can change this levelto one you prefer.Youmay set a cooking timeup to 99 minutes and 59 seconds.
1. Press the TIME COOK pad.
2. Press the NUMBER pads to enter yourpreferred cooking time.
3. If you wish to change the power level,press the POWER LEVEL pad and thenpress a NUMBER pad to select yourpreferred power level.
4. Press the START pad.
If you open the oven door during cooking tocheck foods, when the door is closed pressthe START pad to continue cooking..
VEGETABLE
Beans
:resh)Yozen)
Broccoli
'fresh)
rozench0pped)
_arrotsFresh,sliced)frozen);orn on the
cob
fresh)(frozen)
Mixed reg.frozen)Peas
fresh,shelled)frozen)
Potatoes
(fresh,cubed, white(fresh,whole,sweetor white} I
WEIGHT
1 lb.
10OZ. package
1 bunch(1¼ to 1½1bs.)
10 oz. package
10 oz. package10oz. package
to 5 ears
ear2 to 6 ears
10oz. package
2fbs. unshelled
10 oz. package
4 potatoes6 to 8 oz. each)1 (6 to 8 oz.)
TIME COOK GUIDE(Use power level 10 unless noted)
COOKINGTIME
10 to 15 min4to 8 rain.
5 to 9 rain.
4 to 7 rain.
4 to 8 min.3to 7 min.
1_/_min.perear
3 to 6 min.2 to3min.perear
2 to 6 rain.
7 to 10 min.2 to 6 min.
9 to 12 min.
1 to 4 rain.
I COMMENTS
in 1½-qt. casserole, place V2cup water.In f-qt. casserole, place 2 tablespoons water.
In 2-qt. casserole, place V2cup water.
In 1-qt. casserole.
In 1½-qt. casserole, place V4cup water.In 1-qt. casserole, place 2 tablespoonswater.
In 2-qt oblong glass baking dish, place corn. If cornis in no water: husk corn and add V4cup water.Rearrange after half the time.
Place in 2-qt. oblong glass baking dish. Cover withvented plastic wrap. Rearrange after half the time.
In 1-qt. casserole, place 3 tablespoons water.
In 1-qt. casserole, place ¼ cup water.In 1-qt. casserole, place 2 tablespoons water.
Peel and cut into 1-inch cubes. Place in 2-qt.casserole with V2cup water. Stir after half the time.Pierce with cooking fork. Place in center of the overLet stand 5 minutes
9

OPERATIONTimedCooking
TIME COOK II allows you to change powerlevelsautomatically during cooking.
1, Press the TIME COOK pad.2, Press the NUMBER pads toenter your
firstcooking time.3, If you wish to change the power level,
press the POWER LEVEL pad and thenpress the NUMBER pad to select yourpreferred power level.
4, Press the TIME COOK pad again.5, Press the NUMBER pads again to enter
your second preferred cooking time.6, If you wish to change the power level,
press the POWER LEVEL pad and thenpress the NUMBER pad to select yourpreferred power level.
7, Press the START pad.
At the end of the firstcooking timecountdown, the second cooking time willstart its countdown.
Allows you to defrost for a selected length oftime. The Power Level is automatically setfor level 3, but can be changed. When usinghigher power levels, foods will need to bechecked more frequently.
TO SET TIME DEFROST:
1. Press the TIME DEFROST pad.2. Press the NUMBER pads to enter the
defrosting time3. Press the START pad.
You can use this feature two ways:
• It will add 30 seconds to the time countingdown each time the pad is pressed.
• It can be used as a quick way to set 30seconds of cooking time.
This is a quick way to set cooking time from1 to 6 minutes.
Press one of the Express Cook pads (from1 to 6) for 1 to 6 minutes of cooking atpower level 10.
The power can be changed while thetime is counting down. Press the POWERLEVEL pad and enter a number from1 toO.
Auto Defrost automatically sets the defrostingtimes and power levels to give evendefrosting results for meats, poultry, and fish.Use Time Defrost for mostother frozen foods.
TO SET AUTO DEFROST:
1. Press the AUTO DEFROST pad2, Using the Conversion Guide, enter the
food weight.3, Press the START pad.
There is a handy guide located on the insidefront of the microwaveoven.
• Remove meat from package and place ona microwave-safe dish.
• Twiceduring defrost, the oven signals"TURn." At each "TURn" signal, turn thefood over. Remove defrosted meat orshield warm areas with small pieces of foil.
• After defrosting, most meats need to stand5 minutes to complete defrosting. Largeroasts should stand for about 30 minutes.
CONVERSION GUIDE
If the weight of food is stated in pounds andounces, the ounces must be converted totenths (.1) of a pound.
CONVERSION CHART forAuto Defrost
FOOD WEIGHT FOOD WEIGHTIN OUNCES IN TENTHS
1-23
456-7
89-10
1112-1314-15
.1
.2
.3
.4
.5
.6
.7
.8
.9
10

OPERATIONTimedCooking
FOODBreads, CakesBuns and rollsSweet rolls
Fish and Seafood
Fillets, frozen (1 lb.)Shellfish,smallpieces(f lb.)
Meat
Bacon (1 lb.)
Franks (1 lb.)
Ground meat (1 lb.)Roast:beef,lamb,veal,pork
Steaks, chops, andcutlets
Poultry
Chicken, broiler, fryercut up (2V2to 3 Ibs.)
Chicken, whole(21/2to 3 Ibs.)
Cornish Hen
Turkey breast(4 to 6 Ibs.)
TIMED DEFROSTING GUIDE
TIME COMMENTS,
Y4min.2 to 4 rain.
8 to 9 min. "lace block in casserole. Turn over and break up after3 to 7 rain. half the time.
2 to 5 min. PlaceunopenedpackageinovenLetstand5minutesafterdefrosting.
2 to 5 min. Place unopened package in oven. Microwave just until frankscan be separated. Let stand 5 minutes, if necessary,tocomplete defrosting.
4 to 6 rain. ',rummeatover after half the time Use power tevel 1.9to 13rain.perlb.
4 to 8 rain.per lb. Place unwrapped meat incooking dish Turn over after halfthe time and shield warm areas with foil. When finished,separatepieces and let stand 1ocomplete defrosting.
14 to 20 min. Placewrapped chickenin dish. Unwrapandturn over afterhalfthe time.Whenfinished,separatepiecesand microwave2to 4minutesmore,if necessary.Let standto finishdefrosting.
20 to 25 min. Place wrapped chicken in dish. After half the time,unwrap and turn chicken over. Shield warm areas with foil.Finish defrosting. If necessary, run cold water in the cavityuntil giblets can be removed.
7 to 13 min. Place unwrapped hen in the oven breast side up. Turnper lb. .,vet after half the time. Run cool water in the cavity until
_iblets can be removed.
3 to 8 min. Place unwrapped breast in dish breast side down. After3er lb. half the time, turn over and shield warm areas with foil
Finish defrosting. Let stand t to 2 hours in refrigerator tocomplete defrosting.
• Foods frozen in paper or plastic can bedefrosted in the package. Closedpackages should be slit, pierced, orvented after food has partially defrosted.Plastic storage containers should bepartially uncovered.
• Family-size, prepackaged frozen dinnerscan be defrosted and microwaved. If thefood is in a foil container, transfer it to amicrowave-safe dish.
• Foods that spoil easily should not beallowed to sit out for more than one hourafter defrosting. Room temperaturepromotes the growth of harmful bacteria.
• For more even defrosting of larger foods,such as roasts, use Auto Defrost. Be surelarge meats are completely defrostedbefore cooking.
• When defrosted, food should be cool andsoftened in all areas. If you still notice icyspots, just let stand a few minutes.
11

OPERATIONSensorCooking
TheSensorFeaturedetectsthe increasinghumidity releasedduringcooking.The ovenautomaticallyadjuststhe cooking timetovarioustypes and amountsof food.
• The proper containersand covers areessentialfor best sensorcooking.
• Alwaysuse microwave-safecontainersandcover themwith lids or vented plasticwrap.Neverusetight-sealingplastic containers,which can preventsteamfrom escapingandcause food to overcook,
• Be surethe outsideof the cooking containersand the insideof the microwaveovenare drybefore placing food in the oven. Beadsofmoistureturning into steamcan misleadthesensor,
Useonlywith prepackaged microwavepopcorn weighing 1.75to 3.5 ounces.
TO USE THE POPCORN FEATURE:
Followpackage instructionsusingTIME COOKif the package is less than 1.75 ouncesor largerthan 3.5 ounces, Placethe package of popcornin the center of the microwave.
1. Pressthe POPCORN pad.
If you open the door while"POP" is indisplay,"ERROR" will appear.Close the door and pressthe START pad.
2. HOW TO ADJUST THE POPCORNPROGRAM TO PROVIDE A SHORTEROR LONGER COOK TIME:
If you find that the brand of popcorn you useunderpops or overcooksconsistently,youcan add or subtract 20 to 30 seconds to/fromthe automatic popping time
TO ADD TIME:
After pressing the POPCORN pad, press9immediatelyafterthe ovenstarts foran extra20 seconds.Press9 again to add another10seconds (total30 seconds additionaltime).
"fOSUBTRACT TIME:
.,\fterpressing the POPCORN pad, press 1immediatelyafterthe ovenstartsfor20 seconds lesscooking time.Presst againto reduce cookingtime another10seconds(total30 secondsless time).
_he ReheatFeaturere_ats single servingsofpreviouslycooked foc_', or a plateof leftovers.t. Placecovered food in theoven.
2. Pressthe REHEAT pad. The ovenwillstart immediately.
3. Theoven signalswhen steamissensed and thetime remainingbeginscounting down.
Do notopen theoven door until timeis finishedcountingdown. If the door is opened, close itand pressthe START pad immediately.
After removingfood fromthe oven, stir, ifpossible, to evenout the temperature.If the!,)od is not hot enough,use theTIME COOKpad to reheatfor moretime. Reheatedfoods may have wide variation intemperature, Some areas may beextremely hot.
FOODS NOT RECOMMENDED FORREHEATING"• BreadProducts• Foods that mustbe reheateduncovered,, Foods that needto be stirred• Foodsthat call for a dry look or crisp surface
afterreheating.
-;he PotatoFeaturecooks 1/2to 2 Ibs.ofpotatoes.
1. Pierceskinwith forkand place potatoesonthe turntable. If cooking threeor morepotatoes,arrange in a star pattern.
2. Pressthe POTATO pad, The ovenstartsimmediately.The ovensignalswhen steamis sensedand the time remainingbeginscountingdown.
Do notopen theoven door until timeis finishedcountingdown. If the door is opened, close itand pressthe START pad immediately If foodis not done enough,use the TIME COOK
12 pad to cook for moretime,

OPERATIONConvenienceFeatures
3, Enter weight of food in ounces.4, Press the START pad.
Press and hold the COOK padduring cooking to display the remainingcook time.
Cook Guide
Touse the Beverage Feature:
Press the BEVERAGE pad once fora 4 oz. beverage, twice for an 8 oz.beverage, or three times for a 12 oz.beverage.
Drinks heated with the BeverageFeature may be very hot. Removethe container with care.
FOODTYPE WEIGHT
1Canned 4to20ozVegetables(VEG 1)
2 Frozen !4to16oz.Vegetables(VEG 2)
3 FreshVegetables(VEG3)
The Snacks Feature automatically sets themicrowaving times and power levels towarm a variety of snack foods.
1. Press the SNACKS pad.2, Select snack type 1 to 6. (See chart
below.)3. Enter the number of items or the food
weight in ounces.4. Press the START pad.
You can press and hold the SNACKS padduring cooking to display the remainingmicrowaving time.
Snacks GuideQUANTITY OR WEIG_IT1 to4
1 to2
1 to4
1 to4
8 to 40 oz.
4 to 16 oz.
FOOD TYPE
1 Bread, rolls, muffins
2 Sandwiches
3 Pizza (leftovers)
4 Dessert toppings
5 Soup
6 Cheese dip
The Cook Feature automatically setsthe cooking times and power levels for avariety of foods.
1, Press the COOK pad.2, Select food type 1 to 9. (See Cook
Guide at right.)
4to 16oz.
4 Potatoes 8 to 40 oz.
5 Fish 4to 16oz,
6 Chicken 4to 40 oz iPieces
7Ground 8to48ozMeat(beef, pork,turkey)
8 Bacon 2to 10oz.
4to 16oz.9 Pizza(frozen,Microwaveable
COMMENTS
Use microwave-safecasserole or bowl.Cover with lid or ventedalastic wrap.
Use microwave-sate!casserole or bowl.:Fo!low packageinstructions for addingwater. Cover with lid orvented plastic wrap.
Use microwave-safecasserole or bowl. Add2 tablespoons water foreach serving. Coverwith lid or vented_lastic wrap.
Pierce skin with fork.Place potatoes on theturntable.
Use oblong, square, orround dish. Cover withvented plastic wrap orwax paper.
Use oblong, square,or round dish. Coverwith lid or vented)lastic wrap.
Use round casseroledish. Crumble meat intodish. Cover with lid orvented plastic wrap.
Layerstripson a plate,4 toa layer.Covereachlayerwitha paper towel.
Fo!iow packageinstructions to prepare3izza for microwaving.
NOTE: You cannot enter a weightthat is more or less than tile weightlisted in the Cook Guide above.
13

OPERATIONOtherFeatures
Press the CLOCK pad to enter the time ofday or to check the time of day whilemicrowaving.
TO SET THE CLOCK:
1. Press the CLOCK pad.
2, Enter the time of day.
3, Press the START or CLOCK pad.
To turn the clock display on or off, press andhold the 0 pad for about 3 seconds. TheDISPLAY ONIOFF feature cannot be usedwhile the cooking features are being used.
The reminder feature can be used like analarm clock.
1, Press the REMINDER pad.
2, Enter the time of day you want the ovento remind you. (Be sure the microwaveclock shows the correct time of day.)
3, Press the START pad.
When the Reminder Signal occurs, pressthe CLEAR/OFF pad to turn it off. TheReminder time may be displayed bypressing the REMINDER pad.
NOTE: The REM indicator will remain lit toshow that the Reminder Feature is set. Toclear the Reminder before it occurs, pressthe CLEAR/OFF pad. The REM indicatorlight will go off.
Delay Start allows you to set the microwaveto delay the start time of cooking
1, Press the DELAY START pad.
2. Press the NUMBER pads to select thetime of day you want the oven to turn onand start cooking. Make sure the clock isshowing the correct time of day.
3. Select TIME DEFROST, AUTODEFROST, or TIME COOK. Enter theamount of defrost or cook time, or weightof food for Auto Defrost.
4. Press the START pad.
The Delay Start time will be showing in thedisplay plus Start Time. The oven willautomatically start at the delayed start timeset. The time of day may be displayed bypressing the CLOCK pad.
To turn the control sound on or off, pressand hold the NUMBER 8 SOUND ON/OFF pad for 3 to 4 seconds. The displaywill flash "OFF" and the display will returnto the time of day, "MUTE" will remain inthe display. Toturn the sound back on,press and hold the NUMBER 8 SOUNDON/OFF pad for 3 to 4 seconds, '_)N"will flash in the display, mute will disappear,and the display will return to the time of day.
14

OPERATIONLowerOvenControl
LOWER OVEN
( )OVEN TIMER
ICO0_':NGI
____1 TIM _'R I
* MICROWAVE FAN MAY OPERATE WHILE LOWER O_/ENIS IN USE
Display - Displays timeof day, time, ortemperatureduring cooking, cooking mod:.,and tells you what to do next.
Bake - Press to set oven to bake.
Broil - Letsyou broil at full power bytouching BROIL and START pads, Lets youselect Lo Broil for longer, slower broiling.
Clean - Pressto select Self-Cleaningfunction.Follow all instructions in section onSelf-cleancycle.
Oven Light - Press to turn oven light onand off.
Oven Cooking Time - Useto enteramountof time required for automatic baking.
Delay Start Time - Usewhen bakingorcleaningto enterthe timeof day youwantoven to turn on,WhenDelay Start Time isusedwith Oven Cooking Time, theovenwillalso turn off automaticallyat theend of thecookingtime,
Clock - Pressto enter time of day or checktimeof day when display is showing otherinformation.
Hr/Min Kitchen Timer On/Off - Letsyoutime any kitchen function.
Start - Pressto start anycooking or cleaningfunction.
Clear/Off - Cancelsal! operationsexcept theClock and Timer.
Number Pads - Press these pads to setany function requiring numbers: time of day,kitchen timer,oven temperature,startingtimes,and length of baking or clean times.
CONTROLDISPLAY-- - Indicatorto let youknow
Flashing ?venleraperatmc ovenhasturnedonIndicator tomcat:no -a_or /__ Clockfortoalert _/'I°_i__ _tche.youto I U/-I_rL-i_ _),_-J'_ofnav,set I KLAYBAKECLUN S1_ItTP.OCKCL_i_IDe ayStart
Bf!Or tO I_O nOOR ¢00_ STOP _[Rtempera.___,_0_m___._: t_/_ER_ Time,Oventure or "_ -'"- Cooking,
OvenFunction OvenFunction endtime Indicator Indicator Cleaning
Time ..The display is an easy reference to use Whilelearning your control. Below are descriptionsof how the display works:
Oven Temperature Indicator - Thisindicator has a multiple purpose.
• Displays the temperature
• Displays error code "ERR" - If theoventemperatureindicator flashes"ERR," thenyou haveset an invalidtime or temperature.PresstheCLEARIOFF pad to clear thecontroland reset your oven function.
. Displays Control Problems - If yourcontrol flashes "F" and a numberor letter,you haveexperienced an oven problem.Pleaseread the sectionon F-CODES in thismanual.
On Indicator - Lights when the ovenfunction is set.
Set Indicator - The set indicatorwill flashin combinationwith an oven function or timedfunction to let you knowyou need to set atimeor temperature.Example:"SET" and"BAKE" will flash to let you know you needto set the bake temperature.
Time Indicator - Displays the time of day,cooking time, delayed start time, cleaningtime,or the time set on the kitchen timer.
Displays reminder code "PUSHSTART" - If the oven time indicator flashes
the words "PUSH START," then you needto press the START pad to activate yoursetting.
Oven Function Indicator - Displayswhich oven function has been set, when theoven door locks, and if the function is delayed.
15

OPERATIONClockand Timer
The clock must be set for the correct timeof day before a delayed oven function canwork properly. The time of day cannotbe changed during a delayed ovenfunction, but can be changed during abake or broil function.
HOW TO SET THE CLOCK
1, Pressthe CLOCK pad.
2, PresstheNUMBER pads to set the time.
3, PresstheSTART pad.
RECALL THE CLOCK
While using your oven for timed cooking,press the CLOCK pad if you wish to checkthe time of day. The current timeof day willshow in thedisplay.
POWER FAILURE
If you havehad a power failure, the timeflashing in the display may be incorrect, Resetthe C_ock.
Any oven function thatwas in process willneedto be reset.
The Kitchen Timeris used to time cookingprocesses or other householdactivities, it doesnot control the oven. It can be set for up to 9hoursand 59 minutes. It will count down inminutesuntil the last 60 seconds is reached,then the control will beep once. Whenthecountdown reaches zero, the controlwill beep3 times followedby one beep every6 secondsuntil the HR/MIN KITCHEN TIMER ON/
OFF pad is pressed. This6-second tone canbe canceled. Seetones on the followingpage.
HOW TO SET THE TIMER
1. Press theHR/MIN KITCHEN TIMER
2. Press NUMBER pads to set time.
3. Pressthe START pad.
4. When thecountdown has reached zero,press the HR/MIN KITCHEN TIMERON/OFF pad.
;-o cancel the timer during the countdown,press the HR/MIN KITCHEN TIMER ON/OFF pad twice.
Your new control has a seriesof tones that will.;oundat differenttimes.These tonesmaysound while you set the control for an ovenfunction,or at the end of the oven function. Itwill also alert you that theremay be a problemwith the functions. Beloware the types oftones and a brief description of each.
TONES WHILE SETTING THECONTROL - Whenyou press a touch padyou will hear a beep. This beep will let youknowyou have placed enough pressureonthe pad to activate it.
_-ND OF TIMED CYCLE TONE - At theend of a timed cooking function,you will hear3 short beeps followed by 1 beep every 6seconds. This6-second beep will continuetosound untilthe CLEAR/OFF pad is pressed,or you mayselect the special feature to cancelthis 6-second beep from sounding at the endof future cycles.
TO CANCEL THE 6-SECOND BEEP:
1. Press and hold the BAKE and BROIL
pads, at the same time, for 3 seconds,until the display shows "SF."
2. Press the HR/MIN KITCHEN TIMER
ON/OFF pad, The display will show"CON BEEP" (continuous beep).
3. Press the HR/MIN KITCHEN TIMER
ON/OFF pad again. The display will show"BEEP" (beep canceled).
4. Pressthe START pad.
If you would like to return the 6-second beep,repeat stepsabove until the display showsyour choice and press theSTART pad.
ON/OFF pad.
16

OPERATIONOvenControl, Clock, and TimerATTENTION TONE- This tone will sound ifyou makean erroror an oversightis madewhilesetting an oven function.
Exampleswould be:
a. Settinga clean cycle and the ovendoor isnot properlyclosed.
b. Settingfunctionand not pressing theSTART pad.
c, Pressingan additional function pad withoutfirst setting a temperatureor time.
d. "ERR" will flash if you set an invalidtemperature.PresstheCLEAR/OFF padto clear thecontrol and reset your ovenfunction.
Any of these can be quickly identifiedbywatching the display.
PREHEAT TONE- Whenyou start a bakeoperation,the ovenautomaticallystartsto heat.Whenthe temperature inside theoven reachesthe temperatureyou haveset, a tone will suJndto let you know theoven is ready for baking.
BBImIf you set an oven function and the controlbeeps while the display is flashing "F"and a number "F.4'* or letter "FI," theremay be a problem with the control. Simplypress the CLEAR/OFF pad and waitabout an hour. Try setting the functionagain. If the code repeats, write down thecode and call for service. Tell the
technician what code was flashing.
17

OPERATIONOvenCooking Tips
It is normal to have some odor when
using your oven for the first time. To helpeliminate this odor, ventilate the roomby opening a window or using avent hood.
IMPORTANT: Never cover the ovenbottom or oven rack with aluminum foil.
Improper use can cause poor heat flow,poor baking results, and may damage theoven finish. To prevent staining fromspiliovers, you may place a piece ofaluminum foil or a cookie sheet below foods
which may spill over.
'_= === ===_========="
The oven vent is located under the control
panel. This area could become hot duringoven use. The vent is important for properair circulation, Never block this vent,
oz:-.,%-
In the back of the oven you will notice asmall tube. This is a heat sensor that
maintains the temperature of the oven.Never move or bend this tube.
/l_ Oven
emperature Sensor
Preheating is bringing the oven temperatureup to the temperature you will be usingduring baking. Let the oven preheatthoroughly when recipes call for preheating.
The low temperaturezone of your oven(between 170° and 200°F)is available tokeep hotcooked foods warm. However,foodsshould not be kept-at these temperatureslonger than 2 hours.
To prolong the life of your oven light bulb,follow this helpful tip. Always turn the lightoff when the oven is not in use. If your ovenlight is left on for an extended period ofiime, the oven will be warm when the dooris opened due to the heat generated fromthe light bulb.
Most recipes for baking have beendeveloped using high-fat products such asbutter or margarine (80% fat by weight--thefederal requirement for products labeled"margarine"). You will get poor results ifcakes, pies, pastries, cookies, or candies aremade with low-fat spreads. Low-fatspreadscontain tess fat and more water. The highmoisture content of these spreads affects thetexture and flavor of favorite baked recipes.The lower the fat contentof a spread3roduct, the more noticeable thesedifferences become. To ensure best results,Jse margarine, butter, or stick spreadscontaining at least 70% vegetable oil.
18
OPERATIONOvenCooking Tips
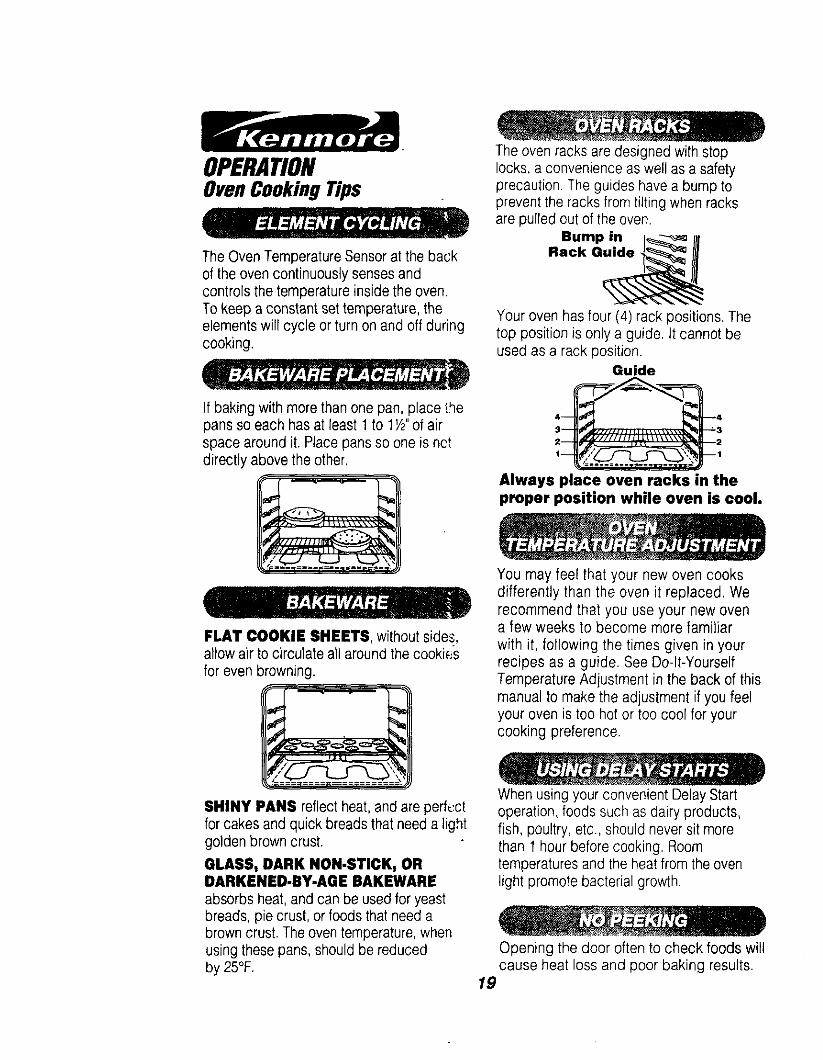
The Oven Temperature Sensor at the backof the oven continuously senses andcontrols the temperature inside the oven.To keep a constant set temperature, theelements will cycle or turn on and off duringcooking.
If baking with more than one pan, place thepans so each has at least 1 to 1W'of airspace around it. Place pans so one is nctdirectly above the other.
FLAT COOKIE SHEETS, without sides,allow air to circulate all around the cookies
for even browning.
SHINY PANS reflect heat, and are perft:ctfor cakes and quick breads that need a lightgolden brown crust.
GLASS, DARK NON-STICK, ORDARKENED-BY-AGE BAKEWARE
absorbs heat, and can be used for yeastbreads, pie crust, or foods that need abrown crust. The oven temperature, whenusing these pans, should be reducedby 25°F.
The oven racks are designed with stoplocks, a convenience as well as a safetyprecaution. The guides have a bump toprevent the racks from tilting when racksare pulled out of the oven.
Your oven has four (4) rack positions. Thetop position is only a guide. It cannot beused as a rack position.
Guide
Always place oven racks in theproper position while oven is cool.
You may feel that your new oven cooksdifferently than the oven it replaced. Werecommend that you use your new ovena few weeks to become more familiar
with it, following the times given in yourrecipes as a guide. See Do-It-YourselfTemperature Adjustment in the back of thismanual to make the adjustment if you feelyour oven is too hot or too cool for yourcooking preference.
When using your convenient Delay Startoperation, foods such as dairy products,fish, poultry, etc., should never sit morethan 1 hour before cooking. Roomtemperatures and the heat from the ovenlight promote bacterial growth.
Opening the door often to check foods willcause heat loss and poor baking results.
19

OPERATIONBaking
1. Press the BAKE pad.
2. Press the NUMBER
pads to set the oventemperature you preferto use.
(_3. Press the START pad.
To set the oven to cook for a specifictime and turn off automatically.
1. Press the BAKE pad.
2. Press the NUMBERpads to set the oventemperature you preferto use.
3. Press the OVENCOOKING TIME pad.
4. Press the NUMBER
pads to set the amountof time you prefer yourfoods to cook,
5. Press the START pad.
ro set the oven to turn on at a later time
of day, cook for a specific amount oftime, and turn off automatically:
1. Press the BAKE pad.
tl
2. Press the NUMBER
pads to set the oventemperature you preferto use.
OVENCOOKIN(;
TIME
3. Press the OVENCOOKING TIME pad.
4. Press the NUMBERpads to set the amount oftime you prefer your foodsto cook.
5. Press the DELAYSTART TIME pad.
L._ 6. Press the NUMBER padsto set the time of day you
prefer the oven to turn on,
_ 7. Press the START pad.
These oven operations maybe used when roasting. Theoven will cut off at the end ofthe cooking time unless theCOOK AND HOLD feature hasbeen activated. (See the Set-ring Special Features sectionfor more information on theCOOK AND HOLD feature.)
2O

OPERATIONBroiling
Broiling is cooking by direct heatfrom the upper element. The ovendoor should remain opened to thebroil stop position during broiling.
It is not necessary to preheat the ovenwhen broiling. Use the broiler pan andgrid that came with your oven. Bothare designed for proper drainage c_fat and liquids.
lf foil is used, it mustbe molded tightly tothe grid and slits cutinto the foil to match
these of the grid. This allowsfats and liquids to drain intothe broiler pan, preventing fireand excessive smoke.
Always remove the pan and_gr:d from the oven. _._(
Stor!ng or forgetting _l_a soiled broiler pan
fin the oven is a potential
_moke or fire hazard.
The U.S. Department of Agriculturerecommends to cook meat and
poultry thoroughly--meat to at leastan INTERNAL temperature of 160°Fand poultry to at least an INTERNALtemperature of 180°F. Cooking tothese temperatures usually protectsagainst food-borne illness.
The closer you place foods to thebroil element, the faster foods brownon the outside yet remain red to pinkin the center.
Moving meats away from the elementwill allow the meat to cook to thecenter while browning on the outside.Cook side 1 at least 2 minutes longerthan side 2. If your oven is connectedto 208 volts, you may want to use ahigher rack position and/or broilfoods longer.
The size, weight, thickness, startingtemperature, and your preference ofthe doneness of the meat will affectbroiling. This chart is based on meatsat refrigerator temperature.
FOOD RACKPOSITION
3
3
Steak 1" thick
Ground beef
patties -1" thick
Pork Chops -1/2"th|ck 3 27-29
Fish (fillets) 3 11-13
Chicken (pieces) 2 45-55
TOTAL
I TIME (MIN. I9-11
16-18
la. Press the BROIL pad. (Thiswill automatically set HIBroil.)
lb, While the set indicator is flashingin the display, press the BROILpad again if you prefer to use LoBroil. Use Lo Broil to cook foodssuch as poultry or thick cuts ofmeat thoroughly without over-browning them.
2. Press the START pad.
3. When broiling is finished, pressthe CLEAR/OFF pad.
21
OPERATIONSetting Special FeaturesYournewtouchpadcontrolhasadditionalfeaturesthatyoumaychooseto use.Aftermakingaselection,ifyouwantto changethatsetting,followthestepsuntilthedisplayshowsyourchoice,
Thecontrolis automaticallysetto turnoff theovenafter 12hoursbakingor3 hoursbroilingshouldyouforget and leavetheovenon. If youwantto removethis feature:
t. Pressandhold,at the same time, theBAKE andBROIL pads for3 seconds,untilthe displayshows"SF,"
2. PresstheDELAY START TIME pad.Thedisplayshows"t 2shdn" (12 hourshutoff).PresstheDELAY START TIMEpadagain.Thedisplaywillshow"no shdn"(noshutoff).
3, PresstheSTART pad.
Theovencontrolis setfor theFahrenheit
temperatureselections.Mostrecipesare givenusingthe Fahrenheitscale.Youcanchangethisto usetheCelsiusselection.
1, Pressandhold,at the same time, theBAKE andBROIL padsfor3 seconds,untilthe displayshows"SF"
2. (a) PresstheBROIL pad.Thecontroldisplaywill showthedegreesignand"F."(b) PresstheBROIL padagain.Thiswill changeF (Fahrenheit)to C (Celsius),
3. PresstheSTART pad.
Thecontrolis setto usethe12hourclock.Ifyoupreferto usethe24-hourMilitaryTimeclockorblackout thedisptay:
1. Pressand hold, at the same time, the
BAKEandBROIL padsfor3 seconds,untilthedisplayshows"SF."
2. (a) PresstheCLOCK pad.Thedisplayshows"12hr." If thisisyourchoice,presstheSTART pad,
(b) PresstheCLOCK padagain.Thedisptaywillshow"24hr." Example:5:00onthe12-hourclockwillshow17:00hoursonthemilitaryclock. Ifthis isyourchoice,presstheSTARTpad,
(c) PresstheCLOCK padagain.Thedisplaywillshow"Off." If thisis yourchoice,presstheSTART pad, Thedisplaywillnotshowtime.(TheDelayStartTimefeaturewillnotoperate)
:he controlwill allowyouto lockthetouch pads:_otheycannotbe activatedwhenpressed.Ifyou'reworriedabout leavingthe ovenunsupervised,activatethis feature.
!, Pressand hold,at the same time, theBAKE andBROIL padsfor 3 seconds,untilthedisplayshows"$F."
;_, (a) PresstheCLEAN pad.Thedisplayshows"LOC OFF" (lockoutoff).(hi PresstheCLEAN padagain. Thedisplaywillshow"LOC ON" (lockouton),
3. Pressthe START pad,
,"this feature can only be set when theoven is not in use. Whenthisfeatureis on,the displaywillshow"LOC," if a touchpad ispressed.(Thisfeaturewill notaffecttheClock,I imer,or OvenLightpads.)
Yournew controlhas a cook and holdfeaturefor timed cooking only thatwill keephot cookedfoods warm up to 3 hours,afterthetimedcooking is finished.Toactivatethis feature:
_s
2.
22
Pressand hold,at the same time, theBAKE and BROIL pads for 3 seconds,untilthe display shows"SF."|a| PresstheOVEN COOKING TIMEpad. The display willshow"HLd OFF."(b} PresstheOVEN COOKINO TIMEpad again to activatethe feature,Thedisplaywill show"HLd ON."PresstheSTART pad.
Self-CleaningCycle
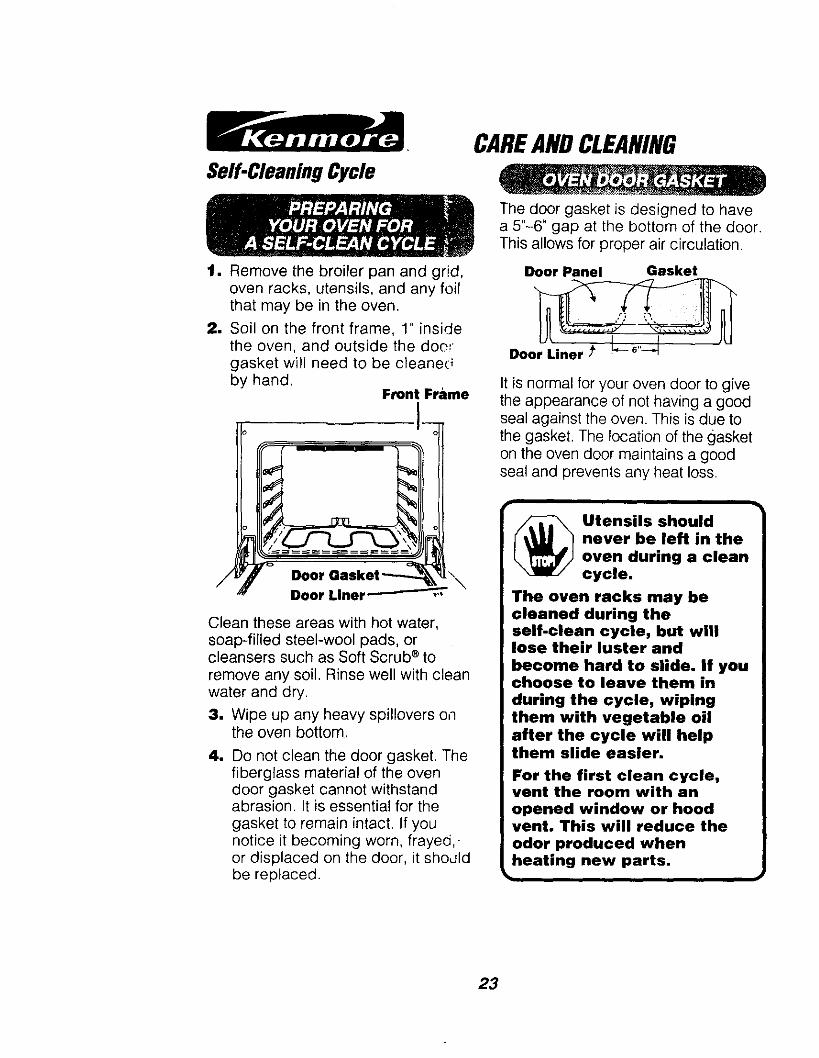
1. Remove the broiler pan and grid,oven racks, utensils, and any foilthat may be in the oven.
2. Soil on the front frame, 1" insidethe oven, and outside the do(:'_gasket will need to be cleane(_by hand.
Front Frame
CAREANDCLEANING
The door gasket is designed to havea 5"-6" gap at the bottom of the door.This allows for proper air circulation.
Door Panel Gasket
It is normal for your oven door to givethe appearance of not having a goodseal against the oven. This is due tothe gasket. The location of the gasketon the oven door maintains a goodseal and prevents any heat loss.
Clean these areas with hot water,soap-filled steel-wool pads, orcleansers such as Soft Scrub ® to
remove any soil. Rinse well with cleanwater and dry.
3. Wipe up any heavy spillovers onthe oven bottom.
4. Do not clean the door gasket. Thefiberglass material of the ovendoor gasket cannot withstandabrasion. It is essential for the
gasket to remain intact. If younotice it becoming worn, frayed,.or displaced on the door, it shouldbe replaced.
Utensils shouldnever be left in the
oven during a cleancycle.
The oven racks may becleaned during theself.clean cycle, but willlose their luster and
become hard to slide. If youchoose to leave them in
during the cycle, wipingthem with vegetable oilafter the cycle will helpthem slide easier.
For the first clean cycle,vent the room with an
opened window or hoodvent, This will reduce the
odor produced whenheating new parts.
23

CAREANDCLEANINGSelf-CleaningCycle
The Clean Cycle, including cooldowntime, is automatically set for 4 hours,but you may change this from 3 hoursif oven is lightly soiled, up to 5 hours ifoven is heavily soiled.
After the cycle, you may notice somewhite ash in the oven. Just wipe it upwith a damp cloth or sponge.
ff white spots remain, scrub themwith a soap-filled steel-wool pad. Besure to rinse thoroughly. These are
¢'ysually deposits o_salt that cannot
be removed durir_the cycle.)f for any reason you are notsatisfied with the cleaning_esults, just repeat the cycle.
1. Press the CLEAN pad.4 hours will show in thedisplay.
2. If you want to changethe length of clean timepress the NUMBER
pads.8. Press the START pad.
Simply press the CLEAR/OFF pad.You will need to wait for the oventemperature to drop below the lock 1L!Jtemperature (approx. 1 hour) beforeattempting to open the door. Lockeddoor will go out in the display.
1. Press the CLEAN pad.
1 If you want to changethe length of clean time,press the NUMBERpads.
3. Press the DELAYSTART TIME pad,
4. Press the NUMBERpads to set the time youprefer the clean cycle tostart.
5. Press the START pad.
24
CAREANDCLEANINGCleaningMicrowave Oven
CLEANING MATERIAL
• Plastic scouring pad• Damp cloth• Dishwashing detergent• Warm water
Clean with mild dishwashingdetergent and water, then rinse wellwith damp cloth. If desired, acontainer of water can be boiled inthe oven using microwave energy.This will help loosen soil. For hard-to-clean soil, clean gently with a plasticscouring pad. Do not useabrasive cleaners, which co_JIdscratch or damage thesurface.
CLEANING MATERIALS
• Nonabrasive nylon mesh scouringpad
• Nonabrasive cleanser• Warm water
• Dishwashing detergent
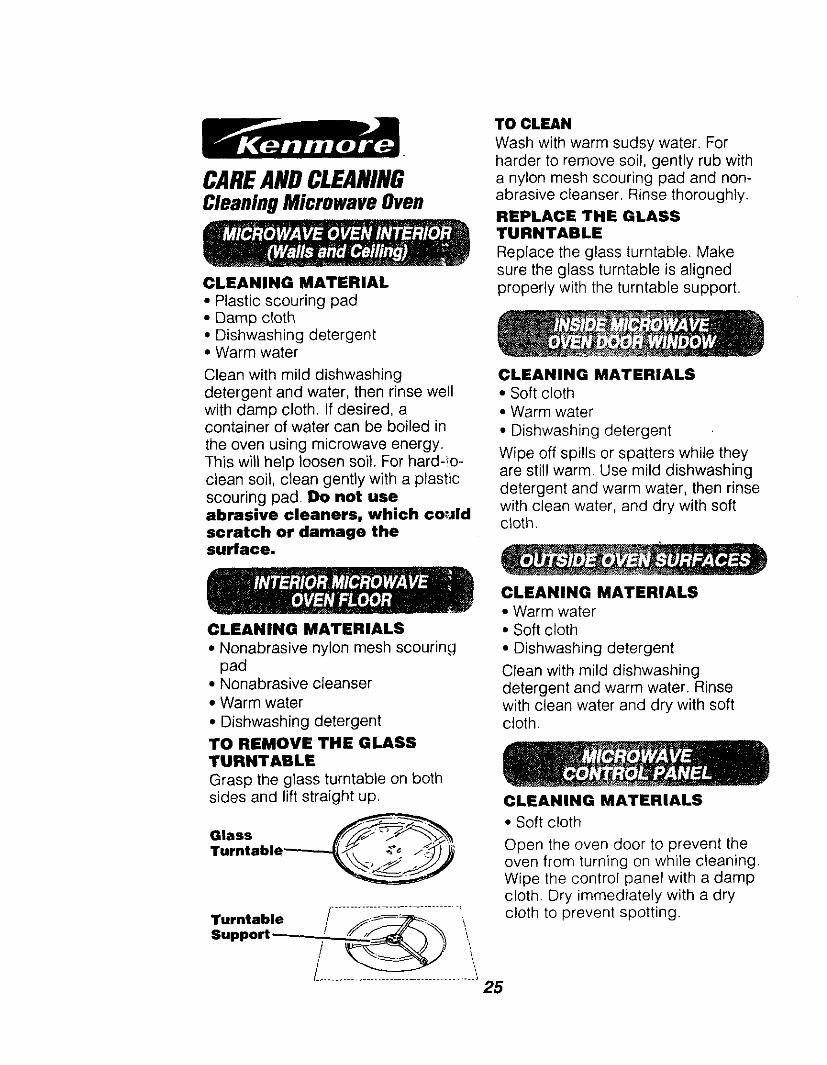
TO REMOVE THE GLASSTURNTABLE
Grasp the glass turntable on bothsides and lift straight up.
Glass
Turntable __ _
............................. i.
Turntablesupport__/, .L_J__, 'i
TO CLEAN
Wash with warm sudsy water. Forharder to remove soil, gently rub witha nylon mesh scouring pad and non-abrasive cleanser. Rinse thoroughly.REPLACE THE GLASSTURNTABLE
Replace the glass turntable. Makesure the glass turntable is alignedproperly with the turntable support.
CLEANING MATERIALS• Soft cloth• Warm water
• Dishwashing detergent
Wipe off spills or spatters while theyare still warm. Use mild dishwashingdetergent and warm water, then rinsewith clean water, and dry with softcloth.
CLEANING MATERIALS• Warm water• Soft cloth
• Dishwashing detergent
Clean with mild dishwashingdetergent and warm water. Rinsewith clean water and dry with softcloth.
CLEANING MATERIALS
• Soft cloth
Open the oven door to prevent theoven from turning on while cleaning.Wipe the control panel with a dampcloth. Dry immediately with a drycloth to prevent spotting.
25

CAREAND CLEANINGCleaningLowerOven
CLEANING MATERIALS
• Dishwashing detergent
• Warm water
• Soft cloth
Do not use abrasive cleaners,industrial cleaners, or bleach.
TO CLEAN
Wipe with warm soapy water. Rinseand dry well.
CLEANING MATERIALS
• Dishwashing detergent
• Warm water
• Soap-filled scouring pad• Commercial oven cleaner
TO CLEAN
Allow the pan to soak. Sprinkle thegrid.with dishwashing detergent andcover with a damp cloth or papertowel. Rinse and dry well. Scour asneeded. You may also place both thepan and grid in the dishwasher.
CLEANING MATERIALS
• Dishwashing detergent
• Soap-filled scouring pad orsteel-wool pad
• Warm water
TO CLEAN
Wash and rinse well.
TO REMOVE
Pull the racks out and up to remove.
26
TO REPLACE
Set the raised back of the rack on the
pair of rack guides. Push until youreach the stop locks; lift the front ofthe rack until it slides easily under thebump. Push back into the oven.
Clean only as touch-up betweenclean cycles. Use dishwashing liquid,warm water, or soap-filled steel-woolpad. Rinse well after cleaningand dry.
NEVER USE OVEN CLEANERSiN OR AROUND ANY PART OFTHE OVEN.
When cleaning, be sure not to bendor displace the temperature sensorlocated on the back wall of the oven.
CLEANING MATERIALS
• Glass cleaner
• Paper towels
• Baking sodaTO CLEAN
!--or everyday cleaning, use glasscleaner and a paper towel. Forstubborn soil, use paste of bakingsoda and water. Rinse thoroughly.

Forin-homemajor t_randrepair service:
Call24 hours a day,7 daysa week
1-800-4-MY-HOME "
(1-800-469-4663)Para pedir servicio de reparaci6n a domicilio -
1-800-676-5811
In Canada for all your service and parts needs call -Au Canada pour tout le service ou les pieces -
1-800-665-4455m
For the repair or replacementparts you need:
Call7 am-7 pro, 7 daysa week
1-800-366-PART(1-800-366-7278)
Para ordenar piezas con entrega a domicilio -1.800.659.7084
For the location of aSearsParts and Repair Center
in yourarea:
Call24 hours a day,7 daysa week
1-800-488-1 222
For informationonpurchasing a SearsMaintenance Agreementor to inquire
aboutan existingAgreement:Call9 am-5 pm, Monday-Saturday
1-800-827-6655
The Service Side of Sears"