1
e eyes of your Bebop! A new and immersive flying exp
erience
User guide
Version: 2.5.4 Build: 25400
Copyright: 2016
Rev.0

2
Table of Contents
Overview .......................................................................................................... 6
Compatibility ..................................................................................................... 7
Main features .................................................................................................... 8
Android Requirements ................................................................................... 8
Application Permissions ................................................................................. 8
Preliminary operations ........................................................................................ 9
Run Auriga Bebop ......................................................................................... 9
Connections .................................................................................................... 10
Skycontroller 1 - WIFI connections ............................................................... 10
Skycontroller 2 - USB connection ................................................................. 10
Bebop - WIFI connections ............................................................................ 11
Parrot Flypad - bluetooth connection .................................................................. 12
Joypad controller - bluetooth connection ....................................................... 13
Waiting page ............................................................................................. 13
Settings .......................................................................................................... 14
Display settings ............................................................................................... 15
Tips Windows ............................................................................................. 16
Navigation ................................................................................................. 16
ON Screen Display ...................................................................................... 16
HUD enable ............................................................................................... 16
Antenna position indicator ........................................................................... 16
DOT enable ................................................................................................ 17
On screen bottom ....................................................................................... 17
On screen upper ......................................................................................... 17
HUD 3D depth ............................................................................................ 18
HUD color .................................................................................................. 18
Opacity ..................................................................................................... 18
Image settings for FPV (headset 2 only ......................................................... 19
3
Head Track settings ......................................................................................... 20
Smoothness ............................................................................................... 20
Horizontal.................................................................................................. 20
Vertical ..................................................................................................... 20
Lock mode ................................................................................................. 21
Always locked; ........................................................................................... 21
Locked on speed (>1m/s); .......................................................................... 21
Always unlocked. ........................................................................................ 21
Flight settings .................................................................................................. 22
Altitude limit .............................................................................................. 23
Altitude limit OFF ....................................................................................... 23
Max distance ............................................................................................. 23
Physical limits (Geo-Fence) .......................................................................... 23
Max vert.speed .......................................................................................... 23
Max Rot.speed ........................................................................................... 23
Max Inclination .......................................................................................... 23
Max Speed Incl. ......................................................................................... 23
Hand Launch.............................................................................................. 23
Flight s ...................................................................................................... 25
etting procedures: ...................................................................................... 25
Minimum altitude........................................................................................ 26
Loiter altitude ............................................................................................ 26
Loiter direction ........................................................................................... 26
Pitch mode ................................................................................................ 26
Video/Photo settings ........................................................................................ 28
Stabilization off .......................................................................................... 29
Camera Speed ........................................................................................... 29
Video Quality ............................................................................................. 29
Frame rate ................................................................................................ 29
Video stream mode ..................................................................................... 30
Video Recording ......................................................................................... 30
Recording quality ........................................................................................ 30
Recording resolution ................................................................................... 30
Video recording .......................................................................................... 30
Time lapse mode ........................................................................................ 30
Photo Preferences ...................................................................................... 31
Camera switch ........................................................................................... 31
4
Flypad and Joypad settings ............................................................................... 32
Buttons and stick settings ............................................................................ 32
Dead zone calibration .................................................................................. 32
RTH and Battery .............................................................................................. 33
Return Delay Time (RDT) ............................................................................ 33
Return Home Position (RHP) ........................................................................ 34
Battery Warnings ....................................................................................... 34
Low battery Auto RTH ................................................................................. 34
PreFlight menu ................................................................................................ 35
Current settings ......................................................................................... 35
Quick settings menu ................................................................................... 36
Display ...................................................................................................... 36
Flight Profile 1 ............................................................................................ 36
Flight Profile 2 ............................................................................................ 36
Banked Turn .............................................................................................. 36
Video Stabilization ...................................................................................... 36
Headtrack .................................................................................................. 36
Flat Trim ................................................................................................... 36
Calibration ................................................................................................. 37
Drone Calibration ....................................................................................... 37
Bebop Calibration ....................................................................................... 37
Parrot Disco Calibration ............................................................................... 38
View Calibration for Headset FPV2 ................................................................ 38
Image resizing ........................................................................................... 39
Vertical position ......................................................................................... 39
Eye spacing ............................................................................................... 39
WiFi Settings ............................................................................................. 40
Video/Photo ............................................................................................... 40
Exposure Adjusting ..................................................................................... 41
White balance ............................................................................................ 41
HeadTracker calibration .................................................................................... 42
Calibration circle ........................................................................................ 42
Flight viewing mode ......................................................................................... 43
FPV Headset interface layouts............................................................................ 44
5
FPV Headset1 ............................................................................................ 44
FPV Headset 2 ........................................................................................... 45
Single view interface layouts ........................................................................ 46
Controller drone Battery Status (1) ............................................................... 46
Bebop drone Battery Status (2) .................................................................... 46
Distance (3) ............................................................................................... 46
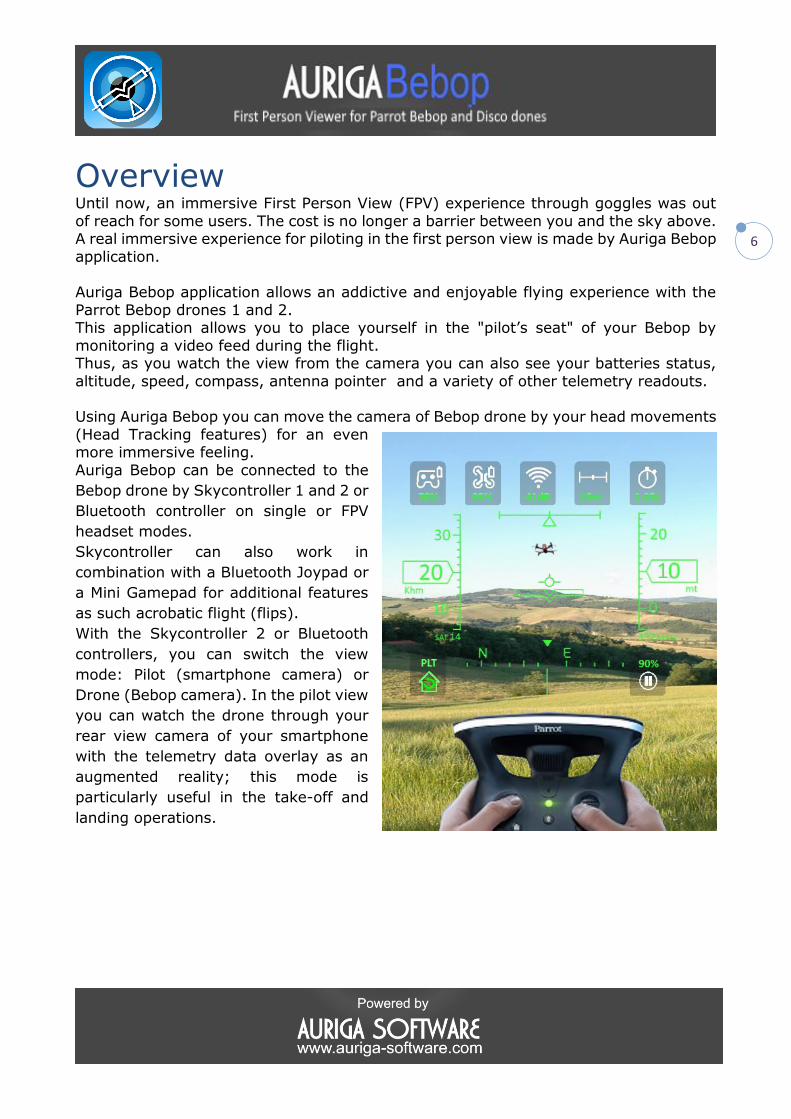
Wifi Signal Strength (4) ............................................................................... 47
Return To Home (5) .................................................................................... 47
Head Tracker Status (6) .............................................................................. 47
Video Recording Status (7) .......................................................................... 47
Flight Time (8) ........................................................................................... 47
Speed slide bar (9) ..................................................................................... 47
Altitude slide bar (10) ................................................................................. 47
Artificial Gyroscope Horizon (11) .................................................................. 47
Antenna Pointer indicator (12) ..................................................................... 47
Compass slide bar (13) ............................................................................... 47
Home Marker (14) ...................................................................................... 47
Altitude Above Sea Level (15) ...................................................................... 48
Center camera indicator (16) ....................................................................... 48
Satellites indicator (17) ............................................................................... 48
Altitude limit override button/indicator (18) ................................................... 48
Tips window (19) ........................................................................................ 48
INFO BAR ....................................................................................................... 49
Flight Data ................................................................................................ 49
Last GPS way point ..................................................................................... 50
Last Flight ................................................................................................. 50
Absolute .................................................................................................... 50
Totals ....................................................................................................... 50
Reset ........................................................................................................ 50
Map .......................................................................................................... 51
Info .......................................................................................................... 51
Recommendations............................................................................................ 52
6
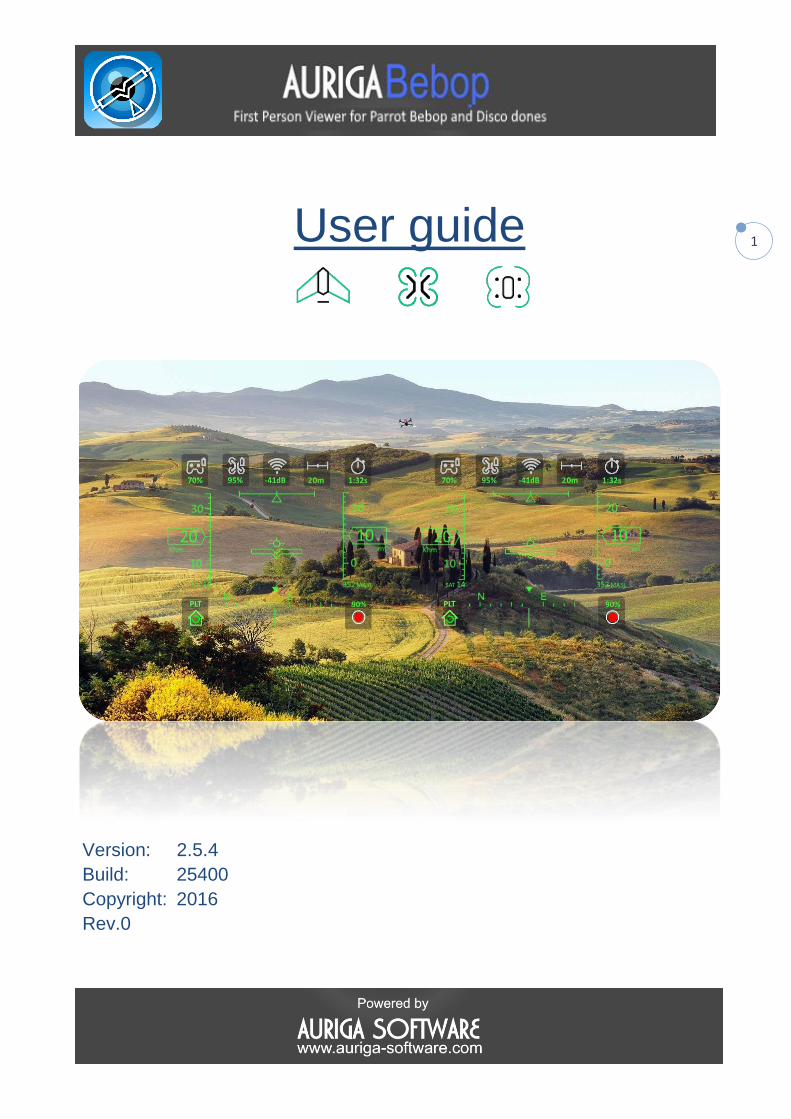
Overview Until now, an immersive First Person View (FPV) experience through goggles was out
of reach for some users. The cost is no longer a barrier between you and the sky above. A real immersive experience for piloting in the first person view is made by Auriga Bebop
application. Auriga Bebop application allows an addictive and enjoyable flying experience with the
Parrot Bebop drones 1 and 2. This application allows you to place yourself in the "pilot’s seat" of your Bebop by
monitoring a video feed during the flight. Thus, as you watch the view from the camera you can also see your batteries status,
altitude, speed, compass, antenna pointer and a variety of other telemetry readouts. Using Auriga Bebop you can move the camera of Bebop drone by your head movements
(Head Tracking features) for an even more immersive feeling.
Auriga Bebop can be connected to the
Bebop drone by Skycontroller 1 and 2 or
Bluetooth controller on single or FPV
headset modes.
Skycontroller can also work in
combination with a Bluetooth Joypad or
a Mini Gamepad for additional features
as such acrobatic flight (flips).
With the Skycontroller 2 or Bluetooth
controllers, you can switch the view
mode: Pilot (smartphone camera) or
Drone (Bebop camera). In the pilot view
you can watch the drone through your
rear view camera of your smartphone
with the telemetry data overlay as an
augmented reality; this mode is
particularly useful in the take-off and
landing operations.
7
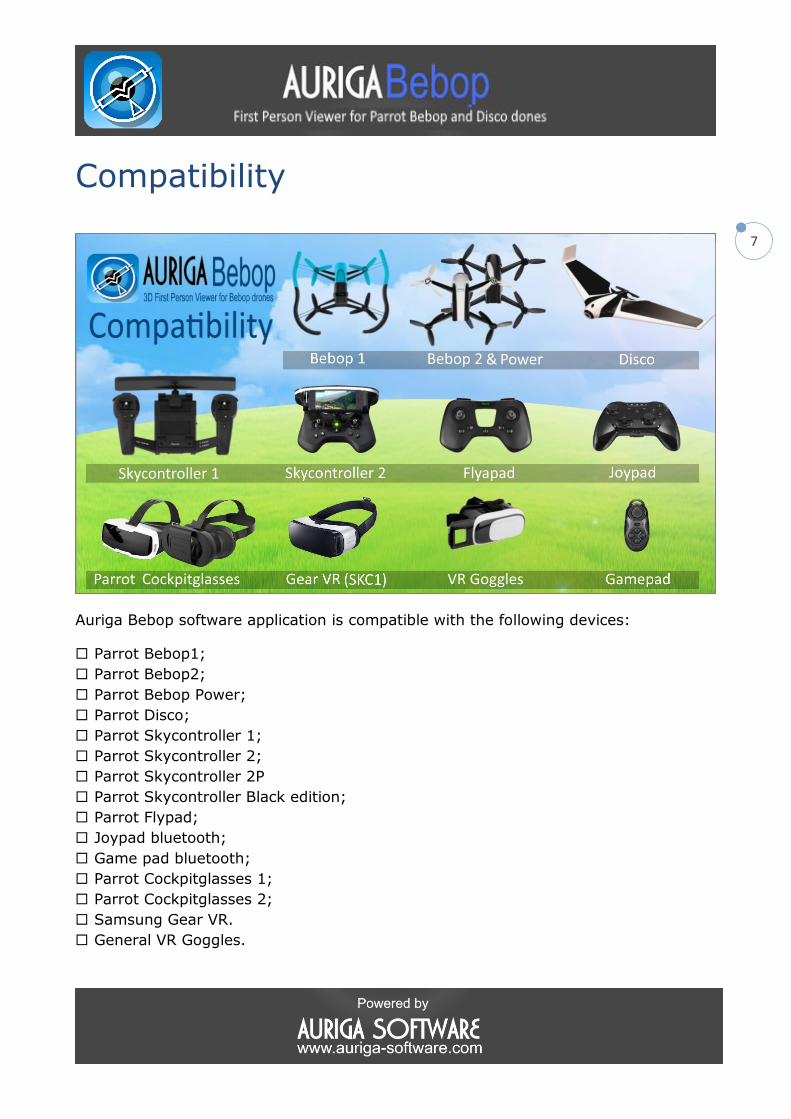
Compatibility
Auriga Bebop software application is compatible with the following devices:
Parrot Bebop1;
Parrot Bebop2;
Parrot Bebop Power;
Parrot Disco;
Parrot Skycontroller 1;
Parrot Skycontroller 2;
Parrot Skycontroller 2P
Parrot Skycontroller Black edition;
Parrot Flypad;
Joypad bluetooth;
Game pad bluetooth;
Parrot Cockpitglasses 1;
Parrot Cockpitglasses 2;
Samsung Gear VR.
General VR Goggles.
8
Main features Two FPV Headset Views for VR goggles and Parrot Cockpitglasses.
Single view flight interface.
Avionic Style interfaces.
3D HUD displays to overlay the flight data.
On Screen Display to display the status and warnings.
Augmented Reality View.
Camera Head Tracking features (FPV headset mode only).
Flight parameters and flight profiles settings.
Drone and VR glasses calibrations features.
Configurable Flypad and Joypad buttons.
Manual/automatic switching of the Drone/Pilot views.
Return to home features.
Antenna pointer indicator.
Compass slide bar.
Altitude Above Sea Level indicator.
Home Marker.
Manual/automatic switching of the Drone/Pilot views.
Flight Data.
White balance and exposure adjusting.
Altitude limit OFF.
WiFi settings.
Video/Photo settings.
Time lapse mode.
Battery alarm threshold settings.
Low battery warning RTH setting.
Hand Launch features (not available for Bebop1)
Multi language support.
Android Requirements Android version 4.4.2 and higher.
NO-ROOT
Application Permissions For the proper working of all features of the application, verify on your smartphone that
Auriga Bebop application has the permission to access the following:
Camera; Location GPS; WiFi and Bluetooth; Storage.

9
Preliminary operations The preliminary operations for the proper use of the Auriga Bebop application are
described in the section below:
Run Auriga Bebop To run Auriga Bebop application tap on this icon on your smartphone:
On the first page verify that all sensors of your smartphone are available.
If the sensors are not all available Head Tracker mode could not work properly.

10
Connections
Skycontroller 1 - WIFI connections
Connect the Skycontroller 1 to your Bebop.
Once done connect the WIFI network of your
smartphone to the Skycontroller 1.
Run Auriga Bebop and verify on the first page that Skycontroller 1 is present on
the device button.
Skycontroller 2 - USB connection
Connect the Skycontroller 2 to your smartphone via a USB cable.
Press the ON/OFF button on Parrot Skycontroller 2 to turn it on and verify that on the
first page the Skycontroller2 is available.
Be sure that GPS is active on your smartphone to allow that all functions
work properly.
11
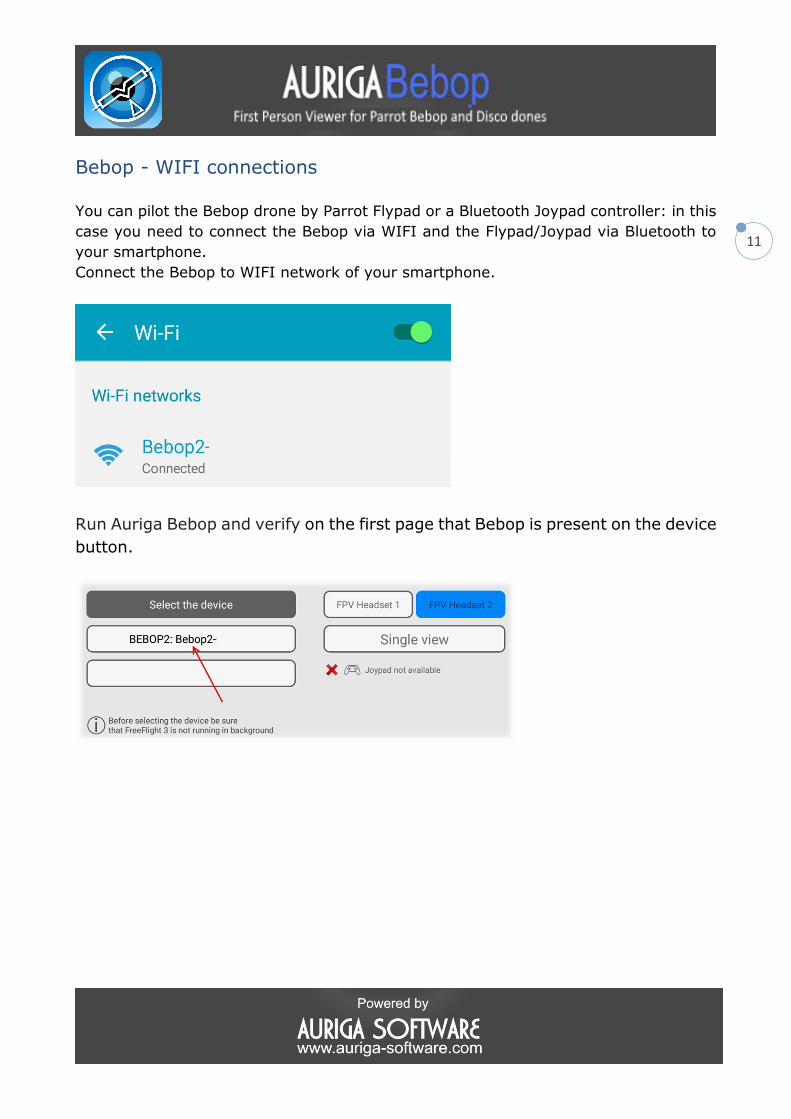
Bebop - WIFI connections
You can pilot the Bebop drone by Parrot Flypad or a Bluetooth Joypad controller: in this
case you need to connect the Bebop via WIFI and the Flypad/Joypad via Bluetooth to
your smartphone.
Connect the Bebop to WIFI network of your smartphone.
Run Auriga Bebop and verify on the first page that Bebop is present on the device
button.

12
Parrot Flypad - bluetooth connection
Connect the Parrot Flypad to bluetooth of your smartphone.
Tap on the Connect FLYPAD button:
Verify that Flypad is now available:
Check if the Flaypad’s battery status is OK.
Be sure that GPS is active on your smartphone to allow that all functions work
properly.
13
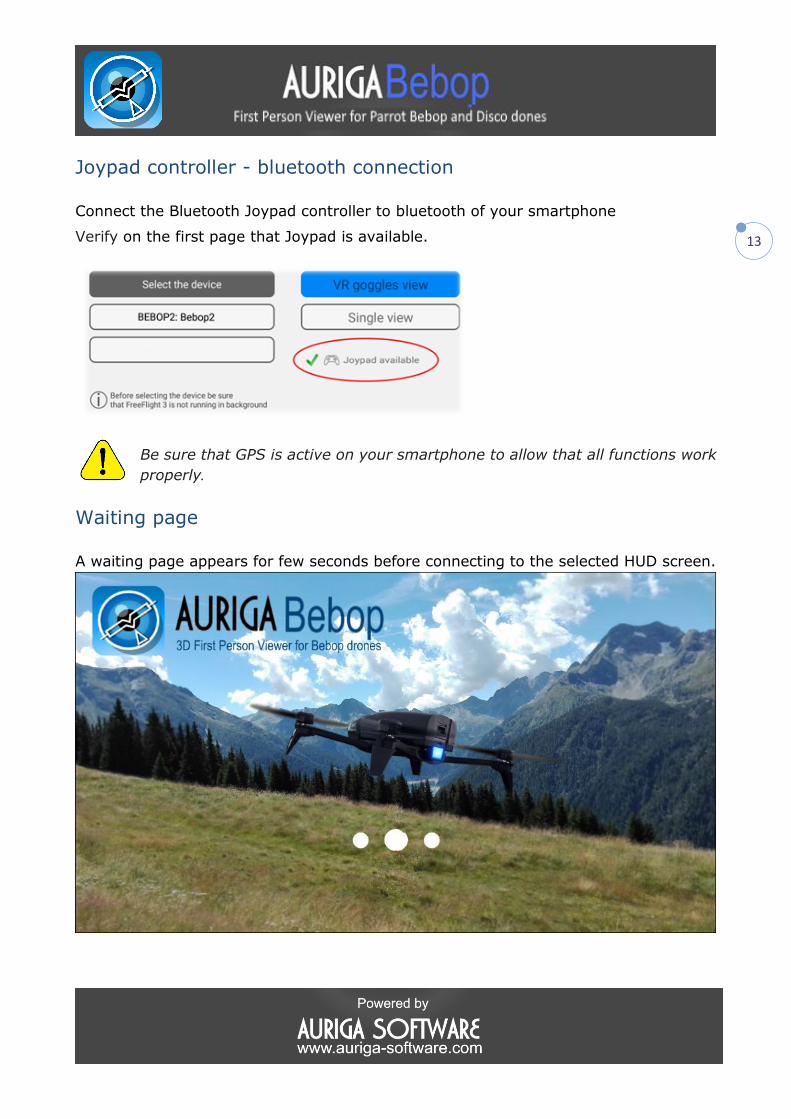
Joypad controller - bluetooth connection
Connect the Bluetooth Joypad controller to bluetooth of your smartphone
Verify on the first page that Joypad is available.
Be sure that GPS is active on your smartphone to allow that all functions work
properly.
Waiting page
A waiting page appears for few seconds before connecting to the selected HUD screen.
14
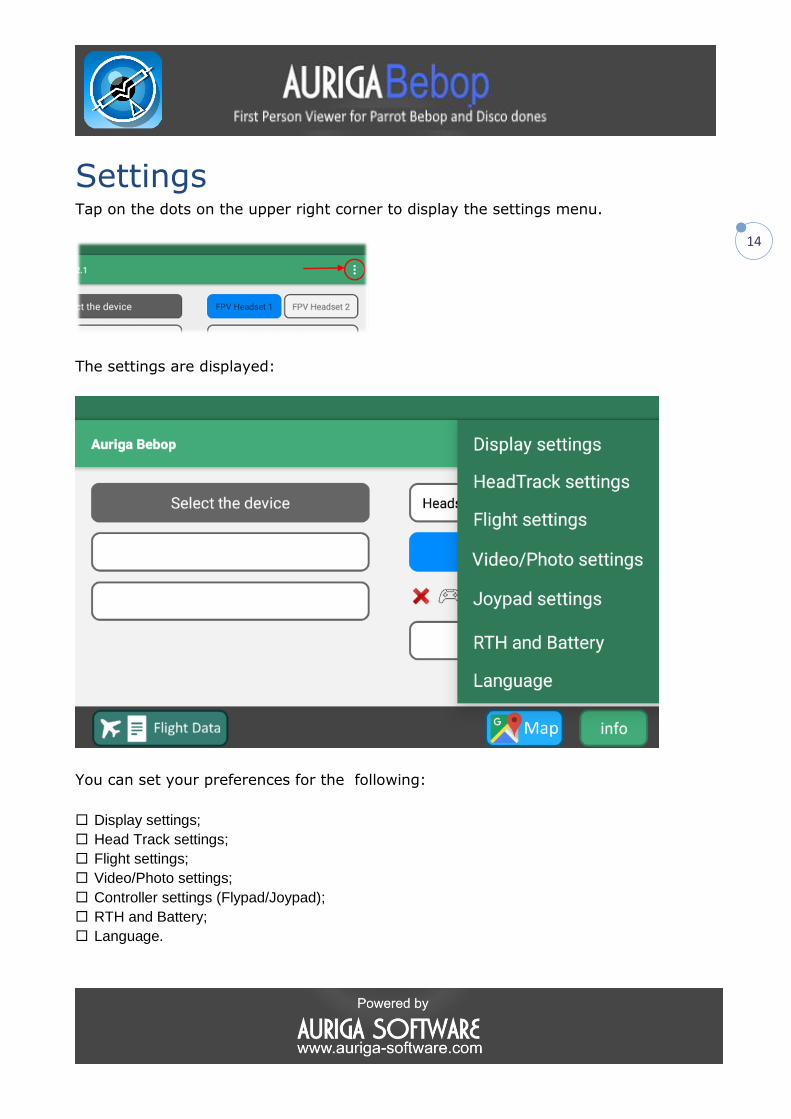
Settings Tap on the dots on the upper right corner to display the settings menu.
The settings are displayed:
You can set your preferences for the following:
Display settings;
Head Track settings;
Flight settings;
Video/Photo settings;
Controller settings (Flypad/Joypad);
RTH and Battery;
Language.

15
Display settings The Display Settings menu is shown below:
16
Tips Windows Tips windows are warning or notification windows that apper on the HUD screen.
They also recommend actions to be performed. This option allows you to enable/disable on HUD the tips windows.
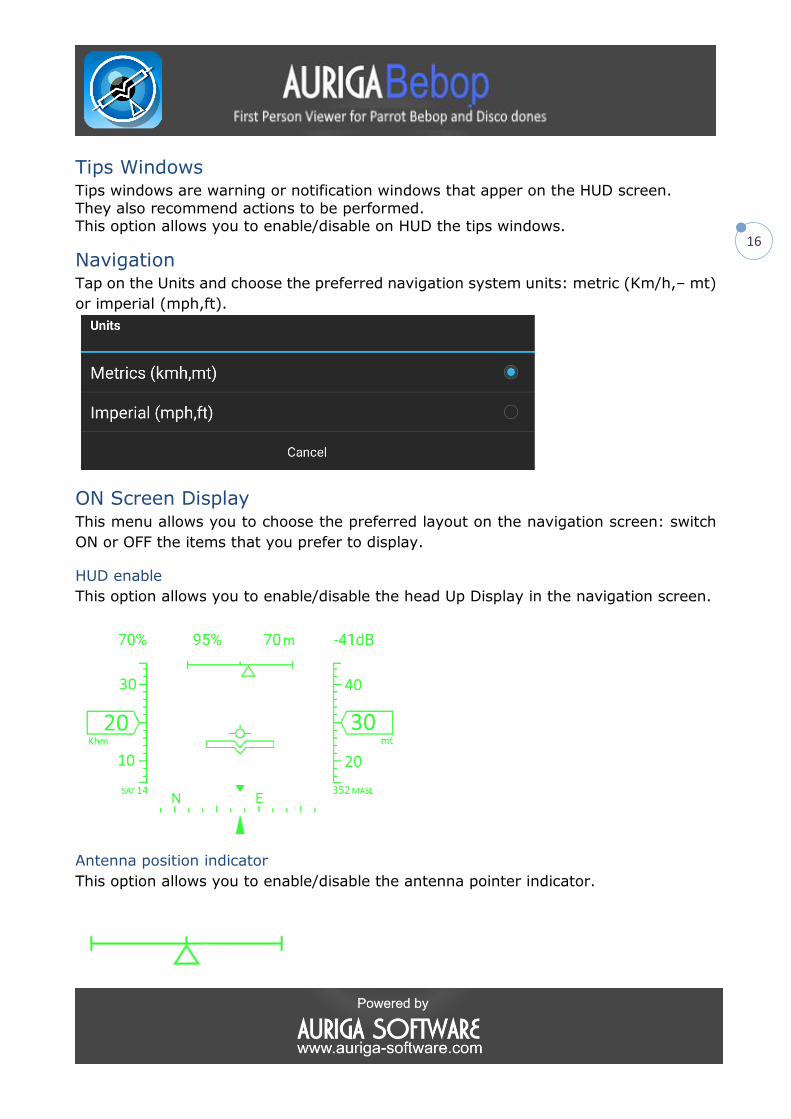
Navigation Tap on the Units and choose the preferred navigation system units: metric (Km/h,– mt)
or imperial (mph,ft).
ON Screen Display This menu allows you to choose the preferred layout on the navigation screen: switch
ON or OFF the items that you prefer to display.
HUD enable
This option allows you to enable/disable the head Up Display in the navigation screen.
Antenna position indicator
This option allows you to enable/disable the antenna pointer indicator.
17
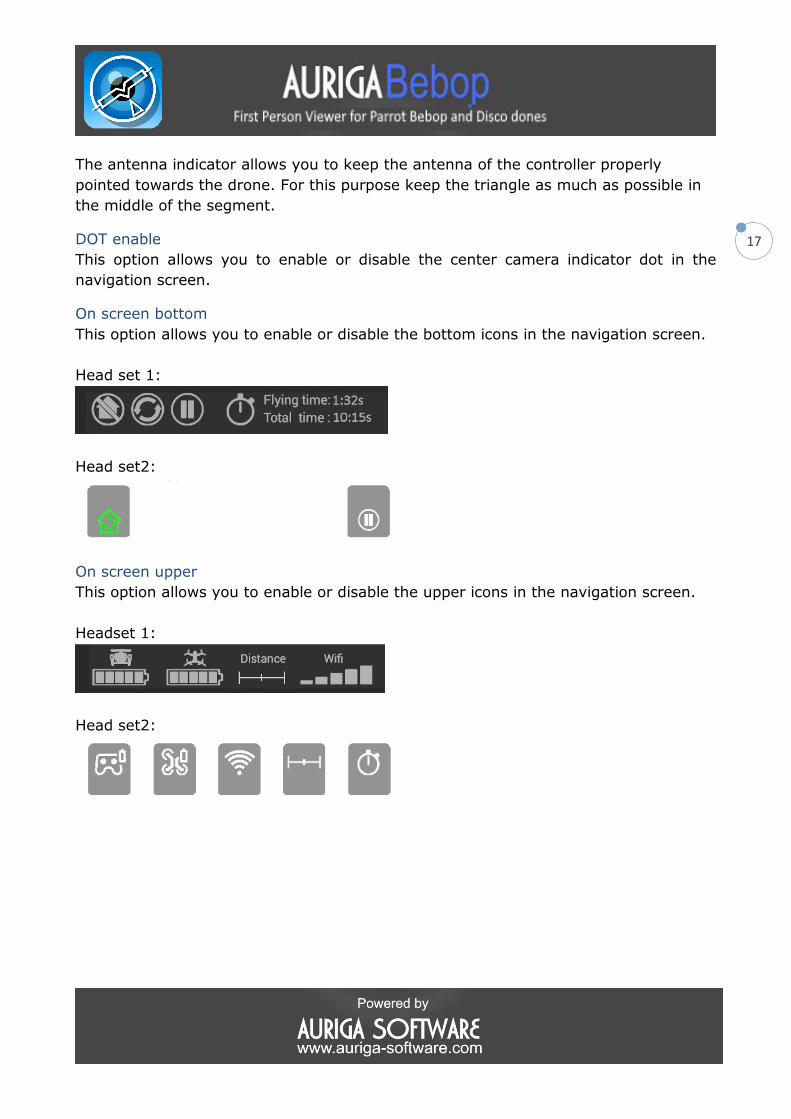
The antenna indicator allows you to keep the antenna of the controller properly
pointed towards the drone. For this purpose keep the triangle as much as possible in
the middle of the segment.
DOT enable
This option allows you to enable or disable the center camera indicator dot in the
navigation screen.
On screen bottom
This option allows you to enable or disable the bottom icons in the navigation screen.
Head set 1:
Head set2:
On screen upper
This option allows you to enable or disable the upper icons in the navigation screen.
Headset 1:
Head set2:

18
HUD 3D depth The HUD is displayed as an overlay on the video streaming from the Bebop with a 3D
effect. This checkbox allows you to choose the depth of the HUD 3D effect.
HUD color This checkbox allows you to choose the color of the HUD.
Opacity This slide bar allows you to adjust the preferred opacity of the HUD display.

19
Image settings for FPV (headset 2 only
These slide bars allow you to properly adjust the Size, the Vertical position and the Eye
spacing for the best viewing by the Cockpitglasses.
This calibration is also possible via the controller sticks (see in the “View Calibration”
chapter).
20
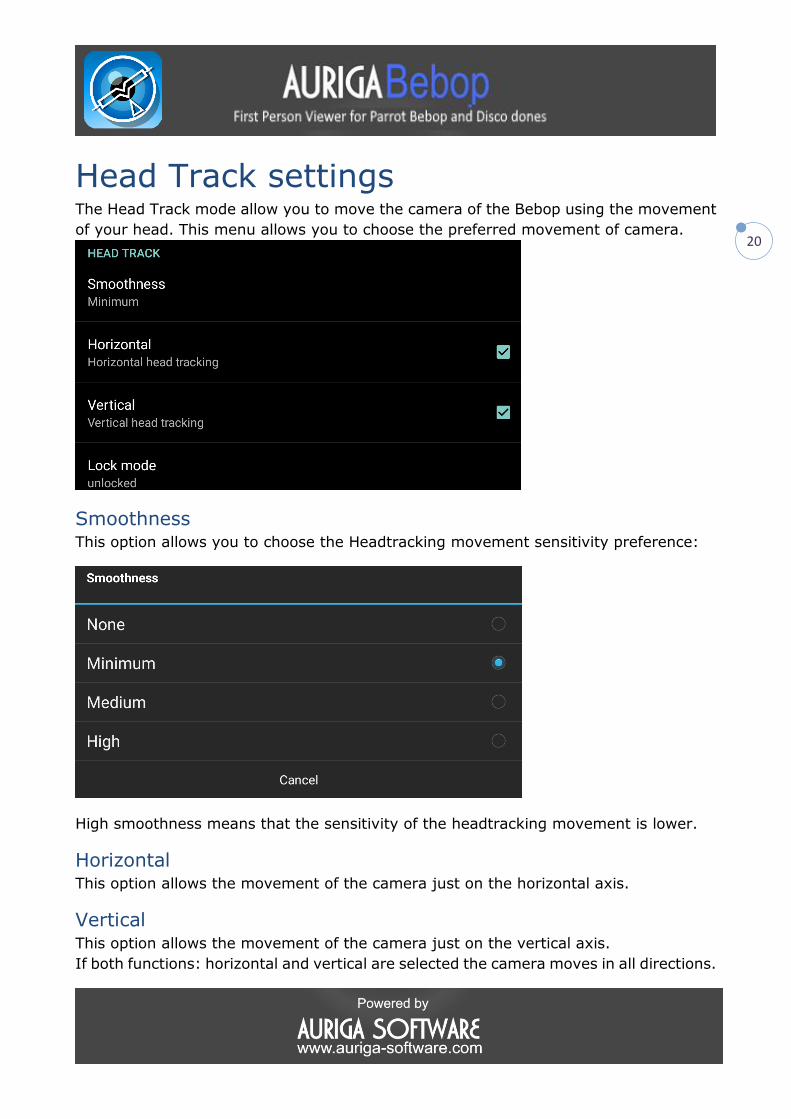
Head Track settings The Head Track mode allow you to move the camera of the Bebop using the movement
of your head. This menu allows you to choose the preferred movement of camera.
Smoothness This option allows you to choose the Headtracking movement sensitivity preference:
High smoothness means that the sensitivity of the headtracking movement is lower.
Horizontal This option allows the movement of the camera just on the horizontal axis.
Vertical This option allows the movement of the camera just on the vertical axis.
If both functions: horizontal and vertical are selected the camera moves in all directions.
21
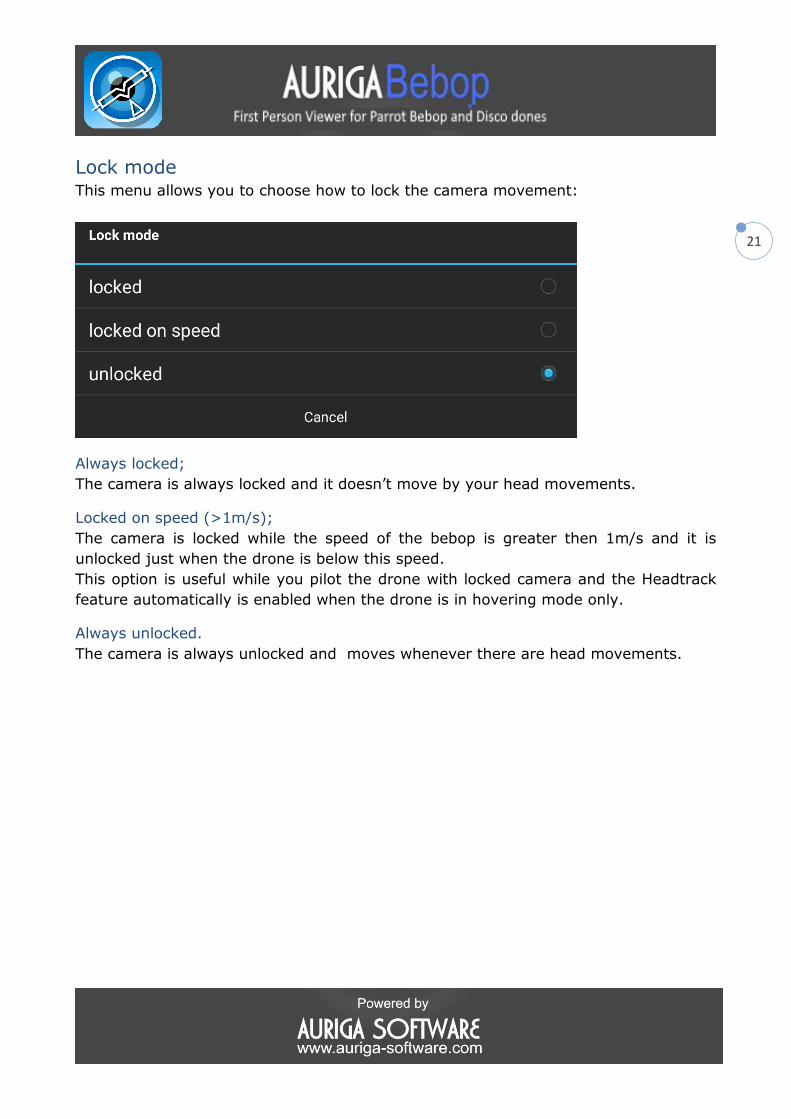
Lock mode This menu allows you to choose how to lock the camera movement:
Always locked;
The camera is always locked and it doesn’t move by your head movements.
Locked on speed (>1m/s);
The camera is locked while the speed of the bebop is greater then 1m/s and it is
unlocked just when the drone is below this speed.
This option is useful while you pilot the drone with locked camera and the Headtrack
feature automatically is enabled when the drone is in hovering mode only.
Always unlocked.
The camera is always unlocked and moves whenever there are head movements.

22
Flight settings This menu allows you to define, and save, two different flight setting profiles.
23
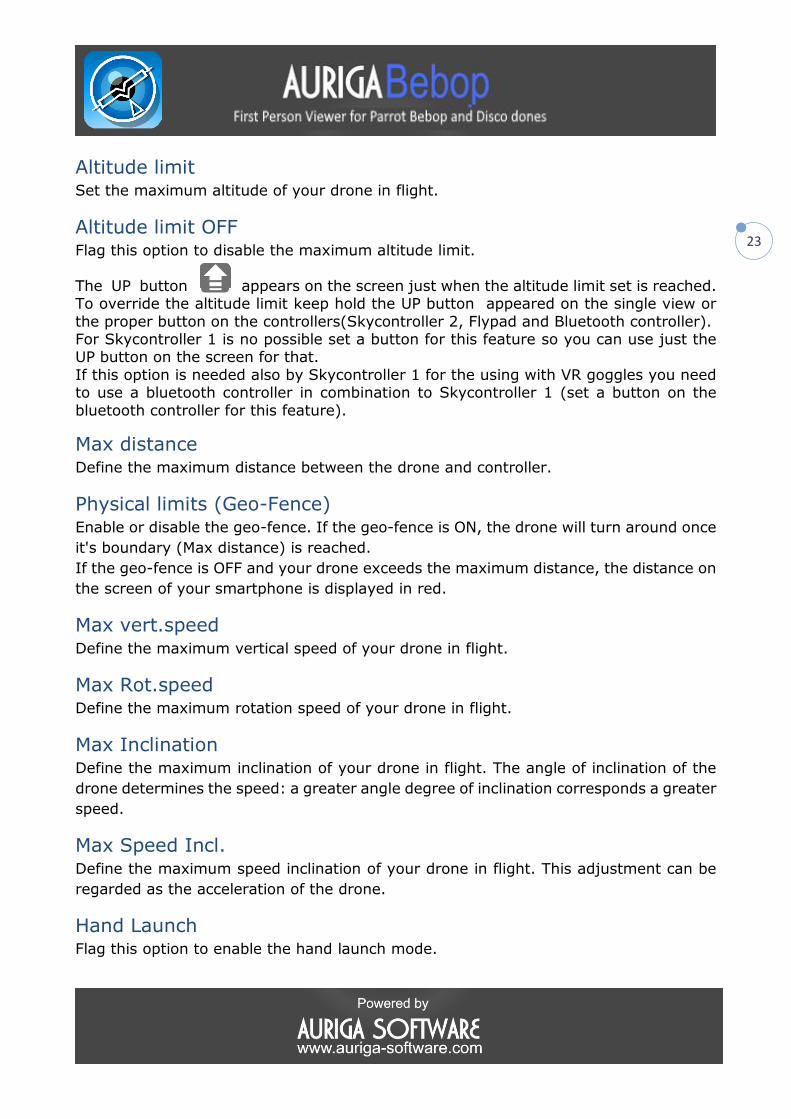
Altitude limit Set the maximum altitude of your drone in flight.
Altitude limit OFF Flag this option to disable the maximum altitude limit.
The UP button appears on the screen just when the altitude limit set is reached. To override the altitude limit keep hold the UP button appeared on the single view or
the proper button on the controllers(Skycontroller 2, Flypad and Bluetooth controller). For Skycontroller 1 is no possible set a button for this feature so you can use just the UP button on the screen for that.
If this option is needed also by Skycontroller 1 for the using with VR goggles you need to use a bluetooth controller in combination to Skycontroller 1 (set a button on the
bluetooth controller for this feature).
Max distance Define the maximum distance between the drone and controller.
Physical limits (Geo-Fence) Enable or disable the geo-fence. If the geo-fence is ON, the drone will turn around once
it's boundary (Max distance) is reached.
If the geo-fence is OFF and your drone exceeds the maximum distance, the distance on
the screen of your smartphone is displayed in red.
Max vert.speed Define the maximum vertical speed of your drone in flight.
Max Rot.speed Define the maximum rotation speed of your drone in flight.
Max Inclination Define the maximum inclination of your drone in flight. The angle of inclination of the
drone determines the speed: a greater angle degree of inclination corresponds a greater
speed.
Max Speed Incl. Define the maximum speed inclination of your drone in flight. This adjustment can be
regarded as the acceleration of the drone.
Hand Launch Flag this option to enable the hand launch mode.

24
To perform the hand launch follow these steps:
Step.1
If the Hand Launch option has been selected this label appers on the hud:
Flip the drone to start the hand launch
Step.2
Return the drone in the normal hand launch position and wait for the propellers start.
Step.3
Launch the drone forward and upward.
If the drone is not launched within 10 seconds, the propellerswill automatically shut off.
To abort the launch flip the drone again.

25
Flight setting procedures:
1. Select the drone: Bebop1, Bebop2(Power) or Disco.
Tap on “SELECT DRONE” button to change the drone type:
BEBOP1
BEBOP2 or BEBOP Power
PARROT DISCO
Be sure that the proper drone has been selected.
26
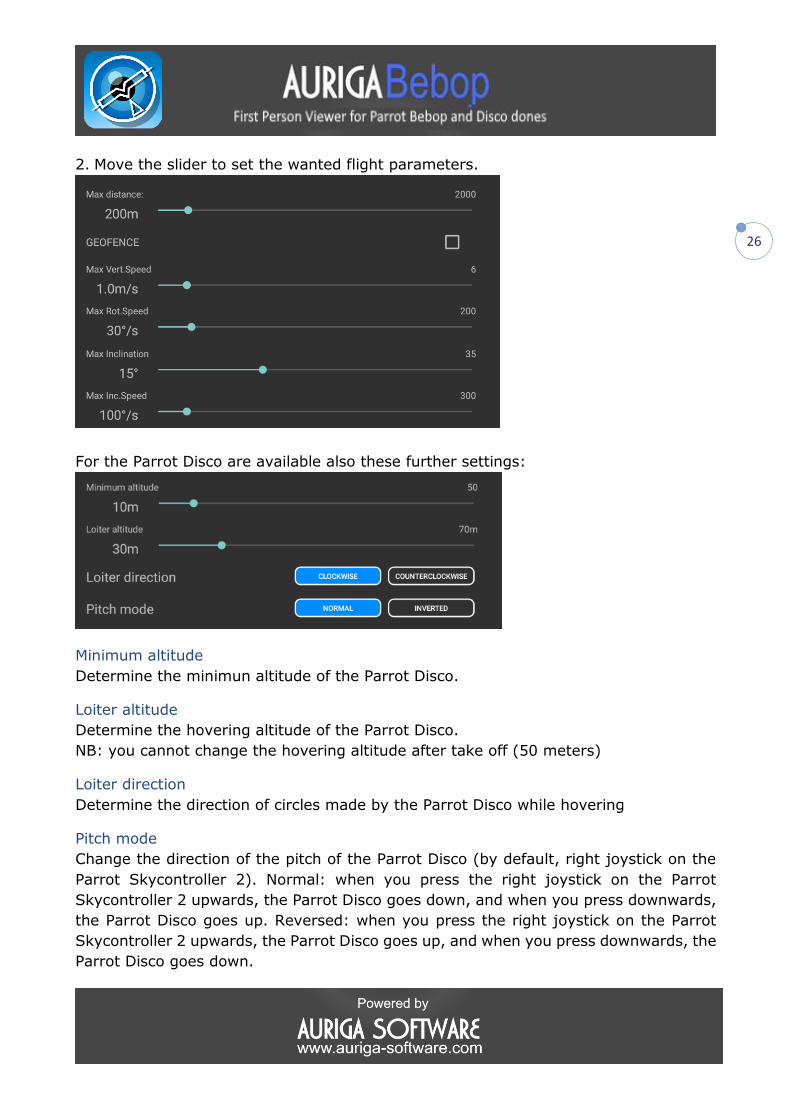
2. Move the slider to set the wanted flight parameters.
For the Parrot Disco are available also these further settings:
Minimum altitude
Determine the minimun altitude of the Parrot Disco.
Loiter altitude
Determine the hovering altitude of the Parrot Disco.
NB: you cannot change the hovering altitude after take off (50 meters)
Loiter direction
Determine the direction of circles made by the Parrot Disco while hovering
Pitch mode
Change the direction of the pitch of the Parrot Disco (by default, right joystick on the
Parrot Skycontroller 2). Normal: when you press the right joystick on the Parrot
Skycontroller 2 upwards, the Parrot Disco goes down, and when you press downwards,
the Parrot Disco goes up. Reversed: when you press the right joystick on the Parrot
Skycontroller 2 upwards, the Parrot Disco goes up, and when you press downwards, the
Parrot Disco goes down.
27
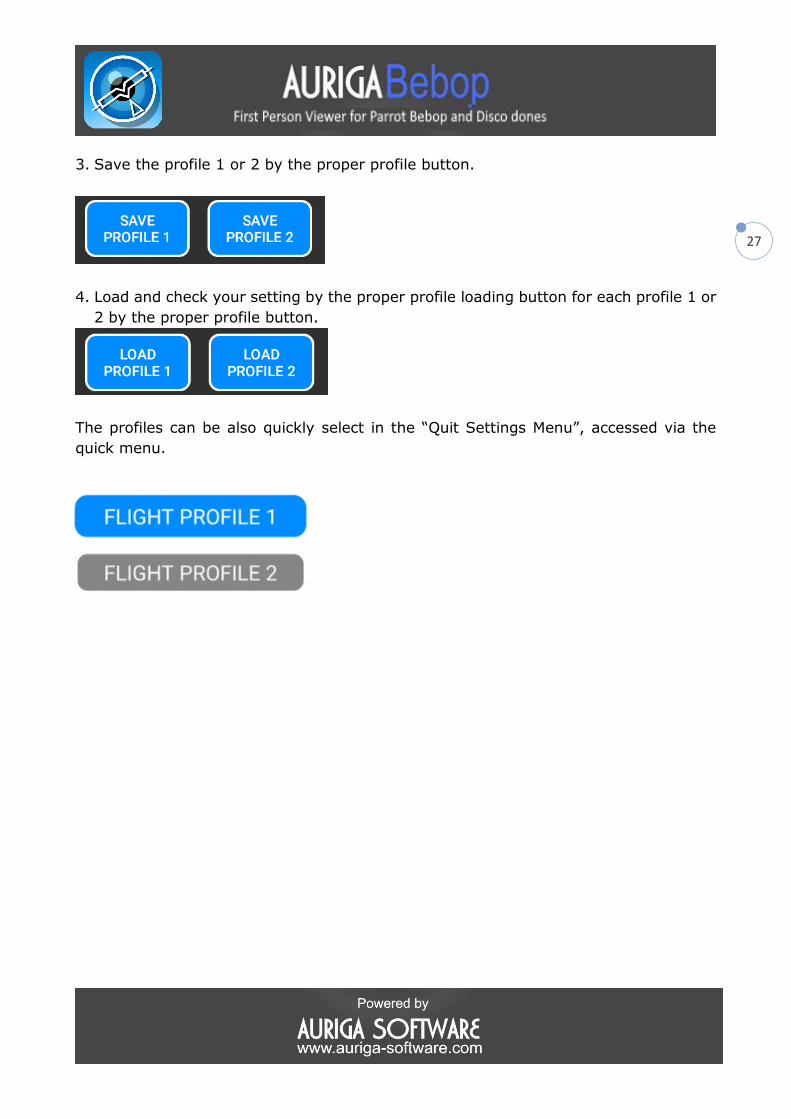
3. Save the profile 1 or 2 by the proper profile button.
4. Load and check your setting by the proper profile loading button for each profile 1 or
2 by the proper profile button.
The profiles can be also quickly select in the “Quit Settings Menu”, accessed via the
quick menu.
28
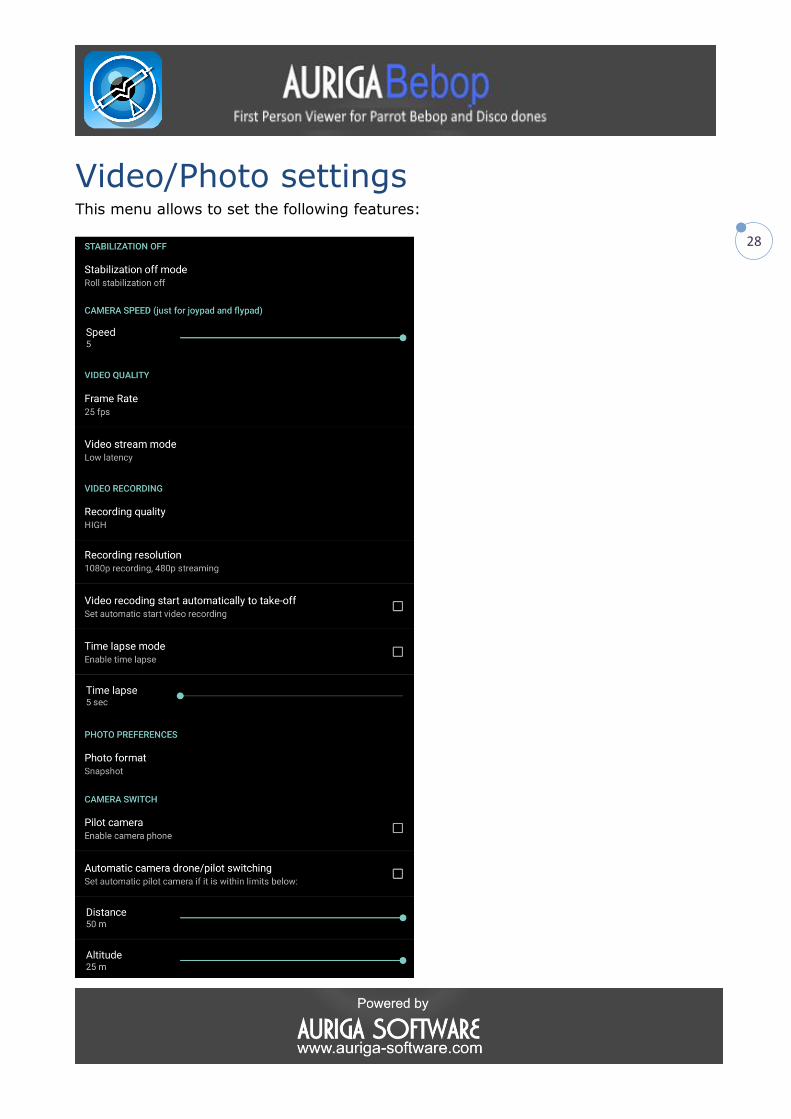
Video/Photo settings This menu allows to set the following features:

29
Stabilization off Tap on the “Stabilization off mode” and choose your preference from the next menu.
To enable this option you need to DISABLE it in the “Quit Settings Menu”ensuring that
the VIDEO STABILIZATION function button is greyed out.
Camera Speed This adjusting allows you to set the speed of movement of the Bebop’s camera.
This setting is for Joypad and Flypad only.
Video Quality This menu allows you to set the following features:
Frame rate
30
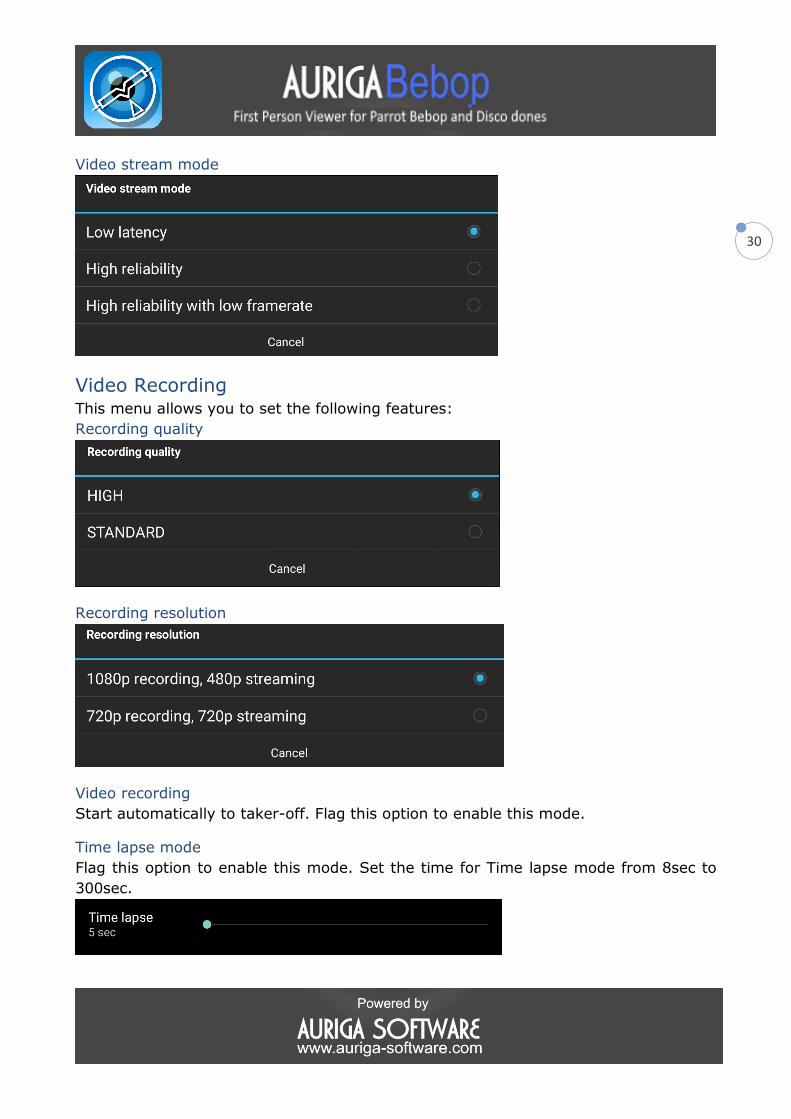
Video stream mode
Video Recording This menu allows you to set the following features:
Recording quality
Recording resolution
Video recording
Start automatically to taker-off. Flag this option to enable this mode.
Time lapse mode
Flag this option to enable this mode. Set the time for Time lapse mode from 8sec to
300sec.

31
Photo Preferences This menu allows you to set the photo format:
Camera switch This menu allows the automatic switching from Pilot view / Drone view based on the
distance and the altitude parameters.
This mode is particularly useful in the take-off and landing operations.

32
Flypad and Joypad settings
Buttons and stick settings
This menu allows you to configure the
Flypad/Joypad buttons:
Select the function and press the
button or move the stick to assign.
Dead zone calibration
Dead zone calibration is for Flypad
only.
Leave your joystick centered.
The region that the joystick can
physically move without registering
any change is the dead zone for the
stick.
If your Bebop move also in the center
position the calibration is necessary.
You can adjust it manually by the
proper cursor.
33
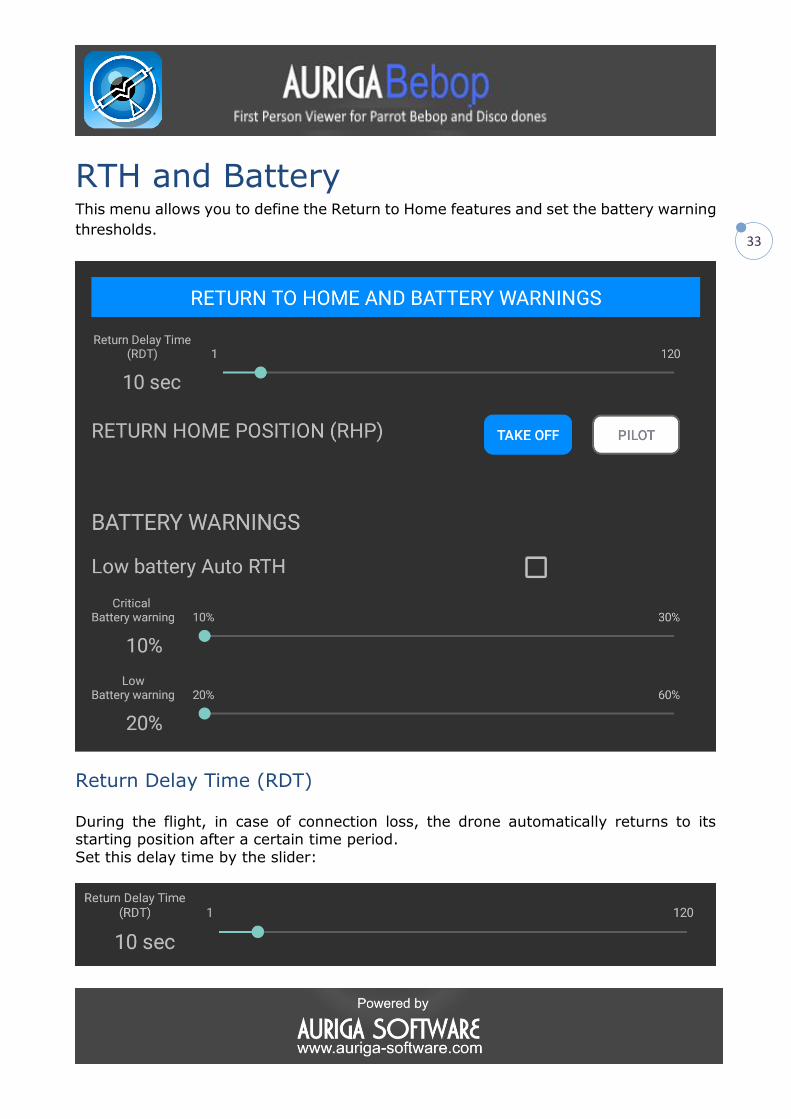
RTH and Battery This menu allows you to define the Return to Home features and set the battery warning
thresholds.
Return Delay Time (RDT)
During the flight, in case of connection loss, the drone automatically returns to its starting position after a certain time period.
Set this delay time by the slider:

34
Return Home Position (RHP)
Return Home Position (RHP) allows you to define the home point: Take-Off or Pilot
position.
Battery Warnings
This menu allows to set the battery warnings thresholds (critical and low battery
warning) and the automatic return to home for battery warning status.
Critical Battery Warning is triggering more frequently than the Low Battery Warning.
Low battery Auto RTH
Flag this option to enable the automatic Return to Home in case of Battery Warnings
35
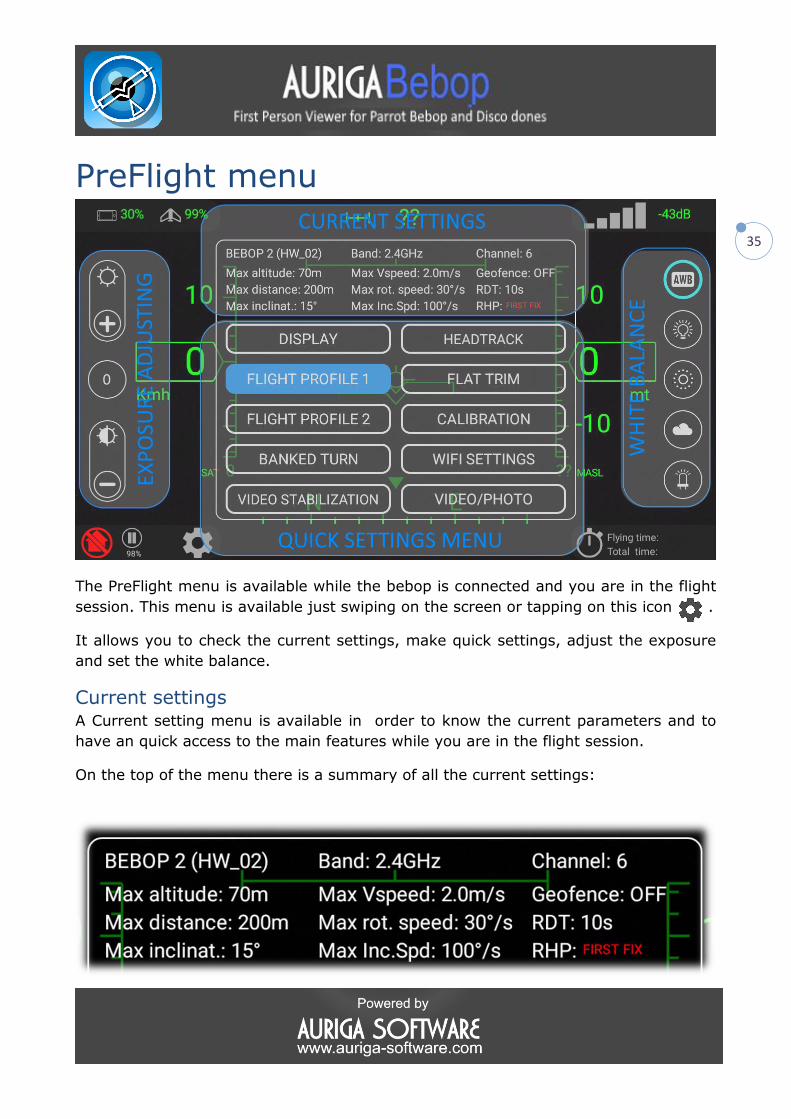
PreFlight menu
The PreFlight menu is available while the bebop is connected and you are in the flight
session. This menu is available just swiping on the screen or tapping on this icon .
It allows you to check the current settings, make quick settings, adjust the exposure
and set the white balance.
Current settings
A Current setting menu is available in order to know the current parameters and to
have an quick access to the main features while you are in the flight session.
On the top of the menu there is a summary of all the current settings:

36
Quick settings menu It allows you to do quick settings while you are already in the flight session, such as
the following:
Display
Tap on this button to show the display settings menu.
Flight Profile 1
Tap on this button to select (blue button) the profile 1 as set previously in the flight
settings menu.
Flight Profile 2
Tap on this button to select (blue button) the profile 2 as set previously in the flight
settings menu.
Banked Turn
Tap on this button to turn ON (blue button) or OFF (greyed out) this feature.
Video Stabilization
Tap on this button to turn on (blue button) this feature.
If it is not selected the stabilization is OFF as set previously in the Stabilization off mode
menu.
Headtrack
Tap on this button to show the headtrack settings menu.
Flat Trim
Use the flat trim feature after you change the battery or if the Parrot Bebop Drone
does not stay on course correctly. Place the Parrot Bebop Drone on a flat, dry,
unobstructed surface and tap on this button to trim the Bebop.

37
Calibration In this section you can calibrate the magnetometer of the Bebop drone or the VR
headset/Parrot Cockpitglasses.
Drone Calibration
Tap on Drone Calibration to calibrate your drone.
Bebop Calibration
Follow the step by step instructions on your smartphone screen to calibrate. Sep.1: Z axis (YAW)calibration - Turn your drone on its Z axis.
Step2: Y axis (PITCH) calibration – Turn your drone on its axis. Step3: X axis (ROLL) calibration – Turn your drone on its axis.

38
Parrot Disco Calibration
Follow the step by step instructions on your smartphone screen to calibrate. Step1: Pitot calibration – Hold the Parrot Disco towards the ground for 5 seconds.
Sep.2: Z axis (YAW)calibration - Turn your drone on its Z axis. Step3: Y axis (PITCH) calibration – Turn your drone on its axis.
Step4: X axis (ROLL) calibration – Turn your drone on its axis
View Calibration for Headset FPV2
This calibration is not allowed by Skycontroller 1.
Use Skycontroller 2/Flypad/Bluetooth joypad controllers to calibrate while wearing VR
headset or Parrot Cockpitglasses.
o Adjust the VR headset/Parrot Cockpitglasses on your head.
o Tap the Settings button of the Parrot Skycontroller 2 or the same function on the
other controllers.
The Settings window opens.
39
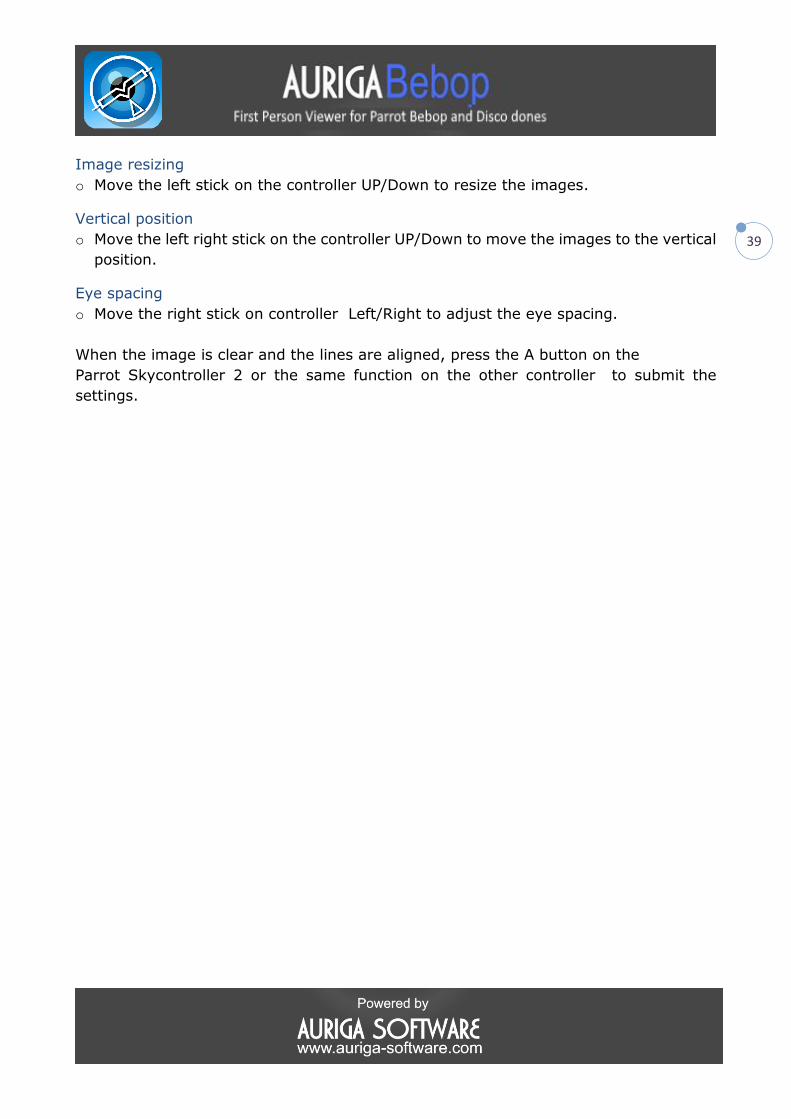
Image resizing
o Move the left stick on the controller UP/Down to resize the images.
Vertical position
o Move the left right stick on the controller UP/Down to move the images to the vertical
position.
Eye spacing
o Move the right stick on controller Left/Right to adjust the eye spacing.
When the image is clear and the lines are aligned, press the A button on the
Parrot Skycontroller 2 or the same function on the other controller to submit the
settings.
40
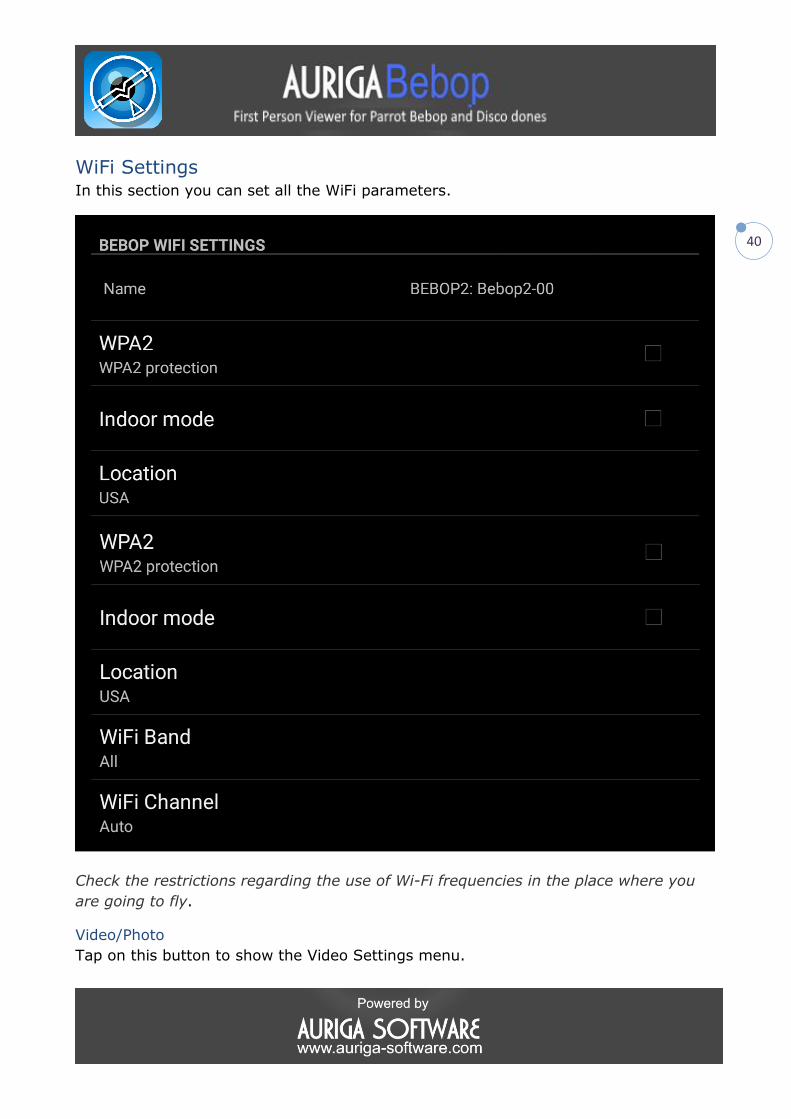
WiFi Settings In this section you can set all the WiFi parameters.
Check the restrictions regarding the use of Wi-Fi frequencies in the place where you
are going to fly.
Video/Photo
Tap on this button to show the Video Settings menu.

41
Exposure Adjusting
It allows you to adjust the exposure of the image. To do this, tap on the +/- buttons. The circle between the buttons shows the exposure
value between + 3 / -3.
White balance
It allows you to adjust the white balance of the image.
To do this, tap on the buttons as show below:
Automatic White Balance
Incandescent
Sunny
Cloudy
Fluorescent
42
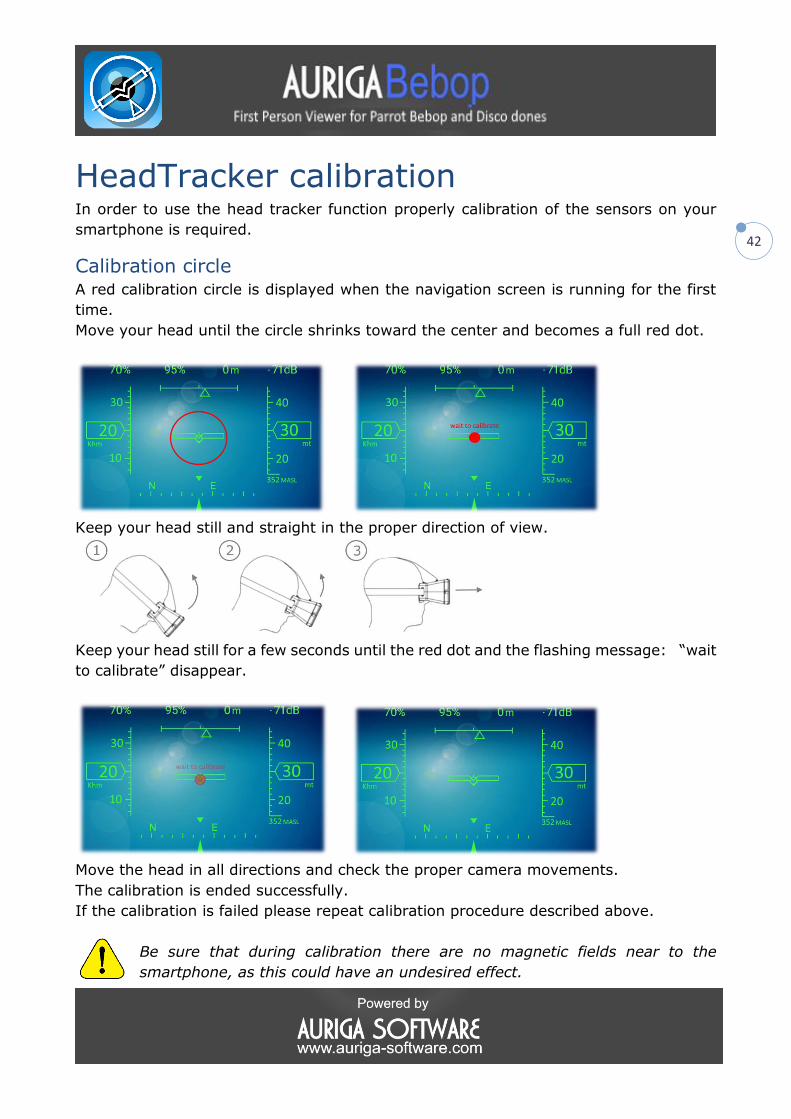
HeadTracker calibration In order to use the head tracker function properly calibration of the sensors on your
smartphone is required.
Calibration circle A red calibration circle is displayed when the navigation screen is running for the first
time.
Move your head until the circle shrinks toward the center and becomes a full red dot.
Keep your head still and straight in the proper direction of view.
Keep your head still for a few seconds until the red dot and the flashing message: “wait
to calibrate” disappear.
Move the head in all directions and check the proper camera movements.
The calibration is ended successfully.
If the calibration is failed please repeat calibration procedure described above.
Be sure that during calibration there are no magnetic fields near to the
smartphone, as this could have an undesired effect.
43
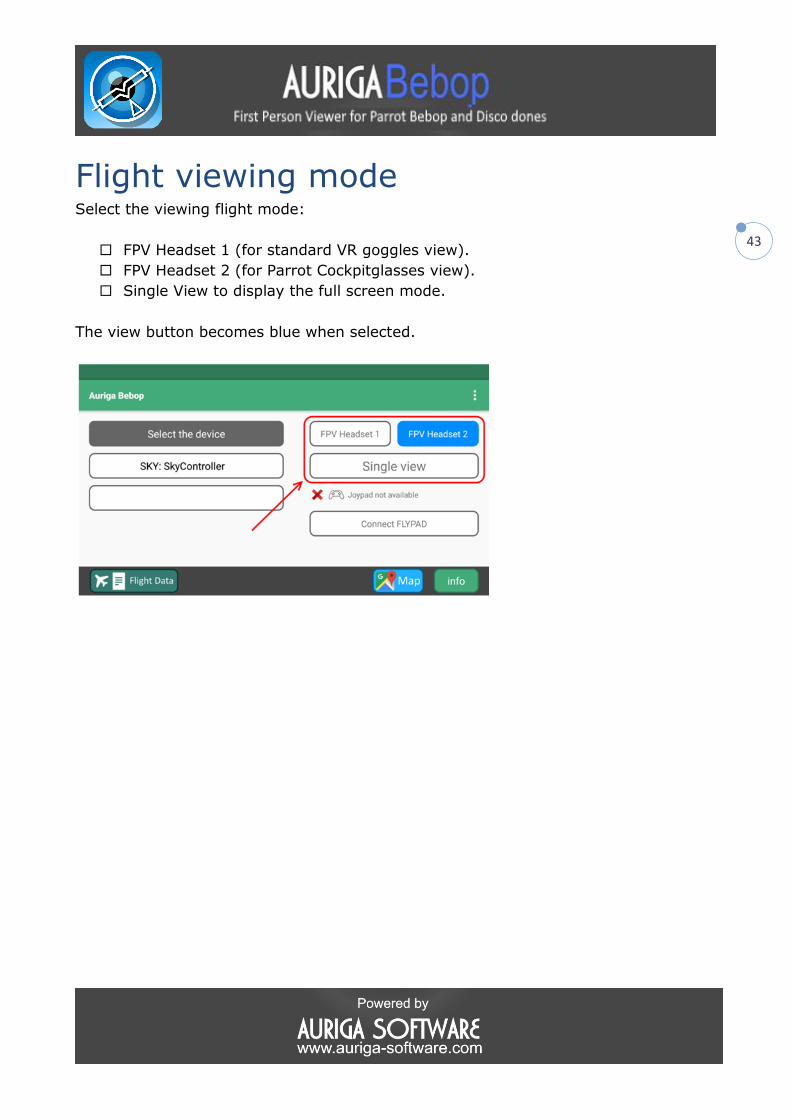
Flight viewing mode Select the viewing flight mode:
FPV Headset 1 (for standard VR goggles view).
FPV Headset 2 (for Parrot Cockpitglasses view).
Single View to display the full screen mode.
The view button becomes blue when selected.

44
FPV Headset interface layouts
FPV Headset1 FPV Headset 1 layout interface is best for the use with standard VR goggles.

45
FPV Headset 2 FPV Headset 2 layout interface is best for the use with Parrot Cockpitglasses 1.
46
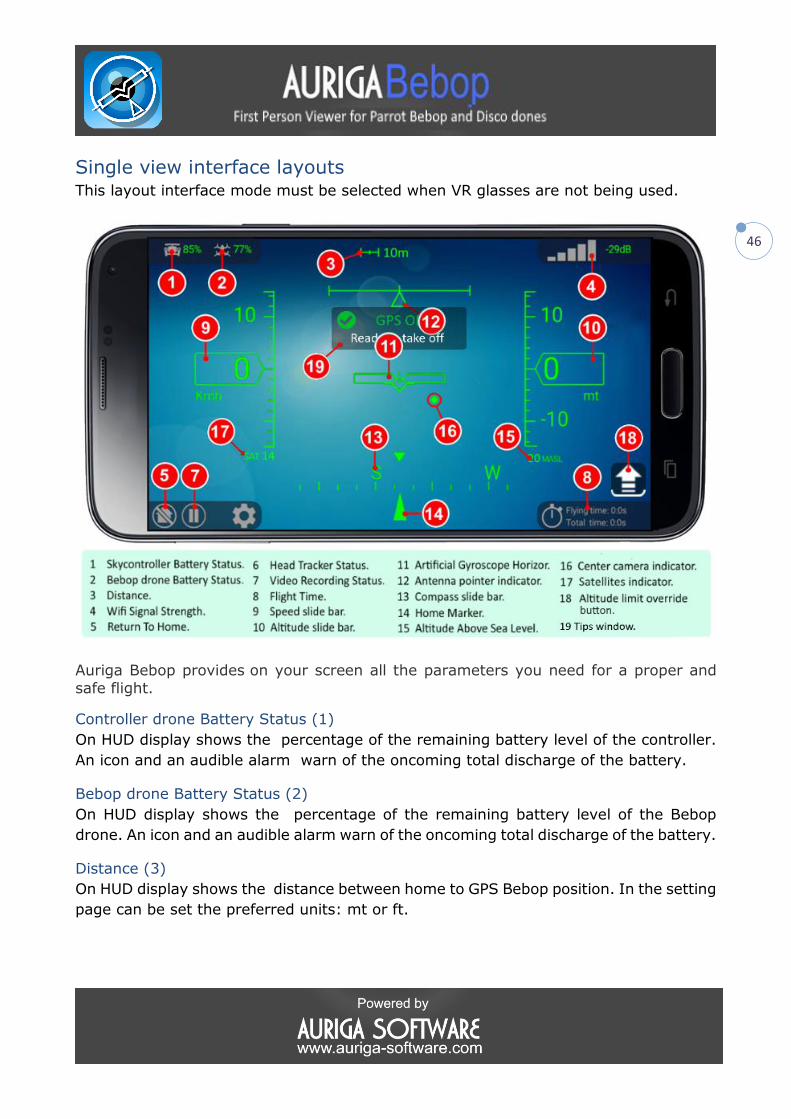
Single view interface layouts This layout interface mode must be selected when VR glasses are not being used.
Auriga Bebop provides on your screen all the parameters you need for a proper and
safe flight.
Controller drone Battery Status (1)
On HUD display shows the percentage of the remaining battery level of the controller.
An icon and an audible alarm warn of the oncoming total discharge of the battery.
Bebop drone Battery Status (2)
On HUD display shows the percentage of the remaining battery level of the Bebop
drone. An icon and an audible alarm warn of the oncoming total discharge of the battery.
Distance (3)
On HUD display shows the distance between home to GPS Bebop position. In the setting
page can be set the preferred units: mt or ft.

47
Wifi Signal Strength (4)
On HUD display shows the -dB (decibel) of the radio WIFI signal strength. An icon and
an audible alarm warn of the oncoming signal loss.
Return To Home (5)
The bottom left of the OSD shows a Return To Home (RTH) icon that becomes flashing
when active.
Head Tracker Status (6)
The bottom of the OSD shows a Head Tracker icon that becomes unlocked when active.
This means that the bebop's camera may be driven simply moving your head.
Video Recording Status (7)
The bottom of the OSD also shows a video recording status: rec/pause. The recording
command is performed by the controller.
Flight Time (8)
The bottom right of the OSD shows two flight times:
- Flight time (min:sec) shown the current session flight time.
- Total time (min:sec) shown the total time that Bebop flew before battery changing.
Speed slide bar (9)
On HUD displays a vertical slide bar of the speed. In the setting page can be set the
preferred speed units: Kmh or Mph.
Altitude slide bar (10)
On HUD displays a slide bar of the altitude. In the setting page can be set the preferred
altitude units: mt or ft.
Artificial Gyroscope Horizon (11)
On HUD displays the gyroscope flight position.
Antenna Pointer indicator (12)
This indicator allows you to point the antenna of the Skycontroller in the direction of
the Bebop in order to have the best radio signal.
For the best radio connection the triangle should be at the center of the segment, this
is obtained by properly directing the antenna of the controller.
Compass slide bar (13)
On HUD displays a slide bar of the compass position.
Home Marker (14)
The Home Marker arrow displays the position of the drone's nose on the compass
respect to the home position.

48
Altitude Above Sea Level (15)
In this position of the HUD the altitude above sea level is displayed. In the settings page
you can set the preferred units: MASL or FASL.
Center camera indicator (16)
A dot on the screen shows the center camera position. This indicator changes its position
on screen when your head is moving in head tracker mode.
Satellites indicator (17)
In this position of the HUD, the number of satellites is displayed for the best GPS position
calculation.
Altitude limit override button/indicator (18)
The override button/indicator appears on HUD when the altitude limit is reached.
Tips window (19)
These items are warning or notification windows, they also recommend actions to be
performed about these alerts.

49
INFO BAR On the bottom in first page is available the below info buttons:
Flight Data This report allows you to see the main data of your flights.

50
Last GPS way point
These are the coordinates of the last waypoint received from GPS of Bebop.
Last Flight
These are the last flight data such as:
▪ Max distance: maximum distance reached from the home position during last
flight.
▪ Max speed: maximum speed performed during last flight.
▪ Max altitude: maximum altitude reached from the take-off during last flight.
▪ Flight time: duration of the last flight.
▪ Distance Flown: estimate total distance flown from the take off during the last
flight.
▪ Battery usage: battery consumption during the last flight.
Absolute
These are the best data such as:
▪ Best max distance: maximum distance reached from the home position for all
flights performed.
▪ Best distance Flown: maximum total distance flown from the take off for all
flights performed.
▪ Best max altitude: maximum altitude reached from the take off for all flights
performed.
Totals
▪ These are the total data such as:
▪ Total flight time: duration of the total flights performed.
▪ Total distance Flown: maximum total distance flown from the take off for all
flights performed.
▪ Distance Flown: total distance flown from the take off for all flights performed.
Reset
Reset buttons to reset the absolute and totals data.
51
Map Tap on this button to link Google Map Service to display the last GPS waypoint of Bebop
drone on the map.
This feature is very useful when you need to search for your drone.
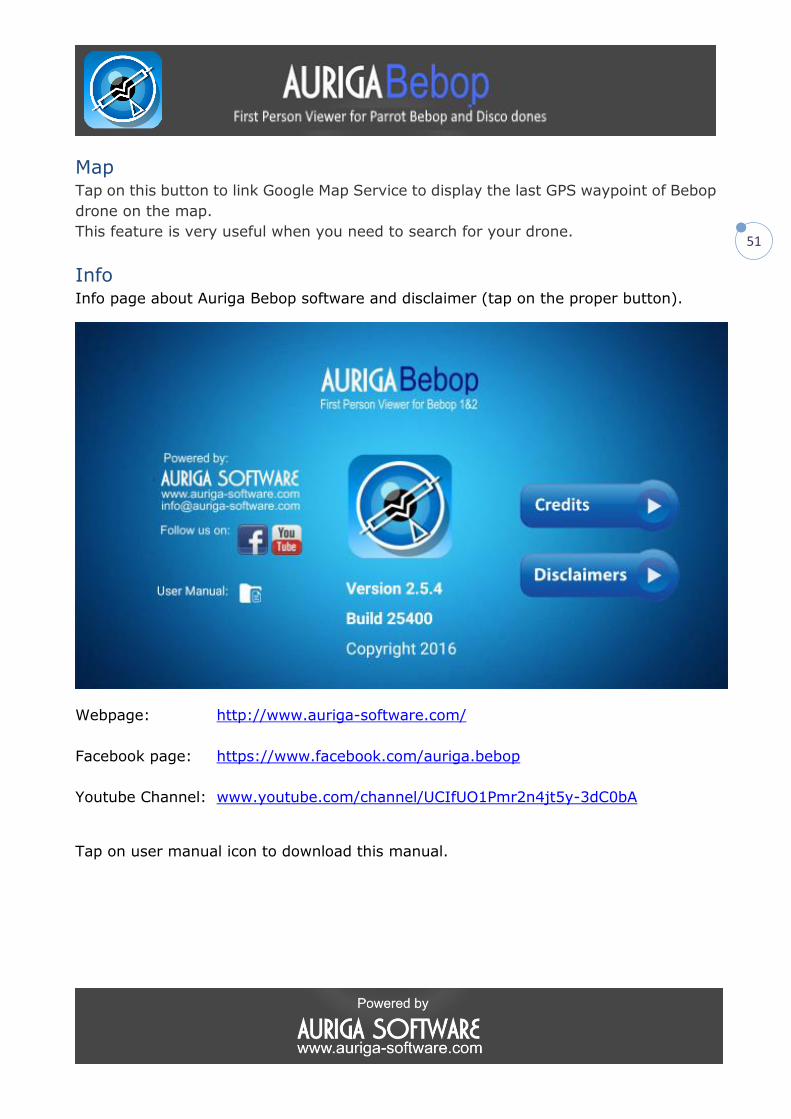
Info Info page about Auriga Bebop software and disclaimer (tap on the proper button).
Webpage: http://www.auriga-software.com/
Facebook page: https://www.facebook.com/auriga.bebop
Youtube Channel: www.youtube.com/channel/UCIfUO1Pmr2n4jt5y-3dC0bA
Tap on user manual icon to download this manual.
52
Recommendations Before flying your Parrot Bebop Drone by Auriga Bebop application software, check and
fly in according with your local civil aerial regulation.
Make sure that the use of your Parrot Drone is allowed where you are going to fly.
Check the restrictions regarding the use of Wi-Fi frequencies in the place where you are
going to fly.
Check the regulations on the use of FPV goggles when flying a drone where you are
going to fly.
53
Enjoy your flight!


