
© 2005 American Honda Motor Co., Inc. - All Rights Reserved. AII 30214 (0509) 1 of 1208B26-SDN-1000-91
INSTALLATIONINSTRUCTIONS
Accessory Application Publications No.
Issue Date
SEP 2005
ACCORD2-DOOR
AII 30214CD CHANGER
TRUNK MOUNT (LX)
PARTS LIST
Attachment Kit (sold separately):P/N 08B26-SDN-100
CD changer bracket
2 Side brackets
BUS cable
3 Clip nuts
3 Washer-bolts, 6 x 12 mm
4 Washer-screws, 4 x 8 mm
4 Flange nuts, 6 mm
13 Wire ties
2 Wire ties with clip
4 EPT sealers
10 Cushion tapes
2 of 12 AII 30214 (0509) © 2005 American Honda Motor Co., Inc. - All Rights Reserved.
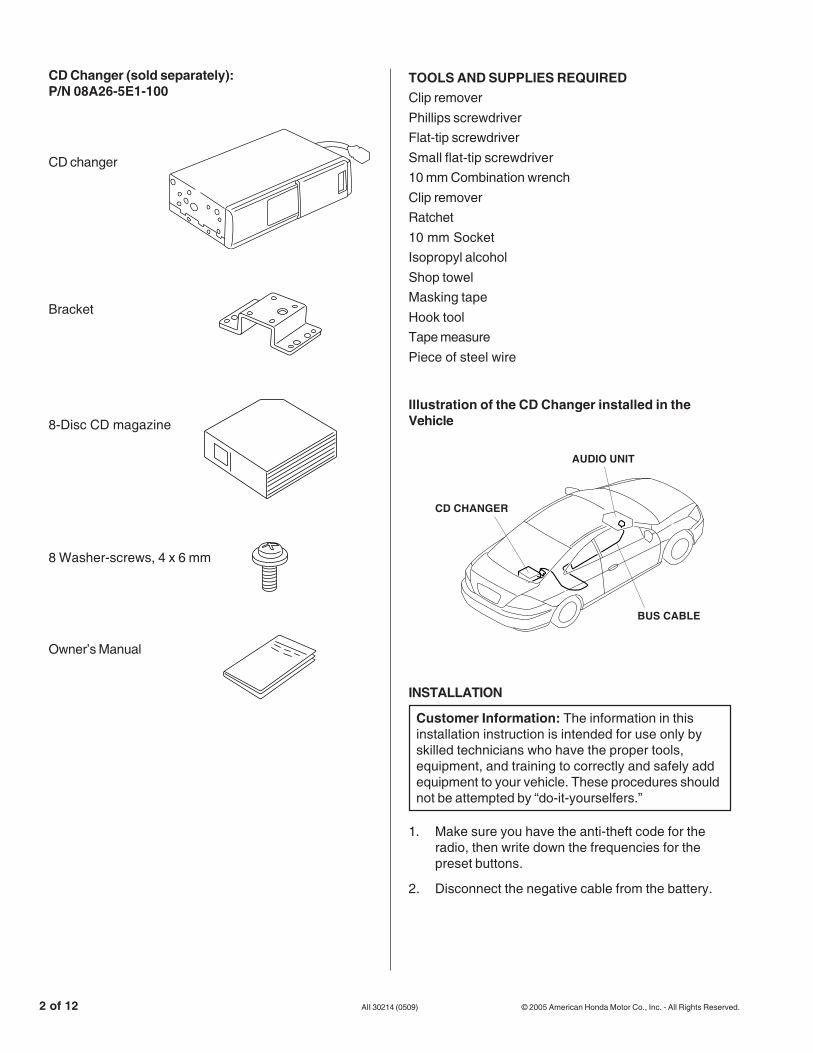
CD Changer (sold separately):P/N 08A26-5E1-100
TOOLS AND SUPPLIES REQUIREDClip removerPhillips screwdriverFlat-tip screwdriverSmall flat-tip screwdriver10 mm Combination wrenchClip removerRatchet10 mm SocketIsopropyl alcoholShop towelMasking tapeHook toolTape measurePiece of steel wire
CD changer
Bracket
8-Disc CD magazine
8 Washer-screws, 4 x 6 mm
Owner’s Manual
Illustration of the CD Changer installed in theVehicle
INSTALLATION
Customer Information: The information in thisinstallation instruction is intended for use only byskilled technicians who have the proper tools,equipment, and training to correctly and safely addequipment to your vehicle. These procedures shouldnot be attempted by “do-it-yourselfers.”
1. Make sure you have the anti-theft code for theradio, then write down the frequencies for thepreset buttons.
2. Disconnect the negative cable from the battery.
2527010T
BUS CABLE
CD CHANGER
AUDIO UNIT

© 2005 American Honda Motor Co., Inc. - All Rights Reserved. AII 30214 (0509) 3 of 12
2206110K
A/T Model:
Gently pry up on the trim ring to release the sixclips, and remove the trim ring.
4. Pry up on the beverage holder to release the sixclips, and remove the beverage holder.
3. Remove the trim ring.
M/T Model:
• Squeeze the plastic clip and pull down on theshift boot. Remove the shift knob by turning itcounterclockwise.
• Gently pry up on the trim ring to release the sixclips, and remove the trim ring.
CLIPS (2)
CLIPS (4)
TRIMRING
2206050K
CLIPS (2)
CLIPS (4)
BEVERAGEHOLDER
2321011K
SHIFTKNOB
PLASTICCLIP
SHIFT BOOT
TRIM RING
2321021K
CLIPS (2)CLIPS (4)
TRIMRING

4 of 12 AII 30214 (0509) © 2005 American Honda Motor Co., Inc. - All Rights Reserved.
5. Remove the dashboard center holder.
• Open the coin pocket lid, and remove the coinpocket.
• Remove the two self-tapping screws.
• Gently pull out on the dashboard center holderto release the two retaining clips, unplug thevehicle connector, and remove the centerholder.
6. Remove the pocket:
• Apply masking tape to the edge of the centerpanel.
• Remove the two self-tapping screws.
• Push in on the bottom of the lid, then pull outon the top by inserting the end of a hook toolbetween the pocket and center panel. Pull outon the hook tool to release the two retainingclips.
7. Remove the right and left inner covers (one hookand one clip for each cover).
2206073K
RETAININGCLIPS (2)
SELF-TAPPINGSCREW (Reuse.)
HOOK TOOLCENTERPANEL
LID
Push
MASKINGTAPE
With Ashtray:
• Open the lid and remove the ashtray.
• Remove the two self-tapping screws.
• Gently pull out on the two retaining clips, andunplug the cigarette lighter harness connector,vehicle connector, and illumination bulb;remove the center holder.
2226010K
CLIP
LEFT INNERCOVER
HOOK
POCKETOPENING
RIGHT INNERCOVER
2730010K
CIGARETTELIGHTERHARNESSCONNECTOR
VEHICLECONNECTOR
RETAININGCLIPS (2)
SELF-TAPPINGSCREW(Reuse.)
ASHTRAYDASHBOARDCENTERHOLDER
ILLUMINATIONBULB
2206061K
DASHBOARDCENTERHOLDER
COINPOCKET
SELF-TAPPINGSCREW(Reuse.)
CLIPS (2)VEHICLECONNECTOR
LID

© 2005 American Honda Motor Co., Inc. - All Rights Reserved. AII 30214 (0509) 5 of 12
If the vehicle is equipped with a cassette or an MP3player, continue with step 8; if not, go to step 9.
8. Remove the player.
• Remove the player panel by removing the twoself-tapping screws and two clips.
2306141T
SELF-TAPPINGSCREW(Reuse.)
CLIPPLAYERPANEL
• Remove the four 6 mm flange nuts that fastenthe player and pocket. Remove the player andpocket by pulling it out toward you, andunplugging the player BUS cable connector.
2321030K
PLAYER BUSCABLECONNECTOR
6 mmFLANGENUT
PLAYER
9. Open the center console lid, and remove thecenter console box mat. Remove the centerconsole by removing the four self-tapping screws,the two screws, and releasing the four retainingtabs.
Without Accessory Socket:
With Accessory Socket:
• Remove the clip from the center console,unplug the accessory socket connector, andremove the console.
2226020K
RETAININGTABS (4)
CENTERCONSOLE
SELF-TAPPINGSCREW(Reuse.)
SCREW(Reuse.)
CENTERCONSOLEBOX MAT
CENTERCONSOLELID
2206090K
RETAININGTABS (4)
CENTERCONSOLE
ACCESSORYSOCKETCONNECTOR
CLIP
SELF-TAPPINGSCREW(Reuse.)
SCREW(Reuse.)
CENTERCONSOLEBOX MAT
CENTERCONSOLELID

6 of 12 AII 30214 (0509) © 2005 American Honda Motor Co., Inc. - All Rights Reserved.
12. Remove the trunk front trim (from the upper edge,pull out to release the four clips).
13. Remove the trunk floor (one clip).
10. Inside the passenger’s compartment, remove therear seat cushion by removing the bolt andreleasing the two locks (push down at the hooklocation, and pull out on the lever).
11. Inside the trunk, fold down the right and left seatbacks by pulling the strap, and pushing forward onthe seat.
2527030T
STRAPLEFT REARSEAT CUSHION
RIGHT REARSEAT BACK
2527020T
BOLT
LOCKS (2)
REAR SEATCUSHION
HOOKS (2)(Pull down.)
LEVERS (2)(Pull out.)
2527040T
TRUNK FRONTTRIM
CLIPS (4)
2527051T
CLIP
TRUNKFLOOR

© 2005 American Honda Motor Co., Inc. - All Rights Reserved. AII 30214 (0509) 7 of 12
14. Remove the trunk weatherstrip in the area shown,then remove the rear panel trim (four clips).
18. If the vehicle is equipped with an in-dash 6-discCD Changer, use a pin to move the number 2switch to the "ON" position.
19. Position the side brackets on the CD changer, withthe elongated holes, down and install the four4 x 8 mm washer-screws included with theattachment kit.
Installing the CD Changer
17. Visually check the position of the spring adjustingslots on both sides of the CD changer. If both ofthe spring adjusting slots are not in the horizontal(H) position, move the slots to the horizontalposition using a small flat-tip screwdriver.
15. Remove the hook from the right side trunk lining(one bolt, one washer).
2527071T
CLIPBOLT
HOOK WASHER
CLIP
SELF-TAPPINGHOOK
RIGHT SIDETRUNK LINING
2527061T
TRUNKWEATHERSTRIP(Remove.)
REARPANELTRIM
CLIPS (4)
16. Remove the right side trunk liner (three self-tapping hooks, and two clips).
2226070K
4 x 8 mmWASHER-SCREW(supplied)
CD CHANGER
4 x 8 mmWASHER-SCREW(supplied)
SIDE BRACKET
ELONGATEDHOLE
ELONGATEDHOLE
12
34
ON
(H: Horizontalposition)
SPRINGADJUSTINGSLOTS (2)
(V: Vertical position)
SWITCHMove to the"ON" Position.

8 of 12 AII 30214 (0509) © 2005 American Honda Motor Co., Inc. - All Rights Reserved.
Routing the BUS cable
24. Connect the BUS cable connector to the CDchanger BUS cable connector, and route the BUScable into the cabin as shown.
20. Position the CD changer on the CD changerbracket, and install the four 6 mm flange nuts.Tighten the flange nuts securely.
21. Wrap the CD changer BUS cable connector withone EPT sealer, and secure it and the CD changerBUS cable to the CD changer bracket with twowire ties.
2527081T
6 mmFLANGE NUT
CDCHANGER
CD CHANGERBRACKET
CD CHANGERBUS CABLECONNECTOR
WIRETIE
EPTSEALER
Secure at thecenter of theelongated hole.
22. Slide the three clip nuts onto the rear metal panelthrough the holes in the panel.
2527090T
6 x 12 mmWASHER-BOLT
CLIP NUTS (3)
METAL PANEL
CDCHANGERBRACKET
6 x 12 mmWASHER-BOLT
23 Secure the CD changer bracket to the metal panelwith three 6 x 12 mm washer-bolts.
2527100T
BUS CABLECONNECTOR
CD CHANGER BUSCABLE CONNECTOR
CD CHANGER
WIRE TIEWITH CLIP
WIRETIE
CUSHIONTAPE
BUS CABLE
WIRE TIEWITH CLIP
25. Using isopropyl alcohol, clean the areas where thecushion tapes will attach. Secure the BUS cableto the vehicle harness and frame with one wire tie,two wire ties with clip, and two cushion tapes inthe areas shown.
26. Route the BUS cable forward, then toward thecenter of the car. Using isopropyl alcohol, cleanthe areas where the cushion tapes will attach,then secure the BUS cable to the vehicle panelwith four cushion tapes.
2527111T
BUS CABLE(Align with thelines on thevehicle panel.)
CUSHION TAPE BUS CABLE
CUSHIONTAPE

© 2005 American Honda Motor Co., Inc. - All Rights Reserved. AII 30214 (0509) 9 of 12
27. Route a piece of steel wire from the edge of therear seat carpet, along the vehicle harness, to therear seat area. Tape the end of the BUS cable tothe wire, and pull the wire with BUS cable throughthe center console area.
2527131T
BUSCABLE
BUSCABLE
VEHICLEHARNESS
VEHICLEHARNESS
BUS CABLE
VEHICLEHARNESS
WIRE TIEVEHICLECLIP
EPT SEALER(Wrap one EPT sealeraround the BUS cableand the vehicle harness.)
2527121T
VEHICLEHARNESS CLIPWIRE TIEWIRE TIE
BUSCABLE
VEHICLEHARNESS
PIECE OF STEEL WIRE BUS CABLE
28. Secure the BUS cable to the vehicle harness, andthe vehicle harness clip, with one wire tie. Securethe BUS cable to the vehicle harness under thecarpet with one wire tie.
29. Route the BUS cable to the front of the car, andsecure it to the vehicle harness with one wire tienear the vehicle clip. Wrap one EPT sealer aroundthe BUS cable and the vehicle harness in thearea shown.
30. Plug the BUS cable into the pocket opening.
Without Player:
• At the center console, clean the vehicle framewith isopropyl alcohol where the cushion tapewill attach. Using scissors, cut one cushiontape in half, and attach one half of the cushiontape to the edge of the vehicle frame.
• Wrap the BUS cable with two EPT sealersstarting at the end of the tube, and plug theBUS cable 14-pin connector into the vehicle14-pin connector.
• Secure the BUS cable to the vehicle harnesswith two wire ties.
2222052K
CUSHION TAPE(Cut in half.)
VEHICLE 14-PINCONNECTOR
VEHICLEFRAME
EPT SEALER
WIRE TIE
VEHICLEHARNESS
BUSCABLE
BUSCABLE
END OFTUBE
14-PINCONNECTOR

10 of 12 AII 30214 (0509) © 2005 American Honda Motor Co., Inc. - All Rights Reserved.
2321042K
• Plug the BUS cable 14-pin connector into theplayer.
Cassette Player:
MP3 Player:
2321051K
CASSETTEPLAYERBUS CABLE 14-PIN
CONNECTOR
2321061K
MULTI-MEDIAPLAYER
BUS CABLE 14-PINCONNECTOR
With Player:
• Wrap the BUS cable with two EPT sealersstarting at the end of the tube.
• Secure the BUS cable to the vehicle harnesswith two wire ties, so that the distancebetween the BUS cable connector end and theupper wire tie is 200 mm.
• Apply masking tape to the center panel in thearea shown.
EPT SEALER
BUS CABLE
200 mm
VEHICLEHARNESS
BUSCABLE
WIRE TIE
END OF TUBE
MASKINGTAPE
PLAYERBASE-BRACKET

© 2005 American Honda Motor Co., Inc. - All Rights Reserved. AII 30214 (0509) 11 of 12
2704060K
2226010K
33. Check that all wire harnesses are routed properlyand all connectors are plugged in.
34. Reconnect the negative cable to the battery.
35. Enter the customer’s radio anti-theft code, andreset the radio station presets.
36. Set the clock.
37. Check the operation of the CD changer accordingto the Owner’s Manual provided.
31. Secure the BUS cable to the vehicle harness withtwo wire ties.
• Plug the player BUS cable connector into thevehicle connector, and reinstall the player andpocket.
2321070K
VEHICLECONNECTOR
PLAYER BUSCABLECONNECTOR
PLAYER
6 mmFLANGENUT
32. Loop the BUS cable and secure it to the vehicleharness with one wire tie.
If the vehicle is equipped with a cassette player orMP3 player, go to step 40; if not, go to step 38.
38. Reinstall the right and left inner covers.
39. Reinstall the pocket.
CLIP
LEFT INNERCOVER
HOOK CLIP
HOOKRIGHT INNERCOVER
CLIPS (2)
SELF-TAPPINGSCREW(reused)
2527141T
WIRETIE
VEHICLEHARNESS
WIRE TIE(Loop the BUScable andsecure it withone wire tie.)
BUS CABLE

12 of 12 AII 30214 (0509) © 2005 American Honda Motor Co., Inc. - All Rights Reserved.
40. Reinstall the player panel using the two screwsremoved in step 8.
With Player: Remove the masking tape applied instep 30.
41. Reinstall all removed parts.
42. Put the CD changer Owner’s Manual in the glovebox.
NOTE: Whenever the battery is disconnected, thedriver’s window AUTO function is disabled.
43. Start the engine. Push down fully on the driver’swindow switch until the window is fully open.
44. Pull up fully on the driver’s window switch to closethe window completely, then hold the switch for2 seconds.
45. Test the window AUTO function.
2306141T
CLIP
SELF-TAPPINGSCREW(reused)
PLAYERPANEL


