Download - APOLLO GX55 GPS Basic SAR Operations

APOLLO APOLLO GX55 GPSGX55 GPS
Basic SAR OperationsBasic SAR Operations
Instructors – use the GPS simulator along with this presentation
IntroductionIntroduction This presentation is designed to introduce This presentation is designed to introduce
the basics of the GX55 GPSthe basics of the GX55 GPS
Focus will be placed on use of the GX55 for Focus will be placed on use of the GX55 for SAR operationsSAR operations
This presentation is not designed to replace This presentation is not designed to replace hands on instruction or the owners manualhands on instruction or the owners manual
Always use your Quick Reference Guide for Always use your Quick Reference Guide for assistance until you are proficient using assistance until you are proficient using this equipmentthis equipment
GX55 SimulatorGX55 Simulator
The GX55 Deluxe simulator is available for download from The GX55 Deluxe simulator is available for download from the Garmin websitethe Garmin website
You should use the simulator to gain proficiency before you You should use the simulator to gain proficiency before you get in the airplaneget in the airplane
Using the arrow keys on your keyboard you can fly the Using the arrow keys on your keyboard you can fly the simulatorsimulator
The up and down arrows control speed and the left right The up and down arrows control speed and the left right arrows control directionarrows control direction
Be sure that you have the SAR function checked under the Be sure that you have the SAR function checked under the options menu before you turn the simulator onoptions menu before you turn the simulator on
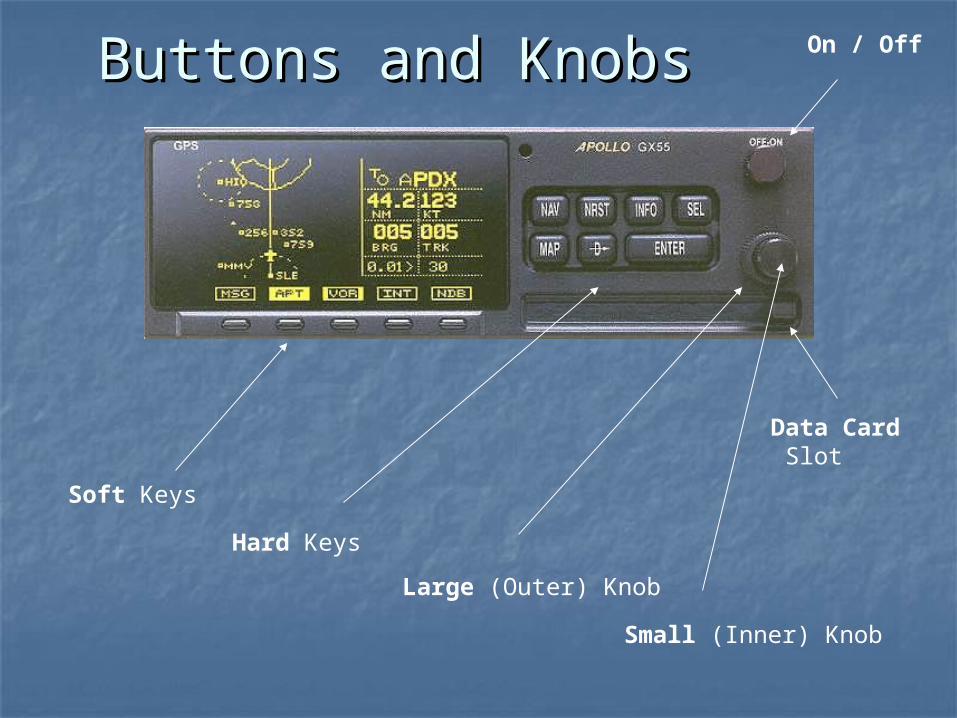
Soft Keys
Hard Keys
Large (Outer) Knob
Small (Inner) Knob
On / OffButtons and KnobsButtons and Knobs
Data Card Slot

NAV (Navigation) Key
NRST (Nearest) Key
INFO (Information) Key
SEL (Select) Key
MAP Key D> (Direct To) Key Enter Key
Hard Key FunctionsHard Key Functions

Soft Key FunctionsSoft Key Functions
Change when screens change (more on this later)
Basic GX55 OperationsBasic GX55 Operations
Caution!Caution!
DO NOT attempt to fly using the GPS DO NOT attempt to fly using the GPS until you master all of the basic until you master all of the basic functions on the simulator. functions on the simulator.
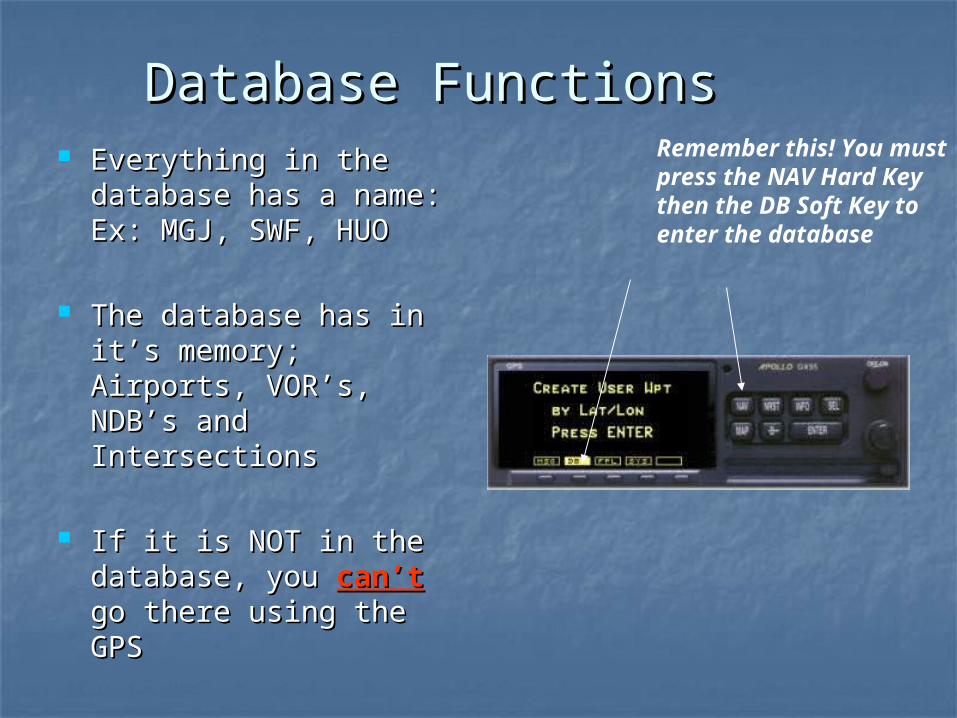
Database FunctionsDatabase Functions Everything in the Everything in the
database has a name: database has a name: Ex: MGJ, SWF, HUOEx: MGJ, SWF, HUO
The database has in The database has in it’s memory; Airports, it’s memory; Airports, VOR’s, NDB’s and VOR’s, NDB’s and IntersectionsIntersections
If it is NOT in the If it is NOT in the database, you database, you can’tcan’t go there using the go there using the GPSGPS
Remember this! You must press the NAV Hard Key then the DB Soft Key to enter the database
Database (continued)Database (continued)
You can navigate to any point on the map using You can navigate to any point on the map using the GPSthe GPS
But…….But…….
If it is not already in the database, you have to If it is not already in the database, you have to enter it firstenter it first
Think of it this way – If it does not have a name Think of it this way – If it does not have a name
- - you can’t get there from here!you can’t get there from here!

What’s already in the What’s already in the Database???Database???
AirportsAirports
VOR’sVOR’s
NDB’sNDB’s
IntersectionsIntersections

What’s NOT in the DatabaseWhat’s NOT in the Database
Lat / Lon Coordinates Lat / Lon Coordinates
Points on a U.S. Grid (299A1 etc.)Points on a U.S. Grid (299A1 etc.)
15 NM on the 150 deg Radial from MSV15 NM on the 150 deg Radial from MSV
The possible wreckage that you just The possible wreckage that you just spottedspotted
DisneylandDisneyland

Adding Waypoints to the Adding Waypoints to the DatabaseDatabase
You have to be in the NAV screen to You have to be in the NAV screen to add anything to the database add anything to the database (except a SAR mark)(except a SAR mark)

Adding a WaypointAdding a Waypoint To enter a new waypoint you have to:To enter a new waypoint you have to: Be in the NAV screenBe in the NAV screen Press the DB (Database) soft keyPress the DB (Database) soft key Turn the Outer Knob to the appropriate screenTurn the Outer Knob to the appropriate screen Press Enter to accept that selectionPress Enter to accept that selection
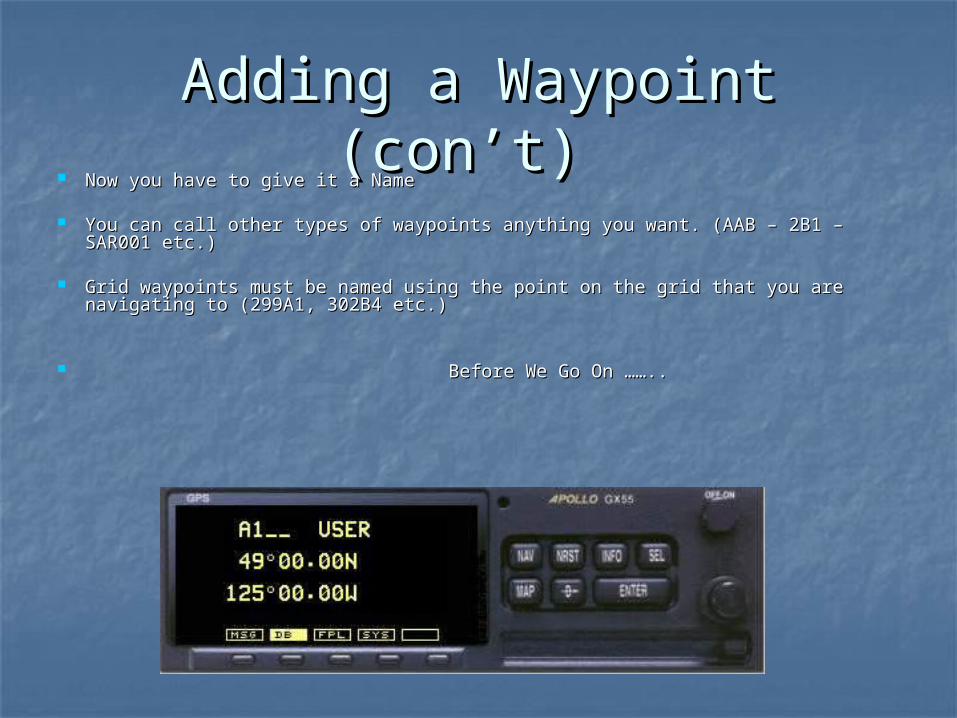
Adding a Waypoint (con’t)Adding a Waypoint (con’t) Now you have to give it a NameNow you have to give it a Name
You can call other types of waypoints anything you want. (AAB – 2B1 – SAR001 You can call other types of waypoints anything you want. (AAB – 2B1 – SAR001 etc.)etc.)
Grid waypoints must be named using the point on the grid that you are navigating Grid waypoints must be named using the point on the grid that you are navigating to (299A1, 302B4 etc.)to (299A1, 302B4 etc.)
Before We Go On ……..Before We Go On ……..
It’s Time for More Basics!!!It’s Time for More Basics!!!
Knobs – Large and SmallKnobs – Large and Small
The Outer (Large) knob changes pages or The Outer (Large) knob changes pages or cursor positioncursor position
The Inner (Small) knob changes flashing The Inner (Small) knob changes flashing items or lists more data when there is a items or lists more data when there is a diamond on the screen (unless in MAP mode)diamond on the screen (unless in MAP mode)
Enter is used to accept what is on the screen. Enter is used to accept what is on the screen. Most times you only have to hit Enter once, Most times you only have to hit Enter once, two times to enter a search pattern.two times to enter a search pattern.
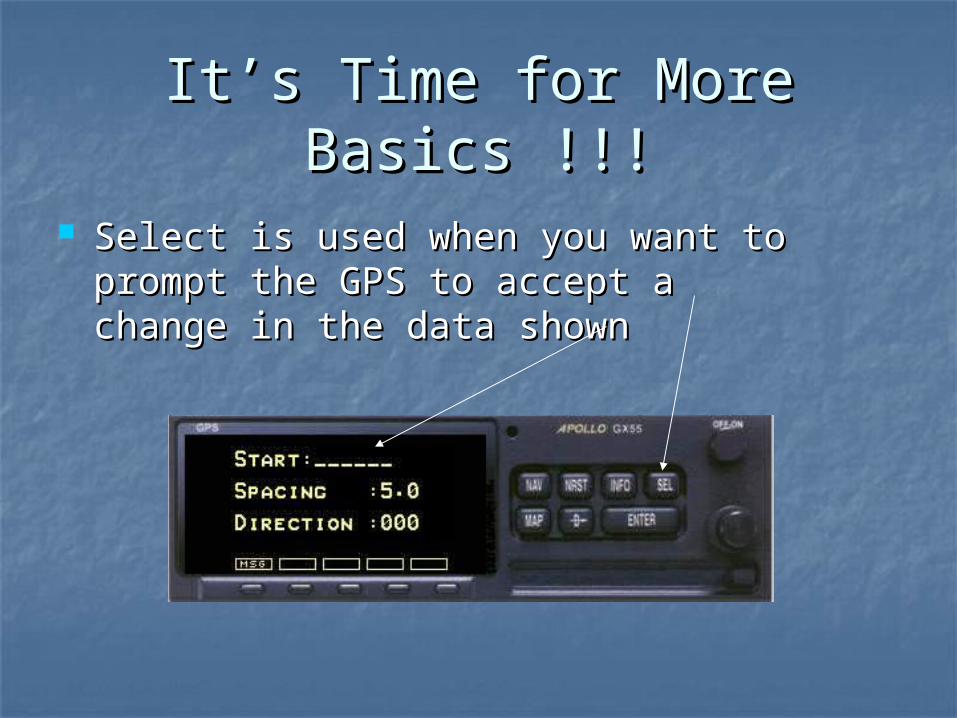
It’s Time for More Basics !!!It’s Time for More Basics !!!
Select is used when you want to Select is used when you want to prompt the GPS to accept a change prompt the GPS to accept a change in the data shownin the data shown
More Basic Facts !!!More Basic Facts !!!
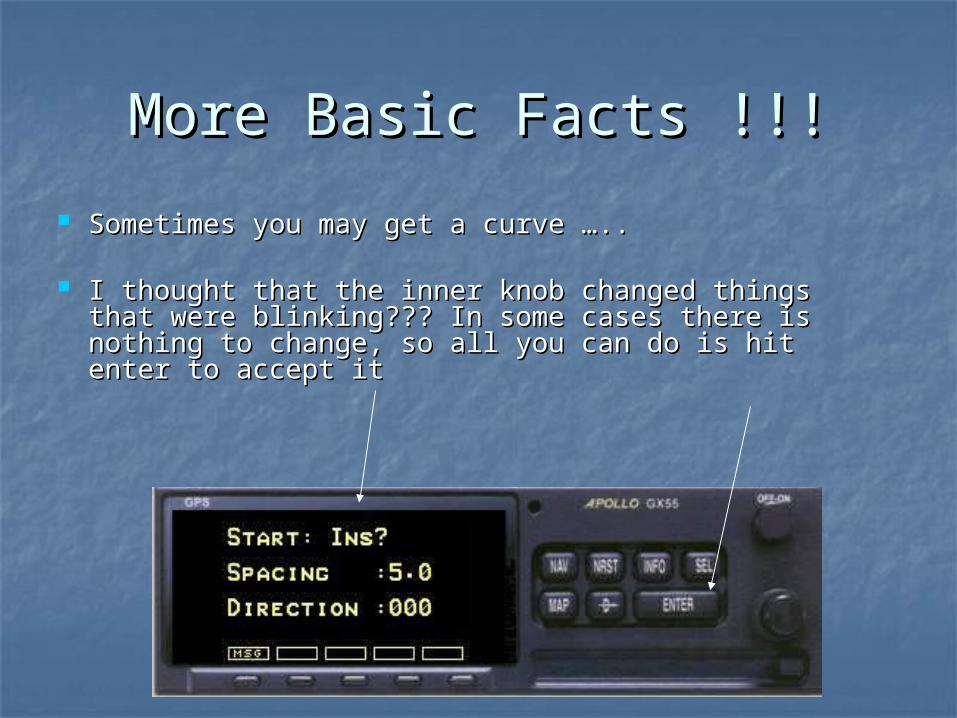
Sometimes you may get a curve …..Sometimes you may get a curve …..
I thought that the inner knob changed things that I thought that the inner knob changed things that were blinking??? In some cases there is nothing to were blinking??? In some cases there is nothing to change, so all you can do is hit enter to accept itchange, so all you can do is hit enter to accept it
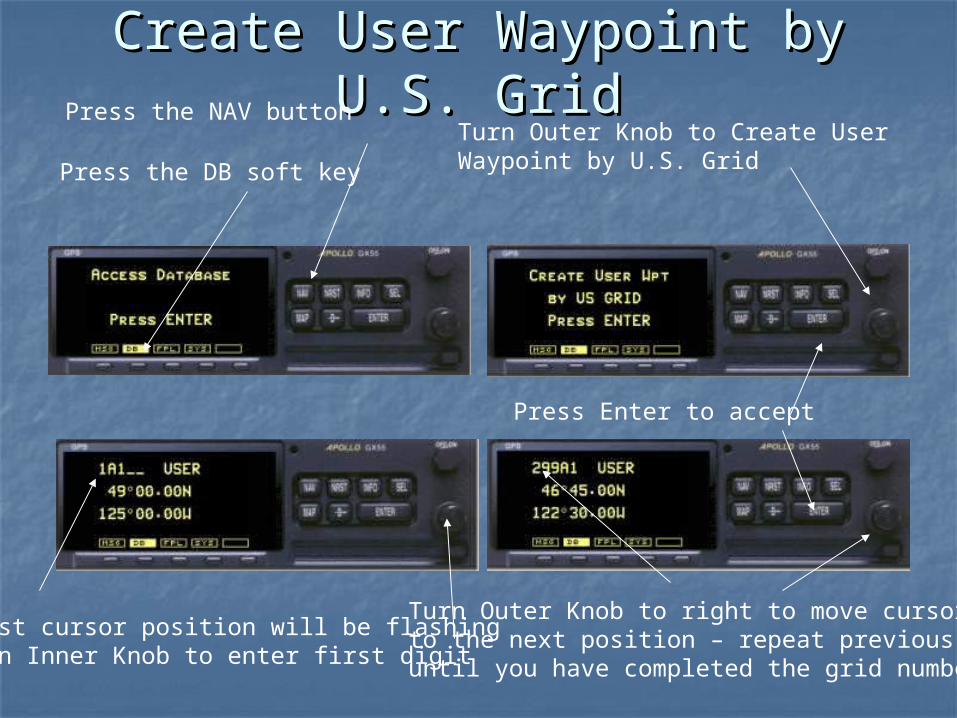
Create User Waypoint by U.S. Create User Waypoint by U.S. GridGridPress the NAV button
Press the DB soft key
Turn Outer Knob to Create UserWaypoint by U.S. Grid
Press Enter to accept
First cursor position will be flashingturn Inner Knob to enter first digit
Turn Outer Knob to right to move cursorto the next position – repeat previous stepuntil you have completed the grid number
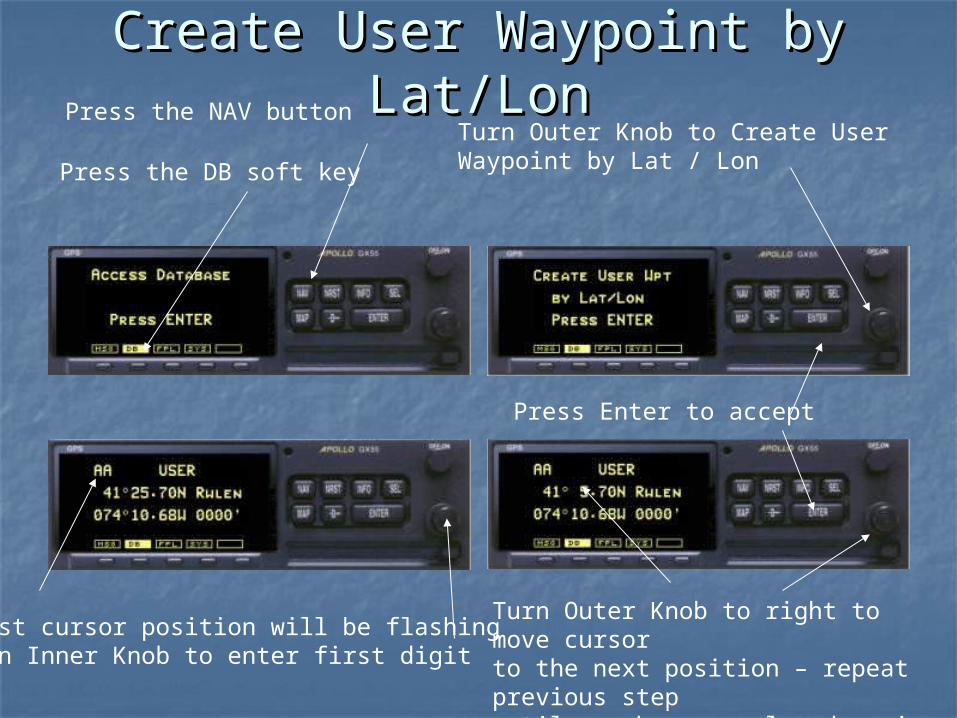
Create User Waypoint by Create User Waypoint by Lat/LonLat/LonPress the NAV button
Press the DB soft key
Turn Outer Knob to Create UserWaypoint by Lat / Lon
Press Enter to accept
First cursor position will be flashingturn Inner Knob to enter first digit
Turn Outer Knob to right to move cursorto the next position – repeat previous stepuntil you have completed naming the waypoint and entered the Lat / Lon
More Waypoint FunctionsMore Waypoint Functions You can create a Waypoint by Radial / You can create a Waypoint by Radial /
Distance – does not have to be from a Distance – does not have to be from a VOR, can be an Airport, NDB etc.VOR, can be an Airport, NDB etc.
SAR Waypoints – You can mark a position SAR Waypoints – You can mark a position by simply hitting a soft key (more on this by simply hitting a soft key (more on this later)later)
You can Edit, Delete, or change user You can Edit, Delete, or change user waypoints from the Database as wellwaypoints from the Database as well
If you have been paying attention so far, If you have been paying attention so far, you should be able to perform the above you should be able to perform the above functions without any difficulty!functions without any difficulty!
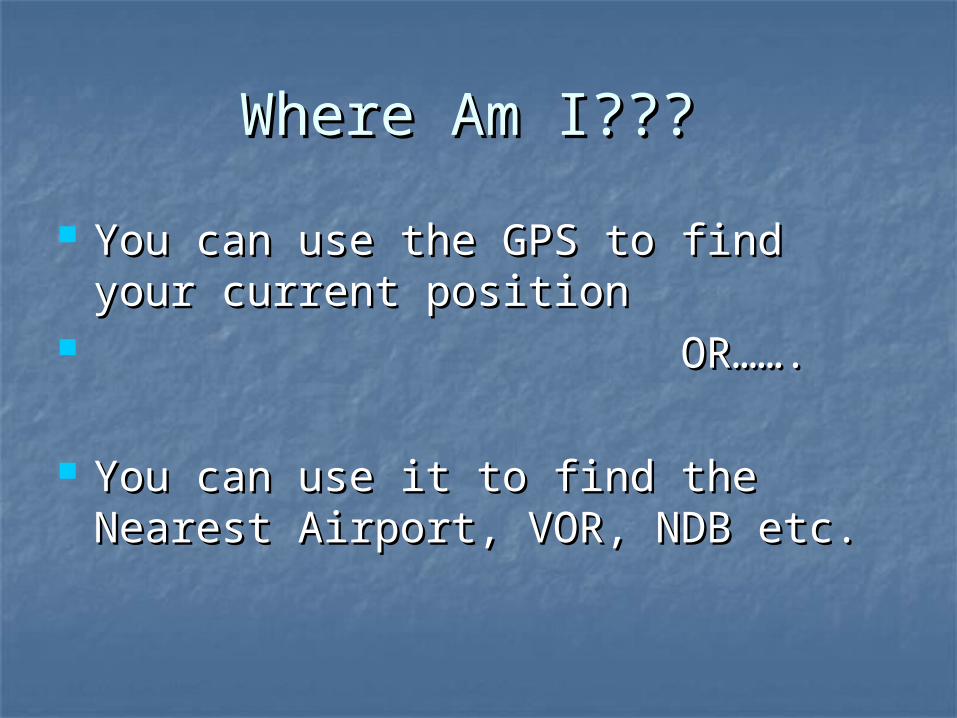
Where Am I???Where Am I???
You can use the GPS to find your You can use the GPS to find your current positioncurrent position
OR…….OR…….
You can use it to find the Nearest You can use it to find the Nearest Airport, VOR, NDB etc.Airport, VOR, NDB etc.

Finding Your Current Finding Your Current PositionPosition
The Ground Team calls and says “Where are you right now?”
Press the NAV Button Turn the Outer Knob until the GPS Position screen appears
You are Here!
Tip: You can also create a SAR Mark using the Mark soft key on the SAR screen
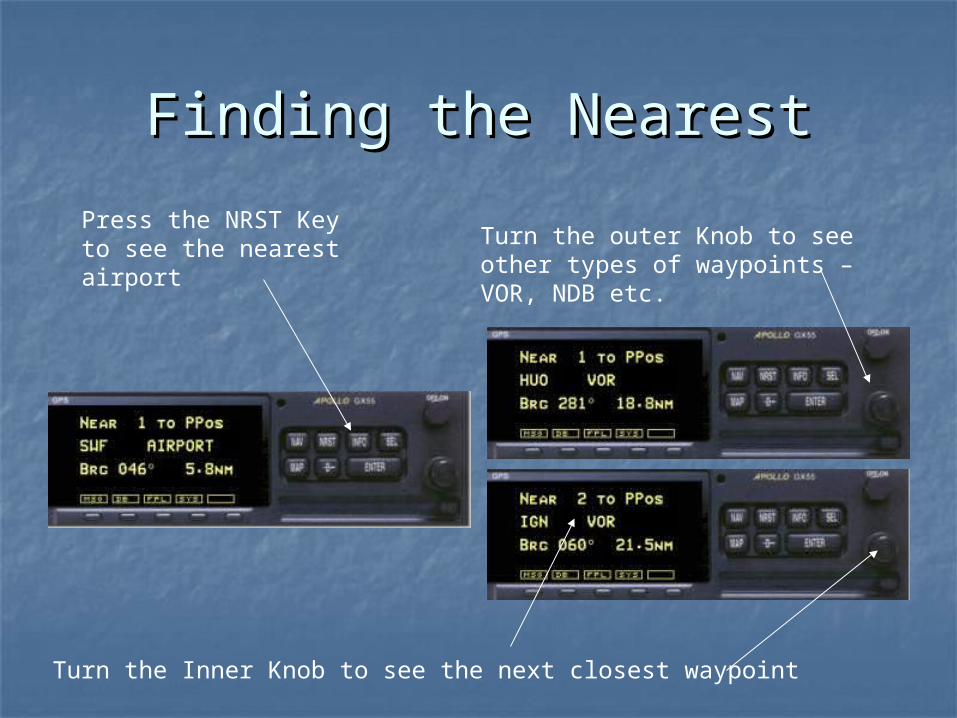
Finding the NearestFinding the Nearest
Press the NRST Key to see the nearest airport
Turn the outer Knob to see other types of waypoints – VOR, NDB etc.
Turn the Inner Knob to see the next closest waypoint

Clear Me DirectClear Me Direct
To go Direct to the nearest waypoint, or any waypoint, press the D> key
If you want to go to the flashing waypoint simply press Enter
If you want to go somewhere else, turn the Inner Knob to select the type of waypoint
Then use the Outer Knob to move the cursor to highlight the object that you want to change
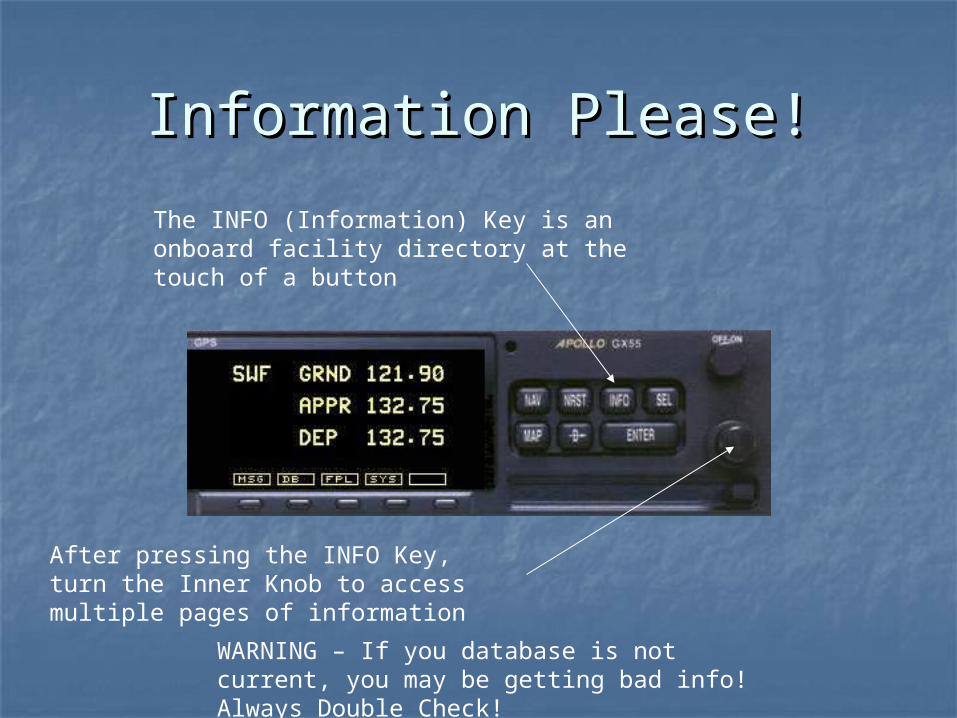
Information Please!Information Please!
The INFO (Information) Key is an onboard facility directory at the touch of a button
After pressing the INFO Key, turn the Inner Knob to access multiple pages of information
WARNING – If you database is not current, you may be getting bad info! Always Double Check!
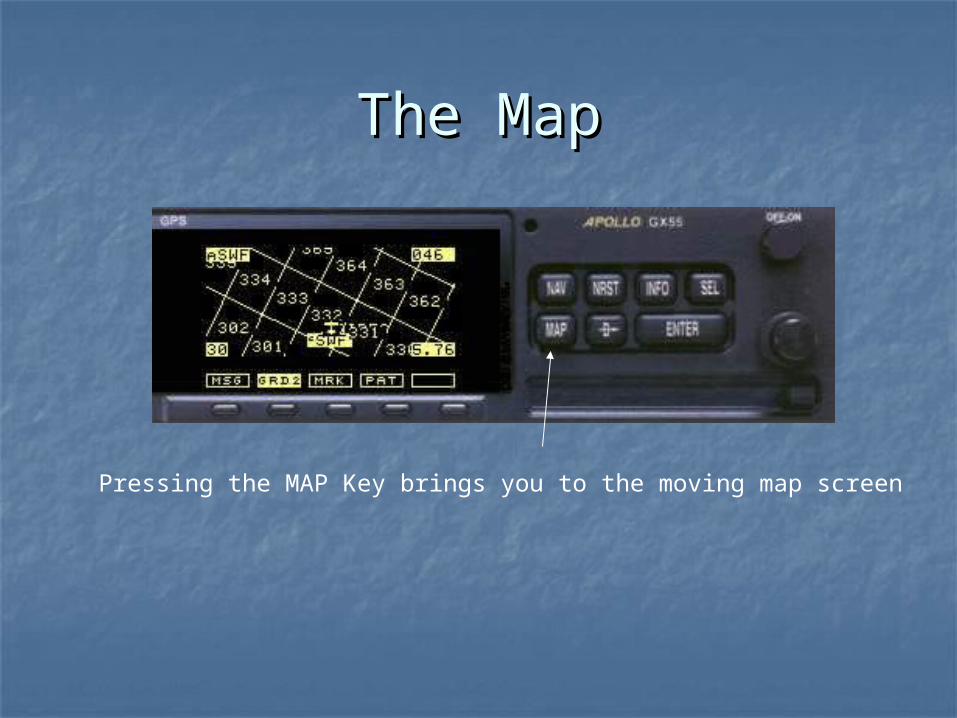
The MapThe Map
Pressing the MAP Key brings you to the moving map screen
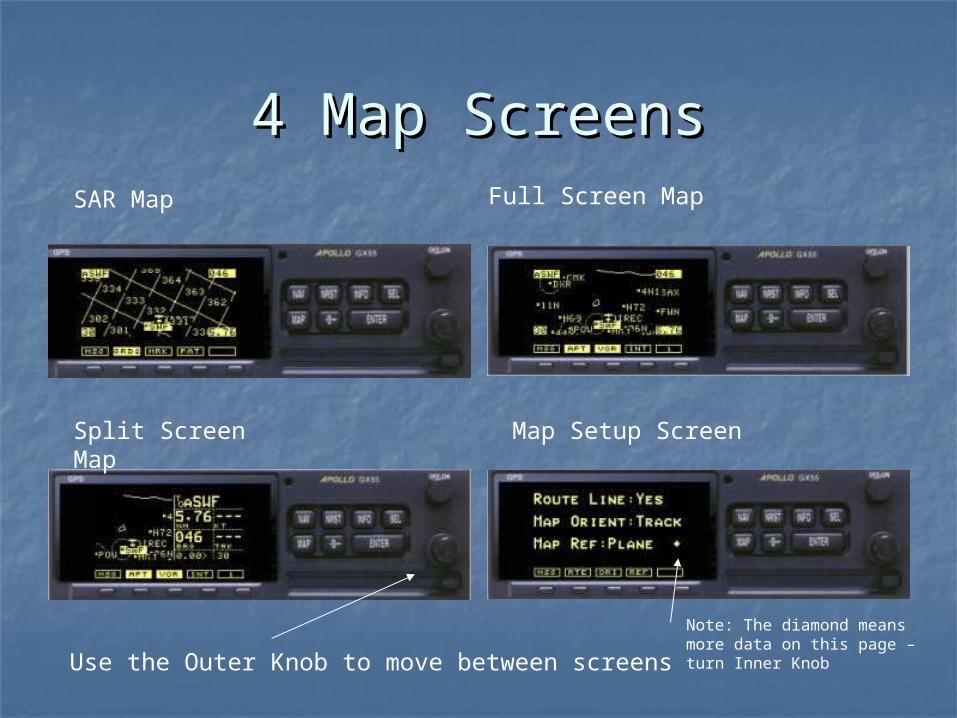
4 Map Screens4 Map ScreensSAR Map Full Screen Map
Split Screen Map Map Setup Screen
Use the Outer Knob to move between screens
Note: The diamond means more data on this page – turn Inner Knob
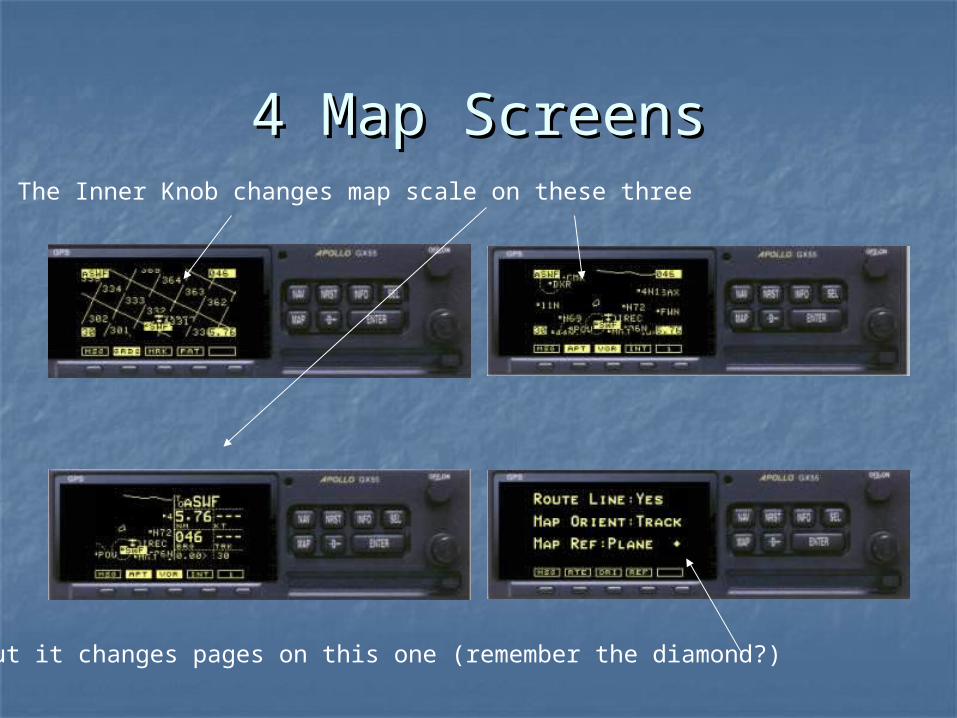
4 Map Screens4 Map ScreensThe Inner Knob changes map scale on these three
But it changes pages on this one (remember the diamond?)
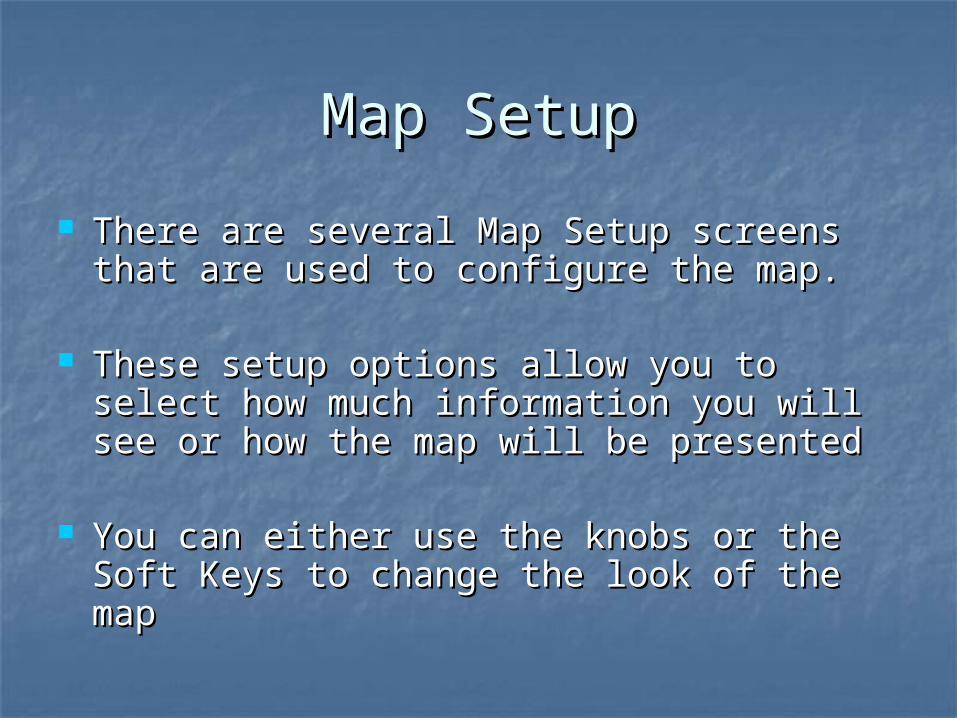
Map SetupMap Setup
There are several Map Setup screens that There are several Map Setup screens that are used to configure the map.are used to configure the map.
These setup options allow you to select These setup options allow you to select how much information you will see or how how much information you will see or how the map will be presentedthe map will be presented
You can either use the knobs or the Soft You can either use the knobs or the Soft Keys to change the look of the mapKeys to change the look of the map
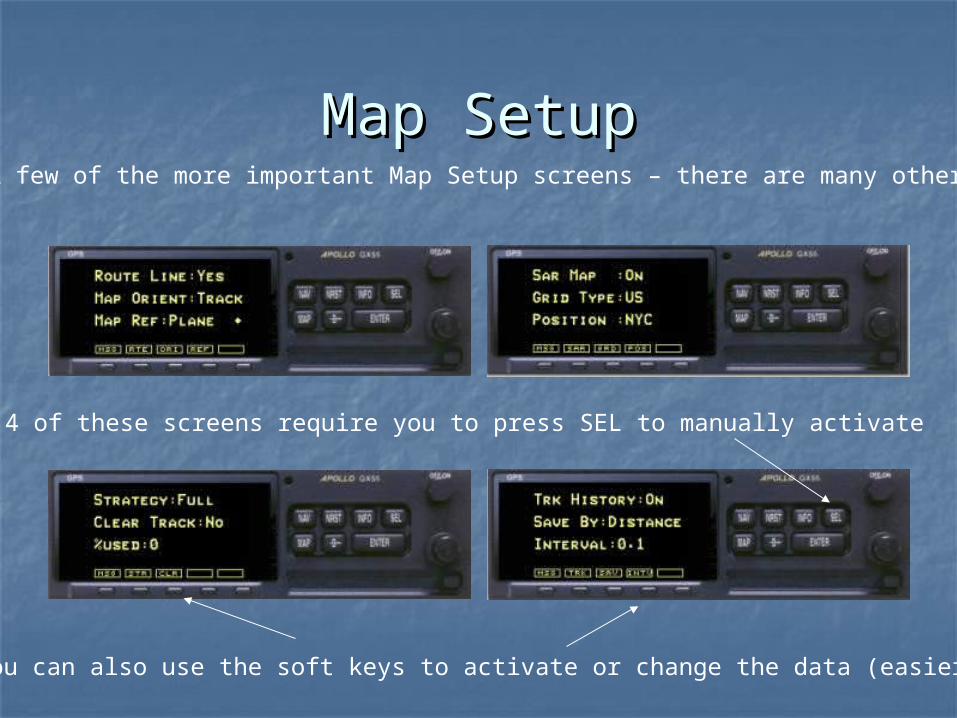
Map SetupMap Setup A few of the more important Map Setup screens – there are many others
All 4 of these screens require you to press SEL to manually activate
You can also use the soft keys to activate or change the data (easier)
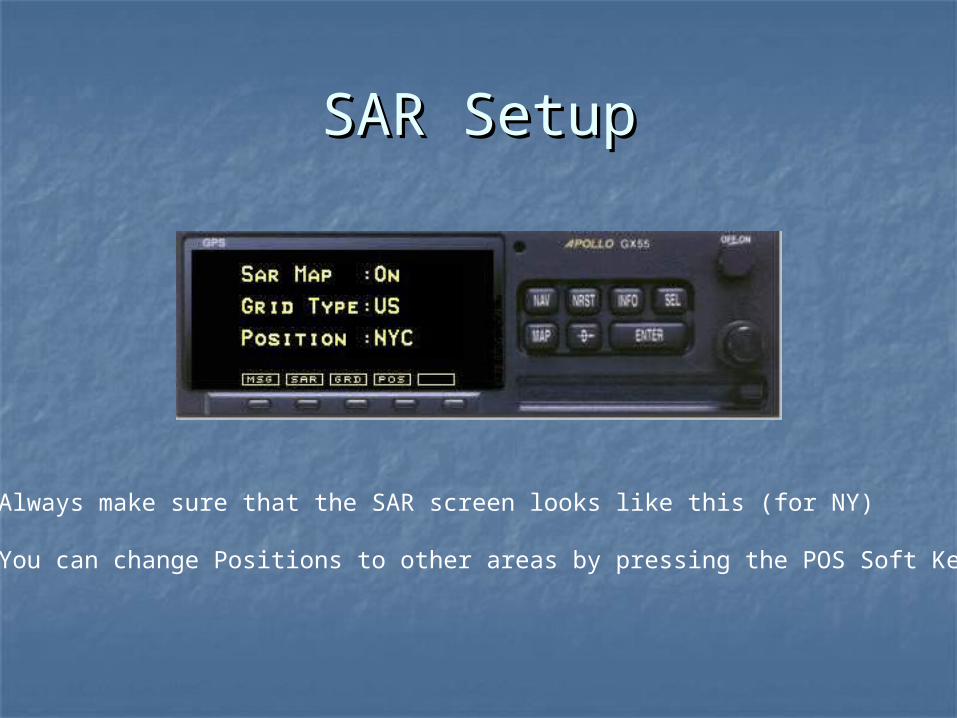
SAR SetupSAR Setup
Always make sure that the SAR screen looks like this (for NY)
You can change Positions to other areas by pressing the POS Soft Key
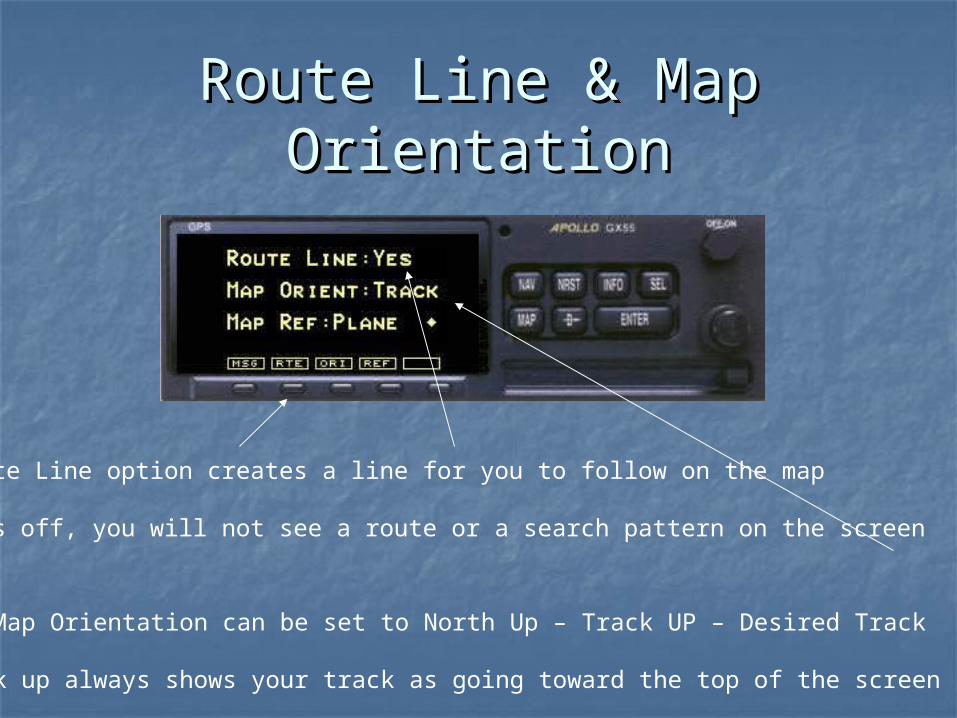
Route Line & Map Route Line & Map OrientationOrientation
The Route Line option creates a line for you to follow on the map
If it is off, you will not see a route or a search pattern on the screen
The Map Orientation can be set to North Up – Track UP – Desired Track
Track up always shows your track as going toward the top of the screen

Track HistoryTrack History
Track History shows where you have been – if you don’t want to see it, shut if off
If you want to clear out old history – press the CLR Soft Key
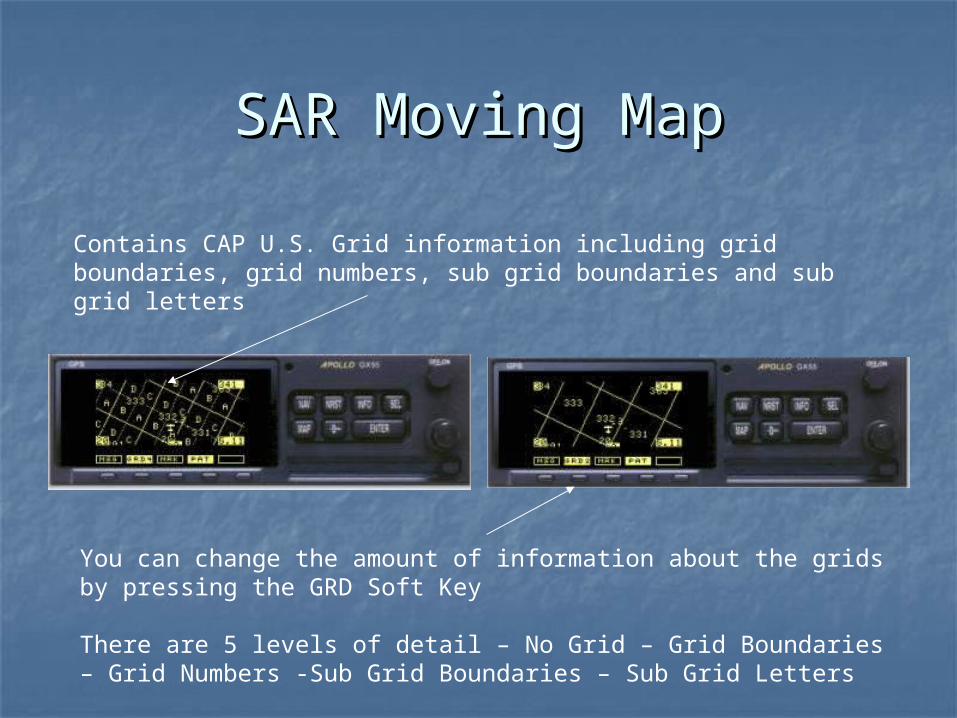
SAR Moving MapSAR Moving Map
Contains CAP U.S. Grid information including grid boundaries, grid numbers, sub grid boundaries and sub grid letters
You can change the amount of information about the grids by pressing the GRD Soft Key
There are 5 levels of detail – No Grid – Grid Boundaries – Grid Numbers -Sub Grid Boundaries – Sub Grid Letters

CAP Grid ReviewCAP Grid Review
15’ X 15’Full Grid
7.5’ X 7.5’¼ Grid
Sub Grid lettersrun left to right
Grid numbers run clockwisearound the grid
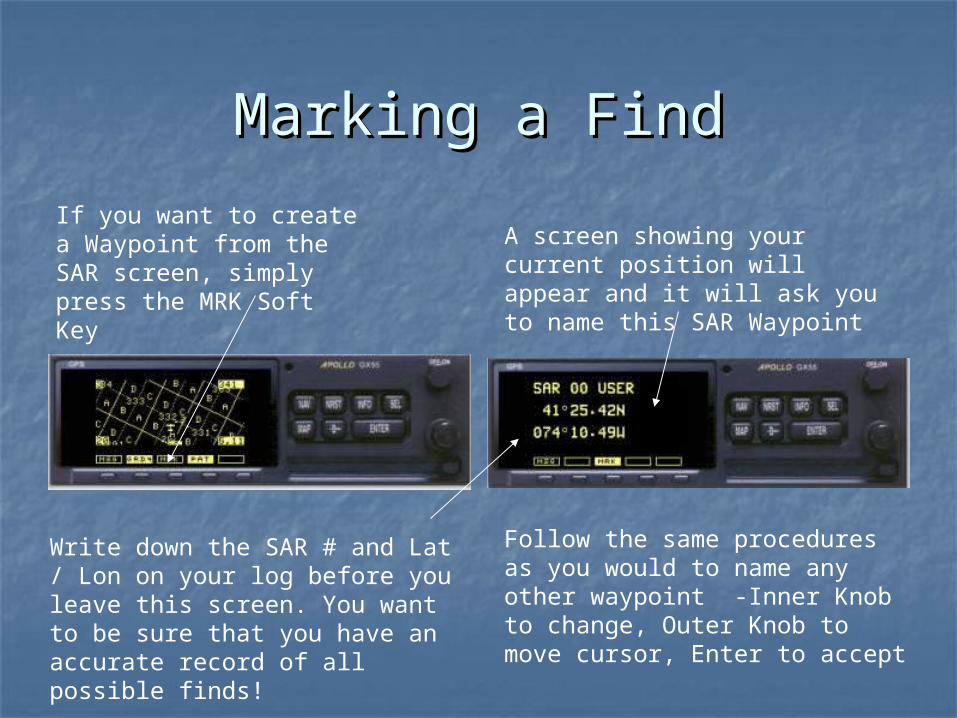
Marking a FindMarking a Find
If you want to create a Waypoint from the SAR screen, simply press the MRK Soft Key
A screen showing your current position will appear and it will ask you to name this SAR Waypoint
Follow the same procedures as you would to name any other waypoint -Inner Knob to change, Outer Knob to move cursor, Enter to accept
Write down the SAR # and Lat / Lon on your log before you leave this screen. You want to be sure that you have an accurate record of all possible finds!

SAR WaypointsSAR WaypointsNote that the SAR Waypoint that we just created does not show up on the SAR Map Screen when the grids are being displayed. To see it on the map, you have to either turn off the grid display or turn the Outer Knob to one of the other Map Screens.
Also note that the USR Soft Key has to be on to see user waypoints. It is found on page #2 of the Wide Screen or Split Screen Maps

SAR Search PatternsSAR Search Patterns
In addition to flying precise Route In addition to flying precise Route Searches, the GX55 can create three Searches, the GX55 can create three common SAR search patterns:common SAR search patterns:
Creeping LineCreeping Line
Parallel Line – AKA Grid SearchParallel Line – AKA Grid Search
Expanding Square Expanding Square

Creeping Line search Creeping Line search
s s s s s
Direction of Search
[Spacing][ Le
g Le
ngth
]
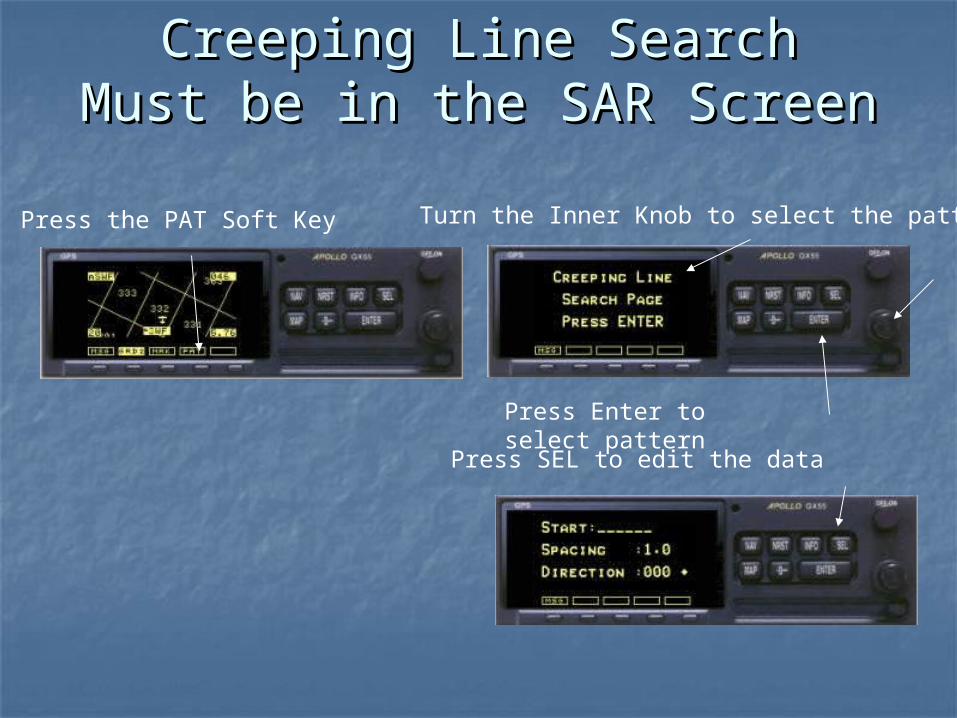
Creeping Line SearchCreeping Line SearchMust be in the SAR ScreenMust be in the SAR Screen
Press the PAT Soft Key Turn the Inner Knob to select the pattern
Press Enter to select pattern
Press SEL to edit the data

Creeping Line Creeping Line
Follow the same procedures as you would to name any other waypoint -Inner Knob to change, Outer Knob to move cursor, Enter to accept.
Press Enter to accept
Enter Spacing
Enter Direction (course you will fly) then hit Enter to Accept
Turn Small Knob to go to next screen
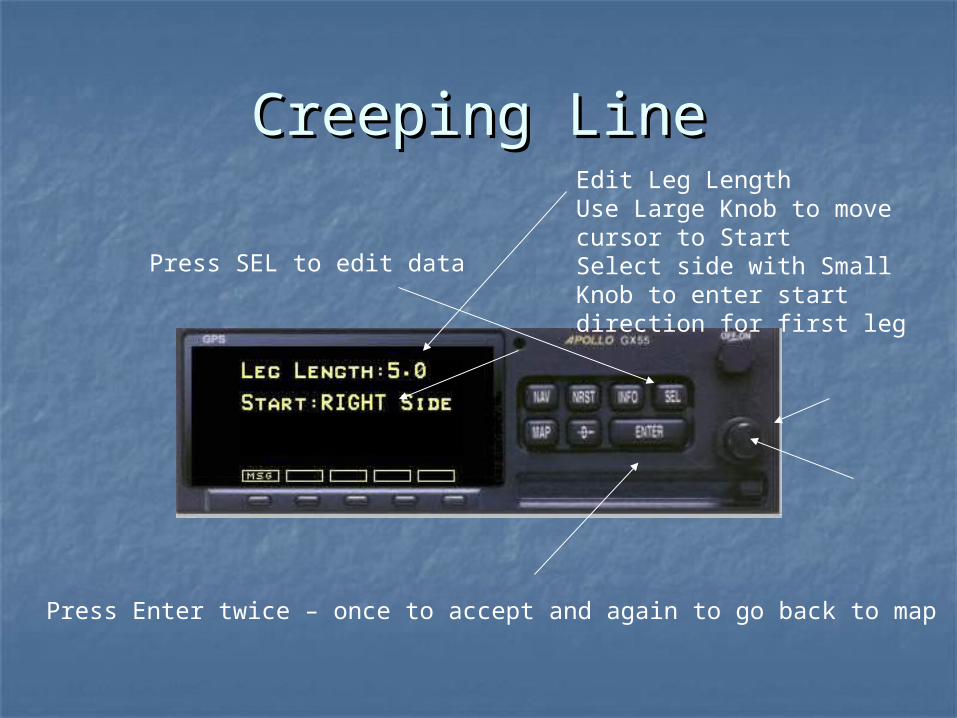
Creeping LineCreeping Line
Press SEL to edit data
Edit Leg Length Use Large Knob to move cursor to StartSelect side with Small Knob to enter start direction for first leg
Press Enter twice – once to accept and again to go back to map
Creeping Line ReviewCreeping Line Review If you are going to start from a User Waypoint, enter if in the If you are going to start from a User Waypoint, enter if in the
database firstdatabase first Must be in Map screenMust be in Map screen Turn Outer Knob to find SAR Map screenTurn Outer Knob to find SAR Map screen Press the PAT Soft KeyPress the PAT Soft Key Turn Inner Knob to find Creeping LineTurn Inner Knob to find Creeping Line Press Enter to acceptPress Enter to accept Press SEL then Enter to edit waypointPress SEL then Enter to edit waypoint Use Inner Knob to change each fieldUse Inner Knob to change each field Use Outer Knob to change cursor positionUse Outer Knob to change cursor position Press Enter to acceptPress Enter to accept Use Inner Knob to set track spacingUse Inner Knob to set track spacing Use Outer Knob to move to DirectionUse Outer Knob to move to Direction Use Inner Knob to change each fieldUse Inner Knob to change each field Use Outer Knob to change cursor positionUse Outer Knob to change cursor position Press Enter to acceptPress Enter to accept Note the Diamond – Use Inner Knob to continue setupNote the Diamond – Use Inner Knob to continue setup Press SEL to edit Leg LengthPress SEL to edit Leg Length Use Inner Knob to change Leg LengthUse Inner Knob to change Leg Length Use Outer Knob to move cursor to Start SideUse Outer Knob to move cursor to Start Side Use Inner Knob to select Start SideUse Inner Knob to select Start Side Press Enter twice Press Enter twice

Parallel Line AKA Grid Parallel Line AKA Grid SearchSearch
1/2 S
S
S
Can be flown either North / South or East / West legs
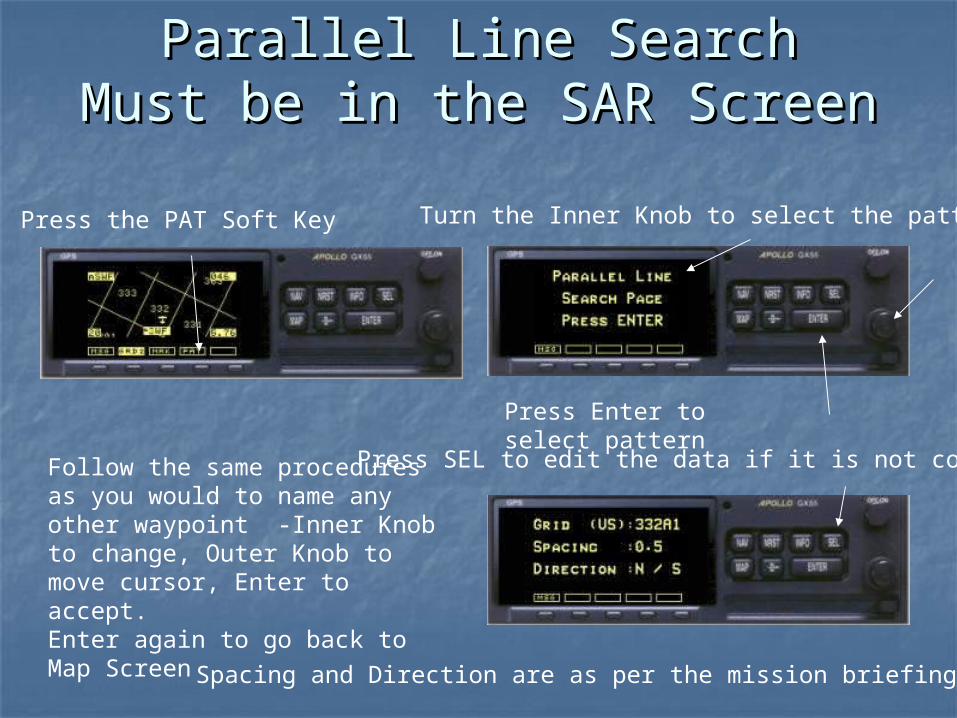
Parallel Line SearchParallel Line SearchMust be in the SAR ScreenMust be in the SAR Screen
Press the PAT Soft Key Turn the Inner Knob to select the pattern
Press Enter to select pattern
Press SEL to edit the data if it is not correctFollow the same procedures as you would to name any other waypoint -Inner Knob to change, Outer Knob to move cursor, Enter to accept.Enter again to go back to Map Screen
Spacing and Direction are as per the mission briefing
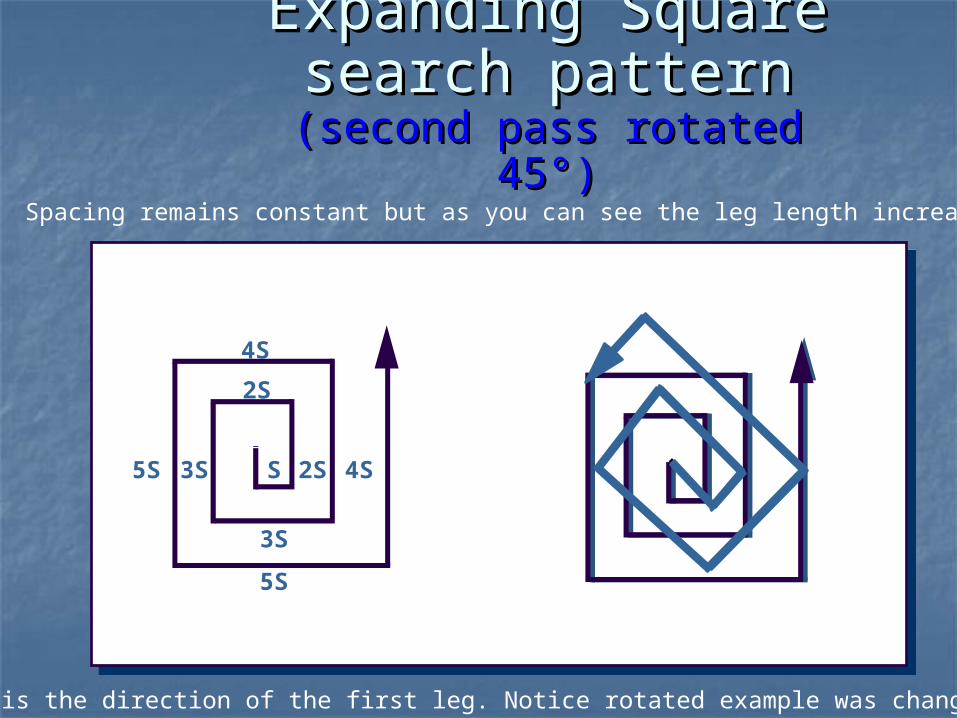
Expanding Square Expanding Square search pattern search pattern
(second pass rotated 45°)(second pass rotated 45°)
4SS
2S
3S5S
4S
2S
3S
5S
Spacing remains constant but as you can see the leg length increases
Direction is the direction of the first leg. Notice rotated example was changed 45 deg
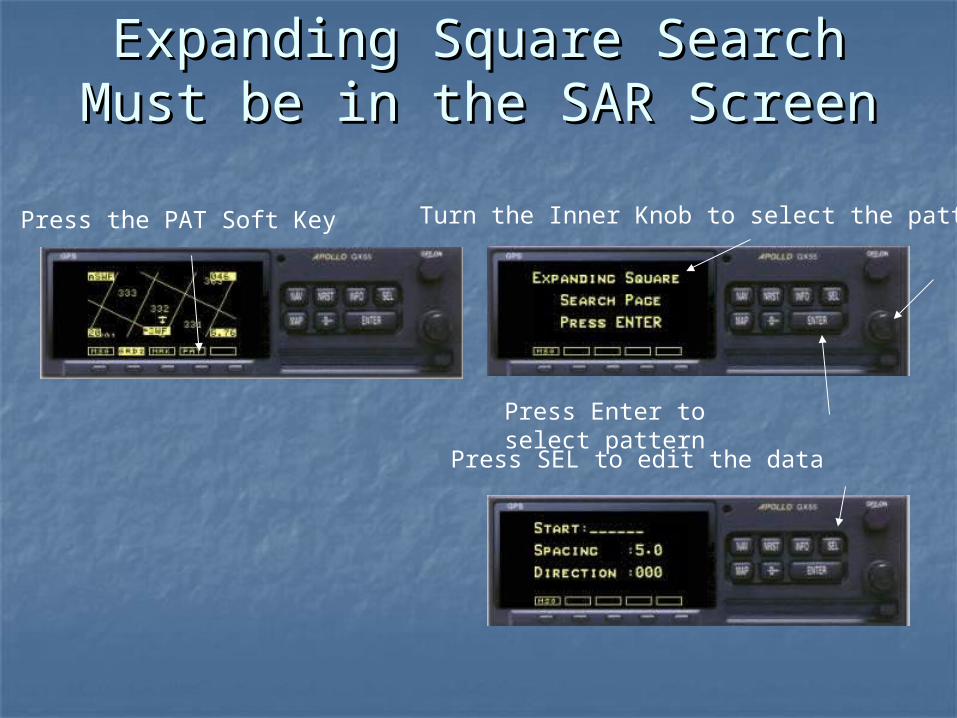
Expanding Square SearchExpanding Square SearchMust be in the SAR ScreenMust be in the SAR Screen
Press the PAT Soft Key Turn the Inner Knob to select the pattern
Press Enter to select pattern
Press SEL to edit the data

Expanding Square Expanding Square
Follow the same procedures as you would to name any other waypoint -Inner Knob to change, Outer Knob to move cursor, Enter to accept.
Press Enter to accept
Enter Spacing
Enter Direction of first leg
Press Enter twice – once to accept and again to go back to map

MessagesMessages
Information that effects the flight; upcoming airspace, reaching a waypoint etc.
When blinking, press the MSG button to read message
Press it again to go back to where you were
Flight PlansFlight Plans
The GX55 offers several advanced The GX55 offers several advanced features including multi leg flight features including multi leg flight plansplans
Refer to your user manual or quick Refer to your user manual or quick reference guide for information on reference guide for information on programming multi leg flight plansprogramming multi leg flight plans

Route SearchRoute Search
A Route Search can be flown “On Route” A Route Search can be flown “On Route” or with an offset to either sideor with an offset to either side
If you are not flying on a route between If you are not flying on a route between one of the four waypoint types already one of the four waypoint types already loaded in the database, you must enter loaded in the database, you must enter the required waypoints first- Remember the required waypoints first- Remember “Nav” – “Database”“Nav” – “Database”
You can not fly a route offset unless you You can not fly a route offset unless you have a flight plan activated in the GPShave a flight plan activated in the GPS

Route SearchRoute SearchNAV
FPL
Outer Knob – Create Flight Plan
Select
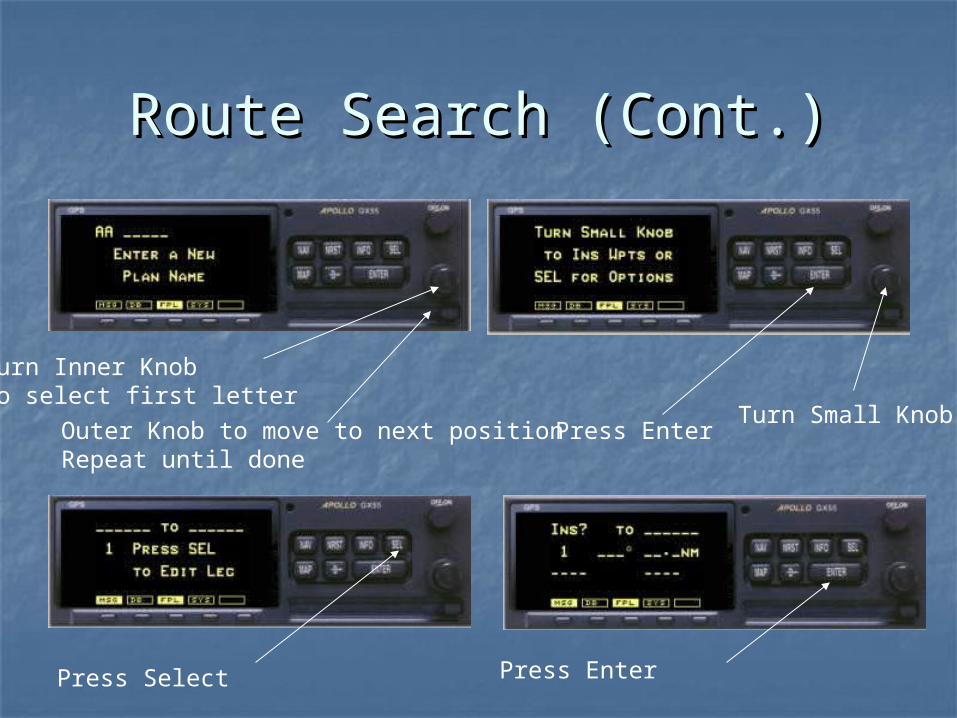
Route Search (Cont.)Route Search (Cont.)
Turn Inner Knobto select first letter
Outer Knob to move to next positionRepeat until done
Press EnterTurn Small Knob
Press Select Press Enter
Route Search (Cont.)Route Search (Cont.)
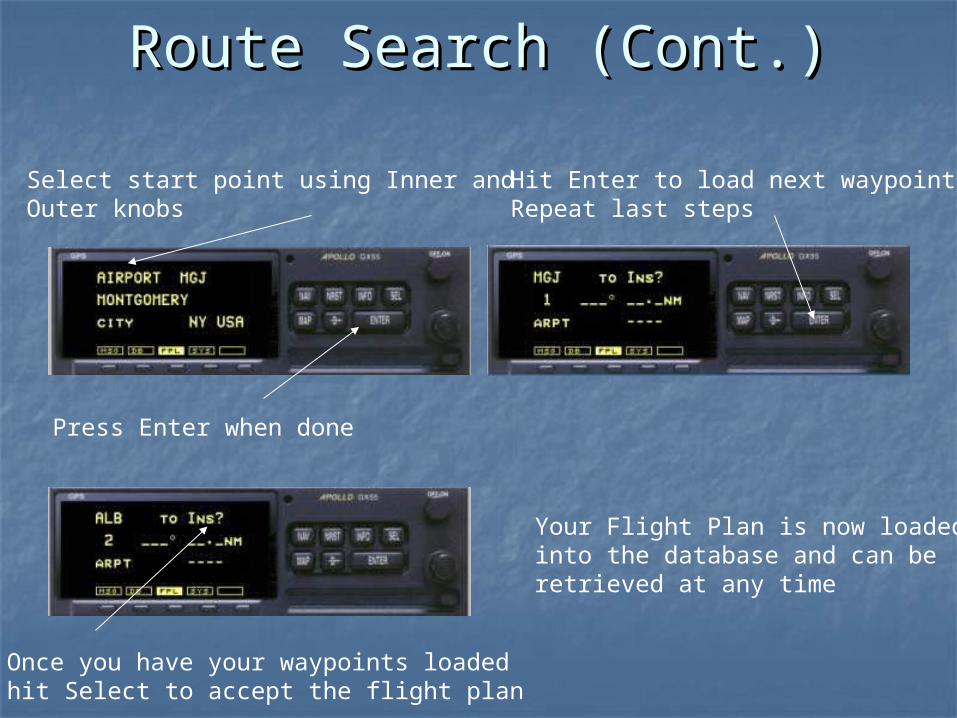
Select start point using Inner and Outer knobs
Press Enter when done
Hit Enter to load next waypointRepeat last steps
Once you have your waypoints loadedhit Select to accept the flight plan
Your Flight Plan is now loadedinto the database and can be retrieved at any time

Route Search Route Search Activate Your Flight PlanActivate Your Flight Plan
NAV
FPL Turn Outer Knob to the desired flight plan
Select
Enter to activate Flight plan is now active
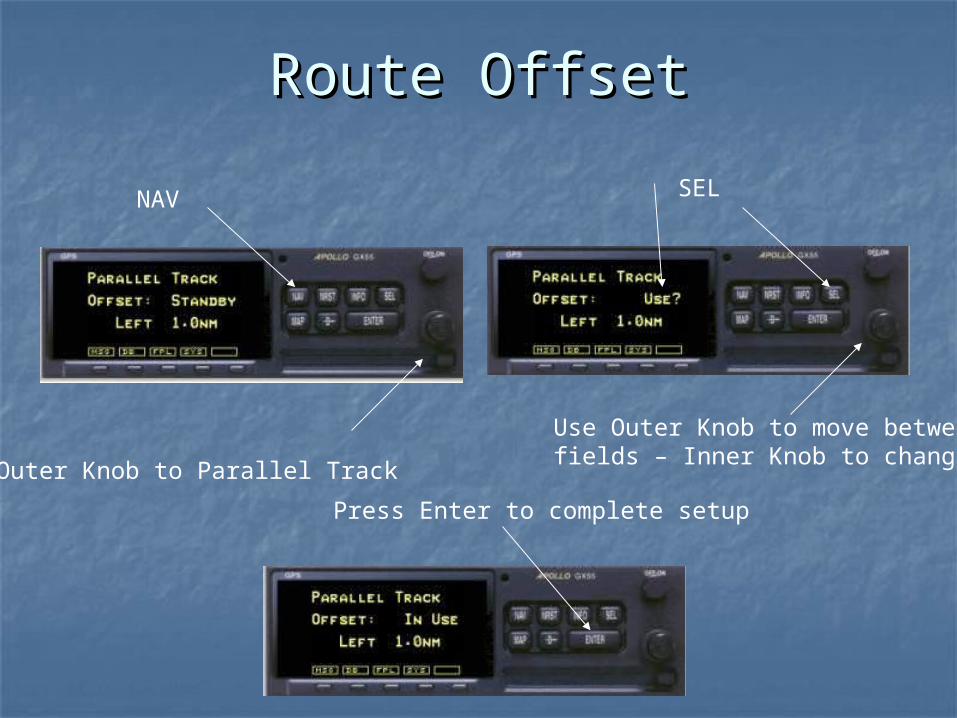
Route OffsetRoute Offset
NAV
Outer Knob to Parallel Track
SEL
Use Outer Knob to move betweenfields – Inner Knob to change
Press Enter to complete setup
TipsTips Clear old tracks and user waypoints to Clear old tracks and user waypoints to
avoid confusionavoid confusion Use your quick reference guide until you Use your quick reference guide until you
are comfortable using the GPSare comfortable using the GPS If you get screwed up – start overIf you get screwed up – start over Practice on the simulator until you can do Practice on the simulator until you can do
it in your sleepit in your sleep Do Not fixate on the GPS screen. See and Do Not fixate on the GPS screen. See and
Avoid traffic!!!Avoid traffic!!! When flying search patterns, find a When flying search patterns, find a
heading that keeps you on course and use heading that keeps you on course and use it for each leg in that directionit for each leg in that direction

QuestionsQuestions
?


