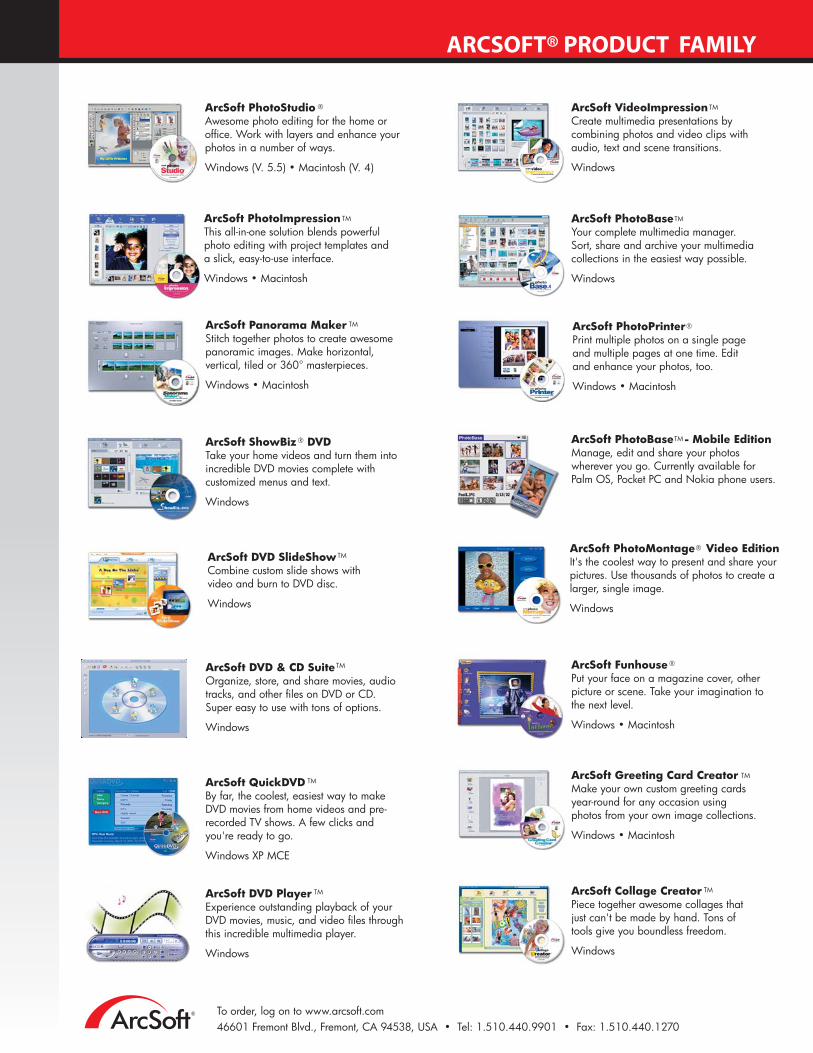
ARCSOFT® PRODUCT FAMILY
®
ArcSoft PhotoMontage Video Edition It's the coolest way to present and share your pictures. Use thousands of photos to create a larger, single image.
Windows
®
ArcSoft PhotoImpressionThis all-in-one solution blends powerful photo editing with project templates and a slick, easy-to-use interface.
Windows • Macintosh
TM
ArcSoft Panorama MakerStitch together photos to create awesome panoramic images. Make horizontal, vertical, tiled or 360° masterpieces.
Windows • Macintosh
TM
TM
®
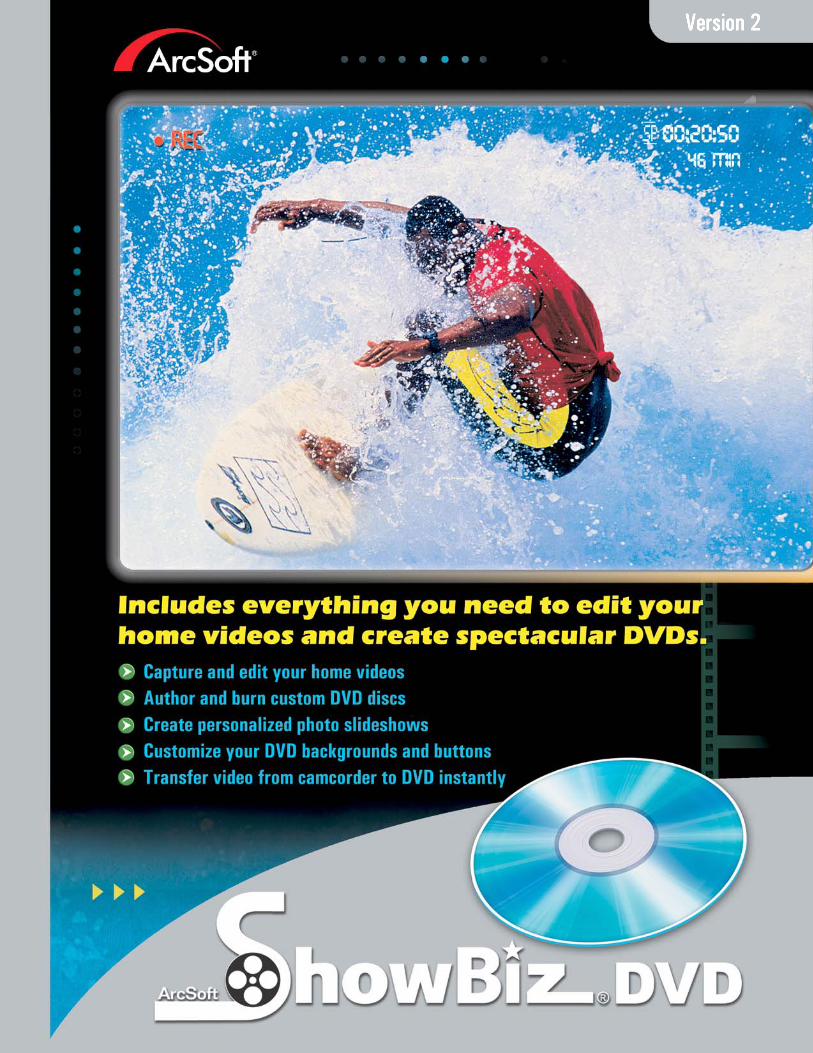
ArcSoft ShowBiz DVDTake your home videos and turn them into incredible DVD movies complete with customized menus and text.
Windows
®
ArcSoft PhotoStudioAwesome photo editing for the home or office. Work with layers and enhance your photos in a number of ways.
Windows (V. 5.5) • Macintosh (V. 4)
ArcSoft PhotoBaseYour complete multimedia manager. Sort, share and archive your multimedia collections in the easiest way possible.
Windows
TMArcSoft VideoImpressionCreate multimedia presentations by combining photos and video clips with audio, text and scene transitions.
Windows
TMArcSoft PhotoBase - Mobile EditionManage, edit and share your photos wherever you go. Currently available for Palm OS, Pocket PC and Nokia phone users.
TMArcSoft DVD & CD SuiteOrganize, store, and share movies, audio tracks, and other files on DVD or CD. Super easy to use with tons of options.
Windows
ArcSoft FunhousePut your face on a magazine cover, other picture or scene. Take your imagination to the next level.
Windows • Macintosh
TMArcSoft Greeting Card CreatorMake your own custom greeting cards year-round for any occasion using photos from your own image collections.
Windows • Macintosh
ArcSoft QuickDVDBy far, the coolest, easiest way to make DVD movies from home videos and pre-recorded TV shows. A few clicks and you're ready to go.
Windows XP MCE
TM
TMArcSoft Collage CreatorPiece together awesome collages that just can't be made by hand. Tons of tools give you boundless freedom.
Windows
ArcSoft DVD PlayerExperience outstanding playback of your DVD movies, music, and video files through this incredible multimedia player.
Windows
TM
ArcSoft DVD SlideShowCombine custom slide shows with video and burn to DVD disc.
Windows
TM
To order, log on to www.arcsoft.com46601 Fremont Blvd., Fremont, CA 94538, USA • Tel: 1.510.440.9901 • Fax: 1.510.440.1270
ArcSoft PhotoPrinterPrint multiple photos on a single page and multiple pages at one time. Edit and enhance your photos, too.
Windows • Macintosh
®
- LICENSING AGREEMENT - The following is a legal software license agreement between you, the software end user, and ArcSoft, Inc. Carefully read this license agreement before using the product. Using the product indicates that you have read this license agreement and agree to its terms. If you do not agree to the terms, promptly return the package to the place it was purchased within 10 days of the date you acquired it for a full refund. Grant of License. This license permits you to use one copy of the software included in this package on any single computer. For each software licensee, the program can be in use on only one computer at any given time. The software is in use when it is either loaded into RAM or installed into the hard disk or other permanent memory. A multi-seat license permit from ArcSoft is required if the program is going to be installed on a network server for the sole purpose of distribution by other computers, or if the program is going to be installed on and used by more than one computer. Copyright. The software contained in this package is owned by ArcSoft and is protected by United States copyright laws, international treaty provisions, and all other applicable national laws. The software must be treated like all other copyrighted materials (e.g. books and musical recordings). This license does not allow the software to be rented or leased, and the written materials accompanying the software (if any) may not be copied. Limited Warranty. ArcSoft, Inc., warrants that the software contained herein will perform substantially in accordance with the accompanying documentation. No Other Warranties. ArcSoft disclaims all other warranties, either express or implied, including but not limited to implied warranties of merchantability and fitness for a particular purpose, with respect to the software, the accompanying written materials, and any accompanying hardware (if any). No Liability for Consequential Damages. In no event shall ArcSoft or its suppliers be liable for any damages whatsoever (including but not limited to damages for loss of business profits, business interruption, loss of business information, or any other pecuniary loss) which result from an inability to use this software, even if ArcSoft, Inc. has been advised of the possibility of such damages. Because some states and jurisdictions do not allow the exclusion or limitation of consequential or incidental damages, the above limitations may not apply to you. U.S. Government Restricted Rights. The software and documentation are provided with Restricted Rights. Use, duplication, or disclosure by the U.S. Government is subject to restrictions as set forth in subparagraph (c)(1)(ii) of the Rights in Technical Data and Computer Software clause at DFARS 252.227-7013 or subparagraphs (c)(1),(2), and (3) of the Commercial Computer Software - Restricted Rights at 48 CFR 52.227-19, as applicable, and any amendments thereto. The manufacturer is ArcSoft, Inc., 46601 Fremont Blvd., Fremont, CA 94538. If this product was purchased in the United States, this Agreement is governed by the laws of the State of California; otherwise, local laws may apply.
ARCSOFT SHOWBIZ DVD 2
- 1 -
- TABLE OF CONTENTS - SYSTEM REQUIREMENTS 2 INTRODUCTION 3 CAPTURING VIDEO 4 EDITING / ASSEMBLING VIDEO CLIPS 5 CREATING A DVD 15
ARCSOFT SHOWBIZ DVD 2
- 2 -
- SYSTEM REQUIREMENTS - • Windows 98SE/ME/2000/XP (Windows 2000/XP recommended) • Pentium III 800 MHz or higher (P4 1.6 GHz or higher recommended) • 400 MB free hard drive space for program installation • 4 GB+ free hard drive space for video capture and editing • 128 MB RAM (512 MB DDR RAM recommended) • 16-bit color display at 1024 x 768 • DirectX 9 • Windows Media Player 9 recommended • 7200 RPM hard drive recommended Note: 1 hour of DV video requires 13 GB of hard drive space.
ARCSOFT SHOWBIZ DVD 2
- 3 -
- INTRODUCTION -
Welcome! Are you ready to learn how to capture, edit, and create DVDs on your computer? Great! We'll walk you through these three main processes to help you put together and share your own home movies.
Don't forget to consult the built-in Help file--it goes over every button and command found in the program. Here, we'll go step-by-step through the video capture, edit, and authoring procedures. They may not require the description of every command, so just be sure to have that handy Help file open whenever you're working on a project.
Choose where you want to go! (You can also navigate using the links at the top of every page.)
• Capture video • Edit/assemble video clips • Create a DVD movie
ARCSOFT SHOWBIZ DVD 2
- 4 -
- CAPTURING VIDEO -
The first thing you'll probably want to do before you make your movie is transfer some video from your camera (or another video device) to your computer. We've made it easy. We'll start from square one. In this walkthrough, we'll capture from a digital video (DV) camera.
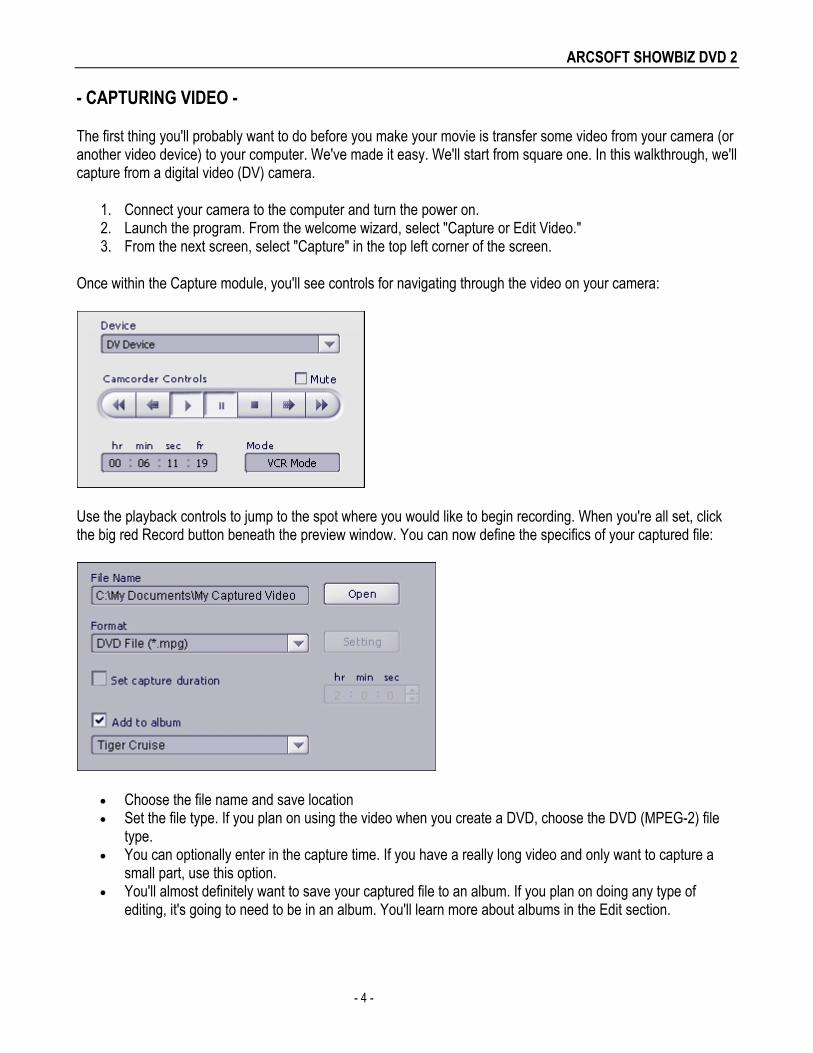
1. Connect your camera to the computer and turn the power on. 2. Launch the program. From the welcome wizard, select "Capture or Edit Video." 3. From the next screen, select "Capture" in the top left corner of the screen.
Once within the Capture module, you'll see controls for navigating through the video on your camera:
Use the playback controls to jump to the spot where you would like to begin recording. When you're all set, click the big red Record button beneath the preview window. You can now define the specifics of your captured file:
• Choose the file name and save location • Set the file type. If you plan on using the video when you create a DVD, choose the DVD (MPEG-2) file
type. • You can optionally enter in the capture time. If you have a really long video and only want to capture a
small part, use this option. • You'll almost definitely want to save your captured file to an album. If you plan on doing any type of
editing, it's going to need to be in an album. You'll learn more about albums in the Edit section.
ARCSOFT SHOWBIZ DVD 2
- 5 -
- EDITING / ASSEMBLING VIDEO CLIPS -
Because the creative possibilities here are limitless, it's a bit difficult to do a step-based walkthough. Instead, we'll talk about the fundamentals of creating a custom video clip. The heart of the program lies in this section; here's where you can get really creative by making truly unique and professional-looking videos. Don't forget to use this tutorial along with the built-in Help file. The Help file details the functions of each button and option.
OVERVIEW
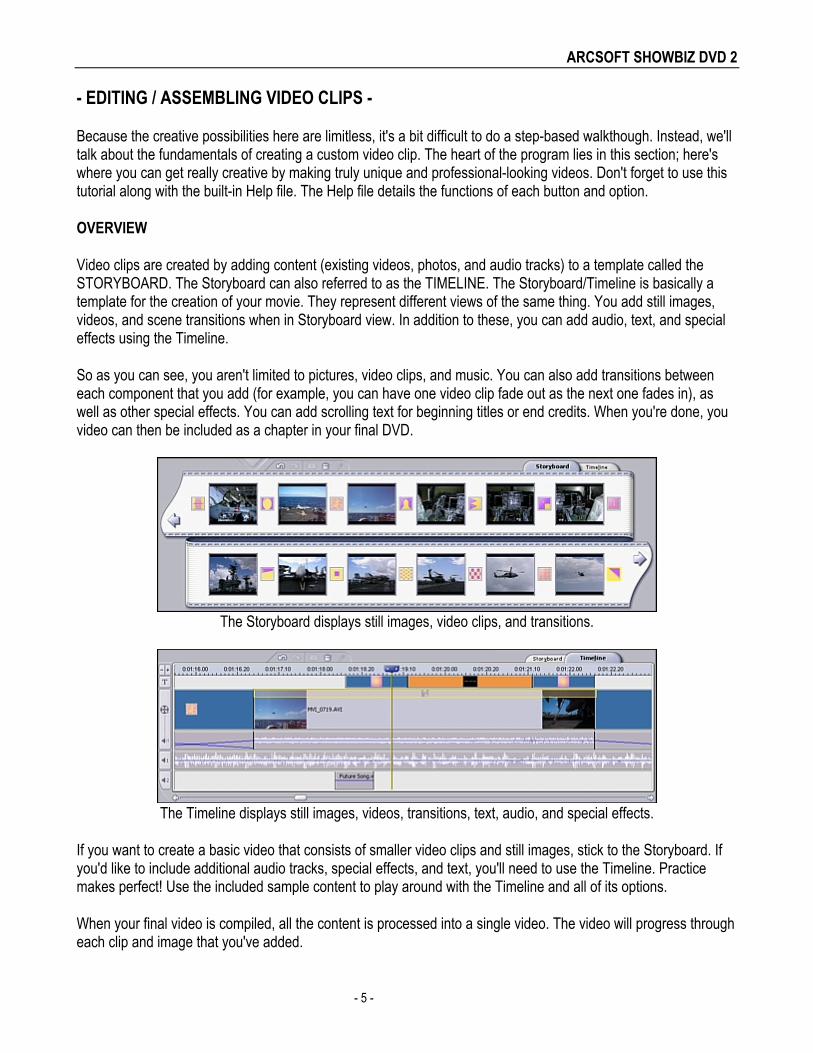
Video clips are created by adding content (existing videos, photos, and audio tracks) to a template called the STORYBOARD. The Storyboard can also referred to as the TIMELINE. The Storyboard/Timeline is basically a template for the creation of your movie. They represent different views of the same thing. You add still images, videos, and scene transitions when in Storyboard view. In addition to these, you can add audio, text, and special effects using the Timeline.
So as you can see, you aren't limited to pictures, video clips, and music. You can also add transitions between each component that you add (for example, you can have one video clip fade out as the next one fades in), as well as other special effects. You can add scrolling text for beginning titles or end credits. When you're done, you video can then be included as a chapter in your final DVD.
The Storyboard displays still images, video clips, and transitions.
The Timeline displays still images, videos, transitions, text, audio, and special effects.
If you want to create a basic video that consists of smaller video clips and still images, stick to the Storyboard. If you'd like to include additional audio tracks, special effects, and text, you'll need to use the Timeline. Practice makes perfect! Use the included sample content to play around with the Timeline and all of its options.
When your final video is compiled, all the content is processed into a single video. The video will progress through each clip and image that you've added.
ARCSOFT SHOWBIZ DVD 2
- 6 -
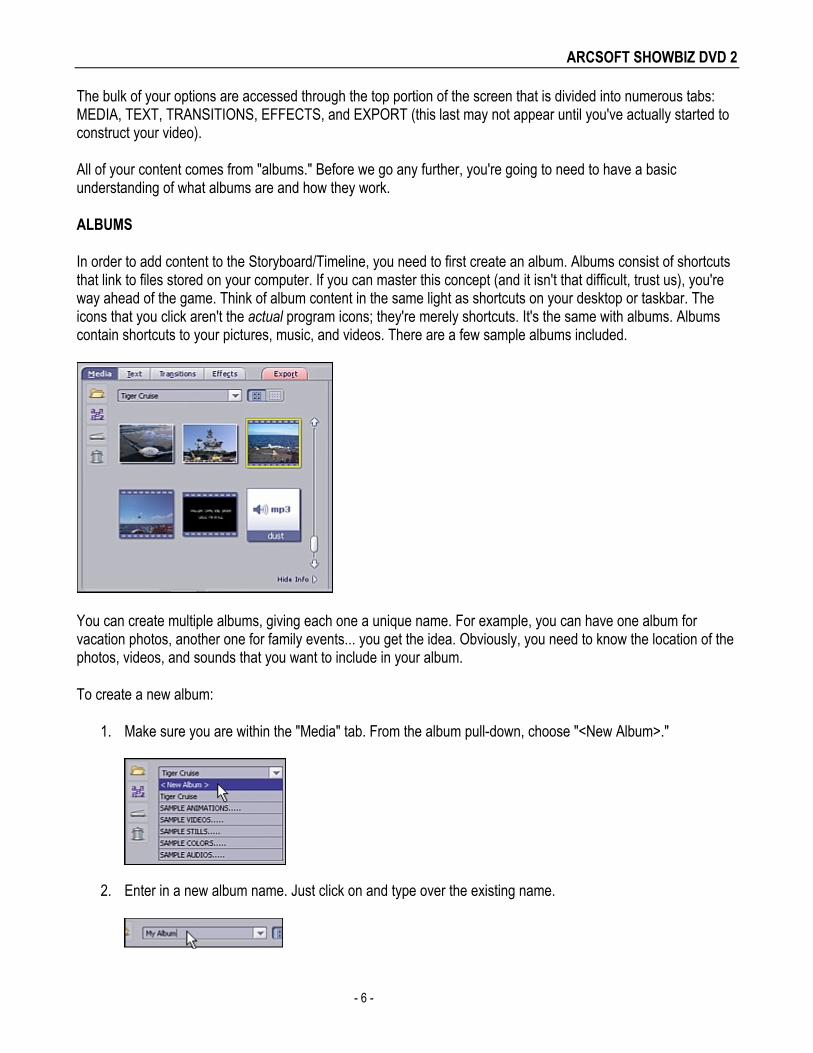
The bulk of your options are accessed through the top portion of the screen that is divided into numerous tabs: MEDIA, TEXT, TRANSITIONS, EFFECTS, and EXPORT (this last may not appear until you've actually started to construct your video). All of your content comes from "albums." Before we go any further, you're going to need to have a basic understanding of what albums are and how they work.
ALBUMS
In order to add content to the Storyboard/Timeline, you need to first create an album. Albums consist of shortcuts that link to files stored on your computer. If you can master this concept (and it isn't that difficult, trust us), you're way ahead of the game. Think of album content in the same light as shortcuts on your desktop or taskbar. The icons that you click aren't the actual program icons; they're merely shortcuts. It's the same with albums. Albums contain shortcuts to your pictures, music, and videos. There are a few sample albums included.
You can create multiple albums, giving each one a unique name. For example, you can have one album for vacation photos, another one for family events... you get the idea. Obviously, you need to know the location of the photos, videos, and sounds that you want to include in your album.
To create a new album:
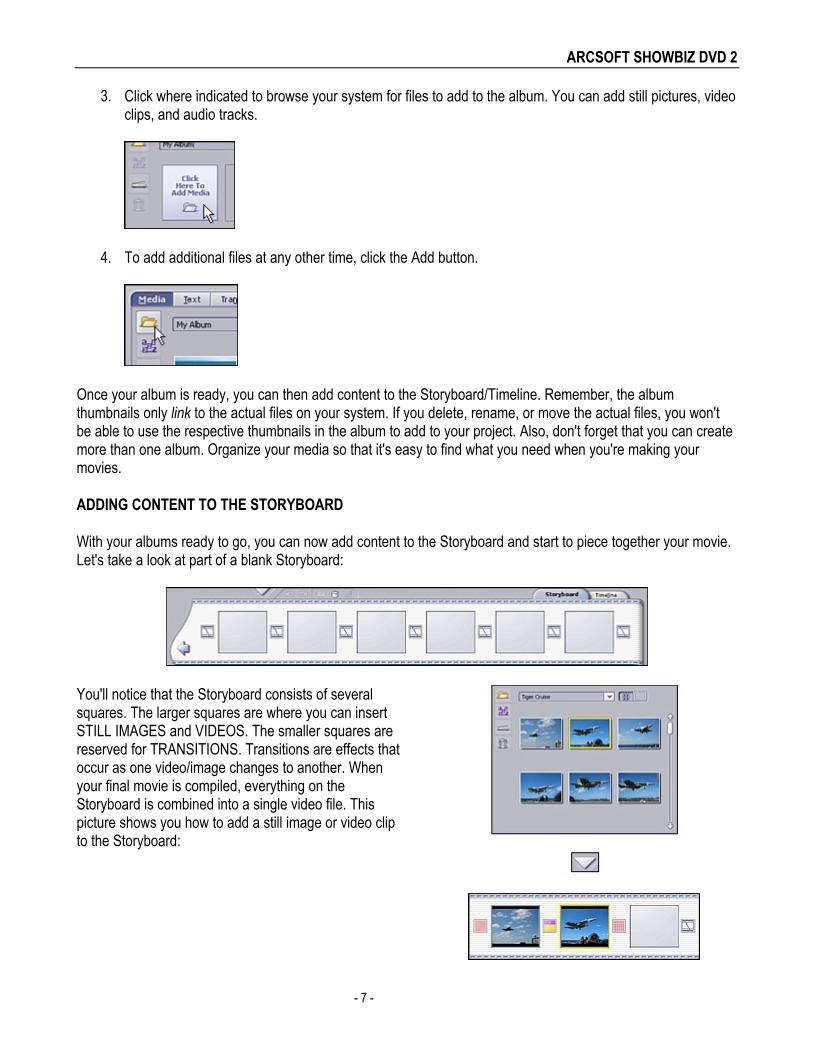
1. Make sure you are within the "Media" tab. From the album pull-down, choose "<New Album>."
2. Enter in a new album name. Just click on and type over the existing name.
ARCSOFT SHOWBIZ DVD 2
- 7 -
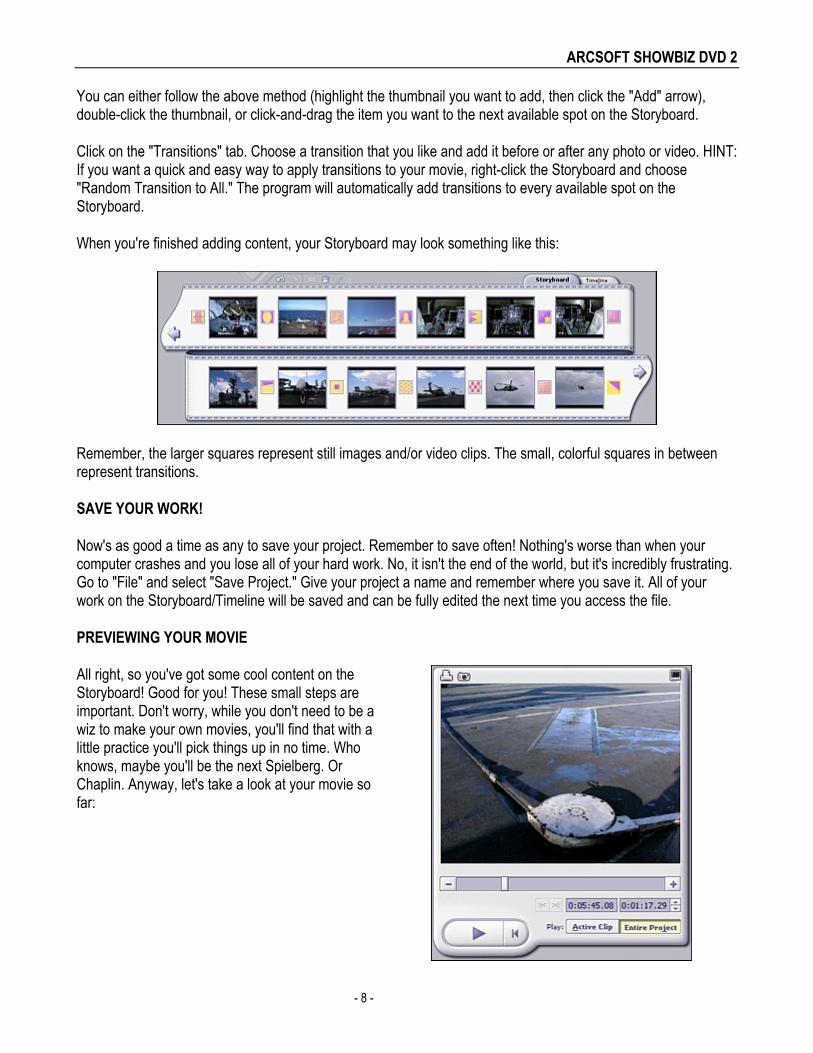
3. Click where indicated to browse your system for files to add to the album. You can add still pictures, video clips, and audio tracks.
4. To add additional files at any other time, click the Add button.
Once your album is ready, you can then add content to the Storyboard/Timeline. Remember, the album thumbnails only link to the actual files on your system. If you delete, rename, or move the actual files, you won't be able to use the respective thumbnails in the album to add to your project. Also, don't forget that you can create more than one album. Organize your media so that it's easy to find what you need when you're making your movies.
ADDING CONTENT TO THE STORYBOARD
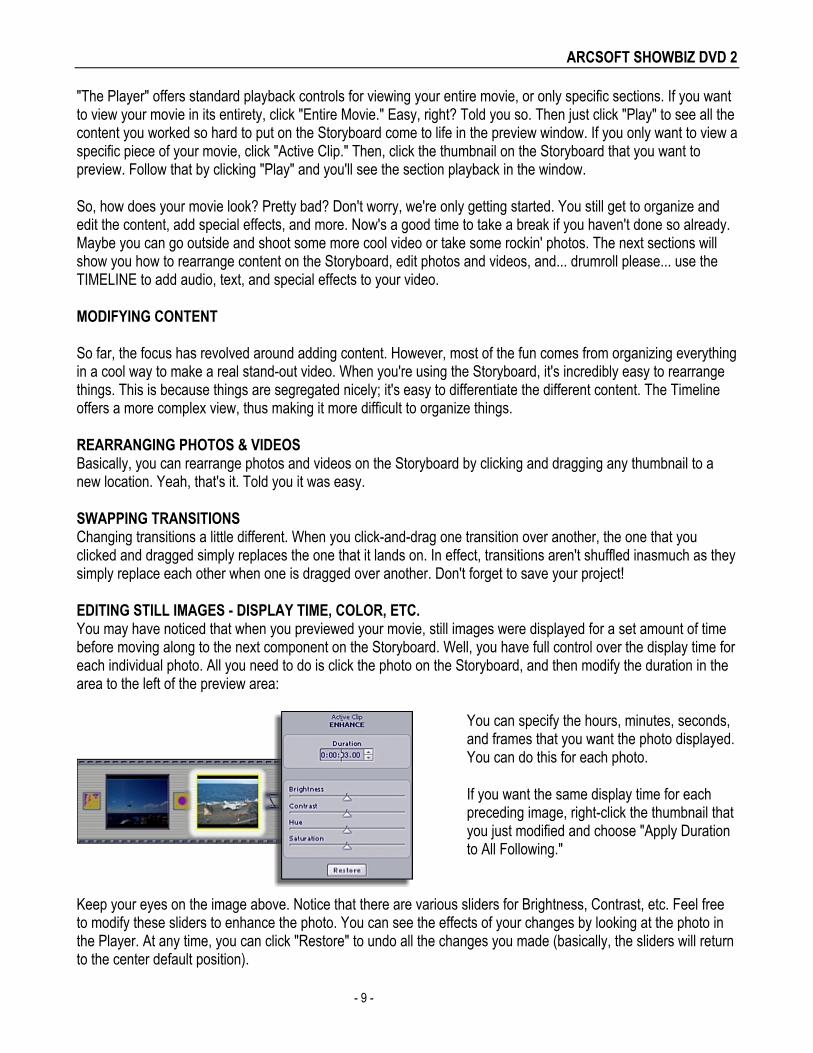
With your albums ready to go, you can now add content to the Storyboard and start to piece together your movie. Let's take a look at part of a blank Storyboard:
You'll notice that the Storyboard consists of several squares. The larger squares are where you can insert STILL IMAGES and VIDEOS. The smaller squares are reserved for TRANSITIONS. Transitions are effects that occur as one video/image changes to another. When your final movie is compiled, everything on the Storyboard is combined into a single video file. This picture shows you how to add a still image or video clip to the Storyboard:
ARCSOFT SHOWBIZ DVD 2
- 8 -
You can either follow the above method (highlight the thumbnail you want to add, then click the "Add" arrow), double-click the thumbnail, or click-and-drag the item you want to the next available spot on the Storyboard.
Click on the "Transitions" tab. Choose a transition that you like and add it before or after any photo or video. HINT: If you want a quick and easy way to apply transitions to your movie, right-click the Storyboard and choose "Random Transition to All." The program will automatically add transitions to every available spot on the Storyboard.
When you're finished adding content, your Storyboard may look something like this:
Remember, the larger squares represent still images and/or video clips. The small, colorful squares in between represent transitions.
SAVE YOUR WORK!
Now's as good a time as any to save your project. Remember to save often! Nothing's worse than when your computer crashes and you lose all of your hard work. No, it isn't the end of the world, but it's incredibly frustrating. Go to "File" and select "Save Project." Give your project a name and remember where you save it. All of your work on the Storyboard/Timeline will be saved and can be fully edited the next time you access the file.
PREVIEWING YOUR MOVIE
All right, so you've got some cool content on the Storyboard! Good for you! These small steps are important. Don't worry, while you don't need to be a wiz to make your own movies, you'll find that with a little practice you'll pick things up in no time. Who knows, maybe you'll be the next Spielberg. Or Chaplin. Anyway, let's take a look at your movie so far:
ARCSOFT SHOWBIZ DVD 2
- 9 -
"The Player" offers standard playback controls for viewing your entire movie, or only specific sections. If you want to view your movie in its entirety, click "Entire Movie." Easy, right? Told you so. Then just click "Play" to see all the content you worked so hard to put on the Storyboard come to life in the preview window. If you only want to view a specific piece of your movie, click "Active Clip." Then, click the thumbnail on the Storyboard that you want to preview. Follow that by clicking "Play" and you'll see the section playback in the window.
So, how does your movie look? Pretty bad? Don't worry, we're only getting started. You still get to organize and edit the content, add special effects, and more. Now's a good time to take a break if you haven't done so already. Maybe you can go outside and shoot some more cool video or take some rockin' photos. The next sections will show you how to rearrange content on the Storyboard, edit photos and videos, and... drumroll please... use the TIMELINE to add audio, text, and special effects to your video.
MODIFYING CONTENT So far, the focus has revolved around adding content. However, most of the fun comes from organizing everything in a cool way to make a real stand-out video. When you're using the Storyboard, it's incredibly easy to rearrange things. This is because things are segregated nicely; it's easy to differentiate the different content. The Timeline offers a more complex view, thus making it more difficult to organize things.
REARRANGING PHOTOS & VIDEOS Basically, you can rearrange photos and videos on the Storyboard by clicking and dragging any thumbnail to a new location. Yeah, that's it. Told you it was easy.
SWAPPING TRANSITIONS Changing transitions a little different. When you click-and-drag one transition over another, the one that you clicked and dragged simply replaces the one that it lands on. In effect, transitions aren't shuffled inasmuch as they simply replace each other when one is dragged over another. Don't forget to save your project!
EDITING STILL IMAGES - DISPLAY TIME, COLOR, ETC. You may have noticed that when you previewed your movie, still images were displayed for a set amount of time before moving along to the next component on the Storyboard. Well, you have full control over the display time for each individual photo. All you need to do is click the photo on the Storyboard, and then modify the duration in the area to the left of the preview area:
You can specify the hours, minutes, seconds, and frames that you want the photo displayed. You can do this for each photo.
If you want the same display time for each preceding image, right-click the thumbnail that you just modified and choose "Apply Duration to All Following."
Keep your eyes on the image above. Notice that there are various sliders for Brightness, Contrast, etc. Feel free to modify these sliders to enhance the photo. You can see the effects of your changes by looking at the photo in the Player. At any time, you can click "Restore" to undo all the changes you made (basically, the sliders will return to the center default position).
ARCSOFT SHOWBIZ DVD 2
- 10 -
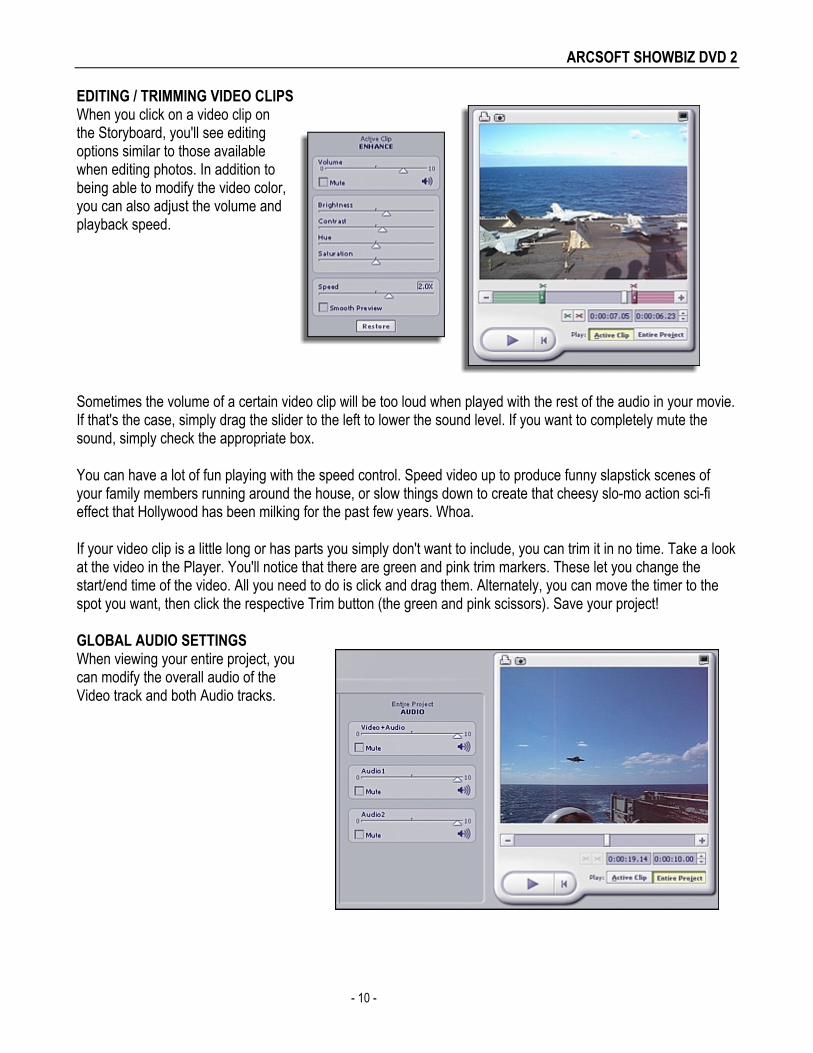
EDITING / TRIMMING VIDEO CLIPS When you click on a video clip on the Storyboard, you'll see editing options similar to those available when editing photos. In addition to being able to modify the video color, you can also adjust the volume and playback speed.
Sometimes the volume of a certain video clip will be too loud when played with the rest of the audio in your movie. If that's the case, simply drag the slider to the left to lower the sound level. If you want to completely mute the sound, simply check the appropriate box.
You can have a lot of fun playing with the speed control. Speed video up to produce funny slapstick scenes of your family members running around the house, or slow things down to create that cheesy slo-mo action sci-fi effect that Hollywood has been milking for the past few years. Whoa.
If your video clip is a little long or has parts you simply don't want to include, you can trim it in no time. Take a look at the video in the Player. You'll notice that there are green and pink trim markers. These let you change the start/end time of the video. All you need to do is click and drag them. Alternately, you can move the timer to the spot you want, then click the respective Trim button (the green and pink scissors). Save your project!
GLOBAL AUDIO SETTINGS When viewing your entire project, you can modify the overall audio of the Video track and both Audio tracks.
ARCSOFT SHOWBIZ DVD 2
- 11 -
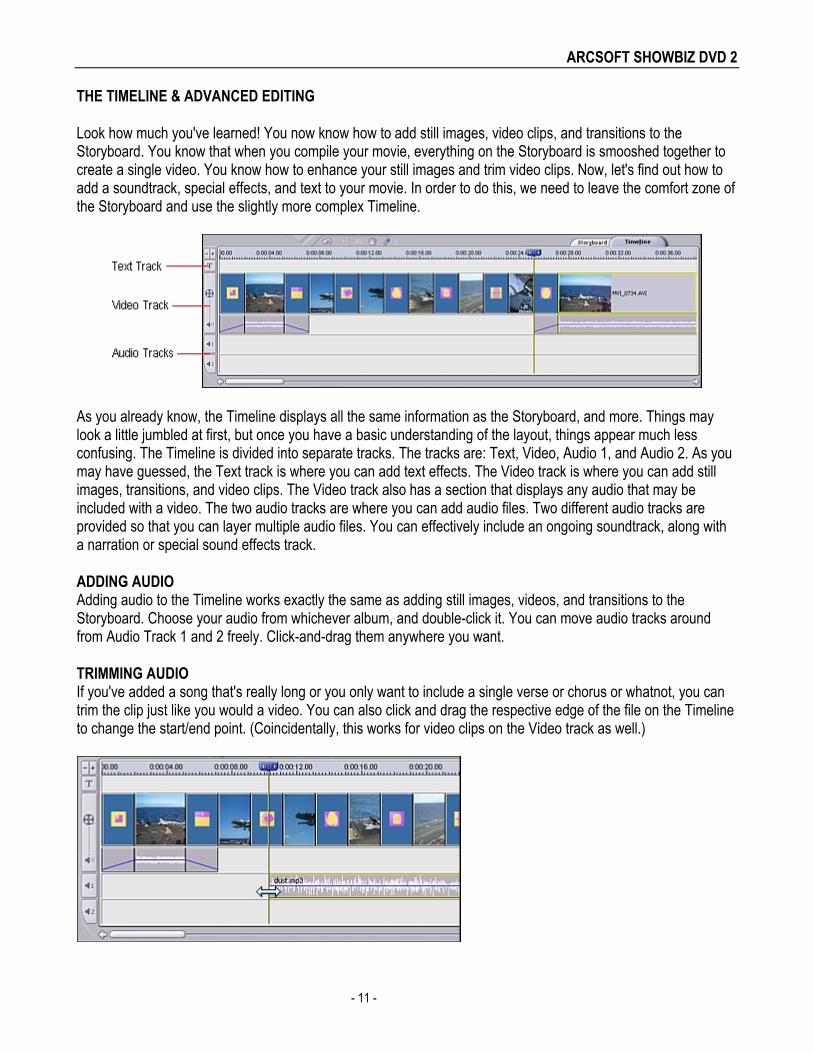
THE TIMELINE & ADVANCED EDITING
Look how much you've learned! You now know how to add still images, video clips, and transitions to the Storyboard. You know that when you compile your movie, everything on the Storyboard is smooshed together to create a single video. You know how to enhance your still images and trim video clips. Now, let's find out how to add a soundtrack, special effects, and text to your movie. In order to do this, we need to leave the comfort zone of the Storyboard and use the slightly more complex Timeline.
As you already know, the Timeline displays all the same information as the Storyboard, and more. Things may look a little jumbled at first, but once you have a basic understanding of the layout, things appear much less confusing. The Timeline is divided into separate tracks. The tracks are: Text, Video, Audio 1, and Audio 2. As you may have guessed, the Text track is where you can add text effects. The Video track is where you can add still images, transitions, and video clips. The Video track also has a section that displays any audio that may be included with a video. The two audio tracks are where you can add audio files. Two different audio tracks are provided so that you can layer multiple audio files. You can effectively include an ongoing soundtrack, along with a narration or special sound effects track.
ADDING AUDIO Adding audio to the Timeline works exactly the same as adding still images, videos, and transitions to the Storyboard. Choose your audio from whichever album, and double-click it. You can move audio tracks around from Audio Track 1 and 2 freely. Click-and-drag them anywhere you want.
TRIMMING AUDIO If you've added a song that's really long or you only want to include a single verse or chorus or whatnot, you can trim the clip just like you would a video. You can also click and drag the respective edge of the file on the Timeline to change the start/end point. (Coincidentally, this works for video clips on the Video track as well.)
ARCSOFT SHOWBIZ DVD 2
- 12 -
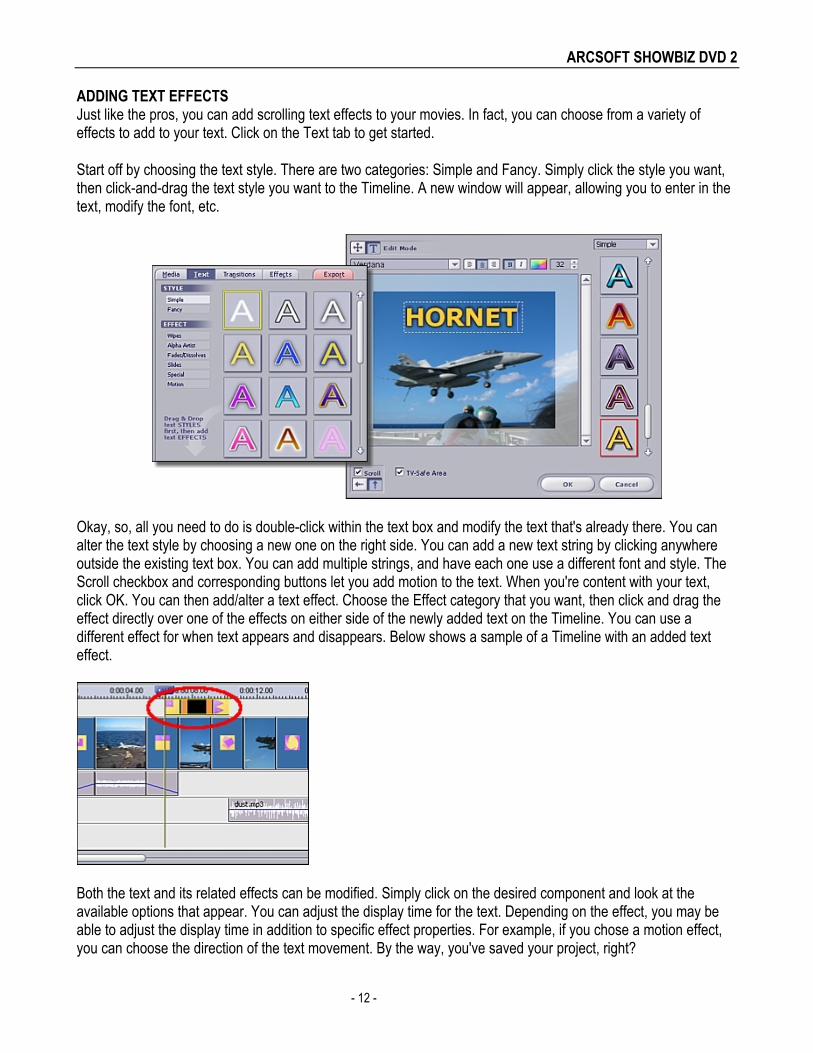
ADDING TEXT EFFECTS Just like the pros, you can add scrolling text effects to your movies. In fact, you can choose from a variety of effects to add to your text. Click on the Text tab to get started.
Start off by choosing the text style. There are two categories: Simple and Fancy. Simply click the style you want, then click-and-drag the text style you want to the Timeline. A new window will appear, allowing you to enter in the text, modify the font, etc.
Okay, so, all you need to do is double-click within the text box and modify the text that's already there. You can alter the text style by choosing a new one on the right side. You can add a new text string by clicking anywhere outside the existing text box. You can add multiple strings, and have each one use a different font and style. The Scroll checkbox and corresponding buttons let you add motion to the text. When you're content with your text, click OK. You can then add/alter a text effect. Choose the Effect category that you want, then click and drag the effect directly over one of the effects on either side of the newly added text on the Timeline. You can use a different effect for when text appears and disappears. Below shows a sample of a Timeline with an added text effect.
Both the text and its related effects can be modified. Simply click on the desired component and look at the available options that appear. You can adjust the display time for the text. Depending on the effect, you may be able to adjust the display time in addition to specific effect properties. For example, if you chose a motion effect, you can choose the direction of the text movement. By the way, you've saved your project, right?
ARCSOFT SHOWBIZ DVD 2
- 13 -
ADDING SPECIAL EFFECTS Click the Effects tab to see all of the fun and unusual effects. Effects are added to specific items on the Video track. You can modify the duration of the effect by clicking and dragging the edges. Note that effects are added to individual components of the video track. You can't, for example, extend an effect over two pictures. You need to add the effect over both of them.
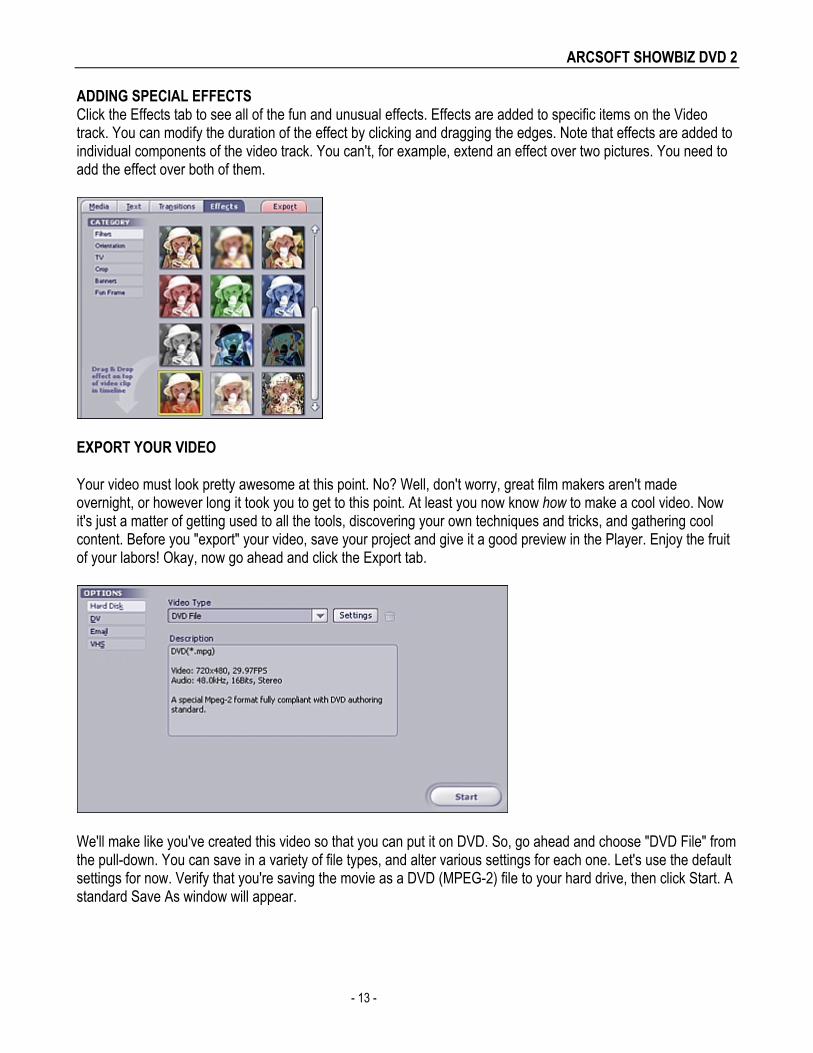
EXPORT YOUR VIDEO
Your video must look pretty awesome at this point. No? Well, don't worry, great film makers aren't made overnight, or however long it took you to get to this point. At least you now know how to make a cool video. Now it's just a matter of getting used to all the tools, discovering your own techniques and tricks, and gathering cool content. Before you "export" your video, save your project and give it a good preview in the Player. Enjoy the fruit of your labors! Okay, now go ahead and click the Export tab.
We'll make like you've created this video so that you can put it on DVD. So, go ahead and choose "DVD File" from the pull-down. You can save in a variety of file types, and alter various settings for each one. Let's use the default settings for now. Verify that you're saving the movie as a DVD (MPEG-2) file to your hard drive, then click Start. A standard Save As window will appear.
ARCSOFT SHOWBIZ DVD 2
- 14 -
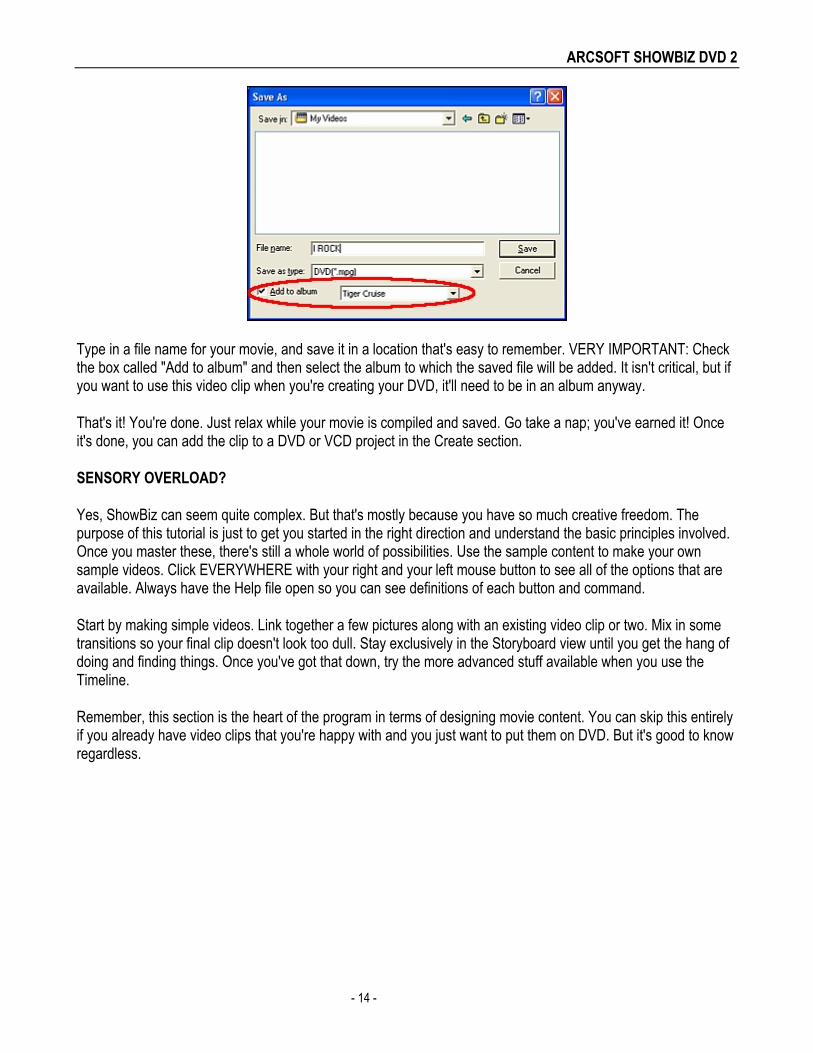
Type in a file name for your movie, and save it in a location that's easy to remember. VERY IMPORTANT: Check the box called "Add to album" and then select the album to which the saved file will be added. It isn't critical, but if you want to use this video clip when you're creating your DVD, it'll need to be in an album anyway.
That's it! You're done. Just relax while your movie is compiled and saved. Go take a nap; you've earned it! Once it's done, you can add the clip to a DVD or VCD project in the Create section.
SENSORY OVERLOAD?
Yes, ShowBiz can seem quite complex. But that's mostly because you have so much creative freedom. The purpose of this tutorial is just to get you started in the right direction and understand the basic principles involved. Once you master these, there's still a whole world of possibilities. Use the sample content to make your own sample videos. Click EVERYWHERE with your right and your left mouse button to see all of the options that are available. Always have the Help file open so you can see definitions of each button and command.
Start by making simple videos. Link together a few pictures along with an existing video clip or two. Mix in some transitions so your final clip doesn't look too dull. Stay exclusively in the Storyboard view until you get the hang of doing and finding things. Once you've got that down, try the more advanced stuff available when you use the Timeline.
Remember, this section is the heart of the program in terms of designing movie content. You can skip this entirely if you already have video clips that you're happy with and you just want to put them on DVD. But it's good to know regardless.

ARCSOFT SHOWBIZ DVD 2
- 15 -
- CREATING A DVD -
The Create module of the program is where you actually put together your DVD (or VCD). It's really simple. If you've created your own custom clips in the edit section, here's where your work really pays off, because you can now add it as a chapter on your DVD. You can do all of the following:
1. Choose the video clips that you want to add to your movie (they'll be added as individual chapters). 2. Create multiple starting points for longer video clips (submenus). 3. Design your movie menus (you can have multiple menu screens, each with their own unique look). 4. Create photo slideshows. 5. Burn your movie to disc.
ADDING CHAPTERS TO YOUR MOVIE
If you've read the edit section (which you should have), you're already somewhat familiar with how albums work. In order to create your DVD (or VCD), you basically apply the same principles. At this point, just worry about adding all your content. Once you're done, you can then arrange the movie menu however you like. To add content:
1. Choose the album that has the video clips you wish to add.
2. Double-click the video clip you want to add. The video clip will appear on the menu as a new chapter. Remember, you can customize the look of the menu, including the chapter button layout, later. For now, just add all the video chapters that you plan on including in your movie. You aren't limited to adding content from one album.
ARCSOFT SHOWBIZ DVD 2
- 16 -
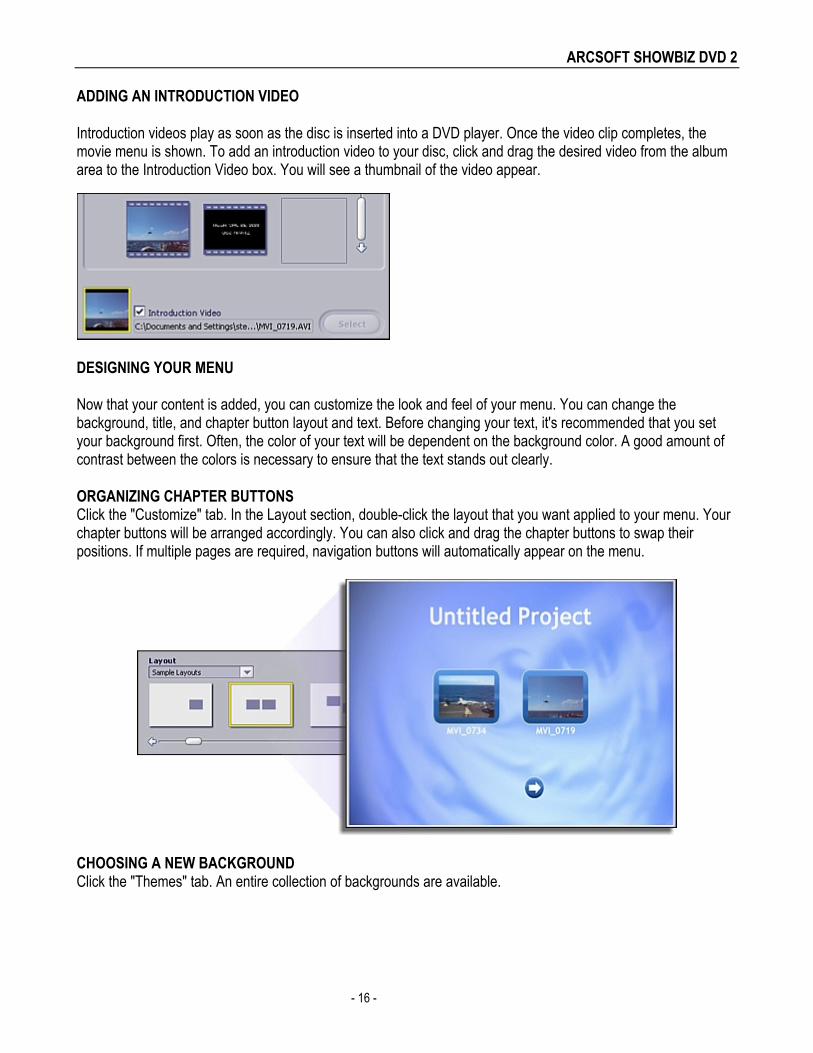
ADDING AN INTRODUCTION VIDEO
Introduction videos play as soon as the disc is inserted into a DVD player. Once the video clip completes, the movie menu is shown. To add an introduction video to your disc, click and drag the desired video from the album area to the Introduction Video box. You will see a thumbnail of the video appear.
DESIGNING YOUR MENU Now that your content is added, you can customize the look and feel of your menu. You can change the background, title, and chapter button layout and text. Before changing your text, it's recommended that you set your background first. Often, the color of your text will be dependent on the background color. A good amount of contrast between the colors is necessary to ensure that the text stands out clearly.
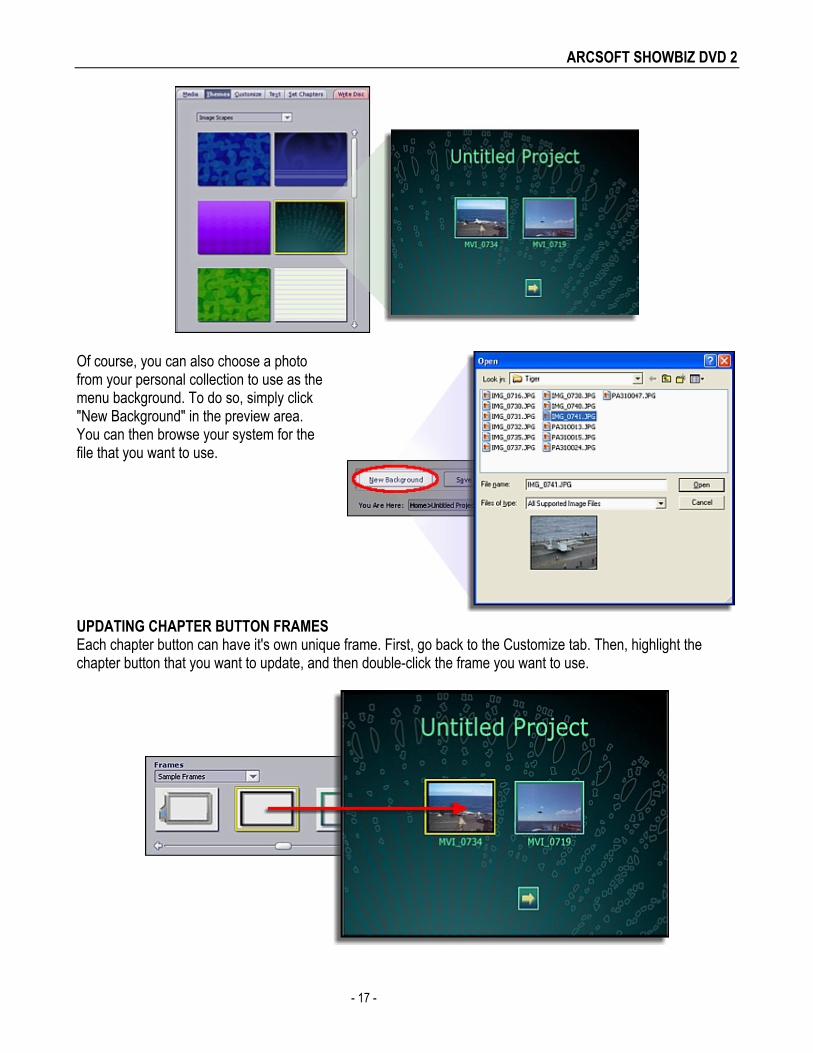
ORGANIZING CHAPTER BUTTONS Click the "Customize" tab. In the Layout section, double-click the layout that you want applied to your menu. Your chapter buttons will be arranged accordingly. You can also click and drag the chapter buttons to swap their positions. If multiple pages are required, navigation buttons will automatically appear on the menu.
CHOOSING A NEW BACKGROUND Click the "Themes" tab. An entire collection of backgrounds are available.
ARCSOFT SHOWBIZ DVD 2
- 17 -
Of course, you can also choose a photo from your personal collection to use as the menu background. To do so, simply click "New Background" in the preview area. You can then browse your system for the file that you want to use.
UPDATING CHAPTER BUTTON FRAMES Each chapter button can have it's own unique frame. First, go back to the Customize tab. Then, highlight the chapter button that you want to update, and then double-click the frame you want to use.
ARCSOFT SHOWBIZ DVD 2
- 18 -
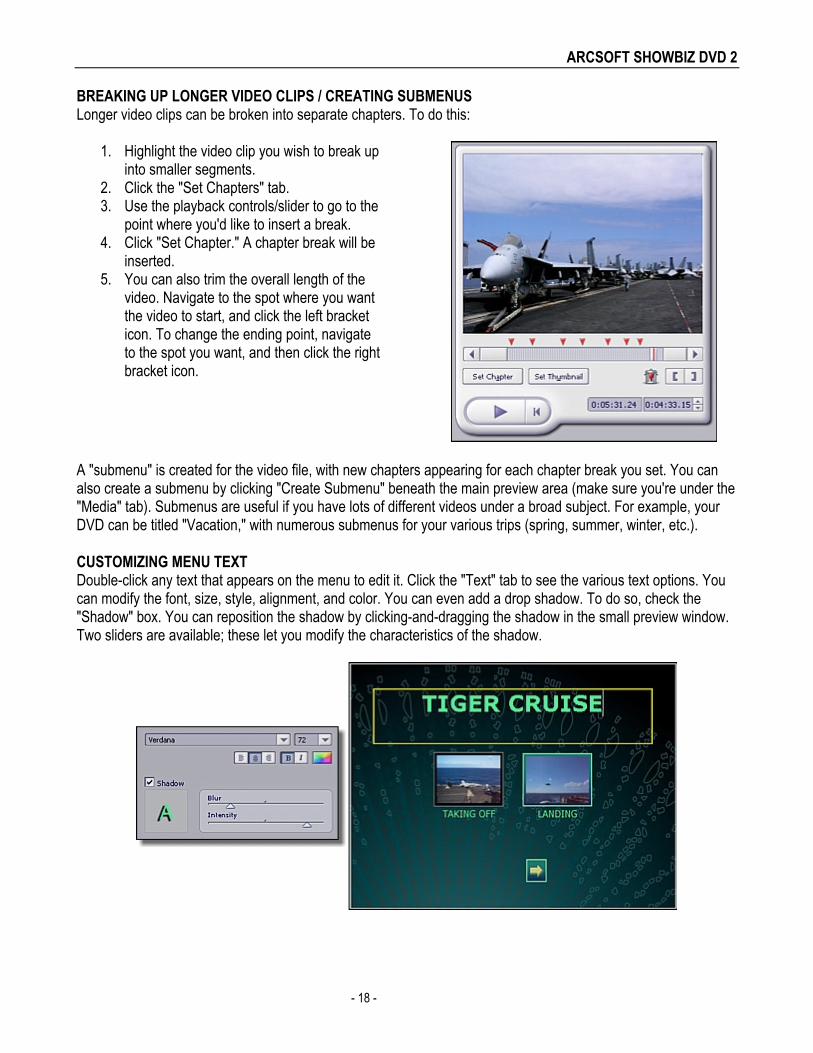
BREAKING UP LONGER VIDEO CLIPS / CREATING SUBMENUS Longer video clips can be broken into separate chapters. To do this:
1. Highlight the video clip you wish to break up into smaller segments.
2. Click the "Set Chapters" tab. 3. Use the playback controls/slider to go to the
point where you'd like to insert a break. 4. Click "Set Chapter." A chapter break will be
inserted. 5. You can also trim the overall length of the
video. Navigate to the spot where you want the video to start, and click the left bracket icon. To change the ending point, navigate to the spot you want, and then click the right bracket icon.
A "submenu" is created for the video file, with new chapters appearing for each chapter break you set. You can also create a submenu by clicking "Create Submenu" beneath the main preview area (make sure you're under the "Media" tab). Submenus are useful if you have lots of different videos under a broad subject. For example, your DVD can be titled "Vacation," with numerous submenus for your various trips (spring, summer, winter, etc.).
CUSTOMIZING MENU TEXT Double-click any text that appears on the menu to edit it. Click the "Text" tab to see the various text options. You can modify the font, size, style, alignment, and color. You can even add a drop shadow. To do so, check the "Shadow" box. You can reposition the shadow by clicking-and-dragging the shadow in the small preview window. Two sliders are available; these let you modify the characteristics of the shadow.
ARCSOFT SHOWBIZ DVD 2
- 19 -
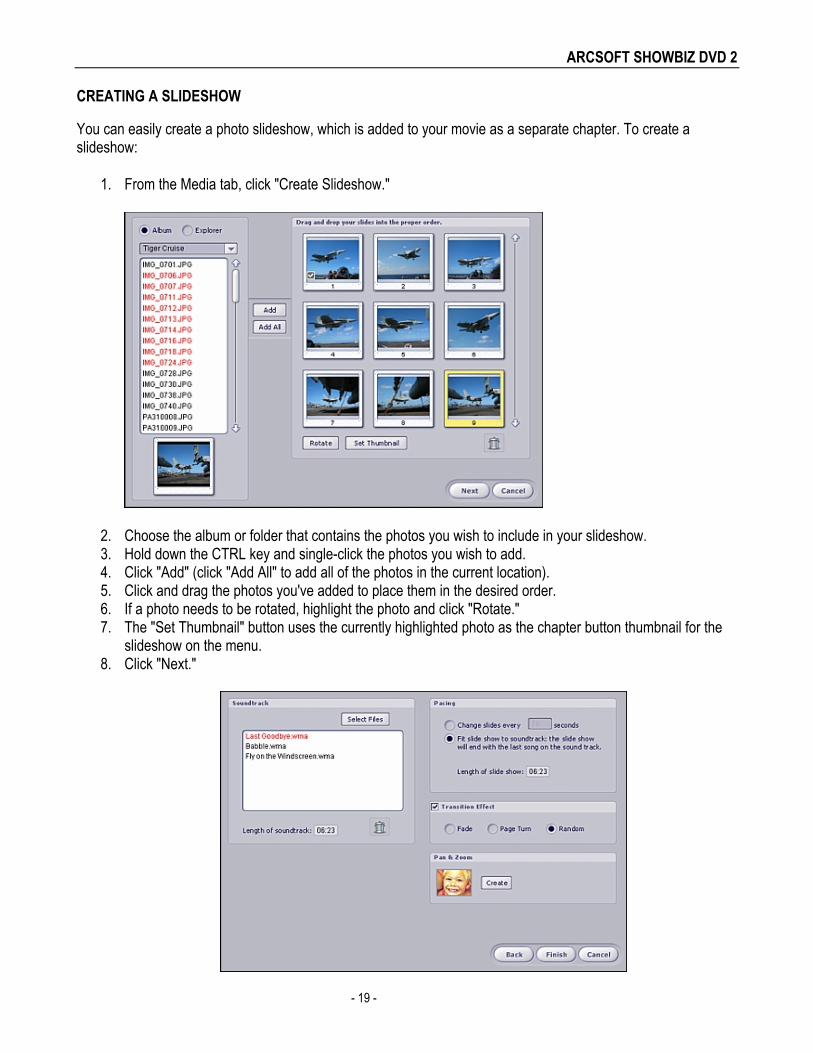
CREATING A SLIDESHOW You can easily create a photo slideshow, which is added to your movie as a separate chapter. To create a slideshow:
1. From the Media tab, click "Create Slideshow."
2. Choose the album or folder that contains the photos you wish to include in your slideshow. 3. Hold down the CTRL key and single-click the photos you wish to add. 4. Click "Add" (click "Add All" to add all of the photos in the current location). 5. Click and drag the photos you've added to place them in the desired order. 6. If a photo needs to be rotated, highlight the photo and click "Rotate." 7. The "Set Thumbnail" button uses the currently highlighted photo as the chapter button thumbnail for the
slideshow on the menu. 8. Click "Next."
ARCSOFT SHOWBIZ DVD 2
- 20 -
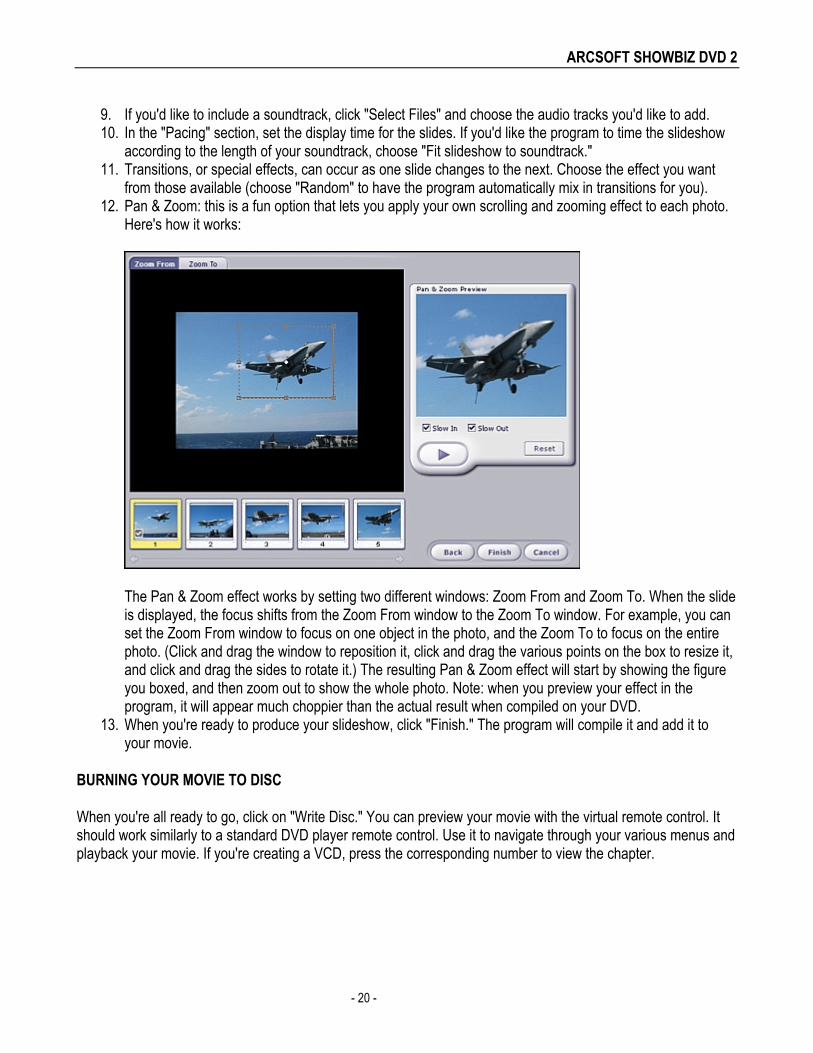
9. If you'd like to include a soundtrack, click "Select Files" and choose the audio tracks you'd like to add. 10. In the "Pacing" section, set the display time for the slides. If you'd like the program to time the slideshow
according to the length of your soundtrack, choose "Fit slideshow to soundtrack." 11. Transitions, or special effects, can occur as one slide changes to the next. Choose the effect you want
from those available (choose "Random" to have the program automatically mix in transitions for you). 12. Pan & Zoom: this is a fun option that lets you apply your own scrolling and zooming effect to each photo.
Here's how it works:
The Pan & Zoom effect works by setting two different windows: Zoom From and Zoom To. When the slide is displayed, the focus shifts from the Zoom From window to the Zoom To window. For example, you can set the Zoom From window to focus on one object in the photo, and the Zoom To to focus on the entire photo. (Click and drag the window to reposition it, click and drag the various points on the box to resize it, and click and drag the sides to rotate it.) The resulting Pan & Zoom effect will start by showing the figure you boxed, and then zoom out to show the whole photo. Note: when you preview your effect in the program, it will appear much choppier than the actual result when compiled on your DVD.
13. When you're ready to produce your slideshow, click "Finish." The program will compile it and add it to your movie.
BURNING YOUR MOVIE TO DISC
When you're all ready to go, click on "Write Disc." You can preview your movie with the virtual remote control. It should work similarly to a standard DVD player remote control. Use it to navigate through your various menus and playback your movie. If you're creating a VCD, press the corresponding number to view the chapter.
ARCSOFT SHOWBIZ DVD 2
- 21 -
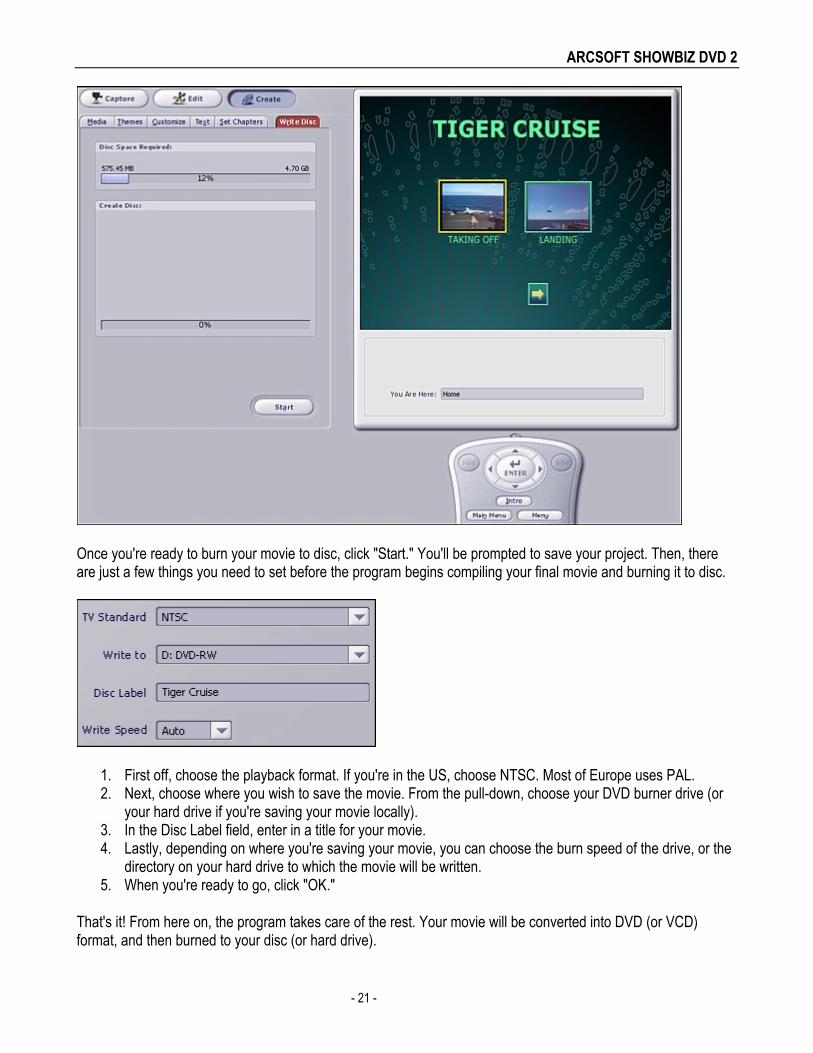
Once you're ready to burn your movie to disc, click "Start." You'll be prompted to save your project. Then, there are just a few things you need to set before the program begins compiling your final movie and burning it to disc.
1. First off, choose the playback format. If you're in the US, choose NTSC. Most of Europe uses PAL. 2. Next, choose where you wish to save the movie. From the pull-down, choose your DVD burner drive (or
your hard drive if you're saving your movie locally). 3. In the Disc Label field, enter in a title for your movie. 4. Lastly, depending on where you're saving your movie, you can choose the burn speed of the drive, or the
directory on your hard drive to which the movie will be written. 5. When you're ready to go, click "OK."
That's it! From here on, the program takes care of the rest. Your movie will be converted into DVD (or VCD) format, and then burned to your disc (or hard drive).
ARCSOFT SHOWBIZ DVD 2
- 22 -
- TECHNICAL SUPPORT -
N. America ArcSoft, Inc. 46601 Fremont Blvd Fremont, CA 94538 Tel: 1.510.440.9901 Fax: 1.510.440.1270 Web: www.arcsoft.com China ArcSoft Beijing Co., Ltd. No. 6 South Capital Gym Road Beijing New Century Hotel Office Building #1060 Beijing 100044, China Tel: 8610-6849-1368 Fax: 8610-6849-1367 Email: [email protected] Latin America Tel (Brazil): 00817-200-0709 Tel (Chili): 800-202-797 Email: [email protected]
Europe Unit 14, Shannon Industrial Estate Shannon, Co. Clare, Ireland Tel: +353 (0) 61-702087 Fax: +353 (0) 61-702001 Email: [email protected] Japan ArcSoft Japan 9F, 1-21-9, Higashi-Gotanda, Shinagawa-ku, Tokyo 141-0022, Japan Tel: +81-3-5795-1392 Fax: +81-3-5795-1397 Web: www.arcsoft.jp Email: [email protected] Taiwan Tel: +886 (0) 2-2506-9355 Fax: +886 (0) 2-2506-8922 Web: www.arcsoft.com.tw Email: [email protected]


