
ARTHROSCOPIC GIANT NEEDLE ROTATOR CUFF REPAIR AS A ROUTINE PROCEDURE
SINCE 1990
A 10 minutes transhumeral footprint repair using only sutures
AIG Medical GmbH Bonn (Aeratec)

Essential for this surgery : Patient in a sitting position not
Beach chair
Advantage of neutral shoulder position,Gravity mild traction and easy operative manipulation

Anatomy in sitting positionshowing working area more than 5 cm
away from the axillary nerve

1. Patient in a sitting position with the arm hangingand the instrumentation table near the thigh

2. Thumb palpates the posterior angle of the acromion
Angel ofacromion

3- Keeping the thumb on the angle of the acrmion an 18-gauge lumbar puncture is placed into the subacromial space through the posteromedial portal which is approximately 1.5 cm medial to the angle of the acromion ( the needle has to move freely through the
space)

4- Keeping the thumb on the angle of the acrmion the lumbar puncture is now placed into the subacromial space through the posterolateral portal which is approximately 1.5 cm below and aterior to the angle of the acromion ( the needle has to move
freely through the space)
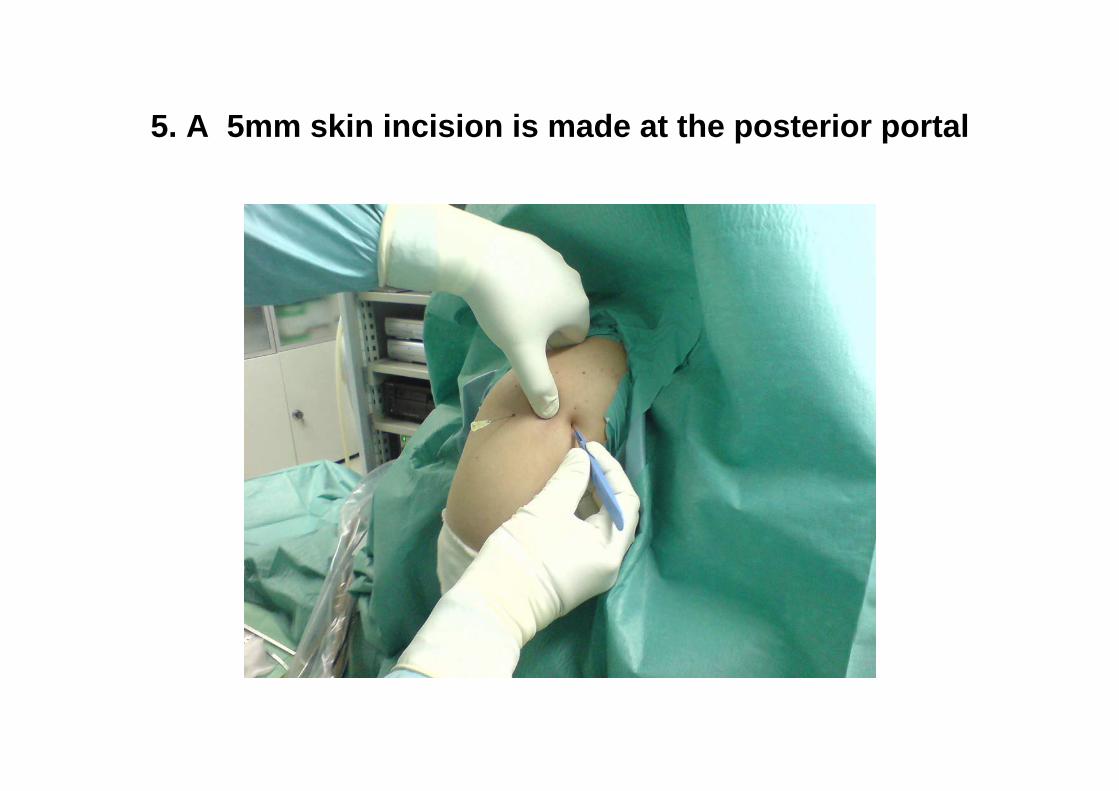
5. A 5mm skin incision is made at the posterior portal

5. A 5mm skin incision is made at the posterolateralportal

7- Keeping the thumb on the angle of the acrmion a sharp trocar is used to penetrate through the deltoid to the subacromial space. The tip of the instrument is directed toward the lower surface of
the acromion.

8- Change from sharp to blunt trocar
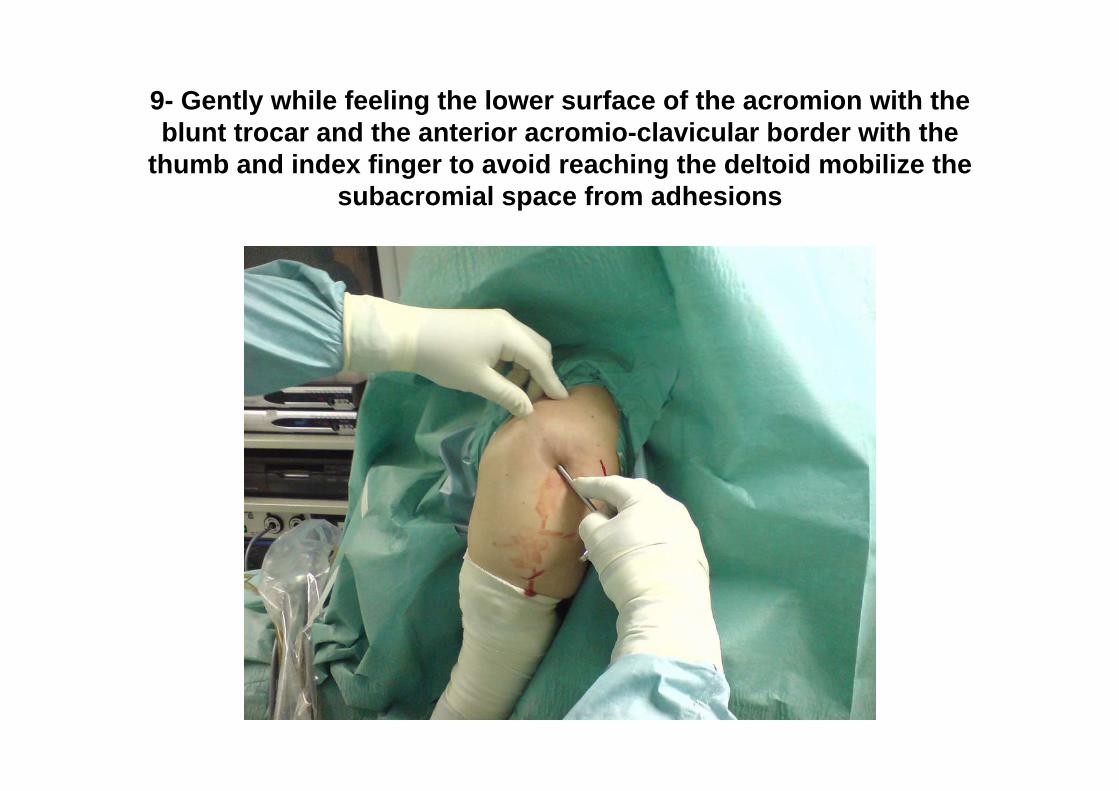
9- Gently while feeling the lower surface of the acromion with the blunt trocar and the anterior acromio-clavicular border with the
thumb and index finger to avoid reaching the deltoid mobilize the subacromial space from adhesions

10- The accessory fluid-ingress cannula is introduced through the posterior skin incision and is directed upward and anteriorly into the subacromial space.

11- The arthroscope and camera are attached. Irrigation fluid enters through the arthroscopic sheath to the proximal arm of the
arthrosopic sheath (Gravity suction)

12- Palpate the AC joint with the index finger and mark the joint with the lumbar needle.

13-The medial measuring needle enters just anterior to the AC joint , and the tip descends to the level of the
rotator cuff

14-The lateral measuring needle enters precisely at the anterolateral corner of the acromion.The vertically directed needle may palpate the bone lightly to ensure its proximity to bone before
it is pushed done and into the subacromial space.
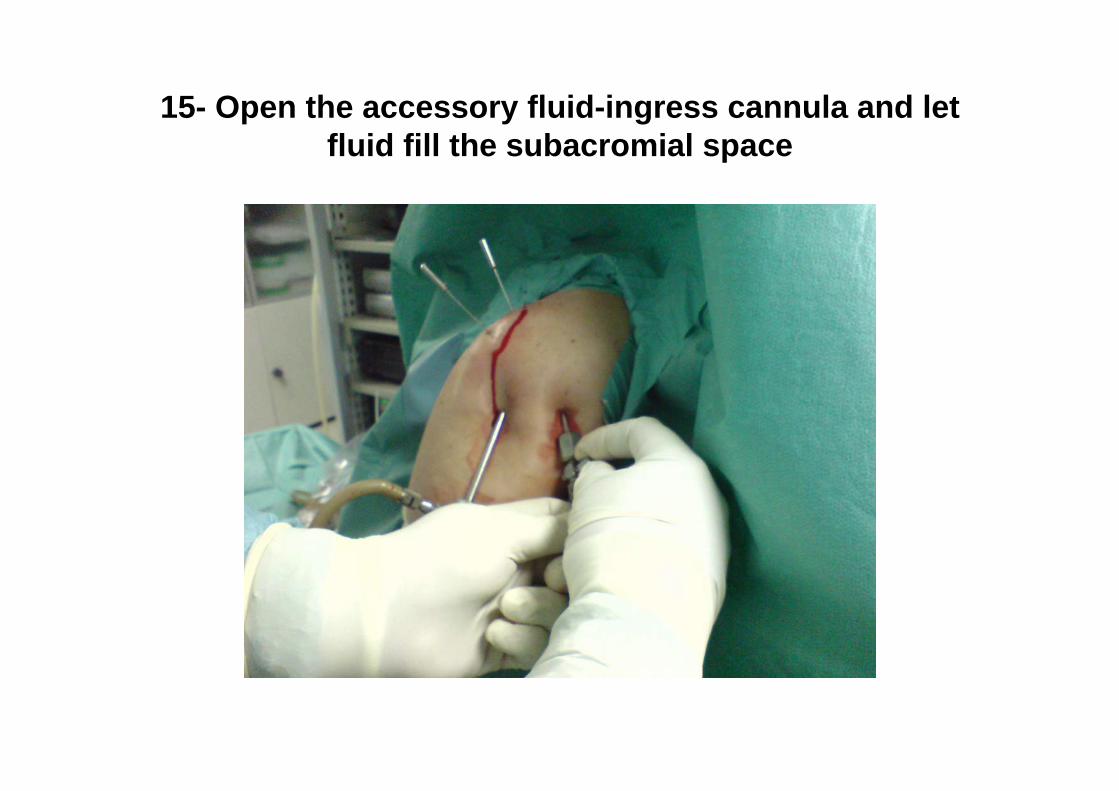
15- Open the accessory fluid-ingress cannula and let fluid fill the subacromial space

16- the lumbar puncture is now placed into the subacromial space through the antrolateral portal which is approximately 3 to 4 cm distal to acromion in a direct
line with anterior edge. ( the needle has to move freely through the space) .It has to be directly above the tendon parallel to the floor. The horizontally directed needle may palpate the supraspinatus lightly to ensure its proximity to tendon before it is pushed medial and into the subacromial space. (This is important to ease suturing
a rotator cuff tear)

17- A 5mm skin incision is made at the anterolateralportal

18- A sharp trocar is used to penetrate through the deltoid to the subacromial space. The tip of the instrument is directed toward
the lower surface of the acromion.

19- A synovial shaver is passed through the antrolateral instrumentation portal.

20- Shaver bursectomy
• After removing the Bursa and adhesions below the acromionyou can localise the coraco-acromialligament which lies between the two measuring needles

21- Do standardized subacromial decompression and remove with an acromionizer as much bone
as a space of more than 1.2 cm measured with the needle is achieved
Before SAD After SAD

22- With a shaver deperiost the greater tuberosity just lateral to the articular
surface of the humeral head

23- A Shallow trough is prepared just lateral to the articularsurface and a hole trough the cortical bone is made at the
cartilage border for needle pass in order to have a wide foot print repair on the whole surface of the greater tuberosity

24- A puncture through the cancillus bone is made through the hole in the cortical bone using an
arthroscopy hook

25- Test the elasticity of the torn tendon. The torn tendon has to easily reach the
lateral edge of the greater tuberosity

26- Giant Needle Placement Guide
• The scope is brought about one cm lateral to the edge of the tear with the arm in external rotation to have the edge also perpendicular to the scope.
• A guide fixed to the scope sheath which was set before inserting the sheath to bring the Needle tip exactly 2 cm in front of the scope tip is then adjusted and the giant needle is brought through the skin, the deltoid to about 1cm medial to the edge of the torn tendon

27- Exit Guide• Remove the placement
guide and place the exit guide with one end on the entry point and the other in a posterolateraldirection to localize the exit point of the needle.
• If the exit point is too distal (in case of small shoulders) then use the medium size or small size giant needle

28- Pass the needle through the tendone,one cm medial to the tear edge in the prepared cortical hole

29- The assistant has to internally rotate the shoulder to pass the tip of the needle in the cancillus bone

30- A very important step• 1- with your left hand hold the
elbow of the patient from the assistant
• 2- place the needle holder 1cm above the skin entry of the needle.
• 3- hold the needle holder with your hand fro its needle end so that your thumb and index finger be in contact with the needle.
• 4- rotate the elbow with your left hand in CW and ACW directions whle pushing the needle done with your right hand til you reach the skin
• 5- now place the needle holder another 1cm above the skin entry and repeat the procedure till you see or feel the tip of the needle coming out through the skin.

31- The direction of pushing the needle should always be postrolateral in order to avoid the hard bony substance at the
bicipital groove
Pull the needle with the needle holder in the same 1cm stepwise manner as pushing it inside

32- Pull the lower end of the suture
• Pull the posterior part of the suture from its exit point from the shaft with an arthroscopy hook out through the instrumentation portal
• The hook is first brought to the trough and with bone contact go done and up along the shaft while pulling tightly on the suture till you feel the suture and then pull them out
• The anterior suture end has to be cached with a clamp to avoid pulling the whole suture

33- Pull the upper end through the instrumentation portal with a ring
forceps
• Advise to pull only one suture and leave the other to ease the knot tying process through the instrumentation portal.
• The posterior suture end has to be hold with a Kocher clap in order not to pull the whole suture out.

34- Giant Fleega Knot
The tichnique recomended is the Giant kont with the concave knot pusherInitial knot is a sliding oneway self-locking knot in which lockingoccures by pulling on loop

35- Sliding the knot inside the goint
• After making the knot outside slide it inside using the concave aeratec or arthrexknot pusher by pushing the knot with the driver inside and pulling the loop till you reach the tendon and then block the knot

36- If easy sliding was not possible
• This may rarlyhappen – then push the knot pusher to the tendon, then fix it there on the knot.
• Now pull each end of the suture alone to get the complete slide and placement

After placing and locking the knot the suture remains can be cut

37- Giant needle complex• Using two giant
needles a giant needle complex can be made which is two simple sutures and one mattress suture
Arthroscopic transhumeral rotator cuff repairGiant needle technique
ArthroscopyFebruary 2002 • Volume 18 • Number 2 • p218 to p223
Basim A. Fleega, M.D.


