Aut
odes
k Re
vit A
rchi
tect
ure
Cer
tifie
d U
ser S
kills
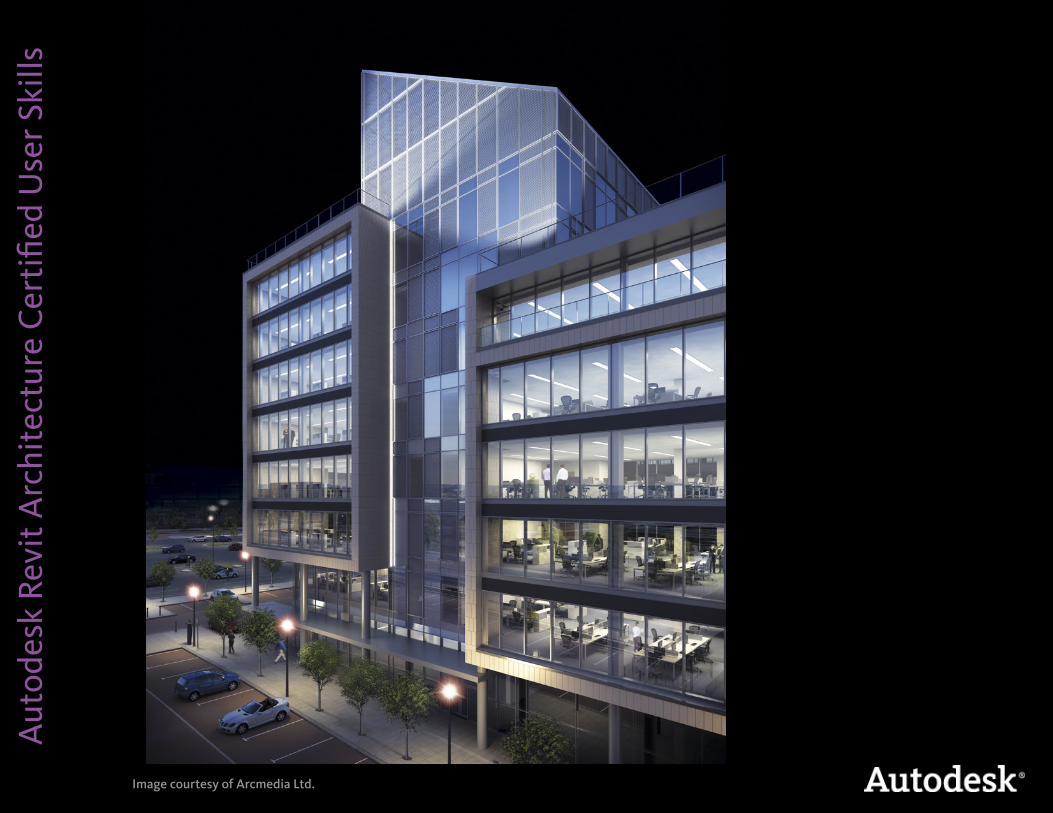
Image courtesy of Arcmedia Ltd.

2
Aut
odes
k Re
vit A
rchi
tect
ure
Cer
tifie
d U
ser S
kills
Introduction
Welcome to the Autodesk® Revit® Architecture Certified User Skills. This document was designed to help educators and educational institutions teach Revit Architecture software skills. Created using valuable input from Project Lead the Way and other respected educators and designers, it sets forth important skill standards for developing a high-quality user certification exam and curriculum resources
The Revit Architecture Certified User Skills serves to standardize the core competencies for fundamental-level instruction with Autodesk Revit Architecture for a two-semester class and provides a content framework and reference guide for the Autodesk® Revit® Architecture Certified User exam.
TIP: Although this document is designed to facilitate teacher-led courses and lessons, it may also be referenced for self-paced learning through the use of the Autodesk® Digital STEAM Workshop and the Autodesk Digital STEAM Workshop.
Using This Document
This easy-to-read document lists industry-specific topics pertaining to a function or feature set of Autodesk Revit Architecture software. Topics are organized into three substructures logically sequenced for classroom presentation:
• Topic: A standard functional subject area and/or feature set available in Autodesk Revit Architecture software. Example: Views
• Subtopic: A subtopic provides more detail on the topics and what the topics support. Example: View Types
• Content: The content provides more detail about the subtopic and what should be taught and learned. Example: Elevations
• Learning Objective: The learning objective exemplifies what the student is expected to understand. Example: Modify, crop, and place elevation views on a sheet.
LEARNING OBJECTIVE
TOPIC SUBTOPIC CONTENT

3
Aut
odes
k Re
vit A
rchi
tect
ure
Cer
tifie
d U
ser S
kills
Introduction
Autodesk Revit Architecture Certified User Digital Study Packet
The Autodesk Revit Architecture Certified User Digital Study Packet is a digital learning resource that provides students with a library of short videos based on the Revit Architecture Certified User Skills. The study packet covers the basic techniques required to become familiar with the software and get hands-on quickly.
TIP: Teachers can leverage the study packets in conjunction with the Autodesk Digital STEAM Workshop or their own curriculum to help their students build their software skills.
Autodesk Digital STEAM Workshop
The Autodesk Digital STEAM Workshop provides teachers and students with a highly visual story-based curriculum created to promote design innovation and creative problem-solving through science, technology, engineering, arts, and math (STEAM). The curriculum is structured as a framework for learning software through project-based content based on engaging real-world industry projects that build gradually in difficulty, offering students a chance to achieve small successes as they build their technical skills.
TIP: Using the Autodesk Revit Architecture Certified User Skills as benchmarks, teachers can measure a student’s progress as they work through the skills-building projects offered in the Autodesk Digital STEAM Workshop.
Feedback
We welcome your feedback on the Revit Architecture Certified User Skills. Please email us at [email protected].

Aut
odes
k Re
vit A
rchi
tect
ure
Cer
tifie
d U
ser S
kills
Audobon Center photo courtesy of Eric D. Lipschutz

5
Aut
odes
k Re
vit A
rchi
tect
ure
Cer
tifie
d U
ser S
kills
5
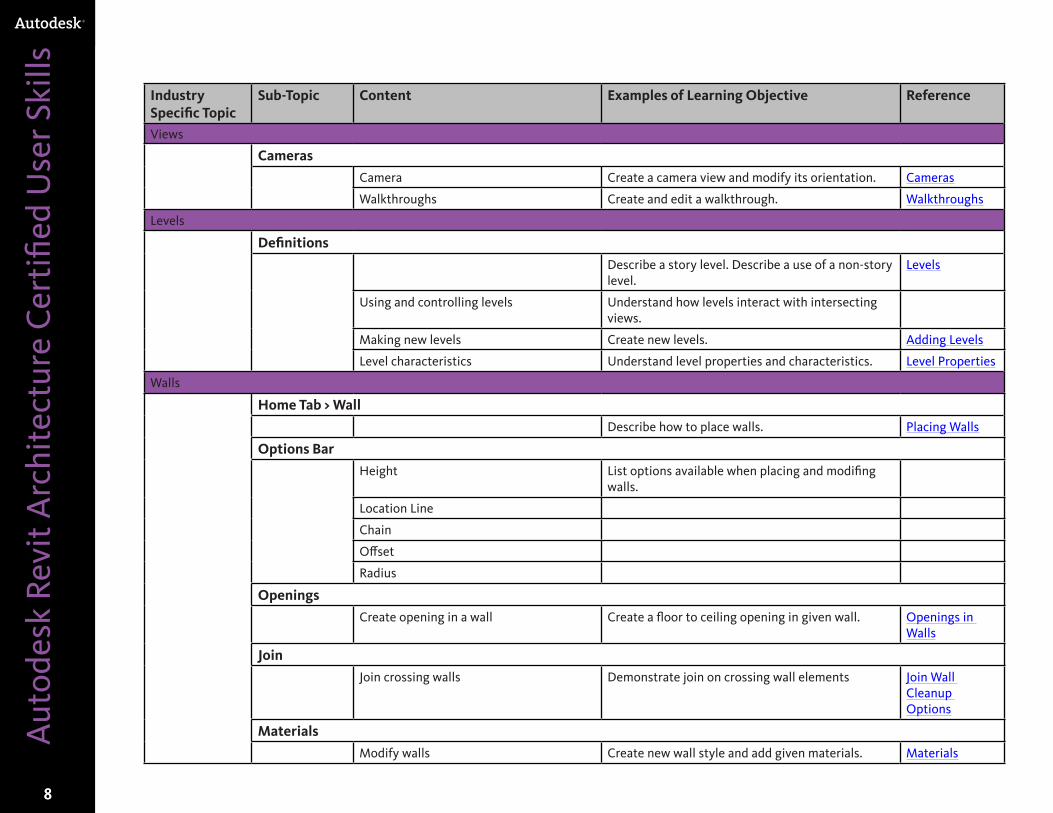
Industry Specific Topic
Sub-Topic Content Examples of Learning Objective Reference
User Interface
DefinitionsUI Features: Autodesk Revit window, graphics window, the ribbon, project browser, and the context (right-click) menus.
Identify primary parts of the User Interface (UI). (Tabs, Application menu, Info Center, Ribbon, Elevation tag, Status bar, View control Bar
UI Navigation/InteractionRibbon > Panels > Tabs Name the key features of the ribbon. Define how a
split button works. Demonstrate the three ways the ribbon can be displayed (Full ribbon, Min to Panel tiles, Min to tabs) Demonstrate how to detach a panel and move it on the screen.
User Interface
Project Browser Describe the hierarchy in the project browser for an new project.
Project Browser
Context (right-click menus) Define what “Context” means when right clicking in the drawing window.
Application Menu Name the tools found on the “Application Menu” ( Save, Plot, Export and Print) or What tools are found on the “Application Menu”
Application Menu
Quick Access toolbar Demonstrate how to add items to the Quick Access Toolbar
Quick Access Toolbar
Options Bar Describe why the “Option Bar” changes. Options Bar
Status Bar Describe the function of the “Status Bar”. Status Bar
Esc> Escape key Describe what hitting the escape key does.
Drawing Window
Elevation Marker Describe what double clicking on a elevation view marker does.
Drawing Area
Origin 3D Indicator Demonstrate how to turn on/off the 3D Indicator
View Control Bar Demonstrate how to change the view scale. View Control Bar

6
Aut
odes
k Re
vit A
rchi
tect
ure
Cer
tifie
d U
ser S
kills
6
Industry Specific Topic
Sub-Topic Content Examples of Learning Objective Reference
User Interface
Navigation Control3D View Icon on QAT Describe the functionality of the ViewCube.
ViewCube Describe what the home icon does.
ZoomNavigation bar Demonstrate how to change the navigation bar
opacity.Navigation Bar
Describe how to zoom using the Navigation bar
Zoom In/out Describe the quickest way to zoom in or out
Pan Describe the quickest way to pan.
File Management
Definitions
BIM Define the acronym “BIM” and why it is important to Revit users.
Building Information Modeling
Template Define a template file. Project Templates
Project Files.rvt> Determine paper size and scales for various projects
Identify the file extension of a project file.
.rte>Create Template File for later project usage.
Identify the file extension of a template file.
.rfa Identify the file extension of a Revit family file.
Open existing Revit projectRecent File window Recent Files
Projects>Open Demonstrate how to open a Revit file. Open a Revit Project File
Application Menu>Open Documents (Icon)

7
Aut
odes
k Re
vit A
rchi
tect
ure
Cer
tifie
d U
ser S
kills
7
Industry Specific Topic
Sub-Topic Content Examples of Learning Objective Reference
File Management
Create new Revit projectApplication Menu>New>Project Demonstrate how to create a new Revit project
folder and file.Creating a Project
Set up Drawing units Change to a metric drawing Project Units
Add project information Add project information to new drawing set. Project Information
Change system settings Create new dimension style, change arrows to architectural tick(oblique’s)
Temporary Dimension Settings
SavePick on disk icon on QAT. Saving Revit
Files
Application Menu - Save, Save as Name the three file types that can be saved while in a open drawing.
Views
View control and propertiesView control and properties Navigate and change views using the control bar. View Controls
View Range Understand the view range of plan views and be able to change it.
View Templates
View templates Understand the purpose of view templates. View Range
Object visibility Change object visibility using temporary hide, hide category, and hide element.
Temporary Hide
View TypesSections Create section views including segmented ones. Section Views
Elevations Modify, crop, and place elevation views on a sheet. Elevation Views
3D views Create and navigate 3D views. 3D Views
Callouts and Detail Views Create callouts for details. Callout Views
Drafting views Create and annotate a drafting view. Drafting Views
Section box Use the section box to create a cutaway 3D view. Section Box
8
Aut
odes
k Re
vit A
rchi
tect
ure
Cer
tifie
d U
ser S
kills
8
Industry Specific Topic
Sub-Topic Content Examples of Learning Objective Reference
Views
CamerasCamera Create a camera view and modify its orientation. Cameras
Walkthroughs Create and edit a walkthrough. Walkthroughs
Levels
DefinitionsDescribe a story level. Describe a use of a non-story level.
Levels
Using and controlling levels Understand how levels interact with intersecting views.
Making new levels Create new levels. Adding Levels
Level characteristics Understand level properties and characteristics. Level Properties
Walls
Home Tab > WallDescribe how to place walls. Placing Walls
Options BarHeight List options available when placing and modifing
walls.
Location Line
Chain
Offset
Radius
OpeningsCreate opening in a wall Create a floor to ceiling opening in given wall. Openings in
Walls
JoinJoin crossing walls Demonstrate join on crossing wall elements Join Wall
Cleanup Options
MaterialsModify walls Create new wall style and add given materials. Materials

9
Aut
odes
k Re
vit A
rchi
tect
ure
Cer
tifie
d U
ser S
kills
9
Industry Specific Topic
Sub-Topic Content Examples of Learning Objective Reference
Doors
Home Tab > DoorDescribe how to place doors. Placing Doors
Options BarVertical/Horizontal Describe door options.
Tag on Placement Door Tags
Leader
Leader attachment distance
Model in placeEdit existing doors. Use Align to position a door.
Windows
Home Tab > WindowDescribe how to place windows. Placing
Windows
Options BarVertical/Horizontal Describe window options.
Tag on Placement Window Tags
Leader
Leader attachment distance
Model in placeEdit existing windows.

10
Aut
odes
k Re
vit A
rchi
tect
ure
Cer
tifie
d U
ser S
kills
10
Industry Specific Topic
Sub-Topic Content Examples of Learning Objective Reference
Component
Home Tab > ComponentComponent Types List the types of components available. Components
Options BarList options available when placing a component. Placing
Components
Component HostDescribe how to move a component to a different host.
Moving Components to Different Hosts
FamiliesLoad a Family Navigate to find component families and load them. Loading Families
Edit a Family Edit a family file and save. Family Editor
Columns and Grids
DefinitionsGrid uses Identify the uses of a grid. Grids
Home Tab > Grid
Grid properties and characteristics. Create an equally spaced grid pattern. Adding Grids
11
Aut
odes
k Re
vit A
rchi
tect
ure
Cer
tifie
d U
ser S
kills
11
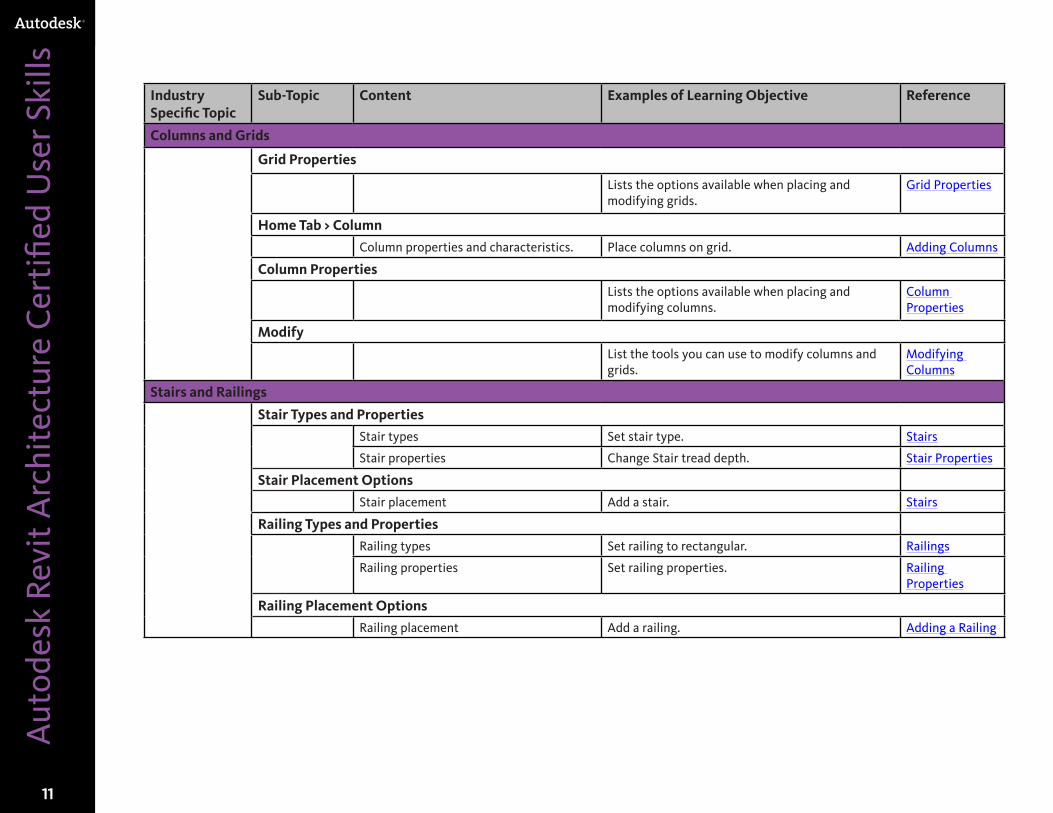
Industry Specific Topic
Sub-Topic Content Examples of Learning Objective Reference
Columns and Grids
Grid Properties
Lists the options available when placing and modifying grids.
Grid Properties
Home Tab > ColumnColumn properties and characteristics. Place columns on grid. Adding Columns
Column Properties
Lists the options available when placing and modifying columns.
Column Properties
ModifyList the tools you can use to modify columns and grids.
Modifying Columns
Stairs and Railings
Stair Types and PropertiesStair types Set stair type. Stairs
Stair properties Change Stair tread depth. Stair Properties
Stair Placement OptionsStair placement Add a stair. Stairs
Railing Types and PropertiesRailing types Set railing to rectangular. Railings
Railing properties Set railing properties. Railing Properties
Railing Placement OptionsRailing placement Add a railing. Adding a Railing

12
Aut
odes
k Re
vit A
rchi
tect
ure
Cer
tifie
d U
ser S
kills
12
Industry Specific Topic
Sub-Topic Content Examples of Learning Objective Reference
Roofs and Floors
Roof Types and PropertiesRoof by foot print, extrusion, face Create a roof. Creating a Roof
Roof properties Roof Properties
Roof ElementsFascia, Soffit, Gutter Adding
Elements to Roofs
Floors Types and PropertiesSloped and tapered Set the floor type. Create a floor. Floors
Sketching Geometry
Lines, Arcs, Polygons, Rectangles Sketch geometry and profiles using all sketching tools.
Sketching
Fillet, TrimFillet Fillet Objects. Fillet
Trim Trim objects. Trim
SnapsSnaps, Tab Cycle, Short cuts Describe the benefits of using snaps Snaps
List the short cuts to toggle osnap on and off Object Snaps and Snap Shortcut Keys

13
Aut
odes
k Re
vit A
rchi
tect
ure
Cer
tifie
d U
ser S
kills
13
Industry Specific Topic
Sub-Topic Content Examples of Learning Objective Reference
Annotations
TextAdd text Add Model text to a Floor plan Adding Text
Notes
DimensionsAdd dimensions Add dimension to give floor plan. Label given wall
sectionDimensions
Add spot elevation Add spot slope to roof on given plan. Spot Elevations
TagsAdd tags Add schedule tags Add Tags
Apply tags to untagged elements in one operation
Tag untagged elements in given floor plan. Tag All Not Tagged
Schedules
Schedule TypesDoor Create door schedule Schedules
Window Create window schedule
Room Create room schedule
LegendsAdd Legend Components Add schedule tags Legends
KeynotesAdd keynotes Add keynotes. Keynotes
Construction Document Sets
Sheet Set upTitle sheet Create title sheet with sheet list. Title Sheet
PrintingView/Sheet Sets Create view/sheet sets for printing View and Sheet
Sets
Print in scale. Print with percentage Print
RenderingRendering
Interior - Lights Place generic lights Lights
Exterior - Setup Set solar angle Solar Studies

14
Aut
odes
k Re
vit A
rchi
tect
ure
Cer
tifie
d U
ser S
kills
14
Acknowledgements
Production design/layout:Diane Erlich
Editorial services:Jessica Bendy
Additional editorial services:Diane Erlich
Primary authors:Phil Dollan
Producer:Linda Sellheim
© 2011 Autodesk®. All rights reserved.
No part of this publication may be edited or reproduced in any form or by any means, electronic or mechanical, without permission in writing from the publisher.
Notices Knowledge and best practice in this field are constantly changing. As new research and experience broaden our understanding, changes in research methods, professional practices, or medical treatment may become necessary.
Practitioners and researchers must always rely on their own experience and knowledge in evaluating and using any information, methods, compounds, or experiments described herein. In using such information or methods they should be mindful of their own safety and the safety of others, including parties for whom they have a professional responsibility.
To the fullest extent of the law, neither the Publisher nor the authors, contributors, or editors, assume any liability for any injury and/or damage to persons or property as a matter of products liability, negligence or otherwise, or from any use or operation of any methods, products, instructions, or ideas contained in the material herein.

Aut
odes
k Re
vit A
rchi
tect
ure
Cer
tifie
d U
ser S
kills
Building design by ONL [Oosterhuis_Lénárd]


