
BodyTrain BPM MOTORIZED TREADMILL
Manual
Please read these instructions carefully and retain for future use
To reduce risk of injury, the user must read and understand the instruction manual before using the Bodytrain
BPM.
This machine is intended for domestic, indoor use only in accordance with the instructions provided in this
manual.
Imported & Supplied by RCD Retail LTD , Building 4 Cursley Distribution Park, Curslow Lane, Shenstone,
Kidderminster DY10 4DX
01562 519 997

1
Please study the following instructions carefully before use paying special attention to the following
guidelines.
For your safety and the safety of others
the following safeguards are very important.
Failure to read and follow these instructions may lead to serious injury.
We always recommend that you talk to your Doctor before embarking on any
new exercise regime if you have had any recent surgery, are pregnant, if you have an injury or if you have concerns about your health
or levels of fitness that you think additional exercise may aggravate.
Always discontinue exercising if you experience dizziness or shortness of breath. Talk your Doctor before resuming exercising if you experienced nausea, pain or
other acute abnormal symptoms, or are simply concerned about continuing.

2
IMPORTANT SAFETY INSTRUCTIONS
Basic precautions, including the following important safety instructions should always be followed when
using this treadmill. Read all instructions before using this treadmill.
DANGER: To reduce the risk of electric shock, always unplug the treadmill from the electrical outlet
immediately after using and before cleaning, assembling, or servicing the treadmill.
Failure to follow these instructions may lead to personal injury and cause damage to the treadmill.
WARNING: To reduce the risk of burns, fire, electric shock or injury to any
persons, please read the following:
Never leave the treadmill unattended while plugged in. Disconnect by turning off the master power
switch and unplugging from wall outlet when not in use and before putting on or taking off parts.
Use this appliance only for its intended use as described in this manual. Do not use attachments
not recommended by the manufacturer.
Never operate this treadmill if it has a damaged cord or plug, or if it is not working properly. If it
has been dropped or damaged, or been exposed to water, return the appliance to a service
center for examination and repair.
Do not attempt any maintenance or adjustments other than those described in this manual.
Should any problems arise, discontinue use and consult an Authorised Service Representative.
Never operate the appliance with the air openings blocked. Keep the air openings free of lint,
hair, and other obstructions.
Do not use the treadmill outdoors.
Do not pull the treadmill by its power cord or use the cord as a handle.
Keep children and pets away from the equipment while in use.
Elderly or disabled users should only use this treadmill in the presence of an adult who can
provide assistance if required.
Do not operate where aerosol (spray) products are being used or where oxygen is being
administered.
Keep dry - do not operate in a wet or moist condition.
The motor cover can become hot while the treadmill is in use. Do not place the treadmill on a
blanket or other flammable surface as this can create a fire hazard.
Keep electrical cord away from heated surfaces.
Keep the treadmill on a solid, level surface with a minimum safety area clearance of two meters
around the treadmill. Be sure the area around the treadmill remains clear of any obstructions
during use.
This treadmill is for domestic household use only.
Only one person should use the treadmill at a time.
Wear comfortable and suitable clothing when using the treadmill. Do not use the treadmill
barefoot or in socks. Always wear appropriate, enclosed athletic footwear. Never wear loose or
baggy clothing as it can become caught on the treadmill and create an entrapment hazard.

3
Always hold on to the handrails while using the treadmill.
Always make sure the foot lock latch tube is in place when folding and moving the treadmill.
Do not leave children who are under 12 years-old unsupervised near or on the treadmill.
To disconnect, turn all controls to the off position, then remove plug from the wall outlet.
This appliance is not intended for use by persons (including children) with reduced physical, sensory
or mental capabilities, or lack of experience and knowledge, unless they have been given supervision
or instruction concerning use of the appliance by a person responsible for their safety.
Children should not be allowed to play on or near the treadmill at any time.
CAUTION - RISK OF INJURY TO PERSONS - To avoid injury, use extreme caution when stepping onto
or off of a moving treadmill belt. Carefully read this instruction manual before use.
Maximum Weight Capacity is 100 kgs.
Pull out the Safety Tether Key for emergency stop.
This unit must be plugged into a nominal 220 volt 50/60 Hz outlet which has been grounded.
Keep hands clear of all moving parts. Never place hands or feet under the treadmill while in use.
Do not use the treadmill on a carpet that is greater than 1.3 cm in height.
Before using the treadmill, check that the belt is aligned and centered on the running deck and all
visible fasteners on the treadmill are sufficiently tightened and secure.
This appliance can be used by children aged from 8 years and above and persons with reduced
physical, sensory or mental capabilities or lack of experience and knowledge if they have been
given supervision or instruction concerning use of the appliance in a safe way and understand the
hazards involved.
Children shall not play with the appliance.
Cleaning and user maintenance shall not be made by children without supervision.
If the supply cord is damaged, it must be replaced by the manufacturer, its service agent or
similarly qualified persons persons in order to avoid a hazard.
Never operate this treadmill if it is in the folded position.
Allow the running belt to fully stop and unplug the power cord from the wall outlet before
folding up the treadmill.
Always face towards the computer console and do not run backwards on the running belt.
WARNING: Before beginning any exercise program consult your physician.
This is especially important for people who are over 35 years old or who have
pre-existing health problems. Read all instructions before using any fitness equipment. Do not operate
this exercise equipment without properly fitted guards, as the moving parts can present a risk of
serious injury if exposed.
CAUTION: Read all instructions carefully before operating this product. Retain this Owner’s Manual for
future reference.

4
GENERAL SAFETY INSTRUCTIONS
Do not use attachments that have not been recommended by the manufacturer. • Never operate the treadmill if it is not working properly, or if it has been damaged.
Contact the authorized dealers for examination and repair.
• Keep hands and feet clear at all times from moving parts to avoid injury.
Never turn the running belt by hand.
• Do not dismount the treadmill until the belt is at a complete STOP. • Do not insert any object, hands or feet into any openings, or expose hands, arms
or feet to the drive mechanism or other potentially moving part of the treadmill
or into the motor cover.
• Users should ensure they can adequately reach the handlebars once the machine has
been adjusted in accordance with the instructions contained in this manual.
• If at any time you feel dizzy or have difficulty breathing, gradually stop the
treadmill and carefully dismount the treadmill.
• Stay hydrated. Drink water throughout your ride as needed. • Do not attempt to run on the treadmill until you have practiced running
and jogging at slower speeds.
UNPACKING
• To avoid danger of suffocation, please keep all plastic bags out of the reach of children
• Check that there is no damage to the unit prior to use. In case of visible damage before
or during use, stop using the treadmill and call our Customer Service number
01562 519 997 with any issues. Do not attempt to use the treadmill.
• The treadmill is designed for home use only and is not intended for commercial
use. Please do not use outdoors.
• Please retain all packaging and paperwork for future use and store safely away from
children and animals.
WARNING: Care must be taken when lifting the treadmill as it may be heavy for you to lift. You may need a friend or family member to help you unpack, assemble and position the unit.

5
HARDWARE LIST
HARDWARE LIST
Knob ( to fold and unfold) 1PC
Allen Wrench
1PC
Locking Nut
1PC
Safety Key
1PC

6
ASSEMBLY INSTRUCTIONS
Step 1
Remove the treadmill from the shipping carton and place it on a level flat surface. Please always use the
aid of a second person when removing the treadmill from the shipping carton.
Pull out the Spring Knob and then carefully lower the main frame to the ground.
Tighten the Knob by turning it in a clockwise direction into the holes on the base frame and main
frame.
Step 2
Turn the Computer Console up or down to align the computer knob hole. Lock the Computer Console
in place by tightening the Computer Knob in a clockwise direction.

7
LIFTING UP THE TREADMILL
Remove the Knob from the lower end of the base frame.
Lift the rear end of the main frame up in the vertical position and then turn the Spring Knob in a
counterclockwise direction until it can be pulled out. Pull out the Spring Knob and then align spring knob
hole. Lock the main frame in place by releasing the Spring Knob until the Spring Knob "pops" down into the
hole on the main frame. For added safety, tighten the Spring Knob in a clockwise direction.
Place the Knob into the hole on the base frame.
Store the treadmill in a clean and dry environment away from children.
CAUTION: Failure to secure the main frame with the Spring Knob may cause the treadmill accidental fall
and cause bodily injury.

8
OPERATING THE COMPUTER
Flip the Master Power Switch that is located at the front of the treadmill to
the ON position. Before beginning a workout session ensure that the Safety
Tether Key is properly placed onto the Computer Console and the Safety Clip
is securely attached to an article of your clothing.
NOTE: Always stand on the side rails when you start the treadmill, never start the treadmill while you
are standing on the running belt.
FUNCTION BUTTONS:
:
Press this button to turn your computer console on and off.
MODE:
Press the MODE button to select training TIME for target pre-setting in STOP mode before
training.Press the MODE button to select PROGRAM mode (P0- Manual Program, P1-P3 Pre-
Set Programs) in STOP mode before training.
Press and hold the MODE button for 3 seconds to reset the all data values to zero and the PROGRAM to
P0 (Manual Program).Press the MODE button to select each function of the computer during training.
SPEED∧ (SPEED UP):
Press the SPEED∧ button to select desired PROGRAM mode (P0-Manual Program, P1-P3 Pre-Set
Programs) in STOP mode before training. Press the SPEED∧ button to make upward adjustments
for pre-setting target training time in
PROGRAM mode before training.The speed range is from 1.0 KPH to 6.0 KPH.
SPEED∨ (SPEED DOWN):
Press the SPEED∨ button to select desired PROGRAM mode (P0-Manual
Program, P1-P3 Pre-Set Programs) in STOP mode before training. Press the SPEED∨ button to
make backward adjustments for pre-setting target training time in PROGRAM mode before
training.The speed range is from 1.0 KPH to 6.0 KPH.
DISPLAY FUNCTIONS:
Scan:
During your workout, press the MODE button until the Scan indicator LED lights up, the computer will
automatically scan each function in sequence with change every 5 seconds.
Speed:
During your workout, press the MODE button until the Speed indicator LED lights up, the computer will
display the current running speed .
Dist. (Distance):
During your workout, press the MODE button until the Dist. indicator LED lights up, the computer
will display the cumulative distance travelled.

9
Time:
During your workout, press the MODE button until the Time indicator LED lights up, the computer
will display the count down elapsed workout time in minutes and seconds.
Cal. (Calories):
During your workout, press the MODE button until the Cal. indicator LED lights up, the computer
will display the approximate amount of calories burned.
Pulse:
During your workout, press the MODE button until the Pulse indicator LED lights up, the computer will
display your current heart rate in beats per minute (BPM). To activate, grip the hand pulse sensors on
the handlebar and the pulse will display after 2-5 seconds.For a more accurate reading, grip pulse
sensors with both hands.
TRAINING IN P0 (MANUAL PROGRAM) MODE:
You may press the MODE button to select PROGRAM mode (P0-Manual Program,
P1-P3 Pre-Set Programs) in STOP mode before training. Next, press the SPEED∧ or SPEED∨button to
select P0 (Manual Program). Then press the MODE button until
the Time indicator LED lights up and the computer screen begins blinking for target time pre-setting. Press the SPEED∧ or SPEED∨ button on the computer console to
change the setting. Each increment is 10 minute. The pre-set target time range is from 10:00 to 30:00
minutes. Once you pre-set target time, press the button on the computer to begin exercising. The
running belt starts moving with an initial speed of
1.0 KPM. You may press the SPEED∧ or SPEED∨ button on the computer console
to increase or decrease the running speed during exercise. Time starts counting down from pre-set
target time to 0:00 per 1 second backward. When the pre-set target time counts down to 0:00, the
computer will beep to alert you and the treadmill will stop automatically.
TRAINING IN P1-P3 (PRE-SET PROGRAMS) MODE:
The computer offers 3 pre-set programs (P1-P3). You may press the MODE button to select PROGRAM
mode (P0-Manual Program, P1-P3 Pre-Set Programs) in STOP mode before training. Next, press the
SPEED∧ or SPEED∨ button to select one of the pre- set programs (P1-P3). Then press the MODE button
until the Time indicator LED lights up and the computer screen begins blinking for target time pre-
setting. Press the SPEED or SPEED∨ button on the computer console to change the setting. Each
increment is 10 minute. The pre-set target time range is from 10:00 to 30:00 minutes.
Once you pre-set target time, press the button on the computer to begin exercising. The running
speed will change automatically during the workout. The program is split evenly into 10 intervals.
You may press the SPEED∧ or SPEED∨ button on the computer console to increase or decrease the
running speed during exercise. When the pre-set training program time counts down to 0:00, the
computer will beep to alert you and the treadmill will stop automatically.

10
CARE, MAINTENANCE & TROUBLESHOOTING GUIDE
WARNING: To prevent electrical shock, please turn off and unplug the treadmill before cleaning or
performing routine maintenance.
WARNING: Always check the wear and tear components like foot lock latch tube and running belt to
prevent injury.
CLEANING
After each exercise, ensure that the unit is wiped down and any sweat is removed from the unit.
The treadmill can be cleaned with a soft cloth and mild detergent. Do not use abrasives or solvents. Be
careful not to get excessive moisture on the display panel as this might damage the unit and create an
electrical hazard.
Please keep the treadmill, especially the computer console, out of direct sunlight to prevent
damage to the screen.
STORAGE
Store the treadmill in a clean and dry indoor environment. Never leave or use the unit outdoors. Ensure the
master power switch is off and the power cord is un-plugged from wall outlet.
TROUBLESHOOTING GUIDE
Problem Potential Causes Corrections
Treadmill will not
start.
1. Treadmill not plugged in.
2. Safety Tether Key is not
correctly installed.
3. Circuit breaker in the house
has been tripped.
4. Treadmill circuit breaker has
been tripped.
1. Plug the power cord into a wall
outlet.
2. Reinstall the Safety Tether Key.
3. Reset the circuit breaker, or call an
electrician to replace the circuit
breaker.
4. Wait 5 minutes and then try to
restart the treadmill.
Belt slips. Belt not tight enough. Adjust belt tension.
Belt hesitates when
stepped on.
1. Not enough lubrication
applied onto the running
deck.
2. Belt is too tight.
1. Apply lubricant.
2. Adjust belt tension.
Belt is not centred. Running belt tension not even
across the rear roller.
Centre the belt.

11
BELT ADJUSTMENT
The running belt is pre-adjusted to the running deck at the factory, but after prolonged use it can stretch
and require readjustment. To adjust the belt, turn on the main power switch of the treadmill and let the
belt run at a speed of 5-6 KPH. Use the Allen Wrench provided to turn the rear roller adjustment bolts in
order to centre the belt. If the running belt is shifting to the left, turn the left adjustment bolt 1/4 turn
clockwise, and the running belt should start to correct itself.
Tool:
Allen Wrench
If the running belt is shifting to the right, then turn the right adjustment bolt 1/4 turn clockwise, and the belt
should start to correct itself. Keep turning the adjustment bolts until the running belt is properly centered.
Tool:
Allen Wrench
If the running belt is slipping during use, turn off and unplug the treadmill. Using the Allen Wrench
provided, turn both left and right rear roller adjustment bolts 1/4 turn clockwise, then turn the main
power switch back on and run the treadmill at a speed of 5-6 KPH. Run on to the running belt to
determine if the belt is still slipping. Repeat this procedure until the belt no longer slips.
Tool:
Allen Wrench

12
LUBRICATION
Lubricating under the running belt will ensure superior performance and extend its life expectancy.
After the first 25 hours of use (or 2-3 months) apply some lubricant, and repeat for every following
50 hours of use (or 5-8 months).
How to check running belt for proper lubrication
Lift one side of the running belt and feel the top surface of the running deck. If the
surface is slick to the touch, then no further lubrication is required.
If the surface is dry to the touch, apply some lubricant.
How to apply lubricant
Lift one side of running belt.
Pour some lubricant under the centre of the running belt on the top surface of the running deck.
Run on the treadmill at a slow speed for 3 to 5 minutes to evenly distribute lubricant. NOTE: DO NOT over
lubricate running deck. Any excess lubricant that comes out should be wiped off.
Lubricant
1 PC
EMERGENCY STOP
Before beginning a workout session ensure that the Safety Tether Key is properly placed onto the
Computer Console and the Safety Clip is securely attached to an article of your clothing. If you fall the clip
will pull out the SAFETY TETHER KEY from the Computer Console and the running belt will stop
immediately for emergency stop, helping to prevent injury.
Replaced the Safety Tether Key onto the Computer Console. Press the START button to begin exercise
again.
13
WARM UP AND COOL DOWN ROUTINE
The WARM-UP is an important part of any workout. The purpose of warming up is to prepare your body
for exercise and to minimize injuries. Warm up for two to five minutes before aerobic exercising. It should
begin every session to prepare your body for more strenuous exercise by heating up and stretching your
muscles, increasing your circulation and pulse rate, and delivering more oxygen to your muscles.
COOL DOWN at the end of your workout, repeat these exercises to reduce soreness in tired muscles. The
purpose of cooling down is to return the body to its resting state at the end of each exercise session. A
proper cool-down slowly lowers your heart rate and allows blood to return to the heart.
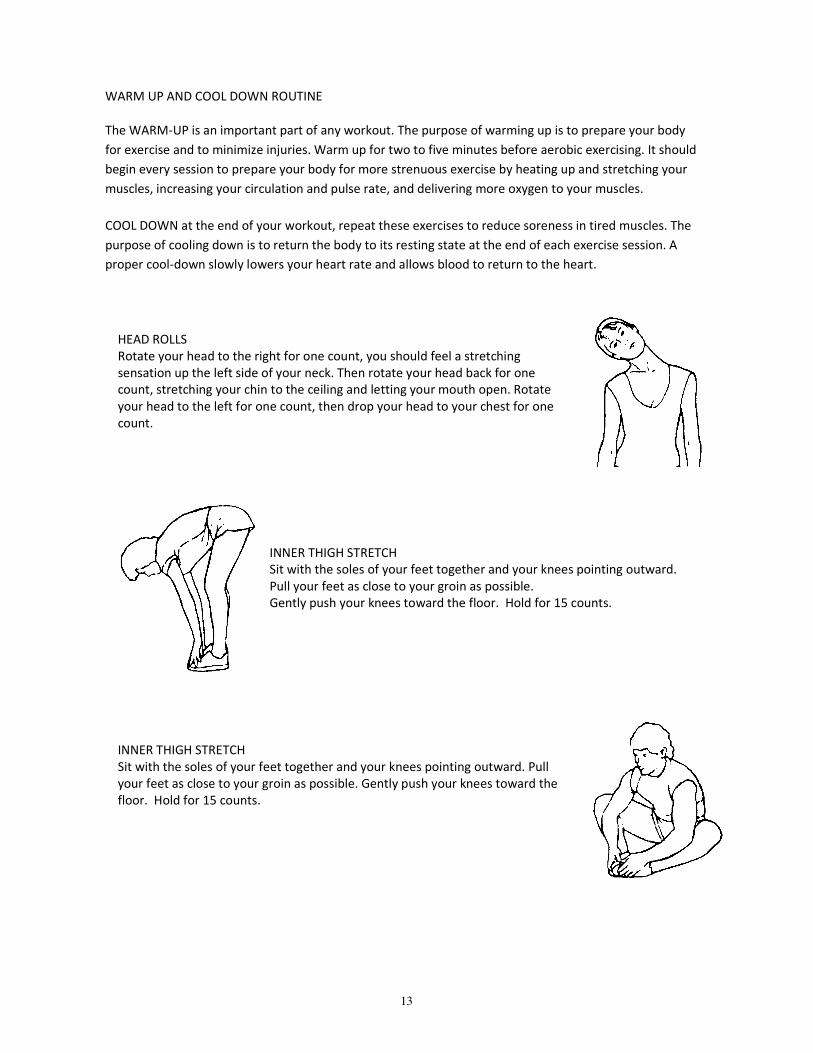
HEAD ROLLS
Rotate your head to the right for one count, you should feel a stretching
sensation up the left side of your neck. Then rotate your head back for one
count, stretching your chin to the ceiling and letting your mouth open. Rotate
your head to the left for one count, then drop your head to your chest for one
count.
INNER THIGH STRETCH
Sit with the soles of your feet together and your knees pointing outward.
Pull your feet as close to your groin as possible.
Gently push your knees toward the floor. Hold for 15 counts.
INNER THIGH STRETCH
Sit with the soles of your feet together and your knees pointing outward. Pull
your feet as close to your groin as possible. Gently push your knees toward the
floor. Hold for 15 counts.

14
Disposal of Old Electrical & Electronic Equipment
Disposal of Old Electrical & Electronic Equipment
(Applicable in the European Union and other European countries with separate collection systems)
Guarantee
This product is guaranteed for a period of 1 year from date of purchase against mechanical and electrical defects.
Guarantee is only valid if the appliance is used solely for domestic purposes in accordance with the
instructions provided, is not connected to an unsuitable power supply. Unauthorised attempts to repair, and
misuse, are not covered by this guarantee.
Under the guarantee we undertake to repair or replace the unit free of charge for the guarantee period.
STORAGE & CLEANING Clean the Bodytrain BPM with a damp cloth and mild detergent only.
Regularly check the treadmill for damage before storing. Should you need to store your treadmill it is advisable to seek help with moving it.
Store on its feet at all times Wipe down after every use with a
damp cloth from warm soapy water.
SPECIFICATIONS Model No.: Bodytrain BPM
Max User Weight: 100kg
Running Area:1000 x 340 mm
Power: 500W Speed: 1.0 - 6Km/H Gross Weight:24Kg Net Weight:27Kg Built Dimentions:120 x 60 x 122cm Folded Dimentions:125 x 60x 32 cm Boxed Dimentions:133 x 65 x 28cm
Made in China
Appliances bearing the symbol shown here may not be disposed of in domestic rubbish. You are required to dispose of old electrical and electronic
appliances like this separately.
Please visit www.recycle-more.co.uk or www.recyclenow.co.uk for access to information about the recycling of electrical items. Please visit
www.weeeireland.ie for access to information about the recycling of electrical items purchased in Ireland.
The WEEE directive, introduced in August 2006, states that all electrical items must be recycled, rather than taken to landfill.
Please arrange to take this appliance to your local Civic Amenity site for recycling, once it has reached the end of its life.
Please arrange to take this appliance to your local Civic Amenity site for recycling, once it has reached the end of its life.

15
For product support contact RCD Retail LTD on 01562 519 997


