
Business Online User Guide
Managing Business Online Using Mission Control

Telstra Business Online
29/03/2007 Business Online User Guide 2
Telstra Corporation Limited, Melbourne, 2004 All rights reserved. No part of this publication may be reprinted, reproduced, stored in a retrieval system or transmitted, in any form or by any means, without the prior permission in writing from the owners. Unless otherwise expressly agreed in writing, the information contained in this manual is subject to change without notice and Telstra Corporation Limited assumes no responsibility for any alteration to, or any error or other deficiency in, this document. Windows, Microsoft Exchange, Exchange 2000, Microsoft Outlook are trademarks of Microsoft Corporation Product or company names are trademarks or registered trademarks of their respective holders. Telstra Corporation Limited, Melbourne, ACN 051 775 556, ABN 33 051 775 556 R7

Telstra Business Online
29/03/2007 Business Online User Guide 3
Business Online User Guide
Table of Contents
About this Guide ...................................................................................................................... 7
Who this Guide Is For ....................................................................................................... 7 What’s In This Guide ........................................................................................................ 7 Syntax used in this Guide ................................................................................................ 8
Getting Started 9 Mission Control Access ............................................................................................................ 9
Requirements................................................................................................................... 9 Accessing Mission Control ............................................................................................... 9 Logging On ...................................................................................................................... 9
The Mission Control Screen ................................................................................................... 10 The Mission Control Screen ........................................................................................... 10
The Main Menu...................................................................................................................... 11 The Main Menu.............................................................................................................. 11
The Business Online Screen ................................................................................................... 12 The Business Online Screens.......................................................................................... 12 Business Online Functions ............................................................................................. 12 ColdFusion. Requesting technical support to move to a web server that supports ColdFusion. .................................................................................................................... 13
Website Builder 14 Introduction................................................................................................................... 14 Activating Website Builder ............................................................................................ 14 .NET 2.0 Activation ........................................................................................................ 14 Activating Website Builder ............................................................................................ 15 Setting Email Response Details for eCommerce users................................................... 15 Logging in to activated Website Builder........................................................................ 16 Using Website Builder.................................................................................................... 16 Navigating through Website Builder ............................................................................. 17 1. Start ........................................................................................................................... 18 2. Design ........................................................................................................................ 18 3. Pages.......................................................................................................................... 19
Web Server Setup 23 Introduction................................................................................................................... 23 Uploading Existing Websites ......................................................................................... 23 Web Server Setup........................................................................................................... 24 Start Page Settings ........................................................................................................ 24 FrontPage Status & SSL Secure Web Pages.................................................................... 25 Active Server Pages........................................................................................................ 25 CGI ................................................................................................................................. 25 PHP ................................................................................................................................ 26 .NET ............................................................................................................................... 26
Domain Name Configuration 27 Domain Name Configuration ........................................................................................ 27 Introduction................................................................................................................... 27 Domain Name Configuration Screen............................................................................. 27 Change Domain Setup Screen ....................................................................................... 28
(continued)

Telstra Business Online
29/03/2007 Business Online User Guide 4
Security 30 Security Screen Introduction......................................................................................... 30 Token Configuration...................................................................................................... 31 What is a Token?............................................................................................................ 32 New Tokens ................................................................................................................... 34 Applying a token to a FrontPage sub-web .................................................................... 35 Auto Tokens................................................................................................................... 39 How to set up Auto Tokens ............................................................................................ 39 Configuring Auto Tokens ............................................................................................... 41 Additional information for Auto Token subscribers ...................................................... 43 Email Messages for Auto Tokens ................................................................................... 44 Notify Admin Message .................................................................................................. 45 User Welcome Message ................................................................................................. 46 User Approved Message ................................................................................................ 46 User Cancelled Message ................................................................................................ 47 Forgotten Password Message........................................................................................ 47 Private FTP Setup........................................................................................................... 48 Private WWW Setup....................................................................................................... 50
Web Site Statistics 52 Web Site Statistics Introduction .................................................................................... 52 Website Statistics Screen............................................................................................... 52
Site Shop 53 Site Shop Introduction................................................................................................... 53 Site Shop View............................................................................................................... 55 Store Admin Setup Request .......................................................................................... 56 Store Admin Setup Request .......................................................................................... 56
Database Products 58 Database Products Introduction.................................................................................... 58 Cold Fusion .................................................................................................................... 59
Business Online POP Mailboxes 60 Business Online POP Mailbox Feature ........................................................................... 60 Business Online POP Mailbox Setup .............................................................................. 60
Additional Features for Business Online 61 Additional Features Introduction .................................................................................. 61 Job System Emails......................................................................................................... 61

Telstra Business Online
29/03/2007 Business Online User Guide 5
Figures
Figure 1 Mission Control URL.............................................................................................................................9 Figure 2 Logging on to Mission Control ...........................................................................................................9 Figure 3 Mission Control Screen......................................................................................................................10 Figure 4 Main Menu..........................................................................................................................................11 Figure 5 Selecting the Business Online Screens............................................................................................11 Figure 6 Business Online Screen......................................................................................................................13 Figure 7 Database Products and Cold Fusion ...............................................................................................13 Figure 8 Activating Website Builder................................................................................................................13 Figure 9 .NET Activation...................................................................................................................................14 Figure 10 Website Builder Screen....................................................................................................................15 Figure 11 Website Builder Activated...............................................................................................................15 Figure 12 Website Feedback Section ..............................................................................................................16 Figure 13 Website Builder Help Link................................................................................................................16 Figure 14 Login to Website Builder .................................................................................................................16 Figure 15 Website Builder Opening Screen....................................................................................................17 Figure 16 Website Builder Navigation ............................................................................................................17 Figure 17 Website Builder Start .......................................................................................................................18 Figure 18 Website Builder Design Screen.......................................................................................................19 Figure 19 Website Builder Page Design Screen.............................................................................................20 Figure 20 Changing Page Positions ................................................................................................................20 Figure 21 Website Builder Editing Tools ........................................................................................................21 Figure 22 Website Builder Publish Screen......................................................................................................22 Figure 23 Web Server Setup Tile .....................................................................................................................23 Figure 24 Uploading Instructions Screen ......................................................................................................25 Figure 25 Web Server Setup Screen ...............................................................................................................26 Figure 26 Start Page Settings .........................................................................................................................22 Figure 27 FrontPage and SSL Secure Web Pages .........................................................................................23 Figure 28 Active Server Pages .........................................................................................................................23 Figure 29 CGI Settings ......................................................................................................................................24 Figure 30 PHP Settings .....................................................................................................................................24 Figure 31 .NET Access .......................................................................................................................................24 Figure 32 Domain Name Configuration Tile .................................................................................................25 Figure 33 Domain Name Configuration Main Menu ...................................................................................25 Figure 34 Domain Name Configuration Screen ..........................................................................................26 Figure 35 Domain Name Configuration Settings ........................................................................................27 Figure 36 Security Tile .....................................................................................................................................28 Figure 37 Security Main Menu ........................................................................................................................28 Figure 38 Security Screen.................................................................................................................................29 Figure 39 Token Configuration Tile ................................................................................................................31 Figure 40 Token Configuration Screen...........................................................................................................32 Figure 41 Token Member List ..........................................................................................................................33 Figure 42 Token Summary Page.....................................................................................................................33 Figure 43 Token Approvals Screen..................................................................................................................34 Figure 44 Adding a new Token........................................................................................................................35 Figure 45 Token Instruction.............................................................................................................................36 Figure 46 Sub Web Name.................................................................................................................................36 Figure 47 Security Tokens in Front Page .......................................................................................................37 Figure 48 Unique Permissions .........................................................................................................................37 Figure 49 “Only Registered Users”..................................................................................................................37 Figure 50 Adding Users .....................................................................................................................................38 Figure 51 Access the Website...........................................................................................................................39 Figure 52 Token Fields ......................................................................................................................................40 Figure 53 Auto Token ‘Key’ Feature................................................................................................................41 Figure 54 Auto Token Approvals .....................................................................................................................42 Figure 55 New User Joins Token .....................................................................................................................42 Figure 56 User Removed...................................................................................................................................43 Figure 57 Forgotten Password – Save Button...............................................................................................43
(continued)
Telstra Business Online
29/03/2007 Business Online User Guide 6
Figure 58 System Capture Fields and Additional Capture Fields................................................................44 Figure 59 Token Email Messages ....................................................................................................................45 Figure 60 Admin Notification Messages ........................................................................................................45 Figure 61 User Welcome Message ..................................................................................................................46 Figure 62 User Approved Message..................................................................................................................46 Figure 63 User Cancel Message.......................................................................................................................47 Figure 64 Forgotten Password Message........................................................................................................47 Figure 65 Private FTP Setup Tile......................................................................................................................48 Figure 66 Private FTP Setup Categories .........................................................................................................50 Figure 67 Private WWW Setup Tile..................................................................................................................50 Figure 68 Private Web Pages............................................................................................................................51 Figure 69 Web Site Statistics Tile ....................................................................................................................52 Figure 70 Web Site Statistics Main Menu ......................................................................................................52 Figure 71 Web Site Statistics Screen...............................................................................................................52 Figure 72 Site Shop Tile ....................................................................................................................................53 Figure 73 Site Shop Main Menu ......................................................................................................................53 Figure 74 Site Shop............................................................................................................................................54 Figure 75 Further Information Prompts.........................................................................................................55 Figure 76 Current Site Shop Services ..............................................................................................................55 Figure 77 Generic SIteShop Address ...............................................................................................................56 Figure 78 Store Admin Access..........................................................................................................................56 Figure 79 SiteShop Administration Console..................................................................................................56 Figure 80 Log a Job ...........................................................................................................................................57 Figure 81 Store Admin Setup Request............................................................................................................57 Figure 82 Database Products Main Menu .....................................................................................................58 Figure 83 Database Products Options............................................................................................................58 Figure 84 Database Products Activation Screen...........................................................................................59 Figure 85 POP Email Example..........................................................................................................................60 Figure 86 Job Request Acknowledgement ....................................................................................................62 Figure 87 Job Closure Notification..................................................................................................................62

Telstra Business Online
29/03/2007 Mission Control User Guide 7
About this Guide
Who this Guide Is For
This guide is for customers using Business Online to administer and manage website services. The guide assumes a basic knowledge of web and email terms and concepts.
What’s In This Guide
Getting Started describes the requirements for using Mission Control. This section contains details on how to log in to Mission Control. Further information on Mission Control is located in the Mission Control User Guide Business Online Screen describes the screens and functions you will see when using the Business Online tools to:
• Activate, create, publish and edit your Website and how to use them
• Setup and manage your Web Server Settings

Telstra Business Online
29/03/2007 Mission Control User Guide 8
Syntax used in this Guide
Throughout this guide, the following conventions are used: Boldface type is used to • emphasise words or phrases as appropriate • describe the names of screens, windows, dialog boxes, and controls (menus, buttons, checkboxes etc) within the description of the procedures in this guide.
Italic type is used for cross references (other sections, figures, tables) in this guide.

Telstra Business Online
29/03/2007 Mission Control User Guide 9
Getting Started
Mission Control Access
Requirements To access Mission Control, you will need a browser with functionality
equivalent or greater than that of Internet Explorer 4. You must have cookies enabled on your browser. You will need a Microsoft Outlook client to administer Distribution Lists and Public Folders.
Accessing Mission Control
Type the URL https://mc-au.server-secure.com/default.cfm into the address field of your browser:
Figure 1 Mission Control URL
Logging On • When prompted, enter your account number and password.
Figure 2 Logging on to Mission Control
• After authentication, Mission Control starts. By default, Mission Control opens at the Mission Control Screen (Figure 3).

Telstra Business Online
29/03/2007 Mission Control User Guide 10
The Mission Control Screen
The Mission Control Screen
The Mission Control Screen has six tiles with links to the following:
• Business Mail – to create, edit and manage POP, Standard and Advanced Mailboxes
• Business Online – create , edit and manage your website or upload an existing site
• Web Site Statistics – view statistics for visitors to your website
• Need Help – Access online help documents
• Job System – requesting a job from the technical support team
• System News – information and alerts on the system Figure 3 shows the default Mission Control Screen.
Figure 3 Mission Control Screen

Telstra Business Online
29/03/2007 Mission Control User Guide 11
The Main Menu
The Main Menu The Main Menu remains visible on
the left of the screen at all times when you are in Mission Control (Figure 4)
The Main Menu can be used to navigate around Mission Control.
Figure 4 Main Menu

Telstra Business Online
29/03/2007 Mission Control User Guide 12
The Business Online Screen
The Business Online Screens
To go to the Business Online screens, select Business Online on the Mission Control Home Page. This can be done from the Main Menu or by clicking the Business Online tile as shown in Figure 5
Figure 5 Selecting the Business Online Screens
Business Online Functions
From the Business Online screen you will be able to access all the functions required create and maintain your website. There are 6 most commonly used areas can be accessed from the tiles on the Business Online screen :
Website Builder. From this screen you can create a professional web site without any prior technical experience
Server Setup. Change Web Server Instructions or view uploading instructions.
Domain Name Configuration. Configure your Domain Name and DNS settings.
Security. Change security settings for your website accounts.
Website Statistics. Check statistics on who is visiting your site.
Site Shop. 8 step installation wizard to set up your online store
Business Online Tile
Main Menu
Telstra Business Online
29/03/2007 Mission Control User Guide 13
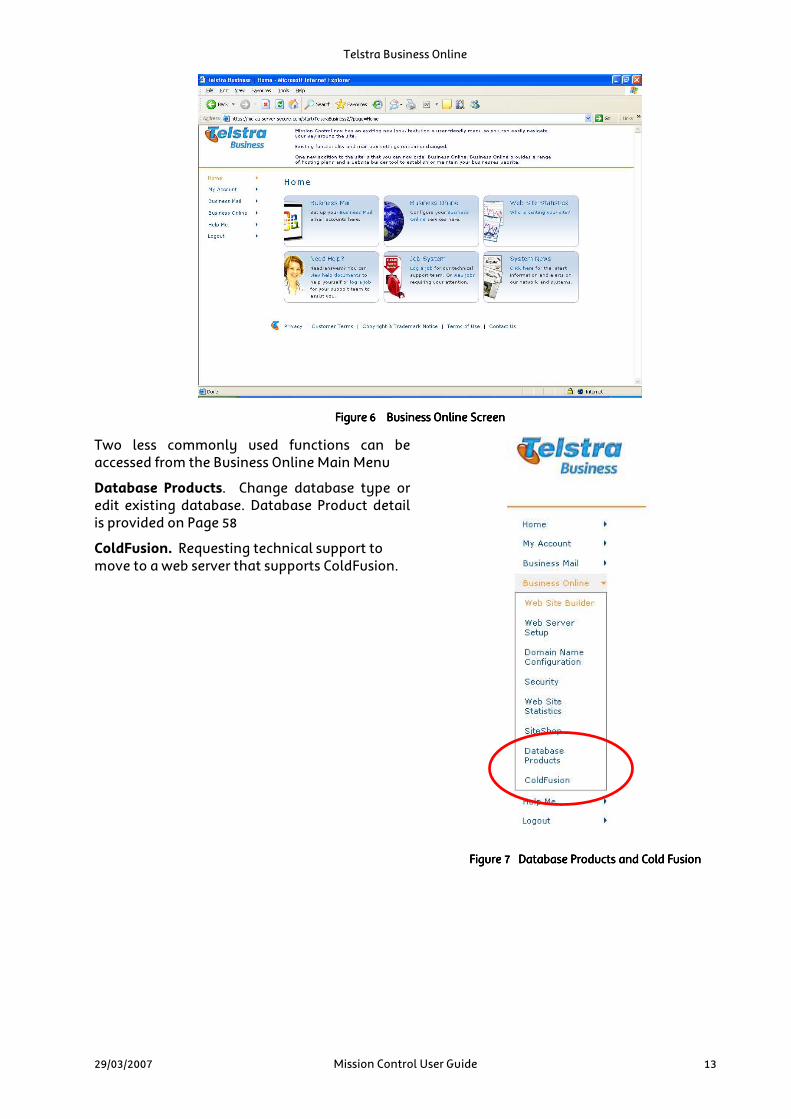
Figure 6 Business Online ScreenFigure 6 Business Online ScreenFigure 6 Business Online ScreenFigure 6 Business Online Screen
Two less commonly used functions can be accessed from the Business Online Main Menu
Database Products. Change database type or edit existing database. Database Product detail is provided on Page 58
ColdFusion. Requesting technical support to move to a web server that supports ColdFusion.
Figure 7 Database Products and Cold FusionFigure 7 Database Products and Cold FusionFigure 7 Database Products and Cold FusionFigure 7 Database Products and Cold Fusion

Telstra Business Online
29/03/2007 Mission Control User Guide 14
Website Builder
Introduction
The Website Builder function allows you to work through a number of steps to design, construct, edit and publish a website.
Activating Website Builder
Prior to activating Website Builder .NET 2.0 needs to be enabled. .NET 2.0 can be enabled by from the Web Site Builder screen as shown in the diagram below circled in red
Figure 8 Activating Website Builder
.NET 2.0 Activation
On the Webserver Setup Screen select install .NET 2.0 and then use the back button to return to Login to Website Builder Page
Figure 9 .NET Activation
Select install to activate .NET 2.0

Telstra Business Online
29/03/2007 Mission Control User Guide 15
Activating Website Builder
On the Website Builder Page select Activate Website Builder
Figure 10 Website Builder Screen
Note : If your Hosting Plan is 500Mb or larger you will have an option activate Website Builder eCommerce If your Hosting Plan is 200Mb or smaller you will only have one choice, Website Builder Standard After completing the Activation step you will see the following screen
Figure 11 Website Builder Activated
Setting Email Response Details for eCommerce users
If you are using Website Builder eCommerce you can create a system generated email for responses to customers who use the Feedback function on your website. On the Website Builder Page complete the Email Response details shown below
Activation Button
Telstra Business Online
29/03/2007 Mission Control User Guide 16
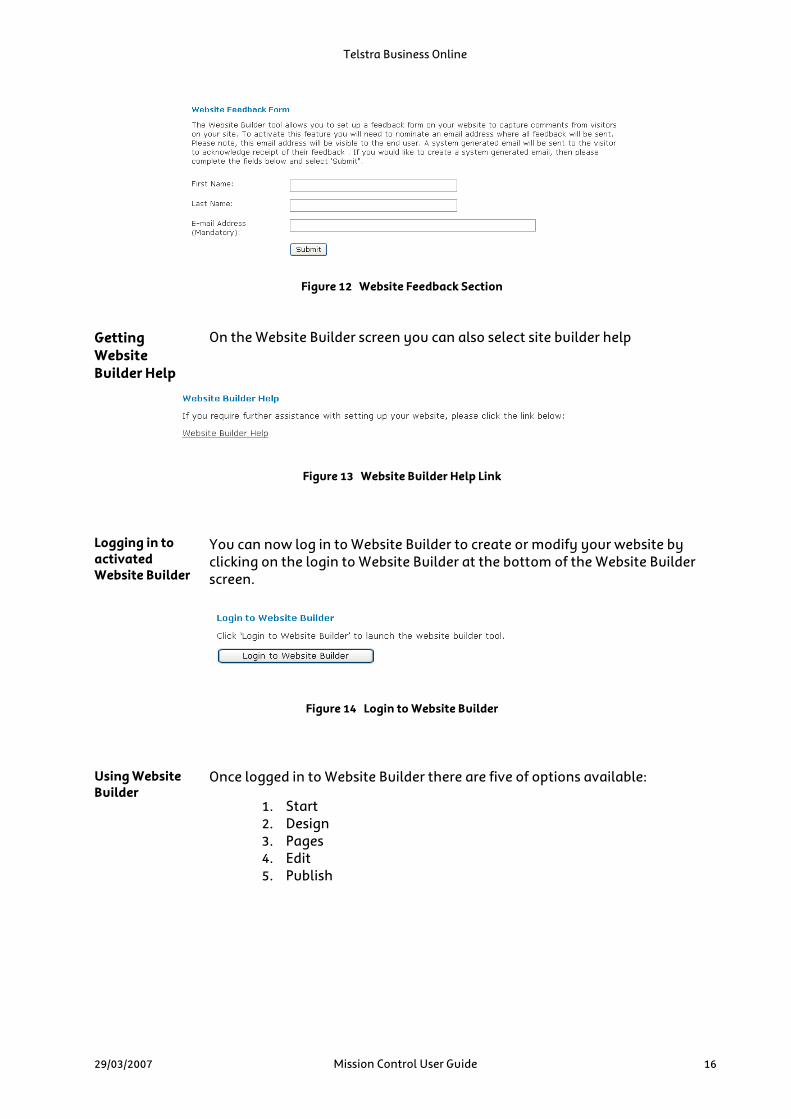
Figure 12 Website Feedback Section Getting Website Builder Help
On the Website Builder screen you can also select site builder help
Figure 13 Website Builder Help Link
Logging in to activated Website Builder
You can now log in to Website Builder to create or modify your website by clicking on the login to Website Builder at the bottom of the Website Builder screen.
Figure 14 Login to Website Builder
Using Website Builder
Once logged in to Website Builder there are five of options available:
1. Start 2. Design 3. Pages 4. Edit 5. Publish

Telstra Business Online
29/03/2007 Mission Control User Guide 17
Figure 15 Website Builder Opening Screen
Navigating through Website Builder
Once you have commenced using one of the five function pages you can move to a different function by clicking on any of the five steps on at the top of the page or by clicking next at the bottom of the screen. These are shown in the following diagram.
Figure 16 Website Builder Navigation

Telstra Business Online
29/03/2007 Mission Control User Guide 18
1. Start
When you select Start you will be asked to select the type of site you will create. If your Hosting Plan is 200Mb or smaller you will not be required to choose. Website Builder Standard will be the only option If your Hosting Plan is 500Mb or larger you will select from two options, Website Builder Standard or Website Builder eCommerce
Figure 17 Website Builder Start
2. Design
On the design screen select the web design template you would like to use There are 470 design templates in 37 different categories For each Design Template you can change the following:
• Colour Scheme • Headers • Buttons
On the design page you may also upload your company logo Note: The screen images you see may be different to the samples in this guide depending on the Template, Colour Scheme, Headers and Buttons you choose to use
Click on Next to go to the design page
OR
Select Design

Telstra Business Online
29/03/2007 Mission Control User Guide 19
Figure 18 Website Builder Design Screen
3. Pages
On the Pages screen select from the types of sites available There are 470 design templates in 37 different categories For each Design Template you can change the following:
• Colour Scheme • Headers • Buttons
On the design page you may also upload your company logo
470 Design Templates to choose from
Select the number of templates to display on your screen
Design Templates can be
viewed by category
Select Colour Scheme,
Headers and Buttons for
each template
Upload your logo and add company name
You can choose to preview at any time, go back to the previous page or select next to go to create and
edit page structure

Telstra Business Online
29/03/2007 Mission Control User Guide 20
Figure 19 Website Builder Page Design Screen
Figure 20 Changing Page Positions
Select from the Standard Pages you want on your site by clicking on the pages
you want
You can select from regional and language options
Select the site type Eg: Service Company
Add the selected pages from your site structure by using the
arrow
To remove pages from your site structure select them and use
the arrow
You can change the order of your pages by selecting the page you want to move and using the Page position buttons

Telstra Business Online
29/03/2007 Mission Control User Guide 21
4. Edit
You can now create and edit the content for each of the pages you have selected
Figure 21 Website Builder Editing Tools
5. Publish
After adding the content and editing as you require the final step is to Publish your website. Clicking on the publish button will publish your website to your Domain Name.
Select the page you want to
create or edit
Create or edit the text for your selected page
here
You can use these
functions to help edit and create your content

Telstra Business Online
29/03/2007 Mission Control User Guide 22
Figure 22 Website Builder Publish Screen

Telstra Business Online
29/03/2007 Mission Control User Guide 23
Web Server Setup
Introduction
On the Web Server Setup screen there are instructions on the following:
• How to Upload your Web Site
• View Start Page Settings
• Configure FrontPage Extensions Status
• Configure SSL Secure Web Pages
• Configure Active Server Pages
• Configure CGI
• Configure PHP
• Configure .NETsite The Web Server Setup screen can be accessed from the Mission Control Screen using the Web Server Setup tile. From this tile you can select Web Server Settings or view uploading instructions
Figure 23 Web Server Setup Tile
Uploading Existing Websites
Tutorials for uploading existing websites can be accessed from the Uploading Instructions screen shown below. Tutorials are available for the following:
• Cute FTP • Dreamweaver MX • FrontPage 2003 FTP • SmartFTP • WS FTP
Figure 24 Uploading Instructions Screen
Uploading instructions for existing websites
View or change your Web Server Settings
Select from one of five tutorials for instructions
on uploading your existing website

Telstra Business Online
29/03/2007 Mission Control User Guide 24
Web Server Setup
On the Web Server Setup screen there are details on the following:
• A link to tutorials on “How to Upload your Web Site” Settings for a range of website development and management components can also be accessed on the Web Server Setup screen.
• View Start Page Settings
• Configure FrontPage Extensions Status
• Configure SSL Secure Web Pages
• Configure Active Server Pages
• Configure CGI
• Configure PHP
• Configure .NET A brief description of each component and directions for enabling are provided below
Figure 25 Web Server Setup Screen
Start Page Settings
Selecting View Start Page Settings allows you to view the start page settings for you website
Figure 26 Start Page Settings
You can also access the Website Upload Tutorials here

Telstra Business Online
29/03/2007 Mission Control User Guide 25
FrontPage Status & SSL Secure Web Pages
If you are using Website Builder FrontPage is not supported. To request any changes to FrontPage status use the Job System as described in the Mission Control User Guide. The SSL is encryption technology. The basic SSL encryption available for Business Online allows people using your website to contact you via a separate secure site. For eCommerce customers using Website Builder Advanced SSL encryption technology supports your online integrity.
Figure 27 FrontPage and SSL Secure Web Pages
Active Server Pages
Allows for server side scripting using ASP which means webpage content is generated when the page is requested.
Figure 28 Active Server Pages
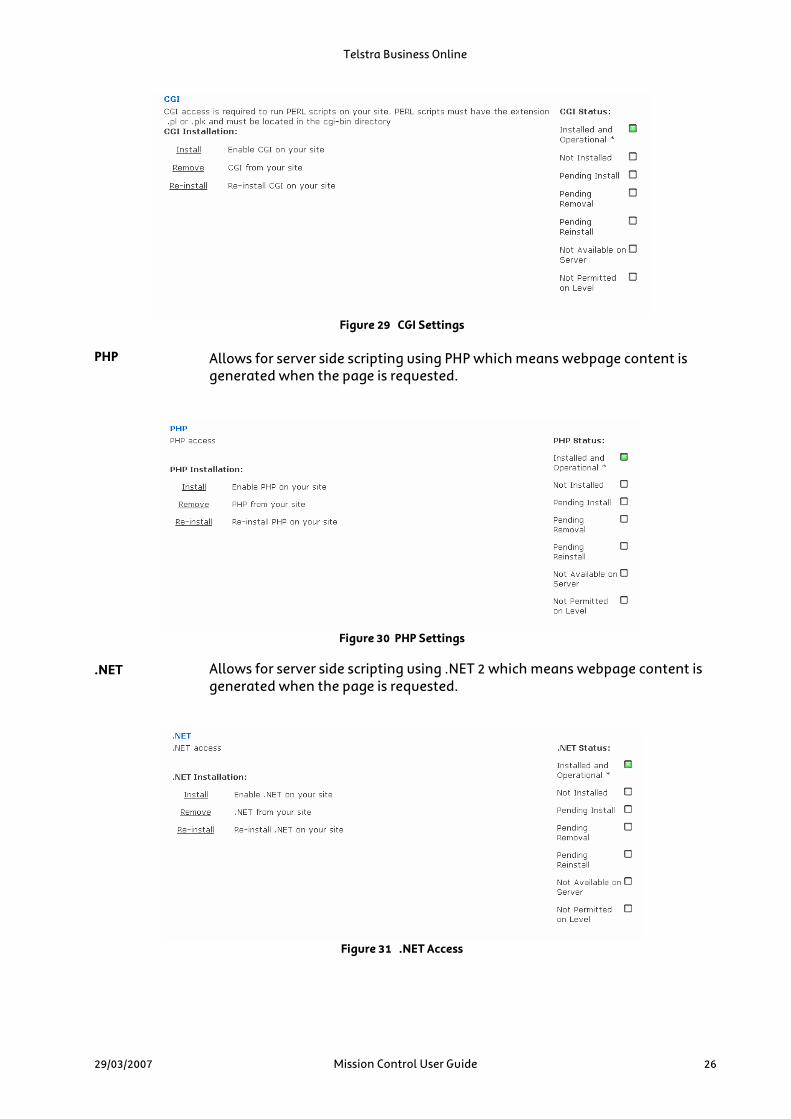
CGI
Allows for server side scripting using PERL which means webpage content is generated when the page is requested.
Telstra Business Online
29/03/2007 Mission Control User Guide 26
Figure 29 CGI Settings
PHP
Allows for server side scripting using PHP which means webpage content is generated when the page is requested.
Figure 30 PHP Settings
.NET
Allows for server side scripting using .NET 2 which means webpage content is generated when the page is requested.
Figure 31 .NET Access

Telstra Business Online
29/03/2007 Mission Control User Guide 27
Domain Name Configuration
Domain Name Configuration Introduction
Name server entries are automatically created for five levels, the Domain Name, www, FTP, MAIL and SHOP. Setting can be viewed in the Domain Name Configuration section. These setting can also be changed in this section.
Figure 32 Domain Name Configuration Tile
Figure 33 Domain Name Configuration Main Menu
Domain Name Configuration Screen
The Domain Configuration Screen indicates the current status of each of the Automatic Domain Configuration entries. For each of the five name server entries listed above you are able to change the set up.
Click on this tile on the Business Online Screen to get to the Domain Name Configuration
Screen
You can also access the Domain Name
Configuration Screen from the Main Menu

Telstra Business Online
29/03/2007 Mission Control User Guide 28
Figure 34 Domain Name Configuration Screen Change Domain Setup Screen
Using the underlined links on the Domain Name Status Screen, the set up for each domain name can be viewed and / or changed. The Domain Configuration Screen indicates the current status of each of these Automatic Entries. For each of the five name server entries listed above you are able to change the set up.
Status of automatic entries is shown here
Base Domain Setup can be changed here
Domain request status is shown here

Telstra Business Online
29/03/2007 Mission Control User Guide 29
Figure 35 Domain Name Configuration Settings

Telstra Business Online
29/03/2007 Mission Control User Guide 30
Security
Security Screen Introduction
Six functions are accessible using the tiles on the Security Screen. Of these functions, use of the following three functions is detailed in the Mission Control User Guide.
• Need Help? • Job System • Master Password
The security function allows you to create and use tokens to restrict Website and FTP access control via username/password authentication. The security functions include:
• Token Configuration • Private FTP Setup • Private WWW Setup
Figure 36 Security Tile
Figure 37 Security Main Menu
View or change Security Settings for your website accounts
View or change Security Settings for your website accounts

Telstra Business Online
29/03/2007 Mission Control User Guide 31
Figure 38 Security Screen Token Configuration
One of the most useful features of Mission Control is the ability to restrict access
to parts of your web site to allow access to only those people who have valid user
names and passwords.
Reasons for restricting access might include –
• Providing confidential information online to authorised personnel only
• Preventing competitors from accessing commercial information while
making it still accessible to dealers and remote sales staff
• Gathering valuable marketing information from customers in exchange
for permitting access to special information sections
• Offering clients secure access to details about their dealings with the web
site owner.
All of this and more can be done using the tokens in Mission Control.
To set up security tokens in Mission Control, click “assign a list of users” on the Token Configuration Tile on the Security Screen.
Figure 39 Token Configuration Tile
Master Password and Need Help? are detailed in the Mission Control
User Guide

Telstra Business Online
29/03/2007 Mission Control User Guide 32
What is a Token?
In simple terms, it is a security protocol that allows users to password protect
areas of their web sites. Think of it as a padlock that can be opened only by
persons with the right key. The token (padlock) can accept the same key cut
many times and handed to different users, or it can accept many different keys.
In more technical terms, it works like the Windows NT security that requires a user
to provide a user name and password pair. When this has been entered, NT parses
it to the Local Security Authority program on the server, which, in-turn runs the
appropriate authentication package.
If the login is valid, an access token is created. This token contains the user’s
security ID and access permissions and is attached to the process it starts, ie, the
actual operating program, or the secure web page.
Each token configured in Mission Control can contain up to 1000 username and
password pairs.
The opening Token Configuration screen is shown below with the key parts of the screen highlighted. The following pages detail steps for creating, editing, approving and reporting on tokens
Figure 40 Token Configuration Screen
Get reports on tokens, individual setup, token summary and token
approvals
Edit and add new tokens here and search for an individual token
Clicking new will allow you to issue a new token
Selecting the Show All button opens details on all tokens

Telstra Business Online
29/03/2007 Mission Control User Guide 33
Figure 41 Token Member List
Figure 42 Token Summary Page
View and edit details on Token Settings here including:
• General Settings • Members • Token Instructions • Auto Tokens • Fields • Email • Instructions
Token Summary Page selected
To view Individual Token Setup select a token from the list and click
on Show All
Telstra Business Online
29/03/2007 Mission Control User Guide 34
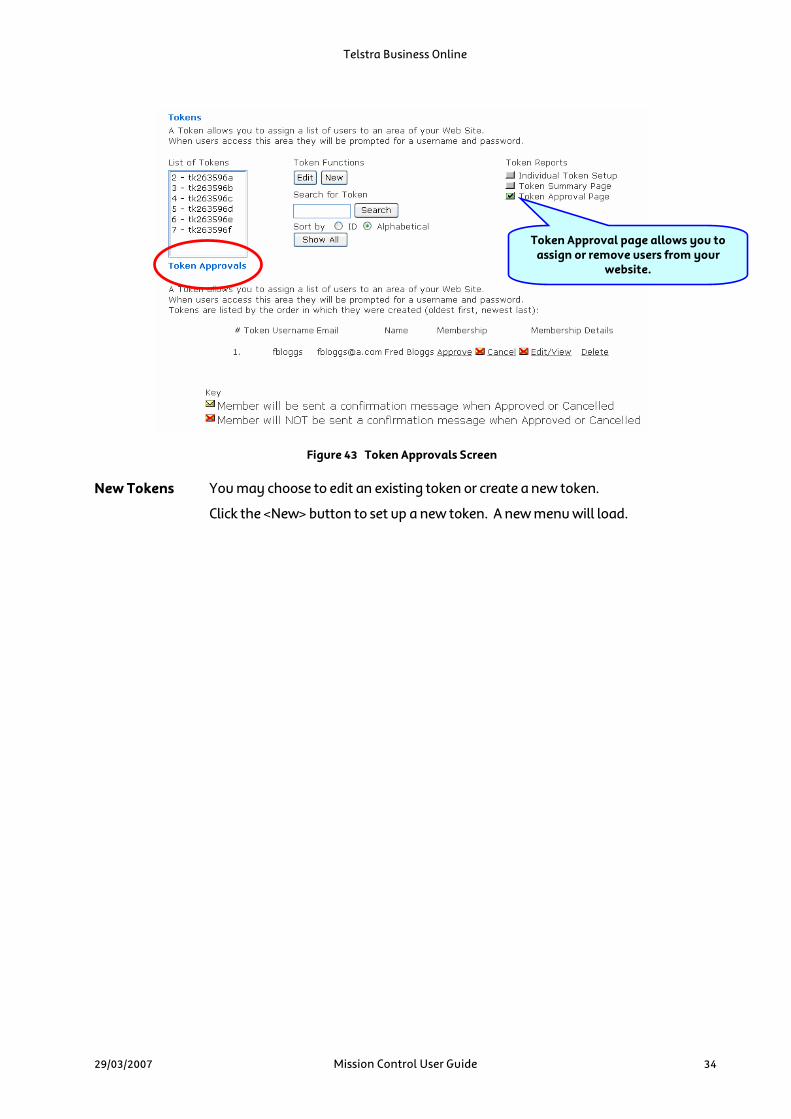
Figure 43 Token Approvals Screen
New Tokens
You may choose to edit an existing token or create a new token.
Click the <New> button to set up a new token. A new menu will load.
Token Approval page allows you to assign or remove users from your
website.

Telstra Business Online
29/03/2007 Mission Control User Guide 35
Figure 44 Adding a new token
Fill in the details in the blank fields and click the <Insert> button. Keep adding entries until you have included all your token users. Each time you click the <Insert> button, the new entry should appear in the list above the fields
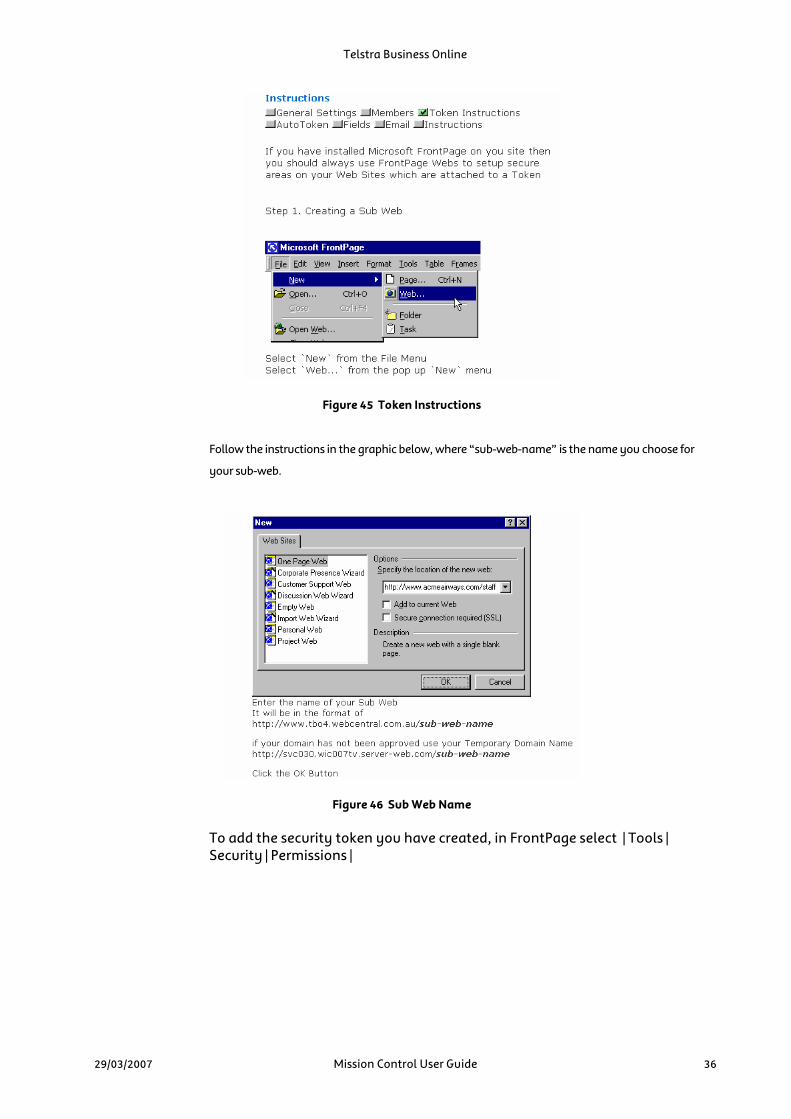
Applying a token to a FrontPage sub-web
A FrontPage sub-web is a self-contained web site which sits within a parent web
site, but is administered separately.
After you have configured your token, create a secure sub-web by clicking the small grey <Token Instructions> button near the top of the menu This will bring up instructions for creating a sub-web and attaching the token to it. To create a new sub-web, open FrontPage, select File, New, Web
Selecting the Members button allows you to Enter details in the
fields and click insert to add a member to a
token
All Members of the selected token are listed
here
Telstra Business Online
29/03/2007 Mission Control User Guide 36
Figure 45 Token Instructions
Follow the instructions in the graphic below, where “sub-web-name” is the name you choose for
your sub-web.
Figure 46 Sub Web Name
To add the security token you have created, in FrontPage select | Tools | Security | Permissions |
Telstra Business Online
29/03/2007 Mission Control User Guide 37
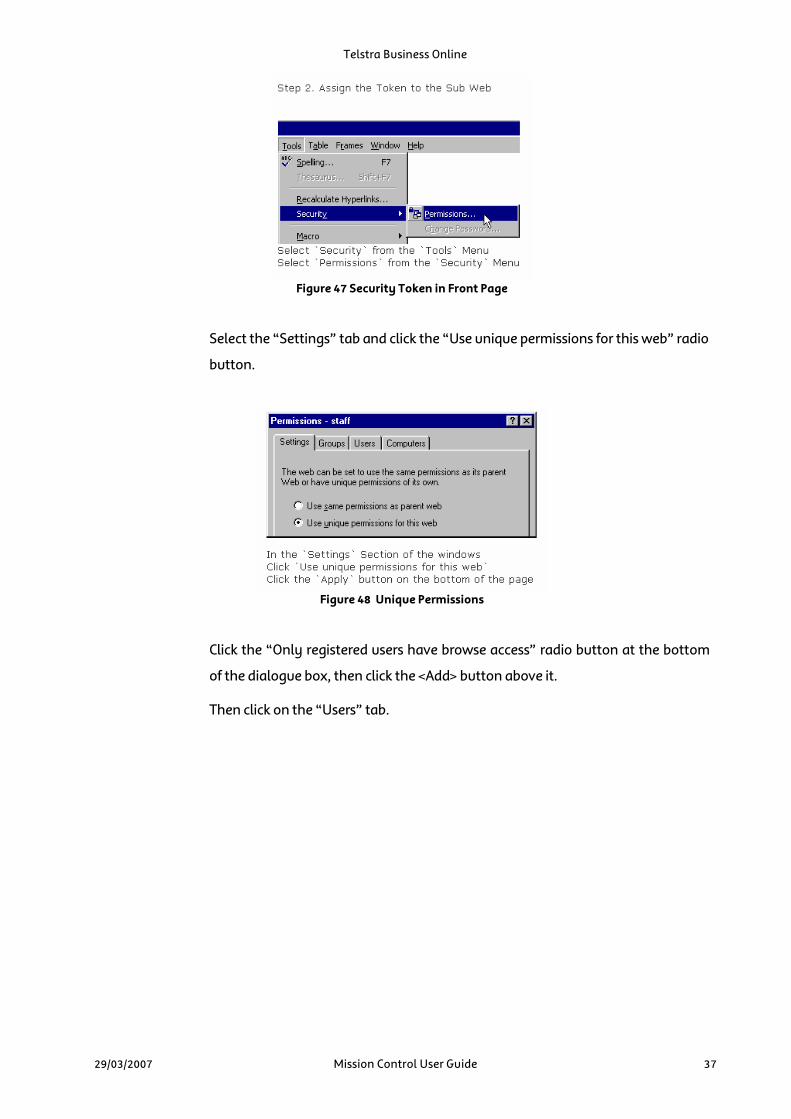
Figure 47 Security Token in Front Page
Select the “Settings” tab and click the “Use unique permissions for this web” radio
button.
Figure 48 Unique Permissions
Click the “Only registered users have browse access” radio button at the bottom
of the dialogue box, then click the <Add> button above it.
Then click on the “Users” tab.

Telstra Business Online
29/03/2007 Mission Control User Guide 38
Figure 49 “Only Registered Users”
In the new dialogue box type the name of the token you created or edited earlier. Don’t change the radio buttons below; your permissions have been set in the security token already. If you click on the other options you are actually giving users permission to alter your web site. Now click the <OK> button, and then click the <Apply> button to close the dialogue box
Figure 50 Adding Users

Telstra Business Online
29/03/2007 Mission Control User Guide 39
Your token protected sub-web is now ready to use. Users can be given the URL
and will be prompted to enter the user names and passwords you have assigned
to them during token set-up. Remember, the sub-web address is the name of the
new folder in your web site that you created as a sub-web.
You may also use this procedure to password protect a folder or group of folders
in a web without creating a sub-web.
Figure 51 Access the Website
Auto Tokens
Another way to use tokens is the Auto Token function.
The Auto Token allows users to join tokens by “subscribing” via a web page. This
can occur automatically, or by sending a subscription application to your
designated administrator for approval.
The Auto Token feature includes powerful functionality to allow you to capture
information about your users and manage subscriber lists.
How to set up Auto Tokens
Select a token to edit or click the <new> button in the Tokens menu. Then select
the small grey <Auto Tokens> button.

Telstra Business Online
29/03/2007 Mission Control User Guide 40
Figure 52 Token Fields
The “Key” field allows you to specify an alias for the token for embedding into
your web pages. This feature ensures that people who read the code of your
subscription form cannot guess and automatically subscribe to all tokens you are
using. The key acts as a referring agent back to the token. It guarantees that
subscribers actually came from your web page rather than using automated data
mining technology.
The Key can be any combination of letters and numbers. It will be automatically
included in the instructions you receive for creating a subscription form in your
web pages.

Telstra Business Online
29/03/2007 Mission Control User Guide 41
Figure 53 Auto Token ‘Key’ feature
Configuring Auto Tokens
To configure your auto token Scroll down the menu.
In setting up your auto token, you may select from a number of options. Granting
automatic approval is the quickest way to allow people to subscribe to a secure
sub-web. This will allow users to create their own user names and passwords.
This method might be appropriate for areas you agree to grant access to only in
return for some marketing information about users.
Appointing an administrator gives you the opportunity to vet subscribers before
giving them access permissions.
You may also opt for a welcome email message, set time limits on
subscriptions and send a custom email to welcome new subscribers
Examples of these are shown below
The “Key” field allows you to specify an alias for the token for embedding into your web pages. The Key can be any combination of letters and numbers.

Telstra Business Online
29/03/2007 Mission Control User Guide 42
Figure 54 Auto Token Approvals
To assign a user manually to a token, an administrator must access Mission
Control. Joining via a web page can be entirely automatic, including sending an
email with a username and password.
Note: You must tick the “User can Join Via Web and Request Password Email” if
you wish to make use of the function that helps users who have forgotten their
passwords.
You may also configure what pages users should end up on if they subscribe
successfully, or if the subscription fails.
An administrator can be notified of each new subscription by sending an email,
and users can be notified by email that their automatic subscription has been
successful.
Figure 55 New User Joins Token

Telstra Business Online
29/03/2007 Mission Control User Guide 43
You may choose to send an automatic email when subscribers unsubscribe
themselves, or when the administrator removes them from the subscription list.
Figure 56 User Removed
A final function of the auto token is the ability to provide help to users who may
have forgotten their passwords.
Once you have filled in the details, remember to click the <Save> button. You
may now attach your auto token to your sub-web or folders as described above.
Figure 57 Forgotten Password – Save Button
Additional information for Auto Token subscribers
Auto tokens allow you to capture additional data from subscribers by clicking the
small grey button marked <Fields>.
In addition to standard system capture fields, you can add up to 10 extra fields,
each with customisable properties that you can choose from the drop down
menu boxes to the right of each field. For example, you might wish to capture
information about the company each person works for, or their age or income
range.
Remember to click the <Save> button when you are done.

Telstra Business Online
29/03/2007 Mission Control User Guide 44
Figure 58 System Capture Fields and Additional Capture Fields
Email Messages for Auto Tokens
You may configure automatic email messages for administering and subscribing
to Auto Token protected areas of your web site.
To configure this email functionality, click the small grey button marked <Email>.
You may select to show a name and email address for the originator of the
email message; the name should belong to the person responsible for dealing
with the subscription, or any email inquiries about this subscription.
Telstra Business Online
29/03/2007 Mission Control User Guide 45
Figure 59 Token Email Messages
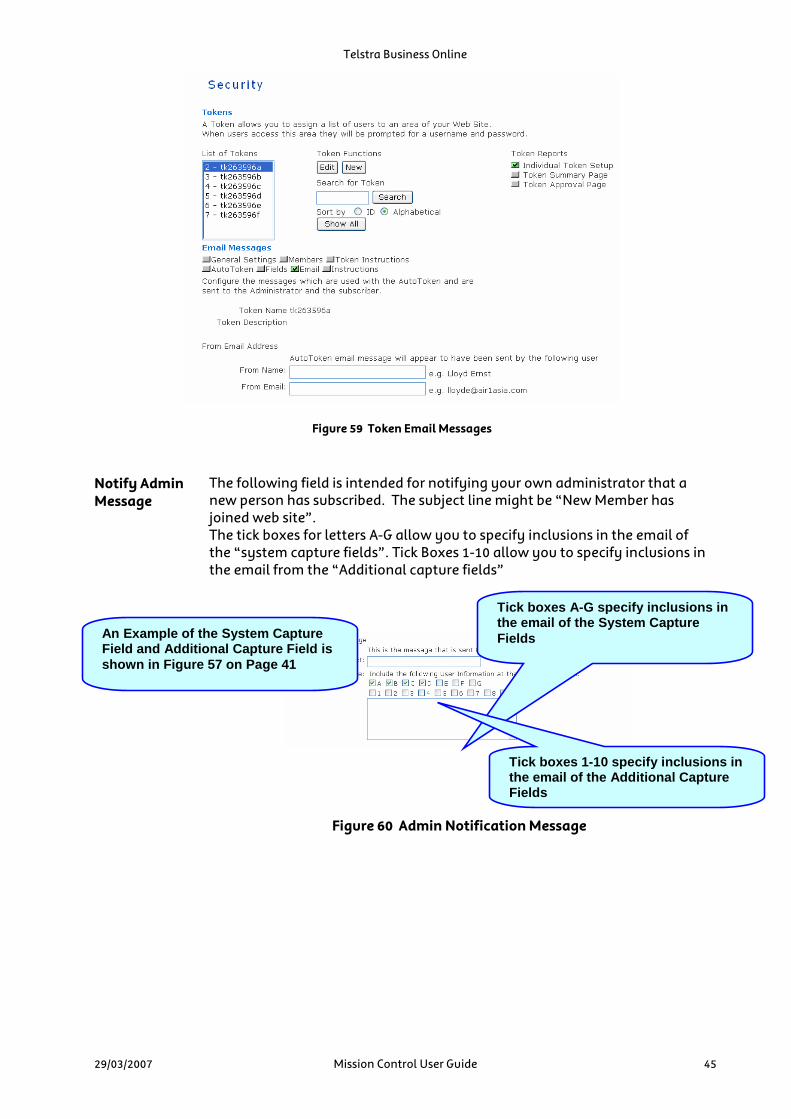
Notify Admin Message
The following field is intended for notifying your own administrator that a new person has subscribed. The subject line might be “New Member has joined web site”. The tick boxes for letters A-G allow you to specify inclusions in the email of the “system capture fields”. Tick Boxes 1-10 allow you to specify inclusions in the email from the “Additional capture fields”
Figure 60 Admin Notification Message
Tick boxes A-G specify inclusions in the email of the System Capture Fields
Tick boxes 1-10 specify inclusions in the email of the Additional Capture Fields
An Example of the System Capture Field and Additional Capture Field is shown in Figure 57 on Page 41

Telstra Business Online
29/03/2007 Mission Control User Guide 46
User Welcome Message
User Welcome Message allows you to specify a welcome letter sent to users when they are automatically or manually added to a token. You may again specify what fields in the additional information set-up you wish to include as part of the letter.
Figure 61 User Welcome Message
User Approved Message
User Approved Message allows you to specify an automatic email letter sent to subscribers who have been manually approved by your administrator. This email may again include additional user information
Figure 62 User Approved Message
You can specify Information Fields and Text for your User Welcome email

Telstra Business Online
29/03/2007 Mission Control User Guide 47
User Cancelled Message
The above section permits you to send an automatic email message to any
subscribers whose attempt to sign up has been denied by your administrator, or
whose subscription is cancelled later.
Figure 63 User Cancel Message
Forgotten Password Message
The above section permits you to send an automatic email message to any user
who may have forgotten his/her password. You must provide a facility on your
web pages for users to state they have forgotten their passwords (see the next
section). You may again choose to include additional user information in your
email message.
Don’t forget to save your set-up by clicking the <Save> button at the bottom of
your screen.
Figure 64 Forgotten Password Message

Telstra Business Online
29/03/2007 Mission Control User Guide 48
Once you have saved your auto token configuration, scroll back to the top and
click the small grey button marked “Instructions” to receive further instructions
on setting up your auto token.
Instructions similar to the following will appear. Note: the instructions are
tailored specifically to suit the custom configuration you selected during set-up.
Do not copy the instructions in this manual.
Private FTP Setup
FTP stands for File Transfer Protocol. It is generally used to describe an area of a
web site or Internet location used to upload and download files with an FTP
program.
As an example the ‘Members’ directory of a site might contain product price lists
for your staff to download while away from the office, the ‘Support’ directory
might contain brochures and the ‘Security’ directory might contain blank
contracts, etc.
To apply a token to an FTP area in your site, once you have configured the token as above, click on the Private FTP Setup tile on the Security Screen.
Figure 65 Private FTP Setup Tile
Telstra Business Online
29/03/2007 Mission Control User Guide 49
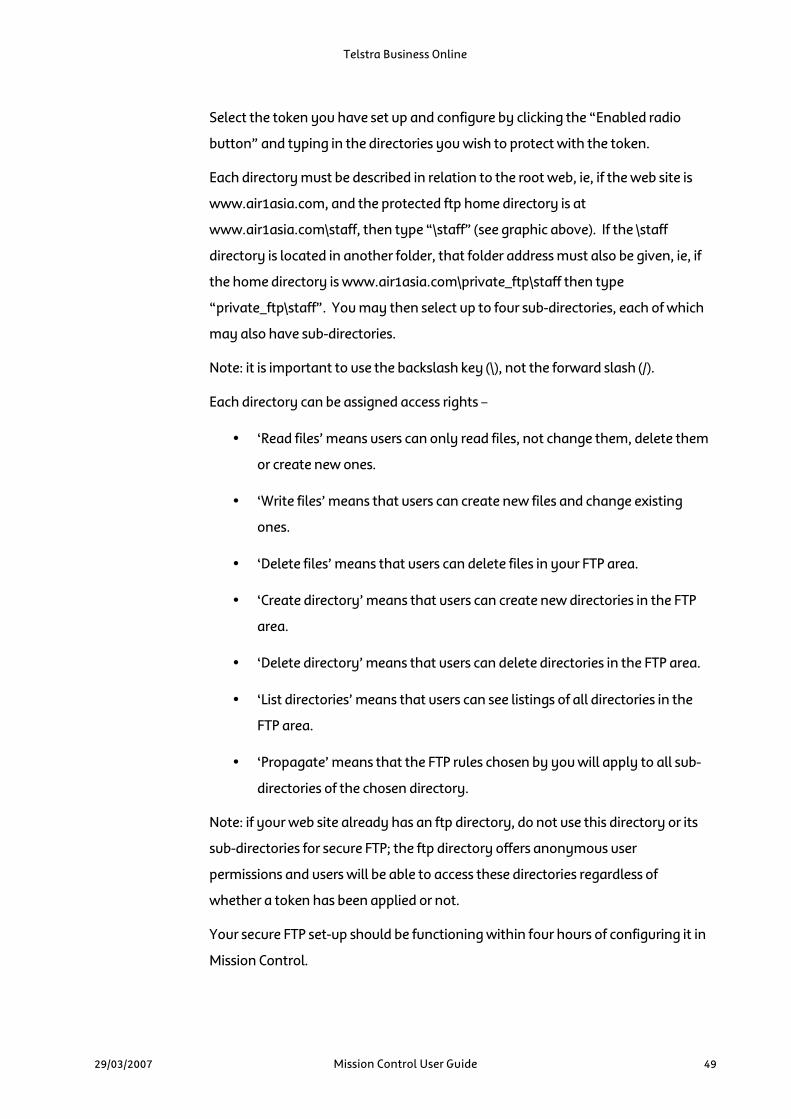
Select the token you have set up and configure by clicking the “Enabled radio
button” and typing in the directories you wish to protect with the token.
Each directory must be described in relation to the root web, ie, if the web site is
www.air1asia.com, and the protected ftp home directory is at
www.air1asia.com\staff, then type “\staff” (see graphic above). If the \staff
directory is located in another folder, that folder address must also be given, ie, if
the home directory is www.air1asia.com\private_ftp\staff then type
“private_ftp\staff”. You may then select up to four sub-directories, each of which
may also have sub-directories.
Note: it is important to use the backslash key (\), not the forward slash (/).
Each directory can be assigned access rights –
• ‘Read files’ means users can only read files, not change them, delete them
or create new ones.
• ‘Write files’ means that users can create new files and change existing
ones.
• ‘Delete files’ means that users can delete files in your FTP area.
• ‘Create directory’ means that users can create new directories in the FTP
area.
• ‘Delete directory’ means that users can delete directories in the FTP area.
• ‘List directories’ means that users can see listings of all directories in the
FTP area.
• ‘Propagate’ means that the FTP rules chosen by you will apply to all sub-
directories of the chosen directory.
Note: if your web site already has an ftp directory, do not use this directory or its
sub-directories for secure FTP; the ftp directory offers anonymous user
permissions and users will be able to access these directories regardless of
whether a token has been applied or not.
Your secure FTP set-up should be functioning within four hours of configuring it in
Mission Control.

Telstra Business Online
29/03/2007 Mission Control User Guide 50
Figure 66 Private FTP Setup Categories
Private WWW Setup
To protect your privacy, you can assign tokens to specific directories to create closed access to sections of your Web Site.
Visitors to these Web Site sections are prompted for a username and password. Approved visitors' usernames and passwords are stored in a security token.
To create closed access to sections of your website click on the link on the Private WWW Setup tile.
Figure 67 Private WWW Setup
Select the token you have set up and configure by clicking the “Enabled” button and typing in the directories you wish to protect with the token.
For each Directory you can assign access rights. These access rights are described above

Telstra Business Online
29/03/2007 Mission Control User Guide 51
Figure 68 Private Web Pages
Select the directory within your site that you want to secure
Select the Permissions that you wish to apply and click ‘add token access’ Definitions for Read,
Write and Execute can be viewed by scrolling down this page in Mission Control

Telstra Business Online
29/03/2007 Mission Control User Guide 52
Web Site Statistics
Web Site Statistics Introduction
The Website statistics page allows you to view usage statistics for your website. Using the Job System go to Add a Job. The Job System can be accessed by the Main Menu or Job System tile In the subject line for Add a Job type ‘Username and Password for Livestats’ It also allows you to set up usernames and passwords for other users to access website statistics.
Figure 69 Web Site Statistics Tile
Figure 70 Web Site Statistics Main Menu
Website Statistics Screen
Figure 71 Web Site Statistics Screen

Telstra Business Online
29/03/2007 Mission Control User Guide 53
Site Shop
Site Shop Introduction
The site shop wizard is an 8 step process to set up your online shop. You may enter, exit and edit any of the information you enter into the Site Shop Wizard until Step 8 which asks you to confirm and submit you site shop setup. Site Shop is accessed by clicking on the Site Shop tile or selecting Site Shop from the Main Menu as shown in Figure 71 and 72 below The Site Shop Setup requires a range of information about your business. Having it close by will make working through the questions easier. There are a number of compulsory fields and you will receive a prompt if you forget to complete these fields or the information contains errors.
Figure 72 Site Shop Tile
Figure 73 Site Shop Main Menu

Telstra Business Online
29/03/2007 Mission Control User Guide 54
Figure 74 Site Shop
Click here to open a detailed help guide for setting up and operating Site Shop
Click start to work through the 8 Question Site Shop Setup Wizard
Telstra Business Online
29/03/2007 Mission Control User Guide 55
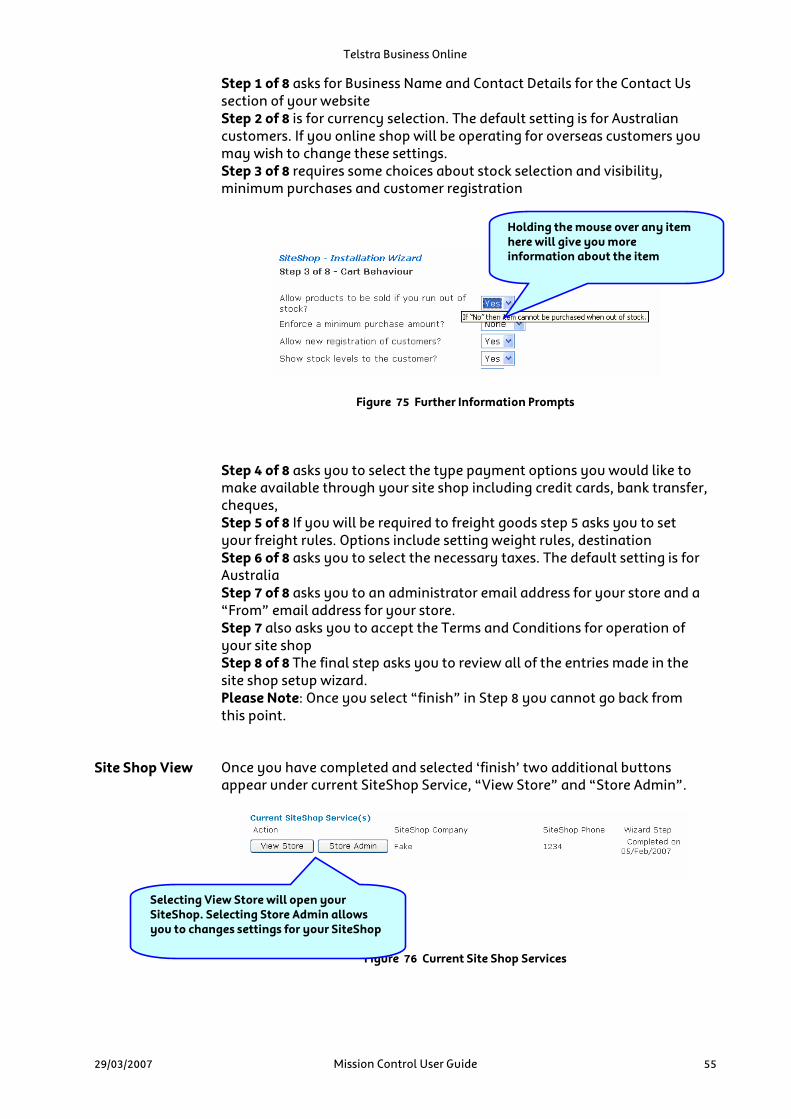
Step 1 of 8 asks for Business Name and Contact Details for the Contact Us section of your website Step 2 of 8 is for currency selection. The default setting is for Australian customers. If you online shop will be operating for overseas customers you may wish to change these settings. Step 3 of 8 requires some choices about stock selection and visibility, minimum purchases and customer registration
Figure 75 Further Information Prompts Step 4 of 8 asks you to select the type payment options you would like to make available through your site shop including credit cards, bank transfer, cheques, Step 5 of 8 If you will be required to freight goods step 5 asks you to set your freight rules. Options include setting weight rules, destination Step 6 of 8 asks you to select the necessary taxes. The default setting is for Australia Step 7 of 8 asks you to an administrator email address for your store and a “From” email address for your store. Step 7 also asks you to accept the Terms and Conditions for operation of your site shop Step 8 of 8 The final step asks you to review all of the entries made in the site shop setup wizard. Please Note: Once you select “finish” in Step 8 you cannot go back from this point.
Site Shop View Once you have completed and selected ‘finish’ two additional buttons appear under current SiteShop Service, “View Store” and “Store Admin”.
Figure 76 Current Site Shop Services
Holding the mouse over any item here will give you more information about the item
Selecting View Store will open your SiteShop. Selecting Store Admin allows you to changes settings for your SiteShop

Telstra Business Online
29/03/2007 Mission Control User Guide 56
Store Admin Setup Request
When you first set up your online store using Site Shop URL in the address bar for the store be the same as the one shown in Figure 76. There are a number of simple steps to change the address so that it shows your Domain.
Figure 77 Generic SiteShop Address Store Admin Setup Request
Selecting the Store Admin button will open the SiteShop Administration site. This will allow you to request the necessary changes to have your Domain Name in your store address.
Figure 78 Store Admin Access
Figure 79 SiteShop Administration Console
Select Store Admin to open the SIteShop Admin
Select Settings in the Main Menu
Telstra Business Online
29/03/2007 Mission Control User Guide 57
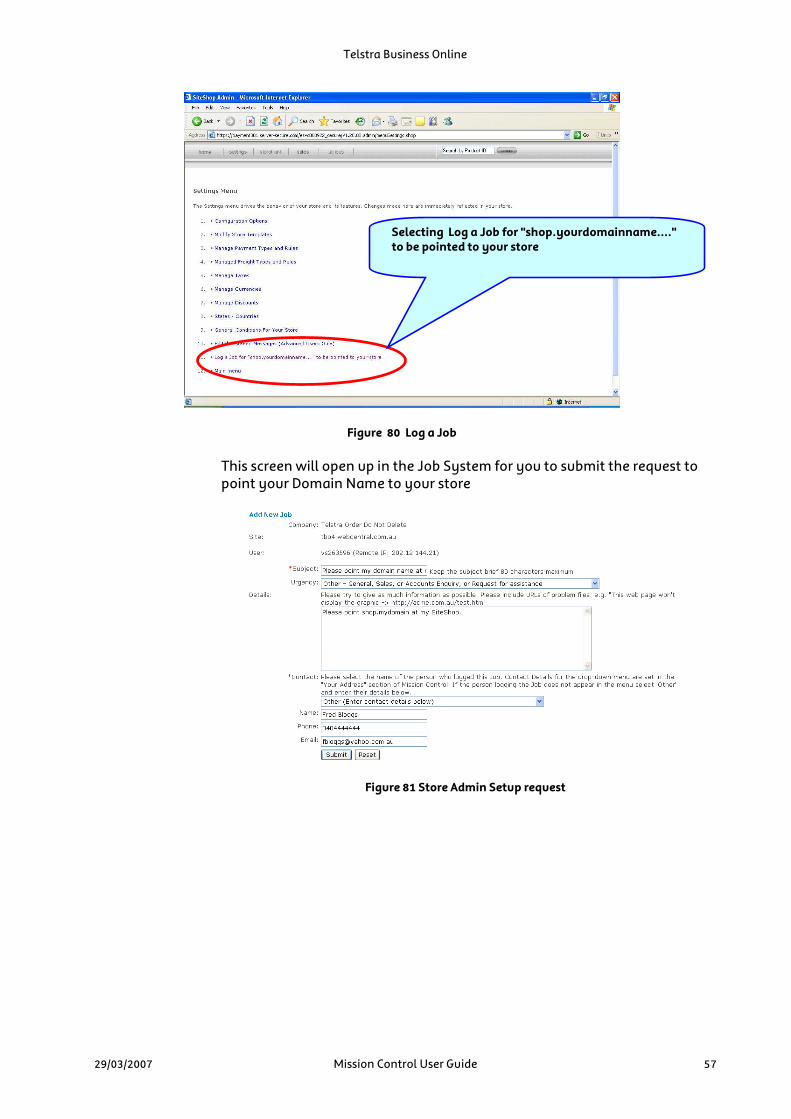
Figure 80 Log a Job
This screen will open up in the Job System for you to submit the request to point your Domain Name to your store
Figure 81 Store Admin Setup request
Selecting Log a Job for "shop.yourdomainname...." to be pointed to your store

Telstra Business Online
29/03/2007 Mission Control User Guide 58
Database Products
Database Products Introduction
Database products allow you to store scaleable amounts of data used to populate webpages within a flexible and scaleable system. It simplifies development of webpages with dynamic content. There are two options available with Business Online, Standard SQL and Premier SQL. These options become available with a hosting plan of 500 MB or greater. The Database Products section of Business Online can be accessed via the Main Menu bar.
Figure 82 Database Products Main Menu
Figure 83 Database Products Options
Select from Standard or Premier if your hosting plan is 500MB or greater

Telstra Business Online
29/03/2007 Mission Control User Guide 59
Figure 84 Database Products Activation Screen Cold Fusion
Cold Fusion allows for server side scripting using ColdFusion which means webpage content is generated when the page is requested. Cold Fusion is requested via Add a Job in the Job System Section of Mission Control
To activate Standard or Premier SQL read through the Terms and Conditions before you agree, then select to add the database product

Telstra Business Online
29/03/2007 Mission Control User Guide 60
Business Online POP Mailboxes
Business Online POP Mailbox Feature
An additional feature of Business Online is access to POP email. POP3 is the most popular protocol which operates on TCP (Transmission Control protocol) on port 110
The advantage of POP3 is that once you have downloaded messages, you are able to delete all messages from the mail server. This essentially means you can still access the data in your outlook/other mail client to view offline after they have been deleted from the mail-server.
The disadvantage of POP3 is that you are only able to access messages that reside in your inbox. POP3 was designed primarily as an offline protocol. It only allows you to receive messages to send you need SMTP protocol Simple mail transfer protocol.
In terms of deployment, customer mailboxes are located on the mail servers. The mailboxes are accessed via client software (eg Outlook) which use POP for receiving and SMTP for sending. POP email or Basic email may not be suitable for all business applications as email is only temporarily stored on mail servers and then downloaded onto your computer. If you check your basic email from another computer, then that email will not be accessible from your primary computer. The diagram below shows how POP email works.
Figure 85 POP Email Example Business Mail Standard or Advance mailboxes may be a more suitable option for you.
Business Online POP Mailbox Setup
If you are a Business Online customer without Business Mail you can setup Business Online POP email boxes by using the POP email for Business Online Guide located in the Help Me section of Mission Control

Telstra Business Online
29/03/2007 Mission Control User Guide 61
Additional Features for Business Online
Additional Features Introduction
There are a range of features available for Business Online customers in addition to features that can be activated through Website Builder, Web Server Setup, Domain Configuration and Security Tiles. These additional features need to be accessed through the Job System. A brief description of the additional features are listed in the following table along with instructions for requesting the service.
Additional Feature What it is / does How is it
charged? How do you request it
Microsoft Windows Streaming Media
Allow a certain number of concurrent streams of Windows Media Format files.
Monthly Help Me -> Add A Job Request for Windows Streaming Media.
Microsoft Broadcast Streaming Media
Allow a large number of concurrent streams of Windows Media Format files limited to a size.
Monthly Help Me -> Add A Job Request for Windows Broadcast Streaming Media
SSL SSL secured access to website content. SSL requires a unique IP address for each https server.
Monthly Help Me -> Add A Job Request for a SSL Certificate and IP address.
Web Server Log (monthly and annually)
Request to view the server log for your site
Monthly Help Me -> Add A Job Request for a copy of the web server log.
Media Upload and Archive via CD
Allows for your website content to be uploaded via mailing a CD to us, or have an archive of your website sent to you via CD.
Once off Help Me -> Add A Job Request to upload via a CD or; Request for archive on a CD.
Web Forum Host a web forum on your account.
Monthly Help Me -> Add A Job Request for a web forum.
Job System Emails
When you request a job using the Job System in Mission Control you will receive two different emails, firstly an email confirming the Job Request and secondly an email confirming closure of the requested job. A sample of the email is shown in Figure 86 and Figure 87
Hello <Name>, The job titled "<Subject>" (job number: nnnnnnn) has been completed pending your acknowledgement. Please review the job for the relevant details. If are not happy with the provided information or solution you can reopen this job at anytime within the next 4 weeks. This job is in regards to the <domain> (vsnnnnnn) account. You can view this job in Mission Control at "Job System" -> "Summary". Please do not reply to this message, as it is for information purposes only. Kind Regards, Hosting Services Support https://mc-au.server-secure.com/
Figure 86 Job Request Acknowledgement

Telstra Business Online
29/03/2007 Mission Control User Guide 62
Hello <Name>, The job titled "<Subject>" (job number: nnnnnnn) has been closed and can no longer be reopened. This job is in regards to the <domain> (vsnnnnnn) account. You can view this job in Partner Control, by following the "Jobs" link in the header menu. Please do not reply to this message, as it is for information purposes only. Kind Regards, Hosting Services Support https://partner-au.server-secure.com/
Figure 87 Job Closure Notification


