
Chapter 10 – Electronic Pollbook
Introduction to the Electronic Pollbook ......................................... 10.2
Pre-Election ................................................................................. 10.3
Setting Up the Electronic Pollbooks and Printers ....................................... 10.3
Verifying the Electronic Pollbooks .............................................................. 10.7
Election Morning - Opening the Polls ............................................ 10.11
Networking Two Electronic Pollbooks ...................................................... 10.14
Networking Three or More Electronic Pollbooks to the Hub ..................... 10.16
Checking Synchronization ......................................................... 10.18
Entering and Clearing Data in the Pollbook ............................... 10.19
Finding Voters in the Electronic Pollbook ................................... 10.20
Finding Voters by Street Address .............................................. 10.24
Voter Not Found in the Electronic Pollbook ................................ 10.25
Voter is Registered in Another Precinct ..................................... 10.26
Find a Voter’s Correct Polling Place .......................................... 10.26
Issuing a Provisional Ballot ........................................................ 10.34
Special Situations ...................................................................... 10.38
1. Voter Moved........................................................................................ 10.38
2. Voter Claims a Different Party Affiliation or Whose Party Does Not Have a
Ballot (Primary Election Only) .............................................................. 10.39
3. Voter’s Status is “Pend1”, “Pend2”, “ABS Issued”, or “Voted Early” .... 10.39
4. Inactive Status Voters (“ID Required” box is blank) ............................ 10.41
5. “Issued” Box is “Reg Issued” or “PROV” ............................................. 10.43
6. ID Require – Show ID (Active or Inactive) ........................................... 10.44
Standards for Acceptable Forms of ID ....................................... 10.45
Standards for Unacceptable Forms of ID ................................... 10.46
Reprinting a Voter Authority Card .............................................. 10.46
Resetting the Judge’s Name ...................................................... 10.47
Ending the Election – Closing the Polls ..................................... 10.50
Packing the Electronic Pollbooks and Printers ........................... 10.53

10. 2 Electronic Pollbook
Introduction to the Electronic Pollbook

Electronic Pollbook 10. 3
Pre-Election Setting Up the Electronic Pollbooks and Printers
1. Open the printer case(s); the printer case(s) are not sealed. Remove
the Electronic Pollbook Integrity Report(s).
2. Verify the outer seal number on each case matches the number in
column 1 of the Electronic Pollbook Integrity Report.
3. Remove the outer seal and put the broken seal in the trash.
4. Open the two latches.
5. Detach the internal power connection from the electronic pollbook.
6. Remove the electronic pollbook and power cord from the case.

10. 4 Electronic Pollbook
7. Verify the State Asset Tag number on the back of each electronic
pollbook matches the numbers in column 2 of the Electronic Pollbook
Integrity Report.
8. Verify the inner seal number on the top of each electronic pollbook is
not broken and the number matches the numbers in column 3 of the
Electronic Pollbook Integrity Report.
Do not grab the electronic pollbook by its legs! Use the elastic
strap on the electronic pollbook.

Electronic Pollbook 10. 5
9. Verify the Power Switch on the top is turned OFF.
10. The power cord is in the case with electronic pollbook and marked with
yellow tape. Insert the power cord (marked with yellow tape) into the
first connection slot marked with PWR and the other end into a power
source. Do NOT turn on the power switch yet!

10. 6 Electronic Pollbook
11. Take the printer’s USB cable from the printer case and plug the larger
end into either of the two USB ports located on the back of the
electronic pollbook.
12. Plug the smaller end of the USB cable into the printer.
13. Plug one end of the printer’s power cord (marked with blue tape) into
the printer and the other end into a power source.

Electronic Pollbook 10. 7
14. Repeat steps 2 through 13 for all electronic pollbooks.
Verifying the Electronic Pollbooks
1. Turn the power switch to ON. DO NOT NETWORK THE POLLBOOKS
YET.
2. When the electronic pollbook switch is ON, the “Launch” screen will
appear.
Verify the date and time is correct. If the date or time is incorrect,
alert a chief judge.
If the date and time is correct, tap the “Launch” button with the
stylus.
The printer end of the power cord is bent 90 degrees (elbow
shaped). DO NOT connect an electronic pollbook power cord to the
printer. It will cause severe damage to the printer.
There should be one printer for each electronic pollbook. If there
are any printers missing, contact the Roamer.

10. 8 Electronic Pollbook
3. Verify the poll name on the left side before tapping the “OK This is
Correct Poll” button at the bottom of the screen.
4. Select “Yes” or “No” when prompted to check the clock accuracy in
bottom right corner.
If the polling place shown is not correct, alert a chief judge who
will contact the local board of elections immediately.

Electronic Pollbook 10. 9
If “No” is selected, go to step 5.
If “Yes” is selected, go to step 6.
5. Make the date and/or time adjustments by tapping “+” or “-“. Select
“Set Clock Time” to make changes.
6. The “Main Screen” will appear with the “Manage Polls” tab at the top of
the screen. The Poll Status will be “Closed.”

10. 10 Electronic Pollbook
7. Tap the “Ballots,” and “Voters” tabs under the “Statistics” to verify that
all the numbers are zero. Be sure to check all three tabs under
“Statistics” for zeroes before networking the electronic pollbooks.
Almost everything you will need to know about using the electronic
pollbook is in the onscreen instructions. Please read them!
Alert a chief judge immediately if any of these numbers are not
zero. Do not network the electronic pollbooks if any number is not zero.

Electronic Pollbook 10. 11
8. Verify that the totals at the bottom of the screen are zero.
9. Repeat steps 1 through 8 for all electronic pollbooks.
Election Morning - Opening the Polls
Do not check-in voters before 7:00 a.m. on Election Day.
Steps 1 through 4 can be performed on each electronic before the polls open
at 6:50 a.m. at the direction of the chief judges:
1. Tap the “Open the Polls” button
Alert a chief judge immediately if any of these numbers are not
zero. Do not network the electronic pollbooks if any number is not zero.

10. 12 Electronic Pollbook
2. Be sure the Print Ballot Counts and Print Voter Counts boxes have
check marks in the pop-up menu.
3. Tap “Continue” to print the Ballot Counts and Voter Counts reports.
4. Two reports will print.
5. Verify all totals on the Consolidated Voter Counts Report and
Consolidated Ballot Counts Report are zero. Alert a chief judge
immediately if the totals are not zero.
6. The “Poll Status” will change from red to green and display “OPENED.”

Electronic Pollbook 10. 13
7. Repeat steps 1 through 6 for all electronic pollbooks.
Networking the Electronic Pollbooks
A. The back of the electronic pollbook has four ports, from left to right:
1. Power connection
2. Two USB ports for the printer
3. LAN port that connects all the electronic pollbooks in the same polling
place together.
Do not network the electronic pollbooks until after:
All electronic pollbooks have been turned on individually.
The “Statistics” on the “Main Screen” are verified as zeroes for
the “Ballots” and “Voter” tabs.
After the Consolidated Voter Counts Report and Consolidated
Ballot Counts Report are printed on each electronic pollbook.

10. 14 Electronic Pollbook
B. All cable connectors are unique and fit only one way. Insert the USB plug
with USB icon facing up. Insert LAN plug with locking tab facing up.
Networking Two Electronic Pollbooks
1. Turn both electronic pollbooks OFF before connecting the network
cables.
For more than two electronic pollbooks, see the “Networking Three
or More Electronic Pollbooks to the Hub” section of this chapter.
Electronic Pollbook 10. 15
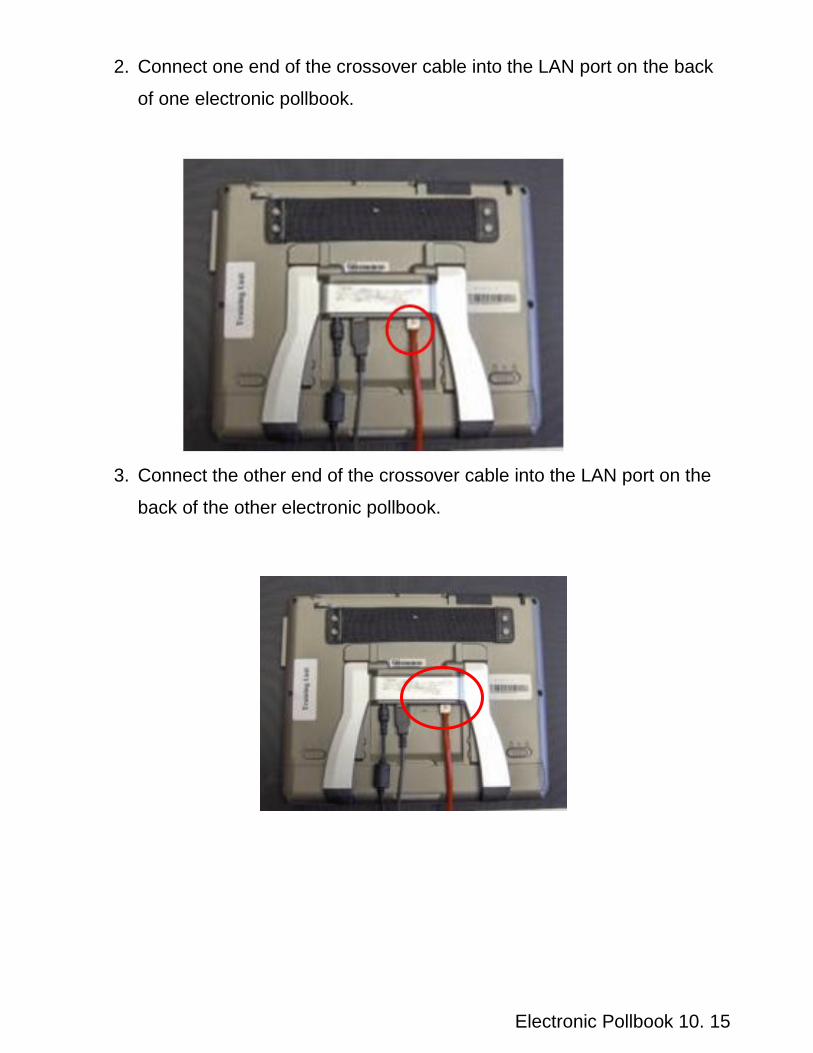
2. Connect one end of the crossover cable into the LAN port on the back
of one electronic pollbook.
3. Connect the other end of the crossover cable into the LAN port on the
back of the other electronic pollbook.

10. 16 Electronic Pollbook
4. Turn an electronic pollbook ON one at a time until the “Launch” screen
appears.
5. Proceed to the “Checking Synchronization” section of this chapter.
Networking Three or More Electronic Pollbooks to the Hub
1. Turn all electronic pollbooks OFF before connecting the network
cables.
2. The hub (or switch) connects more than two electronic pollbooks and
allows them to synchronize data in a polling place. There are several
models used and their appearances vary.
For two electronic pollbooks, see the “Networking Two Electronic
Pollbooks” section of this chapter.

Electronic Pollbook 10. 17
3. Connect the hub’s power cord into the first socket in the back of the
hub.
4. Insert the power cord plug into the power strip. The hub’s power light
indicator will turn on.
5. Connect one end of a hub cable into the LAN port of an electronic
pollbook.
6. Connect the other end of the hub cable to any port in the hub.

10. 18 Electronic Pollbook
7. Repeat steps 1 through 6 for each electronic pollbook.
8. Turn an electronic pollbook ON one at a time until the “Launch” screen
appears.
9. Proceed to the “Checking Synchronization” section of this chapter.
Checking Synchronization
Check that the electronic pollbooks are synchronized with other electronic
pollbooks in the polling place. This is indicated by a pair of icons in the lower
right corner of the screen. If the electronic pollbooks are not synchronized,
check that all connections between the electronic pollbooks and the hub are
intact. If the electronic pollbooks will not synchronize, alert a chief judge who
will seek technical assistance.
Throughout the day, periodically check the voted totals at the bottom of
the screen against the other electronic pollbook(s) in the polling place.
All totals should match.

Electronic Pollbook 10. 19
If the electronic pollbooks are not synchronized, check that all
connections between the electronic pollbooks and the hub are intact. If
the electronic pollbooks will not synchronize, alert a chief judge who will
seek technical assistance.
Entering and Clearing Data in the Pollbook
The electronic pollbook accepts only letters A-Z for name lookup. (No
spaces, hyphens or apostrophes.) The voter’s name will print correctly
(including apostrophes) on the voter authority card.
Tap the “back space” key to delete one or more letters.
Tap the “clear” key to delete an entire field.
Tap the “Clear ALL” button to clear all search fields.

10. 20 Electronic Pollbook
Finding Voters in the Electronic Pollbook
1. Tap the “Issue Ballots” tab at the top of the screen.
2. Tap the “Search Voter Roster” button on the bottom left of the “Issue
Ballots” screen.
Check-in judges may not ask for ID, but may accept an ID if
offered by a voter. Judges must also ask the voter to state his or her
name, address, and month and day of birth.

Electronic Pollbook 10. 21
3. The “Find Voters” screen appears next. You are ready to check-in voters.
4. Inform each voter that there is an accessible way to read or mark your
ballot. Be sure to say to each voter, “There is an accessible way to
read or mark your ballot.”
5. Ask “What is your name?”
Repeat the voter’s name and type in the voter’s name in the “Find
Voters” screen of the electronic pollbook.
On the “Find Voters” screen, tap the keys to enter the first 4 letters
of the voter’s last name.
Note: Do not use apostrophes or hyphens. For example, O’Neal
should be entered ONEA, El-Habib should be entered as ELHA, etc.
Use the 4-3 method by entering only the first 4 letters of the
voter’s last name and the first 3 letters of the voter’s first name.

10. 22 Electronic Pollbook
Tap the “First Name” box before entering the first 3 letters of the
voter’s first name. The list of names will get shorter as you add
letters.
6. Ask “What is your month and day of birth?”
If you need to narrow down the search (a scroll bar appears on the right side indicating a long list), tap on the “Middle Init” box, and tap the first letter of the voter’s middle name. If the voter has no middle name, use the “space” key to enter a blank space in the “Middle Init” box.
You may also narrow the voter search by entering the voter’s zip code or month and day of birth. This can only be done after at least one letter has been entered for the voter’s last and first name fields.

Electronic Pollbook 10. 23
7. If you cannot find the voter’s name in the precinct roster:
Enter the voter’s name without punctuation (apostrophes,
hyphens, etc).
Enter the voter’s date of birth (use the MMDD format). For
example, August 2 would be entered as 0802.
Check all possible variations of spelling for the name or ask the
voter to spell his or her name.
Search the State roster (see the “Finding Voters in the State
Roster” section below).
See the “Finding Voters by Street Address” section of this
chapter.
Finding Voters in the State Roster
1. If you cannot find a voter’s name in the precinct roster and have
verified the correct spelling, tap the “Search State” button to widen
the search.
Confirm the voter’s month and day of birth to be sure you see the
correct voter. Be careful to not confuse father and son, mother and
daughter, father and daughter, etc.

10. 24 Electronic Pollbook
2. If there are too many voters found in the State, enter more letters of
the last and first names to narrow the search.
Finding Voters by Street Address
1. If you cannot find a voter’s name after checking for various spellings, tap
on the “Find by Address” tab and enter the voter’s house number and
street name.
When searching for a common name (Jane Smith, Mary Williams,
James Johnson, etc.), the best way to narrow the search is to add the
voter’s middle initial, date of birth, and/or zip code.
To use the middle initial to search for a voter with no middle
name, you must use the “space” key to enter a blank space in the
“Middle Init” box.
Electronic Pollbook 10. 25
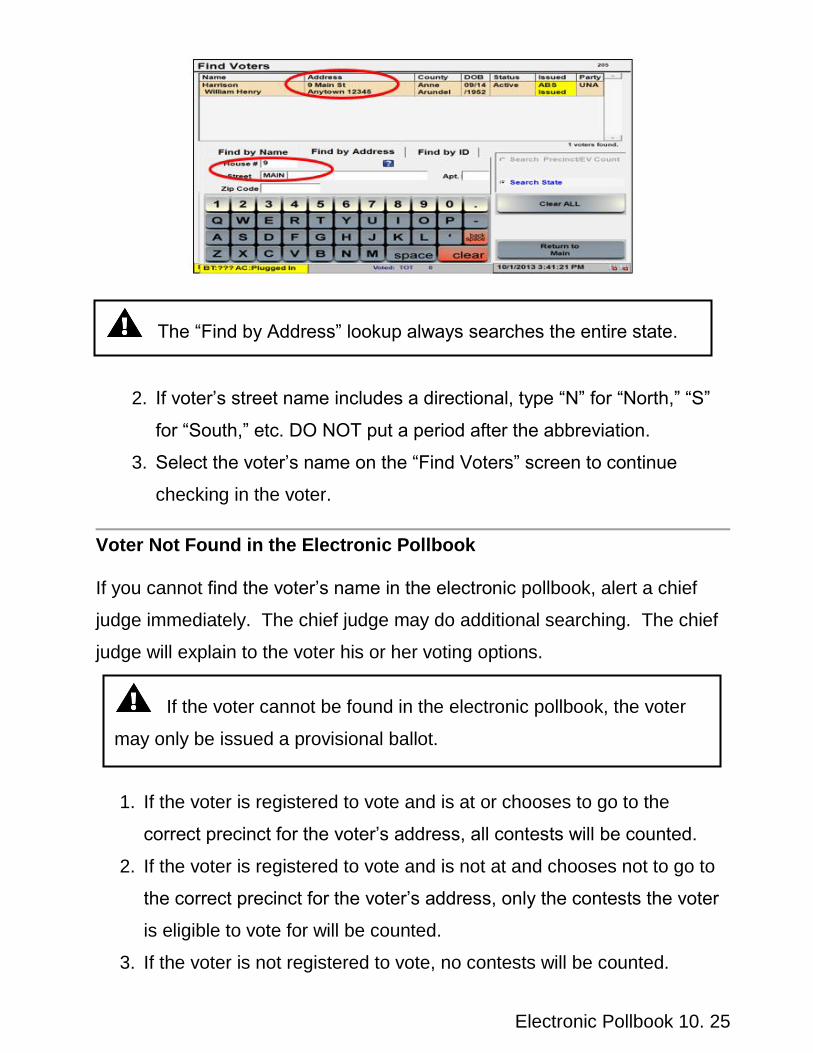
2. If voter’s street name includes a directional, type “N” for “North,” “S”
for “South,” etc. DO NOT put a period after the abbreviation.
3. Select the voter’s name on the “Find Voters” screen to continue
checking in the voter.
Voter Not Found in the Electronic Pollbook
If you cannot find the voter’s name in the electronic pollbook, alert a chief
judge immediately. The chief judge may do additional searching. The chief
judge will explain to the voter his or her voting options.
1. If the voter is registered to vote and is at or chooses to go to the
correct precinct for the voter’s address, all contests will be counted.
2. If the voter is registered to vote and is not at and chooses not to go to
the correct precinct for the voter’s address, only the contests the voter
is eligible to vote for will be counted.
3. If the voter is not registered to vote, no contests will be counted.
The “Find by Address” lookup always searches the entire state.
If the voter cannot be found in the electronic pollbook, the voter
may only be issued a provisional ballot.
10. 26 Electronic Pollbook
Voter is Registered in Another Precinct The voter can choose to go to his or her correct precinct to vote or stay and
vote a provisional ballot.
1. If the voter chooses to go to the correct precinct, every contest will
be counted.
2. If the voter chooses to stay and vote a provisional ballot, only the
contests the voter is eligible to vote for will be counted. Use
provisional code 1.
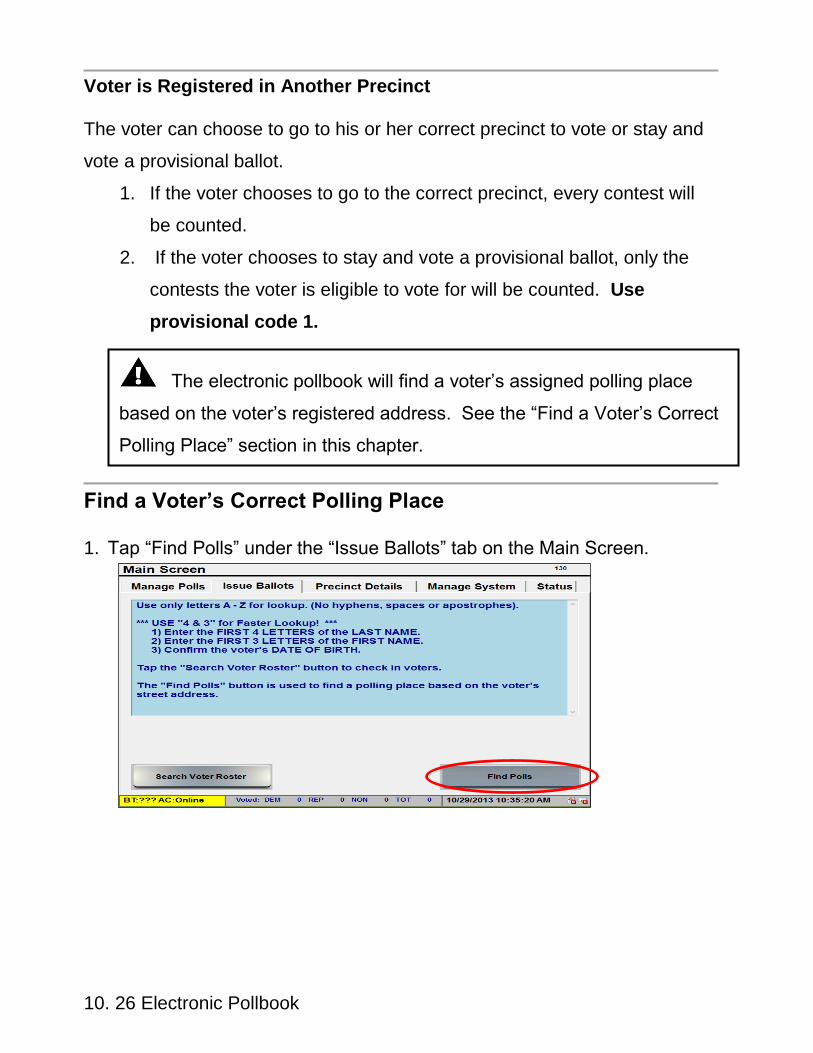
Find a Voter’s Correct Polling Place 1. Tap “Find Polls” under the “Issue Ballots” tab on the Main Screen.
The electronic pollbook will find a voter’s assigned polling place
based on the voter’s registered address. See the “Find a Voter’s Correct
Polling Place” section in this chapter.
Electronic Pollbook 10. 27
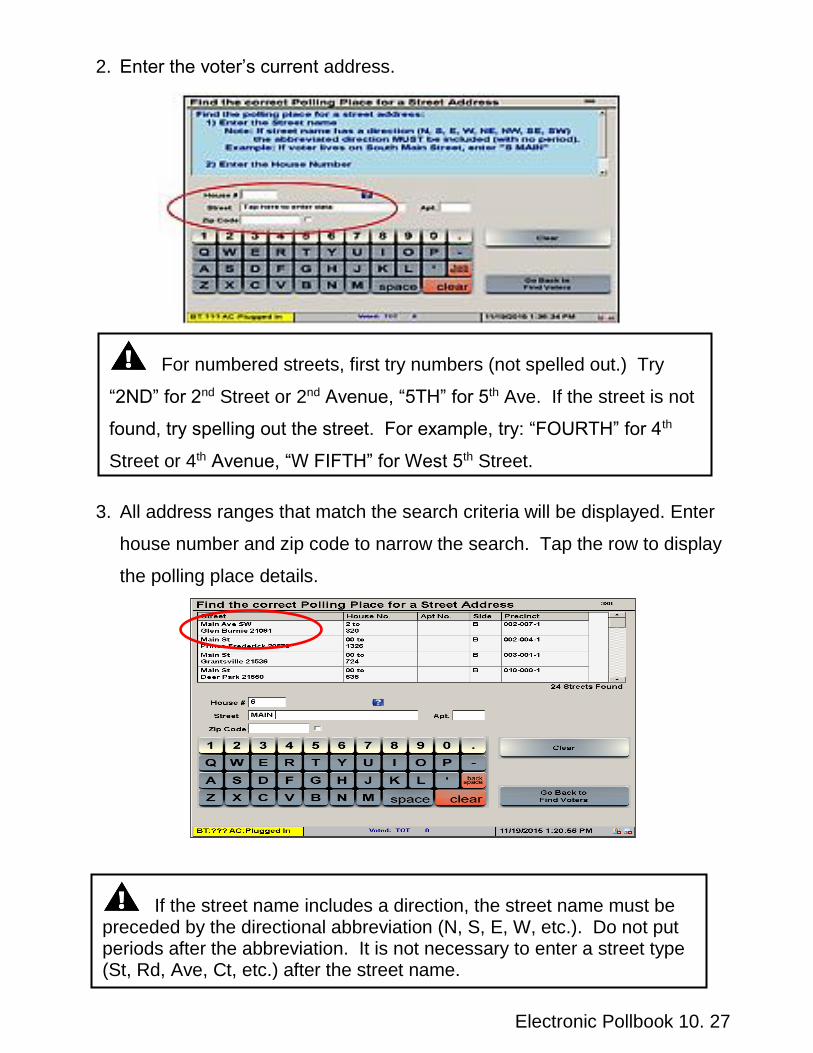
2. Enter the voter’s current address.
3. All address ranges that match the search criteria will be displayed. Enter
house number and zip code to narrow the search. Tap the row to display
the polling place details.
If the street name includes a direction, the street name must be preceded by the directional abbreviation (N, S, E, W, etc.). Do not put periods after the abbreviation. It is not necessary to enter a street type (St, Rd, Ave, Ct, etc.) after the street name.
For numbered streets, first try numbers (not spelled out.) Try
“2ND” for 2nd Street or 2nd Avenue, “5TH” for 5th Ave. If the street is not
found, try spelling out the street. For example, try: “FOURTH” for 4th
Street or 4th Avenue, “W FIFTH” for West 5th Street.

10. 28 Electronic Pollbook
4. Tap the “Print Information” button for a paper print-out of the polling place
name and address that can be given to the voter. The map will not print.
5. Tap “Go Back,” then tap “Go Back to Find Voters” to return to the Main
Screen to continue checking in voters.

Electronic Pollbook 10. 29
Checking in Voters
1. Once you have located the voter’s name, tap anywhere in that voter’s row on the screen to open the “Voter Record” screen. The “Voter Details” tab will be open.
2. Ask “What is your address?” Compare the voter’s response with
what is shown in “Voter Details.” If the voter’s response is the same as
what is shown at the top of the screen, go to step 3.
3. Review the information on the screen to confirm that you have the
correct voter. If the information is correct and you are sure you have
the correct voter, go to step 4 (Primary Election) or step 5 (General
Election). Tap on the “Go Back” button if you have selected the wrong
voter.
If the voter’s address is marked “Confidential,” the voter’s address will not appear in the electronic pollbook. Do not ask the voter to verify his or her address. Continue the check-in process.
If the voter’s address is different than what is shown in the electronic pollbook, see item #1 of the “Special Situations” section of this chapter.
Tap anywhere on the voter’s row to select and continue.

10. 30 Electronic Pollbook
4. Primary election only: Discreetly ask “What is your party
affiliation?” If the voter’s response is the same as what is shown in
the “Party” box, go to step 5.
5. Review the “Status” box in “Voter Details”. If “Active” or “Inactive”,
proceed to Step #6.
If the voter claims a different party affiliation, wants to vote another party’s ballot, or whose party does not have a ballot for this election, see item #2 of the “Special Situations” section of this chapter.

Electronic Pollbook 10. 31
6. Review the “Issued” box in “Voter Details”. If “None” or blank, proceed
to Step #7.
If the voter’s status is “Pend1”, “Pend2”, “ABS Issued”, or “Voted Early”, see item #3 of the “Special Situations” section of this chapter.
If the voter’s status is “Inactive” and the “ID Required” box is
blank, see item #4 of the “Special Situations” section of this chapter.
If the voter’s status is “Active” or “Inactive” and the “ID
Required” box is “Show ID”, see item #6 of the “Special Situations” section of this chapter.
If the voter’s “Issued” box is “Reg Issued” or “PROV”, see item #5
of the “Special Situations” section of this chapter.

10. 32 Electronic Pollbook
7. Review the “ID Required” box in “Voter Details”. If the “ID Require”
box is blank, tap the “Issue Standard Ballot” button and proceed to
Step #8.
If the voter’s “Status” is “Active” or “Inactive” and the “ID Required” box is “Show ID”, see item #6 of the “Special Situations” section of this chapter.
The first time you attempt to issue a ballot, you will be prompted
to enter your name. Type in your name and tap “OK” to continue. You
will not have to enter your name to issue ballots again unless the
judge’s name on the electronic pollbook is reset. See the “Reset
Judge’s Name” section of this chapter for more information.

Electronic Pollbook 10. 33
8. A voter authority card will print.
9. Ask the voter to verify the printed information and sign the voter
authority card.
10. The check-in judge initials the voter authority card.
11. In a Primary Election, circle:
a. Precinct number
b. Party Affiliation and
c. Ballot Style on the voter authority card.
12. Direct the voter to the ballot issuance table.
13. The ballot issuing judge initials the voter authority card on the “Ballot
Issuing Judge” line before giving the voter his or her paper ballot or
ballot activation card.
If you checked-in the wrong voter and have already printed a voter authority card, alert a chief judge immediately.

10. 34 Electronic Pollbook
14. Give the voter the paper ballot, privacy sleeve, and voter authority card
and direct the voter to a voting judge. This voter will now be marked
as “Reg Issued” in the “Issued” column on the “Find Voters” screen.
Issuing a Provisional Ballot In some situations the electronic pollbook automatically prevents a voter
from being issued a regular ballot (i.e., not provisional) and allows only a
provisional ballot to be issued. Examples include “pending” status voters
and voters not in their registered precinct.
There are also situations where the electronic pollbook will allow a voter to
be issued a regular ballot, but the voter should be issued a provisional ballot
instead. Examples include “Active (or Inactive) - show ID” voters or voters
who are challenged by a poll watcher without acceptable identification,
The “Voted:” counts on the status bar will increase by one for
each voter who is issued a ballot. Counts shown are the number of
voters, not ballots. A “re-issued” ballot will not increase the count.
Party counts are based on the ballots issued by party.

Electronic Pollbook 10. 35
extended hours voters, and primary voters claiming a different party
affiliation than what is shown in the electronic pollbook.
Once it has been determined that the voter should be issued a provisional
ballot, the voter will be escorted or directed to the voting operations judge -
provisional (VOP-P). The provisional judge will follow these steps:
1. Look up the voter in the electronic pollbook.
2. Verify the voter’s information on the “Voter Details” tab in the “Voter
Record” screen.
3. Tap “Issue Provisional Ballot” button.
4. The “Select Ballot” screen will appear. Tap on “Select Ballot Reason”
to access a drop-down menu of provisional ballot reason codes.
If a voter cannot be found in the electronic pollbook, the voter
must vote by provisional ballot. Alert a chief judge immediately.
The voter’s current information is highlighted in blue.
Carefully select the appropriate provisional ballot reason code.
It is very important to enter the correct reason code.

10. 36 Electronic Pollbook
The “Select Paper Ballot” button will become available after a provisional
ballot reason code is selected.
5. Tap the “Select Paper Ballot” button.
6. The voter authority card will print.
7. Circle “PROVISIONAL BALLOT” and the reason code.
Tapping the “Cancel No Ballot Issued” button will return you to
the “Find Voters” screen.

Electronic Pollbook 10. 37
8. Have the voter review and sign the voter authority card. The
provisional judge will initial it on the check-in line and place it in an
orange privacy sleeve.
9. The electronic pollbook will return to the “Find Voters” screen.
10. The voter will now be marked as “PROV” in the “Issued” column on the
“Find Voters” screen.
The reason code will print on the voter authority card. The provisional judge needs to enter the same reason code on the voter’s provisional ballot application.

10. 38 Electronic Pollbook
Special Situations The electronic pollbook has been set up so that a check-in judge can follow
procedures to issue either a regular (i.e., not provisional) ballot or a provisional
ballot. In certain cases the electronic pollbook will allow only a provisional ballot
to be issued to a voter. Wherever possible, instructions are provided in the top
section of the screen.
1. Voter Moved If the voter’s current address is different than what is shown in the electronic
pollbook, ask the voter WHEN he or she moved to the current address.
If the voter moved within 21 days of election day, complete a
Voter Update Form. If the voter completes and signs the Voter
Update Form, issue the voter a regular ballot. If the voter
refuses to complete and sign the Voter Update Form, issue the
voter a provisional ballot. See the “Issuing a Provisional Ballot”
section of this chapter.
If the voter moved more than 21 days before election day,
the voter must be issued a provisional ballot. The provisional
ballot application will serve to update the voter’s information
and no Voter Update Form is needed.
“21 Day” dates for the 2018 elections:
Primary Election – If the voter moved prior to June 5, 2018, the voter
must be issued a provisional ballot.
General Election – If the voter moved prior to October 16, 2018, the
voter must be issued a provisional ballot.

Electronic Pollbook 10. 39
2. Voter Claims a Different Party Affiliation or Whose Party Does
Not Have a Ballot (Primary Election Only)
These are voters who claim a party affiliation that is different than
what is indicated in the electronic pollbook or who want to vote a
ballot that is not for the party indicated in the electronic pollbook (this
includes voters whose party does not have a ballot for the primary
election).
If a voter insists on voting a ballot for a party that is different
from the one for the party affiliation shown in the electronic
pollbook, or if the voter’s party does not have ballot for the
primary election, he or she must vote a provisional ballot.
Use provisional code 3.
3. Voter’s Status is “Pend1”, “Pend2”, “ABS Issued”, or “Voted Early”
A. Pend 1: The voter may only be issued a provisional ballot. The
voter’s driver’s license number or social security number could not be
verified. Use provisional code 6.
The voter can present acceptable ID now or to the local board of
elections before the canvassing of provisional ballots which begins
on the 2nd Wednesday after the election to complete the voter
registration.

10. 40 Electronic Pollbook
B. Pend2: The voter may only be issued a provisional ballot. The
voter’s driver’s license number or the last four digits of his or her
social security number was not provided by the voter during
registration. Use provisional code 7.
If the voter provides either a Maryland driver’s license number or the
last four digits of his or her social security number, and if the local
board of elections can verify the information on the Provisional Ballot
Application, the ballot may be counted.
If the voter has never been issued a Maryland driver’s license or a social
security number, the voter will be registered to vote and the ballot may be
counted.
If the voter does not provide either a verifiable Maryland driver’s
license number or last four digits of his or her social security number
before the canvassing deadline, the voter will not be registered to
vote and the ballot will not be counted.
Electronic Pollbook 10. 41
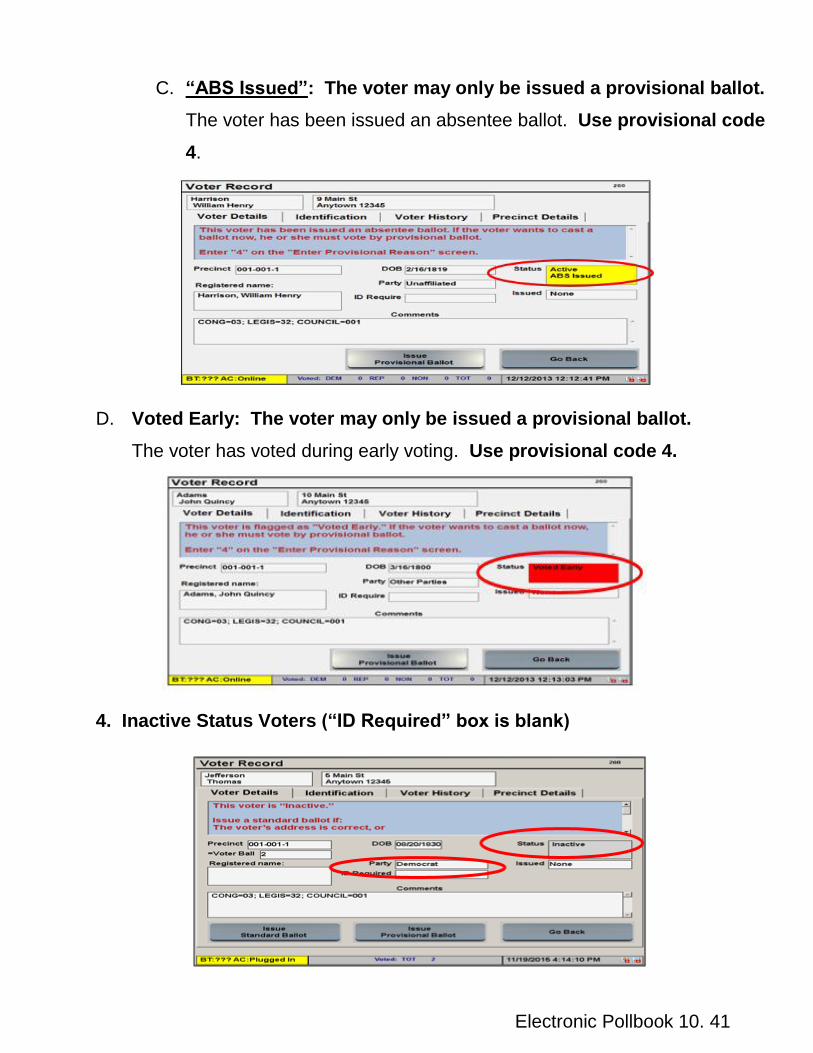
C. “ABS Issued”: The voter may only be issued a provisional ballot.
The voter has been issued an absentee ballot. Use provisional code
4.
D. Voted Early: The voter may only be issued a provisional ballot.
The voter has voted during early voting. Use provisional code 4.
4. Inactive Status Voters (“ID Required” box is blank)

10. 42 Electronic Pollbook
Issue a regular ballot, not a provisional ballot, to Inactive Status voters when:
The voter did not move and signs the Affirmation of Residency for
Inactive Voter. The affirmation is automatically printed on the voter
authority card for “Inactive” status voters when a regular ballot is
issued; or
The voter moved within 21 days of election day. The voter must
complete a Voter Update Form and must sign the Affirmation of
Residency for Inactive Voter on the voter authority card.
Issue a provisional ballot to Inactive Status Voters when:
The voter moved more than 21 days prior to election day. Use
provisional code 2.
If the voter refuses to sign the affirmation of residency, alert a
chief judge immediately.
The Affirmation of Residency will not print on the voter authority
card for provisional voters.

Electronic Pollbook 10. 43
5. “Issued” Box is “Reg Issued” or “PROV”
The pollbook indicates that the voter has been previously issued a
ballot. Inform the voter that he or she is marked as having already
been issued a ballot.
A. Reg Issued:
If it can be confirmed that the voter’s ballot has not been cast,
a regular ballot, not a provisional ballot, may be reissued by a
chief judge. See Chapter 5 – Chief Judges for instructions.
Only chief judges can reissue a ballot. (a supervisor
password is required).
If the ballot has been cast, or it is uncertain if the ballot has
been cast, the voter may only be issued a provisional ballot.
Use provisional code 4.
B. PROV: Provisional ballot issued:
A voter who is checking-in whose status is “Prov”, and who insists
that he or she has not voted or attempted to vote, may only be
issued a provisional ballot by a chief judge (a supervisor
password is required).
If the voter insists that he or she has not voted or attempted to
vote, alert a chief judge immediately. The chief judge will contact the
local board of elections for additional instructions.
All voters, regular and provisional, who make a mistake while
voting their ballot (spoiled ballot) do not need to be checked-in at the
pollbook again to receive a replacement ballot.

10. 44 Electronic Pollbook
6. ID Require – Show ID (Active or Inactive) If an “Active” or “Inactive” voter is listed as “Show ID,” ask the voter for ID.
If the voter presents acceptable ID (see the chart below), issue
the voter a regular ballot. A Voter Update Form must be
completed to record this information.
If the voter does not present an acceptable ID, issue the voter a
provisional ballot. Use provisional code 5.

Electronic Pollbook 10. 45
Standards for Acceptable Forms of ID
A “current” photo ID is an ID that has not expired A “current” non-photo ID is dated within 3 months of election day
Does the voter’s name on the ID have to match the electronic pollbook or the new name on the Voter Update Form?
Does the voter’s address on the ID have to match the electronic pollbook or the new address on the Voter Update Form?
A current Maryland driver’s license
Yes
No
A current MVA-issued photo ID card
Yes
No
A current student photo ID card
Yes
No
A current employee photo ID card
Yes
No
A current military photo ID card
Yes
No
A current passport
Yes
No
Other current State or federal-issued photo ID card
Yes
No
A current utility bill [gas, electricity, water, waste, cable, telephone (land line or cell phone)]
Yes
Yes
A current bank statement
Yes
Yes
A current government check
Yes
Yes
A current paycheck
Yes
Yes
Other current government document
Yes
Yes

10. 46 Electronic Pollbook
Standards for Unacceptable Forms of ID
An out-of-state driver’s license
Not Acceptable
An expired photo ID card
Not Acceptable
Any non-photo ID that is more than 3 months old
Not Acceptable
A membership card (Sam’s Club, gym,…)
Not Acceptable
A Voter Notification Card
Not Acceptable
A Social Security Card
Not Acceptable
Any non-photo ID with an address that does NOT match the electronic pollbook or the new address on the Voter Update Form
Not Acceptable
Reprinting a Voter Authority Card
If the printer paper tears or jams as the voter authority card is being printed,
use the printer “Reprint” button to reprint the same voter authority card:
1. Press the green “Feed” button on the printer and carefully remove
the torn or jammed paper; and
2. Press the blue “Reprint” button to print another copy of the voter’s
voter authority card.

Electronic Pollbook 10. 47
3. If another voter authority card does not print when the “Reprint” button
is pressed, the electronic pollbook can be used to reprint a voter
authority card for any voter who has been issued a ballot.
From the Voter Record screen, tap on the “Identification” tab at
the top; and
Tap on the “Reprint VAC” button in the lower left corner.
Resetting the Judge’s Name The first time you attempt to issue a ballot, you will be prompted to enter
your name. Type in your name and tap “OK” to continue. You will not have
to enter your name or initials to issue ballots again unless the judge’s name
on the electronic pollbook has been reset. To reset the judge’s name:
1. Tap “Return to Main” from the “Find Voters Screen.”

10. 48 Electronic Pollbook
2. Tap the “Manage System” tab.
3. Tap the “System Setup” tab.

Electronic Pollbook 10. 49
4. Tap the “Reset Judge’s Name” button.
5. The election judge’s name in the electronic pollbook will be reset. Tap
“Issue Ballots” tab to continue to issue ballots. The election judge will be
prompted to enter his or her name before the next ballot can be issued.

10. 50 Electronic Pollbook
Ending the Election – Closing the Polls After providing all necessary voter turnout numbers to the chief judges, and
upon authorization from the chief judges, the check-in judges are to:
1. Return to the “Main Screen” and tap the “Manage Polls” tab.
2. Tap on the “Daily Closing Step #1 Close the Polls” button at the bottom
center of the screen. A pop-up screen will appear.
3. Tap the “Continue” button to print the Ballots Counts and Voter Counts
reports.
After the “Continue” button is tapped, the “Poll Status” changes
from “Opened” to “Closed.

Electronic Pollbook 10. 51
4. Tap “Yes” at the “Continue Closing the Polls?” prompt.
5. After the Ballot Counts and Voter Counts reports are printed, tap the
“Daily Closing Step #2 Archive & Close Down” button.
6. If the polling place is closed for the day, and if the end of day Ballot

10. 52 Electronic Pollbook
Counts and Voter Counts reports have been printed, tap the “Yes”
button at the “Question” prompt.
7. The electronic pollbook will return to the “Launch” screen. Turn the
power switch to OFF.
8. Sign the Consolidated Ballot Counts Report and the Consolidated Voter
Counts Report.
Reissued and cancelled ballots are subtracted from “Issued”
ballots to arrive at “Net Ballots” totals for regular and provisional ballots.

Electronic Pollbook 10. 53
10. Give the Electronic Pollbook Integrity Report (with the attached
reports) to the chief judges.
Packing the Electronic Pollbooks and Printers
1. Store the stylus in its slot at the top of each electronic pollbook.
2. Disconnect all cables and cords.
3. Check-in judges must verify that the inner seal on the top lid of each
electronic pollbook is intact and its number matches the number
verified earlier on the Electronic Pollbook Integrity Report.
4. Pack the electronic pollbooks in their cases.
5. The chief judges will provide new seals to seal each case. Record the
new outer seal numbers on the Electronic Pollbook Integrity Report
and have both chief judges sign where indicated.
6. Pack all printers, cords, cables, and hub (if issued).
The total (“TOT”) of the Consolidated Voter Counts Report should
equal “Net Ballots” on the Consolidated Ballot Counts Report.


