Download - Chapter 2

Copyright © 2014 Pearson Education, Inc.
Copyright © 2014 Pearson Education, Inc.
Chapter 2
Creating Applications with
Visual Basic
Copyright © 2014 Pearson Education, Inc.
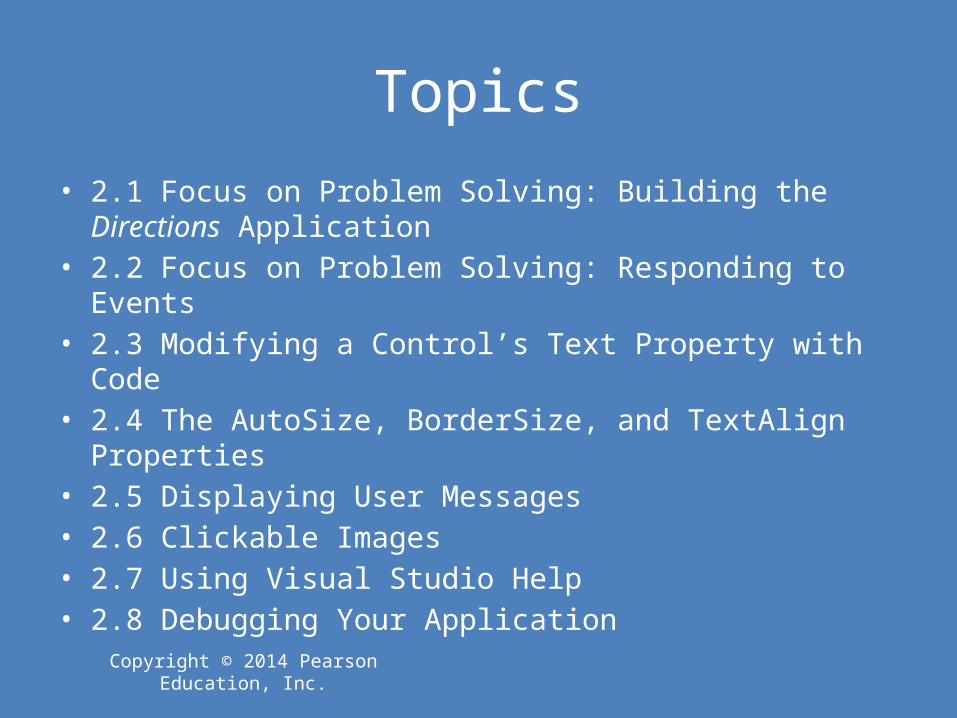
Topics• 2.1 Focus on Problem Solving: Building the Directions
Application• 2.2 Focus on Problem Solving: Responding to Events• 2.3 Modifying a Control’s Text Property with Code• 2.4 The AutoSize, BorderSize, and TextAlign Properties• 2.5 Displaying User Messages• 2.6 Clickable Images• 2.7 Using Visual Studio Help• 2.8 Debugging Your Application

Copyright © 2014 Pearson Education, Inc.
Focus on Problem Solving: Building the Directions Application
2.1
Copyright © 2014 Pearson Education, Inc.
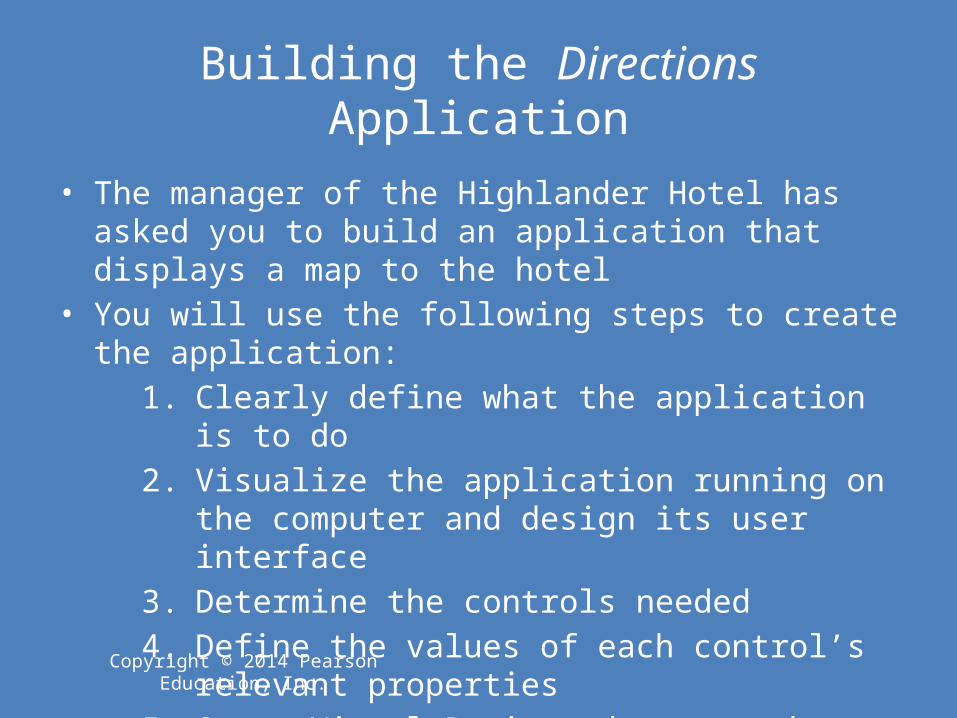
Building the Directions Application
• The manager of the Highlander Hotel has asked you to build an application that displays a map to the hotel
• You will use the following steps to create the application:1. Clearly define what the application is to do2. Visualize the application running on the computer
and design its user interface3. Determine the controls needed4. Define the values of each control’s relevant
properties5. Start Visual Basic and create the forms and other
controls

Copyright © 2014 Pearson Education, Inc.
1. Define What the Application is to Do
• Purpose: Display a map of the Highlander Hotel
• Input: None• Process: Display a form• Output: Display on the form a
graphic image showing a map

Copyright © 2014 Pearson Education, Inc.
2. Visualize the Application and Design Its User Interface

Copyright © 2014 Pearson Education, Inc.
3. Determine the Controls Needed

Copyright © 2014 Pearson Education, Inc.
4. Define the Values of Each Control’s Relevant Properties

Copyright © 2014 Pearson Education, Inc.
5. Start Visual Studio and Create the Forms and Other Controls
• Establish the Form and set its Text property• Add a Label control
– Position and resize it on the form– Set Text, TextAlign, and Font properties
• Add a PictureBox control– Position and resize it on the form– Set its Image property to display HotelMap.jpg
• Run the application• Close and save the application

Copyright © 2014 Pearson Education, Inc.
The Directions Application Running

Copyright © 2014 Pearson Education, Inc.
Design Mode, Run Mode, and Break Mode
• Visual Basic has three modes in which it operates:– Design Mode
• The mode in which you create the application• Also known as design time
– Run Mode • Executes the application in the Visual Studio
environment• Also known as runtime
– Break Mode • Momentarily suspends execution of a running application • For testing and debugging purposes

Copyright © 2014 Pearson Education, Inc.
How Solutions and Projects are Organized
• A solution is a container that holds Visual Studio projects• Each time you create a new project, you will also create a new
solution to hold it• A solution folder is created for each new project
– The solution folder contains:– The solution file and project folder
• Double-clicking the solution file (.sln) will load the project in Visual Studio
– The project folder contains:– Several files and folders generated by Visual Studio– The project file
• Double-clicking the project file (.vbproj) will also load the project in Visual Studio

Copyright © 2014 Pearson Education, Inc.
Opening an Existing Project
• With Visual Studio running, perform any one of the following actions:– Click FILE then Open Project
• Locate either the solution file (.sln) or the project file (.vbproj)– Click FILE then Recent Projects and Solutions
• Select the solution file (.sln) or project file (.vbproj) from the list
– Use the Start Page to open the project• If the start page is not visible, click VIEW then Start Page• Click the Open Project link or Select the name of the project
in the Recent Projects list
Copyright © 2014 Pearson Education, Inc.
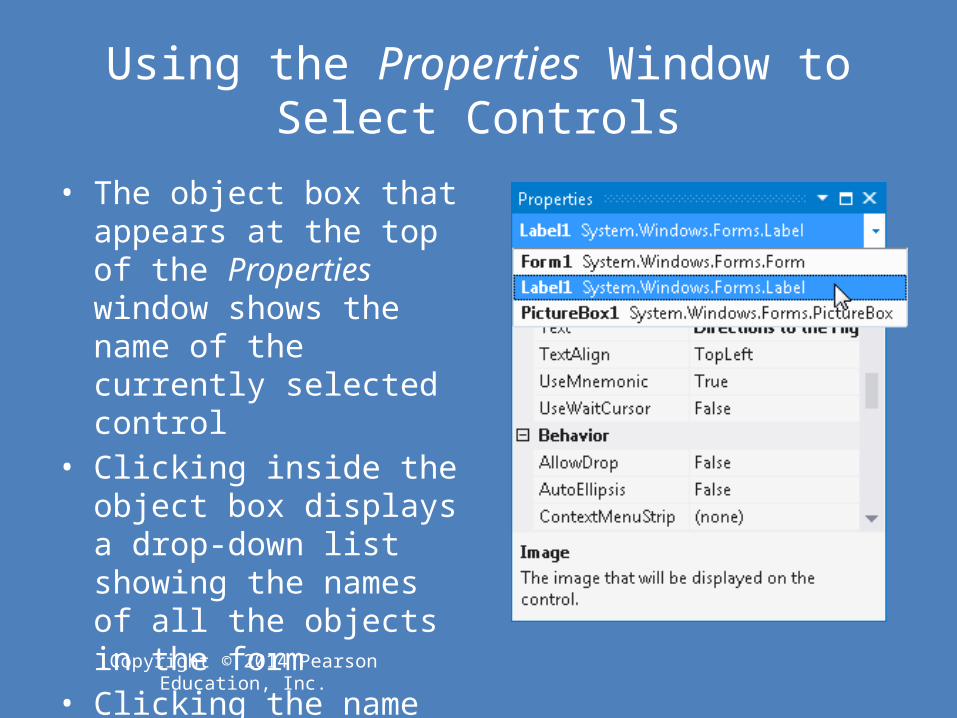
Using the Properties Window to Select Controls
• The object box that appears at the top of the Properties window shows the name of the currently selected control
• Clicking inside the object box displays a drop-down list showing the names of all the objects in the form
• Clicking the name of an object selects it

Copyright © 2014 Pearson Education, Inc.
Categorizing and Alphabetizing Properties
• The Categorized and Alphabetical buttons affect the way properties are displayed
• When the Alphabetical button is selected– The properties are displayed in alphabetical order
• Most of the time it is easier to locate properties that are listed in alphabetical order
• Frequently used properties are enclosed in parentheses and appear at the top of the list
• When the Categorized button is selected– Related properties are displayed together in groups

Copyright © 2014 Pearson Education, Inc.
Focus on Problem Solving: Responding to Events
2.2

Copyright © 2014 Pearson Education, Inc.
Modifying the Directions Application
• The Highlander Hotel manager would like you to add the following items to the application:– A Label containing the
written directions– A Button to display the
directions– A Button to exit the
application

Copyright © 2014 Pearson Education, Inc.
Controls to be AddedControl Type Control Name Description
Label lblDirectionsDisplays written directions to the hotel
Button btnDisplayDirections When clicked, causes lblDisplayDirections text to appear on the
form
Button btnExit Stops the applicationwhen clicked

Copyright © 2014 Pearson Education, Inc.
Control Properties
• Label– Name: lblDirections– Text: “Traveling on I-89,…etc”– Visible: False
• Button– Name: btnDisplayDirections– Text: “Display Directions”
• Button– Name: btnExit– Text: “Exit”

Copyright © 2014 Pearson Education, Inc.
The Code Window• Double-clicking a control in design mode:
– Opens the code window– Creates a code template for the control’s event handler where
you fill in the code for the event

Copyright © 2014 Pearson Education, Inc.
The Click Event Handler for btnDisplayDirections

Copyright © 2014 Pearson Education, Inc.
Changing a Control’s Visible Property in Code
• Specify the control name (lblDirections)• Then a dot (.)• Then the property name (Visible)• For example:
– lblDirections.Visible
• Refers to the Visible property of the lblDirections control
• The Visible property is a Boolean property• It may only hold the value True or False

Copyright © 2014 Pearson Education, Inc.
The Assignment Statement• Specify the item to receive the value (value on the left)• Then the equal symbol (=)
– Known as the assignment operator• Then the value to be assigned (value on the right)• For example:
– lblDirections.Visible = True
• Assigns the value True to the Visible property of the lblDirections control
• Causes the text of the lblDirections control to become visible to the user

Copyright © 2014 Pearson Education, Inc.
Switching Between the Code Window and the Designer Window
• To switch to the Designer window, click the tab that reads Form1.vb [Design]
• To switch to the Code window, click the tab that reads Form1.vb

Copyright © 2014 Pearson Education, Inc.
More Ways to Switch Between the Code Window and the Designer Window
• Use the Solution Explorer to open the Code window
• You can also perform any of the following actions:– Click VIEW on the menu bar then select either Code or Designer– Press Shift +F7 on the keyboard to open the Designer window– Press Ctrl + Alt + 0 to open the Code window

Copyright © 2014 Pearson Education, Inc.
The Click Event Handler for btnExit

Copyright © 2014 Pearson Education, Inc.
Ending an Application with Me.Close()
• An application’s form is an object that has a method named Close• When a form’s Close method is called, it causes the form to close
– If the application has only one form, it also ends the application• For example:
– Me.Close()
• The keyword Me refers to the current form• Followed by a dot (.)• Then the word Close • Followed by a set of parentheses ()
– Parentheses () always appear after the name of the method in a method call

Copyright © 2014 Pearson Education, Inc.
Comments• Comments or remarks are short notes that you can write
in the application’s code to explain what the code does• A comment starts with an apostrophe (')• Anything appearing after the apostrophe, to the end of
the line, is ignored by the compiler
• A comment can also be inserted at the end of a programming statement

Copyright © 2014 Pearson Education, Inc.
Use Visual Basic to Update the Application
• Place the label and the buttons on the form
• Enter the code for the event handlers
• Test the application

Copyright © 2014 Pearson Education, Inc.
Changing Text Colors• The BackColor property
sets the background color• The ForeColor property
sets the text color• In the Properties window:
– Select a color property– Click the down-arrow
button that appears
– Select a color from the list
Copyright © 2014 Pearson Education, Inc.
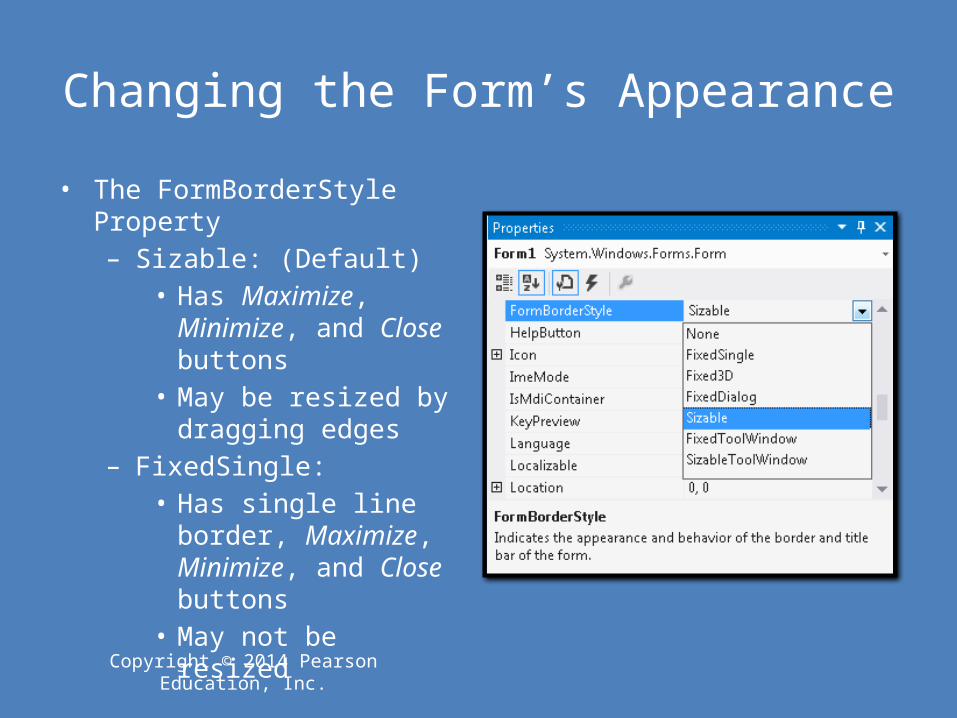
Changing the Form’s Appearance
• The FormBorderStyle Property– Sizable: (Default)
• Has Maximize, Minimize, and Close buttons
• May be resized by dragging edges
– FixedSingle: • Has single line border,
Maximize, Minimize, and Close buttons
• May not be resized

Copyright © 2014 Pearson Education, Inc.
Changing the Form’s Appearance
• The MinimizeBox Property (Boolean)– Hides the Minimize button when set to False
• Is disabled but shown if MaximizeBox is set to True• The MaximizeBox Property (Boolean)
– Hides the Maximize button when set to False • Is disabled but shown if MinimizeBox is set to True
• The ControlBox Property (Boolean)– Hides all buttons when set to False

Copyright © 2014 Pearson Education, Inc.
Locking Controls• Locking controls prevents them from being moved
around during design time– To lock controls:
• Right-click an empty space on the form• Select Lock Controls from the menu

Copyright © 2014 Pearson Education, Inc.
Printing Your Code
• To print a project’s code:– Open the Code window– Click FILE on the menu bar– Click the Print command
• Using the keyboard shortcut:– Open the Code Window– Press Ctrl + P on the keyboard to print

Copyright © 2014 Pearson Education, Inc.
Using IntelliSense
• IntelliSense is a feature that provides automatic code completion as you type programming statements
• Press the Tab key to use IntelliSense– For Example:

Copyright © 2014 Pearson Education, Inc.
Modifying a Control’s Text Property with Code
2.3

Copyright © 2014 Pearson Education, Inc.
Modifying a Control’s Text Property with Code
• Suppose a form is established with a label lblMessage whose Text property is:
1 Kilometer = ?
• And on a btnFeet button click, we want to change the value of the text property to:
1 Kilometer = 3,281 feet

Copyright © 2014 Pearson Education, Inc.
Modifying a Control’s Text Property with Code
Private Sub btnFeet_Click(…) Handles btnFeet.Click' Display the conversion to feet.lblMessage.Text = "1 Kilometer = 3,281 feet"
End Sub
Assigns the string to the right of the equal sign to the Text property of lblMessage
This replaces the previous Text property of lblMessage with the new value shown

Copyright © 2014 Pearson Education, Inc.
The AutoSize, BorderStyle, and TextAlign Properties
2.4

Copyright © 2014 Pearson Education, Inc.
The AutoSize Property• AutoSize is a Boolean property
– When set to True: (default) • The bounding box will automatically resize itself to
fit the amount of text assigned to it– When set to False:
• The label’s size may be changed in the Designer window with its sizing handles
• The bounding box will remain the size it was given at design time
• Text that is too large to fit in the bounding box will be only partially displayed

Copyright © 2014 Pearson Education, Inc.
The BorderStyle Property• The Label control’s BorderStyle property determines the
appearance of the label’s border and may have one of three values:– None (default)
• The label will have no border– FixedSingle
• The label will be outlined with a border one pixel wide– Fixed3D
• The label will have a recessed 3D appearance

Copyright © 2014 Pearson Education, Inc.
The TextAlign Property• The value of the TextAlign property changes the way a
label’s text is aligned

Copyright © 2014 Pearson Education, Inc.
The TextAlign Property• The TextAlign property may be set to one of the following values:
– TopLeft (default)– TopCenter– TopRight– MiddleLeft– MiddelCenter– MiddleRight– BottomLeft– BottomCenter– BottomRight
Copyright © 2014 Pearson Education, Inc.
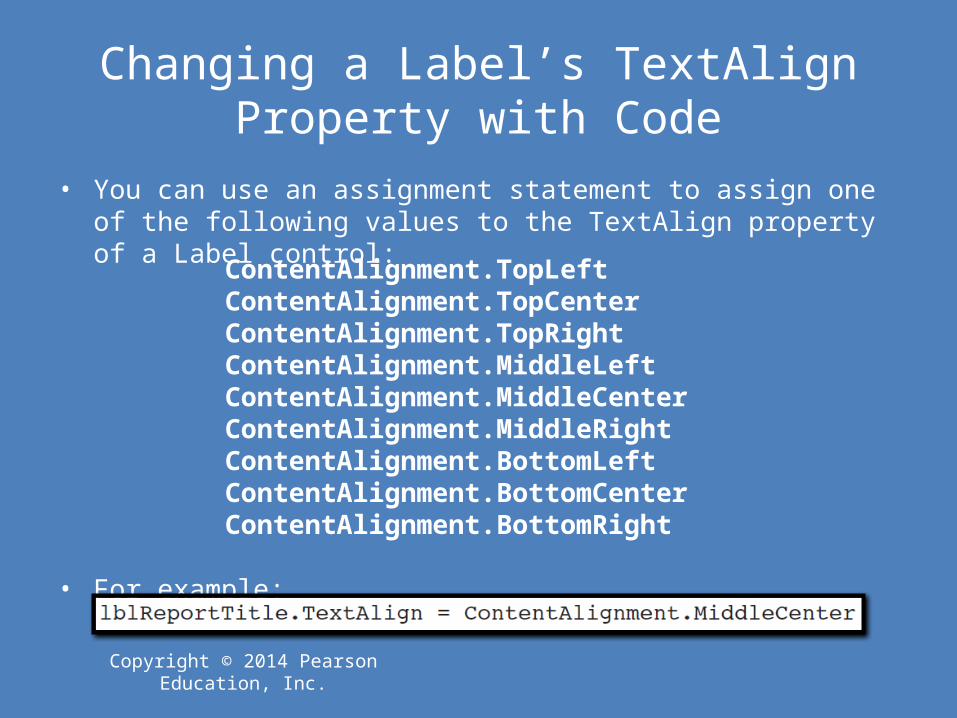
Changing a Label’s TextAlign Property with Code
• You can use an assignment statement to assign one of the following values to the TextAlign property of a Label control:
• For example:
ContentAlignment.TopLeftContentAlignment.TopCenterContentAlignment.TopRightContentAlignment.MiddleLeftContentAlignment.MiddleCenterContentAlignment.MiddleRightContentAlignment.BottomLeftContentAlignment.BottomCenterContentAlignment.BottomRight

Copyright © 2014 Pearson Education, Inc.
Displaying User Messages2.5

Copyright © 2014 Pearson Education, Inc.
Displaying Message Boxes• A message box is a small pop-up message window
– Sometimes referred to as a dialog box– A convenient way to display a message to the user– Displayed by calling the MessageBox.Show method– User must click the OK button to remove the message box
dot ShowMessageBox string enclosed in parentheses
MessageBox.Show("Hello World!")

Copyright © 2014 Pearson Education, Inc.
The StatusStrip Control• The StatusStrip control uses a Label to display program status
information and messages to the user– An ideal way to display messages that are not system critical– Does not force the user to click a button to clear the message
StatusStrip

Copyright © 2014 Pearson Education, Inc.
Adding a StatusStrip and a Label to a Form
• Step 1:– Drag the StatusStrip
control from the Menus & Toolbars section of the Toolbox window onto an existing form.
– The StatusStrip will attach itself to the bottom of the form
– This is called docking the control

Copyright © 2014 Pearson Education, Inc.
Adding a StatusStrip and a Label to a Form
• Step 2: – Click the down arrow on the right side of the StatusStrip and select
StatusLabel from the drop-down list
• A ToolStripStatusLabel control will be added to the StatusStrip– Set its Name property with a more meaningful name– Clear its Text property
Copyright © 2014 Pearson Education, Inc.
Clickable Images2.6

Copyright © 2014 Pearson Education, Inc.
Writing Click event handlers for PictureBox controls
• Earlier you learned that buttons can have Click event handlers
• Other controls, such as PictureBoxes and Labels, may also have Click event handlers
• As we saw earlier the Image Property can be set to a graphic image of some sort
• The flag images in Tutorial 2-16 are clickable• The click event can be handled by code to take whatever
action is desired

Copyright © 2014 Pearson Education, Inc.
Form1 of the Flags Project
Label1
picUSA
picCanada
picUK
btnExit
picAustralia
picBrazil
picItaly
lblMessage
Copyright © 2014 Pearson Education, Inc.
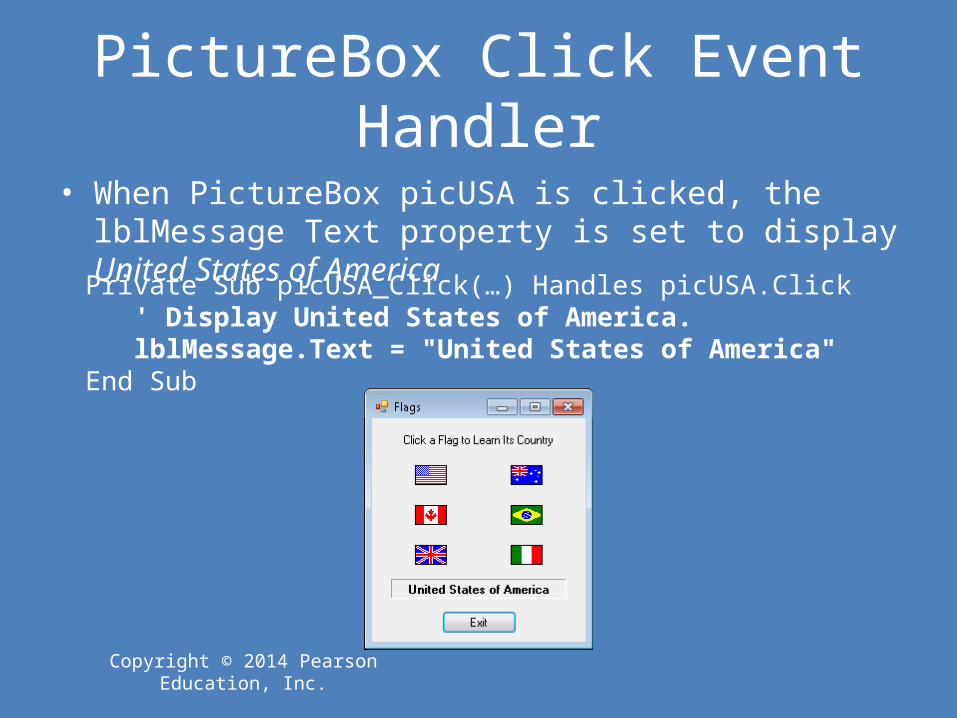
PictureBox Click Event Handler• When PictureBox picUSA is clicked, the lblMessage
Text property is set to display United States of AmericaPrivate Sub picUSA_Click(…) Handles picUSA.Click
' Display United States of America.lblMessage.Text = "United States of America"
End Sub

Copyright © 2014 Pearson Education, Inc.
Using Visual Studio Help2.7

Copyright © 2014 Pearson Education, Inc.
Accessing the Visual Studio Documentation

Copyright © 2014 Pearson Education, Inc.
Context-Sensitive Help• Context-sensitive help is help on a single topic that you are currently
working on• First select an item you need help with in Visual Studio• Then press the F1 key on the keyboard
• This launches a help screen in your Web browser

Copyright © 2014 Pearson Education, Inc.
Help on the = Operator

Copyright © 2014 Pearson Education, Inc.
Debugging Your Application2.8

Copyright © 2014 Pearson Education, Inc.
Compile Errors• These are errors in the syntax of your program
– Misspelled keywords, incorrect use of operators or punctuation
• Visual Basic will inform you of these errors as soon as the code is entered
• The area of the error will be underlined with a jagged blue line

Copyright © 2014 Pearson Education, Inc.
Compile Errors• A description of the error will be given in the Error List
window• Display this window by selecting VIEW on the menu bar,
and then selecting Error List• Double-clicking the error message will position the
cursor at the error in the Code window

Copyright © 2014 Pearson Education, Inc.
Runtime Errors
• Some errors occur as your program runs• These are different from syntax errors
which occur as the code is entered by the programmer
• Runtime errors occur when Visual Basic attempts to perform an operation that cannot be executed


