Contrail plugin for FuelDocumentation
Release 5.0-5.0.0-1
Mirantis Inc.
October 27, 2016
CONTENTS
1 Introduction 11.1 Key terms, acronyms and abbreviations . . . . . . . . . . . . . . . . . . . . . . . 11.2 Overview . . . . . . . . . . . . . . . . . . . . . . . . . . . . . . . . . . . . . . . . 1
2 New features in plugin version 5.0-5.0.0-1 3
3 Limitations 4
4 Requirements 5
5 Installation Guide 65.1 Prerequisites . . . . . . . . . . . . . . . . . . . . . . . . . . . . . . . . . . . . . . 65.2 Install Contrail Plugin . . . . . . . . . . . . . . . . . . . . . . . . . . . . . . . . . 65.3 Configure Contrail Plugin . . . . . . . . . . . . . . . . . . . . . . . . . . . . . . . 7
6 DPDK-based vRouter 136.1 Description . . . . . . . . . . . . . . . . . . . . . . . . . . . . . . . . . . . . . . . 136.2 Prerequisites . . . . . . . . . . . . . . . . . . . . . . . . . . . . . . . . . . . . . . 146.3 Restrictions . . . . . . . . . . . . . . . . . . . . . . . . . . . . . . . . . . . . . . . 146.4 Configure DPDK . . . . . . . . . . . . . . . . . . . . . . . . . . . . . . . . . . . . 156.5 Verify DPDK . . . . . . . . . . . . . . . . . . . . . . . . . . . . . . . . . . . . . . 196.6 Change DPDK options . . . . . . . . . . . . . . . . . . . . . . . . . . . . . . . . 206.7 Change Huge Pages settings after deployment . . . . . . . . . . . . . . . . . . . . 21
7 DPDK-based vRouter on virtual function (VF) 227.1 Description . . . . . . . . . . . . . . . . . . . . . . . . . . . . . . . . . . . . . . . 227.2 Prerequisites . . . . . . . . . . . . . . . . . . . . . . . . . . . . . . . . . . . . . . 227.3 How to enable DPDK on VF . . . . . . . . . . . . . . . . . . . . . . . . . . . . . 22
8 Enable SR-IOV 248.1 Prerequisites . . . . . . . . . . . . . . . . . . . . . . . . . . . . . . . . . . . . . . 248.2 Features . . . . . . . . . . . . . . . . . . . . . . . . . . . . . . . . . . . . . . . . . 248.3 SR-IOV Description . . . . . . . . . . . . . . . . . . . . . . . . . . . . . . . . . . 248.4 Verify SR-IOV environment . . . . . . . . . . . . . . . . . . . . . . . . . . . . . . 248.5 Enable SR-IOV in Fuel . . . . . . . . . . . . . . . . . . . . . . . . . . . . . . . . 258.6 Create a virtual machine with SR-IOV device . . . . . . . . . . . . . . . . . . . . 25
9 Contrail TSN 269.1 TSN Description . . . . . . . . . . . . . . . . . . . . . . . . . . . . . . . . . . . . 269.2 Prerequisites . . . . . . . . . . . . . . . . . . . . . . . . . . . . . . . . . . . . . . 26
i
9.3 HA implementation details . . . . . . . . . . . . . . . . . . . . . . . . . . . . . . 279.4 Configure TSN . . . . . . . . . . . . . . . . . . . . . . . . . . . . . . . . . . . . . 27
10 Contrail with VMware vCenter 2910.1 Overview . . . . . . . . . . . . . . . . . . . . . . . . . . . . . . . . . . . . . . . . 2910.2 Prerequisites . . . . . . . . . . . . . . . . . . . . . . . . . . . . . . . . . . . . . . 3010.3 Restrictions . . . . . . . . . . . . . . . . . . . . . . . . . . . . . . . . . . . . . . . 3010.4 Configuration . . . . . . . . . . . . . . . . . . . . . . . . . . . . . . . . . . . . . . 3010.5 Verification . . . . . . . . . . . . . . . . . . . . . . . . . . . . . . . . . . . . . . . 3310.6 VMware related options . . . . . . . . . . . . . . . . . . . . . . . . . . . . . . . . 3410.7 Add and delete ESXi hosts . . . . . . . . . . . . . . . . . . . . . . . . . . . . . . 35
11 Contrail upgrades (experimental) 3611.1 Description . . . . . . . . . . . . . . . . . . . . . . . . . . . . . . . . . . . . . . . 3611.2 Prequisites . . . . . . . . . . . . . . . . . . . . . . . . . . . . . . . . . . . . . . . 3611.3 Update the packages on Fuel Master node . . . . . . . . . . . . . . . . . . . . . . 3611.4 Upgrade Contrail and OpenStack Controllers . . . . . . . . . . . . . . . . . . . . 3811.5 Upgrade Compute nodes . . . . . . . . . . . . . . . . . . . . . . . . . . . . . . . 38
12 Verify Contrail plugin 4012.1 Run OSTF tests . . . . . . . . . . . . . . . . . . . . . . . . . . . . . . . . . . . . 4112.2 Troubleshooting . . . . . . . . . . . . . . . . . . . . . . . . . . . . . . . . . . . . 44
13 Restore failed Contrail node 45
14 Use Contrail 4714.1 Log into Contrail . . . . . . . . . . . . . . . . . . . . . . . . . . . . . . . . . . . . 4814.2 Verify services status . . . . . . . . . . . . . . . . . . . . . . . . . . . . . . . . . 4914.3 Create the virtual networks . . . . . . . . . . . . . . . . . . . . . . . . . . . . . . 49
15 Appendix 51
ii
CHAPTER
ONE
INTRODUCTION
This document contains instructions for installing and configuring Contrail plugin for Fuel.
Key terms, acronyms and abbreviations
JuniperContrail
Contrail Cloud Platform is a foundational element of Juniper’s open cloudnetworking and NFV solutions.
SDN Software defined networkRESTfulAPI
Representational state transfer application programming interface
IDS Intrusion detection systemDPI Deep packet inspectionVIP virtual IP addressBGP Border gateway protocolAS Autonomous systemContrailvRouter
Contrail vRouter is part of the compute node, which gets reachabilityinformation from the control plane and ensures native L3 services for host-basedvirtual machines.
MOS Mirantis OpenStackTOR Top of rackTSN TOR Services Node
Overview
Contrail plugin for Fuel adds Contrail SDN to Mirantis OpenStack as a networking back endoption using Fuel web UI in a user-friendly manner. Juniper Networks Contrail is an opensoftware defined networking solution that automates and orchestrates the creation of highlyscalable virtual networks.
Contrail features:
• Powerful API calls (REST or direct python class calls)
• Analytics engine: traffic flow reports, statistics
• Network management at 2-4 OSI layers
• Service chaining architecture: you can transparently pass traffic through service instancessuch as IDS, firewalls, and DPI.
1

Contrail plugin for Fuel Documentation, Release 5.0-5.0.0-1
• Fine grained virtual network access policy control
1.2. Overview 2
CHAPTER
TWO
NEW FEATURES IN PLUGIN VERSION 5.0-5.0.0-1
• Fuel 9.1 with OpenStack Mitaka support
• Dedicated Analytics and Analytics DB node roles
• Contrail-Config, Contrail-Control and Contrail-DB are merged into Contrail-Controllerrole
• DPDK on VF, including bonded VFs
• Sahara and Murano compatibility
• vCenter as a secondary hypervisor support
• TSN in HA mode
3
CHAPTER
THREE
LIMITATIONS
• Plugin does not support removing Contrail-Controller and Analytics-DB nodes from acluster. This can lead to data loss and must be a manual procedure. Plugin supportsadding new Contrail-DB nodes to the environment.
• The Fuel Networking option “Assign public network to all nodes” is not compatible withContrail Plugin.
• In case of using contrail service chaining with service instances, you may need to addneutron service user to a current project after you have deployed the environment:
– Open OpenStack Dashboard, navigate to the Identity - Projects page.
– Click modify users button on the right side of the admin project.
– Add the neutron user to project members with _member_ role.
• Changing the default OpenStack project name is not supported. Default project nameshould be admin.
• The password of OpenStack admin user should not contain following characters: $, ‘, \\and !
• Upgrade procedure based on custom deployment graphs does not support upgrading nodeswith roles dpdk, tsn and vmware. Contrail packages upgrades should be done manuallyon these nodes.
4
CHAPTER
FOUR
REQUIREMENTS
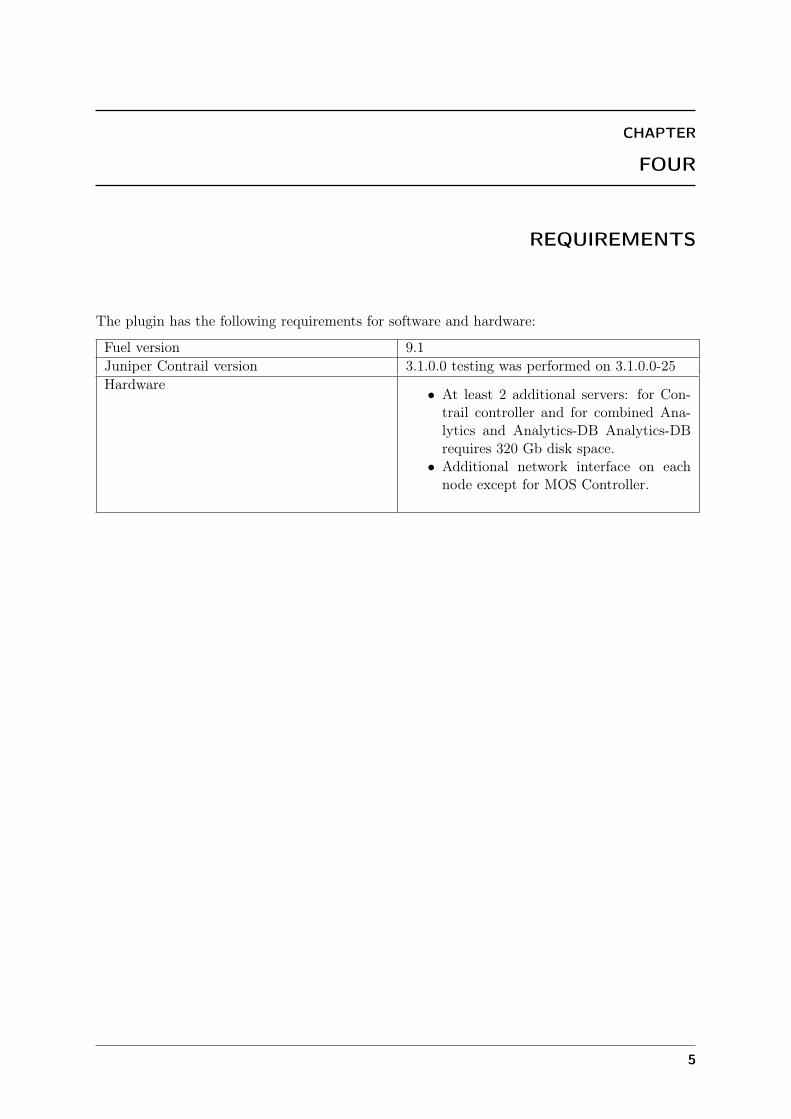
The plugin has the following requirements for software and hardware:
Fuel version 9.1Juniper Contrail version 3.1.0.0 testing was performed on 3.1.0.0-25Hardware
• At least 2 additional servers: for Con-trail controller and for combined Ana-lytics and Analytics-DB Analytics-DBrequires 320 Gb disk space.
• Additional network interface on eachnode except for MOS Controller.
5
CHAPTER
FIVE
INSTALLATION GUIDE
Prerequisites
This guide assumes that you have installed Fuel and all the nodes of your future environmentare discovered and functional.
Install Contrail Plugin
To install the Contrail plugin:
1. Download the Contrail plugin from the Fuel Plugins Catalog.
2. Copy the rpm package downloaded at the previous step to the Fuel Master node and installthe plugin
scp contrail-5.0-5.0.0-1.noarch.rpm <Fuel Master node ip>:/tmp/
3. Log into the Fuel Master node and install the plugin
ssh <the Fuel Master node ip>fuel plugins --install contrail-5.0-5.0.0-1.noarch.rpm
You should get the following output
Plugin <plugin-name-version>.rpm was successfully installed
4. Copy the Juniper Contrail installation package to the Fuel Master node and run theinstallation script to unpack the vendor package and populate the plugin repository:
Note: You can obtain the Juniper Contrail installation package from Juniper by sub-scription. More information can be found on the official Juniper Contrail web-site.
scp contrail-install-packages_3.0.2.1-4~liberty_all.deb \<Fuel Master node ip>:/var/www/nailgun/plugins/contrail-5.0/ssh <Fuel Master node ip> /var/www/nailgun/plugins/contrail-5.0/install.sh
5. In case if vmware integration expected, before running install.sh copy vcenter plugin pack-age to contrail plugin folder
scp contrail-install-vcenter-plugin_3.0.0.0-2723_all.deb \<Fuel Master node ip>:/var/www/nailgun/plugins/contrail-3.0/
6
Contrail plugin for Fuel Documentation, Release 5.0-5.0.0-1
Configure Contrail Plugin
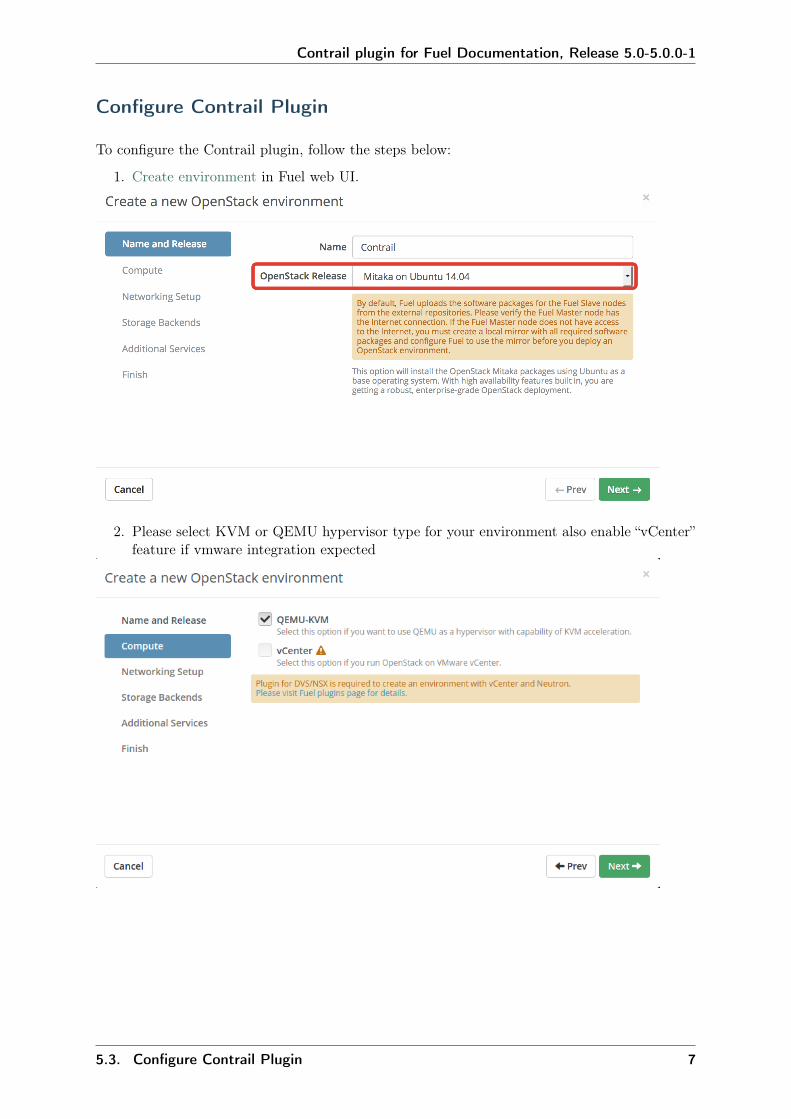
To configure the Contrail plugin, follow the steps below:
1. Create environment in Fuel web UI.
2. Please select KVM or QEMU hypervisor type for your environment also enable “vCenter”feature if vmware integration expected
5.3. Configure Contrail Plugin 7
Contrail plugin for Fuel Documentation, Release 5.0-5.0.0-1
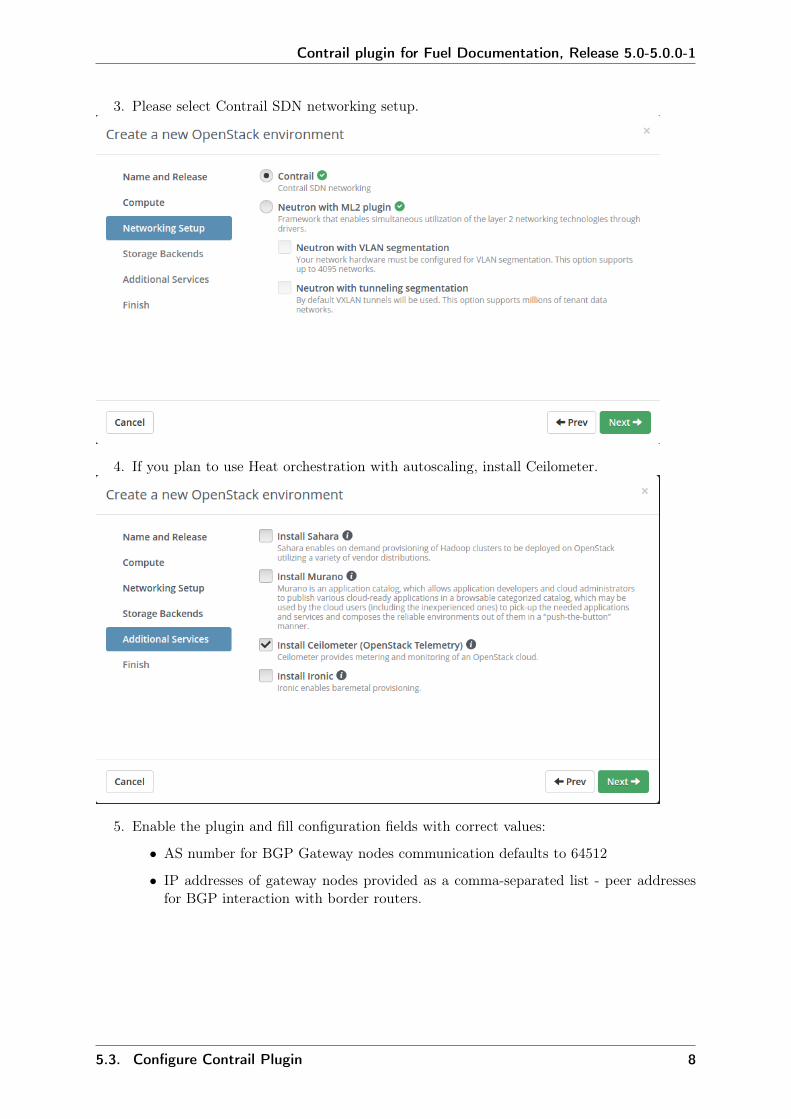
3. Please select Contrail SDN networking setup.
4. If you plan to use Heat orchestration with autoscaling, install Ceilometer.
5. Enable the plugin and fill configuration fields with correct values:
• AS number for BGP Gateway nodes communication defaults to 64512
• IP addresses of gateway nodes provided as a comma-separated list - peer addressesfor BGP interaction with border routers.
5.3. Configure Contrail Plugin 8
Contrail plugin for Fuel Documentation, Release 5.0-5.0.0-1
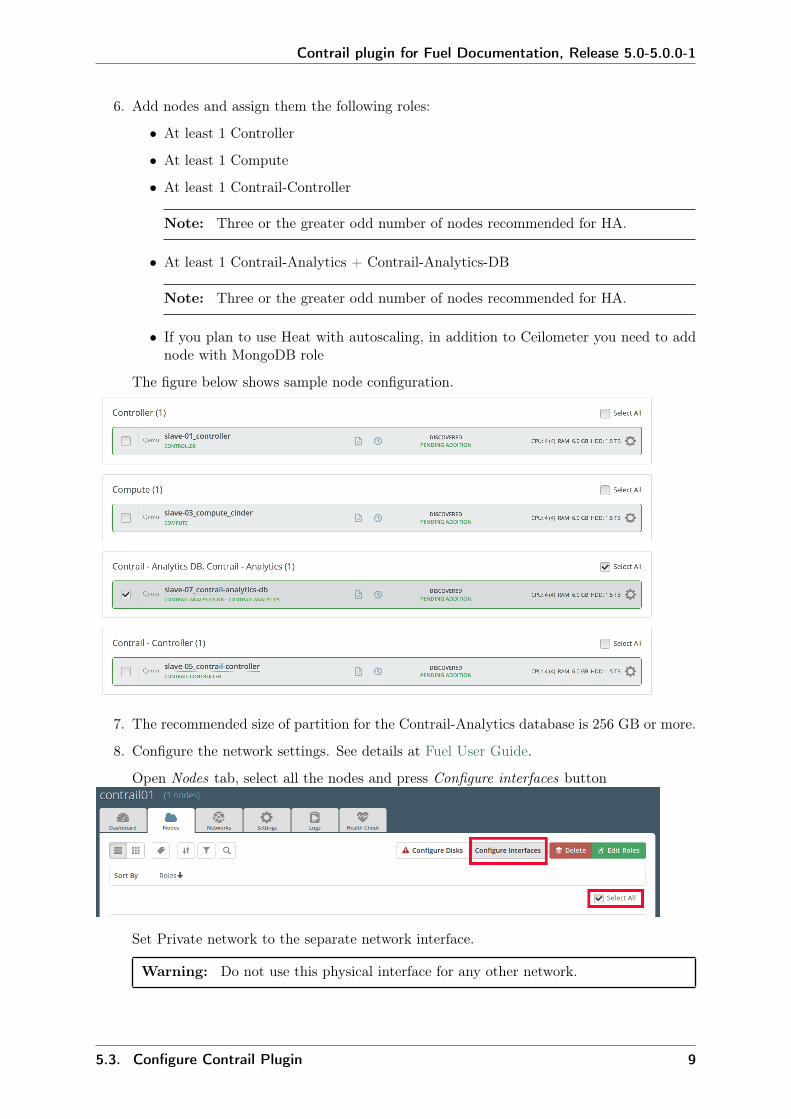
6. Add nodes and assign them the following roles:
• At least 1 Controller
• At least 1 Compute
• At least 1 Contrail-Controller
Note: Three or the greater odd number of nodes recommended for HA.
• At least 1 Contrail-Analytics + Contrail-Analytics-DB
Note: Three or the greater odd number of nodes recommended for HA.
• If you plan to use Heat with autoscaling, in addition to Ceilometer you need to addnode with MongoDB role
The figure below shows sample node configuration.
7. The recommended size of partition for the Contrail-Analytics database is 256 GB or more.
8. Configure the network settings. See details at Fuel User Guide.
Open Nodes tab, select all the nodes and press Configure interfaces button
Set Private network to the separate network interface.
Warning: Do not use this physical interface for any other network.
5.3. Configure Contrail Plugin 9
Contrail plugin for Fuel Documentation, Release 5.0-5.0.0-1
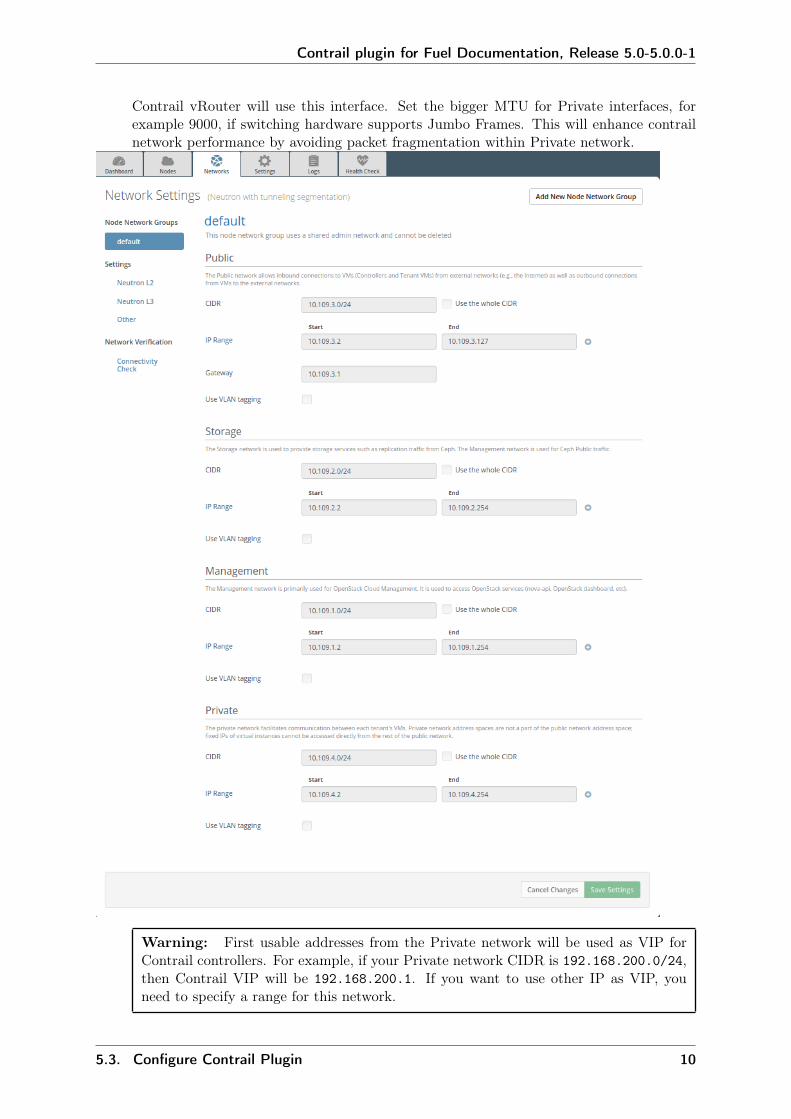
Contrail vRouter will use this interface. Set the bigger MTU for Private interfaces, forexample 9000, if switching hardware supports Jumbo Frames. This will enhance contrailnetwork performance by avoiding packet fragmentation within Private network.
Warning: First usable addresses from the Private network will be used as VIP forContrail controllers. For example, if your Private network CIDR is 192.168.200.0/24,then Contrail VIP will be 192.168.200.1. If you want to use other IP as VIP, youneed to specify a range for this network.
5.3. Configure Contrail Plugin 10
Contrail plugin for Fuel Documentation, Release 5.0-5.0.0-1
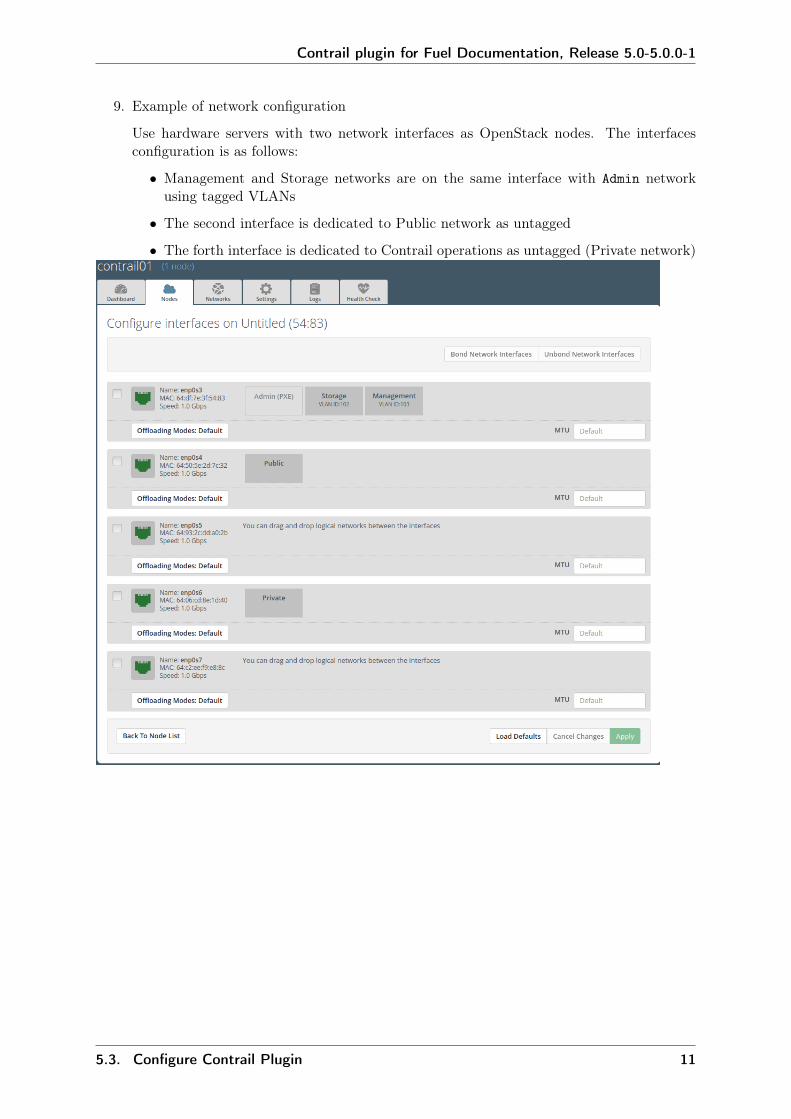
9. Example of network configuration
Use hardware servers with two network interfaces as OpenStack nodes. The interfacesconfiguration is as follows:
• Management and Storage networks are on the same interface with Admin networkusing tagged VLANs
• The second interface is dedicated to Public network as untagged
• The forth interface is dedicated to Contrail operations as untagged (Private network)
5.3. Configure Contrail Plugin 11
Contrail plugin for Fuel Documentation, Release 5.0-5.0.0-1
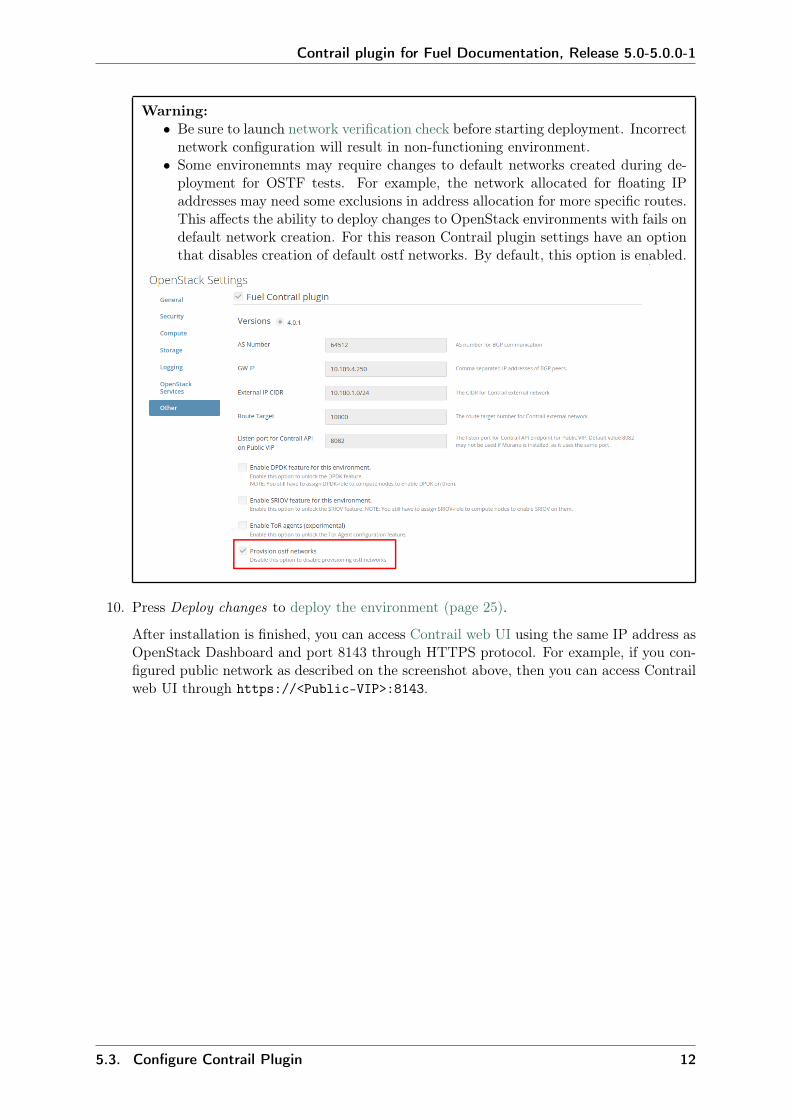
Warning:• Be sure to launch network verification check before starting deployment. Incorrect
network configuration will result in non-functioning environment.• Some environemnts may require changes to default networks created during de-
ployment for OSTF tests. For example, the network allocated for floating IPaddresses may need some exclusions in address allocation for more specific routes.This affects the ability to deploy changes to OpenStack environments with fails ondefault network creation. For this reason Contrail plugin settings have an optionthat disables creation of default ostf networks. By default, this option is enabled.
10. Press Deploy changes to deploy the environment (page 25).
After installation is finished, you can access Contrail web UI using the same IP address asOpenStack Dashboard and port 8143 through HTTPS protocol. For example, if you con-figured public network as described on the screenshot above, then you can access Contrailweb UI through https://<Public-VIP>:8143.
5.3. Configure Contrail Plugin 12
CHAPTER
SIX
DPDK-BASED VROUTER
Description
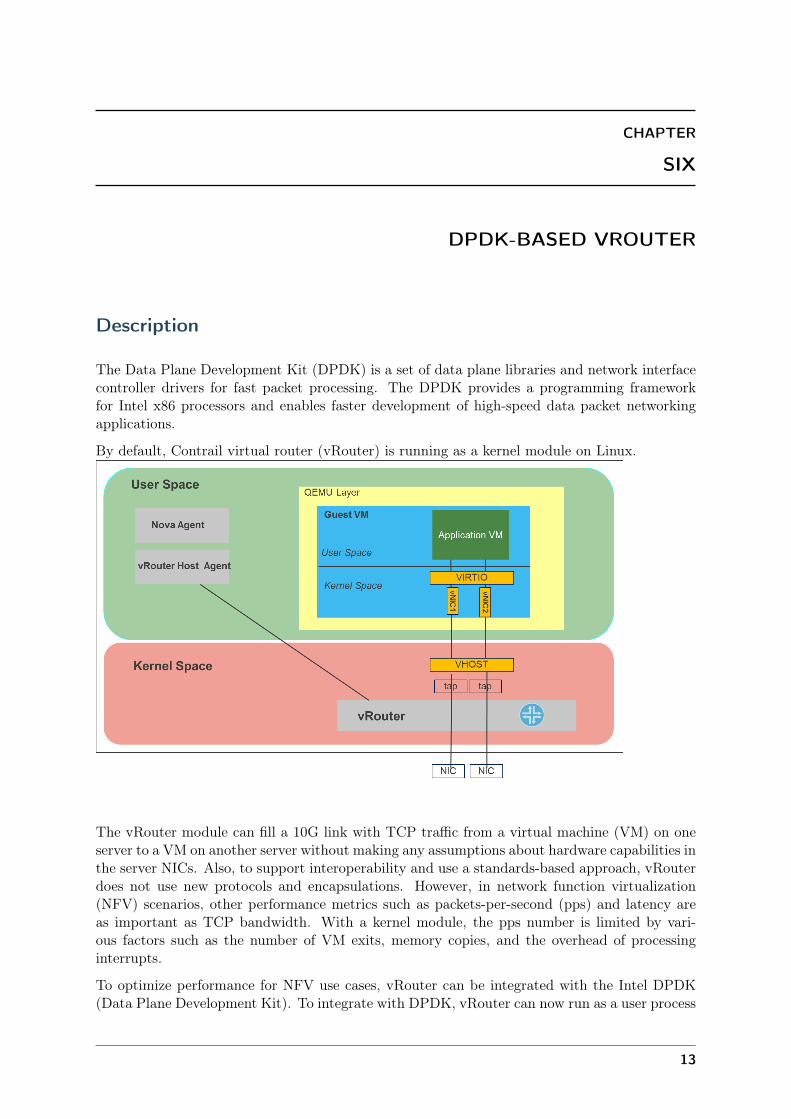
The Data Plane Development Kit (DPDK) is a set of data plane libraries and network interfacecontroller drivers for fast packet processing. The DPDK provides a programming frameworkfor Intel x86 processors and enables faster development of high-speed data packet networkingapplications.
By default, Contrail virtual router (vRouter) is running as a kernel module on Linux.
The vRouter module can fill a 10G link with TCP traffic from a virtual machine (VM) on oneserver to a VM on another server without making any assumptions about hardware capabilities inthe server NICs. Also, to support interoperability and use a standards-based approach, vRouterdoes not use new protocols and encapsulations. However, in network function virtualization(NFV) scenarios, other performance metrics such as packets-per-second (pps) and latency areas important as TCP bandwidth. With a kernel module, the pps number is limited by vari-ous factors such as the number of VM exits, memory copies, and the overhead of processinginterrupts.
To optimize performance for NFV use cases, vRouter can be integrated with the Intel DPDK(Data Plane Development Kit). To integrate with DPDK, vRouter can now run as a user process
13
Contrail plugin for Fuel Documentation, Release 5.0-5.0.0-1
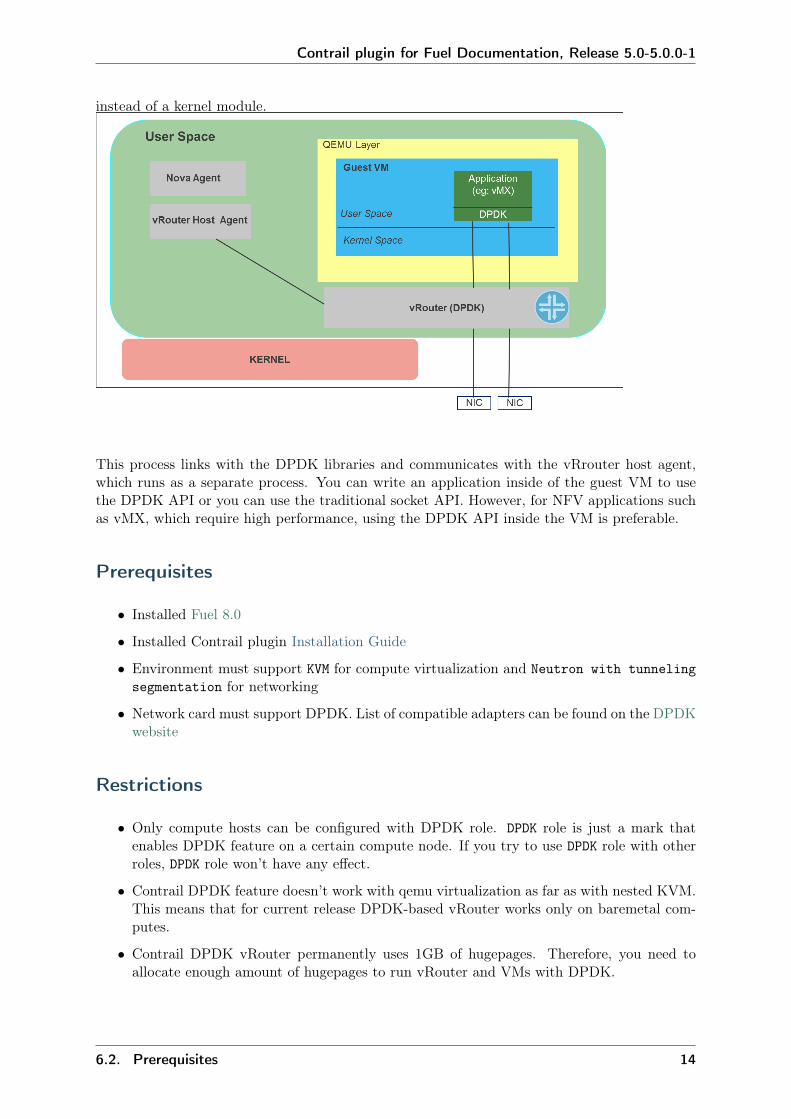
instead of a kernel module.
This process links with the DPDK libraries and communicates with the vRrouter host agent,which runs as a separate process. You can write an application inside of the guest VM to usethe DPDK API or you can use the traditional socket API. However, for NFV applications suchas vMX, which require high performance, using the DPDK API inside the VM is preferable.
Prerequisites
• Installed Fuel 8.0
• Installed Contrail plugin Installation Guide
• Environment must support KVM for compute virtualization and Neutron with tunnelingsegmentation for networking
• Network card must support DPDK. List of compatible adapters can be found on the DPDKwebsite
Restrictions
• Only compute hosts can be configured with DPDK role. DPDK role is just a mark thatenables DPDK feature on a certain compute node. If you try to use DPDK role with otherroles, DPDK role won’t have any effect.
• Contrail DPDK feature doesn’t work with qemu virtualization as far as with nested KVM.This means that for current release DPDK-based vRouter works only on baremetal com-putes.
• Contrail DPDK vRouter permanently uses 1GB of hugepages. Therefore, you need toallocate enough amount of hugepages to run vRouter and VMs with DPDK.
6.2. Prerequisites 14

Contrail plugin for Fuel Documentation, Release 5.0-5.0.0-1
Configure DPDK
To configure DPDK you should proceed with the following steps:
1. Enable the Contrail plugin in Fuel web UI settings
6.4. Configure DPDK 15
Contrail plugin for Fuel Documentation, Release 5.0-5.0.0-1
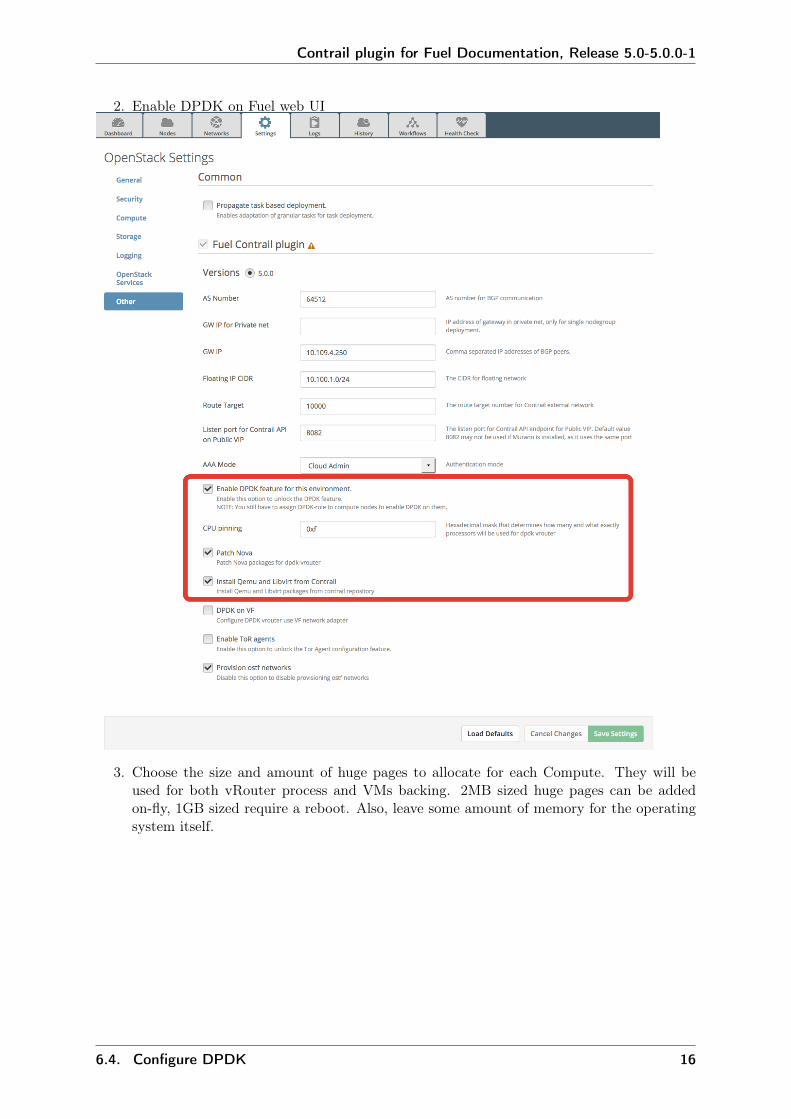
2. Enable DPDK on Fuel web UI
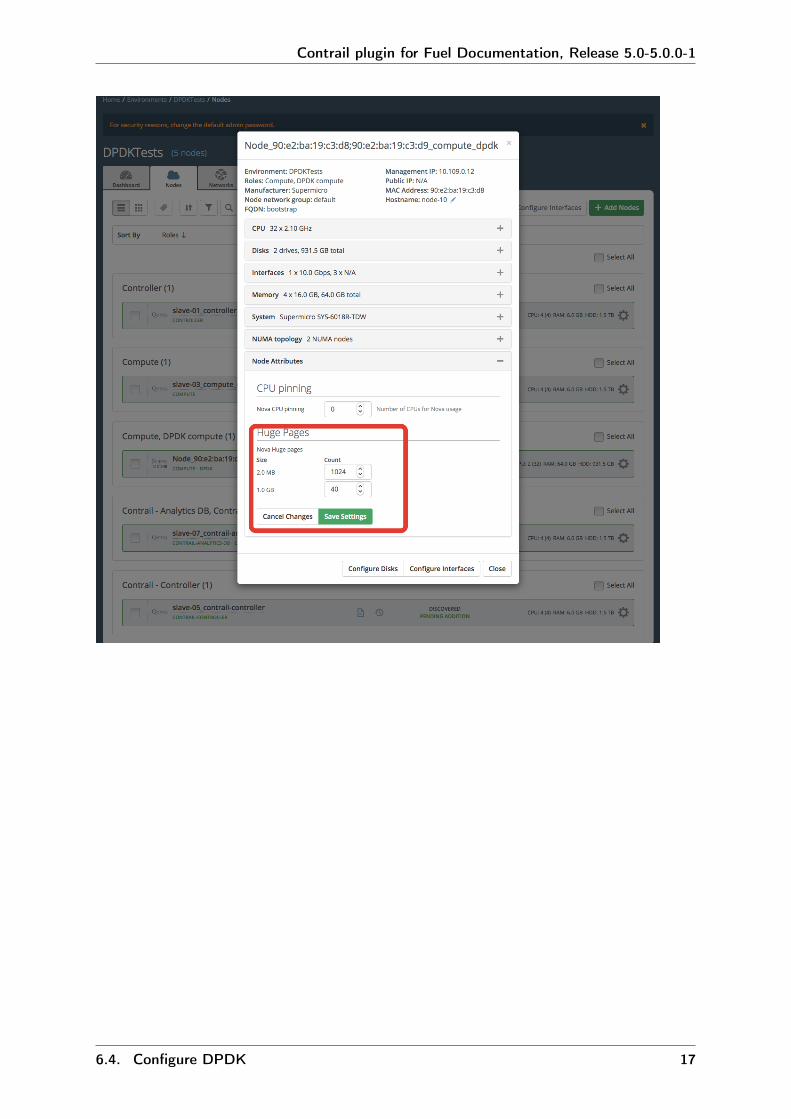
3. Choose the size and amount of huge pages to allocate for each Compute. They will beused for both vRouter process and VMs backing. 2MB sized huge pages can be addedon-fly, 1GB sized require a reboot. Also, leave some amount of memory for the operatingsystem itself.
6.4. Configure DPDK 16
Contrail plugin for Fuel Documentation, Release 5.0-5.0.0-1
6.4. Configure DPDK 17
Contrail plugin for Fuel Documentation, Release 5.0-5.0.0-1
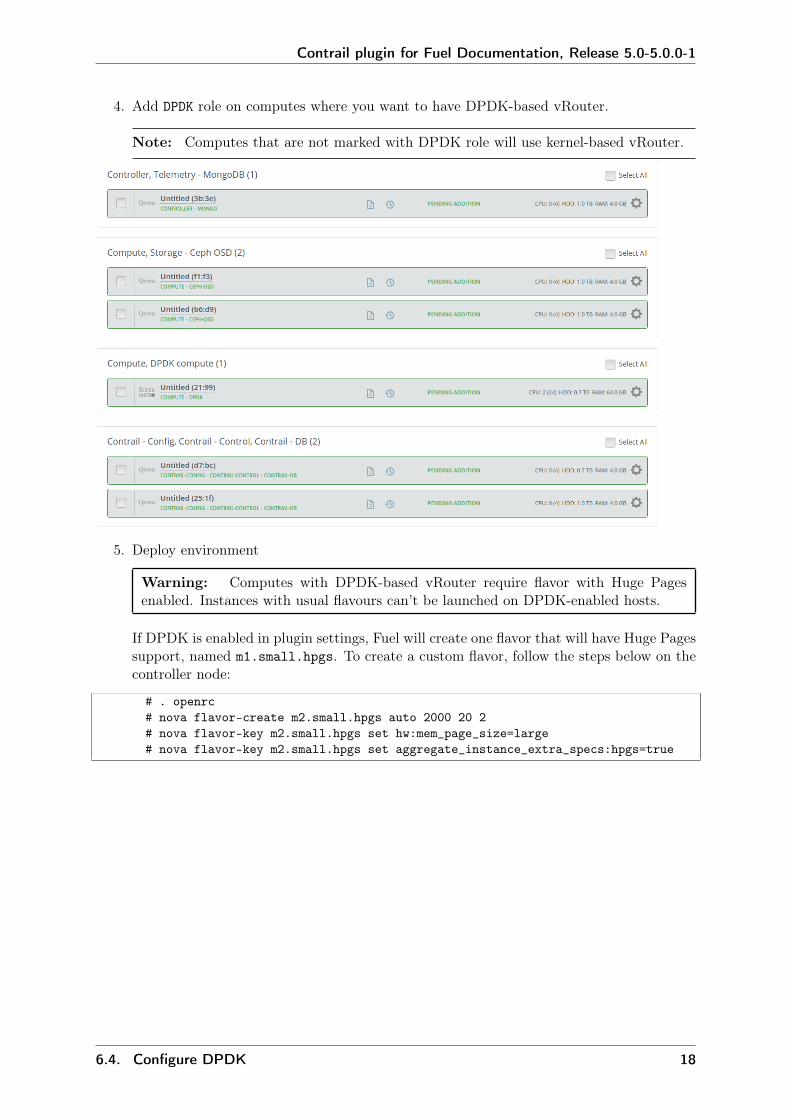
4. Add DPDK role on computes where you want to have DPDK-based vRouter.
Note: Computes that are not marked with DPDK role will use kernel-based vRouter.
5. Deploy environment
Warning: Computes with DPDK-based vRouter require flavor with Huge Pagesenabled. Instances with usual flavours can’t be launched on DPDK-enabled hosts.
If DPDK is enabled in plugin settings, Fuel will create one flavor that will have Huge Pagessupport, named m1.small.hpgs. To create a custom flavor, follow the steps below on thecontroller node:
# . openrc# nova flavor-create m2.small.hpgs auto 2000 20 2# nova flavor-key m2.small.hpgs set hw:mem_page_size=large# nova flavor-key m2.small.hpgs set aggregate_instance_extra_specs:hpgs=true
6.4. Configure DPDK 18
Contrail plugin for Fuel Documentation, Release 5.0-5.0.0-1
Verify DPDK
To verify your installation, proceed with basic checks below:
1. Verify that Contrail services and DPDK vRouter are running on a compute node:
contrail-status
System response:
== Contrail vRouter ==supervisor-vrouter: activecontrail-vrouter-agent activecontrail-vrouter-dpdk activecontrail-vrouter-nodemgr active
2. Verify if DPDK vRouter binds network interfaces:
/opt/contrail/bin/dpdk_nic_bind.py -s
Example of system response:
Network devices using DPDK-compatible driver============================================0000:06:00.0 '82599ES 10-Gigabit SFI/SFP+ Network Connection' drv=igb_uiounused=Network devices using kernel driver===================================0000:02:00.0 'I350 Gigabit Network Connection' if=eth0 drv=igb unused=igb_uio0000:02:00.1 'I350 Gigabit Network Connection' if=eth1 drv=igb unused=igb_uio0000:06:00.1 '82599ES 10-Gigabit SFI/SFP+ Network Connection' if=eth3 drv=ixgbeunused=igb_uioOther network devices=====================<none>
3. Verify if vRrouter uses Huge Pages:
grep Huge /proc/meminfo
Example of system response:
AnonHugePages: 0 kBHugePages_Total: 30000HugePages_Free: 29488HugePages_Rsvd: 0HugePages_Surp: 0Hugepagesize: 2048 kB
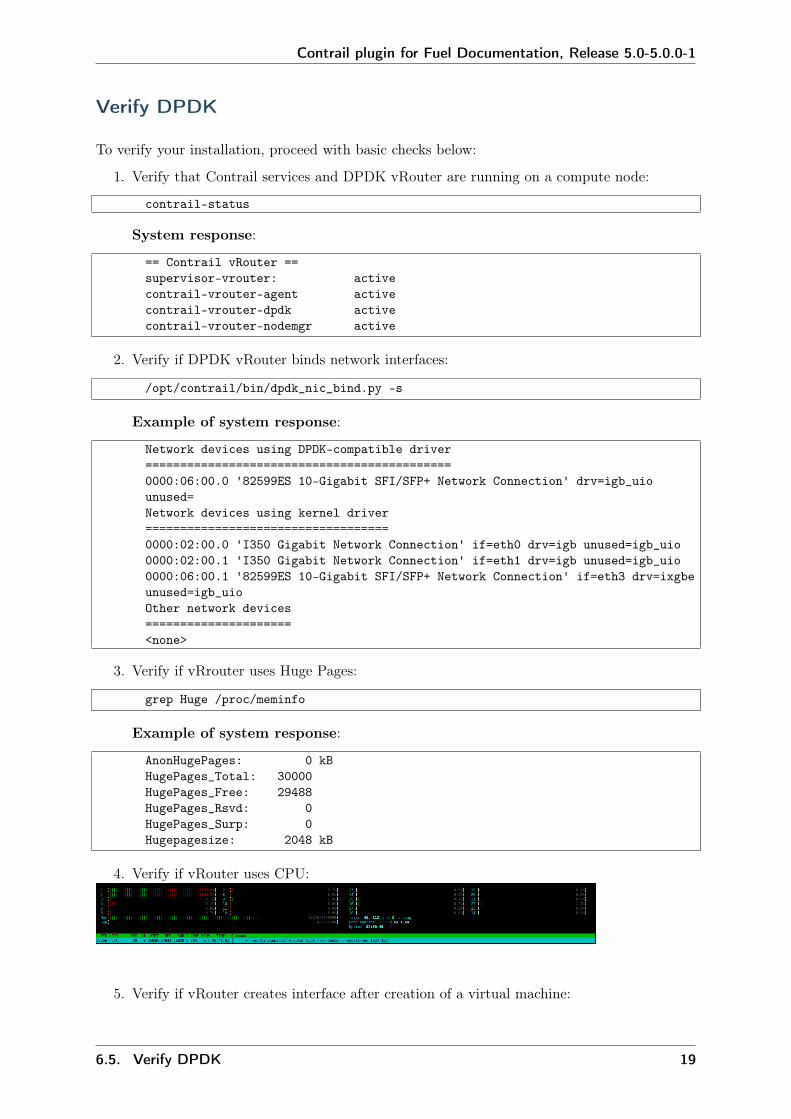
4. Verify if vRouter uses CPU:
5. Verify if vRouter creates interface after creation of a virtual machine:
6.5. Verify DPDK 19
Contrail plugin for Fuel Documentation, Release 5.0-5.0.0-1
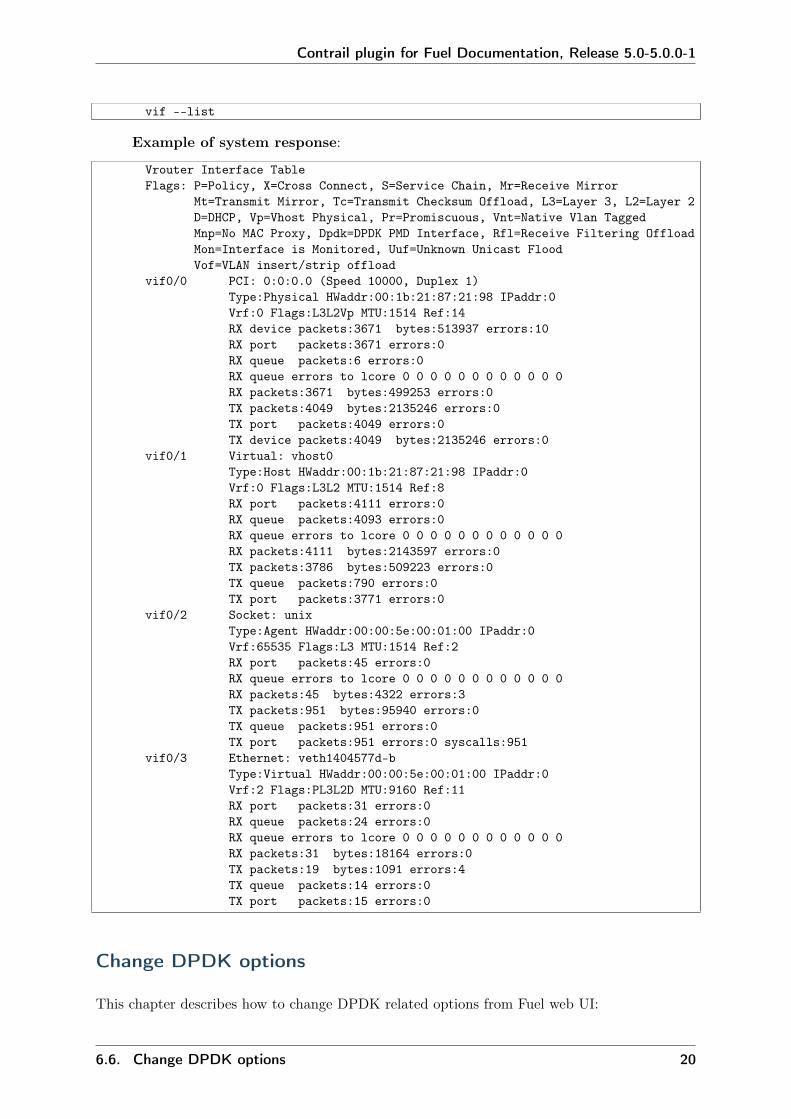
vif --list
Example of system response:
Vrouter Interface TableFlags: P=Policy, X=Cross Connect, S=Service Chain, Mr=Receive Mirror
Mt=Transmit Mirror, Tc=Transmit Checksum Offload, L3=Layer 3, L2=Layer 2D=DHCP, Vp=Vhost Physical, Pr=Promiscuous, Vnt=Native Vlan TaggedMnp=No MAC Proxy, Dpdk=DPDK PMD Interface, Rfl=Receive Filtering OffloadMon=Interface is Monitored, Uuf=Unknown Unicast FloodVof=VLAN insert/strip offload
vif0/0 PCI: 0:0:0.0 (Speed 10000, Duplex 1)Type:Physical HWaddr:00:1b:21:87:21:98 IPaddr:0Vrf:0 Flags:L3L2Vp MTU:1514 Ref:14RX device packets:3671 bytes:513937 errors:10RX port packets:3671 errors:0RX queue packets:6 errors:0RX queue errors to lcore 0 0 0 0 0 0 0 0 0 0 0 0RX packets:3671 bytes:499253 errors:0TX packets:4049 bytes:2135246 errors:0TX port packets:4049 errors:0TX device packets:4049 bytes:2135246 errors:0
vif0/1 Virtual: vhost0Type:Host HWaddr:00:1b:21:87:21:98 IPaddr:0Vrf:0 Flags:L3L2 MTU:1514 Ref:8RX port packets:4111 errors:0RX queue packets:4093 errors:0RX queue errors to lcore 0 0 0 0 0 0 0 0 0 0 0 0RX packets:4111 bytes:2143597 errors:0TX packets:3786 bytes:509223 errors:0TX queue packets:790 errors:0TX port packets:3771 errors:0
vif0/2 Socket: unixType:Agent HWaddr:00:00:5e:00:01:00 IPaddr:0Vrf:65535 Flags:L3 MTU:1514 Ref:2RX port packets:45 errors:0RX queue errors to lcore 0 0 0 0 0 0 0 0 0 0 0 0RX packets:45 bytes:4322 errors:3TX packets:951 bytes:95940 errors:0TX queue packets:951 errors:0TX port packets:951 errors:0 syscalls:951
vif0/3 Ethernet: veth1404577d-bType:Virtual HWaddr:00:00:5e:00:01:00 IPaddr:0Vrf:2 Flags:PL3L2D MTU:9160 Ref:11RX port packets:31 errors:0RX queue packets:24 errors:0RX queue errors to lcore 0 0 0 0 0 0 0 0 0 0 0 0RX packets:31 bytes:18164 errors:0TX packets:19 bytes:1091 errors:4TX queue packets:14 errors:0TX port packets:15 errors:0
Change DPDK options
This chapter describes how to change DPDK related options from Fuel web UI:
6.6. Change DPDK options 20
Contrail plugin for Fuel Documentation, Release 5.0-5.0.0-1
• Enable DPDK feature for this environment - this option enables DPDK globally. Still youmust use DPDK role to mark a compute node with DPDK
• Hugepage size - specifies the size of huge pages that will be used for a dpdk feature. Verifyif 1GB pages are supported on the target compute node:
grep pdpe1gb /proc/cpuinfo | uniq
• Hugepages amount (%) - sets amount of memory allocated on each compute node forhuge pages. It will use % of all memory available on a compute node. DPDK vRouterpermanently uses 1GB of huge pages and other applications running on compute nodemay not support huge pages. Therefore, use this parameter carefully.
• CPU pinning - this hexadecimal value describes how many and which exact processorsdpdk-vrouter will use. CPU pinning is implemented using taskset util
• Patch Nova - in the MOS 8.0 release nova doesn’t support DPDK-based vRouter. Infuture, MOS maintenance updates will include necessary patches.
• Install Qemu and Libvirt from Contrail - DPDK-based vRouter needs huge pages memory-backing for guests. MOS 8.0 includes qemu and libvirt that don’t support huge pagesmemory-backing. DPDK feature needs qemu and libvirt from Contrail only on nodes withDPDK role.
Change Huge Pages settings after deployment
After deploy is finished, plugin settigs are locked in Fuel web UI. Therefore, size and ammountof huge pages cannot be changed by the plugin. You need to set Huge Pages settings manuallyon each compute node.
To set 2MB-sized huge pages:
1. Calculate the number of huge pages based on the ammount you need. For example 20GB= 20 * 1024 / 2 = 10240 pages.
2. Set 2MB-sized huge pages:
sysctl -w vm.nr_hugepages=<number of pages>
3. Edit the /etc/sysctl.conf file to make these changes persistent over reboots.
On the contrary to setting 2MB-sized huge pages, you can set 1GB-sized huge pages throughthe kernel parameter only, which requires a reboot to take effect. Kernel versions supplied withUbuntu 14.04 don’t support on the fly allocation for 1GB-sized huge pages.
To set 1GB-sized huge pages:
1. Edit the /etc/default/grub file and set needed amount of huge pages. ForGRUB_CMDLINE_LINUX in /etc/default/grub:
GRUB_CMDLINE_LINUX="$GRUB_CMDLINE_LINUX hugepagesz=1024M hugepages=20
2. Update the bootloader and reboot for these parameters to take effect:
# update-grub# reboot
6.7. Change Huge Pages settings after deployment 21
CHAPTER
SEVEN
DPDK-BASED VROUTER ON VIRTUAL FUNCTION (VF)
Description
This guide describes how to run DPDK-based vRouter on virtual functions (VF). DPDK on VFdepends on Enable SR-IOV and DPDK-based vRouter features. This feature shares a physicalinterface for DPDK and SR-IOV usage.
Prerequisites
• Installed Fuel 9.1
• Installed Fuel Contrail Plugin Installation Guide
• Environment must be created with “KVM” for compute virtualization and “Contrail” fornetworking
• Network card must support DPDK. List of compatible adapters can be found on DPDKwebsite
• Network card must support SRIOV.
How to enable DPDK on VF
1. Enable DPDK feature DPDK-based vRouter.
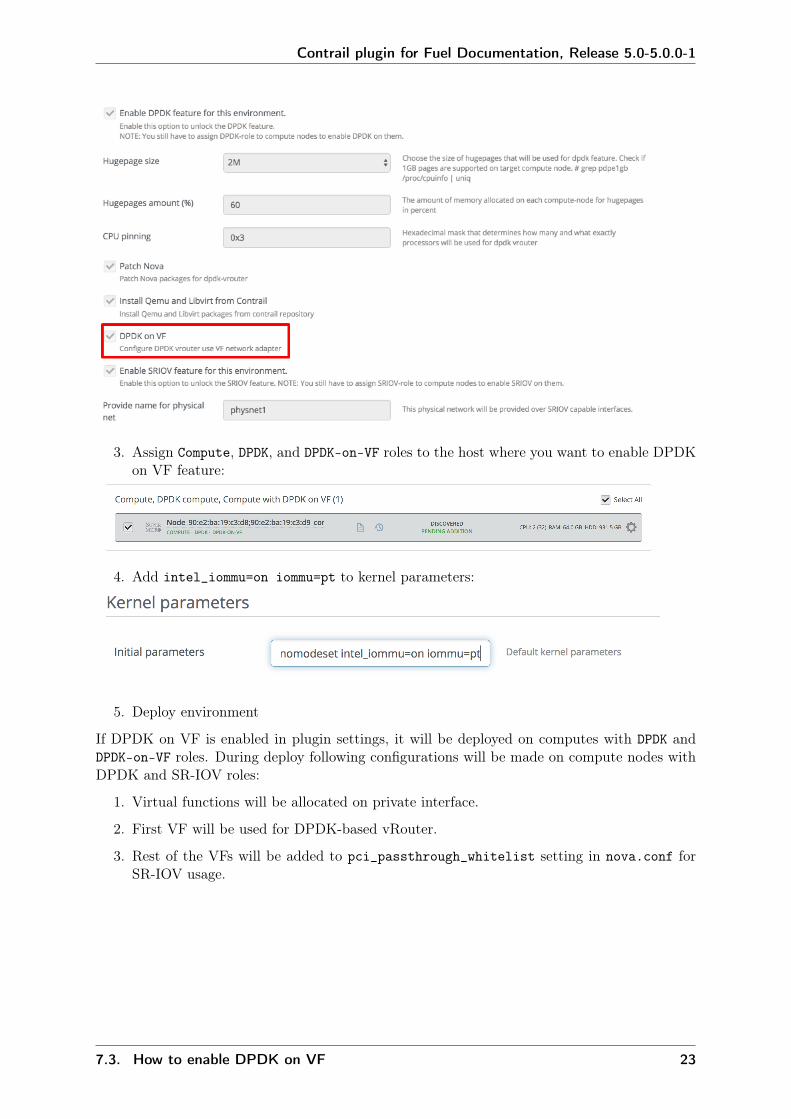
2. Enable DPDK on VF in Fuel UI settings:
22
Contrail plugin for Fuel Documentation, Release 5.0-5.0.0-1
3. Assign Compute, DPDK, and DPDK-on-VF roles to the host where you want to enable DPDKon VF feature:
4. Add intel_iommu=on iommu=pt to kernel parameters:
5. Deploy environment
If DPDK on VF is enabled in plugin settings, it will be deployed on computes with DPDK andDPDK-on-VF roles. During deploy following configurations will be made on compute nodes withDPDK and SR-IOV roles:
1. Virtual functions will be allocated on private interface.
2. First VF will be used for DPDK-based vRouter.
3. Rest of the VFs will be added to pci_passthrough_whitelist setting in nova.conf forSR-IOV usage.
7.3. How to enable DPDK on VF 23
CHAPTER
EIGHT
ENABLE SR-IOV
Prerequisites
This guide assumes that you have installed Fuel and performed steps 5.3.1 - 5.3.9 from Instal-lation Guide. To enable SR-IOV, you need a SRIOV-capable network PCI card. Also, onlycompute hosts can be configured with the‘‘SRIOV‘‘ role.
Features
1. You can have multple VLANs inside one physical network
2. When using Passthrough, as in SR-IOV scenario, OpenStack does not provides dhcp andmetadata. You have to manage that manually or provide an additional network port witha regular OpenStack network.
SR-IOV Description
Quoting Mirantis blog post:
SR-IOV is a PCI Special Interest Group (PCI-SIG) specification for virtualizing network in-terfaces, representing each physical resource as a configurable entity (called a PF for PhysicalFunction), and creating multiple virtual interfaces (VFs or Virtual Functions) with limited con-figurability on top of it, recruiting support for doing so from the system BIOS, and convention-ally, also from the host OS or hypervisor. Among other benefits, SR-IOV makes it possible torun a very large number of network-traffic-handling VMs per compute without increasing thenumber of physical NICs/ports and provides means for pushing processing for this down intothe hardware layer, off-loading the hypervisor and significantly improving both throughput anddeterministic network performance.
Verify SR-IOV environment
To verify if network interface is SRIOV-capable and how many VFs are available, run the fol-lowing command on the boostraped host:
lspci -s <bus ID> -vvv
24
Contrail plugin for Fuel Documentation, Release 5.0-5.0.0-1
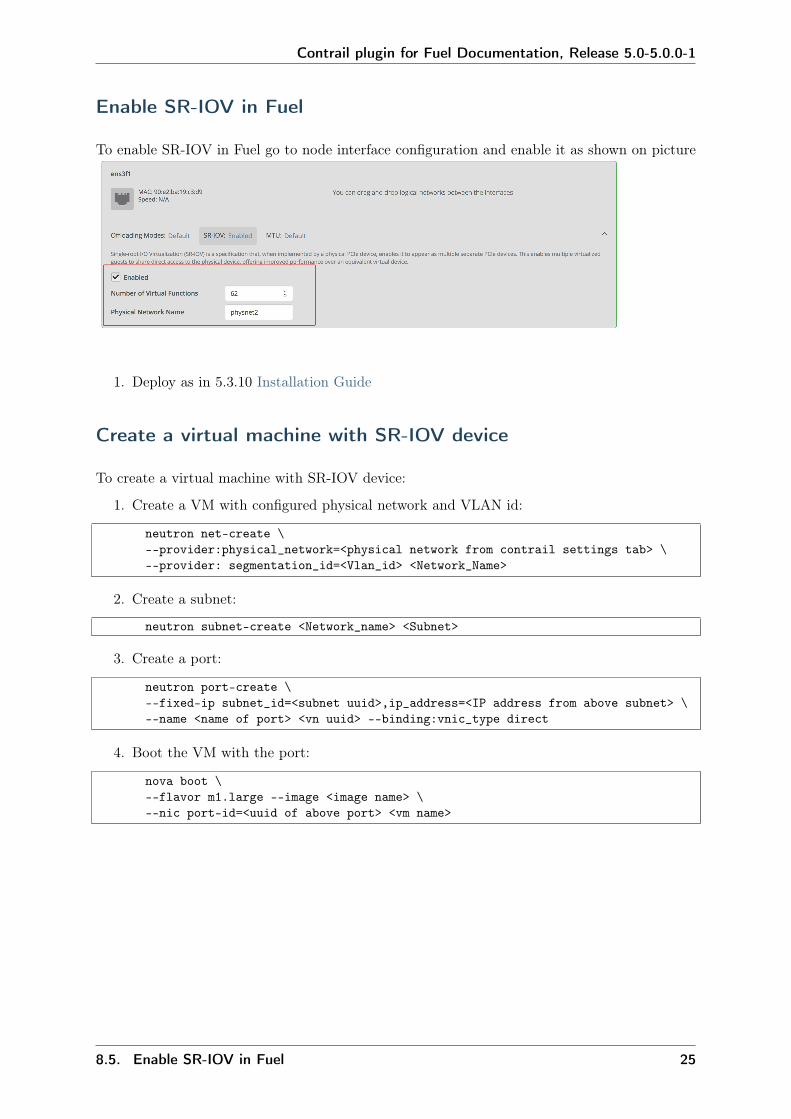
Enable SR-IOV in Fuel
To enable SR-IOV in Fuel go to node interface configuration and enable it as shown on picture
1. Deploy as in 5.3.10 Installation Guide
Create a virtual machine with SR-IOV device
To create a virtual machine with SR-IOV device:
1. Create a VM with configured physical network and VLAN id:
neutron net-create \--provider:physical_network=<physical network from contrail settings tab> \--provider: segmentation_id=<Vlan_id> <Network_Name>
2. Create a subnet:
neutron subnet-create <Network_name> <Subnet>
3. Create a port:
neutron port-create \--fixed-ip subnet_id=<subnet uuid>,ip_address=<IP address from above subnet> \--name <name of port> <vn uuid> --binding:vnic_type direct
4. Boot the VM with the port:
nova boot \--flavor m1.large --image <image name> \--nic port-id=<uuid of above port> <vm name>
8.5. Enable SR-IOV in Fuel 25
CHAPTER
NINE
CONTRAIL TSN
TSN Description
Contrail supports extending a cluster to include bare metal servers and other virtual instancesconnected to a TOR switch supporting OVSDB protocol. You can configure the bare metalservers and other virtual instances to be a part of any of the virtual networks configured in thecontrail cluster facilitating communication between them and the virtual instances running inthe cluster. You can use Contrail policy configurations to control this communication.
The solution uses the OVSDB protocol to configure the TOR switch and to import dynamicallylearnt addresses from it. VXLAN encapsulation will be used in the data plane communicationwith the TOR switch.
A new node, the TOR services node (TSN), is introduced and provisioned as a new role in theContrail system. The TSN acts as the multicast controller for the TOR switches. TSN alsoprovides DHCP and DNS services to the bare metal servers or virtual instances running behindTOR ports.
TSN receives all the broadcast packets from the TOR, and replicates them to the requiredcompute nodes in the cluster and to other EVPN nodes. Broadcast packets from the virtualmachines in the cluster are sent directly from the respective compute nodes to the TOR switch.
TSN can also act as the DHCP server for the bare metal servers or virtual instances, leasing IPaddresses to them, along with other DHCP options configured in the system. TSN also providesa DNS service for the bare metal servers.
See also:
Contrail Wiki
Prerequisites
This guide assumes that you have installed Fuel and all the nodes of your future environmentare discovered and functional. To configure TSN in you environment, you need to perform stepsadditional to Installation Guide
To configure TSN in your network, you need TOR switch.
26
Contrail plugin for Fuel Documentation, Release 5.0-5.0.0-1
HA implementation details
Contrail TSN in HA mode is implemented for default SSL mode.
All required certificates will be located on CONTRAIL-TSN node in location:
/var/lib/astute/tsn_certificates/certs
There will be two folders per TOR service. Folder named tor_agent_<@id> contain certs fortor agent service. Folder named vtep_<@id> contain certificates which should be delivered toToR Switch.
Configure TSN
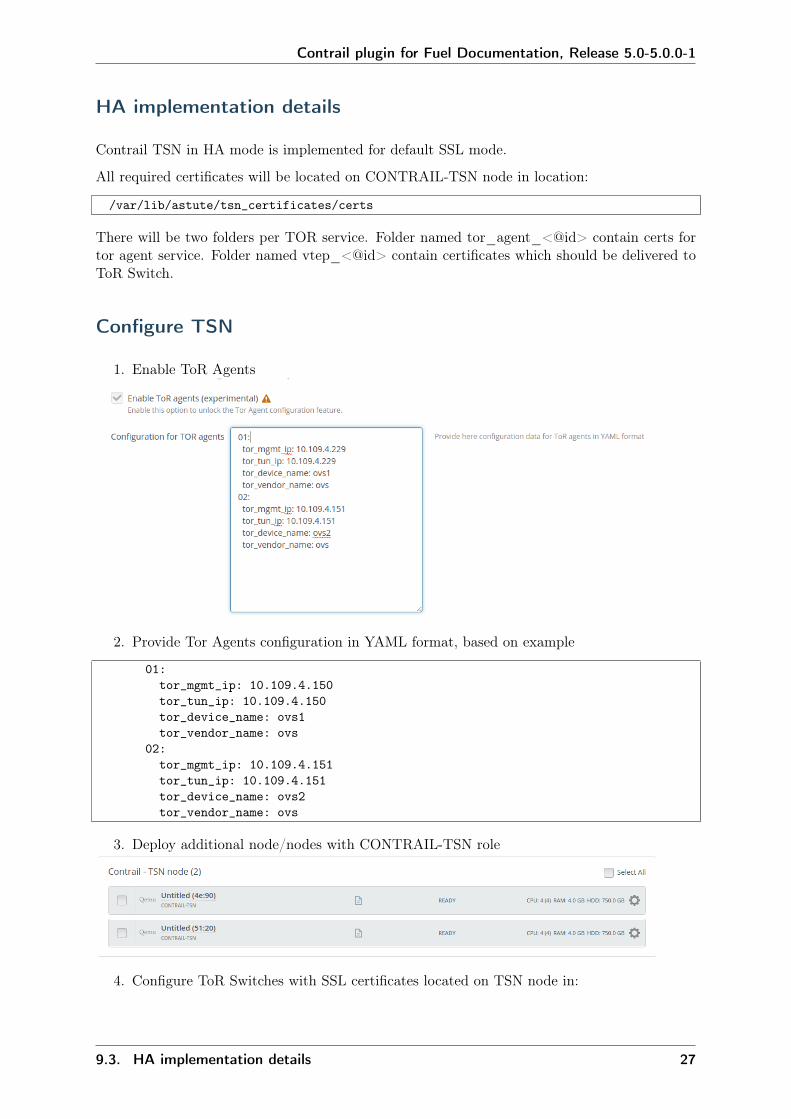
1. Enable ToR Agents
2. Provide Tor Agents configuration in YAML format, based on example
01:tor_mgmt_ip: 10.109.4.150tor_tun_ip: 10.109.4.150tor_device_name: ovs1tor_vendor_name: ovs
02:tor_mgmt_ip: 10.109.4.151tor_tun_ip: 10.109.4.151tor_device_name: ovs2tor_vendor_name: ovs
3. Deploy additional node/nodes with CONTRAIL-TSN role
4. Configure ToR Switches with SSL certificates located on TSN node in:
9.3. HA implementation details 27

Contrail plugin for Fuel Documentation, Release 5.0-5.0.0-1
/var/lib/astute/tsn_certificates/certs
5. Verify working TSN by going to Contrail web UI
9.4. Configure TSN 28
CHAPTER
TEN
CONTRAIL WITH VMWARE VCENTER
Overview
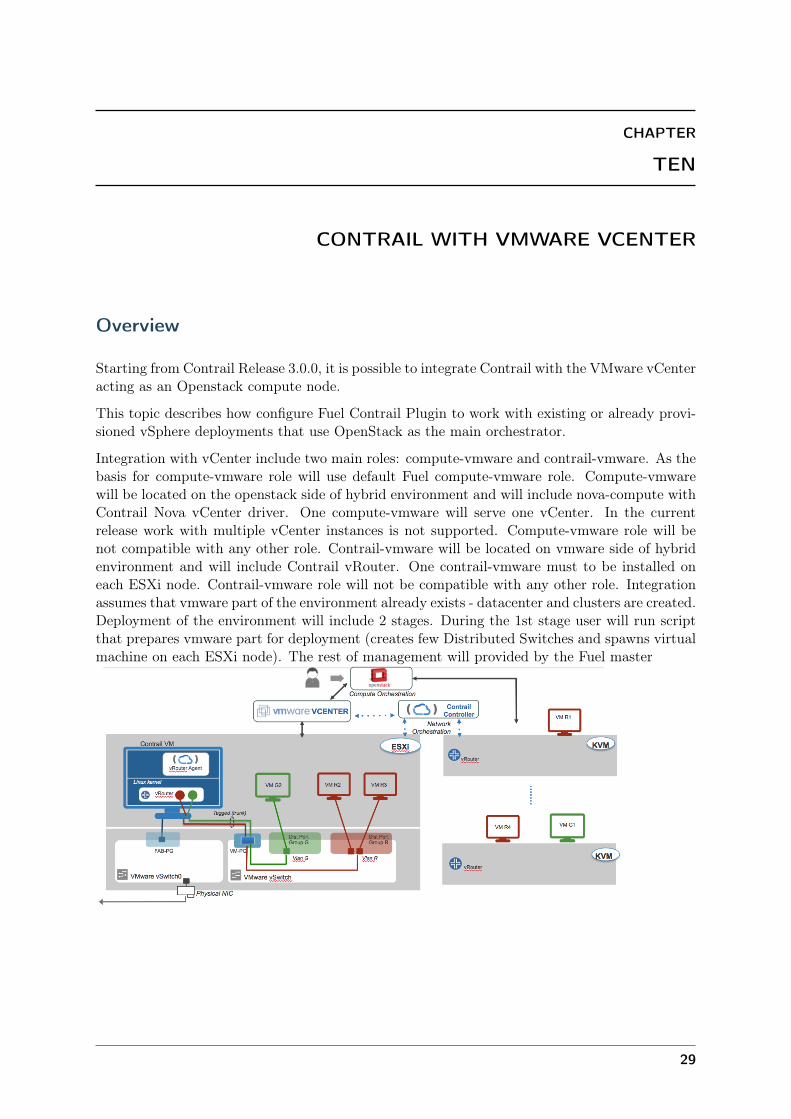
Starting from Contrail Release 3.0.0, it is possible to integrate Contrail with the VMware vCenteracting as an Openstack compute node.
This topic describes how configure Fuel Contrail Plugin to work with existing or already provi-sioned vSphere deployments that use OpenStack as the main orchestrator.
Integration with vCenter include two main roles: compute-vmware and contrail-vmware. As thebasis for compute-vmware role will use default Fuel compute-vmware role. Compute-vmwarewill be located on the openstack side of hybrid environment and will include nova-compute withContrail Nova vCenter driver. One compute-vmware will serve one vCenter. In the currentrelease work with multiple vCenter instances is not supported. Compute-vmware role will benot compatible with any other role. Contrail-vmware will be located on vmware side of hybridenvironment and will include Contrail vRouter. One contrail-vmware must to be installed oneach ESXi node. Contrail-vmware role will not be compatible with any other role. Integrationassumes that vmware part of the environment already exists - datacenter and clusters are created.Deployment of the environment will include 2 stages. During the 1st stage user will run scriptthat prepares vmware part for deployment (creates few Distributed Switches and spawns virtualmachine on each ESXi node). The rest of management will provided by the Fuel master
29

Contrail plugin for Fuel Documentation, Release 5.0-5.0.0-1
Prerequisites
• Installed Fuel 9.1
• Installed Fuel Contrail Plugin Installation Guide
• Environment must be created with “vCenter” support for compute virtualization and Con-trail for networking
• vSphere environments must be already preconfigured
• pyvmomi python package need to be installed for vmware provision script
Restrictions
• There must be a single vmware-compute node for each vCenter
• Compute-vmware role can not be combined with any other roles
• Contrail-vmware role can not be combined with any other roles
• The environment must contain at least one KVM/QEMU compute node
• According contrail package (version: 3.1.0.0-25) bug we can use only one cluster per Dat-acenter.
• All ESXi hosts in vCenter cluster must have instance with contrail-vmware role
Configuration
To install environment with Contrail and VMWware support you should proceed with followingsteps:
1. Install pyvmomi module
[root@nailgun ~]# easy_install pyvmomi
2. Fill vmware credentials in Fuel vmware tab
3. Run script that will spawn ContrailVM’s, DVS’s
[root@nailgun ~]# cd /var/www/nailgun/plugins/contrail-5.0/deployment_scripts/[root@nailgun deployment_scripts]# ./spawner.py --env_id 1 --spawn
10.2. Prerequisites 30
Contrail plugin for Fuel Documentation, Release 5.0-5.0.0-1
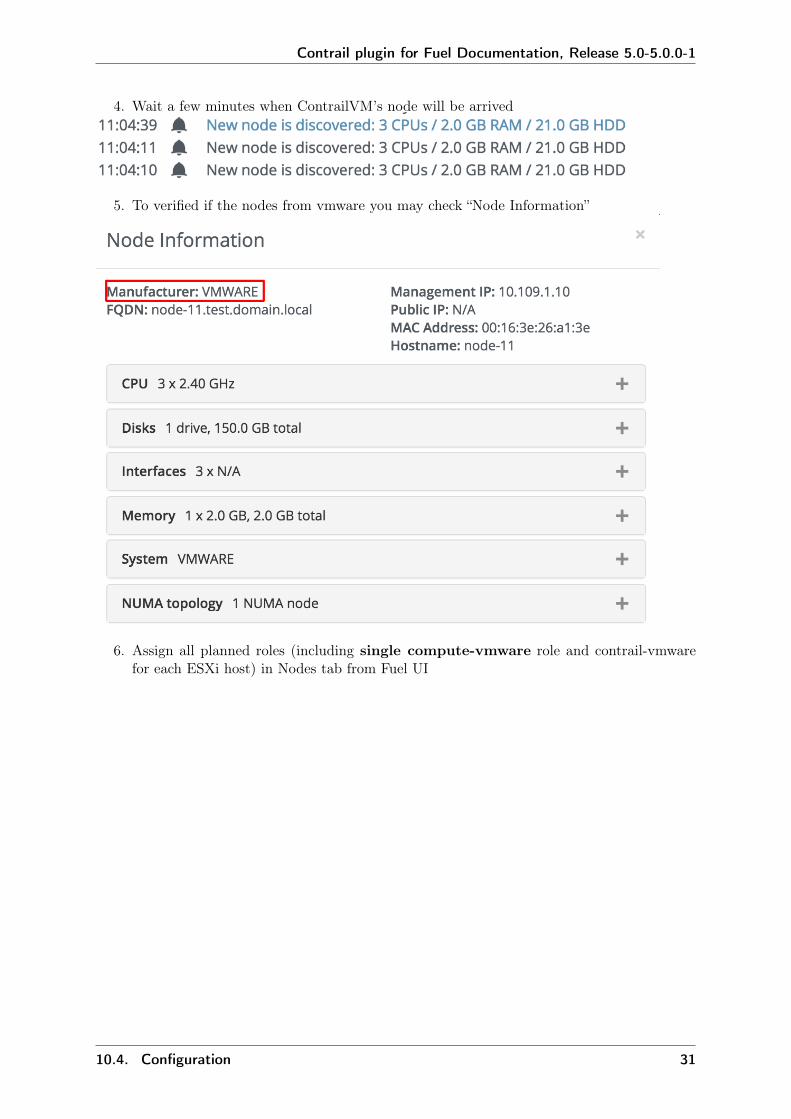
4. Wait a few minutes when ContrailVM’s node will be arrived
5. To verified if the nodes from vmware you may check “Node Information”
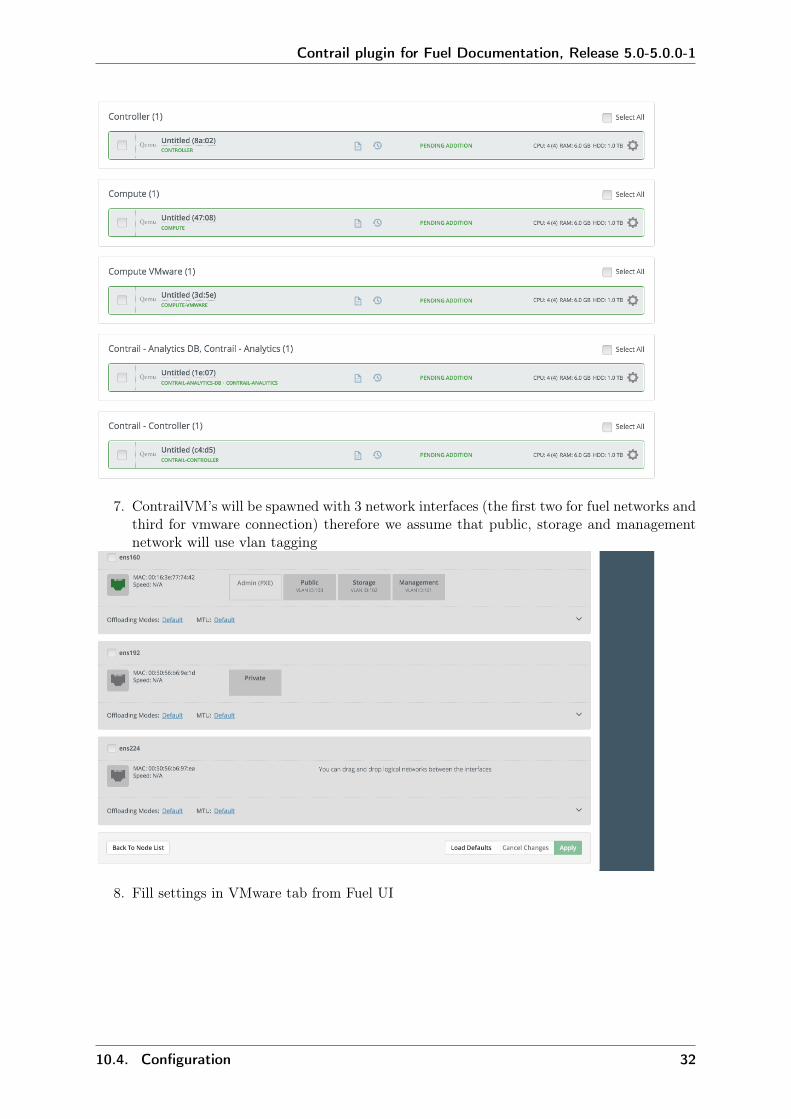
6. Assign all planned roles (including single compute-vmware role and contrail-vmwarefor each ESXi host) in Nodes tab from Fuel UI
10.4. Configuration 31
Contrail plugin for Fuel Documentation, Release 5.0-5.0.0-1
7. ContrailVM’s will be spawned with 3 network interfaces (the first two for fuel networks andthird for vmware connection) therefore we assume that public, storage and managementnetwork will use vlan tagging
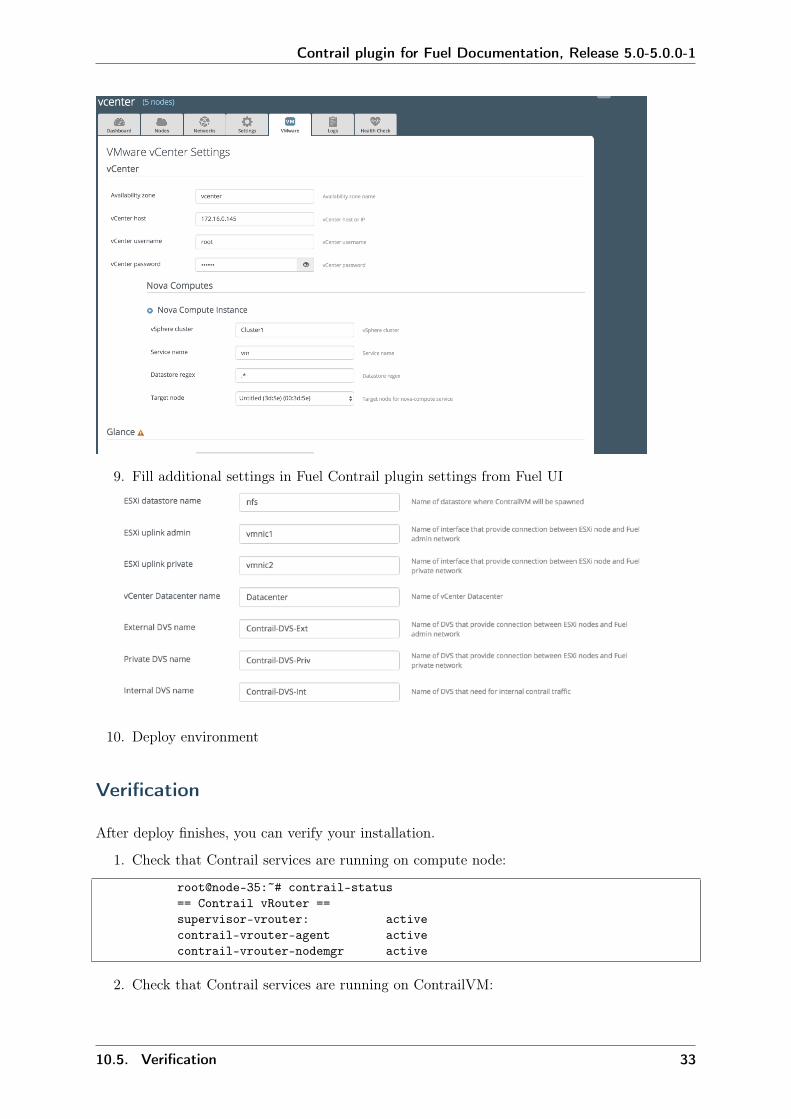
8. Fill settings in VMware tab from Fuel UI
10.4. Configuration 32
Contrail plugin for Fuel Documentation, Release 5.0-5.0.0-1
9. Fill additional settings in Fuel Contrail plugin settings from Fuel UI
10. Deploy environment
Verification
After deploy finishes, you can verify your installation.
1. Check that Contrail services are running on compute node:
root@node-35:~# contrail-status== Contrail vRouter ==supervisor-vrouter: activecontrail-vrouter-agent activecontrail-vrouter-nodemgr active
2. Check that Contrail services are running on ContrailVM:
10.5. Verification 33
Contrail plugin for Fuel Documentation, Release 5.0-5.0.0-1
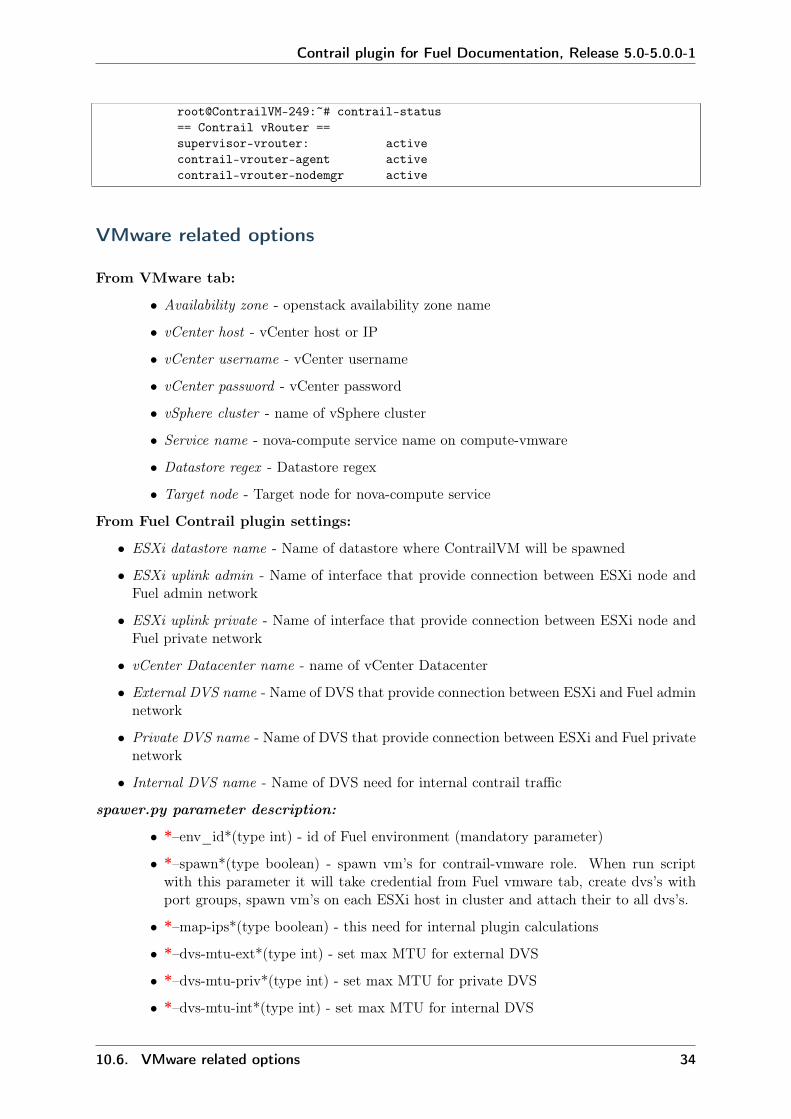
root@ContrailVM-249:~# contrail-status== Contrail vRouter ==supervisor-vrouter: activecontrail-vrouter-agent activecontrail-vrouter-nodemgr active
VMware related options
From VMware tab:
• Availability zone - openstack availability zone name
• vCenter host - vCenter host or IP
• vCenter username - vCenter username
• vCenter password - vCenter password
• vSphere cluster - name of vSphere cluster
• Service name - nova-compute service name on compute-vmware
• Datastore regex - Datastore regex
• Target node - Target node for nova-compute service
From Fuel Contrail plugin settings:
• ESXi datastore name - Name of datastore where ContrailVM will be spawned
• ESXi uplink admin - Name of interface that provide connection between ESXi node andFuel admin network
• ESXi uplink private - Name of interface that provide connection between ESXi node andFuel private network
• vCenter Datacenter name - name of vCenter Datacenter
• External DVS name - Name of DVS that provide connection between ESXi and Fuel adminnetwork
• Private DVS name - Name of DVS that provide connection between ESXi and Fuel privatenetwork
• Internal DVS name - Name of DVS need for internal contrail traffic
spawer.py parameter description:
• *–env_id*(type int) - id of Fuel environment (mandatory parameter)
• *–spawn*(type boolean) - spawn vm’s for contrail-vmware role. When run scriptwith this parameter it will take credential from Fuel vmware tab, create dvs’s withport groups, spawn vm’s on each ESXi host in cluster and attach their to all dvs’s.
• *–map-ips*(type boolean) - this need for internal plugin calculations
• *–dvs-mtu-ext*(type int) - set max MTU for external DVS
• *–dvs-mtu-priv*(type int) - set max MTU for private DVS
• *–dvs-mtu-int*(type int) - set max MTU for internal DVS
10.6. VMware related options 34
Contrail plugin for Fuel Documentation, Release 5.0-5.0.0-1
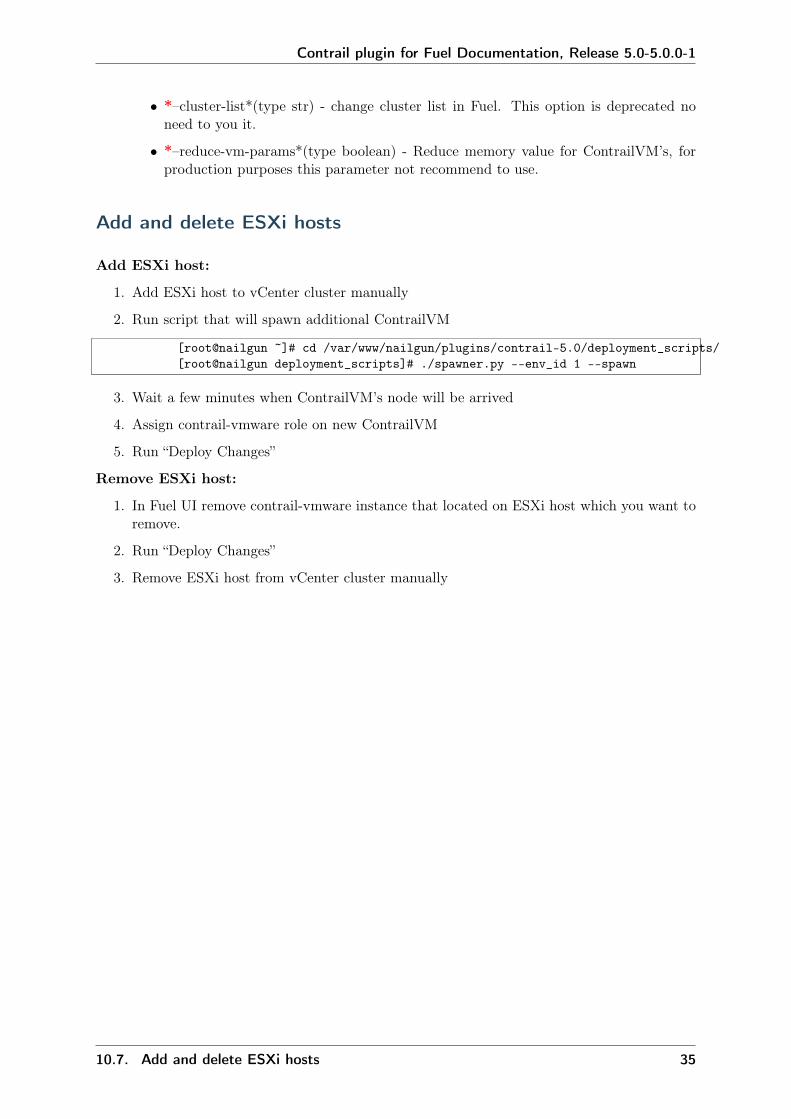
• *–cluster-list*(type str) - change cluster list in Fuel. This option is deprecated noneed to you it.
• *–reduce-vm-params*(type boolean) - Reduce memory value for ContrailVM’s, forproduction purposes this parameter not recommend to use.
Add and delete ESXi hosts
Add ESXi host:
1. Add ESXi host to vCenter cluster manually
2. Run script that will spawn additional ContrailVM
[root@nailgun ~]# cd /var/www/nailgun/plugins/contrail-5.0/deployment_scripts/[root@nailgun deployment_scripts]# ./spawner.py --env_id 1 --spawn
3. Wait a few minutes when ContrailVM’s node will be arrived
4. Assign contrail-vmware role on new ContrailVM
5. Run “Deploy Changes”
Remove ESXi host:
1. In Fuel UI remove contrail-vmware instance that located on ESXi host which you want toremove.
2. Run “Deploy Changes”
3. Remove ESXi host from vCenter cluster manually
10.7. Add and delete ESXi hosts 35
CHAPTER
ELEVEN
CONTRAIL UPGRADES (EXPERIMENTAL)
Description
Starting from version 4.0.1 the Fuel Contrail Plugin includes the set of tasks and scripts thatallow the cloud administrator to upgrade the Contrail packages along with Contrail configurationwith minimal downtime to production network. The upgrade process is divided into tasks,that modify only the components that need to be upgraded without touching other OpenStackcomponents. The packages are updated using the plugin-based repository, and configurationfiles are updated using the templates included in the latest plugin version. Controllers andcompute nodes are upgraded separately, using puppet manifests provided with plugin. Othercontrail-specific roles such as DPDK-compute, VMWare-compute, and TSN are not supportedyet. More information on running custom deployment graphs can be found in Fuel User Guide
Prequisites
This guide assumes that you have installed Fuel 9.1 with the Fuel Contrail plugin, and success-fully deployed the environment according to Installation Guide.
Package versions supported:
• Fuel Contrail plugin >= 5.0.0
• Juniper Contrail >= 3.1.0
Update the packages on Fuel Master node
In case Fuel Contrail plugin package should be upgraded, please execute steps 1-3, otherwiseproceed to step 4.
1. Obtain the latest package of Fuel Contrail plugin that supports your Fuel version.
2. Copy the rpm package downloaded at previous step to the Fuel Master node
scp contrail-5.0-5.0.0-1.noarch.rpm <Fuel Master node ip>:/tmp/
3. Log in to the Fuel Master node and upgrade the plugin:
ssh <the Fuel Master node ip>fuel plugins --update /tmp/contrail-5.0-5.0.0-1.noarch.rpm
36

Contrail plugin for Fuel Documentation, Release 5.0-5.0.0-1
4. Copy the latest Juniper Contrail installation package to the Fuel Master node and run theinstallation script to unpack the vendor package and populate the plugin repository withup-to-date packages:
scp contrail-install-packages_3.1.0.0-25~Ubuntu-14.04.4-mitaka_all.deb \<Fuel Master node ip>:/var/www/nailgun/plugins/contrail-5.0/
ssh <Fuel Master node ip> /var/www/nailgun/plugins/contrail-5.0/install.sh
11.3. Update the packages on Fuel Master node 37
Contrail plugin for Fuel Documentation, Release 5.0-5.0.0-1
Upgrade Contrail and OpenStack Controllers
The first upgrade step involves the controllers, both for OpenStack and Contrail. Upgrade tasksstop Contrail config services for the time of upgrade, this will stop Neutron operations for 10-20 minutes without affecting the workload. The Contrail control nodes will be upgraded andrestarted one-by-one to keep BGP and XMPP connectivity. After the tasks have been finishedon contrail nodes, the upgrade of OpenStack controllers starts. The Neutron service will berestarted in case if contrail core plugin will be upgraded.
1. Log in to Fuel Master node, change the working directory to plugin folder:
ssh <the Fuel Master node ip>cd /var/www/nailgun/plugins/contrail-5.0/
2. Check ID of contrail plugin:
fuel plugins
3. Check ID of your env:
fuel2 env list
4. Upload upgrade graph:
fuel2 graph upload --plugin <plugin-ID> --type contrail_upgrade_control --file upgrade_control.yaml
5. Verify the graph has been uploaded:
fuel2 graph list --env <env-ID>
6. Execute the custom graph to upgrade control plane:
fuel2 graph execute --env <env-ID> --type contrail_upgrade_control
7. Run the contrail service verification steps from Verify Contrail plugin to ensure that allContrail services are up and running. You can verify the version of Contrail packages usingContrail Web UI or contrail-version CLI command.
Upgrade Compute nodes
After the control plane has been upgraded, you can upgrade OpenStack Compute nodes. Theupgrade task can install the latest version of Contrail vRouter, correctly replacing the kernelmodule without host reboot. The task upgrades compute hosts one by one, in ascending orderby node ID. The instances running on particular compute node will lose network connectivityduring the vRouter upgrade, this can take up to 5 min.
1. Log in to Fuel Master node, change the working directory to plugin folder:
ssh <the Fuel Master node ip>cd /var/www/nailgun/plugins/contrail-5.0/
2. Check ID of contrail plugin:
fuel plugins
3. Check ID of your env:
11.4. Upgrade Contrail and OpenStack Controllers 38
Contrail plugin for Fuel Documentation, Release 5.0-5.0.0-1
fuel2 env list
4. Upload upgrade graph:
fuel2 graph upload --plugin <plugin-ID> --type contrail_upgrade_compute --file upgrade_compute.yaml
5. Verify the graph has been uploaded:
fuel2 graph list --env <env-ID>
6. Execute the custom graph to upgrade compute hosts:
fuel2 graph execute --env <env-ID> --type contrail_upgrade_compute
7. Log in to compute nodes and verify output of the contrail-status command. You canverify the version of the vRouter package by running contrail-version command.
11.5. Upgrade Compute nodes 39
CHAPTER
TWELVE
VERIFY CONTRAIL PLUGIN
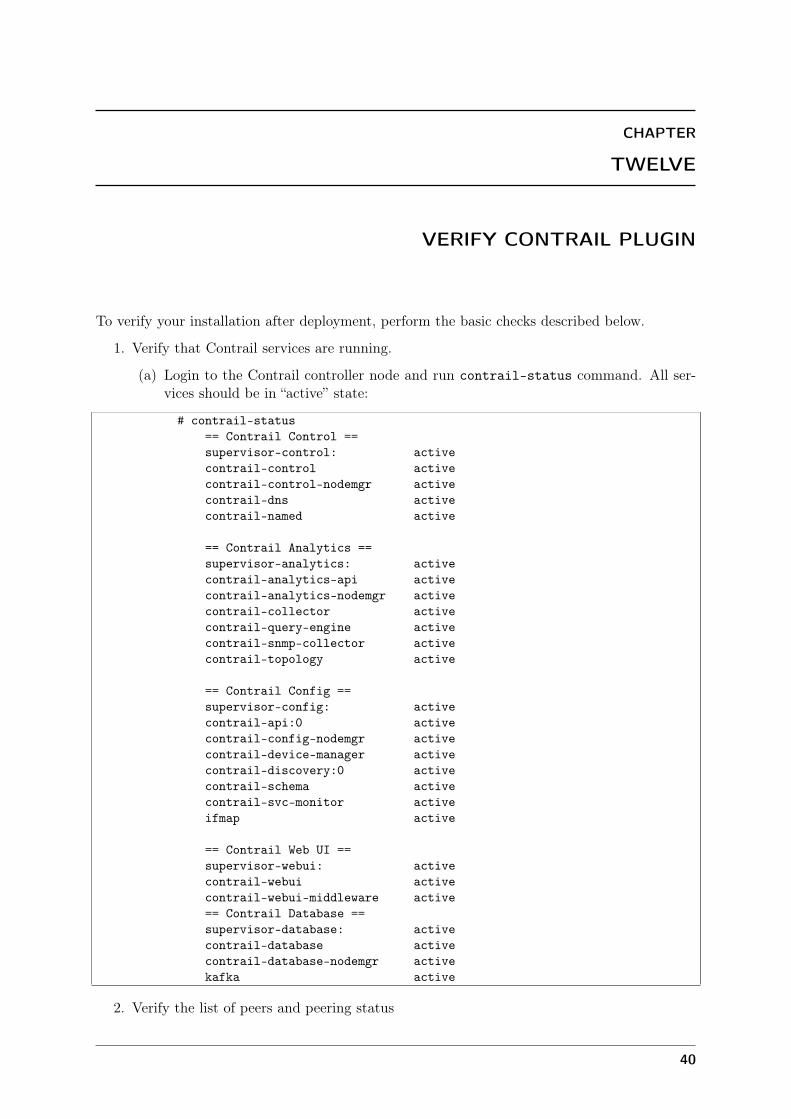
To verify your installation after deployment, perform the basic checks described below.
1. Verify that Contrail services are running.
(a) Login to the Contrail controller node and run contrail-status command. All ser-vices should be in “active” state:
# contrail-status== Contrail Control ==supervisor-control: activecontrail-control activecontrail-control-nodemgr activecontrail-dns activecontrail-named active
== Contrail Analytics ==supervisor-analytics: activecontrail-analytics-api activecontrail-analytics-nodemgr activecontrail-collector activecontrail-query-engine activecontrail-snmp-collector activecontrail-topology active
== Contrail Config ==supervisor-config: activecontrail-api:0 activecontrail-config-nodemgr activecontrail-device-manager activecontrail-discovery:0 activecontrail-schema activecontrail-svc-monitor activeifmap active
== Contrail Web UI ==supervisor-webui: activecontrail-webui activecontrail-webui-middleware active== Contrail Database ==supervisor-database: activecontrail-database activecontrail-database-nodemgr activekafka active
2. Verify the list of peers and peering status
40
Contrail plugin for Fuel Documentation, Release 5.0-5.0.0-1
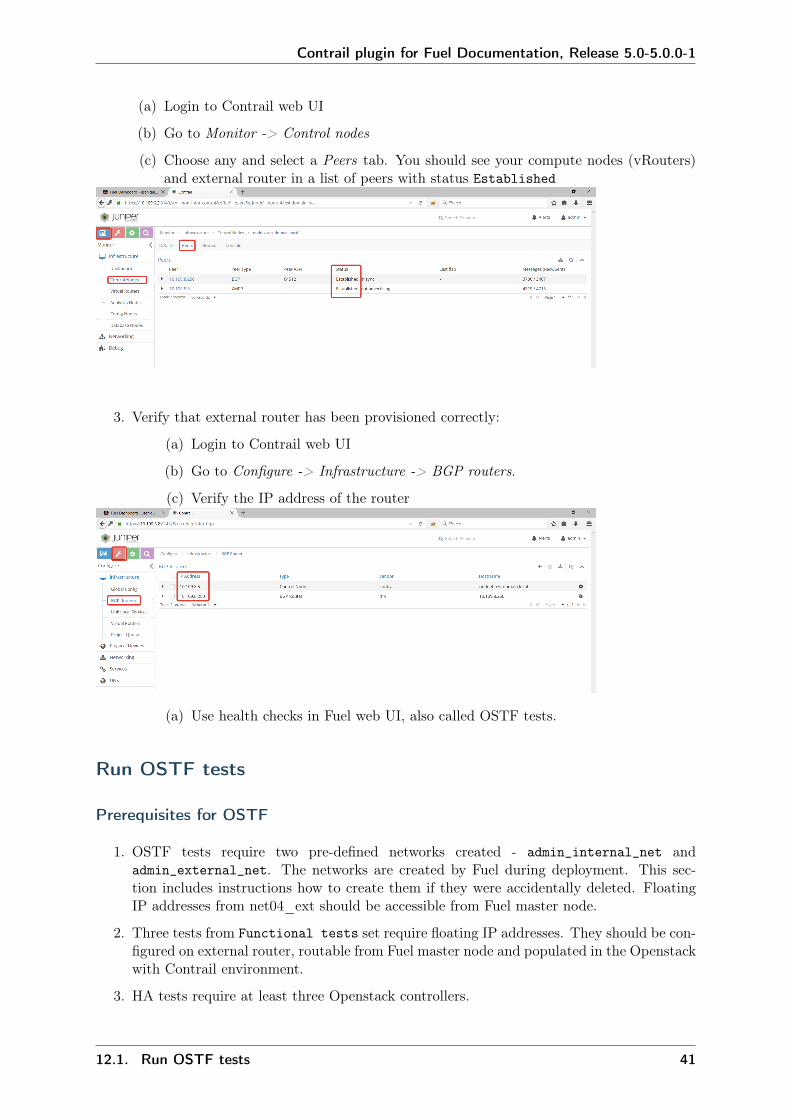
(a) Login to Contrail web UI
(b) Go to Monitor -> Control nodes
(c) Choose any and select a Peers tab. You should see your compute nodes (vRouters)and external router in a list of peers with status Established
3. Verify that external router has been provisioned correctly:
(a) Login to Contrail web UI
(b) Go to Configure -> Infrastructure -> BGP routers.
(c) Verify the IP address of the router
(a) Use health checks in Fuel web UI, also called OSTF tests.
Run OSTF tests
Prerequisites for OSTF
1. OSTF tests require two pre-defined networks created - admin_internal_net andadmin_external_net. The networks are created by Fuel during deployment. This sec-tion includes instructions how to create them if they were accidentally deleted. FloatingIP addresses from net04_ext should be accessible from Fuel master node.
2. Three tests from Functional tests set require floating IP addresses. They should be con-figured on external router, routable from Fuel master node and populated in the Openstackwith Contrail environment.
3. HA tests require at least three Openstack controllers.
12.1. Run OSTF tests 41
Contrail plugin for Fuel Documentation, Release 5.0-5.0.0-1
4. Platform services functional tests. require Ceilometer and MongoDB.
Configure OSTF networks and floating IPs
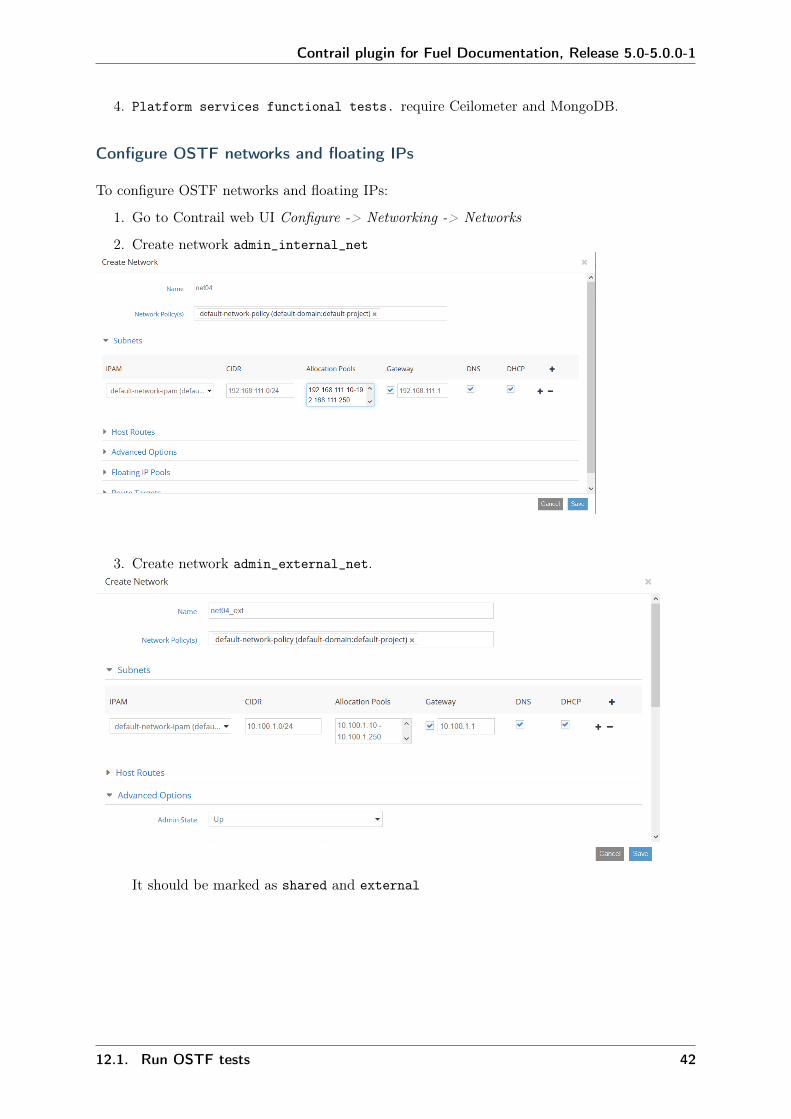
To configure OSTF networks and floating IPs:
1. Go to Contrail web UI Configure -> Networking -> Networks
2. Create network admin_internal_net
3. Create network admin_external_net.
It should be marked as shared and external
12.1. Run OSTF tests 42
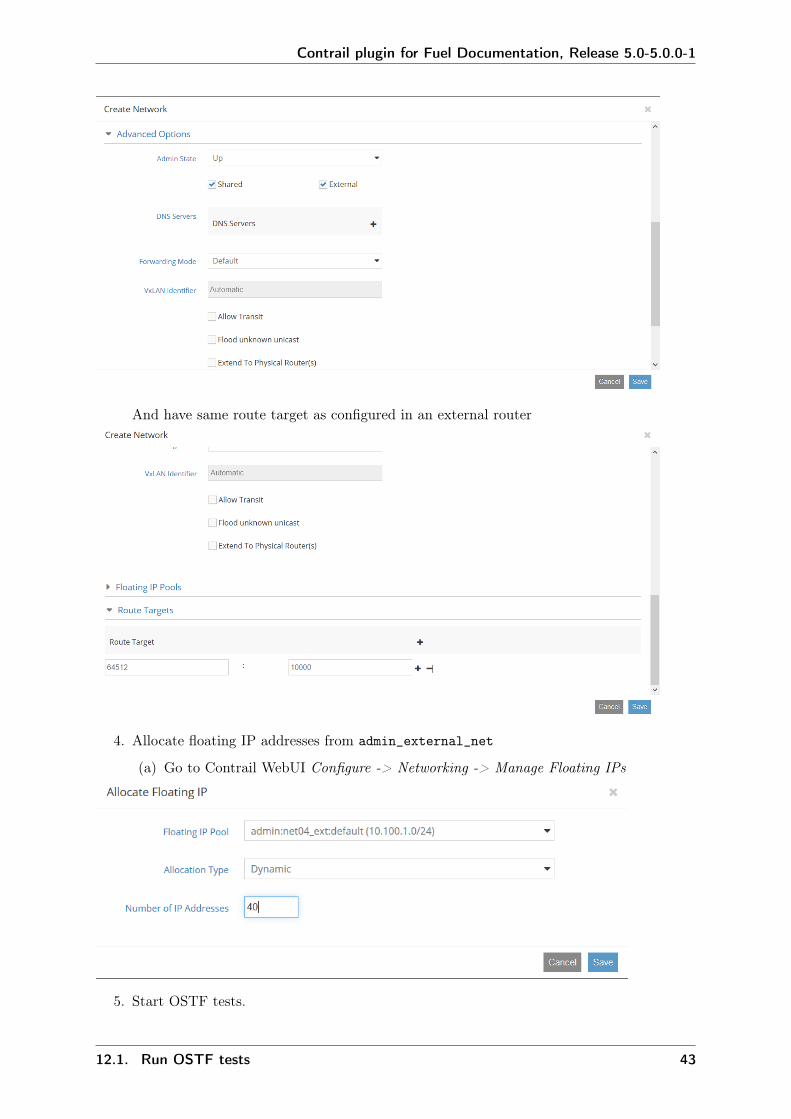
Contrail plugin for Fuel Documentation, Release 5.0-5.0.0-1
And have same route target as configured in an external router
4. Allocate floating IP addresses from admin_external_net
(a) Go to Contrail WebUI Configure -> Networking -> Manage Floating IPs
5. Start OSTF tests.
12.1. Run OSTF tests 43
Contrail plugin for Fuel Documentation, Release 5.0-5.0.0-1
See also:
Fuel user-guide.
Warning: ‘OSTF test ‘Check network connectivity from SRIOV instance via floating IP’is expected to fail in environments with Contrail. Contrail doesn’t support assigning floatingaddresses to SRIOV ports, they are treated as pci passthrough devices.
Troubleshooting
To troubleshoot:
1. Verify output of the contrail-status command.
2. Verify the logs for corresponding serivice:
• Contrail logs are located in /var/log/contrail/ directory, and log names matchwith contrail service name.
• Cassandra logs are located in /var/log/cassandra/
• Zookeeper logs are in /var/log/zookeeper/
12.2. Troubleshooting 44

CHAPTER
THIRTEEN
RESTORE FAILED CONTRAIL NODE
This guide describes how to replace the failed Contrail all-in-one node (with all Contrail rolesassigned) in a multi-node environment.
If your Contrail node has been crashed, follow the steps to fix the issue:
1. Remove failed node from Cassandra cluster (on working contrail node)
(a) Obtain Host-ID of the failed Cassandra node:
nodetool status
(b) Remove the failed node:
nodetool removenode <Host-ID>
2. Deprovision analytics, control, database, and config components of the failed node fromcontrail db.
(a) Obtain IP address of Contrail API endpoint (Managment VIP):
hiera management_vip
Example of system response:
10.109.1.3
(b) Obtain Neutron service password:
hiera neutron_config | grep admin_password
Example of system response:
"keystone"=>{"admin_password"=>"VerySecurePassword!"},
(c) Deprovision contrail-config:
/opt/contrail/utils/provision_config_node.py \--api_server_ip <Managment VIP> \--api_server_port 8082 \--oper del \--host_name node-294.domain.tld \--host_ip 172.21.129.193 \--admin_user neutron \--admin_tenant_name services \--admin_password <Neutron password>
(d) Deprovision contrail-analytics:
45
Contrail plugin for Fuel Documentation, Release 5.0-5.0.0-1
/opt/contrail/utils/provision_analytics_node.py \--api_server_ip <Managment VIP> \--api_server_port 8082 \--oper del \--host_name node-294.domain.tld \--host_ip 172.21.129.193 \--admin_user neutron \--admin_tenant_name services \--admin_password <Neutron password>
(e) Deprovision contrail-control:
/opt/contrail/utils/provision_control.py \--api_server_ip <Managment VIP> \--api_server_port 8082 \--oper del \--host_name node-294.domain.tld \--host_ip 172.21.129.193 \--router_asn 64512 \--admin_user neutron \--admin_tenant_name services \--admin_password <Neutron password>
(f) Deprovision contrail-database:
/opt/contrail/utils/provision_database_node.py \--api_server_ip <Managment VIP> \--api_server_port 8082 \--oper del \--host_name node-294.domain.tld \--host_ip 172.21.129.193 \--admin_user neutron \--admin_tenant_name services \--admin_password <Neutron password>
3. Add a new node with Contrail roles and deploy it with Fuel
46
CHAPTER
FOURTEEN
USE CONTRAIL
This document describes very basic operations with Contrail UI.
See also:
Juniper documentation.
47
Contrail plugin for Fuel Documentation, Release 5.0-5.0.0-1
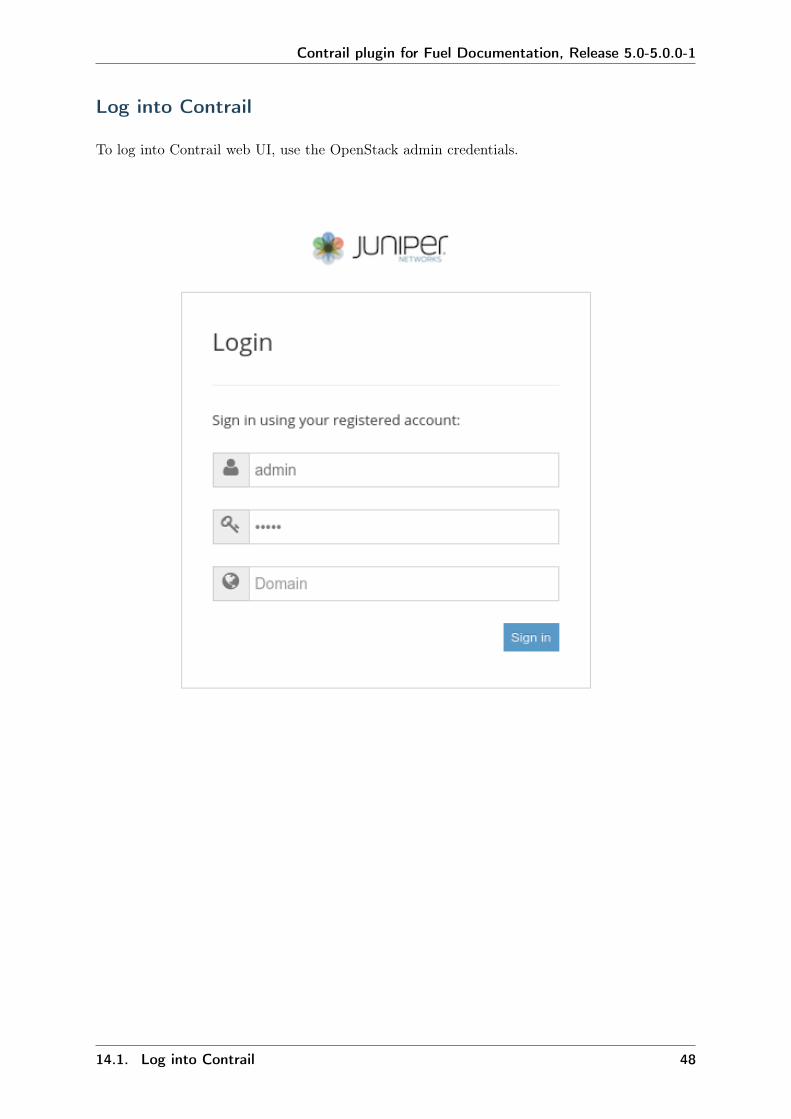
Log into Contrail
To log into Contrail web UI, use the OpenStack admin credentials.
14.1. Log into Contrail 48
Contrail plugin for Fuel Documentation, Release 5.0-5.0.0-1
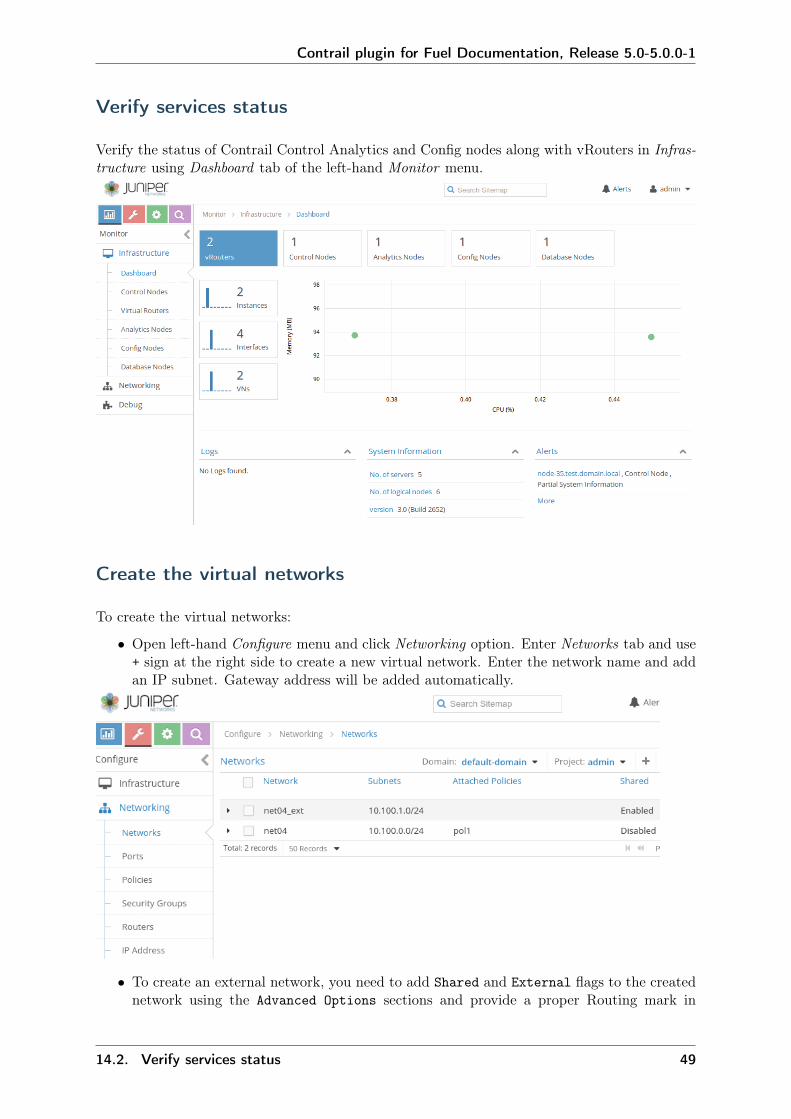
Verify services status
Verify the status of Contrail Control Analytics and Config nodes along with vRouters in Infras-tructure using Dashboard tab of the left-hand Monitor menu.
Create the virtual networks
To create the virtual networks:
• Open left-hand Configure menu and click Networking option. Enter Networks tab and use+ sign at the right side to create a new virtual network. Enter the network name and addan IP subnet. Gateway address will be added automatically.
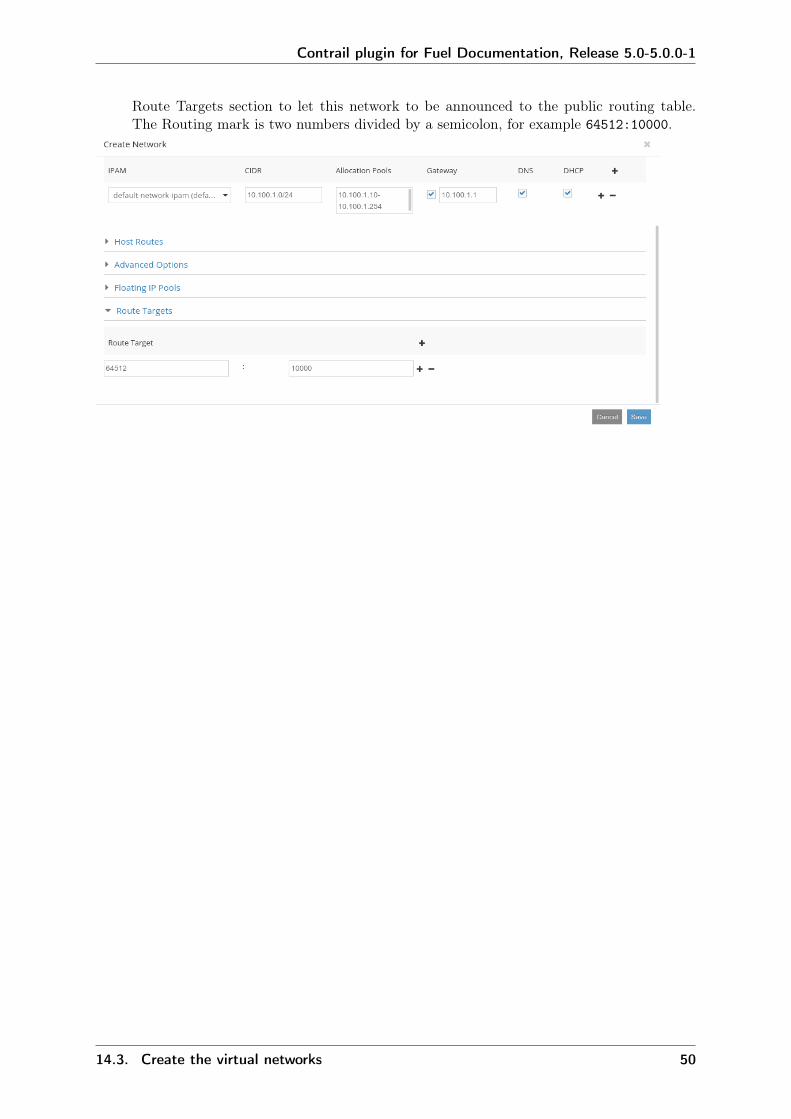
• To create an external network, you need to add Shared and External flags to the creatednetwork using the Advanced Options sections and provide a proper Routing mark in
14.2. Verify services status 49
Contrail plugin for Fuel Documentation, Release 5.0-5.0.0-1
Route Targets section to let this network to be announced to the public routing table.The Routing mark is two numbers divided by a semicolon, for example 64512:10000.
14.3. Create the virtual networks 50
CHAPTER
FIFTEEN
APPENDIX
1. Contrail overview.
2. Contrail overview at github.com.
3. Contrail major components.
4. Contrail architecture.
5. Contrail quick start guide.
51


