Create a Framework RequisitionUsed for the creation of Service request
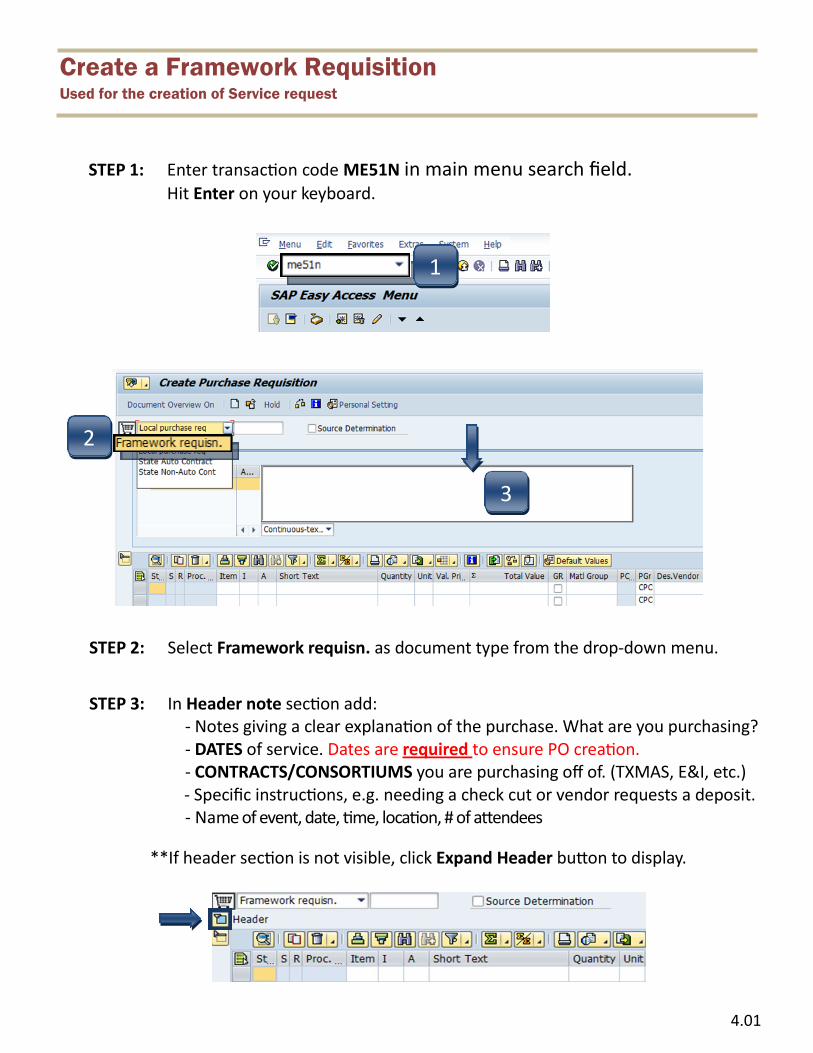
STEP 1: Enter transaction code ME51N in main menu search field. Hit Enter on your keyboard.
2
3
STEP 2: Select Framework requisn. as document type from the drop-down menu.
STEP 3: In Header note section add: - Notes giving a clear explanation of the purchase. What are you purchasing? - DATES of service. Dates are required to ensure PO creation. - CONTRACTS/CONSORTIUMS you are purchasing off of. (TXMAS, E&I, etc.)
- Specific instructions, e.g. needing a check cut or vendor requests a deposit. - Name of event, date, time, location, # of attendees
**If header section is not visible, click Expand Header button to display.
4.01
1
Create a Framework Requisition - Line Items
1 2 3 4
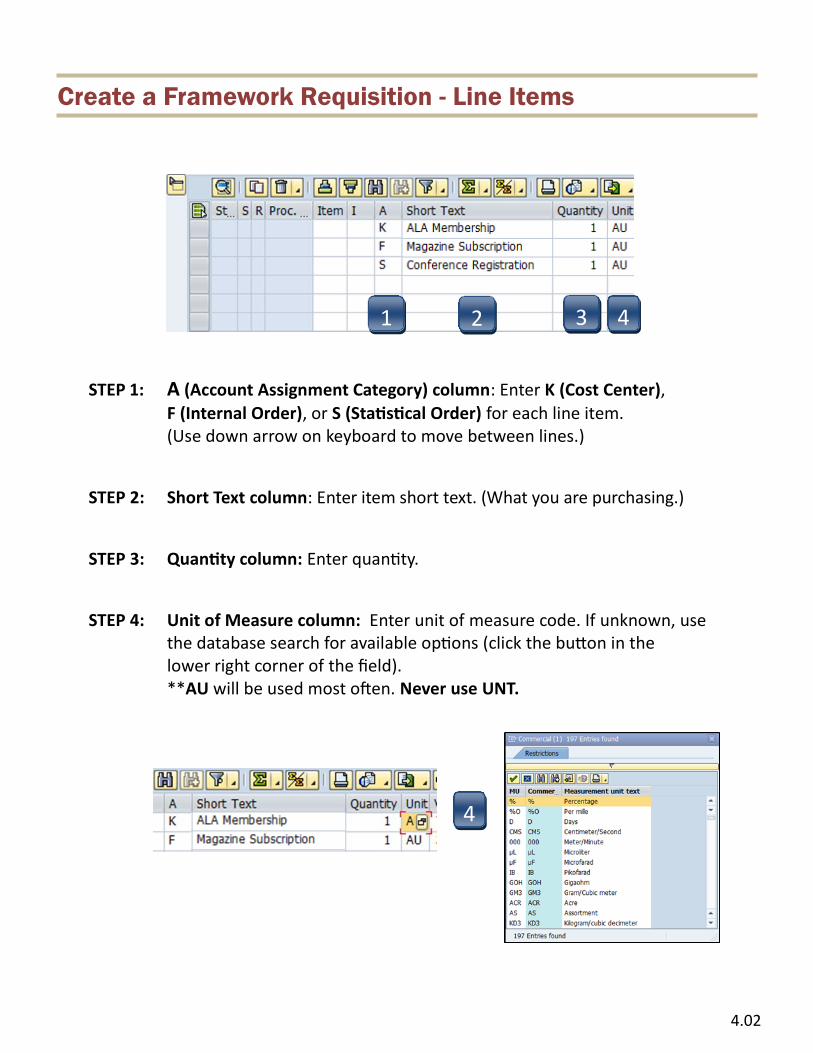
STEP 1: A (Account Assignment Category) column: Enter K (Cost Center),
F (Internal Order), or S (Statistical Order) for each line item. (Use down arrow on keyboard to move between lines.)
STEP 2: Short Text column: Enter item short text. (What you are purchasing.)
STEP 3: Quantity column: Enter quantity.
STEP 4: Unit of Measure column: Enter unit of measure code. If unknown, use the database search for available options (click the button in the lower right corner of the field). **AU will be used most often. Never use UNT.
4.02
4
Create a Framework Requisition - Line Items
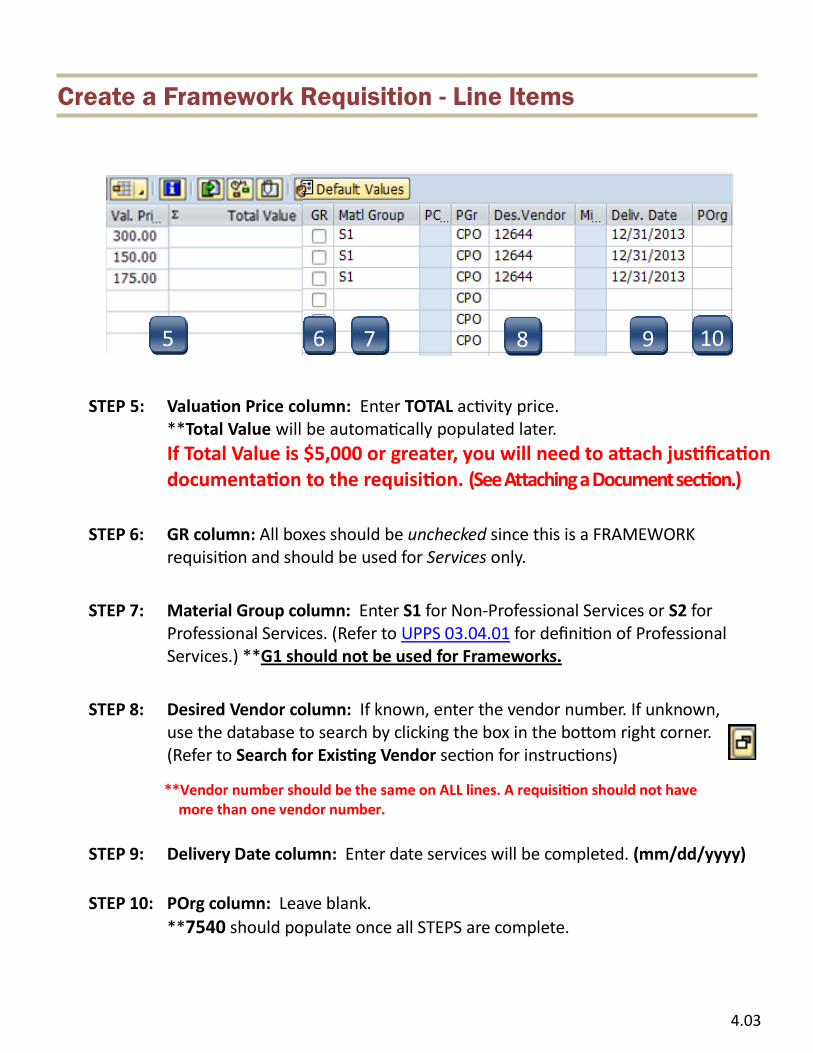
STEP 5: Valuation Price column: Enter TOTAL activity price. **Total Value will be automatically populated later.
If Total Value is $5,000 or greater, you will need to attach justification documentation to the requisition. (See Attaching a Document section.)
STEP 6: GR column: All boxes should be unchecked since this is a FRAMEWORK requisition and should be used for Services only.
STEP 7: Material Group column: Enter S1 for Non-Professional Services or S2 for Professional Services. (Refer to UPPS 03.04.01 for definition of Professional Services.) **G1 should not be used for Frameworks.
STEP 8: Desired Vendor column: If known, enter the vendor number. If unknown, use the database to search by clicking the box in the bottom right corner. (Refer to Search for Existing Vendor section for instructions)
STEP 9: Delivery Date column: Enter date services will be completed. (mm/dd/yyyy)
STEP 10: POrg column: Leave blank.
**7540 should populate once all STEPS are complete.
**Vendor number should be the same on ALL lines. A requisition should not have more than one vendor number.
8 9 10 7
4.03
6 5
Create a Framework Requisition - Line Items
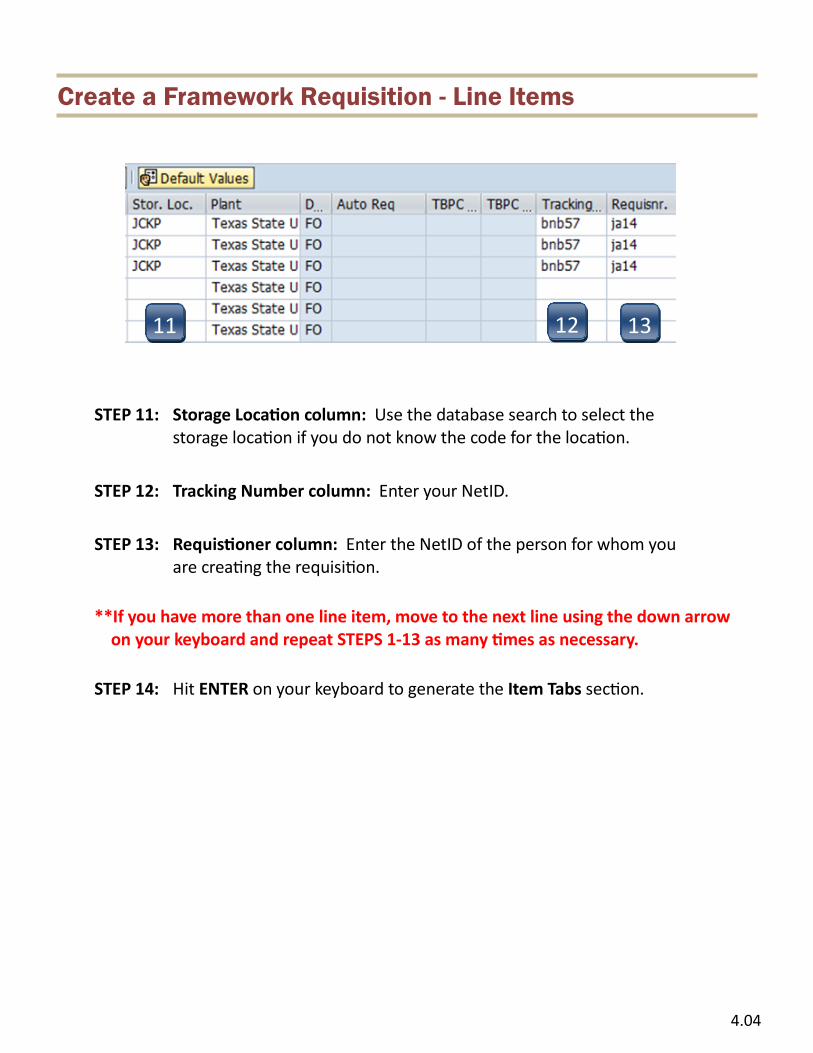
STEP 11: Storage Location column: Use the database search to select the storage location if you do not know the code for the location.
STEP 12: Tracking Number column: Enter your NetID.
STEP 13: Requistioner column: Enter the NetID of the person for whom you are creating the requisition.
**If you have more than one line item, move to the next line using the down arrow on your keyboard and repeat STEPS 1-13 as many times as necessary.
STEP 14: Hit ENTER on your keyboard to generate the Item Tabs section.
11 12 13
4.04
Create a Framework Requisition - Item Tab Detail
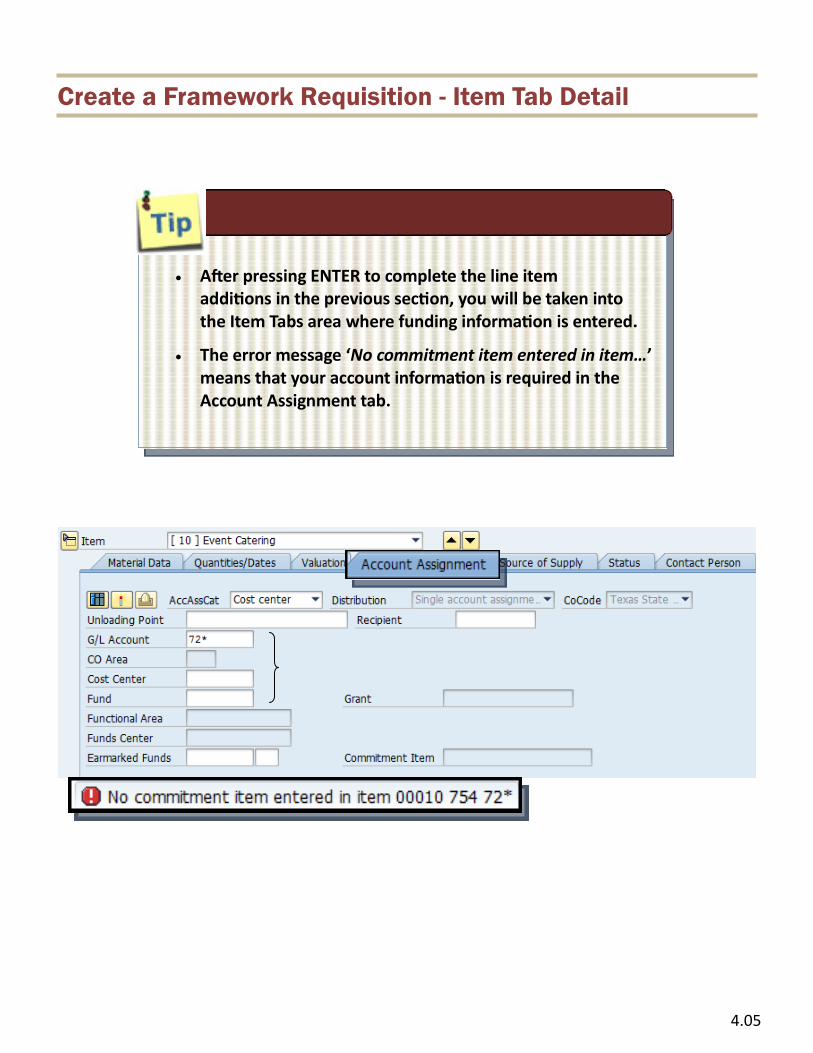
After pressing ENTER to complete the line itemadditions in the previous section, you will be taken intothe Item Tabs area where funding information is entered.
The error message ‘No commitment item entered in item…’means that your account information is required in theAccount Assignment tab.
4.05
Create a Framework Requisition - Item Tab Detail
4.06
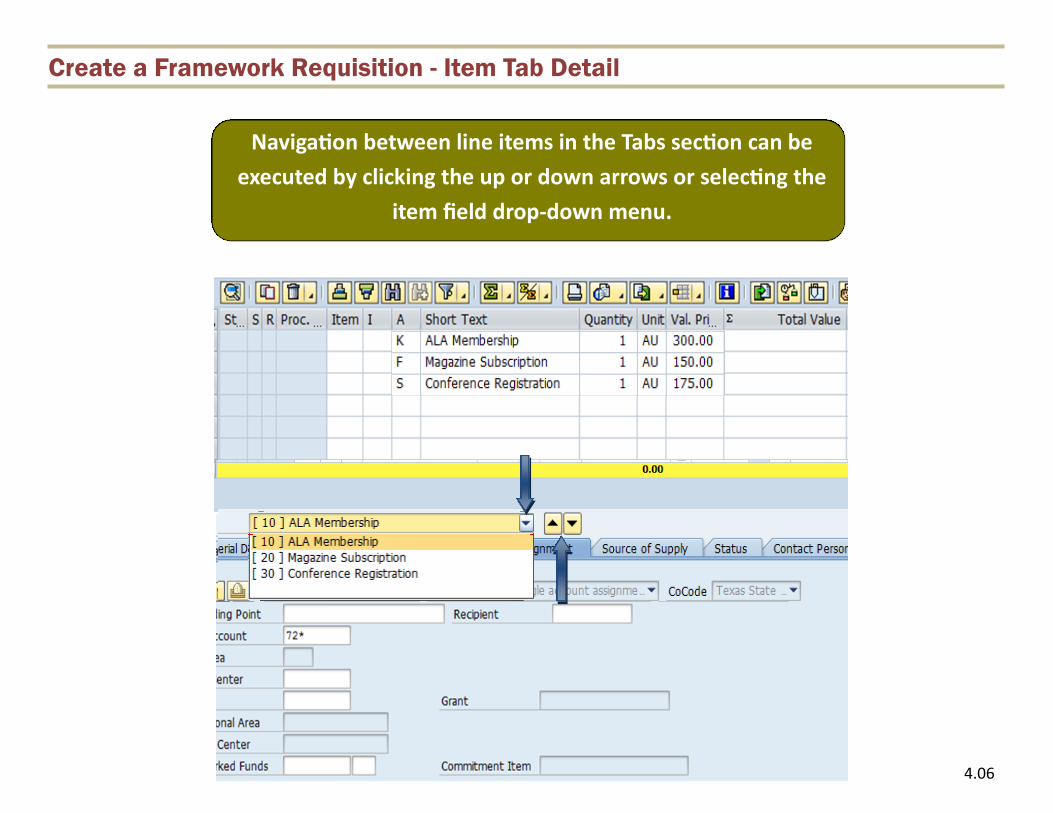
Navigation between line items in the Tabs section can be
executed by clicking the up or down arrows or selecting the
item field drop-down menu.

Create a Framework Requisition - Item Tab Detail
STEP 1: Enter GL number. **GL/Asset Reference Guide or Database search can be used if GL is unknown.
STEP 2: Enter Cost Center and Fund. **Earmarked Funds will be left blank.
Account Assignment Tab – Cost Center (K)
2
1
4.07
Create a Framework Requisition - Item Tab Detail
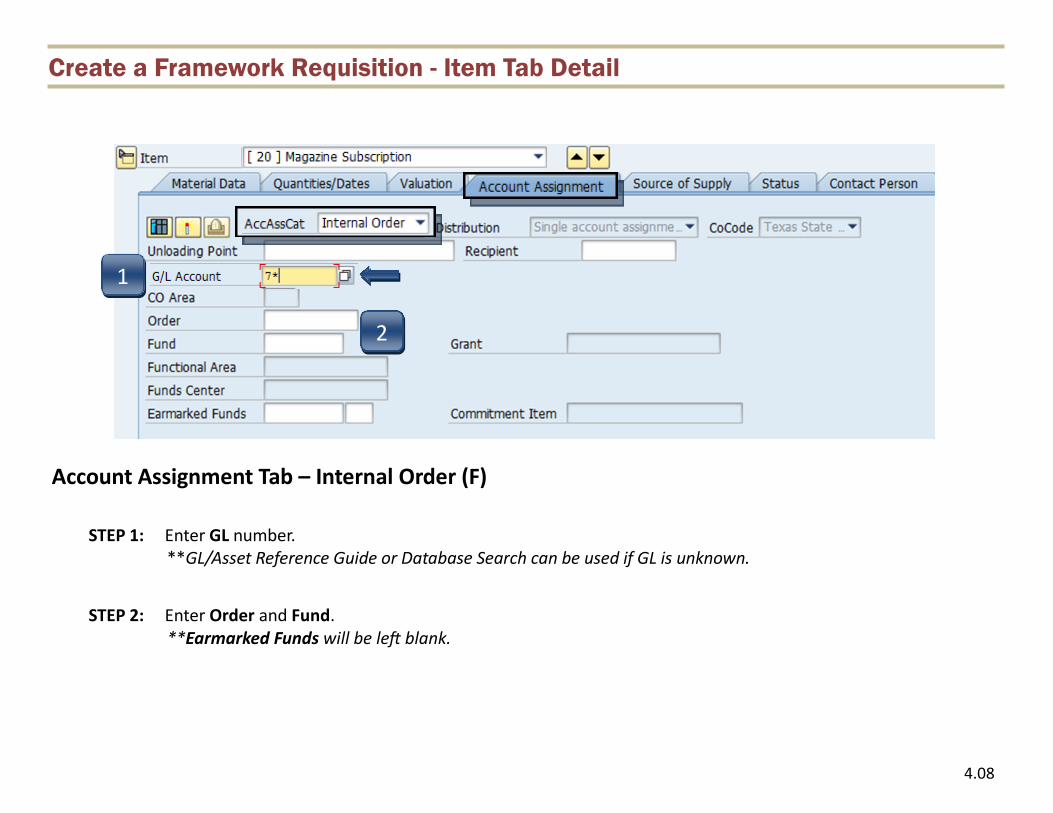
STEP 1: Enter GL number. **GL/Asset Reference Guide or Database Search can be used if GL is unknown.
STEP 2: Enter Order and Fund. **Earmarked Funds will be left blank.
Account Assignment Tab – Internal Order (F)
2
1
4.08
Create a Framework Requisition - Item Tab Detail
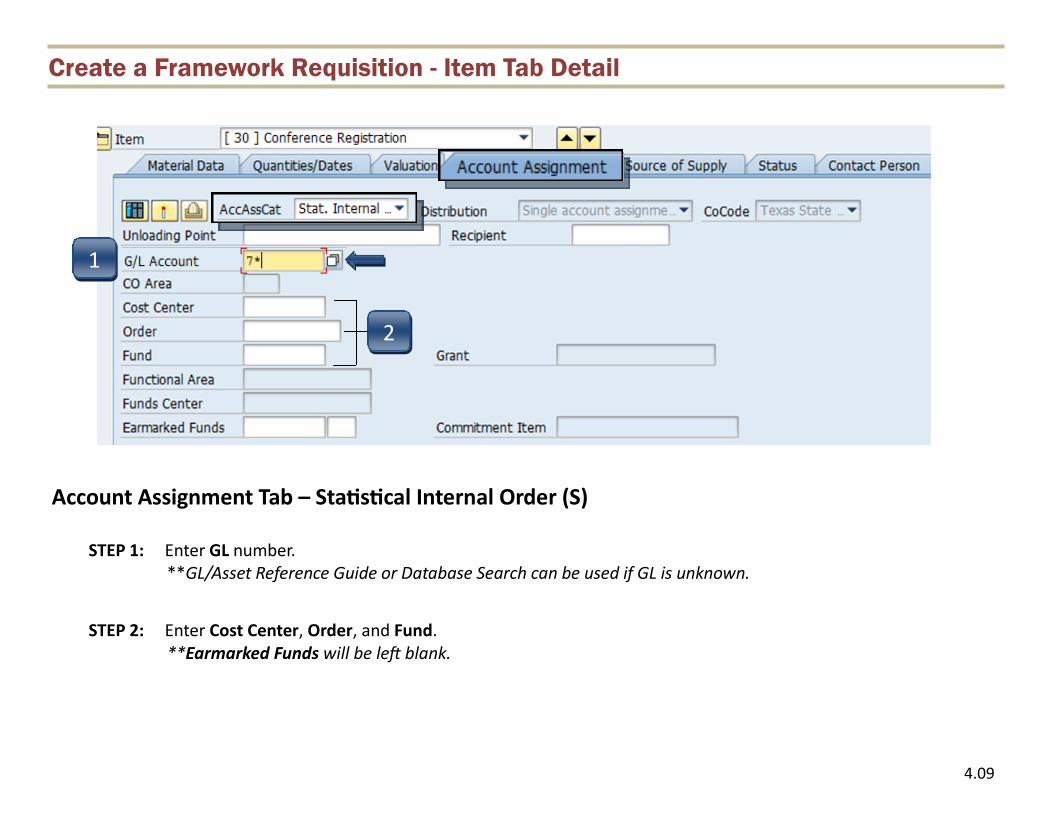
STEP 1: Enter GL number. **GL/Asset Reference Guide or Database Search can be used if GL is unknown.
STEP 2: Enter Cost Center, Order, and Fund. **Earmarked Funds will be left blank.
Account Assignment Tab – Statistical Internal Order (S)
1
2
4.09
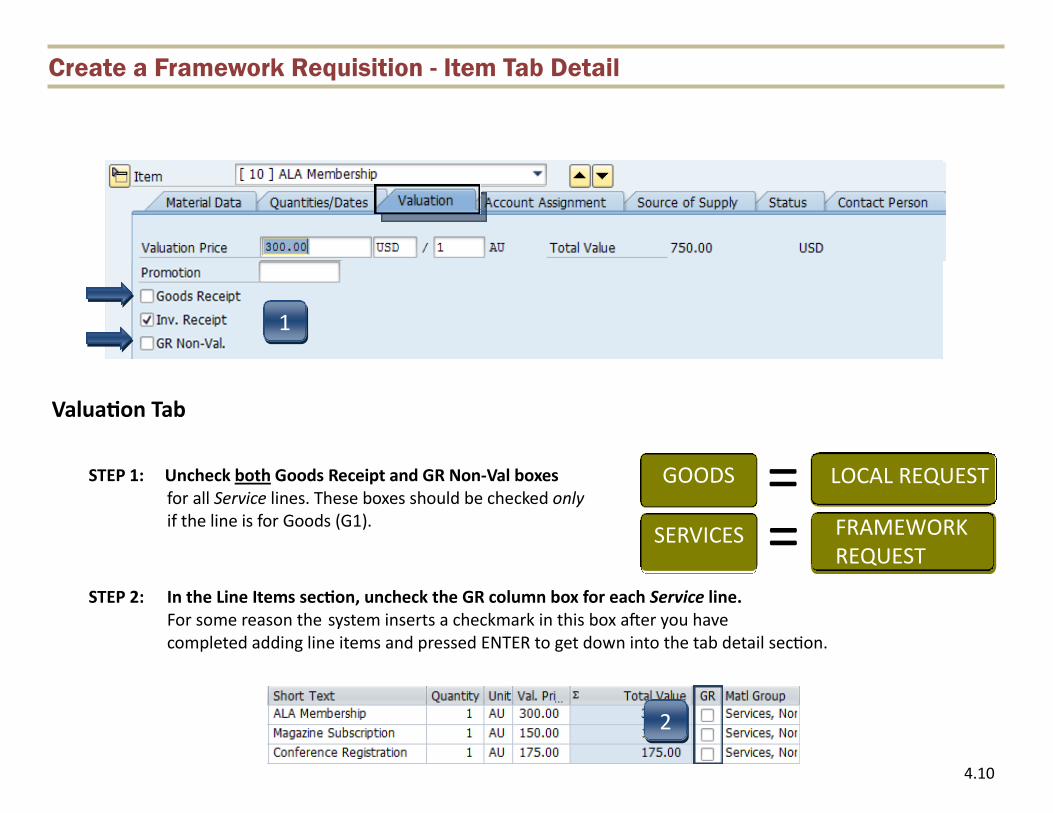
Create a Framework Requisition - Item Tab Detail
STEP 1: Uncheck both Goods Receipt and GR Non-Val boxes for all Service lines. These boxes should be checked only if the line is for Goods (G1).
STEP 2: In the Line Items section, uncheck the GR column box for each Service line. For some reason the system inserts a checkmark in this box after you have completed adding line items and pressed ENTER to get down into the tab detail section.
Valuation Tab
1
2
GOODS = LOCAL REQUEST
SERVICES = FRAMEWORK REQUEST
4.10
Create a Framework Requisition - Item Tab Detail
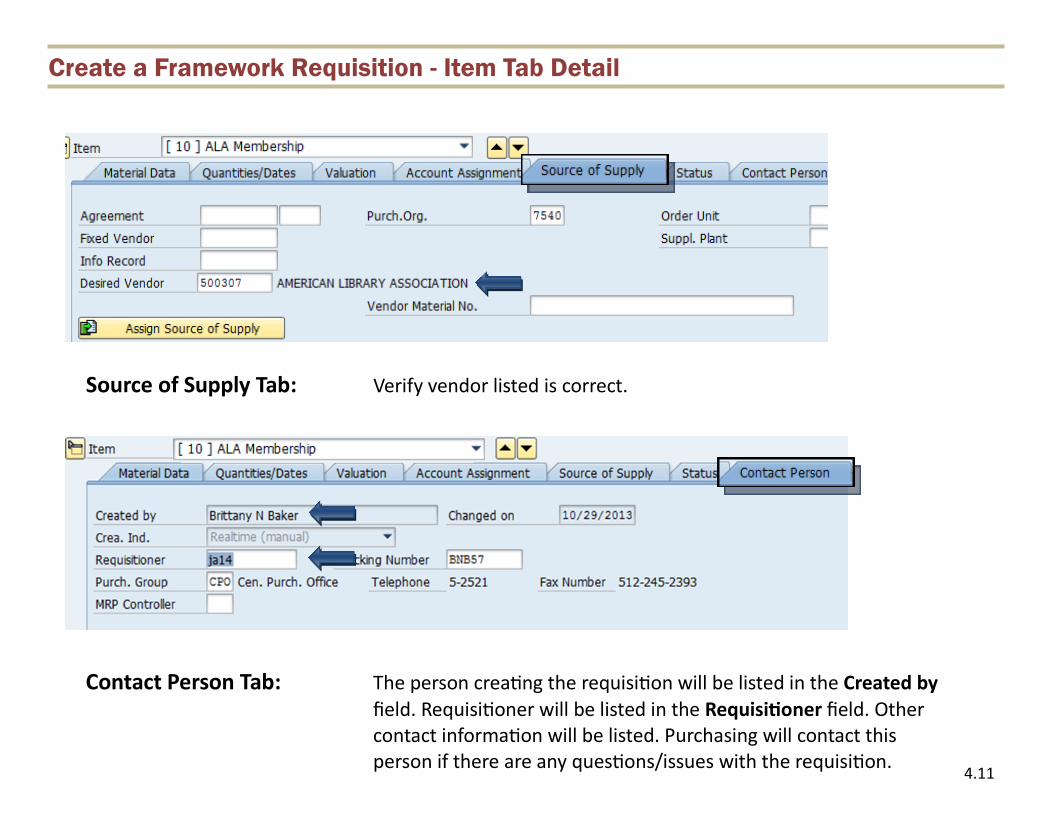
Source of Supply Tab: Verify vendor listed is correct.
Contact Person Tab: The person creating the requisition will be listed in the Created by
field. Requisitioner will be listed in the Requisitioner field. Other contact information will be listed. Purchasing will contact this person if there are any questions/issues with the requisition.
4.11
Create a Framework Requisition - Item Tab Detail
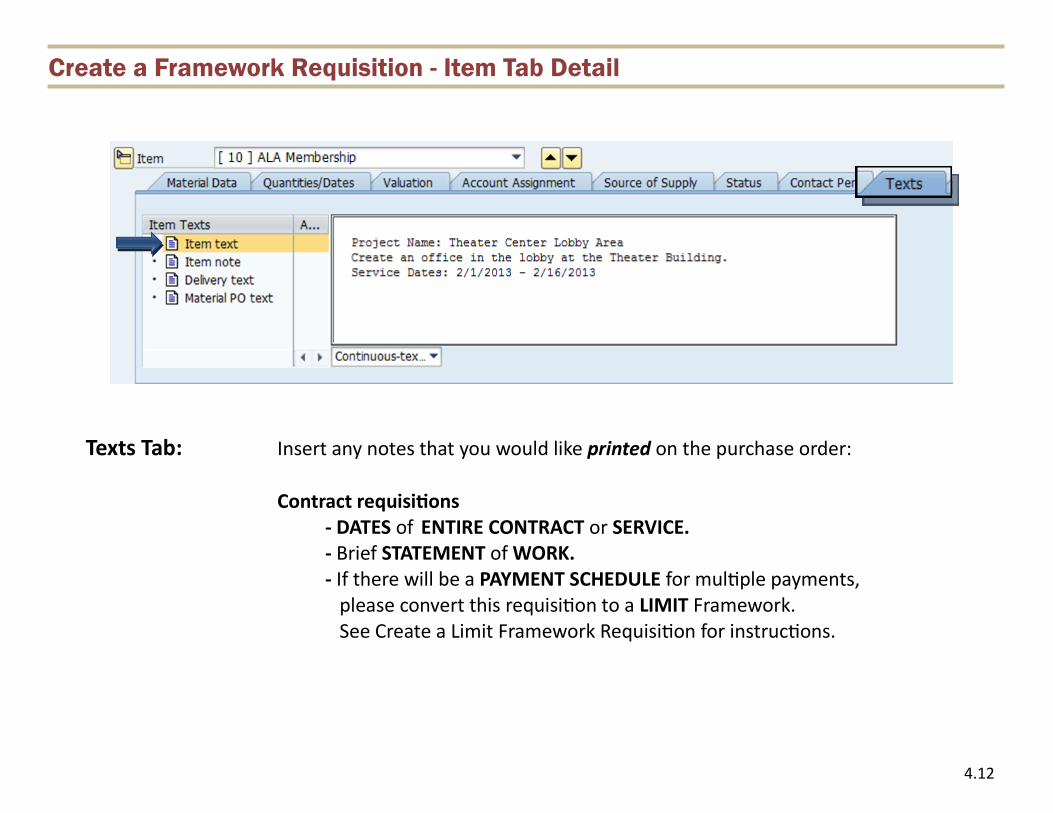
Texts Tab: Insert any notes that you would like printed on the purchase order:
Contract requisitions - DATES of ENTIRE CONTRACT or SERVICE. - Brief STATEMENT of WORK. - If there will be a PAYMENT SCHEDULE for multiple payments, please convert this requisition to a LIMIT Framework. See Create a Limit Framework Requisition for instructions.
4.12

Create a Framework Requisition - Check, Save, and Submit
STEP 1: Click the Check icon to ensure there are no errors.
SAP will check your requisition and generate a window that displays found errors. -If any errors are found, click the green check to close the message window. Double-check your requisition to verify you have not omitted any information. -If you have checked everything and still receive red hard stop errors, please contact Purchasing at 245-2521.
STEP 2: If there are no errors, click Save.
STEP 3: After you have saved, the requisition number will be displayed in the bottom left corner of the screen. Your requisition number will begin with 14 and follow with six additional numbers, example: 14057615
4.13


