
User’s GuideCreative Live! Cam Voice
How to use this manual
This document has been designed to provide you with complete product knowledge. You can resize the document window or print this document, access linked web sites and get information from specially prepared graphics.• To jump to a linked topic or a web site, click the underlined blue text, or the
hand symbol whenever it appears.
• To show a short description (tooltip) of an object, move your mouse cursor over it. A tooltip appears after a few seconds.
You can choose to print portions of this document:1. On the Contents tabbed page to your left, click a topic heading.2. On the menu, click the Print button.3. In the dialog box that appears, click the option to print one topic only, or all
topics under a heading.

Introduction

Introduction 1-1
I
oice. You can enjoy ideo chatting with your s and still photos in . Its built-in while video chatting!
use it to enhance your
BB
P
ion of purchase.
R other information that ore you begin installing
ntroduction
Congratulations on purchasing your Creative Live!® Cam Vfantastic voice clarity and high quality video images while vfriends and loved ones. This webcam captures 24-bit video16.7 million colors at resolutions up to SXGA (1280 x 960)microphones enable you to lean back and chat comfortably
Read on to learn more about your web camera and how tovideo chatting experience.
efore You egin
ackage Contents Your webcam package contains the following items:❑ Creative Live! Cam Voice with USB cable attached❑ Creative Live! Cam Voice Installation CD❑ Hands-free Headset❑ Quick Start Booklet
Note• Contents may vary depending on product model and reg
EADME file The README file on the CD-ROM contains late-breaking orsupplements the product documentation. Read the file befyour webcam.
Introduction 1-2
M
R
ng at 850 MHz or higher
are installation)ower supply (USB 2.0
d. Sound Blaster 16 or with full-duplex support.
er
inimum System
equirements
❑ Intel® Pentium® III or AMD® equivalent processor runni(Intel Pentium 4, 2.8 GHz recommended)
❑ Microsoft® Windows® XP or Windows 2000❑ 128 MB RAM (256 MB RAM or higher recommended)❑ 100 MB free hard disk space (excludes third party softw❑ Available USB 1.1 port or a USB 1.1 hub with external p
required for maximum frame rate and resolution)❑ 16-bit true color display❑ CD-ROM/DVD-ROM drive for software installation❑ Sound Blaster® or other Windows-compatible audio car
higher required for simultaneous two-way conversation
For Video Instant Messaging❑ Modem or LAN access to the Internet at 56 Kbps or fast

Introduction 1-3
ACC
am Voice.
tion
am Center (when ing in the ture images.
ly during video
4
3
2
bout reative Live! am Voice
The figure below highlights the features of Creative Live! C
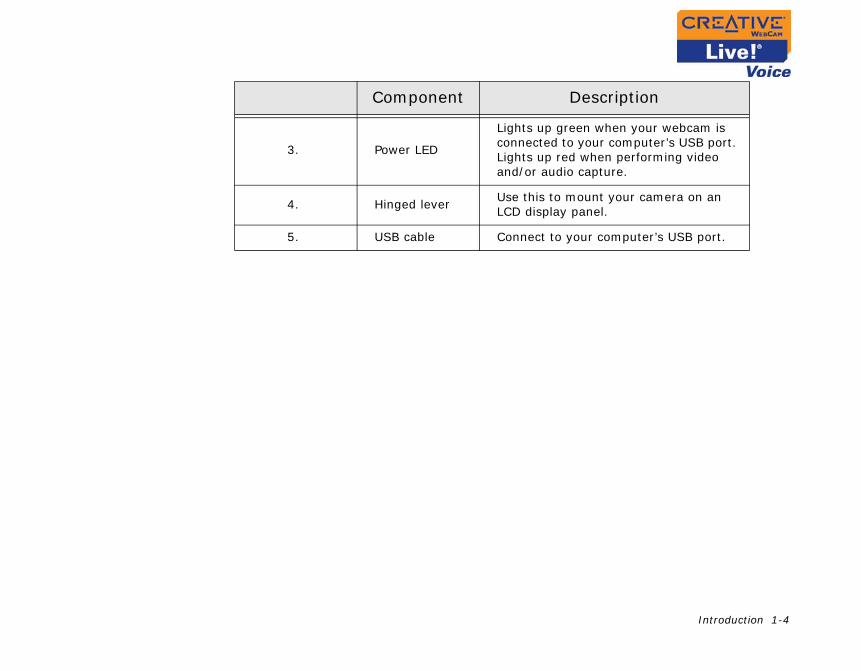
Component Descrip
1.Snapshot button
Press to launch WebCCam Detector is runnbackground) and cap
2. MicrophonesCaptures voices clearchats.
5
1
Introduction 1-4
your webcam is puter’s USB port.
erforming video
r camera on an
uter’s USB port.
tion
3. Power LED
Lights up green whenconnected to your comLights up red when pand/or audio capture.
4. Hinged leverUse this to mount youLCD display panel.
5. USB cable Connect to your comp
Component Descrip

Installing Your Webcam
Installing Your Webcam 2-1
I
sing your webcam.
e installing the
nected and the Add rd dialog box appears,
r CD should start
then click Autoplay.utton.
, and then click the
an available USB port page 2-3).
ps below:
box appears, select nded), and then click
installation. You may be talled, if you want to ications are installed.ve been installed.
nstalling Your Webcam
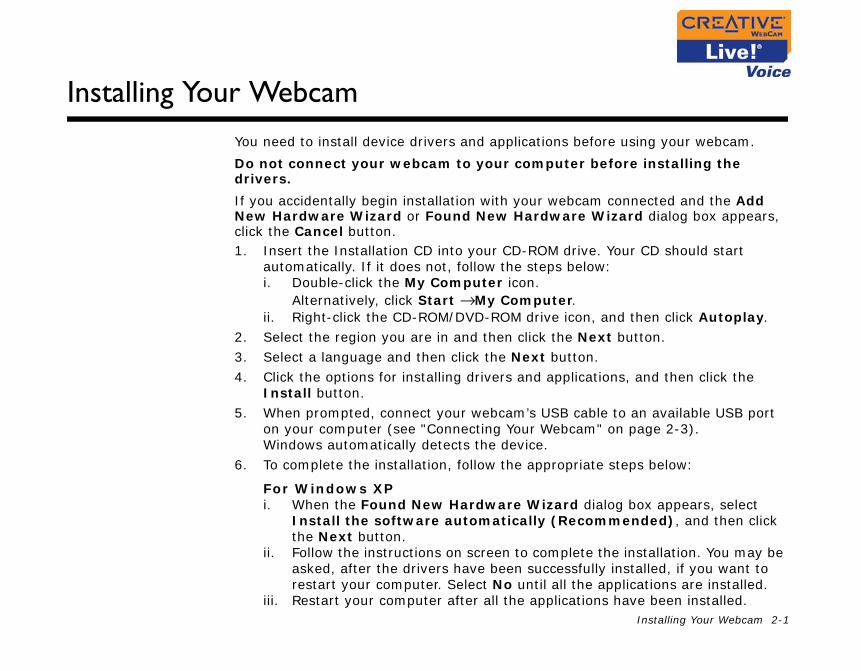
You need to install device drivers and applications before u
Do not connect your webcam to your computer befordrivers.
If you accidentally begin installation with your webcam conNew Hardware Wizard or Found New Hardware Wizaclick the Cancel button.1. Insert the Installation CD into your CD-ROM drive. You
automatically. If it does not, follow the steps below:i. Double-click the My Computer icon.
Alternatively, click Start → My Computer.ii. Right-click the CD-ROM/DVD-ROM drive icon, and
2. Select the region you are in and then click the Next b3. Select a language and then click the Next button.4. Click the options for installing drivers and applications
Install button.5. When prompted, connect your webcam’s USB cable to
on your computer (see "Connecting Your Webcam" onWindows automatically detects the device.
6. To complete the installation, follow the appropriate ste
For Windows XPi. When the Found New Hardware Wizard dialog
Install the software automatically (Recommethe Next button.
ii. Follow the instructions on screen to complete the asked, after the drivers have been successfully insrestart your computer. Select No until all the appl
iii. Restart your computer after all the applications ha

Installing Your Webcam 2-2
tion in Windows XP and
appears (see figure e has been detected,
the installation.ccessfully installed, if l all the applications are
ve been installed.tion in Windows XP and
To verify the installation, see "Verifying the installaWindows 2000".
For Windows 2000i. When a Digital Signature Not Found dialog box
below), telling you that Creative Live! Cam Voicclick the Yes button.
ii. Follow the instructions on the screen to complete You may be asked, after the drivers have been suyou want to restart your computer. Select No untiinstalled.
iii. Restart your computer after all the applications haTo verify the installation, see "Verifying the installaWindows 2000".

Installing Your Webcam 2-3
are components on your computer, and ve such a message, do performs to its fullest
ck for your operating
P Hotfix KB822603e vendor
B822603 can be r via Windows Update.
CY
alling the drivers. To 2-1.
er flat surface. For LCD ted hinged lever to
Note
For users with USB 2.0-equipped computers only Creative Installation automatically checks that the softwrequired for optimal USB 2.0 performance are installed alerts you if these components are missing. If you receione of the following to ensure that your webcam alwayspotential over a USB 2.0 connection:• download and install the latest Windows Service Pa
system• if you are using Windows XP SP1, install Windows X• install the USB 2.0 driver provided by your hardwar
The latest Windows Service Packs and Windows Hotfix Kobtained from the Microsoft Help and Support website o
onnecting our Webcam
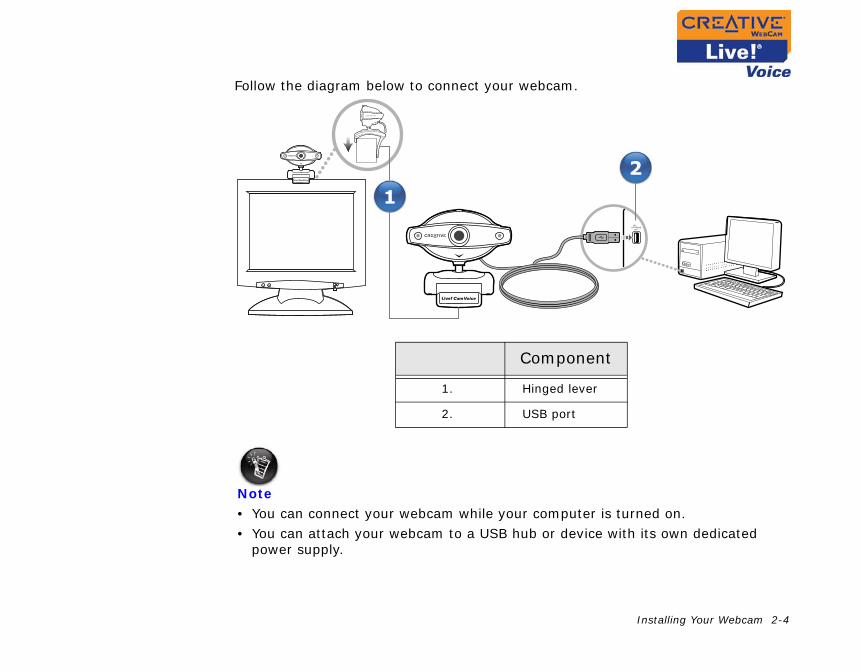
Do not connect your webcam to your computer before instinstall your drivers, see "Installing Your Webcam" on page
Place your webcam on top of your computer monitor or othflat panel monitors or notebook computers, use the integramount the camera.
Installing Your Webcam 2-4
rned on.h its own dedicated
2
Follow the diagram below to connect your webcam.
Note• You can connect your webcam while your computer is tu• You can attach your webcam to a USB hub or device wit
power supply.
Component
1. Hinged lever
2. USB port
1

Installing Your Webcam 2-5
ViWW
in the Windows Start
ware tab..on.
Game controllers
erifying the nstallation in
indows XP and indows 2000
1. Right-click the My Computer icon on your desktop ormenu.
2. On the menu that appears, click Properties.3. In the System Properties dialog box, click the Hard4. Click the Device Manager button. A window appears5. Click the plus (+) sign next to the Imaging Device ic
The entry “Live! Cam Voice” appears.6. Click the plus (+) sign next to the Sound, Video and
icon.The entry “Live! Cam Voice (Mic)” appears.
e! Cam Voice Applications 3-1
C
from those described
CWC
pictures and perform nd time lapse video wing you to optimize e all your photos and reative WebCam
Creative Liv
reative Live! Cam Voice Applications
The Installation CD includes the following:❑ Creative WebCam Center❑ Creative Photo Manager❑ Creative Photo Calendar
❑ muvee® autoProducer™
❑ Orb™ with OrbSecure❑ SightSpeed™
❑ Yahoo!® Messenger
Note• The applications included with your webcam may differ
here.
reative ebCam
enter
With this powerful application, you can record videos, takeadvanced tasks like remote monitoring, motion detection acapturing. There are various settings for you to adjust, allothe quality of your pictures and videos. You can also browsvideos at one convenient location. For details, see "Using CCenter".

e! Cam Voice Applications 3-2
CM
nd manage all your nd effects for advanced
Creative Liv
reative Photo anager
With Creative Photo Manager, you can organize, arrange aphotos and videos. It also comes with enhanced features aphoto and video management.
e! Cam Voice Applications 3-3
application's Help.
CC
n photo calendar for ublic holidays and
Creative Liv
For additional information and usage instructions, see the
reative Photo alendar
Use Creative Photo Calendar to design and create your owprint. You can also insert your own lunar calendar dates, pspecial events.

e! Cam Voice Applications 3-4
ree easy steps: just
ma
d quickly. Its fantastic nal videos in an nd share it!
Creative Liv
You can have your personalized photo calendar ready in thcreate, save and print!
uvee utoProducer
With muvee autoProducer, you can create videos easily anvideo editing technology enables you to produce professioamazingly short period of time. Simply shoot it, muvee it a

e! Cam Voice Applications 3-5
application's Help.
OO
personal home security your home to assure
as notebooks or you instant access to
Creative Liv
For additional information and usage instructions, see the
rb with rbSecure
Perfect for remote monitoring, Orb with OrbSecure is your application. From anywhere and at any time, you can viewyourself that all is right.
When used together with Internet-connected devices suchPersonal Digital Assistants, Orb with OrbSecure also gives files on your home computer.
e! Cam Voice Applications 3-6
application's Help.
S our computer into a co-workers, friends and long-distance fees. You four people seeing and
Creative Liv
For additional information and usage instructions, see the
Note• Only available for American customers.
ightSpeed SightSpeed is an easy-to-use technology that transforms yvideo phone. With SightSpeed, you can see and hear your family, no matter how far away they are, without incurringcan have multiparty conference and video calls with up to hearing one another simultaneously!
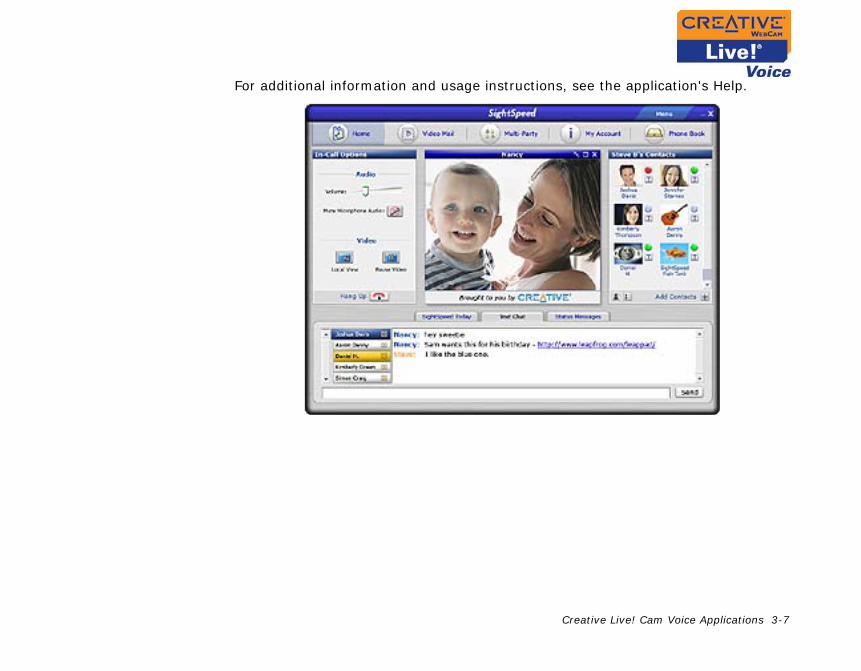
e! Cam Voice Applications 3-7
application's Help.
Creative Liv
For additional information and usage instructions, see the
e! Cam Voice Applications 3-8
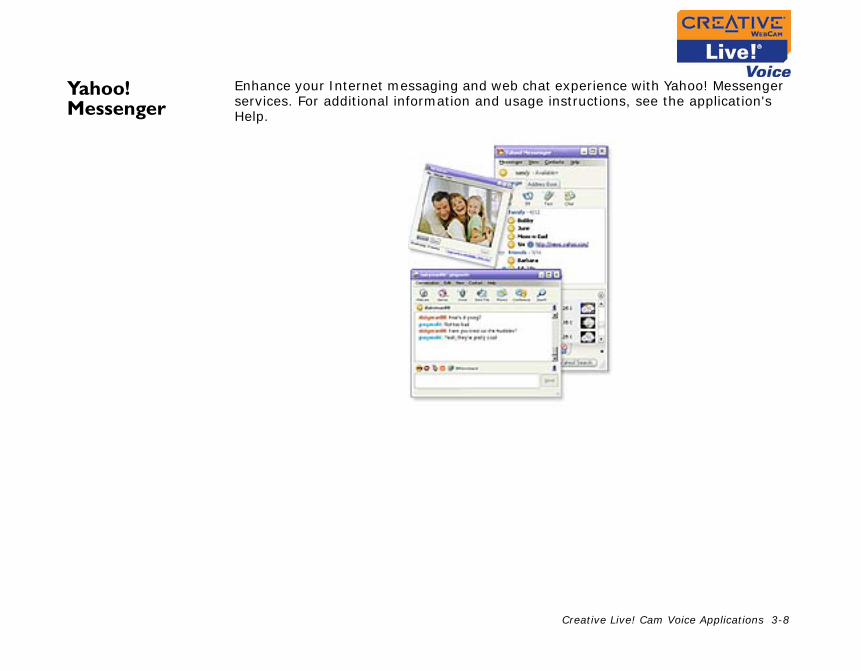
YM
with Yahoo! Messenger , see the application's
Creative Liv
ahoo! essenger
Enhance your Internet messaging and web chat experienceservices. For additional information and usage instructionsHelp.

Center
Using Creative WebCam
Creative WebCam Center 4-1
U
and video with your monitoring, motion
following ways: Creative WebCam →
ur taskbar, and select
to-detect it. You can e from a popup window
era correctly, see
talled model of user interface.
ettings, refer to its Help
n window, click Help.
Using
sing Creative WebCam Center
Creative WebCam Center makes it easy to capture imageswebcam. You can also perform advanced tasks like remotedetection and time lapse video capturing.
You can start Creative WebCam Center in any of the ❑ Click Start → Programs or All Programs → Creative →
Creative WebCam Center.❑ Right-click the Creative Cam Detector icon in yo
Launch WebCam Center.❑ Plug your camera into the USB port and let Windows au
choose to start Creative WebCam Center in Capture modthat appears.
Note• If Creative WebCam Center does not recognize the cam
"Frequently Asked Questions" on page C-1.• Creative WebCam Center automatically detects your ins
webcam, and disables any unsupported features in the
For more information about the application’s features and sfile.
To start the Help file: In Creative WebCam Center’s mai
Creative WebCam Center 4-2
CIV
T apture tab.on that you want.
e. Images are saved as
age files in the
tion. To adjust your nt.
R apture tab.n that you want.
recording.
hen you stop recording.
eo files in the
Using
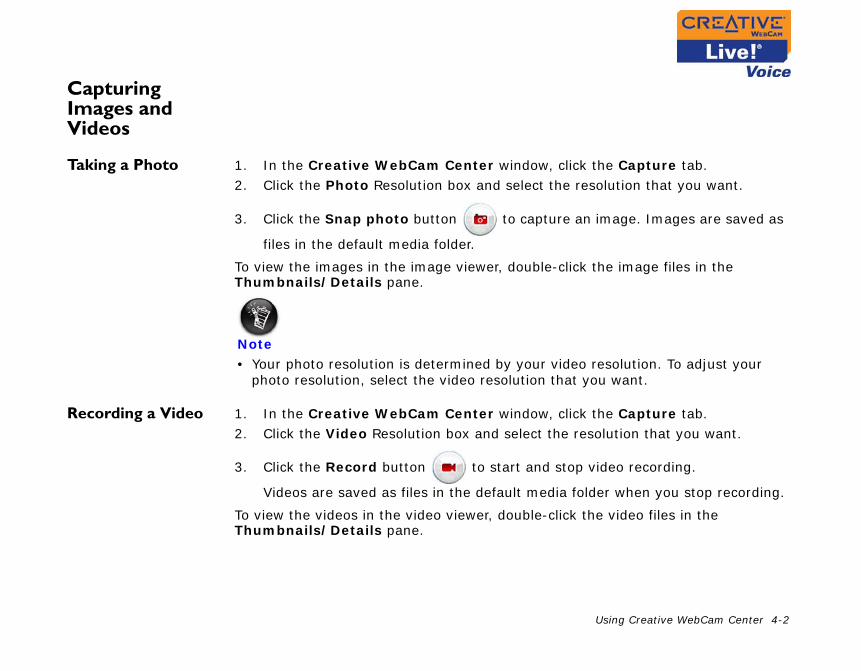
apturing mages and ideos
aking a Photo 1. In the Creative WebCam Center window, click the C2. Click the Photo Resolution box and select the resoluti
3. Click the Snap photo button to capture an imag
files in the default media folder.
To view the images in the image viewer, double-click the imThumbnails/Details pane.
Note• Your photo resolution is determined by your video resolu
photo resolution, select the video resolution that you wa
ecording a Video 1. In the Creative WebCam Center window, click the C2. Click the Video Resolution box and select the resolutio
3. Click the Record button to start and stop video
Videos are saved as files in the default media folder w
To view the videos in the video viewer, double-click the vidThumbnails/Details pane.
Creative WebCam Center 4-3
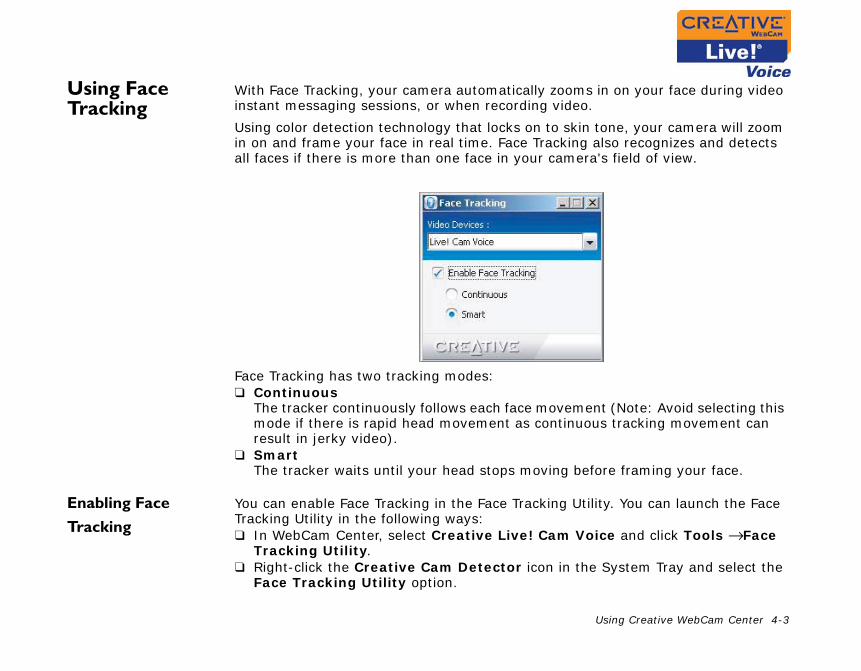
UT
your face during video
, your camera will zoom recognizes and detects ld of view.
ote: Avoid selecting this cking movement can
raming your face.
E
T
ou can launch the Face
nd click Tools → Face
tem Tray and select the
Using
sing Face racking
With Face Tracking, your camera automatically zooms in oninstant messaging sessions, or when recording video.
Using color detection technology that locks on to skin tonein on and frame your face in real time. Face Tracking also all faces if there is more than one face in your camera's fie
Face Tracking has two tracking modes:❑ Continuous
The tracker continuously follows each face movement (Nmode if there is rapid head movement as continuous traresult in jerky video).
❑ SmartThe tracker waits until your head stops moving before f
nabling Face
racking
You can enable Face Tracking in the Face Tracking Utility. YTracking Utility in the following ways:❑ In WebCam Center, select Creative Live! Cam Voice a
Tracking Utility.❑ Right-click the Creative Cam Detector icon in the Sys
Face Tracking Utility option.
Creative WebCam Center 4-4
puter, you must first
→ Creative Live! Cam
u will not see the Face t Face Tracking.
TF
t there is no color cast. hite paper about 20 cm
posed. An over-exposed ears dark. as human skin.
ly event that the tracker your head to attract the
ation setting. Changing ffect the performance of
feature is very sensitive ftware not to track
Using
If you have more than one camera installed in your comselect the camera that you want.
❑ Click Start → Programs or All Programs → Creative Voice → Face Tracking Utility.
Note• Face Tracking is only available with selected webcams. Yo
Tracking Utility option if your camera does not suppor
ips for successful ace Tracking
❑ Make sure the white balance is correctly adjusted so thaTo quickly adjust white balance, place a blank sheet of w(8-inches) in front of your webcam for three seconds.
❑ Make sure your face is well lit and not over- or under-exface appears white whereas an under-exposed face app
❑ Avoid backgrounds and clothing that are the same color❑ Avoid sleeveless clothing.❑ The tracker is sensitive to head movement. In the unlike
fails to detect very small head movements, gently move attention of the tracker.
❑ The tracker is set to work best at the default color saturthis setting, especially to one of the extreme ends, will athe tracker.
❑ Place the camera on a sturdy surface. The Face Tracking to movement, and holding the camera can cause the soproperly.
Creative WebCam Center 4-5
Uaf
webcam's view in zoom e lets you adjust the ght different directions. webcam’s view directly
W
C
is not enabled, and you
the feature.w. An arrow appears on
irection indicated by the
move your mouse
e symbol that
W
C ce and click Tools →
System Tray and select
computer, you must
ive → Creative Live!
n to enable the Pan and
Using
sing the Pan nd Tilt eature
With the digital Pan and Tilt feature, you can control your mode without moving your webcam manually. The softwarview by panning horizontally, vertically and diagonally in eiSelect one of the following options to start controlling yourfrom your computer.❑ With WebCam Center❑ With Pan and Tilt Control.
ith WebCam
enter
1. In Creative WebCam Center, make sure Face Tracking are not in My Recordings mode.
2. On the video pane, click the Zoom In slider to enable3. Move your mouse toward the direction you want to vie
the screen.4. Click the arrow. Your camera view moves toward the d
arrow.5. To bring the camera view back to its default position,
toward the center of the video pane, and then click thappears.
ith Pan and Tilt
ontrol
1. Launch Pan and Tilt Control in the following ways:• In WebCam Center, select Creative Live! Cam Voi
Pan and Tilt Control.• Right-click the Creative Cam Detector icon in the
the Pan and Tilt Control option.If you have more than one camera installed in yourfirst select the camera that you want.
• Click Start → Programs or All Programs → CreatCam Voice → Pan and Tilt Control.
2. On the Pan and Tilt window, click the Zoom In buttoTilt feature.
Creative WebCam Center 4-6
buttons. by pressing the arrow
e zoom button you
Using
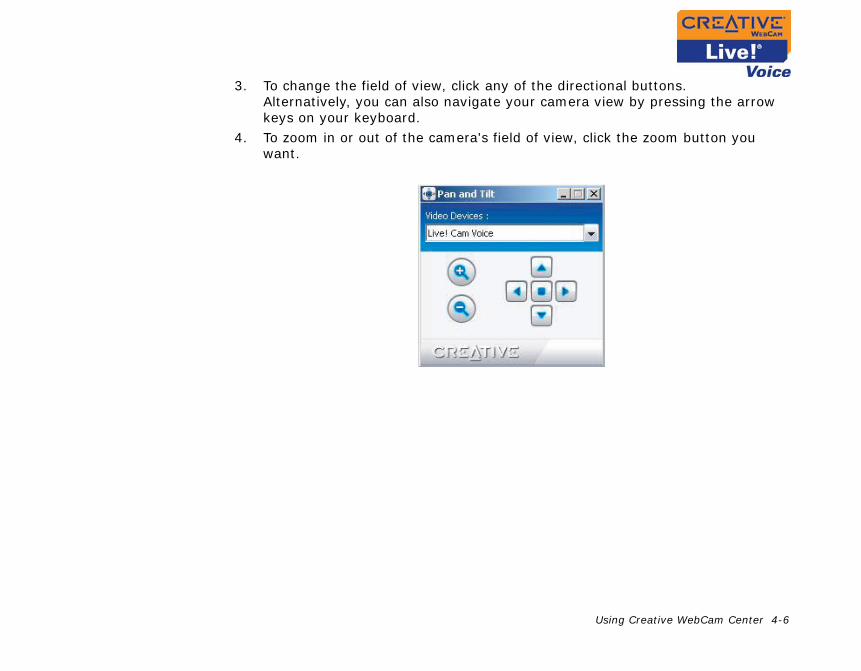
3. To change the field of view, click any of the directionalAlternatively, you can also navigate your camera viewkeys on your keyboard.
4. To zoom in or out of the camera's field of view, click thwant.
Creative WebCam Center 4-7
UtAf
's stereo microphones, The WebCam Audio cellation and directional ce clarity for video
u to speak comfortably,
background noise by voice recognition rates.
ensitivity on your voice
L
W
C
ing methods:ce and click Tools →
System Tray and select
computer, you must
ive → Creative Live!
dio control mode that
Using
nderstanding he WebCam udio Control
eature
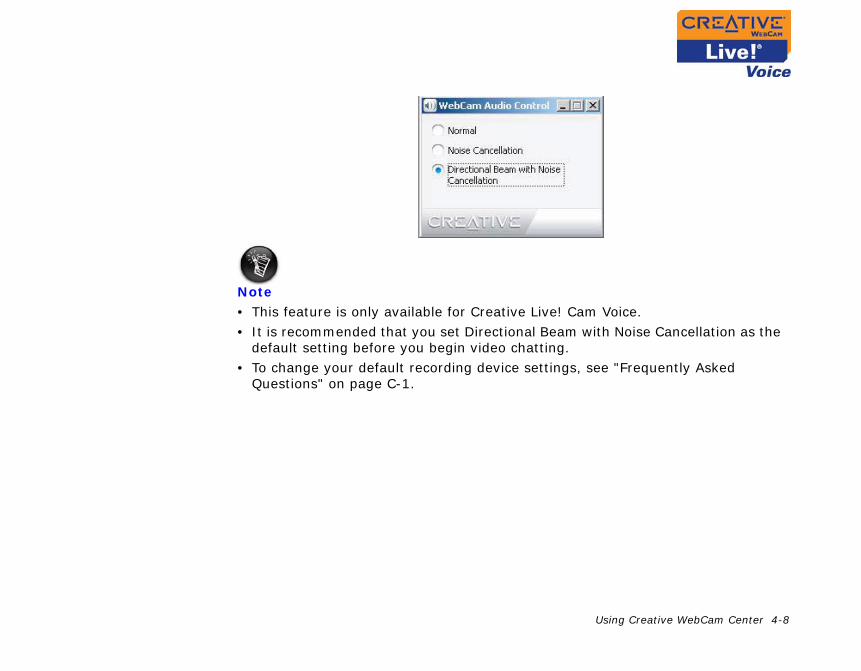
The WebCam Audio Control feature activates your webcamfreeing you from wearing a headset during video chatting.Control feature includes audio enhancements like noise canbeam. This patented technological feature will redefine voichatting.
There are three types of audio control:❑ Normal
The sensitive stereo microphones in your webcam let yofrom a distance of up to 48 inches (1.2 metres) away.
❑ Noise CancellationThis speech-centric feature removes environmental andimproving the signal-to-noise ratio and enabling higher
❑ Directional Beam with Noise CancellationThis directional beam feature centers the microphone sand reduces pickup of surrounding noise.
aunching
ebCam Audio
ontrol
1. Launch WebCam Audio Control using one of the follow• In WebCam Center, select Creative Live! Cam Voi
WebCam Audio Control.• Right-click the Creative Cam Detector icon in the
WebCam Audio Control.If you have more than one camera installed in yourfirst select the camera that you want.
• Click Start → Programs or All Programs → CreatCam Voice → WebCam Audio Control.
2. On the WebCam Audio Control window, click the auyou want.
Creative WebCam Center 4-8
e.oise Cancellation as the
requently Asked
Using
Note• This feature is only available for Creative Live! Cam Voic• It is recommended that you set Directional Beam with N
default setting before you begin video chatting.• To change your default recording device settings, see "F
Questions" on page C-1.

Features
Using Creative WebCam
reative WebCam Features 5-1
U
EAVU
esting effects to your ty in the following ways:tem Tray and click the
→ Creative WebCam
ct the type of effect you
ect you want.
ive → Creative
ideo Effects) from the
launching WebCam
wnload more video o effects.X Utility, click More →
Using C
sing Creative WebCam Features
nabling dvanced ideo FX tility
Advanced Video FX Utility enables you to add fun and interwebcam video. You can launch the Advanced Video FX Utili❑ Right-click the Creative Cam Detector icon in the Sys
Advanced Video FX Utility option❑ Click Start → Programs or All Programs → Creative
→ Advanced Video FX Utility
To apply a video effect, do the following:1. Launch Advanced Video FX Utility. 2. Click the Select Category box (if available), and sele
want.3. Click the Select Effect box, and select the specific eff4. Launch WebCam Center.
Click Start → Programs or All Programs → CreatWebCam → Creative WebCam Center.
5. In WebCam Center, select Creative WebCam (With VDevice list box.
Note• Make sure you launch Advanced Video FX Utility before
Center. • The Select Category box is available only when you do
effects. For more information, click More → More videTo add the downloaded video effects to Advanced Video FAdd video effects.

reative WebCam Features 5-2
r to the Creative
Using C
• For more information on Advanced Video FX Utility, refeWebCam Features online Help.

Technical Specifications
Technical Specifications A-1
T
C
P
S
V
P WebCam Center
V
A
E
W
F
F
P
echnical Specifications
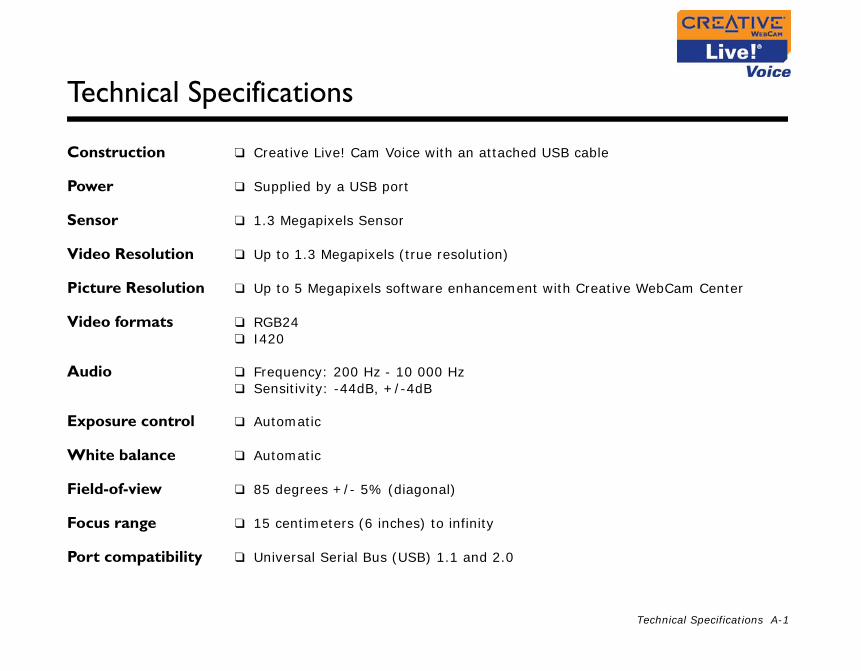
onstruction ❑ Creative Live! Cam Voice with an attached USB cable
ower ❑ Supplied by a USB port
ensor ❑ 1.3 Megapixels Sensor
ideo Resolution ❑ Up to 1.3 Megapixels (true resolution)
icture Resolution ❑ Up to 5 Megapixels software enhancement with Creative
ideo formats ❑ RGB24❑ I420
udio ❑ Frequency: 200 Hz - 10 000 Hz❑ Sensitivity: -44dB, +/-4dB
xposure control ❑ Automatic
hite balance ❑ Automatic
ield-of-view ❑ 85 degrees +/- 5% (diagonal)
ocus range ❑ 15 centimeters (6 inches) to infinity
ort compatibility ❑ Universal Serial Bus (USB) 1.1 and 2.0

Technical Specifications A-2
S
c
ectShow that runs in
oftwareompatibility
❑ TWAIN, Video for Windows, and WDM MiniDriver for DirWindows XP and Windows 2000.

ity
Note on USB Compatibil
ote on USB Compatibility B-1
N
ed Universal Serial Bus ards that do not meet mpliant motherboards
the manufacturers of f motherboards or BIOS
SB port is incompatible system and you suspect ort, the following is a
otherboard or its BIOS s.
BIOS, we recommend
wer supply.
N
ote on USB Compatibility
While testing your webcam on motherboards with integrat(USB) ports, we encountered a small number of motherbothe USB specification exactly. These and other non-USB-comay not operate correctly with your webcam. Fortunately,some of these motherboards have released new versions oto address the problem.
If the setup program warns you that your motherboard’s Uwith your webcam, or if the camera does not work on your that the problem may be related to your computer’s USB plist of available options:1. Contact your computer vendor.
Your computer vendor may be able to upgrade your mto a newer version that addresses USB incompatibilitie
2. Use a PCI host adapter that provides USB connectors.If you are not able to upgrade your motherboard or itsthis approach.
3. Attach your webcam to a USB hub with an external po

ions
Frequently Asked Quest
equently Asked Questions C-1
F
our webcam. If you onsult our self-help tool region and then select
re cannot be enabled
→ Creative Live! Cam
t feature to enable atting.
ice.o change a recording
nd Audio Devices.
Fr
requently Asked Questions
This section covers questions you might have while using yhave more questions about this product, you may wish to c"Knowledge Base". Go to www.creative.com, select yourSupport.
The audio enhancement (for directional beam) featuduring video chatting.To resolve this problem:
1. Exit from your video chatting application.
2. Click Start → Programs or All Programs → CreativeVoice → WebCam Audio Control.
3. Select Directional Beam with Noise Cancellation.4. Start your video chatting application.
Note• Set Directional Beam as your default audio enhancemen
changing of audio enhancement settings during video ch
Unable to capture audio using another recording devCreative Live! Cam Voice is the default recording device. Tdevice, follow the steps below:
1. Click Start → Settings → Control Panel → Sounds a
2. Click the Audio tab.
equently Asked Questions C-2
ing Default device list
the default recording
y in use, or that the
nd that the USB ter’s documentation for
mputer.
ect the camera with
puter. back of your computer.
ply sufficient power for
Fr
3. Select the device that you want from the Sound recordbox.
Note• Repeat the steps above if you want your webcam to be
device subsequently.
An application reports that the video driver is alreadcamera cannot be found.The camera is not properly connected.
To resolve this problem:
4. Ensure that the camera’s USB connector is inserted, aconnector is enabled in the BIOS. Refer to your compuinformation on the BIOS.
5. Reinstall the video capture drivers and restart your co
My computer cannot detect the camera when I connan extended USB cable.To resolve this problem:
❑ Connect the camera directly to a USB port on your comMake sure the camera is connected to the USB port at theSome USB ports at the front of computers may not supyour camera.

equently Asked Questions C-3
he computer restarts
your computer. This can ve or self-powered USB box appears.
rt.
ort, causing the
oblems with the
Fr
The webcam does not light up, or in Windows 2000, tfor no apparent reason.You may have USB devices drawing too much power from happen especially when connecting USB devices to a passihub. In Windows XP, a USB Hub Power Exceeded dialog
Try the following:
❑ Connect the camera directly to your computer’s USB po❑ Use a USB hub with an external power supply.
Insufficient system resources reserved for the USB psystem to be unable to function.There are too many devices in the system, causing IRQ prsystem’s USB controller.
Do the following:
1. Remove some devices from the system.2. Restart the system.
The computer reallocates resources.

Appendixes

License and Copyright

License and Copyright -1
Ldoes not represent a anual may be reproduced or cluding photocopying and Technology Ltd.
reative logo, Sound Blaster, Technology Ltd. in the United egistered trademarks of ered trademarks of muvee rk of Orb in the United States l other brand and product tive holders.
installation CD.
icense and CopyrightInformation in this document is subject to change without notice and commitment on the part of Creative Technology Ltd. No part of this mtransmitted in any form or by any means, electronic or mechanical, inrecording, for any purpose without the written permission of Creative
Copyright © 2005 Creative Technology Ltd. All rights reserved. The CBlaster and Live! are trademarks or registered trademarks of CreativeStates and/or other countries. Microsoft, MS-DOS, and Windows are rMicrosoft Corporation. muvee Technologies and its logotype are registTechnologies Pte. Ltd. in the US and other countries. Orb is a trademaand other countries. Sightspeed is a trademark of SightSpeed, Inc. Alnames listed are trademarks or registered trademarks of their respec
The Software License Agreement is found in a separate folder on the
Version 1.0
December 2005


