
Badewannenfaltwand
Parete pieghevole
Badvouwwand
Fold. door for bathscreen
Paroi pliante/baign.
Mampara para banera
składana ścianka nawannowa
D
I
NL
GB
F
E
PL
MontageanleitungIstruzioni di montaggioMontage - instructieAssembling instructionsInstructions de montageInstrucciones para el montajeInstrukcja monta˝u
CUBF3/MUBF3

1
2
CUBF3/MUBF3
25 mm
90°
6 mm

4
3CUBF3/MUBF3
3 mm
3,5 x 9,5
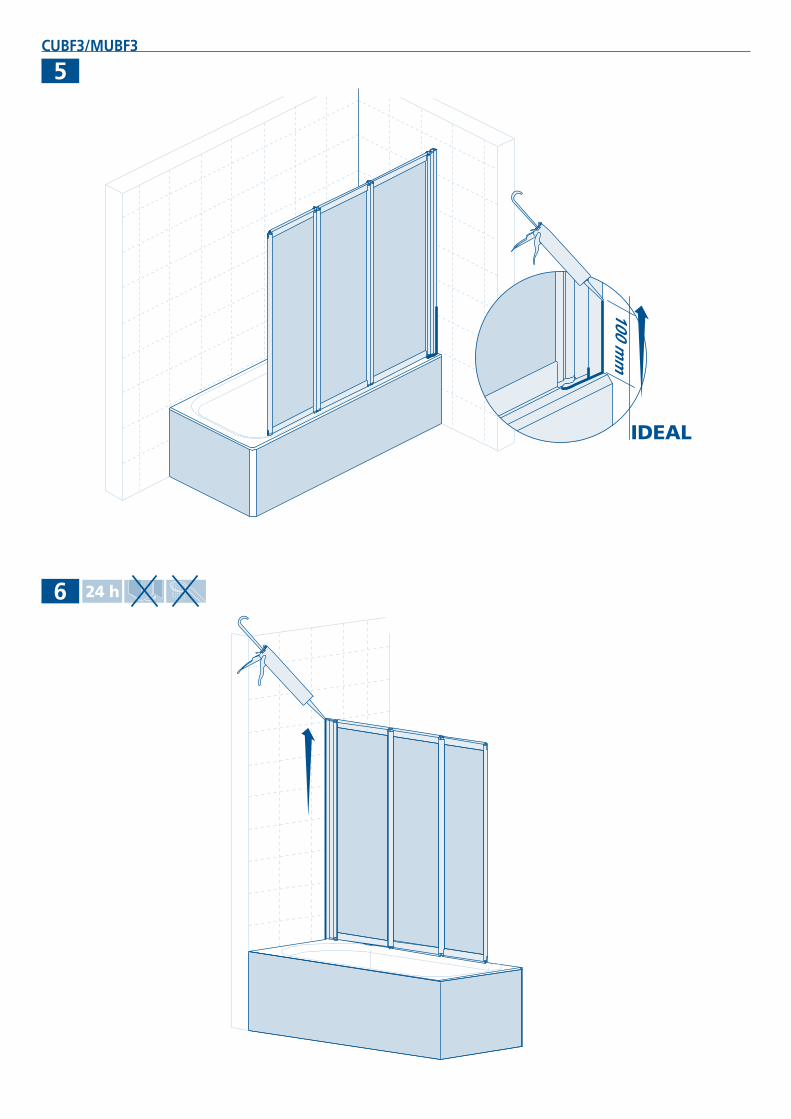
100 mm
IDEAL
5CUBF3/MUBF3
6 24 h


IImportante! Prima del montaggio controllare se il prodotto ha subito danni di trasporto. Per danni su prodotti già montati non possiamo assumerci alcuna responsabilità.Per la pulizia utilizzare un detergente con un PH neutro oppure il detergente neutro da noi consigliato.Non utilizzare diluenti e/o sostanze alcaline, sostanze contenenti solventi, acidi, cloro o abrasivi.
Utensili per il montaggio: livella, matita, bulino, martello, trapano, punta da muro 6 mm, per acciaio 3 mm, cacciavite a croce, cacciavite piatto, silicone.
2 Attenzione: controllare le condizioni nelle quali si trovano sia la parete che le tubazioni gas, corrente ed acqua. I tasselli e le viti fornite a corredo alla cabina doccia sono adatti per pareti in cemento armato o simili materiali di costruzione. Per pareti di tipo costruttivo diverso, utilizzare di conseguenza materiale di fissaggio adeguato. Utilizzare solo silicone o materiale isolante adatto alle superfici sulle quali verrà montata la cabina doccia. Il fissaggio a parete, il montaggio e la siliconatura della cabina doccia devono essere eseguiti in modo preciso e professionale. Per ulteriori domande relative al montaggio, rivolgersi per favore al grossista. Posizionare il profilo a mura a 25 mm dal bordo esterno della vasca, control-lare con la livella, quindi segnare con la matita la posizione del profilo.
2 Segnare con un punzone i punti da forare, quindi procedere alla foratura con il trappano, usando una punta per muro da 6 mm; inserire i tasselli, fissando poi il profilo a muro con le viti 3,9 x 38. Attenzione: prima di forare il muro, verificare che non vi siano linee telefoniche, cavi luce, tubi acqua o gas. Tasselli di fissaggio in dotazione adatti per muro tradizionale.
3 Inserire la cabina nel profilo a muro.
4 Forare con la punta in dotazione,fissare con le viti 3,5x3,9.
6 La cabina doccia, una volta concluso il montaggio, deve essere siliconata come da disegno. Attenzione: le superfici interessate (vetro, profili, piatto doccia, pavimento, ecc.) devono prima essere pulite. Prima di utilizzare la doccia devono passare almeno 24 ore!
DWichtig!Bitte überprüfen Sie Ihre Duschkabine vor der Montage auf Transportschäden. Für Schäden an bereits montierten Produkten kann keine Haftung übernommen werden. Zur Reinigung benutzen Sie ein PH-neutrales Reinigungsmittel oder den von uns empfohlenen Spezialreiniger. Nicht zu verwenden sind Verdünner, sowie alkalische, lösungs-mittel-, säure- und chlorhaltige oder scheuernde Mittel.
Werkzeuge für die Montage: Wasserwaage, Bleistift, Körner, Hammer, Bohrmaschine, Steinbohrer 6mm, Kreuz¬schraubenzieher, Schraubenzieher, Stahlbohrer 3mm, Silikon.
2 Achtung: Kontrollieren Sie die Beschaffenheit der Wand, Licht-, Gas- und Wasserleitungen. Die mit der Kabine mitgelieferten Dübel und Schrauben sind nur für sämtliche Beton- und Mauerwerkbaustoffe geeignet. Für Wände anderer Bauart müssen Sie dafür geeignetes Befestigungsmaterial verwenden. Verwenden Sie nur Silikon oder Dichtungsmasse, welche für die Oberflächen und Materialien geeignet sind, an denen die Duschkabine montiert wird. Die Befestigung an der Wand, die Montage und die Silikonierung der Duschkabine müssen sorgfältig und professionell durchgeführt werden. Falls Fragen bezüglich der Montage entstehen sollten, wenden Sie sich bitte an Ihren Wiederverkäufer. Nehmen Sie das Wandprofil, stellen es auf die Badewanne (25 mm vom Außenrand), mit der Wasserwaage ausrichten und mit einem Stift die Position anzeichnen.
2 Löcher ankörnen, mit einem Steinbohrer 6 mm die Löcher bohren und die Dübel einsetzen. Achtung: kontrollieren Sie die Beschaffenheit der Mauer, Licht,- Gas- und Wasserleitungen. Mit den Schrauben 3,9 x 38 das Wandprofil festschrauben. Dübel ist nur für traditionelles Mauerwerk geeignet.
3 Die Kabine in das Wandprofil einführen.
4 Bohren Sie die Profile mit dem mitgeliefertem Bohrer an und fixieren Sie diese mittels der Schrauben 3,5x9,5.
6 Am Ende der Montage ist die Duschabtrennung lt. Zeichnung zu silikonieren. Achtung vorher die zu silikonierenden Flächen (Glas, Profile, Duschtasse, Boden, etc.) reinigen. Vor Benutzen der Dusche Silikon mindestens 24 Stunden lang aushärten lassen.
NLBelangrijk! Vóór montage dient U het artikel op eventuele transport¬beschadigingen of fabrieksfouten te kontroleren. Voor schade aan reeds gemonteerde onderdelen kunnen wij niet aansprakelijk gesteld worden. Voor de reiniging dient u een PH neutraal reinigingsmiddel of de aanbevolen Sealskin douchereiniger te gebruiken. Geen verdunner, alkalische, zuur, chloor of schurende middelen gebruiken.
Benodigd gereedschap: Kruisschroevendraaier, schroevendraaier, waterpas, potlood, boormachine, steenboor 6mm, staalboor 3mm, silicon.
2 Let op: Controleer de muur op licht, gas- en waterleidingen. De bij de douchecabine meegeleverde pluggen en schroeven zijn uitsluitend voor beton en steen geschikt. Voor wanden van een ander bouwmateriaal dient u daarvoor geschikt bevestigmateriaal aan te schaffen. Gebruik uitsluitend siliconen of een andere applicatiekit, welke geschikt is voor het oppervlak en het materiaal wat aan de douchecabine gemonteerd wordt. De bevestiging aan de wand, de montage en het siliconeren van de douchecabine moet zorgvuldig en professioneel worden uitgevoerd. Indien u vragen heeft tijdens de montage wordt vriendelijk verwezen naar uw wederverkoper. Plaats het muurprofiel op de badrand(ca. 25 mm vanaf de buitenrand).Het profiel waterpas zetten en aftekenen.
2 De boorgaten merken en met 6 mm steenboor de gaten boren. Daarna de pluggen plaatsen. Let op: voor het boren dient U er zeker van te zijn dat er geen water- licht- of gasleidingen lopen. Hierna met schroeven 3,9 x 38 het muurprofiel vastschroeven. De pluggen zijn alleen geschikt voor traditioneel metselwerk (bv. baksteen of gipsbetonblokken)
3 De cabine in het muurprofiel plaatsen.
4 Boor met het meegeleverde boortje het profiel en fixeer deze doormiddel van de schroeven 3,5 x 9,5
6 Nadat de douchecabine is gemonteerd, dient deze te worden afgekit volgens de tekening. Let op dat de oppervlaktes welke gekit worden (glas, profiel, douchebak/vloer etc.) ontvet worden.
Voordat de douche in gebruik genomen kan worden, dient de kit tenminste 24 uur te worden uitgehard.
Zum herausnehmen • Foglio da staccare • Om uit te nemen • Take out the folder • À enlever • Oja a extraer • Do wyciàgni´cia
GBImportant! Before assembling the shower, please control if the product has been damaged by the transport. We don’t assume responsibility for damaged products which are already assembled. For cleaning use a pH-neutral cleaning agent or the special cleaner recommended by us. Not to use are solvents, as well as alkaline, solvent -, acid- and chloric or scrubbing agents.
Required assembly tools: Water level, pencil, hammer, drill, drill 6 mm, cross-shaped screwdriver, screwdriver, steeldrill 3mm, silicon.
2 Attention: please ensure to check the wall condition and the position of electrical wiring, gas and water piping. Plugs and screws, provided with the shower enclosure, are only suitable for masonry walls. For different wall constructionand material types, please use the appropriate fixing means. Use only sealants suitable for the surfaces and materials on which the shower enclosure will be installed. Erection, installation, fixing on the wall and sealing of the shower enclosure must be properly done according to good practice. In case of doubt on erection and installation procedures, please contact the reseller. Please take out the wall jamb, put it on the buth tub (25 mm from outside) bring it In line and mark the position.
2 Drill the whole in the wall after marking it, and put in the wall inlay for screw. Attention: Please check the wall for water or gas lines. Fix the wall jamb with the screws 3,9 x 38. Please use the pegs witch You will find in the installation kit only for traditonal walls.
3 Insert the enclosure in the wall profiles.
4 Drill the profiles with the in the installation kit included driller. Fix with the two 3,5x9,5 screws.
6 Once the shower enclosure is assembled, it must be isolated with silicone according to the drawings. Attention: Please assure that the surfaces used to isolate (glass, profiles, shower tray, floor, etc.) is clean. Please wait for 24 hours till the silicone is dry before using it.
FAttention! Avant de commencer les opérations de montage, assurez-vouz que votre cabine n'a subi aucun dommage durant le transport. Les réclamations pour cause de dommage ne peuvent être acceptées lorsque la cabine est déjà montée. Pour nettoyer veuillez utiliser un produit de nettoyage au pH neutre ou le produit spécial que nous recommandons. N’utilisez pas de solvants, de produits alcalins, acides à base de chlore ou agressifs.
Outils requis: tournevis cruciforme, niveau à bulle, crayon, perceuse, mèche de 6 mm pour la pierre, mèche da 3 mm pour l'acier et silicone.
2 Attention: il est important de vérifier l'absence de canalisations d'eau, de gaz ou de câbles électriques dans le mur. Les chevilles et vis fournies avec la cabine ne sont appropriées pour tous les matériaux de maçonnerie et bétons. Pour des murs réalisés avec d’autres matériaux veuillez utiliser pour cela du matériel de fixation approprié. N'utilisez que du silicone ou un produit d'étanchéité qui est approprié aux surfaces et matériaux, où la cabine douche sera installée. La fixation au mur, l'assemblage et le siliconnage de la cabine de douche doivent être mis en oeuvre soigneusement et professionnellement. Si des questions devaient naître concernant l'assemblage, veuillez vous adresser à votre détaillant.Placer le profilé de mur au bord de la baignoire (25 mm du bord extérieur). Mettre d'aplomb à l'aide d'un niveau et marquer l'endroit de fixation.
2 Marquer sur le mur les trous à forer. Percer les trous avec une mèche à pierre de 6 mm. Introduire les chevilles. Attention: veiller aux conduites d'électricité et de gaz! Fixer le profilé de mur à l'aide des vis 3,9 x 38. La cheville est uniquement adaptè à des murs en materiaux traditionelles comme bèton et placo-plâtre.
3 Insérer la cabine dans les profils au mur.
4 Forer les profilés avec la mèche livrée et fixer-les avec les vis 3,5x9,5.
6 La cabine de douche, une fois que l'assemblage est terminé, doit être siliconée selon le dessin. Attention: les surfaces intéressées (verre, profils, receveur de douche, sol, etc.) doivent d'abord être nettoyées. Avant d'utiliser le cabine de douche attendre au moins 24 heures!
EImportante! Antes del montaje controlar si el producto tiene daños de trasporte. Para daños a productos ya montados no asumamos alguna responsabilidad. Limpiar cada semana con agua y jabón, no utilizar diluentes, detergentes rasgueantes, bencina, ... Para la limpieza utilizar un detergente con un PH neutral o el detergente neutral recomendado de duka. No utilizar diluentes y/o substancias alcalinas, substancias que contienen solventes, ácidos, cloro o materias abrasivas.
Herramientas por el montaje: Nivel, lápiz, puntero, martillo, tallador, punta de 6 mm, 3 mm por acero, destornillador a cruz, destornillador plano y silicón.
2 Atención: controlar por favor las condiciones de las paredes y la ubicación de líneas de gas, energía y agua. Los tacos y los tornillos enviados juntos a la mampara son adecuados para material edil en cemento y para material de construcción de paredes. Para paredes realizadas con material constructivo diferente tiene que utilizar material de fijación en función del material de construcción. Utilizar solo silicón o material de insolación adapto a las superficies sobre las que se fija la mampara. La fijación a pared, el montaje y la siliconatura de la mampara tienen que ser hechas en manera precisa y profesional. Si tiene preguntas al respecto del montaje, las rogamos de contactar el distributor. Toma el perfil de compensación, póngalo sobre la bañera (25 mm al interior desde el borde exterior), nivelar y marcar la posición con un lápiz.
2 Puntar y taladrar los agujeros con la punta de 6 mm y inserir las clavijas. Atención: Controla la situación de las paredes, conducciones de luz, gas, agua y teléfono antes de taladrar. Fijar con los tornillos 3,9 x 38 el perfil de compensación a pared. Tacos contenidos en el set de montaje solo para paredes tradicionales.
3 Inserir la mampara en los perfiles de compensación fijados a pared.
4 Taladrar los perfiles con el taladrador comprendido en el set de montaje y fija con los tornillos 3,5x9,5.
6 . La cabina de ducha, una vez ha concluido su instalación, debe ser sellada con silicona como se indica en el diseño. Atención: las superficies en contacto con la silicona (cristal, perfiles, plato de ducha, pavimento, etc.) se deben limpiar con anterioridad. Antes de utilizar la cabina de ducha, deben pasar al menos 24 horas.
Zum herausnehmen • Foglio da staccare • Om uit te nemen • Take out the folder • À enlever • Oja a extraer • Do wyciàgni´cia

Zum herausnehmen • Foglio da staccare • Om uit te nemen • Take out the folder • À enlever • Oja a extraer • Do wyciàgni´cia
PLWa˝ne! Przed rozpocz´ciem monta˝u kabin´ nale˝ysprawdziç pod kàtem ewentualnych uszkodzeƒtransportowych. Nie ponosi si´ odpowiedzialnoÊciza szkody wykryte na w aÊnie montowanych produktach. Do mycia i piel´nacji prosz´ u˝ywaç Êrodków czyszczàych o odczynie PH oboj´tnym lub polecany przez nas specjalny preparat. Nie nale˝y stosowaç rozpuszczalników, jak równie˝ preparatów alkalicznych, kwaÊnych, zawierajàcych chlor lub posiadajàych w∏aÊciwoÊci Êcierne.
Narz´dzia niezb´dne do monta˝u: poziomica, o ówek, punktak, m otek, wiertarka, wiert o dokamienia 6 mm, Êrubokr´t krzy˝akowy, Êrubokr´t, wiert o do stali 3 mm.
2 Uwaga!Prosz´ sprawdziç jakoÊç i stan Êciany oraz przebieg instalacji elektrycznej, gazowej i wodnej. Dostarczone w komplecie z kabinà ko∏ki rozporowe i wkr´ty nadajà si´ wy∏àcznie do Êian murowanych. Do Êian wykonanych w systemie lekkiej zabudowy lub innych nale˝y zastosowaç odmienne systemy mocowaƒ. Prosz´ zwróciç uwag´ na to, aby zastosowany zosta∏ rodzaj silikonu w∏aÊciwy dla powierzchni na jakiej zamontowano kabin´. Monta˝ kabiny i jej uszczelnienie musi zostaç wykonane zgodnie z instrukcjà! W wypadku wàtpliwoÊci prosimy zwróciç si´ o pomoc do dystrybutora lub naszego przedstawicielstwa. Nale˝y wziàç profil przyÊcienny, ustawiç go na wannie (25 mm od kraw´dzi zewn´trznej), wypoziomowaç oraz zaznaczyç o∏ówkiem jego ustawienie.
2 Zaznaczyç otwory, wywierciç otwory wiert∏em do kamienia 6 mm oraz osadziç ko∏ki rozporowe. Uwaga! Nale˝y sprawdziç jakoÊç muru, przewodów elektrycznych, instalacji gazowej oraz wodociàgowej. Profil Êcienny nale˝y trwale dokr´ciç za pomocà Êrub 3,9 x 38. Ko∏ki przeznaczone sà wy∏àcznie do tradycyjnej Êciany murowanej.
3 Wprowadziç kabin´ w profil przyÊcienny.
4 Na koñcach profili nale˝y wywierciç otwory za pomocà zawartego w komplecie dostawy wiert a, a nast´pnie trwale je zamontowaç Êrubami 3,5 x 9,5.
6 Po zakończeniu montażu należy kabinę uszczelnić silikonem zgodnie z instrukcją. Uwaga ! Przedtem wszystkie silikonowane powierzchnie (szkło, profile, brodzik, płytki) należy oczyścić. Przed pierwszym natryskiem pozostawić silikon na 24 godziny do wyschnięcia.

EL1080
EL1079
EL1078
EL1077
PLF023
SRAKF3532
SRAKF3532
PLF022
PLF025SRAKFS3927
PLF014
GUMF026
PRH32504-02
GULMD106
GLAS3Metacryl
GLAS3Metacryl
GUMF026
PRH32504-02
GULMD106
GLAS3Metacryl
PLF015
SRAKFS3927PLF024
SRAKF3532
PLF015
SRAKFS3927PLF024
SRAKF3532
SRAKF3532
PLF025SRAKFS3927
PLF014
SRAKV3938
SRAKV3938
PLF019-01
SRAKFS3595PLMD039
SRAKFS3595PLMD039
SRAKFS3595PLMD039
PLF018-01
GUMF027
PRHF267
SRAKF3532
PRH32506-02
GULMD106
PLF022
PLF023
GUMF029
GUMF029
GUMF029
GUMF029
GUMF029
GUMF029
PRBP235
PRBP235
PRBP235
PRBP235
PRBP235
PRBP235
PLF025SRAKFS3927PLF016
PRH32505-02
PRH32505-02
PRH32503-02
SRAKF3532
PLF017
PLF024SRAKFS3927
SRAKF3532
PLF017
PLF024SRAKFS3927
SRAKF3532
PLF025SRAKFS3927PLF016
PLF021
SRAKFB3938
SRAKFB3938
KLE001
KLE001
SRAKFB3938KLE001
PRHF266-01SRAKF3532PLF020
PLF034
PLF034
SRAKF3532
SRAKF3532
• Bei Ersatzteillieferungen sind folgende Angaben erforderlich: • Per ordini di pezzi di ricambio sono necessari i seguenti dati: • Bij onderdeelbestellingen zijn de volgende gegevens gewenst: • Spare parts need the following specification: • Pour toute commande de pièces détachées,il est nécessaire de fournir les informations suivantes: • Para pedir los repuestos, necesitamos de los siguientes datos: • W przypadku dostaw cz´Êci zamiennych wymagane sà nast´pujàce dane:
Breite / larghezza / breedte / width / largeur / anchura / szerokoÊç _____________________________ Farbe / colore / kleur / colour / couleur / color / kolor __________________________________________
Höhe / altezza / hoogte / hight / hauteur / altura / WysokoÊç ___________________________________ Glas / vetro / glaspaneel / Glas-type / verre / vidrio / element szklany____________________________
CUBF3/MUBF3

EL1080
EL1079
EL1078
EL1077
PLF023
SRAKF3532
SRAKF3532
PLF022
PLF025SRAKFS3927
PLF014
GUMF026
PRH32504-02
GULMD106
GLAS3Metacryl
GLAS3Metacryl
GUMF026
PRH32504-02
GULMD106
GLAS3Metacryl
PLF015
SRAKFS3927PLF024
SRAKF3532
PLF015
SRAKFS3927PLF024
SRAKF3532
SRAKF3532
PLF025SRAKFS3927
PLF014
SRAKV3938
SRAKV3938
PLF019-01
SRAKFS3595PLMD039
SRAKFS3595PLMD039
SRAKFS3595PLMD039
PLF018-01
GUMF027
PRHF267
SRAKF3532
PRH32506-02
GULMD106
PLF022
PLF023
GUMF029
GUMF029
GUMF029
GUMF029
GUMF029
GUMF029
PRBP235
PRBP235
PRBP235
PRBP235
PRBP235
PRBP235
PLF025SRAKFS3927PLF016
PRH32505-02
PRH32505-02
PRH32503-02
SRAKF3532
PLF017
PLF024SRAKFS3927
SRAKF3532
PLF017
PLF024SRAKFS3927
SRAKF3532
PLF025SRAKFS3927PLF016
PLF021
SRAKFB3938
SRAKFB3938
KLE001
KLE001
SRAKFB3938KLE001
PRHF266-01SRAKF3532PLF020
PLF034
PLF034
SRAKF3532
SRAKF3532
• Bei Ersatzteillieferungen sind folgende Angaben erforderlich: • Per ordini di pezzi di ricambio sono necessari i seguenti dati: • Bij onderdeelbestellingen zijn de volgende gegevens gewenst: • Spare parts need the following specification: • Pour toute commande de pièces détachées,il est nécessaire de fournir les informations suivantes: • Para pedir los repuestos, necesitamos de los siguientes datos: • W przypadku dostaw cz´Êci zamiennych wymagane sà nast´pujàce dane:
Breite / larghezza / breedte / width / largeur / anchura / szerokoÊç _____________________________ Farbe / colore / kleur / colour / couleur / color / kolor __________________________________________
Höhe / altezza / hoogte / hight / hauteur / altura / WysokoÊç ___________________________________ Glas / vetro / glaspaneel / Glas-type / verre / vidrio / element szklany____________________________
CUBF3/MUBF3

D Der Produzent behält sich jederzeit das Recht, ohne Vorbescheid Abänderungen vorzunehmen.
I Il produttore si riserva il diritto di apportare modifiche al prodotto senza preavviso.
NL De producent houdt zich het recht voor, ten alle tijde zonder tegenbericht, veranderingen door te voeren.
GB The producer reserves the right to modify the product at any time without prior notice.
F Le producteur se réserve le droit de modifier le produit sans aucun préavis.
E El productor se reserva el derecho de aportar modificaciones al producto sin previo aviso.
PL Producent zastrzega sobie prawo do wprowadzania zmian bez uprzedniego powiadamiania.
VER
MO
N C
UB
F3/M
UB
F3 1
0.01
.201
7


