
CONSTRUCTAFLOOR® DECKING SYSTEMSExterior Decking System
DESIGN AND INSTALLATION GUIDE

CONSTRUCTAFLOOR® – Exterior Decking System2
CONTENTSDESCRIPTION 2
APPLICATIONS 2
ADVANTAGES 2
COMPONENTS 2 – 3
DESIGN CONSIDERATIONS 4 – 5
SYSTEM SELECTION 5 – 6
MORTAR BED WITH SEPARATING LAYER 7 – 10
LIQUID MEMBRANE & TRAFFICABLE MEMBRANE SYSTEM 11 – 14
WATER RESISTANT SYSTEM 15 – 18
MAINTENANCE 19
HANDLING & STORAGE 19
SHEET PREPARATION 19
HEALTH & SAFETY, WARRANTY 20
CONTACT DETAILS 20
DESCRIPTIONCemintel Constructaf loor® Exter ior Floor ing is an is an advanced, lightweight, f ibre cement f looring sheet. Constructafloor Exterior has a flat surface with a tongue and grooved joint to the two long edges of the sheet. These edges are coloured red for easy identification. Constructafloor Exterior sheet can be installed with power driven nails for ease of installation.
With mesh reinforcing to the underside of the sheet, Constructafloor Exterior Flooring is a strong and durable building product.
Cemintel Constructafloor Exterior Flooring conforms to the requirements of AS2908.2: Cellulose-cement products, Part 2: Flat sheets for Type A Category 3.
APPLICATIONSCemintel Constructafloor Exterior Flooring provides a light weight but solid substrate for self contained dwellings. When combined with a suitable waterproofing system it can then be covered with your selection of tiles, decorative finishes, synthetic turf, outdoor carpets or suitable paint finishes. It is suited for a range of external decking applications, including:
• Upper and lower storey decks and balconies
• Tiled verandahs
• Trafficable roofs
• Swimming pool surrounds (non-saltwater)
Constructafloor Exterior Flooring may be installed to timber or steel floor joists at 450mm maximum spacings in accordance with the relevant Australian Standards.
ADVANTAGES• Simple and quick to install using screw or gun-nail fixings
• Tough durable substrate for external areas
• Immune to permanent water damage
• Will not rot, warp or burn
• Immune to termite attack
• A suitable substrate for many forms of finishing
COMPONENTSCEMINTEL CONSTRUCTAFLOOR® EXTERIOR SHEETCemintel Constructafloor Exterior Sheet is 19mm thick and has an approximate mass of 25.5 kg/m2. Sheets are available in the following sizes for exterior decking applications.
Order Nº Product
115659 600 x 2700 mm
115762 900 x 1800 mm
PROPERTIES
Specification Value
Thickness (19mm nominal) -0/+0.3 mm
Mass (EMC 23°C, 50% Humidity) 25.5 kg/m2
Width -3 /+0 mm
Length -3/+0 mm
Diagonal Difference (max.) 3 mm
FIRE RESISTANCEIn accordance with the Building Code of Australia, Part 3.7.1.2, Cemintel Constructafloor sheet can be used wherever non-combustible material is required by the code.
COUNTERSINKING TOOLA tungsten carbide tipped tool specifically designed for drilling and countersinking.
Order Nº Description
22116 Countersinking Tool

CONSTRUCTAFLOOR® – Exterior Decking System 3
FLEXIBLE SEALANT• Sikaflex PRO™ polyurethane
sealant for sealing sheet joints.
Order Nº Qty
11378 310ml Tube (Grey)
39488 310ml Tube (Black)
Prime surfaces as recommended by the manufacture.
BACKING RODPolyethylene Foam Bead used to enable correct filling of joints with sealant.
Order Nº Description
11177 10mm Ø x 50m roll
CONSTRUCTION ADHESIVETo be used on all framing where Constructafloor sheets are nail fixed.
Order Nº Product
39378 Sikaflex® II FC, 310ml tube
Supplied by others Fuller Max Bond™
Supplied by others Fuller Max Bond Pro™
NOTE: The following system components are not supplied by CSR.
FASTENERSNOTE: In high corrosion zones, such as the coastal marine environment, Class 4 fasteners must be used.
• Nails for fixing Constructafloor Sheets:
Power driven nails, 50mm D head, Class 3 or 4 finish.
• Screws for fixing Constructafloor Sheets:
For timber framing, use countersunk head wood screws 10G x 50mm hot dip galvanised steel (class 3) or stainless steel. Pre-drill and countersink heads.
For steel framing, use Metal Teks 10G x 16TPI x 30mm class 3 or 4, countersunk head screws. Pre-drill and countersink heads.
• Screws for fixing Drip Mould:
Nº8 x 15mm hot dip galvanised steel, countersunk head, metal thread self-tapping screws.
SLIP SHEET0.2mm Polyethylene (Polythene) sheet to AS2870.
MEMBRANEA flexible sheet or liquid membrane to AS4654.1 as required for the system (may incorporate joint reinforcing). Refer to system installation details.
MORTAR BED AND STEEL REINFORCEMENTAs required for the system, and in accordance with AS3958.1.
WALL/FLOOR JOINT FLASHINGPVC Angle Mould 4mm x 47mm x 47mm.
EDGE DRIP MOULD
Aluminium or PVC Angle 12mm x 12mm.
FLASHINGAlcor™ or equivalent.
PAINT FINISHESAnti-slip exterior paint suitable as a trafficable wearing surface for fibre cement substrates.
MOISTURE BARRIERArdex WPM 300. For use with the water resistant decking system. A liquid sealer to be applied to the Constructafloor immediately prior to the installation of the surface finish.

CONSTRUCTAFLOOR® – Exterior Decking System4
DESIGN CONSIDERATIONSThis guide refers to good practice, though it is not intended as an exhaustive statement of all relevant information. It remains the responsibility of the building designer to verify that Cemintel Constructafloor Exterior Flooring is suitable for the particular requirements of any given project.
FRAMINGCemintel Constructafloor Exterior Flooring can be fixed to either timber or steel floor joists at maximum 450mm spacings, and joists and trimmers must have a fixing face width of 45mm or to floor joist manufacturer's requirements. All perimeters must be supported on framing.
As a minimum requirement, framing shall be in accordance with the following standard:
• AS1684 – Residential Timber-Framed Construction.
• AS/NZS4600 – Cold-Formed Steel Structures.
• The Building Code of Australia (BCA).
Timber shall be seasoned or have reached an equilibrium moisture content of 16% or less at the time of framing. Unseasoned timber is not recommended. Fixing to timber floor joists can utilize brad nails fired from a suitable pneumatic or gas fired nail-gun.
The design and construction of the steel frames should be considered in conjunction with the advice from the manufacturer. In highly corrosive environments, appropriate measures should be taken to protect the frame from corrosion. Fixings to steel joists are suitable up to a 2.0mm base metal thickness (BMT), contact CSR Cemintel™ for fixing information where steel BMT is greater than 2.0mm.
CONTROL JOINTSControl joints in sheets must be provided at appropriate locations as specified in each system installation details.
Movement joints provided in framing should be aligned to joints in the sheets.
SHEET LAYOUTCemintel Constructafloor Exterior Flooring sheets are fixed directly to the floor joists. Sheets are laid with tongue and groove joints perpendicular to the joists. Sheet ends must align with the centreline of joists, and may be staggered or aligned according to the system requirements. Sheet ends must be aligned at control joints. Sheets may be laid in either direction relative to the slope. All perimeters must be supported on framing.
Where sheets are cantilevered at the outer edge of a deck, sheet edges must not extend more than 50mm beyond
the frame/support. Balustrades and other fittings must be connected to the structural framing.
LOADSCemintel Constructafloor Exterior Flooring has been designed to resist a live load of 2.0kPa and a 1.8kN point load to AS1170 Category A1.
MEMBRANESWaterproofing membranes should be installed in accordance with AS 4654.2 Waterproofing membrane systems for exterior use - Above ground level Part 2: Design and installation.
Membranes may be required to resist a range of conditions, including chemical attack, ultra-violet light, heat aging, and temperatures from −15°C to +85°C. Low temperatures can result in reduced flexibility, and high temperatures can result in softening of the membrane.
The standard has specific details for the termination of membranes at vertical upward and downward locations. For decks up to 4m from the ground in wind classifications N1 to N3 and C1, the vertical upward termination height is 100mm. This increases for higher wind classifications and exposure conditions, and for greater deck heights.
The details include methods of sealing, anchoring and protecting the membrane terminations.
DRAINAGERegardless of whether the deck is to be waterproof, or not, decks must have a fall to facilitate drainage and prevent ponding. Decks must not be constructed level, and a fall of at least 1 in 100 is recommended. Where possible the fall should be provided in the framing, or as an alternative may be provided in a topping screed.
Whenever possible avoid draining into a sump as this can lead to water building up to a depth above flashings. If this is unavoidable, the mortar bed with separating layer system must be used. The use of a gutter at the edge of the deck can assist in the reduction of staining and prevent water tracking under the tiles and membrane.
The interior floor level at doors and other openings must be at a sufficient level above the finished deck surface to prevent water entering the building. The step should be at least 100mm, and equal to the membrane vertical upward termination height.
COASTAL AREASCemintel Constructafloor Exterior Flooring is suitable for use in coastal areas, which are defined as being within 1km of a beach with breaking surf, or up to 200m from a non-surf beach shoreline. Consideration must also be given to local weather and topographical features which can increase the distance that salt spray can travel, extending these areas.
To resist corrosion in these areas, fixings and steel framing must have suitable corrosion resistance.

CONSTRUCTAFLOOR® – Exterior Decking System 5
FIXINGFix ings should f in ish below the f in ished level of the Constructafloor Exterior Flooring and any indentation should be filled with joint sealant.
FIG 1: Fastener Countersinking Detail
Floor Joist
� �Cemintel Constructafloor
Sealant covered
FIG 2: Constructafloor® Fixing Detail – Nail Fixing
200mmmax
200mmmax
50mmfromcorners
2mm gap at butt joint
T&G Joint
Construction adhesive with nail fixing
CemintelConstructafloor
Joist
12mm
25mm
FIG 3: Constructafloor Fixing Detail – Screw Fixing
450mmmax
450mmmax
50mm fromcorners
2mm gap at butt joint
T&G Joint
Cemintel Constructafloor
Joist
Screw fixing
12mm 25mm
SYSTEM SELECTIONA number of systems are available for different applications, surface finishes and drainage conditions. Refer to Table 1 for details.
For upper storey decks over habitable rooms, select from the waterproof systems range. Where waterproofing is not critical, such as over non-habitable ground, the water resistant system may be used.
WATERPROOF SYSTEMSConstructafloor Exterior Sheet is a fibre cement product, and waterproofing systems should be chosen that are recommended by their manufacturer for fibre cement substrates. Components including sealers, membranes, mortars, adhesives and finishes should be considered for their compatibility with each other, as well as with the substrate, and their performance as a complete system.
Extensive testing has been carried out by Ardex and Bostik and a number of system recommendations are available. Contact CSR for details or refer to cemintel.com.au.
MORTAR BED WITH SEPARATING LAYERThe Cemintel Constructafloor Exterior Flooring is laid directly on joists and covered with a waterproof sheet membrane. A separating layer or slip-sheet then separates the membrane from the mortar bed to accommodate minor movement.
Drainage to the deck edge may be provided by fall in the sheets or in the mortar bed, or the mortar bed may drain to a sump. Control joints in tiling need not correspond with sheet joints.
TILES WITH LIQUID MEMBRANEThis system has an applied waterproof membrane directly over the Cemintel Constructafloor Exterior Flooring. Tiles are fixed over the membrane, and drainage is provided by fall in the sheets. Control joints in tiling must correspond with sheet joints.
TRAFFICABLE MEMBRANEMembrane systems, laid directly over Cemintel Constructafloor Exterior Flooring, are available that are suitable for foot traffic.
WATER RESISTANT SYSTEMThe Cemintel Constructafloor Exterior Flooring is laid directly on joists and protected with tiles or other rigid or flexible surface material.
Drainage is provided by fall in the sheets and control joints in tiling/rigid finish must correspond with sheet joints.

CONSTRUCTAFLOOR® – Exterior Decking System6
SYSTEM SELECTION TABLE
MORTAR BED WITH SEPARATING LAYER SYSTEM DESCRIPTION
Slip SheetWaterproof Membrane
Suitable for Tile, Slate and all surface finishes
Adhesive
Joist
Cemintel Constructafloor Exterior Sheet
Mortar Bed
• Drain to edge of deck or sump.
• Staggered or aligned sheet layout.
• Screw or power nail fix.
• Control joints in sheets at maximum 4.5 x 12m centres.
• Control joints in mortar bed and tile layers at maximum 4.5 x 4.5m centres.
• Tile/mortar bed control joints need not correspond with sheet joints.
TILES WITH LIQUID MEMBRANE SYSTEM SYSTEM DESCRIPTION
Joist
Cemintel Constructafloor Exterior Sheet
Tiles or othersurface finish
Adhesive
Waterproofmembrane • Drain to edge of deck.
• Aligned sheet layout only.
• Screw or power nail fix.
• Control joints in sheets at maximum 2.7 x 12m centres.
• Control joints in tile layer at maximum 2.7 x 3.6m centres.
• Tile control joint must correspond with sheet joints.
TRAFFICABLE MEMBRANE SYSTEM SYSTEM DESCRIPTION
Trafficable waterproof membrane
Joist
Cemintel Constructafloor Exterior Sheet
• Drain to edge of deck.
• Aligned sheet layout only.
• Screw or power nail fix.
• Control joints in sheets at maximum 2.7 x 12m centres.
WATER RESISTANT SYSTEM SYSTEM DESCRIPTION
Joist
Adhesive
Flashing
Tiles or other surface finish
Cemintel Constructafloor Exterior Sheet
• Drain to edge of deck.
• Aligned sheet layout only.
• Screw fix only.
• Control joints in sheets at maximum 2.7 x 12m centres.
• Control joints in tile/rigid finish layer at maximum 2.7 x 3.6m centres.
• Tile control joint must correspond with sheet joints.
• Suitable for paint finishes.
Table 1: System Selection
CONSTRUCTAFLOOR® – Exterior Decking System 7
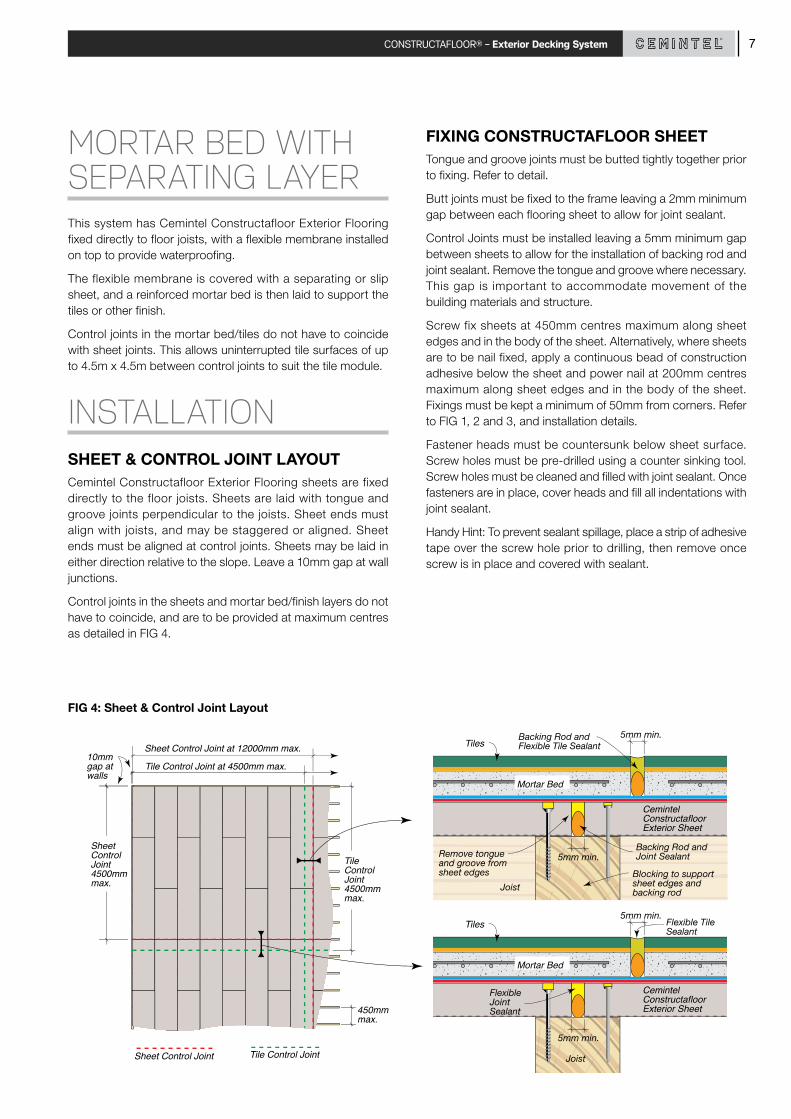
MORTAR BED WITH SEPARATING LAYERThis system has Cemintel Constructafloor Exterior Flooring fixed directly to floor joists, with a flexible membrane installed on top to provide waterproofing.
The flexible membrane is covered with a separating or slip sheet, and a reinforced mortar bed is then laid to support the tiles or other finish.
Control joints in the mortar bed/tiles do not have to coincide with sheet joints. This allows uninterrupted tile surfaces of up to 4.5m x 4.5m between control joints to suit the tile module.
INSTALLATIONSHEET & CONTROL JOINT LAYOUTCemintel Constructafloor Exterior Flooring sheets are fixed directly to the floor joists. Sheets are laid with tongue and groove joints perpendicular to the joists. Sheet ends must align with joists, and may be staggered or aligned. Sheet ends must be aligned at control joints. Sheets may be laid in either direction relative to the slope. Leave a 10mm gap at wall junctions.
Control joints in the sheets and mortar bed/finish layers do not have to coincide, and are to be provided at maximum centres as detailed in FIG 4.
FIXING CONSTRUCTAFLOOR SHEETTongue and groove joints must be butted tightly together prior to fixing. Refer to detail.
Butt joints must be fixed to the frame leaving a 2mm minimum gap between each flooring sheet to allow for joint sealant.
Control Joints must be installed leaving a 5mm minimum gap between sheets to allow for the installation of backing rod and joint sealant. Remove the tongue and groove where necessary. This gap is important to accommodate movement of the building materials and structure.
Screw fix sheets at 450mm centres maximum along sheet edges and in the body of the sheet. Alternatively, where sheets are to be nail fixed, apply a continuous bead of construction adhesive below the sheet and power nail at 200mm centres maximum along sheet edges and in the body of the sheet. Fixings must be kept a minimum of 50mm from corners. Refer to FIG 1, 2 and 3, and installation details.
Fastener heads must be countersunk below sheet surface. Screw holes must be pre-drilled using a counter sinking tool. Screw holes must be cleaned and filled with joint sealant. Once fasteners are in place, cover heads and fill all indentations with joint sealant.
Handy Hint: To prevent sealant spillage, place a strip of adhesive tape over the screw hole prior to drilling, then remove once screw is in place and covered with sealant.
Tile Control Joint at 4500mm max.
Sheet Control Joint at 12000mm max.
Joist
5mm min.
Flexible JointSealant
Flexible Tile Sealant
5mm min.Tiles
Cemintel Constructafloor Exterior Sheet
Mortar Bed
Joist
5mm min.
Backing Rod and Flexible Tile Sealant
5mm min.Tiles
Cemintel Constructafloor Exterior Sheet
Mortar Bed
Blocking to support sheet edges and backing rod
Backing Rod and Joint SealantRemove tongue
and groove from sheet edges
Tile Control Joint 4500mm max.
Sheet Control Joint 4500mm max.
10mm gap at walls
450mm max.
Sheet Control Joint Tile Control Joint
FIG 4: Sheet & Control Joint Layout

CONSTRUCTAFLOOR® – Exterior Decking System8
JOINTINGSheets must be fixed in position ready for joints to be completed. Ensure joints are clean and clear of any dust that may prevent sealant adhering.
For control joints only, press foam backing rod into joint pressing down firmly against joist leaving approximately 6mm gap at top.
Fill all joints with joint sealant, finishing level with the sheet surface. Joints must be smoothed within 10 minutes.
MEMBRANEA proprietary membrane system must be used and should be installed by a specialist waterproofing contractor, and a waterproof guarantee provided.
SLIP SHEETTo protect the membrane during tiling, and to separate the movement of the substructure and the tiled surface, a heavy duty plastic sheet must be installed over the membrane.
FIG 5: Constructafloor with Mortar Bed/Tiles and Slip Sheet
Control Joint through Mortar Bed and Tiles filled with Backing Rod and Tile Sealant
Tiles with grouted joints
Proprietary Waterproof Membrane continued up wall above finished deck surface
Mortar Bed with mesh reinforcement
Slip SheetCemintel Constructafloor Exterior Sheet
Remove tongue and groove from sheet edges at sheet control joint and fill with Backing Rod and Joint Sealant
Backing Rodand Joint Sealantin sheet control joint
Blocking to support sheet edges and backing rod at sheet control joints only
Cover all fastener heads with Joint Sealant
Fill all T&G joints with Joint Sealant
Fill all butt joints with Joint Sealant
T&G sheet joint
Construction adhesive to joists where nail fixing used
Backing Rod and Joint Sealant in perimeter gap
MORTAR BEDA mortar bed is laid over the slip sheet to provide a suitable surface for tiling.
Control joints must be installed at 4.5m maximum spacings in both directions.
The mortar bed must be 40mm minimum thickness and reinforced with galvanised steel or stainless steel mesh.
The mortar bed should be allowed to cure for approximately 10 days before tiling commences.
TILINGDo not tile over control joints in the mortar bed.
When selecting tiles ensure they are suitable for external use. An appropriate adhesive recommended for external use must be used.
In all cases, the tile and tile adhesive manufacturer’s instructions should be followed.
For further advice, refer to Australian Standard AS3958.1 ‘Guide to the installation of ceramic tiles’.

CONSTRUCTAFLOOR® – Exterior Decking System 9
FIG 7: Typical Butt Joint Detail
FIG 8: Control Joint at Butt Joint with Mortar Bed & Tiles
FIG 9: Control Joint at T&G Joint with Mortar Bed & Tiles
FIG 6: Typical T&G Joint Detail
Joint Sealant
Joist
Waterproof Membrane
Slip Sheet
12mmmin.
12mmmin.
Framing 45mm min. face width or to joist manufacturer’s requirements
2mm min.
Mortar Bed
Construction adhesive
Cemintel Constructafloor Exterior Sheet
12mmmin.
12mmmin.
Approx. 6mm
5mm min.
Joist
Backing Rodand Joint Sealant
Waterproof Membrane
Slip Sheet
Mortar Bed
Construction Adhesive
Cemintel Constructafloor Exterior Sheet
Framing 45mm min. face width or to joist manufacturer’s requirements
12mmmin.
12mmmin.
Approx. 6mm
5mm min.
Backing rodand sealant
Waterproof Membrane
Slip Sheet
Mortar Bed
Construction adhesive
Cemintel Constructafloor Exterior Sheet
Remove tongue and groove from sheet edges
Blocking to support sheet edges and backing rodJoist
25mm 25mm
Joint Sealant
Joist
Construction adhesiveWaterproof
Membrane
Slip Sheet
Mortar Bed
Cemintel Constructafloor Exterior Sheet
FIG 10: Control Joint Through Mortar Bed and Rigid Finish
5mm min.
Slip SheetWaterproof Membrane
Flexible Tile Sealant
Backing Rod
Cemintel Constructafloor Exterior Sheet
Mortar Bed

CONSTRUCTAFLOOR® – Exterior Decking System10
FIG 14: Door Sill
FIG 13: Edge Finish
TilesMortar Bed steel reinforced
Slip Sheet
Fall
Extend tile below deck line to form drip edge
Drip mould
WaterproofMembrane Cemintel
Constructafloor Exterior Sheet
Sheet cantilever 50mm max.
FIG 11: Wall/Floor Junction Option 1
Waterproof Membrane laid over Constructafloor Sheet and up wall into brickwork minimum 100mm above finished deck surface
TilesMortar Bed steel reinforced
10mm gap
Flashing
Slip Sheet
Fall
Backing rod and flexible sealant
Cemintel Constructafloor Exterior Sheet
FIG 12: Wall/Floor Junction Option 2
Waterproof Membrane laid over Constructafloor Sheet and up wall into brickwork minimum 100mm above finished deck surface
Tiles100mmmin.
Mortar Bed steel reinforced
Pressure seal flashing 10mm gap
to surface
Slip Sheet
Fall
Backing rod and flexible sealant
10mm gap
Cemintel Constructafloor Exterior Sheet
100mmmin.
Door sill
Subsill flashing
Finished floor level
Finished floor level
Waterstop angle and membrane returning to external face
Fix where horizontal restraint is required
Membrane suitable for exposure, or provide flashing for protection
5 x 5mm min fillet in corner
Waterstop angle
Weephole in sill
10mm gap
Cemintel Constructafloor Exterior Sheet
CONSTRUCTAFLOOR® – Exterior Decking System 11
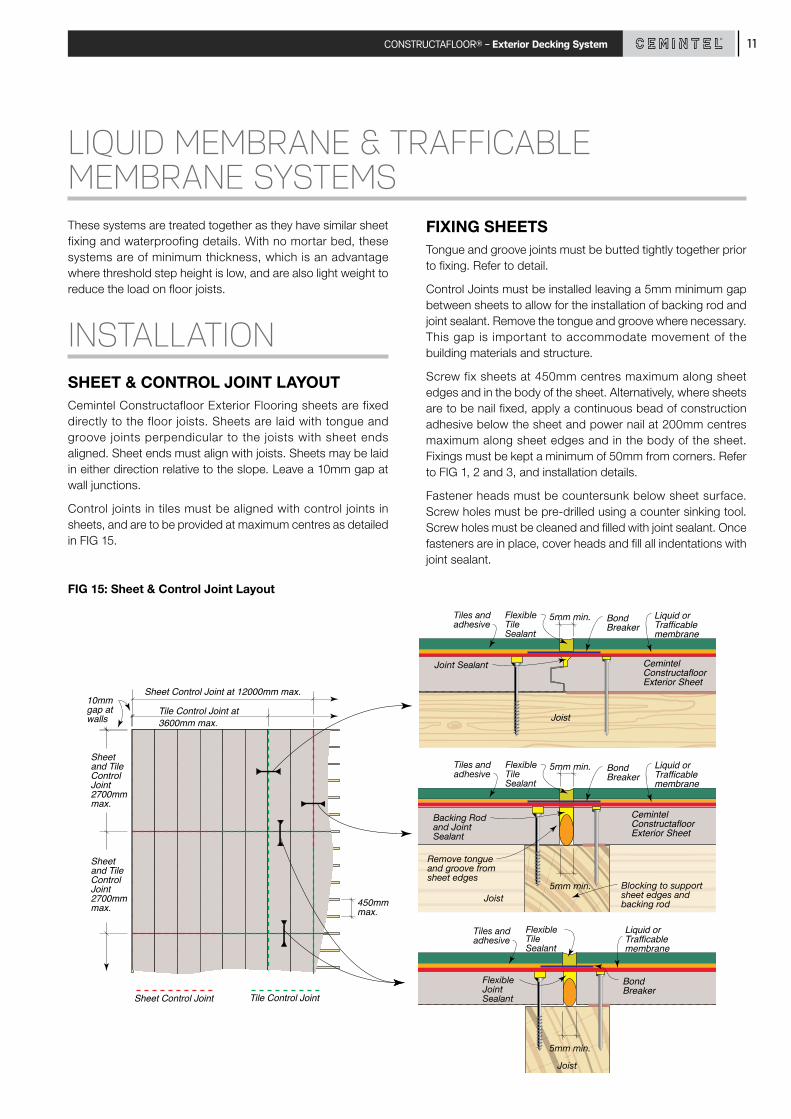
LIQUID MEMBRANE & TRAFFICABLE MEMBRANE SYSTEMSThese systems are treated together as they have similar sheet fixing and waterproofing details. With no mortar bed, these systems are of minimum thickness, which is an advantage where threshold step height is low, and are also light weight to reduce the load on floor joists.
INSTALLATIONSHEET & CONTROL JOINT LAYOUTCemintel Constructafloor Exterior Flooring sheets are fixed directly to the floor joists. Sheets are laid with tongue and groove joints perpendicular to the joists with sheet ends aligned. Sheet ends must align with joists. Sheets may be laid in either direction relative to the slope. Leave a 10mm gap at wall junctions.
Control joints in tiles must be aligned with control joints in sheets, and are to be provided at maximum centres as detailed in FIG 15.
FIXING SHEETSTongue and groove joints must be butted tightly together prior to fixing. Refer to detail.
Control Joints must be installed leaving a 5mm minimum gap between sheets to allow for the installation of backing rod and joint sealant. Remove the tongue and groove where necessary. This gap is important to accommodate movement of the building materials and structure.
Screw fix sheets at 450mm centres maximum along sheet edges and in the body of the sheet. Alternatively, where sheets are to be nail fixed, apply a continuous bead of construction adhesive below the sheet and power nail at 200mm centres maximum along sheet edges and in the body of the sheet. Fixings must be kept a minimum of 50mm from corners. Refer to FIG 1, 2 and 3, and installation details.
Fastener heads must be countersunk below sheet surface. Screw holes must be pre-drilled using a counter sinking tool. Screw holes must be cleaned and filled with joint sealant. Once fasteners are in place, cover heads and fill all indentations with joint sealant.
Tile Control Joint at 3600mm max.
Sheet Control Joint at 12000mm max.10mm gap at walls
Sheet and Tile Control Joint 2700mm max.
Sheet and Tile Control Joint 2700mm max.
Sheet Control Joint Tile Control Joint
450mm max.
Joist
5mm min.
Flexible Tile Sealant
Flexible JointSealant
Liquid or Trafficablemembrane
Bond Breaker
Tiles and adhesive
Backing Rod and JointSealant
Tiles and adhesive
5mm min.
5mm min.
Bond Breaker
Liquid or Trafficablemembrane
Flexible Tile Sealant
Joist
Cemintel Constructafloor Exterior Sheet
Blocking to support sheet edges and backing rod
Remove tongue and groove from sheet edges
Joist
Cemintel Constructafloor Exterior Sheet
Tiles and adhesive
5mm min. Bond Breaker
Liquid or Trafficablemembrane
Flexible Tile Sealant
Joint Sealant
FIG 15: Sheet & Control Joint Layout
CONSTRUCTAFLOOR® – Exterior Decking System12
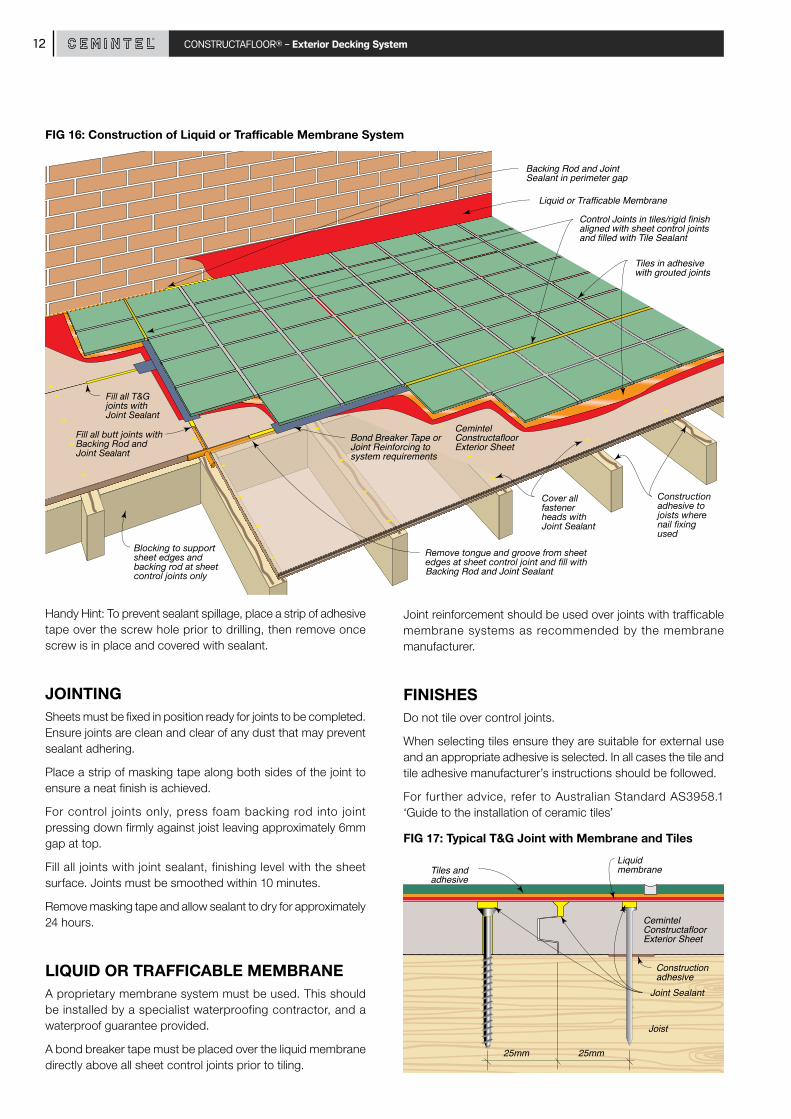
Joint reinforcement should be used over joints with trafficable membrane systems as recommended by the membrane manufacturer.
FINISHESDo not tile over control joints.
When selecting tiles ensure they are suitable for external use and an appropriate adhesive is selected. In all cases the tile and tile adhesive manufacturer’s instructions should be followed.
For further advice, refer to Australian Standard AS3958.1 ‘Guide to the installation of ceramic tiles’
FIG 17: Typical T&G Joint with Membrane and Tiles
25mm 25mm
Joint Sealant
Joist
Construction adhesive
Tiles and adhesive
Liquidmembrane
Cemintel Constructafloor Exterior Sheet
Handy Hint: To prevent sealant spillage, place a strip of adhesive tape over the screw hole prior to drilling, then remove once screw is in place and covered with sealant.
JOINTINGSheets must be fixed in position ready for joints to be completed. Ensure joints are clean and clear of any dust that may prevent sealant adhering.
Place a strip of masking tape along both sides of the joint to ensure a neat finish is achieved.
For control joints only, press foam backing rod into joint pressing down firmly against joist leaving approximately 6mm gap at top.
Fill all joints with joint sealant, finishing level with the sheet surface. Joints must be smoothed within 10 minutes.
Remove masking tape and allow sealant to dry for approximately 24 hours.
LIQUID OR TRAFFICABLE MEMBRANEA proprietary membrane system must be used. This should be installed by a specialist waterproofing contractor, and a waterproof guarantee provided.
A bond breaker tape must be placed over the liquid membrane directly above all sheet control joints prior to tiling.
Control Joints in tiles/rigid finish aligned with sheet control joints and filled with Tile Sealant
Tiles in adhesive with grouted joints
Cemintel Constructafloor Exterior Sheet
Blocking to support sheet edges and backing rod at sheet control joints only
Cover all fastener heads with Joint Sealant
Fill all T&G joints with Joint Sealant
Fill all butt joints with Backing Rod and Joint Sealant
Construction adhesive to joists where nail fixing used
Backing Rod and Joint Sealant in perimeter gap
Liquid or Trafficable Membrane
Bond Breaker Tape or Joint Reinforcing to system requirements
Remove tongue and groove from sheet edges at sheet control joint and fill with Backing Rod and Joint Sealant
FIG 16: Construction of Liquid or Trafficable Membrane System
CONSTRUCTAFLOOR® – Exterior Decking System 13
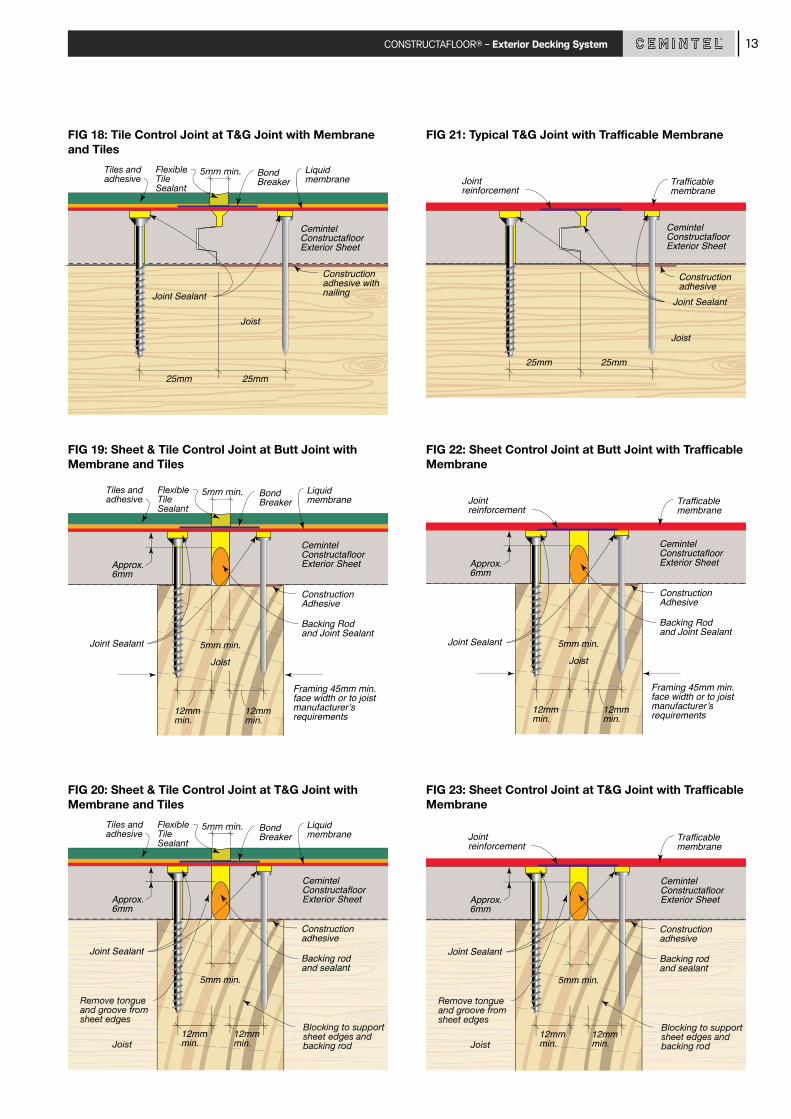
FIG 19: Sheet & Tile Control Joint at Butt Joint with Membrane and Tiles
FIG 22: Sheet Control Joint at Butt Joint with Trafficable Membrane
FIG 20: Sheet & Tile Control Joint at T&G Joint with Membrane and Tiles
FIG 18: Tile Control Joint at T&G Joint with Membrane and Tiles
FIG 23: Sheet Control Joint at T&G Joint with Trafficable Membrane
FIG 21: Typical T&G Joint with Trafficable Membrane
25mm 25mm
Joint Sealant
Joist
Construction adhesive
Trafficablemembrane
Joint reinforcement
Cemintel Constructafloor Exterior Sheet
12mmmin.
12mmmin.
Approx. 6mm
5mm min.
Joist
Backing Rodand Joint Sealant
Construction Adhesive
Cemintel Constructafloor Exterior Sheet
Joint Sealant
Tiles and adhesive
5mm min. Bond Breaker
Liquidmembrane
Flexible Tile Sealant
Framing 45mm min. face width or to joist manufacturer’s requirements
12mmmin.
12mmmin.
Approx. 6mm
5mm min.
Joist
Backing Rodand Joint Sealant
Construction Adhesive
Cemintel Constructafloor Exterior Sheet
Joint Sealant
Trafficablemembrane
Joint reinforcement
Framing 45mm min. face width or to joist manufacturer’s requirements
12mmmin.
12mmmin.
Approx. 6mm
5mm min.
Backing rodand sealant
Construction adhesive
Tiles and adhesive
5mm min. Bond Breaker
Liquidmembrane
Flexible Tile Sealant
Joint Sealant
Remove tongue and groove from sheet edges
Blocking to support sheet edges and backing rodJoist
Cemintel Constructafloor Exterior Sheet
25mm25mm
Construction adhesive with nailing
Tiles and adhesive
5mm min. Bond Breaker
Liquidmembrane
Flexible Tile Sealant
Joint Sealant
Joist
Cemintel Constructafloor Exterior Sheet
12mmmin.
12mmmin.
Approx. 6mm
5mm min.
Backing rodand sealant
Construction adhesive
Trafficablemembrane
Joint reinforcement
Joint Sealant
Remove tongue and groove from sheet edges
Blocking to support sheet edges and backing rodJoist
Cemintel Constructafloor Exterior Sheet

CONSTRUCTAFLOOR® – Exterior Decking System14
FIG 27: Metal Post Support
FIG 29: Gutter Detail
FIG 28: Pipe Penetration Detail
Post
Fixing
Base support bracket
Waterproof membrane
Fixings to framing
Sealant around base of support
Cemintel Constructafloor Exterior Sheet
75mm min.
10mm min.
100mm min.
Membrane
Sealant
Clamp
Flashing
Membrane to be sealed to the collar
Finished floor level
Collar compatible with membrane fixed to substrate
Cemintel Constructafloor Exterior Sheet
Fall
Fascia
Gutter
Tiles
Membrane support angle 35mm min. vertical leg
MembraneCemintel Constructafloor Exterior Sheet
Wall Cladding
Fall
Tiles
Backing rod and sealant
Waterproof Membrane laid over Constructafloor Sheet and up wall minimum 100mm above finished deck surface
10mm gap
Cemintel Constructafloor Exterior Sheet
FIG 26: Wall/Floor Junction
Waterproof Membrane laid over Constructafloor Sheet and up wall into brickwork minimum 100mm above finished deck surface
Tiles
Flashing
Fall
Backing rod and sealant
Cemintel Constructafloor Exterior Sheet
10mm gap
FIG 25: Wall/Floor Junction
50mmmax.
Drip Mould 12mm x 12mm screw and sealant fixed
Tiles Liquid ortrafficablemembrane
Fall
Cemintel Constructafloor Exterior Sheet
FIG 24: Edge Finishing Detail

CONSTRUCTAFLOOR® – Exterior Decking System 15
WATER RESISTANT SYSTEMDecks that are not required to be completely waterproof should be constructed to minimise the penetration of water to avoid dry rot in timber framing. It is recommended that a moisture barrier be applied over all sheets before finishes are applied.
Timber and structural specifications must comply with the relevant building authority requirements.
Timber should be treated exterior grade, or where untreated timber is used, the top of the joists must be flooded with a timber preservative available from paint suppliers.
In addition, flashing must be used to protect the timber framing. Flashing must extend 50mm down the sides of the joists and trimmers.
Alcor™ flashing or equivalent is recommended.
INSTALLATIONSHEET & CONTROL JOINT LAYOUT Cemintel Constructafloor Exterior Flooring sheets are fixed directly to the floor joists. Sheets are laid with tongue and groove joints perpendicular to the joists with sheet ends aligned. Sheet ends must align with joists. Sheets may be laid in either direction relative to the slope. Leave a 10mm gap at wall junctions.
Control joints in tiles/rigid finishes must be aligned with control joints in sheets, and are to be provided at maximum centres as detailed in FIG 30.
FIXING CONSTRUCTAFLOOR SHEETSTongue and groove joints must be butted tightly together prior to fixing. Refer to detail.
Control Joints must be installed leaving a 5mm minimum gap between sheets to allow for the installation of backing rod and joint sealant. Remove the tongue and groove where necessary. This gap is important to accommodate movement of the building materials and structure.
Joist
Flashing
5mm min.
Flexible Tile Sealant
Tiles and adhesive
JointSealant
Cemintel Constructafloor Exterior Sheet
Backing Rod and JointSealant
Cemintel Constructafloor Exterior Sheet
Flashing
Joist
Flexible Tile Sealant
JointSealant
5mm min.Tiles and adhesive
Tile Control Joint at 3600mm max.
Sheet Control Joint at 12000mm max.10mm gap at walls
Sheet Control Joint Tile Control Joint
450mm max.
Sheet and Tile Control Joint 2700mm max.
Sheet and Tile Control Joint 2700mm max.
Backing Rod and JointSealant
Tiles and adhesive
5mm min.
5mm min.
Flexible Tile Sealant
Joist
Cemintel Constructafloor Exterior Sheet
Blocking to support sheet edges and backing rod
Remove tongue and groove from sheet edges
Flashing
FIG 30: Sheet & Control Joint Layout

CONSTRUCTAFLOOR® – Exterior Decking System16
Screw fix sheets at 450mm centres maximum along sheet edges and in the body of the sheet. Alternatively, where sheets are to be nail fixed, apply a continuous bead of construction adhesive below the sheet and power nail at 200mm centres maximum along sheet edges and in the body of the sheet. Fixings must be kept a minimum of 50mm from corners. Refer to FIG 1, 2 and 3, and installation details.
Fastener heads must be countersunk below sheet surface. Screw holes must be pre-drilled using a counter sinking tool. Screw holes must be cleaned and filled with joint sealant. Once fasteners are in place, cover heads and fill all indentations with joint sealant.
Handy Hint: To prevent sealant spillage, place a strip of adhesive tape over the screw hole prior to drilling, then remove once screw is in place and covered with sealant.
JOINTINGSheets must be fixed in position ready for joints to be completed. Ensure joints are clean and clear of any dust that may prevent sealant adhering.
Place a strip of masking tape along both sides of the joint to ensure a neat finish is achieved.
For control joints only, press foam backing rod into joint pressing down firmly against joist leaving approximately 6mm gap at top.
Fill all joints with joint sealant, finishing level with the sheet surface. Joints must be smoothed within 10 minutes.
Remove masking tape and allow sealant to dry for approximately 24 hours.
WALL/FLOOR JUNCTIONFlashing must be used at wall/floor junctions. PVC flashing 47 x 47mm is adhered to the Constructafloor sheet only, to allow for frame movement.
Metal over-flashing such as Alcor™ or lead flashing is then installed from the wall. Tuck up behind wall cladding or into brick work.
FINISHESDecks may be finished with artificial grass, outdoor carpet, pebble finishes, tiles or paint. Decks must not be left bare.
It is critical that rigid finishes such as pebble or tiles do not cover the sheet control joints.
Constructafloor sheets are supplied with a factory applied sealer to reduce water penetration. However, surface wear from handling and construction traffic can damage the sealer and it is recommended that a moisture barrier be applied immediately before any finish is applied. Use a suitable product such as Ardex WPM 300, applied in a single coat.
Control Joints in tiles/rigid finish aligned with sheet control joints and filled with Tile Sealant
Tiles in adhesive with grouted joints
Cemintel Constructafloor Exterior Sheet
Blocking to support sheet edges and backing rod at sheet control joints only
Cover all screw heads with Joint Sealant
Fill all T&G joints with Joint Sealant
Fill all butt joints with Backing Rod and Joint Sealant
Screw fixing only
Backing Rod and Joint Sealant in perimeter gap
Remove tongue and groove from sheet edges at sheet control joint and fill with Backing Rod and Joint Sealant
Flashing (Alcor ™ or equivalent)
FIG 31: Construction of Deck Using Water Resistant System

CONSTRUCTAFLOOR® – Exterior Decking System 17
JointSealant
Chosen rigid surface finish
Cemintel Constructafloor Exterior Sheet
Joist
Flashing to extend 50mm min. down sides of framing members
FlashingAlcor™ or equivalent
25mm 25mm
Flashing to extend 50mm min. down sides of framing members
FlashingAlcor™ or equivalent
12mmmin.
12mmmin.
Approx. 6mm
5mm min.
Backing rod
Joist
JointSealant
Chosen rigid surface finish
Cemintel Constructafloor Exterior Sheet
Remove tongue and groove from sheet edges
Flexible Sealant
5mm min.
Blocking to support sheet edges and backing rod
Chosen flexible surface finish
Flashing to extend 50mm min. down sides of framing members
FlashingAlcor™ or equivalent
12mmmin.
12mmmin.
Approx. 6mm
5mm min.
Backing rod
Joist
JointSealant
Cemintel Constructafloor Exterior Sheet
Remove tongue and groove from sheet edges
Blocking to support sheet edges and backing rod
Chosen flexible surface finish
JointSealant
Joist
Flashing to extend 50mm min. down sides of framing members
FlashingAlcor™ or equivalent
Cemintel Constructafloor Exterior Sheet
25mm 25mm
Flashing to extend 50mm min. down sides of framing members
FlashingAlcor™ or equivalent
12mmmin.
12mmmin.
Approx. 6mm
5mm min.
Backing rod
Joist
JointSealant
Chosen rigid surface finish
Cemintel Constructafloor Exterior Sheet
Flashing to extend 50mm min. down sides of framing members
FlashingAlcor™ or equivalent
12mmmin.
12mmmin.
Approx. 6mm
5mm min.
Backing rod
Joist
JointSealant
Chosen flexible surface finish
Cemintel Constructafloor Exterior Sheet
FIG 32: Typical T & G Joint with Rigid Finish
FIG 34: Control Joint at T & G Joint with Rigid Finish FIG 37: Control Joint at T & G Joint with Flexible Finish
FIG 35: Typical T & G Joint with Flexible Finish
FIG 33: Control Joint at Butt Joint with Rigid Finish FIG 36: Control Joint at Butt Joint with Flexible Finish
CONSTRUCTAFLOOR® – Exterior Decking System18
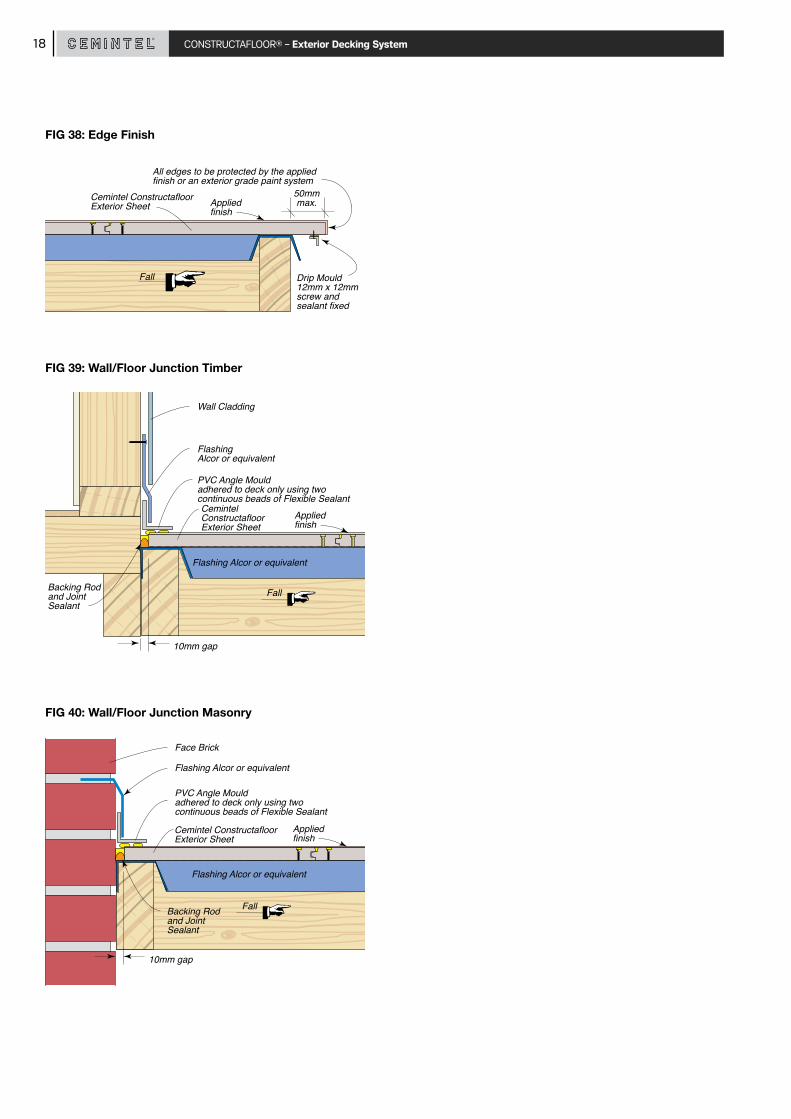
Fall
50mmmax.Applied
finish
Drip Mould 12mm x 12mm screw and sealant fixed
All edges to be protected by the applied finish or an exterior grade paint system
Cemintel Constructafloor Exterior Sheet
Applied finish
Cemintel Constructafloor Exterior Sheet
Backing Rod and Joint Sealant
10mm gap
Flashing Alcor or equivalent
Fall
Wall Cladding
FlashingAlcor or equivalent
PVC Angle Mouldadhered to deck only using two continuous beads of Flexible Sealant
Flashing Alcor or equivalent
Fall
Applied finish
Cemintel Constructafloor Exterior Sheet
Backing Rod and Joint Sealant
10mm gap
Face Brick
Flashing Alcor or equivalent
PVC Angle Mouldadhered to deck only using two continuous beads of Flexible Sealant
Flashing Alcor or equivalent
FIG 39: Wall/Floor Junction Timber
FIG 38: Edge Finish
FIG 40: Wall/Floor Junction Masonry

CONSTRUCTAFLOOR® – Exterior Decking System 19
HANDLING & STORAGE Cemintel Constructafloor Sheets must be treated with care. During handling, avoid damage to edges, ends and surfaces. Sheets must be carried on edge.
All sheets must be stacked flat, clear of the ground, and supported at 300mm maximum centres on a level platform.
Material must be kept dry, preferably by being stored inside the building. Sheets exposed to moisture prior to installation may be subject to shrinkage, and voiding of warranty. Protect from contaminants such as silicone spray. Where it is necessary to store sheets outside, they must be protected from the weather.
Sheets must be dry prior to fixing, joint sealing and coating.
SAFETYWhen cutting, drilling or grinding Cemintel™ sheets using power tools, always ensure the work area is well ventilated. CSR Cemintel recommends the use of appropriate dust reduction methods. An approved dust mask (AS1715 and AS1716) and safety glasses (AS1337) must be worn. CSR recommends that hearing protection be worn.
SHEET PREPARATIONCement based levelling products may be used.
Sheets should not be sanded.
CUTTINGPower Saw
Sheets should be cut from the back using a power saw.*
PENETRATIONSPenetrations in sheets may be cut or drilled prior to installation. Cut from the back or drill from the front. Cut penetrations oversize by 8 –10mm all around. Seal penetrations in accordance with recommended products.
MAINTENANCEThe durability of the system can be maintained by periodic inspection, including examination of the surface finishes, flashings, penetrations and membranes. Any cracked or damaged flashings or seals that would allow water ingress must be repaired immediately.
Product Description Size Quantity Product Code
Makita Plunge Saw Kit (1300W) includes 1400mm guide rail and bonus 165mm fibre cement saw blade – excellent for cutting cement based sheets
165mm 1 165485
Makita 165mm Fibre Cement Saw Blade – ideal for use with the Makita Plunge saw and other 165mm circular saws fitted with vacuum extraction systems
165mmx20x4T 1 165486
Tools*Cemintel recommends the cutting tools in the table below. Appropriate dust extraction methods should also be used.

Our Offices
Brisbane 768 Boundary Road Coopers Plains QLD 4108
Adelaide Lot 100 Sharp Court Mawson Lakes SA 5095
Darwin Cnr Stuart Highway & Angliss Street Berrimah NT 0828
Sydney 376 Victoria Street Wetherill Park NSW 2164
Perth 19 Sheffield Road Welshpool WA 6106
Melbourne 277 Whitehall Street Yarraville VIC 3013
Hobart 11 Farley Street Derwent Park TAS 7009
cemintel.com.au 1300 236 468
For Design and Technical Support: DesignLink – 1800 621 117
Disclaimer: Information presented in this document is supplied in good faith and to the best of our knowledge, was accurate at the time of preparation. Products are subject to natural variation as part of the manufacturing process. Product images may vary from actual product in regard to colour and surface finish. The provision of this information should not be construed as a recommendation to use any of our products in violation of any patent rights or in breach of any statute or regulation. Users are advised to make their own determination as to the suitability of this information in relation to their particular purpose or specific circumstances. Since the information contained in this document may be applied under conditions beyond our control, no responsibility can be accepted by Cemintel, or its staff for any loss or damage caused by any person acting or refraining from action as a result of misuse of this information. 07
/20
18


