
Copyright 2012 Avolve Software Corporation.
ProjectDox is a registered trademark of Avolve Software Corporation.
Rev. 2012-04-23
Electronic Plan Solutions
ProjectDox Viewer Tool Tips
4835 East Cactus Road Suite 420
Scottsdale, Arizona 85254
Phone: 602.714.9774
www.avolvesoftware.com

ProjectDox Viewer Tool Tips Rev. 2012-04-23
2
Table of Contents
1 ABOUT THIS GUIDE ........................................................................................................... 3
2 AUDIENCE .......................................................................................................................... 3
2.1 Running the Brava Client ....................................................................................... 4
2.2 User Interface ......................................................................................................... 4
2.3 Toolbars .................................................................................................................. 5
2.3.1Main Toolbar ......................................................................................................... 5
2.3.2Brava! Enterprise Functions Menu ........................................................................ 5
2.3.2.1 Markup Toolbar 6
2.3.2.2 Review Tools 8
2.3.2.3 Redaction Toolbar 8
2.3.2.4 Measure Toolbar 9
2.3.2.5 Publish Tools 11
2.3.3Brava! Viewer Display Toolbar ............................................................................ 12
2.4 Brava! Compare Toolbar ...................................................................................... 13
2.5 Tool Properties Toolbar ....................................................................................... 15
2.6 Brava! Viewer Task Pane ..................................................................................... 17
2.6.1.1 Page Thumbnails Panel 17
2.6.1.2 Bookmarks Panel 17
2.6.1.3 Changemarks Panel 18
2.6.1.4 Verify Redactions Panel 19
2.6.1.5 Measure Takeoff Panel 19

ProjectDox Viewer Tool Tips Rev. 2012-04-23
3
1 About this Guide
This guide provides an overview of the Brava! ® Enterprise Client user interface (the document
viewer integrated with ProjectDox). This guide is designed for end users who are using their
browsers to view documents, via web page links, that were processed and cached through the
Brava Server via ProjectDox. The ProjectDox (Brava) Viewer allows users to view, zoom, pan,
rotate, measure, annotate, and redact documents and images quickly and easily.
2 Audience
This guide is intended for use by Avolve customers.

ProjectDox Viewer Tool Tips Rev. 2012-04-23
4
2.1 Running the Brava Client
The first time you access a published document for viewing through your browser, you will be
required to download the Brava ActiveX control onto your system. This requirement is a one-
time installation. Click Run at the prompt to begin the installation.
Once installed, if you have ActiveX controls blocked in your browser option settings, you will
need to select Allow Blocked Content from the IE Security bar when prompted.
2.2 User Interface
ProjectDox Viewer Tool Tips Rev. 2012-04-23
5
2.3 Toolbars
This guide provides a quick overview of all of the button functions available in the Brava!
Enterprise 7.0 SR1 viewer application.
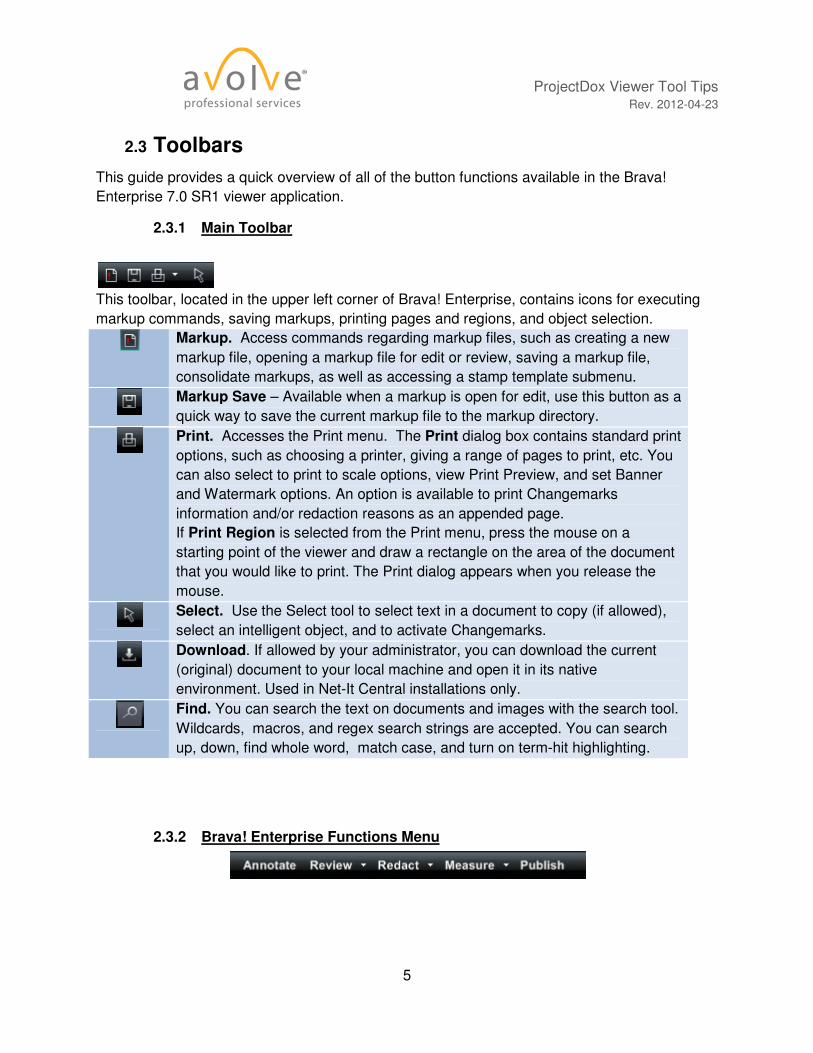
2.3.1 Main Toolbar
This toolbar, located in the upper left corner of Brava! Enterprise, contains icons for executing
markup commands, saving markups, printing pages and regions, and object selection.
Markup. Access commands regarding markup files, such as creating a new
markup file, opening a markup file for edit or review, saving a markup file,
consolidate markups, as well as accessing a stamp template submenu.
Markup Save – Available when a markup is open for edit, use this button as a
quick way to save the current markup file to the markup directory.
Print. Accesses the Print menu. The Print dialog box contains standard print
options, such as choosing a printer, giving a range of pages to print, etc. You
can also select to print to scale options, view Print Preview, and set Banner
and Watermark options. An option is available to print Changemarks
information and/or redaction reasons as an appended page.
If Print Region is selected from the Print menu, press the mouse on a
starting point of the viewer and draw a rectangle on the area of the document
that you would like to print. The Print dialog appears when you release the
mouse.
Select. Use the Select tool to select text in a document to copy (if allowed),
select an intelligent object, and to activate Changemarks.
Download. If allowed by your administrator, you can download the current
(original) document to your local machine and open it in its native
environment. Used in Net-It Central installations only.
Find. You can search the text on documents and images with the search tool.
Wildcards, macros, and regex search strings are accepted. You can search
up, down, find whole word, match case, and turn on term-hit highlighting.
2.3.2 Brava! Enterprise Functions Menu

ProjectDox Viewer Tool Tips Rev. 2012-04-23
6
2.3.2.1 Markup Toolbar
The Markup toolbar contains tools for adding markup entities and Changemarks (annotations)
to the current file. The Markup toolbar is displayed on the left side of the viewer when you:
• Click from the functions toolbar.
• Click and select New.
Additional markup tools are available by clicking on any arrow that exists to the right of the
currently displayed tool. Please see the Tool Properties Toolbar section of this document for
available tool options.
Edit Markups. Use to select and edit markup attributes, resize, reshape,
rotate, copy, or move entity.
Arrow Pointer. Use to add arrows to your images. The arrow head is set
at the first selection point.
Text. Use the Text tool to insert text directly on the image (rather than in
a note). Use the Markup Properties tools to change the font name, size,
etc.
Changemarks. The Changemarks tool allows markup authors to type or
copy/paste in detailed text in a scrolling window. Authors can also add
hyperlinks to point the user to additional information. Reviewers simply
need to double-click on the markup entity while in select mode to
review the text, or automatically scroll through each Changemarks
contained in the Changemarks list by clicking a Next button. See Also
"Changemarks Panel".
Changemarks combination tools: These tools are available purely for
convenience. With one single click, you can add a Changemarks with
either a Highlight , Text Highlight , Cloud , or Arrow .
Once added, the two entities behave totally independent of each other.
Changemarks Type and State: Type and State are attributes that can
be assigned to the original Changemarks content and to each reply that is
added to a discussion. After the Type is selected, the State drop-down
will show only the States associated with the currently selected Type.
Types and States can be customized in the ChangemarkConfig.xml file.

ProjectDox Viewer Tool Tips Rev. 2012-04-23
7
Insert Image. Use this markup tool to insert external raster images (JPG,
BMP, or PNG) into your current markup layer. Once selected, images can
be resized and positioned where you want them.
You can set multiple instances of this same image entity or use the
Browse button in the Markup Properties bar to choose another raster
image to insert. The properties bar also contains a list of 10 most recently
used images which can be individually selected and inserted.
Add Markup Stamp. If Stamp Templates have been authored and
saved, the markup stamp button is available on the Markup Toolbar.
When clicked, a list of available markup stamps is shown that can be
added to the current markup layer.
The stamp template is a group of markup entities that have been defined
as a single unit and all elements of the template are resized and moved
as a single entity and cannot be edited otherwise. Color, content, and
other elements are defined by the author when a stamp template is
created and saved.
When a stamp is inserted, if a dynamic text field exists (such as %Page,
%Date, %dbstring(value), etc.), the field is resolved and results are
populated in the stamp.
Cloud and Polyclouds. Add cloud or polycloud shapes on your images.
Highlight. Creates highlight entities by drawing a rectangle. Unlike the
filled shape entity, highlights do not have the option of being filled or
hollow.
Sketch and PolySketch. Use this tool to draw freehand shapes and lines
on your image. Polysketch can be filled or unfilled.
Crossout, Scratchout, Arc, and Line Tools. Use any of these tools to
add linear shapes on your documents and images. The mouse cursor
will change to reflect the tool selected. Line width and style can be
selected in the markup properties toolbar, with additional arrow end styles
available for the Line Arrow tool.
Rectangle, Rounded Rectangle, Ellipse, and Polygon shapes.
Shapes can be used as highlights or hides, and can be filled or hollow as
determined by your selection in the Shape Properties drop-down list. Use
ProjectDox Viewer Tool Tips Rev. 2012-04-23
8
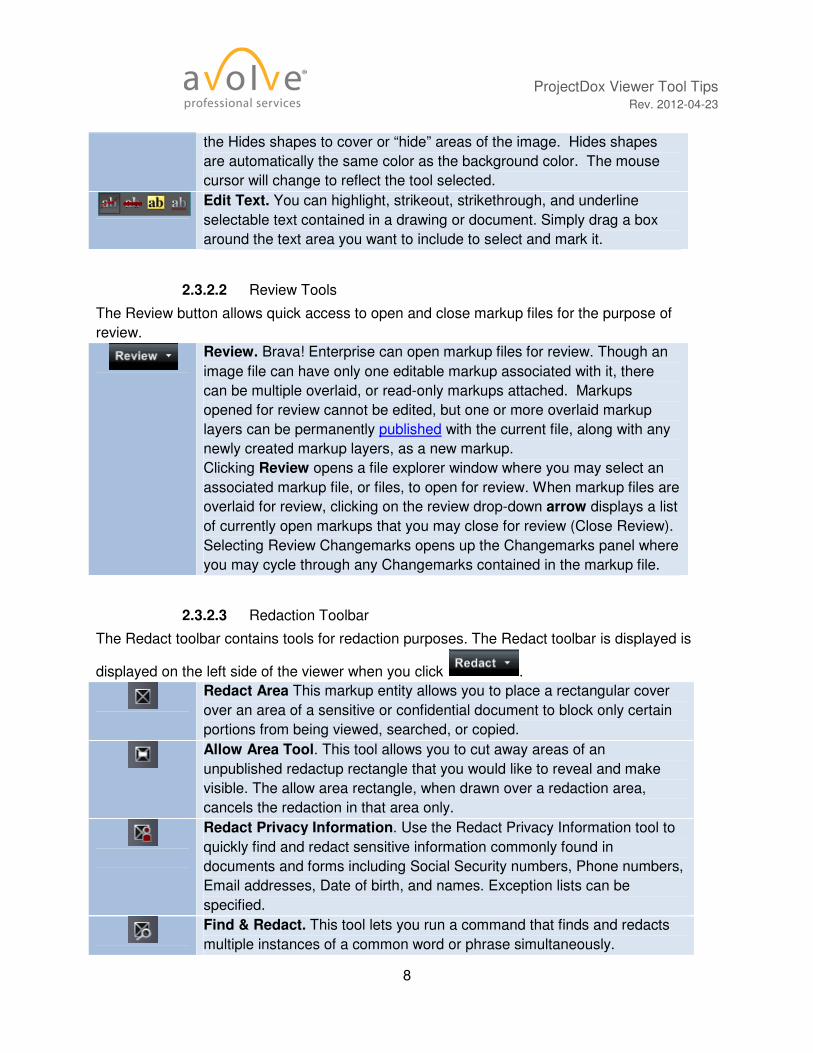
the Hides shapes to cover or “hide” areas of the image. Hides shapes
are automatically the same color as the background color. The mouse
cursor will change to reflect the tool selected.
Edit Text. You can highlight, strikeout, strikethrough, and underline
selectable text contained in a drawing or document. Simply drag a box
around the text area you want to include to select and mark it.
2.3.2.2 Review Tools
The Review button allows quick access to open and close markup files for the purpose of
review.
Review. Brava! Enterprise can open markup files for review. Though an
image file can have only one editable markup associated with it, there
can be multiple overlaid, or read-only markups attached. Markups
opened for review cannot be edited, but one or more overlaid markup
layers can be permanently published with the current file, along with any
newly created markup layers, as a new markup.
Clicking Review opens a file explorer window where you may select an
associated markup file, or files, to open for review. When markup files are
overlaid for review, clicking on the review drop-down arrow displays a list
of currently open markups that you may close for review (Close Review).
Selecting Review Changemarks opens up the Changemarks panel where
you may cycle through any Changemarks contained in the markup file.
2.3.2.3 Redaction Toolbar
The Redact toolbar contains tools for redaction purposes. The Redact toolbar is displayed is
displayed on the left side of the viewer when you click .
Redact Area This markup entity allows you to place a rectangular cover
over an area of a sensitive or confidential document to block only certain
portions from being viewed, searched, or copied.
Allow Area Tool. This tool allows you to cut away areas of an
unpublished redactup rectangle that you would like to reveal and make
visible. The allow area rectangle, when drawn over a redaction area,
cancels the redaction in that area only.
Redact Privacy Information. Use the Redact Privacy Information tool to
quickly find and redact sensitive information commonly found in
documents and forms including Social Security numbers, Phone numbers,
Email addresses, Date of birth, and names. Exception lists can be
specified.
Find & Redact. This tool lets you run a command that finds and redacts
multiple instances of a common word or phrase simultaneously.

ProjectDox Viewer Tool Tips Rev. 2012-04-23
9
Redact Using Script(s)/List(s). This tool allows you to run a command to
find and redact a predefined list of phrases or redaction scripts in one
action. See the Brava! online help for the required scripts and lists format.
You may use redaction wildcards and macros to search for and redact text
strings and number combinations. See the online help for using the
available tags and macros that can be used with the Find & Redact, and
Redact Using Scripts tools.
Redact Page. This tool allows you to redact an entire page or specified
pages. You can select to redact all pages, only the currently displayed
page, or a range of pages (type in the start and end page numbers).
Essentially, this tool can be used in conjunction with the Allow Area tool as
a reverse redaction tool, in other words, "redact everything on this page
except specified areas."
With all of the above tools, the redactions are not finalized until the
document is published.
Insert Image. Use this redactup tool to insert external raster images (JPG,
BMP, or PNG) into your current redaction layer. Once selected, images
can be resized and positioned where you want them.
You can set multiple instances of this same image entity or use the
Browse button in the Tool Properties Toolbar bar to choose another raster
image to insert. The properties bar also contains a list of 10 most recently
used images which can be individually selected and inserted.
Find & Redact From/To. Similar to Find & Redact, this tool allows you to
specify a range of text to redact by entering a start and end search
pattern. You can choose whether or not to include the end string in the
redaction.
2.3.2.4 Measure Toolbar
The Measure toolbar contains tools for measurement purposes. The Measure toolbar is
displayed is displayed on the left side of the viewer when you click .
Measure. Access commands for measurement and calibration. You
can measure lines, polygons, circles, and rectangles, use the
measure count feature, and access the measurement settings
dialog.
Measurement Properties. Depending on the measurement tool
selected from the menu (line, polyline, polygon, rectangle, circle, or
count), various properties display for that measurement, including:
Distance Angle X,Y Coordinates

ProjectDox Viewer Tool Tips Rev. 2012-04-23
10
Perimeter Area (poly)
Height Area (rectangle)
Radius Circumference Area (circle)
Count
Clear All and Undo Last . Clears all or only the last count
marker placed on an image.
If Show Leader is selected, a text box (with category color border)
will display each individual measurement result on the entities you
place.
The Negative Area check box allows you to place a negative entity
for that category. As long as the check box is selected, any entity
you place on the drawing will subtract from the accumulated results.
The measurement entities text box displays a negative number if
Show Leader is selected.
You can select the Snap check box if you would like your
measurement points to snap to the nearest picking point or to the
midpoint of segments and circles. Note that only CAD type formats
support snap. The setting has no effect on raster images and text
documents.
Measure Takeoff
To access the Measure Takeoff panel, click or from the
Measure button , select Takeoff.
You can create categories of different types (length, area, and
count) and accumulate total measurement values for each category
defined. Select New to define a new category through the Takeoff
Category dialog. You can Edit or Delete a selected category if you
are the author.
You can assign a different color for each category and the
measurements placed on the document will display with that color.
The list of categories can be sorted by name (click Category in the
top column). Click the ascending/descending arrow to arrange the

ProjectDox Viewer Tool Tips Rev. 2012-04-23
11
list accordingly.
Once the categories are defined, highlight a category and use the
available (dependent on type) measurement tools to place multiple
measurements on the document. As you place each measurement
entity, accumulated totals display at the top of the takeoff panel.
Takeoff information can be Exported to a file or to the Clipboard
through the Takeoff Export dialog.
To hide a category, click the hide icon to toggle between visible
and hide. To toggle all categories from visible/hide state, click the
icon located in the column heading. Hidden category
information will still remain available for export.
Category and takeoff information is saved as a markup layer to the
current file and can be reviewed as any other markup file.
2.3.2.5 Publish Tools
The Publish toolbar contains tools for republishing documents. The Publish options menu is
displayed when you click .
Save and Publish
Select Save Current View as JPG from the submenu to save the current
view displayed in the Brava! viewing window as a JPG file. This feature
captures the image window as a screen capture and will include all visible
elements (e.g., markup entities, magnifier window, measurement
indications, etc.). Note that redactions are NOT finalized in the captured
image.
Select Publish to CSF from the submenu to publish the current file to
secure CSF format with encrypted Visual Rights. CSF is a neutral 2D
format that is a replica of the source file, including images, graphics,
layout, and more. Secure CSF files published with Brava! Desktop can be
opened in the free Brava! Reader.
Select Publish to PDF, or TIFF from the submenu to publish the current
file (with any open markups) to PDF, or TIFF format. A variety of
publishing options can be selected from the dialog.

ProjectDox Viewer Tool Tips Rev. 2012-04-23
12
When redactup entities are present in the open markup, publishing to
CSF, PDF, or TIFF finalizes the redaction in the output file.
2.3.3 Brava! Viewer Display Toolbar
The Brava Viewer display toolbar contains tools to control how images display.
Color. Use this button to change the background color of file types
with "transparent" background colors, such as monochrome raster
and vector file types (color raster files are not affected) to black,
white, or gray.
Monochrome: Available from the color menu is also the
Monochrome setting. Turning on Monochrome change all lines of a
color vector image to a single color (the default is black) while
leaving markup entities in color for quick identification.
Set Visible Layers. Turn image layers (e.g., layers of a DWG file)
on or off to minimize clutter in the view window or to focus on a
particular area or part.
Rotate. The Rotate button allows you to rotate the image in 90
degree clockwise increments.
Fit All. Returns the zoom level to 100% so the full image displays in
the Brava! window.
Fit Width. Ideal for 8.5” X 11” office documents, Zoom Width
changes the zoom level so that the entire width of the image appears
in the window. You can read rows of text without having to scroll
right and left to see the entire line.
Zoom Slider. You can move the slider ball from left to right to
increase or decrease magnification. Move left to decrease, right to
increase. The ball snaps back to center on release.
Pan/Zoom. When zoomed in on an image, use the Pan tool to
maneuver around the image.
Magnifier. Use the Magnifier to summon a magnified view window
on your image. The magnification can be adjusted and a toggle tool
is available to allow you to switch between eye glass , bird’s
eye , and docking behavior.
Page Control. Use page control to navigate through the pages of
your documents. You can select a specific page from the drop-down

ProjectDox Viewer Tool Tips Rev. 2012-04-23
13
list.
CSF Icon – this icon displays when viewing secure CSF format
documents. Clicking on the icon launches a dialog that shows you
what Visual Rights were applied to the published file.
2.4 Brava! Compare Toolbar
The Compare toolbar offers tools for viewing two versions of a file while in Compare mode.
Compare mode can only be enabled through your Brava Administrator and is available via
integration to a document management system. Through your integration, open a file, and then
browse to and select another version of the file for comparison. The Compare toolbar displays
at the bottom of the viewing window.
Overlay: Use this button to overlay both versions on top of each other.
Both files display at their original colors. Use the slider to change the
transparency of each file - left to dim the compare version, right to dim the
open version.
Overlay Differences: With this button, the compare file version opens
overlaid on the open file. The open file displays in red (deleted geometry),
and the compare file displays in green (added geometry). Geometry that
has not changed (common between both revisions) is gray.
Side-By-Side: Both versions are displayed in a split-screen image. Move
the slider to view transparent differences overlaid in each version.

ProjectDox Viewer Tool Tips Rev. 2012-04-23
14
Text Comparison: While a graphical comparison is useful for viewing
differences in CAD drawings (as overlaid images), this method has
limitations when it comes to comparing the actual text contained in a
document file. Use the Text Comparison mode to view the (non
WYSIWYG) text content comparison of the open and compare documents.
The document is shown in split screen mode with the open and compare
files displayed in two windows as lines of text, and the WYSIWYG view of
the Compare or Open file shown beneath. Text differences between the
two documents are highlighted in yellow, red, or green.
Red indicates something that was deleted out of the open document.
Green indicates something that was added to the compare document.
Yellow indicates something that has changed between the two documents.
A merged report can be exported to PDF using the Text Compare Report
button.
Open File (Only): Only the file that was first opened is displayed (normal
colors). The set alignment points for comparison tool is available in this
mode. All Annotate, Review, Redact, Measure, and Publish features are
supported in this compare mode only.
Compare File (Only): Only the file that was opened for compare is
displayed (normal colors). The set alignment points for comparison tool is
available in this mode. Measure, and Publish features are supported in this
compare mode.
Additions: Only added areas (areas present in the compare version, but
not in the open version) are displayed in green.
Deletions: Only deleted areas (areas present in the open version, but not
in the compare version) are displayed in red.
Unchanged: Only areas that are present in both the compare version and
open version are displayed in gray.
Nudge Alignment: This button is available when using the Overlay,
Overlay Differences, Side by Side, Additions, Deletions, and Unchanged
viewing modes. You can use the Nudge Alignment commands to nudge
and re-scale a compare image or drawing to an open drawing, allowing you
to interactively make small adjustments to align the files more precisely.
This feature is especially useful for comparing two TIFF images that
contain the same text but have different line spacing. Click the Nudge
Alignment button and select a direction from the pop up menu to nudge the
compare file by one increment. This tool allows you to compare two
versions of a file that are of different scales, or world page sizes.
Clear Alignment Points clears any currently set points.
Transparency Slider: This tool is available for Overlay, Overlay
Differences, and Side-by-side modes to adjust the transparency amount of

ProjectDox Viewer Tool Tips Rev. 2012-04-23
15
the two documents. In the two overlay modes, move the slider to the left to
reduce the transparency of the Compare document (additions), move the
slider to the right to reduce the transparency of the Open document
(deletions).
When the slider is centered, both documents display at 50% transparency.
In Side-by-side mode, center the slider to view the changes side by side,
overlaid at 25% transparency. Move the slider all the way to the left to view
50% transparency, or all the way to the right for 0% transparency (no
overlay).
Text Compare Report: Use this button to generate a merged text
compare report and output the results to PDF.
2.5 Tool Properties Toolbar
This toolbar contains tools to modify the properties of Markups and Measurements. The
properties bar is located directly below the main toolbar.
Brava! Enterprise Help. Launch the on-line Help file to access detailed
information about using Brava! features.
Text Properties. Use the Bold, Italic, and Underline buttons to modify the
style of your markup text.
Use the font style and size drop-down boxes to change the markup font
style and size used. Changing the size of the markup text box on the image
will dynamically update the size of the font used in the font size selection
box.
MarkupText Background. Use this feature to select a background type for
your markup text box. Available choices from the drop-down menu are
Transparent, Match Display Background, and <Color>. Use Select
Background Color to choose the markup text background color from the
Color Chooser dialog.
Tokens. Available when creating a stamp template, use this button to
replace markup text with token variables. The token expressions will be
resolved when a user inserts or double clicks on a stamp containing token
variables. If the token used is a %prompt(), the user will be prompted with a
text entry field where he can type in the requested information.

ProjectDox Viewer Tool Tips Rev. 2012-04-23
16
Line Width. Change the width of markup lines using the Line Width tool.
Line Style. Choose the style of line used for any of the Sketch, arrow,
shape, edit text, or line tools. Choices include solid, dotted, dashed, or
dash-dot.
Shape Properties – Fill Type. Select Solid, Hollow, Highlight, or
Background Fill as attributes for a Rectangle, Ellipse, or Polygon shape.
Choosing solid or highlight fills the shapes with the currently selected
markup color.
Arrow End Styles. Choose the start and end arrow styles to use with the
Line Arrow tool.
Color. Change the color of any markup entity using the 16 predefined
markup colors, or you can choose More… to use the custom Color Chooser
dialog.
Copy Markups. Use this button to copy selected markup entities to one or
all pages of the document (specific page numbers can be entered in the
Copy Entities to Designated Pages dialog). Entities that cannot be copied
include Edit Text entities, Changemarks, and Redactups.
Hyperlink. Add a hyperlink to any markup entity when this icon is available.
Hyperlinks can be launched by clicking on a markup entity containing a

ProjectDox Viewer Tool Tips Rev. 2012-04-23
17
hyperlink with the Select tool .
2.6 Brava! Viewer Task Pane
The task pane can be toggled open and closed by clicking on the Pane Arrow on the right
side of the Brava Viewing window.
Pane Arrow. This icon, located on the right side of the viewing
window, expands and collapses the tabbed tool panel when
clicked.
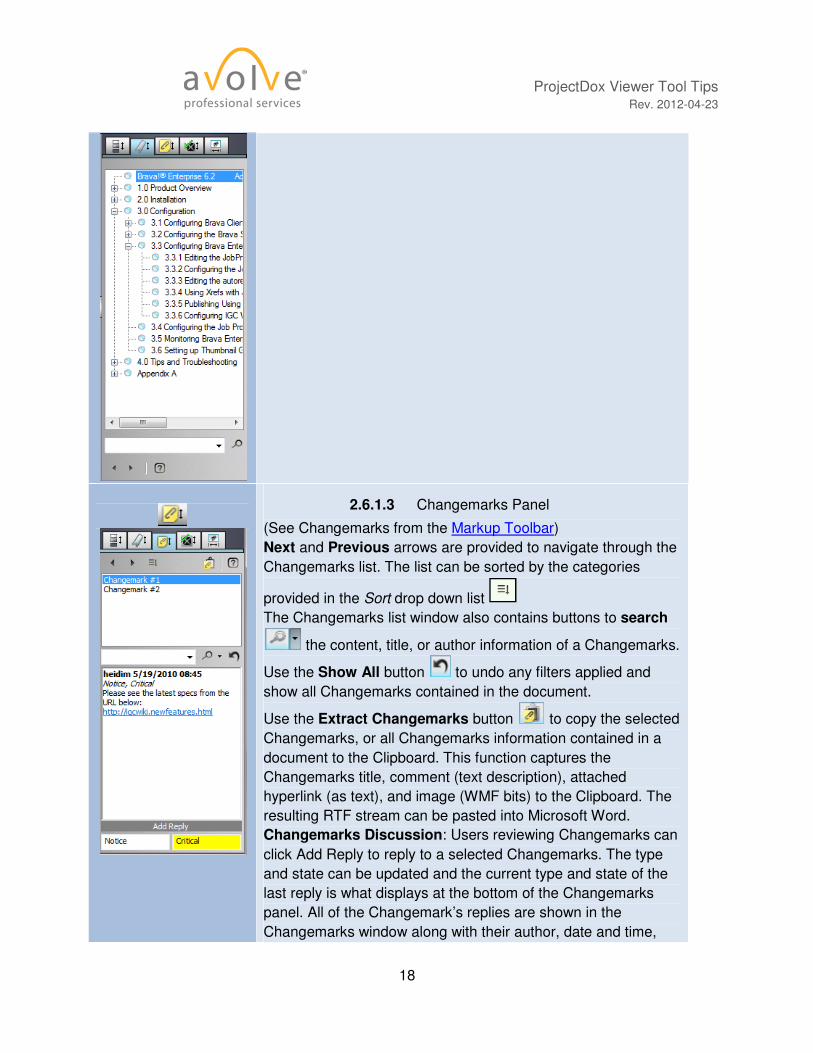
2.6.1.1 Page Thumbnails Panel
The Page Thumbnails Tab opens a scrollable thumbnail
navigation panel on the right side of the Brava! viewing area.
When clicked, the pages of the currently opened file appear in
the panel as small click-able thumbnail images.
First/Previous/Next/Last buttons are provided for quick page
navigation.
If a markup file is open, an exclamation point appears to
indicate the pages that contain markups. You can use the
next/previous markup page arrows to navigate through only
those pages containing markups.
2.6.1.2 Bookmarks Panel
The bookmark panel lists the internal bookmarks contained in
the document being viewed. In this panel you can expand or
collapse the bookmark trees by clicking the +/- signs. Click a
bookmark to go to that location in the document. Use the search
field to search for bookmark titles. Use the next and previous
arrows to navigate through bookmarks
ProjectDox Viewer Tool Tips Rev. 2012-04-23
18
2.6.1.3 Changemarks Panel
(See Changemarks from the Markup Toolbar)
Next and Previous arrows are provided to navigate through the
Changemarks list. The list can be sorted by the categories
provided in the Sort drop down list
The Changemarks list window also contains buttons to search
the content, title, or author information of a Changemarks.
Use the Show All button to undo any filters applied and
show all Changemarks contained in the document.
Use the Extract Changemarks button to copy the selected
Changemarks, or all Changemarks information contained in a
document to the Clipboard. This function captures the
Changemarks title, comment (text description), attached
hyperlink (as text), and image (WMF bits) to the Clipboard. The
resulting RTF stream can be pasted into Microsoft Word.
Changemarks Discussion: Users reviewing Changemarks can
click Add Reply to reply to a selected Changemarks. The type
and state can be updated and the current type and state of the
last reply is what displays at the bottom of the Changemarks
panel. All of the Changemark’s replies are shown in the
Changemarks window along with their author, date and time,

ProjectDox Viewer Tool Tips Rev. 2012-04-23
19
type and state information, and note content. Only reviewers
with markup edit permissions can reply to Changemarks.
2.6.1.4 Verify Redactions Panel
Once you have redacted a document (see Redaction tools)
you can optionally run the Verify tool to manually check and
adjust the accuracy of each redacted area that has been set on
the document before you finalize the redaction through
publishing .
2.6.1.5 Measure Takeoff Panel
To access the Measure Takeoff panel click this tab, or from the
Measure button , select Takeoff.
The takeoff panel lets you create categories and accumulate
measurements and export the information to a (markup) file or
to the Clipboard. You can total length, area, and counts by
placing multiple measurement entities on the drawing for each
category defined.


