1
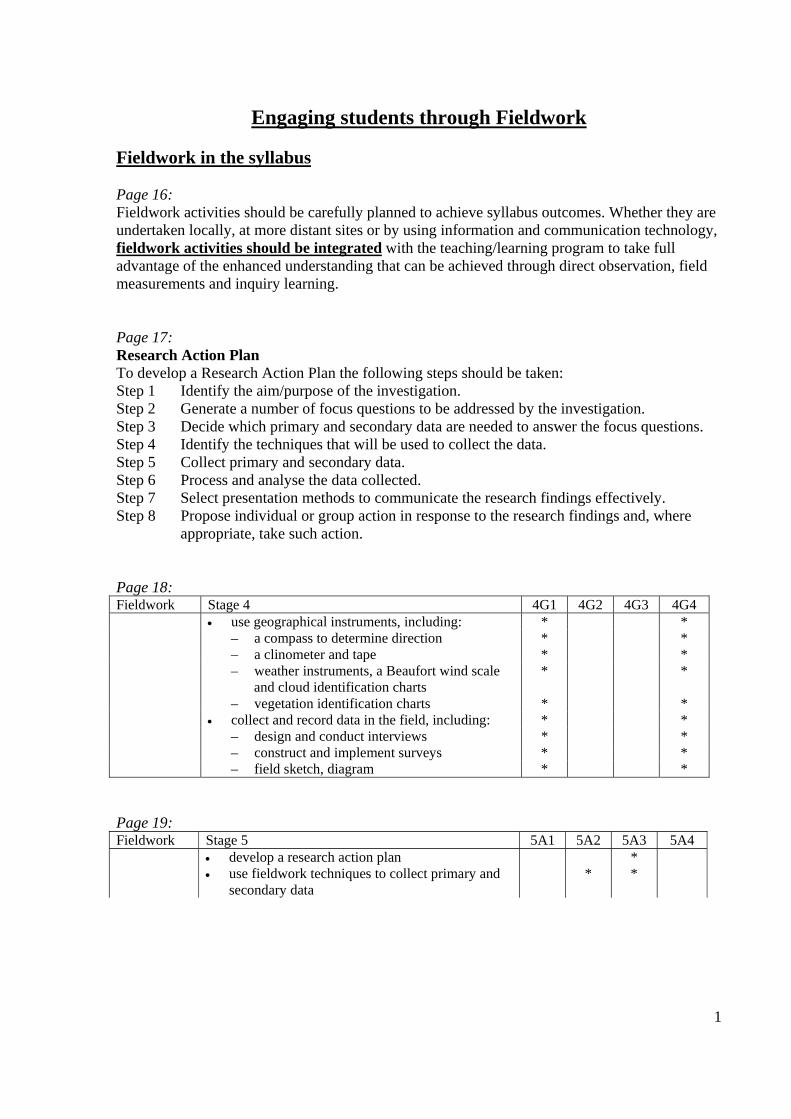
Engaging students through Fieldwork Fieldwork in the syllabus Page 16: Fieldwork activities should be carefully planned to achieve syllabus outcomes. Whether they are undertaken locally, at more distant sites or by using information and communication technology, fieldwork activities should be integrated with the teaching/learning program to take full advantage of the enhanced understanding that can be achieved through direct observation, field measurements and inquiry learning. Page 17: Research Action Plan To develop a Research Action Plan the following steps should be taken: Step 1 Identify the aim/purpose of the investigation. Step 2 Generate a number of focus questions to be addressed by the investigation. Step 3 Decide which primary and secondary data are needed to answer the focus questions. Step 4 Identify the techniques that will be used to collect the data. Step 5 Collect primary and secondary data. Step 6 Process and analyse the data collected. Step 7 Select presentation methods to communicate the research findings effectively. Step 8 Propose individual or group action in response to the research findings and, where
appropriate, take such action. Page 18: Fieldwork Stage 4 4G1 4G2 4G3 4G4 • use geographical instruments, including: * * – a compass to determine direction * * – a clinometer and tape * * – weather instruments, a Beaufort wind scale
and cloud identification charts * *
– vegetation identification charts * * • collect and record data in the field, including: * * – design and conduct interviews * * – construct and implement surveys * * – field sketch, diagram * * Page 19: Fieldwork Stage 5 5A1 5A2 5A3 5A4 • develop a research action plan * • use fieldwork techniques to collect primary and
secondary data * *
2
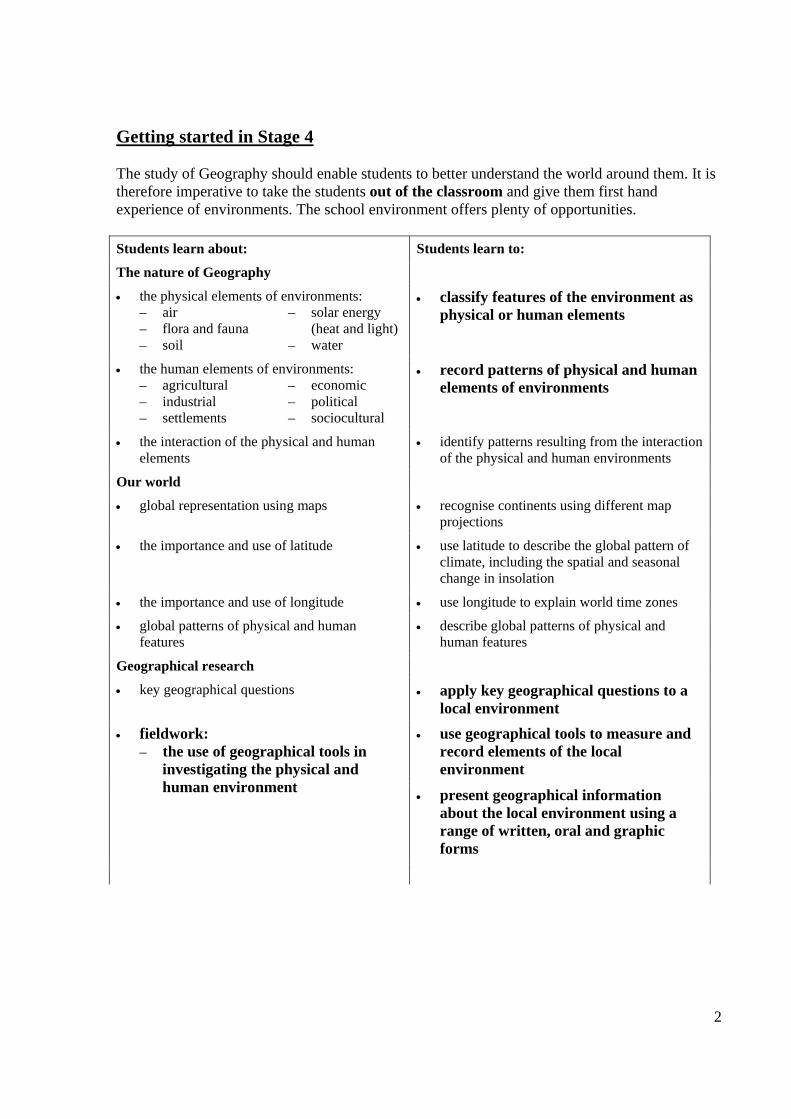
Getting started in Stage 4 The study of Geography should enable students to better understand the world around them. It is therefore imperative to take the students out of the classroom and give them first hand experience of environments. The school environment offers plenty of opportunities. Students learn about: Students learn to:
The nature of Geography
• the physical elements of environments: – air – flora and fauna – soil
– solar energy (heat and light)
– water
• classify features of the environment as physical or human elements
• the human elements of environments: – agricultural – industrial – settlements
– economic – political – sociocultural
• record patterns of physical and human elements of environments
• the interaction of the physical and human elements
• identify patterns resulting from the interaction of the physical and human environments
Our world
• global representation using maps • recognise continents using different map projections
• the importance and use of latitude • use latitude to describe the global pattern of climate, including the spatial and seasonal change in insolation
• the importance and use of longitude • use longitude to explain world time zones
• global patterns of physical and human features
• describe global patterns of physical and human features
Geographical research
• key geographical questions • apply key geographical questions to a local environment
• use geographical tools to measure and record elements of the local environment
• fieldwork: – the use of geographical tools in
investigating the physical and human environment
• present geographical information about the local environment using a range of written, oral and graphic forms
3
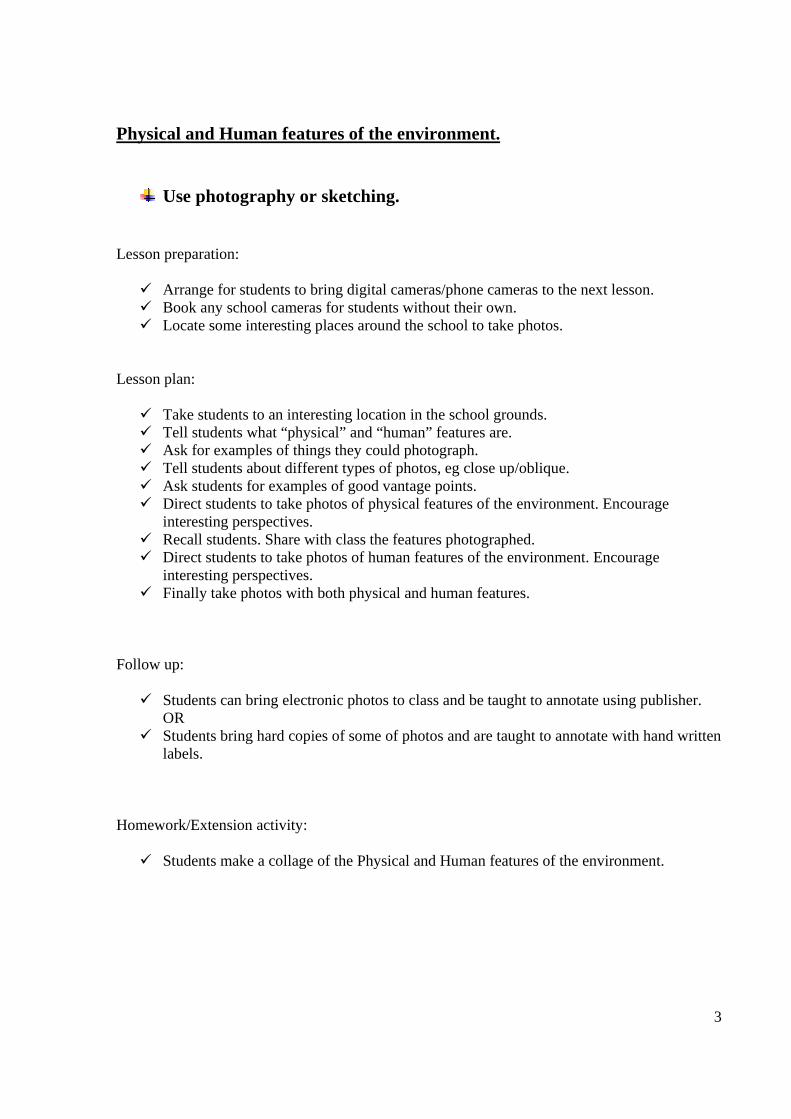
Physical and Human features of the environment.
Use photography or sketching. Lesson preparation:
Arrange for students to bring digital cameras/phone cameras to the next lesson. Book any school cameras for students without their own. Locate some interesting places around the school to take photos.
Lesson plan:
Take students to an interesting location in the school grounds. Tell students what “physical” and “human” features are. Ask for examples of things they could photograph. Tell students about different types of photos, eg close up/oblique. Ask students for examples of good vantage points. Direct students to take photos of physical features of the environment. Encourage
interesting perspectives. Recall students. Share with class the features photographed. Direct students to take photos of human features of the environment. Encourage
interesting perspectives. Finally take photos with both physical and human features.
Follow up:
Students can bring electronic photos to class and be taught to annotate using publisher. OR
Students bring hard copies of some of photos and are taught to annotate with hand written labels.
Homework/Extension activity:
Students make a collage of the Physical and Human features of the environment.
4
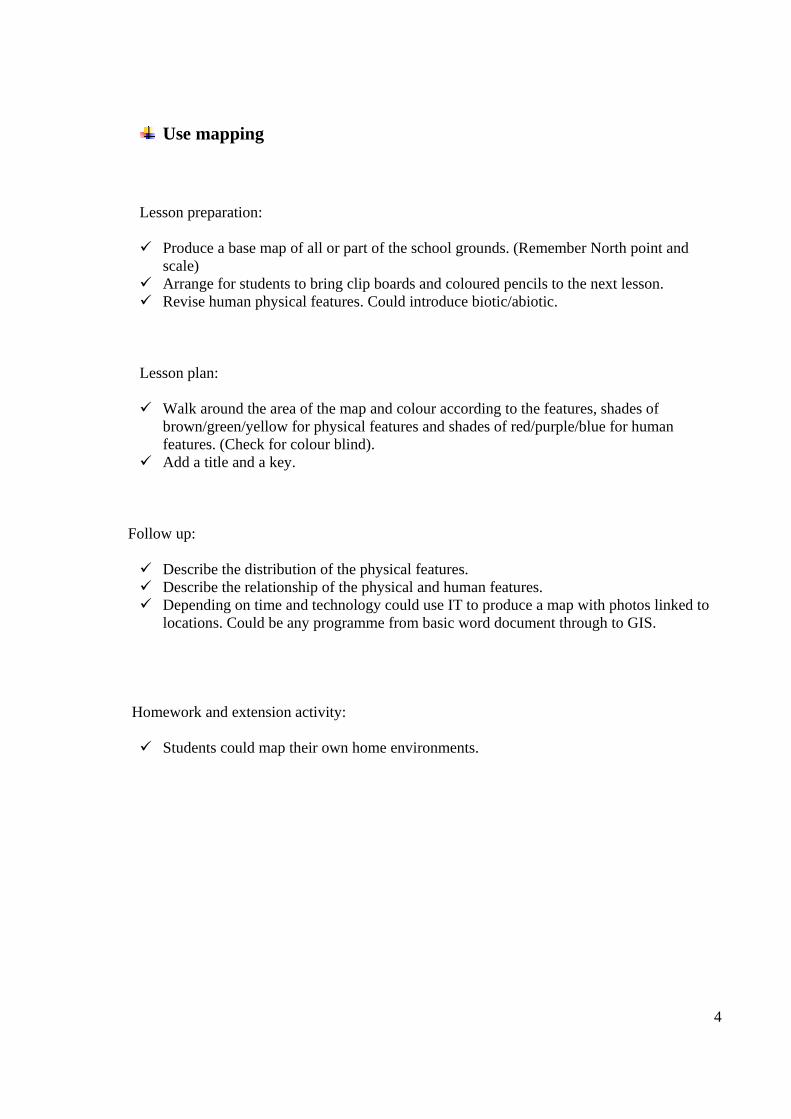
Use mapping
Lesson preparation:
Produce a base map of all or part of the school grounds. (Remember North point and scale)
Arrange for students to bring clip boards and coloured pencils to the next lesson. Revise human physical features. Could introduce biotic/abiotic.
Lesson plan:
Walk around the area of the map and colour according to the features, shades of
brown/green/yellow for physical features and shades of red/purple/blue for human features. (Check for colour blind).
Add a title and a key. Follow up:
Describe the distribution of the physical features. Describe the relationship of the physical and human features. Depending on time and technology could use IT to produce a map with photos linked to
locations. Could be any programme from basic word document through to GIS. Homework and extension activity:
Students could map their own home environments.
5
Use a compass to determine direction. Ideas for practical exercises. Compass Race Create a number of stations around the school. (Make sure they are specific, such as the flag pole not the library.) Put a laminated card at each station with 3-5 places that students need to determine the direction of, using their compass. Start each group at a different station, and ensure they move around the stations in order. Either give a time limit and the group with the most correct in the time wins, or make it a race to be first to complete all stations, ensuring even the slowest can get back within the lesson time. This could be made harder by marking the stations on a school base map rather than identifying them by name. Compass treasure trail Mark the location of the treasure on a map; keep it out of sight. Give a series of directions with paces (or use a tape) to reach the treasure, e.g. North 20 paces, East 5 paces and so on. Each group follows the directions and decides on the location of the treasure. They mark where they believe the treasure to be and the group that are nearest win the treasure. Can vary this by having the groups create treasure trails, then copying them and each group completing everyone else’s. Compass mapping (Harder and requires a knowledge of scale) Select a central point and a list of 5-6 places that are within reasonable distance. Students determine the direction of each place from the centre and also the distance. They then plot the features on a map, use a simple scale of 1cm to represent 1m. For more able students there could be more key points and buildings could be drawn in by plotting their corners. If the Geography department does not have compasses ask the people that run D of E in the school or see how many students have them at home.
6
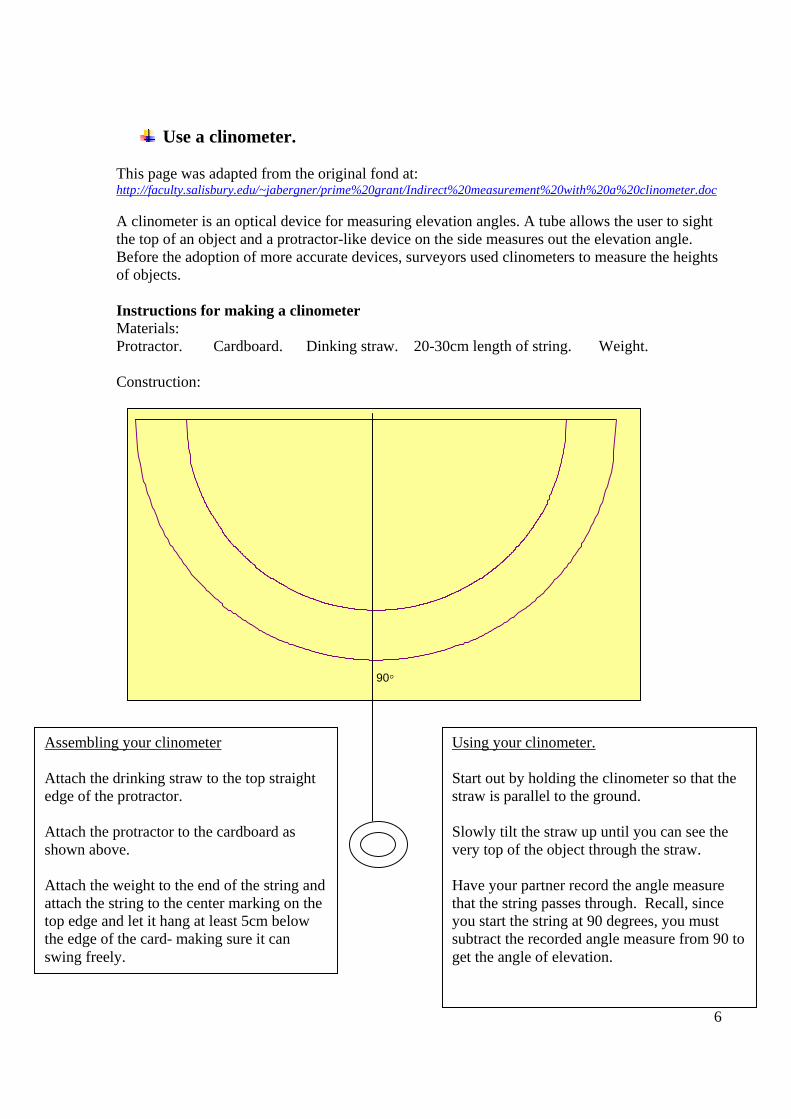
Use a clinometer.
This page was adapted from the original fond at: http://faculty.salisbury.edu/~jabergner/prime%20grant/Indirect%20measurement%20with%20a%20clinometer.doc A clinometer is an optical device for measuring elevation angles. A tube allows the user to sight the top of an object and a protractor-like device on the side measures out the elevation angle. Before the adoption of more accurate devices, surveyors used clinometers to measure the heights of objects. Instructions for making a clinometer Materials: Protractor. Cardboard. Dinking straw. 20-30cm length of string. Weight. Construction:
90°
Uses weather instruments
Assembling your clinometer Attach the drinking straw to the top straight edge of the protractor. Attach the protractor to the cardboard as shown above. Attach the weight to the end of the string and attach the string to the center marking on the top edge and let it hang at least 5cm below the edge of the card- making sure it can swing freely.
Using your clinometer. Start out by holding the clinometer so that the straw is parallel to the ground. Slowly tilt the straw up until you can see the very top of the object through the straw. Have your partner record the angle measure that the string passes through. Recall, since you start the string at 90 degrees, you must subtract the recorded angle measure from 90 to get the angle of elevation.

7
Use weather instruments A similar piece of equipment can be used for measuring wind speed. See “Just a gust” at the following web site: http://www.anoka.k12.mn.us/images/docmgr/3734file18417.pdf Another way to measure wind speed is to have students make their own anemometer
Instructions for making an Anemometer.
A. Materials o 4 small paper cups or muffin cases. o 4 plastic drinking straws o tape o scissors o straight pin o pencil with a new eraser o stapler
B. Procedure
1. Arrange four (4) plastic drinking straws to form a cross and tape them together at the centre.
2. Staple the top side of one drinking cup (or the middle of the case), to the end of each straw, so the open ends of the cups all face the same direction.
3. Push a straight pin through the centre of the straws into an eraser on the end of a pencil. This provides the axle.
4. Colour one of the cups; this will be the one you use for counting when the anemometer spins.
Make sure that the cups spin when you blow them lightly.
There are many different weather recording instruments that can be made. Students can make their own cloud charts/Beaufort scales/rain gauges and thermometer stands. Instuctions for these are readily available on the internet. Good sites include: http://www.bom.gov.au/ http://www.metoffice.gov.uk/education/secondary/students/observation.html Once students have made instruments fieldwork can be planned and implemented using the RAP. Refer to Geography Focus 1 Page 18. The following exercise was completed in one period by a year 7 class at Tara this year. This format could be adapted for other weather elements.

8
Aim: To investigate Wind Speed at Tara School. Objective: To find out where the wind is strongest. Technique: Measuring wind speed with an anemometer. Method: On Wednesday 4th March between 1.30 and 2.30 pm the wind speed was recorded at ___ locations in the school grounds. At each location the anemometer was held facing in to the wind for one minute. The highest wind speed observed was then recorded. This was repeated three times and the average then calculated. A description of each site was also recorded. Results: Location
Description of location
Wind Speed 1
Wind Speed 2
Wind Speed 3
Average Wind Speed
1
2
3
4
5
Conclusion: The windiest place in the school was _____________________________________, because ______________________________________________________________________________ ______________________________________________________________________________ The least windy place in the school was __________________________________, because ______________________________________________________________________________ ______________________________________________________________________________

9
Developing further fieldwork skills in stage 4
Construct and implement surveys In 4G4 students study at least two geographical issues. This provides opportunities to conduct interviews/polls and surveys. They can be used to discover opinions and/or factual information. There are also opportunities for practicing other fieldwork skills depending on the issues. In studying Tourism with year 8, Tara students go to the Hilton Hotel and Darling Harbour, activities undertaken include:
Interview with hotel staff. Land use mapping of Darling Harbour. Visitor counts Field sketching in the Chinese Gardens Visitor Survey Observation through photography.
See separate fieldwork booklet. The other issue chosen at Tara is Climate Change. This provides opportunities to conduct a poll: Do you believe the climate is changing? YES NO Which alternate power source(s) should Australia investigate? HYDRO GEOTHERMAL SOLAR WIND TIDAL NUCLEAR Before students construct a poll or survey ensure they understand the difference between open and closed questions and the data they generate. Refer to Geography Focus Page 19 Make them think about the data they will collect and the way they will process and present it to help them understand the need to categorise answers. Consider ways other than writing to record results and also to present results. Students use technology in their day to day lives and are very comfortable with it.

10
Fieldwork in Stage 5
Use fieldwork techniques to collect primary and secondary data. 5A1 Could include:
Mapping Water and soil sampling Collection and interpretation of weather data alongside synoptic charts. Vegetation transects. Counts of native birds /fauna.
5A2 Could include:
Population surveys/interviews examining structure and or ethnicity. Census data analysis Community studies using photography, land use mapping, field sketching, interviews. Media analysis.
A community study of Maitland can be found on the Bureau of statistics web site: http://www.abs.gov.au/websitedbs/D3310116.NSF/8eded5e0a14f570aca256e15001c9894/acbddf36926905e6ca256faa001b0b6b!OpenDocument 5A3 Research Action Plan: RAP Working towards 5A3 the aim should be to model the RAP and to give students a wide range of skills to draw from when they conduct their own RAP. By engaging in well planned fieldwork through out their Geography courses it will be a natural progression to plan their own investigation. Closing Remarks Fieldwork takes the students out of the classroom to DO Geography it is just one of many ways that students can be engaged in this subject. It should be integrated in to a varied programme not taught as something separate. It should never be treated as another dot point. Sue van Zuylen Tara Anglican School for Girls April 2009


