ENGINE / CLUTCH REMOVAL & RE-ASSEMBLY: GRILLO G85 / G85d / G107d STANDARD CONE CLUTCH TYPE ON ENGINES WITH 3/4” OR 1” KEYED CRANKSHAFT
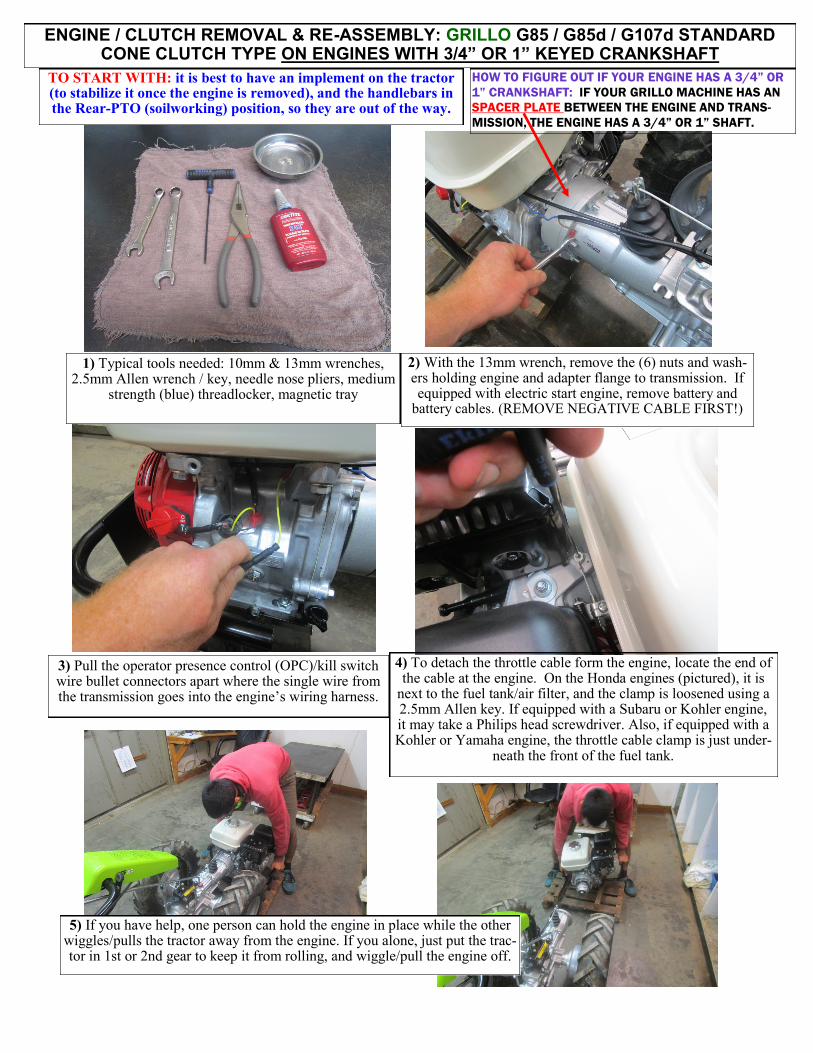
1) Typical tools needed: 10mm & 13mm wrenches, 2.5mm Allen wrench / key, needle nose pliers, medium
strength (blue) threadlocker, magnetic tray
2) With the 13mm wrench, remove the (6) nuts and wash-ers holding engine and adapter flange to transmission. If equipped with electric start engine, remove battery and
battery cables. (REMOVE NEGATIVE CABLE FIRST!)
3) Pull the operator presence control (OPC)/kill switch wire bullet connectors apart where the single wire from the transmission goes into the engine’s wiring harness.
4) To detach the throttle cable form the engine, locate the end of the cable at the engine. On the Honda engines (pictured), it is
next to the fuel tank/air filter, and the clamp is loosened using a 2.5mm Allen key. If equipped with a Subaru or Kohler engine, it may take a Philips head screwdriver. Also, if equipped with a Kohler or Yamaha engine, the throttle cable clamp is just under-
neath the front of the fuel tank.
TO START WITH: it is best to have an implement on the tractor (to stabilize it once the engine is removed), and the handlebars in the Rear-PTO (soilworking) position, so they are out of the way.
HOW TO FIGURE OUT IF YOUR ENGINE HAS A 3/4” OR
1” CRANKSHAFT: IF YOUR GRILLO MACHINE HAS AN
SPACER PLATE BETWEEN THE ENGINE AND TRANS-
MISSION, THE ENGINE HAS A 3/4” OR 1” SHAFT.
5) If you have help, one person can hold the engine in place while the other wiggles/pulls the tractor away from the engine. If you alone, just put the trac-tor in 1st or 2nd gear to keep it from rolling, and wiggle/pull the engine off.
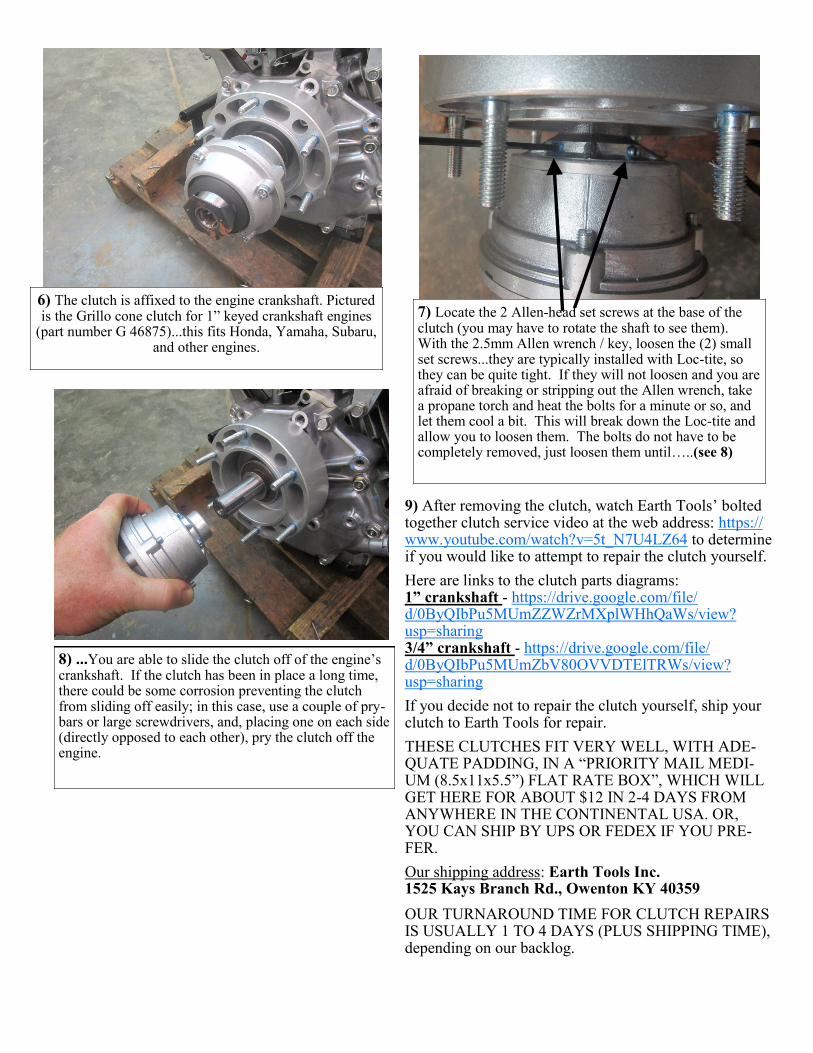
6) The clutch is affixed to the engine crankshaft. Pictured is the Grillo cone clutch for 1” keyed crankshaft engines
(part number G 46875)...this fits Honda, Yamaha, Subaru, and other engines.
7) Locate the 2 Allen-head set screws at the base of the clutch (you may have to rotate the shaft to see them). With the 2.5mm Allen wrench / key, loosen the (2) small set screws...they are typically installed with Loc-tite, so they can be quite tight. If they will not loosen and you are afraid of breaking or stripping out the Allen wrench, take a propane torch and heat the bolts for a minute or so, and let them cool a bit. This will break down the Loc-tite and allow you to loosen them. The bolts do not have to be completely removed, just loosen them until…..(see 8)
8) ...You are able to slide the clutch off of the engine’s crankshaft. If the clutch has been in place a long time, there could be some corrosion preventing the clutch from sliding off easily; in this case, use a couple of pry-bars or large screwdrivers, and, placing one on each side (directly opposed to each other), pry the clutch off the engine.
9) After removing the clutch, watch Earth Tools’ bolted together clutch service video at the web address: https://www.youtube.com/watch?v=5t_N7U4LZ64 to determine if you would like to attempt to repair the clutch yourself.
Here are links to the clutch parts diagrams: 1” crankshaft - https://drive.google.com/file/d/0ByQIbPu5MUmZZWZrMXplWHhQaWs/view?usp=sharing 3/4” crankshaft - https://drive.google.com/file/d/0ByQIbPu5MUmZbV80OVVDTElTRWs/view?usp=sharing
If you decide not to repair the clutch yourself, ship your clutch to Earth Tools for repair.
THESE CLUTCHES FIT VERY WELL, WITH ADE-QUATE PADDING, IN A “PRIORITY MAIL MEDI-UM (8.5x11x5.5”) FLAT RATE BOX”, WHICH WILL GET HERE FOR ABOUT $12 IN 2-4 DAYS FROM ANYWHERE IN THE CONTINENTAL USA. OR, YOU CAN SHIP BY UPS OR FEDEX IF YOU PRE-FER.
Our shipping address: Earth Tools Inc. 1525 Kays Branch Rd., Owenton KY 40359
OUR TURNAROUND TIME FOR CLUTCH REPAIRS IS USUALLY 1 TO 4 DAYS (PLUS SHIPPING TIME), depending on our backlog.

RE-ASSEMBLY
AFTER INSTALLING A CLUTCH, THE CLUTCH CA-BLE MAY NEED TO BE RE-ADJUSTED. PROPER ADJUSTMENT IS: SET CABLE WITH MINIMUM AMOUNT OF TENSION NECESSARY SO THAT WHEN CLUTCH HANDLE IS FULLY SQUEEZED,
TRACTOR COMES TO A FULL STOP. ESSENTIAL-LY, YOU WANT THE MOST CABLE “FREE PLAY” YOU CAN GET WITH THE CLUTCH HANDLE IN THE “RELAXED” POSI-TION, WHILE STILL HAVING THE CLUTCH DISENGAGE POWER WHEN CLUTCH HANDLE FULLY SQUEEZED. ADJUST CABLE TENSION USING HOLLOW BOLT / JAMNUT NEAR CLUTCH HANDLE (BACKING OUT [so more threads are exposed on the bolt] INCREAS-ES TENSION, SCREWING IN INCREASES FREE PLAY)... DON’T FOOL WITH CABLE CLAMP DOWN BY CLUTCH FORK / ENGINE UNLESS YOU RUN OUT OF ADJUSTMENT AT THE “TOP END”. You can view our Clutch Adjustment VIDEO by copying this URL into your browser: http://www.youtube.com/watch?v=SAv8eE7ytiY&list=UUnEPLYReFF1UlPuQmJIqGow&index=1&feature=plcp
QUESTIONS? EARTH TOOLS: 502-484-3988
10) Reassembly is the reverse of removal. Make sure to apply a little bit of medium strength (blue) threadlocker to the (2) small set screws on the clutch before installation. Get the screws tight!! (If you are staring to worry that the Allen wrench will break, that’s about tight enough!!)
12) It is also good to apply a VERY SMALL AMOUNT of grease (multi-purpose) to the clutch fork pads that contact the throwout bearing plate on the clutch and also on the splined input shaft of the transmission. Then slide the engine & clutch back onto the tractor and tighten the 6 nuts.
11) Make sure that the square “key” in the groove of the crankshaft is slid ALL THE WAY BACK as far as it will go toward the engine, as shown in this picture.


