
ENOVIA Synchronicity DesignSync Data Manager
V6R2009x
DesignSync User’s Guide

Copyrights and Trademarks © Dassault Systèmes, 1997 - 2008.
All rights reserved.
PROPRIETARY RIGHTS NOTICE: This documentation is proprietary property of Dassault Systèmes and its subsidiaries. This documentation shall be treated as confidential information and may only be used by employees or contractors with the Customer in accordance with the applicable Software License Agreement.
Adaplet®, Compliance Connect®, DesignSync®, ENOVIA®, MatrixOne®, ProjectSync®, Synchronicity®, and Team Central® are registered trademarks of Dassault Systèmes.
ENOVIA Collaboration Platform, ENOVIA Business Process Services, ENOVIA Platform Server, ENOVIA Modeling Studio, ENOVIA 3D Live, FCS, AEF, Application Exchange Framework, Application Development Kit, ENOVIA Engineering Central, ENOVIA Library Central, ENOVIA Materials Compliance Central, ENOVIA Product Central, ENOVIA Program Central, ENOVIA Sourcing Central, ENOVIA Specification Central, ENOVIA Supplier Central, ENOVIA Collaborative Interference Management, ENOVIA Semiconductor Accelerator for Team Compliance, ENOVIA Aerospace and Defense Accelerator for Program Management, ENOVIA Apparel Accelerator for Design and Development, ENOVIA Automotive Accelerator for Program Management, ENOVIA Medical Device Accelerator for Regulatory Compliance, ENOVIA X-BOM Cost Analytics, ENOVIA X-BOM Manufacturing, ENOVIA Synchronicity DesignSync DFII, ENOVIA Synchronicity DesignSync MW, ENOVIA Synchronicity DesignSync CTS, ENOVIA IP Gear, IconMail, ImageIcon and Star Browser are trademarks of Dassault Systèmes.
Oracle® is a registered trademark of Oracle Corporation, Redwood City, California. DB2, AIX, and WebSphere are registered trademarks of IBM Corporation. WebLogic is a registered trademark of BEA Systems, Inc. Solaris, UltraSPARC, Java, JavaServer Pages, JDBC, and J2EE are registered trademarks of Sun Microsystems, Inc. Windows XP and Internet Explorer are registered trademarks of Microsoft Corp. HP and HP-UX are registered trademarks of HP. All other product names and services identified throughout this book are recognized as trademarks, registered trademarks, or service marks of their respective companies.
The documentation that accompanies ENOVIA Synchronicity DesignSync products describes the applications as delivered by Dassault Systèmes. This documentation includes readme files, online help, user guides, and administrator guides. If changes are made to an application or to the underlying framework, Dassault Systèmes cannot ensure the accuracy of this documentation.
NOTE: This manual was generated directly from the online help with minimal reformatting. The PDF version is optimized for printing and does not contain active cross-reference links or animated use cases. Because the intent of the help is to be an online guide, there may be shortcomings in its organization and general usability as a printed document. The PDF version was created before limited changes were made to WebHelp. For the most current information, see the product’s online help. ENOVIA MatrixOne
900 Chelmsford Street
Lowell, MA 01851
Telephone 978.442.2500
Email: [email protected]
http://www.3ds.com

Table of Contents
Release Information ........................................................................................................ 1
Using DesignSync ........................................................................................................... 3
Introduction to DesignSync .......................................................................................... 3
Getting Started with DesignSync.............................................................................. 3
What is Revision Control? ........................................................................................ 5
DesignSync Architecture .......................................................................................... 6
Object States............................................................................................................ 8
Object Types ............................................................................................................ 9
Context Menu ......................................................................................................... 10
URL Syntax ............................................................................................................ 10
Vaults, Versions, and Branches ............................................................................. 13
Command Line Defaults System ............................................................................ 13
Configuring DesignSync ......................................................................................... 14
Understanding Your DesignSync Work Area ......................................................... 15
The DesignSync GUI ............................................................................................. 33
DesignSync Shells ................................................................................................. 92
SyncServers ......................................................................................................... 107
Setting Up a DesignSync Workspace ...................................................................... 112
Setting Up a Work Area for a Project ................................................................... 112
Joining a Project Using a Wizard ......................................................................... 113
Joining a Project Step-by-Step ............................................................................. 135
Using Legacy Configurations ............................................................................... 161
iii
DesignSync Data Manager User's Guide
Basic Revision Control Operations .......................................................................... 188
Populating Your Work Area .................................................................................. 189
Changing the State of Objects in Your Work Area ............................................... 204
Showing Potential Checkouts .............................................................................. 205
Checking Out Design Data ................................................................................... 206
Canceling a Checkout .......................................................................................... 211
Checking In Design Data ..................................................................................... 214
Displaying Information ............................................................................................. 223
Identifying Modified Objects ................................................................................. 223
Displaying Version History ................................................................................... 224
Displaying Contents of Vault Data ........................................................................ 229
Compare the Contents of Two Areas ................................................................... 232
Advanced Revision Control Operations ................................................................... 237
Moving and Renaming Files ................................................................................. 237
Moving and Renaming Folders ............................................................................ 237
Creating Branches ............................................................................................... 237
Tagging Versions and Branches .......................................................................... 240
Retiring Design Data ............................................................................................ 246
Unlocking Server Data ......................................................................................... 249
Deleting Design Data ........................................................................................... 252
Deleting Versions from a Vault ............................................................................. 253
Deleting Vaults ..................................................................................................... 255
Creating Folders ................................................................................................... 257
iv

Table of Contents
Deleting Server Folders ....................................................................................... 259
Using Revision Control Keywords ........................................................................ 260
Workspace Operations ............................................................................................ 264
Creating Files ....................................................................................................... 264
Deleting Files ....................................................................................................... 265
Creating Folders ................................................................................................... 267
Deleting Folders ................................................................................................... 268
File Comparison ................................................................................................... 270
Introduction to Merging ............................................................................................ 282
What Is Merging? ................................................................................................. 282
Merge Conflicts .................................................................................................... 282
Two-Way Merge ................................................................................................... 283
Three-Way Merge ................................................................................................ 284
Merge Edges ........................................................................................................ 285
Using DesignSync with Modules ................................................................................. 289
Introduction to Modules ........................................................................................... 289
What Is a Module? ............................................................................................... 289
Data Management of Modules ............................................................................. 292
Operating on Module Data ................................................................................... 293
Filtering Module Data ........................................................................................... 296
Module Recursion ................................................................................................ 300
Module Locking .................................................................................................... 304
Module Hierarchy ................................................................................................. 306
v
DesignSync Data Manager User's Guide
Folder Versioning ................................................................................................. 309
Module Branching ................................................................................................ 309
Module Merging ................................................................................................... 312
Using Modules with the Submit, Integrate, Test, and Release (SITaR) Methodology................................................................................................................................. 316
Overview of SITaR Workflow ............................................................................... 316
SITaR Module Structure ....................................................................................... 317
Branching in SITaR .............................................................................................. 319
Using SITaR as a SITaR Designer ....................................................................... 319
Using SITaR as a SITaR Integrator ...................................................................... 323
Configuring SITaR ................................................................................................ 328
Setting Up a Module Workspace ............................................................................. 334
Setting a Workspace Root ................................................................................... 334
Specifying Module Objects for Operations ........................................................... 335
Setting Persistent Populate Filters ....................................................................... 338
Populating Your Work Area .................................................................................. 340
Procedure for Creating a Module Cache Link ...................................................... 355
Displaying Module Information ................................................................................ 356
Module Toolbar .................................................................................................... 356
Controlling the Display of Module Information ...................................................... 358
Displaying Module Status ..................................................................................... 359
Displaying Contents of Vault Data ........................................................................ 363
Identifying Modified Objects ................................................................................. 366
Displaying Version History ................................................................................... 367
vi

Table of Contents
Displaying Module Hierarchy ............................................................................... 372
Displaying a Module Cache ................................................................................. 376
Compare the Contents of Two Areas ................................................................... 377
Creating Module Data and Hierarchy ....................................................................... 383
Creating a Module ................................................................................................ 383
Creating a New Version of a Module .................................................................... 385
Auto-Merging........................................................................................................ 385
Adding a Member to a Module ............................................................................. 389
Removing a Member from a Module .................................................................... 391
Moving a module member .................................................................................... 393
Using the Moving Modules Members dialog box .................................................. 396
Creating a Hierarchical Reference ....................................................................... 398
Deleting a Hierarchical Reference ........................................................................ 401
Module-Specific Operations ..................................................................................... 402
Conflict Handling .................................................................................................. 402
Module Version Updating ..................................................................................... 403
Using a Module Cache ......................................................................................... 404
Deleting a Module Cache Link ............................................................................. 405
Locking Module Data ........................................................................................... 406
Merging Module Data ........................................................................................... 407
Overlaying Module Data ....................................................................................... 412
Deleting a Module ................................................................................................ 415
Rolling Back a Module ......................................................................................... 417
vii

DesignSync Data Manager User's Guide
Animated Use Cases ............................................................................................... 419
Creating Modules and Module Data ..................................................................... 419
Updating Module Hierarchy .................................................................................. 426
Operating with Module Data ................................................................................. 431
Merging and Modules ........................................................................................... 442
Step-by-Step Use Cases ......................................................................................... 450
Creating Modules and Module Data ..................................................................... 450
Updating Module Hierarchy .................................................................................. 497
Operating with Module Data ................................................................................. 529
Merging and Modules ........................................................................................... 606
Considerations for Projects ......................................................................................... 647
Improving Efficiency Using Caches and Mirrors ...................................................... 647
Mirrors Versus LAN Caches ................................................................................. 647
What is a LAN Cache? ......................................................................................... 647
Why Use a LAN Cache? ...................................................................................... 648
What is a Module Cache? .................................................................................... 649
Mirroring Overview ............................................................................................... 650
Locking, Branching, and Merging ............................................................................ 652
What Is Merging? ................................................................................................. 652
Locking and Merging Work Styles ........................................................................ 653
Selecting Versions and Branches ........................................................................ 656
Parallel (Multi-Branch) Development .................................................................... 673
Working with Legacy Modules ................................................................................. 693
viii

Table of Contents
How DesignSync 5.0 Handles Legacy Modules ................................................... 693
Upgrading Legacy Modules ................................................................................. 695
Upgrading DesignSync Vaults.............................................................................. 701
Managing Legacy Configurations and REFERENCEs ......................................... 705
Diagnostics and Troubleshooting ................................................................................ 719
Troubleshooting the DesignSync Client ................................................................... 719
The DesignSync Environment .............................................................................. 719
About DesignSync Client Log Files ...................................................................... 719
Running a DesignSync Client in Debug Mode ..................................................... 721
Starting a New Browser Process Each Time Help Is Invoked .............................. 723
Troubleshooting nsremote Issues ........................................................................ 724
Interrupt Button Does Not Seem to Work ............................................................. 724
Troubleshooting Metadata Errors ......................................................................... 724
Tagging Does Not Warn of Removed Objects ..................................................... 726
Files Missing from the Cache ............................................................................... 727
Error Accessing or Storing to Database ............................................................... 728
Performance Issues with DesignSync GUI Client ................................................ 728
Troubleshooting Communication Errors .................................................................. 729
Proxy Errors ......................................................................................................... 729
Controlling Network Communication Timeouts .................................................... 729
Troubleshooting a SyncServer ................................................................................ 730
About SyncServer Log Files ................................................................................. 730
Running a SyncServer in Debug Mode ................................................................ 733
ix
DesignSync Data Manager User's Guide
Troubleshooting Email Notification of RevisionControl Notes .............................. 735
Troubleshooting the Mirror System .......................................................................... 736
First Steps for Troubleshooting the Mirror System ............................................... 736
Mirror Log Files .................................................................................................... 737
Resetting the Mirror Daemons ............................................................................. 740
Detecting Absent Files in the Mirror ..................................................................... 740
Diagnostic Utilities ................................................................................................... 740
Overview of syncdiag Utility ................................................................................. 740
Running a DesignSync Client in Debug Mode ..................................................... 743
Running a SyncServer in Debug Mode ................................................................ 744
Diagnosing Performance ...................................................................................... 747
EDA Vendor Design Object Support ........................................................................... 753
Collections ............................................................................................................... 753
Collections Overview ............................................................................................ 753
Displaying Collections .......................................................................................... 753
Cadence Collections ................................................................................................ 755
Cadence Design Objects Overview ...................................................................... 755
Enabling Cadence Object Recognition ................................................................. 756
How DesignSync Recognizes Cadence Data ...................................................... 757
How DesignSync Manages Cadence Objects ...................................................... 758
Managing Non-Collection Objects ........................................................................ 759
Synopsys Milkyway Collections ............................................................................... 760
Synopsys Milkyway Collections Overview ............................................................ 760
x
Table of Contents
Custom Type Package Collections .......................................................................... 761
Custom Type Package Collections Overview ...................................................... 761
How DesignSync Recognizes CTP Data ............................................................. 762
Integration with MatrixOne Program Central ............................................................... 765
Using the ENOVIA Semiconductor Accelerator for Enterprise Project Management................................................................................................................................. 765
Using the ENOVIA Semiconductor Accelerator for Design to Manufacture ............. 767
Using DesignSync Central ....................................................................................... 768
Using the ENOVIA Semiconductor Accelerator for IP Management ........................ 768
Troubleshooting the ENOVIA Semiconductor Accelerators ..................................... 769
Enterprise Performance Management ................................................................. 769
Getting Assistance ...................................................................................................... 773
Using Help ............................................................................................................... 773
Getting a Printable Version of Help.......................................................................... 774
Accessing Product Documentation .......................................................................... 775
Contacting ENOVIA ................................................................................................. 775
DesignSync Glossary .................................................................................................. 777
A ........................................................................................................................... 777
B ........................................................................................................................... 778
C .......................................................................................................................... 779
D .......................................................................................................................... 782
E ........................................................................................................................... 784
F ........................................................................................................................... 785
G .......................................................................................................................... 786
xi

DesignSync Data Manager User's Guide
xii
H .......................................................................................................................... 786
I ............................................................................................................................ 787
J ........................................................................................................................... 788
K ........................................................................................................................... 788
L ........................................................................................................................... 788
M .......................................................................................................................... 791
N .......................................................................................................................... 794
O .......................................................................................................................... 794
P ........................................................................................................................... 795
Q .......................................................................................................................... 797
R .......................................................................................................................... 797
S ........................................................................................................................... 801
T ........................................................................................................................... 804
U .......................................................................................................................... 805 U
V ........................................................................................................................... 806
W .......................................................................................................................... 807
X ........................................................................................................................... 808
Y ........................................................................................................................... 808
Z ........................................................................................................................... 808
Index ........................................................................................................................... 809

Release Information Release-specific information is located in the <SYNC_DIR>/share/content/doc directory in the DesignSync installation hierarchy. The documents listed in the following table are available.
Click on the file name below to go directly to the document.
Release Notes README-ENOVIASynchronicityDesignSyncDataManager-V6R2009x.html
The Release Notes summarize new features, fixed defects, known product limitations, suggested workarounds, and other information about the current release of the ENOVIA Synchronicity DesignSync Data Manager software.
ENOVIA Synchronicity DesignSync Data Manager documentation main menu index.html
The documentation main menu provides links to all release and product documentation.
A PDF version of this help system is available for printing in:
<SYNC_DIR>/share/content/doc/pdf/ENOVIASynchronicityDesignSyncDataManager-DesignSyncUser-V6R2009x.pdf
If you have Adobe Acrobat Reader 8 or above installed, you can click on the hyperlinked path above to view the PDF version of this documentation. This file may not display or print correctly with earlier versions of Adobe Acrobat Reader.
The PDF document includes a table of contents and an index and should meet most of your needs for printed documentation. However, this material is optimized for online use.
1

Using DesignSync
Introduction to DesignSync
Getting Started with DesignSync
This topic provides instructions to help you set up a work area and get started using ENOVIA Synchronicity DesignSync® Data Manager to manage your design data.
In the following scenario, assume that your project lead has checked in data for the project you are working on, creating vaults on a SyncServer. Your project lead provides you with the DesignSync URL for the project's vault data or the name of the project on the SyncServer. Your first step is to set up a work area for the project.
Setting Up Your Work Area
You can set up a work area using any of these four methods:
Method 1: Use the DesignSync GUI to manually set up your work area.
1. Using the DesignSync GUI, specify the vault location to associate with your workspace.
2. If your project lead provided a mirror directory path for the project, use the setmirror command to associate your workspace with the mirror directory. Use the Command Shell Window to run commands in the GUI.
3. Fetch data from the vault. Your project lead will have set a default object state, with that value pre-selected in the Populate dialog box. For example, if the project has an associated mirror directory, the default setting in the Populate dialog box will be to populate your workspace with "Links to mirror".
Method 2: Use a DesignSync shell to manually set up your work area.
1. Using a DesignSync Shell, use the setvault command to associate your workspace with the vault location.
2. If your project lead provided a mirror directory path for the project, use the setmirror command to associate your workspace with the mirror directory.
3. Use the populate command to fetch data from the vault. Your project lead will have set a default object state. For example, if the project has an associated mirror directory, populate will create symbolic links from your workspace to files in the mirror, as if the -mirror option had been specified on the populate command line.
Method 3: Use the Workspace Wizard to set up your work area.
1. Invoke the Workspace Wizard.
3

DesignSync Data Manager User's Guide
2. From the Workspace Wizard, you can select, or browse to, the project to join. Or you can manually type in its DesignSync URL, in the Wizard page from which you specify a project vault.
3. In a subsequent Wizard page you will specify a workspace. 4. Your project lead will have set a default object state for the kind of data to fetch,
with that value pre-selected in the Wizard page from which you specify an object state. For example, if the project has an associated mirror directory, the default setting will be to populate your workspace with "Links to mirror".
5. If "Links to mirror" will be populated, the next Wizard page prompts you to specify the mirror directory. When you finish setting up with the Wizard, DesignSync populates your workspace with data from the vault.
Method 4: Set up your work area by joining a project.
1. Select a project. 2. Right-click on the selected project to display a context menu. Select the
Workspace Wizard menu item. The Workspace Wizard launches, positioned to the Wizard page in which you specify a workspace. You will not be prompted to specify the DesignSync URL of the project. That information is already known, from your having invoked the Wizard from the project you are joining.
3. Your project lead will have set a default object state for the kind of data to fetch, with that value pre-selected in the Wizard page from which you specify an object state. For example, if the project has an associated mirror directory, the default setting will be to populate your workspace with "Links to mirror".
4. If "Links to mirror" will be populated, the next Wizard page prompts you to specify the mirror directory. When you finish setting up with the Wizard, DesignSync populates your workspace with data from the vault.
You now have project data in your workspace. You might want to add a bookmark, to easily revisit this workspace. You should populate your workspace periodically, to update your workspace with the project's current data.
Modifying Data
If your team is using the lock model, before modifying a file, you can check out the file with a lock. Checking out with a lock fetches a local, writable copy of the file and prevents anyone else from checking in their modifications to the file. You can check out files using the GUI's Checkout dialog box, or using the co command. You perform a Checkout based on the files that you already have in your workspace. To see what files have been added to the project since you last populated your workspace, you can Show Potential Checkouts using the GUI.
Double-click on a file to open it in your default editor. After you have edited some files, you can identify modified files in your workspace by running the GUI's Modified Objects report. From the report's results, you can select objects on which to operate. Right-click on a file in the report listing to display a context menu. You can show your local modifications to the file, or compare your locally modified file to the Latest version.
4

Using DesignSync
If you decide not to modify a file, you can cancel your checkout either by using the GUI's Cancel Checkouts dialog box, or by using the cancel command. You can also discard your local modifications by fetching a new copy of the file into your workspace, as part of the cancel operation.
When you are ready to check in your changes to the project vault, use the GUI's Check In dialog box, or the ci command to create a new version of each file that you modified. The check-in operation also releases the locks on those files that you previously obtained when you checked out the files.
Staying Informed of Project Changes
To see the revision control history of a managed object, you can view its Data Sheet or show its Version History.
To receive e-mail notification of design changes to the project resulting from DesignSync operations or notification of bugs entered against the project, subscribe for e-mail notification of activity against the project.
What is Revision Control?
Revision control is the ability to freeze the state of an object, such as a file, at various stages in its development. Each time a file is frozen, a new and distinct version of the file is created. The existence of the version lets you continue to change the file with the full confidence that if you make an error, you can always revert to the previous version. It is also possible to compare the current state of the file to an earlier state, and maintain a log of what changed with each version. You can also merge changes when more than one person makes changes to the same design object.
You create a version with the checkin operation and DesignSync stores the version in a vault. Once in the vault, any person who has access to that vault can retrieve the version. When using the locking model, only one person at a time should be "officially" changing the data. When you want to retrieve an object in order to change it, you can perform a checkout operation with a lock; this gives you an exclusive lock on that object. An alternative model, called the non-locking or merge model, does not require a lock on checkout; this checkout is often referred to as a fetch operation. When you complete your changes, you check the object back in, creating another new version of the data.
At any point in time it might be useful to take a specific version and create a branchemanating from it. The branch can then have a sequence of versions checked into and out of it, creating another thread of development for the stored object. A version that is the root of a new branch is referred to as a branch point version. As an example, consider a Verilog file that is part of an ASIC design. The ASIC is in verification and a new revision of the ASIC is in the works. During verification, the team finds it needs to modify the Verilog file for the original ASIC but not for the new revision of the ASIC; the team branches the Verilog file. The team makes the changes associated with the first
5

DesignSync Data Manager User's Guide
ASIC on the branch, while the new work occurs on the original thread of development. The concept of "one person at a time" editing really means "one person at a time, per branch".
Related Topics
Vaults, Versions, and Branches
Viewing the Contents of a Vault
Object Types
Object States
Specifying the Vault Location
Checking in Design Files
Checking out Design Files
Undoing a Check Out
Populating Your Work Area
Tagging Versions and Branches
Retiring Branches
Deleting Files or Versions from a Design Project
Parallel (Multi-Branch) Development
DesignSync Architecture
DesignSync is a client/server groupware application similar in architecture to WWW browsers and the servers with which they communicate. DesignSync servers, known as SyncServers, manage shared information, control access to design files, and perform administrative functions such as user authentication and user privilege validation. For installations where many or all of the users are on the same LAN with a cross-mounted file system, it may be possible to increase performance through the use of a LAN cache. Also, DesignSync mirrors provide another mechanism for sharing files.
6

Using DesignSync
Like WWW servers and browsers, a DesignSync client can communicate with any number of SyncServers, anywhere on a LAN, WAN, or the Internet.
When you request a revision-control operation, the request is passed to the server, where the operation takes place. Once requested, server operations will complete, even when the connection between the client and the server is disconnected before the server has sent confirmation to the client.
While most of the information about a revision-controlled project is stored on the SyncServer, some data is local to the client. This client-side metadata is stored in .SYNC folders that reside in the parent folder of any local DesignSync-associated object.
CAUTION: DesignSync manages these .SYNC metadata folders; do not directly manipulate these folders or their contents.
Related Topics
What Is a SyncServer?
What is a LAN Cache?
Metadata Overview
DesignSync Data Manager Administrator's Guide: Mirroring Overview
DesignSync Data Manager Administrator's Guide: Access Control Overview
7

DesignSync Data Manager User's Guide
Object States
You can populate or check out design files into you local workspace in one of five states: locked, unlocked, reference, locked reference, link to the cache, or link to the mirror. You can have any mix of states in the same folder. What state or states you want your files in depends on your design methodology.
State Description Locked A locked object is the original object. When you create a new
object, such as a file, the object also is the original.
When you check out a file with lock, your work area contains the specified version of the original file.
Unlocked An unlocked object is a replica of another object. Replication is different from the normal copying process. A "copy," in the usual sense, is an independent object; it is not associated with the object from which it was copied. An unlocked copy, on the other hand, retains an association with the original from which it was copied.
When you check out a file without lock, your work area contains a replica of the file.
Reference A reference is an object that is not physically present, but instead points to another object. Although no physical files correspond to a reference, DesignSync metadata keeps track of the revision-control information for the reference. Just as with unlocked copies, the object that the reference points to is the original.
When you check an object into the vault and choose to retain a reference in your work area, DesignSync metadata maintains a connection between your working area and the object in the vault.
You also can create a locked reference to ensure that the referenced object cannot be updated by another user.
Link (UNIX only)
A link is a symbolic link to another object. Links are useful when you want to easily access a file without having a copy in your work area - for example, when the file is very large. Links are available only on UNIX systems.
You can have links to a shared cache or to a mirror directory.
Note: The link icon is used for any symbolic link in your work area, whether the link is a DesignSync-created link to the cache or mirror or a link to a file or folder that DesignSync did not create. Use the Type field in the List View to determine the revision-control state of
8

Using DesignSync
a symbolic link.
Your project leader can specify the state objects in your work area should be in when they are not being edited (the fetch state). See the SyncAdmin Help: Default Fetch State for more information.
Saving the Setting of an Object's State
You can have DesignSync save the object state settings you specify. During a checkin, checkout, or populate operation, take these steps:
1. In the Check In, Check Out, or Populate dialog box, specify the object state you want.
2. Click Save Settings.
Then each time you bring up that dialog box, DesignSync displays the object state as selected. This is the default behavior, even when default fetch state has been defined.
You can also set a default fetch state, which will apply to both command line operations and the DesignSync GUI. For details, see SyncAdmin Help: Default Fetch State.
Related Topics
DesignSync Data Manager Administrator's Guide: How DesignSync Handles Symbolic Links
SyncAdmin Help: Default Fetch State
Object Types
The term object most often refers to file system objects such as files or folders (directories). The term object can also be used in a more general sense - for example, to refer to any object identifiable by an Internet Uniform Resource Locator (URL).
The following types of objects are commonly used in DesignSync:
Object Type Description Branch A thread of development that emanated from a version. The
branch itself typically contains versions. Branch point version
A version which is the root of a branch from which other versions emanate.
Category Provides a means of organizing modules. Specify a virtual path category to group related modules. For example, if you work with two different types of projects, Chip design and CPU design, you
9

DesignSync Data Manager User's Guide
can create two categories /Chip and /CPU to store the different modules for each type of project. These paths do not map to actual paths on the server.
Collection A group of files treated by DesignSync as a single versionable object.
File File system file. Folder File system directory. Hierarchical Reference
A reference, or connection, from an upper-level module to any of the following object types: a submodule, branch or version, a legacy submodule configuration, a DesignSync vault, or an IP Gear deliverable.
IP Gear deliverable
A package of data that has been uploaded and associated with an IP Gear Catalog Component.
Module A collection of managed objects that together make up a single entity.
Module Cache A shared copy of a module. Module Cache Link
A symbolic link that points to the base directory of the module in the module cache.
Vault Contains files you have checked in and their versions; also contains branches. Vault is also used to mean the default vault associated with a folder (directory).
Version An immutable snapshot of a file at a particular point in time.
Context Menu
The Context menu pops up when you right-click on an object in the DesignSync View Pane. You can use the selections on this menu to perform most of the common revision-control operations.
Clicking Edit opens the selected file using your default editor or to open the selected project so you can view or edit its properties. If you make changes using the default ASCII editor, local modifications are recognized automatically.
Note: If you are using the DesignSync Windows client and you use any application other than the default ASCII editor, DesignSync will not automatically recognize local modifications.
View as Text displays the contents of the file as text using your default editor. You can change the default ASCII editor using the SyncAdmin tool.
URL Syntax
10
Using DesignSync
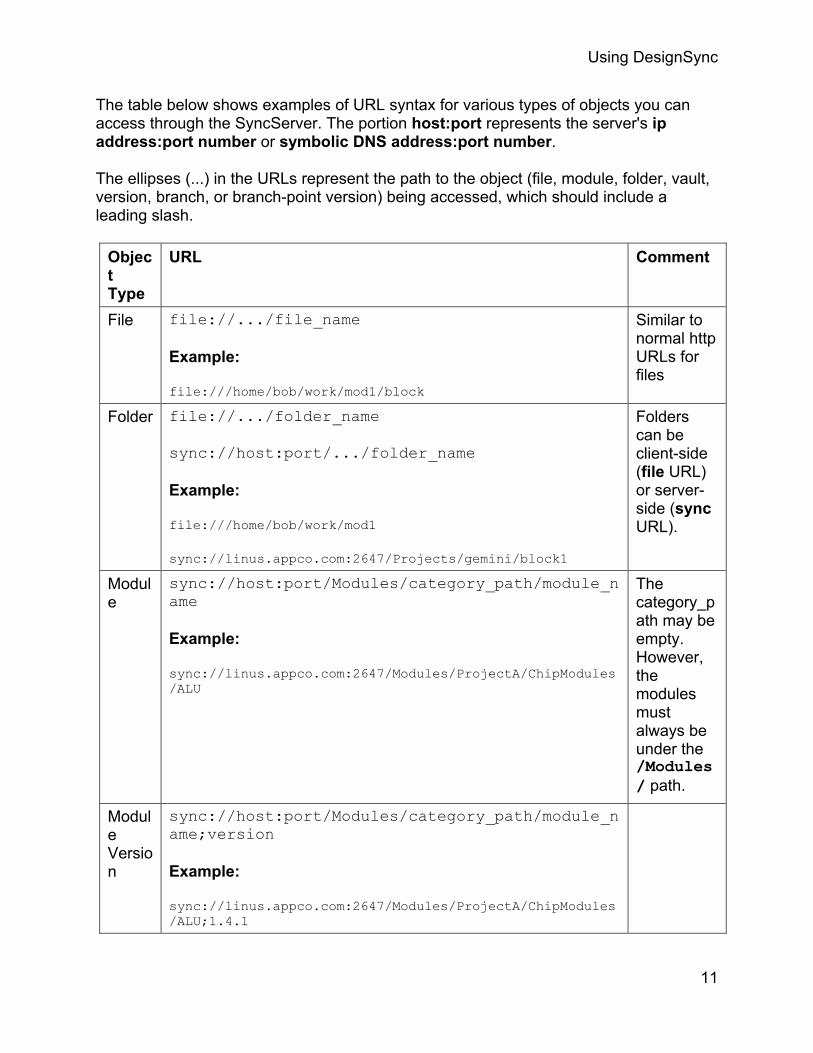
The table below shows examples of URL syntax for various types of objects you can access through the SyncServer. The portion host:port represents the server's ip address:port number or symbolic DNS address:port number.
The ellipses (...) in the URLs represent the path to the object (file, module, folder, vault, version, branch, or branch-point version) being accessed, which should include a leading slash.
Object Type
URL Comment
File file://.../file_name
Example:
file:///home/bob/work/mod1/block
Similar to normal http URLs for files
Folder file://.../folder_name
sync://host:port/.../folder_name
Example:
file:///home/bob/work/mod1
sync://linus.appco.com:2647/Projects/gemini/block1
Folders can be client-side (file URL) or server-side (sync URL).
Module
sync://host:port/Modules/category_path/module_name
Example:
sync://linus.appco.com:2647/Modules/ProjectA/ChipModules/ALU
The category_path may be empty. However, the modules must always be under the /Modules/ path.
Module Version
sync://host:port/Modules/category_path/module_name;version
Example:
sync://linus.appco.com:2647/Modules/ProjectA/ChipModules/ALU;1.4.1
11

DesignSync Data Manager User's Guide
Version
sync://host:port/.../vault_name;1.1
Example::
sync://linus.appco.com:2647/Projects/gemini/block1/top.v;1.3
Version URL is formed by appending the Version name to the Vault URL
Branch-Point Version
sync://host:port/.../vault_name;1.1
Example:
sync://linus.appco.com:2647/Projects/gemini/block1/top.v;1.3
Same as Version (just happens to be a version from which a branch emanates)
Branch
sync://host:port/.../vault_name;1.1.1
Example:
sync://linus.appco.com:2647/Projects/gemini/block1/top.v;1.3.1
Branch URL is formed by appending the Branch name to the Vault URL
Reserved Characters
Module and category names may only contain printable characters and cannot contain a space, or any of the following symbols:
~ ! @ # $ % ^ & * ( ) , ; : | ` ' " = [ ] / \ < >
Because these symbols are used for specific purposes in URLs and datasheets, and are illegal for modules, you should avoid using them in other DesignSync elements as well to minimize confusion.
Reserved File Extensions
Do not use the following strings in your URL names, as either files or directory components:
.sgc
.sync
12

Using DesignSync
These strings are reserved for use by DesignSync's Custom Type System. See the DesignSync Custom Type System Programmer's Guide: Custom Type System for more information.
Vaults, Versions, and Branches
A vault is an object that holds versions of other objects, such as files. For example, if you create a new file and check it in, the checked in file would be identified as version 1.1 in the vault. If you check out 1.1, make changes to it, and check it back in, you create version 1.2. If you check out 1.2, make changes to it, and check it back in, you create version 1.3, and so on. Vault names always end in a semicolon ( ; ), for example: top.v; is the vault for top.v.
A vault also holds any branches that may be derived from versions of a file, as well as the versions on those branches. Branches allow for parallel development, where multiple design activities on the same design files take place simultaneously.
Folders (directories) are not revision controlled and therefore are not stored in a vault. However, a folder has a default vault associated with it that specifies the vault used, by default, for files within the folder. Using this principle, people often refer to the vault associated with the top-level folder of a revision-controlled project as "The Vault Folder", or simply "The Vault" for the project.
Branches and vaults have owners associated with them. Ownership is important for controlling access to design objects through operating-system protections and DesignSync access controls. For example, the ability to delete a vault can be access-controlled based on the owner of the vault. The owner of a vault is defined as the owner of the design object's main branch. By default, the owner of a branch is the creator of the initial version of the branch unless a different owner has been specified with the setowner command. See the ENOVIA Synchronicity Command Reference: setowner command for more details.
Related Topics
Viewing the Contents of a Vault
DesignSync Data Manager Administrator's Guide: Access Control Overview
Parallel (Multi-Branch) Development
Command Line Defaults System
The command line defaults system only pertains to the command line interface. Underlying commands that are automatically invoked by the DesignSync GUI's dialog boxes, reports, etc., do not use the command line defaults system. The Save Settings
13

DesignSync Data Manager User's Guide
button in DesignSync GUI dialog boxes does not interact with the command line defaults system.
The DesignSync GUI's Command Shell Window, into which a user types commands, does use the command line defaults system. For an overview of the command line defaults system, see the ENOVIA Synchronicity Command Reference Help: command defaults command line topic.
Related Topic
Command Shell Window
Configuring DesignSync
The DesignSync Administrator (SyncAdmin) tool is a graphical user interface that lets users easily configure the DesignSync client for individual use. See the ENOVIA Synchronicity Administrator (SyncAdmin) Help for more information on the SyncAdmin tool. The SyncAdmin tool is part of the DesignSync software distribution and is available on both UNIX and Windows platforms.
To start SyncAdmin on Windows:
Start =>Programs =>ENOVIA Synchronicity DesignSync V6R2009x => SyncAdmin
To start SyncAdmin on UNIX:
% SyncAdmin
SyncAdmin maintains your user preferences in a registry file.
Note: In order for changes made to your user registry file to take effect, you must restart your DesignSync client (exit and restart your DesSync, dssc, or stclc session, or if you are using dss or stcl, use the syncdadmin command to restart syncd). An alternative to restarting the DesignSync client is to use the sregistry reset command to re-read the registry files.
The DesignSync GUI's Tools =>Options menu invokes SyncAdmin, which you can use to set additional preferences pertaining to the DesignSync GUI.
You can also use environment variables to configure your DesignSync environment.
Related Topics
Command Line Defaults System
14

Using DesignSync
DesignSync Data Manager Administrator's Guide: Using Environment Variables
ENOVIA Synchronicity Command Reference Help: syncdadmin command
ENOVIA Synchronicity Command Reference Help: sregistry reset
Understanding Your DesignSync Work Area
Using a Mirror
A mirror exactly mimics the data set defined for your project vault. Mirrors provide an easy way for multiple users to point to the file versions that comprise their project's data. The file versions in the mirror belong to the configuration defined by the project lead.
Examples
• The configuration might be the Latest version of files on the main Trunk branch. A mirror for a development branch might be defined to always contain the file versions on that branch with a specific tag. When the file versions comprising the configuration change, the mirror directory automatically updates with the new version.
• If Latest versions are being mirrored and a new version of a file is checked into the vault, the mirror directory updates with this new version. Without mirroring, users need to frequently update their work areas using the populate command to reflect the project's current data set.
Mirror directories can be treated in the same way as your DesignSync work areas. For example, you can use commands such as the url or ls commands on mirror directories.
Setting Up Your Workspace
Your team leader will have set up a mirror directory for your project. Use the setmirror command to associate your workspace with the project's mirror directory. The setmirror command does not have a GUI equivalent. See ENOVIA Synchronicity Command Reference: setmirror help for more information on this command.
Note: you cannot link to a module mirror from a workspace.
All of the workspace's subdirectories automatically inherit the mirror location set for the top level of the workspace. You cannot set a different mirror on a subdirectory from that of its the parent directory.
To determine if your current work area directory is associated with a mirror, use the url mirror command. See the ENOVIA Synchronicity Command Reference: url mirror help for more information on this command.
15

DesignSync Data Manager User's Guide
Note: To resolve the mirror location, DesignSync does not search above the root of a workspace where a setvault has been applied.
So if a setvault has been applied to a folder (/Projects/ASIC/alu) and you apply the setmirror command at a higher-level folder (for example, /Projects/ASIC), the setmirror command is ignored at and below the folder where the setvault occurred (/Projects/ASIC/alu). See ENOVIA Synchronicity Command Reference: setvault help for more information on this command.
Normally, the path to a mirror is stored exactly as specified by the setmirror command. If your mirror directory is set to an auto-mounted directory, you can set a registry key for DesignSync to resolve the path instead.
See DesignSync System Administration Help: DesignSync Client Commands Registry Settings for more information.
Changing the Mirror Directory Associated with Your Workspace
If the mirror directory for your project changes, run the setmirror command from the same directory in which the original setmirror command was run. This command updates the workspace's mirror association, which is inherited by lower level directories.
To correct existing workspace links to mirror files, run the populate command with these options:
populate -recursive -mirror -unifystate
This command corrects the links to point to the mirror directory's new location.
Disassociating Your Workspace from a Mirror Directory
If you no longer need to use a mirror directory, you can disassociate your work area directory from the mirror, by using the setmirror command.
Using the -mirror Option to Commands
Once you have associated your workspace with a mirror directory, use the -mirror option with populate, ci, co, and cancel commands (or select Keep a link to Latest (mirror) when performing these operations through the DesignSync GUI). You can also specify that -mirror be used by default, if your team leader did not set that for your project. For details, see Object States.
Note: You cannot use the populate -mirror command (or select Keep a link to Latest (mirror)) to populate a directory containing a module. In addition, the ci command ignores the -mirror option if you use it when checking in a module.
16

Using DesignSync
Having links to files in the mirror directory ensures that you are always referencing the most up-to-date configuration. However, if other mirror users add files to the mirror, they are not automatically exposed to your work area. Therefore, you should periodically populate your work area directory using the populate -mirror command.
Notes:
• When performing the populate -mirror operation, DesignSync creates links only if no file or link already exists in your work area directory; DesignSync does not change the state of existing files and links. To change the state of existing files and links when you populate your working directory, use the -force or -unifystate option (or select Overwrite local files if they exist or Unify workspace state in the DesignSync GUI), in addition to the -mirror option.
Caution: Using the -force option overwrites any locally modified files.
• You cannot use the populate -mirror command to populate a directory containing a module.
Related Topics
DesignSync System Administration Help: Mirroring Overview
DesignSync Data Manager Administrator's Guide: Mirrors Versus LAN Caches
ENOVIA Synchronicity Command Reference Help: setmirror
ENOVIA Synchronicity Command Reference Help: ci
ENOVIA Synchronicity Command Reference Help: populate
ENOVIA Synchronicity Command Reference Help: co
ENOVIA Synchronicity Command Reference Help cancel
Mirrors
Introduction to Data Replication
Members of a project team often need read-only access to the same data. DesignSync users on UNIX all have access to the same data, with that data maintained in a common area by DesignSync. If users each fetch local copies of the same data into their own work areas, your project team will require additional disk space per user and additional time for the data to be transferred from the server. Instead, your team can share common data in a cache or a mirror directory.
17

DesignSync Data Manager User's Guide
When users do need their own local copies of data, DesignSync attempts to copy the requested file version from a LAN cache or a mirror directory. If the requested file version does not exist in a LAN cache or a mirror directory, DesignSync fetches the data from the server.
For module data, UNIX users can link to modules in a module cache. Similar to DesignSync caches, linking to files across the LAN instead of transferring data from the server optimizes performance. Using UNIX links also save disk space. Symbolic links are not supported on Windows.
Legacy modules can be linked to, or copied from, a module cache.
Related topics
Using a Module Cache
DesignSync System Administration Help: Mirrors Versus Caches
DesignSync System Administration Help:Fetching Files from the Mirror or Cache
DesignSync System Administration Help:Setting up a Module Cache
Mirroring Overview
A mirror exactly mimics the data set defined for your project vault. Mirrors provide an easy way for multiple users to point to the file versions that comprise their project's data. The file versions in the mirror belong to the configuration defined by the project lead. For example, the configuration could be the Latest version of files on the main Trunk branch. A mirror for a development branch may be defined to always contain the file versions on that branch with a specific tag. When the file versions comprising the configuration change, for example, if Latest versions are being mirrored and a new version of a file is checked into the vault, the mirror directory is automatically updated with the new version. Without mirroring, users would need to frequently update their work areas using the populate command to reflect the project's current data set. You can find where vault data is being mirrored, and the status of those mirrors. (See the Related Topics below.)
The setmirror command associates a workspace with a mirror directory. A mirror will always have accurate metadata because any action that writes to a mirror directory updates the local metadata in the mirror directory. When you use the setmirror command to associate a mirror directory, checking in an object will:
• create the new version in the vault, • update the file in the associated mirror associated, and then • update the metadata.
18
Using DesignSync
Mirror can be updated and administered automatically. See the section Administering Mirrors for details. As of Version 4.2, the legacy Remote Mirror Assurance package is no longer supported.
Mirror Attributes
• All actions that write to a mirror directory will update the local metadata in the mirror directory. When looking at a workspace that has objects in the mirror state, a combination of the workspace’s and the mirror directory’s local metadata will be used to determine the correct version of the objects. This allows you to use the ls or url command on objects in the workspace to show the correct state of the object.
• Mirrors support all defined configurations. • When a check-in occurs from a client, it creates a new version in the vault,
returns control back to the client, and the client writes the object into the mirror and updates the local metadata in the mirror directory.
• A mirror write through will occur for all fetch states. Regardless of the fetch state, if a mirror write through is done, then the metadata is updated to reflect what was written to the mirror directory.
• No other commands, with or without the -mirror option, write through to the mirror. Commands like populate -mirror and cancel -mirror do not write to the mirror directory. However, the co -mirror command writes through to the mirror directory if the correct up-to-date version is not already in the mirror. Most commands only create links from a workspace to the files in the mirror directory.
As a DesignSync administrator, you can:
• Set up a mirror directory and navigate through this mirror knowing that everything is being kept up-to-date.
• Set up your environment (from that LAN where the check-ins occur) to write through to your mirror when checking a new version into the server. You do not have to wait for the mirror update process to update the mirror.
Restrictions
• Because mirroring is implemented with UNIX links, mirrors are not supported on Windows platforms.
• The mirror directory and the users accessing it must be on the same LAN. • Only one process can write to the mirror subdirectory at a time. The system
ensures that when you check in a new version, there will be a lock on the mirror subdirectory. The lock is held for the duration of the client check-in from the workspace subdirectory. The system will display a "waiting on metadata lock" message while the system processes the workspace. This may cause a delay if someone is checking in a large amount of objects or large files.
19

DesignSync Data Manager User's Guide
• Mirrors for modules cannot be linked to from a workspace. A module cache should be used instead.
Related Topics
General Mirror Topics:
Mirrors Versus Caches
Using a Mirror
ENOVIA Synchronicity Command Reference: mirror wheremirrored
Mirror Administration Topics:
Administering Mirrors
Finding Mirrored Data
Architecture of the Mirror System
The flow diagram below shows how mirror directories are automatically updated, reacting to a change in the vault being mirrored. Descriptions of the steps follow.
20

Using DesignSync
1. A DesignSync client operation, from any site, is issued that will modify the vault data being mirrored. For example, a ci command is run, of a locally modified managed object.
2. A new file version is created in the Repository Server's vault. 3. The Repository Server updates its transaction log with the new version
information, recording the change in vault content as vault log entries.
21

DesignSync Data Manager User's Guide
4. The Mirror Push Daemon on the Repository Server reads the transaction log via the Tcl interface, for the "change set".
5. The Mirror Push Daemon pushes the change set via rstcl to each Mirror Administration Server. Only the changes relevant to the mirrors being managed by a particular Mirror Administration Server are pushed to that Mirror Administration Server.
6. The Mirror Administration Server writes the changes to its transaction log as mirror log entries, and then returns control back to the Mirror Push Daemon. From the successful return of the Mirror Administration Server, the Mirror Push Daemon knows that the Mirror Administration Server has received the changes.
7. The Mirror Administration Daemon reads the change set from the mirror's transaction log via the Tcl interface.
8. The Mirror Administration Daemon spawns a Mirror Update Process for each affected mirror that needs to be updated.
9. The mirror directories are updated. When mirroring a non-legacy module, a populate will always be performed, regardless of the DesignSync client command used to modify the module. When mirroring a legacy module or a DesignSync vault, if the originating DesignSync client command was a ci, then each Mirror Update Process performs a co to fetch the new versions that belong in the mirror. If the originating DesignSync client command was some other operation (such as tag, mvfolder, retire, etc.) then each Mirror Update Process performs a populate, to update the mirror. populate is also run by each Mirror Update process if the originating DesignSync client command was a ci that produced new versions of many files. For more information, see the DesignSync Data Manager Administrator's Guide: Registry Settings for a Mirror Administration Server for more information.
Administering Mirrors
The 4.1 release of Developer Suite introduced a new method for managing mirrors. All of your mirror servers must be running version 4.1 or later to take advantage of this new mirror functionality. This requirement also applies to servers accessed by DesignSync references or HCM hrefs. If you are setting up mirrors on a pre-4.1 Developer Suite installation, refer to documentation from that release.
You can set up the following types of DesignSync mirrors:
• Standard mirror – Fetches design objects directly from the repository server.
• Primary mirror – Fetches design objects directly from the repository server and serves them to secondary mirrors. A primary mirror must be on a UNIX host that supports hard links. This is not supported for non-legacy modules.
• Secondary mirror – Fetches design objects from a primary mirror instead of directly from the repository server. This is not supported for non-legacy modules. Secondary mirrors help reduce network traffic at the repository server. A secondary mirror communicates with the Repository Server to determine what
22

Using DesignSync
objects need to be updated in the mirror. The secondary mirror fetches the updated contents from the primary mirror instead of from the Repository Server.
Mirrors are managed by a SyncServer. You can use ProjectSync to create and administer two types of DesignSync mirror servers:
• Mirror Administration Server (MAS) –- The SyncServer at a mirror site that manages the mirrors. When objects change in a repository associated with an MAS, the MAS is notified and then updates its affected mirrors. You can create mirrors only on servers with an MAS.
• Repository Server (RS) –- The SyncServer that manages a repository (vault) that is mirrored at one or more mirror sites.
You use the ProjectSync GUI to set up Repository Servers and Mirror Administration Servers and to create and edit mirrors. See ProjectSync Help: Mirror Overview for details on how to set up your mirror servers and your mirrors.
You also can use the mirror commands to work with mirrors. See the mirror command descriptions in the ENOVIA Synchronicity Command Reference for details.
Note: As of Version 4.2, Remote Mirror Assurance package and local mirrors are no longer supported.
Related Topics
Mirroring Overview
Using a Mirror
Using a Module Cache
DesignSync System Administration Help: Administering Mirrors
DesignSync System Administration Help: Mirrors Versus Caches
DesignSync System Administration Help:Fetching Files from the Mirror or Cache
DesignSync System Administration Help:Setting up a Module Cache
ProjectSync Help: Mirror Overview
ProjectSync Help: Setting Up a Mirror Server
Metadata Overview
23

DesignSync Data Manager User's Guide
When you place objects under revision control, DesignSync manages the objects both in the vault (typically on a server) and in your local (client) work area. Information about the objects that DesignSync manages is called metadata. DesignSync maintains both server-side and local metadata. You view the metadata indirectly using the DesignSync graphical interface or DesignSync shells.
Server-side metadata is accessible by all users who have access to the vault, and includes information such as:
• The branches and versions available for a module or an object • A branch's lock and retired status • A branch's tags • A version's tags and log (check-in/check-out comments)
Local metadata is accessible by you, and it may or may not be accessible to other users based on your preferred work style. Local metadata is designed to optimize the performance and disk utilization of common operations and includes information such as:
• The module instance name. • The state of an object in your local work area (reference, copy, locked copy, link
to cache or mirror) • The object's vault, branch, and version • The timestamp when you fetched the object • The persistent selector list • The version last merged with the object
Local metadata is stored in the workspace module root directory and in .SYNC directories on your local file system.
CAUTION: DesignSync manages these metadata directories; do not directly manipulate these directories or their contents.
Local metadata
DesignSync stores the metadata information in the workspace module directory. You must have write access to the module root directory.
Note: If your intent is not to share a work area, you should structure your local hierarchy so that multiple users are not required to write into the same module root directory.
If the workspace is shared, DesignSync clients on UNIX platforms must have their UNIX umask set so that the module root directory is created with write access granted to others in the same UNIX group.
Notes:
24

Using DesignSync
• Problems you might experience reading or writing metadata (reported as errors by DesignSync) are typically due to protection or locking issues.
• If two users attempt to perform revision control operations in the same directory, DesignSync forces the second user to wait until the first is complete -- two users cannot modify the metadata at the same time. The second user can interrupt the operation if the wait is too long. For more information, see the ENOVIA Synchronicity Command Reference Help Interrupt (Control-c) section of the Command Reference.
Related Topics
Controlling Access to Your Local Work Area
Setting Up a Shared Workspace
Troubleshooting Metadata Errors
Controlling Access to Your Local Work Area
Depending on the sharing methodology employed on your project, you may or may not want other users to be able to browse or even modify DesignSync objects in your work area. Access is based on two factors:
• The ability of other users to obtain the proper metadata lock • Your operating system directory and file protections
For other users to browse objects in your work area, they must obtain a read lock on the associated metadata (.SYNC) directory. The ability to obtain a read or write lock on a file depends on the type of permissions set when the file is created. How DesignSync creates files depends on the operating system platform on which it runs:
• On the Windows platform, DesignSync creates files with open permissions. This level of permission lets anyone obtain metadata locks.
• On UNIX platforms, DesignSync creates files with permissions based on your umask. If users want to modify your work area, they must obtain a write lock, and therefore your umask must allow write access.
Once the proper lock is obtained, the directory- and file-level protections determine what access users have to objects in your local work area.
Related Topics
Metadata Overview
Setting Up a Shared Workspace
Setting Up a Shared Work Area
25

DesignSync Data Manager User's Guide
Note: Setting up a shared work area is a task that a UNIX system administrator performs.
To set up a shared work area you first must set up the team's UNIX environment for sharing by setting appropriate UNIX permissions.
DesignSync follows UNIX permissions such that:
• If User1 has UNIX permission to read User2's files, then User1 sees User2's managed objects as being under revision control.
• If User1 has UNIX write permissions for User2's files, then user1 can perform revision control operations on User2's managed objects.
You can set up a shared work area for either of the following situations:
• Individual users can still lock objects for revision control operations.
Shared work area can be set up such that locks are on an individual basis. In this model, individual users can lock objects for revision control operations. Also, only the UNIX owner of a file can checkout files with a lock (co -lock) to modify them and subsequently perform check in or cancel operations. The other team members who share the same work area have only read permissions and cannot perform any revision control operations mentioned above.
• Locks are shared; individuals can switch lock ownership.
Shared work area can be set up such that locks are shared and individuals can switch lock ownership. In this model,user1 can checked out a file with a lock (co -lock), user2 can edit the file, then switch the ownership of the lock to User2 and check in the object.
To set up a shared work area where locks can be applied on an individual basis:
As system administrator, take the following steps:
1. Set up the work area so that members of a team have write permission into the same work area.
For example, on the work area directory, use the UNIX change mode command (chmod -R 775). This command sets the permissions to let the owner and the group read, write, and execute files but denies write permission for others.
2. Set each team member's user mask by adding a umask entry to each member's .cshrc file.
26
Using DesignSync
For example, to each user's .cshrc file add umask 002. This setting specifies that files be created with read and write permission for the owner and group but turns off write permission for others.
To set up a shared work area where locks are shared:
As system or DesignSync administrator, take the following steps:
1. Start SyncAdmin and choose Change 'Site' settings. 2. Click the Client Triggers tab and create a client-side trigger. Define the trigger to:
• Fire when a team member performs a checkout command (co) • Fire when a lock is present on the object (isLock 1) • Fire after the object is checked out (postObject) • Run a script that changes the object's permissions from the default (644,
which is rw-r--r--) to 664 (rw-rw-r---)
When you enable the trigger, the next restart of a DesignSync client loads the trigger for the client. The trigger is then available to all users within the installation.
If User1 checks out an object with a lock, the trigger fires. The trigger runs the commands, which change the object's permissions. User2 then has UNIX permission to edit the object that User1 checked out.
3. Change the access control restriction on the switchlocker command to allow users access to the command.
The switchlocker command changes the current owner of a lock on an object. The default AccessControl files included with DesignSync deny access to this command for all users. However, as a system or DesignSync administrator, you can modify the AccessControl file to allow users to access to the command. For more information, see DesignSync Action Definitions.
For example, suppose you modify the AccessControl file to allow lock switching among team members. If User1 checks out the file with a lock, User2 can use the switchlocker command to change an object's lock owner from User1 to User2. User 2 can then check in the modified file.
See the ENOVIA Synchronicity Command Reference Help: switchlocker command for more information and examples of its use.
Related Topics
Controlling Access to Your Local Work Area
Moving a Work Area
27

DesignSync Data Manager User's Guide
There may be situations in which you want to relocate the project data of a work area to another UNIX file structure location.
Note: Moving a module work area is not recommended. To use a different module work area, check in any modified files or locked files using the existing work area, then populate the new work area. If there are unmanaged files in the original work area, you can copy or move them to the new location. For more information on creating a work area see, Populating Your Work Area.
You may want to move an existing work area to a new work area, but you want to preserve the work area's association with the vault. Or you may want to move a work area, set up an association with another server/vault, and perhaps create new project data.
In either situation, you use the DesignSync setvault command after you relocate the work area.
The Role of setvault in Moving a Work Area
The setvault command associates a single directory with a vault location. DesignSync stores this assignment as an entry in the file ../.SYNC/Contents. For example, suppose you have the following directory structure:
db/
db/pci/
db/pci/rtl/
db/pci/rtl/pci.v
db/pci/rtl/pcicntl.v
If you run the setvault command on the db/pci directory, DesignSync stores the vault association information in the file db/.SYNC/Contents.
When files are passed to and from the vault, DesignSync stores the association of a file with a vault in the ../.SYNC/Contents file. However, DesignSync does not associate a subdirectory with the vault unless you run the setvault command directly on that subdirectory. So in the example directory structure, the subdirectory db/pci/rtl/ is not associated with the vault by a ../.SYNC/Contents entry until you run the setvault command on the db/pci/rtl/ subdirectory.
Note: If setvault is not run on a subdirectory, the subdirectory's vault association is inherited from its parent.
28

Using DesignSync
See the ENOVIA Synchronicity Command Reference Help: setvault command for information on the syntax and options of this command.
Moving a Work Area Yet Preserving Its Vault Association
Because the .SYNC/Contents file for your work area resides at the level above your work area in the hierarchy, the file does not get moved with the work area directories and files. To move a work area, yet preserve its association with the vault:
• Move the top-level work area directory. (Only the top-level directory needs to be moved; the rest of the hierarchy follows the top-level directory, thus preserving the current structure of the work area.)
• Recreate the top-level .SYNC/Contents entry by associating the relocated work area with the vault.
Caution: To avoid corrupting metadata, you should never edit .SYNC/ directory contents by hand, .
For example, suppose you move all files and directories of our example work area from the location db/pci to a new UNIX file structure location, projects/pci. The vault association for the pci work area, however, does not get moved, because it is stored in the file db/.SYNC/Contents, which resides at a level higher than the pci/ directory. Without this file in the new location, the pci/ directory has no server/vault association. In addition, all the subdirectories have no association with the vault, since they inherit it from the pci/ directory.
The only exception is where setvault has been run on a subdirectory to explicitly set up an association between that subdirectory and the vault.
To associate the work area in the new location with the same vault as the old work area:
1. Change directory to the work area root directory (the pci/ directory in our example).
2. From this directory, execute the DesignSync command setvault and specify the URL of the vault. For example:
dss> setvault sync://adagio.myco.com:2647/Projects/Sportster .
DesignSync creates the .SYNC/Contents file at the level above the work area work directory (projects/.SYNC/Contents in our example).
Moving a Work Area and Creating New Project Data
When you move a work area, the files in the work area are still associated with the old server/vault location. To associate the relocated work area with a different vault, use the
29

DesignSync Data Manager User's Guide
DesignSync setvault command with the -recursive option. Using the -recursive option causes the setvault operation to modify the server/vault association value for all files in the hierarchy as well as for the root directory. Then when the files are used in a transfer to or from the new server/vault location, they have their association set to follow that chosen at the root directory.
To move a work area and make a new vault association:
1. Move the top-level work area directory. (Only the top-level directory needs to be moved; the rest of the hierarchy follows the top-level directory, thus preserving the current structure of the work area.)
2. Change directory to the work area root directory (the pci/ directory in our example).
3. Use the DesignSync setvault command with the -recursive option and specify the URL of the vault. For example:
dss> setvault -rec sync://adagio.myco.com:2647/Projects/Sportster .
DesignSync associates the relocated work area with the new server/vault. Now you can check in new project data.
Related Topics
Metadata Overview
Setting Up a Shared Workspace
UNIX Permissions of Work Areas and Vaults
When populating a workspace, all subfolders inherit the parent folder's UNIX permissions.
When an object is fetched -lock, the object is always writable by the file's UNIX owner. All other workspace UNIX permissions, of both locked and local file copies, depend on:
• Your umask setting • Whether the workspace is shared • The default preference for how local (unlocked) copies of files are fetched into
the workspace • The UNIX permissions on the vault file • Cache and mirror UNIX permissions
These factors are explained below.
How your umask Affects Local Permissions
30
Using DesignSync
Your UNIX umask controls whether read and execute permissions for UNIX group and UNIX everyone are set, when a file is fetched into your workspace. The UNIX write bit is never set for UNIX group or UNIX everyone, regardless of your umask.
How Shared Workspaces Affect Local File Permissions
Users' umask settings must allow others in their UNIX group to access shared data. The shared work area must also be created with the appropriate UNIX directory permissions. If users are to share DesignSync locks, additional set up steps are required, such as setting the UNIX write bit for the UNIX group. See Setting Up a Shared Work Area for details.
How the Default Fetch Preference Affects Fetched Copies
If the DesignSync client's default fetch preference is to "fetch read-only", the file's UNIX owner cannot write to unlocked copies that are fetched. If the default fetch preference is not "fetch read-only", The file's UNIX owner will be able to write to unlocked copies that are fetched. For more information on how to modify the default behavior, see SyncAdmin Help: General Options.
How UNIX Permissions on Vault Files are Managed
UNIX permissions on vault files are always read-only. They are never writable, not even for the server owner. The UNIX read and execute permissions for UNIX owner, group and everyone are set every time a new file version is checked in. When a new file version is checked in, the UNIX read and execute permissions of the local workspace file being checked in are applied to the vault file. The UNIX read and execute permissions on a vault file reflect the UNIX read and execute permissions of the last version checked in, from the workspace in which that last version was checked in.
When a file is fetched from the vault, the workspace file's UNIX read and execute permissions are set to those of the vault. A user's umask can cause the fetched file's UNIX permissions to be further restricted, but a user's umask cannot cause more open UNIX permissions on the fetched file. For example, if a vault file does not have execute permissions for UNIX everyone, when the file is fetched, the workspace file will not have execute permissions for UNIX everyone, regardless of the user's umask.
How Cache and Mirror UNIX Permissions Affect Local File Permissions
The default -from local performance optimization copies files from a LAN cache or mirror directory into your workspace, instead of fetching the file from the server. If the cache or mirror environment was not set up correctly, the local file copies fetched into the cache or mirror will have incorrect UNIX permissions. Consequently, if you use the -from local option to copy the cache file or mirror file into your workspace, the file will also have incorrect UNIX permissions. See Fetching Files from the Mirror or Cache for details.
Troubleshooting Metadata Errors
31

DesignSync Data Manager User's Guide
Client operation stalls, "Waiting to obtain metadata lock"
Problem: You kill a DesignSync client, then restart the DesignSync client in the same workspace. Attempting a DesignSync operation in that workspace stalls, outputting:
WARNING - Waiting to obtain metadata lock for /home/tbarbg7/SD31447testData/
Already locked by: user (tbarbg7) on host (poulenc), process id (28730)
Possible Cause:
In the above example, the user "tbarbg7" started the initial stclc session, which was killed. "tbarbg7" then restarted stclc from the same workspace in which it was killed.
Because stclc was killed, its lock on the workspace metadata was not released. This was indicated by the lock still being held by the user. When stclc restarts, if the lock file (.SYNC/Contents.sync.lck) is more than 5 minutes old the lock file is presumed to be orphaned. At that time, the lock file is removed, allowing operations to proceed.
Solutions:
• An alternative to waiting for the 30 second time period to elapse is to remove the .SYNC/Contents.sync.lck lock file, if you are certain the process that obtained the lock file (shown in the output above) has exited.
• Change the orphan timeout value from 5 minutes to a lower value, so that DesignSync clients wait less time before automatically removing the lock file. See Workspace Metadata Registry Settings for how to modify the orphan timeout value.
Setvault Command Returns Error: Metadata No Permission
Problem: You enter the setvault command and DesignSync returns the error "Metadata No Permission." For example:
[somlib-16] Failed on metadata in /home (Open failed; check permissions)
file:///u1/userA: som-E-121: Metadata No Permission.
Possible Causes:
• Your umask permissions are not set to allow write access. DesignSync needs to be able to write into the parent directory of the work area directory where you run the setvault command. For an explanation of this concept, see Local Metadata and the .SYNC Directories and The Role of setvault in Moving a Workspace.
32

Using DesignSync
• There is insufficient disk space to write to the local metadata file.
Solutions:
• Check UNIX permissions and, if necessary, set them so that you have write access to the parent directory of the work area directory.
• Make there is enough space on the disk in which the local metadata file resides.
RevisionControl Operation Returns Error: Not Metadata Owner
Problem: You perform a revision control operation and DesignSync returns the error:
"Not metadata owner." For example:
Checking out: samp.asm : [somlib-16] Failed on metadata in
/u1/userA/Sportster/code (Not Owner)
Failed:som: Error 120: Not Metadata Owner
Possible Cause:
Your umask permissions are not set to allow write access. DesignSync needs to be able to write into the parent directory of the work area directory where the setvault is being formed.
Solution: Change the umask permissions to allow write access.
For example, if user1 has a umask set to 022 (which turns off write permission for group and world), then DesignSync creates the .SYNC/Contents files with permissions 644. If user2 attempts to operate on files in user1's managed work area, user2 does not have UNIX write access to user1's .SYNC/Contents file.
Related Topics
Metadata Overview
Setting Up a Shared Workspace
Relocating a Workspace
DesignSync Data Manager Administrator's Guide: Workspace Metadata Registry Settings
The DesignSync GUI
The DesignSync Window
33

DesignSync Data Manager User's Guide
Using the DesignSync GUI
There are many elements to the DesignSync graphical user interface (GUI). Click on the label for each region in the following illustration to go to a topic that describes that part of the DesignSync GUI.
In addition to the DesignSync GUI, DesignSync has several command-line interfaces. See DesignSync Command-Line Shells for more information.
Using Toolbars
A toolbar is a set of tools represented by icon buttons that are grouped together into an area on the main window of an application. In the DesignSync GUI, there are two main toolbars:
• The Main Toolbar is a group of the most frequently used operations. You can customize the toolbar by selecting Tools =>Options =>GUI Customization =>Main Toolbar.
• The Module Toolbar is a group of the frequently used module operations. You can customize the toolbar by selecting Tools =>Options =>GUI Customization =>Module Toolbar.
A brief explanation of each button in a toolbar pops up when you move the mouse pointer over that button (commonly known as a tool tip). In addition to the tool tip, a
34
Using DesignSync
slightly longer description appears in the status region at the bottom of the DesignSync window.
A toolbar can be either docked or floating. A toolbar is docked when it is attached to one side of the DesignSync window. You can dock a toolbar below the Location Bar (or below the Menu Bar if the Location bar is not displayed) or to the left, right, or bottom edge of the DesignSync window. When you drag a toolbar to the edge of the DesignSync window, the toolbar outline snaps into place along the length of the window edge.
A toolbar is floating when it is an independent window that is not attached to the DesignSync window. To change the shape of a floating toolbar, move the cursor over any edge until it changes to a double-headed arrow, and then drag the edge of the toolbar.
To move a toolbar, click and hold the left mouse button within the toolbar but not on an icon, then drag the toolbar. If the toolbar is floating, you can also grab the title bar.
Note: On UNIX, you cannot dock a floating toolbar by dragging the title bar. You must position the cursor within the window but not over an icon.
Main Menu Toolbar
The Main Menu Toolbar provides access to DesignSync commands. Clicking on an item in the Main Menu produces a drop-down menu containing menu choices. Menu choices either execute immediately, lead you to further choices, or invoke dialog boxes. For example, if you:
• Select a menu choice with ellipses (...), a dialog box displays. For example, if you choose Revision Control => Check In . . ., the Check In dialog box appears.
• Select a menu choice without ellipses or right arrows, such as Go Up One Level, the command executes immediately.
• Select an item with a right arrow, you are lead to further choices, such View => Verbosity leads you to three more choices (Brief, Normal, and Verbose.)
The standard Main Menu Toolbar contains these choices:
• File • Revision Control
• Edit • Modules
• View • Tools
• Go • Help
35

DesignSync Data Manager User's Guide
• Bookmarks
Click on the menus in the following illustration to go to the topic describing that menu:
Module Toolbar
By default the Module Toolbar appears under the Main toolbar. You can customize the Module Toolbar to appear:
• On the side of the main toolbar, when your display window is wide enough. • On either the left side, right side, or bottom of the DesignSync GUI window. • As a free floating tool bar that you can move to where you want it.
You can choose to display or hide this too bar from the View menu. The Module Toolbar displays these items by default:
See SyncAdmin Help: Customizing the Module Toolbar for more details.
Toolbar Item Description
This toggle button shows or hides hierarchical references for workspace listing of modules or module version contents on the server. When hierarchical references are hidden, the hierarchical references button looks like this:
This toggle button shows or hides module members on the server. When modules members are hidden, the modules members button looks like this:
This toggle button that shows or hides module deltas on the server. When module deltas are hidden, the modules delta button looks like this:
36

Using DesignSync
This pull-down list allows you to filter module branches displayed. Choices are:
o <All Branches> o <Tagged Branches> o One of the last five 5 glob expressions as defined
in the module branch filter field in the Display Filters dialog box
This pull-down list allows you to filter versions displayed. Choices are:
o <Tagged Versions> o <All Versions> o One of the last five 5 glob expressions as defined
in the module version filter field in the Display Filters dialog box
This button invokes the Add to Module dialog box.
This button invokes the Remove from module dialog box.
This button invokes the Move modules member dialog box.
This button invokes the Create a hierarchical reference dialog box.
This button invokes the Create new module dialog box.
The button adds the Module Hierarchy tab to the display window.
Related Topics
Renaming a Module Member
Creating a Hierarchical Reference
Displaying Module Hierarchy
Creating a New Module
Removing a Member from a Module
37

DesignSync Data Manager User's Guide
Display Filters
Location Bar
The Location Bar displays the path or URL of the object that you are viewing in the DesignSync window. To go directly to a folder (client-side or server-side), enter the folder's path or URL in the Location Bar. You can also view and select previously visited locations from the location history by clicking the pull-down arrow to the right of the text field.
DesignSync updates the Location Bar as you navigate using the Tree View or List View. However, these locations are not stored in the location history unless you press Enter while a location is displayed in the Location Bar.
DesignSync does not update the Location Bar when you navigate from the Command Bar using the scd (or cd) command. The Location Bar is always synchronized with the Tree and List Views, and navigating from the Command Bar does not update the Tree and List Views.
File Name and Path Name Completion
While in the Location Bar, you can press the <Tab> key for file name or path name completion.
Note: When entering text in the location bar for file/path name completion, remember that the DesignSync application is case sensitive when it comes to the characters entered. A lower case "y" entered will not complete file or path names that with start with a capital "Y".
In the example below, if you entered Sy in the location bar and then you pressed the <Tab> key, you would get a small pop up list with SyncAdmin and SysAdmin to choose from since there are two folders that start with "Sy".
38

Using DesignSync
In the example below, if you entered M in the location bar and then you pressed the <Tab> key, you would get a file complete because there is only one folder that starts with M.
39

DesignSync Data Manager User's Guide
Related Topics
Going to a Location
Go Menu
ENOVIA Synchronicity Command Reference Help:scd
ENOVIA Synchronicity Command Reference Help:cd
View Pane
The View pane displays one or more views showing information about the objects being operated on. The List View, which shows the contents of the folders selected in the Tree View, is always visible. Some menu choices, such as File =>Data Sheet, will cause other views to appear.
The view pane can take on two forms:
40

Using DesignSync
• In the tabbed view, only one view is visible at a time. At the bottom of the view pane are a list of tabs representing the available views; you can switch to a view by clicking on a tab. (If the List View is the only available view, the tabs are not displayed.)
You can also click the right mouse button on the tabs to display a context menu with the following options:
o Close the view (not available for the List View). o Close all other views except the current view (and the List View). o Switch to desktop view.
o In the desktop view, each view appears as a window that can be moved around a desktop. Each window has a frame with buttons to maximize, minimize, and close the window. You can also click the right mouse button on an empty space in the desktop to display a context menu with the following options: o Cascade the windows (arrange them in an overlapping manner). o Tile the windows (arrange them in a non-overlapping manner). o Switch to tabbed view.
You can switch to the tabbed view by selecting the View =>Tabbed View menu choice. You can switch to the desktop view by selecting the View => Desktop menu choice. You can also toggle between the two views by pressing the Alt-F2 key.
You can operate on items inside the view pane by selecting them and choosing from the menu bar, or right-clicking and displaying the context menu.
Related Topics
DesignSync Symbols and Icons
Tree View Pane
Use the Tree View (left pane) to browse any of the following:
• Folders on your local client system (My Computer) • Available servers (SyncServers ) • Projects
From the Tree View, you can perform the following actions:
• To expand a collapsed item, left click the plus sign (+) or double click on the item. • To collapse an expanded item, left click the minus sign (-) or double click on the
item. • To select an item, left click on the item. The contents of the item are displayed in
the List View pane.
41

DesignSync Data Manager User's Guide
• To operate on an item, right click on the item and choose an operation from the context menu.
Note: A CD drive will display a folder icon if there is no CD in the drive bay.
Gray folders have not been directly traversed to get to a subfolder. In the picture above, the HTMLHelp subfolder folder was reached by selecting a bookmark. Hovering the cursor over a gray folder displays the following message in the Status Bar: "You have not visited this node. The node will be automatically refreshed if you visit it."
For information on adding a sync server to the sync server list, sync_servers.txt, see SyncServer List Files in the DesignSync System Administration help.
Related Topics
DesignSync Symbols and Icons
List View Pane
The List View (right pane) gives you a list view of an object that you have selected from the Tree View (left pane). The title of the pane is updated to display the path of the selected object.
42

Using DesignSync
The List View has several columns that provide information about the displayed objects, such as the object name, revision-control status, and version. The columns provide the same information that is available from the ls command. You can click on the column headings to sort the displayed objects based on that column. See ENOVIA Synchronicity Command Reference Help: ls command for more information.
From the List View, you can do the following:
• To select an item, left click on the item (use the Ctrl and Shift keys to select multiple items).
• To view or edit a file, double click on the file. • To expand a folder, double click on the folder. • To operate on an item, right click on the item and choose an operation from the
popup menu. • To close all of the views except your present view, right click on the List View tab
and select Close Other Views. • To switch from a tabbed view to a Desktop view, right click on the List View tab
and select Desktop.
You can choose whether to keep the command shell window synchronized with the tree and list views by selecting Tools =>Options =>GUI Options =>Options.
You can specify how frequently information should be refreshed by selecting Tools =>Options =>GUI Options =>Options. See the SyncAdmin Help: GUI Options topic for more information.
You can control which columns display by selecting Tools =>Options =>GUI Options =>Columns. See the SyncAdmin Help: Customize Columns topic for more information.
You can also resize and change the order of the columns in the List View:
• Click and drag the separator bar to the right of a column header to resize the column.
• Click the column header and drag it to a new position. • Mouse-over the column header to display tips in the Status bar.
If the display for the Branch and Version Tags fields are truncated due to length, double-click the file in the Branch or Version Tags column (or press F2) to switch to a list box view.
You can customize the look and feel of the List View by selecting Tools =>Options =>GUI Options =>Display. See the SyncAdmin Help: Customize Display topic for more information. The following table provides a description of each column that could display in the list view.
Column Description
43

DesignSync Data Manager User's Guide
Name Branch The branch tags of a managed object's current
branch, or the persistent selector list for a folder. For example, where an object has two branch tags, the column displays:
Trunk,RelA
Notes:
• If the folder belongs to a module, this column is blank. If the folder belongs to a legacy module, it contains the current branch tags or selector list.
• The Branch column displays the branch tags of a managed object's current branch, or the persistent selector list for a folder. In cases where a managed object's persistent selector list is different from the parent folder's persistent selector list, the Branch column for the managed object also displays (!). For example: (!) Trunk,RelA
• The persistent selector lists can disagree if the setselector command has been applied to the managed object. See the ENOVIA Synchronicity Command Reference Help: setselector for more information. Synchronicity does not recommend setting the persistent selector list on individual objects, because populate operations do not obey per-object persistent selector lists
• Unmanaged items that have a selector individually set in a manner which is different than the parent folder show the -> symbol and the item's selector, in addition to the (!) symbol.
• If the Branch value exceeds 250 characters, the value is truncated as indicated by four periods (....). Select an object's displayed branch tags and then
44

Using DesignSync
double-click or press the [F2] key to display a list of all branch tags on the object.
Cache URL The URL location of the cache. Description (Project/Sync Server)
The description of the ProjectSync project.
Locker The username of the locker, or is blank if the object is not locked. In addition to the name of the locker, this column displays an asterisk (*) if the object is locked in this location, or displays no asterisk if locked elsewhere. For example:
Jeff* shows that the file is locked in this location by user Jeff
Jeff shows that the file is locked elsewhere by user Jeff
Note: The asterisk lets you sort first by locking user, then by local or remote locks (*).
Member of Lists the a name of the module or modules in which this object is a member.
Modified The time the file was last modified. Name The name of the object. Project URL The URL location of the ProjectSync project. Referenced Target
This field is only displayed when the item is a hierarchical reference.
Size The size of the object, in bytes. For collection objects, the Size column displays the total number of member files in the collection. Sizes of server-side files are not available to your DesignSync client and will be displayed as ""-"
Status The revision-control status of the object. See Status Types for more information.
Type The object type: File, Folder, Referenced File, Link to File, Link to Folder, Cached File, Mirrored File, and vendor-specific object types, for example Cadence libraries, cells, and cell views; Synopsys Milkyway libraries and cell
45
DesignSync Data Manager User's Guide
views; and custom collection objects. Version The current version number of the object and
upcoming version if object is locked or auto-branched. For example:
1.3
1.7->1.8
The version may also indicate Reference to: 1.3 if the item is a reference. Similar output is presented for Mirror and Share links.
Version Tags The tags currently on this object's version. This column lists tags in the order of Most-Recent to Oldest (the reverse order of when the tags were added).
Note: If the Version Tags column value exceeds 250 characters, the value is truncated as indicated by four periods (....). Select an object's displayed version tags and then double-click or press the [F2] key to display a list of all version tags on the object.
Related Topics
DesignSync Symbols and Icons
Revision Control Status Values
In the List View Pane, the revision-control status of the objects are listed under status columns.
Note: For collections of data, the Status is reported only for the collection object, and not its member files.
Values Description Up-to-date File is currently the correct version for the selector, or that the
module member version matches the correct version for the module selector.
Locally Modified File has been edited since it was fetched and a more recent version has not been checked into the branch, or that an hcm add has been performed on a module member that has not been checked into the module.
Needs Merge File has been locally modified and the version is not correct for the
46

Using DesignSync
[<change>] current selector.
For modules, an additional value indicating the type of change may appear in brackets [ ] after the Needs Merge status value:
• <Version number> - the version of the member in the module version.
• Moved - the module member has a different natural path than the one expected by the module version.
• Removed - the module member is not in the module version.
• <Version number>,Moved - the module member is both a different version and located at a different natural path than the module version.
Needs Update [<change>]
Indicates that you have an incorrect version on the given branch.
For modules, an additional value indicating the type of change may appear in brackets [ ] after the Needs Update status value:
• <Version number> - the version of the member in the module version.
• Moved - the module member has a different natural path than the one expected by the module version.
• Removed - the module member is not in the module version.
• <Version number>,Moved - the module member is both a different version and located at a different natural path than the module version.
Unresolved Conflicts
Indicates that a merge of versions has resulted in conflicts.
Added Indicates that the object has been added to the module, but has not been checked in.
Added By Merge, Needs Checkin
Indicates that the file was introduced to the work area by a merge or overlay operation and does not exist on the current branch. When you check in the file, the branch is created automatically.
Absent Indicates an object that is unexpectedly absent from the workspace. Typically an object is listed as 'Absent' if it was deleted from the workspace using operating system commands, leaving behind the local metadata.
Unknown Indicates that the version of the file in the workspace cannot be determined from the local metadata. An object can be Unknown when:
• The object has been modified locally but is not derived from
47

DesignSync Data Manager User's Guide
the version in the vault. For example, when you remove an object and then recreate it. In this case, you can check in the object using the -skip option.
• A reference has been retired and then the selector is changed. If you retire an object (without -keep), both the object and its metadata are removed from the local workspace.
• A setselector operation then creates a metadata entry, but without a version number.
• A broken network connection interrupts the check in of a new object. When the client loses its connection, the check in to the server can succeed, but the client may not receive results back from the server. This situation leaves managed files in the local workspace that do not have corresponding metadata.
[Retired] This is not a state of its own; rather it is a prefix to one of the other states. Indicates that the current branch is retired. For example, the status column might contain:
[Retired] Locally Modified
Because the [Retired] status is a prefix to other status terms, sorting causes retired items to be grouped either at the beginning or end of the listing, independent of the items' local state.
Related Topics
DesignSync Symbols and Icons
Output Window
The Output Window, located above the Results Summary window, displays any output produced by commands typed into the Command Shell window and by some graphical operations.
You can drag and drop single lines from the Output Window into the Command Shell Window, You may need to edit the line to remove prefix characters. Right-clicking in the Output Window displays this menu:
from which you can:
• Select and find text in the output • Clear the output
48
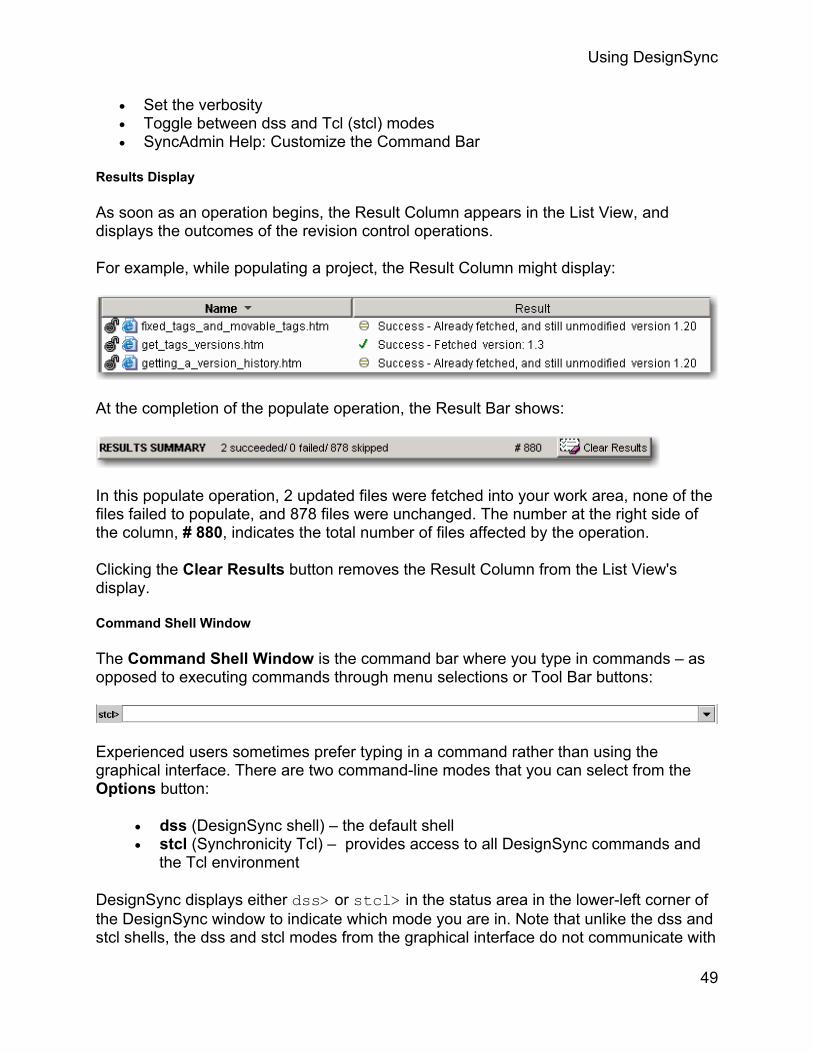
Using DesignSync
• Set the verbosity • Toggle between dss and Tcl (stcl) modes • SyncAdmin Help: Customize the Command Bar
Results Display
As soon as an operation begins, the Result Column appears in the List View, and displays the outcomes of the revision control operations.
For example, while populating a project, the Result Column might display:
At the completion of the populate operation, the Result Bar shows:
In this populate operation, 2 updated files were fetched into your work area, none of the files failed to populate, and 878 files were unchanged. The number at the right side of the column, # 880, indicates the total number of files affected by the operation.
Clicking the Clear Results button removes the Result Column from the List View's display.
Command Shell Window
The Command Shell Window is the command bar where you type in commands – as opposed to executing commands through menu selections or Tool Bar buttons:
Experienced users sometimes prefer typing in a command rather than using the graphical interface. There are two command-line modes that you can select from the Options button:
• dss (DesignSync shell) – the default shell • stcl (Synchronicity Tcl) – provides access to all DesignSync commands and
the Tcl environment
DesignSync displays either dss> or stcl> in the status area in the lower-left corner of the DesignSync window to indicate which mode you are in. Note that unlike the dss and stcl shells, the dss and stcl modes from the graphical interface do not communicate with
49

DesignSync Data Manager User's Guide
syncd. In this way, the command bar from the graphical interface is more like the dssc and stclc shells.
You can also select previously entered commands by clicking the drop-down arrow to the right of the command line.
You can select the prompt displayed for the command shell window:
• Enter the prompt -url command to display the current directory as the prompt. • Enter the prompt -default command to display the dss> prompt. This setting
is the default.
You can choose whether to keep the command shell window synchronized with the tree and list views by selecting Tools =>Options =>GUI Options =>Options. See SyncAdmin Help: GUI Options topic for more information.
Right-clicking in the Command Shell Window displays the context sensitive menu shown in the Output Window topic.
You can also execute command-line commands from a DesignSync shell instead of from the graphical interface. DesignSync command-line shells, and the Command Shell window, use the command line defaults system.
Command Line Completion
In the command bar, press the <Tab> key for command line completion. Pressing the <Tab> key displays a pop up box with matching recent commands, from which you can select a command to run. In the example below, when you enter the character c in the command bar and then press <Tab> key, you get a list of all commands that start with the letter c.
50

Using DesignSync
Note: When entering text in the location bar for file/path name completion, remember that the DesignSync application is case sensitive when it comes to the characters entered. A lower case "y" entered will not complete file or path names that with start with a capital "Y".
Related Topics
DesignSync Command-Line Shells
Command Line Defaults System
ENOVIA Synchronicity Command Reference: Command defaults
Status Bar
The status bar displays status messages during DesignSync operations and also allows you to set display options.
Right-click in the status bar to toggle between dss and Tcl mode. The default mode is dss. To change it to Tcl (stcl) mode, select Tools =>Tcl Mode. A check mark next to Tcl Mode means you are in stcl mode; otherwise, you are in dss mode. DesignSync displays the mode (DSS or STCL) in the status area next to the command shell window.
You can also right-click on the icons on the right side of the status area to:
• Toggle between dss and Tcl mode • Set Verbosity • Show Excluded Objects in the View Pane
Related Topics
DesignSync Command-Line Shells
DesignSync Symbols and Icons
Informational Symbols
These symbols provide information about DesignSync activities.
"In process" symbols indicate that the selected folder is being processed. (The hourglass cursor also indicates processing, but these symbols tell you specifically which objects are being processed.)
51

DesignSync Data Manager User's Guide
Failed attempt to connect to a server.
Informational message.
File or folder is excluded from the operation you have selected.
The operation is not allowed on the object you selected. This might appear, for example, if access controls have been defined.
The server referenced by a project or SyncServers file is accessible.
A collection object is not properly defined. DesignSync cannot determine the collection's members.
Object Icons
These icons identify objects in a DesignSync workspace. They may be in either the Tree View Pane or the List View Pane.
The Internet The root of all objects in the DesignSync universe. Available under this top-level icon are: SyncServers, My Computer, Projects, and Bookmarks.
My Computer
The root of the local file system. On a Windows system, expansion of the icon shows icons representing hard drives, removable drives, and so on, as well as the hierarchies under them. (Note: Sort order is case sensitive. Capital letters are sorted before lower case letters.)
On a UNIX system, expansion shows the mount points that you have chosen to display. The default mount point is the location represented by the $HOME environment variable.
52
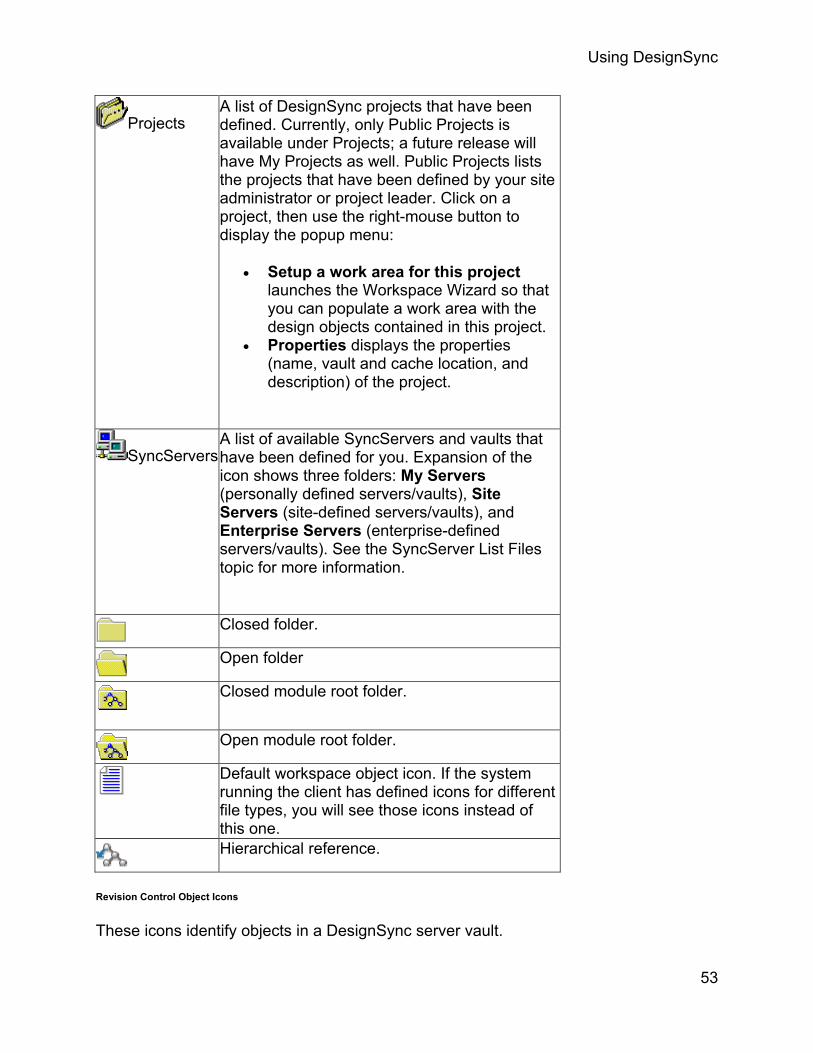
Using DesignSync
Projects
A list of DesignSync projects that have been defined. Currently, only Public Projects is available under Projects; a future release will have My Projects as well. Public Projects lists the projects that have been defined by your site administrator or project leader. Click on a project, then use the right-mouse button to display the popup menu:
• Setup a work area for this project launches the Workspace Wizard so that you can populate a work area with the design objects contained in this project.
• Properties displays the properties (name, vault and cache location, and description) of the project.
SyncServers A list of available SyncServers and vaults that have been defined for you. Expansion of the icon shows three folders: My Servers (personally defined servers/vaults), Site Servers (site-defined servers/vaults), and Enterprise Servers (enterprise-defined servers/vaults). See the SyncServer List Files topic for more information.
Closed folder.
Open folder
Closed module root folder.
Open module root folder.
Default workspace object icon. If the system running the client has defined icons for different file types, you will see those icons instead of this one.
Hierarchical reference.
Revision Control Object Icons
These icons identify objects in a DesignSync server vault.
53
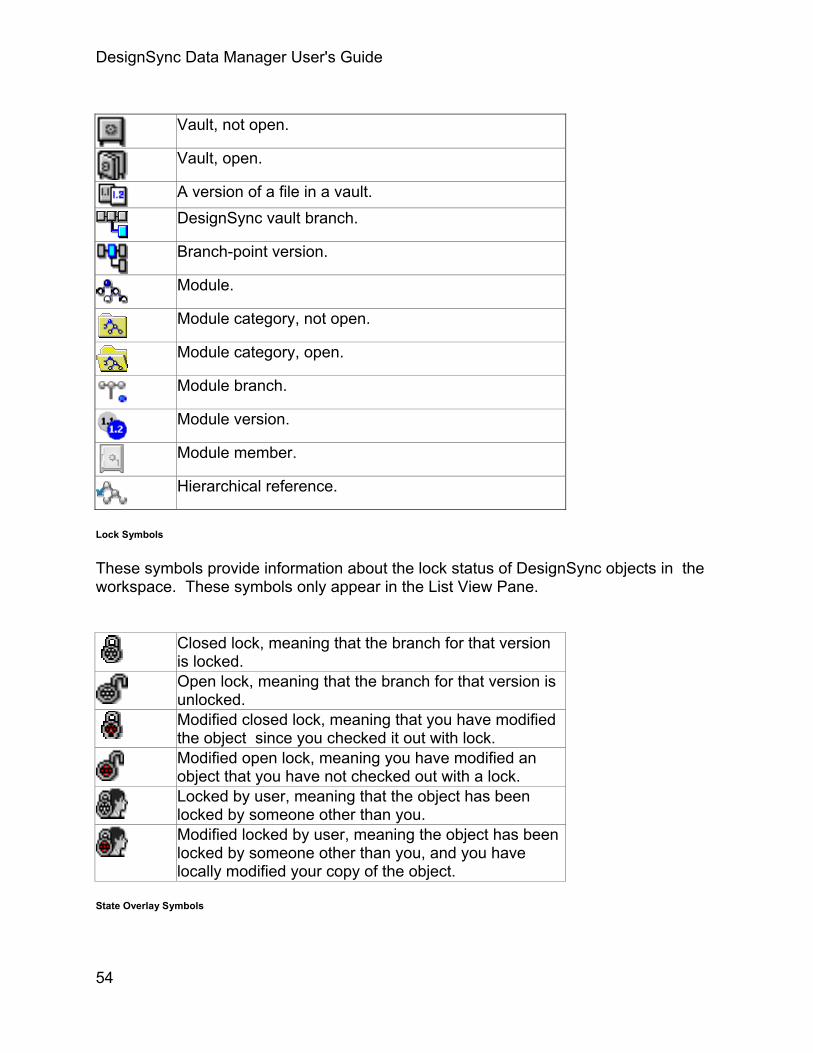
DesignSync Data Manager User's Guide
Vault, not open.
Vault, open.
A version of a file in a vault.
DesignSync vault branch.
Branch-point version.
Module.
Module category, not open.
Module category, open.
Module branch.
Module version.
Module member.
Hierarchical reference.
Lock Symbols
These symbols provide information about the lock status of DesignSync objects in the workspace. These symbols only appear in the List View Pane.
Closed lock, meaning that the branch for that version is locked.
Open lock, meaning that the branch for that version is unlocked.
Modified closed lock, meaning that you have modified the object since you checked it out with lock.
Modified open lock, meaning you have modified an object that you have not checked out with a lock.
Locked by user, meaning that the object has been locked by someone other than you.
Modified locked by user, meaning the object has been locked by someone other than you, and you have locally modified your copy of the object.
State Overlay Symbols
54

Using DesignSync
These symbols provide additional information about an object and appear with the object icon.
A reference is an object that is not physically present, but instead points to another object. Although there are no physical files corresponding to a reference, there is DesignSync metadata that keeps track of the revision-control information for the reference. Just as with replicas, the object that the reference points to is called its original.
A replica is a copy of another object. The replication process is different from the normal copying process. A "copy," in the usual sense, is an independent object; it does not "remember" the object from which it was copied. A replica, on the other hand, does remember the object from which it was copied.
In some situations you want to be able to easily access a file without having a copy of it in your work area, especially if the file is very large. This is where a link is useful. A link, or symbolic link, is visible in your local work area (for example, by the ls command), but the file it represents is not actually there. Links are available only on UNIX systems.
DesignSync uses links to implement two sharing methodologies: caches and mirrors.
Working with Menus
Main Menu Toolbar
The Main Menu Toolbar provides access to DesignSync commands. Clicking on an item in the Main Menu produces a drop-down menu containing menu choices. Menu choices either execute immediately, lead you to further choices, or invoke dialog boxes. For example, if you:
• Select a menu choice with ellipses (...), a dialog box displays. For example, if you choose Revision Control => Check In . . ., the Check In dialog box appears.
• Select a menu choice without ellipses or right arrows, such as Go Up One Level, the command executes immediately.
• Select an item with a right arrow, you are lead to further choices, such View => Verbosity leads you to three more choices (Brief, Normal, and Verbose.)
The standard Main Menu Toolbar contains these choices:
55

DesignSync Data Manager User's Guide
• File • Revision Control
• Edit • Modules
• View • Tools
• Go • Help
• Bookmarks
Click on the menus in the following illustration to go to the topic describing that menu:
File Menu
The File menu contains the commands that are most relevant to file and folder management. Some of the actions available from the File menu are also available by selecting a file or a folder and right-clicking to display the context menu.
The following actions can be selected from the File menu:
Action Result
56

Using DesignSync
New=>File Invokes the New File dialog box. New=>Folder Invokes the New Folder dialog box. Open Opens a session with your default editor and opens the selected file,
or opens the selected project so you can view or edit its properties. Your default editor is determined by a registry setting in one of the DesignSync client registry files. You can override the installation- or site-wide default editor using the SyncAdmin tool.
You can select and open as many files as you choose, but you will be prompted for confirmation if you selected more than four files to open simultaneously.
Note: If you are using the DesignSync Windows client and you use any application other than the default ASCII editor, DesignSync will not automatically recognize local modifications.
Delete Deletes any of the following selected objects:
• A file from your working directory. You cannot delete a file that is a member of a collection object.
• An empty folder, either local or on the SyncServer. • A version from a vault.
Save Saves information displayed in the View Pane such as a data sheet. You can choose the file name and directory from the dialog box. Collection objects and DesignSync references are not shown. The Save menu item is active for DesSync's Output Region, Text views and HTML views.
Print Allows you to print information displayed in the View Pane such as a data sheet. You can also highlight text in a View Pane and send it to a printer. If you are using the Windows platform, you can also print a file that you have selected in the List View.
Page Setup Controls the print parameters of your default printer. Properties Invokes the Properties dialog box where you can view or edit the
various properties of the selected object. The Properties dialog box will only display when you select one file or folder in the list or tree view.
Data Sheet Displays the data sheet for the selected object in a new tabbed view in the View Pane.
New Window Creates a new instance of DesignSync; the same way you would create a new window in a browser.
Close Window
Closes the current DesignSync window and exits DesignSync if this is the only DesignSync window.
Exit DesignSync
Closes all DesignSync windows and exits DesignSync. If there is more than one DesignSync window currently open, a confirmation box appears and you must confirm the operation. You can also exit
57

DesignSync Data Manager User's Guide
DesignSync using the exit command from the command bar. See ENOVIA Synchronicity Command Reference Help: Exit for more information.
Edit Menu
The Edit menu choices allow you to cut, copy, paste, select, and search the text that displays in text output windows such as Data Sheet output, or the output window at the bottom of the screen.
All of the options (except for Find) also work on the text in the location bar at the top of the screen.
View Menu
The View menu contains the commands that control what objects are displayed in the List View. Some of these commands can also be added as Toolbar options to the Main or Module Toolbar.
58

Using DesignSync
The following actions or options can be selected from the View Menu:
Action/Option Result Main Toolbar When checked, the Main Toolbar displays. When not checked, the
Mail Toolbar is hidden. Module Toolbar
When checked, the Module Toolbar displays. When not checked, the Modules Toolbar is hidden.
Location Bar When checked, the Location Toolbar displays. When not checked, the Modules Toolbar is hidden.
Status Bar When checked, the Status Toolbar displays. When not checked, the Status Toolbar is hidden.
Refresh Verifies the selected object's current properties and updates the DesignSync display.
In the case of container objects (folders, vaults, branches), the child objects are also refreshed.
Some DesignSync operations do not update the display automatically because of performance constraints. To ensure that your display is up-to-date, you should refresh an object before operating on it, particularly if the object is shared with other users as
59

DesignSync Data Manager User's Guide
they may have changed the state of an object.
You can control how often the List View is refreshed by selecting Tools =>Options =>GUI Options. Enter the amount of minutes in the Automatically Refresh after so many minutes field. See the SyncAdmin Help: Options topic for more information.
Excluded Objects
When checked, the Exclude Objects displays in the View Pane. When not checked, the Excluded Objects are hidden.
Hierarchical References
When checked, hierarchical references for workspace listing of modules or module version contents on the server are displayed. When not checked, hierarchical references are hidden.
Module Members on Server
When checked, module members on the server are displayed. When unchecked, the modules members on the server are hidden.
Module Deltas on Server
When checked, module deltas are displayed. When unchecked, the module deltas are hidden.
Display Filters
Invokes the Display Filters dialog box.
Verbosity Sets the verbosity displayed in the output pane.
Close View Closes the current view displayed in the View Pane.
Close Other Views
Closes all views except the one you are currently viewing and the List View.
Cascade Displays the Desktop View windows as cascaded in the View Pane.
Tile Displays the Desktop View windows as tiled in the View Pane.
Desktop Sets the View Pane to multiple windows that can be moved around a desktop
Tabbed View Sets the View Pane to a series of tabbed view with only one view visible at any time.
Related Topic
SyncAdmin Help: Customizing the View Pane
Go Menu
The Go menu helps you to quickly navigate to a folder or a location. At the bottom of the Go menu is the recently visited list. This list shows up to the last ten (10) locations
60
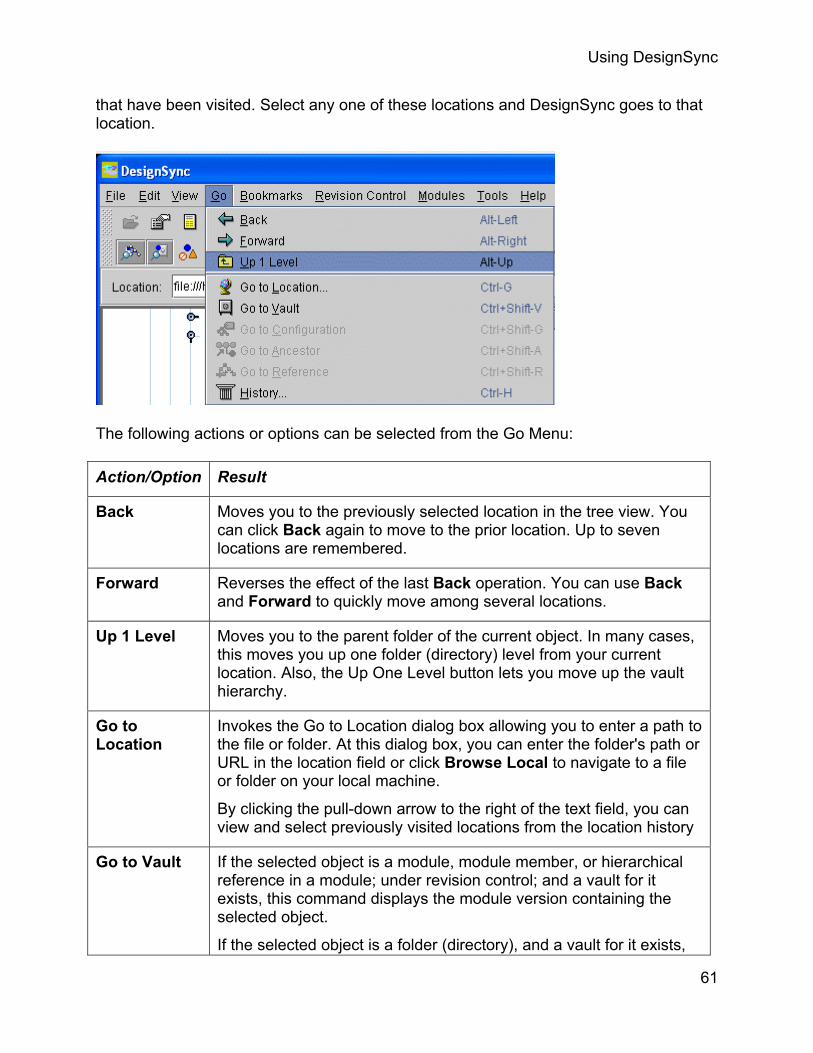
Using DesignSync
that have been visited. Select any one of these locations and DesignSync goes to that location.
The following actions or options can be selected from the Go Menu:
Action/Option Result
Back Moves you to the previously selected location in the tree view. You can click Back again to move to the prior location. Up to seven locations are remembered.
Forward Reverses the effect of the last Back operation. You can use Back and Forward to quickly move among several locations.
Up 1 Level Moves you to the parent folder of the current object. In many cases, this moves you up one folder (directory) level from your current location. Also, the Up One Level button lets you move up the vault hierarchy.
Go to Location
Invokes the Go to Location dialog box allowing you to enter a path to the file or folder. At this dialog box, you can enter the folder's path or URL in the location field or click Browse Local to navigate to a file or folder on your local machine.
By clicking the pull-down arrow to the right of the text field, you can view and select previously visited locations from the location history
Go to Vault If the selected object is a module, module member, or hierarchical reference in a module; under revision control; and a vault for it exists, this command displays the module version containing the selected object.
If the selected object is a folder (directory), and a vault for it exists,
61

DesignSync Data Manager User's Guide
this command displays the contents of the vault where the selected folder is stored.
If the selected object is any other type of object, the command displays the versions of the object and the version tags associated with the object.
Note: This command uses the selector associated with the workspace to display the appropriate branch.
Go to Configuration
This option is supported for legacy modules only.
Brings you to the configuration definition on the server for the highlighted object in the workspace.
Go to Ancestor
When a server module branch node is highlighted, invoking the Go to Ancestor command brings you to the ancestor branch point version for the branch selected. You can then browse back through the ancestry of any given version.
Notes:
• If the desired ancestor is not visible due to the current display filter mode, you will see a dialog box telling you this information.
• This action will not be available when branch 1 is selected. • To see descendant information, you will have to get the
version history for the given module version.
Go to Reference
When an hierarchical reference is selected on the client or server, invoking the Go to Reference command brings you to the object referenced by the hierarchical reference.
On the client, the referenced object must already be present in the workspace for the command to complete.
History Displays the history dialog box that has a table of all locations visited over the last 30 days as well as the date and time at which each location was last visited. See Reviewing History for more information on this command.
Bookmarks Menu
The Bookmarks menu lets you add, edit or select bookmarks. Creating a bookmark lets you quickly access directories (folders), vaults, or objects that you access frequently. A list of created bookmarks appears under the Bookmarks commands.
62
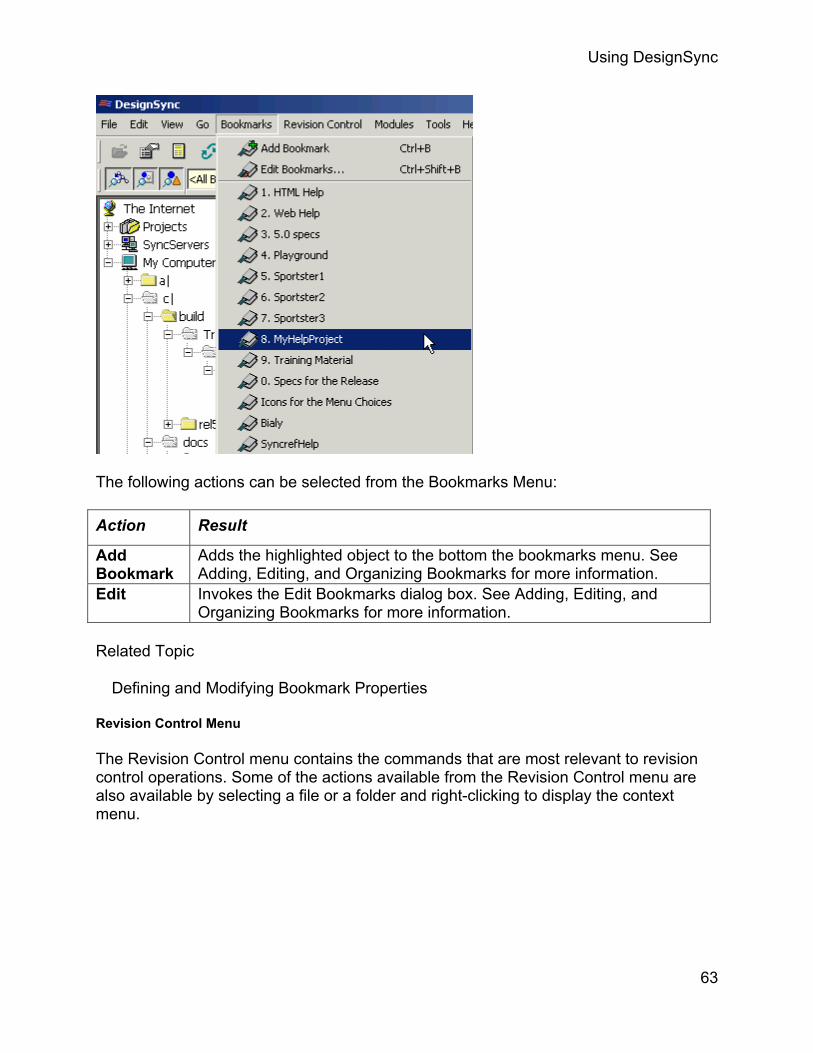
Using DesignSync
The following actions can be selected from the Bookmarks Menu:
Action Result
Add Bookmark
Adds the highlighted object to the bottom the bookmarks menu. See Adding, Editing, and Organizing Bookmarks for more information.
Edit Invokes the Edit Bookmarks dialog box. See Adding, Editing, and Organizing Bookmarks for more information.
Related Topic
Defining and Modifying Bookmark Properties
Revision Control Menu
The Revision Control menu contains the commands that are most relevant to revision control operations. Some of the actions available from the Revision Control menu are also available by selecting a file or a folder and right-clicking to display the context menu.
63

DesignSync Data Manager User's Guide
Once you have highlighted a file or folder, the following actions or options can be selected from the Revision control menu:
Action/Option Result Check In Invokes the Check in Dialog box. See Checking In Design Files
for more information. Check Out Invokes the Check Out Dialog box. See Checking Out Design
Files for more information. Populate Invokes the Populate Dialog box. See Populating Your Work Area
for more information. Workspace Wizard
Invokes the Workspace Wizard. See Invoking the Workspace Wizard for more information.
Clear Results Clears the results of the previous action. As part of a Clear Result command, the Result Column and the Summary Bar disappear. See Clearing Results for more information.
Set Vault Association
Invokes the Set Vault Association Dialog box. See Specifying the Vault Location for a Design Hierarchy for more information.
Set Persistent Populate filters
Invokes the Set Persistent populate filters Dialog box. See Setting Persistent Populate Filters for more information.
Show Potential Checkouts
The List View is updated to include all of the objects that exist in the vault but not in the work area. In the Type column, files and collections are shown as Potential Checkout. Folders are shown as Potential Checkout Folder. See Showing Potential Checkouts for more information
64

Using DesignSync
Tag Invokes the Tag dialog box. See Tagging Versions and Branches for more information.
Make Branch Invokes the Make Branch dialog box. See Creating Branches for more information.
Cancel Checkouts
Invokes the Cancel Checkout dialog box. See Canceling a Checkout for more information.
Unlock Invokes the Unlock dialog box. See Unlocking files for more information.
Retire Invokes the Retire dialog box. See Retiring Design Data for more information.
Modules Menu
The Module menu contains the commands that are most relevant to module operations. Some of the actions available from the modules menu are also available by selecting a file or a folder and right-clicking to display the context menu. Also many of these menu items are available on the Module Toolbar.
Once you have highlighted a file or folder, the following actions or options can be selected from the Modules menu:
Action/Option Result Set Root Folder
Sets the root folder. See Setting a Module root for more information.
New Module Invokes the Create a new module dialog box. See Creating a Module for more information.
Add Href Invokes the Create a hierarchical reference dialog box. See Creating a Hierarchical Reference for more information.
Add Member Invokes the Add to Member dialog box. See Adding a Member to a
65

DesignSync Data Manager User's Guide
Module for more information.
Remove Member
Invokes the Remove from module dialog box. See Removing a Member from a Module for more information.
Move Member Invokes the Move module members dialog box which allows you to move or rename module members. See Moving a module member or Renaming a Module Member for more information.
Lock Branch Invokes the Lock module branch dialog box. See Locking Module Data for more information.
Show Display a menu with these choices:
• Module Hierarchy • Module Status • Module Cache
See these topics for more information.
Tools Menu
The Tool Menu contains the list of command and utilities to that help you maintain and manage your DesignSync application.
The following actions or options can be selected from the Tool Menu:
Action/Option Result
Stop Interrupts or cancel an operations. If you interrupt a command operating on multiple files, the command completes its operation on the current file before stopping. Generally, you cannot stop or
66

Using DesignSync
interrupt operations that complete immediately.
There is also an icon for Stop on the toolbar icon which looks like this .
Tcl Mode Toggles the command line mode between dss mode (unchecked) and stcl mode (checked). The default mode is dss. The current mode is display the status bar below the command shell window.
You can also right-click in the status bar to choose between dss or stcl mode.
Compare Files
Gives you five options to compare files:
• Show Local Modifications – Compares the highlighted object in your work area with the original version that you checked out. This report shows changes made in your work area since the object was checked out.
• Compare to Latest – Performs a 3-way diff comparing the highlighted object in your work area with the current version in the vault, using the original version in the vault as the common ancestor
• Compare Original to Latest – compares the original version of the highlighted object with the latest version in the vault. This report shows changes made to the vault by others since the object was checked out.
• Compare 2 Files – Two files have to be highlighted to have the option available. Compares the two files and displays the comparison
• Advanced Diff – Invokes the Advanced Diff dialog box. See Advanced Diff Options for more information.
See Common Diff Operations for more information on the first four options.
Resolve Conflicts
Helps you resolve conflicts when changes to the same lines in a file has been made by multiple users in multiple workspaces. This menu choice is only enabled when you have to do perform a merge update from a different workspace into your file, and these updates conflict with your local changes.
Reports Gives you four Report options to compare files:
• Version History – Invokes the Version History dialog box. The results of the Version History dialog box displays status information and version history for local objects. See Displaying Version History for more information.
• Modified Objects – performs a recursive search of a workspace to find all managed modified objects in that workspace or its subdirectories. See Identifying Modified
67

DesignSync Data Manager User's Guide
Objects for more information.
• Contents – Invokes the Contents dialog box. See Displaying Contents of Vault Data for more information. The results of the Contents dialog box is a list of the vault data.
• Compare – Invokes the Compare Workspace/Selectors dialog box. See Compare the Contents of Two Areas for more information. The results of the Compare Workspace/Selectors dialog box is a comparison of the contents of two areas.
ProjectSync Launches a new window with the installed version of ProjectSync associated with your workspace.
Options Invokes the SyncAdmin tool. See the SyncAdmin Help system for more information.
Diagnostics Invokes up the DesignSync Diagnostics dialog box. See the DesignSync Environment for more information. The results of the DesignSync Diagnostics dialog box is a display of diagnostic information that can help you troubleshoot a problem with your DesignSync environment.
Help Menu
The Help menu gives you access to the help for the application as well as important information such as summary of new features and contact information.
The following actions or options can be selected from the Help Menu:
Action/Option Result
DesignSync Help
Invokes the DesignSync help system.
What's New In the List View window, displays a summary of new DesignSync features. You can choose to show the summary at startup.
68
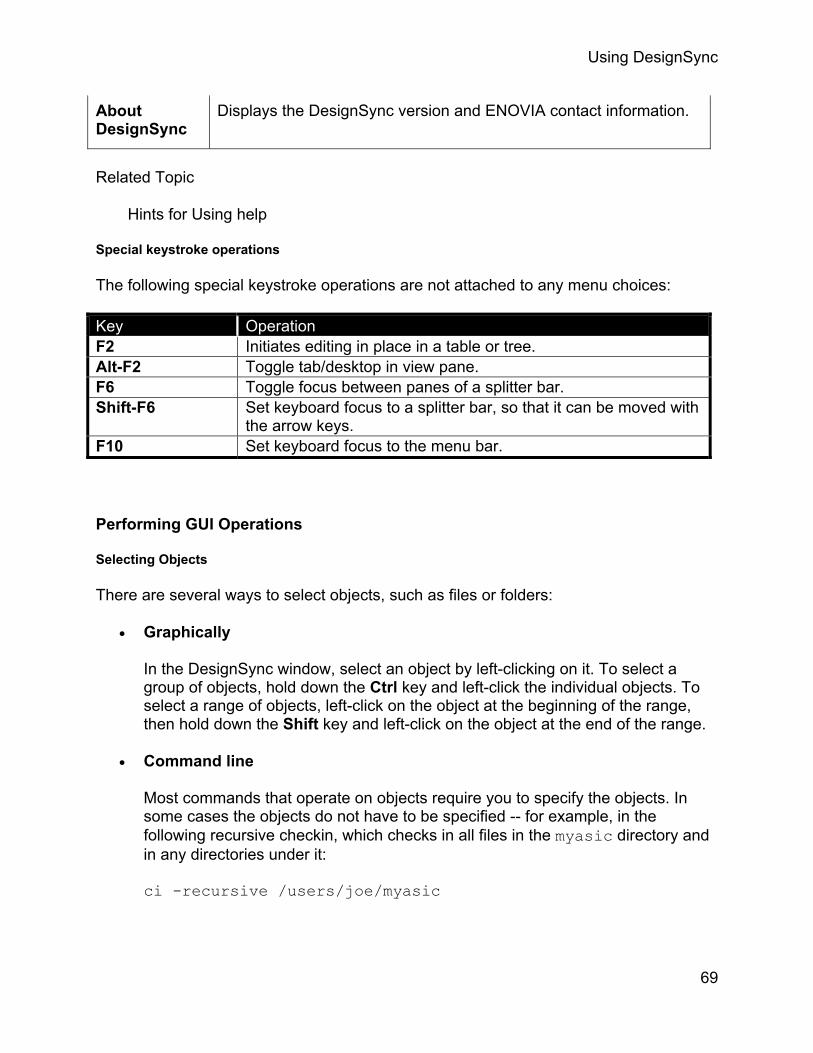
Using DesignSync
About DesignSync
Displays the DesignSync version and ENOVIA contact information.
Related Topic
Hints for Using help
Special keystroke operations
The following special keystroke operations are not attached to any menu choices:
Key Operation F2 Initiates editing in place in a table or tree. Alt-F2 Toggle tab/desktop in view pane. F6 Toggle focus between panes of a splitter bar. Shift-F6 Set keyboard focus to a splitter bar, so that it can be moved with
the arrow keys. F10 Set keyboard focus to the menu bar.
Performing GUI Operations
Selecting Objects
There are several ways to select objects, such as files or folders:
• Graphically
In the DesignSync window, select an object by left-clicking on it. To select a group of objects, hold down the Ctrl key and left-click the individual objects. To select a range of objects, left-click on the object at the beginning of the range, then hold down the Shift key and left-click on the object at the end of the range.
• Command line
Most commands that operate on objects require you to specify the objects. In some cases the objects do not have to be specified -- for example, in the following recursive checkin, which checks in all files in the myasic directory and in any directories under it:
ci -recursive /users/joe/myasic
69

DesignSync Data Manager User's Guide
You can also create DesignSync select lists to operate on objects. See the ENOVIA Synchronicity Command Reference Help: select command for more information.
Going to a Location
There are two different methods to specify a location:
1. Selecting Go from the menu. 2. Entering the folder's path or URL in the Location Bar.
Go Menu Option
To go directly to a folder, select Go =>Go to Location from the menu. In the Go to Location dialog box, enter the folder's path or URL in the location field. Click Browse Local to navigate to a file or folder on your local machine.
View and select previously visited locations from the location history by clicking the pull-down arrow to the right of the text field.
Location Bar Option
To go directly to a folder (client-side or server-side), enter the folder's path or URL in the Location Bar. You can also view and select previously visited locations from the location history by clicking the pull-down arrow to the right of the text field.
DesignSync updates the Location Bar as you navigate using the Tree View or List View. However, these locations are not stored in the location history unless you press Enter while a location is displayed in the Location Bar.
DesignSync does not update the Location Bar when you navigate from the Command Bar using the scd (or cd) command. The Location Bar is always synchronized with the Tree and List Views, and navigating from the Command Bar does not update the Tree and List Views.
Related Topics
Go Menu
ENOVIA Synchronicity Command Reference: scd
ENOVIA Synchronicity Command Reference: cd)
Viewing the Results of an Operation
While a revision control operation is performed, the results of the operation are displayed in the main DesignSync window. There are three places in the window where
70

Using DesignSync
you can find information about the progress of the operation: the Output Window, the Result column of the list view, and the summary bar.
Result Column
As soon as an operation begins, the result column appears in the list view. As objects are operated on, the results appear in the appropriate rows of the list column.
For files and collections, the result column contains a message containing the result of the operation on that particular object. The column also displays one of the following icons:
The operation succeeded on this object
The operation failed on this object.
This object was skipped
For folders, the result column summarizes the results of the objects it contains. For example, if 5 objects within the folder were operated on successfully, the result column contains the message "5 succeeded."
The result column for a folder also contains one or more icons indicating the results of the objects it contains. For example, if all of the objects in a folder succeeded, the success icon is displayed; if some succeeded and others were skipped, it contains both the success and skip icons.
To see exactly what happened to each object in a folder, double-click on the folder in the list view to expand it, and examine the result column of those objects.
Summary Bar
The summary bar appears in between the Output Window and the Command Bar. It provides a summary of the operation as it progresses.
The summary bar provides a total of all objects that have succeeded, failed, and been skipped.
For some operations, it is possible to determine how many objects will be operated on before the operation takes place. In this case, the summary bar provides a percent complete indication. If a total cannot be determined in advance, the summary bar provides a total count of objects operated on.
It is not possible to determine a total in advance for the following operations:
• The populate command • The tag command
71

DesignSync Data Manager User's Guide
• Any operations entered into the command bar that use the -recursive flag.
Clearing the Results
When you are done examining the results of an operation, you may clear the results by pressing the Clear Results button on the summary bar, or by selecting the Revision Control => Clear Results menu choice.
When the results are cleared, the Result Column and the Summary Bar disappear.
To clear the operation's output, right-click in the Output Window to display its context menu. Select Clear Output to clear the Output Window.
Adding, Editing, and Organizing Bookmarks
Adding a Bookmark
To bookmark an object:
• Select the object and then select Bookmarks =>Add Bookmark. • Select the object and then click Ctrl+B
With either of these methods, your current location is added to the bookmark list. The object's bookmark is represented by a folder with a bookmark on it. The bookmark persists between invocations of DesignSync.
Editing and Organizing Bookmarks
To edit or organize your bookmarks, select from the Main menu, Bookmarks =>Edit Bookmarks. This displays the Edit Bookmarks dialog box.
72

Using DesignSync
To change the order of your bookmarks, select one or more bookmarks and then drag them to their new position.
To modify a bookmark, highlight a bookmark and click the right mouse button. This displays a context menu with the following choices:
• Visit takes you to the bookmark's location. You can also visit a bookmark by double clicking on it.
• New Bookmark creates a new bookmark. It then displays the bookmark properties dialog box so you can define the bookmark.
• New Folder creates a new folder for bookmarks. It then displays the bookmark properties dialog box so you can define the folder.
• Rename allows you to change the name of the bookmark or folder. You can also rename a bookmark or folder by selecting it and pressing F2. Note that renaming a bookmark changes its name, but not its location.
• Delete deletes the selected bookmarks or folders. You can also delete bookmarks and folders by pressing the Delete key.
• Properties displays the bookmark properties dialog box, so you can change the bookmark's or folder's properties.
Related Topics
73

DesignSync Data Manager User's Guide
Adding a Vault to Bookmarks
Defining and Modifying Bookmark Properties
You can modify the properties of a bookmark or bookmark folder with the bookmark properties dialog box.
This dialog box allows you to set the following properties:
• The name of a bookmark or folder is the text that appears in the bookmark menu.
• The location of a bookmark is the location that the bookmark goes to when you select it from the bookmark menu. Bookmark folders do not have a location.
• The description of a bookmark appears in the status bar when you move your mouse over the bookmark's menu choice.
• The creation date is the date that the bookmark or folder was created. Bookmarks created in earlier versions of DesignSync do not have a creation date. You cannot modify the creation date.
• The last visited date is the last date that the bookmark was visited by selecting it from the bookmark menu. Bookmark folders do not have a last visited date; you cannot modify the last visited date.
For example, you might create a bookmark with the following properties:
Name ALU75 Workspace Location file://home/aurora/Projects/ALU75/src Description Workspace for the ALU75 project.
74

Using DesignSync
Searching for Text
You can search the Data Sheet, HTML or text report output for any text that you choose. These include:
• diff results • report results • custom tools that generate text reports
Select Edit => Find... or right-click in the region to search and select Find... from the context menu. This displays the Find dialog box:
Find text Enter the text to find. You can also click on the pull-down menu to choose from previously searched text.
Match case Select if you want to find text only with the exact case specified. If not selected, the search is case insensitive by default.
Whole word match only Select if you want to only find text that matches an entire word. If not selected, which is the default, matching text that is embedded within a word is returned.
Direction Select whether to search forward or backward from the current cursor position.
Click OK to initiate the search.
To search for the next occurrence of the last text searched for, select Edit => Find Next, or right-click in the region to search and select Find Next from the context menu.
Reviewing History
The history dialog box allows you to review the history of previously visited locations. To display the history dialog box, select Go => History.
75
DesignSync Data Manager User's Guide
The history dialog box displays a table of all locations visited over the last 30 days, and the date and time at which each was last visited. You can sort the table by location or by time by clicking on the table header.
You can select entries in the history table by clicking on them. Use Ctrl and Shift to select multiple entries in the table.
To operate on the locations listed in the history table, right click the mouse button. This displays a context menu with the following entries:
• Visit takes you the selected location. You can also visit a location by double clicking on it.
• Add Bookmark creates a bookmark for the selection location. • Delete deletes the selected location from the history list. You can also delete a
location by pressing the Delete key. • Clear History removes all entries from the display. • History Properties displays the Customize History dialog box.
To close the history dialog box, click Close.
Using Data Sheets
A DesignSync data sheet displays information about a selected object such as a file, folder, version, or vault. To display a data sheet, select an object, then do one of the following:
• Select File=>Data sheet. • Select Data Sheet from the right mouse button's drop-down menu. • Click the Data Sheet toolbar button. • Press F4.
DesignSync displays the information in a new window in the View Pane.
The information that is displayed by a data sheet depends on the object you selected. For example, the data sheet for a file in your working folder contains information such as lock status, modification status, version number, associated tags, attached notes, and the ongoing log (see the description of Revision Log for details on the ongoing log).
Related Topics
ENOVIA Synchronicity Command Reference Help: datasheet Command
ENOVIA Synchronicity Command Reference Help: vhistory command
Revision Control Properties
Setting the Verbosity of the Output Window
76

Using DesignSync
Many revision control operations, particularly those that can operate recursively over an entire directory hierarchy, can generate a large amount of output in the output window. Changing the verbosity setting can make it easier to locate the important messages in the output.
Changing the verbosity setting is retroactive. For example, you can execute a command in verbose mode, and after it completes, switch to brief mode to examine the output of the command.
Tip: Use verbose mode when performing operations, and switch to the other modes when examining the output afterwards.
There are three verbosity modes:
• Brief displays output for objects that failed, but suppresses the output for objects that succeeded or that were skipped. Brief mode also suppresses some diagnostic messages generated by the server.
• Normal displays the output for objects that succeeded or failed, but suppresses the output for objects that were skipped, for example, "Not Under Revision Control."
• Verbose displays all of the generated output.
If logging is turned on, the log file contains all output regardless of the verbosity mode being used.
The current verbosity mode is indicated by an icon in the status bar.
Object Properties
Viewing and Setting Properties
The Properties dialog box lets you view and set properties for a selected object. You select the object whose properties you want to view, then can either:
• Select File =>Properties. • Click the Properties button. • Right-click on the object and select Properties from the context pop-up menu.
The information available from the Properties dialog box depends on the type of object you have selected. You can also select multiple objects, but typically less meaningful information is displayed when multiple objects are selected.
Depending on the object selected, one or more of these tabs could display:
• The General tab provides general information. • The Revision Control tab shows revision status.
77

DesignSync Data Manager User's Guide
• The Modules tab shows module information. • The Version tab that shows version status. • The Tag shows all of the branch tags, and all of the version tags, that are
associated with the object. • The Collection tab displays the collection members.
You can also display properties for Public Projects that have been defined for you.
General Properties
The General tab of the Properties dialog box provides general information about an object that you have selected.
Note: When displayed, the only field you can edit is the Description field, where you can enter a description of the object. Any description you enter here is separate from comments associated with revision control operations such as checkin and checkout. It is not propagated to the vault and is only associated with the local file. Other users who access the object from a shared workspace can view this description. Also, this description does not apply to any Potential Checkouts since they do not exist in the workspace.
For managed objects, you can enter revision notes in the Description text box. The notes in the Log, if any, also appear in the object's data sheet. The Log is a workspace for you to build check-in comments. When you check out an object, the Log for that object is seeded with your check-out comment. You can add to and edit the Log any number of times while you have the object checked out. When you check in the object, the comment you specify with the check-in command, if any, is appended to the Log to form the complete check-in comment. Therefore, to check in an object without any comment, clear the Log prior to the check-in command. Note that the content of the Log does not contribute to the minimum comment-length requirement, if any. Following the check-in, DesignSync clears the contents of the Log.
78

Using DesignSync
Note: When viewing the General tab for hierarchical references, you see the following notation for URL: <path>/<ModuleName>#<HierarchicalReferenceName>.
Related Topics
Revision Control Properties
Module Object Properties
Version Properties
Tag Properties
Displaying Project Properties
Viewing and Setting Properties
Revision Control Properties
The Revision Control tab of the Properties dialog box provides revision-control information about an object that you have selected. The information available depends on the object or objects you have selected.
79

DesignSync Data Manager User's Guide
When viewing the properties of a folder, you can initially set the vault location for the folder or change the vault location already associated with the folder. If you cannot see the entire vault location, place your cursor in the field and move it to the right.
Related Topics
ENOVIA Synchronicity Command Reference Help: setvault command
Specifying the Vault Location for a Design Hierarchy
Changing the Vault for a Design Hierarchy
General Properties
Module Object Properties
Version Properties
Module Object Properties
Version Properties
Tag Properties
Module Objects Properties
The Modules tab of the Properties dialog box provides revision-control information about modules and modules objects. The information available depends on the object you selected and whether it was selected from the client or the server. You can display module object properties for the following module object types:
Href Node (Server) Module Node (Server) Legacy Configuration Node (Server) Module Version Node (Server) Legacy Href Node (Server) Modules Node (Server) Legacy Module Base Node (Client) Module Base Node (Client) Legacy Module Node (Server) Module Href Node (Client) Legacy Modules Node (Server) Module File Member Node (Client and
Server) Module Branch Node (Server) Module Folder Member Node (Client and
Server)
Related Topics
General Properties
Revision Control Properties
80
Using DesignSync
Displaying Collections
Displaying Project Properties
Version Properties
Tag Properties
Version Properties
The Version tab of the Properties dialog box provides the author and revision log information about an object that you have selected in the vault.
Related Topics
General Properties
RevisionControl Properties
Module Object Properties
Tag Properties
Displaying Project Properties
Viewing and Setting Properties
Tags Properties
The Tags tab of the Properties dialog box shows all of the branch tags, and all of the version tags, that are associated with the object.
81

DesignSync Data Manager User's Guide
If the tag name is too long, you can mouse over to the column splitter and expand the tag name field by grabbing and then moving the column splitter indicator.
Related Topics
General Properties
RevisionControl Properties
Module Object Properties
Version Properties
Displaying Project Properties
Viewing and Setting Properties
Collection Properties
The Collection tab of the Properties dialog box provides a list of the members of a collection. The Collection tab appears when the properties of a View object are displayed.
82

Using DesignSync
Collection Properties Field Descriptions
Members
The list of members present in the view. The list displays the full workspace path of the view members.
Update Members
Refreshes the list of members.
Related Topics
Collections Overview
Displaying Collections
Collection Member Properties
Collection Member Properties
The Collection Member tab of the Properties dialog box provides the workspace address of the collection to which the specified member belongs.
83

DesignSync Data Manager User's Guide
Related Topics
Collections Overview
Displaying Collections
Collection Properties
Dialog Boxes
Comment Field
Enter notes for this operation here.
• Check-out comments are added to the Revision Log, which is used as part of the future check-in comments.
• Check-in comments are appended to any comments you have in your Revision Log (File=>Properties). Check-in comments become part of the version history. Depending on the DesignSync methodology your team adopts, your project leader may require that every check-in have a comment of a given length. If there is a minimum comment length defined with SyncAdmin, a tool-tip window will display in the lower-right portion of the Comment field. The tool tip will show you how many characters you have entered and the minimum character length of the comment. When you reach the minimum length, the tool tip will close.
84
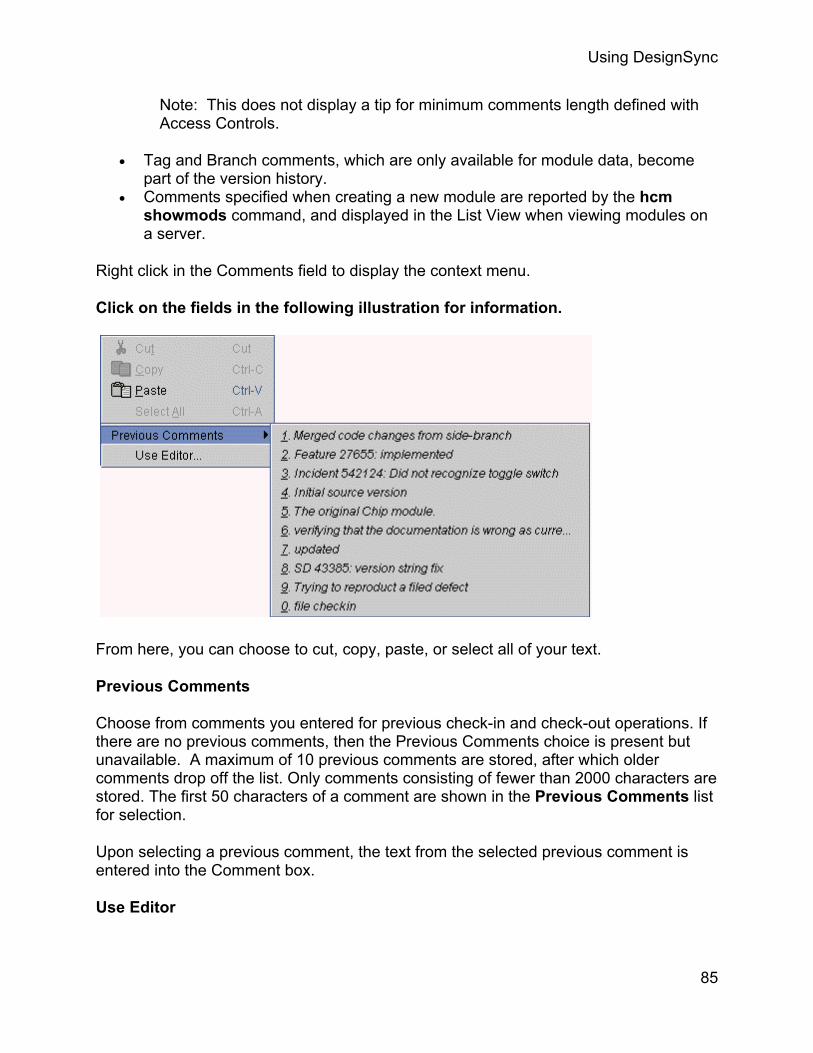
Using DesignSync
Note: This does not display a tip for minimum comments length defined with Access Controls.
• Tag and Branch comments, which are only available for module data, become part of the version history.
• Comments specified when creating a new module are reported by the hcm showmods command, and displayed in the List View when viewing modules on a server.
Right click in the Comments field to display the context menu.
Click on the fields in the following illustration for information.
From here, you can choose to cut, copy, paste, or select all of your text.
Previous Comments
Choose from comments you entered for previous check-in and check-out operations. If there are no previous comments, then the Previous Comments choice is present but unavailable. A maximum of 10 previous comments are stored, after which older comments drop off the list. Only comments consisting of fewer than 2000 characters are stored. The first 50 characters of a comment are shown in the Previous Comments list for selection.
Upon selecting a previous comment, the text from the selected previous comment is entered into the Comment box.
Use Editor
85

DesignSync Data Manager User's Guide
Open the default editor to prepare your comments. When you save and exit from your editor, your comments will be added to the Comment field. Quitting from your editor without saving leaves the Comment field empty.
Related Topics
Displaying Version History
ENOVIA Synchronicity Command Reference Help: hcm showmods
Exclude Field
Enter here the kinds of files or directories you want to exclude from the operation. Wildcards are allowed. Separate items with commas. For example, to exclude all log files from the operation, you would specify *.log .
Click on the button to the right of the Exclude text field to bring up a list of common exclude patterns (tmp,*.o,*.obj,*.bak,*~,*.log,*.db). Selecting a pattern will append the pattern to the current contents of the Exclude text field.
Do not specify paths in your arguments to Exclude . Before operating on each object (such as during a recursive operation), DesignSync compares the object's leaf name (path stripped off) to the items in the Exclude field to see if there is a match. Because the object's path is not considered, it will not match any item in the exclude list specified with a path. For example, if you specify bin/*.exe in the Exclude field, you will not successfully exclude bin/test.exe or any other *.exe file. You need to instead specify *.exe (or test.exe if you want to exclude only test.exe). This means, however, that you cannot exclude a specific instance of a file or folder -- you exclude all matching files and folders.
For details of how the Exclude value is used by a particular command, see the -exclude option description for the command invoked by the graphical interface.
See the SyncAdmin Help: Exclude Lists topic for information about global exclude lists.
Filter Field
Apply the specified expression, to identify the exact subset of module members on which the command will operate. Specify comma-separated object expressions, where an object expression takes the form:
[+|-]<path_expression>
86
Using DesignSync
where:
• +/- indicates whether a particular object expression indicates items to be included or excluded. The default is "-" , excluding items based on the <path_expression>
• <path_expression> is an extended glob expression that specifies object paths. An extended glob expression is a standard glob-style expression, but extended to allow the use of the "..." syntax to mean "match any number of directory levels".
For example, the expression top/.../lib/*.v matches any *.v file in a directory path that starts with top, then has any number of levels (zero or more), ending in a lib sub-directory.
Note: A glob expression of * for a <path_expression> is not always the same as .../* . For an exclude (-* or *), the * would match the folders in the top level directory, and therefore everything down the hierarchy. But for an include (+*), the * would only match the top level directories, and not match the lower level items, causing the lower level items to remain excluded.
Path expression matches are performed against the relative path of the objects from the starting point of the command.
If a match is performed against a full sync: URL, then a "..." value will match the sync://<host>:<port> at the start of the URL. For example, .../Chip matches sync://<host>:<port>/Modules/Chip.
Ordinarily, a command starts with everything included. But if the first entry in the Filter field is an include (+<path_expression>), then it is assumed that the intention is to start with everything excluded, as if the expression had started with -.../* . This makes it simple to write expressions that just include some items.
Notes:
• This field is only available when operating on module data. • The Exclude field is applied in addition to the Filter field. • When Populating Your Work Area, see Setting Persistent Populate Filters for
how Populate uses the Filter field.
Force Overwrite of Local Modifications Option
By default, DesignSync does not overwrite locally modified files. Use this option to force DesignSync to overwrite locally modified files. Your locally modified copies of files will be replaced according to the fetch mode selected. For example, unlocked copies, or links to cached files.
87

DesignSync Data Manager User's Guide
Href Filter Field
Apply the specified expression to filter out the hierarchical references followed, when operating on a module recursively. Specify comma-separated object expressions, where an object expression takes the form:
<href_expression>
where the <href_expression> is a simple glob expression.
The expressions are simple leaf names; it is not possible to specify an form of a "path" in order to filter out a specific href in a hierarchy.
The <href_expression> matches are applied to both the href name and the target module name, with the href being excluded if either matches. This is regardless of how far down the hierarchy the href is.
It is not possible to specify that a single instance of an href in a hierarchy be excluded, unless that href has a unique name. For example, if module Chip is being populated, and module Chip references CPU, which references ALU, which references STD_CELLS, then the href filter match is against STD_CELLS. And not, for example, against Chip/CPU/ALU/STD_CELLS.
Notes:
• This field is only available when operating on module data. • When Populating Your Work Area, see Setting Persistent Populate Filters for
how Populate uses the Href filter field.
Keys Field
You can control keyword substitution by selecting one of the following options from the Keyword Substitution drop-down menu:
• Update values and keep keys expands keyword values and retains the keywords in the file (default option). For example: $Revision 1.4 $
• Update values and remove keys expands keyword values but removes keys from the file. This option is not recommended when you check out files for editing. If you edit and then check in the files, future keyword updates are impossible, because the value without the keyword is interpreted as regular text. For example, 1.4.
• Remove values and keep keys keeps the keywords but removes keyword values. This option is useful if you want to ignore differences in keyword expansion, such as when you are comparing two different versions of a file. For example, $Revision: 1.28 $
88

Using DesignSync
• Do not update keeps exactly the same keywords and values as were present at checkin.
By default, revision control keywords in your ASCII (but not binary) files are expanded during a checkout or populate operation. You can also expand keywords in local copies of files that you leave in your working directory during a checkin.
If you perform this operation using a mirror or cache directory, keywords are automatically expanded in the file that remains in the cache or mirror directory and the keyword itself remains in the file -- as if the Update values and keep keys option were used.
Related Topics
Revision Control Keywords Overview
Local Versions Field
Note: This option affects only DS MW collection objects and objects of a collection defined by the Custom Type Package (CTP). This option does not affect objects that are not part of a collection or collections that do not have local versions.
When it fetches an object, the populate operation first removes from your workspace any local version that is unmodified. (To remove a local version containing modified data, specify Force overwrite of local modifications.) Then the populate operation fetches the object from the vault (with the local version number it had at the time of checkin).
The Local Versions option specifies the action that the populate operation takes with modified local versions in your workspace (other than the current, or highest numbered, local version). (DesignSync considers a local version to be modified if it contains modified members or if it is not the local version originally fetched from the vault when the collection object was checked out or populated to your workspace.)
Specify the Local Versions option with one of the following values:
• Save local versions. If your workspace contains a local version other than the local version being fetched, the populate operation saves the local version for later retrieval. For more information on retrieving local versions that were saved, see the ENOVIA Synchronicity Command Reference: localversion restore command.
• Delete local versions. If your workspace contains a local version other than the local version being fetched, the populate operation deletes the local version from your workspace.
• Fail if local versions exist. If your workspace contains an object with a local version number equal to or higher than the local version being fetched, the
89

DesignSync Data Manager User's Guide
Note: If your workspace contains an object with local version numbers lower than the local version being fetched and if these local versions are not in the DesignSync vault, the populate operation saves them. This behavior occurs even when you specify Fail if local versions exist.
Module Context Field
This field is only available when a module folder is being operated on, in which case a module context is required. Specifying a module context enables the operation to be run on a workspace folder that is below multiple modules. Or on a sub-folder of a module on a server.
The default module context value is an empty string. You can type the server URL of a module, or select an existing client module to restrict the scope of the operation. Or select from among the module instances for the folder being operated on, which are listed alphabetically in the pull-down. However, if more than one folder is being operated on, then you can only select from the available module instances (you cannot type in a value).
For dialog boxes in which a Browse... button appears next the Module context field, you can use the Browse... button to navigate to and select a module on a server.
Select Module Context
The Select Module Context dialog displays when an object needs a module context assigned to it. This usually happens when the objects can be associated with more than one module, for example, when adding an object to a module in a workspace that contains more than one module.
You may see this menu when performing any of the following tasks:
• Adding objects to a module • Viewing a module's data hierarchy • Navigating to the module vault on the server
Click on the fields in the following illustration for information.
90

Using DesignSync
Module Context
Select from the available module instances. The choices are listed in alphabetical order. Only the listed module instances can be applied to the selected objects.
Related Topics
Adding a Member to a Module
Displaying Module Hierarchy
Go Menu
Recursion Option
For a DesignSync folder, recursively operate on its contents. The set of objects operated on may be reduced by use of the Exclude field. By default, only the contents of the selected folder are operated on.
For a module, follow any hierarchical references and recursively operate on their contents. The set of objects operated on may be reduced by use of the Exclude field, the Filter field and/or the Href filter field. By default, only the contents of the selected module are operated on.
For a module folder, recursively operate on its contents. The Module context field determines the set of objects operated on. The set of objects operated on may be further reduced by use of the Exclude field and the Filter field. By default, only the contents of the selected folder are operated on.
Suggested Branches, Versions, and Tags
Dialog boxes that ask you to specify a version, branch, or tag provide a pull-down menu of suggested entries. These entries include:
• Any tags specified by the Project Leader through the Sync Administration application. See SyncAdmin Help: Tag Options.
91

DesignSync Data Manager User's Guide
• Standard selectors, such as Trunk and Latest, and special specifiers, such as Date(). These only appear when appropriate.
• Up to three options that query the server and add the results to the selection list: • Get branches queries the server for a list of all branches of the selected
object. • Get versions/tags queries the server for a list of all versions or tags of the
selected object. This option only appears when appropriate and when a single object is selected.
• Get selectors gets a list of all selectors appropriate for the current directory. This only works correctly if the current directory, or its associated vault, has the form sync://host:port/Projects/projectname/.... And if projectname is a ProjectSync project that has configurations defined.
Note: When you query the server for branches, versions, tags, or selector information, the system displays a "Getting vault information" screen. You can stop the process by clicking the Stop button during the query.
Command Buttons
Button Description Save Settings Click this button to save the option settings that you have
selected. The saved settings are displayed the next time you bring up the dialog box, and the settings persist from one DesignSync invocation to the next.
Most saved settings apply only to future invocations of the same operation. However, some saved settings, such as for Exclude Filter and Key Substitution, apply to all operations that support the options. You typically want to apply some options consistently across all commands. For example, if you exclude *.log files during checkins, you likely want to exclude *.log files for all operations.
OK When you click on the OK button, your settings are executed and the dialog closes.
Cancel
When you click on the Cancel button, the dialog closes without executing any of the settings in the dialog.
Help This button invokes help information for the dialog. You can also invoke help by pressing F1 at any time.
DesignSync Shells
DesignSync Command Line Shells
92

Using DesignSync
In addition to DesSync, the DesignSync graphical user interface, DesignSync has four command-line client shells: dss (DesignSync shell), dssc (concurrent dss), stcl (Synchronicity Tcl), and stclc (concurrent stcl). You might use a command-line shell instead of the graphical interface if you:
• Are more comfortable with command-line interfaces • Need to perform operations not available from the graphical interface • Do not want to incur the overhead of running a graphical interface • Want to create scripts to automate tasks or to perform operations in batch mode
Note that DesSync's command bar provides both Tcl and non-Tcl command-line modes so that you can perform command-line operations from the graphical interface.
Related Topics
Comparing the DesignSync Shells
Invoking a DesignSync Shell
Using DesignSync Commands in OS Shell Scripts
Creating DesignSync Scripts
Command Line Defaults System
Command Line Editing
ENOVIA Synchronicity Command Reference Help
Comparing the DesignSync Shells
The primary differences of the four command-line clients are outlined below:
Shell Uses syncd Includes Tcldss yes no dssc no no stcl yes yes stclc no yes
See ENOVIA Synchronicity Command Reference Help for more information on these command line clients.
syncd versus no syncd
93

DesignSync Data Manager User's Guide
The dss and stcl clients communicate with a DesignSycn server (SyncServer) through syncd. The syncd process can manage multiple dss/stcl requests per user, allowing one user to run parallel dss/stcl sessions. However, syncd handles requests serially, which can cause operations from one dss/stcl session to be blocked while operations from another session execute. It is therefore recommended that you use the concurrent shells: dssc and stclc. The dssc and stclc clients do not use syncd; they communicate directly with a SyncServer. The dssc and stclc clients also have the advantage of supporting more robust command-line editing than the dss and stcl shells. See Command-Line Editing for details. The stcl shell also does not support DesignSync command abbreviations as do the dss/dssc/stclc shells.
The only advantage of dss/stcl over dssc/stclc is that dss/stcl start-up time when a syncd is already running is less than dssc/stclc start-up time. If you frequently run DesignSync commands from your OS shell using the form:
% dssc <command>
% stclc -e "<command>"
instead of staying within the shell, consider using dss/stcl.
Tcl versus no Tcl
The stcl and stclc clients include Tcl, a powerful interpreted command language that provides programming constructs (such as variables, conditionals, and loops) in addition to all the DesignSync commands available from dss/dssc. Use the stcl/stclc shells when you need the scripting constructs of Tcl; otherwise, use dssc/dssc, which provide a simpler command environment. With stcl/stclc:
• You must use double quotes around objects that contain a semicolon (;), such as vaults, branches, and versions. The semicolon is the Tcl (and therefore stcl/stclc) command separator.
• You must specify the -exp option to execute a DesignSync command from the OS shell. Because stclc is primarily a scripting shell, an argument specified without -exp is assumed a script. With dss/dssc, the syntax for specifying a single command is simpler.
For more information on Tcl, including documentation for Tcl commands, visit the Tcl Web page:
http://www.tcltk.com
You can determine the version of Tcl included in your DesignSync installation's stcl interpreter by using the Tcl info tclversion and info patchlevel commands within an stcl/stclc client shell.
94

Using DesignSync
Related Topics
DesignSync Command Line Shells
Invoking a DesignSync Shell
Command Line Editing
ENOVIA Synchronicity Command Reference Help: dss Command
ENOVIA Synchronicity Command Reference Help: dssc Command
ENOVIA Synchronicity Command Reference Help: stcl Command
ENOVIA Synchronicity Command Reference Help: stclc Command
Invoking a DesignSync Shell
To invoke a DesignSync command-line shell, type one of the following commands from your UNIX or Windows shell:
dss
dssc
stcl
stclc
On Windows platforms, you can also invoke DesignSync shells from the Windows Start menu.
For dss and dssc, your prompt changes to dss> to indicate that you are in the dss/dssc shell. For stcl/stclc, the prompt is stcl>. You can now enter any of DesignSync's command-line commands, and if you are in an stcl/stclc shell, you can also use any Tcl construct.
The following example shows the invocation of dssc from a UNIX shell:
% dssc dss>
To exit any DesignSync shell, type exit.
dss> exit %
95

DesignSync Data Manager User's Guide
You can also enter DesignSync commands directly from the UNIX or Windows shell without remaining in the DesignSync shell. This capability is useful for executing occasional DesignSync commands, and for embedding DesignSync commands in OS shell scripts. To execute DesignSync commands without remaining in the shell, prefix the DesignSync command with dss or dssc -- for example:
% dssc ls sync://myserver.myco.com:2647/Projects <output from the DesignSync ls command> %
For the stcl/stclc shells, you prefix the DesignSync or Tcl commands with stcl or stclc, and you must use the -exp option to indicate that you are executing a command, not running a script -- for example:
% stclc -exp "ls sync://myserver.myco.com:2647/Projects" <output from the DesignSync ls command> %
Note:
The dss and stcl shells require a syncd daemon process. If syncd is not already running, it starts up automatically a few seconds after dss or stcl is invoked. You can also start syncd manually from a UNIX or Windows shell by using the syncdadmin command with the start argument. "syncdadmin start" starts syncd only if syncd is not already running -- only one syncd process can be running for a given user on a given machine.
Related Topics
DesignSync Command-Line Shells
Comparing the DesignSync Shells
Command-Line Editing
Using DesignSync Commands in OS Shell Scripts
Creating DesignSync Scripts
Running Scripts
ENOVIA Synchronicity Command Reference Help
Command Line Editing
96

Using DesignSync
Command-line editing including key shortcuts, command completion, and filename completion are supported for some DesignSync client shells. The same command-line editing support is provided for both Windows and UNIX clients; however, the command-line editing support varies depending upon the DesignSync client: stcl, stclc, dss, or dssc. The following table lists the types of command-line editing support for each of these clients.
Type of Editing
stclc Shell dssc Shell stcl Shell dss Shell
control key shortcuts Supported Supported
Adopts key bindings of platform
Adopts key bindings of platform
arrow key shortcuts Supported Supported
Adopts key bindings of platform
Adopts key bindings of platform
command abbreviations Supported Supported Not Supported Supported
command completion Supported Supported Not Supported Not Supported
filename completion Supported Supported Not Supported Not Supported
Tcl history command and '!' expansion
Supported Not Supported Not Supported Not Supported
Key Bindings
The following table describes the key bindings supported for the stclc and dssc shells.
Behavior Control Keys Special Keys Forward one character
Control-f Right arrow
Back one character Control-b Left arrow Beginning of line Control-a Home (only
supported for Windows platforms)
End of line Control-e End (only supported for Windows
97
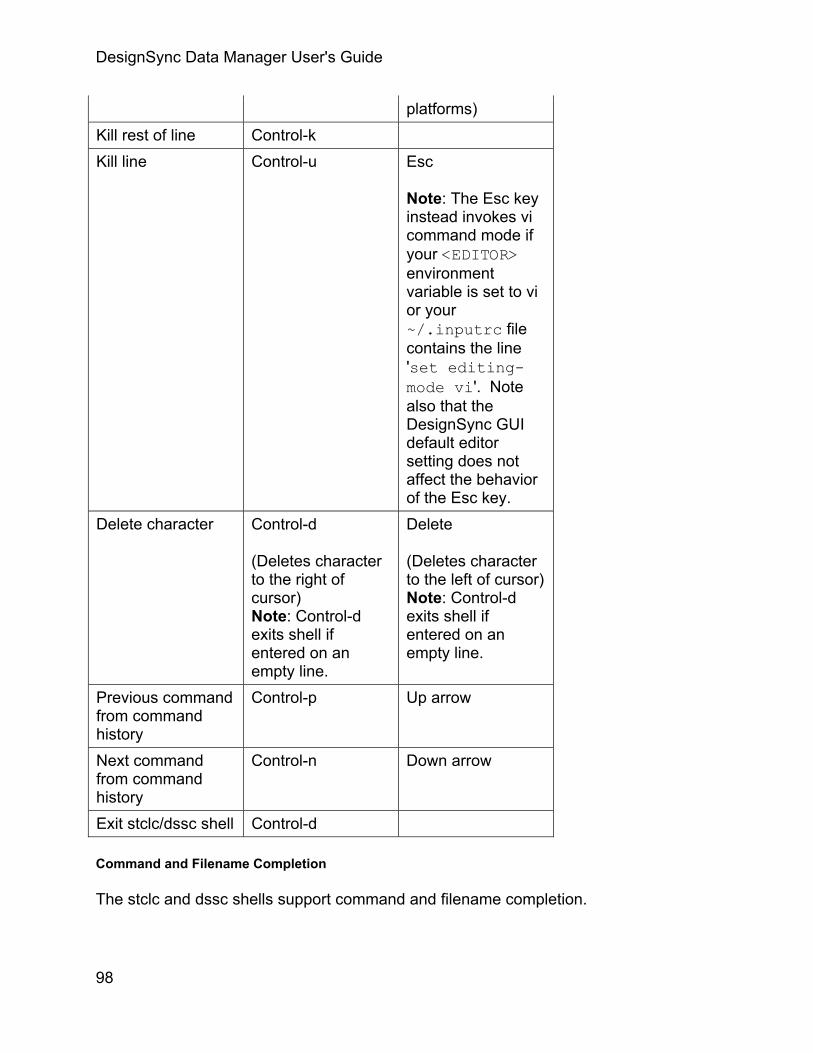
DesignSync Data Manager User's Guide
platforms) Kill rest of line Control-k Kill line Control-u Esc
Note: The Esc key instead invokes vi command mode if your <EDITOR> environment variable is set to vi or your ~/.inputrc file contains the line 'set editing-mode vi'. Note also that the DesignSync GUI default editor setting does not affect the behavior of the Esc key.
Delete character Control-d
(Deletes character to the right of cursor) Note: Control-d exits shell if entered on an empty line.
Delete
(Deletes character to the left of cursor)Note: Control-d exits shell if entered on an empty line.
Previous command from command history
Control-p Up arrow
Next command from command history
Control-n Down arrow
Exit stclc/dssc shell Control-d
Command and Filename Completion
The stclc and dssc shells support command and filename completion.
98

Using DesignSync
Note: Filename completion is only supported for files and folders because filename completion uses local file system objects. Filename completion is not supported for other DesignSync object types, such as Cadence view objects, DesignSync references, and server-side objects such as vaults or modules.
To use command and filename completion:
1. Type a partial command and press the <Tab> key. 2. If the command is unique, the command displays and you can enter options
using option completion:
To view a list of the command's options, press '-' and then the <Tab> key. To complete a partial option, press '-' followed by the partial option and the Tab key. If the partial option is unique, the option displays. If the partial option is not unique, choose from the options listed by typing to the next unique character and pressing the <Tab> key.
Note: Option completion is supported for DesignSync commands, not for general Tcl commands.
3. If there are multiple matches for a command completion, select a command from the list of matched commands displayed by typing to the next unique character and pressing the <Tab> key again.
4. If your command line includes a filename, you can use filename completion:
Type the partial filename and press the Tab key. If the partial filename is unique, the filename displays. If the partial filename is not unique, select a filename from the list of matched filenames displayed by typing to the next unique character and pressing the <Tab> key again.
5. Once you have completed the command line using command, option, or filename completion, you can edit the command line if necessary, then press Enter to invoke the command.
If no matches are found for command, option, or filename completion, the message "(no matches)" displays.
Examples of Command, Option, and Filename Completion
If you type The completion is pu<Tab> puts
rm<Tab> rmfile rmfolder rmvault rmversion
rmfi<Tab> rmfile
99
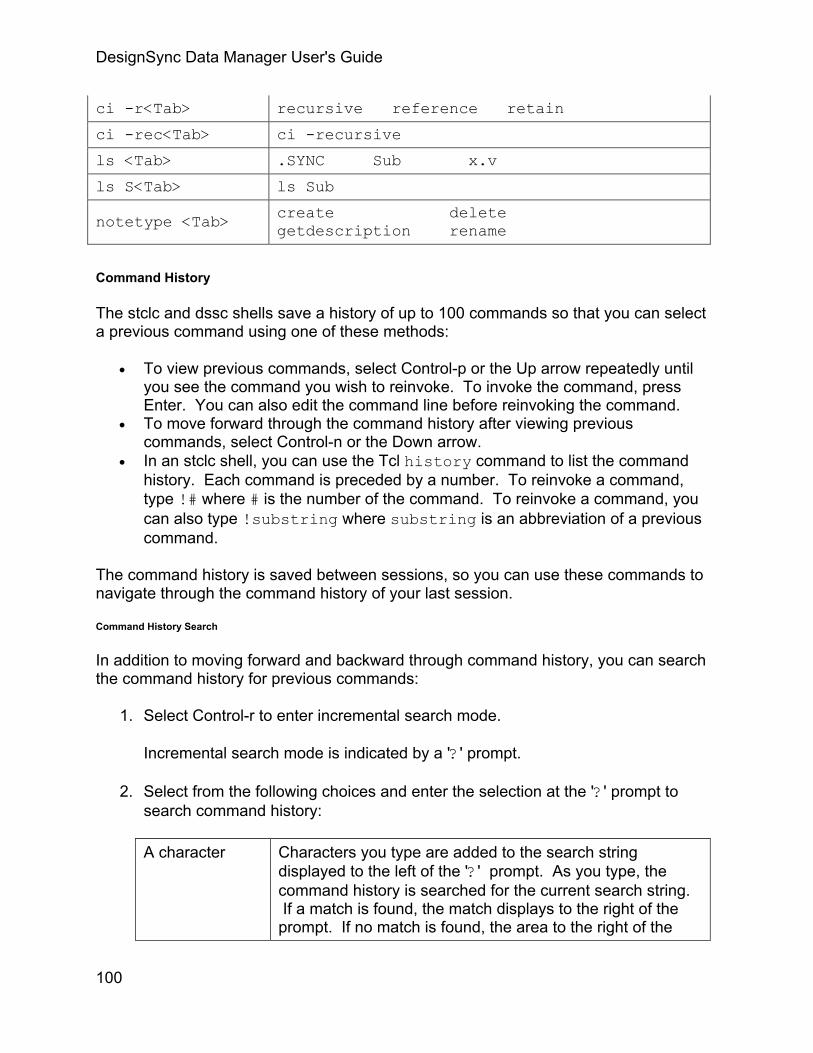
DesignSync Data Manager User's Guide
ci -r<Tab> recursive reference retain
ci -rec<Tab> ci -recursive
ls <Tab> .SYNC Sub x.v
ls S<Tab> ls Sub
notetype <Tab> create delete getdescription rename
Command History
The stclc and dssc shells save a history of up to 100 commands so that you can select a previous command using one of these methods:
• To view previous commands, select Control-p or the Up arrow repeatedly until you see the command you wish to reinvoke. To invoke the command, press Enter. You can also edit the command line before reinvoking the command.
• To move forward through the command history after viewing previous commands, select Control-n or the Down arrow.
• In an stclc shell, you can use the Tcl history command to list the command history. Each command is preceded by a number. To reinvoke a command, type !# where # is the number of the command. To reinvoke a command, you can also type !substring where substring is an abbreviation of a previous command.
The command history is saved between sessions, so you can use these commands to navigate through the command history of your last session.
Command History Search
In addition to moving forward and backward through command history, you can search the command history for previous commands:
1. Select Control-r to enter incremental search mode.
Incremental search mode is indicated by a '?' prompt.
2. Select from the following choices and enter the selection at the '?' prompt to search command history:
A character Characters you type are added to the search string displayed to the left of the '?' prompt. As you type, the command history is searched for the current search string. If a match is found, the match displays to the right of the prompt. If no match is found, the area to the right of the
100

Using DesignSync
prompt remains empty. Enter Invoke the command found by the incremental search
mechanism and return to normal mode. Esc Terminate the search and return to normal mode. Control-r Set the direction of the search to reverse mode and
continue searching. Repeat Control-r to find multiple previous commands that match the search string.
Control-s Set the direction of the search to forward mode and continue searching. Repeat Control-s to find multiple following commands that match the search string. Note: Control-s is only applicable if you have already entered reverse mode using Control-r.
Backspace To delete characters in the current search string, press the Backspace key. As you delete characters, the command history is searched for the current search string. Note: If you delete all of the characters in the search string, the search is set to the end of command history. If you are in forward mode (set using Control-s), no matches can be found because you are at the end of command history.
Related Topics
DesignSync Command Line Shells
Comparing the DesignSync Shells
Using DesignSync Commands in OS Shell Scripts
Creating DesignSync Scripts
Working with Command Aliases
You can create DesignSync command aliases, either from the command line or within scripts, to define your own DesignSync commands. For example, you can create an alias as follows:
dss> alias -args 1 go scd $1 && ls
Once defined, typing go with a folder argument has the effect of entering the command scd <folder> followed by ls. You cannot use the alias command to redefine the behavior of built-in DesignSync commands. For example, you could not have specified scd instead of go in this example.
101

DesignSync Data Manager User's Guide
Arguments to an alias are substituted for the $1 through $n placeholders in the alias definition. In stcl mode, you must surround the argument placeholders with curly braces to ensure that they are not interpreted as Tcl variables. For example:
stcl> alias -args 1 go scd {$1} && ls
Alias definitions remember the mode, dss or stcl, in which they were defined. For example, if while in stcl mode you create an alias containing Tcl constructs, the alias will always execute in stcl mode even if you change to dss mode. The following alias contains Tcl constructs and demonstrates some of the details of stcl syntax:
alias -args 1 -- checkin if \[file exists \$1 \] \{ci -new -noc \$1 \}
Things to note in this example:
• The -- option ensures that the -new and -noc checkin options are not treated as options to the alias command.
• Backslashes are required for [ and ] to prevent the expression from being interpreted during alias definition.
• Backslashes are required for { and } to avoid substitution of the second $1 placeholder.
• There must be a space after both occurrences of \$1, otherwise the alias command sees "$1]" (or "$1}"), which it does not recognize as $1, so no substitution takes place.
Other variations of the alias command include:
• alias -delete <alias_name>
Deletes the alias.
• alias -temporary <alias_name> <alias_definition>
Creates the alias, but does not store it permanently. If you exit DesignSync and come back, the alias is no longer defined.
• alias -list
Lists all available aliases.
Related Topics
ENOVIA Synchronicity Command Reference Help: alias command
Working with Scripts
102

Using DesignSync
DesignSync Scripts
You can include DesignSync commands in scripts that you invoke from any of the DesignSync clients or from your operating system. The following sections focus on creating and running scripts containing DesignSync commands:
• Using DesignSync Commands in OS Shell Scripts • Creating DesignSync Scripts • Running Scripts • Running a Script at Startup
You can also use DesignSync commands in Tcl scripts by using the stcl language, a combination of DesignSync, ProjectSync, and Tcl commands. If your scripts are Tcl scripts that include DesignSync or ProjectSync commands, see the ENOVIA Synchronicity stcl Programmer's Guide for guidance in developing, setting up, and running both client and server stcl scripts.
Using DesignSync Commands in OS Shell Scripts
You can embed DesignSync and Tcl commands in operating-system (OS) shell scripts. For single commands, include the line as though you were invoking it directly from the OS shell. In the following example, the c-shell script called lockNotify.csh takes a directory and your user name as arguments, searches for all files locked by you, then sends you an email with the list of locked files:
#!/bin/csh set dir=$1 set user=$2
# Find files locked by the user in the specified directory # dssc ls -recursive -path -locked $dir | grep $user > /tmp/$user.list
# Notify the user # mail -s "Reminder: You have locked files" $user < /tmp/$user.list
Note that all the commands in this script are OS commands except for ls, which is the DesignSync ls command and must therefore be preceded by dssc. You could then run this script from your OS shell:
% lockNotify.csh . goss
103

DesignSync Data Manager User's Guide
If you have a block of DesignSync or Tcl commands that you want to include in your script, you can enter the DesignSync shell, issue several commands, then exit from the shell, as shown:
#!/bin/csh
# - Go to the local working directory # - Specify which files to check-in and tag # - Check in selected files from the local working directory # to the shared cache. Symbolic links are created from # the work area to the files in the cache. # - Tag these files, which will be used by test engineers, moving # the tag from a previous version if necessary dssc<<EOF scd $HOME/synth select hdl* ci -comment "ready for testing" -share tag -replace ready_for_testing exit EOF
Related Topics
DesignSync Command-Line Shells
Invoking a DesignSync Shell
Creating DesignSync Scripts
Creating DesignSync Scripts
You can create scripts containing DesignSync commands in two ways:
• By hand, using any text editor. The following is an example of a scripts created by hand:
# Go to the local working directory scd $HOME/synth
# # Specify which files to check-in and tag # select hdl*
# # Check in selected files from the local working directory
104
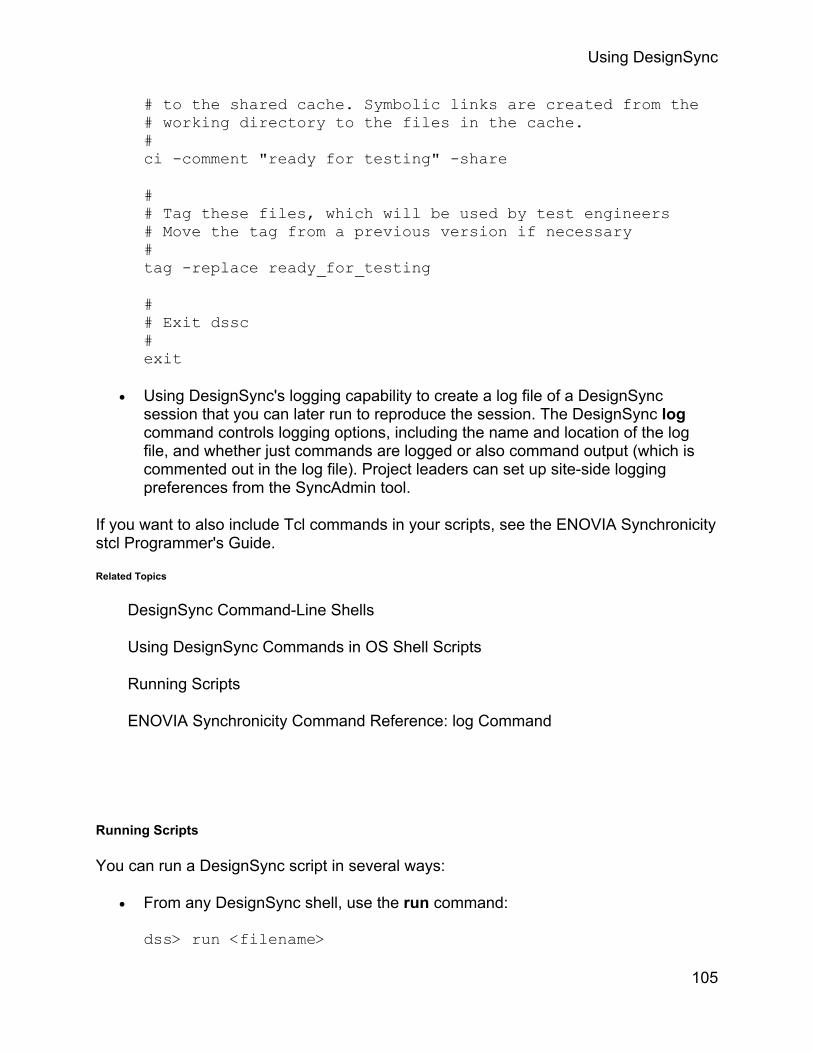
Using DesignSync
# to the shared cache. Symbolic links are created from the # working directory to the files in the cache. # ci -comment "ready for testing" -share
# # Tag these files, which will be used by test engineers # Move the tag from a previous version if necessary # tag -replace ready_for_testing
# # Exit dssc # exit
• Using DesignSync's logging capability to create a log file of a DesignSync session that you can later run to reproduce the session. The DesignSync log command controls logging options, including the name and location of the log file, and whether just commands are logged or also command output (which is commented out in the log file). Project leaders can set up site-side logging preferences from the SyncAdmin tool.
If you want to also include Tcl commands in your scripts, see the ENOVIA Synchronicity stcl Programmer's Guide.
Related Topics
DesignSync Command-Line Shells
Using DesignSync Commands in OS Shell Scripts
Running Scripts
ENOVIA Synchronicity Command Reference: log Command
Running Scripts
You can run a DesignSync script in several ways:
• From any DesignSync shell, use the run command:
dss> run <filename>
105

DesignSync Data Manager User's Guide
If the extension of the file is .tcl, the script is run in stcl mode regardless of your current shell. Otherwise, the script is run as a dss script (no Tcl constructs allowed).
If you do not specify a path for the script file, DesignSync looks in the default log directory. By default, the default log directory is the directory from which you invoked DesignSync. You can change the default log directory by using either of the following DesignSync command-line commands:
dss> run -defaultdir <path> dss> log -defaultdir <path>
Note that project leaders can set up site-side logging preferences from the SyncAdmin tool.
• From an stcl or stclc shell, you can use the Tcl source command to run your script. Running the script with source or run has the same effect.
stcl> source <filename>
• From your OS shell, use stcl or stclc without the -exp option to run the script:
% stclc <filename>
• DesignSync can run a script automatically when you invoke a DesignSync client. See Running a Script at Startup.
Note:
To run server-side scripts -- scripts that reside on and are executed by a SyncServer as opposed to a DesignSync client -- use the rstcl command.
Related Topics
DesignSync Command-Line Shells
Creating DesignSync Scripts
Running a Script at Startup
ENOVIA Synchronicity Command Reference Help: run Command
ENOVIA Synchronicity Command Reference Help: rstcl Command
ENOVIA Synchronicity stcl Programmer's Guide
Running a Script at Startup
106
Using DesignSync
You can have DesignSync run a startup script when you invoke any DesignSync client. In SyncAdmin, select General =>Startup to specify a startup script. The script can contain DesignSync and Tcl commands. By default, the script is named dsinit.dss, but you can choose any name and path for the script. DesignSync interprets the specified script file as a dss script unless the file has a .tcl extension, in which case DesignSync interprets it as an stcl script. If you do not specify a path for the script, DesignSync searches for the script in these directories in the following order:
1. $SYNC_USER_CFGDIR (by default, resolves to <HOME>/.synchronicity on UNIX and %AppData%\Synchronicity on Windows)
2. $SYNC_SITE_CUSTOM (resolves to <SYNC_CUSTOM_DIR>/site by default) 3. $SYNC_ENT_CUSTOM (resolves to <SYNC_CUSTOM_DIR>/enterprise by
default)
DesignSync searches for the script in the $SYNC_SITE_CUSTOM directory only if the $SYNC_USER_CFGDIR directory does not contain the script.
Examples of tasks you might include in a startup script are:
• scd to a particular directory • Perform an incremental populate (so you always have the latest versions of files)
Your system administrator or project leader can also prepare startup scripts for DesignSync to source at startup. In this way, your site or project team can share the same aliases. See Autoloading Tcl Procedures for more information.
Related Topics
SyncAdmin Help: Startup Options
DesignSync Command-Line Shells
Running Scripts
Creating DesignSync Scripts
DesignSync Data Manager Administrator's Guide: Autoloading Tcl Procedures
DesignSync Data Manager Administrator's Guide: Using Environment Variables
SyncServers
What Is a SyncServer?
DesignSync is a client/server groupware application similar in architecture to WWW browsers and the servers with which they communicate. DesignSync servers, known as
107

DesignSync Data Manager User's Guide
SyncServers, manage shared information, control access to design files, and perform administrative functions such as user authentication and user privilege validation.
Related Topics
Accessing a SyncServer: User Authentication
DesignSync Data Manager Administrator's Guide: SyncServer List Files
Accessing a SyncServer with User Authentication
Your project leader may have configured DesignSync to require username and password authentication when accessing vault data on a SyncServer (client vaults never require authentication). The first time you access the server, DesignSync displays a dialog box where you must supply your username and password.
The username and password must correspond to your ProjectSync user profile, or if the SyncServer is configured to use LDAP (Lightweight Directory Access Protocol), your ProjectSync-compatible LDAP profile. See ProjectSync User's Guide: What Are User Profiles? for more details. If you do not know your username or password, contact your project leader.
This authentication takes place each time you start a new DesignSync session or access a different server. If you select Save password, DesignSync stores your password, so in subsequent accesses to the server, you will not have to enter your username and password. Note that the username and password must correspond to your ProjectSync user profile for that server. If you do not have a ProjectSync user profile, contact your project leader.
Related Topics
ENOVIA Synchronicity Access Control Guide: User Authentication Access Controls
108

Using DesignSync
DesignSync URLs
URLs (Uniform Resource Locators) give you a way to identify every object in the computing world. The URL of an object specifies what computer the object is on, where the object is on that computer, and how to access it.
Most URLs you see on the World Wide Web begin with the string http. This string represents the protocol portion of the URL. The protocol tells the server receiving the request how to process the URL -- in this case a request for an HTML page residing somewhere on the server's file system.
Instead of the http protocol, DesignSync uses a special protocol, sync, to allow it to instruct a SyncServer how to distinguish and handle requests for information. Using the sync protocol, DesignSync can address objects such as directories or files, anywhere on the Internet, by specifying a URL with either of the following formats:
sync://IPAddress:portnum/path_to_object
sync://host.domain:portnum/path_to_object
For example:
sync://208.196.5.5:2647/Projects/SCSI_Proj
or
sync://host.mycompany.com:2647/Projects/SCSI_Proj
or if you are on the same LAN as "host":
sync://host:2647/Projects/SCSI_Proj
The default SyncServer port number is 2647. You can omit the port specification if the SyncServer is using this default port number.
All objects can be referenced in the DesignSync clients, and by the DesignSync server as a URL -- not only remote objects, but also objects on the local file system of the computer where you are running the DesignSync client. You address a local object with the file protocol, as in the following:
file:///directory_path/file_name
Note:
DesignSync also supports a syncs protocol for communicating with secure (SSL) SyncServer ports. In most cases, DesignSync automatically redirects requests to a
109

DesignSync Data Manager User's Guide
cleartext (non-secure) port using the sync protocol to the secure port, if one is defined. The default DesignSync secure port number is 2679. Your DesignSync administrator defines what SyncServer ports are available and whether secure communications are required. See Overview of Secure Communications for more information.
Related Topics
URL Syntax
DesignSync Data Manager Administrator's Guide: Using Secure Communications
URL Syntax
The table below shows examples of URL syntax for various types of objects you can access through the SyncServer. The portion host:port represents the server's ip address:port number or symbolic DNS address:port number.
The ellipses (...) in the URLs represent the path to the object (file, module, folder, vault, version, branch, or branch-point version) being accessed, which should include a leading slash.
Object Type
URL Comment
File file://.../file_name
Example:
file:///home/bob/work/mod1/block
Similar to normal http URLs for files
Folder file://.../folder_name
sync://host:port/.../folder_name
Example:
file:///home/bob/work/mod1
sync://linus.appco.com:2647/Projects/gemini/block1
Folders can be client-side (file URL) or server-side (sync URL).
Module
sync://host:port/Modules/category_path/module_name
Example:
sync://linus.appco.com:2647/Modules/ProjectA/ChipModules/ALU
The category_path may be empty. However, the modules
110

Using DesignSync
must always be under the /Modules/ path.
Module Version
sync://host:port/Modules/category_path/module_name;version
Example:
sync://linus.appco.com:2647/Modules/ProjectA/ChipModules/ALU;1.4.1
Version
sync://host:port/.../vault_name;1.1
Example::
sync://linus.appco.com:2647/Projects/gemini/block1/top.v;1.3
Version URL is formed by appending the Version name to the Vault URL
Branch-Point Version
sync://host:port/.../vault_name;1.1
Example:
sync://linus.appco.com:2647/Projects/gemini/block1/top.v;1.3
Same as Version (just happens to be a version from which a branch emanates)
Branch
sync://host:port/.../vault_name;1.1.1
Example:
sync://linus.appco.com:2647/Projects/gemini/block1/top.v;1.3.1
Branch URL is formed by appending the Branch name to the Vault URL
Reserved Characters
Module and category names may only contain printable characters and cannot contain a space, or any of the following symbols:
~ ! @ # $ % ^ & * ( ) , ; : | ` ' " = [ ] / \ < >
111

DesignSync Data Manager User's Guide
Because these symbols are used for specific purposes in URLs and datasheets, and are illegal for modules, you should avoid using them in other DesignSync elements as well to minimize confusion.
Reserved File Extensions
Do not use the following strings in your URL names, as either files or directory components:
.sgc
.sync
These strings are reserved for use by DesignSync's Custom Type System. See the DesignSync Custom Type System Programmer's Guide: Custom Type System for more information.
Setting Up a DesignSync Workspace
Setting Up a Work Area for a Project
If you are part of a project that your project leader has defined as a Public Project, you will want to populate a work area with that project's files. Public Projects are displayed in your Tree View under Projects =>Public Projects.
1. In the Tree View, expand the Projects item, then expand Public Projects.
The Tree view lists the defined projects (if any), and the List View displays each project name and its description.
2. Select the project for which you want to create a work area.
There may be a delay as DesignSync verifies that the vault for the selected project is accessible.
3. Click the right mouse button.
A popup menu appears. If DesignSync was unable to access the project's vault, the commands in the popup menu are grayed out and you cannot continue.
4. Select Setup a work area for this project.
The Workspace Wizard is invoked. When launched by the File =>Workspace Wizard command, the Workspace Wizard asks you a series of questions to either create a new project or access an existing project. Launching the Workspace Wizard from the "Setup a work area for this project" command skips the initial questions and brings you directly to the Select Working Area dialog
112

Using DesignSync
box. You continue from this point responding to the questions that the Workspace Wizard asks you.
Related Topics
What Is a Project?
Workspace Wizard Overview
Joining a Project Using a Wizard
What Is a Project?
A DesignSync project is the DesignSync and ProjectSync infrastructure required to support a real-world design project, such as:
• Who are the team members, and what access rights do they have? • Where is the vault that stores the project files located, and what cache directory
is used? • What design methodologies (such as locking versus non-locking file sharing, or
required check-in comments) are enforced? • What are the project-wide defaults for options such as the default ASCII editor
and HTML browser, whether files are checked out writeable or read-only, and the default fetch state?
When fully implemented, all of these attributes would be defined by a project leader and inherited by all team members. Using the SyncAdmin tool, the DesignSync project leader or LAN administrator can do the following:
• Set LAN-wide preferences such as the default editor, default fetch state, recognition of collection objects, and so on. You inherit all of these settings, but can override some of them by using SyncAdmin yourself or through Tools => Options within DesignSync.
• Define Public Projects, which consist of the project name, the vault where the project files are stored, the project's cache directory, and an optional description.
Public Projects provide two benefits:
• They allow different vaults to use different caches. For example, the ASIC1 design project could use a cache called asic1_cache, while the FPGA project could use a cache called fpga_cache.
• They simplify how team members interact with a project vault. You can do the following:
o View the properties (definition) of a Public Project. o Browse the vault of a Public Project. o Populate a work area with the files of a Public Project.
113

DesignSync Data Manager User's Guide
Notes:
• The project interface prior to DesignSync V2.1 (New Project and Edit Project dialog boxes) allowed users to associate a vault and a cache directory. These project definitions were on a per-user basis and were therefore of limited usefulness so have been removed in V2.1. A vault and cache association is now defined by a project leader using the SyncAdmin tool.
• The default cache directory used for vaults that have not been defined as part of a Public Project is the cache that was specified during installation (typically <SYNC_DIR>/../sync_cache) or by the LAN administrator using SyncAdmin.
• Although caching as a means for sharing DesignSync files is not implemented on Windows platforms (the share option to the check-in, check-out, cancel, and populate commands are not available), caches are used by DesignSync for other housekeeping purposes. Therefore, you can define and use Public Projects, including specifying the cache directory, on Windows.
Related Topics
Defining a Public Project
Displaying Project Properties
Browsing a Project Vault
Setting Up a Work Area for a Project
DesignSync System Administration Help: The SyncAdmin Tool
Defining a Public Project
Your project leader or LAN administrator uses the SyncAdmin tool to define Public Projects. See the SyncAdmin help for more information.
Note: You must restart DesignSync to see new Public Projects or changes to existing Public Projects.
Related Topics
What Is a Project?
DesignSync System Administration Help: The SyncAdmin Tool
Displaying Project Properties
You can display the definitions of projects that appear under Projects =>Public Projects in your Tree View as follows:
114

Using DesignSync
1. In the Tree View, expand the Projects item, then expand Public Projects.
The Tree view lists the defined projects (if any), and the List View displays each project name and its description.
2. Select the project whose properties you want to view.
There may be a delay as DesignSync verifies that the vault for the selected project is accessible.
3. Click the right mouse button.
A popup menu appears. If DesignSync was unable to access the project's vault, the commands in the popup menu will be grayed out and you cannot continue.
4. Select the Properties command.
The Properties dialog box appears, which displays the name, vault, cache, and description of the project. Note that the fields are not editable. Project leaders can modify a Public Project definition using the SyncAdmin tool.
Related Topics
What Is a Project?
Viewing and Setting Properties
Browsing a Project Vault
You can browse the vault of a Public Project:
1. In the Tree View, expand the Projects item, then expand Public Projects.
The Tree view lists the defined projects (if any), and the List View displays each project name and its description.
2. Click the project whose vault you want to browse.
There may be a delay as DesignSync attempts to communicate with the vault. Assuming the vault is accessible, a green check mark appears next to the project name and the top-level contents of the vault are displayed in the List View. You can then expand the project in the Tree View or the folders in the List View to navigate farther into the vault.
Related Topics
What Is a Project?
115
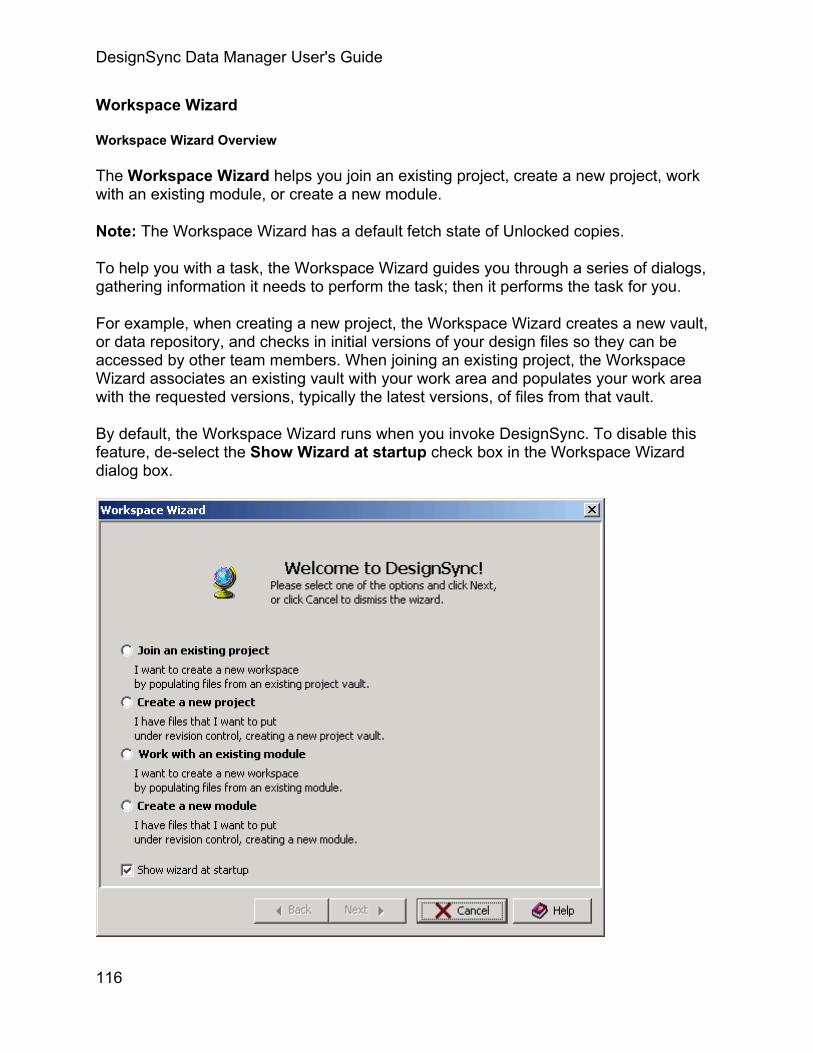
DesignSync Data Manager User's Guide
Workspace Wizard
Workspace Wizard Overview
The Workspace Wizard helps you join an existing project, create a new project, work with an existing module, or create a new module.
Note: The Workspace Wizard has a default fetch state of Unlocked copies.
To help you with a task, the Workspace Wizard guides you through a series of dialogs, gathering information it needs to perform the task; then it performs the task for you.
For example, when creating a new project, the Workspace Wizard creates a new vault, or data repository, and checks in initial versions of your design files so they can be accessed by other team members. When joining an existing project, the Workspace Wizard associates an existing vault with your work area and populates your work area with the requested versions, typically the latest versions, of files from that vault.
By default, the Workspace Wizard runs when you invoke DesignSync. To disable this feature, de-select the Show Wizard at startup check box in the Workspace Wizard dialog box.
116

Using DesignSync
You can also invoke the Workspace Wizard from your DesignSync session in any of these three ways:
• Select Revision Control =>Workspace Wizard from the DesignSync menu. • Right-click on a public project in Tree View and select Setup a work area for
this project. Invoking the Workspace Wizard this way bring you directly to the Select Working Area dialog box.
• On the server, in Tree View, right-click on the Modules folder to display a popup menu. From the menu, select Workspace Wizard.
When DesignSync displays the Workspace Wizard dialog box, you select the option you want and click Next to continue to the next dialog box. Each options leads through the Workspace Wizard steps.
Using the Workspace Wizard
Before you use the Workspace Wizard, you should review the Workspace Wizard Overview topic.
The Workspace Wizard dialog box (Welcome to DesignSync!) asks you to choose one of the four following options.
Note: The Workspace Wizard has a default fetch state of Unlocked copies. The fetch state is set through the SyncAdmin application.
Option and Steps Choose this option when Join an existing project:
1. Specify the vault of the existing project
2. Select workspace for an existing project
3. Specify selector or configuration 4. Specify object state 5. Specify mirror (optional) 6. Final confirmation
The vault structure for a project is already in place and you have just joined the team.
Note: Create the desired folder structure in your workspace before running the wizard.
Create a new project:
1. Specify a Vault for a New Project 2. Select Workspace 3. Specify Files to Exclude 4. Specify the Object State 5. Specify a Check-In Comment 6. Final Confirmation
You want to create a vault on the server from files in your workspace.
You want to put this design hierarchy, including any files it contains, into a vault accessible by the team members.
117

DesignSync Data Manager User's Guide
Work with an existing module:
1. Select a Module 2. Select a Workspace for the
Module 3. Fetch the Module Hierarchy 4. Final Confirmation
A module already exists and you select this option to fetch the module to your workspace.
For example, you join a design team that uses modules to contain design blocks. To fetch the module for a design block to your workspace, select this option.
Create a new module:
1. Specify Information about the New Module
2. Select Workspace Files for the New Module
3. Final Confirmation
You want to create a module on the server from files in your workspace.
For example, you are the design team leader and your team is using modules for its design blocks. Your work area already has the directory containing the files for the block. You want to put those files under revision control and create a module from them. Then team members can fetch the module to their workspaces and work with it.
By default, the Workspace Wizard runs when you invoke DesignSync. To disable this feature, de-select the Show Wizard at startup check box in the Workspace Wizard dialog box.
Click on the option in the following illustration to see the dialog box for the next step for that option.
Related Topics
Object States
SyncAdmin Help: Default Fetch States
Joining an existing project
Specify the Vault of the Existing Project
The Select Vault dialog box asks you specify the URL of the vault of the existing project. You can choose between remote and local vaults.
A remote vault is used when more than one person or an entire development team (often from diverse geographical locations) needs to share files. In this way any team member located anywhere can access your vault using the URL of your vault.
A local vault is used when you will not be sharing your design files with other users. DesignSync then uses the default client-vault location as specified when DesignSync
118

Using DesignSync
was installed. Since you typically want to share files with other users, choosing a local vault is not often a logical choice when joining an existing project.
To specify the existing project you want to join:
1. In the field of Select Vault dialog box, enter the URL of the vault that contains the project files for which you want to populate your work area. You can enter the URL in one of three ways:
• Type the URL in the text field. • Click on the arrow and select from the URLs (if any) that you entered in
previous Wizard invocations. DesignSync stores the 10 most recently entered URLs.
• Click the Browse Servers button to browse the available public projects (as defined by your project leader) and SyncServers (as defined in your site and local SyncServer lists). Click the Browse Local button to select a local vault on your machine.
For example, you might specify:
sync://apollo.spaceco.com:2647/Projects/Sportster
where sync: is the DesignSync protocol for specifying a remote server, apollo is the server (machine) name, 2647 is the port number that was specified when the server was configured, Projects is the top-level folder on the server under which project vaults are located, and Sportster is the top-level vault folder for the Sportster project. If apollo is on your LAN, you can simplify the URL to:
>sync://apollo:2647/Projects/Sportster
2. Click Next button to continue to the Select Workspace dialog box. o If DesignSync alerts you if the specified vault location does not exist, you
need to verify that the URL you entered is correct. o You may be asked for account information (username/password) to
access the SyncServer.
Notes:
• The default SyncServer port is 2647. You can omit the port specification when accessing a SyncServer that uses the default port number.
• On Windows machines, there may be a short delay before the next dialog box appears depending on your drive configuration.
• If you are working in a multi-branch environment, you can optionally specify the persistent selector list (see the What Are Persistent Selector Lists topic for details) for the hierarchy by following the vault URL with @<selectorList>. This URL syntax is equivalent to executing a setselector command following the
119

DesignSync Data Manager User's Guide
setvault command. For example, you could define the persistent selector list to be "main" as follows:
sync://apollo:2647/Projects/Sportster@main
• DesignSync also supports a syncs protocol for communicating with secure (SSL) SyncServer ports. In most cases, DesignSync automatically redirects requests to a cleartext (non-secure) port using the sync protocol to the secure port, if one is defined. The default DesignSync secure port number is 2679. Your DesignSync administrator defines what SyncServer ports are available and whether secure communications are required.
Select Workspace for an Existing Project
The Select Workspace dialog box asks you to choose the work area into which you want the project files to be put.
To select a workspace for an existing project:
1. In the Workspace field, enter the path to the existing project. You can click Browse to browse to the correct path.
2. Optionally, in the Bookmark field, enter the bookmark name that will display for this project from your DesignSync Bookmarks menu.
3. Click Next button to continue to the Specify Selector or Configuration dialog box.
Note: The Workspace Wizard will not let you proceed if you select any of the following as the directory you want to populate with project files:
• My Computer • A drive, such as C: (Windows only) • Your $HOME directory (UNIX only)
Specify Selector or Configuration
The Specify selector or configuration dialog box asks you to specify what versions of design files you want to be put in your work area. You can specify:
• A branch selector, typically Trunk, which populates the Latest versions from the specified branch.
• Any other selector list, such as a version tag. However, the selector list you specify becomes the persistent selector list for the work area, meaning that the workspace will always be populated with the matching selector list. In the case of a version tag, it means it will always be populated with the same tagged version. If the version tag is mutable, this may be the desired behavior, but more often, you'll want to specify a branch tag instead.
120
Using DesignSync
• A project configuration, as created using ProjectSync, that has been applied to the project vault you are accessing. See the ProjectSync documentation for additional information about project configurations.
To select a workspace for an existing project:
1. Click the arrow to the right of the text field to display a drop-down list of choices. The list contains:
o Trunk, which is the default branch tag for branch 1. o The persistent selector list for the work area you specified if it is different
from the default of Trunk. o The selector list, if any, that you specified with the @<selectorList>
syntax when you specified the URL of the project vault. 2. Click Next button to continue to Specify the Object State Dialog box.
Specify the Object State of Populated Items
The Specify Object State dialog box asks you what should be placed in your work area as a result of the check out. The options are:
Option Result References to versions Leaves DesignSync references to the files in your
work area. Unlocked copies Leaves copies (replicas) of the files in your work
area, not locked. This is the default selection unless your project leader has defined a default fetch state.
Locked copies: Leave files in your work area, locked. Other users can check the files out from the vault but cannot check in new versions as long as you have the files locked.
Links to caches Links to a shared copy of the design object in a cache directory. This option is available only on UNIX platforms.
Links to mirror: Links to a shared copy of the design object in a mirror directory. This option is available only on UNIX platforms.
To select a specify the object state of populated items:
1. Select one of the object state options. 2. If you chose the Links to mirror option, when you click Next, the Workspace
Wizard takes you to the Specify Mirror Dialog box. If you chose any other option, when you click Next, the Workspace Wizard takes you to Finished dialog box. This is where you can confirm or cancel the commands you have entered the previous dialog boxes.
121
DesignSync Data Manager User's Guide
Specify Mirror
The Specify Mirror dialog box asks you to specify the mirror directory to associate with this project.
Notes:
• Mirror capability is related to symbolic links which exist only on UNIX systems. • A mirror directory must have already been set up for the project. See ENOVIA
Synchronicity Command Reference: setmirror for more information.
To specify a mirror:
1. Specify the mirror directory. Enter the directory in the field or You can click Browse to select the directory. If you have not associated a mirror directory with your work area, an alert box warns you that you cannot proceed.
2. Click Next, the Workspace Wizard takes you to Finished dialog box. This is where you can confirm or cancel the commands you have entered the previous dialog boxes.
Workspace Wizard Confirmation
After gathering information the previous dialog boxes, the Workspace Wizard displays the Finished dialog box. The Finished dialog displays the commands DesignSync uses to complete the operation. At this point, you must confirm or cancel the commands you have entered the previous dialog boxes.
Click Finish to have DesignSync perform the commands listed in the dialog box. Click Cancel to cancel these commands.
Examples of commands you could see in the Finish dialog box:
If you selected Join an existing project from the Workspace Wizard dialog, the Finished dialog would display commands similar to these:
122

Using DesignSync
If you selected Create a New Module from the Workspace Wizard dialog, the Finished dialog would display commands similar to these:
123

DesignSync Data Manager User's Guide
Related Topics
Workspace Wizard Overview
Workspace Wizard Paths
Creating a new project
Specify a Vault for a New Project
The Select Vault dialog box asks you specify the URL of the vault of the new project. You can choose between remote and local vaults:
A remote vault is used when more than one person or an entire development team (often from diverse geographical locations) needs to share files. In this way any team member located anywhere can access your vault using the URL of your vault.
A local vault is used when you will not be sharing your design files with other users. DesignSync then uses the default client-vault location as specified when DesignSync was installed. Since you typically want to share files with other users, choosing a local vault is not often a logical choice when creating a new project.
124

Using DesignSync
To specify the new project you want to create:
1. In the field of Select Vault dialog box, enter the URL of the vault that contains the project files for which you want to populate your work area. You can enter the URL in one of three ways:
• Type the URL in the text field. • Click on the arrow and select from the URLs (if any) that you entered in
previous Wizard invocations. DesignSync stores the 10 most recently entered URLs.
• Click the Browse Servers button to browse the available public projects (as defined by your project leader) and SyncServers (as defined in your site and local SyncServer lists). Click the Browse Local button to select a local vault on your machine.
For example, you might specify:
sync://apollo.spaceco.com:2647/Projects/Sportster
where sync: is the DesignSync protocol for specifying a remote server, apollo is the server (machine) name, 2647 is the port number that was specified when the server was configured, Projects is the top-level folder on the server under which project vaults are located, and Sportster is the top-level vault folder for the Sportster project. If apollo is on your LAN, you can simplify the URL to:
>sync://apollo:2647/Projects/Sportster
2. Click Next button to continue to the Select Workspace dialog box. Since the location you specified does not exist yet, an alert box tells you that DesignSync will create the vault for you.
o If the location you specify does exist, you must confirm that you want to check in new files into an existing vault.
o You may be asked for account information (username/password) to access the SyncServer.
Select Workspace for a New Project
The Select Workspace dialog box asks you to choose the work area into which you want the project files to be put.
Your work area refers to the directory (folder) that represents your project -- that is, the directory that contains the files you wish to check in so that they will be under revision control.
To select a workspace for an new project:
1. In the Workspace field, enter the path to the new project. You can click Browse to browse to the directory that represents your work area.
125

DesignSync Data Manager User's Guide
2. Optionally, in the Bookmark field, enter the bookmark name that will display for this project from your DesignSync Bookmarks menu.
3. Click Next button to continue to the Specify Exclude Files dialog box.
Note: The Workspace Wizard will not let you proceed if you select any of the following as the directory you want to populate with project files:
• My Computer • A drive, such as C: (Windows only) • Your $HOME directory (UNIX only)
Specify Files to Exclude
The Specify Exclude Files dialog box asks you to specify what files you want to exclude from being checked into the vault. You can choose items from the display of drop-down list of choices or add your own wildcards.
The drop-down list contains the categories of files that are often excluded:
These are the wildcards you can use in the Exclude List text box:
Wildcard Representing ? A single character * A string A[1-9] A1 through A9
To create a list of excluded from check in files types:
1. Select from the drop-down list each file type you want excluded from check-in. As you choose, the system adds commas between the items.
2. If desired, add your own wildcard exclusions. When you choose to create your own wildcard file exclusions from the list above, remember that you will have to add your own commas to separate items on the file exclusions list.
3. Click Next button to continue to Specify the Object State Dialog box.
Specify the Object State of Items Checked In
The Specify Object State dialog box asks you what should be left behind in your work area when the check in operation completes. The options are:
126

Using DesignSync
Option Result References to versions
Leaves DesignSync references to the files in your work area.
Unlocked copies Checks file into the vault and a leaves a replica in your work area.
You can use the file as if you had not checked it in. However, depending on your work methodology, you may want to keep a locked copy if you plan on editing the file.
This is the default selection unless your project leader has defined a default fetch state.
Locked copies Checks in file and immediately checks the file back out into your work area with a lock.
Others can check the file out from the vault but cannot check in a new version as long as you have the lock on the files.
Links to caches Links to a shared copy of the design object in a cache directory. This option is available only on UNIX platforms.
Links to mirror Links to a shared copy of the design object in a mirror directory. This option is available only on UNIX platforms.
To select a specify the object state of checked in items:
1. Select one of the object state options. 2. Click Next to continue to the Specify a Check-In Comment dialog box.
Specify a Check-In Comment
The Specify Check-In Comment dialog box asks you to specify a comment for the project you are creating. This comment serves as the initial check-in comment or all your files when you first place your project files under revision control.
To specify a check in comment for the initial check in of a new project:
1. Click in the comment field. You can also use your default editor to prepare your comments. Right click in the client field and select Use Editor from the context menu. When you save and exit from your editor, your comments will be put in the message box. Quitting from your editor without saving leaves the message box empty.
2. Create your comment for this project. Note that projects can be defined with a minimum comment-length requirement and you will need to create a comment is long enough to meet this requirement.
3. Click Next button to continue to Finished dialog box. This is where you can confirm or cancel the commands you have entered the previous dialog boxes.
127

DesignSync Data Manager User's Guide
Workspace Wizard Confirmation
After gathering information the previous dialog boxes, the Workspace Wizard displays the Finished dialog box. The Finished dialog displays the commands DesignSync uses to complete the operation. At this point, you must confirm or cancel the commands you have entered the previous dialog boxes.
Click Finish to have DesignSync perform the commands listed in the dialog box. Click Cancel to cancel these commands.
Examples of commands you could see in the Finish dialog box:
If you selected Join an existing project from the Workspace Wizard dialog, the Finished dialog would display commands similar to these:
If you selected Create a New Module from the Workspace Wizard dialog, the Finished dialog would display commands similar to these:
128

Using DesignSync
Related Topics
Workspace Wizard Overview
Workspace Wizard Paths
Working with an existing module
Select a Module
The Select Module dialog box asks you to specify the vault URL and the configuration/selector for the you want to fetch to your work area.
To select the existing module:
1. In the Specify the URL of the module's vault field, enter the URL of the vault that contains the existing module. You can enter the URL in one of three ways:
o Type the URL in the text field. o Click on the arrow and select from the URLs (if any) that you entered in
previous Wizard invocations. DesignSync stores the 10 most recently entered URLs.
129

DesignSync Data Manager User's Guide
o Click the Browse Servers button to browse the available public projects (as defined by your project leader) and SyncServers (as defined in your site and local SyncServer lists). Click the Browse Local button to select a local vault on your machine.
2. If you selected a legacy module in step 1, then second field that is displayed is named Configuration. If you selected a current module in step 1, then the second field that is displayed is named Selector. You can type name of the selector for the module or the configuration for a legacy module. You can also accept the pre-filled default.
3. Click Next button to continue to the Select a Workspace for the Module dialog box.
Select a Workspace for the Module
The Select Workspace dialog box asks you to choose the workspace where you want the module to reside.
To select a workspace for an existing module:
1. In the Workspace field, enter the path to the existing project. You can click Browse to browse to the correct path.
2. Optionally, in the Bookmark field, enter the bookmark name that will display for this module from your DesignSync Bookmarks menu.
3. Click Next button to continue to the Fetch the Module Hierarchy dialog box.
Fetch the Module Hierarchy
The Recurse dialog box asks you to specify whether DesignSync should fetch just the selected module (the default) or fetch the module and each submodule in its hierarchy.
To select a workspace for an existing module:
1. If you want to fetch the files of the entire module hierarchy, check the Get the module recursively checkbox. By default, the checkbox is unchecked, indicating that only the files of the selected module are fetched.
2. Click Next button to continue to Finished dialog box. This is where you can confirm or cancel the commands you have entered the previous dialog boxes.
Workspace Wizard Confirmation
After gathering information the previous dialog boxes, the Workspace Wizard displays the Finished dialog box. The Finished dialog displays the commands DesignSync uses to complete the operation. At this point, you must confirm or cancel the commands you have entered the previous dialog boxes.
130

Using DesignSync
Click Finish to have DesignSync perform the commands listed in the dialog box. Click Cancel to cancel these commands.
Examples of commands you could see in the Finish dialog box:
If you selected Join an existing project from the Workspace Wizard dialog, the Finished dialog would display commands similar to these:
If you selected Create a New Module from the Workspace Wizard dialog, the Finished dialog would display commands similar to these:
131
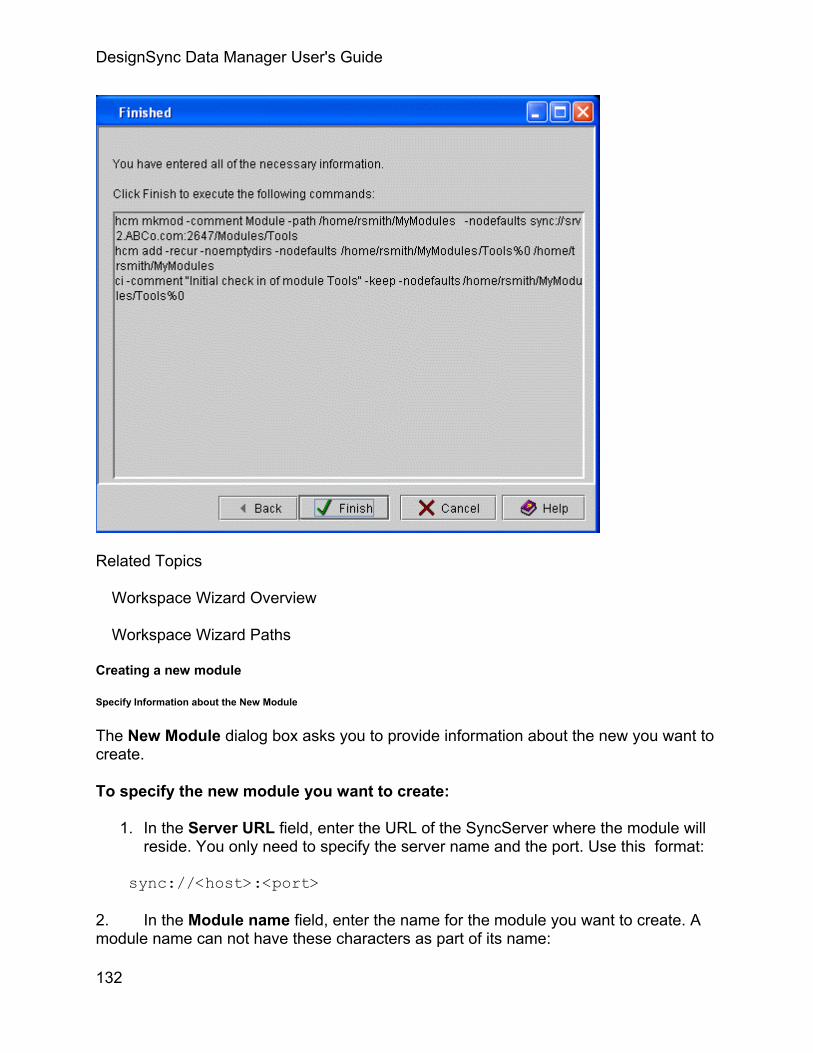
DesignSync Data Manager User's Guide
Related Topics
Workspace Wizard Overview
Workspace Wizard Paths
Creating a new module
Specify Information about the New Module
The New Module dialog box asks you to provide information about the new you want to create.
To specify the new module you want to create:
1. In the Server URL field, enter the URL of the SyncServer where the module will reside. You only need to specify the server name and the port. Use this format:
sync://<host>:<port>
2. In the Module name field, enter the name for the module you want to create. A module name can not have these characters as part of its name:
132

Using DesignSync
~ ! @ # $ % ^ & * ( ) , ; : | ` ' " = [ ] /
3. In the Comment field, enter the first branch comment. 4. Click Next button to continue to the Select Workspace Files for the New Module.
Select Workspace Files for the New Module
The Select Workspace dialog box asks you to select files that you want to include in the new module.
To select a workspace for an new module:
1. In the Workspace field, enter the path to the new module. You can click Browse to select the workspace directory containing the files you want to include in the module.
2. Optionally, in the Bookmark field, enter the bookmark name that will display for this module from your DesignSync Bookmarks menu.
3. Optionally, you can choose to include empty directories in the initial creation. This allows you to create a framework for the module, even if the data for the empty directories doesn't exist yet.
Note: Any directories explicitly added to the module must be explicitly removed if no longer needed. Any directories not explicitly added to the module are automatically removed from the module when they become empty.
4. Click Next button to continue to the Finished dialog box. This is where you can confirm or cancel the commands you have entered the previous dialog boxes.
Workspace Wizard Confirmation
After gathering information the previous dialog boxes, the Workspace Wizard displays the Finished dialog box. The Finished dialog displays the commands DesignSync uses to complete the operation. At this point, you must confirm or cancel the commands you have entered the previous dialog boxes.
Click Finish to have DesignSync perform the commands listed in the dialog box. Click Cancel to cancel these commands.
Examples of commands you could see in the Finish dialog box:
If you selected Join an existing project from the Workspace Wizard dialog, the Finished dialog would display commands similar to these:
133

DesignSync Data Manager User's Guide
If you selected Create a New Module from the Workspace Wizard dialog, the Finished dialog would display commands similar to these:
134

Using DesignSync
Related Topics
Workspace Wizard Overview
Workspace Wizard Paths
Joining a Project Step-by-Step
Specifying the Vault Location for a Design Hierarchy
Before you can check in files for the first time or check out files from an existing vault, you must associate a vault location with your local work area. Typically, an entire hierarchy of files and folders that represent a design project would be revision-controlled under the same top-level vault.
The Set Vault Association dialog box associates a vault location with a work area. This command maps a local folder (directory) to a revision-control vault folder (repository).
When working with modules and module objects
135

DesignSync Data Manager User's Guide
The only time you would need to use the Set Vault Association dialog box on a module workspace is if you have moved a module, such as moving it to a different or server location. These module objects cannot have a vault association:
• Any subdirectory of a module • A module root directory • A module member object • A module that is in a workspace as a result of a hierarchical reference from
another module (such as a sub-module).
Client Vaults and Server Vaults
Setting the vault association is the first step in placing design data under revision control or checking out (populating) data that is already managed. Every local folder and file has a default client vault even if you have not explicitly set the vault.
Client vaults:
• Reside in the location determined during installation of your client. • Cannot be accessed by other users. Should only used to manage private data. • Are always identified using a file URL.
You must explicitly set the vault for a folder before you can check in objects contained in the folder. Typically, you use server (remote) vaults, which are managed by SyncServers, instead of client vaults.
Server vaults:
• Can reside on your local host, but often reside on another host. • Can be accessed by any user who is authorized to do so. • Are always identified using a sync: URL.
Notes
• When trying to resolve a selector, DesignSync does not search above the root of a workspace where a set vault association has been applied. Therefore, when folder that has no selector or persistent selector set, DesignSync searches up the hierarchy only to the first folder that has a vault association.
• Vault settings on subfolders in a work area are affected by the recursive option when they are populated. Consider using REFERENCEs in sync_project.txt files to redirect a subfolder to a different vault. See Vault REFERENCEs for Design Reuse for more information.
• When you specify a new vault in the Modify Vault field, the vault folder is not created until you check in design data.
• The local folder on which you are setting the vault must already exist. • You must have write permission for the parent folder of the folder for which you
are setting the vault.
136

Using DesignSync
• You need write permission in order for DesignSync to create local metadata stored in .SYNC directories for the parent folder.
• To facilitate the interaction between DesignSync and ProjectSync, it is recommended that you specify Projects as the top-level folder.
• Your DesignSync administrator defines what SyncServer ports are available and whether secure communications are required. See DesignSync Data Manager Administrator's Guide: Using Secure Communications for more information.
• DesignSync also supports a syncs protocol for communicating with secure (SSL) SyncServer ports. In most cases, DesignSync automatically redirects requests to a cleartext (non-secure) port using the sync protocol to the secure port, if one is defined. The default SyncServer ports are 2679 for the secure port or 2647 for the cleartext port.
• You can omit the port specification when accessing a SyncServer that uses the default port number.
To associate a vault with your design hierarchy:
1. Highlight the top-level folder of the hierarchy that you want to place under revision control. To modify the vault location for a module, highlight the module’s base directory.
2. From the main menu, select Revision Control =>Set Vault Association. You can also right-click and select Set Vault Association from the context menu.
3. Enter information or select options as needed from the Set Vault Association dialog box. See Field and Option Descriptions below for more details. If you will not be sharing your design data with other users, you can accept the default local vaults instead of specifying a remote vault.
4. Click OK to confirm.
Click on the fields in the following illustration for information on each field.
137

DesignSync Data Manager User's Guide
Field and Option Descriptions
Modify the vault
Note: When the number of characters in the path to the vault exceeds 1024, the command will fail.
When checked, you can enter the location of new vault for the top-level Module or DesignSync object or folder. For a client vault, the path is the full, absolute path on your local machine. For a server vault, the path is relative to the server root as specified during the SyncServer installation.
Click Browse to find known projects and servers. Typically, you will specify a remote vault location.
A module path should be specified in the following form:
<protocol>://<host>:<port>/[Modules|Projects]/ <path>
An example of a location of a new vault location is:
sync://apollo.spaceco.com:2647/Projects/Sportster
In this example:
Path item Description sync: DesignSync protocol for specifying a remote server. For a standard
connection use sync as the protocol. For an SSL connection, use syncs as the protocol.
apollo: Server (machine) name. Specify a full domain name, such as myhost.myco.com. You can specify just the machine name, which in this case is apollo) if you are on the same LAN as the SyncServer host machine, for example:
sync://apollo:2647/Projects/Sportster 2647 Port number that was specified when the server was configured. You
can omit the port specification if the SyncServer is using the default port of 2647.
Projects Top-level folder on the server under which project vaults are located Sportster Top-level vault folder for the Sportster project
By default, this option is unchecked.
Note: All Modules must be in the top-level folders in order to be recognized by DesignSync. It is recommended legacy modules use the top-level folder Projects.
138

Using DesignSync
Modify the selector
When checked, you can specify the persistent selector list for the hierarchy by following the vault URL with ;<selectorList>. For example, to define the persistent selector list as main you would enter the path something like this:
sync://apollo:2647/Projects/Sportster;main
For non module object, you also can select from a list of available selectors, by highlighting Get selectors from the pull down. The system retrieves the available selectors for the project entered in the Modify the vault field.
For module objects, you can select either Get Branches or Get Tags/Versions.
When unchecked, no selector is set and the default is set to Trunk. If you need to remove a selector, deselect the Modify the vault option, select the Modify the selector option, and then delete the selector information.
Apply changes recursively
When checked, recursively clears any vault information that may have been set in subfolders. When you are setting the vault for the first time, checking this option was no effect. Check this option if you are changing the vault location for a hierarchy.
When not checked, any previously set vault information in subfolders remains.
When you set the vault on a folder, that vault association is stored in the local metadata for that folder. Each subfolder inherits its vault association from its parent folder; the vault association is not stored in metadata unless the subfolder has an explicit set vault association applied to it.
Every versionable object (file or collection) in the hierarchy inherits its vault from the parent folder, although once a revision-control operation has been performed on the object, the vault association is stored in that object's metadata. Therefore, anytime you want to change a vault setting (as opposed to setting the vault for the first time), check the apply change recursively option. This removes all vault associations that are stored in metadata, which causes all objects in the hierarchy to inherit their vault associations from the folder on which the set vault association has been applied.
Note: The -recursive option is not valid for modules and is ignored.
Caution: If a subfolder had an explicit set vault association applied to it such that the vault information is stored in the folder's local metadata, that vault association is removed and the subfolder reverts to inheriting its vault association from the parent folder.
139
DesignSync Data Manager User's Guide
Module context
The field is only enabled for module base folders and contains the module instance names of the modules based at that folder. These module instance names are listed alphabetically in the pull-down.
Related Topics
Changing the Vault for a Design Hierarchy
ENOVIA Synchronicity Command Reference: setvault command
ENOVIA Synchronicity Command Reference: setselector
Using Vault REFERENCEs for Design Reuse
ENOVIA Synchronicity Command Reference: populate
ENOVIA Synchronicity Command Reference: unlock
ENOVIA Synchronicity Command Reference: url vault
ENOVIA Synchronicity Command Reference: setselector
Adding a Vault to Bookmarks
In the List View (right pane) of the DesignSync window, right-click an object. Then select Go =>Go to Vault from the menu.
Click to select the vault and select Bookmark =>Add Bookmark from the menu, or right-click on the vault and select Add Bookmark.
Verifying That a Vault Has Been Set on a Folder
To verify that a vault has been set on a folder in the working directory, do either of the following:
• From DesignSync, select the folder of interest, then select File =>Properties. The Properties dialog box contains the vault information.
• From the command line, use the url vault command.
Related Topics
Revision Control Properties
ENOVIA Synchronicity Command Reference: url vault
140

Using DesignSync
Browse the Vault for a File or Project
To browse the vault for a file or project, enter a search path in the Location bar of the DesignSync window followed by a carriage return. The objects searched for will be displayed in the Tree View (left pane) of the DesignSync window.
The search path does not need to be complete. You can enter only the name of a server and port. For example, if you enter the following:
sync://myserver.myco.com:2647
You can then expand the search from that point.
Viewing the Contents of a Vault
You can view the vault folder for your project by selecting the top-level local folder and clicking the Go to Vault button. You can navigate the vault hierarchy as you navigate other items in the Tree View to display the folders and vaults that make up the project.
You can also go directly to the vault of specific files or vault folders of specific folders. Select the local file or folder of interest and do one of the following:
• Click the Go to Vault button. • Select Go =>Go to Vault. • Right-click the folder or file and select Go to Vault from the pop-up menu.
Notes:
• The folder or file must be part of a project that is under revision control. Attempting to view the vault of a file or folder that is not under revision control results in an error.
• A folder will not have a display in the Branch column if the folder belongs to a 5.0 module.
When viewing the vault of a file, you can see the versions of a file, as well as any branches that may emanate from a version. A version that has branches off it is called a branch-point version. Note that every managed object has at least one branch: branch 1, or Trunk. When you view the vault, you are viewing branch 1.
The illustration shows the DesignSync window after viewing the top-level vault folder for the project and then navigating down to top.v;, the vault for the top.v file. Note that vault names end in a semicolon ( ; ). The List View shows that there are currently three versions of top.v on the main (Trunk) branch in the vault.
141
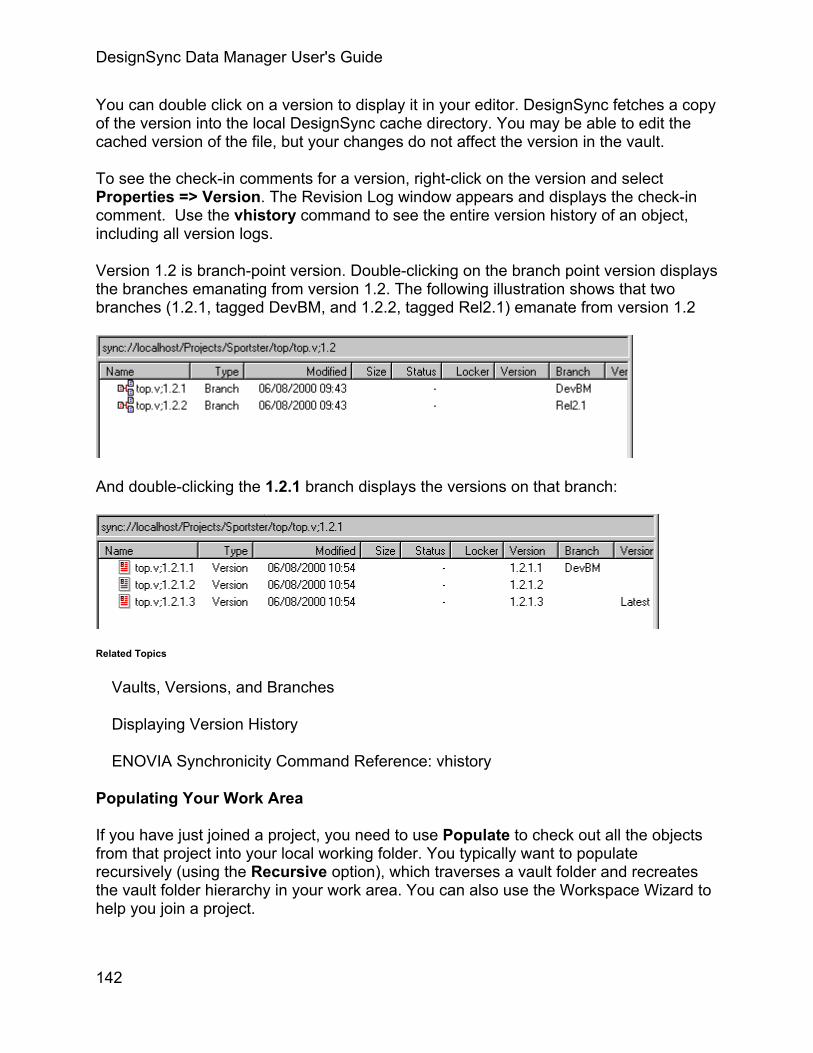
DesignSync Data Manager User's Guide
You can double click on a version to display it in your editor. DesignSync fetches a copy of the version into the local DesignSync cache directory. You may be able to edit the cached version of the file, but your changes do not affect the version in the vault.
To see the check-in comments for a version, right-click on the version and select Properties => Version. The Revision Log window appears and displays the check-in comment. Use the vhistory command to see the entire version history of an object, including all version logs.
Version 1.2 is branch-point version. Double-clicking on the branch point version displays the branches emanating from version 1.2. The following illustration shows that two branches (1.2.1, tagged DevBM, and 1.2.2, tagged Rel2.1) emanate from version 1.2
And double-clicking the 1.2.1 branch displays the versions on that branch:
Related Topics
Vaults, Versions, and Branches
Displaying Version History
ENOVIA Synchronicity Command Reference: vhistory
Populating Your Work Area
If you have just joined a project, you need to use Populate to check out all the objects from that project into your local working folder. You typically want to populate recursively (using the Recursive option), which traverses a vault folder and recreates the vault folder hierarchy in your work area. You can also use the Workspace Wizard to help you join a project.
142
Using DesignSync
The default mode for populate fetches Unlocked copies of objects, unless you have saved a different object state setting with the Save Settings button, or your project leader has defined a default fetch state. See Saving the Setting of an Object's State and SyncAdmin Help: Default Fetch State for information on these two conditions.
After you have initially populated your work area, you need to populate periodically to update your local files, because the vault might have changed since your previous populate. For example, another user might have checked in new design objects or new versions of objects that are already in your work area. Generally, you can perform an incremental populate for these periodic updates. If you need to change the states of files in your work area (for example, if you are changing from locked to unlocked files, or unlocked files to links to the cache), you should perform a full populate. An incremental populate updates only those local folders whose corresponding vault folders have changed, which is faster than a full populate operation. DesignSync performs an incremental populate by default whenever possible, although it automatically reverts to a full populate when necessary. See the ENOVIA Synchronicity Command Reference:populate command description for the circumstances where DesignSync automatically performs a full populate and for the circumstances where you might choose to specify a full populate.
You can select these types of data for the populate operation:
• A DesignSync folder • A managed DesignSync (non-module) object • A module that is already in your workspace (for an update of your workspace) • A server module, server module branch, or server module version (for an initial
populate of a workspace) • An href that is already in your workspace
Note: You cannot select an href on the server; to select an href, you must populate the entire module from the server, or filter the data that is fetched. Specifying an href for a populate is equivalent to specifying the relevant submodule directly. By specifying an href, the submodule (and the version to be fetched) is identified via the parent module. Specifying an href enables you to fetch a submodule of a module, without necessarily knowing where that module is sourced from, or what version is appropriate. You can only specify the hrefs directly in the module being addressed, not in its submodules. Selecting an href in your workspace as the object to populate sets the module context accordingly, disabling the Module context field.
• A module folder that is already in your workspace
143

DesignSync Data Manager User's Guide
Note: You cannot select a module folder on the server; to select a module folder, you must populate the entire module from the server, or filter the data that is fetched.
• A module member that is already in your workspace
Note: You cannot select a module member on the server; to select a module member, you must populate the entire module from the server, or filter the data that is fetched.
• A legacy module already in your workspace • A legacy module configuration on the server
Additional Notes:
• You can only select one server object at a time. • You cannot use the Populate dialog box to populate a specific version of a
module member. The version specification is always associated with the module and not its members. See Specifying Module Objects for Operations for details. To populate a specific version of a module member, use the populate command.
Some of the fields in the Populate dialog box are applicable to DesignSync (non-module) data, and some to module data:
Field in the Populate dialog box
Applicable to DesignSync (non-module) data
Applicable to module data
Populate with Unlocked copies
yes yes
Populate with Locked copies
yes yes
Populate with References to versions
yes yes
Populate with Links to cache
yes yes
Populate with Links to mirror
yes no
Populate with Locked references
yes yes
Recursive yes yes
144

Using DesignSync
Merge with workspace
yes yes
Populate new module members
no yes
Replacement mode
yes yes
Filter no yes Exclude yes yes Working directory
no yes
Module context no yes Report mode yes yes Retain timestamp
yes yes
Unify workspace state
yes yes
Incremental populate
yes not typically
Populate empty directories
yes no
Href filter no yes Href mode no yes Version yes yes Overlay version in workspace
yes yes
Keys yes yes Local Versions no yes Module Cache Mode
no yes
Module Cache Paths
no yes
Trigger Arguments
yes yes
145
DesignSync Data Manager User's Guide
To interrupt a populate operation, Click the Stop button. DesignSync completes the processing of any objects being populated, before stopping the command. See the ENOVIA Synchronicity Command Reference: interrupt command line topic for more information.
Click on the fields in the following illustration for information.
146

Using DesignSync
147

DesignSync Data Manager User's Guide
Populate Field Descriptions
Populate with Unlocked copies
After the operation is over, keep an unlocked copy in your work area. This is the default unless your project leader has defined a default fetch state.
Because you have relinquished any lock you may have had on the object, someone else can check the object out from the vault with a lock in order to modify it.
The Unlocked files are checked out in Read Only mode option from the Tools => Options => General dialog box determines whether these files are read/write or read-only.
148
Using DesignSync
Populate with Locked copies
After the operation is over, keep a locked copy in your work area. You can continue to work on the object. Others cannot check in new versions of the object as long as you have the branch locked. (The copy in your work area is known as an original.) This option is not available for legacy modules or legacy module configurations. When operating on 5.0 modules, it is module members that are locked; not whole modules. Thus, this option is mutually exclusive with the Recursive option, or with a Module context specified. To lock a module, use the Modules => Lock Branch dialog box, or the hcm lock command. See Locking Module Data for details.
Populate with References to versions
This option lets you acquire references to the versions you have selected.
Tip: Do not use this option when operating on a collection object. If you use this option, DesignSync creates a reference in the metadata for the collection object, but member files are not processed and are not included in the metadata.
Populate with Links to cache
Use this option to link to a shared copy of the design object in a cache directory. This option is available only on UNIX platforms.
Populate with Links to mirror
Use this option to link to a shared copy of the design object in a mirror directory. This option is available only on UNIX platforms. This option is not available for module data.
Populate with Locked references
This option lets you acquire a locked reference. If you intend to regenerate the object, create a locked reference to avoid fetching a copy of the object from the vault. This option is not available for legacy modules or legacy module configurations. For other module data, this option is mutually exclusive with the Recursive option, or with a Module context specified.
Merge with workspace
Select this option if you want to merge the Latest version of an object in the vault with a locally modified version. This option supports the merging work style where multiple team members can check out the Latest version of an object for editing. The first team member to check his changes in creates the next version; other team members merge their local changes with the new Latest version, and then check the merged version in. To learn how the Merge with workspace option operates on module data, see Merging Module Data.
149
DesignSync Data Manager User's Guide
If there are no conflicts, then the merge succeeds, leaving you the merged file in your work area. If there are conflicts, a warning message results. You must edit the merged file to resolve the conflicts before DesignSync allows you to check in the merged version. Conflicts are shown as follows:
<<<<<<< local
Lines from locally modified version
=======
Lines from Latest version
>>>>>>> versionID
The conflicts are considered resolved when the file no longer contains any of the conflict delimiters (7 less-than, greater-than, or equal signs in the first column). The Status column of the List View and the ls command indicates if a file has unresolved conflicts.
Populate new module members
This option only applies to module data. If selected, the populate operation fetches objects that are in the vault, but not currently in the workspace (subject to the Filter and Exclude fields). This is the default behavior. If unselected, the populate operation updates only objects already in the workspace.
Replacement mode
The Replacement mode determines how the populate operation updates your work area with the data you are fetching. Specify one of the following update methods:
• Do not replace any objects. For DesignSync data, do not overwrite locally modified files. Do not remove files that do match the requested version. For module data, preserve local modifications you made to module members, and leave intact any module members that are in your work area that are not in the requested module version.
This mode causes the least disruption to your work area; however, it may require you to clean up resulting work area data.
• Replace unmodified objects only. This replacement mode does not apply to DesignSync data. DesignSync data will not be replaced. For module data, update module members that have not been locally modified
150

Using DesignSync
and that are part of the requested module version. Also remove any unmodified module members that are not part of the requested module version.
This mode, which is the default behavior for module data, leaves intact any module members you have modified in your workspace
• Force overwrite of modified objects. For DesignSync data, overwrite locally modified files. Also remove managed objects that do not match the requested selector. For module data, replace or remove module members, regardless of whether you have modified them locally or whether they are part of the requested module version.
The intent of this mode is to make the workspace match the data being requested (subject to the Filter and Exclude fields), as closely as possible. Unmanaged data is never removed. This mode removes items that have been added to a module but have not yet been checked in; their "added" indicator is removed. The data, which is unmanaged, is not removed. See Adding a Member to a Module for information adding members to modules. If there is a conflict with data fetched from another module, that other data is not removed. See Conflict Handling for details. If populating a module overlaps with another module already in your workspace, data from that other module is not removed. This mode is mutually exclusive with the Merge with workspace option.
The Replacement mode only applies to items that are not filtered out by the Href filter, Filter or Exclude options.
Working directory
This field is used when initially populating a workspace with a module from a server. The Working directory field only applies when a server module is selected as the object to populate. Specify the path to the directory in your work area where you want the fetched module to reside. Click Browse to select the work area where you want to place the module. You can also type the absolute path to the directory.
Note: If you are populating a directory with links to a module cache, the Working directory must be new (uncreated).
Report mode
151

DesignSync Data Manager User's Guide
For the Report mode, choose the level of information to be reported:
Brief output: Report error messages. For module data, also report the success/failure/skip status of each submodule.
Normal output: In addition to the information reported in Brief mode, output informational messages for objects that are updated by the populate operation and messages for objects excluded from the operation (due to exclusion filters or explicit exclusions). For module data, also output information about all objects that are fetched. This is the default report mode.
Verbose output: In addition to the information reported in Normal mode, output an informational message for every object examined but not updated. For module data, also output information about all objects that are filtered.
Incremental populate
Perform a fast populate operation by updating only those folders whose corresponding vault folders have been modified. DesignSync performs an incremental populate by default whenever possible, although it automatically reverts to a full populate when necessary.
To change the default populate mode, your DesignSync administrator can use the SyncAdmin tool, or you can use the Save Settings button to override the default mode.
Note: This option by itself does not cause state changes of objects in your work area (for example, changing from locked to unlocked objects or unlocked objects to links to the cache). DesignSync changes the states of updated objects only. Furthermore, for an incremental populate, DesignSync only processes folders that contain updated objects, so state changes are not guaranteed. Select Unify workspace state to change the state of objects in your work area.
For incremental populate operations: If you exclude objects during a populate, a subsequent incremental populate will not necessarily process the folders of the previously excluded objects. DesignSync does not automatically perform a full populate in this case. To guarantee that previously excluded objects are fetched, turn off the Incremental populate check box for the subsequent populate operation.
This option usually is not relevant for module data. However, there are two circumstances in which you should deselect this option for a full populate of module data:
• To re-fetch data that was manually removed. The Unify workspace state option also re-fetches such data, but for missing
152

Using DesignSync
• To re-fetch objects that are unchanged from the current module version to the new one, but for which the version in the workspace is incorrect. For example, let's say there is a module Chip, containing the member alu.v . You have version 1.4 of the module Chip. The Latest version of the module is 1.5. There is no change to the file alu.v between module Chip versions 1.4 and 1.5; alu.v is version 1.3 in both module versions. However, you actually have version 1.2 of alu.v, having specifically fetched that file from a previous Chip module version 1.3. In this case, an incremental populate of the module would not re-fetch the 1.3 version of alu.v. A full populate is required to re-fetch the 1.3 version of alu.v.
Unify workspace state
Sets the state of all objects processed, even up-to-date objects, to the specified state (Unlocked copies, Locked copies, References to versions, Links to cache, Links to mirror, Locked references) or to the default fetch state if no state option is specified. See SyncAdmin Help: Defining a Default Fetch State for more information. If turned off, DesignSync changes the state of only those objects that are not up-to-date. If checked, DesignSync changes the state of the up-to-date objects, as well.
The Unify workspace state check box:
• Does not change the state of locally modified objects; select the Replacement Mode setting Force overwrite of modified objects to force a state change and overwrite the local changes.
• Does not change the state of objects not in the configuration; use the Replacement Mode setting Force overwrite of modified objects to remove objects not in the configuration.
• Does not cancel locks. To cancel locks, you can check in the locked files, select Revision Control =>Cancel Checkout to cancel locks you have acquired, or select Revision Control =>Unlock to cancel team members' locks.
Note:
The Unify workspace state option is ignored when you lock design objects. If you check out locked copies or locked references, DesignSync leaves all processed objects in the requested state.
Populate empty directories
Determines whether empty directories are removed or retained when populating a directory. Select this option to retain empty directories.
153

DesignSync Data Manager User's Guide
If you do not select this option, the populate operation follows the DesignSync registry setting for "Populate empty directories". This registry setting is by your DesignSync administrator using the SyncAdmin tool. By default, this setting is not enabled; therefore, the populate operation removes empty directories.
This option is not applicable to module data. See Directory Versioning for background. To prevent specific empty directories from being created by the populate, use the Filter field.
Href mode
The Href mode option lets you specify how hierarchical references should be evaluated in order to identify the versions of submodules to reference when populating a module recursively. This field is only available when operating on module data.
Normal mode: Examines the href's selector. If the href's selector represents a static version (a numeric version, a version tag, or a list of such items), the populate fetches the submodule using the selector. In this case, the populate uses Static mode for referencing subsequent levels of hierarchy. If the href's selector does not represent a static version, the populate still fetches the submodule using the selector, but continues to use Normal mode for referencing subsequent levels of hierarchy. This is the default Href mode.
Static mode: Populates the static version of the submodule that was recorded with the href at the time the parent module's version was created.
Dynamic mode: Evaluates the selector associated with the href to identify the version of the submodule to populate.
The Href mode option is mutually exclusive with the option to fetch Locked copies.
Version
Specify the version number or tag (or any selector or selector list) of the objects on which to operate.
For DesignSync folders, this field is set to the folder's persistent selector list by default. The Version field has a pull-down list containing suggested selectors; see Suggested Branches, Versions, and Tags for details.
For module data, if module members are selected as the objects to populate, all of the module members must belong to the same module. And, that module must be specified in the Module context field.
Note: Modules do not support auto-branching, so for module data, the Version field can not contain the auto() construct.
154

Using DesignSync
When populating module data, specifying a Module Version value never changes the workspace selector, even for the initial populate of a module. To set or change the workspace selector, use the setselector command.
If the only items selected to populate are module member files in the workspace, and all of the selected members are members of the same module, the Version field is replaced by a Module Version field. And, the Module context field will be disabled, because you are populating the selected member files as they existed in a specific version of the module.
If a legacy module on a server is selected as the object to populate, the Version field is replaced by a Configuration field, with a default value of "<Default>" (the default configuration). You can select a different configuration of the module from the pull-down list.
If a legacy module configuration on a server is selected as the object to populate, the Version field is also replaced by a Configuration field. The field's value is set to the configuration that was selected as the object to populate.
If a legacy module already in your workspace is selected as the object to populate, the Version field is replaced by a Configuration field. The value of the field defaults to the currently fetched configuration. You can select a different configuration of the same module from the pull-down list. If you change the configuration to be populated, the Recursive option and the Replace unmodified objects only mode are both selected.
Overlay version in workspace
For DesignSync data, if this option is selected, the version specified in the Version field is used to indicate the version to be overlaid on the work area. Overlaying a version does not change the current version status as stored in the workspace metadata. The Overlay version in workspace option is often used in conjunction with the Merge with workspace option, to merge one branch onto another.
To find out how the Overlay version in workspace option operates on module data, see Overlaying Module Data.
Module cache mode
This field only applies to module data. A populate operation can link to data in a module cache instead of fetching data from the server, to help decrease fetch time and save disk space.
• Link to module cache. (UNIX only) Creates a symbolic link from your workspace to the base directory of a module in the module cache. This is the default mode on UNIX platforms.
155
DesignSync Data Manager User's Guide
Note: To use this option, the Working directory must be empty. In order to guarantee that the workspace is empty, the GUI client requires that the Working directory not already exist for the initial mcache populate. The command line does not enforce this, but overwrites any duplicate files in the workspace.
• Copy from the module cache. Copies a module from the module cache to your work area. Notes:
o This mode is the default mode on Windows platforms. o This mode only applies to legacy modules.
• Fetch from the server. Fetches modules from the server.
This option overrides the default module cache mode registry setting. If the registry value does not exist, the Module Cache Mode selection defaults to Link to module cache (UNIX platforms) or to Copy from the module cache (Windows platforms).
Note: When a link to an mcache is created, the fetch mode, specified by the "Populate with" option, is ignored and the module is fetched according to Module cache mode settings.
Module Cache Paths
This field only applies to module data. Use the Module Cache Paths field to specify paths to the module caches that the populate operation searches, when using a Module Cache Mode. If your project leader defined a default module cache path (or paths), the Module Cache Paths field will be preset with that default path (or paths).
Click Browse... to select one or more paths. When a path is selected with the Browse... pop-up dialog box, the selected path is added to the end of the Module Cache Paths field.
You can also type paths into the Module Cache Paths field. You must specify the absolute path to each module cache. To specify multiple paths, separate paths with a comma (,). The paths must exist.
If no Module Cache Paths are specified, the populate operation fetches modules from the server.
Log populate messages in populate log file
Use this option to log populate messages to a populate log file. The log file provides easy access to the populate messages to allow for later review. This is particularly useful for complex populate operations such as merging a module version from another branch.
156

Using DesignSync
Note: If the specified log file already exists, DesignSync will append the results of this populate operation to the file. If the file cannot be created for any reason, such as the directory specified does not exist, or you do not have write permissions to the directory, the populate operation fails.
Related Topics
Setting Persistent Populate Filters
Merging Module Data
Using a Module Cache
How DesignSync Handles Legacy Modules
SyncAdmin Help: Default Fetch State
ENOVIA Synchronicity Command Reference: populate command
ENOVIA Synchronicity Command Reference: ls command
ENOVIA Synchronicity Command Reference: hcm lock command
ENOVIA Synchronicity Command Reference: setselctor command
Recursion option
Filter field
Exclude field
Module context field
Retain timestamp option
Href filter field
Keys field
Local Versions field
Trigger Arguments
Command Invocation
Command Buttons
157

DesignSync Data Manager User's Guide
Using a Mirror
A mirror exactly mimics the data set defined for your project vault. Mirrors provide an easy way for multiple users to point to the file versions that comprise their project's data. The file versions in the mirror belong to the configuration defined by the project lead.
Examples
• The configuration might be the Latest version of files on the main Trunk branch. A mirror for a development branch might be defined to always contain the file versions on that branch with a specific tag. When the file versions comprising the configuration change, the mirror directory automatically updates with the new version.
• If Latest versions are being mirrored and a new version of a file is checked into the vault, the mirror directory updates with this new version. Without mirroring, users need to frequently update their work areas using the populate command to reflect the project's current data set.
Mirror directories can be treated in the same way as your DesignSync work areas. For example, you can use commands such as the url or ls commands on mirror directories.
Setting Up Your Workspace
Your team leader will have set up a mirror directory for your project. Use the setmirror command to associate your workspace with the project's mirror directory. The setmirror command does not have a GUI equivalent. See ENOVIA Synchronicity Command Reference: setmirror help for more information on this command.
Note: you cannot link to a module mirror from a workspace.
All of the workspace's subdirectories automatically inherit the mirror location set for the top level of the workspace. You cannot set a different mirror on a subdirectory from that of its the parent directory.
To determine if your current work area directory is associated with a mirror, use the url mirror command. See the ENOVIA Synchronicity Command Reference: url mirror help for more information on this command.
Note: To resolve the mirror location, DesignSync does not search above the root of a workspace where a setvault has been applied.
So if a setvault has been applied to a folder (/Projects/ASIC/alu) and you apply the setmirror command at a higher-level folder (for example, /Projects/ASIC), the setmirror command is ignored at and below the folder where the setvault occurred (/Projects/ASIC/alu). See ENOVIA Synchronicity Command Reference: setvault help for more information on this command.
158

Using DesignSync
Normally, the path to a mirror is stored exactly as specified by the setmirror command. If your mirror directory is set to an auto-mounted directory, you can set a registry key for DesignSync to resolve the path instead.
See DesignSync System Administration Help: DesignSync Client Commands Registry Settings for more information.
Changing the Mirror Directory Associated with Your Workspace
If the mirror directory for your project changes, run the setmirror command from the same directory in which the original setmirror command was run. This command updates the workspace's mirror association, which is inherited by lower level directories.
To correct existing workspace links to mirror files, run the populate command with these options:
populate -recursive -mirror -unifystate
This command corrects the links to point to the mirror directory's new location.
Disassociating Your Workspace from a Mirror Directory
If you no longer need to use a mirror directory, you can disassociate your work area directory from the mirror, by using the setmirror command.
Using the -mirror Option to Commands
Once you have associated your workspace with a mirror directory, use the -mirror option with populate, ci, co, and cancel commands (or select Keep a link to Latest (mirror) when performing these operations through the DesignSync GUI). You can also specify that -mirror be used by default, if your team leader did not set that for your project. For details, see Object States.
Note: You cannot use the populate -mirror command (or select Keep a link to Latest (mirror)) to populate a directory containing a module. In addition, the ci command ignores the -mirror option if you use it when checking in a module.
Having links to files in the mirror directory ensures that you are always referencing the most up-to-date configuration. However, if other mirror users add files to the mirror, they are not automatically exposed to your work area. Therefore, you should periodically populate your work area directory using the populate -mirror command.
Notes:
• When performing the populate -mirror operation, DesignSync creates links only if no file or link already exists in your work area directory; DesignSync does not change the state of existing files and links.
159

DesignSync Data Manager User's Guide
To change the state of existing files and links when you populate your working directory, use the -force or -unifystate option (or select Overwrite local files if they exist or Unify workspace state in the DesignSync GUI), in addition to the -mirror option.
Caution: Using the -force option overwrites any locally modified files.
• You cannot use the populate -mirror command to populate a directory containing a module.
Related Topics
DesignSync System Administration Help: Mirroring Overview
DesignSync Data Manager Administrator's Guide: Mirrors Versus LAN Caches
ENOVIA Synchronicity Command Reference Help: setmirror
ENOVIA Synchronicity Command Reference Help: ci
ENOVIA Synchronicity Command Reference Help: populate
ENOVIA Synchronicity Command Reference Help: co
ENOVIA Synchronicity Command Reference Help cancel
Setting Permissions for the Mirror
All mirror directories must grant full access to the users of the mirror, unless SUID is being used.
Even though mirrored files are read-only, a user must have write access to the mirror because the user's process sometimes updates the mirror directory when checking in a new version. This client write-through always happens when a mirror is set on the workspace using the setmirror command. . DesignSync checks that the user has write access to the mirror.
Note: Note: It is possible and highly recommended to enforce the read-only intent of mirror directories (SUID) and not require that all users have write access. For information on configuring SUID, see INSTALL.txt.
Note: DesignSync creates mirror directories with wide-open permissions:
777 -- read/write/execute privileges for owner/group/others
Related Topics
160

Using DesignSync
Mirroring Overview
Using a Mirror
Administering Mirrors
DesignSync Data Manager Administrator's Guide: Mirrors versus Cache
Changing the Vault for a Design Hierarchy
To change an existing vault association for a design hierarchy, follow the procedure for setting the vault initially (Specifying the Vault Location for a Design Hierarchy) with the Apply changes recursively check box selected. You should select this option when you have already associated a vault location with a work area and want to change that association. Selecting this option is equivalent to specifying the -recursive option to the setvault command.
You can optionally specify the persistent selector list for the hierarchy by following the vault URL with @<selectorList>. This URL syntax is equivalent to executing a setselector command following the setvault command.
Selecting the Apply changes recursively option sets the vault on the specified folder and clears any vault setting for subfolders and files in the hierarchy. Clearing the vault settings causes subfolders and files to inherit the vault setting for the top-level folder. If you do not select this option, only the vault associated with the top-level folder is changed -- the folder is not recursed, so the vault associations for the files and subfolders are not changed. If you specified a persistent selector list, DesignSync sets and clears the persistent selector list in the same way it sets and clears the vault for the hierarchy.
Related Topics
Specifying the Vault Location for a Design Hierarchy
Properties - Revision Control
ENOVIA Synchronicity Command Reference: setvault command
ENOVIA Synchronicity Command Reference: setselector command
Using Legacy Configurations
Getting Started with the GUI
Using the DesignSync GUI
161

DesignSync Data Manager User's Guide
This document provides instructions to help you create a work area and quickly get started using DesignSync to manage your design data.
Assumed Environment:
(UNIX platform, locking work style)
The instructions in this document assume that:
• You are working in a UNIX environment such as Solaris, HP, or Linux. • The DesignSync tools have been installed. • To use DesignSync, you invoke the DesignSync GUI (DesSync) and use it to
perform revision control operations. • In your environment:
o You have set the SYNC_DIR variable. (This environment variable defines the path to your DesignSync installation directory; you need to set this variable before running DesignSync.)
o The PATH variable includes $SYNC_DIR/bin so that the operating system can find the DesSync executable.
This document uses a scenario to illustrate the steps you use to get started. In the scenario:
• You are a designer working on a project called ASIC. • On a DesignSync server (also called a SyncServer) your project leader or
DesignSync tools administrator has created a SyncServer folder where you can put your design data for your ASIC project. The SyncServer has the <host name>:<port> of ca-srvr.Acompany.com:2647 (a remote vault). The URL for the Projects folder is: sync://ca-srvr.Acompany.com:2647/Projects.
• Your project team follows the locking work style where you always check out with a lock an object that you plan to edit. Other team members can fetch (check out without a lock) the object, but no one else should make changes while you hold the lock.
• Your project leader has set up a project directory with subdirectories for the project team members. The project directory has the UNIX hierarchy:
/data/devel/ASIC/users user1 user2 user3 . .
• Your user directory is /data/devel/ASIC/users/user3.
Creating a Work Area
162

Using DesignSync
Suppose you are a designer and you have developed an ALU design. Now you are ready to place your design files under revision control, so you can share them with the other members of your project team.
To put your files under revision control and share them with team members, you first must associate your local top-level design directory with a SyncServer folder (also called a vault folder). Then you check in your files to the vault.
Once you check in your files, the design directory you associated with the vault folder becomes your DesignSync work area. A work area is a directory hierarchy that reflects the data hierarchy in the vault. A work area is also the location from which you check file versions into and out of the vault. You are the only user accessing your work area, and you have full control over the files and files versions that exist there.
Task 1: Associate your local directory with the SyncServer folder and check in files.
To put your files under revision control, you can use the DesignSync Workspace Wizard. The Wizard helps you perform two tasks: associate your local directory with the vault and check in files.
1. Invoke DesignSync. (From your UNIX shell, enter DesSync.)
The DesignSync main window appears and then the Workspace Wizard. (If the Workspace Wizard does not appear, select Revision Control => Workspace Wizard.)
2. Click Create a new project (I have files that I want to put under revision control, creating a new project vault). Then click Next.
3. In the Select Vault dialog, type the URL of the project where you will place your files or select one from the pull-down list. Then click Next. The URL specifies the sync protocol plus the SyncServer name and port number and then the vault folder. For example, you might enter: sync://ca-srvr.ACompany.com:2647/Projects/ASIC/alu8
(In certain cases, DesignSync displays a SyncSecurity dialog. Enter your user name and password as defined in the ProjectSync User's Profile. Then click OK.)
Note: The SyncServer folder does not have to exist for you to specify it. For example, suppose the ASIC folder exists on the SyncServer but there is no alu8 subfolder. When you specify a vault folder that does not exist (alu8), DesignSync displays a warning so you can make sure that your vault path is correct and then creates the vault folder when you check in design data.
4. In the Select Workspace dialog, select the top level directory for the files you want to put under revision control (alu8) and click Next.
163

DesignSync Data Manager User's Guide
If the Wizard does not display the directory, click Browse to set another directory. Optional: Type the name of a bookmark in the Bookmark field for future reference.
5. In the Exclude Files dialog, specify the names or file types of files you do not want to place under revision control. Then click Next.
• For example, suppose you do not want to put under revision control temporary files, log files, certain files you used in an experiment, or files with notes to yourself. Your specification might be: temp,*.log,experiment1.*,notes.txt.
6. In the Specify Object State dialog, in answer to the question "What should be left behind when the checkin completes?", select Unlocked copies. Then click Next. 7. In the Specify Check-In Comment dialog, type a comment about the files you are checking in. Then click Next. 8. In the Finished dialog, click Finish.
The Workspace Wizard:
• Creates the alu8 vault folder on the SyncServer and associates it with (ca-srvr.ACompany.com:2647/Projects/ASIC/alu8) with your project work area directory (/data/devel/ASIC/users/user3/alu8).
• Sets the persistent selector list for the work area. This list specifies the version or branch a revision control command operates on when no version or branch is explicitly specified for the operation (through the Version Selector field or the -version and -branch options to commands).
• Checks in the files to the vault (the SyncServer folder you specified) • Fetches copies of those files from the vault to your workspace.
The files are now under DesignSync revision control. To access these new files in the vault, other team members need to use DesignSync to repopulate their work areas.
Tip: Repopulate your work area periodically to keep it up-to-date, reflecting the most recent versions and any new files added to the vault. When you use populate to update your work area, DesignSync performs an incremental populate operation. An incremental populate is a kind of fast populate operation which fetches copies of only the vault folders that have changed.
Creating a Work Area
To join the development effort for a project, you first must create and populate a work area in your user directory. A work area is a directory hierarchy that reflects the data hierarchy in the vault. A work area is also the location from which you check file
164

Using DesignSync
versions into and out of the vault. You are the only user accessing your work area, and you have full control over the files and file versions that exist there.
Task 1: Create and populate your work area folder
To create and populate your work area, you can use the DesignSync Workspace Wizard. The Wizard helps you perform two tasks: associate your work area with the vault and populate your work area with files from the project.
1. Invoke DesignSync. (From your UNIX shell, enter DesSync.)
The DesignSync main window appears and then the Workspace Wizard. (If the Workspace Wizard does not appear, select Revision Control => Workspace Wizard.)
2. Click Join an existing project (I want to create a new workspace by populating files from an existing project vault). Then click Next.
o In the Select Vault dialog, type the URL of the project you want to join or select one from the pull-down list. Then click Next. The URL specifies the sync protocol plus the SyncServer name and port number and then the vault folder. For example, you might enter: sync://ca-srvr.ACompany.com:2647/Projects/ASIC
(In certain cases, DesignSync displays a SyncSecurity dialog. Enter your user name and password as defined in the ProjectSync User's Profile. Then click OK.)
4. In the Select Workspace dialog, select the directory to be the top level directory for the work area and click Next.
If the directory does not exist, you can create it by clicking Browse and creating a new folder. To set up your work area for the ASIC project files for example, under the /data/devel/ASIC/users/user3 directory you might create the Latest subdirectory. Then you would select the Latest directory and click Next.
Optional: Type the name of a bookmark in the Bookmark field for future reference.
5. In the Specify Selector or Configuration dialog, specify the branch or version of design files you want to be put in your work area. Then click Next.
o If your environment does not use branches, you can accept the default selector of Trunk. (Trunk is the default branch tag for branch 1, the default branch.) DesignSync fetches the Latest version of files on the Trunk branch.
o If your development environment uses branches, type the branch selector for your project's files (for example Rel4:Latest).
165

DesignSync Data Manager User's Guide
6. In the Specify Object State dialog, in answer to the question "In what state should the objects be populated?", select Unlocked copies. 7. In the Specify the Mirror dialog, select the mirror directory. If you are not using a mirror model, click Next. 8. In the Finished dialog, click Finish.
The Workspace Wizard:
• Associates the vault folder (ca-srvr.ACompany.com:2647/Projects/ASIC) with your project work area directory (Latest).
• Sets the persistent selector list for the work area. This list specifies the version or branch a revision control command operates on when no version or branch is explicitly specified for the operation (through the Version Selector field or the -version and -branch options to commands).
• Fetches copies of project files from the vault.
Tip: Repopulate your work area periodically to keep it up-to-date, reflecting the most recent versions and any new files added to the vault. When you use populate to update your work area, DesignSync performs an incremental populate. An incremental populate is a kind of fast populate operation which fetches copies of only the vault folders that have changed.
Creating File Versions
As you go about your daily design tasks, you'll need to make modifications to the design data files. You make all of these modifications in your private work area to files that you have checked out of the vault. When you're ready to share your modifications with other users, you can check your files into the SyncServer vault, where other users can access them.
Task 2: Checking out a file for editing
To make changes and create a new version, you should first check out the file with a lock. When you check out the file with a lock, DesignSync fetches a copy of the file to your work area and sets the permissions to read-write. Then it locks the file in the vault, so that only you, the user holding the lock, can check in a newer version of the file.
To check out a file with a lock:
1. In DesignSync, click the file you want to check out (for example, decoder.v).
To select more than one file in a folder, press Ctrl and click each file.
2. Select Revision Control => Check Out. 3. In the Check Out dialog:
166
Using DesignSync
o Click Locked Copies. o Type a comment if you want. (A comment usually is not required for a
checkout and you can always add a comment when you check in the file.) 4. Click OK.
After checking out a file to your work area, you can invoke an editor appropriate for the file and make changes.
Tip: To "undo" a checkout when you have a file locked but have decided not to make changes, select Revision Control => Cancel Checkout. See Task 4: Releasing a lock on a file.
To check out with a lock all files in a folder and all of its subfolders:
Suppose you want to check out for edit not only all the files in the top folder but also all of the files in its decoder, alu, and register subfolders (a recursive checkout). All you have to do is select the top folder and perform a check-out operation:
1. In the DesignSync window, select the folder that contains the files and subfolders you want to check out (top).
To select more than one folder, press Ctrl and click each folder.
2. Select Revision Control => Check Out. 3. In the Check Out dialog:
o Click Unlocked Copies. o Type a comment, if you want. (A comment is not required for a checkout.
You can always add a comment when you check in the file.) 4. Click Check Out.
DesignSync checks out all the files in the top folder, in all its subfolders, in all their subfolders, and so on down through the hierarchy. DesignSync performs this type of checkout (the equivalent of the co -recursive command) by default when you perform a check-out operation from the DesignSync GUI. (To see the command options DesignSync uses, look at the command display box at the bottom of the Check Out dialog.)
Task 3: Checking in a file
Once you have made changes to a file, you need to check in the file to create a new version in the vault and to make it available to other team members.
1. In the DesignSync main window, select the file you want to check in (for example, decoder.v).
To select more than one file in a folder, press Ctrl and click each file.
167
DesignSync Data Manager User's Guide
2. Select Revision Control => Check In. 3. In the Check In dialog:
o Click Unlocked copies. o Type a comment, if you want. (It is a good idea to include a comment
explaining the changes you made. In addition, your project leader may have set up access controls that require a check-in comment of a certain length.)
4. Click OK.
• If you checked out a file for editing (by selecting the Locked copies option) but did not change it, the check-in operation creates no new version. Instead, it releases the lock and marks the file as read-only in your work area.
To check in a folder of files:
If you checked out for edit many files in a work area, you can perform a blanket checkin to check them all in at once. This blanket checkin checks in all files that have been modified. Suppose, for example, that you want to check in all files in the top folder and in its decoder, alu, and register subfolders
1. In the DesignSync main window, select the folder that contains the files and subfolders that you want to check in (for example, top).
2. Select Revision Control => Check In. 3. In the Check In dialog:
o Click Unlocked copies. o Type a comment, if you want. (It is a good idea to include a comment
explaining the changes you made. In addition, your project leader may have set up access controls that require a check-in comment of a certain length.)
4. Click OK..
DesignSync inspects all files in the top folder and its subfolders and checks in any files that were modified. DesignSync performs this type of checkin (the equivalent of the ci -recursive command) by default when you perform a check in from the GUI. (To see the commands DesignSync uses, look at the command display box at the bottom of the Check In dialog.)
Task 4: Releasing a lock
Suppose another team member notifies you that she needs to make changes to decoder.v, a design file that you have checked out with a lock. To release the lock on the file and make it available for others to edit, you can either:
• Check in the file (Revision Control => Check In), which releases the lock and puts a copy of the modified file into the vault. (In most situations, this is the action you'll probably want to take.)
168
Using DesignSync
• Cancel the check-out operation you performed on that file (Revision Control => Cancel Checkout). This option effectively performs an "un"checkout operation on the file you checked out with a lock: it releases the lock and (if your project leader defined a default fetch state of share) keeps a copy of the file in the directory.
To cancel a checkout (and release the lock) on a file:
1. In the DesignSync main window, select the file (for example, decoder.v). To select more than one file in a folder, in the DesignSync main window, press Ctrl and click each file.
2. Select Revision Control => Cancel Checkout.
Some points about how the Cancel Checkout option works:
• It cancels only a checkout that you performed. To unlock a file that is locked by another user, select Revision Control = > Unlock.
• If you have modified the file and want to keep your changes, check in the file. See Task 3: Checking in a file.
• If you select a folder the DesignSync GUI and then select Cancel Checkout, DesignSync cancels the checkout on all of the files in the folder and in all of its subfolders.
Configuration/Release Management
When you have in your work area a set of design files that meet some requirement, you'll want to mark this file set for future reference. For example, when the design passes simulation, you might want to mark the current versions of your design files as "passing". You can mark files by selecting the Revision Control => Tag. (The set of files that share a common tag is sometimes called a configuration.) You can also use the Tag selection to retrieve specific file versions when creating a work area in the future.
Note: This section describes working with DesignSync design configurations. ProjectSync and the Hierarchical Configuration Manager (HCM) each have a different concept of a configuration. For information, see ProjectSync Help: What Are Configurations?.
Task 5: Creating a design configuration/release
To create a design configuration, first select the items (files or folders) you want to have in the configuration; then select Revision Control => Tag. However, before you perform the tag operation, you should check any modified files into the vault and update your work area with a populate operation.
169
DesignSync Data Manager User's Guide
Before you tag:
• Check in files that you have modified.
The tag operation attaches a tag (a text string) to a specific file version. However, DesignSync attaches tags only to file versions in the vault, not to local copies of files. For this reason, before you perform a Tag operation, check in any files that are locally modified or checked out with a lock in your work area.
If you do not check in locally modified objects before you use the tag command, the tag operation displays an error message for each locally modified object and does not tag any version of those objects in the vault. This is the default behavior of the tag operation. For example, suppose you check out decoder.v (version 1.3) with a lock and modify it. If you try to tag the modified version, DesignSync displays an error message. To have the tag added to your modified version, you need to first check in decoder.v. DesignSync then creates version decoder.v;1.4 in the vault. When you add a tag to the file, DesignSync tags version 1.4.
• Make sure your work area is up-to-date.
Although tags reside on file versions in the vault, the version of the file in your work area determines the version that DesignSync tags in the vault. Usually, your work area will contain all the versions you want to tag, especially if you have been simulating or verifying with a set of design files. But it may not. Your design files may not be copies of the latest checked in files. If you want your work area to remain current, it may be necessary to populate prior to simulating or verifying.
To tag one or more files:
Suppose you want to tag several files in your work area with the string of passing:
1. In the DesignSync main window, select the files you want to tag. To select more than one file, press Ctrl and click each file.
2. Select Revision Control => Tag. 3. Click Add a tag. 4. In the Tag: field, type the tag name (for example, passing). 5. Click Tag version in workspace. 6. Click OK.
To tag all file versions in a folder and all its subfolders within your work area:
Suppose you want to tag all the files in the top folder of your work area with the string of passing and also have the tag applied to all files in its decoder, alu, and register subfolders:
170

Using DesignSync
1. In the DesignSync main window, select the folder (top) you want to tag. To select more than one folder, press Ctrl and click each folder.
2. Select Revision Control => Tag. 3. Click Add a tag. 4. Click Recurse into folders. 5. In the Tag: field, type the tag name (for example, passing). 6. Click Tag version in workspace. 7. Click OK.
DesignSync tags all the files in the top folder and in all its subfolders.
If you change a file later and want to mark the new file version with an existing tag, you can use the Replace existing tags option of the Tag dialog to move the tag to the new version.
For example, suppose you tag a set of files with the tag passing. Later you change the decoder.v file to correct an error in the header and check in the file, creating a new version (1.2, for example). This new version, of course, does not have the tag. To move the tag to the version 1.2:
1. Select the decoder.v file and select Revision Control => Tag. 2. Click Add a tag. 3. Click Replace existing tags. 4. In the Tag: field, type the tag name, type the name of the existing tag (in this
example, passing) you want to move to the new version of decoder.v. 5. Click Tag version in workspace. 6. Click OK.
Notes:
• This example of the tag operation does not specify a version with the file name. Checking in the file first created a new version in the vault and updated the work area. From the version in the work area, DesignSync determines the version to tag in the vault.
• This tag operation is the equivalent of the tag -replace command.
You can also specify the file version to which DesignSync attaches the tag, rather than letting the version in the workspace determine the version to be tagged. Use the Tag specified version option of the Tag dialog. For example:
1. Select the decoder.v file and select Revision Control => Tag. 2. Click Add a tag. 3. In the Tag: field, type initial_vers. 4. Click Tag specified version. 5. In the Version/Branch: field, type version you want to tag, for example, 1.1.
171

DesignSync Data Manager User's Guide
Alternately, you can display a list of versions and choose the one you want to tag. Click on the down arrow and select Get versions/tags. In the Get Tags/Versions dialog, select a branch (most often it will be Current branch). Then select Get versions and the specific version you want.
6. Click OK.
This capability to tag a file version can be quite useful, considering that the tag string can be a version parameter. One use is to create a new configuration based on a previous configuration. For example:
1. Select the folder that contains the objects you want to tag and then select Revision Control => Tag.
2. Click Add a tag. 3. In the Tag: field, type relB. 4. Click Tag specified version. 5. In the Version/Branch field, type relA, where relA is an existing version. 6. Click OK.
DesignSync applies the tag RelB to file versions that have the RelA tag attached.
To remove a tag string from a file, use the Delete a tag option of the Tag dialog:
1. Select the decoder.v file and select Revision Control => Tag. 2. Click Delete a tag. 3. In the Tag: field, type the tag you want to delete, for example, temp_tag1. 4. Click OK.
This tag operation deletes the temp_tag1 tag from the decoder.v file. (This tag operation is the equivalent of the tag -delete command.)
To remove a tag string from all files in a folder and in all its subfolders, select the folder and use the Delete a tag option of the Tag dialog:
1. Select the top folder and select Revision Control => Tag. 2. Click Delete a tag. 3. Click Recurse into folders. 4. In the Tag: field, type the tag you want to delete, for example, temp_tag1. 5. Click OK..
This tag operation deletes the temp_tag1 tag from files in the top folder and all its subfolders. (This tag operation is the equivalent of the tag -delete -recursive command.)
Task 6: Creating a work area based on a configuration/release
172

Using DesignSync
The operations that fetch a file version to a work area (populate, checkout) have a Version field where you can specify the version to be fetched.
While you can use the version selector to retrieve a specific numeric version, such as 1.5, the real power is in using a tag string as the version selector. For example, let's say you want to create a new work area that holds certain ASIC files--those that have been tagged with the RelA tag.
To create a work area based on a configuration:
1. In the DesignSync main window, select your user directory for the project (/data/devel/ASIC/users/user3).
2. Select File => New => Folder and create a new top level folder (ASIC2) for this configuration.
3. Select the top level folder you just created (RelA). 4. Select Revision Control => Set Vault Association. 5. In the Modify the Vault field, type the URL of the vault folder that contains the
files you want to use as the basis for your new work area (in our example, sync://ca-srvr.Acompany.com:2647/Projects/ASIC).
6. In the Modify the Selector field, type the tag name you want to use to populate the new work area (RelA).
7. Click OK. 8. Select Revision Control = > Populate 9. Click Unlocked copies. 10. Click Recurse into folders if not already selected. 11. Click Incremental populate, if not already selected. 12. Click OK. • Specifying a tag name for Version causes the populate operation to fetch into
your work area file versions that have the specified tag (in our example, RelA). The operation does not remove any file versions that do not have the RelA tag. In your RelA work area, you can create any new files you want. However, these new files will not have any tag unless you attach one with a tag operation.
• The Recurse into folders option causes DesignSync to populate not just the current folder (RelA) but all its subfolders, recreating the vault folder hierarchy in your work area.
To delete from your work area all file versions that are not part of a specified configuration (that is, not tagged with a specified string), perform a populate operation, selecting the Force overwrite of local modifications option. For example, after DesignSync performs the following populate operation, only files tagged with the RelC_proposed tag exist in the your work area:
1. In the DesignSync main window, click the folder you want to update. 2. Check that the vault association between your work area folder and the vault
folder has been set appropriately. Select File => Properties and click the
173

DesignSync Data Manager User's Guide
Revision Control tab. (For our example, the vault that the RelA work area is associated with should be sync://ca-srvr.Acompany.com:2647/Projects/ASIC.)
3. Select Revision Control => Populate. 4. Click these options:
o Unlocked copies o Recurse into folders o Force overwrite of local modifications
5. Click Advanced and in the Version field, type RelC_proposed. 6. Click OK.
WARNING: The Force overwrite of local modifications option deletes from your work area any file versions that are not tagged with the specified string, including any files that are checked out for edit or locally modified. Use this option with care. However, this option does not affect unmanaged files (files that are not under DesignSync revision control) in your work area.
Working with Files in Your DesignSync Work Area
Although directories and files in your work area may look the same as your other UNIX directories and files, your work area contains information (metadata) that DesignSync uses to manage objects under its revision control. To ensure that DesignSync can track file versions and perform revision control operations successfully, always use DesignSync to create, delete, rename, and move directories and files in your work area.
• To create a directory within your work area, in the DesignSync main window, select File => New => Folder (mkfolder command).
• To delete directories or files within your work area, in the DesignSync main window, select the folder or file and then select File => Delete (rmfolder and rmfile commands).
• To rename or move directories or files within your work area, use the DesignSync mvfolder and mvfile commands.
Getting Started with the Command Shell
Using the DesignSync Command Shell
This document provides instructions to help you create a work area and quickly get started using DesignSync to manage your design data.
174

Using DesignSync
Assumed Environment
(UNIX platform, dssc or stcl command shell, shared cache, locking work style)
The instructions in this document assume that:
• You are working in a UNIX environment such as Solaris or HP. • The DesignSync tools have been installed. • To use DesignSync, you invoke the DesignSync command shell (dssc) and use
DesignSync commands. (You can also use the stcl command shell.) • In your environment:
o You have set the SYNC_DIR variable. (This environment variable defines the path to your DesingSync installation directory; you need to set this variable before running DesignSync.)
o The PATH variable includes $SYNC_DIR/bin so that the operating system can find the dssc executable.
This document uses a scenario to illustrate the steps you use to get started. In the scenario:
• You are a designer working on a project called ASIC. • On a DesignSync server (also called a SyncServer) your project leader or
DesignSync tools administrator has created a SyncServer folder where you can put your ASIC design files. The SyncServer has the <host name>:<port> of ca-srvr.Acompany.com:2647 (a remote vault). The URL for the Projects folder is: sync://ca-srvr.Acompany.com:2647/Projects.
• Your project leader has set up a shared cache on the Local Area Network (LAN) that holds copies of each version of all the project's files. Project members reference these files in the cache instead of storing copies of files in their own work areas.
• Your project team follows the locking work style where you always check out with a lock an object that you plan to edit. Other team members can fetch (check out without a lock) the object, but no one else should make changes while you hold the lock.
• Your project leader has set up a user directory with subdirectories for the project team members. The directory has the UNIX hierarchy:
/data/devel/ASIC/users user1 user2 user3 . .
• Your user directory is /data/devel/ASIC/users/user3.
Creating a Work Area - Putting Files Under Revision Control
175

DesignSync Data Manager User's Guide
Suppose you are a designer who has developed a design for an ALU. You are ready to place your design files under revision control, so that you can share them with the other members of your project team.
To put your files under revision control and share them with team members, you first must associate your local top-level design directory with a SyncServer folder (also called a vault folder). Then you check in your files to the vault.
Once you check in your files, the design directory you associated with the vault folder becomes your DesignSync work area. A work area is a directory hierarchy that reflects the data hierarchy in the vault. A work area is also the location from which you check file versions into and out of the vault. You are the only user accessing your work area, and you have full control over the files and files versions that exist there.
Task 1: Associate your work area directory with the vault (SyncServer folder).
Before you can put your design files under revision control, your alu8 directory needs to be associated with a SyncServer folder. To make the association, use the dssc or stclc command setvault.
To associate your work area with a SyncServer folder:
1. Invoke the DesignSync command shell. (At the UNIX prompt, enter dssc.) 2. Use the DesignSync cd command to change directory to the top level directory
for the files you want to put under revision control. 3. Use the DesignSync setvault command to associate your directory with a
corresponding SyncServer folder for your project. The SyncServer folder is specified with a URL that uses the sync protocol plus the SyncServer name and port number and then the vault folder (sync://ca-srvr.Acompany.com:2647/Projects/ASIC/alu8).
Note: The SyncServer folder does not have to exist for you to specify it. For example, suppose the ASIC folder exists on the SyncServer but there is no alu8 subfolder. When you specify a vault folder that does not exist (alu8), DesignSync displays a warning so you can make sure that your vault path is correct and then creates the vault folder when you check in design data.
%dssc dss> cd /data/devel/ASIC/users/user3/alu8 dss> setvault sync://ca-srvr.Acompany.com:2647/Projects/ASIC/alu8 . dss> exit %
Task 2: Check in your files.
176

Using DesignSync
The next step is to perform the initial checkin of your ALU design files into the SyncServer vault folder.
To check in of all files in the alu8 folder and all of its subfolders:
1. In your work area, change directory to the top-level directory containing the files you want to check in.
2. Use the DesignSync command ci to check in the files. It is a good idea to include a comment (with the -comment option) explaining the changes you made. In addition, your project leader may have set up access controls that require a check-in comment of a certain length.
dss> cd /data/devel/ASIC/users/user3/ASIC/alu8 dss> ci -comment "8-bit ALU" -new -share -recursive /data/devel/ASIC/users/user3/ASIC/alu8 dss> exit %
• The -new option causes DesignSync to create a new version (1.1) of each file on a new branch (1).
• The -recursive option causes DesignSync to check in all of the files in the ASIC folder and in all of its subfolders, recreating your work area ASIC directory in the vault folder. To check in recursively, you must specify the -recursive option; otherwise DesignSync checks in the files in the current folder only.
• You use the -share option when your project has a shared (LAN) cache. This option causes the ci command to fetch copies of files into the project's shared (LAN) cache, not into your own work area. Instead, your work area contains symbolic links to the files in the cache. The checkin command fetches files into the cache only if they are not already there. For this reason, using ci -share is the fastest method for creating a work area and makes efficient use of disk space for your team.
Note: If your project leader has set up a default fetch state of share, you do not need to use the -share option. DesignSync automatically includes it with the populate, co, ci, and cancel commands.
Other team members will see the files you placed under revision control when they populate their work areas.
Tip: You also should populate your work area periodically to keep it up to date, reflecting the most recent versions and new files in the vault. To update your work area, use the populate command.
By default, the populate command performs a fast populate operation using the -incremental option. This option causes the populate command to fetch copies of only the vault folders that have changed.
177
DesignSync Data Manager User's Guide
Now you are ready to check files out and in, creating new file versions.
Creating a Work Area - Joining a Project Already Under Revision Control
To join the development effort for a project, you first must create and populate a work area in your user directory. A work area is a directory hierarchy that reflects the data hierarchy in the vault. A work area is also the location from which you check file versions into and out of the vault. You are the only user accessing your work area, and you have full control over the files and file versions that exist there.
Task 1: Associate your work area folder with a SyncServer folder.
Your work area folder needs to be associated with a SyncServer folder. To make the association, use the dssc or stclc command setvault.
To associate your work area with a SyncServer folder:
1. Invoke the DesignSync command shell. (At the UNIX prompt, enter dssc.) 2. Use the DesignSync cd command to change directory to your user directory for
the project. 3. Use the DesignSync mkfolder command to create a new folder (Latest) for the
project files you plan to work on. This is the root (top level) folder of your work area. (A folder is a directory that is under DesignSync revision control.)
4. Use the DesignSync cd command to change directory to the top level folder you just created.
5. Use the DesignSync setvault command to associate the SyncServer folder (ca-srvr.ACompany.com:2647/Projects/ASIC) with your project work area folder (/data/devel/ASIC/users/user3/Latest). The SyncServer folder is specified with a URL that uses the sync protocol plus the SyncServer name and port number and then the vault folder (sync://ca-srvr.Acompany.com:2647/Projects/ASIC).
% dssc dss> cd /data/devel/ASIC/users/user3 dss> mkfolder Latest dss> cd Latest dss> setvault sync://ca-srvr.Acompany.com:2647/Projects/ASIC . dss> exit %
Task 2: Populate the work area with project data
The next step is to fill your work area folder structure with directories and files that already have been checked in to the SyncServer for this project. The most common
178
Using DesignSync
approach is to get a copy of the most recent version of every file by using the populate command.
To populate your work area with copies of the data and files in the vault:
1. Change directory to the folder you created to hold your project files. 2. Use the DesignSync populate command to fill your work area folder with copies
of all project directories and files.
% dssc dss> cd /data/devel/ASIC/users/user3/Latest dss> populate -recursive -share dss> exit %
• You can abbreviate command words, if you choose. For example:
% dssc pop -rec
• The -recursive option causes DesignSync to populate not just the current folder (Latest) but all its subfolders, recreating the vault folder hierarchy in your work area. To populate recursively, you must specify the -recursive option; otherwise DesignSync populates just the current folder.
• You use the -share option to populate your work area when your project has a shared (LAN) cache. This option causes the populate command to fetch copies of files into the project's shared (LAN) cache, not into your own work area. Instead, your work area contains symbolic links to the files in the cache. The populate command fetches files into the cache only if they are not already there. For this reason, using populate -share is the fastest method for creating a work area and makes efficient use of disk space for your team.
Note: If your project leader has set up a default fetch state of share, you do not need to use the -share option. DesignSync automatically includes it with the populate, co, ci, and cancel commands.
Tip: Repopulate your work area periodically to keep it up-to-date, reflecting the most recent versions and any new files added to the vault. To update your work area, use the populate command.
By default, the populate command performs a fast populate operation using the -incremental option. This option causes the populate command to fetch copies of only the vault folders that have changed.
Now you are ready to check files out and in, creating new file versions.
179
DesignSync Data Manager User's Guide
Creating File Versions
As you go about your daily design tasks, you'll need to make modifications to the design data files. You make all of these modifications in your private work area to files that you have checked out with a lock from the vault . When you're ready to share your modifications with other users, you can check your files into the SyncServer vault, where other users can access them.
Task 3: Checking out a file for editing
To make changes and create a new version, you should first check out the file with a lock. When you check out the file with a lock, DesignSync fetches a copy of the file to your work area and sets the permissions to read-write. Then it locks the file in the vault, so that only you, the user holding the lock, can check in a newer version of the file.
To check out a file with a lock:
1. In your work area, change your directory to the folder that contains the file you want to check out.
2. Use the DesignSync command co -lock to check out the file with a lock.
% dssc dss> cd /data/devel/ASIC/users/user3/Latest/top/decoder dss> co -nocomment -lock decoder.v dss> exit %
Use the -nocomment option when you want to check the file out without describing your intended changes. You can still add a comment (with the -comment option) when you check in the file.
After checking out a file to your work area, you can invoke an editor appropriate for the file and make changes.
Tip: To "undo" a checkout when you have a file locked but have decided not to make changes, use the cancel command. See Task 5: Releasing a lock on a file.
To check out with a lock all files in one folder:
1. In your work area, change your directory to the folder that contains the files you want to check out.
2. Use the DesignSync command co -lock and a wildcard (*).
% dssc dss> cd /data/devel/ASIC/users/user3/Latest/top/decoder dss> co -nocomment -lock *
180

Using DesignSync
dss> exit %
This command checks out all of the files in the decoder folder of the ASIC project.
To check out with a lock all files in a folder and all of its subfolders:
Suppose you want to check out for edit not only all the files in the top folder but also all of the files in its decoder, alu, and register subfolders. You use the -recursive option in addition to the co -lock command:
1. In your work area, change directory to the folder higher up in the hierarchy. For example, if you are working in the /users/user3/Latest/top folder, change directory to the Latest folder.
2. Use the DesignSync command co -lock -recursive to check out the files.
% dssc dss> pwd /data/devel/ASIC/users/user3/Latest/top dss> cd /data/devel/ASIC/users/user3/Latest dss> co -recursive -lock top dss> exit %
The -recursive option causes DesignSync to check out all files in the top folder, in all its subfolders, in all their subfolders, and so on down through the hierarchy.
Task 4: Checking in a file
Once you have made changes to a file, you need to check in the file to create a new version in the vault and to make it available to other team members.
To check in a file:
1. In your work area, change your directory to the folder that contains the file you want to check in.
2. Use the DesignSync ci command to check in the file to the vault. It is a good idea to include a comment (with the -comment option) explaining the changes you made. In addition, your project leader may have set up access controls that require a check-in comment of a certain length.
% dssc dss> cd /data/devel/ASIC/users/user3/Latest/top/decoder dss> ci -comment "added power-up state vector" -share decoder.v
181

DesignSync Data Manager User's Guide
dss> exit %
• If you checked out a file for editing (using the co -lock command) but did not change it, the check-in operation creates no new version. Instead, it releases the lock and marks the file as read-only in your work area.
• The -share option causes the check-in operation to put a copy of the changed file into the shared cache (instead of your work area) and create a symbolic link in your work area to the file version in the cache.
To check in all files in a folder and all of its subfolders (a "blanket" checkin):
If you checked out for edit many files in a work area, you can perform a blanket checkin from a folder higher up in the hierarchy. This blanket operation checks in all files that have been modified.
1. In your work area, change directory to the folder higher up in the hierarchy. For example, if you are working in the /data/devel/ASIC/users/user3/Latest/top folder, change directory to the Latest folder.
2. Use the DesignSync command ci -recursive to check in the files. It is a good idea to include a comment (with the -comment option) explaining the changes you made. In addition, your project leader may have set up access controls that require a check-in comment of a certain length.
% dssc dss> pwd /data/devel/ASIC/users/user3/Latest/top dss> cd /data/devel/ASIC/users/user3/Latest dss> ci -comment "extensive changes for reset" -share -recursive top dss> exit %
The -recursive option causes DesignSync to inspect all files in the top folder and its subfolders in your work area and check in any files that were modified.
Task 5: Releasing a lock
Suppose another team member notifies you that she needs to make changes to decoder.v, a design file that you have checked out with a lock. To release the lock on the file and make it available for others to edit, you can either:
• Check in the file with the ci command, which releases the lock and puts a copy of the modified file into the vault. (In most situations, this is the action you'll probably want to take.)
182
Using DesignSync
• Cancel the check-out operation you performed on that file by using the cancel command. This command effectively performs an "un"checkout operation on the file you checked out with a lock: it releases the lock and, when used with the -share option, keeps a copy of the file in the cache directory.
To cancel a checkout (and release the lock) on a file:
1. Make sure you are in the folder containing the file. 2. Use the DesignSync cancel command to release the lock.
% dssc dss> cd /data/devel/ASIC/users/user3/Latest/top/decoder dss> cancel -share decoder.v dss> exit %
Some points about how the cancel command works:
• It cancels only a checkout that you performed. To unlock a file that is locked by another user, use the unlock command.
• If you have modified the file but you do not want to keep your changes, use cancel -force. This command cancels your checkout and replaces the locally modified file with a valid version from the vault.
• If you have modified the file and want to keep your changes, check in the file with the ci command. See Task 4: Checking in a file.
Configuration/Release Management
When you have in your work area a set of design files that meet some requirement, you'll want to mark this file set for future reference. For example, when the design passes simulation, you might want to mark the current versions of your design files as "passing". You can mark files with the DesignSync tag command. (The set of files that share a common tag is sometimes called a configuration.) You can also use the tag command to retrieve specific file versions when creating a work area in the future.
Note: This section describes working with DesignSync design configurations. ProjectSync and the Hierarchical Configuration Manager (HCM) each have a different concept of a configuration. For information, see ProjectSync Help: What Are Configurations?.
Task 6: Creating a design configuration/release
To create a design configuration, first select the items (files or folders) you want to have in the configuration; then use the tag command. However, before you perform the tag operation, you
183

DesignSync Data Manager User's Guide
should check any modified files into the vault and update your work area using the populate command.
Before you tag:
• Check in files that you have modified.
The tag command attaches a tag (a text string) to a specific file version. However, DesignSync attaches tags only to file versions in the vault, not to local copies of files. For this reason, before you use the tag command, check in any files that are locally modified or checked out with a lock in your work area.
If you do not check in locally modified objects before you use the tag command, the tag operation displays an error message for each locally modified object and does not tag any version of those objects in the vault. This is the default behavior of the tag operation. For example, suppose you check out decoder.v (version 1.3) with a lock and modify it. If you try to tag the modified version, DesignSync displays an error message. To have the tag added to your modified version, you need to first check in decoder.v. DesignSync then creates version decoder.v;1.4 in the vault. When you add a tag to the file, DesignSync tags version 1.4.
• Make sure your work area is up-to-date.
Although tags reside on file versions in the vault, the version of the file in your work area determines the version that DesignSync tags in the vault. Usually, your work area will contain all the versions you want to tag, especially if you have been simulating or verifying with a set of design files. But it may not. Your design files may not be copies of the latest checked in files. If you want your work area to remain current, it may be necessary to populate prior to simulating or verifying.
To tag all file versions in a folder and all its subfolders within your work area:
Suppose you want to tag all the files in the top folder of your work area with the string passing and also have the tag applied to all files in its decoder, alu, and register subfolders (recursive behavior):
1. In your work area, change directory to the folder that contains the files and subdirectories with files you want to tag.
2. Use the DesignSync command tag -recursive to tag all the files in that folder (top) and all the files in its subfolders.
% dssc dss> cd /data/devel/ASIC/users/user3/Latest/top dss> tag -recursive passing .
184

Using DesignSync
dss> exit %
If you change a file later and want to mark the new file version with an existing tag, you can use the tag -replace command to move the tag to the new version.
For example, suppose you tag a set of files with the tag passing. Later you change the decoder.v file to correct an error in the header and check in the file, creating a new version. The new version, of course, does not have the tag. To move the tag to the new version, you use the tag -replace command and specify the file's name.
% dssc dss> cd /data/devel/ASIC/users/user3/Latest/top/decoder dss> ci -share -com "corrected error in header" decoder.v dss> tag -replace passing decoder.v dss> exit %
Note: This example of the tag command does not specify a version with the file name. Checking in the file first created a new version in the vault and updated the work area. From the version in the work area, DesignSync determines the version to tag in the vault.
You can also specify the file version to which DesignSync attaches the tag, rather than letting the version in the work area determine the version to be tagged. Use the -version option. For example:
% dssc dss> cd /data/devel/ASIC/users/user3/Latest/top/decoder dss> tag -version 1.1 initial_vers decoder.v dss> exit %
This example attaches the tag initial_vers to version 1.1 of the decoder.v file.
This capability to tag a file version can be quite useful, considering that the tag string can be a version parameter. One use is to create a new configuration based on a previous configuration. For example:
% dssc dss> cd /data/devel/ASIC/users/user3/Latest dss> tag -version RelA RelB -recursive . dss> exit %
185

DesignSync Data Manager User's Guide
This command operates on all files in the Latest folder and all its subfolders and applies the tag RelB to all file versions that have the RelA tag attached. Then you can use the tag -replace command to move the RelB tag to different file versions as you identify differences between the RelA and RelB configurations.
To remove a tag string from a single file, use the tag -delete command. For example:
% dssc dss> cd /data/devel/ASIC/users/user3/Latest/top/decoder dss> tag -delete temp_tag1 decoder.v dss> exit %
To remove a tag string from all files in a folder and in all its subfolders, use the tag -delete -recursive command. For example:
% dssc dss> cd /data/devel/ASIC/users/user3/Latest/top dss> tag -delete temp_tag1 -recursive . dss> exit %
This tag command deletes the temp_tag1 tag from files in the top folder and all its subfolders.
Task 7: Creating a work area based on a configuration/release
The commands that fetch a file version to a work area (populate, co) accept a -version option where you can specify the version to be fetched.
While you can use the -version option to retrieve a specific numeric version, such as 1.5, the real power is in using a tag string as the version specifier. For example, suppose you want to create a new work area that holds ASIC files that have been tagged with the RelA tag.
To create a work area based on a configuration:
1. Change directory to your user directory for the project (/data/devel/ASIC/users/user3).
2. Use the DesignSync mkfolder command to create a new folder (RelA) for this configuration.
3. Change directory to the top level folder you just created (RelA). 4. Use the DesignSync setvault command to associate the SyncServer folder
(sync://ca-srvr.Acompany.com:2647/Projects/ASIC) with your new work area folder (RelA).
186
Using DesignSync
5. Change directory to the RelA folder in the new work area. 6. Use the DesignSync command populate -share -recursive command with the -
version option to fill your new work area folder with links to the cache for all file versions that have the RelA tag. (As always, the -share option causes the populate command to populate the shared cache and create links from your work area to the cache.)
% dssc dss> cd /data/devel/ASIC/users/user3 dss> mkfolder RelA dss> cd RelA dss> setvault sync://ca-srvr.Acompany.com:2647/Projects/ASIC . dss> populate -share -recursive -version RelA dss> exit %
Note: This command sequence creates a new work area (/data/devel/ASIC/users/user3/RelA) and populates it with copies of only those ASIC files in the vault that have a tag of RelA. In your RelA work area, you can create any new files you want. However, these new files will not have any tag unless you attach one with the tag command.
The populate -version <tagname> command fetches into your work area file versions that have the specified tag (in our example, RelA). The command does not remove any file versions that do not have the RelA tag.
You can also use the tag and populate -version <tagname> command to add existing files to your new work area. Suppose you modify some files in the first work area you created (/data/devel/ASIC/users/user3/Latest) and then decide that you want to include the changes in your new workarea (RelA). To put copies of the changed files in your new work area, you:
1. Check in the modified files to the vault. 2. Tag each modified file in the old work area (Latest) with the tag string
MyChanges. 3. Change directory to your new workarea
/data/devel/ASIC/users/user3/RelA. 4. Use the populate -version command to fetch copies of the tagged files into
RelA.
For example:
% dssc dss> pwd /data/devel/ASIC/users/user3/Latest/top/decoder dss> tag MyChanges decoder.v decoder.gv
187

DesignSync Data Manager User's Guide
dss> cd /data/devel/ASIC/users/user3/RelA dss> populate -share -recursive -version MyChanges dss>exit %
The resulting work area contains the RelA release plus all file versions tagged with MyChanges.
To delete from your work area all file versions that are not part of a specified configuration (not tagged with a specified string), use the DesignSync command populate -force. For example, after DesignSync executes the following commands, only files tagged with the RelC_proposed tag exist in the your work area:
% dssc dss> cd /data/devel/ASIC/users/user3/RelA dss> populate -share -force -recursive -version RelC_proposed dss> exit %
WARNING: The -force option deletes from your work area any file versions that are not tagged with the specified string, including any files that are checked out for edit or locally modified. Use this option with care. However, the -force option does not affect unmanaged files (files that are not under DesignSync revision control) in your work area.
Working with Files in Your DesignSync Work Area
Although directories and files in your work area may look the same as your other UNIX directories and files, your work area contains information (metadata) that DesignSync uses to manage objects under its revision control. To ensure that DesignSync can track file versions and perform revision control operations successfully, always use DesignSync commands to create, delete, rename, and move directories and files in your work area.
• To create a directory within your work area, use the mkfolder command. • To delete directories or files within your work area, use the rmfolder and
rmfile commands. • To rename or move directories or files within your work area, use the
mvfolder and mvfile commands.
Basic Revision Control Operations
188

Using DesignSync
Populating Your Work Area
If you have just joined a project, you need to use Populate to check out all the objects from that project into your local working folder. You typically want to populate recursively (using the Recursive option), which traverses a vault folder and recreates the vault folder hierarchy in your work area. You can also use the Workspace Wizard to help you join a project.
The default mode for populate fetches Unlocked copies of objects, unless you have saved a different object state setting with the Save Settings button, or your project leader has defined a default fetch state. See Saving the Setting of an Object's State and SyncAdmin Help: Default Fetch State for information on these two conditions.
After you have initially populated your work area, you need to populate periodically to update your local files, because the vault might have changed since your previous populate. For example, another user might have checked in new design objects or new versions of objects that are already in your work area. Generally, you can perform an incremental populate for these periodic updates. If you need to change the states of files in your work area (for example, if you are changing from locked to unlocked files, or unlocked files to links to the cache), you should perform a full populate. An incremental populate updates only those local folders whose corresponding vault folders have changed, which is faster than a full populate operation. DesignSync performs an incremental populate by default whenever possible, although it automatically reverts to a full populate when necessary. See the ENOVIA Synchronicity Command Reference:populate command description for the circumstances where DesignSync automatically performs a full populate and for the circumstances where you might choose to specify a full populate.
You can select these types of data for the populate operation:
• A DesignSync folder • A managed DesignSync (non-module) object • A module that is already in your workspace (for an update of your workspace) • A server module, server module branch, or server module version (for an initial
populate of a workspace) • An href that is already in your workspace
Note: You cannot select an href on the server; to select an href, you must populate the entire module from the server, or filter the data that is fetched. Specifying an href for a populate is equivalent to specifying the relevant submodule directly. By specifying an href, the submodule (and the version to be fetched) is identified via the parent module. Specifying an href enables you to fetch a submodule of a module, without necessarily knowing where that module is sourced from, or what version is appropriate.
189

DesignSync Data Manager User's Guide
You can only specify the hrefs directly in the module being addressed, not in its submodules. Selecting an href in your workspace as the object to populate sets the module context accordingly, disabling the Module context field.
• A module folder that is already in your workspace
Note: You cannot select a module folder on the server; to select a module folder, you must populate the entire module from the server, or filter the data that is fetched.
• A module member that is already in your workspace
Note: You cannot select a module member on the server; to select a module member, you must populate the entire module from the server, or filter the data that is fetched.
• A legacy module already in your workspace • A legacy module configuration on the server
Additional Notes:
• You can only select one server object at a time. • You cannot use the Populate dialog box to populate a specific version of a
module member. The version specification is always associated with the module and not its members. See Specifying Module Objects for Operations for details. To populate a specific version of a module member, use the populate command.
Some of the fields in the Populate dialog box are applicable to DesignSync (non-module) data, and some to module data:
Field in the Populate dialog box
Applicable to DesignSync (non-module) data
Applicable to module data
Populate with Unlocked copies
yes yes
Populate with Locked copies
yes yes
Populate with References to versions
yes yes
Populate with Links to cache
yes yes
Populate with yes no
190

Using DesignSync
Links to mirror Populate with Locked references
yes yes
Recursive yes yes Merge with workspace
yes yes
Populate new module members
no yes
Replacement mode
yes yes
Filter no yes Exclude yes yes Working directory
no yes
Module context no yes Report mode yes yes Retain timestamp
yes yes
Unify workspace state
yes yes
Incremental populate
yes not typically
Populate empty directories
yes no
Href filter no yes Href mode no yes Version yes yes Overlay version in workspace
yes yes
Keys yes yes Local Versions no yes Module Cache no yes
191

DesignSync Data Manager User's Guide
Mode Module Cache Paths
no yes
Trigger Arguments
yes yes
To interrupt a populate operation, Click the Stop button. DesignSync completes the processing of any objects being populated, before stopping the command. See the ENOVIA Synchronicity Command Reference: interrupt command line topic for more information.
Click on the fields in the following illustration for information.
192

Using DesignSync
193
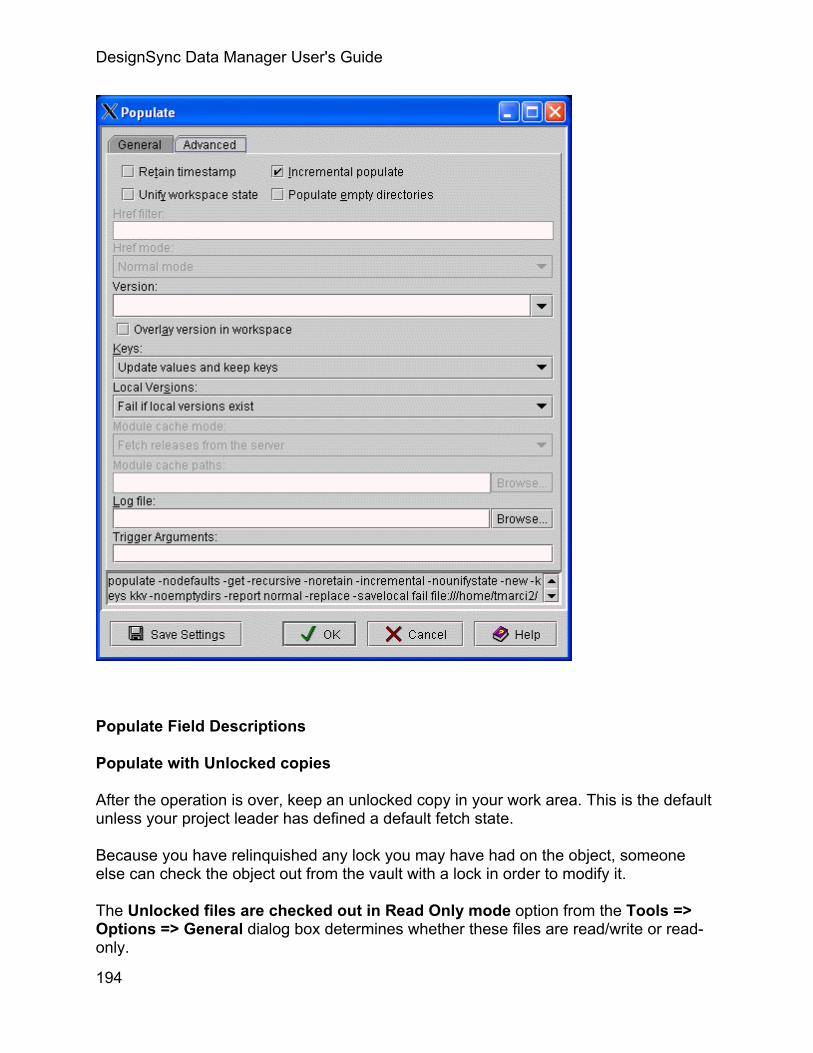
DesignSync Data Manager User's Guide
Populate Field Descriptions
Populate with Unlocked copies
After the operation is over, keep an unlocked copy in your work area. This is the default unless your project leader has defined a default fetch state.
Because you have relinquished any lock you may have had on the object, someone else can check the object out from the vault with a lock in order to modify it.
The Unlocked files are checked out in Read Only mode option from the Tools => Options => General dialog box determines whether these files are read/write or read-only.
194

Using DesignSync
Populate with Locked copies
After the operation is over, keep a locked copy in your work area. You can continue to work on the object. Others cannot check in new versions of the object as long as you have the branch locked. (The copy in your work area is known as an original.) This option is not available for legacy modules or legacy module configurations. When operating on 5.0 modules, it is module members that are locked; not whole modules. Thus, this option is mutually exclusive with the Recursive option, or with a Module context specified. To lock a module, use the Modules => Lock Branch dialog box, or the hcm lock command. See Locking Module Data for details.
Populate with References to versions
This option lets you acquire references to the versions you have selected.
Tip: Do not use this option when operating on a collection object. If you use this option, DesignSync creates a reference in the metadata for the collection object, but member files are not processed and are not included in the metadata.
Populate with Links to cache
Use this option to link to a shared copy of the design object in a cache directory. This option is available only on UNIX platforms.
Populate with Links to mirror
Use this option to link to a shared copy of the design object in a mirror directory. This option is available only on UNIX platforms. This option is not available for module data.
Populate with Locked references
This option lets you acquire a locked reference. If you intend to regenerate the object, create a locked reference to avoid fetching a copy of the object from the vault. This option is not available for legacy modules or legacy module configurations. For other module data, this option is mutually exclusive with the Recursive option, or with a Module context specified.
Merge with workspace
Select this option if you want to merge the Latest version of an object in the vault with a locally modified version. This option supports the merging work style where multiple team members can check out the Latest version of an object for editing. The first team member to check his changes in creates the next version; other team members merge their local changes with the new Latest version, and then check the merged version in. To learn how the Merge with workspace option operates on module data, see Merging Module Data.
195

DesignSync Data Manager User's Guide
If there are no conflicts, then the merge succeeds, leaving you the merged file in your work area. If there are conflicts, a warning message results. You must edit the merged file to resolve the conflicts before DesignSync allows you to check in the merged version. Conflicts are shown as follows:
<<<<<<< local
Lines from locally modified version
=======
Lines from Latest version
>>>>>>> versionID
The conflicts are considered resolved when the file no longer contains any of the conflict delimiters (7 less-than, greater-than, or equal signs in the first column). The Status column of the List View and the ls command indicates if a file has unresolved conflicts.
Populate new module members
This option only applies to module data. If selected, the populate operation fetches objects that are in the vault, but not currently in the workspace (subject to the Filter and Exclude fields). This is the default behavior. If unselected, the populate operation updates only objects already in the workspace.
Replacement mode
The Replacement mode determines how the populate operation updates your work area with the data you are fetching. Specify one of the following update methods:
• Do not replace any objects. For DesignSync data, do not overwrite locally modified files. Do not remove files that do match the requested version. For module data, preserve local modifications you made to module members, and leave intact any module members that are in your work area that are not in the requested module version.
This mode causes the least disruption to your work area; however, it may require you to clean up resulting work area data.
• Replace unmodified objects only. This replacement mode does not apply to DesignSync data. DesignSync data will not be replaced. For module data, update module members that have not been locally modified
196
Using DesignSync
and that are part of the requested module version. Also remove any unmodified module members that are not part of the requested module version.
This mode, which is the default behavior for module data, leaves intact any module members you have modified in your workspace
• Force overwrite of modified objects. For DesignSync data, overwrite locally modified files. Also remove managed objects that do not match the requested selector. For module data, replace or remove module members, regardless of whether you have modified them locally or whether they are part of the requested module version.
The intent of this mode is to make the workspace match the data being requested (subject to the Filter and Exclude fields), as closely as possible. Unmanaged data is never removed. This mode removes items that have been added to a module but have not yet been checked in; their "added" indicator is removed. The data, which is unmanaged, is not removed. See Adding a Member to a Module for information adding members to modules. If there is a conflict with data fetched from another module, that other data is not removed. See Conflict Handling for details. If populating a module overlaps with another module already in your workspace, data from that other module is not removed. This mode is mutually exclusive with the Merge with workspace option.
The Replacement mode only applies to items that are not filtered out by the Href filter, Filter or Exclude options.
Working directory
This field is used when initially populating a workspace with a module from a server. The Working directory field only applies when a server module is selected as the object to populate. Specify the path to the directory in your work area where you want the fetched module to reside. Click Browse to select the work area where you want to place the module. You can also type the absolute path to the directory.
Note: If you are populating a directory with links to a module cache, the Working directory must be new (uncreated).
Report mode
197

DesignSync Data Manager User's Guide
For the Report mode, choose the level of information to be reported:
Brief output: Report error messages. For module data, also report the success/failure/skip status of each submodule.
Normal output: In addition to the information reported in Brief mode, output informational messages for objects that are updated by the populate operation and messages for objects excluded from the operation (due to exclusion filters or explicit exclusions). For module data, also output information about all objects that are fetched. This is the default report mode.
Verbose output: In addition to the information reported in Normal mode, output an informational message for every object examined but not updated. For module data, also output information about all objects that are filtered.
Incremental populate
Perform a fast populate operation by updating only those folders whose corresponding vault folders have been modified. DesignSync performs an incremental populate by default whenever possible, although it automatically reverts to a full populate when necessary.
To change the default populate mode, your DesignSync administrator can use the SyncAdmin tool, or you can use the Save Settings button to override the default mode.
Note: This option by itself does not cause state changes of objects in your work area (for example, changing from locked to unlocked objects or unlocked objects to links to the cache). DesignSync changes the states of updated objects only. Furthermore, for an incremental populate, DesignSync only processes folders that contain updated objects, so state changes are not guaranteed. Select Unify workspace state to change the state of objects in your work area.
For incremental populate operations: If you exclude objects during a populate, a subsequent incremental populate will not necessarily process the folders of the previously excluded objects. DesignSync does not automatically perform a full populate in this case. To guarantee that previously excluded objects are fetched, turn off the Incremental populate check box for the subsequent populate operation.
This option usually is not relevant for module data. However, there are two circumstances in which you should deselect this option for a full populate of module data:
• To re-fetch data that was manually removed. The Unify workspace state option also re-fetches such data, but for missing
198

Using DesignSync
• To re-fetch objects that are unchanged from the current module version to the new one, but for which the version in the workspace is incorrect. For example, let's say there is a module Chip, containing the member alu.v . You have version 1.4 of the module Chip. The Latest version of the module is 1.5. There is no change to the file alu.v between module Chip versions 1.4 and 1.5; alu.v is version 1.3 in both module versions. However, you actually have version 1.2 of alu.v, having specifically fetched that file from a previous Chip module version 1.3. In this case, an incremental populate of the module would not re-fetch the 1.3 version of alu.v. A full populate is required to re-fetch the 1.3 version of alu.v.
Unify workspace state
Sets the state of all objects processed, even up-to-date objects, to the specified state (Unlocked copies, Locked copies, References to versions, Links to cache, Links to mirror, Locked references) or to the default fetch state if no state option is specified. See SyncAdmin Help: Defining a Default Fetch State for more information. If turned off, DesignSync changes the state of only those objects that are not up-to-date. If checked, DesignSync changes the state of the up-to-date objects, as well.
The Unify workspace state check box:
• Does not change the state of locally modified objects; select the Replacement Mode setting Force overwrite of modified objects to force a state change and overwrite the local changes.
• Does not change the state of objects not in the configuration; use the Replacement Mode setting Force overwrite of modified objects to remove objects not in the configuration.
• Does not cancel locks. To cancel locks, you can check in the locked files, select Revision Control =>Cancel Checkout to cancel locks you have acquired, or select Revision Control =>Unlock to cancel team members' locks.
Note:
The Unify workspace state option is ignored when you lock design objects. If you check out locked copies or locked references, DesignSync leaves all processed objects in the requested state.
Populate empty directories
Determines whether empty directories are removed or retained when populating a directory. Select this option to retain empty directories.
199

DesignSync Data Manager User's Guide
If you do not select this option, the populate operation follows the DesignSync registry setting for "Populate empty directories". This registry setting is by your DesignSync administrator using the SyncAdmin tool. By default, this setting is not enabled; therefore, the populate operation removes empty directories.
This option is not applicable to module data. See Directory Versioning for background. To prevent specific empty directories from being created by the populate, use the Filter field.
Href mode
The Href mode option lets you specify how hierarchical references should be evaluated in order to identify the versions of submodules to reference when populating a module recursively. This field is only available when operating on module data.
Normal mode: Examines the href's selector. If the href's selector represents a static version (a numeric version, a version tag, or a list of such items), the populate fetches the submodule using the selector. In this case, the populate uses Static mode for referencing subsequent levels of hierarchy. If the href's selector does not represent a static version, the populate still fetches the submodule using the selector, but continues to use Normal mode for referencing subsequent levels of hierarchy. This is the default Href mode.
Static mode: Populates the static version of the submodule that was recorded with the href at the time the parent module's version was created.
Dynamic mode: Evaluates the selector associated with the href to identify the version of the submodule to populate.
The Href mode option is mutually exclusive with the option to fetch Locked copies.
Version
Specify the version number or tag (or any selector or selector list) of the objects on which to operate.
For DesignSync folders, this field is set to the folder's persistent selector list by default. The Version field has a pull-down list containing suggested selectors; see Suggested Branches, Versions, and Tags for details.
For module data, if module members are selected as the objects to populate, all of the module members must belong to the same module. And, that module must be specified in the Module context field.
Note: Modules do not support auto-branching, so for module data, the Version field can not contain the auto() construct.
200

Using DesignSync
When populating module data, specifying a Module Version value never changes the workspace selector, even for the initial populate of a module. To set or change the workspace selector, use the setselector command.
If the only items selected to populate are module member files in the workspace, and all of the selected members are members of the same module, the Version field is replaced by a Module Version field. And, the Module context field will be disabled, because you are populating the selected member files as they existed in a specific version of the module.
If a legacy module on a server is selected as the object to populate, the Version field is replaced by a Configuration field, with a default value of "<Default>" (the default configuration). You can select a different configuration of the module from the pull-down list.
If a legacy module configuration on a server is selected as the object to populate, the Version field is also replaced by a Configuration field. The field's value is set to the configuration that was selected as the object to populate.
If a legacy module already in your workspace is selected as the object to populate, the Version field is replaced by a Configuration field. The value of the field defaults to the currently fetched configuration. You can select a different configuration of the same module from the pull-down list. If you change the configuration to be populated, the Recursive option and the Replace unmodified objects only mode are both selected.
Overlay version in workspace
For DesignSync data, if this option is selected, the version specified in the Version field is used to indicate the version to be overlaid on the work area. Overlaying a version does not change the current version status as stored in the workspace metadata. The Overlay version in workspace option is often used in conjunction with the Merge with workspace option, to merge one branch onto another.
To find out how the Overlay version in workspace option operates on module data, see Overlaying Module Data.
Module cache mode
This field only applies to module data. A populate operation can link to data in a module cache instead of fetching data from the server, to help decrease fetch time and save disk space.
• Link to module cache. (UNIX only) Creates a symbolic link from your workspace to the base directory of a module in the module cache. This is the default mode on UNIX platforms.
201

DesignSync Data Manager User's Guide
Note: To use this option, the Working directory must be empty. In order to guarantee that the workspace is empty, the GUI client requires that the Working directory not already exist for the initial mcache populate. The command line does not enforce this, but overwrites any duplicate files in the workspace.
• Copy from the module cache. Copies a module from the module cache to your work area. Notes:
o This mode is the default mode on Windows platforms. o This mode only applies to legacy modules.
• Fetch from the server. Fetches modules from the server.
This option overrides the default module cache mode registry setting. If the registry value does not exist, the Module Cache Mode selection defaults to Link to module cache (UNIX platforms) or to Copy from the module cache (Windows platforms).
Note: When a link to an mcache is created, the fetch mode, specified by the "Populate with" option, is ignored and the module is fetched according to Module cache mode settings.
Module Cache Paths
This field only applies to module data. Use the Module Cache Paths field to specify paths to the module caches that the populate operation searches, when using a Module Cache Mode. If your project leader defined a default module cache path (or paths), the Module Cache Paths field will be preset with that default path (or paths).
Click Browse... to select one or more paths. When a path is selected with the Browse... pop-up dialog box, the selected path is added to the end of the Module Cache Paths field.
You can also type paths into the Module Cache Paths field. You must specify the absolute path to each module cache. To specify multiple paths, separate paths with a comma (,). The paths must exist.
If no Module Cache Paths are specified, the populate operation fetches modules from the server.
Log populate messages in populate log file
Use this option to log populate messages to a populate log file. The log file provides easy access to the populate messages to allow for later review. This is particularly useful for complex populate operations such as merging a module version from another branch.
202

Using DesignSync
Note: If the specified log file already exists, DesignSync will append the results of this populate operation to the file. If the file cannot be created for any reason, such as the directory specified does not exist, or you do not have write permissions to the directory, the populate operation fails.
Related Topics
Setting Persistent Populate Filters
Merging Module Data
Using a Module Cache
How DesignSync Handles Legacy Modules
SyncAdmin Help: Default Fetch State
ENOVIA Synchronicity Command Reference: populate command
ENOVIA Synchronicity Command Reference: ls command
ENOVIA Synchronicity Command Reference: hcm lock command
ENOVIA Synchronicity Command Reference: setselctor command
Recursion option
Filter field
Exclude field
Module context field
Retain timestamp option
Href filter field
Keys field
Local Versions field
Trigger Arguments
Command Invocation
Command Buttons
203

DesignSync Data Manager User's Guide
Changing the State of Objects in Your Work Area
By default, populate does not re-fetch file versions that you already have in your workspace. This is a performance optimization.
For example, let's say you currently have cache links in your workspace to version 1.2 of fileA.txt and version 1.3 of fileB.txt . Version 1.2 is the latest version of fileA.txt. Version 1.5 is the latest version of fileB.txt . To update your workspace with the Latest versions of all files, you run:
stcl> populate -recursive -get
The above command fetches a local copy of version 1.5 of fileB.txt. The workspace's cache link to version 1.2 of fileA.txt remains unchanged, because you already have the requested version of fileA.txt in your workspace.
This default behavior is as if the -nounifystate option was specified to populate. For populate to instead re-fetch versions that you already have in your workspace in the desired fetch mode, specify the -unifystate option. For example, instead of the populate command above, you would run:
stcl> populate -recursive -get -unifystate
In addition to fetching a local copy of version 1.5 of fileB.txt, the above command fetches a local copy of version 1.2 of fileA.txt, replacing the workspace's cache link to version 1.2 of fileA.txtt .
In order to unify the state of all of the managed objects in the workspace, a full populate is performed, as if the -full option were specified. A full populate traverses the entire vault hierarchy associated with the workspace, whereas an incremental populate only traverses those sub-directories of the workspace's associated vault that have changed since the workspace was last populated. The -incremental option is the default populate behavior.
You can set the default populate behavior to -incremental or -full using the Synchroncity Administrator (SyncAdmin) Command Defaults pane. However, regardless of whether -incremental is set as the default, specifying -unifystate results in a full populate. Similarly, even if -incremental is specified on the populate command line or selected in the Populate GUI, if -unifystate is requested, a full populate is performed.
You can set -unifystate as the default populate behavior using the Command Defaults system.
The default behavior of co is -unifystate. If a user is explicitly fetching objects by using the co command or Checkout GUI, the objects are fetched in the state requested by the user.
204

Using DesignSync
Related Topics
Populating Your Work Area
Checking Out Design Files
SyncAdmin Help: Command Defaults
ENOVIA Synchronicity Command Reference: co
Showing Potential Checkouts
Sometimes, when you are working on a project, another user will check in new files into the vault. Often, you will use populate to keep your work area fully synchronized with the vault. However, in some circumstances you may want to only checkout some of the newly added files. The menu choice Revision Control => Show Potential Checkouts makes it easy to do this.
If you are viewing your work area in the List View, and you click Revision Control => Show Potential Checkouts, the List View is updated to include all of the objects that exist in the vault but not in the work area. Files and collections are described in the Type column as "Potential Checkout"; folders are described as "Potential Checkout Folder."
Checking out a potential folder creates a corresponding local folder in your workspace, as if you had used the mkfolder command. You can browse into the new workspace folder and perform revision control operations on it. For example, you can Show Potential Checkouts for the folder or populate it.
Once these objects are displayed in the List View, you can select them and choose the Revision Control => Check Out menu choice to check them out into your work area. Potential checkouts are only displayed in the List View until the List View is next refreshed by any operation.
Notes:
• The Show Potential Checkouts menu choice operates on the object selected in the Tree View, regardless of the active selection.
• Check Out is the only operation permitted on possible checkout objects. • Show Potential Checkouts is not applicable to module data. • Retired files show up in the list generated by Show Potential Checkouts as
italicized items.
Related Topics
Checking out Design Files
205
DesignSync Data Manager User's Guide
ENOVIA Synchronicity Command Reference: mkfolder
ENOVIA Synchronicity Command Reference: populate
Checking Out Design Data
The Check Out dialog box displays the options for the files and folders (directories) you selected. You can exclude files and folders by using the Exclude field.
Notes:
• The Populate dialog box can also be used to fetch individual DesignSync objects. For details, see Populating Your Work Area.
• The Check Out dialog box does not operate on module data. To fetch module data, use the Populate dialog box, described in Populating Your Work Area.
The default check-out mode is Unlocked copies unless you have saved a different object state setting with the Save Settings button or your project leader has defined a default fetch state. See Saving the Setting of an Object's State and SyncAdmin Help: Default Fetch State for information on these two conditions.
Click the OK button to start the check-out operation. After the check-out operation completes, the success or failure status for each object appears in the Result column of the List View.
Click on the fields in the following illustration for information.
206

Using DesignSync
Check Out Field Descriptions
Check out Unlocked copies
After the operation is over, keep an unlocked copy in your work area. This is the default unless your project leader has defined a default fetch state.
207

DesignSync Data Manager User's Guide
Because you have relinquished any lock you may have had on the file, someone else can check the file out from the vault with lock in order to modify it.
The Unlocked files are checked out in Read Only mode option from the Tools =>Options =>General dialog box determines whether these files are read/write or read-only.
Check out Locked copies
After the operation is over, keep a locked copy in your work area. You can continue to work on the file. Others cannot check in new versions of the object as long as you have the branch locked. (The copy in your work area is known as an original.)
Check out References to versions
This option lets you acquire references to the versions you have selected.
Tip: Do not use this option when operating on a collection object. If you use this option, DesignSync creates a reference in the metadata for the collection object but member files are not processed and are not included in the metadata.
Check out Links to cache
Use this option to link to a shared copy of the design object in a cache directory. This option is available only on UNIX platforms.
Check out Links to mirror
Use this option to link to a shared copy of the design object in a mirror directory. This option is available only on UNIX platforms.
Check out Locked references
This option lets you acquire a locked reference. If you intend to regenerate the object, create a locked reference to avoid fetching a copy of the object from the vault.
Recurse into folders
Performs the operation on all objects in the selected folder and all subfolders.
This option is not available if there are no selected folders.
Merge with workspace
Select this option if you want to merge the Latest version of a file in the vault with a locally modified version. This option supports the merging work style (as opposed to the
208

Using DesignSync
locking work style) where multiple team members can check out for editing the Latest version of an object. The first team member to check his changes in creates the next version; other team members 'merge' their local changes with the new Latest version and then check the merged version in. However, you can select Check out Locked copies to perform the merge and lock the branch, effectively combining the locking and merging work styles. See Locking and Merging Work Styles to learn more about these work styles.
You can only select this option when you select Check out Unlocked copies or Check out Locked copies, and you cannot specify any value other than Latest for the Version Selector. If there are no conflicts, then the merge succeeds, leaving you the merged file in your work area. If there are conflicts, a warning message results. You must edit the merged file to resolve the conflicts before DesignSync allows you to check in the merged version. Conflicts are shown as follows:
<<<<<<< local
Lines from locally modified version
=======
Lines from Latest version
>>>>>>> versionID
The conflicts are considered resolved when the file no longer contains any of the conflict delimiters (7 less-than, greater-than, or equal signs in the first column). The Status column of the List View and the ls command indicates if a file has unresolved conflicts.
Unify Workspace State
Sets the state of all objects processed, even up-to-date objects, to the specified state (Unlocked copies, Locked copies, References to versions, Links to cache, Links to mirror, Locked references) or to the default fetch state if no state option is specified. See Defining a Default Fetch State for more information. If turned off, DesignSync changes the state of only those objects that are not up-to-date. If checked, DesignSync changes the state of the up-to-date objects, as well.
The Unify workspace state check box:
• Does not change the state of locally modified objects; select the Force overwrite of local modifications check box to force a state change and overwrite the local changes.
• Does not change the state of objects not in the configuration; use the Force overwrite of local modifications check box to remove objects not in the configuration.
209

DesignSync Data Manager User's Guide
• Does not cancel locks. To cancel locks, you can check in the locked files, select Revision Control =>Cancel Checkout to cancel locks you have acquired, or select Revision Control =>Unlock to cancel team members' locks.
Note:
The Unify workspace state option is ignored when you lock design objects. If you check out locked copies or locked references, DesignSync leaves all processed objects in the requested state.
Version
Specify the version number or tag (or any selector or selector list) of the files on which to operate.
This field is empty by default, which means the persistent selector list for each object is used to determine the version to check out.
The Version field has a pull-down list containing suggested selectors; see Suggested Branches, Versions, and Tags for details.
Overlay Version in Workspace
If the overlay check box is checked, the version specified in the Version Selector field is used to indicate the version to be overlaid on the work area. Overlaying a version does not change the current version status as stored in the metadata. Overlay is often used in conjunction with the Merge with Local Copy Check Box to merge one branch onto another.
Related Topics
Checking in Design Files
Changing the State of Objects in Your Work Area
Operating on Cadence Data
ENOVIA Synchronicity Command Reference: co command
SyncAdmin Help: Default Fetch State
ENOVIA Synchronicity Command Reference: ls
Force overwrite of local modifications option
Exclude field
210

Using DesignSync
Comment field
Retain timestamp option
Keys field
Local Versions field
Trigger Arguments
Command Invocation
Command Buttons
Canceling a Checkout
If you check out an object for editing (with a lock) and then change your mind about creating a new version, you can undo (cancel) the checkout with the Cancel Checkout dialog box. When you cancel a checkout, an unlocked copy of the object remains in your work area unless your project leader has defined a default fetch state. You can also request a different object state if you use the cancel command. If you have made changes to the object prior to canceling the checkout, you cannot change the object state, thereby overwriting your local modifications, unless you specify the -force option to the cancel command.
This command only cancels a checkout performed by you. Use the Unlock dialog box to unlock an object that is locked by another user.
You can select these workspace items for the cancel operation:
• A DesignSync folder • A managed DesignSync (non-module) object • A module base folder • A module folder • A module member
Note: To release the lock on a module branch, use the Unlock dialog box.
Some of the fields in the Cancel Checkout dialog box are applicable to DesignSync (non-module) data, and some to module data:
Field in the Cancel dialog box
Applicable to DesignSync (non-module) data
Applicable to module data
Leave behind Unlocked copies
yes yes
Leave behind References yes yes
211

DesignSync Data Manager User's Guide
to versions Leave behind Links to cache
yes yes
Leave behind Links to mirror
yes no
Recurse into folders yes yes Force overwrite of local modifications
yes yes
Exclude yes yes Module context no yes Retain timestamp yes yes Filter no yes Href filter no yes Trigger Arguments yes yes
To interrupt a recursive cancel operation, click the Stop button. DesignSync completes the processing of the current objects being cancelled, before stopping the command. See the ENOVIA Synchronicity Command Reference: interrupt command line topic for more information.
Click on the fields in the following illustration for information.
212

Using DesignSync
Cancel Checkout Field Descriptions
Leave behind Unlocked copies
After the operation is over, keep an unlocked copy in your work area. This is the default unless your project leader has defined a default fetch state.
Because you have relinquished any lock you may have had on the file, someone else can check the file out from the vault with lock in order to modify it.
The SyncAdmin setting Check out read only when not locking on the General tab determines whether these files are read/write or read-only.
Leave behind References to versions
This option lets you acquire references to the versions you have selected.
213
DesignSync Data Manager User's Guide
Tip: Do not use this option when operating on a collection object. If you use this option, DesignSync creates a reference in the metadata for the collection object but member files are not processed and are not included in the metadata.
Leave behind Links to cache
Use this option to link to a shared copy of the design object in a cache directory. This option is available only on UNIX platforms.
Leave behind Links to mirror
Use this option to link to a shared copy of the design object in a mirror directory. This option is available only on UNIX platforms. This option is not available for module data.
Related Topics
ENOVIA Synchronicity Command Reference: cancel
Unlocking Server Data
Operating on Cadence Data
Recursion option
Force overwrite of local modifications option
Exclude field
Module context field
Filter field
Retain timestamp option
Href filter field
Trigger Arguments
Command Invocation
Command Buttons
Checking In Design Data
214
Using DesignSync
The Check In dialog box displays the options for checking in the files and folders (directories) you selected. You can exclude files and folders by using the Exclude field.
The default check-in mode is Unlocked copies unless you have saved a different object state setting with the Save Settings button or your project leader has defined a default fetch state. See Saving the Setting of an Object's State and Defining a Default Fetch State for information on these two conditions.
Notes:
• For DesignSync data, the check-in operation requires that your work area folder be associated with a DesignSync vault. Otherwise, the operation will fail. Usually, you need to set up the vault association only once, as the first step in placing design data under revision control or before you do an initial populate of the work area. For information on setting the vault association, see the Specifying the Vault Location for a Design Hierarchy. For information on how to tell if the work area is associated with a vault, see Verifying That a Vault Has Been Set on a Folder.
• For collections that have local versions, the check-in operation usually does not change the set of local versions in your workspace. However, there is an exception to this behavior. The check-in operation changes the set of local versions in your workspace when the originally fetched state of the object was Cache or Mirror. In this case, the check-in operation replaces files linked to the cache or mirror with physical copies.
• For module data, if there are workspace changes to a module that were not committed with the checkin (because the changed files were not selected to check in), the module will still be considered locally modified following a successful checkin. The version number of the module in the workspace will be incremented, to reflect the new version of the module that was created by the checkin.
• For module data, if there is a newer version of the module in the vault, and the option to Allow version skipping is not selected, then auto-merging may occur.
You can select these types of workspace data for the checkin operation:
• A DesignSync folder • A managed DesignSync object • An unmanaged object • A module – The checkin creates a new version of the module. Any modified
member files are checked in. Any objects in an "Added" state are also checked in. For background, see Adding a Member to a Module.
• A module folder – The checkin creates a new version of the module. Only the selected objects are considered, when determining what member files participate in the checkin.
215

DesignSync Data Manager User's Guide
Note: When the Allow check in of new items option is used with the Module context option on a module folder, any unmanaged non-folder objects in the folder and any subfolders are added to the module and checked in. If the Recursive option is also used, it is ignored and the hierarchical references are not followed.
• A module member – The checkin creates a new version of the module. Only the selected objects are considered, when determining what member files participate in the checkin.
Some of the fields in the Check In dialog box are applicable to DesignSync (non-module) data, and some to module data:
Field in the Check In dialog box
Applicable to DesignSync (non-module) data
Applicable to module data
Leave behind Unlocked copies
yes yes
Leave behind Locked copies
yes yes
Leave behind References to versions
yes yes
Leave behind Links to cache
yes yes
Leave behind Links to mirror
yes no
Allow check in of new items
yes yes
Recurse into folders yes yes Force check in yes yes Perform dry run only yes yes Record href versions no yes Exclude yes yes Filter no yes Module context no yes Href filter no yes Comment yes yes Retain timestamp yes yes Allow version skipping yes yes Branch yes yes
216
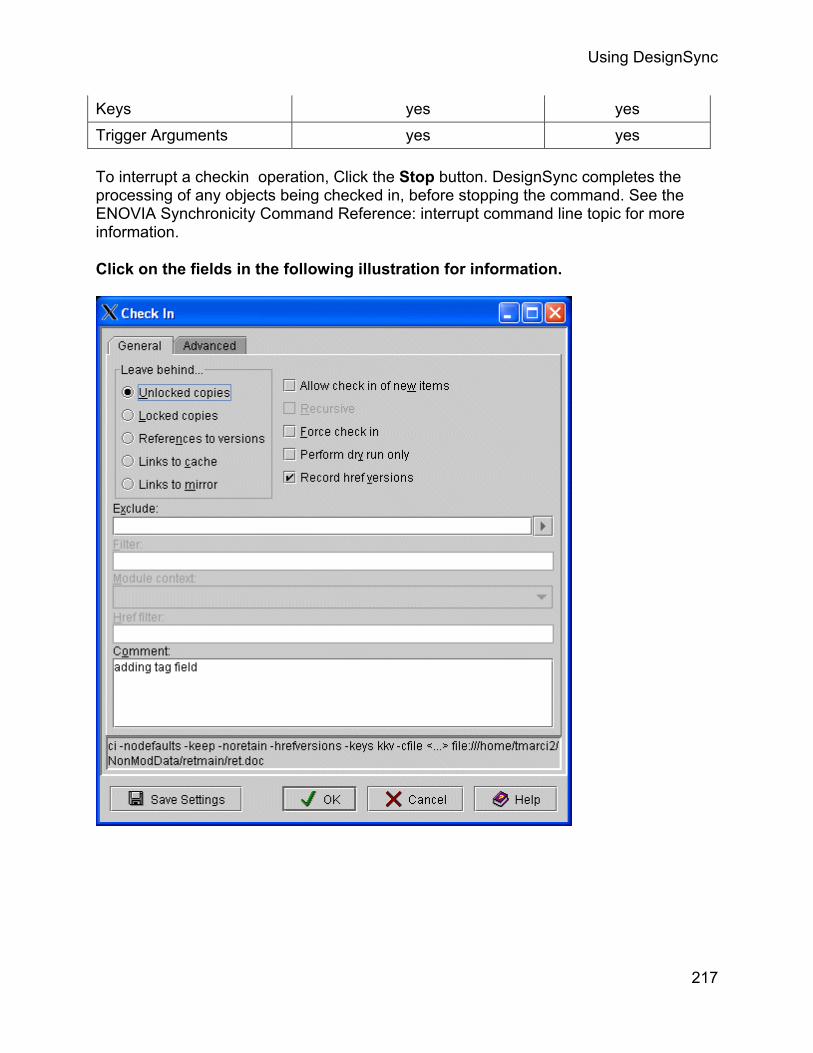
Using DesignSync
Keys yes yes Trigger Arguments yes yes
To interrupt a checkin operation, Click the Stop button. DesignSync completes the processing of any objects being checked in, before stopping the command. See the ENOVIA Synchronicity Command Reference: interrupt command line topic for more information.
Click on the fields in the following illustration for information.
217

DesignSync Data Manager User's Guide
Check In Field Descriptions
Leave behind Unlocked copies
After the operation is over, keep an unlocked copy in your work area. This is the default unless your project leader has defined a default fetch state.
Because you have relinquished any lock you may have had on the file, someone else can check the file out from the vault with lock in order to modify it.
The Unlocked files are checked out in Read Only mode option from the Tools =>Options =>General dialog box determines whether these files are read/write or read-only.
Leave behind Locked copies
218

Using DesignSync
After the operation is over, keep a locked copy in your work area. You can continue to work on the file. Others cannot check in new versions of the object as long as you have the branch locked. (The copy in your work area is known as an original.)
Leave behind References to versions
After a file is checked into the vault, a reference is left behind in your work area. A reference does not have a corresponding file on the file system, but does have DesignSync metadata.
Tip: Do not use this option when operating on a collection object. If you use this option, DesignSync creates a reference in the metadata for the collection object but member files are not processed and are not included in the metadata.
Leave behind Links to cache
Use this option to link to a shared copy of the design object in a cache directory. This option is available only on UNIX platforms.
Leave behind Links to mirror
Use this option to link to a shared copy of the design object in a mirror directory. This option is available only on UNIX platforms. This option is not available for module data.
Allow check in of new items
You must select this option if you are checking in an object that has never been checked in before or, in the case of module data, was neither checked in before, nor added to a module. When you check in the object, DesignSync creates a vault for it. This is the vault from which subsequent versions of the object are checked in and out. Once the vault has been created for the object, you do not need to select this option during checkins.
Note that selecting this option also lets you check an object onto a retired branch. The branch is unretired and a new version of the object is created.
If the unmanaged object is being added to a module, then either a Module context must be specified, or there must be only one module in the workspace (so that DesignSync can determine the module context). If a Module context is specified with a folder object, DesignSync performs the check in a module-centric way, checking in any unmanaged objects into the specified module. If the Recursive option is also specified, it is ignored and the hierarchical references are not followed.
If Allow version skipping is selected, and a module member has been removed between the currently fetched module version and the Latest module version, then specifying to Allow check in of new items will cause the removed member object to be
219
DesignSync Data Manager User's Guide
added back to the module. The version of the member object that is added back into the module is the version that is currently in the workspace. If the version in the workspace has been modified, then a new version of the added back in member object is created.
For example, suppose you have version 1.4 of the Chip module, and version 1.3 of the module member file tmp.txt. The Latest version of Chip is 1.6. Version 1.6 of the Chip module does not contain tmp.txt, because tmp.txt was removed from the module. (See Removing a Member from a Module for details.) Using Allow version skipping with Allow check in of new items will add the tmp.txt object back into the module, in the module version 1.7 created with your checkin. You could also add the tmp.txt object back into the module by adding the tmp.txt object (see Adding a Member to a Module for details), then checking in with Allow version skipping, without having to Allow check in of new items.
Note: When checking in module data, you cannot specify the Recursive option with the Allow check in of new items option.
Force check in
If you check out a file, make no changes to it, and then attempt to check it in, DesignSync informs you that it will not check the file in. If you want to check the file in anyway, you must select this check box. The file will be checked in and a new version created that is identical to the version already in the vault.
Note that you must have a local copy of the file in your working directory for a new version to be created. A new version is not created if the object does not exist or is a reference.
In most cases, not being allowed to check in an unchanged file is reasonable. One reason you may wish to use this option is to keep version numbers synchronized.
Perform dry run only
Select this option to indicate that DesignSync is to treat the operation as a trial run without actually checking in design objects. For module data, module hierarchy processing is included in the output.
This option helps detect whether there are problems that might prevent the checkin from succeeding. Because file and vault states are not changed, a successful dry run does not guarantee a successful checkin. Errors that can be detected without state changes, such as a vault or branch not existing, merge conflicts, or a branch being locked by another user, are reported. Errors such as permissions or access rights violations are not reported by a dry run. Note that a dry run checkin is significantly faster than a normal checkin.
Record href versions
220

Using DesignSync
When a module is checked in (either an entire module or any of its contents), DesignSync captures the currently populated versions of all of that module's hierarchically referenced sub-modules, and records those as part of the next module version. This is the default behavior, for the module version to reflect the contents of the workspace.
If you do not want to have the href versions captured as part of the check-in, then de-select this option.
This option is ignored for non-module data.
If the Recurse into folders option is selected, and the check-in is operating in a Module context, then this option cannot be de-selected.
Allow version skipping
By default, this option does not appear in the Check In dialog box. For the Allow version skipping option appear, the option must be set in the Sync Administrator application. See SyncAdmin's SyncAdmin Help: Command Options for more information.
This option allows you to create a new version, even if the new version is not derived from the Latest version. This happens if your modifications were to a non-Latest version. The new version skips over changes made in intermediate versions, which is why the option is hidden by default.
You typically need to specify Allow version skipping when you check into a branch other than the current branch of the data in your workspace, by using the Branch field.
For module data, the objects that are being considered for checkin may still be checked in if there is a later module version that has affected those objects. For example, suppose you have module version 1.4 of Chip, which contains version 1.2 of file.txt. You modify your local copy of file.txt. Meanwhile, a later version of the module Chip has been checked in, containing version 1.3 of file.txt. Opting to Allow version skipping will include your file.txt modifications in the new version of the module that is created, skipping over the changes in version 1.3 of file.txt. However, if a module member file was renamed or removed in intermediate module versions, then those structural changes are also skipped. Allow version skipping also applies to changes to hierarchical references. If the checkin is capturing a new static version of a submodule for an href, and an intermediate module version also changed the href, Allow version skipping will cause the href change in the workspace to be applied.
Tag
Tags the object version or module version on the server with the specified tag name.
221

DesignSync Data Manager User's Guide
For module objects, all objects are evaluated before the checkin begins. If the objects cannot be tagged, for example if the user does not have access to add a tag or because the tag exists and is immutable, the entire checkin fails.
For other DesignSync objects, if the user does not have access to add a tag, the object is checked in without a tag.
For more information on the access control for the tag command, see ENOVIA Synchronicity Access Control Guide: Access Controls for Tagging. For more information on branch and version tags, see Tagging Versions and Branches.
Notes:
• If both a tag and a comment are specified for a module version or branch checkin, the comment is also used as the tag comment.
• You cannot tag modules stored on DesignSync server versions prior to 5.1.
Branch
Specify a branch in the Branch field to check in to a branch other than the one from which you checked the object out. The Branch field has a pull-down menu from which you can query for existing branches. See Suggested Branches, Versions, and Tags for details.
Note: The Branch field accepts a branch tag, a version tag, a single auto-branch selector tag, or a branch numeric. It does not accept a selector or selector list.
This field is not applicable to module data.
Datatype
Specify the data type for any new objects being checked in.
• Auto-detect uses a built-in algorithm to determine whether the object contains only ASCII text or a binary file. (Default)
• ASCII creates the new object with a vault data type of ascii. • Binary creates the new object with a vault data type of binary. Binary objects
cannot be merged, they can only be replaced. ZIP vaults are always checked in using binary mode, regardless of whether the vault's data type is designated as ascii.
Note: To change the data type of an existing object, use the url setprop command. For more information, see ENOVIA Synchronicity Command Reference: url setprop.
Related Topics
222

Using DesignSync
ENOVIA Synchronicity Command Reference: ci Command
Checking out Design Files
Operating on Cadence Data
Recursion option
Exclude field
Filter field
Module context field
Comment field
Retain timestamp option
Keys field
Href filter field
Trigger Arguments
Command Invocation
Command Buttons
Displaying Information
Identifying Modified Objects
You can identify objects that you have modified in your work area by selecting Tools => Reports => Modified Objects. When you select this option, DesignSync performs a recursive search to find all modified objects (including module objects) in the specified work area directory and its subdirectories.
Note: Objects must be managed (under DesignSync revision control) as well as modified for this operation to identify them.
When the search completes, DesignSync displays the modified objects in a directory tree structure. The root of the tree is the work area directory where you started the search. Subdirectories of the work area are shown only if those subdirectories contain modified objects. Objects that have been locally modified are displayed under the directory in which they are located.
223

DesignSync Data Manager User's Guide
You can select objects in the display and operate on them through the menu or toolbar selections. You can also right-click on any object in the display to see a context menu showing common revision control operations used from this view.
For example, you select a modified object and right-click to select Show Local Modifications which displays the local changes.
Then you could either check in the file or check out the file with the Force overwrite of local modifications option to discard the local changes.
If you select a folder and perform an operation recursively, it will operate on the folder's entire contents, as though you had selected the folder from the List View.
Displaying Version History
The Version History report displays version history for managed objects. If the history report is run from a workspace, local status is also reported.
Tools =>Reports =>Version History opens the Version History dialog box. This report is available when files, folders or the base directory of a module is selected in a local workspace. The report is also available when a server object is selected (vaults, versions, branches, modules, module versions, or module branches).
Click OK to display the results in a new text tab labeled Version History, in the View Pane.
Click on the fields in the following illustration for information.
224
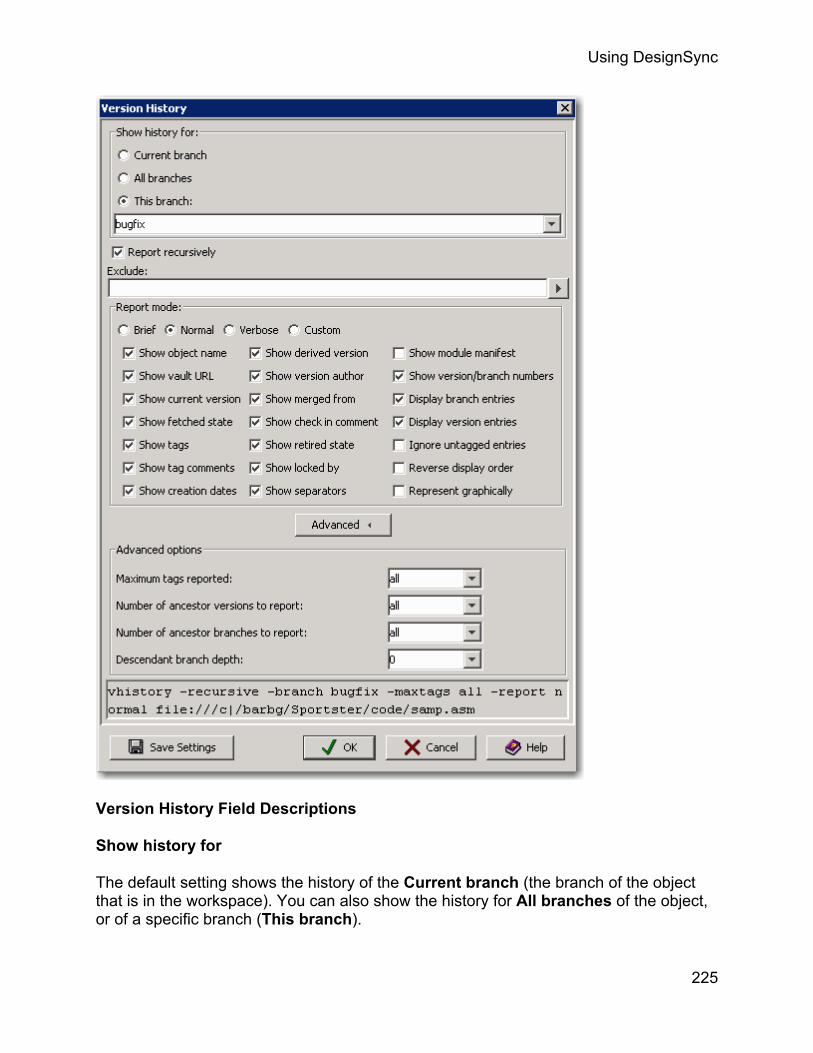
Using DesignSync
Version History Field Descriptions
Show history for
The default setting shows the history of the Current branch (the branch of the object that is in the workspace). You can also show the history for All branches of the object, or of a specific branch (This branch).
225

DesignSync Data Manager User's Guide
To select the history of a particular branch, select "Show history for This branch". The field below becomes active and you can type the branch name or click the pull-down menu to select a branch.
Report recursively
Whether to descend through sub-folders of the starting folder, or only report on the objects in the selected folder. This option is available for local folders or server (non-module) folders. The option is unchecked by default.
Report mode
The type of information that will be reported. The choices Brief, Normal, and Verbose represent defined reports. Selecting one of these defined reports automatically enables all of the report options that comprise the selected mode. Report options not in the selected mode are automatically disabled. The Normal report mode is selected by default. Select the Custom report mode to specify your own combination of report options.
Show object name
Show the workspace path to the object, or to the vault URL.
Show vault URL
Show the vault URL associated with a workspace object.
Show current version
Show the version currently in the workspace.
Show fetched state
Show the fetched state in the workspace.
Show tags
Show branch and version tags. Immutable tags are shown with "(immutable)" appended.
Show tag comments
Show the comments associated with version and branch tags. Tag comments are only available for module data.
Show creation dates
226
Using DesignSync
Show a version's creation date.
Show derived version
Show the numerical parent version. This maintains the continuity between versions for merge and rollback operations.
Note: If a merge, skip,rollback or overlay operation occurs to create this version, the referenced version is shown as "Merged from" version.
Show version author
Show a version's author.
Show merged from
Show the version used to create the from current version when the current version was created as the result of a rollback, merge, skip, or overlay operation requiring an alternate parent version.
Show check in comment
Show a version's check in comments, and any checkout comments. For DesignSync objects, checkout comments are only visible from the workspace in which the checkout occurred. For module objects, the branch lock comment is visible to all users.
Show retired state
Show whether a branch is retired. This is not applicable to module data, so is not reported for module data.
Show locked by
Show the lock owner of a locked branch. For DesignSync objects, also show the "version -> upcoming version" information.
Show separators
Show separators between items and versions.
Show module manifest
For a module, show the manifest of changes in each version. For a module member, show only the changes to that member.
Show version/branch numbers
227

DesignSync Data Manager User's Guide
Show the version number for versions, and the branch number for branches. For branches, indicate whether any versions exist on the branch.
Display branch entries
Show information for branch objects.
Display version entries
Show information for version objects.
Ignore untagged entries
Do not show entries that have no tags.
Reverse display order
Show the versions/branches in reverse numeric order.
Represent graphically
Show a graphical representation of the version history, as a text graph.
Maximum tags reported
The maximum number of tags shown for any object. You can select a value from the pull-down list, or type in a positive integer. By default, all tags are shown. This option is only available when Show tags is selected.
Number of ancestor versions to report
How many versions back to report. By default, all versions on a branch are reported. You can select a value from the pull-down list, or type in a positive integer. Specifying the number of ancestor versions to report sets the Descendant branch depth value to 0.This option is only available when Show history for Current branch or This branch is selected.
Number of ancestor branches to report
How many branches back to report. By default, only versions on the specified branch are reported. You can select a value from the pull-down list, or type in a positive integer. Specifying the number of ancestor branches to report sets the Descendant branch depth value to 0. This option is only available when Show history for Current branch or This branch is selected.
Descendant branch depth
228

Using DesignSync
The number of levels of descendant branches to report, from the starting branch. By default, the report is limited to the starting branch (a value of 0). You can select a value from the pull-down list, or type in a positive integer. Specifying a descendant branch depth sets the Number of ancestor versions to report and the Number of ancestor branches to report to all.
Related Topics
ENOVIA Synchronicity Command Reference: vhistory Command
Exclude field
Command Invocation
Command Buttons
Displaying Contents of Vault Data
The Contents report lists data belonging to either a DesignSync configuration or to a module. The report is available when any of these objects are selected:
• a workspace folder associated with a DesignSync vault • a server folder • a module folder (within the context of a module) • a module • a module branch • a module version (if the report is run for a module version, the data items
comprising that module version are shown)
Tools => Reports => Contents opens the Contents dialog box. Click OK to display the results in a new text tab labeled Contents, in the View Pane.
Click on the fields in the following illustration for information.
229

DesignSync Data Manager User's Guide
Contents Field Descriptions
Show versions
Show the version numbers of the objects reported. If the report is run on a module version, the member version numbers for the data items in a module version are reported.
Report names
Specify how the name of each object within a directory is shown:
• File names only - Show only the object name; present its parent directory as an absolute path (default)
230

Using DesignSync
• Relative paths - Show the path to the object as relative to where the command was started
• Full paths - Show the absolute path to the object
Selector
Identify which version of an object to report.
For a DesignSync folder, select Get selectors to display configurations of the associated workspace vault. Choose any selector except Date() and VaultDate(). If a selector is not specified, the current selector is used for a workspace folder, and Trunk:Latest used for a server folder.
For a module, if a selector is not specified, the current selector is used for a workspace module, and Trunk:Latest used for a server module.
Report verbosity
The level of additional information reported:
Normal output: Include header information and progress lines. This is the default output mode.
Verbose output: For DesignSync folders, include information about configuration mappings.
Href mode
When reporting on a module recursively, how hierarchical references should be evaluated. This field is only available when reporting on module data. If a workspace module is being reported on, and a Selector is not specified, then the hierarchy in the workspace is followed. In that case, the Href mode is ignored.
Normal mode: If the Selector represents a static version (a numeric version, a version tag, or a list of such items), then report on that static version of the sub-module. Also switch the Href mode to Static mode, for subsequent levels of hierarchy. If the Selector does not represent a static version, then still report on the sub-module identified by the Selector. But continue to use Normal mode as the Href mode, for subsequent levels of hierarchy. This is the default Href mode.
Static mode: Report on the static version of the sub-module that was recorded with the href at the time the parent module's version was created.
Dynamic mode: Evaluate the Selector to identify the version of the sub-module to report on.
231

DesignSync Data Manager User's Guide
Related Topics
ENOVIA Synchronicity Command Reference: contents Command
Recursion option
Exclude field
Filter field
Module context field
Href_filter_field
Command Invocation
Command Buttons
Compare the Contents of Two Areas
The Compare report compares the contents of two areas.
The report is available when any of these objects are selected:
• a workspace folder associated with a DesignSync vault • a server folder • a module folder (within the context of a module) • a module
You may also invoke the Compare dialog without first selecting any objects. The objects to compare are then selected on the dialog itself.
Notes:
• The contents of a module version can be compared against the contents of another version of the same module, or against a workspace that contains a version of that module.
• In comparing collections, the compare operation compares only collections and not collection members.
• To display differences between files, DesignSync provides Diff tools available from Tools =>Compare Files and Tools =>Compare Files =>Advanced Diff.
Tools =>Reports =>Compare opens the Compare dialog box. Click OK to display the comparison results in a new text tab labeled Compare, in the View Pane.
Click on the fields in the following illustration for information.
232

Using DesignSync
Compare Workspaces/Selectors Field Descriptions
Operation
233

DesignSync Data Manager User's Guide
Choose from four options:
• Compare workspace to vault • Compare workspace to another path • Compare workspace to a selector • Compare two selectors of a workspace's vault
Workspace Path
Enter the workspace path you want to use in the Compare action. Click Browse... to display the Select Path dialog and choose your workspace.
Alternate Path
This option is available when you select the "Compare workspace to another path" Operation. Enter the path you want to use for comparison. Click Browse... to display the Select Path dialog and choose your workspace.
First Selector
This option is available when you select the "Compare workspace to a selector" Operation. Enter the selector you want to use for the comparison. For a DesignSync folder, select Get selectors to display configurations of the associated workspace vault. Choose any selector except Date() and VaultDate().
Second Selector
This option is available when you select the "Compare two selectors of a workspace's vault" Operation. Enter the second selector you want to use for the comparison. For a DesignSync folder, select Get selectors to display configurations of the associated workspace vault. Choose any selector except Date() and VaultDate().
First module context
This option is available when you select a single module base folder to compare. The module instance names based at the module base folder specified in the Workspace Path field are listed. A first module context is required, when comparing a single module base folder.
Second module context
This option is available when you select two module base folders to compare. The module instance names based at the module base folder specified in the Alternate Path field are listed. When comparing two module base folders, the First module context and Second module context are both optional. Selecting the empty entry results in a folder centric comparison; the module base folders are used for the
234

Using DesignSync
comparison. Selecting a module context results in a module centric comparison; the selected module contexts are used for the comparison.
Show history
Report the checkin comment and other details for the version history back to the common ancestor of the two versions reported.
Show objects that are the same
Report items that are the same version, in addition to items that are different.
Show object paths
Specify how the name of each object within a directory is shown. If selected, show the path to the object as relative to where the command was started. If not selected, show only the object name, and present the object's parent directory as an absolute path. Showing only the object name is the default.
First href mode
This option is available when you select the "Compare workspace to a selector" Operation. When reporting on a module recursively, this field specifies how hierarchical references should be evaluated. This field is only available when reporting on module data. If a workspace module is being reported on, and a Selector is not specified, then the hierarchy in the workspace is followed. In that case, the Href mode is ignored.
Normal mode: If the Selector represents a static version (a numeric version, a version tag, or a list of such items), then report on that static version of the sub-module. Also switch the Href mode to Static mode, for subsequent levels of hierarchy. If the Selector does not represent a static version, then still report on the sub-module identified by the Selector. But continue to use Normal mode as the Href mode, for subsequent levels of hierarchy. This is the default Href mode.
Static mode: Report on the static version of the sub-module that was recorded with the href at the time the parent module's version was created.
Dynamic mode: Evaluate the Selector to identify the version of the sub-module to report on.
Second href mode
This option is available when you select the "Compare two selectors of a workspace's vault" Operation. When reporting on a module recursively, this field specifies how hierarchical references should be evaluated. This field is only available when reporting on module data. If a workspace module is being reported on, and a Selector is not
235

DesignSync Data Manager User's Guide
specified, then the hierarchy in the workspace is followed. In that case, the Href mode is ignored.
Normal mode: If the Selector represents a static version (a numeric version, a version tag, or a list of such items), then report on that static version of the sub-module. Also switch the Href mode to Static mode, for subsequent levels of hierarchy. If the Selector does not represent a static version, then still report on the sub-module identified by the Selector. But continue to use Normal mode as the Href mode, for subsequent levels of hierarchy. This is the default Href mode.
Static mode: Report on the static version of the sub-module that was recorded with the href at the time the parent module's version was created.
Dynamic mode: Evaluate the Selector to identify the version of the sub-module to report on.
Report verbosity
The level of additional information reported:
Brief output: Include header information and progress lines. Directories that contain only items in one of the areas being compared, or for which all items in the two areas being compared are identical, are not expanded to show their contents.
Normal output: Expand directories that would be skipped in Brief output mode, because they are present in one of the areas being compared, or because all items in the two areas being compared are identical. This is the default output mode.
Verbose output: For DesignSync folders, include information about configuration mappings.
Related Topics
ENOVIA Synchronicity Command Reference: compare Command
Filter field
Module context field
Recursion option
Exclude field
Href filter field
Command Invocation
236

Using DesignSync
Command Buttons
Advanced Revision Control Operations
Moving and Renaming Files
You can move and rename local files, both managed and unmanaged, using the mvfile command. The DesignSync graphical interface does not support moving and renaming files.
Related Topics
ENOVIA Synchronicity Command Reference : mvfile Command
Moving and Renaming Folders
Moving and Renaming Folders
You can move and rename local folders, whether the folder is associated with a vault or not, using the mvfolder command. The DesignSync graphical interface does not support moving and renaming folders.
Related Topics
ENOVIA Synchronicity Command Reference: mvfolder Command
Moving and Renaming Design Files
Creating Branches
When there is a need for a new branch, a single person, typically a release engineer or project manager, uses the Make Branch dialog box to branch all design objects at the same time. Users can then create a new work area for the new branch.
You can select these types of data for the branch operation:
• A DesignSync folder • A managed DesignSync (non-module) object • A module version (server only)
Note: When a module is branched, the first version on that branch is created immediately, with the content of the module version from which the branch was created.
Some of the fields in the Make Branch dialog box are applicable to DesignSync (non-module) data, and some to module versions:
237

DesignSync Data Manager User's Guide
Field in the Make Branch dialog box
Applicable to DesignSync (non-module) data
Applicable to module versions
Branch Name yes yes Recurse into folders yes no Version yes no Exclude yes no Comment no yes
To interrupt a recursive branch operation, click the Stop button. DesignSync completes the processing of the current objects being branched, before stopping the command. See the ENOVIA Synchronicity Command Reference: interrupt command line topic for more information.
Click on the fields in the following illustration for information.
Make Branch Field Descriptions
Branch Name
Enter a branch tag name here that is easily understood - for example, "Rel2.1", "ready _for _simulation", "current_demo", "Golden".
Branch names:
238

Using DesignSync
• Can contain letters, numbers, underscores (_), periods (.), hyphens (-), and forward slashes (/). All other characters, including white space, are prohibited.
• Cannot start with a number and consist solely of numbers and embedded periods (for example, 5, 1.5, or 44.33.22), because there would be ambiguity between the tag name and version/branch dot-numeric identifiers.
• Cannot be any of the following reserved, case-insensitive keywords: Latest, LatestFetchable, VaultLatest, VaultDate, After, VaultAfter, Current, Date, Auto, Base, Next, Prev, Previous, Noon, Orig, Original, Upcoming, SyncBud, SyncBranch, SyncDeleted. Also, avoid using tag names starting with "Sync" (case-insensitive), because this prefix space is reserved for any additional system-defined keywords created in the future.
• DesignSync vaults and legacy modules have an additional restriction: branch names cannot end in --R.
Note: Referring to a branch by its branch number is not recommended. DesignSync requires that a branch tag be associated with a branch when it is created. A branch can have more than one branch tag.
Recurse into folders
For a DesignSync folder, recursively operate on its contents. The set of objects operated on may be reduced by use of the Exclude field. By default, only the contents of the selected folder are operated on. This option, and the Exclude field, are not applicable to module data.
Version
Specify the version number or tag (or any selector or selector list) of the files on which to operate.
The Version field has a pull-down menu containing suggested selectors; see Suggested Branches, Versions, and Tags for details.
The Version field is active only if you have selected a vault object prior to selecting Make Branch. To select a vault object, you can select the local object and then Go To Vault. See Viewing the Contents of a Vault for more information.
Note:This field is not applicable to module data.
Related Topics
Parallel (Multi-Branch) Development
Other Branch Operations
Exclude field
239

DesignSync Data Manager User's Guide
Comment field
Command Invocation
Command Buttons
ENOVIA Synchronicity Command Reference: mkbranch
Tagging Versions and Branches
Tagging is the application of a symbolic name, called a tag, to a version or a branch. Tags can only be applied to objects that are under revision control.
You might identify a set of related file versions that work together by assigning the same tag to them -- for example, "runnable", "Alpha", or "ready_for_simulation". In a multi-branch environment (see the Parallel Development topic), you use branch tags to reflect the purpose of the branch -- for example, "rel2.1", "devFeatureX", or "platSolaris". In a single-branch environment, you probably will not be tagging branches but will just work on Trunk, the default tag for branch 1.
A list of tags can be created and displayed from the drop-down menu of the Tag dialog. See SyncAdmin Help: Tags for more information.
The tag operation tags versions or branches of objects in the vault, not the local copies of objects in your work area. Although tags reside on object versions in the vault, the tag operation uses the object versions in your work area to determine the versions to tag in the vault.
Note: Applying a tag that already exists on the specified version or branch is considered a successful operation.
If you want to tag an unmanaged object or a locally modified object (whether locked or not) in your work area, you must first check in your changes to create a new version of the object in the vault. Then you can tag that version. If you do not check in a locally modified object before you use the tag command, the tag operation fails for that object and does not tag any version of it in the vault. This is the default behavior of the tag operation.
If you want to tag the version in the vault from which a locally modified object was derived (instead of tagging the new version that contains your changes), you can select the Tag modified objects check box. You might use this option, for example, if you have modified objects in your work area and you want to take a "snapshot" of them as they were before you made the changes.
Tag Naming Conventions
240

Using DesignSync
Branch tags and version tags share the same name space. To distinguish version selectors from branch selectors, you append :<versiontag> to the branch name; for example, Gold:Latest is a valid branch selector. You can leave off the Latest keyword as shorthand; for example, Gold: is equivalent to Gold:Latest. The selector Trunk is also a valid branch selector. Trunk is a shorthand selector for Trunk:Latest.
You cannot assign the same tag name to both a version and a branch of the same object. For example, a file called top.v cannot have both a version tagged Gold and a branch tagged Gold. However, top.v can have a version tagged Gold while another file, alu.v, can have a branch tagged Gold.
Consider adopting a consistent naming convention for branch and version tags to reduce confusion. For example, you might have a policy that branch tags always begin with an initial uppercase letter (Rel2.1, for example) whereas version tags do not (gold, for example).
You can select these types of data for the tag operation:
• A DesignSync folder • A managed DesignSync (non-module) object • A module version (server only) • A module branch (server only)
Some of the fields in the Tag dialog box are applicable to DesignSync (non-module) data, and some to module data:
Field in the Tag dialog box
Applicable to DesignSync (non-module) data
Applicable to module data
Add a tag yes yes Delete a tag yes yes Recurse into folders
yes no
Replace existing tags
yes yes
Tag modified objects
yes no
Tag yes yes Tag version or branch
yes no
241

DesignSync Data Manager User's Guide
Mutability no yes Version/Branch yes no Exclude yes no Comment no yes Trigger Arguments
yes no
To interrupt a recursive tag operation, click the Stop button. DesignSync completes the processing of the current objects being tagged, before stopping the command. See the ENOVIA Synchronicity Command Reference: interrupt command line topic for more information..
Click on the fields in the following illustration for information.
242

Using DesignSync
Tag Field Descriptions
Add a tag
Select this option to add a tag.
Delete a tag
Select this option to delete a tag. Because a tag can exist on only one version of a file at a time, the Tag version or branch field is ignored when you delete a tag.
Recurse into folders
243
DesignSync Data Manager User's Guide
For a DesignSync folder, recursively operate on its contents. The set of objects operated on may be reduced by use of the Exclude field. By default, only the contents of the selected folder are operated on. This option, and the Exclude field, are not applicable to module data.
Replace existing tags
Move a tag to the version or branch specified in the Version/Branch field, even if that tag is already in use on another version or branch. For example, suppose that at the end of every week you want to select the latest files that produce a good demo and tag them "current_demo". To reuse the "current_demo" tag in this way, you must check the Replace existing tags check box.
By default (if you do not select Replace existing tags), a tag operation fails if the tag is already in use, because a tag can be attached to only one version or branch of an object at a time. Note that you can move a tag from a branch to a version or a version to a branch. DesignSync provides a warning message when you do so.
Note: If you specify a comment, the tag operation replaces the comment with the new comment. If you do not specify a comment, the operation removes the previous comment associated with tag.
Tag modified objects
For modified DesignSync objects in your work area, tag the version in the vault that you fetched to your work area. You might use this option, for example, if you have modified objects in your work area and you want to take a "snapshot" of them as they were before you made the changes.
If you do not specify this option, when the tag operation encounters a locally modified object, the operation displays an error for the object and does not tag any version of that object in the vault.
Note: This option affects modified objects only. If a work area object is unmodified, the tag operation tags the version in the vault that matches the one in your work area.
This option is not applicable to module data. It is applicable to module branches and module versions.
Tag
Enter a tag name here that is easily understood - for example, "Rel2.1", "ready _for _simulation", "current_demo", "Golden".
Tag names:
244

Using DesignSync
• Can contain letters, numbers, underscores (_), periods (.), hyphens (-), and forward slashes (/). All other characters, including white space, are prohibited.
• Cannot start with a number and consist solely of numbers and embedded periods (for example, 5, 1.5, or 44.33.22), because there would be ambiguity between the tag name and version/branch dot-numeric identifiers.
• Cannot be any of the following reserved, case-insensitive keywords: Latest, LatestFetchable, VaultLatest, VaultDate, After, VaultAfter, Current, Date, Auto, Base, Next, Prev, Previous, Noon, Orig, Original, Upcoming, SyncBud, SyncBranch, SyncDeleted. Also, avoid using tag names beginning with "Sync" (case-insensitive); this prefix is reserved for new system keywords.
• DesignSync vaults and legacy modules have an additional restriction: tag names cannot end in --R.
Tag version or branch
Specify which version or branch of the object to tag.
• To tag the version of the object in the vault that is the same as the one you have in your work area, select Tag version in workspace.
• To tag an object version in the vault different from the one in your work area, select Tag specified version and specify the version number or name in the Version/Branch field.
• To tag a specific branch of an object, select Tag specified branch and specify the branch name in the Version/Branch field.
This field is not applicable to module data.
Mutability
This field only pertains to module data. The field is ignored when other types of objects are tagged.
When a tag is added, the new tag is marked as Immutable (fixed) or Mutable (movable). A mutable tag can be replaced or deleted. To replace or delete an immutable tag, Immutable (fixed) must be selected. The default Mutability selection is Mutable (movable).
Version/Branch
Specify the version or branch of the objects to tag. If you selected the Tag specified version option, you must specify a version selector or selector list. If you selected the Tag specified branch option, you must specify a single branch tag, a single version tag, a single auto-branch selector tag, or a branch numeric, but not a selector or selector list.
245
DesignSync Data Manager User's Guide
The Version/Branch field has a pull-down menu from which you can query for existing versions and branches. See Suggested Branches, Versions, and Tags for details.
Note: This field is not applicable to module data.
Related Topics
What is a Design Configuration?
What Are Selectors?
Operating on Cadence Data
ENOVIA Synchronicity Command Reference: tag Command
SyncAdmin Help: Tags
Exclude field
Comment field
Trigger Arguments
Command Invocation
Command Buttons
Retiring Design Data
If a design object is obsolete or no longer part of the design project, you can retire the object's branch. If you work on objects that reside on a single development branch (the default Trunk branch), retiring the sole branch of an object retires the object.
The retire and unretire operations only apply to managed DesignSync objects. The Retire dialog box is not active when a folder is selected, or when module data is selected. For module data, if your intention is for a selector to no longer resolve to a branch, remove the relevant branch tag from the module.
Retiring a branch prevents the branch from participating in future populate operations and prevents new versions from inadvertently being created on the branch. Users must specify the checkin of new items, which will unretire the branch.
Suppose that you populate your work area with files A, B, and C from the Trunk branch. Further along in development, file B is no longer needed. So you retire its Trunk branch. When you or other team members populate your work area again, the populate operation does not copy file B to your work area.
246

Using DesignSync
You may want to inform your team before you retire a file's branch in case someone wishes to continue using the file. ProjectSync's Email Notification can be used for the communication. Ask your team leader to review the RevisionControl Notes Overview.
The Status column of the List View in DesignSync GUI and the ls command both indicate if the current branch of an object in your work area is retired. You can also display the Version History of an object, to determine whether a branch of an object is retired.
If you decide that a retired object needs to be active again, you can use the Retire dialog box to unretire the object's branch.
Note: Retired files show up in the list generated by Show Potential Checkouts as italicized items
Click on the fields in the following illustration for information.
Retire Field Descriptions
Operation
247

DesignSync Data Manager User's Guide
The Retire dialog box lets you retire or unretire the selected object's branch. Select the option for the action you want to perform:
• Retire the selected objects. Prevent the selected branch from participating in future populate operations. Prevent the creation of new versions on the branch, unless the new option is specified for the checkin operation.
• Unretire the selected objects. Let the selected branch once again participate in populate operations. Allow the creation of new versions on the branch.
Recurse into folders
For a DesignSync folder, recursively operate on its contents. By default, only the contents of the selected folder are operated on. This option does not apply to module data.
Local Area
How you want DesignSync to handle the object in your work area after its branch has been retired:
• Delete objects in workspace. If you have not modified the object, DesignSync deletes the object from your work area. (If you have modified the object in your work area, DesignSync keeps the object in your work area.) This option is the default.
• Keep objects in local workspace. The object remains in your work area. However, if your workspace contains a symbolic link to a copy of the object in the mirror, the option to Keep objects in local workspace is not available. That is because if the mirror directory is for Latest file versions, the retired object is automatically removed from the mirror.
• Ignore workspace; retire specified branch in vault. The object in your work area is not affected. You must specify the branch to retire, in the Branch field.
Branch
This option is used in conjunction with Ignore workspace; retire specified branch in the vault to retire a branch other than the branch of the objects in your work area.
The Branch field has a pull-down menu from which you can query for existing branches. See Suggested Branches, Versions, and Tags for details.
Note: The Branch field accepts a branch tag, a version tag, a single auto-branch selector tag, or a branch numeric. It does not accept a selector list.
Unlock locked branches; delete modified files
248

Using DesignSync
Unlock locked branches prior to retiring them. Also, if you selected Delete objects in workspace, your local copy of the object will be deleted, even if you have modified the local object. To keep your local objects, select Keep objects in workspace.
Note: Use this option with caution; it removes the lock even if it is held by someone else.
Related Topics
Deleting Files or Versions from a Design Project
Operating on Cadence Data
ENOVIA Synchronicity Command Reference: retire Command
Trigger Arguments
Command Invocation
Command Buttons
Unlocking Server Data
If you check out a file with a lock and then decide that you do not need to edit the file, you can cancel your check out using the Cancelling a Checkout dialog box or the cancel command. In cases where you need to unlock a branch that someone else has locked or when you no longer have the file that you checked out in your work area, use the Unlock dialog box or the unlock command.
Being able to remove a lock held by another user is an unusual operation. If this capability is not an acceptable policy for your project, you (as the administrator or project leader) can disallow this capability. See the ENOVIA Synchronicity Access Control Guide for more information.
For module data, Cancel is typically used to release the lock on a module member. To release the lock on a module branch, Unlock must be used. If a module folder in your workspace is selected, and module member locks are released as part of the unlock operation, module member locks in the workspace are also canceled.
You can select these types of data for the unlock operation:
• A DesignSync folder, branch or version (server only) • A module branch or version (server only) • A module member (server only) • A module folder
249
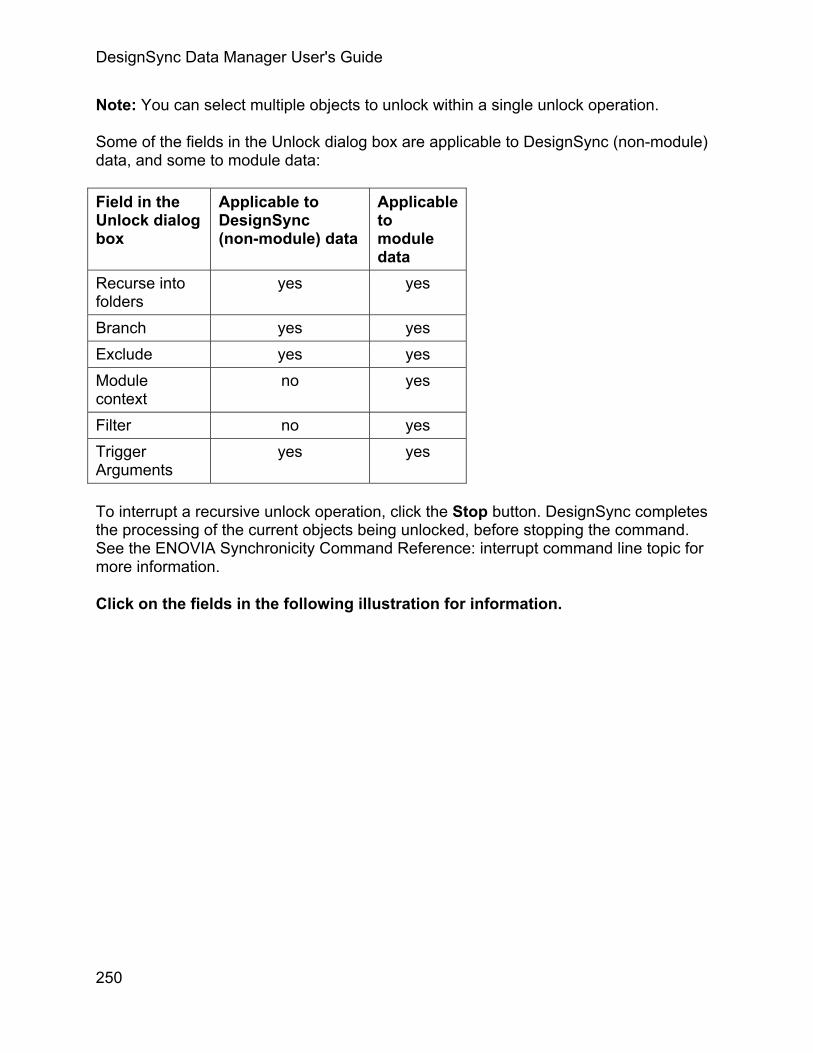
DesignSync Data Manager User's Guide
Note: You can select multiple objects to unlock within a single unlock operation.
Some of the fields in the Unlock dialog box are applicable to DesignSync (non-module) data, and some to module data:
Field in the Unlock dialog box
Applicable to DesignSync (non-module) data
Applicable to module data
Recurse into folders
yes yes
Branch yes yes Exclude yes yes Module context
no yes
Filter no yes Trigger Arguments
yes yes
To interrupt a recursive unlock operation, click the Stop button. DesignSync completes the processing of the current objects being unlocked, before stopping the command. See the ENOVIA Synchronicity Command Reference: interrupt command line topic for more information.
Click on the fields in the following illustration for information.
250

Using DesignSync
Unlock Field Descriptions
Recurse into folders
For a DesignSync folder, recursively operate on its contents. The set of objects operated on may be reduced by use of the Exclude field. By default, only the contents of the selected folder are operated on.
For a module folder, recursively operate on its contents. The Module context field determines the set of objects operated on. The set of objects operated on may be further reduced by use of the Exclude field and the Filter field. By default, only the contents of the selected folder are operated on.
This option is ignored when a module is selected. The unlock operation does not descend through hierarchical references.
Branch
Specify the branch(es) to unlock in this field. If you do not specify one or more branches, DesignSync unlocks the branch indicated by the selector of your working area. The Branch field has a pull-down menu from which you can query for existing branches. See Suggested Branches, Versions, and Tags for details.
Notes:
251

DesignSync Data Manager User's Guide
• The Branch field accepts branch tags, version tags, a single auto-branch selector tag, or branch numerics. It does not accept a selector list.
• You can only specify a single branch using the pull-down menu. To select multiple branches, select the desired branches before invoking the unlock command.
• If you have selected multiple server branches to unlock, you cannot specify any other object types within the same command. If other objects are selected with the same command, the command returns an error and does not perform the unlock.
Related Topics
Cancelling a Check Out
Operating on Cadence Data
ENOVIA Synchronicity Command Reference: unlock
ENOVIA Synchronicity Command Reference: cancel
Exclude field
Module context field
Filter field
Trigger Arguments
Command Invocation
Command Buttons
Deleting Design Data
You can delete the following objects from DesignSync:
• Local Files • Local Folders • Versions from a vault • Vaults • Server Folders • Modules and Module caches (mcache) • Hierarchical References • Module Cache (mcache) Links
252

Using DesignSync
In addition, there are DesignSync command-line commands for each of these object types (rmfile, rmfolder, rmversion, rmvault, hcm rmmod, hcm rmhref).
To delete a branch, use the purge command.
Related topics
ENOVIA Synchronicity Command Reference: rmfile
ENOVIA Synchronicity Command Reference: rmfolder
ENOVIA Synchronicity Command Reference: rmversion
ENOVIA Synchronicity Command Reference: rmvault
ENOVIA Synchronicity Command Reference: hcm rmmod
ENOVIA Synchronicity Command Reference: hcm rmhref
ENOVIA Synchronicity Command Reference: purge
Deleting Versions from a Vault
DesignSync allows you to delete versions of an object from the vault. Deleting a version does not remove any corresponding file in your local work area.
You cannot delete:
• The first version of an object on any branch (for example, 1.1, 1.1.1.1, 1.3.2.1, and so on).
• A branch-point version (for example, if 1.2.1 is a branch, you cannot delete version 1.2).
• The Latest version on a locked branch (for example, if someone checks out version 1.3 with a lock, you cannot delete version 1.3 from the vault until the lock is released).
Note: You cannot recover a deleted version, so delete versions with caution. Before deleting versions from the vault, you may want to verify with your project team that the versions can be safely deleted.
You can clean up the vault by deleting old versions of objects using the purge command. This command deletes a range of versions of an object on a single branch in the vault.
253

DesignSync Data Manager User's Guide
You can use the purge command on files, objects, or folders. The command also provides options that let you delete all versions of an object except the last <n> number of versions or delete all versions created before a specified date.
To delete vault versions using the DesignSync graphical interface:
1. From your workspace, select Go => Go to Vault to identify the vault whose versions are to be deleted. Or navigate to the vault's location on the server. Select the vault versions in the Tree View or List View panes.
2. Select File =>Delete, or press the Delete key. You will be prompted to confirm the deletion.
Click on the fields in the following illustration for information.
Delete Field Descriptions
Delete the selected objects/Delete all contents of a folder recursively
This field is not applicable to version deletion.
Module Context
This field is not applicable to deletion.
254

Using DesignSync
Allow deletion of a tagged vault options, locked objects and modified objects
Deletes tagged versions from the vault. Use this option with caution, because deleting a tagged version changes (possibly damaging) a configuration. The "locked vault" aspect of the field name is not applicable to version deletion.
Retain vault information
This field is not applicable to version deletion.
Remove notes after detaching
This field is not applicable to version deletion.
Remove vault associated with module
This field is not applicable to version deletion.
Related Topics
Deleting Design Objects
ENOVIA Synchronicity Command Reference: rmversion Command
ENOVIA Synchronicity Command Reference: purge Command
Trigger Arguments
Command Invocation
Deleting Vaults
Deleting a vault removes all versions of a design object from the SyncServer (but does not remove any corresponding file in your local work area) and should therefore be used with caution. If there is a design object that is no longer part of your project, consider retiring the object instead of deleting the object's vault. You can unretire a retired object, but you cannot recover a deleted vault.
By default, the ability to delete server data is restricted. See the ENOVIA Synchronicity Access Control Guide for details.
From your workspace, select Go => Go to Vault to identify the vault to be deleted. Or navigate to its server location. Select the vault in the Tree View or List View panes. Multiple vaults can be selected.
255

DesignSync Data Manager User's Guide
Select File =>Delete, or press the Delete key. You will be prompted to confirm the deletion.
Click on the fields in the following illustration for information.
Delete Field Descriptions
Delete all the contents of a folder/Delete all contents of a folder recursively
This field is not applicable to vault deletion.
Module Context
This field is not applicable to vault deletion.
Allow deletion of a tagged vault options, locked objects and modified objects
Lets you delete a vault that has tagged versions or a locked branch. Use this option with caution:
• A tagged version may be a necessary part of a configuration. • A locked branch typically indicates someone is editing the design object and
therefore the design object is still active.
256

Using DesignSync
Retain vault information
Retain the version number of the last version in the vault. This is the default behavior, so that version numbers are not reused if a vault of the same name is later created.
Remove notes after detaching
This field is not applicable to vault deletion.
Remove vault associated with module
This field is not applicable to vault deletion.
Related Topics
Deleting Design Data
Deleting Versions from a Vault
Retiring Branches
ENOVIA Synchronicity Command Reference: rmvault
Trigger Arguments
Command Invocation
Command Buttons
Creating Folders
You can create new folders, either locally or on the SyncServer. To create a folder:
1. Navigate to the folder or SyncServer location in which you want to create a new folder. A folder you specify with a relative path name will be created relative to your current folder.
2. Select File =>New =>Folder to bring up the New Folder dialog box. 3. Enter the name of the folder you want to create. You can specify:
• The folder name or a relative path to create the folder relative to Current Folder.
• For a local folder, an absolute path. • On a SyncServer, a sync: URL
4. Click OK to create the new folder.
A success or error message is displayed in the Output Window.
257

DesignSync Data Manager User's Guide
Notes:
• The permissions of the new folder are inherited from the parent folder. • When creating local folders, you must have write privileges for the parent
directory. • DesignSync creates whatever folders are needed to create the specified path.
This behavior is similar to UNIX's mkdir -p command. • You can restrict the ability to create server-side folders (sync: protocol). See the
Access Control Guide for details.
Click on the fields in the following illustration for information.
New Folder Field Descriptions
Current Folder
This field is not editable. It shows the folder from which the New Folder dialog was invoked.
New Folder
Enter the name of the folder you want to create. You can specify:
• The folder name or a relative path to create the folder relative to Current Folder. • For a local folder, an absolute path. • On a SyncServer, a sync: URL.
Related Topics
Deleting Local Folders
Deleting Server Folders
ENOVIA Synchronicity Command Reference: mkfolder Command
258

Using DesignSync
Command Invocation
Command Buttons
Trigger Arguments
Deleting Server Folders
A folder on the server, and the vault data contained in the folder, can be deleted. By default, the ability to delete server data is restricted. See the ENOVIA Synchronicity Access Control Guide for details.
From your workspace, select Go => Go to Vault to identify the vault folder to be deleted. Or navigate to its server location. Select the vault folder in the Tree View or List View panes. Multiple vault folders can be selected.
Select File =>Delete, or press the Delete key. You will be prompted to confirm the deletion.
Click on the fields in the following illustration for information.
Delete Field Descriptions
Delete the selected objects/Delete all contents of a folder recursively
259

DesignSync Data Manager User's Guide
Delete the specified folder and all folders in the hierarchy beneath it. The contents of the folders are also deleted, similar to the UNIX command rm -rf. Use this option with caution. All vaults in the specified folder are deleted, regardless of whether a branch is locked, or whether there are tagged versions. By default, you cannot delete a folder unless it is empty.
Module Context
This field is not applicable to server folder deletion.
Allow deletion of a tagged vault options, locked objects and modified objects
This field is not applicable to vault folder deletion. When the option to Delete all the contents of a folder is selected, all vaults in the specified folder are deleted, regardless of whether a branch is locked, or whether there are tagged versions.
Retain vault information
Retain the version number of the last version in the vault. This is the default behavior, so that version numbers are not reused if a vault of the same name is later created.
Remove notes after detaching
This field is not applicable to server folder deletion.
Remove vault associated with module
This field is not applicable to server folder deletion.
Related Topics
Deleting Design Data
Deleting Vaults
Deleting Versions of a Design Object
ENOVIA Synchronicity Command Reference: rmfolder
Trigger Arguments
Command Invocation
Using Revision Control Keywords
Revision Control Keywords Overview
260
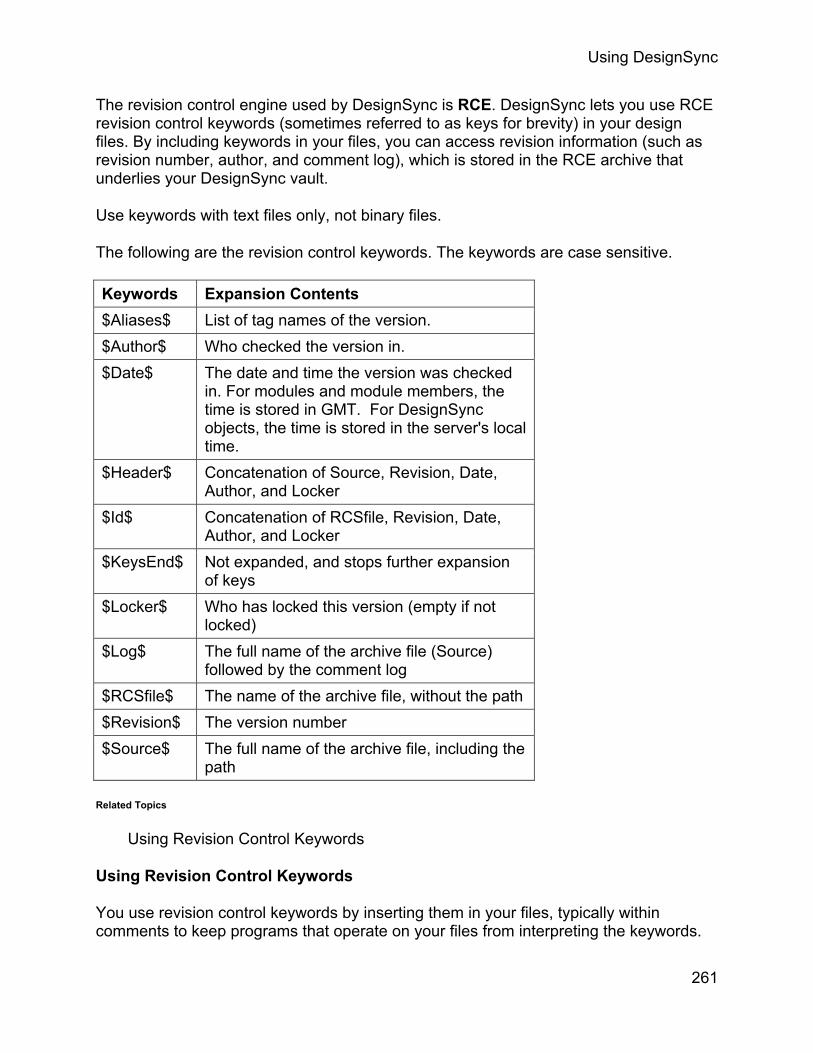
Using DesignSync
The revision control engine used by DesignSync is RCE. DesignSync lets you use RCE revision control keywords (sometimes referred to as keys for brevity) in your design files. By including keywords in your files, you can access revision information (such as revision number, author, and comment log), which is stored in the RCE archive that underlies your DesignSync vault.
Use keywords with text files only, not binary files.
The following are the revision control keywords. The keywords are case sensitive.
Keywords Expansion Contents $Aliases$ List of tag names of the version. $Author$ Who checked the version in. $Date$ The date and time the version was checked
in. For modules and module members, the time is stored in GMT. For DesignSync objects, the time is stored in the server's local time.
$Header$ Concatenation of Source, Revision, Date, Author, and Locker
$Id$ Concatenation of RCSfile, Revision, Date, Author, and Locker
$KeysEnd$ Not expanded, and stops further expansion of keys
$Locker$ Who has locked this version (empty if not locked)
$Log$ The full name of the archive file (Source) followed by the comment log
$RCSfile$ The name of the archive file, without the path $Revision$ The version number $Source$ The full name of the archive file, including the
path
Related Topics
Using Revision Control Keywords
Using Revision Control Keywords
You use revision control keywords by inserting them in your files, typically within comments to keep programs that operate on your files from interpreting the keywords.
261

DesignSync Data Manager User's Guide
Keywords are delimited by preceding and trailing dollar signs ($). There cannot be a space between a keyword and its dollar-sign delimiters. The keywords are case sensitive.
Keywords are expanded (also known as keyword substitution) based on the version of the file that you are checking out. Because the keyword expansion usually changes the length of the file, keywords should only be used with files whose format is position independent, such as text files.
You can control keyword expansion from DesignSync using options to the check-in, check-out, and populate commands. For example, you can choose not to expand keyword values when you check out a file, or you can remove keys from a file.
Note: Revision control keyword expansion is not supported for files belonging to collections.
The following is an example of keywords in a file before expansion. Note that the keywords appear within comment delimiters, in this case /* and */, such as a C file.
/* * $Aliases$ * $Author$ * $Date$ * $Header$ * $Id$ * $Locker$ * $Log$ * * $RCSfile$ * $Revision$ * $Source$ * $KeysEnd$ * $Id$ */
By default, keywords are expanded when you check out a file. The following is an example of keyword expansion:
/* * $Aliases: Key-Example $ * $Author: jjh $ * $Date: Thur Jul 4 11:47:20 1997 $ * $Header: /rca/archive/src/test.c.rca 1.1 Thu Jul 4 11:47:20 1997 jjh Stable $ * $Id: test.c.rca 1.1 Thu Jul 4 11:47:20 1997 jjh Stable $ * $Locker: $ * $Log: test.c.rca $
262

Using DesignSync
* * Revision: 1.1 Thu Jul 4 11:47:20 1997 jjh * Initial revision * * $RCSfile: test.c.rca $ * $Revision: 1.1 $ * $Source: /rca/archive/src/test.c.rca $ * $KeysEnd$ * $Id$ */
Notes:
• The $Log$ keyword, when expanded, permanently adds log information to your file -- later collapsing the keyword leaves the log information in your file. Existing log messages are not replaced. Instead, the new log information is inserted each time the keyword is expanded. $Log$ is useful for accumulating a complete change log in a source file, but can result in differences or conflicts when doing merges or file comparisons. $Log$ is the only keyword with this behavior.
• When a keyword expansion spans multiple lines, the comment delimiter at the beginning of the line is repeated on subsequent lines. Therefore, make sure that the resulting syntax is valid. For example, in a C file, do not specify:
/* $Log$ */
The resulting expansion has invalid comment syntax:
/* $Log: top.f.rca $ /* /* Revision: 1.6 Thu Feb 26 09:12:07 1998 Goss /* *** Fixed defect 1445. *** */
Whereas if you specify:
/* * $Log$ */
The resulting expansion is valid:
/* * $Log: top.f.rca $ * * Revision: 1.6 Thu Feb 26 09:12:07 1998 Goss * *** Fixed defect 1445. *** */
263
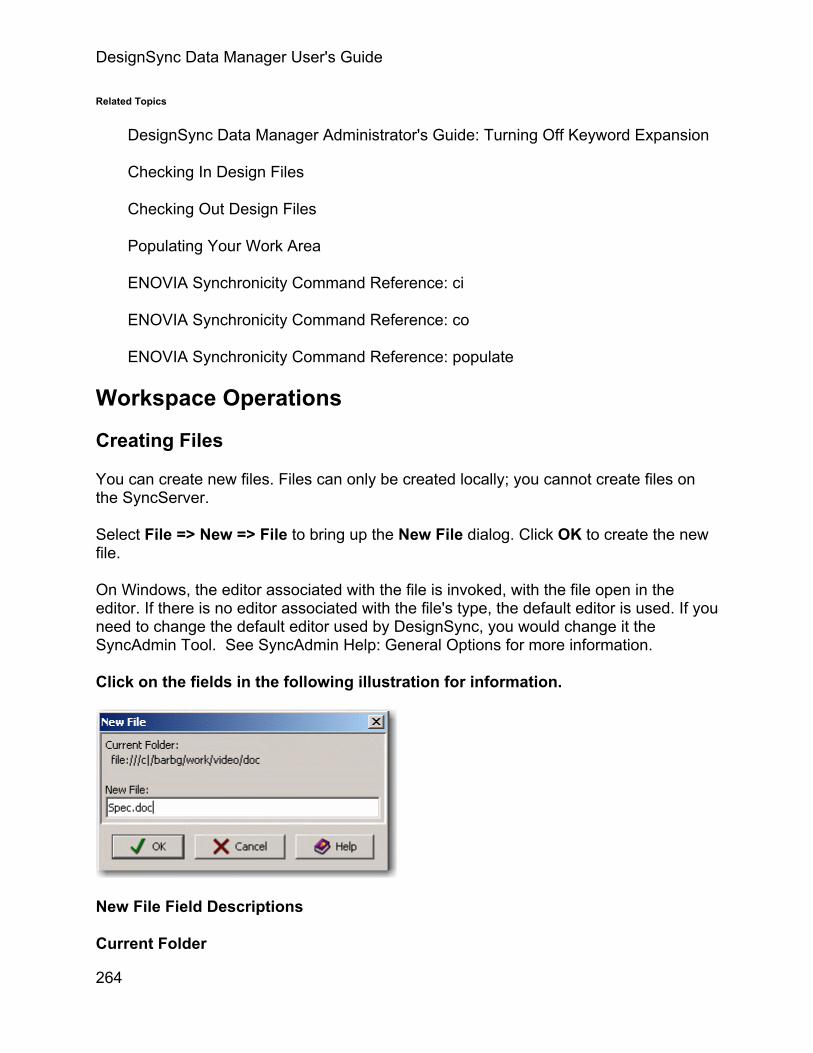
DesignSync Data Manager User's Guide
Related Topics
DesignSync Data Manager Administrator's Guide: Turning Off Keyword Expansion
Checking In Design Files
Checking Out Design Files
Populating Your Work Area
ENOVIA Synchronicity Command Reference: ci
ENOVIA Synchronicity Command Reference: co
ENOVIA Synchronicity Command Reference: populate
Workspace Operations
Creating Files
You can create new files. Files can only be created locally; you cannot create files on the SyncServer.
Select File => New => File to bring up the New File dialog. Click OK to create the new file.
On Windows, the editor associated with the file is invoked, with the file open in the editor. If there is no editor associated with the file's type, the default editor is used. If you need to change the default editor used by DesignSync, you would change it the SyncAdmin Tool. See SyncAdmin Help: General Options for more information.
Click on the fields in the following illustration for information.
New File Field Descriptions
Current Folder
264

Using DesignSync
This field is not editable. It shows the folder from which the New File dialog was invoked.
New File
Enter the name of the file you want to create. You can specify:
• The file name or a relative path to create the file relative to the Current Folder • An absolute path
Related Topics
Deleting Files
Deleting Files
You can delete files from your local work area (whether revision controlled or not). You cannot delete:
• A file that is locked • A member of a collection
Select the file you want to delete in the List View pane. Multiple files can be selected. Select File => Delete, or press the Delete key, to bring up the Delete dialog. Click OK to delete the file. You will be prompted to confirm the deletion.
Click on the fields in the following illustration for information.
265

DesignSync Data Manager User's Guide
Delete Field Descriptions
Delete the selected objects/Delete all contents of a folder recursively
This field is not applicable to file deletion.
Module Context
This field is not applicable to file deletion.
Allow deletion of a tagged vault options, locked objects and modified objects
This field is not applicable to file deletion.
Retain vault information
This field is not applicable to file deletion.
Remove notes after detaching
This field is not applicable to file deletion.
Remove vault associated with module
This field is not applicable to file deletion.
266
Using DesignSync
Related Topics
Deleting Design Data
ENOVIA Synchronicity Command Reference: rmfile
Creating Folders
You can create new folders, either locally or on the SyncServer. To create a folder:
1. Navigate to the folder or SyncServer location in which you want to create a new folder. A folder you specify with a relative path name will be created relative to your current folder.
2. Select File =>New =>Folder to bring up the New Folder dialog box. 3. Enter the name of the folder you want to create. You can specify:
• The folder name or a relative path to create the folder relative to Current Folder.
• For a local folder, an absolute path. • On a SyncServer, a sync: URL
4. Click OK to create the new folder.
A success or error message is displayed in the Output Window.
Notes:
• The permissions of the new folder are inherited from the parent folder. • When creating local folders, you must have write privileges for the parent
directory. • DesignSync creates whatever folders are needed to create the specified path.
This behavior is similar to UNIX's mkdir -p command. • You can restrict the ability to create server-side folders (sync: protocol). See the
Access Control Guide for details.
Click on the fields in the following illustration for information.
267

DesignSync Data Manager User's Guide
New Folder Field Descriptions
Current Folder
This field is not editable. It shows the folder from which the New Folder dialog was invoked.
New Folder
Enter the name of the folder you want to create. You can specify:
• The folder name or a relative path to create the folder relative to Current Folder. • For a local folder, an absolute path. • On a SyncServer, a sync: URL.
Related Topics
Deleting Local Folders
Deleting Server Folders
ENOVIA Synchronicity Command Reference: mkfolder Command
Command Invocation
Command Buttons
Trigger Arguments
Deleting Folders
You can delete folders from your local work area whether their contents are revision controlled or not. You cannot delete your current folder or any parent of your current folder.
268

Using DesignSync
Select the folder you want to delete in the Tree View or List View panes. Multiple folders can be selected. Select File => Delete, or press the Delete key, to bring up the Delete dialog. Click OK to delete the folder. You will be prompted to confirm the deletion.
Click on the fields in the following illustration for information.
Delete Field Descriptions
Delete the selected objects/Delete all contents of a folder recursively
By default, you cannot delete a folder unless it is empty. When the recursive option is chosen, delete the specified folder and all folders in the hierarchy beneath it. The contents of the folders are also deleted, similar to the UNIX command rm -rf. Use this option with caution.
Module Context
This field is not applicable to folder deletion.
Allow deletion of a tagged vault options, locked objects and modified objects
This field is not applicable to deletion of a local folder.
Retain vault information
269

DesignSync Data Manager User's Guide
The option to Retain vault information is not applicable to the deletion of local folders. Selecting or de-selecting the option does not affect the operation.
Remove notes after detaching
This field is not applicable to folder deletion.
Remove vault associated with module
This field is not applicable to folder deletion.
Related Topics
Deleting Design Data
Creating Folders
ENOVIA Synchronicity Command Reference: rmfolder
File Comparison
Common Diff Operations
The diff operations provided in the Tools => Compare Files menu provide the most common file comparison operations. They do not display a dialog; instead they immediately perform the comparison operation using default settings for all options and display the results in the view pane.
Note: DesignSync also allows you to compare workspaces and configurations with the Compare tool available from Tools => Reports => Compare.
The following common diff operations are available:
• Show Local Modifications compares the selected object in your work area with the original version that you checked out. This report shows changes made in your work area since the object was checked out.
• Compare to Latest performs a 3-way diff comparing the selected object in your work area with the current version in the vault, using the original version in the vault as the common ancestor. This report can be used to show the results that occur if a Checkout operation with the Merge with workspace option (co -merge) is performed, including any conflicts that occur.
• Compare Original to Latest compares the original version of the selected object with the latest version in the vault. This report shows changes made to the vault by others since the object was checked out.
• Compare 2 Files compares the two selected objects. You can use this report to compare two files or two versions of the same file. Depending on the default
270

Using DesignSync
settings, if two versions of a file are selected, this report may attempt to identify a common ancestor for a 3-way diff.
The default settings used by the common diff operations can be modified by selecting options in the Advanced Diff dialog box and pressing the Save Settings button.
See Reading Diff Results for information on interpreting diff output.
Related Topics
Advanced Diff Options
Graphical Diff Utility
SyncAdmin Help: diff Format
SyncAdmin Help: Customizing Diff Output
ENOVIA Synchronicity Command Reference: diff
ENOVIA Synchronicity Command Reference: co
Advanced Diff Options
Advanced Diff is a tool for displaying the differences between two files or two versions of the same file. You can compare the two files directly (a 2-way comparison) or against a common ancestor (3-way comparison). When comparing ASCII (text) files, Advanced Diff provides detailed difference and conflict information.
To access the complete set of options for comparing files, select Tools => Compare Files => Advanced Diff.
Version-Extended Naming
When invoking Advanced Diff from DesignSync, you can specify the files you want to compare using version-extended filenames, which consist of the filename, followed by a semicolon (;), followed by a version number or tag. For example, alu.v;1.2 is version 1.2 of alu.v, and alu.v;golden is the version that is tagged 'golden'. You can also use the following reserved tags:
Orig The version in the vault from which your local version originated; for example, alu.v;Orig.
Latest The most recent version in the vault; for example, alu.v;Latest. Often Latest and Orig are the same version. For example, you fetch alu.v;1.4, which is the most recent version in the vault. Version 1.4 is both Latest and Orig. If your teammate then checks in version 1.5, Orig is still version 1.4, but Latest is now version 1.5.
271

DesignSync Data Manager User's Guide
Note: For modules, you can specify version extended filenames to the local workspace version, but not to the server version, using the sync URL.
For example: alu.v;1.2 is a valid construct, but sync://srv2.ABCo.com:2647/Modules/ALU/alu.v;1.2 is not. To specify a module member that is not loaded into your workspace, use the Module context field to select the module, then specify the file as a simple version extended file reference: /alu.v;1.2.
DesignSync interprets these version-extended filenames and fetches files from the vault as needed, placing them in your DesignSync cache. These cached files are used exclusively by the graphical Diff utility, if you have one; DesignSync users will not get links to these files if they populate from the cache.
Click the fields in the following illustration for information.
Click OK to execute the Advanced Diff command. The results are displayed in the Diff View, unless you selected the Display output in GUI option.
272

Using DesignSync
Notes
Click Save Settings to set the current settings as the default for the Advanced Diff dialog.
If two objects are selected when the Tools => Compare Files => Advanced Diff menu option is chosen, the comparison mode is initially set to Compare 2 Files/Versions; otherwise, it is initially set to the default setting.
Field Descriptions
Files to Compare
Specify one or two files depending on the type of comparison you want to perform. If you choose to compare 2 files or versions in the Comparison Mode, enter the URLs of the objects to compare in the File A and File B fields.
Optionally, you may specify a common ancestor. If you specify a common ancestor, a 3-way diff is performed. For example, if you specify the following:
File A file:///home/aurora/projects/alu/sym12.dat;exper1 File B file:///home/aurora/projects/alu/sym12.dat;release17 Com. Anc. file:///home/aurora/projects/alu/sym12.dat;golden
the exper1 and release17 versions of the given file are compared using the golden version as the common ancestor.
Instead of specifying a common ancestor, you can select Calculate Common Ancestor, and the common ancestor will be determined, using the object's branch and merge history. If no common ancestor can be determined, a 2-way diff is performed. For example, if you select Calculate Common Ancestor and specify the following:
File A file:///home/aurora/projects/alu/sym12.dat;1.12.1.5 File B file:///home/aurora/projects/alu/sym12.dat;1.17
a 3-way diff will be performed using version 1.12 as a common ancestor (unless a merge has created a more recent common ancestor).
If you are comparing files that are not present in the workspace, you may use the sync URL to specify a non-module object. If you are specifying a module member that is not in the workspace, use the Module context field to specify the module, and the Files to compare field to specify the member's natural path, name and version.
273

DesignSync Data Manager User's Guide
Note: The Select File to Compare browser does not display DesignSync references.
Module Context
Specify the module context. You can specify a module instance or the sync URL to the module. If you are specifying a module member that is not located in the workspace, the module context uniquely identifies the source module.
In some cases, DesignSync will calculate the default module context for you.
• If the objects being compared are both located on the server and within the same module, the default is the module name on the server.
• If there is only one object specified, or one object is in the workspace, while the other object is on the server, the module context field automatically fills with the server object version.
Comparison Mode
Specify one of the following types of comparison:
• Compare 2 files/version allows you to compare any two objects or versions of an object.
• Show local modifications compares the object in your work area with the original that was checked out, showing you the changes made in your work area.
• Compare to latest in vault compares the original version of an object with the latest version in the vault; showing changes made by others since you checked the object out.
• Compare original to latest compares the object in your work area with the current version in the vault, using the original as a common ancestor.
Comparison Options
Select from the following comparison options:
• Use module versions: Select this option to use module versions rather then module member versions when comparing two files/versions.
• Ignore case: Select this option for case-insensitive comparisons. • Ignore RCE keys: Determines whether differences in RCE keyword values are
ignored. RCE keywords are tokens (such as $Revision$, $Author$, and $Log$) that you can add to your files to provide revision information (such as revision number, author, and comment log). If you select this option, DesignSync hides the keyword values (collapses the keywords) prior to comparing the files. For example:
First line of File A:
274

Using DesignSync
$Id: Advanced_Diff.htm.rca 1.10 Thu May 12 12:07:30 2005 mmf Experimental $
First line of File B: $Id: Advanced_Diff.htm.rca 1.13 Tue May 20 11:27:55 2008 larry Experimental $
Advanced Diff reports the difference unless you select the Ignore RCE keys option, in which case Advanced Diff collapses each line to: $Id: $.
Differences in keyword usage and placement are always reported. For example:
First line of File A: $Id: Advanced_Diff.htm.rca 1.10 Thu May 12 12:07:30 2005 mmf Experimental $
First line of File B: $Author: mmf $
Advanced Diff reports the difference irrespective of the Ignore RCE keys setting because the keywords themselves, not just the keyword values, are different.
Notes:
o $Log$, when expanded, permanently adds log information to your files. The Ignore RCE keys option does not hide these log messages prior to performing a comparison. Advanced Diff may flag differences or conflicts (if log information has been edited by hand) if you use $Log$ in your files. $Log$ is the only keyword with this behavior.
o Advanced Diff honors the $KeysEnd$ keyword -- any expanded keywords after $KeysEnd$ are compared fully and literally.
• Ignore leading/trailing white space: Determines whether white space (spaces, tabs) differences at the beginning or end of a line are ignored. For example, if a line in one file starts with a tab character whereas the same line in the other file starts with a space, Advanced Diff ignores the difference if you select this option.
• Ignore changes in white space amount: Determines whether differences in white space within a line are ignored. For example, if a line in one file has three spaces between two words whereas the same line in the other file has only one space, Advanced Diff ignores the difference if you select this option.
• Perform binary comparison: Performs the comparison in binary mode. When comparing files in binary mode, Advanced Diff only reports whether the files are identical or different. No other comparison options are available in binary mode.
275

DesignSync Data Manager User's Guide
Display Options
The Display Options determines how the results of a compare operation are displayed. The option you select is used when you perform both common and advanced diff operations.
You can choose one of the following display options:
• Display only the diffs (standard format) uses the standard UNIX output format to display only lines that have been added, removed, or changed.
• Display only the diffs (unified format) uses the gnu unified output format to display both lines that are the same and lines that have changed.
• Display only the diffs (syncdiff format) uses a DesignSync-specific diff output format to display only lines that have been added, removed, or changed.
• Display diff-annotated file displays both lines that are the same in both files and lines that have changed.
• Display output in GUI displays the results graphically.
The first four options display the results in the Diff View tab page of the main DesignSync panel. The last option displays the results in the graphical Diff utility.
See Reading Diff Results for examples of the different types of output.
Related Topics
Common Diff Operations
Reading Diff Results
ENOVIA Synchronicity Command Reference: diff
Reading Diff Results
The format of your diff results is determined by your Display Options selection on the Advanced Diff panel. (See Advanced Diff Options for details.) The output from the different types of diff operations is described in the following sections:
Display only the diffs (standard format)
Display only the diffs (unified format)
Display only the diffs (syncdiff format)
Display diff-annotated file
Display output in GUI
276
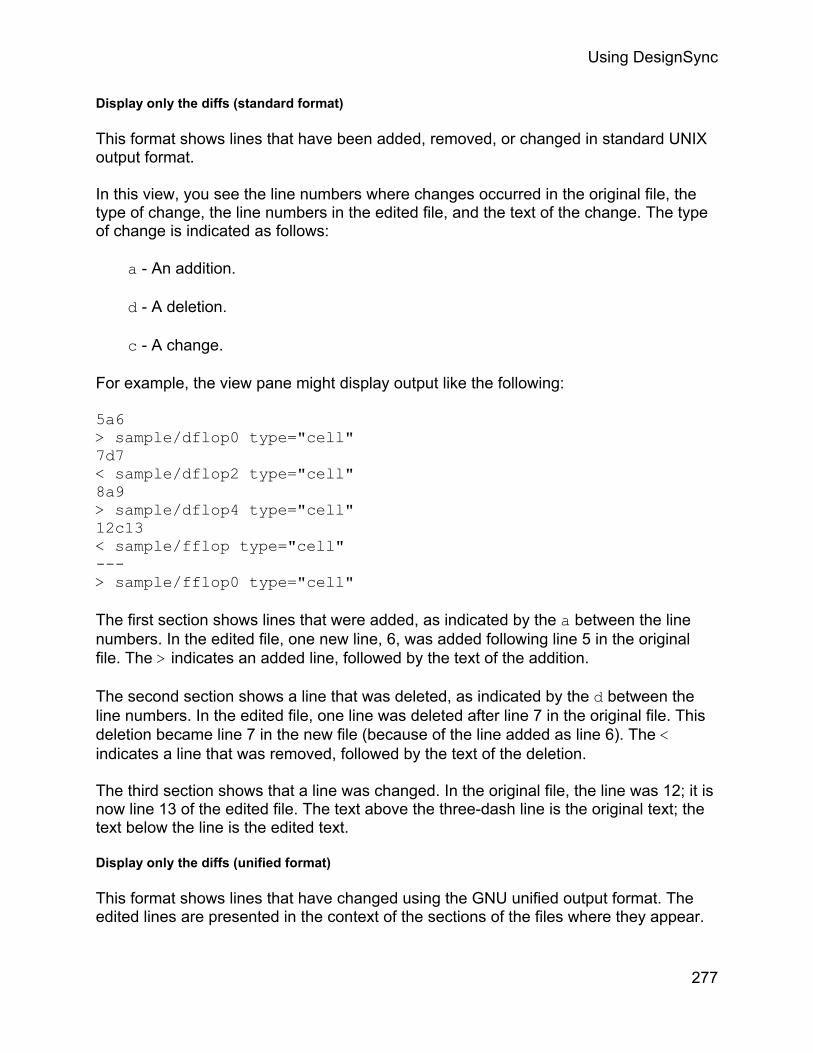
Using DesignSync
Display only the diffs (standard format)
This format shows lines that have been added, removed, or changed in standard UNIX output format.
In this view, you see the line numbers where changes occurred in the original file, the type of change, the line numbers in the edited file, and the text of the change. The type of change is indicated as follows:
a - An addition.
d - A deletion.
c - A change.
For example, the view pane might display output like the following:
5a6 > sample/dflop0 type="cell" 7d7 < sample/dflop2 type="cell" 8a9 > sample/dflop4 type="cell" 12c13 < sample/fflop type="cell" --- > sample/fflop0 type="cell"
The first section shows lines that were added, as indicated by the a between the line numbers. In the edited file, one new line, 6, was added following line 5 in the original file. The > indicates an added line, followed by the text of the addition.
The second section shows a line that was deleted, as indicated by the d between the line numbers. In the edited file, one line was deleted after line 7 in the original file. This deletion became line 7 in the new file (because of the line added as line 6). The < indicates a line that was removed, followed by the text of the deletion.
The third section shows that a line was changed. In the original file, the line was 12; it is now line 13 of the edited file. The text above the three-dash line is the original text; the text below the line is the edited text.
Display only the diffs (unified format)
This format shows lines that have changed using the GNU unified output format. The edited lines are presented in the context of the sections of the files where they appear.
277

DesignSync Data Manager User's Guide
In this view, the original file is preceded by three dashes (---); the edited file is preceded by three pluses (+++). The line enclosed in ampersands (@@) indicates the changed sections of the two files. The first range of line numbers shows the affected section of the original file; the second range shows the affected section of the edited file.
In the main body of the code, lines common to both files begin with a space character. The lines that differ begin with one of the following characters:
+ Indicates a line added to this position.
- Indicates a line removed from this position.
For example, the view pane might display output like the following:
--- sync://zen.our_company.com:2647/Projects/smallLib/FFlops.Cat;1.1 +++ file:///c|/Projects/smallLib/FFlops.Cat @@ -3,13 +3,14 @@ sample/dffpc_ type="cell" sample/dffpp_c_ type="cell" sample/dflop type="cell" +sample/dflop0 type="cell" sample/dflop1 type="cell" -sample/dflop2 type="cell" sample/dflop3 type="cell" +sample/dflop4 type="cell" sample/dl type="cell" sample/dla type="cell" sample/dlc_ type="cell" -sample/fflop type="cell" +sample/fflop0 type="cell" sample/fflop1 type="cell" sample/fflop2 type="cell" sample/fflop3 type="cell"
The + characters at the beginnings of lines 4 and 8 indicate lines that were added in your edited file. The - at the beginning of line 6 indicates a line that was removed. Lines 12 and 13 show a line that was changed; the original line is preceded by a - character and the change in the edited file is indicated by the + character.
Display only the diffs (syncdiff format)
This format shows lines that have been added, removed, or changed in the syncdiff format.
278
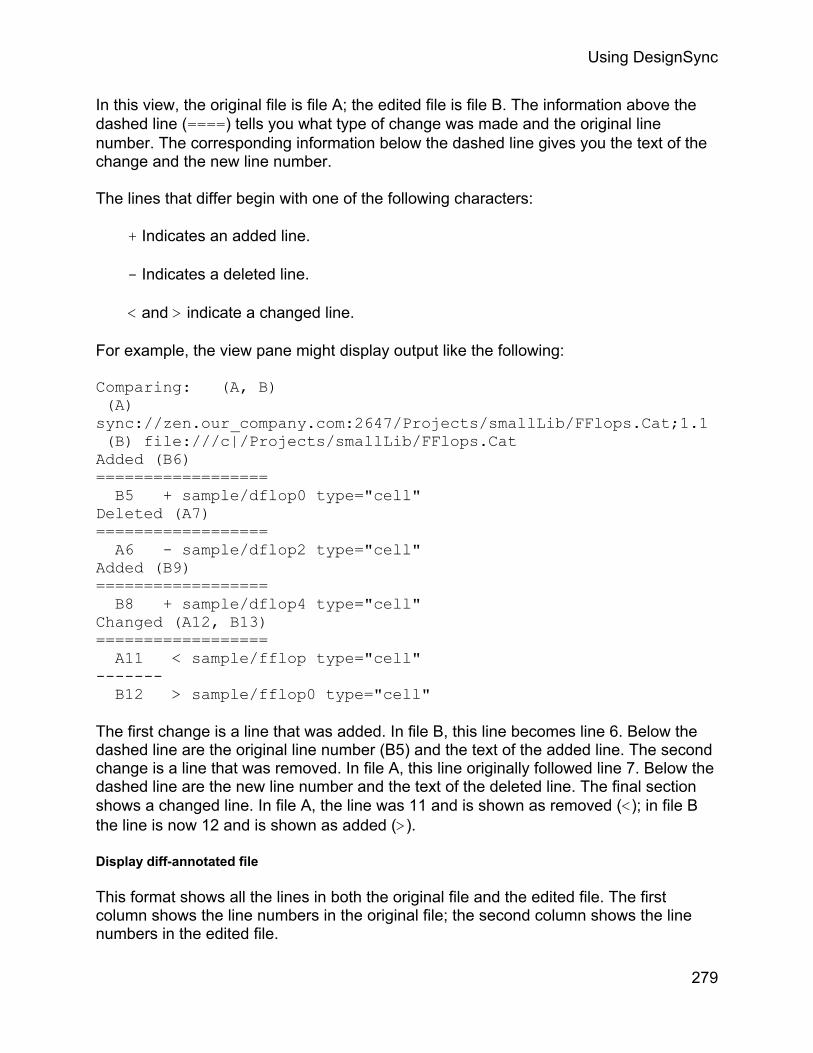
Using DesignSync
In this view, the original file is file A; the edited file is file B. The information above the dashed line (====) tells you what type of change was made and the original line number. The corresponding information below the dashed line gives you the text of the change and the new line number.
The lines that differ begin with one of the following characters:
+ Indicates an added line.
- Indicates a deleted line.
< and > indicate a changed line.
For example, the view pane might display output like the following:
Comparing: (A, B) (A) sync://zen.our_company.com:2647/Projects/smallLib/FFlops.Cat;1.1 (B) file:///c|/Projects/smallLib/FFlops.Cat Added (B6) ================== B5 + sample/dflop0 type="cell" Deleted (A7) ================== A6 - sample/dflop2 type="cell" Added (B9) ================== B8 + sample/dflop4 type="cell" Changed (A12, B13) ================== A11 < sample/fflop type="cell" ------- B12 > sample/fflop0 type="cell"
The first change is a line that was added. In file B, this line becomes line 6. Below the dashed line are the original line number (B5) and the text of the added line. The second change is a line that was removed. In file A, this line originally followed line 7. Below the dashed line are the new line number and the text of the deleted line. The final section shows a changed line. In file A, the line was 11 and is shown as removed (<); in file B the line is now 12 and is shown as added (>).
Display diff-annotated file
This format shows all the lines in both the original file and the edited file. The first column shows the line numbers in the original file; the second column shows the line numbers in the edited file.
279
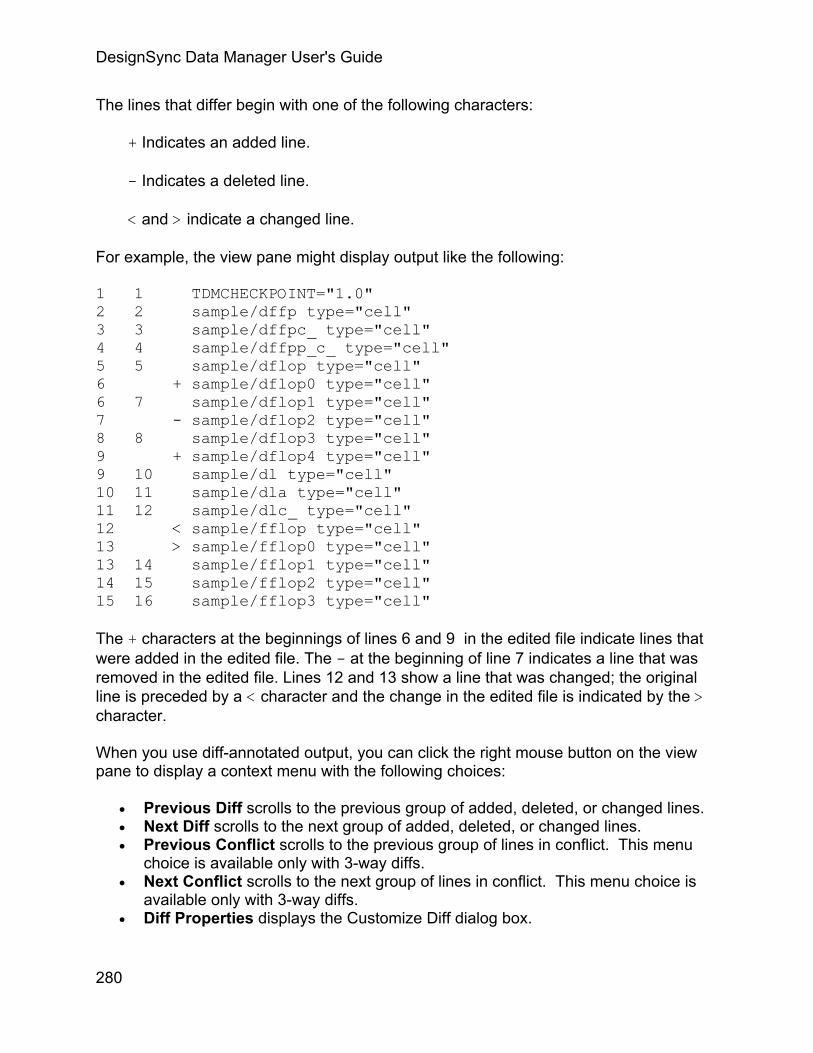
DesignSync Data Manager User's Guide
The lines that differ begin with one of the following characters:
+ Indicates an added line.
- Indicates a deleted line.
< and > indicate a changed line.
For example, the view pane might display output like the following:
1 1 TDMCHECKPOINT="1.0" 2 2 sample/dffp type="cell" 3 3 sample/dffpc_ type="cell" 4 4 sample/dffpp_c_ type="cell" 5 5 sample/dflop type="cell" 6 + sample/dflop0 type="cell" 6 7 sample/dflop1 type="cell" 7 - sample/dflop2 type="cell" 8 8 sample/dflop3 type="cell" 9 + sample/dflop4 type="cell" 9 10 sample/dl type="cell" 10 11 sample/dla type="cell" 11 12 sample/dlc_ type="cell" 12 < sample/fflop type="cell" 13 > sample/fflop0 type="cell" 13 14 sample/fflop1 type="cell" 14 15 sample/fflop2 type="cell" 15 16 sample/fflop3 type="cell"
The + characters at the beginnings of lines 6 and 9 in the edited file indicate lines that were added in the edited file. The - at the beginning of line 7 indicates a line that was removed in the edited file. Lines 12 and 13 show a line that was changed; the original line is preceded by a < character and the change in the edited file is indicated by the > character.
When you use diff-annotated output, you can click the right mouse button on the view pane to display a context menu with the following choices:
• Previous Diff scrolls to the previous group of added, deleted, or changed lines. • Next Diff scrolls to the next group of added, deleted, or changed lines. • Previous Conflict scrolls to the previous group of lines in conflict. This menu
choice is available only with 3-way diffs. • Next Conflict scrolls to the next group of lines in conflict. This menu choice is
available only with 3-way diffs. • Diff Properties displays the Customize Diff dialog box.
280
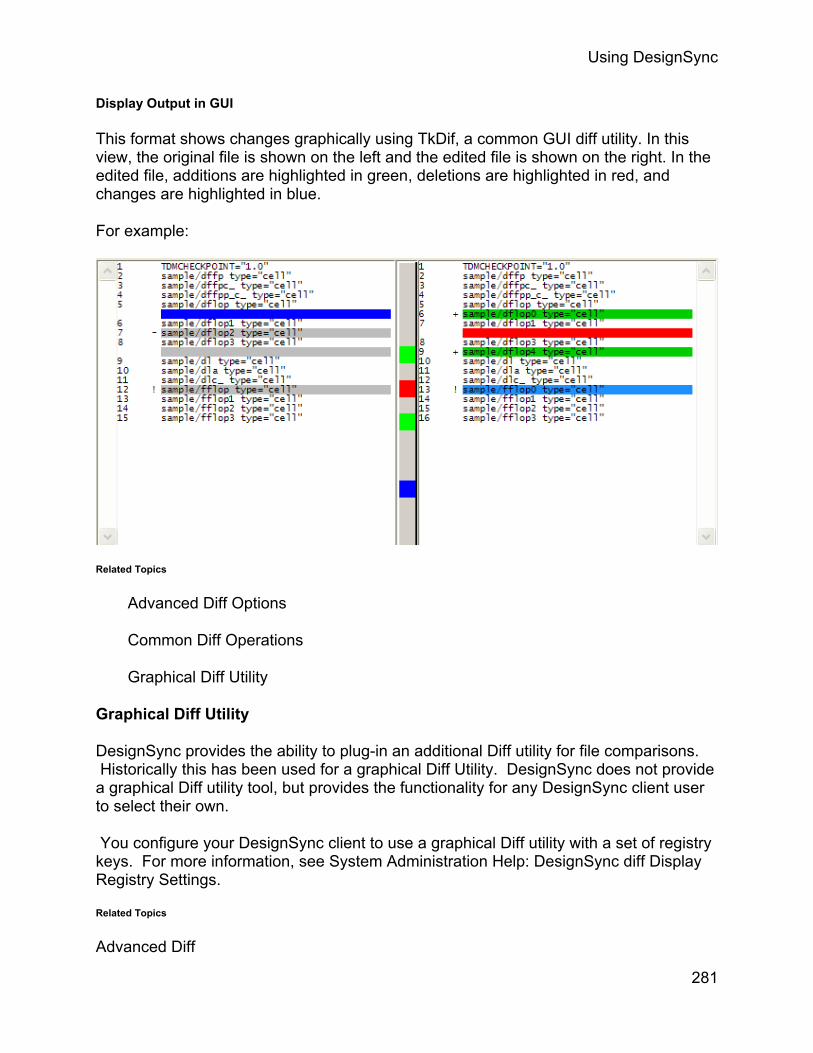
Using DesignSync
Display Output in GUI
This format shows changes graphically using TkDif, a common GUI diff utility. In this view, the original file is shown on the left and the edited file is shown on the right. In the edited file, additions are highlighted in green, deletions are highlighted in red, and changes are highlighted in blue.
For example:
Related Topics
Advanced Diff Options
Common Diff Operations
Graphical Diff Utility
Graphical Diff Utility
DesignSync provides the ability to plug-in an additional Diff utility for file comparisons. Historically this has been used for a graphical Diff Utility. DesignSync does not provide a graphical Diff utility tool, but provides the functionality for any DesignSync client user to select their own.
You configure your DesignSync client to use a graphical Diff utility with a set of registry keys. For more information, see System Administration Help: DesignSync diff Display Registry Settings.
Related Topics
Advanced Diff
281

DesignSync Data Manager User's Guide
Introduction to Merging
What Is Merging?
Merging combines changes made on two branches, or within a branch. Branching without merging has limited usability – two developments streams diverge forever and can never be reconciled.
There are several important notions related to the general concept of merging that are equally applicable to file merging and module merging:
Merge Conflicts
Two-Way Merge
Three-Way Merge
Merge Edges
Module merging has additional factors to consider because instead of merging specific files, you are merging a set of changes. For more information on module merging, see Merging Module Data.
Related Topics
Merging Module Data
Using the Merging Work Style
Parallel (Multi-Branch) Development
Merge Conflicts
Two-Way Merge
Three-Way Merge
Merge Edges
Merge Conflicts
Merge conflicts are differences in the two objects involved in the merge, which cannot be resolved automatically. A conflict is presented in a textual or graphical format as two options. You resolve the conflict by specifying some combination of these options.
282

Using DesignSync
An example of a merge conflict in two versions of a text file, each with fixes to typing errors follows:
<<<<<<< 1.7 1.7 This is the time 1.7 to celebrate ================ 1.3.1.6 this is the time 1.3.1.6 to celebrate >>>>>>> 1.3.1.6
This might be resolved by editing the file, resulting in:
This is the time To celebrate The anniversary
Note that the second line of the resolved text is different from the second line in either side of the conflict. And the third line was not in the conflict text.
Merge conflicts can also arise when changes in the two branches being merged are incompatible, such as when a file is renamed to different locations on the two branches.
When working with modules, it is not necessary to resolve all conflicts before creating the next module version. You can check in, or perform other operations that create new module versions, as long as the objects being operated on are not the ones that are in conflict.
Related Topics
Two-Way Merge
Three-Way Merge
Conflict Handling
ENOVIA Synchronicity Command Reference: populate
Two-Way Merge
In a two-way merge, differences between two objects are present as merge conflicts. This is the simplest merge approach, but it can lead to a significant number of conflicts.
For example, suppose one programmer modified one function in a source file while another programmer modified an unrelated function on a different branch. Two-way merge will present both modifications as merge conflicts.
283
DesignSync Data Manager User's Guide
Related Topics
Merge Conflicts
Three-Way Merge
Three-Way Merge
A three-way merge is more complicated than a two-way merge. The benefit of a three-way merge is that it minimizes the number of conflicts requiring resolution, by automatically resolving some differences.
Let's take the example described in the Two-Way Merge:
Suppose one programmer modified one function in a source file while another programmer modified an unrelated function on a different branch.
A three-way merge assumes that both objects participating in the merge were derived from a common earlier version of the object. That common earlier version of the object is referred to as the base version. There are therefore three versions of the object participating in the merge; thus the merge is a 3-way merge.
A three-way merge calculates two sets of differences:
• The difference between the base version and the first version • The difference between the base version and the second version
Differences from these two sets are called intersecting if they involve a common part of the base object.
In the example above, changes made by the programmers to the two different functions are non-intersecting changes. Non-intersecting changes are presumed to result from unrelated improvements made to the base object. They are accepted automatically, resulting in a merged object with non-intersecting changes from both versions. Intersecting changes are shown as merge conflicts.
Choosing the Right Base Version
The base version is the version from which both objects participating in the merge were derived. When merging end points of two branches, a good candidate for a base version is the closest common branch-point version.
You can derive the closest common branch-point from the dot-numeric representations of branch names. Find a longest common prefix of two names ending with a dot, and remove the last dot.
284

Using DesignSync
If the resulting string designates a version, then that version is the closest common branch-point. This is also known as the closest common ancestor.
For example, the longest common prefix of 1.2.2.1.1.8 and 1.2.2.1.3.1 is 1.2.2.1. Removing the last dot leaves 1.2.2.1, which is a version, and therefore the closest common branch-point.
If the resulting string designates a branch, then the closest common branch-point will be the smaller endpoint branch-point version on this branch.
For example, the longest common prefix of 1.2.2.1.1.8 and 1.2.2.3 is 1.2.2. Removing the last dot leaves 1.2.2, which is a branch. 1.2.2.1 (in 1.2.2.1.1.8) is smaller than 1.2.2.3 (in 1.2.2.3), so the closest common branch-point version is 1.2.2.1.
Related Topics
Merge Conflicts
Two-Way Merge
Merging Module Data
Merge Edges
While the closest common branch-point version is usually a good candidate for the base version of a 3-way merge, in certain cases it is possible to find a better candidate.
For example, let's say the main development of a product takes place on the Trunk branch. Versions on the Trunk are periodically tagged (for example, bp-rel33, bp-rel40, bp-rel41, bp-rel42), and released to customers as major releases. To accommodate bug fixes, service pack branches are created for each release (rel33sp, rel40sp, rel41sp).
Some versions on service pack branches are tagged as service pack releases (rel41sp1, re41sp2, rel42sp1).
How should bug fixes from service pack branches be incorporated into the main development branch? An appealing approach might be to merge a service pack branch into Trunk each time a service pack is released. This method generates a set of merges rel41sp->Trunk for every service pack of rel41. What would be the base versions for the merges? The closest common branch-point for all these merges will be the same, bp-rel41. But always using bp-rel41 as a base version results in a repetitive resolution of the same conflicts.
Suppose the fix of bug #12345 was released in rel41sp1, and merging of this fix into the Trunk resulted in a conflict. In other words, diff(bp-rel41, rel41sp1) and diff(bp-rel41, Trunk:Latest) intersected. This happened because the Trunk developer stumbled onto
285

DesignSync Data Manager User's Guide
the same bug and fixed it in a different way than the rel41sp1 developer. The resolution of the merge conflict was to use the fix from rel41sp1.
The conflict reappears when rel41sp2 is later merged onto Trunk. Although the section of code pertaining to the fix of bug #12345 was not modified on either branch since the merge, the code fix for bug #12345 still shows as a conflict, because corresponding differences diff(bp-rel41, rel41sp2) and (bp-rel41, Trunk:Latest) still exist and intersect.
In this case, it is better to choose rel41sp1 as the base version, because then there would be no differences related to the code fix for bug #12345 between rel41sp1 and rel41sp2. The conflict would then have been resolved automatically, as in the previous merge.
As more development is done on two branches, the branches continue to diverge from each other, making merges more and more difficult. By choosing appropriate base versions we can completely eliminate this issue. To select the right base version we need to discuss merge edges.
A merge edge is an edge in a history graph of an object from one participant of a merge to the merge result. The other participant has a direct edge (it is the parent of the new version).
For example:
Without merge edges the history graph is simply a tree. With merge edges the history graph becomes a directed acyclic graph.
Based on merge edges, we can choose the base version for a new merge as the closest common predecessor of the two versions participating in the merge. The advantage of this approach is that the base version chosen is much “closer” to these
286

Using DesignSync
287
versions than the closest common branch-point, resulting in fewer differences and conflicts.
In the above diagram, we merged Trunk:27 and rel41sp1, resolved the conflicts and checked in the result as Trunk:28. The merge edge is version rel41sp1 (version 1.6.1.6). For the next merge (Trunk:35 to rel41sp2) the previous merge edge (version 1.6.1.6) is used to find the base version rel41sp1, so that none of the conflicts resolved in the previous merge reappear.
The vhistory command and the Version History report both indicate merge edges.
Related Topics
Merge Conflicts
Two-Way Merge
Three-Way Merge
Merging Module Data
ENOVIA Synchronicity Command Reference: vhistory

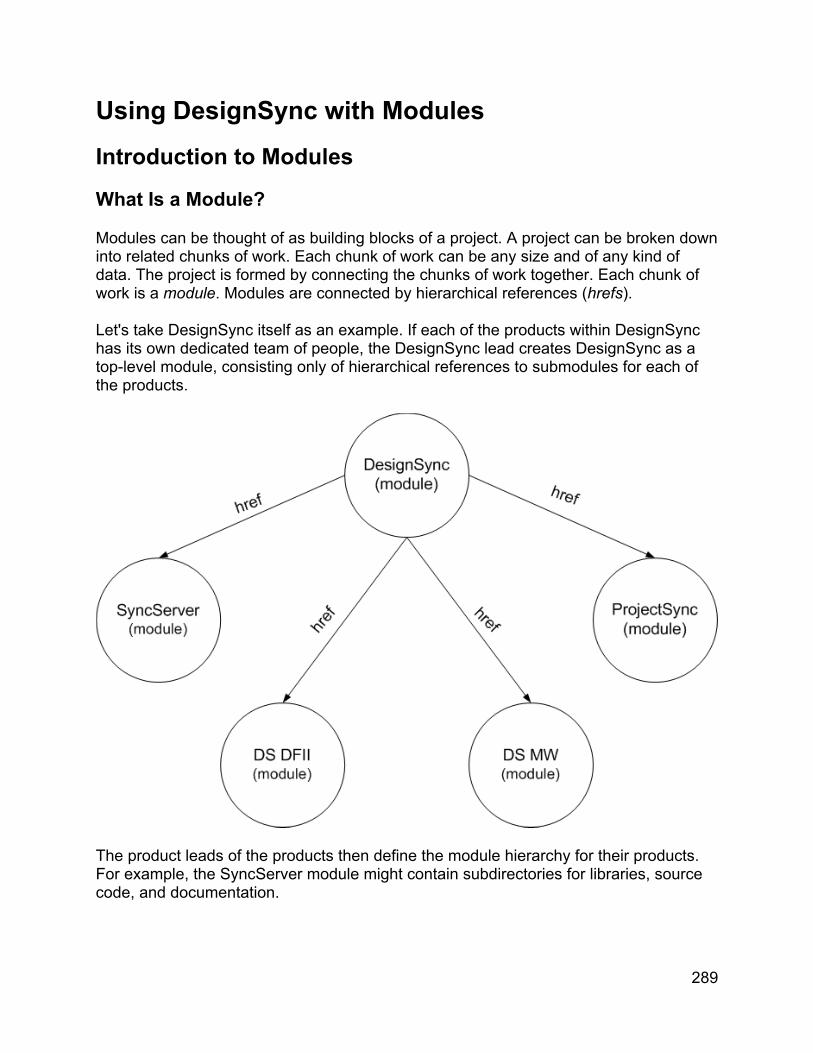
Using DesignSync with Modules
Introduction to Modules
What Is a Module?
Modules can be thought of as building blocks of a project. A project can be broken down into related chunks of work. Each chunk of work can be any size and of any kind of data. The project is formed by connecting the chunks of work together. Each chunk of work is a module. Modules are connected by hierarchical references (hrefs).
Let's take DesignSync itself as an example. If each of the products within DesignSync has its own dedicated team of people, the DesignSync lead creates DesignSync as a top-level module, consisting only of hierarchical references to submodules for each of the products.
The product leads of the products then define the module hierarchy for their products. For example, the SyncServer module might contain subdirectories for libraries, source code, and documentation.
289

DesignSync Data Manager User's Guide
The ProjectSync module also has code and documentation subdirectories:
290

Using DesignSync with Modules
Let's say the documentation team is a shared resource for all products, with a few of the writers working on both SyncServer and ProjectSync. A writer might fetch both the DesignSync and ProjectSync modules into the same workspace, /home/karen/work/DesignSync, as shown in the example below. Note that top-level "DesignSync" and "ProjectSync" directories are not created. The data within those modules is fetched, resulting in this workspace structure:
Although not shown in the above diagram, each of the directories contains subdirectories.
Since both the SyncServer and ProjectSync modules contain doc subdirectories, the doc workspace directories will contain data from both of the DesignSync and ProjectSync modules. These are referred to as overlapping modules, because they share a common base directory.
The doc writer did not need to fetch all of the content of the SyncServer and ProjectSync modules. She could have fetched only data pertaining to the documentation. See Filtering Module Data and Recursion.
Users define the content of a module and how modules are structured (see Module Hierarchy). Every item within a module is a member of that module (a module member). Users work with modules and their data by using DesignSync and hcm commands. See Operating on Module Data.
DesignSync automatically manages modules by creating a new version of a module every time the module is modified.
A module is modified when a user:
• Checks in data that was added to the module (using the hcm add command followed by the ci command)
• Restructures the data within the module (by using the hcm mvmember command)
• Removes data from the module (using the hcm remove command) • Adds a hierarchical reference to the module (using the hcm addhref command) • Removes a hierarchical reference from the module (using the hcm rmhref
command)
The topic Data Management of Modules explains how module data is managed.
291

DesignSync Data Manager User's Guide
Directories, not only their content, are part of a module's data (module members). Consequently, DesignSync automatically manages directories belonging to a module. See Directory Versioning.
Atomic Checkin and Recovery
You can add any amount of data to a module at once, resulting in a single check-in attempt. However, either the entire checkin succeeds, or the entire checkin fails; checkin of a module is an atomic operation. A new version of a module is created only if the entire check-in operation succeeds.
By default, after a failed atomic checkin, a subsequent check-in attempt utilizes information previously sent to the server. This optimizes the amount of data that needs to be transferred to the server, with the retry effectively continuing from where the previous try failed. For details, see ENOVIA Synchronicity Command Reference: ci for more information on the -resume option.
Related Topics
ENOVIA Synchronicity Command Reference:hcm
ENOVIA Synchronicity Command Reference: hcm add
ENOVIA Synchronicity Command Reference: ci
ENOVIA Synchronicity Command Reference:hcm mvmember
ENOVIA Synchronicity Command Reference:hcm remove
ENOVIA Synchronicity Command Reference:hcm addhref
ENOVIA Synchronicity Command Reference:hcm rmhref
Data Management of Modules
The topic Vaults, Versions and Branches explains how objects under data management are version-controlled. As an object's development progresses, new versions are created, such as versions 1.1, 1.2, and 1.3 of an object, on the default Trunk branch (branch 1). You can branch an object, with parallel development of the object taking place on the side branch, for example, versions 1.1.1.1, 1.1.1.2, and 1.1.1.3 on the branch 1.1.1.
292

Using DesignSync with Modules
When working with module data, the module object is version-controlled; module members are not independently version-controlled. The software's internal data management of module members is transparent to users of the software.
Creating a module (using the hcm mkmod command) creates version 1.1 of that module, without any module content. To create module content, use the hcm add command to add files and directories to the module. Then use the ci command to check in the files and directories to the module. The checkin creates version 1.2 of the module. The files and directories are now members of the module.
When changes to the module content occur, DesignSync creates new versions of the module. See What Is a Module? for operations that cause a new version of a module to be created. As with ordinary DesignSync data, you can branch a module so that parallel development of the module can take place on the side branch.
Related Topics
Module Locking
Module Branching
Module Merging
ENOVIA Synchronicity Command Reference: hcm add
ENOVIA Synchronicity Command Reference: ci
ENOVIA Synchronicity Command Reference:hcm mkmod
Operating on Module Data
You can run DesignSync commands on modules or on the contents of a module (a module's members). Let's use the ProjectSync module in What Is a Module? as an example:
293

DesignSync Data Manager User's Guide
ProjectSync is a top-level module with subdirectories for its code and documentation.
Let's add a module to the module hierarchy for the JRE (Java Runtime Environment):
Both the SyncServer and ProjectSync use the JRE, so both the SyncServer and ProjectSync modules have hierarchical references to the JRE module which were added using the hcm addhref command.
Fetching the ProjectSync module hierarchy into the workspace directory, /home/deb/work/ProjectSync, results in this structure:
294

Using DesignSync with Modules
Although not shown in the above diagram, there are subdirectories and files below the doc and tcl directories. Note that a "JRE" directory was not created. DesignSync followed the reference to the JRE module, and fetched the content of the JRE module.
/home/deb/work/ProjectSync is the base directory of the ProjectSync module.
You can run commands that operate on module data on:
• A module, such as all data belonging to the ProjectSync module (all data in the doc and tcl subdirectories -- not the *.jar and *.exe files belonging to the referenced JRE module)
• Individual module members, such as the JRE module's *.jar and *.exe files • Workspace folders within a base directory, such as the tcl subdirectory in the
/home/deb/work/ProjectSync base directory
Operations can be module-centric or folder-centric. See the Module Recursion topic for details.
Notes:
• The co command does not apply to modules or module members; use populate to fetch modules and module members.
• To tag module data, specify the module's location on the server. Also, you can tag only modules, not individual module members.
Animated Examples
• Operating on a module • Operating on a module's contents
Related Topics
Filtering Module Data
Module Locking
Module Branching
Module Merging
295

DesignSync Data Manager User's Guide
ENOVIA Synchronicity Command Reference:hcm
ENOVIA Synchronicity Command Reference:hcm addhref
ENOVIA Synchronicity Command Reference:co
ENOVIA Synchronicity Command Reference:tag
Filtering Module Data
You can narrow operations on modules to a subset of the module's data. Let's use the SyncServer module hierarchy in What Is a Module? as an example. The SyncServer module has subdirectories for libraries, source code, and documentation:
The "doc" directory consists of *.htm files and an "images" directory containing *.gif and *.vsd files.
A SyncServer writer does not need to fetch the entire contents of the "doc" directory. Instead, the writer can fetch only the "images" directory. This results in the workspace
296
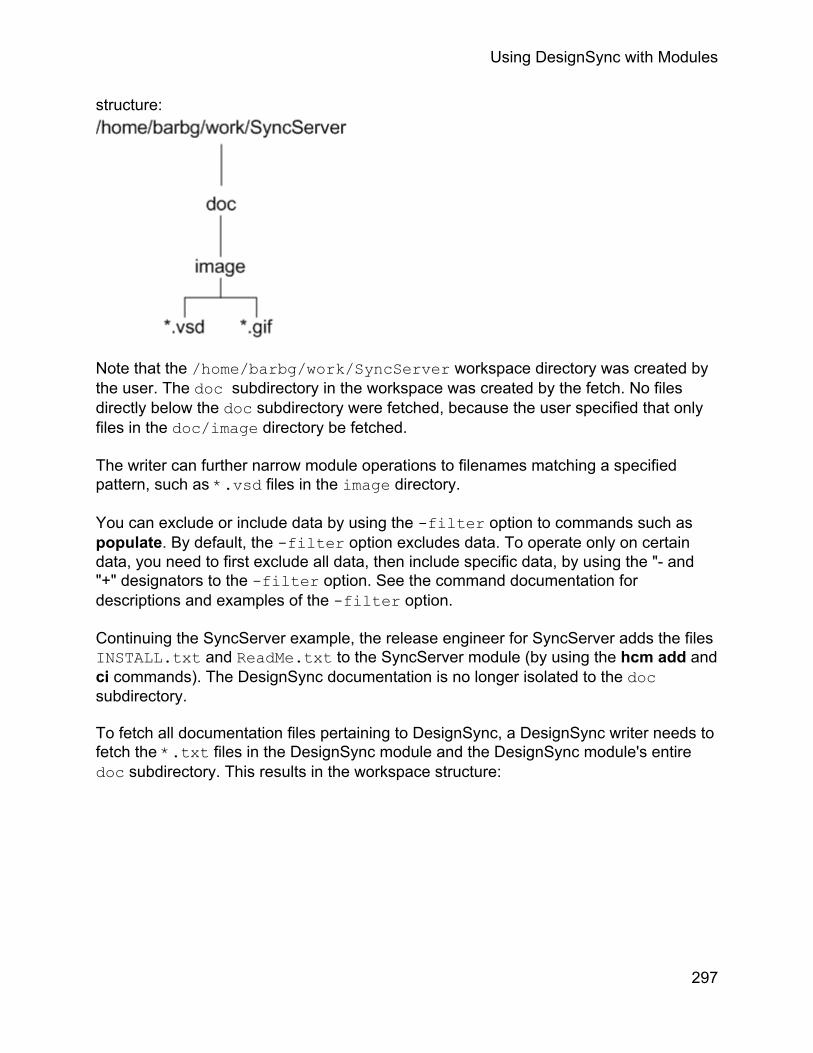
Using DesignSync with Modules
structure:
Note that the /home/barbg/work/SyncServer workspace directory was created by the user. The doc subdirectory in the workspace was created by the fetch. No files directly below the doc subdirectory were fetched, because the user specified that only files in the doc/image directory be fetched.
The writer can further narrow module operations to filenames matching a specified pattern, such as *.vsd files in the image directory.
You can exclude or include data by using the -filter option to commands such as populate. By default, the -filter option excludes data. To operate only on certain data, you need to first exclude all data, then include specific data, by using the "- and "+" designators to the -filter option. See the command documentation for descriptions and examples of the -filter option.
Continuing the SyncServer example, the release engineer for SyncServer adds the files INSTALL.txt and ReadMe.txt to the SyncServer module (by using the hcm add and ci commands). The DesignSync documentation is no longer isolated to the doc subdirectory.
To fetch all documentation files pertaining to DesignSync, a DesignSync writer needs to fetch the *.txt files in the DesignSync module and the DesignSync module's entire doc subdirectory. This results in the workspace structure:
297
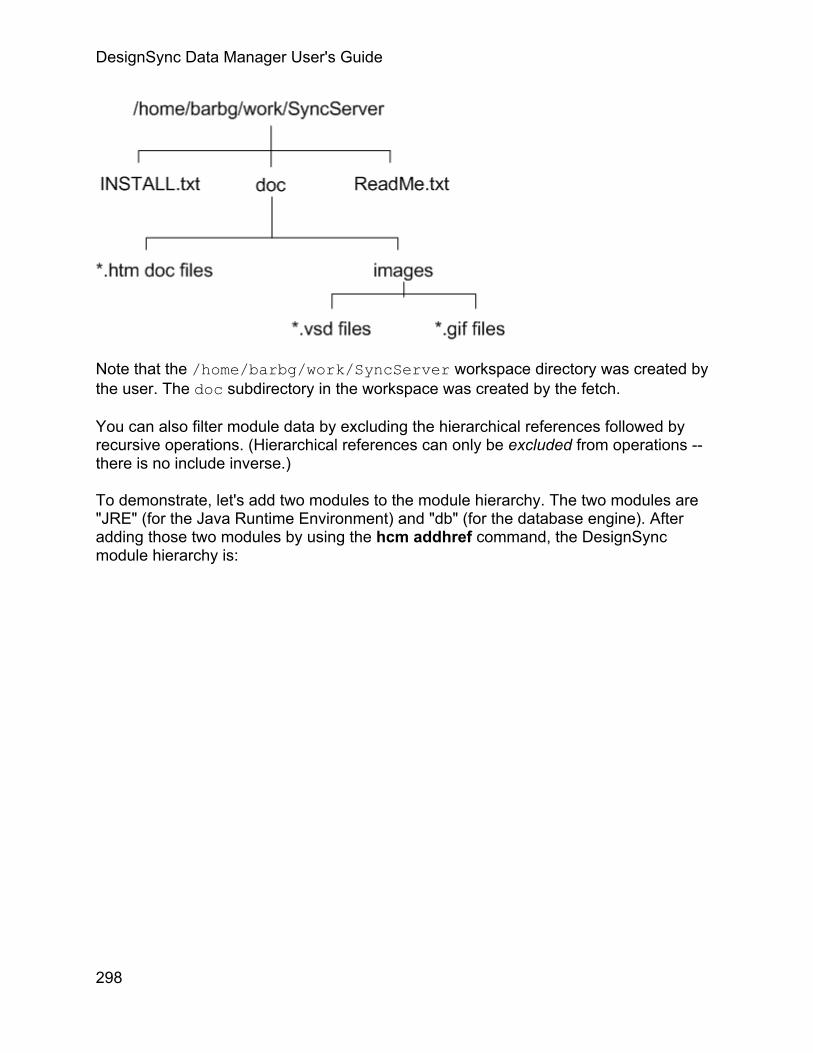
DesignSync Data Manager User's Guide
Note that the /home/barbg/work/SyncServer workspace directory was created by the user. The doc subdirectory in the workspace was created by the fetch.
You can also filter module data by excluding the hierarchical references followed by recursive operations. (Hierarchical references can only be excluded from operations -- there is no include inverse.)
To demonstrate, let's add two modules to the module hierarchy. The two modules are "JRE" (for the Java Runtime Environment) and "db" (for the database engine). After adding those two modules by using the hcm addhref command, the DesignSync module hierarchy is:
298

Using DesignSync with Modules
A developer who wants to work on the Java libraries needs the java data in the lib subdirectory of the SyncServer module and the referenced JRE module. To do so, the developer uses the populate command, specifying that the lib/*java data be included (using the -filter option discussed above), and specifying that the referenced db module be excluded (using the -hreffilter option). See the command documentation for descriptions and examples of the -hreffilter option.
The populate results in the workspace structure:
299

DesignSync Data Manager User's Guide
Note that the user created the /home/jim/work/SyncServer workspace directory. The lib directory and its contents were created by the fetch. Note that a "JRE" directory was not created. DesignSync followed the reference to the JRE module and fetched the content of the JRE module.
Operations can be module-centric or folder-centric. See the Module Recursion topic for details.
Animated Examples
• Filtering
• Persistent populate filter
Related Topics
Operating on Module Data
Setting Persistent Populate Filters
ENOVIA Synchronicity Command Reference: setfilter
ENOVIA Synchronicity Command Reference: populate
ENOVIA Synchronicity Command Reference: hcm add
ENOVIA Synchronicity Command Reference: ci
ENOVIA Synchronicity Command Reference:hcm addhref
Module Recursion
300

Using DesignSync with Modules
Operations can operate on an entire module hierarchy, a single module, a folder within a module, or a submodule that's referenced by a module. Let's use the SyncServer module hierarchy in Filtering Module Data as an example. The SyncServer module contains directories with data, and hierarchical references (hrefs) to the JRE and db modules:
By default, populate is not recursive; populate fetches only the module's data, resulting in the workspace structure:
301

DesignSync Data Manager User's Guide
Note that the user created the /home/simon/work/SyncServer workspace directory.
A module is considered a single object. A populate of a single module fetches all of the module's members, except for hierarchical references. Because the operation is not recursive, DesignSync does not follow hierarchical references.
When using populate with the -recursive option, the entire SyncServer module hierarchy is fetched, resulting in the workspace structure of:
Note that the user created the /home/ian/work/SyncServer workspace directory. Because the -recursive option was specified, DesignSync followed the referenced JRE and db modules and fetched their data.
Operations can handle modules (module-centric) or workspace directories (folder-centric).
Module-Centric Operations
Operations are module-centric if they operate on:
• An individual module's content, such as the entire content of the /home/simon/work/SyncServer workspace shown above
302

Using DesignSync with Modules
• An entire module hierarchy, such as the entire content of the /home/ian/work/SyncServer workspace shown above
• A subfolder of a specific module, such as the lib subdirectory in either of the /home/simon/work/SyncServer or /home/simon/work/SyncServer workspaces shown above
You can specify a referenced module as the object of a module-centric operation. Referenced modules are described in the topic Module Hierarchy.
Folder-Centric Operations
To illustrate folder-centric operations, let's return to the DesignSync example in What Is a Module?. Both the SyncServer and ProjectSync submodules contain a "doc" directory, which has *.htm files and an "image" subdirectory (with *.vsd and *.gif files). The top-level DesignSync module contains *.txt files. A documentation writer working on both SyncServer and ProjectSync fetches into their workspace only files pertaining to the documentation (as described in Filtering Module Data).
DesignSync fetches both the SyncServer and ProjectSync modules into the same workspace, /home/barbg/work/DesignSync, in the example below. Note that top-level "DesignSync" and "ProjectSync" directories are not created. It is the data within those modules that is fetched, resulting in this workspace structure:
Since both the SyncServer and ProjectSync modules contain doc subdirectories, the doc workspace directories will contain data from both of the SyncServer and ProjectSync modules. These are referred to as overlapping modules, because they share a common base directory.
A folder-centric operation operates on a workspace directory, ignoring module boundaries. The workspace directory can belong to multiple modules. For example, the doc and images directories in the /home/barbg/work/DesignSync workspace shown above belong to both the SyncServer module and the ProjectSync module.
303
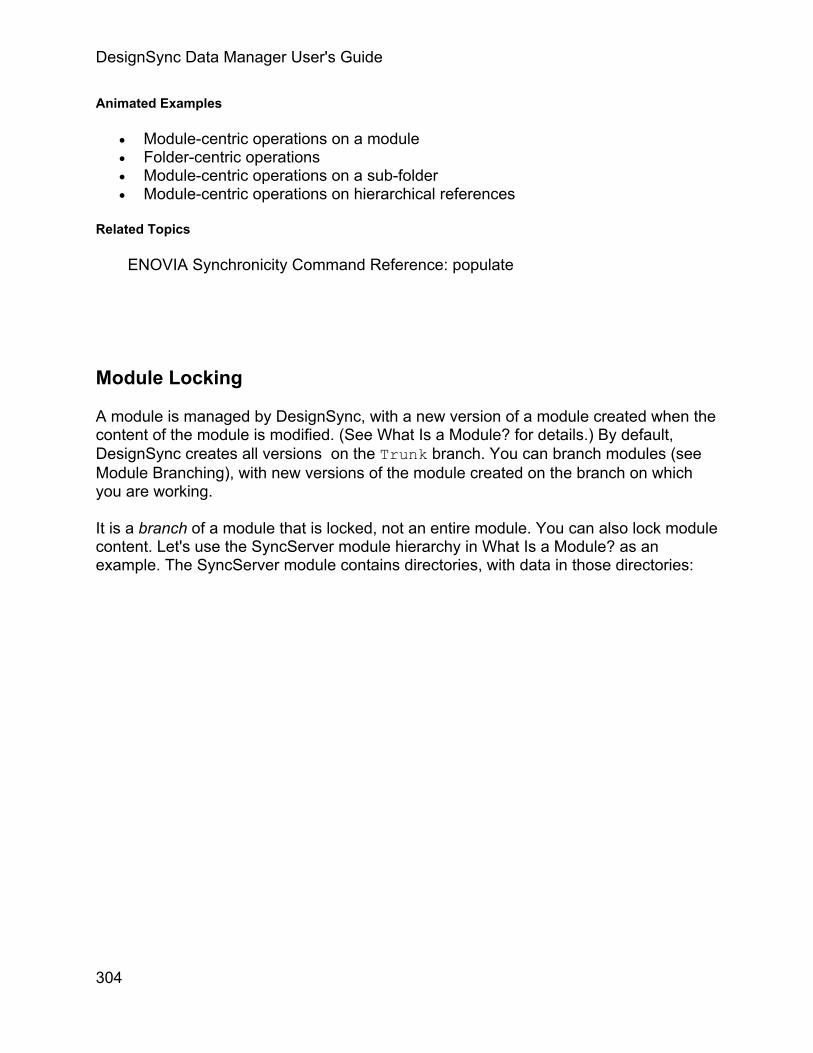
DesignSync Data Manager User's Guide
Animated Examples
• Module-centric operations on a module • Folder-centric operations • Module-centric operations on a sub-folder • Module-centric operations on hierarchical references
Related Topics
ENOVIA Synchronicity Command Reference: populate
Module Locking
A module is managed by DesignSync, with a new version of a module created when the content of the module is modified. (See What Is a Module? for details.) By default, DesignSync creates all versions on the Trunk branch. You can branch modules (see Module Branching), with new versions of the module created on the branch on which you are working.
It is a branch of a module that is locked, not an entire module. You can also lock module content. Let's use the SyncServer module hierarchy in What Is a Module? as an example. The SyncServer module contains directories, with data in those directories:
304
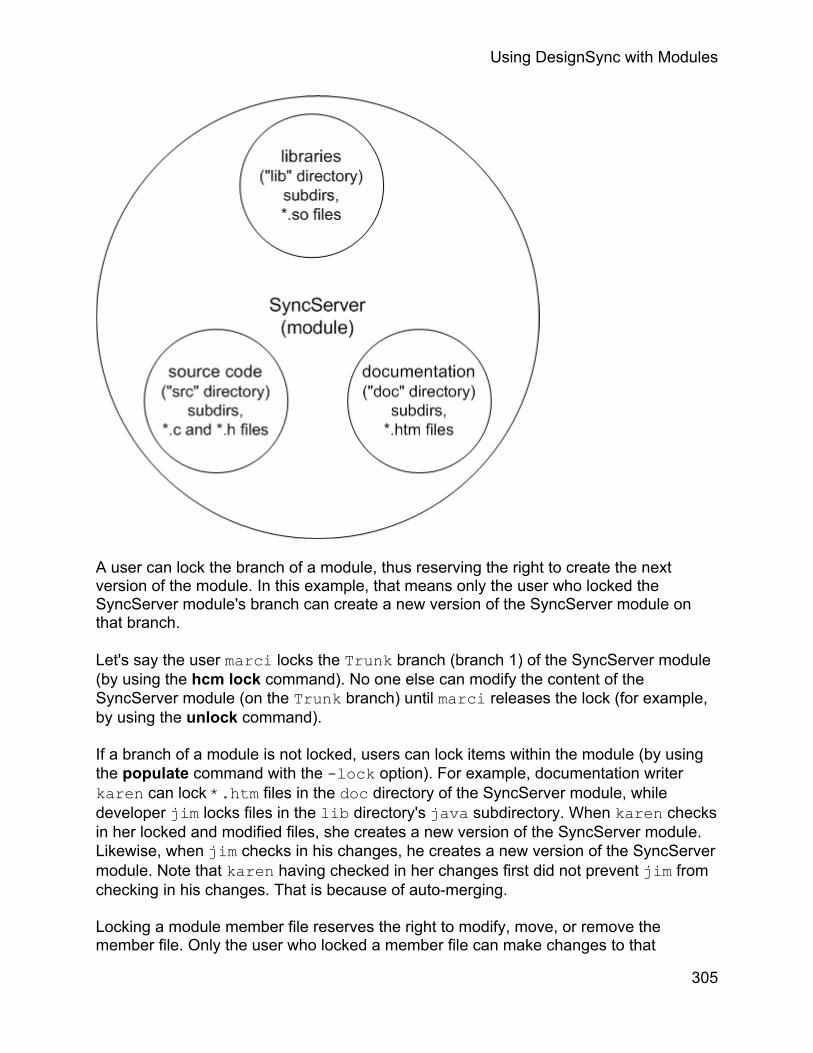
Using DesignSync with Modules
A user can lock the branch of a module, thus reserving the right to create the next version of the module. In this example, that means only the user who locked the SyncServer module's branch can create a new version of the SyncServer module on that branch.
Let's say the user marci locks the Trunk branch (branch 1) of the SyncServer module (by using the hcm lock command). No one else can modify the content of the SyncServer module (on the Trunk branch) until marci releases the lock (for example, by using the unlock command).
If a branch of a module is not locked, users can lock items within the module (by using the populate command with the -lock option). For example, documentation writer karen can lock *.htm files in the doc directory of the SyncServer module, while developer jim locks files in the lib directory's java subdirectory. When karen checks in her locked and modified files, she creates a new version of the SyncServer module. Likewise, when jim checks in his changes, he creates a new version of the SyncServer module. Note that karen having checked in her changes first did not prevent jim from checking in his changes. That is because of auto-merging.
Locking a module member file reserves the right to modify, move, or remove the member file. Only the user who locked a member file can make changes to that
305
DesignSync Data Manager User's Guide
member file (either its modification, removal from the module, or move within the module). Another user might check in modifications to other unlocked member files, thus creating a new module version, as long as the modifications do not affect the locked member file.
When a new version of the module results from a change made to the member file that was locked, the lock on the member file is not released. This is so the user can continue to work on the member file, without having to reobtain the lock. The user who locked a member file can release the lock, by using the cancel command.
Animated Examples
• Locking a module branch • Locking module content
Related Topics
ENOVIA Synchronicity Command Reference: hcm lock
ENOVIA Synchronicity Command Reference: unlock
ENOVIA Synchronicity Command Reference: populate
ENOVIA Synchronicity Command Reference:cancel
Module Hierarchy
A design hierarchy is comprised of modules, with the modules connected through hierarchical references (hrefs). The href connecting two modules indicates which module references the other. To illustrate, let's use the DesignSync module hierarchy, from earlier examples in this document:
306

Using DesignSync with Modules
All of the arrows in the above diagram represent hierarchical references, which were added by using the hcm addhref command. The arrow direction indicates that the href is from one module to another module. You can also remove hierarchical references by using the hcm rmhref command.
An href from a module is considered to be a member of that module. As with any change to a module's contents, a change to a module's hierarchical references (either adding an href or removing an href) creates a new version of the module.
Fetching only the DesignSync module fetches only its content, *.txt member files. Following the DesignSync hrefs (by specifying the -recursive option to the populate
307
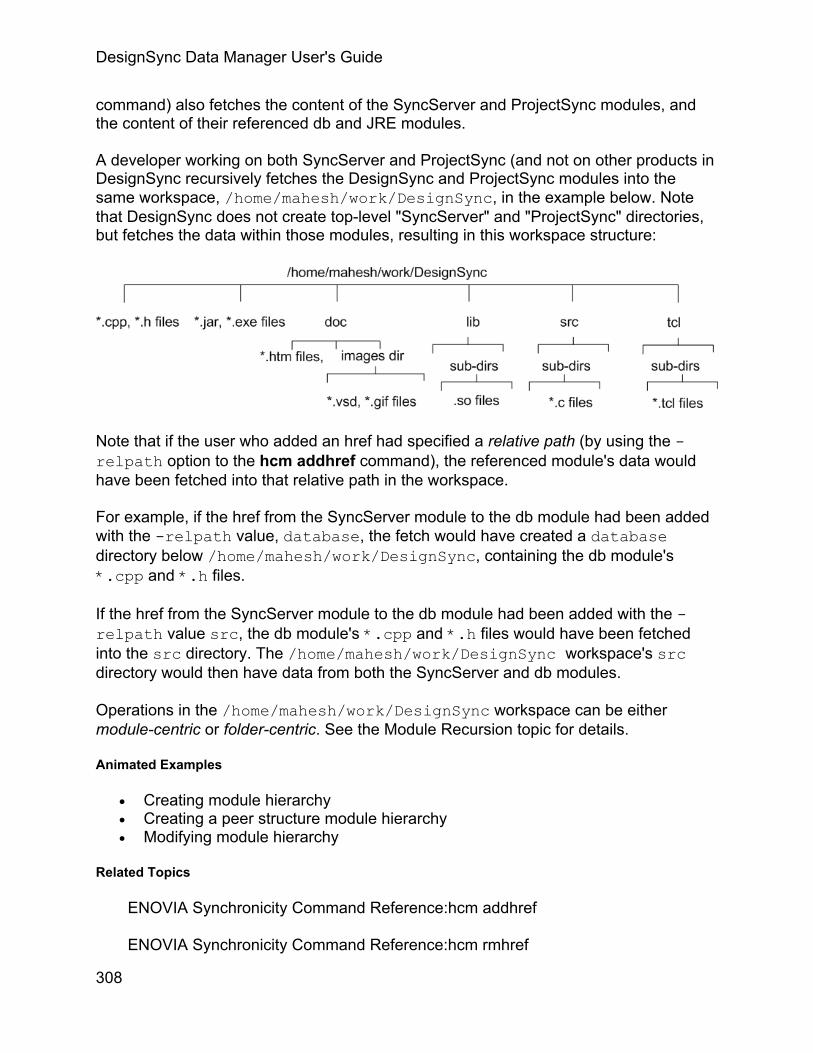
DesignSync Data Manager User's Guide
command) also fetches the content of the SyncServer and ProjectSync modules, and the content of their referenced db and JRE modules.
A developer working on both SyncServer and ProjectSync (and not on other products in DesignSync recursively fetches the DesignSync and ProjectSync modules into the same workspace, /home/mahesh/work/DesignSync, in the example below. Note that DesignSync does not create top-level "SyncServer" and "ProjectSync" directories, but fetches the data within those modules, resulting in this workspace structure:
Note that if the user who added an href had specified a relative path (by using the -relpath option to the hcm addhref command), the referenced module's data would have been fetched into that relative path in the workspace.
For example, if the href from the SyncServer module to the db module had been added with the -relpath value, database, the fetch would have created a database directory below /home/mahesh/work/DesignSync, containing the db module's *.cpp and *.h files.
If the href from the SyncServer module to the db module had been added with the -relpath value src, the db module's *.cpp and *.h files would have been fetched into the src directory. The /home/mahesh/work/DesignSync workspace's src directory would then have data from both the SyncServer and db modules.
Operations in the /home/mahesh/work/DesignSync workspace can be either module-centric or folder-centric. See the Module Recursion topic for details.
Animated Examples
• Creating module hierarchy • Creating a peer structure module hierarchy • Modifying module hierarchy
Related Topics
ENOVIA Synchronicity Command Reference:hcm addhref
ENOVIA Synchronicity Command Reference:hcm rmhref
308

Using DesignSync with Modules
ENOVIA Synchronicity Command Reference:populate
Folder Versioning
Conceptually, folder (or directory) versioning preserves the state of a folder, such that the folder's structure and file content at that moment can always be retrieved.
A folder, like a file, is a module member. A folder can be:
• Added to a module (by using thehcm add command followed by the ci command)
• Removed from a module (by using the hcm remove command) • Moved within a module (by using the hcm mvmember command)
Any of the above actions cause a new version of the module to be created. Consequently, you can always retrieve the state of a folder (its structure and content), based on the version number (or version tag) of the module to which the directory belongs.
Note that when a folder is moved in a module, all of the contents of that folder are also moved. Similarly, when a folder is removed from a module, all of the contents of that folder are also removed.
The hcm mvmember operation changes the natural path of an object, from this module version forward only.
Animated Examples
• Moving a file • Moving a folder
Related Topics
Data Management of Modules
ENOVIA Synchronicity Command Reference: hcm add
ENOVIA Synchronicity Command Reference: ci
ENOVIA Synchronicity Command Reference:hcm remove
ENOVIA Synchronicity Command Reference:hcm mvmember
Module Branching
309

DesignSync Data Manager User's Guide
When working with module data, it is a module object that is version-controlled. For background, see Data Management of Modules. As with ordinary DesignSync data, a module can be branched.
A module always has a branch 1 (the default Trunk branch) and an initial version 1.1 on branch 1. (Version 1.1 of the module results from creating the module, using the hcm mkmod command.) New versions of the module are created as the module's content changes. See What Is a Module? for details.
A side branch can originate from any version of a module. The content of the module version from which the side branch originates is used as the content of the initial module version on the new side branch.
For example, let's say there are versions 1.1, 1.2, and 1.3 of the module Top. Version 1.1 of the Top module does not have any content (version 1.1 resulted from hcm mkmod).
Version 1.2 of the Top module contains:
Version 1.3 of the Top module contains:
310

Using DesignSync with Modules
Note that although all of the files shown in module version 1.2 are also shown in module version 1.3, the content of those files might differ between the two module versions.
Using the mkbranch command on version 1.2 of the Top module creates:
• Branch 1.2.1 of the Top module • Version 1.2.1.2 of the Top module
The initial version (1.2.1.2) on the new branch (1.2.1) has the same content as the module version from which the side branch originated:
311

DesignSync Data Manager User's Guide
The initial version on the new branch also contains the hierarchical references that are in the version from which it was branched.
Animated Examples
Branching a module
Related Topics
Module Merging
ENOVIA Synchronicity Command Reference: hcm mkmod
ENOVIA Synchronicity Command Reference: mkbranch
Module Merging
When working with module data, it is a module object that is version-controlled. For background, see Data Management of Modules. The contents of each version are the
312

Using DesignSync with Modules
files, folders. and hrefs that make up that version. As with ordinary DesignSync data, a module can be branched.
Module branching is used to allow a parallel development of several variants of a module. There are three situations where merging is needed:
• You have a non-Latest version of a module in your workspace, and you want to check in your local changes to the module. This requires auto-merging.
• You want to merge a module version of the same branch as that of your workspace into your workspace. This is in-branch merging.
• You want to overlay a version of the module from a different branch, over the module version that is in your workspace. This is cross-branch overlaying.
• You want to merge a version of the module from a different branch as that of your workspace into your workspace. This is cross-branch merging.
Auto-Merging
In this scenario, you want to ci your local modifications to a module. The module version fetched into your workspace is not the Latest version on the target branch. You do not want to always specify the –skip option, as that would skip over changes that were made to the same files that you are checking in. The ci can proceed, if there is no overlap between the objects that are participating in the checkin, and the changes between the version that was fetched into your workspace and the Latest version of the module. This capability is auto-merging.
In other words, as long as you are working independently from others, on different objects, you can still check in even though someone else has created a new module version with their own independent changes. Note that this auto-merging happens at the file level; the contents of files are not automatically merged.
Auto-merging also applies to other commands that create a new module version: hcm mvmember, hcm remove, hcm addhref, and hcm rmhref. These commands are also allowed, if there is no overlap between the objects being operated on and the changes between the current and latest versions.
When an auto-merge operation occurs, the version number of the module in your workspace is not updated, since there might be changes in the intermediate versions that are not reflected in your workspace copy of the module. A subsequent populate is required to update the version number of the module in your workspace.
For further details, see Auto-Merging.
In-Branch Merging
You merge a module version within a branch using the -merge option to the populate command. In-branch merging fetches the version of the module associated with the
313

DesignSync Data Manager User's Guide
module selector, and merges into that any changes in the files in your workspace, leaving the workspace with the fetched module version, but with some members modified.
For example, let's say you're working with the module Chip, using the selector Trunk:Latest, and you have version 1.5 in your workspace. You have modified the files tmp.txt and verilog.v, and want to merge in the changes that are in the Latest version of the module.
The Latest version of the Chip module is 1.6. Version 1.6 contains a new version of verilog.v, but no newer version of tmp.txt. If you were to simply populate:
populate Chip
the populate would fail on the verilog.v object, because the object is modified.
If you instead merge:
populate –merge Chip
DesignSync merges your changes to verilog.v into the verilog.v file being fetched into your workspace.
If there is a file in your workspace that is either unmanaged or added with the hcm add command, and that file has also been added to the version of the module you are merging with, a conflict occurs. In this case, an error is reported for that file, similar to an attempt to populate without -merge when a file is modified.
If there is a file in your workspace that you added with hcm add and that file is not a member of the merged module version, that file remains in an “Added” state; it will be added to the module by your next ci to that module.
For further details, see In-Branch Merging.
Cross-Branch Overlaying
When data is overlaid across branches, DesignSync fetches objects from the requested branch, and overlays them onto the existing equivalent objects. There is no merging.
The command used for performing cross-branch overlay is:
populate –overlay <branch:Latest>
In this case, there can be no conflicts, as a conflict is, by definition, related to a merge.
For further details, see Overlaying Module Data.
314

Using DesignSync with Modules
Cross-Branch Merging
When data is merged across branches, DesignSync fetches the objects from the requested branch and merges them with the equivalent objects from the branch already loaded in your workspace. You merge two module versions from different versions using the -merge -overlay options to the populate command. Cross-branch merging fetches the specified version of the module, and merges it into your workspace over the existing equivalent objects. The workspace is still associated with the same module branch as before the merge.
For example, let's say you're working with the module Chip, and you have the Trunk:Latest version, version 1.5 in your workspace. Independently, you have a set of changes in a branched release that you want to integrate into the Trunk branch.
The branched release of the Chip module is Rel2:Latest. If you've modified the files as followed:
• Edited verilog.v • Removed tmp.txt • Added Chip.doc
You run the following command to merge your module into your current workspace.
populate –merge -overlay Rel2:Latest
DesignSync performs the following actions:
• Merges your changes to verilog.v into the verilog.v file being fetched into your workspace.
• Creates Chip.doc in your workspace in the added state so it automatically checks in when you check in the module. If you had an unmanaged copy of Chip.doc in your workspace, or used hcm add to add the file to the module, a conflict occurs and DesignSync identifies the conflict to allow you to determine which version of Chip.doc you want to keep in the workspace.
• Identifies in the output message that tmp.txt was removed in the branch module and marks the tmp.txt file as removed in the metadata. This allows you to determine whether you want to remove the file, or leave it in the module. If you want to remove the file, you must manually remove it from the workspace version and check in the module. This removes the file from the module version on the server.
If there is a file in your workspace that you added with hcm add and that file is not a member of the merged module version, that file remains in an “Added” state; it will be added to the module by your next ci to that module.
Related Topics
315
DesignSync Data Manager User's Guide
Module Branching
ENOVIA Synchronicity Command Reference: ci
ENOVIA Synchronicity Command Reference: hcm mvmember
ENOVIA Synchronicity Command Reference: hcm remove
ENOVIA Synchronicity Command Reference: hcm addhref
ENOVIA Synchronicity Command Reference: hcm rmhref
ENOVIA Synchronicity Command Reference: populate
ENOVIA Synchronicity Command Reference: hcm add
Using Modules with the Submit, Integrate, Test, and Release (SITaR) Methodology
Overview of SITaR Workflow
SITaR (Submit, Integrate, Test, and Release) is a simple workflow for projects that consist of multiple blocks, or modules, developed by several contributors. The workflow is based upon the concept of two distinct project roles:
• Designers contribute to the development of blocks or modules. • Integrators verify the stability of the blocks or modules, and assemble them into
functional packages from which designers continue to develop. This provides a qualified and stable baseline for development work.
By working from a qualified baseline, a designer is able to develop a module within a known, trusted environment. When module development has reached the point where a new version should be available to the entire design team, the Designer submits (the ‘S’ in SITaR) the new version of the module for integration.
At this point the Integrator may chose to integrate (the ‘I’ in SITaR) the new module version into the design. The integration process may include several new module versions submitted by any number of contributors. The integrator tests (the ‘T’ in SITaR) the new module versions within the overall design to ensure that everything functions together. When satisfied with the test results, the Integrator creates a new release (the ‘R’ in SITaR) of the design. This release then becomes the new baseline from which module development continues.
316

Using DesignSync with Modules
Designer and Integration Workspaces
Integration workspaces and Design workspaces should be kept separate. Design work should never be done inside an Integration workspace. Integrators who sometimes do Design work should maintain separate Integration and Design workspaces.
Because Integration workspaces are used to do testing prior to release of a new baseline, it is imperative that contents of the workspace exactly matches what will be released as the baseline. If Design work is being done within an Integration workspace, it is possible for the tests to pass, due to the presence of the Trunk: version of a sub-module in the workspace that is not currently part of the Trunk: version of the container module, and therefore will not be part of the baseline to be created.
Related Topics
SITaR Module Structure
The Designer Role
The Integrator Role
SITaR Module Structure
SITaR provides a simple use model, with a two levels of hierarchy. A project is partitioned into a “Container Module” and a number of connected sub-modules. All of the design work resides in the sub-modules. Hierarchical references (hrefs) within the container module bind the sub-modules together into a functioning system.
Using DesignSync as an example, DesignSync itself is composed of components (sub-modules) that together become the DesignSync product. The DesignSync lead creates
317

DesignSync Data Manager User's Guide
DesignSync as a container module, consisting only of hierarchical references to submodules for each of the products.
Designing and Implementing Your Module Structure
When beginning a SITaR project, you must design your module structure. This includes determining how to partition the design into a number of sub-modules. Usually the project is broken along functional lines. For design data management, however, it is useful to also consider the number of people that will be working on each of the sub-modules. If the team working on an individual sub-module is too large, or does not communicate well, efficient management of the changes to the design can become a burden.
Ideally, there will be a small number of designers assigned to any given sub-module. Keeping the design teams small helps facilitate communication, and minimizes design conflicts that can arise when multiple people are modifying the same design concurrently.
318

Using DesignSync with Modules
SITaR helps facilitate concurrent design of the top-level project, but the sub-module design teams must handle the concurrent design process within any given sub-module.
Related Topics
Overview of SITaR Workflow
Branching in SITaR
SITaR (Submit, Integrate, Test, and Release) supports parallel (Muti-branch) development for the container module and sub-modules in the SITaR methodology.
The Designers can branch any sub-module.
The Integrator can branch the container module, a sub-module, or link a sub-module on any branch to the container module.
Related Topics
Parallel (Multi-Branch) Development
Branching a Sub-Module (Develop role)
Branching a Container or Sub-Module (Integrate role)
ENOVIA Synchronicity Command Reference: sitr mkbranch command
Using SITaR as a SITaR Designer
The Designer Role
Designers work on the design files within the project sub-modules. Design workspaces start with a baseline release of all of the sub-modules.
• Designers use the sitr update command to make individual sub-modules editable within their design workspace, leaving the other sub-modules at the baseline.
• Designers working on a specific sub-module coordinate their work to create a version of the sub-module that is ready to for submittal as part of the new baseline.
• Designers test their sub-module work in progress versus the existing baseline versions of the other sub-modules, or they can selectively fetch specific versions of other sub-modules for testing.
When the lead Designer responsible for a sub-module believes that it is ready, they submit it for integration.
Related Topics
319

DesignSync Data Manager User's Guide
Creating a Workspace
Changing a Sub-Module
Synchronizing a Module with the Baseline
Submitting a Sub-Module for Integration
Synchronizing all Sub_Modules with the Baseline
ENOVIA Synchronicity Command Reference: sitr update
ENOVIA Synchronicity Command Reference: sitr submit
Creating a Workspace
To use a design in the SITaR workflow, a designer must use the sitr populate command to fetch the design into his workspace. The design is represented as a module hierarchy. The top-level or container module name and the path into which it will be fetched are defined by the SITaR environment variables.
Note: You must have already created the directory to store the designer workspace and the name must match the name specified in the SITaR environment variables.
stcl> sitr populate
The sitr populate commands fetches the baseline version of the design.
Note: Before beginning to use SITaR, a designer must define a set of SITaR environment variables that control the behavior of the SITaR commands. For more information, see SITaR Environment Variables.
Related Topics
ENOVIA Synchronicity Command Reference: sitr populate
Editing a Sub-Module
Once the design has been fetched a designer may begin development on one or more of the sub-modules contained in the design. When developing a sub-module, you must change it to a “development” state using the sitr update command.
stcl> sitr update <ModuleName>
The sitr update command above will fetch the latest version of the specified sub-module from the appropriate branch into the workspace, replacing the sub-module version previously fetched as part of the baseline. The contents of the fetched sub-module may
320

Using DesignSync with Modules
now be modified as desired. When modifications are complete, use the DesignSync ci command to check them in and create a new version of the sub-module.
Related Topics
ENOVIA Synchronicity Command Reference: sitr update
ENOVIA Synchronicity Command Reference: populate
Synchronizing a Module with the Baseline
While development work is done on one sub-module, releases of other sub-modules may be submitted and successfully integrated into new baseline releases. The sitr populate command can be used to pick up any new baseline releases of sub-modules that are not in the “development” state of a designer’s workspace, without affecting any development work.
stcl> sitr populate
Related Topics
ENOVIA Synchronicity Command Reference: sitr populate
Submitting a Sub-Module for Integration
When all changes to a sub-module have been checked in and the new sub-module version is ready to share with the design team, the sitr submit command is used to tag the sub-module version and inform the SITaR integrators that it is ready for integration.
Note: If development work on a sub-module is being done in more than one workspace, you must check-in all of the local changes, and populate all of the checked-in changes from other workspaces prior to running sitr submit.
stcl> sitr submit <WorkspaceDir>
The command above will apply DesignSync tag to the latest version of the Trunk branch of the specified sub-module. SITaR has a default naming convention for sub-module tags. The convention takes the form “vX.Y” where X is a major release number and Y is a minor release number. Each time a sub-module is submitted for integration, SITaR automatically increments the minor release number and applies the tag to the latest version on the Trunk branch of the sub-module.
For more information on SITaR version numbers, see the ENOVIA Synchronicity Command Reference: sitr submit help.
Related Topics
321
DesignSync Data Manager User's Guide
ENOVIA Synchronicity Command Reference: sitr submit
Synchronizing all Sub-Modules with the Baseline
Once the designer has submitted the submodule, the integrator is responsible for integrating the new version of the sub-module into the design, testing and releasing a new version of the baseline, if needed.
After a baseline containing the submitted version of the sub-module has been released, the sub-module designers have two options:
1. Continue development of the Trunk: files in the existing sub-module workspaces, and update all of the other sub-modules to the new baseline using the sitr populate command. This allows designers to fetch baseline changes to sub-modules that are not currently under development in their workspace without affecting the sub-modules that are under development. For more information, see Synchronizing a Module with the Baseline.
2. Update all of the sub-modules in their workspaces to match the new baseline.
The –force option to the sitr populate command tells it to “force” the current baseline into a workspace, including replacing all sub-modules that are under development work with their current baseline versions.
stcl> sitr populate –force
If, after forcing the current baseline into a workspace, a designer wants to continue development work on specific sub-modules, the sub-modules should be placed in the “development” state using the sitr update command as described in Changing a Sub-Module.
Related Topics
Changing a Sub-Module
Synchronizing a Module with the Baseline
ENOVIA Synchronicity Command Reference: sitr update
ENOVIA Synchronicity Command Reference: sitr populate
Branching a Sub-Module
The Designer role can use the sitr mkbranch command to create a sub-module branch from any sub-module version.
The sitr mkbranch command can perform the following actions:
322

Using DesignSync with Modules
• Create a branch from any sub-module version. You can specify the version by sync URL, workspace directory, or workspace module instance name.
• Update your local workspace with the new branch version. • Change the local workspace selector to point to the new branch.
The format for the sitr mkbranch command is:
stcl> sitr mkbranch [-populate] <BranchName> <Module>
Related Topics
Branching in SITaR
Parallel (Multi-Branch) Development
ENOVIA Synchronicity Command Reference: sitr mkbranch command
Using SITaR as a SITaR Integrator
The Integrator Role
Integrators maintain the container module. The integration workspaces contain the Latest version of the container module on the specified branch (Trunk: by default).
• Integrators use the sitr lookup command to find module versions that are candidates for integration into the next baseline, including versions of sub-modules submitted for consideration by the designers.
• Integrators use the sitr select and sitr integrate commands to manipulate the sub-module hrefs associated with the Trunk:Latest version of the container module, and to create a container module version that is a candidate for the next baseline.
• Integrators run tests within the integration workspace to insure that the versions of the sub-modules in the candidate version of the container module function properly together.
• If the sub-module versions do not function properly, the Integrators report their findings to the designers. The designers can modify the sub-modules causing the problem and submit new versions, or the integrators can choose different versions of the sub-modules and continue testing.
When the integrators are satisfied with the test results, they release a new baseline version of the container module.
The Integration Workspace
323

DesignSync Data Manager User's Guide
An Integration workspace is used to integrate, test, and release new baselines of the container module. Integration workspaces are inherently different than design workspaces.
Within design workspaces, designers populate the baseline version of the project, and then peform the development work on the Trunk:Latest versions of individual sub-modules.
Within the integration workspaces, integrators manipulate the Trunk:Latest version of the container module, but do not modify the contents of any individual sub-modules. Any sub-module changes must be made in the design workspaces and submitted to the integrator.
Creating an Integration Workspace
To use a design using the SITaR workflow, integrators use the sitr populate command to fetch the Trunk:Latest version of the container module into their workspaces.
stcl> sitr populate
Note: Before beginning to use SITaR, a designer must define a set of SITaR environment variables that control the behavior of the SITaR commands. For more information, see SITaR Environment Variables.
Related Topics
ENOVIA Synchronicity Command Reference: sitr populate
Workflow for Updating the Container Module
The typical flow for an SITaR integrator is:
1. Locate modules versions to be considered for integration into the container module.
2. Select module versions to add or remove from the container module. Note: You select the changes individually, but you can integrate multiple selections with a single integration command.
3. Integrate the selected changes into the Trunk:Latest version of the container module.
4. Test the Trunk:Latest version of the container. 5. If the tests fail, repeat the select/integrate/test process. 6. If the tests pass, Release a new baseline version of the container module.
Related Topics
Locating Submitted Modules for Integration
324
Using DesignSync with Modules
Selecting Sub-Modules for Integration
Integrating Selected Changes into the Container Module
Testing the Integration Version of the Container Module
Releasing a New Baseline
Locating Submitted Modules for Integration
Tthe sitr lookup command displays versions of the existing container sub-modules that have been created submitted (or tagged) since the time that the most recent baseline release was created.
stcl> sitr lookup
The sitr lookup command can also be used to look up the tagged module history of a specified module, or to look up all tagged module version since a specified date and time. For more information, see the ENOVIA Synchronicity Command Reference: sitr lookup command.
Note: The lookup command searches across all modules residing on servers defined in the sync_servers.txt file.
Related Topics
SyncAdmin Help: SyncServer List Files
ENOVIA Synchronicity Command Reference: sitr lookup
Selecting Sub-Modules for Integration
The sitr select command targets tagged module versions for addition to or deletion from the container module. The module is added to the default relative path location specified by the sitr_relpath environment variable, unless the -relpath option is used to select a different relpath. If a sub-module already exists in the relpath selected, the old sub-module is targeted for deletion during the next integration.
stcl> sitr select <module>@<version>
stcl> sitr select -delete <module>@<version>
Note: SITaR does not allow overlapping modules. If you try to add a module to a relpath that already contains a module, SITaR replaces the existing module with the selected module.
325

DesignSync Data Manager User's Guide
For a list of the current selected changes, specifying ‘sitr select’ with no arguments:
stcl> sitr select
Note: at any time you can clear all of the selected changes by either exiting DesignSync, or by using the –clear option to sitr select:
stcl> sitr select –clear
Tip: The sitr update command assumes all editing is done on the Trunk branch, however SITaR allows integrators to select any tagged version of a sub-module, including versions that are on a non-Trunk: branch. To provide a stable workflow, you should avoid integrating non-Trunk: versions of a sub-module into the container. If you decide to integrate a non-Trunk version however, you should only be do it if there are no plans to change the contents of the associated sub-modules for the project.
Related Topics
ENOVIA Synchronicity Command Reference: sitr select
Integrating Selected Changes into the Container Module
After the changes for integration have been selected, you integrate them into the Trunk:Latest version of the container by using the sitr integrate command. Then you populate the new contents of the container into the integration workspace.
stcl> sitr integrate
Related Topics
ENOVIA Synchronicity Command Reference: sitr integrate
Testing the Integration Version of the Container Module
The sitr integrate command updates the Trunk:Latest version of the container, but does not release a new baseline. The SITaR workflow assumes that after the sitr integrate command is used to create the new Trunk:Latest version of the container into an integration workspace, the Integrator will run tests on the contents of the workspace to ensure that everything functions properly together.
326
Using DesignSync with Modules
If there are problems with the sub-modules being integrated, the integrators can either contact the appropriate designers to have them update and submit new versions of the problem sub-modules, or re-execute the sitr select/sitr integrate process to try different combinations of different versions of the sub-modules to attempt to create a version of the container module that passes the tests.
Releasing a New Baseline
Once the new Trunk:Latest version of the container module passes all necessary tests, the Integrator can establish a new baseline using the sitr release command. Creating a new release of the baseline increments the version tag associated with the current baseline release and applies the new tag to the Trunk:Latest version of the container module. It also updates the baseline tag defined by the SITaR environment variables to the appropriate version of the container module so developers can populate their workspaces with the latest baseline.
stlc> sitr release
Note: For more information on SITaR version tags, see the ENOVIA Synchronicity Command Reference: sitr submit command help.
Related Topics
Synchronizing all Sub-Modules with the Baseline
ENOVIA Synchronicity Command Reference: sitr release
Branching a Container or Sub-Module
The Integrator can use the sitr mkbranch command to branch either a container module or sub-module.
The sitr mkbranch command can perform the following actions:
• Create a branch from the specified container or sub-module version. You can specify the version by sync URL, workspace directory, or workspace module instance name.
• Update your local workspace with the new branch version. • Change the local workspace selector to point to the new branch. • Integrate the newly created sub-module into the container module.
The format for the sitr mkbranch command is:
stcl> sitr mkbranch [-populate] [-integrate] <BranchName> <Module>
Related Topics
327
DesignSync Data Manager User's Guide
Branching in SITaR
Parallel (Multi-Branch) Development
ENOVIA Synchronicity Command Reference: sitr mkbranch command
Configuring SITaR
SITaR Environment Variables
SITaR uses environment variables to simplify the SITaR command options by defining default behaviors and roles.
Most of the SITaR commands cannot run if the SITaR environment variables are not defined.
The SITaR environment variables are:
sitr_role Defines the SITaR role for the user. There are 2 possible values:
• Design - Users modifying the individual sub modules • Integrate - Users defining and maintaining the container module
An example of setting the environment variable is:
export sitr_role=Design
sitr_container Defines the name of the container module for the project, for example:
export sitr_container=projxContainer
Note: This documentation uses ‘projxContainer’ as the name of the container project to be unambiguous about which module is the container module. In practice, the container module can have any desired name.
sitr_alias Defines the name of the tag used by SITaR to define the latest qualified ‘baseline’ release of the container module, for example:
export sitr_alias=baseline
sitr_server Defines the URL for of the server hosting the container module, for example:
328

Using DesignSync with Modules
export sitr_server=sync://syncServer1:2647
Note: The ‘sitr_server’ is the first server searched by the ‘sitr lookup’ and ‘sitr select’ commands, and the default server used by the ‘sitr mkmod’ command.
sitr_workdir Defines the workspace directory of the container module, for example:
export sitr_workdir=~/Workspaces/projxContainer
sitr_relpath Defines the default relationship between the container module workspace directory (defined by sitr_workdir), and the base directory of each sub module.
There are two possible values for sitr_relpath:
• Cone - Indicates that the default directory structure is hierarchical. Each of the sub modules is placed in a sub directory of the sitr_workdir, for example:
If you have sub modules named “ALU” and “memory” their default relative paths are: ./ALU and ./memory, and, given sitr_workdir=~/Workpaces/projxContainer, their base directories are:
~/Workspaces/projxContainer/ALU
~/Workspaces/projxContainer/memory
• Peer - Indicates that the default directory structure is flat. Each of the sub modules is placed in directories parallel to sitr_workdir, For example:
If you have sub-modules “ALU” and “memory”, their relative paths are ../ALU and ../memory, and, given sitr_workdir=~/Workspaces/projxContainer, their base directories are:
~/Workspaces/ALU
~/Workspaces/memory
An example of setting the environment variable is:
export sitr_relpath=Cone
sitr_branch Defines the default branch of the container module. This default is used by the sitr integrator for the sitr integrate and sitr release commands. If the variable is not defined, "Trunk" is used as the default branch.
329

DesignSync Data Manager User's Guide
An example of setting the environment variable is: export sitr_branch=rel2.6
Note: The examples above show setting the environments on UNIX in bourne shell (sh).
Tip: Create project specific setup files that define the SITaR environment variables. User’s can then “source” the appropriate project setup file prior to executing any SITaR commands. This reduces setup time, minimizes the possibility of user error, and guarantees that all users are using a controlled environment defined for them.
Related Topics
Sample SITaR Environment Variable File
ENOVIA Synchronicity Command Reference: sitr env
Sample SITaR Environment Variable File
This example shows a SITaR environment variable file for the Designer team. This example assumes a UNIX csh environment.
setenv sitr_role Design
setenv sitr_container projxContainer
setenv sitr_alias baseline
setenv sitr_server sync://syncServer1:2647
setenv sitr_workdir ~/Workspaces/projxContainer
setenv sitr_relpath Cone
Related Topics
SITaR Environment Variables
Creating a SITaR Container Module
The SITaR container modules "contain" the sub modules that make up the design. Usually, the container module only has hrefs to sub modules. All design files should reside within the sub modules and not within the container module.
To create a container module you:
330

Using DesignSync with Modules
1. Set up the SITaR environment variables as described in the SITaR Environment Variables topics.
2. Execute the sitr mkmod command with the –top option
sitr mkmod –top
The SITaR environment variables are used to create the specified SITaR container module on the specified SITaR server.
After the SITaR container module has been created, the individual sub modules can be created and/or integrated in to the container module.
Related Topics
Creating a SITaR Sub-Module
ENOVIA Synchronicity Command Reference: sitr mkmod
Creating a SITaR Sub-Module
All design work should reside inside the sub modules of a SITaR project. The SITaR sub-modules are created with the sitr mkmod command.
stcl> sitr mkmod -name <Module>
When the sitr mkmod command creates a sub module, it tags the Trunk:Latest version of the module as v1.1, and submits it for integration. If the module does already exist, the v1.1 module version tagged is empty.
Note: You may need to populate your workspace to see the module.
Examples of using the sitr mkmod command
The ‘sitr mkmod’ command can be used to:
• Create a new/empty module on the default SITaR server. sitr mkmod –name ALU
• Create a new/empty module on a server that is not the default SITaR server. Exp: sitr mkmod –vaultpath sync://syncServer2:2647/Modules/ALU2
• Define an existing module as a SITaR module.
331

DesignSync Data Manager User's Guide
sitr mkmod –vaultpath sync://syncServer2:2647/Modules/OLD_ALU
Related Topics
SITaR Environment Variables
Creating a SITaR Container Module
ENOVIA Synchronicity Command Reference: sitr mkmod
ENOVIA Synchronicity Command Reference: sitr env
Creating an Initial Baseline Release
After the container module and desired sub modules have been created, an integrator should create the initial baseline release of the project to release to the designers. This allows them to begin working in a SITaR workflow environment.
To create the initial baseline release:
1. Define all the SITaR environment variables for the integrator as described in SITaR Environment Variables.
2. Use the ‘sitr select’ command to select all of the versions of the sub modules being added to the container.
3. Use the ‘sitr integrate’ command to integrate the selected sub modules into the Trunk: version of the container module, and populate the Trunk: version into their integration workspace.
4. Run any necessary tests on the Trunk: version of the container.
5. Use the ‘sitr release’ command to release the v1.1 version of the container.
Example of creating a baseline configuration:
You are the integrator of the projx project and you want the initial baseline release of projx to have 3 sub modules:
projx - To contain the top level design files for projx
ALU - To contain the ALU design files
memory - To contain the memory design files.
332

Using DesignSync with Modules
You have used ‘sitr mkmod’ to create the initial release of both the projx and ALU sub modules, and you are using the v1.5 version of the memory module.
You have defined a cone structure for your SITaR environment. Your workspace directories should look like this:
~/Workspaces/projxContainer/projx
~/Workspaces/projxContainer/ALU
~/Workspaces/projxContainer/memory
Within DesignSync, select the appropriate module versions for addition into the projxContainer module at the default relative path of each sub module:
stcl> sitr select [email protected]
stcl> sitr select [email protected]
stcl> sitr select [email protected]
Note: If you are unsure what modules are available to be integrated, use the sitr lookup command.
Integrate the above selections into the Trunk: version of the projxContainer module, and populate this version into the integration workspace.
stcl> sitr integrate
Test the Trunk: version of the projxContainer module, if necessary. Create the v1.1 release of the projxContainer module, and tag it as the ‘baseline’ release.
stcl> sitr release
The baseline release is now ready to be used by the designers in a development environment.
Related Topics
SITaR Environment Variables
Creating a SITaR Container Module
Creating a SITaR Sub-Module
ENOVIA Synchronicity Command Reference: sitr lookup
333
DesignSync Data Manager User's Guide
ENOVIA Synchronicity Command Reference: sitr select
ENOVIA Synchronicity Command Reference: sitr integrate
ENOVIA Synchronicity Command Reference: sitr release
Branching a Container or Sub-Module
The Integrator can use the sitr mkbranch command to branch either a container module or sub-module.
The sitr mkbranch command can perform the following actions:
• Create a branch from the specified container or sub-module version. You can specify the version by sync URL, workspace directory, or workspace module instance name.
• Update your local workspace with the new branch version. • Change the local workspace selector to point to the new branch. • Integrate the newly created sub-module into the container module.
The format for the sitr mkbranch command is:
stcl> sitr mkbranch [-populate] [-integrate] <BranchName> <Module>
Related Topics
Branching in SITaR
Parallel (Multi-Branch) Development
ENOVIA Synchronicity Command Reference: sitr mkbranch command
Setting Up a Module Workspace
Setting a Workspace Root
This command allows you to designate the workspace directory to be used as a storage area for a set of local metadata information for a collection of modules. This metadata will include information about the module instance name which is the unique name that identifies a module version in a workspace area. Setting a workspace root does not create modules metadata. Setting a workspace root only creates the area where you will populate or create modules sometime in the future.
334
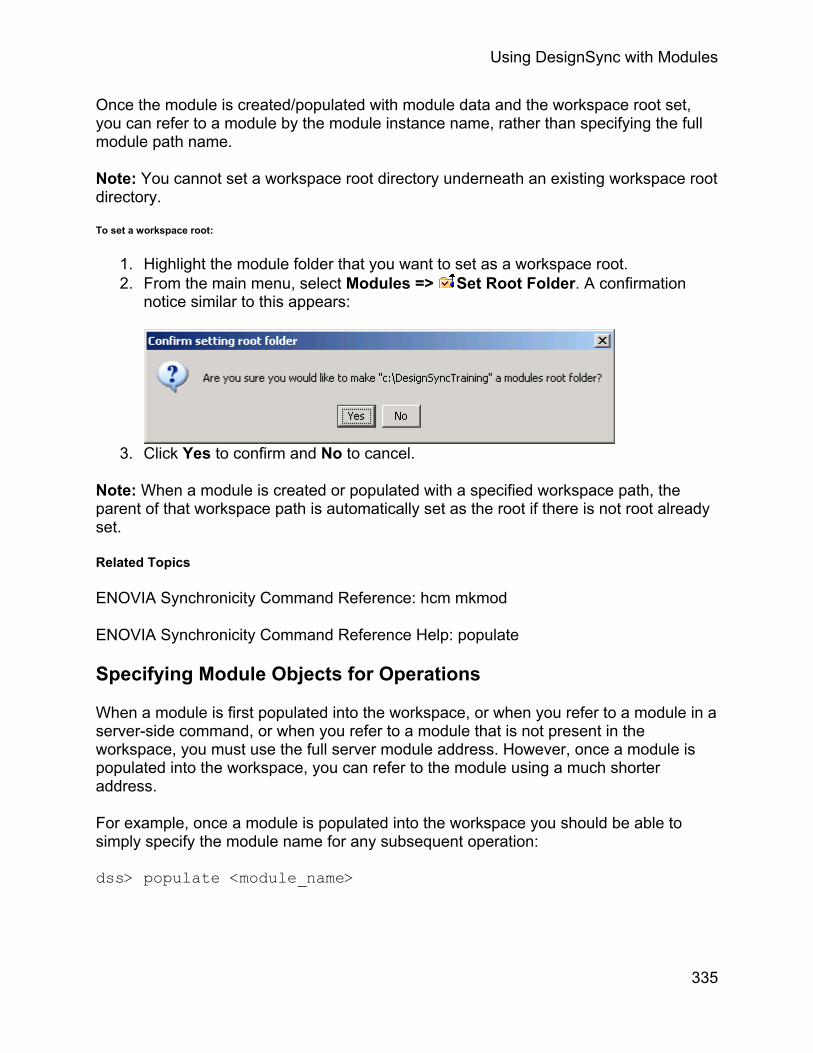
Using DesignSync with Modules
Once the module is created/populated with module data and the workspace root set, you can refer to a module by the module instance name, rather than specifying the full module path name.
Note: You cannot set a workspace root directory underneath an existing workspace root directory.
To set a workspace root:
1. Highlight the module folder that you want to set as a workspace root. 2. From the main menu, select Modules => Set Root Folder. A confirmation
notice similar to this appears:
3. Click Yes to confirm and No to cancel.
Note: When a module is created or populated with a specified workspace path, the parent of that workspace path is automatically set as the root if there is not root already set.
Related Topics
ENOVIA Synchronicity Command Reference: hcm mkmod
ENOVIA Synchronicity Command Reference Help: populate
Specifying Module Objects for Operations
When a module is first populated into the workspace, or when you refer to a module in a server-side command, or when you refer to a module that is not present in the workspace, you must use the full server module address. However, once a module is populated into the workspace, you can refer to the module using a much shorter address.
For example, once a module is populated into the workspace you should be able to simply specify the module name for any subsequent operation:
dss> populate <module_name>
335
DesignSync Data Manager User's Guide
However, it is important to note that DesignSync supports overlapping modules some of which may have the same name contained within a single module base directory or underneath the same workspace root.
For example, it is possible that your workspace root may contain two modules named Chip (either populated from different servers, or populated as different versions of the same module). To differentiate between workspace modules of the same name, you need to address the module using its module instance name.
Module Instance Name
DesignSync uses module instance names to identify each module as it is populated into the workspace. Set automatically by the server when the module is populated, the module instance name is guaranteed to be a unique identifier for a module within a workspace root directory. The module instance name cannot be specified or changed by the user. The format of the module instance name is:
<module name>%<integer>
For example, if you populate module “Chip” into your workspace, and there are no other modules named “Chip” present under the workspace root, it will automatically receive the module instance name “Chip%0”. If another module named “Chip” is subsequently populated into a directory under the same workspace root, it would receive the module instance name of “Chip%1”.
The full workspace address of a module in a workspace takes the form:
<module base directory>/<module instance name>
Note: It is important to realize that this is the full unique workspace address. In general, it is rare that this form of address will need to be used as an argument to a DesignSync command.
For example, the module ModA is populated into the module base directory /home/joe/Modules/subdir and is assigned the module instance name “ModA%0”. The full workspace address of the module will be:
/home/joe/Modules/subdir/ModA%0
Note: It is the module instance name that is used here, not the module name.
Addressing a Module Object in the Workspace
There are many ways you can address a module in the workspace. DesignSync commands will accept any of the following, and will attempt to resolve the module name automatically:
336

Using DesignSync with Modules
• The module instance name, providing that the current directory is somewhere below the workspace root directory
• The module name, providing that the current directory is somewhere below the workspace root directory. Note: This may not be unique if multiple modules were fetched with the same module name. If a non-unique module name is specified, an error is reported.
• The full workspace address of the module, which is guaranteed to be unique. The full workspace address is the preferred method when needing to reference a module outside the current workspace root.
• The module base directory, although this may not be unique enough to reference a module, as multiple modules may be fetched into the same base directory. If a module base directory is given, then all objects under that directory will be operated on, if the command is operating recursively.
Note: Specifying a module base directory does not actually identify a specific module. A module base directory is not appropriate for a command that requires a module as an argument.
Example
Suppose a workspace, /home/joe/Modules, has the following modules populated into it, all with the same base directory:
Module instance “ModA%0” of module “ModA” from server address sync://granite:2647/Modules/ModA;
Module instance “ModB%0” of module “ModB” from server address sync://granite:2647/Modules/ModB;
Module instance “ModB%1” of module “ModB” from server address sync://onyx:2647/Modules/ModB;
Module instance “ModC%0” of module “ModC” from server address sync://onyx:2647/Modules/ModC;
Then the following matches apply, assuming the current working directory is anywhere below the workspace root directory:
dss> <command> ModA Matches the single module ModA by its module name
dss> <command> ModB%1 Matches the single module ModB%1 by its instance name
dss> <command> ModC Matches the single module ModC by its module name
337

DesignSync Data Manager User's Guide
dss> <command> ModB Matches two modules by their module name, and will fail as being ambiguous.
dss> <command> /home/joe/Modules Matches the base directory, but if it is a directory operation, it will continue and run on all five modules if running recursively.
dss> <command> Mod* No match. Wildcards on the command line cannot be used to match modules
dss> <command> /home/ian/Modules/ModB%0 Matches the single module ModB%0 by its full unique workspace address.
dss> select ModA This selects the module, and a “select –show” then reports /home/joe/Modules/ModA%0
Addressing Hierarchical References in the Workspace
When a hierarchical reference is created from a module, it is given a name. This name can be specified by the user when the hierarchical reference is created and must be unique within the module. If a name is not specified when the hierarchical reference is created, the name will default to the leaf name of the object that is being referenced.
Since hierarchical references have names, we can now address them within the module version. This is achieved for commands that accept hierarchical references as arguments by specifying the hierarchical reference name and a module context:
populate –modulecontext Chip ALU
The above command would populate the module referenced by the ALU hierarchical reference of module Chip. Clearly, there is a possible name clash here, as the module may contain objects or folders called “ALU” as well as the hierarchical reference called ALU. The hierarchical reference name will take precedence.
Note that wildcard matching is supported when specifying hierarchical reference names when module context is supplied. For example, the command:
populate –modulecontext Chip AL*
would match the ALU hierarchical reference.
Setting Persistent Populate Filters
338

Using DesignSync with Modules
The Set persistent populate filters dialog box is used to create the filters that will be applied each time a module is populated. These filters controls what is and is not populated into your workspace from the module during the populate command.
Note: A persistent populate filter is also set when a module is initially populated by the command line when the –filter and/or -hreffilter switches are used with the populate command.
To set a persistent filter for future populate commands for a module:
1. Select the workspace module in the List View pane or the Tree view for which you want to set the persistent filters.
2. Select Revision Control => Set Persistent Populate Filters. 3. Enter information or select options as needed from the Set persistent populate
filters dialog box. 4. Click OK to confirm.
Click on the fields in the following illustration for information on each field.
Field Descriptions
Module context
Expanding the list-box shows the available module instances for the currently selected base folder. All available module instances are listed alphabetically in the pull-down. Note: There may only be one module listed.
Filter
This field defaults to the current filter setting for the selected workspace module. Enter the expressions that will include and exclude the module members to be populated into
339

DesignSync Data Manager User's Guide
your workspace during future populate commands. To remove existing filters, just delete the existing text.
Href Filter
This field defaults to the current hierarchical reference filter setting for the selected workspace module. Enter the hierarchical reference expressions that will exclude the hierarchical references to be populated into your workspace during future populate commands. To remove existing filters, just delete the existing text.
Animated Examples
Filtering
Persistent populate filter
Related Topics
Filtering Module Data
Filter Field
Href Filter Field
ENOVIA Synchronicity Command Reference: populate
ENOVIA Synchronicity Command Reference: setfilter
Populating Your Work Area
If you have just joined a project, you need to use Populate to check out all the objects from that project into your local working folder. You typically want to populate recursively (using the Recursive option), which traverses a vault folder and recreates the vault folder hierarchy in your work area. You can also use the Workspace Wizard to help you join a project.
The default mode for populate fetches Unlocked copies of objects, unless you have saved a different object state setting with the Save Settings button, or your project leader has defined a default fetch state. See Saving the Setting of an Object's State and SyncAdmin Help: Default Fetch State for information on these two conditions.
After you have initially populated your work area, you need to populate periodically to update your local files, because the vault might have changed since your previous populate. For example, another user might have checked in new design objects or new versions of objects that are already in your work area. Generally, you can perform an incremental populate for these periodic updates. If you need to change the states of
340

Using DesignSync with Modules
files in your work area (for example, if you are changing from locked to unlocked files, or unlocked files to links to the cache), you should perform a full populate. An incremental populate updates only those local folders whose corresponding vault folders have changed, which is faster than a full populate operation. DesignSync performs an incremental populate by default whenever possible, although it automatically reverts to a full populate when necessary. See the ENOVIA Synchronicity Command Reference:populate command description for the circumstances where DesignSync automatically performs a full populate and for the circumstances where you might choose to specify a full populate.
You can select these types of data for the populate operation:
• A DesignSync folder • A managed DesignSync (non-module) object • A module that is already in your workspace (for an update of your workspace) • A server module, server module branch, or server module version (for an initial
populate of a workspace) • An href that is already in your workspace
Note: You cannot select an href on the server; to select an href, you must populate the entire module from the server, or filter the data that is fetched. Specifying an href for a populate is equivalent to specifying the relevant submodule directly. By specifying an href, the submodule (and the version to be fetched) is identified via the parent module. Specifying an href enables you to fetch a submodule of a module, without necessarily knowing where that module is sourced from, or what version is appropriate. You can only specify the hrefs directly in the module being addressed, not in its submodules. Selecting an href in your workspace as the object to populate sets the module context accordingly, disabling the Module context field.
• A module folder that is already in your workspace
Note: You cannot select a module folder on the server; to select a module folder, you must populate the entire module from the server, or filter the data that is fetched.
• A module member that is already in your workspace
Note: You cannot select a module member on the server; to select a module member, you must populate the entire module from the server, or filter the data that is fetched.
• A legacy module already in your workspace • A legacy module configuration on the server
341
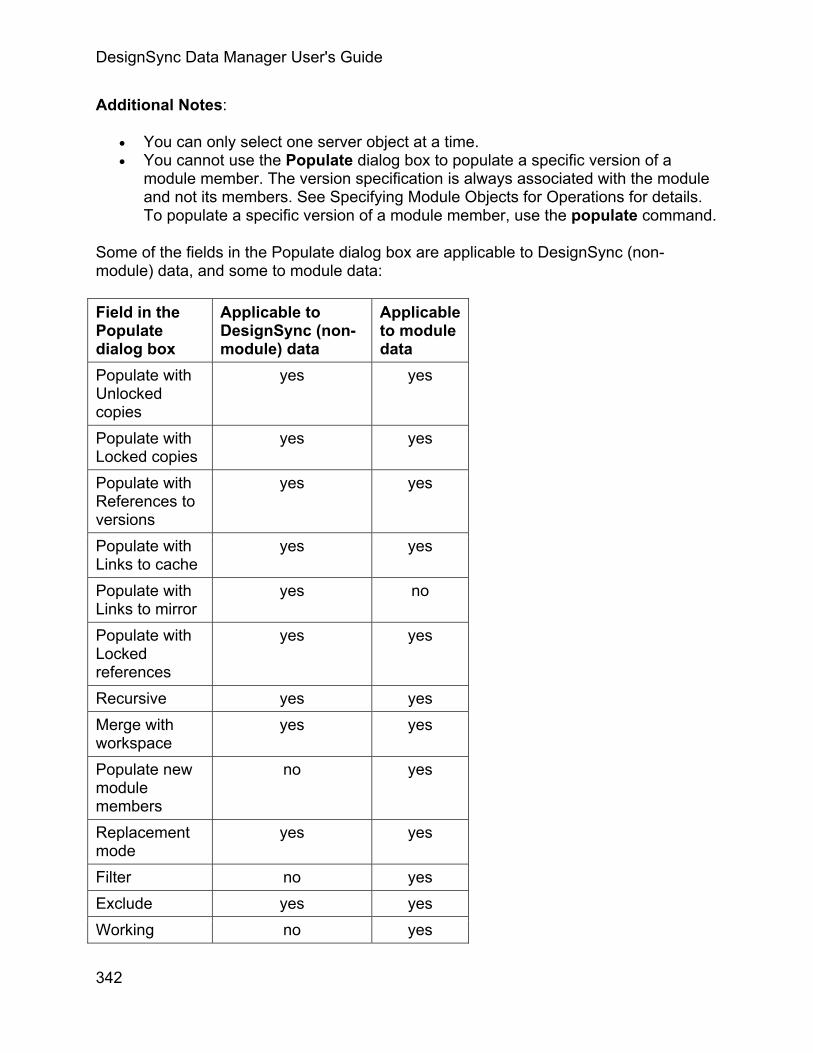
DesignSync Data Manager User's Guide
Additional Notes:
• You can only select one server object at a time. • You cannot use the Populate dialog box to populate a specific version of a
module member. The version specification is always associated with the module and not its members. See Specifying Module Objects for Operations for details. To populate a specific version of a module member, use the populate command.
Some of the fields in the Populate dialog box are applicable to DesignSync (non-module) data, and some to module data:
Field in the Populate dialog box
Applicable to DesignSync (non-module) data
Applicable to module data
Populate with Unlocked copies
yes yes
Populate with Locked copies
yes yes
Populate with References to versions
yes yes
Populate with Links to cache
yes yes
Populate with Links to mirror
yes no
Populate with Locked references
yes yes
Recursive yes yes Merge with workspace
yes yes
Populate new module members
no yes
Replacement mode
yes yes
Filter no yes Exclude yes yes Working no yes
342

Using DesignSync with Modules
directory Module context no yes Report mode yes yes Retain timestamp
yes yes
Unify workspace state
yes yes
Incremental populate
yes not typically
Populate empty directories
yes no
Href filter no yes Href mode no yes Version yes yes Overlay version in workspace
yes yes
Keys yes yes Local Versions no yes Module Cache Mode
no yes
Module Cache Paths
no yes
Trigger Arguments
yes yes
To interrupt a populate operation, Click the Stop button. DesignSync completes the processing of any objects being populated, before stopping the command. See the ENOVIA Synchronicity Command Reference: interrupt command line topic for more information.
Click on the fields in the following illustration for information.
343

DesignSync Data Manager User's Guide
344

Using DesignSync with Modules
Populate Field Descriptions
Populate with Unlocked copies
After the operation is over, keep an unlocked copy in your work area. This is the default unless your project leader has defined a default fetch state.
Because you have relinquished any lock you may have had on the object, someone else can check the object out from the vault with a lock in order to modify it.
The Unlocked files are checked out in Read Only mode option from the Tools => Options => General dialog box determines whether these files are read/write or read-only.
345

DesignSync Data Manager User's Guide
Populate with Locked copies
After the operation is over, keep a locked copy in your work area. You can continue to work on the object. Others cannot check in new versions of the object as long as you have the branch locked. (The copy in your work area is known as an original.) This option is not available for legacy modules or legacy module configurations. When operating on 5.0 modules, it is module members that are locked; not whole modules. Thus, this option is mutually exclusive with the Recursive option, or with a Module context specified. To lock a module, use the Modules => Lock Branch dialog box, or the hcm lock command. See Locking Module Data for details.
Populate with References to versions
This option lets you acquire references to the versions you have selected.
Tip: Do not use this option when operating on a collection object. If you use this option, DesignSync creates a reference in the metadata for the collection object, but member files are not processed and are not included in the metadata.
Populate with Links to cache
Use this option to link to a shared copy of the design object in a cache directory. This option is available only on UNIX platforms.
Populate with Links to mirror
Use this option to link to a shared copy of the design object in a mirror directory. This option is available only on UNIX platforms. This option is not available for module data.
Populate with Locked references
This option lets you acquire a locked reference. If you intend to regenerate the object, create a locked reference to avoid fetching a copy of the object from the vault. This option is not available for legacy modules or legacy module configurations. For other module data, this option is mutually exclusive with the Recursive option, or with a Module context specified.
Merge with workspace
Select this option if you want to merge the Latest version of an object in the vault with a locally modified version. This option supports the merging work style where multiple team members can check out the Latest version of an object for editing. The first team member to check his changes in creates the next version; other team members merge their local changes with the new Latest version, and then check the merged version in. To learn how the Merge with workspace option operates on module data, see Merging Module Data.
346

Using DesignSync with Modules
If there are no conflicts, then the merge succeeds, leaving you the merged file in your work area. If there are conflicts, a warning message results. You must edit the merged file to resolve the conflicts before DesignSync allows you to check in the merged version. Conflicts are shown as follows:
<<<<<<< local
Lines from locally modified version
=======
Lines from Latest version
>>>>>>> versionID
The conflicts are considered resolved when the file no longer contains any of the conflict delimiters (7 less-than, greater-than, or equal signs in the first column). The Status column of the List View and the ls command indicates if a file has unresolved conflicts.
Populate new module members
This option only applies to module data. If selected, the populate operation fetches objects that are in the vault, but not currently in the workspace (subject to the Filter and Exclude fields). This is the default behavior. If unselected, the populate operation updates only objects already in the workspace.
Replacement mode
The Replacement mode determines how the populate operation updates your work area with the data you are fetching. Specify one of the following update methods:
• Do not replace any objects. For DesignSync data, do not overwrite locally modified files. Do not remove files that do match the requested version. For module data, preserve local modifications you made to module members, and leave intact any module members that are in your work area that are not in the requested module version.
This mode causes the least disruption to your work area; however, it may require you to clean up resulting work area data.
• Replace unmodified objects only. This replacement mode does not apply to DesignSync data. DesignSync data will not be replaced. For module data, update module members that have not been locally modified
347

DesignSync Data Manager User's Guide
and that are part of the requested module version. Also remove any unmodified module members that are not part of the requested module version.
This mode, which is the default behavior for module data, leaves intact any module members you have modified in your workspace
• Force overwrite of modified objects. For DesignSync data, overwrite locally modified files. Also remove managed objects that do not match the requested selector. For module data, replace or remove module members, regardless of whether you have modified them locally or whether they are part of the requested module version.
The intent of this mode is to make the workspace match the data being requested (subject to the Filter and Exclude fields), as closely as possible. Unmanaged data is never removed. This mode removes items that have been added to a module but have not yet been checked in; their "added" indicator is removed. The data, which is unmanaged, is not removed. See Adding a Member to a Module for information adding members to modules. If there is a conflict with data fetched from another module, that other data is not removed. See Conflict Handling for details. If populating a module overlaps with another module already in your workspace, data from that other module is not removed. This mode is mutually exclusive with the Merge with workspace option.
The Replacement mode only applies to items that are not filtered out by the Href filter, Filter or Exclude options.
Working directory
This field is used when initially populating a workspace with a module from a server. The Working directory field only applies when a server module is selected as the object to populate. Specify the path to the directory in your work area where you want the fetched module to reside. Click Browse to select the work area where you want to place the module. You can also type the absolute path to the directory.
Note: If you are populating a directory with links to a module cache, the Working directory must be new (uncreated).
Report mode
348

Using DesignSync with Modules
For the Report mode, choose the level of information to be reported:
Brief output: Report error messages. For module data, also report the success/failure/skip status of each submodule.
Normal output: In addition to the information reported in Brief mode, output informational messages for objects that are updated by the populate operation and messages for objects excluded from the operation (due to exclusion filters or explicit exclusions). For module data, also output information about all objects that are fetched. This is the default report mode.
Verbose output: In addition to the information reported in Normal mode, output an informational message for every object examined but not updated. For module data, also output information about all objects that are filtered.
Incremental populate
Perform a fast populate operation by updating only those folders whose corresponding vault folders have been modified. DesignSync performs an incremental populate by default whenever possible, although it automatically reverts to a full populate when necessary.
To change the default populate mode, your DesignSync administrator can use the SyncAdmin tool, or you can use the Save Settings button to override the default mode.
Note: This option by itself does not cause state changes of objects in your work area (for example, changing from locked to unlocked objects or unlocked objects to links to the cache). DesignSync changes the states of updated objects only. Furthermore, for an incremental populate, DesignSync only processes folders that contain updated objects, so state changes are not guaranteed. Select Unify workspace state to change the state of objects in your work area.
For incremental populate operations: If you exclude objects during a populate, a subsequent incremental populate will not necessarily process the folders of the previously excluded objects. DesignSync does not automatically perform a full populate in this case. To guarantee that previously excluded objects are fetched, turn off the Incremental populate check box for the subsequent populate operation.
This option usually is not relevant for module data. However, there are two circumstances in which you should deselect this option for a full populate of module data:
• To re-fetch data that was manually removed. The Unify workspace state option also re-fetches such data, but for missing
349

DesignSync Data Manager User's Guide
objects to be considered for the operation, you must deselect the Incremental populate option.
• To re-fetch objects that are unchanged from the current module version to the new one, but for which the version in the workspace is incorrect. For example, let's say there is a module Chip, containing the member alu.v . You have version 1.4 of the module Chip. The Latest version of the module is 1.5. There is no change to the file alu.v between module Chip versions 1.4 and 1.5; alu.v is version 1.3 in both module versions. However, you actually have version 1.2 of alu.v, having specifically fetched that file from a previous Chip module version 1.3. In this case, an incremental populate of the module would not re-fetch the 1.3 version of alu.v. A full populate is required to re-fetch the 1.3 version of alu.v.
Unify workspace state
Sets the state of all objects processed, even up-to-date objects, to the specified state (Unlocked copies, Locked copies, References to versions, Links to cache, Links to mirror, Locked references) or to the default fetch state if no state option is specified. See SyncAdmin Help: Defining a Default Fetch State for more information. If turned off, DesignSync changes the state of only those objects that are not up-to-date. If checked, DesignSync changes the state of the up-to-date objects, as well.
The Unify workspace state check box:
• Does not change the state of locally modified objects; select the Replacement Mode setting Force overwrite of modified objects to force a state change and overwrite the local changes.
• Does not change the state of objects not in the configuration; use the Replacement Mode setting Force overwrite of modified objects to remove objects not in the configuration.
• Does not cancel locks. To cancel locks, you can check in the locked files, select Revision Control =>Cancel Checkout to cancel locks you have acquired, or select Revision Control =>Unlock to cancel team members' locks.
Note:
The Unify workspace state option is ignored when you lock design objects. If you check out locked copies or locked references, DesignSync leaves all processed objects in the requested state.
Populate empty directories
Determines whether empty directories are removed or retained when populating a directory. Select this option to retain empty directories.
350
Using DesignSync with Modules
If you do not select this option, the populate operation follows the DesignSync registry setting for "Populate empty directories". This registry setting is by your DesignSync administrator using the SyncAdmin tool. By default, this setting is not enabled; therefore, the populate operation removes empty directories.
This option is not applicable to module data. See Directory Versioning for background. To prevent specific empty directories from being created by the populate, use the Filter field.
Href mode
The Href mode option lets you specify how hierarchical references should be evaluated in order to identify the versions of submodules to reference when populating a module recursively. This field is only available when operating on module data.
Normal mode: Examines the href's selector. If the href's selector represents a static version (a numeric version, a version tag, or a list of such items), the populate fetches the submodule using the selector. In this case, the populate uses Static mode for referencing subsequent levels of hierarchy. If the href's selector does not represent a static version, the populate still fetches the submodule using the selector, but continues to use Normal mode for referencing subsequent levels of hierarchy. This is the default Href mode.
Static mode: Populates the static version of the submodule that was recorded with the href at the time the parent module's version was created.
Dynamic mode: Evaluates the selector associated with the href to identify the version of the submodule to populate.
The Href mode option is mutually exclusive with the option to fetch Locked copies.
Version
Specify the version number or tag (or any selector or selector list) of the objects on which to operate.
For DesignSync folders, this field is set to the folder's persistent selector list by default. The Version field has a pull-down list containing suggested selectors; see Suggested Branches, Versions, and Tags for details.
For module data, if module members are selected as the objects to populate, all of the module members must belong to the same module. And, that module must be specified in the Module context field.
Note: Modules do not support auto-branching, so for module data, the Version field can not contain the auto() construct.
351

DesignSync Data Manager User's Guide
When populating module data, specifying a Module Version value never changes the workspace selector, even for the initial populate of a module. To set or change the workspace selector, use the setselector command.
If the only items selected to populate are module member files in the workspace, and all of the selected members are members of the same module, the Version field is replaced by a Module Version field. And, the Module context field will be disabled, because you are populating the selected member files as they existed in a specific version of the module.
If a legacy module on a server is selected as the object to populate, the Version field is replaced by a Configuration field, with a default value of "<Default>" (the default configuration). You can select a different configuration of the module from the pull-down list.
If a legacy module configuration on a server is selected as the object to populate, the Version field is also replaced by a Configuration field. The field's value is set to the configuration that was selected as the object to populate.
If a legacy module already in your workspace is selected as the object to populate, the Version field is replaced by a Configuration field. The value of the field defaults to the currently fetched configuration. You can select a different configuration of the same module from the pull-down list. If you change the configuration to be populated, the Recursive option and the Replace unmodified objects only mode are both selected.
Overlay version in workspace
For DesignSync data, if this option is selected, the version specified in the Version field is used to indicate the version to be overlaid on the work area. Overlaying a version does not change the current version status as stored in the workspace metadata. The Overlay version in workspace option is often used in conjunction with the Merge with workspace option, to merge one branch onto another.
To find out how the Overlay version in workspace option operates on module data, see Overlaying Module Data.
Module cache mode
This field only applies to module data. A populate operation can link to data in a module cache instead of fetching data from the server, to help decrease fetch time and save disk space.
• Link to module cache. (UNIX only) Creates a symbolic link from your workspace to the base directory of a module in the module cache. This is the default mode on UNIX platforms.
352

Using DesignSync with Modules
Note: To use this option, the Working directory must be empty. In order to guarantee that the workspace is empty, the GUI client requires that the Working directory not already exist for the initial mcache populate. The command line does not enforce this, but overwrites any duplicate files in the workspace.
• Copy from the module cache. Copies a module from the module cache to your work area. Notes:
o This mode is the default mode on Windows platforms. o This mode only applies to legacy modules.
• Fetch from the server. Fetches modules from the server.
This option overrides the default module cache mode registry setting. If the registry value does not exist, the Module Cache Mode selection defaults to Link to module cache (UNIX platforms) or to Copy from the module cache (Windows platforms).
Note: When a link to an mcache is created, the fetch mode, specified by the "Populate with" option, is ignored and the module is fetched according to Module cache mode settings.
Module Cache Paths
This field only applies to module data. Use the Module Cache Paths field to specify paths to the module caches that the populate operation searches, when using a Module Cache Mode. If your project leader defined a default module cache path (or paths), the Module Cache Paths field will be preset with that default path (or paths).
Click Browse... to select one or more paths. When a path is selected with the Browse... pop-up dialog box, the selected path is added to the end of the Module Cache Paths field.
You can also type paths into the Module Cache Paths field. You must specify the absolute path to each module cache. To specify multiple paths, separate paths with a comma (,). The paths must exist.
If no Module Cache Paths are specified, the populate operation fetches modules from the server.
Log populate messages in populate log file
Use this option to log populate messages to a populate log file. The log file provides easy access to the populate messages to allow for later review. This is particularly useful for complex populate operations such as merging a module version from another branch.
353

DesignSync Data Manager User's Guide
Note: If the specified log file already exists, DesignSync will append the results of this populate operation to the file. If the file cannot be created for any reason, such as the directory specified does not exist, or you do not have write permissions to the directory, the populate operation fails.
Related Topics
Setting Persistent Populate Filters
Merging Module Data
Using a Module Cache
How DesignSync Handles Legacy Modules
SyncAdmin Help: Default Fetch State
ENOVIA Synchronicity Command Reference: populate command
ENOVIA Synchronicity Command Reference: ls command
ENOVIA Synchronicity Command Reference: hcm lock command
ENOVIA Synchronicity Command Reference: setselctor command
Recursion option
Filter field
Exclude field
Module context field
Retain timestamp option
Href filter field
Keys field
Local Versions field
Trigger Arguments
Command Invocation
Command Buttons
354

Using DesignSync with Modules
Procedure for Creating a Module Cache Link
When a project team is working with modules you do not need to edit, for example a design tools, compiler, integrated modules, or SITaR baselines produced by other teams or companies, the DesignSync Administrator can create a module cache to share the project to the team members. Having an alternate location for the module data available to the user reduces the need for SyncServer requests to populate those modules into individual workspaces.
The individual team members can then create a module cache link in their UNIX workspace, or a copy of the module members from the link in their Windows workspace to use the module cache. This reduces the populate time by allowing you to load a single DesignSync object, the module cache link, rather than the contents of the module.
Setting up the module cache link involves the following steps:
1. Chose the module cache link location. 2. Populate the module cache.
Choose the module cache link location
Choose the location for the module cache link. If you require integration into your existing environment, place the link in an appropriate location within the modules you are working on. If you are using a tool, such as compiler version, create a tools directory to contain the link.
Populate the module cache link
Use the populate command or the Populate dialog box to fetch modules as an mcache link . This section lists the populate options you may use to create the module cache link as well as the options you cannot set.
Populate GUI option/Command-Line option
Availability Description
Unlocked copies/-get
Recommended For non-legacy modules on Windows, creates a copy of the module in the workspace. (Similar to Module cache mode: Copy from the module cache) for legacy modules. Otherwise, the Module cache mode setting takes preference to the Populate with options.
Module cache mode: Link to
Required (UNIX)
Creates the mcache link in the workspace. This is a single managed link that points to
355

DesignSync Data Manager User's Guide
module cache/-mcachemode link
the module cache and allows you to access the files in the module cache.
Note: using Module cache mode: Fetch from server/-mcachemode server, bypasses the module cache and populates the mcache link directly from the server.
Mcache path/-mcachepath
Required Specifies the location of the module cache you're populating from. If your team lead or administrator has already defined the module cache path in SyncAdmin, this value will be pre-filled for you.
Related Topics:
What is a Module Cache?
Using a Module Cache
System Administration Help: Procedure for Setting up a Module Cache
SyncAdmin Help: Module Options
System Administration Guide:
Displaying Module Information
Module Toolbar
By default the Module Toolbar appears under the Main toolbar. You can customize the Module Toolbar to appear:
• On the side of the main toolbar, when your display window is wide enough. • On either the left side, right side, or bottom of the DesignSync GUI window. • As a free floating tool bar that you can move to where you want it.
You can choose to display or hide this too bar from the View menu. The Module Toolbar displays these items by default:
See SyncAdmin Help: Customizing the Module Toolbar for more details.
Toolbar Item Description
356

Using DesignSync with Modules
This toggle button shows or hides hierarchical references for workspace listing of modules or module version contents on the server. When hierarchical references are hidden, the hierarchical references button looks like this:
This toggle button shows or hides module members on the server. When modules members are hidden, the modules members button looks like this:
This toggle button that shows or hides module deltas on the server. When module deltas are hidden, the modules delta button looks like this:
This pull-down list allows you to filter module branches displayed. Choices are:
o <All Branches> o <Tagged Branches> o One of the last five 5 glob expressions as defined
in the module branch filter field in the Display Filters dialog box
This pull-down list allows you to filter versions displayed. Choices are:
o <Tagged Versions> o <All Versions> o One of the last five 5 glob expressions as defined
in the module version filter field in the Display Filters dialog box
This button invokes the Add to Module dialog box.
This button invokes the Remove from module dialog box.
This button invokes the Move modules member dialog box.
This button invokes the Create a hierarchical reference dialog box.
357
DesignSync Data Manager User's Guide
This button invokes the Create new module dialog box.
The button adds the Module Hierarchy tab to the display window.
Related Topics
Renaming a Module Member
Creating a Hierarchical Reference
Displaying Module Hierarchy
Creating a New Module
Removing a Member from a Module
Display Filters
Controlling the Display of Module Information
Displaying module versions
By default, the last 50 versions on a module branch are shown. The maximum number of versions displayed is configurable. For details, see SyncAdmin Help: Modules Options.
Using Display Filters
The Display Filters dialog box is used to set filters that control what is displayed in the tree and list view.
1. From the main menu, select View => Display Filters. 2. Select options as needed. 3. Click OK.
Click on the fields in the following illustration for information.
358
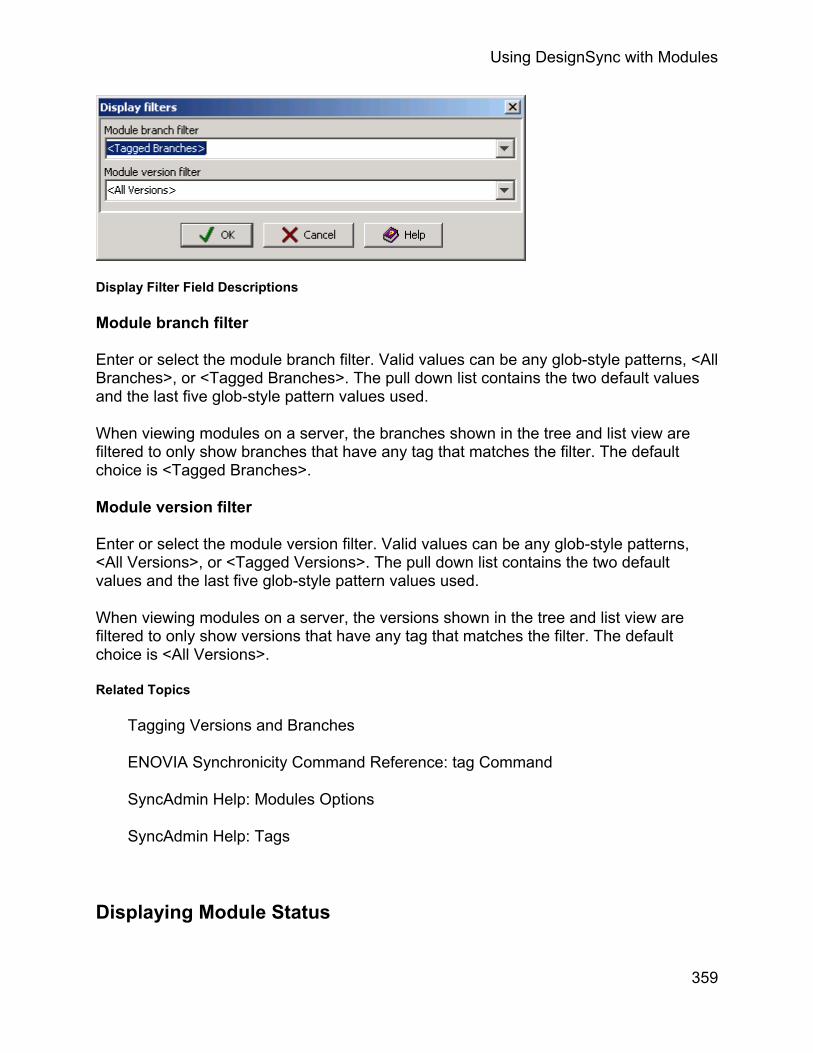
Using DesignSync with Modules
Display Filter Field Descriptions
Module branch filter
Enter or select the module branch filter. Valid values can be any glob-style patterns, <All Branches>, or <Tagged Branches>. The pull down list contains the two default values and the last five glob-style pattern values used.
When viewing modules on a server, the branches shown in the tree and list view are filtered to only show branches that have any tag that matches the filter. The default choice is <Tagged Branches>.
Module version filter
Enter or select the module version filter. Valid values can be any glob-style patterns, <All Versions>, or <Tagged Versions>. The pull down list contains the two default values and the last five glob-style pattern values used.
When viewing modules on a server, the versions shown in the tree and list view are filtered to only show versions that have any tag that matches the filter. The default choice is <All Versions>.
Related Topics
Tagging Versions and Branches
ENOVIA Synchronicity Command Reference: tag Command
SyncAdmin Help: Modules Options
SyncAdmin Help: Tags
Displaying Module Status
359

DesignSync Data Manager User's Guide
The Show status dialog is available when a legacy module configuration or current module-base node (tree or list view) is selected in the client work area. The results from the show status command is displayed in a new text tab labeled
Module Status.
The Module Status tab displays:
• Updated module versions for dynamic hierarchical references. • New hierarchical references. • New module members in the modules. • Old module members removed from the module. • Removed or added hierarchical references or legacy modules.
To show the status of a module:
1. From the main menu, highlight the module.
2. Select Modules => Show => Module Status. 3. Select options as needed. 4. Click OK.
Click on the fields in the following illustration for information.
360

Using DesignSync with Modules
Show object status
When checked, the status of each object in the workspace is compared with the server module. This status displays in the Module Status tab.
When not checked, only the status of the module and the status of its hierarchical references displays in the Module Status tab.
By default, this option is unchecked.
Show release status
This option is only available when a legacy module base directory is selected in the client work area.
When checked, a recursive report will stop at released modules These items are not displayed on the Module Status tab:
• a release • an alias • an IP Gear deliverable • a vault folder residing on a non HCM-enabled server • a reference that does not exist locally
By default, this option is unchecked.
Note: To display the current status of the hierarchical references of releases in your work area, both the Show release status option and the Show object status option
361

DesignSync Data Manager User's Guide
must be selected. Otherwise, the status of hierarchical references of releases is always listed as up-to-date.
Show href status
When checked, the hierarchical references are verified to determine if the reported status is current. When not checked, the hierarchical references are not verified.
By default, this option is unchecked.
Recurse into references
When checked, the Module Status tab displays the status for the specified module and all referenced modules.
Note: Hierarchical references that point to IP Gear deliverables, non-HCM servers, aliases, or references are only displayed if that item exists locally.
When not checked, the Module Status tab displays the status for the specified module only.
By default, this option is unchecked.
Module context
This field is available when a non legacy module base folder is selected. The list box has the available module instances for the base folder listed in alphabetical order.
Report type
Select the type of report from the pull down list to be displayed on the Module Status tab. The default choice is Normal output. There are four report modes:
• Brief output – Displays a summary and lists hierarchical references that are out-of-date. Lists file status for files that are out-of-date. Also displays a table of conflicts if conflicts exist between the expected submodule and the actual submodule.
• Normal output – Displays the status of the hierarchical references and file status for the module. Displays a table of conflicts if conflicts exist between the expected submodule and the actual submodule.
• Summary output – Displays the target and base directory of the module, the status of each module, and the overall status of the module in the workspace. Also displays a table of conflicts if conflicts exist between the expected submodule and the actual submodule.
362

Using DesignSync with Modules
• Verbose output – Displays the status of the hierarchical reference and file status for the module. Also displays a table of conflicts if conflicts exist between the expected submodule and the actual submodule.
Displaying Contents of Vault Data
The Contents report lists data belonging to either a DesignSync configuration or to a module. The report is available when any of these objects are selected:
• a workspace folder associated with a DesignSync vault • a server folder • a module folder (within the context of a module) • a module • a module branch • a module version (if the report is run for a module version, the data items
comprising that module version are shown)
Tools => Reports => Contents opens the Contents dialog box. Click OK to display the results in a new text tab labeled Contents, in the View Pane.
Click on the fields in the following illustration for information.
363

DesignSync Data Manager User's Guide
Contents Field Descriptions
Show versions
Show the version numbers of the objects reported. If the report is run on a module version, the member version numbers for the data items in a module version are reported.
Report names
Specify how the name of each object within a directory is shown:
• File names only - Show only the object name; present its parent directory as an absolute path (default)
364

Using DesignSync with Modules
• Relative paths - Show the path to the object as relative to where the command was started
• Full paths - Show the absolute path to the object
Selector
Identify which version of an object to report.
For a DesignSync folder, select Get selectors to display configurations of the associated workspace vault. Choose any selector except Date() and VaultDate(). If a selector is not specified, the current selector is used for a workspace folder, and Trunk:Latest used for a server folder.
For a module, if a selector is not specified, the current selector is used for a workspace module, and Trunk:Latest used for a server module.
Report verbosity
The level of additional information reported:
Normal output: Include header information and progress lines. This is the default output mode.
Verbose output: For DesignSync folders, include information about configuration mappings.
Href mode
When reporting on a module recursively, how hierarchical references should be evaluated. This field is only available when reporting on module data. If a workspace module is being reported on, and a Selector is not specified, then the hierarchy in the workspace is followed. In that case, the Href mode is ignored.
Normal mode: If the Selector represents a static version (a numeric version, a version tag, or a list of such items), then report on that static version of the sub-module. Also switch the Href mode to Static mode, for subsequent levels of hierarchy. If the Selector does not represent a static version, then still report on the sub-module identified by the Selector. But continue to use Normal mode as the Href mode, for subsequent levels of hierarchy. This is the default Href mode.
Static mode: Report on the static version of the sub-module that was recorded with the href at the time the parent module's version was created.
Dynamic mode: Evaluate the Selector to identify the version of the sub-module to report on.
365

DesignSync Data Manager User's Guide
Related Topics
ENOVIA Synchronicity Command Reference: contents Command
Recursion option
Exclude field
Filter field
Module context field
Href_filter_field
Command Invocation
Command Buttons
Identifying Modified Objects
You can identify objects that you have modified in your work area by selecting Tools => Reports => Modified Objects. When you select this option, DesignSync performs a recursive search to find all modified objects (including module objects) in the specified work area directory and its subdirectories.
Note: Objects must be managed (under DesignSync revision control) as well as modified for this operation to identify them.
When the search completes, DesignSync displays the modified objects in a directory tree structure. The root of the tree is the work area directory where you started the search. Subdirectories of the work area are shown only if those subdirectories contain modified objects. Objects that have been locally modified are displayed under the directory in which they are located.
You can select objects in the display and operate on them through the menu or toolbar selections. You can also right-click on any object in the display to see a context menu showing common revision control operations used from this view.
For example, you select a modified object and right-click to select Show Local Modifications which displays the local changes.
Then you could either check in the file or check out the file with the Force overwrite of local modifications option to discard the local changes.
If you select a folder and perform an operation recursively, it will operate on the folder's entire contents, as though you had selected the folder from the List View.
366

Using DesignSync with Modules
Displaying Version History
The Version History report displays version history for managed objects. If the history report is run from a workspace, local status is also reported.
Tools =>Reports =>Version History opens the Version History dialog box. This report is available when files, folders or the base directory of a module is selected in a local workspace. The report is also available when a server object is selected (vaults, versions, branches, modules, module versions, or module branches).
Click OK to display the results in a new text tab labeled Version History, in the View Pane.
Click on the fields in the following illustration for information.
367

DesignSync Data Manager User's Guide
Version History Field Descriptions
Show history for
The default setting shows the history of the Current branch (the branch of the object that is in the workspace). You can also show the history for All branches of the object, or of a specific branch (This branch).
368

Using DesignSync with Modules
To select the history of a particular branch, select "Show history for This branch". The field below becomes active and you can type the branch name or click the pull-down menu to select a branch.
Report recursively
Whether to descend through sub-folders of the starting folder, or only report on the objects in the selected folder. This option is available for local folders or server (non-module) folders. The option is unchecked by default.
Report mode
The type of information that will be reported. The choices Brief, Normal, and Verbose represent defined reports. Selecting one of these defined reports automatically enables all of the report options that comprise the selected mode. Report options not in the selected mode are automatically disabled. The Normal report mode is selected by default. Select the Custom report mode to specify your own combination of report options.
Show object name
Show the workspace path to the object, or to the vault URL.
Show vault URL
Show the vault URL associated with a workspace object.
Show current version
Show the version currently in the workspace.
Show fetched state
Show the fetched state in the workspace.
Show tags
Show branch and version tags. Immutable tags are shown with "(immutable)" appended.
Show tag comments
Show the comments associated with version and branch tags. Tag comments are only available for module data.
Show creation dates
369
DesignSync Data Manager User's Guide
Show a version's creation date.
Show derived version
Show the numerical parent version. This maintains the continuity between versions for merge and rollback operations.
Note: If a merge, skip,rollback or overlay operation occurs to create this version, the referenced version is shown as "Merged from" version.
Show version author
Show a version's author.
Show merged from
Show the version used to create the from current version when the current version was created as the result of a rollback, merge, skip, or overlay operation requiring an alternate parent version.
Show check in comment
Show a version's check in comments, and any checkout comments. For DesignSync objects, checkout comments are only visible from the workspace in which the checkout occurred. For module objects, the branch lock comment is visible to all users.
Show retired state
Show whether a branch is retired. This is not applicable to module data, so is not reported for module data.
Show locked by
Show the lock owner of a locked branch. For DesignSync objects, also show the "version -> upcoming version" information.
Show separators
Show separators between items and versions.
Show module manifest
For a module, show the manifest of changes in each version. For a module member, show only the changes to that member.
Show version/branch numbers
370

Using DesignSync with Modules
Show the version number for versions, and the branch number for branches. For branches, indicate whether any versions exist on the branch.
Display branch entries
Show information for branch objects.
Display version entries
Show information for version objects.
Ignore untagged entries
Do not show entries that have no tags.
Reverse display order
Show the versions/branches in reverse numeric order.
Represent graphically
Show a graphical representation of the version history, as a text graph.
Maximum tags reported
The maximum number of tags shown for any object. You can select a value from the pull-down list, or type in a positive integer. By default, all tags are shown. This option is only available when Show tags is selected.
Number of ancestor versions to report
How many versions back to report. By default, all versions on a branch are reported. You can select a value from the pull-down list, or type in a positive integer. Specifying the number of ancestor versions to report sets the Descendant branch depth value to 0.This option is only available when Show history for Current branch or This branch is selected.
Number of ancestor branches to report
How many branches back to report. By default, only versions on the specified branch are reported. You can select a value from the pull-down list, or type in a positive integer. Specifying the number of ancestor branches to report sets the Descendant branch depth value to 0. This option is only available when Show history for Current branch or This branch is selected.
Descendant branch depth
371

DesignSync Data Manager User's Guide
The number of levels of descendant branches to report, from the starting branch. By default, the report is limited to the starting branch (a value of 0). You can select a value from the pull-down list, or type in a positive integer. Specifying a descendant branch depth sets the Number of ancestor versions to report and the Number of ancestor branches to report to all.
Related Topics
ENOVIA Synchronicity Command Reference: vhistory Command
Exclude field
Command Invocation
Command Buttons
Displaying Module Hierarchy
The Show Module Hierarchy command is available when anyone of the following objects is highlighted:
• Legacy module configuration • Legacy module alias • Legacy module release • Module version on server • Legacy module base directory • A 5.0 module base directory in client work area
The results from the Show Module Hierarchy command is displayed in a new text tab labeled Module Hierarchy in the list view pane.
372

Using DesignSync with Modules
When viewing the hierarchy of 5.0 module, you can choose one of three display options from buttons at the bottom of the Module Hierarchy tab. These are:
• Normal mode: The selector associated with the hierarchical reference is examined to determine whether it is static or dynamic. If the selector represents a static version then the module referenced by the selector is displayed, but all subsequent levels of the hierarchy are displayed in Static Mode. If the selector represents a dynamic version, again the module referenced by the selector is displayed, and all subsequent levels of the hierarchy continue to be displayed in Normal Mode.
• Static mode: The static version is the version that was recorded at the time each hierarchical reference was created from a parent module to a sub-module
• Dynamic mode: The dynamic version is that version that shows of the module’s hierarchical references are displayed for all levels of the hierarchy. Selectors associated with all hierarchical references are evaluated individually to identify the version to be displayed.
373

DesignSync Data Manager User's Guide
The default display is Normal mode. This command is available from the context menu when a node highlighted is in the module hierarchy tree. These options are not applicable for legacy modules.
To display module hierarchy
1. Highlight the node for which you want to see the module hierarchy. You can see Module Hierarchy for these legacy module objects:
• Server Side – Module Alias • Server Side – Module Release • Server Side – Module Configuration • Client Workspace – Configuration Base
For on legacy modules, you can highlight either Server side – Module Version or Client Workspace – Module base objects.
2. From the main menu, select Modules => Show => Module Hierarchy.
Results
For legacy objects:
• The text displayed for a configuration shows both the module name and the configuration name such as module@config.
• When it is a default configuration, module@<Default> displays. • DesignSync vault nodes displays the vault name. • IP Gear Deliverables displays the Deliverable Number. Mouse-overs on the
nodes in the module hierarchy tree display the full object URL.
374

Using DesignSync with Modules
For current objects:
Note: If current module contains hierarchical references to a legacy module, the Module Hierarchy tab displays the information on the objects as described above for legacy objects.
• The top level node in the hierarchy displays in the version filter format that is currently selected in the GUI.
• For sub-modules, the text for a module version displays both the module name and the module version number or the module tag name depending on which mode is used when the hierarchy is browsed and the type of the displayed hierarchical reference.
• For a static hierarchical reference, the module name and version displays. • For dynamic hierarchical references, the tag name displays. In cases where the
hierarchical reference was created by using a selector list, the module name and resolving tag also displays.
• For a DesignSync vault, the vault name displays. • For an IP Gear deliverable, the Deliverable Number displays.
Mouse-overs on the nodes in the module hierarchy tree display the full object URL.
375

DesignSync Data Manager User's Guide
When you are browsing from a module base folder in the workspace, and there are multiple modules based at the folder, the Select Module Context dialog appears so you can select the module on which to show the hierarchy.
Related Topics
Context menu
Module Context Field
Displaying a Module Cache
The show module cache functionality in the DesignSync GUI helps you to determine whether or not a module is already in an module cache (mcache) before you:
• Fetch the module into it • Removing the module from it.
To show the contents of a module cache:
1. From the main menu, highlight the module. 2. Select Modules => Show => Module Cache. The Show contents of module
caches dialog box displays
. 3. The module cache path is pre-filled in with the value of the default module cache
path as defined by your project lead. You can accept this path, you can enter a different module caches path, or you can click Browse to browse to the correct path.
Note: The paths must exist. If this field contains an empty string, an error is displayed.
4. Click OK. The results from the Show a Module Cache command is displayed in a new text tab labeled Module Cache in the list view.
376
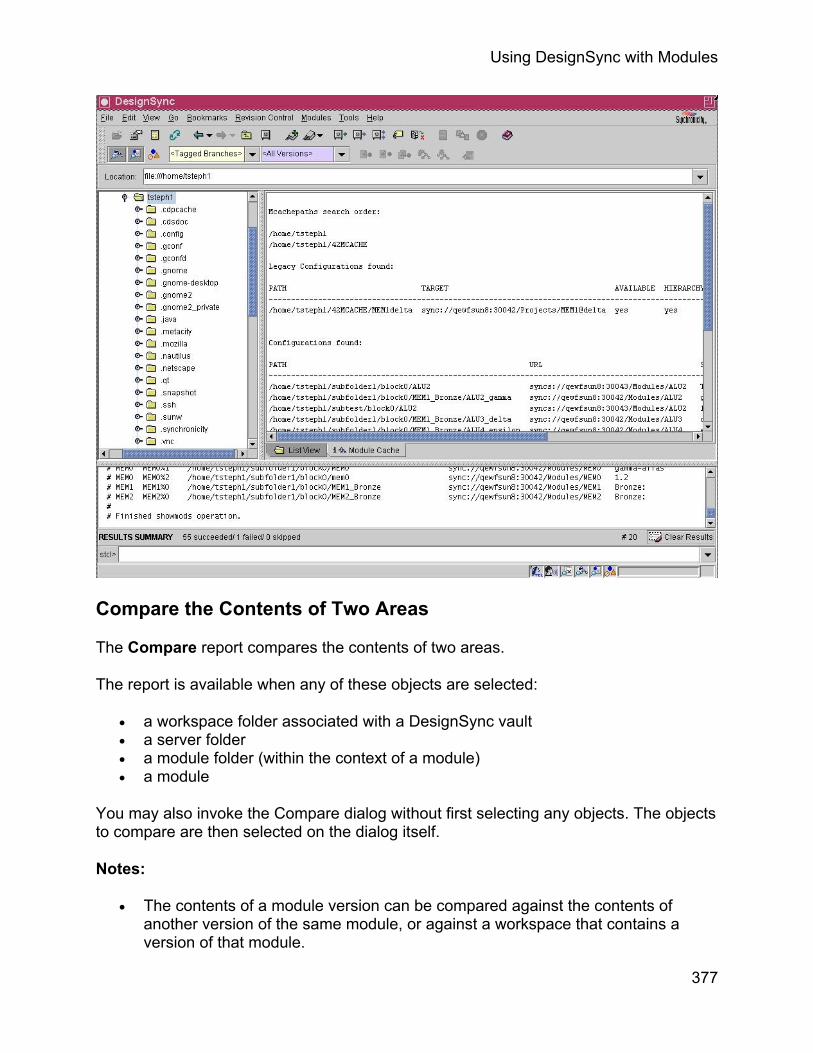
Using DesignSync with Modules
Compare the Contents of Two Areas
The Compare report compares the contents of two areas.
The report is available when any of these objects are selected:
• a workspace folder associated with a DesignSync vault • a server folder • a module folder (within the context of a module) • a module
You may also invoke the Compare dialog without first selecting any objects. The objects to compare are then selected on the dialog itself.
Notes:
• The contents of a module version can be compared against the contents of another version of the same module, or against a workspace that contains a version of that module.
377

DesignSync Data Manager User's Guide
• In comparing collections, the compare operation compares only collections and not collection members.
• To display differences between files, DesignSync provides Diff tools available from Tools =>Compare Files and Tools =>Compare Files =>Advanced Diff.
Tools =>Reports =>Compare opens the Compare dialog box. Click OK to display the comparison results in a new text tab labeled Compare, in the View Pane.
Click on the fields in the following illustration for information.
378
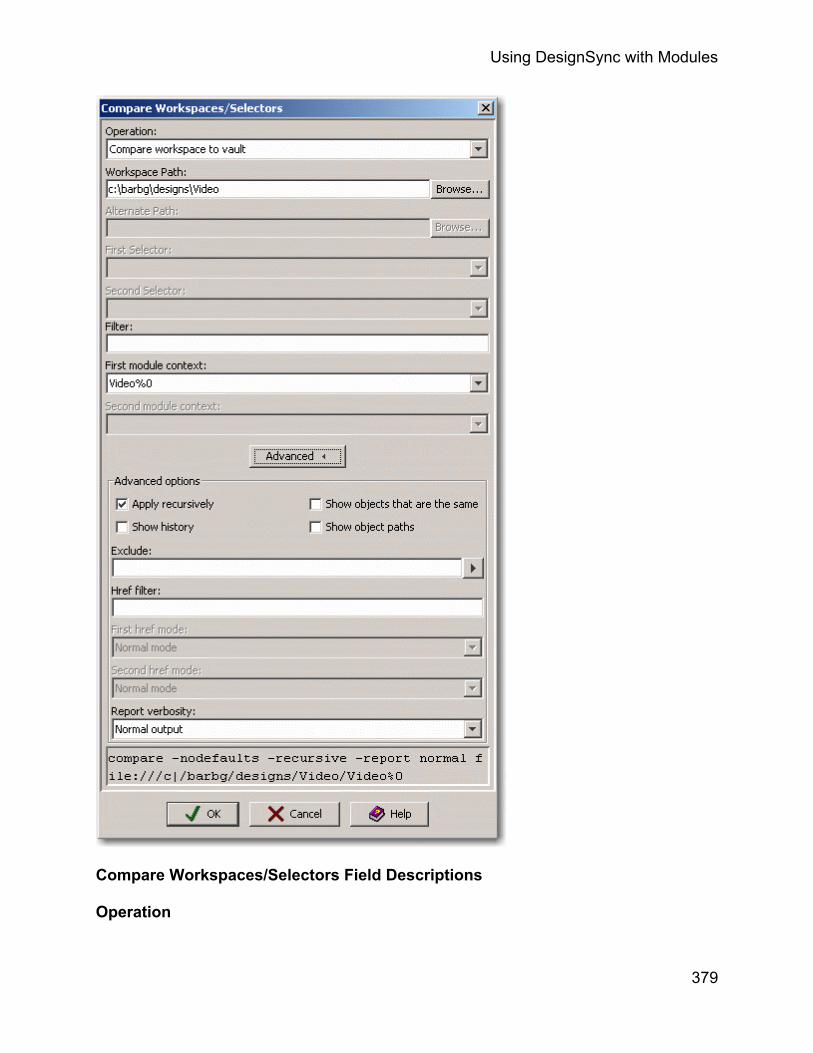
Using DesignSync with Modules
Compare Workspaces/Selectors Field Descriptions
Operation
379

DesignSync Data Manager User's Guide
Choose from four options:
• Compare workspace to vault • Compare workspace to another path • Compare workspace to a selector • Compare two selectors of a workspace's vault
Workspace Path
Enter the workspace path you want to use in the Compare action. Click Browse... to display the Select Path dialog and choose your workspace.
Alternate Path
This option is available when you select the "Compare workspace to another path" Operation. Enter the path you want to use for comparison. Click Browse... to display the Select Path dialog and choose your workspace.
First Selector
This option is available when you select the "Compare workspace to a selector" Operation. Enter the selector you want to use for the comparison. For a DesignSync folder, select Get selectors to display configurations of the associated workspace vault. Choose any selector except Date() and VaultDate().
Second Selector
This option is available when you select the "Compare two selectors of a workspace's vault" Operation. Enter the second selector you want to use for the comparison. For a DesignSync folder, select Get selectors to display configurations of the associated workspace vault. Choose any selector except Date() and VaultDate().
First module context
This option is available when you select a single module base folder to compare. The module instance names based at the module base folder specified in the Workspace Path field are listed. A first module context is required, when comparing a single module base folder.
Second module context
This option is available when you select two module base folders to compare. The module instance names based at the module base folder specified in the Alternate Path field are listed. When comparing two module base folders, the First module context and Second module context are both optional. Selecting the empty entry results in a folder centric comparison; the module base folders are used for the
380

Using DesignSync with Modules
comparison. Selecting a module context results in a module centric comparison; the selected module contexts are used for the comparison.
Show history
Report the checkin comment and other details for the version history back to the common ancestor of the two versions reported.
Show objects that are the same
Report items that are the same version, in addition to items that are different.
Show object paths
Specify how the name of each object within a directory is shown. If selected, show the path to the object as relative to where the command was started. If not selected, show only the object name, and present the object's parent directory as an absolute path. Showing only the object name is the default.
First href mode
This option is available when you select the "Compare workspace to a selector" Operation. When reporting on a module recursively, this field specifies how hierarchical references should be evaluated. This field is only available when reporting on module data. If a workspace module is being reported on, and a Selector is not specified, then the hierarchy in the workspace is followed. In that case, the Href mode is ignored.
Normal mode: If the Selector represents a static version (a numeric version, a version tag, or a list of such items), then report on that static version of the sub-module. Also switch the Href mode to Static mode, for subsequent levels of hierarchy. If the Selector does not represent a static version, then still report on the sub-module identified by the Selector. But continue to use Normal mode as the Href mode, for subsequent levels of hierarchy. This is the default Href mode.
Static mode: Report on the static version of the sub-module that was recorded with the href at the time the parent module's version was created.
Dynamic mode: Evaluate the Selector to identify the version of the sub-module to report on.
Second href mode
This option is available when you select the "Compare two selectors of a workspace's vault" Operation. When reporting on a module recursively, this field specifies how hierarchical references should be evaluated. This field is only available when reporting on module data. If a workspace module is being reported on, and a Selector is not
381

DesignSync Data Manager User's Guide
specified, then the hierarchy in the workspace is followed. In that case, the Href mode is ignored.
Normal mode: If the Selector represents a static version (a numeric version, a version tag, or a list of such items), then report on that static version of the sub-module. Also switch the Href mode to Static mode, for subsequent levels of hierarchy. If the Selector does not represent a static version, then still report on the sub-module identified by the Selector. But continue to use Normal mode as the Href mode, for subsequent levels of hierarchy. This is the default Href mode.
Static mode: Report on the static version of the sub-module that was recorded with the href at the time the parent module's version was created.
Dynamic mode: Evaluate the Selector to identify the version of the sub-module to report on.
Report verbosity
The level of additional information reported:
Brief output: Include header information and progress lines. Directories that contain only items in one of the areas being compared, or for which all items in the two areas being compared are identical, are not expanded to show their contents.
Normal output: Expand directories that would be skipped in Brief output mode, because they are present in one of the areas being compared, or because all items in the two areas being compared are identical. This is the default output mode.
Verbose output: For DesignSync folders, include information about configuration mappings.
Related Topics
ENOVIA Synchronicity Command Reference: compare Command
Filter field
Module context field
Recursion option
Exclude field
Href filter field
Command Invocation
382

Using DesignSync with Modules
Command Buttons
Creating Module Data and Hierarchy
Creating a Module
The Create a new module dialog box is used to create a new module . You can create a module when:
• The "/Modules" node is selected on a server. • A category node is selected on a server. • A folder is selected in a your workspace.
Note: These types of folders cannot be used to create a module:
o A managed workspace folder o A base folder of a legacy module
When a workspace folder is selected, that folder is initialized as the module's base directory. You can then add objects to the module (see Adding a Member to a Module) so that an initial checkin can be performed. See Checking In Design Data for more details.
To create a module:
1. From the main menu, select Modules => New Module or select the button from the Modules toolbar. You can also select New Module from the context menu on the Modules node or from a category node.
2. The Create a new module dialog box appears. Select options as needed. 3. Click OK.
Click on the fields in the following illustration for information.
383

DesignSync Data Manager User's Guide
Name
The name of the new module. See URL Syntax for a list of illegal characters.
Server path
The server URL and category path for the new module, in the form:
sync://<host>:<port>/Modules/<category>
The <category> is optional, and may be a path, such as /Project1/mymods. A module category is similar to a path to a DesignSync project or vault. The term category is used to indicate that this is a virtual path, rather than a physical path. And that its use is intended to categorize modules.
If a server node is selected, the value of the Server path is set to the URL of the selected object. As shown in the example, in order to specify a category path, you must add the category as part of the Module name.
If a workspace folder is selected, the Server path must be specified. You can type in a URL, or use the Browse... button to navigate to and select the Modules node on a server, or a category folder below the Modules node.
Related Topics
ENOVIA Synchronicity Command Reference: hcm mkmod
The Module Toolbar
384

Using DesignSync with Modules
Comment field
Command Invocation
Command Buttons
Creating a New Version of a Module
A user creates a new version of a module by checking in their modifications to the module. Local modifications may include added data. See Adding a Member to a Module for details.
A new version of a module is also created when a user:
• Restructures the data within the module (see Renaming a Module Member for details)
• Removes data from the module (see Removing a Member from a Module for details)
• Adds a hierarchical reference to the module (see Creating a Hierarchical Reference for details)
• Removes a hierarchical reference from the module (see Deleting a Hierarchical Reference for details)
Branch locks are not removed upon checkin. For example, suppose that you lock the Trunk branch of the module Chip. (See Locking Module Data for details.) Later, you check in either the entire Chip module, or some portion of the Chip module. The branch lock remains in place, until it is removed by an unlock operation. (See Unlocking Server Data for details.) This enables you to perform multiple operations that modify the module, while retaining the branch lock on the module.
Any amount of data can be added to a module at once, resulting in a single checkin attempt. However, either the entire checkin will succeed, or the entire checkin will fail. I.e. Checkin of a module is an atomic operation. A new version of a module is only created if the entire checkin operation succeeds.
By default, after a failed atomic checkin, a subsequent checkin attempt will utilize information previously sent to the server. This optimizes the amount of data that needs to be transferred to the server, with the retry effectively continuing from where the previous try failed. For details, see Checking In Design Data.
Auto-Merging
You can check-in from a non-Latest module version, without having to merge first if the objects you modified have not been updated on the server. This is achieved by an auto-merge check-in. This functionality applies to any operation that creates a new module version, such as Renaming a Module Member, or Creating a Hierarchical Reference.
385

DesignSync Data Manager User's Guide
The auto-merge capability may be disabled for all module data on a server, forcing a strict policy to check-in only from Latest. For details, see SyncAdmin's Modules Options.
Auto-merging can only be used to update a module when the objects modified locally are identical to the objects they replace on the server. If there is a change to the object on the server, you must either perform a merge to incorporate the changes into your workspace, or use the skip option with the checkin operation to update the server. Note that auto-merging happens at the file level. The contents of files are not automatically merged. Auto-merge will not overwrite changes that other users have made to the module.
The -skip option to the ci command can be used to skip over changes that were made in subsequent module versions. The -skip option is applied to individual module members. To disallow the use of the -skip option, your project leader can define a client trigger.
When an auto-merge occurs, the fetched version number of the module is not updated at the end of the operation. This is because there may be changes in intermediate versions of the module, that are not reflected in the workspace.
Output from the ci command includes details of an auto-merge.
Similarly, structural changes that result in a new version of a module, such as adding or removing href's, or renaming member files, do not require that your workspace have the Latest version of a module.
Note: The automerge functionality is not valid for the following operations:
• Adding a file to a module - because the file did not exist in the previous version of the module, it must be explicitly added (hcm add) or checked in with the Allow Checkin of New Items option (ci -new).
• Removing a file from a module - Removing a file from a module (hcm remove) immediately creates a new module version without the removed module member. Therefore this operation never requires an auto-merge.
Examples
The examples below all begin with version 1.4 of the module Chip in your workspace. Version 1.4 consists of the files: file1, file2 and file3.
Latest version 1.5 of the module contains a new version of file1. You modified file2 and file3.
Module version 1.5 contains a new version of file2. Module version 1.6 contains a new version of file3. You modified file1 and file2.
386

Using DesignSync with Modules
Module version 1.5 contains the new file file4. You created and added file4.
Module version 1.5 renamed file1 to file4. You modified file2.
Module version 1.5 renamed file1 to file4. You modified file1.
Module version 1.5 does not contain file1. You modified file1.
Latest version 1.5 of the module contains a new version of file1. You modified file2 and file3.
The check-in proceeds, because none of the files you modified were altered in later versions of the module. The new module version 1.6 is created, containing the updated file2 and file3 from your workspace, as well as the file1 from the module version 1.5.
The fetched version number of the module in your workspace is not updated, remaining at version 1.4. This is because the workspace version does not have all of the changes that were made in intermediate versions. The status of file2 and file3, as reported by ls –report S, is “Out-of-sync”. The module status, as reported by hcm showstatus, is “Needs Update”.
View an animated illustration of this example.
Module version 1.5 contains a new version of file2. Module version 1.6 contains a new version of file3. You modified file1 and file2.
The check-in fails, with an error message such as:
file2: Error: Newer version exists in vault
This is because your change to file2 conflicts with the new version of that file that was introduced in version 1.5. File content is not automatically merged.
You should populate –merge the module, to merge in the later changes.
View an animated illustration of this example.
Module version 1.5 contains the new file file4. You created and added file4.
Your local copy of file4 is in the "Added" state, from your having run the hcm add command.
The check-in fails, with an error message such as:
file4: Error: New object already exists in vault
The two file4 files are different, so the error cannot be resolved by merging. Instead, either:
387
DesignSync Data Manager User's Guide
• remove the other file4 from the module, using the hcm remove command; or • rename the other file4 in the module, using the hcm mvmember command; or • rename the file4 in your workspace, using the hcm mvmember command; or • delete the file4 in your workspace, using the rmfile command, if your local
file4 is not needed.
View an animated illustration of this example.
Module version 1.5 renamed file1 to file4. You modified file2.
The check-in proceeds, because there is no overlap in the changes. Your modified file2 gets checked into the new module version 1.6. As with the first example, the fetched version number of the module in your workspace is not updated. The workspace still has version 1.4 of the module. Also, file1 remains in your workspace, since the changes in version 1.5 have not been fetched. A subsequent populate is required, to reflect the rename of file1 to file4.
View an animated illustration of this example.
Module version 1.5 renamed file1 to file4. You modified file1.
The check-in fails, with an error message such as:
file1: Failed: Object has been moved
You can either manually accept the change, by using populate -merge to merge with the new module version. Or run hcm mvmember directly on the server module, to move the file1 member back to its original path.
View an animated illustration of this example.
Module version 1.5 does not contain file1. You modified file1.
The check-in fails, with an error message such as:
file1: Failed: Object does not exist in Latest version of module
Because file1 is not in the Latest version of the module, you are attempting to check-in a new file. This requires that the -new option to the ci command be used.
Or, you can use the hcm add command, to re-add the object, and then perform the ci. The ls command will report the object as "Added".
View an animated illustration of this example.
Related Topics
388

Using DesignSync with Modules
Modules Options
Adding a member to a module
Removing a file from a module
Renaming a Module Member
Creating a Hierarchical Reference.
ENOVIA Synchronicity Command Reference: hcm add
ENOVIA Synchronicity Command Reference: hcm remove
ENOVIA Synchronicity Command Reference: hcm mvmember
ENOVIA Synchronicity Command Reference: rmfile
ENOVIA Synchronicity Command Reference: ci
Adding a Member to a Module
The Add to Module dialog box adds highlighted objects to a local module in your workspace. The objects must be within the scope of the base directory of the specified module. The objects can be files, directories, or collection objects. The locally added objects are checked into the module version that is created by your next checkin. See Checking In Design Data for more information.
• If the highlighted objects are all files, and the module context can be uniquely determined, the files are added without invoking the Add to Module dialog box. These results are shown in the output window.
• If the highlighted objects are all files, and within the scope of more than one module, the Select Module Context dialog box is displayed. Once the module context is selected, the results are shown in the output window.
• If the highlighted object contains one or more folder objects, the Add to Module dialog displays.
To add to a member with Add to Module dialog box:
1. From the main menu, select Modules => Add Member or you can select the button from the Module Toolbar. You can also select this command from the
context menu. 2. The Add to Member dialog box appears. Select options as needed. 3. Click OK.
Click on the fields in the following illustration for information.
389
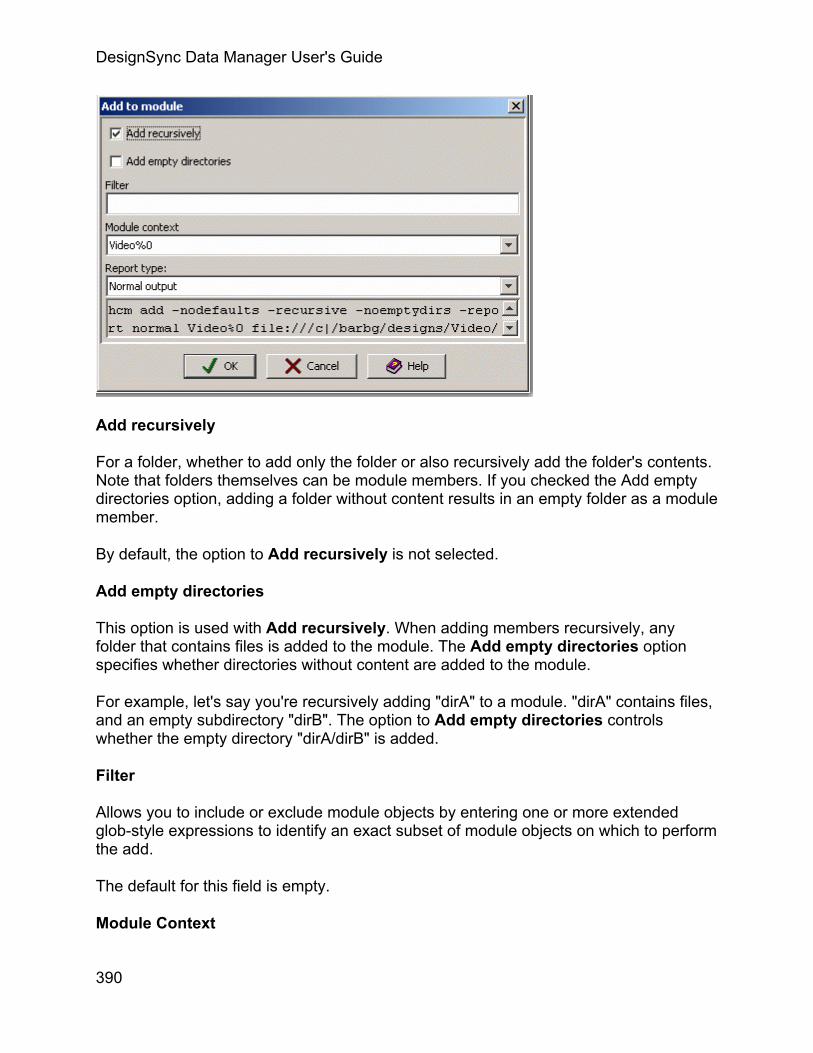
DesignSync Data Manager User's Guide
Add recursively
For a folder, whether to add only the folder or also recursively add the folder's contents. Note that folders themselves can be module members. If you checked the Add empty directories option, adding a folder without content results in an empty folder as a module member.
By default, the option to Add recursively is not selected.
Add empty directories
This option is used with Add recursively. When adding members recursively, any folder that contains files is added to the module. The Add empty directories option specifies whether directories without content are added to the module.
For example, let's say you're recursively adding "dirA" to a module. "dirA" contains files, and an empty subdirectory "dirB". The option to Add empty directories controls whether the empty directory "dirA/dirB" is added.
Filter
Allows you to include or exclude module objects by entering one or more extended glob-style expressions to identify an exact subset of module objects on which to perform the add.
The default for this field is empty.
Module Context
390

Using DesignSync with Modules
Expanding the list-box shows the available workspace module instances for the currently selected object or objects. All available workspace module instances are listed alphabetically in the pull-down. Note: There may only be one module listed.
Report type
From the pull-down, select the level of information you want to display in the output window:
Brief output: Lists all of the objects added to the local module.
Normal output: In addition to the information listed for the Brief output mode, lists the output beginning and ending messages for the add operation. This is the default output mode.
Verbose output: In addition to the information listed for the Normal output mode, lists:
o Skipping of objects that are already members of the module o Skipping of objects that are already members of a different module o Skipping of objects that are filtered o Status messages as each directory is processed
Related Topics
Directory Versioning
ENOVIA Synchronicity Command Reference: hcm add
Filter field
Module context field
Command Invocation
Command Buttons
Context Menu
Removing a Member from a Module
The Remove from module dialog box is used to remove the selected module members from a module and creates a new module version without the selected module member. You can use this dialog box when:
• Current module members (files/folders) are selected in the client work area.
391
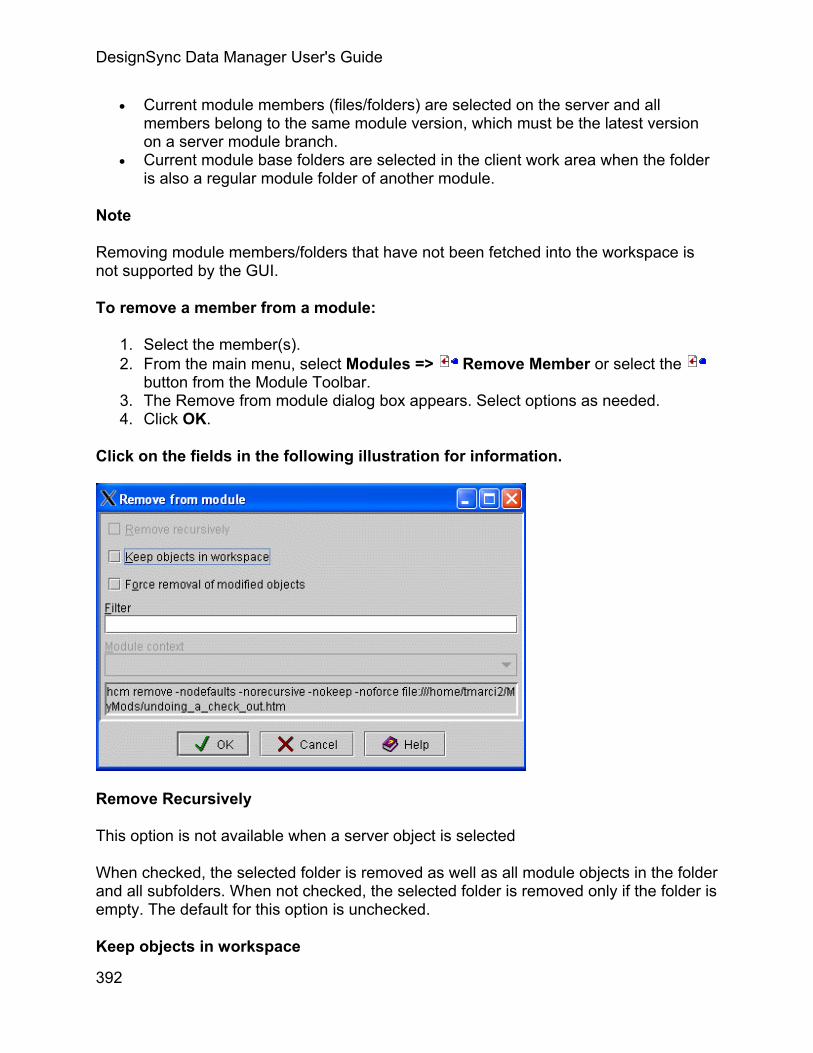
DesignSync Data Manager User's Guide
• Current module members (files/folders) are selected on the server and all members belong to the same module version, which must be the latest version on a server module branch.
• Current module base folders are selected in the client work area when the folder is also a regular module folder of another module.
Note
Removing module members/folders that have not been fetched into the workspace is not supported by the GUI.
To remove a member from a module:
1. Select the member(s). 2. From the main menu, select Modules => Remove Member or select the
button from the Module Toolbar. 3. The Remove from module dialog box appears. Select options as needed. 4. Click OK.
Click on the fields in the following illustration for information.
Remove Recursively
This option is not available when a server object is selected
When checked, the selected folder is removed as well as all module objects in the folder and all subfolders. When not checked, the selected folder is removed only if the folder is empty. The default for this option is unchecked.
Keep objects in workspace
392

Using DesignSync with Modules
This option is not available when remove is done directly on a server object.
When checked, the local copies of the removed objects are left in the workspace as unmanaged objects. When unchecked, the local copies of the selected objects are removed from the workspace. The default for this option is unchecked.
Force removal of modified objects
This option is not available when remove is done directly on a server object
When checked, the selected object is removed even if the object in the workspace is not the same as the last checked in version of the object or is locked. If you are removing objects that were added to a module, but never checked in, you choose this option to remove the objects.
When unchecked, the selected object is not removed if it is locked or not identical to the last checked in version or added to the module but never checked in.
The default for this option is unchecked.
Filter
Allows you to include or exclude module objects by entering one or more extended glob-style expressions to identify an exact subset of module objects on which to perform the remove.
The default for this field is empty.
Module Context
This option is only available when the selection set includes one or more client side folders. You can select from the available module instances. The choice are listed in alphabetical order.
The default for this field is empty.
Related Topics
The Module Toolbar
Filter Field
ENOVIA Synchronicity Command Reference: hcm remove
Moving a module member
393

DesignSync Data Manager User's Guide
You can move module members using the Move modules members dialog box when:
• One or more current module members or module folders are selected in the client work area or on the server.
• A module base folder in the client work area can be selected if it is also a module member folder for another module.
Note: Unless all the selected objects are members of the same module in the workspace or the same module version on the server, you can not invoke the Move module members dialog box.
Some notes on moving folders
Moving module folders on the server
The Move module members dialog box is used to move module folders on the server. When a folder is moved on the server, the contents of the folder move with it. However, the following objects do not move with the folder:
• Any module members locked by another user. • Any non-versioned objects in the workspace.
If all the contents of a folder are moved, the folder is removed from the server, and if the module is populated with the -force option, it is also removed from the workspace.
Moving module folders in the workspace
The Move module members dialog box is used to move a workspace folder. When the workspace folder moves, the following happens:
• The contents within the folder (files or collection objects) are moved to the specified location.
• The folder is removed from the workspace.
To move a module member:
1. Select the member. 2. From the main menu, select Modules => Move Member or select the
button from the Modules toolbar. The Move module members dialog box appears.
3. Select options as needed. 4. Click OK.
Click on the fields in the following illustration for information.
394
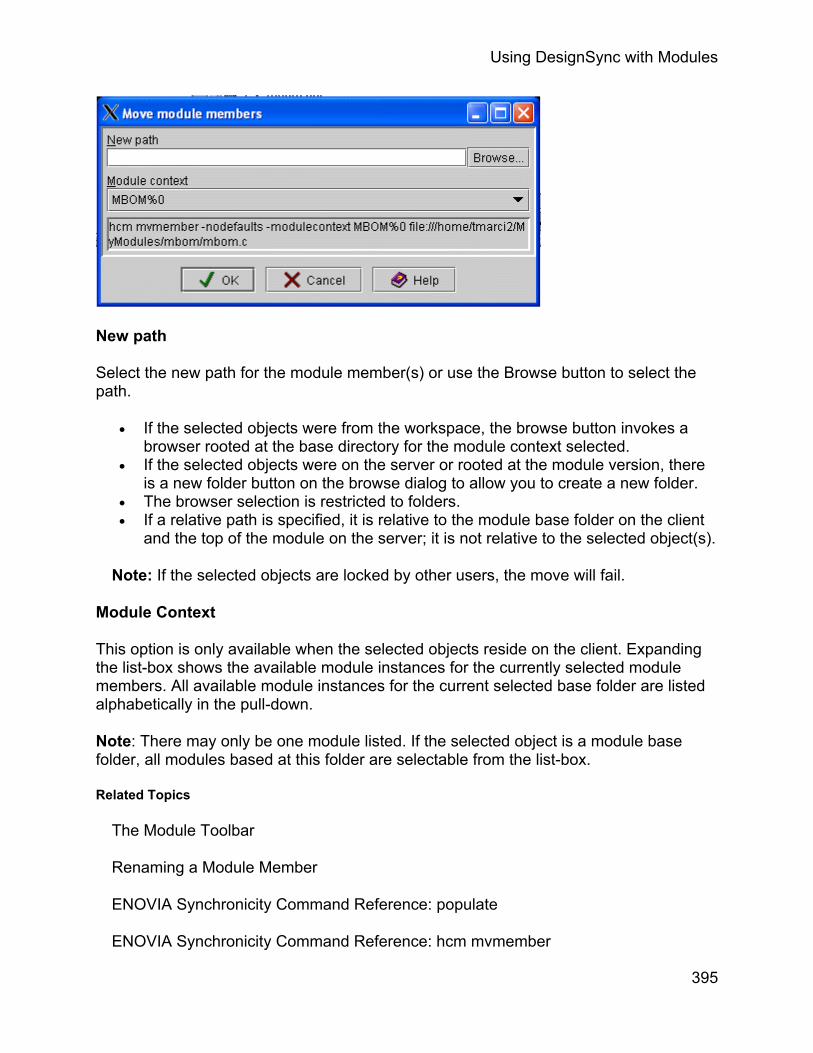
Using DesignSync with Modules
New path
Select the new path for the module member(s) or use the Browse button to select the path.
• If the selected objects were from the workspace, the browse button invokes a browser rooted at the base directory for the module context selected.
• If the selected objects were on the server or rooted at the module version, there is a new folder button on the browse dialog to allow you to create a new folder.
• The browser selection is restricted to folders. • If a relative path is specified, it is relative to the module base folder on the client
and the top of the module on the server; it is not relative to the selected object(s).
Note: If the selected objects are locked by other users, the move will fail.
Module Context
This option is only available when the selected objects reside on the client. Expanding the list-box shows the available module instances for the currently selected module members. All available module instances for the current selected base folder are listed alphabetically in the pull-down.
Note: There may only be one module listed. If the selected object is a module base folder, all modules based at this folder are selectable from the list-box.
Related Topics
The Module Toolbar
Renaming a Module Member
ENOVIA Synchronicity Command Reference: populate
ENOVIA Synchronicity Command Reference: hcm mvmember
395

DesignSync Data Manager User's Guide
Using the Moving Modules Members dialog box
While you use the same Move module members dialog box to move or renaming a module member, the information you enter for each mode is a little different. If you are moving the location of a module member, see Moving a module member.
If you are renaming a module member, use the instructions below.
Renaming a module member
You can rename module members using the Move modules members dialog box when:
• One or more module members or folders are selected in the client work area or on the server.
• A module base folder in the client work area if it is also a module member folder for another module
Note: Unless all the selected objects are members of the same module in the workspace or the same module version on the server, you can not invoke the Move module members dialog box.
Things to remember about renaming:
• A module context is required to both limit what is renamed and to make it clear what is being renamed.
• Renaming an object in the workspace updates the object on the server. • Renaming a specified a server object directly does not affect any workspaces
containing the moved object until that workspace is updated. • Renaming a folder automatically means renaming all the members in that folder.
Renaming affects that whole directory cone. • If the fetched version is currently the Latest on its branch, the local module
version is updated. The renamed objects in the workspace do not appear as modified, the action of renaming itself does not display as a modification.
• Items which have been previously added to a module but not checked in may also be renamed, and remain in the added state. When all items in a rename meet this criteria, no new module version is created, since the only changes are in the workspace
Renaming folders on the server
The Move module members dialog box is used to rename module folders on the server. When a folder is renamed on the server, the contents of the folder follow it. However, the following objects do not follow within the folder:
• Any module members locked by another user. • Any non-versioned objects in the folder in the workspace.
396

Using DesignSync with Modules
If all the contents of a folder are renamed, the previous folder name is removed from the server, and if the module is populated with the -force option, the previous folder name is also removed from the workspace.
Renaming folders in the workspace
The Move module members dialog box is used to rename a workspace folder. When the workspace module folder is renamed, the following happens:
• The contents within the module folder (files or collection objects) are renamed. • The previous folder is removed from the workspace.
To rename a member from a module:
1. Select the member. 2. From the main menu, select Modules => Move Member or select the
button from the Modules toolbar. 3. Select options as needed. 4. Click OK.
Click on the fields in the following illustration for information.
New path
Enter the new path name for the module member(s) or use the Browse button to select the new path name.
• If the selected objects were from the workspace, the browse button invokes a browser rooted at the base directory for the module context selected.
• If the selected objects were on the server or rooted at the module version, there is a new folder button on the browse dialog to allow you to create a new folder.
• The browser selection is restricted to folders. • If a relative path is specified, it is relative to the module base folder on the client
and the top of the module on the server; it is not relative to the selected object(s).
397

DesignSync Data Manager User's Guide
Note: If the selected objects are locked by other users, the rename will fail.
Module Context
This option is only available when the selected objects reside on the client. All the available module instances for the currently selected module members are listed alphabetically in the pull-down.
Note: There may only be one module listed if the selected object is a module base folder.
Related Topics
The Module Toolbar
Moving a module member
ENOVIA Synchronicity Command Reference: populate
ENOVIA Synchronicity Command Reference: hcm mvmember
Creating a Hierarchical Reference
The Create a hierarchical reference dialog box is used to create a new hierarchical reference from an upper-level module to any of the following objects:
• A module • A legacy module or legacy module configuration • A DesignSync vault folder • An IP Gear deliverable
You can create a hierarchical reference when a module version node (server) or 5.0 module base folder (client) is selected. When you create a hierarchical reference, a new module version is created.
Notes:
You can not create a hierarchical reference for a legacy module or a legacy module configuration.
Also, the following conditions must be met before you can create an hierarchical reference:
• The items you want must already exist. You may only create hierarchical references between objects that already exist
• The servers that hosts the modules must be available.
398

Using DesignSync with Modules
To create a hierarchical reference:
1. From the main menu, select Modules => Add Href or select the button from the Module Toolbar.
2. The Create a hierarchical reference dialog box appears. Select options as needed.
3. Click OK.
Click on the fields in the following illustration for information.
Field Descriptions
Referenced target
Enter the referenced target or use the Browse button to select the module, IPGear deliverable, or vault folder to which you want to add a reference. Remember that:
• If the selected node is a server module version, the referenced target can not be a client module instance.
• If the selected node is a 5.0 module base folder, the reference target can not be a 5.0 base folder. The module instance must be specified. References must be modules and not folders.
• The referenced target can not be the base folder of a legacy module. • You can not use the Browse button to find IPGear deliverable URLs. You must
enter an IPGear deliverable URL in the Referenced Target field.
The default of this field is empty.
399

DesignSync Data Manager User's Guide
Additional Notes
o If the “Referenced Target” is an IPGear deliverable or a vault directory, the selector field must remain empty.
o You can not specify a reference target to a legacy module configuration by specifying its vault URL and a selector.
Name
This field needs a legal value entered.
If you have already selected a referenced target and the referenced target is a module, the name field is filled in with the name of the target module. You can modify this default name, however, the name must be unique within the module.
If you select a node that is a version 5.0 module base folder and the referenced target is that of a workspace module identifier which includes an instance number, the module instance name is stripped off the hierarchical reference name.
There are some characters that are reserved for DesignSync and cannot be used in the name of an href. For the list of reserved characters, see URL Syntax: Reserved characters.
Selector
Name of the selector for the referenced target. Depending on what you have entered in other fields, this field may be pre-filled. For example:
• When the object in the Referenced Target field is a server module, the selector field is set to Trunk:Latest.
• When the object in the Referenced Target field is a server module branch or version, the selector is set to match. For example, if the version was selected from a node is described by a tag, the selector uses the tag name and branches such as tagname:Latest.
• When the object in the Referenced Target field is a server legacy module, the selector is set to <default>.
• When the object in the Referenced Target field is a server legacy module configuration, the selector is set to the configuration name.
• When the selected node is a version 5.0 module base folder and the referenced target is a client module instance, the selector field is set to the selector of the referenced module.
Caution: If you manually change the value in this field, the value is not replaced afterwards by information generated by changes in other fields.
Relative Path
400

Using DesignSync with Modules
This field is optional.
Depending on what you have entered in other fields, this field may be pre-filled. Captures the relative path from the module to the sub-module when the module hierarchy is fetched.
• When the object in the referenced target field is server module version, the leaf name of the target is entered into relative path field
• When the selector field contains the 5.0 module base folder and the referenced target field is a workspace module identifier, the relative path between the two base directories is calculated by the system.
Do not populate submodule
When checked, the submodule is not included in a recursive populate of the parent module. When not checked, a recursive populate of the parent module does include the sub-module. The default is not checked.
Module Context
The field is only enabled for module base folders and contains the module instance names of the modules based at that folder. These module instance names are listed alphabetically in the pull-down.
Related Topics
The Module Toolbar
ENOVIA Synchronicity Command Reference: hcm_addhref
ENOVIA Synchronicity Command Reference: hcm_release
ENOVIA Synchronicity Command Reference: hcm_rmhref
ENOVIA Synchronicity Command Reference: hcm_showhrefs
ENOVIA Synchronicity Command Reference: hcm_showstatus
Deleting a Hierarchical Reference
You can delete a hierarchical reference (href) from either from your local work area or from the server.
To delete a hierarchical reference:
1. Highlight the href you want to delete in either the List View pane or the Tree view.
401
DesignSync Data Manager User's Guide
2. Select File =>Delete, or press the Delete key, to bring up the Delete dialog. On the server, you can also select a server module, right-click and select Delete from the context menu.
3. There are no options to select from the Delete dialog box for a href. Click OK to delete the file. You are prompted to confirm the deletion.
Important: If you remove the
hierarchical reference in your workspace, you must repopulate the workspace
to see the change.
Related Topics
Deleting Design Data
ENOVIA Synchronicity Command Reference: hcm addhref command
ENOVIA Synchronicity Command Reference: hcm rmhref command
Module-Specific Operations
Conflict Handling
Because modules can overlap in a workspace, it is possible that a populate will try to fetch a file, and find that there is a file from another module already in the target workspace address. For example, let's say modules Chip and ALU are both fetched to the module base directory basedir. Both contain the file README.txt. When the second module is fetched, it will find that there is already a README.txt from the other module. This issue is referred to as a populate conflict.
A populate conflict is handled as follows; the first module to populate a file will win. Subsequent populates of other modules with conflicting objects will lead to the conflicting object being reported as a failure to fetch, thereby increasing the failure count of the populate.
Related Topics
Populating Your Work Area
Merge Conflicts
Merging Module Data
Overlaying Module Data
402

Using DesignSync with Modules
ENOVIA Synchronicity Command Reference:populate
Module Version Updating
The fetched version number is the version number of an object that is in your workspace. If a new version of a module is being fetched, the fetched version number is updated at the end of a successful populate command. If the command is not completely successful, then the fetched version number is not updated.
Other scenarios to consider are:
• If a member could not be fetched because it is already in the workspace, and is modified, then the fetch of that member fails. Consequently, the overall operation fails, and the module's fetched version number is not updated.
• If a member is skipped due to: o the -filter option o the -exclude option o the -nonew option
then that member is not fetched. Therefore, the workspace does not contain the full module version, so its fetched version number is not updated.
• If a member is due for removal from the workspace (because the new module version being fetched does not contain it), and:
o the module member (that is due for removal) is modified in the workspace o the -force option is not used
then that member is unaffected. After the fetch attempt, the workspace has the complete contents of the module, (plus the member that was not removed), so the module's fetched version number is updated.
Not having the Latest version of a module as the fetched version is not necessarily a problem, The auto-merge system ensures that subsequent check-ins can still proceed. However, a potential downstream effect is that the hcm showstatus command will continue to show the module as Needs Update, until a successful populate is performed, fetching the Latest version.
Related Topics
Populating Your Work Area
Auto-Merging
Merging Module Data
ENOVIA Synchronicity Command Reference: populate
403

DesignSync Data Manager User's Guide
ENOVIA Synchronicity Command Reference: hcm showstatus
Using a Module Cache
As a performance optimization, your team leader may fetch modules into a module cache on the LAN, for you to link to. This is faster than your fetching data from a server. On UNIX, the use of symbolic links also saves disk space. The link is created to the base directory of the requested module version in the module cache. On Windows, symbolic links are not supported.
When you fetch module data using the Populate dialog box or populate command, you can opt to link to a module in the module cache. You can also specify the module cache paths to search for the module data. If the requested module version is not found in the module cache, DesignSync fetches the module from the server.
Your team leader might have defined default module cache paths and a default module cache mode. You can override these values by setting your own default values. See SyncAdmin Help:Module Options for more information.
Since the copy mode for an mcache is ignored for modules, your team lead should fetch the modules from the server into the mcache using the share mode. This forces the module contents to get fetched into the DesignSync cache (different from an mcache).
Symlinks are created in the mcache to point to these files in the DesignSync cache. If you subsequently use the copy mode for mcaches to get full copies of the module contents from the mcache instead of the server), the '-mcachemode copy' switch is ignored. The populate operation uses the default 'from local' copy mode to fetch the files from the DesignSync cache.
When the module cache is created, it is assigned a workspace instance to allow to the creator to manage it like any other module in their workspace.
When users create links to the module cache, a symbolic link to the base directory of the module in the mcache is created. This link is assigned a module instance and can be managed like any other module in the workspace. The link has the object type "Link to Mcache."
Related topics
What is a Module Cache?
Displaying Module Cache
DesignSync Data Manager Administrator's Guide: Setting Up a Module Cache
404

Using DesignSync with Modules
ENOVIA Synchronicity Command Reference: populate
Deleting a Module Cache Link
You can delete mcache links from your local work area. You cannot delete your current folder or any parent of your current folder. This does not affect the module cache itself, or the module on the server.
Select the module cache link you want to delete in the Tree View or List View panes. Multiple folders can be selected. Select File => Delete, or press the Delete key, to bring up the Delete dialog. Click OK to delete the folder containing the module cache links. You are prompted to confirm the deletion.
Click on the fields in the following illustration for information.
Delete Field Descriptions
Delete the selected objects/Delete all contents of a folder recursively
This field is not applicable to mcache links. Any objects accessed through mcache link are not available without it.
Module Context
405
DesignSync Data Manager User's Guide
This field is not applicable for mcache links. The module context is implicit.
Allow deletion of a tagged vault options, locked objects and modified objects
This field is not applicable to deletion of module cache links.
Retain vault information
The option to Retain vault information is not applicable to the deletion of module cache links.
Remove notes after detaching
This field is not applicable to module cache links.
Remove vault associated with module
This field is not applicable to module cache links.
Related Topics
Deleting Design Data
Using a Module Cache
ENOVIA Synchronicity Command Reference: rmfolder
Locking Module Data
The Lock module branch dialog box is used to lock a module version on a specified module branch. Locking the branch is useful when creating new branches, creating or deleting tags, or adding to, deleting from, or copying a module's metadata. By locking the module version, you insure that no one else can alter the data while you make your changes.
The Lock module dialog box is available when a module-base directory is selected in the client work area or a module branch is selected on the server.
Notes:
• You can not lock a module version on the server. • If a module branch contains members that are themselves locked, then you can
only lock that branch if you are the lock owner for all those locked members.
To lock a module branch:
406

Using DesignSync with Modules
1. Highlight the module version or module-base directory you want to lock. 2. From the main menu, select Modules => Lock branch. You can also select
Lock branch from the context menu. 3. The Lock module branch dialog box appears. Select options as needed. 4. Click OK.
Click on the fields in the following illustration for information.
Field Descriptions
Module context
Expanding the list-box shows the available module instances for the currently highlighted base directory. All available module instances are listed alphabetically in the pull-down. Note: There may only be one module listed.
Comment
Enter the comment information you want other users to know about this locked branch. The default entry is blank. You can use context menu commands to cut, copy, paste, select all, previous comments, and open your default text editor.
Animated Examples
• Locking a module branch • Locking module content
Merging Module Data
Merging combines changes made within a branch. General concepts pertaining to merging are described in these topics:
407

DesignSync Data Manager User's Guide
• Merge Conflicts • Three-Way Merge
• Two-Way Merge • Merge Edges
In the above topics, examples of merging text files are used to illustrate their concepts. The concepts are applicable to both file merging and module merging. These additional concepts pertain to just module merging:
• Module Merge Edges • Resolving Merge Conflicts
• Unique Identifiers • In-branch_Merging
• Module Structural Changes • Cross-Branch Merging
• Merge Types and Forms
Module Merge Edges
The Merge Edges topic shows how merge edges are created and used. When merging module data, merge edges are created for individual member objects. This helps with further merges (of the member file contents) at a later date. These merge edges take part in the individual file merges of the members.
Merge edges for the module are automatically created the merge is a in-branch merge and the entire module is the merge candidate. The merge edge is created when a check-in of the entire module is performed, and if an auto-merge does not take place upon check-in. In other words, the merge edge is only created if the workspace version at the time of the check-in is the Latest version on the branch. Module-level merge edges help with later re-merges of the module.
Merge edges for the module can be manually created after the changes resulting from a cross-branch merge have been checked in. To create a merge edge, use the hcm mkedge command. If the merge edge is no longer valid or needed, you can remove it with the hcm rmedge command.
Unique Identifiers
Every object and folder in the vault of a module is assigned a unique identifier. These unique identifiers are used within the module's versions. There is a mapping from the unique identifier to a natural path. The natural path is the path where that object is placed under the module base directory. The natural path can change from one module version to another, as a result of using the hcm mvmember command. Changing the natural path in this manner does not change the object's unique identifier.
408
Using DesignSync with Modules
Module Structural Changes
A module typically consists of many directories and files. A module can also refer to its sub-modules by using hrefs. We refer to a set of directories, files, and hrefs as a module structure. Users can modify a module's structure by adding, moving, and removing directories and files, and by adding, and removing hrefs. Versions of a module can therefore have different module structures, with module merging involving the merging of structural changes.
Merge Types and Forms
There are two primary types of merging that take place in the module environment. Both use the -merge option to the populate command:
Merging of file contents
For example, let's say you modified version 1.4 of file.txt in module version 1.8. Someone else checked in version 1.5 of file.txt as part of module version 1.9. You want to merge their changes to file.txt with your changes.
Module member file content will be merged, similar to when merging non-module managed files. The diff command can be used to compare individual objects from different module versions. Also see Comparing Modules, for how to compare the contents of different module versions.
Merging of structural changes
For example, suppose that on your development branch, a file that was originally populated with path /dir/a, was renamed (by using the hcm mvmember command), to be populated at /dir/b. You want to merge that change onto your development branch.
An object that was renamed in the module version being fetched will be fetched into a new position in the workspace (/dir/c in this example). Any local modifications to the file at the old position in the workspace (/dir/b in this case) are merged into the fetched file (/dir/c), and the old file (/dir/b) removed.
As another example, let's say an object is removed from a module (by using the hcm remove command), so that it is not in the module version that is being fetched. The merge operation will remove the object from the workspace. This may require the -force option to the populate command, if the workspace object is locally modified.
In-Branch Merging
Merging a module version within a branch is performed using the populate –merge command. This fetches the version of the module associated with the module selector, and merges into that any changes in the workspace files. After the merge, the
409
DesignSync Data Manager User's Guide
workspace has the module version associated with the module selector, with some members modified.
Examples
Let's say you have version 1.2 of module ROM in your workspace, from using the selector Trunk:Latest . You modified the files verilog/rom.v and DOC/Rom.doc, and want to merge in the changes that are in the Latest version of the module. The Latest version of the ROM module is 1.3. Version 1.3 contains a new version of verilog/rom.v. DOC/ROM.doc has not changed in the Latest version.
You run:
populate –merge ROM
Without the -merge option, the populate would fail on the verilog/rom.v object, because the object is modified. With the -merge option, your changes to verilog/rom.v are merged into the file being fetched. If there are conflicting changes, those are reported in the output from populate. After resolving any conflicts, you can check-in your modifications, creating version 1.4 of the ROM module. Version 1.4 contains new versions of both verilog/rom.v and DOC/RAM.doc. You now have the Latest version of ROM, version 1.4, in your workspace. This is demonstrated in this animated illustration.
Next, someone else creates the file verilog/rom_sub.v, and checks it into the ROM module, creating version 1.5 of ROM. In your workspace, you also create a file named verilog/rom_sub.v. The verilog/rom_sub.v is either unmanaged, or in the "Added" state, from your having used the hcm add command. You also created a local file named verilog/rom2.v. verilog/rom2.v is in the "Added" state, from your having used hcm add.
Attempting to populate -merge fails on the verilog/rom_sub.v file. You delete the local verilog/rom_sub.v file, after which a populate -merge succeeds. The verilog/rom2.v file is not a member of the module version being merged, so remains in the "Added" state. A subsequent check-in creates version 1.6 of the ROM module, with the added verilog/rom2.v file. You now have the Latest version of ROM, version 1.6, in your workspace. This is demonstrated in this animated illustration.
Cross-Branch Merging
Merging a module version from a different branch is performed using the populate –merge -overlay <selector>[...] command. This fetches the version of the module specified by overlay selector(s) and merges those into the workspace. Unlike In-Branch Merging, cross-branch merging does not automatically accept most structural changes into the new version of the module. Because of the complexity of the module merge across branches, you must review the changes and determine whether to accept them. Structural changes are processed as follows:
410
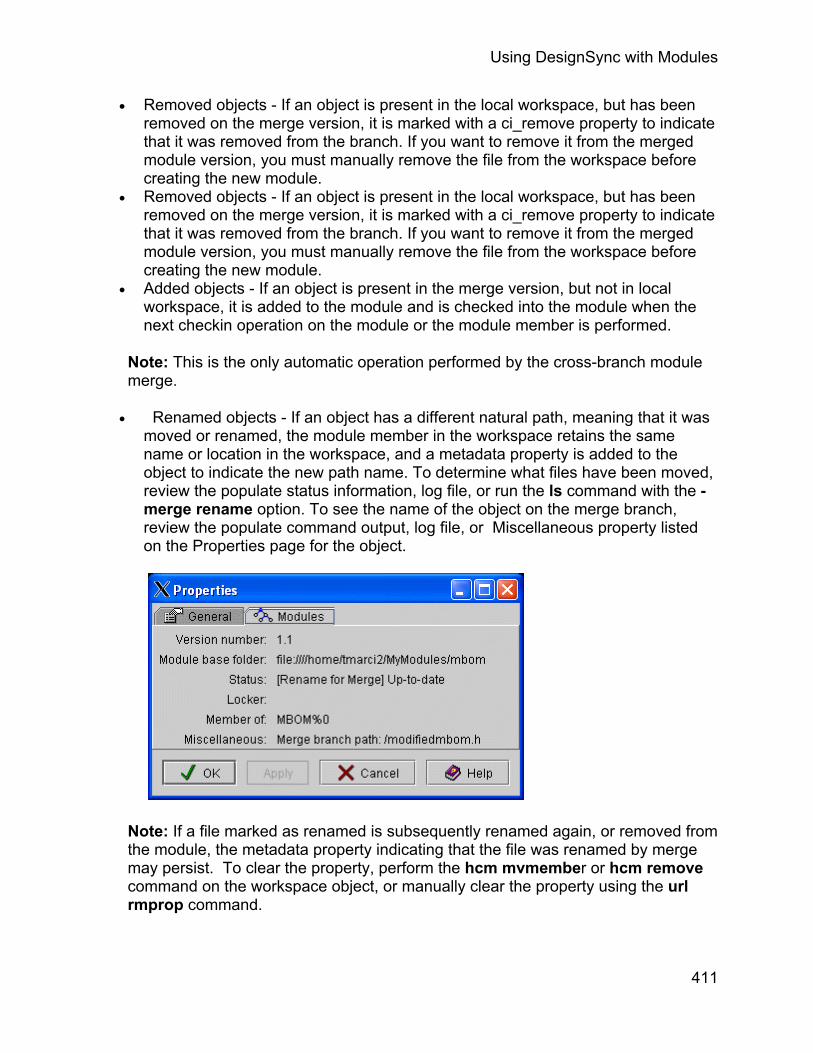
Using DesignSync with Modules
• Removed objects - If an object is present in the local workspace, but has been removed on the merge version, it is marked with a ci_remove property to indicate that it was removed from the branch. If you want to remove it from the merged module version, you must manually remove the file from the workspace before creating the new module.
• Removed objects - If an object is present in the local workspace, but has been removed on the merge version, it is marked with a ci_remove property to indicate that it was removed from the branch. If you want to remove it from the merged module version, you must manually remove the file from the workspace before creating the new module.
• Added objects - If an object is present in the merge version, but not in local workspace, it is added to the module and is checked into the module when the next checkin operation on the module or the module member is performed.
Note: This is the only automatic operation performed by the cross-branch module merge.
• Renamed objects - If an object has a different natural path, meaning that it was moved or renamed, the module member in the workspace retains the same name or location in the workspace, and a metadata property is added to the object to indicate the new path name. To determine what files have been moved, review the populate status information, log file, or run the ls command with the -merge rename option. To see the name of the object on the merge branch, review the populate command output, log file, or Miscellaneous property listed on the Properties page for the object.
Note: If a file marked as renamed is subsequently renamed again, or removed from the module, the metadata property indicating that the file was renamed by merge may persist. To clear the property, perform the hcm mvmember or hcm remove command on the workspace object, or manually clear the property using the url rmprop command.
411
DesignSync Data Manager User's Guide
• Added or Removed hierarchical references - Hierarchical reference changes cannot be merged. You must manually adjust your hierarchical references.
After the merge, the workspace has the module version associated with the workspace, with some members modified. To incorporate the changes, check in the module to create a new module version.
Related Topics
Auto-Merging Check-in
Overlaying Module Data
Module Objects Properties
ENOVIA Synchronicity Command Reference: populate
ENOVIA Synchronicity Command Reference: diff
ENOVIA Synchronicity Command Reference: hcm add
ENOVIA Synchronicity Command Reference: hcm remove
ENOVIA Synchronicity Command Reference: hcm mvmember
ENOVIA Synchronicity Command Reference: hcm lock
ENOVIA Synchronicity Command Reference: rmfile
ENOVIA Synchronicity Command Reference: ci
ENOVIA Synchronicity Command Reference: unlock
ENOVIA Synchronicity Command Reference: ls
ENOVIA Synchronicity Command Reference: url rmprop
ENOVIA Synchronicity Command Reference: hcm mkedge
ENOVIA Synchronicity Command Reference: hcm rmedge
Overlaying Module Data
You may want to overlay member files from a module version that is a different module version than the one already in your workspace.
412

Using DesignSync with Modules
Overlaying a module version will:
• Fetch the member files of the requested module version • Replace the equivalent member files in your workspace • Retain the current fetched version information of the member files
The status of the workspace member files that were overlaid will be "locally modified".
Note that merging is not involved. There are no conflicts, because conflicts only pertain to merging.
You can overlay across branches:
populate –overlay <branch>:Latest
The populate command above will fetch objects from the specified <branch>, and overlay them onto the equivalent objects in the workspace.
How hrefs are handled
Any hrefs on the branch version that do not exactly match an href in the workspace version will be reported as a failure. No attempt to overlay hrefs is made. Details of a failed href are reported. From the output, you can easily determine the hcm addhref and hcm rmhref commands needed, if you want the href from the branch version.
Similarly, an href on the branch version that does not exist in the workspace version is reported as a failure, with details of the href output.
Note that hrefs cannot simply be changed or added to a workspace, because any href change results in a new module version. (See Creating a New Version of a Module for details.) Populate fetches data from the vault – it does not create new vault data.
Examples
The examples below describe several cross-branch overlay scenarios. As background, you will need to understand natural paths and unique identifiers.
Object present on branch and workspace, with the same natural path
Object present on branch and workspace, with different natural paths
Object present on branch but not in workspace version
Object present on branch and workspace, with the same natural path
In this case, a unique identifier exists in the branch version and the workspace version, with the same natural path.
413

DesignSync Data Manager User's Guide
The branch version object is fetched into the workspace, replacing the object already in the workspace. The fetched version number is that of the workspace module version. The status of the object in the workspace will be "locally modified".
However, if there is an unmanaged object in the workspace, or an object from another module, that is using the same natural path, then the fetch will fail.
Object present on branch and workspace, with different natural paths
In this case, a unique identifier exists in the branch version and the workspace version, with different natural paths.
The branch version object is fetched into the workspace, using the workspace version's path. Note that overlaying an object does not change the object's natural path. The overlay applies to the file contents.
The output from the populate command will include the workspace path used for the fetch.
Object present on branch but not in workspace version
In this case, a unique identifier exists in the branch version that is not in the workspace version.
The branch version object is fetched into the workspace, and added to the module, so that it is a candidate for the next check-in. The ls command will report the object as "Added".
However, if there is an unmanaged object, or an object from a different module, at the natural path in the workspace, then the fetch will fail.
If the workspace module version contains a different object at the same natural path, (i.e. there is a different unique identifier in the workspace version that has the same natural path), then the branch version object will still replace the workspace object. The unique identifier of the workspace object is retained. This results in the contents of one unique identifier replacing the contents of a different unique identifier.
It is possible for the situations above to occur during the same populate. For example, suppose all three of these conditions are met:
• The workspace version contains an object with unique identifier 1111 at natural path file1.txt
• The branch version contains the object with unique identifier 1111 at natural path file2.txt
• The branch version contains the object with unique identifier 2222 at natural path file1.txt
414

Using DesignSync with Modules
Under the previous rules, both of the branch version objects would be brought to the workspace at natural path file1.txt. The first object fetched causes the workspace object to be locally modified.
If the -force option to the populate command is used, both branch version objects will be fetched, with the object that was fetched second replacing the (locally modified) object that was fetched first.
If the –force option is not used, then the object that is fetched first will remain in the workspace. The second fetch attempt will fail, because the workspace object is locally modified.
Related Topics
Merging Module Data
ENOVIA Synchronicity Command Reference: populate
ENOVIA Synchronicity Command Reference: hcm addhref
ENOVIA Synchronicity Command Reference: hcm rmhref
ENOVIA Synchronicity Command Reference: ls
Deleting a Module
You can delete a module from either from your local work area or from the server. You cannot delete a legacy module in the workspace, however, you can delete the module base directory for that module. A module cache can only be deleted from the workspace. Deleting the module on the server does not remove the corresponding mcache or any links to the mcache.
Deleting a module or module cache in your workspace will only remove the module from the workspace. It does not affect the server. If you delete a module from the server it does not affect your work area. If the module was fetched into a work area, and the module it was fetched from was deleted, the files remain in your work area.
Notes
• The deletion of a module is not recursive, it does not follow the hierarchical references of the module and delete the referenced modules. To remove an entire module hierarchy, you must remove each module separately.
• The deletion of a module does not remove hierarchical references to the deleted module and for pre-V5.0 releases configurations of the deleted module.
415

DesignSync Data Manager User's Guide
• If you delete a legacy module without removing the vault and the module resides in the /Projects folder, the module and its configurations will still appear in ProjectSync as a ProjectSync project.
To delete a module:
1. Select the module you want to delete in the List View pane or the Tree view. However, in order to delete a workspace module, you have to select the workspace module’s base directory.
2. Select File =>Delete, or press the Delete key, to bring up the Delete dialog. On the server, you can also select a server module, right-click and select Delete from the context menu.
3. Select options as needed. 4. Click OK to delete the module. You are prompted to confirm the deletion.
Click on the fields in the following illustration for information on each field.
Field and Option Descriptions
Delete the selected objects/Delete all contents of a folder recursively
This option is not applicable to module deletion.
Module context
416

Using DesignSync with Modules
The module context field is only enabled if you have selected a module base directory in the workspace or a module cache. It does not apply to server modules.
The default module context value is set to the first item in the list. To specify a module context you can select from among the module instances for the module base directory being operated on, which are listed alphabetically in the pull-down. You can only select from the available module instances. You cannot type in a value.
Allow deletion of tagged vault object, locked objects and modified objects
This option is only available when deleting a module from your workspace and indicates whether locked or modified objects can be deleted from the workspace. It is not applicable to module caches.
If this option is not specified, then such objects will be left and the module itself will not be deleted from the workspace. The unlocked/unmodified objects will still be deleted from the workspace.
Retain vault information
This option applies to legacy modules on the server. You cannot remove a legacy module from the workspace. Specifies whether the vault folder in which the module contents reside should be removed.
Remove notes after detaching
This option is only available when deleting server legacy modules or server modules.
If checked, deletes all the notes that were attached to the deleted module if the notes have no ties to any other live projects such as in ProjectSync.
Remove vault associated with module
This option is not applicable to module deletion.
Related Topics
Deleting a Module Cache Link
ENOVIA Synchronicity Command Reference: hcm rmmod
Rolling Back a Module
If module changes are made that are not appropriate or correct, you can "roll back" the module to the last good version. Module rollback restores a previous module version by
417
DesignSync Data Manager User's Guide
creating a new module version containing the identical information as the rollback version. All versions between the rollback versions are retained in the server vault.
When a module is rolled back, the module version increments, but all module members contained in the module version return to the versions contained in the original module version. When a modified version of a module member is checked in, DesignSync allocates an appropriate version number such as the next number available sequentially or a branched version number. This maintains the integrity of each checked in module member version and allows any module version to be restored at any time.
The rollback reinstates the module exactly as it was, removing any structural changes to the module. The following table lists the type of structural changes possible, and the result of those changes when rolling back the module version to before the change was made.
Type of structural change Rollback operation Removed file or collection File or collection is added back to the
module as a module member. Removed folder If the folder was explicitly added in the
module version being rolled back to, and was removed in a later version, then the folder is restored to an explicitly added state.
If the folder was implicitly present in the rollback version due to the presence of members within it, and in a later version was either explicitly added or was removed (by removing all the members within it), then the folder is restored to the implicitly added state because it contains module members.
Renamed or moved file or collection The file or collection reverts to the name, location, and version of the object active in the rollback version.
Added file or collection File or collection is removed from the module. To add the object back to the module, use checkin with the Allow Checkin of New Items and Allow Version Skipping (ci -new -skip) options selected.
Removed hierarchical reference The hierarchical reference is restored to the module.
Note: DesignSync performs no consistency checking to verify that the
418
Using DesignSync with Modules
reference is still valid. Added hierarchical reference The hierarchical reference is removed
from the module. You can recreate the reference. For information on creating hierarchical references, see Creating a Hierarchical Reference.
Related Topics
ENOVIA Synchronicity Command Reference Help: rollback command
Animated Use Cases
Creating Modules and Module Data
Module Hierarchy: Module Structure
The animated illustration below will continually repeat, advancing a step every 5 seconds. In this use case, "Server MD" refers to the server metadata. Read an overview of module hierarchy.
419

DesignSync Data Manager User's Guide
View the individual steps.
Creating Module Hierarchy: Overview
The animated examples below should be reviewed in the order they are listed. Each animated topic has a hyperlink to step-by-step illustrations. View the module structure that is used in all of the examples below.
1. Create the Module 2. Add Files and Check In 3. Add an HREF to a Module in the Workspace 4. Populate with Dynamic HREF Mode 5. Add an HREF to a Module not in the Workspace
Read an overview of module hierarchy.
Creating Module Hierarchy: Create the Module
420
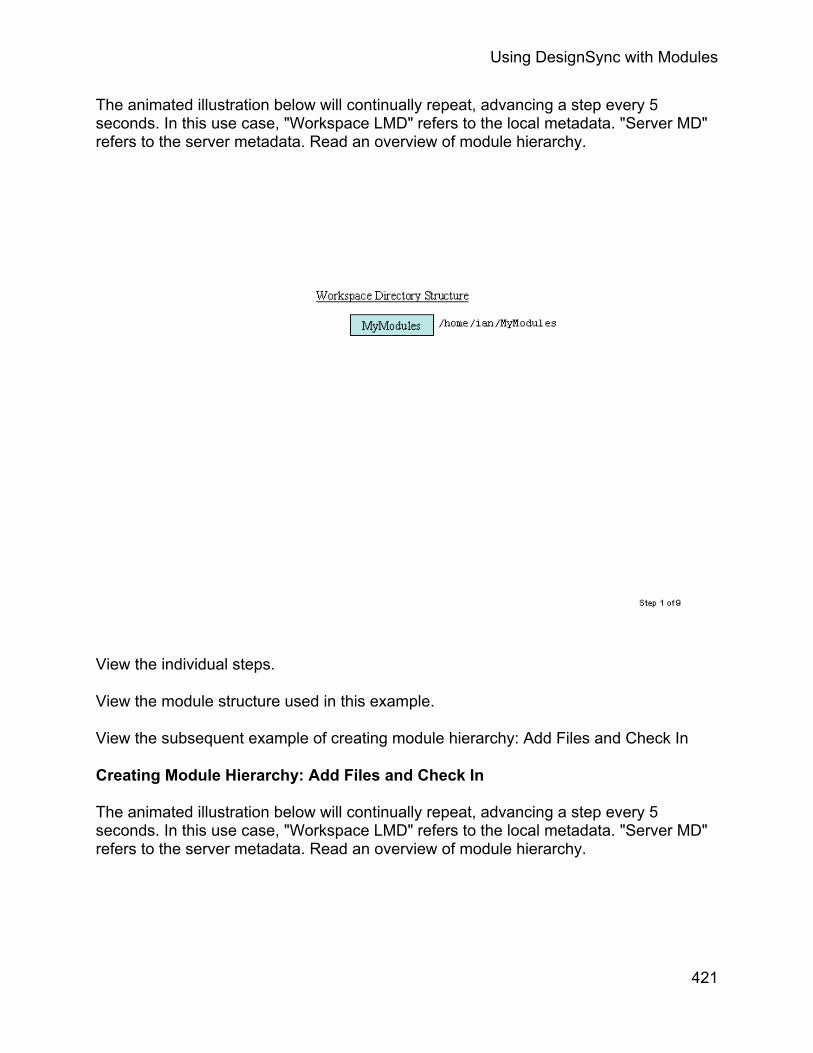
Using DesignSync with Modules
The animated illustration below will continually repeat, advancing a step every 5 seconds. In this use case, "Workspace LMD" refers to the local metadata. "Server MD" refers to the server metadata. Read an overview of module hierarchy.
View the individual steps.
View the module structure used in this example.
View the subsequent example of creating module hierarchy: Add Files and Check In
Creating Module Hierarchy: Add Files and Check In
The animated illustration below will continually repeat, advancing a step every 5 seconds. In this use case, "Workspace LMD" refers to the local metadata. "Server MD" refers to the server metadata. Read an overview of module hierarchy.
421

DesignSync Data Manager User's Guide
View the individual steps.
View the module structure used in this example.
View the subsequent example of creating module hierarchy: Add an HREF to a Module in the Workspace
Creating Module Hierarchy: Add an HREF to a Module in the Workspace
The animated illustration below will continually repeat, advancing a step every 5 seconds. In this use case, "Workspace LMD" refers to the local metadata. "Server MD" refers to the server metadata. Read an overview of module hierarchy.
422

Using DesignSync with Modules
View the individual steps.
View the module structure used in this example.
View the subsequent example of creating module hierarchy: Populate with Dynamic HREF Mode
Creating Module Hierarchy: Populate with Dynamic HREF Mode
The animated illustration below will continually repeat, advancing a step every 5 seconds. In this use case, "Workspace LMD" refers to the local metadata. "Server MD" refers to the server metadata. Read an overview of module hierarchy.
423

DesignSync Data Manager User's Guide
View the individual steps.
View the module structure used in this example.
View the subsequent example of creating module hierarchy: Add an HREF to a Module not in the Workspace
Creating Module Hierarchy: Add an HREF to a Module not in the Workspace
The animated illustration below will continually repeat, advancing a step every 5 seconds. In this use case, "Workspace LMD" refers to the local metadata. "Server MD" refers to the server metadata. Read an overview of module hierarchy.
424

Using DesignSync with Modules
View the individual steps.
View the module structure used in this example.
View the subsequent example of creating module hierarchy: Creating a Peer Structure Module Hierarchy.
Creating a Peer Structure Module Hierarchy
The animated illustration below will continually repeat, advancing a step every 5 seconds. In this use case, "Server MD" refers to the server metadata. Read an overview of module hierarchy.
425

DesignSync Data Manager User's Guide
View the individual steps.
Updating Module Hierarchy
Modifying Module Hierarchy: Overview
The animated examples below should be reviewed in the order they are listed. Each animated topic has a hyperlink to step-by-step illustrations. View the module structure that is used in all of the examples below.
1. The ALU team develops a new "Gold" version of their module. 2. Chip team members use the new version of the ALU module.. 3. The CPU team reverts to an earlier version of the ALU module.
Read an overview of module hierarchy.
Modifying Module Hierarchy: New "Gold" Version of ALU Created
426

Using DesignSync with Modules
The animated illustration below will continually repeat, advancing a step every 5 seconds. In this use case, "Workspace LMD" refers to the local metadata. "Server MD" refers to the server metadata. Read an overview of module hierarchy.
The ALU team has developed a new "Gold" version of their module, with new features. The "Gold" version is intended to replace all earlier versions. The new "Gold" version is version 1.6.1.2 of the ALU module. The new "Gold" ALU version uses a private version of the RAM module. The private version of the RAM module is different than the general version of the RAM module used previously by both ALU and CPU (in the "Creating Module Hierarchy" use cases).
View the individual steps.
View the module structure used in this example.
View the subsequent example of modifying module hierarchy: Chip team members use the new ALU version
Modifying Module Hierarchy: Chip Team Uses New ALU Version
427

DesignSync Data Manager User's Guide
The animated illustration below will continually repeat, advancing a step every 5 seconds. In this use case, "Workspace LMD" refers to the local metadata. "Server MD" refers to the server metadata. Read an overview of module hierarchy.
View the individual steps.
View the module structure used in this example.
View the subsequent example of modifying module hierarchy: The CPU team reverts to an earlier version of ALU.
Modifying Module Hierarchy: CPU Team Reverts to Earlier ALU Version
The animated illustration below will continually repeat, advancing a step every 5 seconds. In this use case, "Workspace LMD" refers to the local metadata. "Server MD" refers to the server metadata. Read an overview of module hierarchy.
The CPU team performs tests with the "Gold" version of ALU. The CPU team decides that the new ALU features are not required, and come at the cost of a larger floor plan. The CPU team reverts to the "RelA" version of the ALU.
428

Using DesignSync with Modules
View the individual steps.
View the module structure used in this example.
Moving a File
The animated illustration below will continually repeat, advancing a step every 5 seconds. In this use case, "Workspace LMD" refers to the local metadata. "Server MD" refers to the server metadata. Read an overview of directory versioning.
429

DesignSync Data Manager User's Guide
View the individual steps.
View an animated example of moving a folder.
Moving a Folder
The animated illustration below will continually repeat, advancing a step every 5 seconds. In this use case, "Workspace LMD" refers to the local metadata. "Server MD" refers to the server metadata. Read an overview of directory versioning.
430

Using DesignSync with Modules
View the individual steps.
View an animated example of moving a file.
Operating with Module Data
Operating on a Module
The animated illustration below will continually repeat, advancing a step every 5 seconds. In this use case, "Workspace LMD" refers to the local metadata. Read an overview of operating on module data.
431

DesignSync Data Manager User's Guide
View the individual steps.
View an animated example of operating on a module's contents.
Operating on a Module's Contents
The animated illustration below will continually repeat, advancing a step every 5 seconds. In this use case, "Workspace LMD" refers to the local metadata. Read an overview of operating on module data.
432

Using DesignSync with Modules
View the individual steps.
View an animated example of operating on a module.
Filtering
The animated illustration below will continually repeat, advancing a step every 5 seconds. Read an overview of filtering module data.
433

DesignSync Data Manager User's Guide
View the individual steps.
View an animated example of a persistent populate filter.
Persistent Populate Filter
The animated illustration below will continually repeat, advancing a step every 5 seconds. In this use case, "Workspace LMD" refers to the local metadata. Read an overview of filtering module data.
434

Using DesignSync with Modules
View the individual steps.
View an animated example of filtering.
Folder-Centric Operations
The animated illustration below will continually repeat, advancing a step every 5 seconds. Read an overview of module recursion.
435

DesignSync Data Manager User's Guide
View the individual steps.
View an animated example of module-centric operations on a module.
View an animated example of module-centric operations on a sub-folder.
View an animated example of module-centric operations on hierarchical references.
Module-Centric Operations on a Module
The animated illustration below will continually repeat, advancing a step every 5 seconds. Read an overview of module recursion.
436

Using DesignSync with Modules
View the individual steps.
View an animated example of module-centric operations on a sub-folder.
View an animated example of module-centric operations on hierarchical references.
View an animated example of folder-centric operations.
Module-Centric Operations on a Subfolder
The animated illustration below will continually repeat, advancing a step every 5 seconds. Read an overview of module recursion.
437
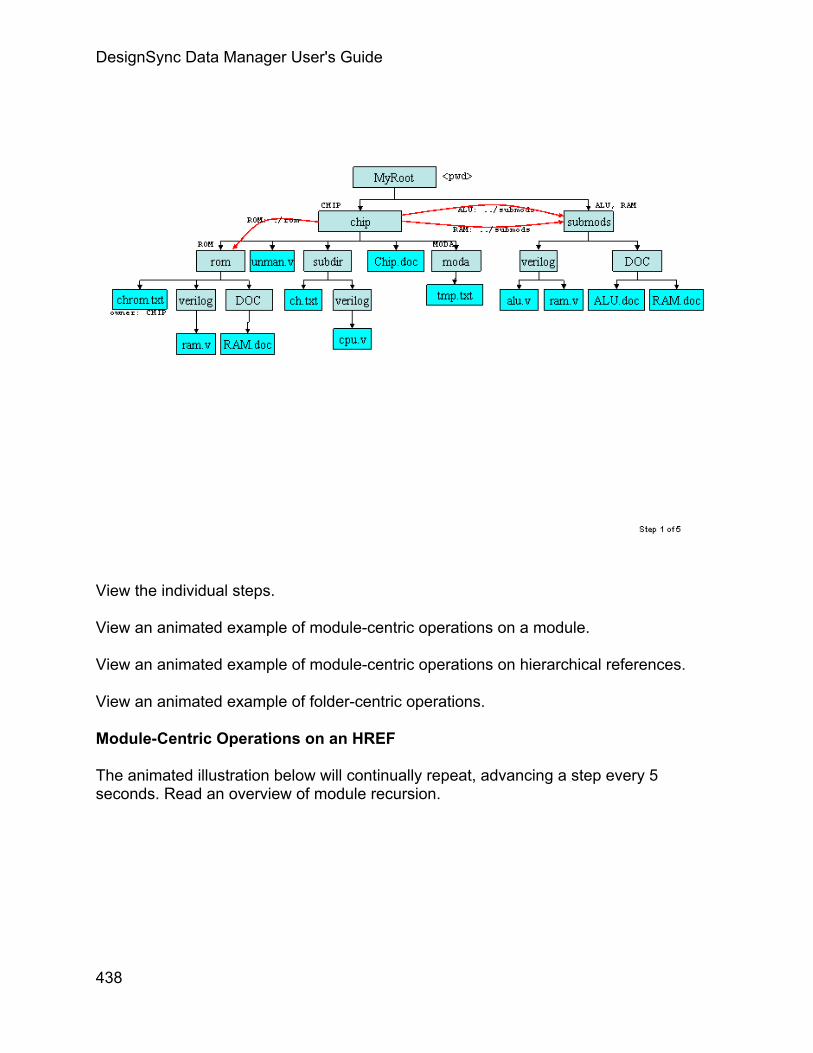
DesignSync Data Manager User's Guide
View the individual steps.
View an animated example of module-centric operations on a module.
View an animated example of module-centric operations on hierarchical references.
View an animated example of folder-centric operations.
Module-Centric Operations on an HREF
The animated illustration below will continually repeat, advancing a step every 5 seconds. Read an overview of module recursion.
438

Using DesignSync with Modules
View the individual steps.
View an animated example of module-centric operations on a module.
View an animated example of folder-centric operations.
View an animated example of module-centric operations on a sub-folder.
Locking a Module Branch
The animated illustration below will continually repeat, advancing a step every 5 seconds. In this use case, "Workspace LMD" refers to the local metadata. "Server MD" refers to the server metadata. Read an overview of module locking.
439

DesignSync Data Manager User's Guide
View the individual steps.
View an animated example of locking module content.
Locking Module Content
The animated illustration below will continually repeat, advancing a step every 5 seconds. In this use case, "Workspace LMD" refers to the local metadata. "Server MD" refers to the server metadata. Read an overview of module locking.
440

Using DesignSync with Modules
View the individual steps.
View an animated example of locking a module branch.
Branching a Module
The animated illustration below will continually repeat, advancing a step every 5 seconds. In this use case, the RAM team is producing a new version of the RAM module, with an "automatic undo" feature. The new version is created as a side-branch of version 1.4. "Workspace LMD" refers to the local metadata. "Server MD" refers to the server metadata. Read an overview of module branching.
441

DesignSync Data Manager User's Guide
View the individual steps.
Merging and Modules
Auto-Merging Locally Added Files
The animated illustration below will continually repeat, advancing a step every 5 seconds. In this use case, "Workspace LMD" refers to the local metadata. "Server MD" refers to the server metadata. Read a description of this use case.
442

Using DesignSync with Modules
View the individual steps.
Auto-Merging Locally Modified Files
The animated illustration below will continually repeat, advancing a step every 5 seconds. In this use case, "Workspace LMD" refers to the local metadata. "Server MD" refers to the server metadata. Read a description of this use case.
443
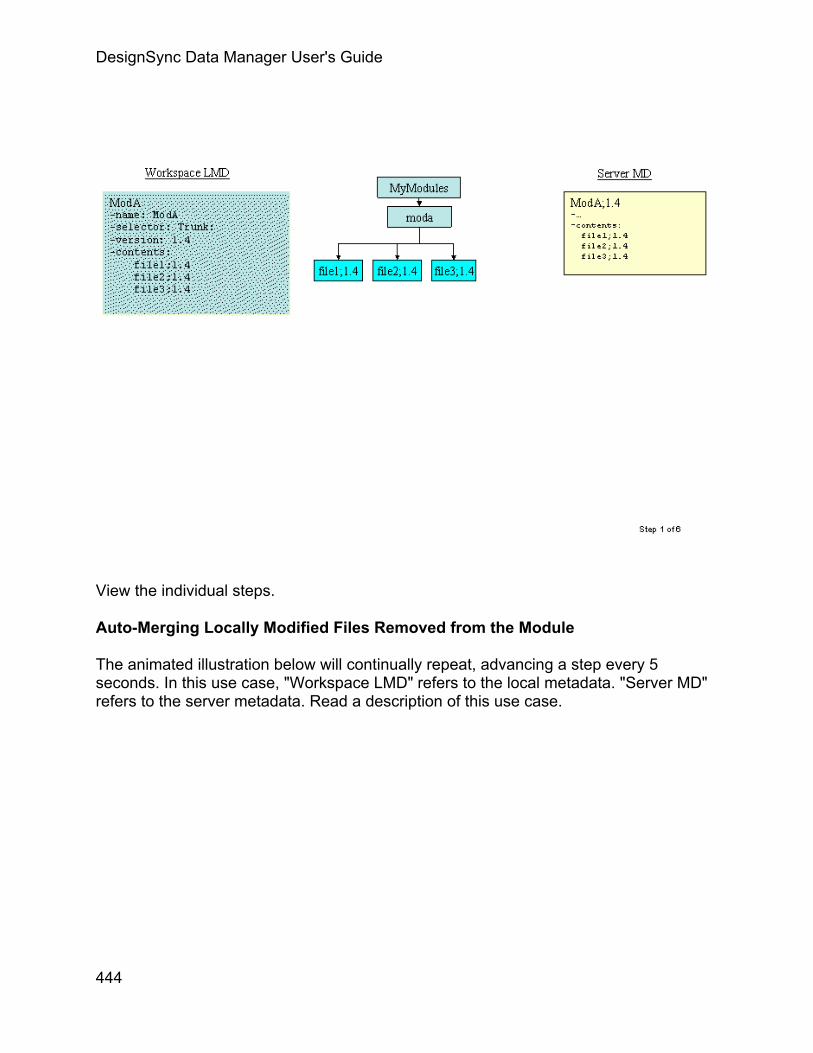
DesignSync Data Manager User's Guide
View the individual steps.
Auto-Merging Locally Modified Files Removed from the Module
The animated illustration below will continually repeat, advancing a step every 5 seconds. In this use case, "Workspace LMD" refers to the local metadata. "Server MD" refers to the server metadata. Read a description of this use case.
444

Using DesignSync with Modules
View the individual steps.
Auto-Merging Non-Latest Locally Modified Files
The animated illustration below will continually repeat, advancing a step every 5 seconds. In this use case, "Workspace LMD" refers to the local metadata. "Server MD" refers to the server metadata. Read a description of this use case.
445

DesignSync Data Manager User's Guide
View the individual steps.
Auto-Merging Locally Modified Files Renamed in the Module
The animated illustration below will continually repeat, advancing a step every 5 seconds. In this use case, "Workspace LMD" refers to the local metadata. "Server MD" refers to the server metadata. Read a description of this use case.
446

Using DesignSync with Modules
View the individual steps.
Auto-Merging Locally Modified Files with Other Files Renamed in the Module
The animated illustration below will continually repeat, advancing a step every 5 seconds. In this use case, "Workspace LMD" refers to the local metadata. "Server MD" refers to the server metadata. Read a description of this use case.
447

DesignSync Data Manager User's Guide
View the individual steps.
In-Branch Merging of Locally Added Files
The animated illustration below will continually repeat, advancing a step every 5 seconds. In this use case, "Workspace LMD" refers to the local metadata. "Server MD" refers to the server metadata. Read a description of this use case.
448

Using DesignSync with Modules
View the individual steps.
In-Branch Merging of Locally Modified Files
The animated illustration below will continually repeat, advancing a step every 5 seconds. In this use case, "Workspace LMD" refers to the local metadata. "Server MD" refers to the server metadata. Read a description of this use case.
449

DesignSync Data Manager User's Guide
View the individual steps.
Step-by-Step Use Cases
Creating Modules and Module Data
Module Hierarchy: Module Structure
Step 1: Module Structure
In this use case, "Server MD" refers to the server metadata. Read an overview of module hierarchy.
450

Using DesignSync with Modules
View the next step.
Step 2: Module Structure
In this use case, "Server MD" refers to the server metadata. Read an overview of module hierarchy.
451

DesignSync Data Manager User's Guide
View the next step.
Step 3: Module Structure
In this use case, "Server MD" refers to the server metadata. Read an overview of module hierarchy.
452

Using DesignSync with Modules
View the next step.
Step 4: Module Structure
In this use case, "Server MD" refers to the server metadata. Read an overview of module hierarchy.
453
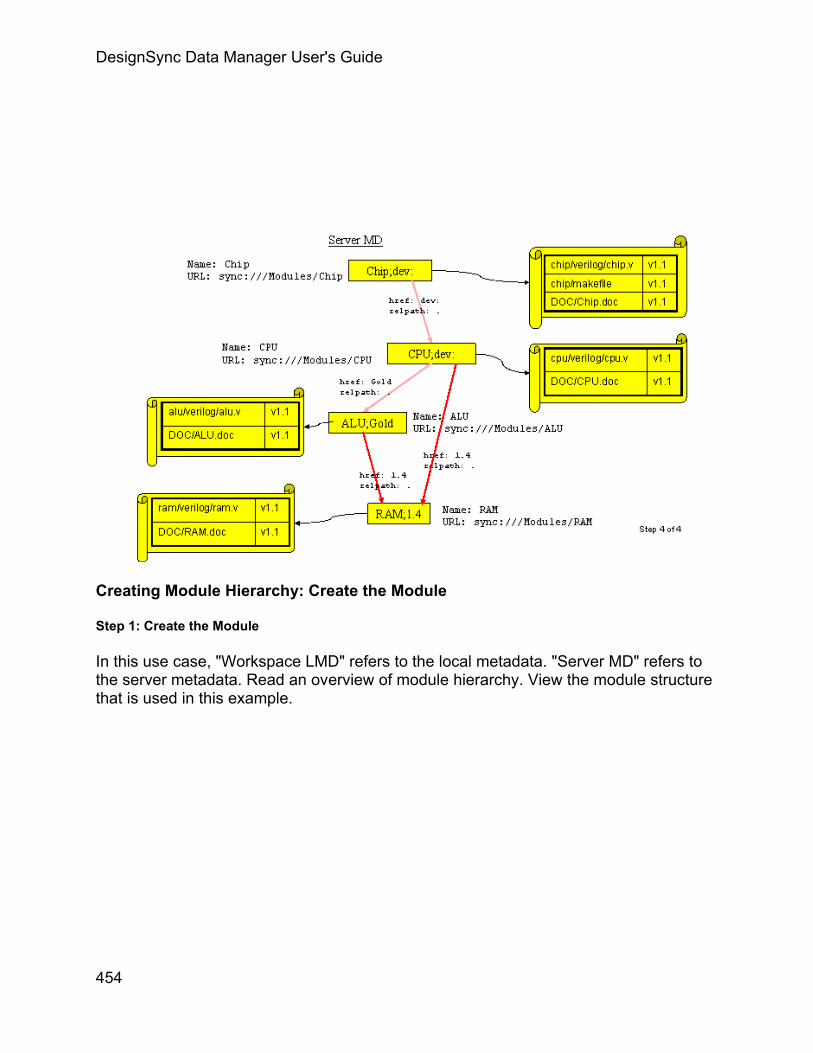
DesignSync Data Manager User's Guide
Creating Module Hierarchy: Create the Module
Step 1: Create the Module
In this use case, "Workspace LMD" refers to the local metadata. "Server MD" refers to the server metadata. Read an overview of module hierarchy. View the module structure that is used in this example.
454

Using DesignSync with Modules
View the next step.
Step 2: Create the Module
In this use case, "Workspace LMD" refers to the local metadata. "Server MD" refers to the server metadata. Read an overview of module hierarchy. View the module structure that is used in this example.
455

DesignSync Data Manager User's Guide
View the next step.
Step 3: Create the Module
In this use case, "Workspace LMD" refers to the local metadata. "Server MD" refers to the server metadata. Read an overview of module hierarchy. View the module structure that is used in this example.
456

Using DesignSync with Modules
View the next step.
Step 4: Create the Module
In this use case, "Workspace LMD" refers to the local metadata. "Server MD" refers to the server metadata. Read an overview of module hierarchy. View the module structure that is used in this example.
457

DesignSync Data Manager User's Guide
View the next step.
Step 5: Create the Module
In this use case, "Workspace LMD" refers to the local metadata. "Server MD" refers to the server metadata. Read an overview of module hierarchy. View the module structure that is used in this example.
458

Using DesignSync with Modules
View the next step.
Step 6: Create the Module
In this use case, "Workspace LMD" refers to the local metadata. "Server MD" refers to the server metadata. Read an overview of module hierarchy. View the module structure that is used in this example.
459
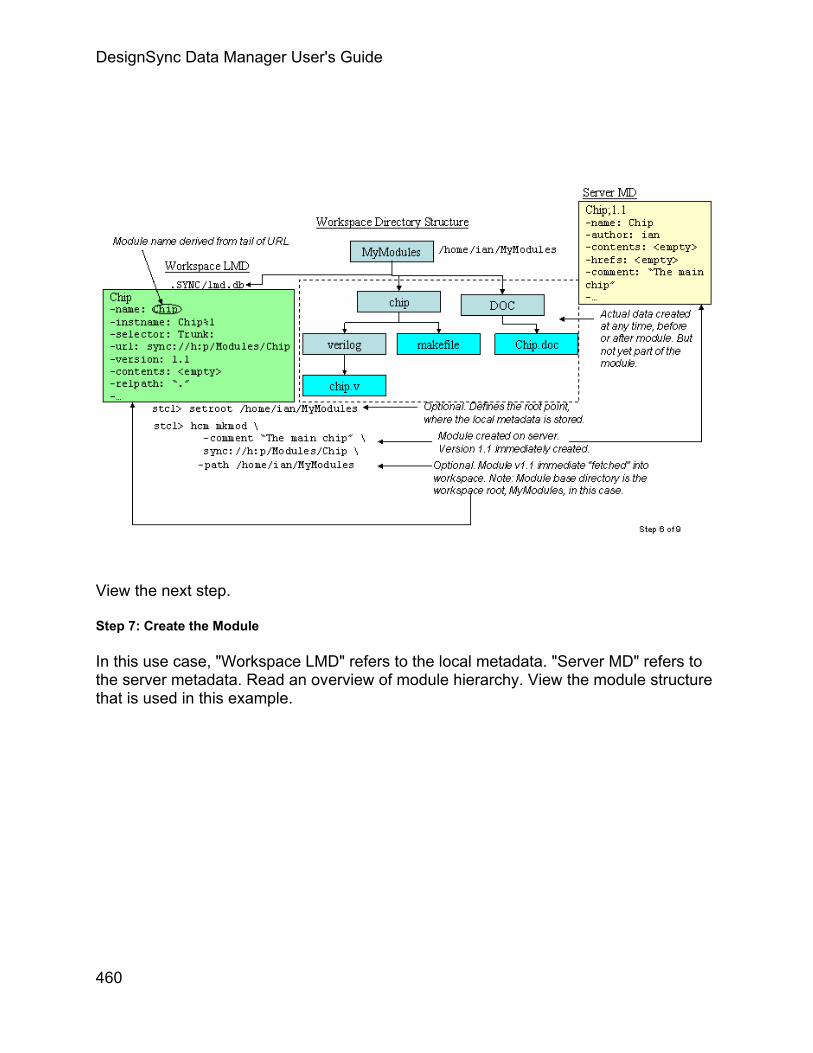
DesignSync Data Manager User's Guide
View the next step.
Step 7: Create the Module
In this use case, "Workspace LMD" refers to the local metadata. "Server MD" refers to the server metadata. Read an overview of module hierarchy. View the module structure that is used in this example.
460

Using DesignSync with Modules
View the next step.
Step 8: Create the Module
In this use case, "Workspace LMD" refers to the local metadata. "Server MD" refers to the server metadata. Read an overview of module hierarchy. View the module structure that is used in this example.
461

DesignSync Data Manager User's Guide
View the next step.
Step 9: Create the Module
In this use case, "Workspace LMD" refers to the local metadata. "Server MD" refers to the server metadata. Read an overview of module hierarchy. View the module structure that is used in this example.
462

Using DesignSync with Modules
Creating Module Hierarchy: Add Files and Check In
Step 1: Add Files and Check In
In this use case, "Workspace LMD" refers to the local metadata. "Server MD" refers to the server metadata. Read an overview of module hierarchy. View the module structure that is used in this example.
463
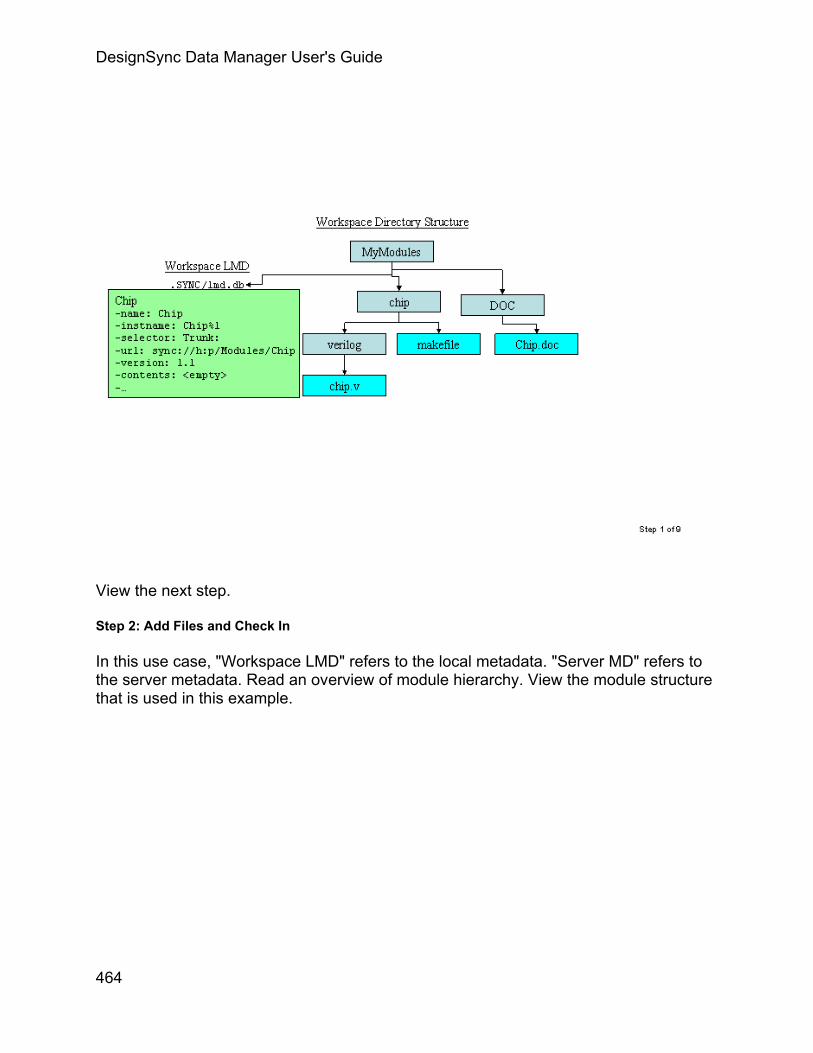
DesignSync Data Manager User's Guide
View the next step.
Step 2: Add Files and Check In
In this use case, "Workspace LMD" refers to the local metadata. "Server MD" refers to the server metadata. Read an overview of module hierarchy. View the module structure that is used in this example.
464

Using DesignSync with Modules
View the next step.
Step 3: Add Files and Check In
In this use case, "Workspace LMD" refers to the local metadata. "Server MD" refers to the server metadata. Read an overview of module hierarchy. View the module structure that is used in this example.
465

DesignSync Data Manager User's Guide
View the next step.
Step 4: Add Files and Check In
In this use case, "Workspace LMD" refers to the local metadata. "Server MD" refers to the server metadata. Read an overview of module hierarchy. View the module structure that is used in this example.
466

Using DesignSync with Modules
View the next step.
Step 5: Add Files and Check In
In this use case, "Workspace LMD" refers to the local metadata. "Server MD" refers to the server metadata. Read an overview of module hierarchy. View the module structure that is used in this example.
467

DesignSync Data Manager User's Guide
View the next step.
Step 6: Add Files and Check In
In this use case, "Workspace LMD" refers to the local metadata. "Server MD" refers to the server metadata. Read an overview of module hierarchy. View the module structure that is used in this example.
468

Using DesignSync with Modules
View the next step.
Step 7: Add Files and Check In
In this use case, "Workspace LMD" refers to the local metadata. "Server MD" refers to the server metadata. Read an overview of module hierarchy. View the module structure that is used in this example.
469

DesignSync Data Manager User's Guide
View the next step.
Step 8: Add Files and Check In
In this use case, "Workspace LMD" refers to the local metadata. "Server MD" refers to the server metadata. Read an overview of module hierarchy. View the module structure that is used in this example.
470
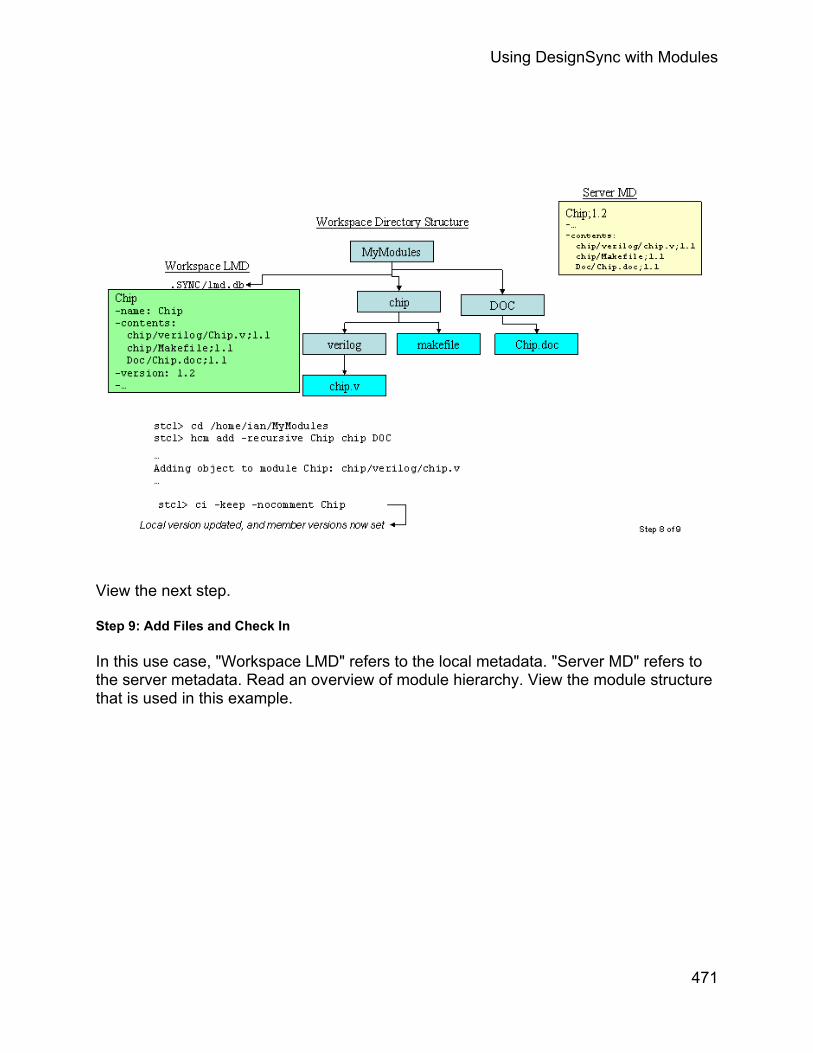
Using DesignSync with Modules
View the next step.
Step 9: Add Files and Check In
In this use case, "Workspace LMD" refers to the local metadata. "Server MD" refers to the server metadata. Read an overview of module hierarchy. View the module structure that is used in this example.
471

DesignSync Data Manager User's Guide
Creating Module Hierarchy: Add an HREF to a Module in the Workspace
Step 1: Add an HREF to a Module in the Workspace
In this use case, "Workspace LMD" refers to the local metadata. "Server MD" refers to the server metadata. Read an overview of module hierarchy. View the module structure that is used in this example.
472

Using DesignSync with Modules
View the next step.
Step 2: Add an HREF to a Module in the Workspace
In this use case, "Workspace LMD" refers to the local metadata. "Server MD" refers to the server metadata. Read an overview of module hierarchy. View the module structure that is used in this example.
473
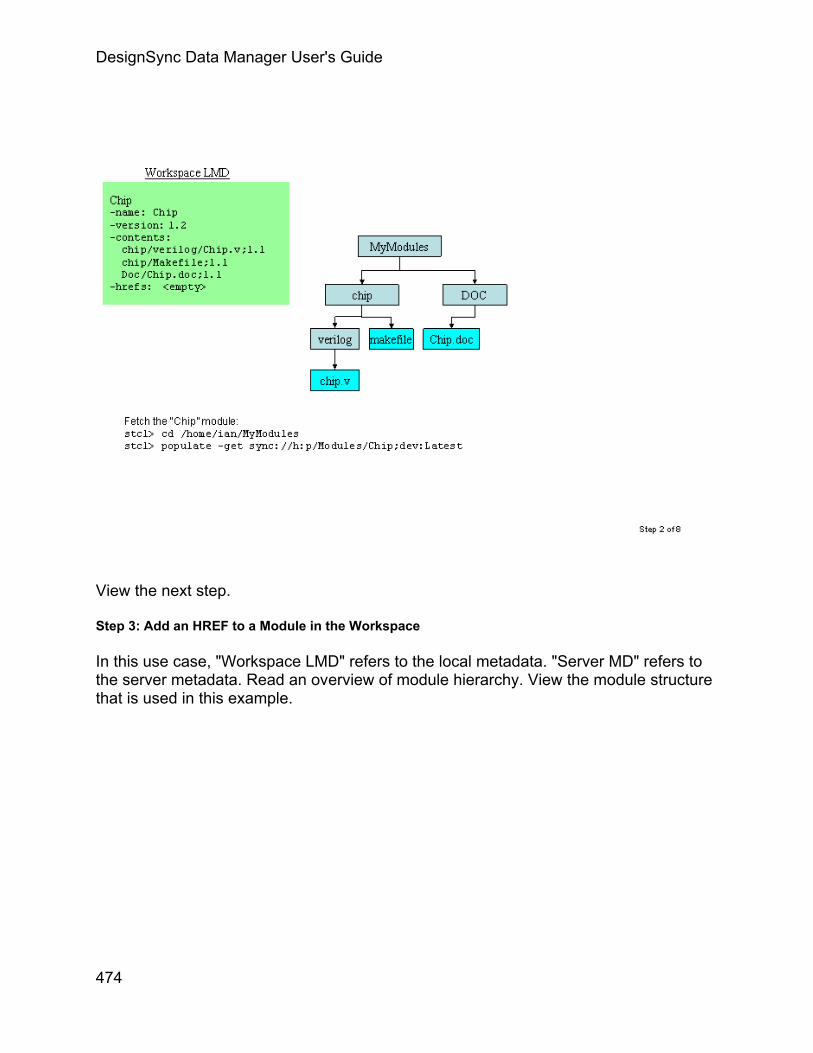
DesignSync Data Manager User's Guide
View the next step.
Step 3: Add an HREF to a Module in the Workspace
In this use case, "Workspace LMD" refers to the local metadata. "Server MD" refers to the server metadata. Read an overview of module hierarchy. View the module structure that is used in this example.
474

Using DesignSync with Modules
View the next step.
Step 4: Add an HREF to a Module in the Workspace
In this use case, "Workspace LMD" refers to the local metadata. "Server MD" refers to the server metadata. Read an overview of module hierarchy. View the module structure that is used in this example.
475

DesignSync Data Manager User's Guide
View the next step.
Step 5: Add an HREF to a Module in the Workspace
In this use case, "Workspace LMD" refers to the local metadata. "Server MD" refers to the server metadata. Read an overview of module hierarchy. View the module structure that is used in this example.
476

Using DesignSync with Modules
View the next step.
Step 6: Add an HREF to a Module in the Workspace
In this use case, "Workspace LMD" refers to the local metadata. "Server MD" refers to the server metadata. Read an overview of module hierarchy. View the module structure that is used in this example.
477

DesignSync Data Manager User's Guide
View the next step.
Step 7: Add an HREF to a Module in the Workspace
In this use case, "Workspace LMD" refers to the local metadata. "Server MD" refers to the server metadata. Read an overview of module hierarchy. View the module structure that is used in this example.
478

Using DesignSync with Modules
View the next step.
Step 8: Add an HREF to a Module in the Workspace
In this use case, "Workspace LMD" refers to the local metadata. "Server MD" refers to the server metadata. Read an overview of module hierarchy. View the module structure that is used in this example.
479

DesignSync Data Manager User's Guide
Creating Module Hierarchy: Populate with Dynamic HREF Mode
Step 1: Populate with Dynamic HREF Mode
In this use case, "Workspace LMD" refers to the local metadata. "Server MD" refers to the server metadata. Read an overview of module hierarchy. View the module structure that is used in this example.
480

Using DesignSync with Modules
View the next step.
Step 2: Populate with Dynamic HREF Mode
In this use case, "Workspace LMD" refers to the local metadata. "Server MD" refers to the server metadata. Read an overview of module hierarchy. View the module structure that is used in this example.
481

DesignSync Data Manager User's Guide
View the next step.
Step 3: Populate with Dynamic HREF Mode
In this use case, "Workspace LMD" refers to the local metadata. "Server MD" refers to the server metadata. Read an overview of module hierarchy. View the module structure that is used in this example.
482

Using DesignSync with Modules
View the next step.
Step 4: Populate with Dynamic HREF Mode
In this use case, "Workspace LMD" refers to the local metadata. "Server MD" refers to the server metadata. Read an overview of module hierarchy. View the module structure that is used in this example.
483
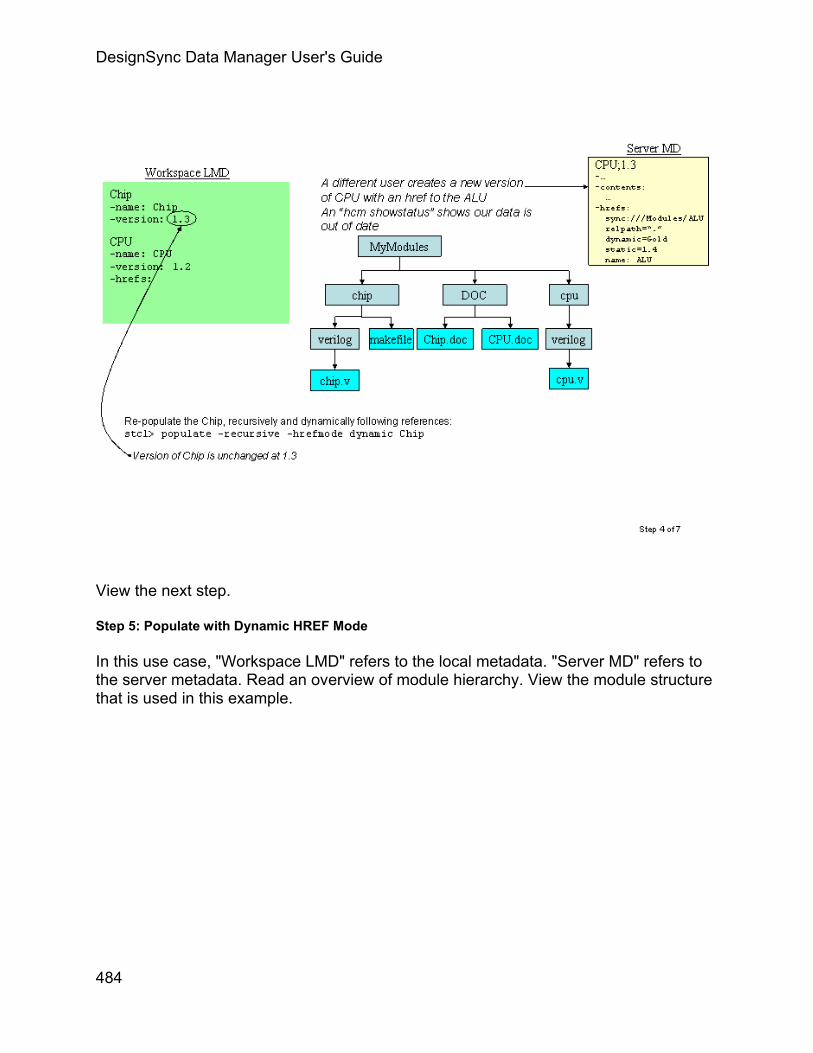
DesignSync Data Manager User's Guide
View the next step.
Step 5: Populate with Dynamic HREF Mode
In this use case, "Workspace LMD" refers to the local metadata. "Server MD" refers to the server metadata. Read an overview of module hierarchy. View the module structure that is used in this example.
484

Using DesignSync with Modules
View the next step.
Step 6: Populate with Dynamic HREF Mode
In this use case, "Workspace LMD" refers to the local metadata. "Server MD" refers to the server metadata. Read an overview of module hierarchy. View the module structure that is used in this example.
485

DesignSync Data Manager User's Guide
View the next step.
Step 7: Populate with Dynamic HREF Mode
In this use case, "Workspace LMD" refers to the local metadata. "Server MD" refers to the server metadata. Read an overview of module hierarchy. View the module structure that is used in this example.
486

Using DesignSync with Modules
Creating Module Hierarchy: Add an HREF to a Module not in the Workspace
Step 1: Add an HREF to a Module not in the Workspace
In this use case, "Workspace LMD" refers to the local metadata. "Server MD" refers to the server metadata. Read an overview of module hierarchy. View the module structure that is used in this example.
487

DesignSync Data Manager User's Guide
View the next step.
Step 2: Add an HREF to a Module not in the Workspace
In this use case, "Workspace LMD" refers to the local metadata. "Server MD" refers to the server metadata. Read an overview of module hierarchy. View the module structure that is used in this example.
488

Using DesignSync with Modules
View the next step.
Step 3: Add an HREF to a Module not in the Workspace
In this use case, "Workspace LMD" refers to the local metadata. "Server MD" refers to the server metadata. Read an overview of module hierarchy. View the module structure that is used in this example.
489

DesignSync Data Manager User's Guide
View the next step.
Step 4: Add an HREF to a Module not in the Workspace
In this use case, "Workspace LMD" refers to the local metadata. "Server MD" refers to the server metadata. Read an overview of module hierarchy. View the module structure that is used in this example.
490
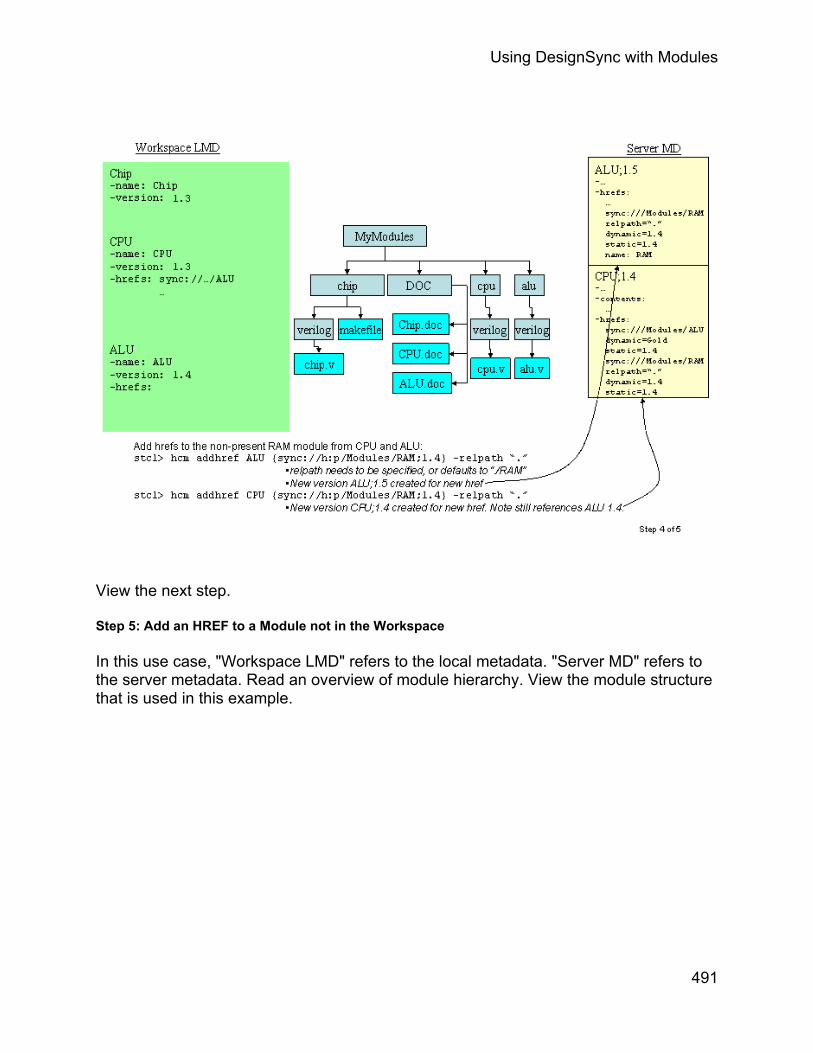
Using DesignSync with Modules
View the next step.
Step 5: Add an HREF to a Module not in the Workspace
In this use case, "Workspace LMD" refers to the local metadata. "Server MD" refers to the server metadata. Read an overview of module hierarchy. View the module structure that is used in this example.
491

DesignSync Data Manager User's Guide
Creating a Peer Structure Module Hierarchy
Step 1: Creating a Peer Structure Module Hierarchy
In this use case, "Server MD" refers to the server metadata. Read an overview of module hierarchy.
492

Using DesignSync with Modules
View the next step.
Step 2: Creating a Peer Structure Module Hierarchy
In this use case, "Server MD" refers to the server metadata. Read an overview of module hierarchy.
493

DesignSync Data Manager User's Guide
View the next step.
Step 3: Creating a Peer Structure Module Hierarchy
In this use case, "Server MD" refers to the server metadata. Read an overview of module hierarchy.
494

Using DesignSync with Modules
View the next step.
Step 4: Creating a Peer Structure Module Hierarchy
In this use case, "Server MD" refers to the server metadata. Read an overview of module hierarchy.
495

DesignSync Data Manager User's Guide
View the next step.
Step 5: Creating a Peer Structure Module Hierarchy
In this use case, "Server MD" refers to the server metadata. Read an overview of module hierarchy.
496

Using DesignSync with Modules
Updating Module Hierarchy
Modifying Module Hierarchy: New "Gold" Version of ALU Created
Step 1: New "Gold" Version of ALU Created
In this use case, "Workspace LMD" refers to the local metadata. "Server MD" refers to the server metadata. Read an overview of module hierarchy. View the module structure that is used in this example.
The ALU team has developed a new "Gold" version of their module, with new features. The "Gold" version is intended to replace all earlier versions. The new "Gold" version is version 1.6.1.2 of the ALU module. The new "Gold" ALU version uses a private version of the RAM module. The private version of the RAM module is different than the general version of the RAM module used previously by both ALU and CPU (in the "Creating Module Hierarchy" use cases).
497

DesignSync Data Manager User's Guide
View the next step.
Step 2: New "Gold" Version of ALU Created
In this use case, "Workspace LMD" refers to the local metadata. "Server MD" refers to the server metadata. Read an overview of module hierarchy. View the module structure that is used in this example.
The ALU team has developed a new "Gold" version of their module, with new features. The "Gold" version is intended to replace all earlier versions. The new "Gold" version is version 1.6.1.2 of the ALU module. The new "Gold" ALU version uses a private version of the RAM module. The private version of the RAM module is different than the general version of the RAM module used previously by both ALU and CPU (in the "Creating Module Hierarchy" use cases).
498

Using DesignSync with Modules
View the next step.
Step 3: New "Gold" Version of ALU Created
In this use case, "Workspace LMD" refers to the local metadata. "Server MD" refers to the server metadata. Read an overview of module hierarchy. View the module structure that is used in this example.
The ALU team has developed a new "Gold" version of their module, with new features. The "Gold" version is intended to replace all earlier versions. The new "Gold" version is version 1.6.1.2 of the ALU module. The new "Gold" ALU version uses a private version of the RAM module. The private version of the RAM module is different than the general version of the RAM module used previously by both ALU and CPU (in the "Creating Module Hierarchy" use cases).
499

DesignSync Data Manager User's Guide
View the next step.
Step 4: New "Gold" Version of ALU Created
In this use case, "Workspace LMD" refers to the local metadata. "Server MD" refers to the server metadata. Read an overview of module hierarchy. View the module structure that is used in this example.
The ALU team has developed a new "Gold" version of their module, with new features. The "Gold" version is intended to replace all earlier versions. The new "Gold" version is version 1.6.1.2 of the ALU module. The new "Gold" ALU version uses a private version of the RAM module. The private version of the RAM module is different than the general version of the RAM module used previously by both ALU and CPU (in the "Creating Module Hierarchy" use cases).
500
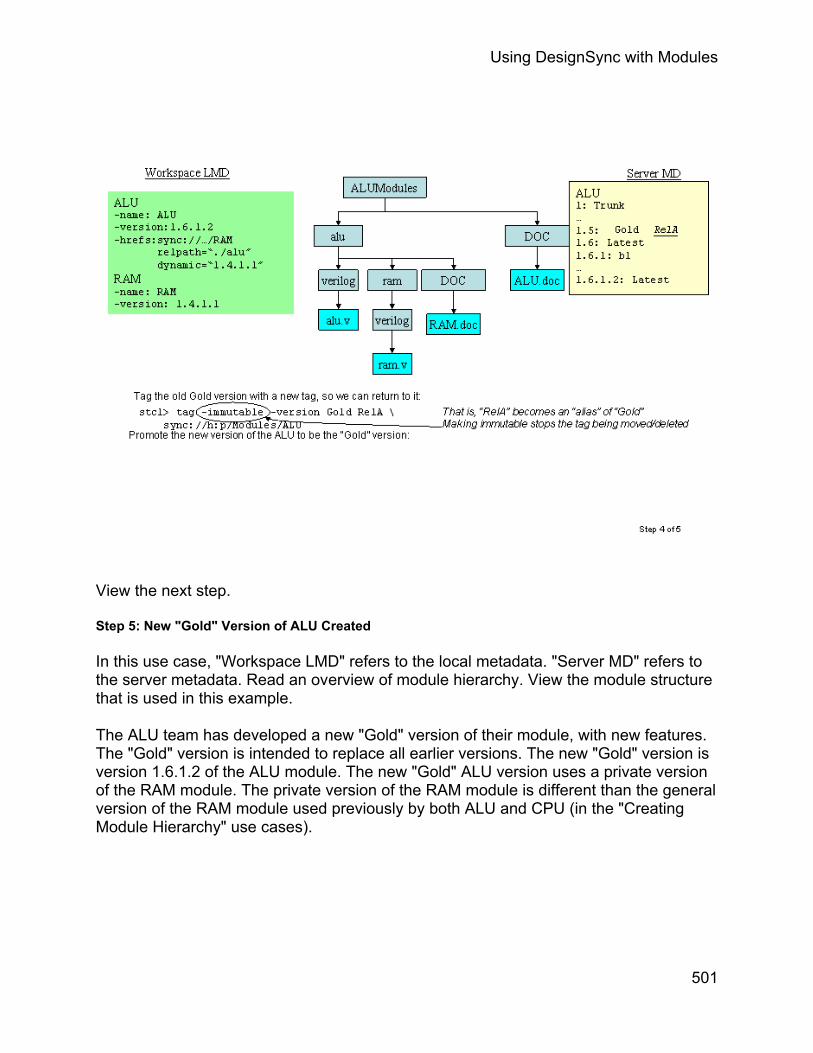
Using DesignSync with Modules
View the next step.
Step 5: New "Gold" Version of ALU Created
In this use case, "Workspace LMD" refers to the local metadata. "Server MD" refers to the server metadata. Read an overview of module hierarchy. View the module structure that is used in this example.
The ALU team has developed a new "Gold" version of their module, with new features. The "Gold" version is intended to replace all earlier versions. The new "Gold" version is version 1.6.1.2 of the ALU module. The new "Gold" ALU version uses a private version of the RAM module. The private version of the RAM module is different than the general version of the RAM module used previously by both ALU and CPU (in the "Creating Module Hierarchy" use cases).
501

DesignSync Data Manager User's Guide
Modifying Module Hierarchy: Chip Team Uses New ALU Version
Step 1: Chip Team Uses New ALU Version
In this use case, "Workspace LMD" refers to the local metadata. "Server MD" refers to the server metadata. Read an overview of module hierarchy. View the module structure that is used in this example.
502

Using DesignSync with Modules
View the next step.
Step 2: Chip Team Uses New ALU Version
In this use case, "Workspace LMD" refers to the local metadata. "Server MD" refers to the server metadata. Read an overview of module hierarchy. View the module structure that is used in this example.
503
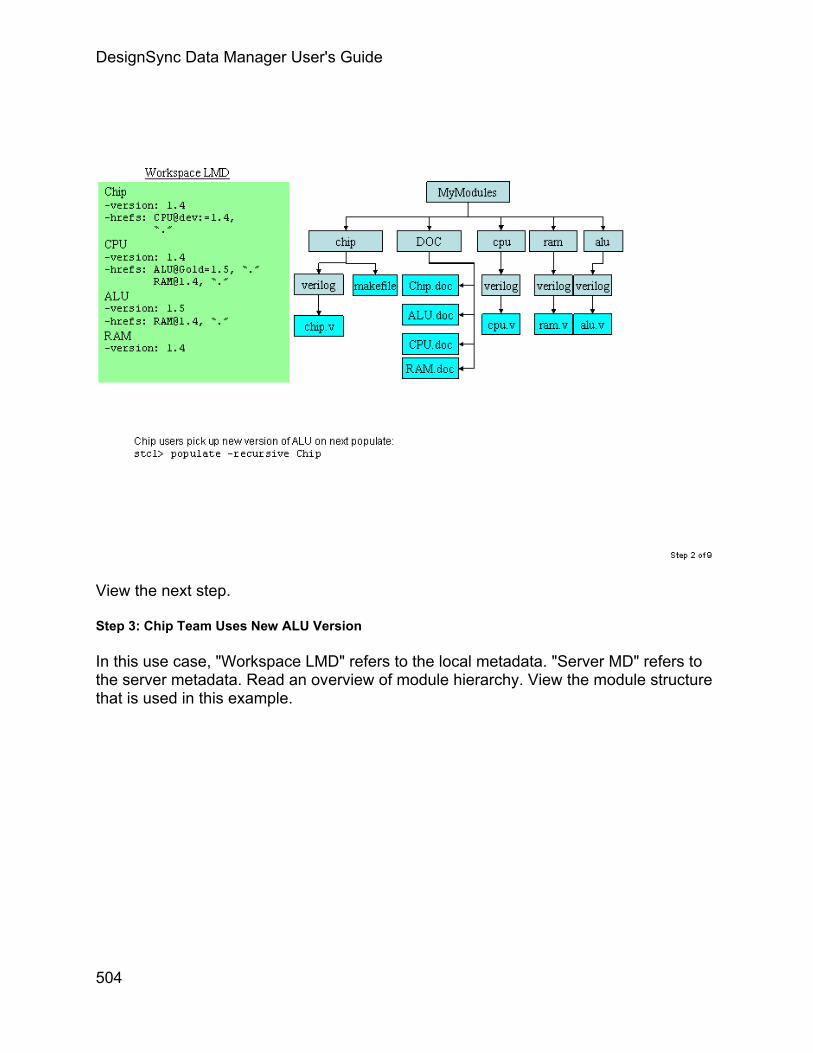
DesignSync Data Manager User's Guide
View the next step.
Step 3: Chip Team Uses New ALU Version
In this use case, "Workspace LMD" refers to the local metadata. "Server MD" refers to the server metadata. Read an overview of module hierarchy. View the module structure that is used in this example.
504

Using DesignSync with Modules
View the next step.
Step 4: Chip Team Uses New ALU Version
In this use case, "Workspace LMD" refers to the local metadata. "Server MD" refers to the server metadata. Read an overview of module hierarchy. View the module structure that is used in this example.
505

DesignSync Data Manager User's Guide
View the next step.
Step 5: Chip Team Uses New ALU Version
In this use case, "Workspace LMD" refers to the local metadata. "Server MD" refers to the server metadata. Read an overview of module hierarchy. View the module structure that is used in this example.
506

Using DesignSync with Modules
View the next step.
Step 6: Chip Team Uses New ALU Version
In this use case, "Workspace LMD" refers to the local metadata. "Server MD" refers to the server metadata. Read an overview of module hierarchy. View the module structure that is used in this example.
507

DesignSync Data Manager User's Guide
View the next step.
Step 7: Chip Team Uses New ALU Version
In this use case, "Workspace LMD" refers to the local metadata. "Server MD" refers to the server metadata. Read an overview of module hierarchy. View the module structure that is used in this example.
508

Using DesignSync with Modules
View the next step.
Step 8: Chip Team Uses New ALU Version
In this use case, "Workspace LMD" refers to the local metadata. "Server MD" refers to the server metadata. Read an overview of module hierarchy. View the module structure that is used in this example.
509

DesignSync Data Manager User's Guide
View the next step.
Step 9: Chip Team Uses New ALU Version
In this use case, "Workspace LMD" refers to the local metadata. "Server MD" refers to the server metadata. Read an overview of module hierarchy. View the module structure that is used in this example.
510

Using DesignSync with Modules
Modifying Module Hierarchy: CPU Team Reverts to Earlier ALU Version
Step 1: CPU Team Reverts to Earlier ALU Version
In this use case, "Workspace LMD" refers to the local metadata. "Server MD" refers to the server metadata. Read an overview of module hierarchy. View the module structure that is used in this example.
The CPU team performs tests with the "Gold" version of ALU. The CPU team decides that the new ALU features are not required, and come at the cost of a larger floor plan. The CPU team reverts to the "RelA" version of the ALU.
511

DesignSync Data Manager User's Guide
View the next step.
Step 2: CPU Team Reverts to Earlier ALU Version
In this use case, "Workspace LMD" refers to the local metadata. "Server MD" refers to the server metadata. Read an overview of module hierarchy. View the module structure that is used in this example.
The CPU team performs tests with the "Gold" version of ALU. The CPU team decides that the new ALU features are not required, and come at the cost of a larger floor plan. The CPU team reverts to the "RelA" version of the ALU.
512

Using DesignSync with Modules
View the next step.
Step 3: CPU Team Reverts to Earlier ALU Version
In this use case, "Workspace LMD" refers to the local metadata. "Server MD" refers to the server metadata. Read an overview of module hierarchy. View the module structure that is used in this example.
The CPU team performs tests with the "Gold" version of ALU. The CPU team decides that the new ALU features are not required, and come at the cost of a larger floor plan. The CPU team reverts to the "RelA" version of the ALU.
513

DesignSync Data Manager User's Guide
View the next step.
Step 4: CPU Team Reverts to Earlier ALU Version
In this use case, "Workspace LMD" refers to the local metadata. "Server MD" refers to the server metadata. Read an overview of module hierarchy. View the module structure that is used in this example.
The CPU team performs tests with the "Gold" version of ALU. The CPU team decides that the new ALU features are not required, and come at the cost of a larger floor plan. The CPU team reverts to the "RelA" version of the ALU.
514

Using DesignSync with Modules
View the next step.
Step 5: CPU Team Reverts to Earlier ALU Version
In this use case, "Workspace LMD" refers to the local metadata. "Server MD" refers to the server metadata. Read an overview of module hierarchy. View the module structure that is used in this example.
The CPU team performs tests with the "Gold" version of ALU. The CPU team decides that the new ALU features are not required, and come at the cost of a larger floor plan. The CPU team reverts to the "RelA" version of the ALU.
515

DesignSync Data Manager User's Guide
View the next step.
Step 6: CPU Team Reverts to Earlier ALU Version
In this use case, "Workspace LMD" refers to the local metadata. "Server MD" refers to the server metadata. Read an overview of module hierarchy. View the module structure that is used in this example.
The CPU team performs tests with the "Gold" version of ALU. The CPU team decides that the new ALU features are not required, and come at the cost of a larger floor plan. The CPU team reverts to the "RelA" version of the ALU.
516

Using DesignSync with Modules
Moving a File
Step 1: Moving a File
In this use case, "Workspace LMD" refers to the local metadata. "Server MD" refers to the server metadata. Read an overview of directory versioning.
517

DesignSync Data Manager User's Guide
View the next step.
Step 2: Moving a File
In this use case, "Workspace LMD" refers to the local metadata. "Server MD" refers to the server metadata. Read an overview of directory versioning.
518

Using DesignSync with Modules
View the next step.
Step 3: Moving a File
In this use case, "Workspace LMD" refers to the local metadata. "Server MD" refers to the server metadata. Read an overview of directory versioning.
519

DesignSync Data Manager User's Guide
View the next step.
Step 4: Moving a File
In this use case, "Workspace LMD" refers to the local metadata. "Server MD" refers to the server metadata. Read an overview of directory versioning.
520

Using DesignSync with Modules
View the next step.
Step 5: Moving a File
In this use case, "Workspace LMD" refers to the local metadata. "Server MD" refers to the server metadata. Read an overview of directory versioning.
521

DesignSync Data Manager User's Guide
View the next step.
Step 6: Moving a File
In this use case, "Workspace LMD" refers to the local metadata. "Server MD" refers to the server metadata. Read an overview of directory versioning.
522

Using DesignSync with Modules
Moving a Folder
Step 1: Moving a Folder
In this use case, "Workspace LMD" refers to the local metadata. "Server MD" refers to the server metadata. Read an overview of directory versioning.
523

DesignSync Data Manager User's Guide
View the next step.
Step 2: Moving a Folder
In this use case, "Workspace LMD" refers to the local metadata. "Server MD" refers to the server metadata. Read an overview of directory versioning.
524

Using DesignSync with Modules
View the next step.
Step 3: Moving a Folder
In this use case, "Workspace LMD" refers to the local metadata. "Server MD" refers to the server metadata. Read an overview of directory versioning.
525

DesignSync Data Manager User's Guide
View the next step.
Step 4: Moving a Folder
In this use case, "Workspace LMD" refers to the local metadata. "Server MD" refers to the server metadata. Read an overview of directory versioning.
526

Using DesignSync with Modules
View the next step.
Step 5: Moving a Folder
In this use case, "Workspace LMD" refers to the local metadata. "Server MD" refers to the server metadata. Read an overview of directory versioning.
527

DesignSync Data Manager User's Guide
View the next step.
Step 6: Moving a Folder
In this use case, "Workspace LMD" refers to the local metadata. "Server MD" refers to the server metadata. Read an overview of directory versioning.
528
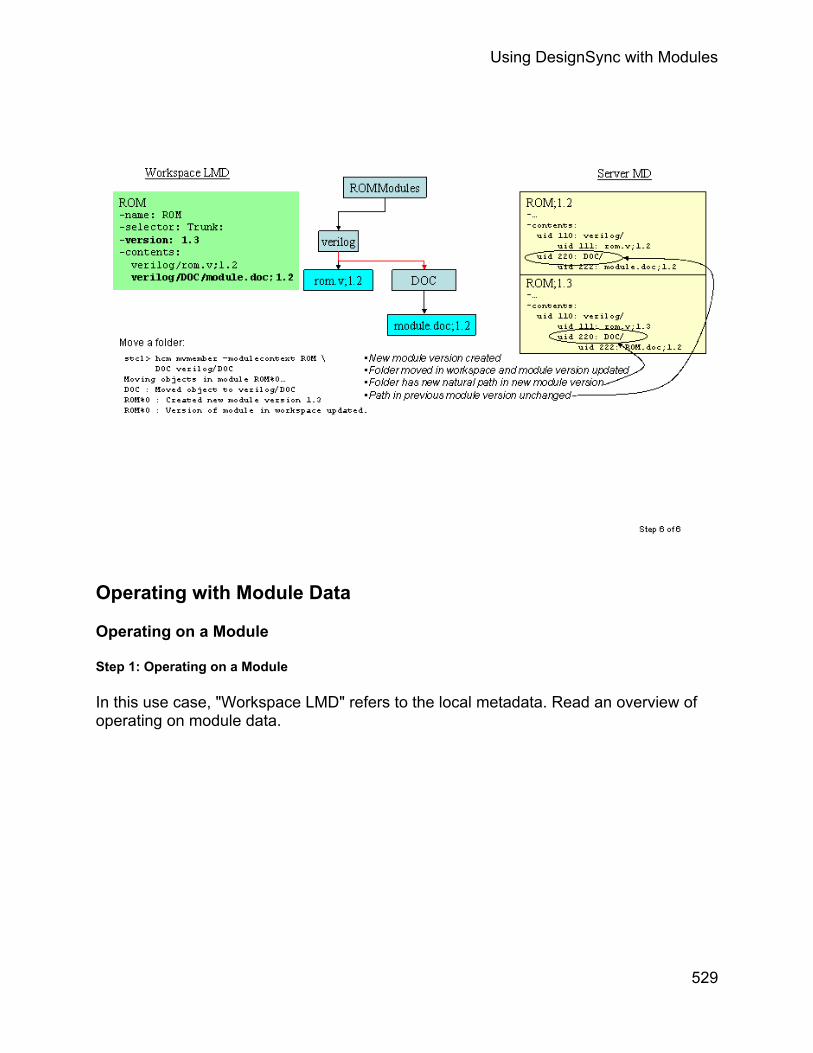
Using DesignSync with Modules
Operating with Module Data
Operating on a Module
Step 1: Operating on a Module
In this use case, "Workspace LMD" refers to the local metadata. Read an overview of operating on module data.
529

DesignSync Data Manager User's Guide
View the next step.
Step 2: Operating on a Module
In this use case, "Workspace LMD" refers to the local metadata. Read an overview of operating on module data.
530

Using DesignSync with Modules
View the next step.
Step 3: Operating on a Module
In this use case, "Workspace LMD" refers to the local metadata. Read an overview of operating on module data.
531
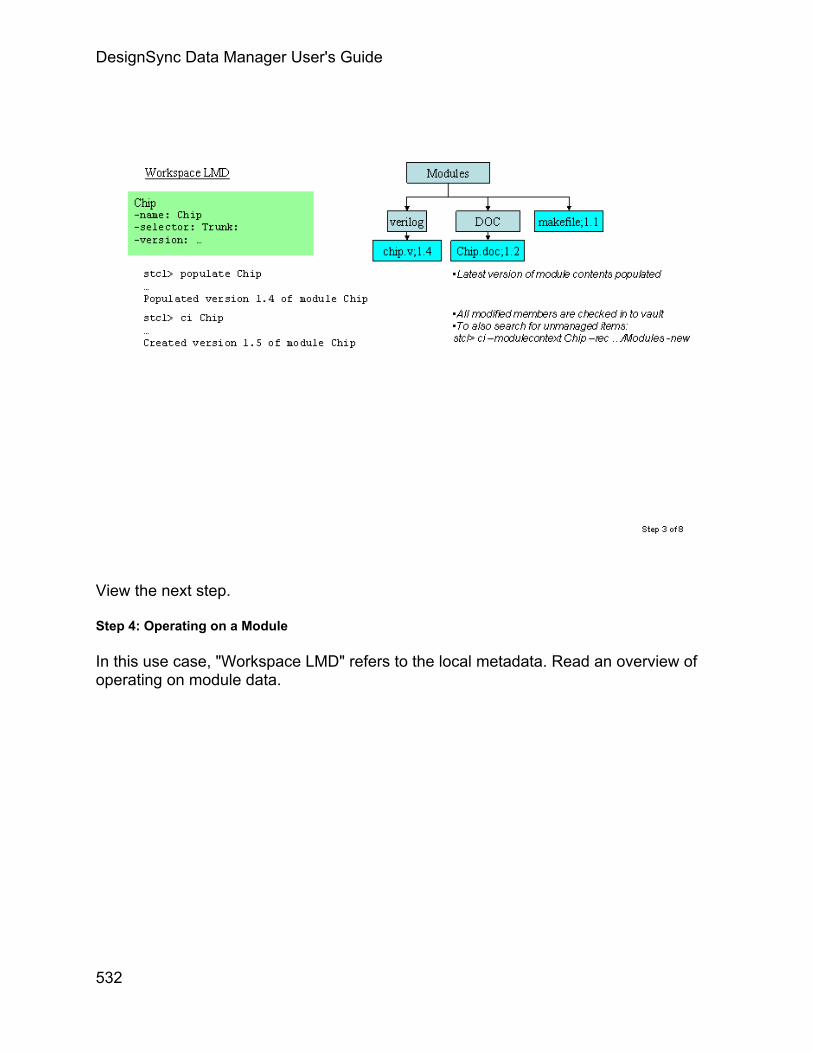
DesignSync Data Manager User's Guide
View the next step.
Step 4: Operating on a Module
In this use case, "Workspace LMD" refers to the local metadata. Read an overview of operating on module data.
532

Using DesignSync with Modules
View the next step.
Step 5: Operating on a Module
In this use case, "Workspace LMD" refers to the local metadata. Read an overview of operating on module data.
533

DesignSync Data Manager User's Guide
View the next step.
Step 6: Operating on a Module
In this use case, "Workspace LMD" refers to the local metadata. Read an overview of operating on module data.
534

Using DesignSync with Modules
View the next step.
Step 7: Operating on a Module
In this use case, "Workspace LMD" refers to the local metadata. Read an overview of operating on module data.
535
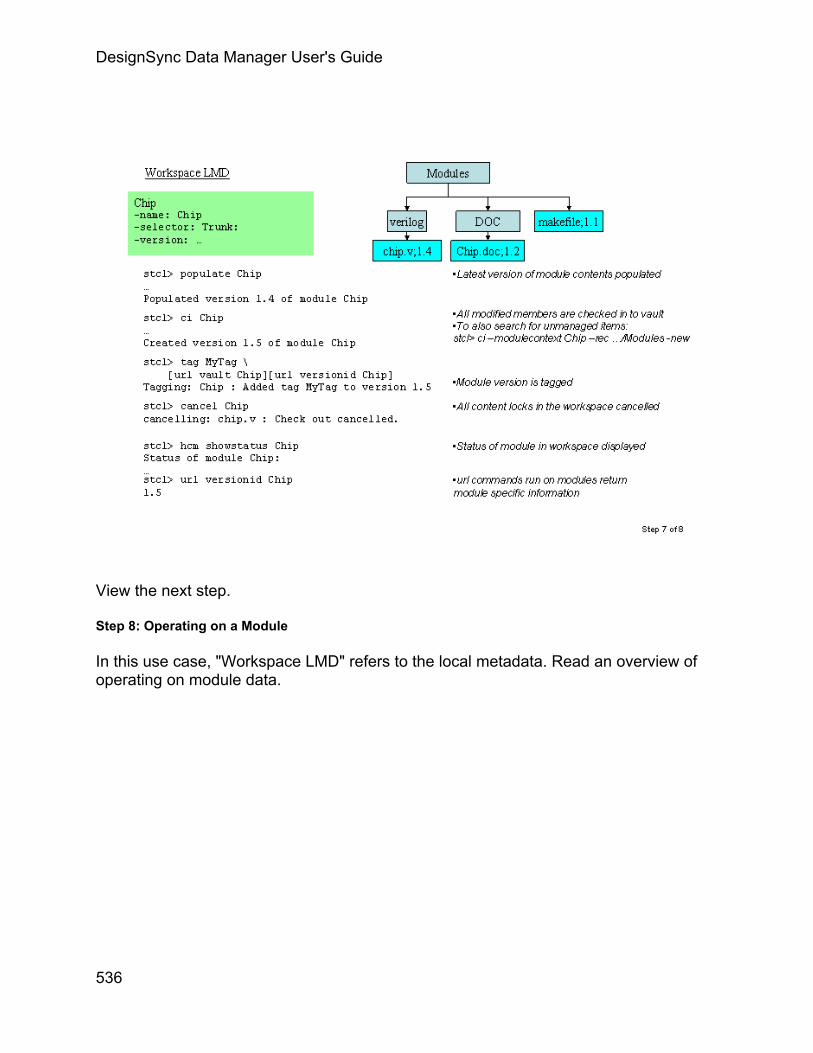
DesignSync Data Manager User's Guide
View the next step.
Step 8: Operating on a Module
In this use case, "Workspace LMD" refers to the local metadata. Read an overview of operating on module data.
536

Using DesignSync with Modules
Operating on a Module's Contents
Step 1: Operating on a Module's Contents
In this use case, "Workspace LMD" refers to the local metadata. Read an overview of operating on module data.
537

DesignSync Data Manager User's Guide
View the next step.
Step 2: Operating on a Module's Contents
In this use case, "Workspace LMD" refers to the local metadata. Read an overview of operating on module data.
538

Using DesignSync with Modules
View the next step.
Step 3: Operating on a Module's Contents
In this use case, "Workspace LMD" refers to the local metadata. Read an overview of operating on module data.
539

DesignSync Data Manager User's Guide
View the next step.
Step 4: Operating on a Module's Contents
In this use case, "Workspace LMD" refers to the local metadata. Read an overview of operating on module data.
540

Using DesignSync with Modules
View the next step.
Step 5: Operating on a Module's Contents
In this use case, "Workspace LMD" refers to the local metadata. Read an overview of operating on module data.
541
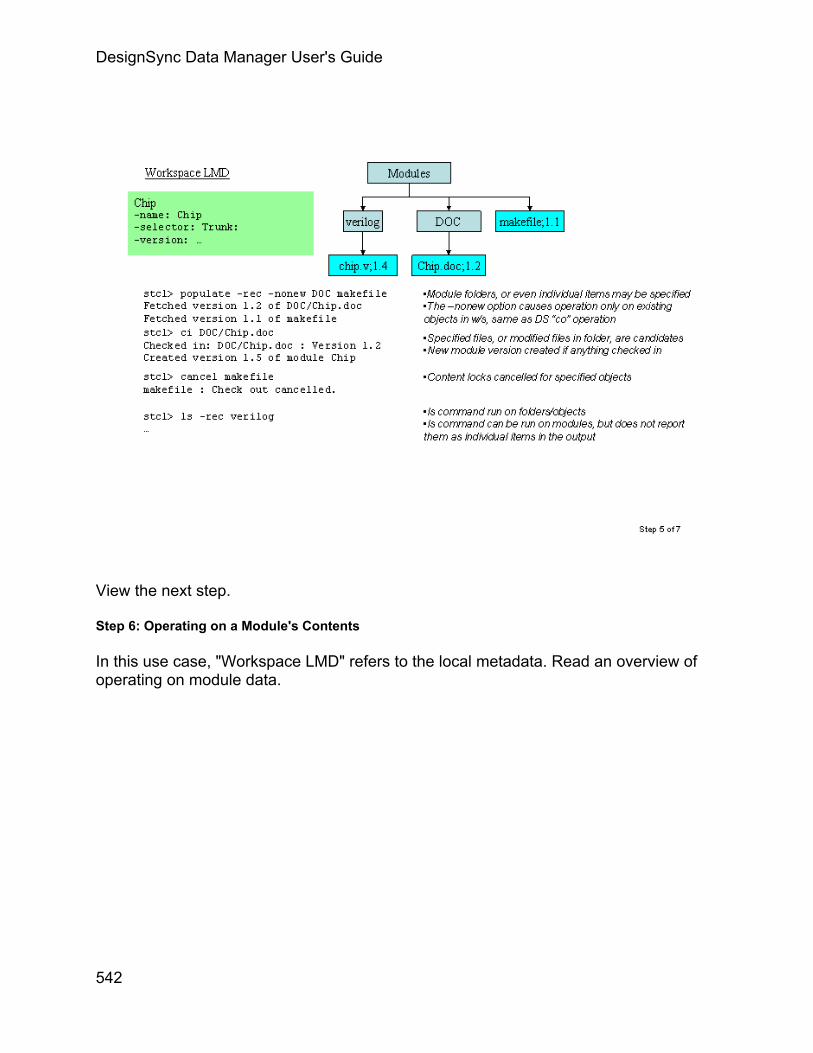
DesignSync Data Manager User's Guide
View the next step.
Step 6: Operating on a Module's Contents
In this use case, "Workspace LMD" refers to the local metadata. Read an overview of operating on module data.
542

Using DesignSync with Modules
View the next step.
Step 7: Operating on a Module's Contents
In this use case, "Workspace LMD" refers to the local metadata. Read an overview of operating on module data.
543

DesignSync Data Manager User's Guide
Filtering
Step 1: Filtering
Read an overview of filtering module data.
544

Using DesignSync with Modules
View the next step.
Step 2: Filtering
Read an overview of filtering module data.
545
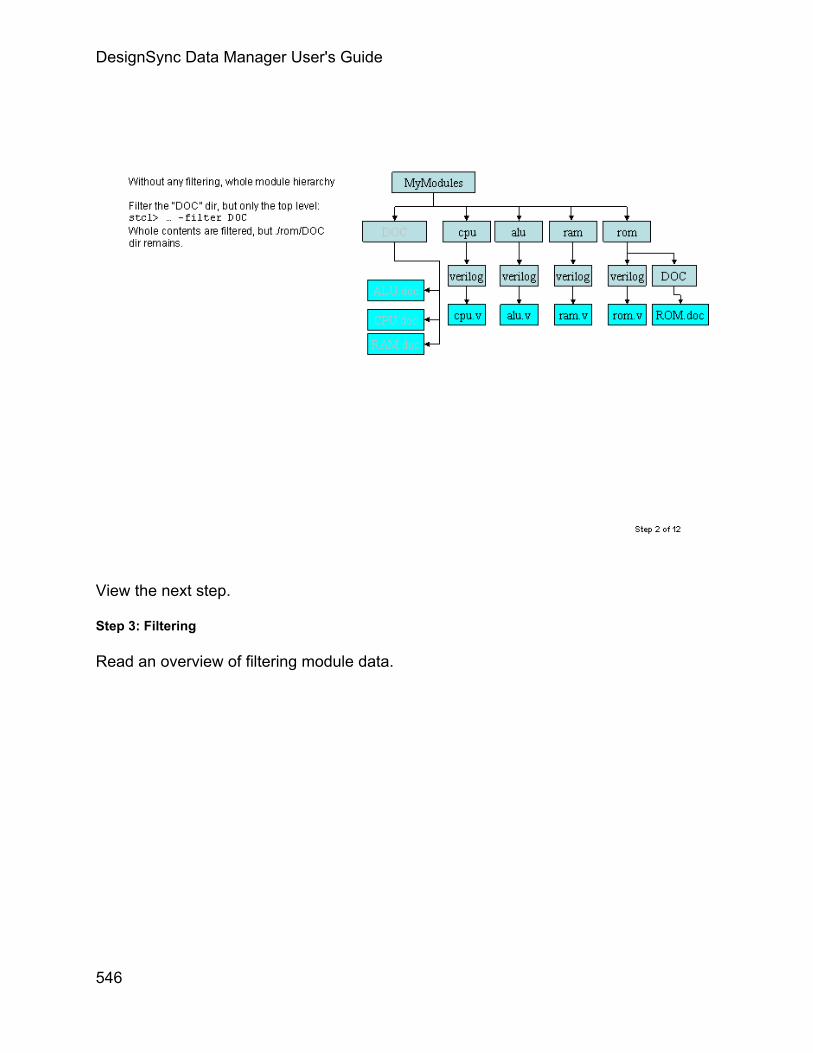
DesignSync Data Manager User's Guide
View the next step.
Step 3: Filtering
Read an overview of filtering module data.
546

Using DesignSync with Modules
View the next step.
Step 4: Filtering
Read an overview of filtering module data.
547

DesignSync Data Manager User's Guide
View the next step.
Step 5: Filtering
Read an overview of filtering module data.
548
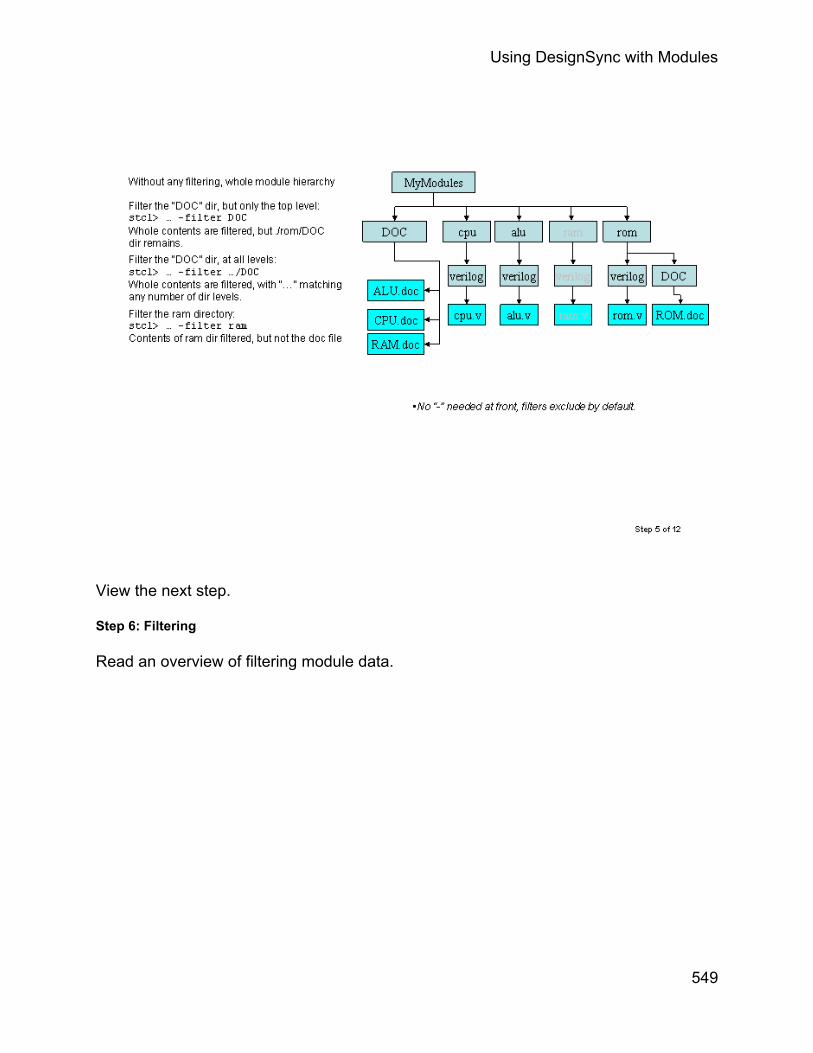
Using DesignSync with Modules
View the next step.
Step 6: Filtering
Read an overview of filtering module data.
549

DesignSync Data Manager User's Guide
View the next step.
Step 7: Filtering
Read an overview of filtering module data.
550
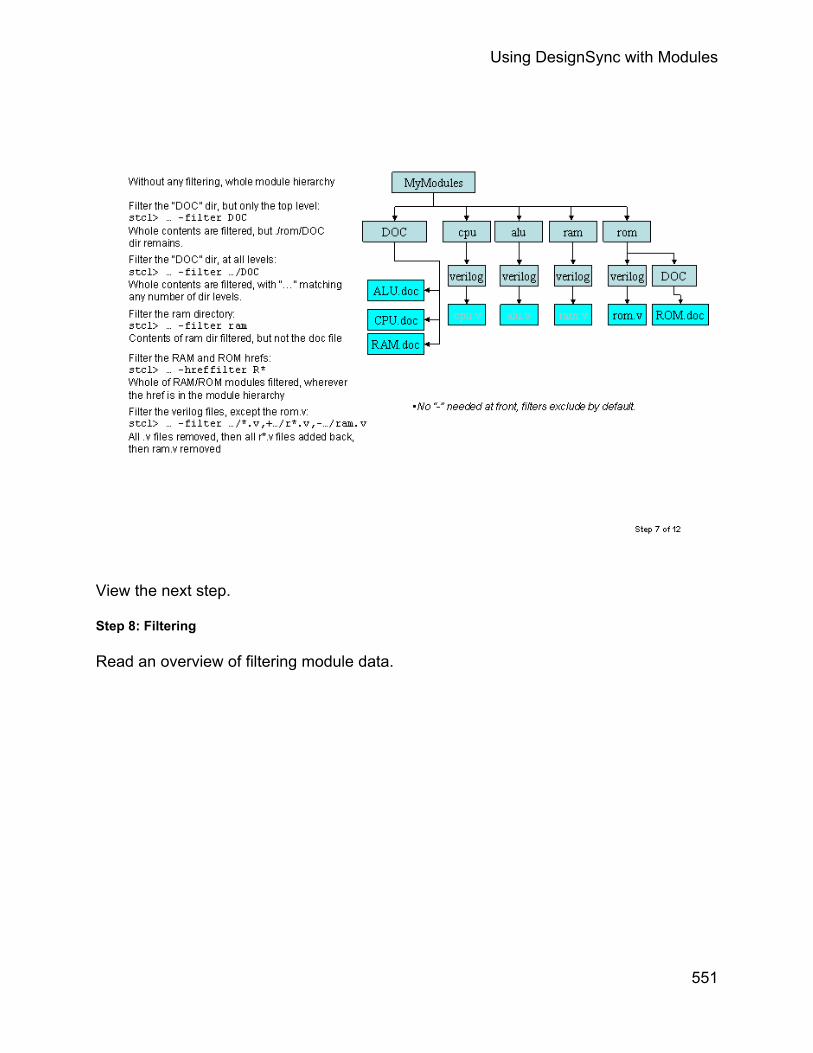
Using DesignSync with Modules
View the next step.
Step 8: Filtering
Read an overview of filtering module data.
551

DesignSync Data Manager User's Guide
View the next step.
Step 9: Filtering
Read an overview of filtering module data.
552

Using DesignSync with Modules
View the next step.
Step 10: Filtering
Read an overview of filtering module data.
553
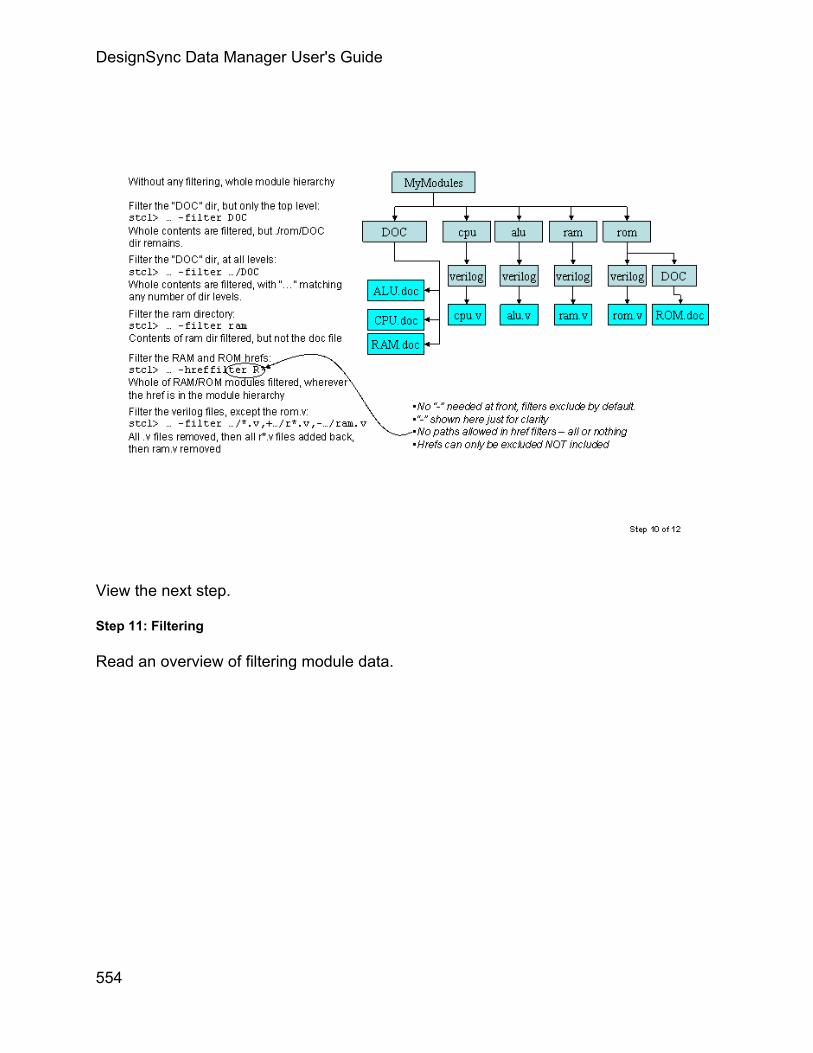
DesignSync Data Manager User's Guide
View the next step.
Step 11: Filtering
Read an overview of filtering module data.
554

Using DesignSync with Modules
View the next step.
Step 12: Filtering
Read an overview of filtering module data.
555

DesignSync Data Manager User's Guide
Persistent Populate Filter
Step 1: Persistent Populate Filter
In this use case, "Workspace LMD" refers to the local metadata. Read an overview of filtering module data.
556
Using DesignSync with Modules
View the next step.
Step 2: Persistent Populate Filter
In this use case, "Workspace LMD" refers to the local metadata. Read an overview of filtering module data.
557
DesignSync Data Manager User's Guide
View the next step.
Step 3: Persistent Populate Filter
In this use case, "Workspace LMD" refers to the local metadata. Read an overview of filtering module data.
558

Using DesignSync with Modules
View the next step.
Step 4: Persistent Populate Filter
In this use case, "Workspace LMD" refers to the local metadata. Read an overview of filtering module data.
559

DesignSync Data Manager User's Guide
View the next step.
Step 5: Persistent Populate Filter
In this use case, "Workspace LMD" refers to the local metadata. Read an overview of filtering module data.
560
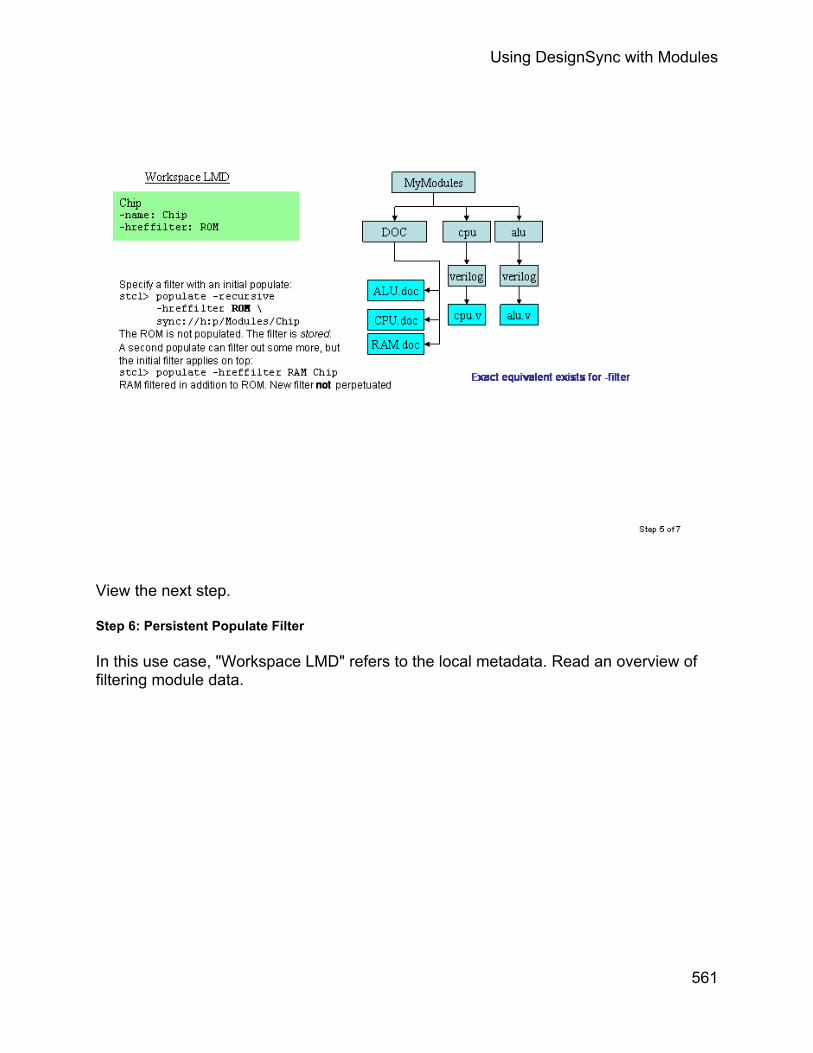
Using DesignSync with Modules
View the next step.
Step 6: Persistent Populate Filter
In this use case, "Workspace LMD" refers to the local metadata. Read an overview of filtering module data.
561

DesignSync Data Manager User's Guide
View the next step.
Step 7: Persistent Populate Filter
In this use case, "Workspace LMD" refers to the local metadata. Read an overview of filtering module data.
562

Using DesignSync with Modules
Folder-Centric Operations
Step 1: Folder-Centric Operations
Read an overview of module recursion.
563

DesignSync Data Manager User's Guide
View the next step.
Step 2: Folder-Centric Operations
Read an overview of module recursion.
564

Using DesignSync with Modules
View the next step.
Step 3: Folder-Centric Operations
Read an overview of module recursion.
565
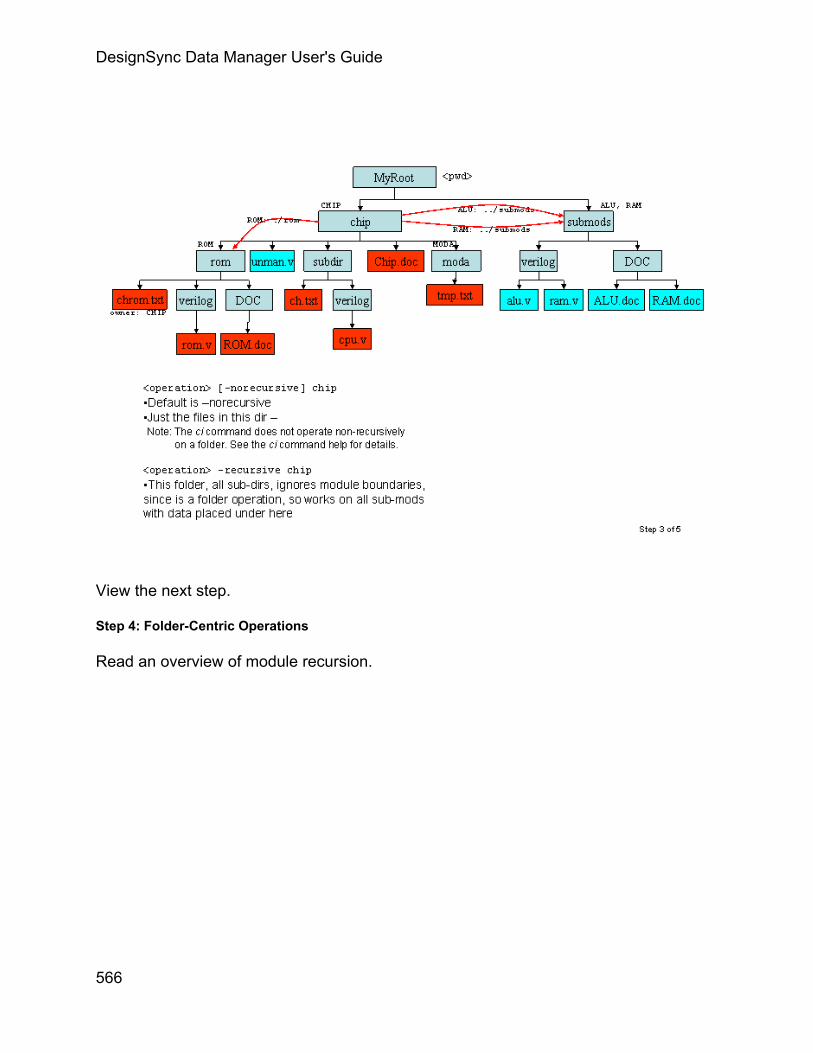
DesignSync Data Manager User's Guide
View the next step.
Step 4: Folder-Centric Operations
Read an overview of module recursion.
566
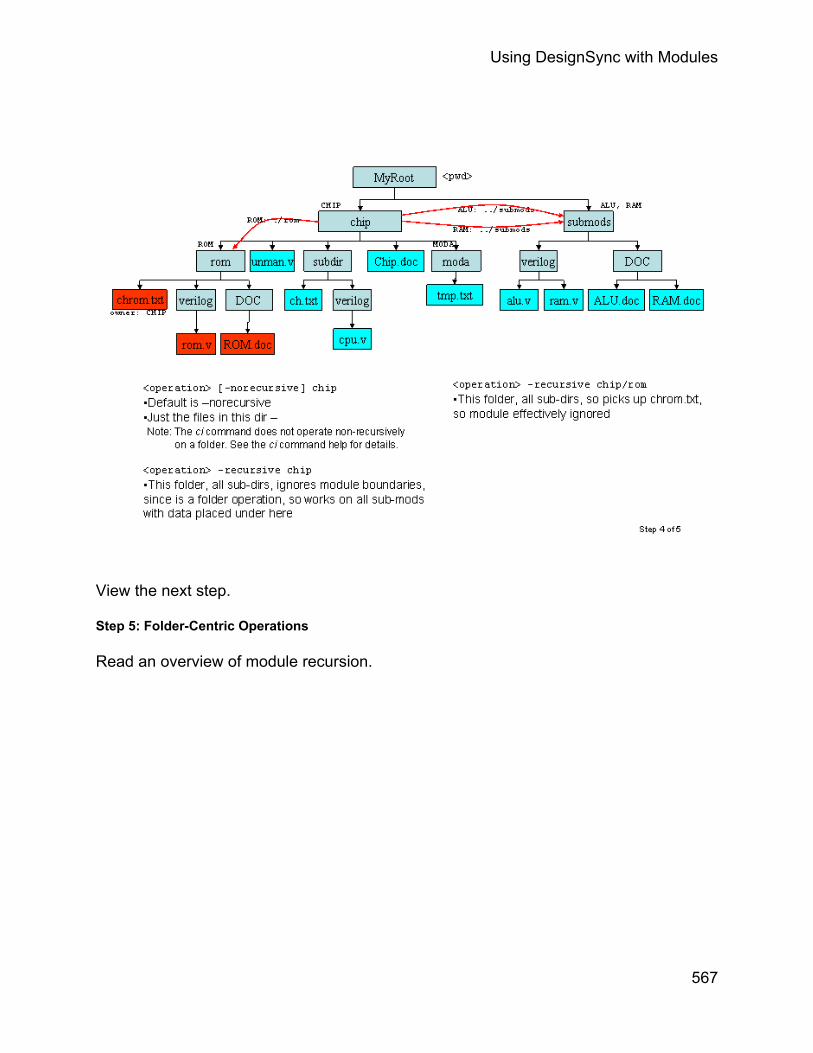
Using DesignSync with Modules
View the next step.
Step 5: Folder-Centric Operations
Read an overview of module recursion.
567
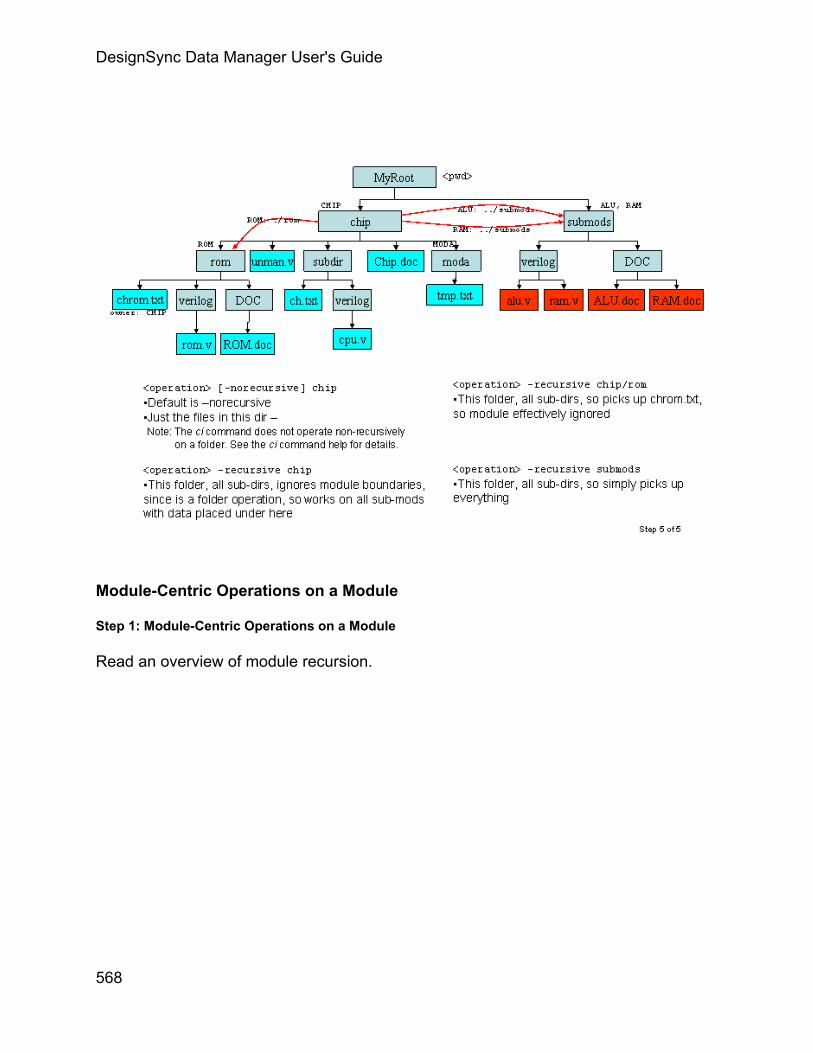
DesignSync Data Manager User's Guide
Module-Centric Operations on a Module
Step 1: Module-Centric Operations on a Module
Read an overview of module recursion.
568
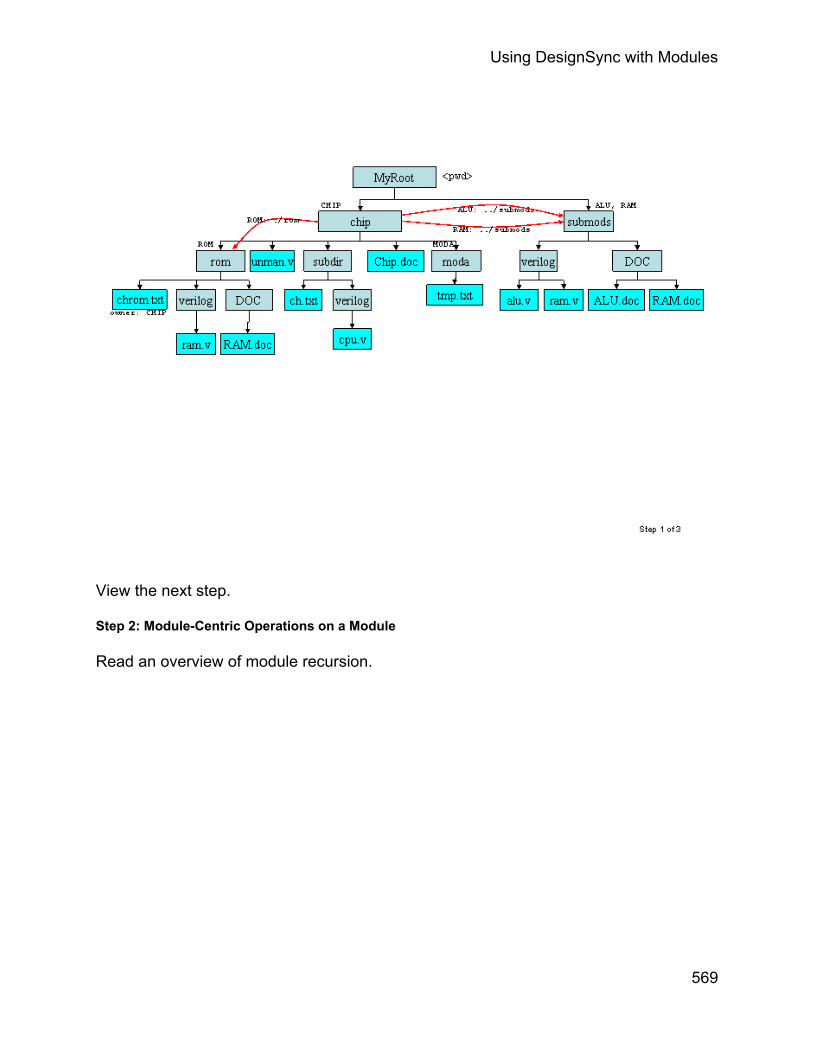
Using DesignSync with Modules
View the next step.
Step 2: Module-Centric Operations on a Module
Read an overview of module recursion.
569
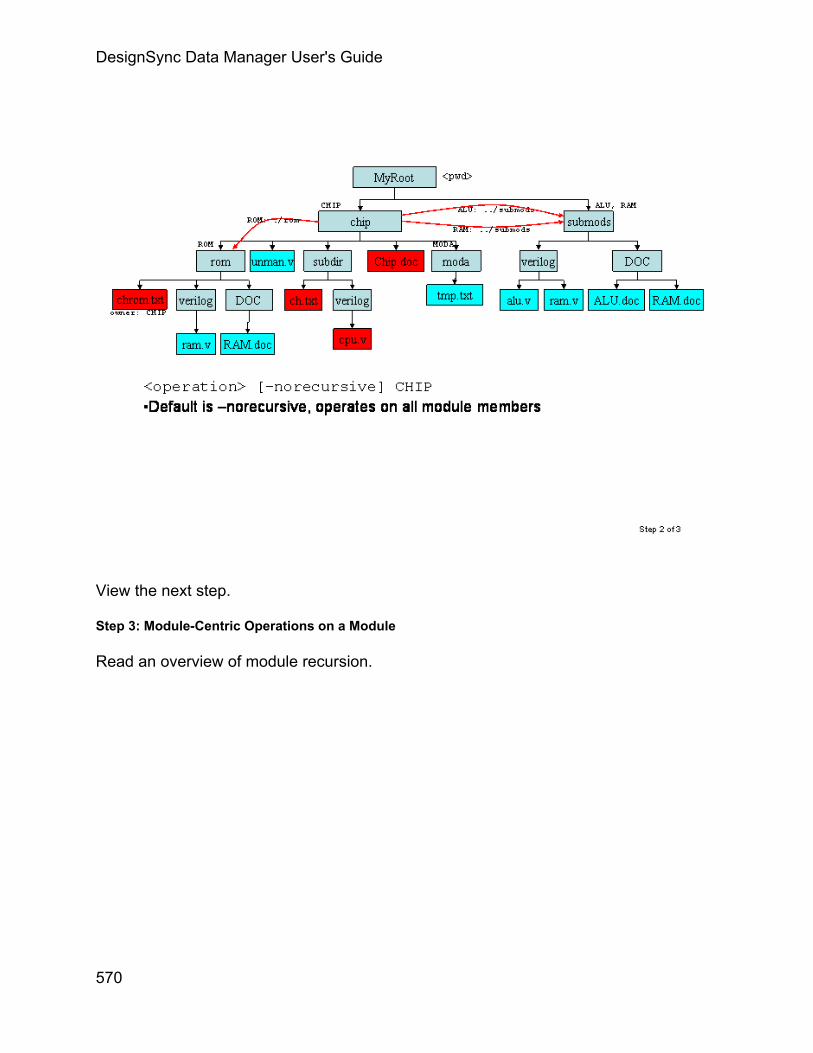
DesignSync Data Manager User's Guide
View the next step.
Step 3: Module-Centric Operations on a Module
Read an overview of module recursion.
570

Using DesignSync with Modules
Module-Centric Operations on a Subfolder
Step 1: Module-Centric Operations on a Subfolder
Read an overview of module recursion.
571

DesignSync Data Manager User's Guide
View the next step.
Step 2: Module-Centric Operations on a Subfolder
Read an overview of module recursion.
572

Using DesignSync with Modules
View the next step.
Step 3: Module Centric Operations on a Subfolder
Read an overview of module recursion.
573
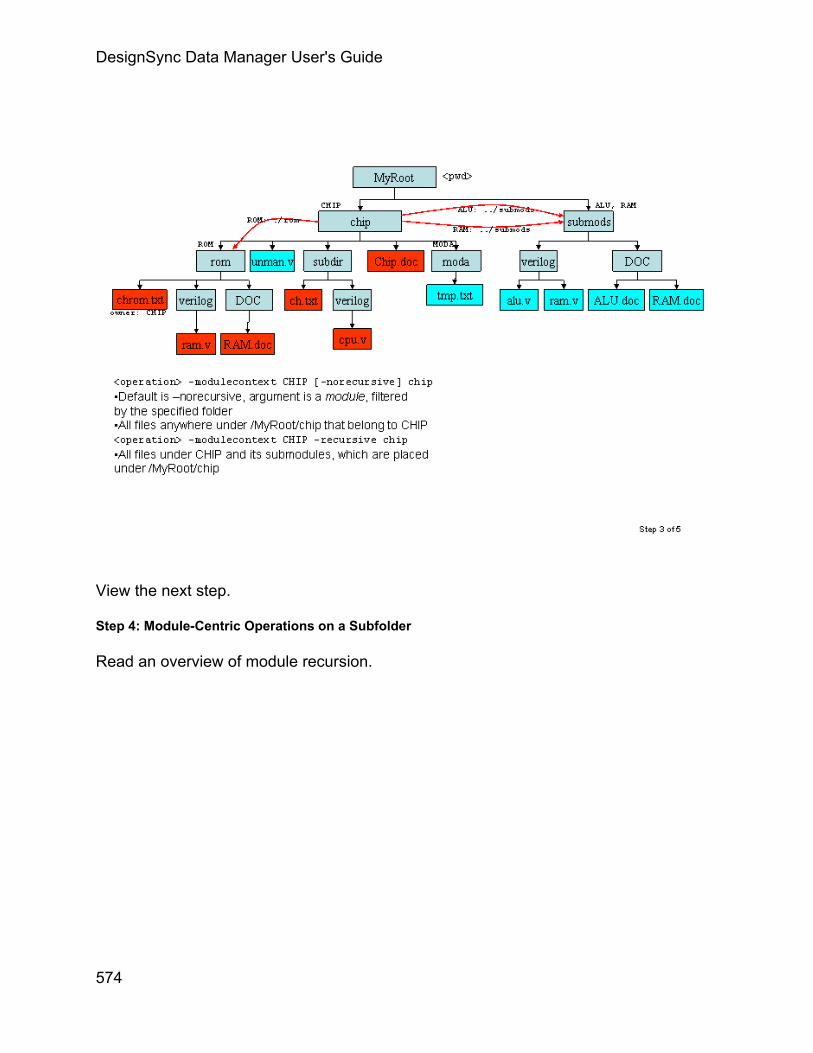
DesignSync Data Manager User's Guide
View the next step.
Step 4: Module-Centric Operations on a Subfolder
Read an overview of module recursion.
574

Using DesignSync with Modules
View the next step.
Step 5: Module-Centric Operations on a Subfolder
Read an overview of module recursion.
575

DesignSync Data Manager User's Guide
Module-Centric Operations on an HREF
Step 1: Module-Centric Operations on an HREF
Read an overview of module recursion.
576

Using DesignSync with Modules
View the next step.
Step 2: Module-Centric Operations on an HREF
Read an overview of module recursion.
577

DesignSync Data Manager User's Guide
View the next step.
Step 3: Module-Centric Operations on an HREF
Read an overview of module recursion.
578

Using DesignSync with Modules
View the next step.
Step 4: Module-Centric Operations on an HREF
Read an overview of module recursion.
579

DesignSync Data Manager User's Guide
View the next step.
Step 5: Module-Centric Operations on an HREF
Read an overview of module recursion.
580

Using DesignSync with Modules
Locking a Module Branch
Step 1: Locking a Module Branch
In this use case, "Workspace LMD" refers to the local metadata. "Server MD" refers to the server metadata. Read an overview of module locking.
581

DesignSync Data Manager User's Guide
View the next step.
Step 2: Locking a Module Branch
In this use case, "Workspace LMD" refers to the local metadata. "Server MD" refers to the server metadata. Read an overview of module locking.
582

Using DesignSync with Modules
View the next step.
Step 3: Locking a Module Branch
In this use case, "Workspace LMD" refers to the local metadata. "Server MD" refers to the server metadata. Read an overview of module locking.
583
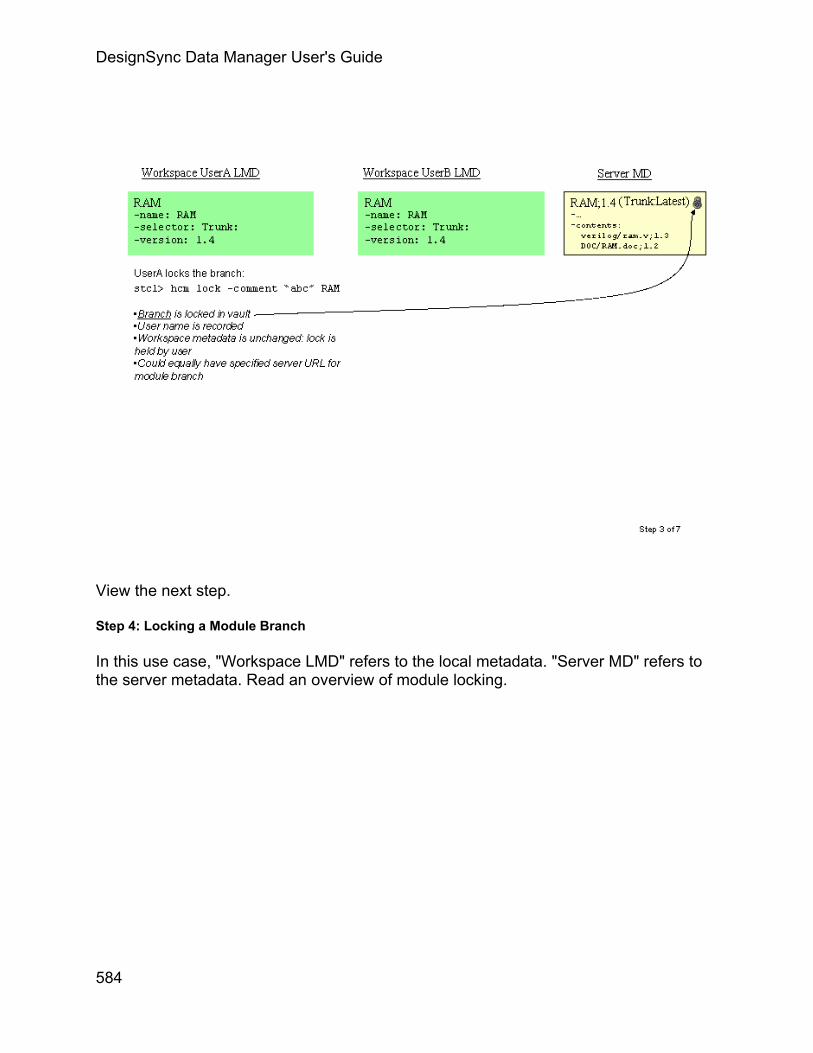
DesignSync Data Manager User's Guide
View the next step.
Step 4: Locking a Module Branch
In this use case, "Workspace LMD" refers to the local metadata. "Server MD" refers to the server metadata. Read an overview of module locking.
584

Using DesignSync with Modules
View the next step.
Step 5: Locking a Module Branch
In this use case, "Workspace LMD" refers to the local metadata. "Server MD" refers to the server metadata. Read an overview of module locking.
585

DesignSync Data Manager User's Guide
View the next step.
Step 6: Locking a Module Branch
In this use case, "Workspace LMD" refers to the local metadata. "Server MD" refers to the server metadata. Read an overview of module locking.
586

Using DesignSync with Modules
View the next step.
Step 7: Locking a Module Branch
In this use case, "Workspace LMD" refers to the local metadata. "Server MD" refers to the server metadata. Read an overview of module locking.
587

DesignSync Data Manager User's Guide
Locking Module Content
Step 1: Locking Module Content
In this use case, "Workspace LMD" refers to the local metadata. "Server MD" refers to the server metadata. Read an overview of module locking.
588

Using DesignSync with Modules
View the next step.
Step 2: Locking Module Content
In this use case, "Workspace LMD" refers to the local metadata. "Server MD" refers to the server metadata. Read an overview of module locking.
589

DesignSync Data Manager User's Guide
View the next step
Step 3: Locking Module Content
In this use case, "Workspace LMD" refers to the local metadata. "Server MD" refers to the server metadata. Read an overview of module locking.
590

Using DesignSync with Modules
View the next step
Step 4: Locking Module Content
In this use case, "Workspace LMD" refers to the local metadata. "Server MD" refers to the server metadata. Read an overview of module locking.
591
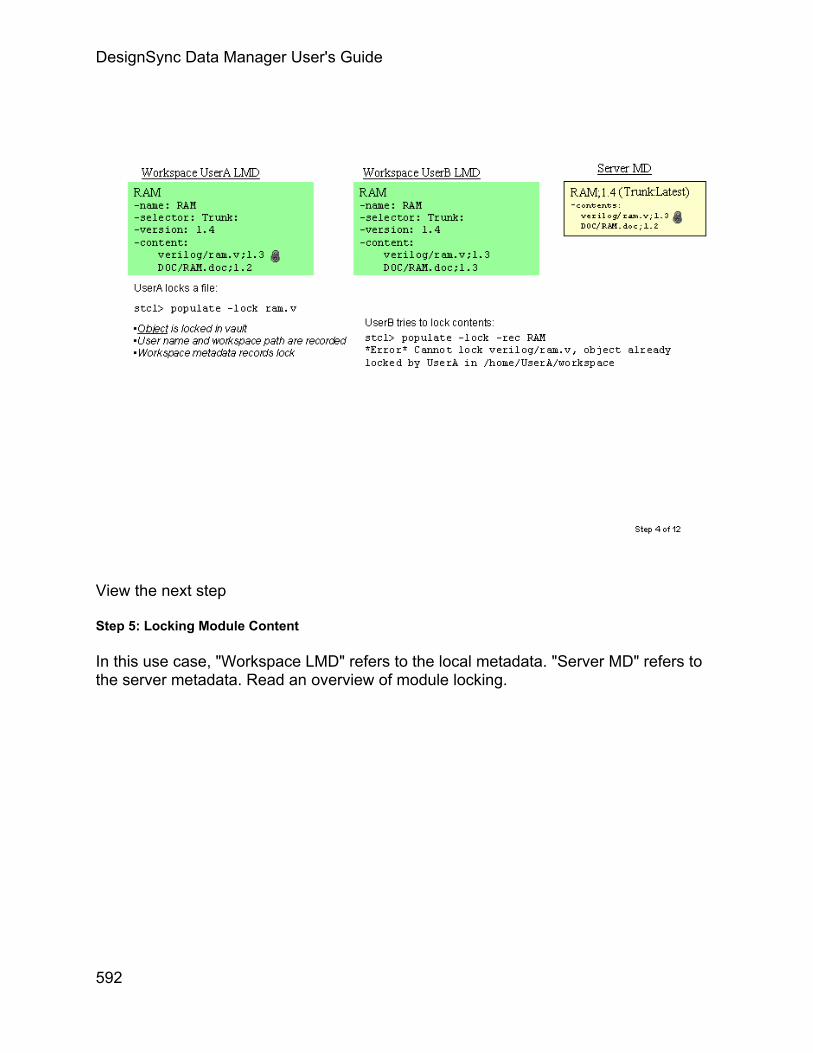
DesignSync Data Manager User's Guide
View the next step
Step 5: Locking Module Content
In this use case, "Workspace LMD" refers to the local metadata. "Server MD" refers to the server metadata. Read an overview of module locking.
592

Using DesignSync with Modules
View the next step
Step 6: Locking Module Content
In this use case, "Workspace LMD" refers to the local metadata. "Server MD" refers to the server metadata. Read an overview of module locking.
593

DesignSync Data Manager User's Guide
View the next step
Step 7: Locking Module Content
In this use case, "Workspace LMD" refers to the local metadata. "Server MD" refers to the server metadata. Read an overview of module locking.
594
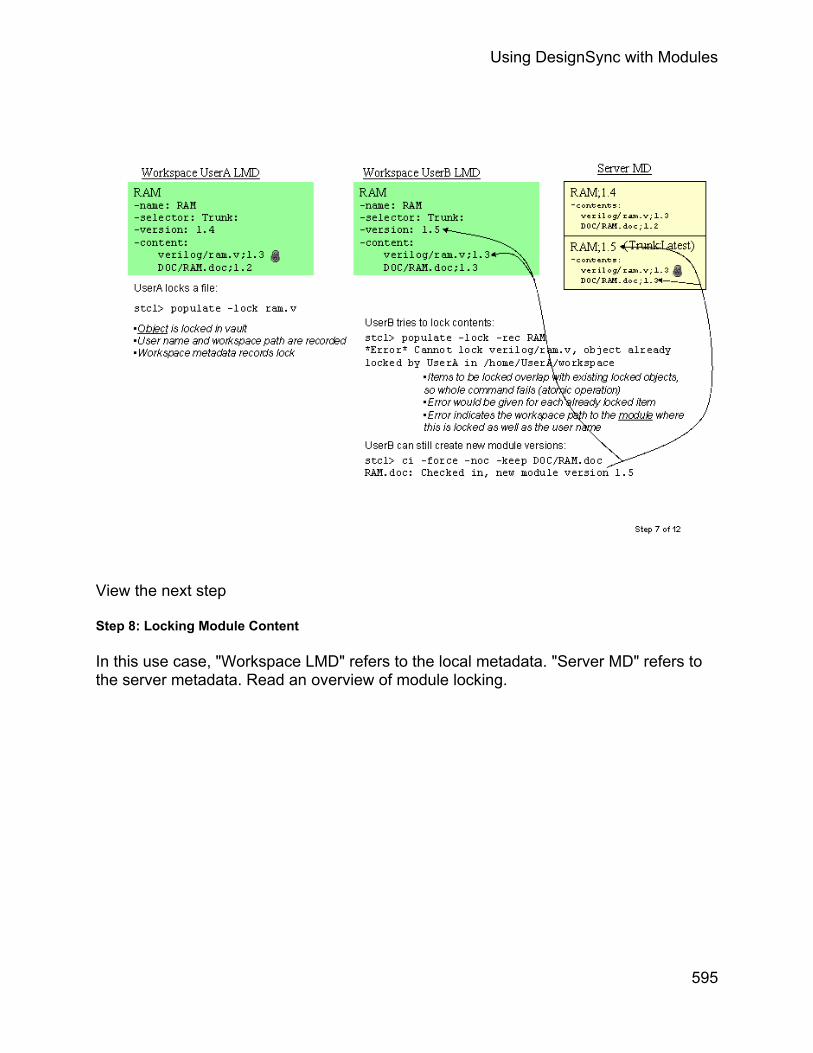
Using DesignSync with Modules
View the next step
Step 8: Locking Module Content
In this use case, "Workspace LMD" refers to the local metadata. "Server MD" refers to the server metadata. Read an overview of module locking.
595
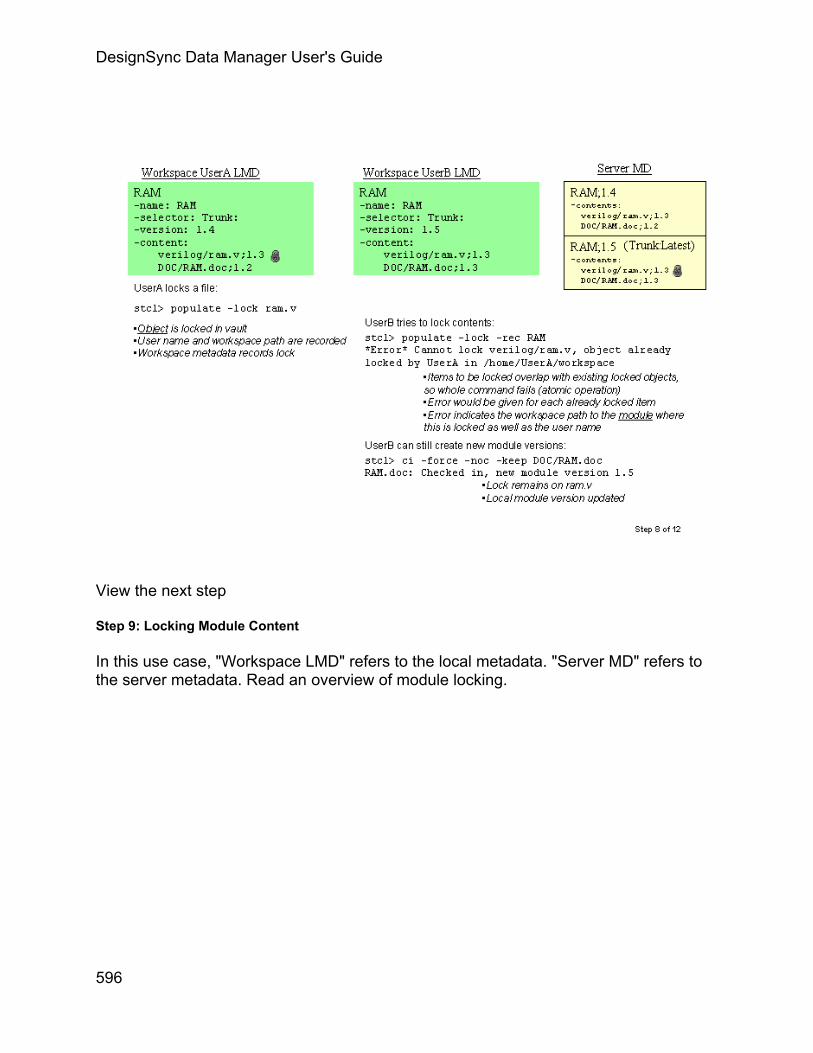
DesignSync Data Manager User's Guide
View the next step
Step 9: Locking Module Content
In this use case, "Workspace LMD" refers to the local metadata. "Server MD" refers to the server metadata. Read an overview of module locking.
596

Using DesignSync with Modules
View the next step
Step 10: Locking Module Content
In this use case, "Workspace LMD" refers to the local metadata. "Server MD" refers to the server metadata. Read an overview of module locking.
597

DesignSync Data Manager User's Guide
View the next step
Step 11: Locking Module Content
In this use case, "Workspace LMD" refers to the local metadata. "Server MD" refers to the server metadata. Read an overview of module locking.
598

Using DesignSync with Modules
View the next step
Step 12: Locking Module Content
In this use case, "Workspace LMD" refers to the local metadata. "Server MD" refers to the server metadata. Read an overview of module locking.
599

DesignSync Data Manager User's Guide
Branching a Module
Step 1: Branching a Module
In this use case, the RAM team is producing a new version of the RAM module, with an "automatic undo" feature. The new version is created as a side-branch of version 1.4. "Workspace LMD" refers to the local metadata. "Server MD" refers to the server metadata. Read an overview of module branching.
600

Using DesignSync with Modules
View the next step.
Step 2: Branching a Module
In this use case, the RAM team is producing a new version of the RAM module, with an "automatic undo" feature. The new version is created as a side-branch of version 1.4. "Workspace LMD" refers to the local metadata. "Server MD" refers to the server metadata. Read an overview of module branching.
601

DesignSync Data Manager User's Guide
View the next step
Step 3: Branching a Module
In this use case, the RAM team is producing a new version of the RAM module, with an "automatic undo" feature. The new version is created as a side-branch of version 1.4. "Workspace LMD" refers to the local metadata. "Server MD" refers to the server metadata. Read an overview of module branching.
602

Using DesignSync with Modules
View the next step
Step 4: Branching a Module
In this use case, the RAM team is producing a new version of the RAM module, with an "automatic undo" feature. The new version is created as a side-branch of version 1.4. "Workspace LMD" refers to the local metadata. "Server MD" refers to the server metadata. Read an overview of module branching.
603

DesignSync Data Manager User's Guide
View the next step
Step 5: Branching a Module
In this use case, the RAM team is producing a new version of the RAM module, with an "automatic undo" feature. The new version is created as a side-branch of version 1.4. "Workspace LMD" refers to the local metadata. "Server MD" refers to the server metadata. Read an overview of module branching.
604

Using DesignSync with Modules
View the next step
Step 6: Branching a Module
In this use case, the RAM team is producing a new version of the RAM module, with an "automatic undo" feature. The new version is created as a side-branch of version 1.4. "Workspace LMD" refers to the local metadata. "Server MD" refers to the server metadata. Read an overview of module branching.
605

DesignSync Data Manager User's Guide
Merging and Modules
Auto-Merging Locally Added Files
Step 1: Auto-Merging Locally Added Files
In this use case, "Workspace LMD" refers to the local metadata. "Server MD" refers to the server metadata. Read a description of this use case.
606

Using DesignSync with Modules
View the next step.
Step 2: Auto-Merging Locally Added Files
In this use case, "Workspace LMD" refers to the local metadata. "Server MD" refers to the server metadata. Read a description of this use case.
607

DesignSync Data Manager User's Guide
View the next step.
Step 3: Auto-Merging Locally Added Files
In this use case, "Workspace LMD" refers to the local metadata. "Server MD" refers to the server metadata. Read a description of this use case.
608
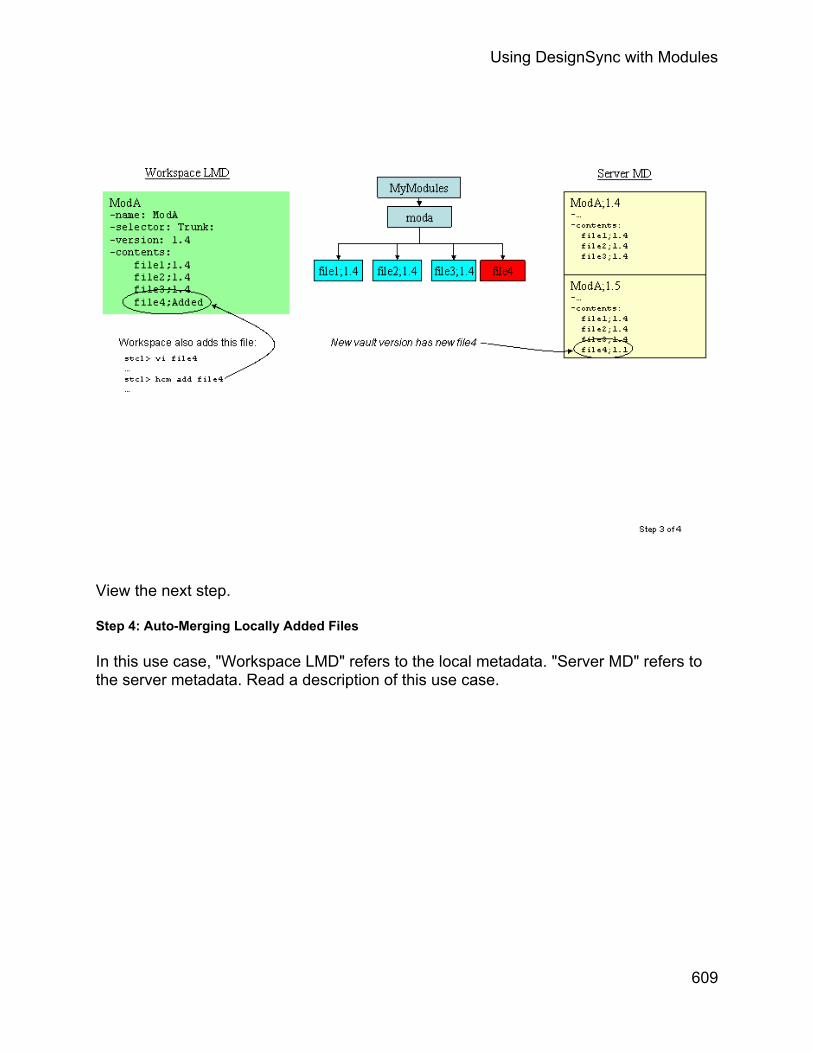
Using DesignSync with Modules
View the next step.
Step 4: Auto-Merging Locally Added Files
In this use case, "Workspace LMD" refers to the local metadata. "Server MD" refers to the server metadata. Read a description of this use case.
609
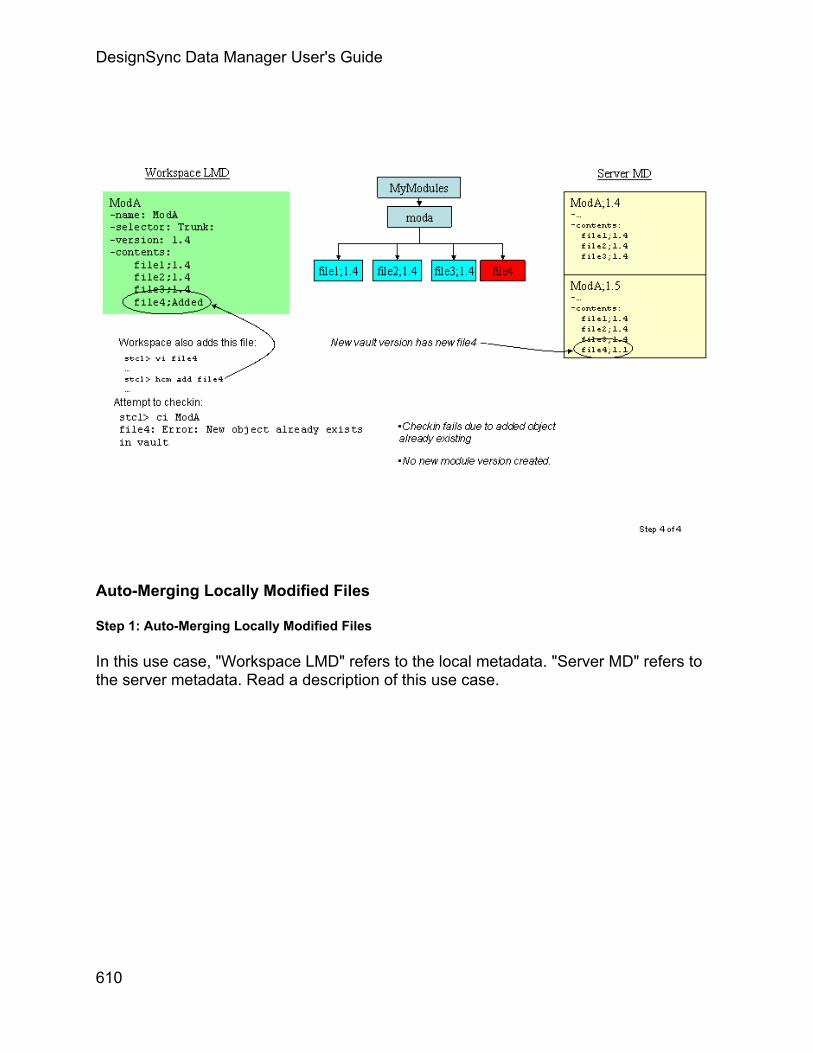
DesignSync Data Manager User's Guide
Auto-Merging Locally Modified Files
Step 1: Auto-Merging Locally Modified Files
In this use case, "Workspace LMD" refers to the local metadata. "Server MD" refers to the server metadata. Read a description of this use case.
610

Using DesignSync with Modules
View the next step.
Step 2: Auto-Merging Locally Modified Files
In this use case, "Workspace LMD" refers to the local metadata. "Server MD" refers to the server metadata. Read a description of this use case.
611

DesignSync Data Manager User's Guide
View the next step.
Step 3: Auto-Merging Locally Modified Files
In this use case, "Workspace LMD" refers to the local metadata. "Server MD" refers to the server metadata. Read a description of this use case.
612

Using DesignSync with Modules
View the next step.
Step 4: Auto-Merging Locally Modified Files
In this use case, "Workspace LMD" refers to the local metadata. "Server MD" refers to the server metadata. Read a description of this use case.
613

DesignSync Data Manager User's Guide
View the next step.
Step 5: Auto-Merging Locally Modified Files
In this use case, "Workspace LMD" refers to the local metadata. "Server MD" refers to the server metadata. Read a description of this use case.
614

Using DesignSync with Modules
View the next step.
Step 6: Auto-Merging Locally Modified Files
In this use case, "Workspace LMD" refers to the local metadata. "Server MD" refers to the server metadata. Read a description of this use case.
615

DesignSync Data Manager User's Guide
Auto-Merging Locally Modified Files Removed from the Module
Step 1: Auto-Merging Locally Modified Files Removed from the Module
In this use case, "Workspace LMD" refers to the local metadata. "Server MD" refers to the server metadata. Read a description of this use case.
616

Using DesignSync with Modules
View the next step.
Step 2: Auto-Merging Locally Modified Files Removed from the Module
In this use case, "Workspace LMD" refers to the local metadata. "Server MD" refers to the server metadata. Read a description of this use case.
617

DesignSync Data Manager User's Guide
View the next step
Step 3: Auto-Merging Locally Modified Files Removed from the Module
In this use case, "Workspace LMD" refers to the local metadata. "Server MD" refers to the server metadata. Read a description of this use case.
618

Using DesignSync with Modules
View the next step
Step 4: Auto-Merging Locally Modified Files Removed from the Module
In this use case, "Workspace LMD" refers to the local metadata. "Server MD" refers to the server metadata. Read a description of this use case.
619
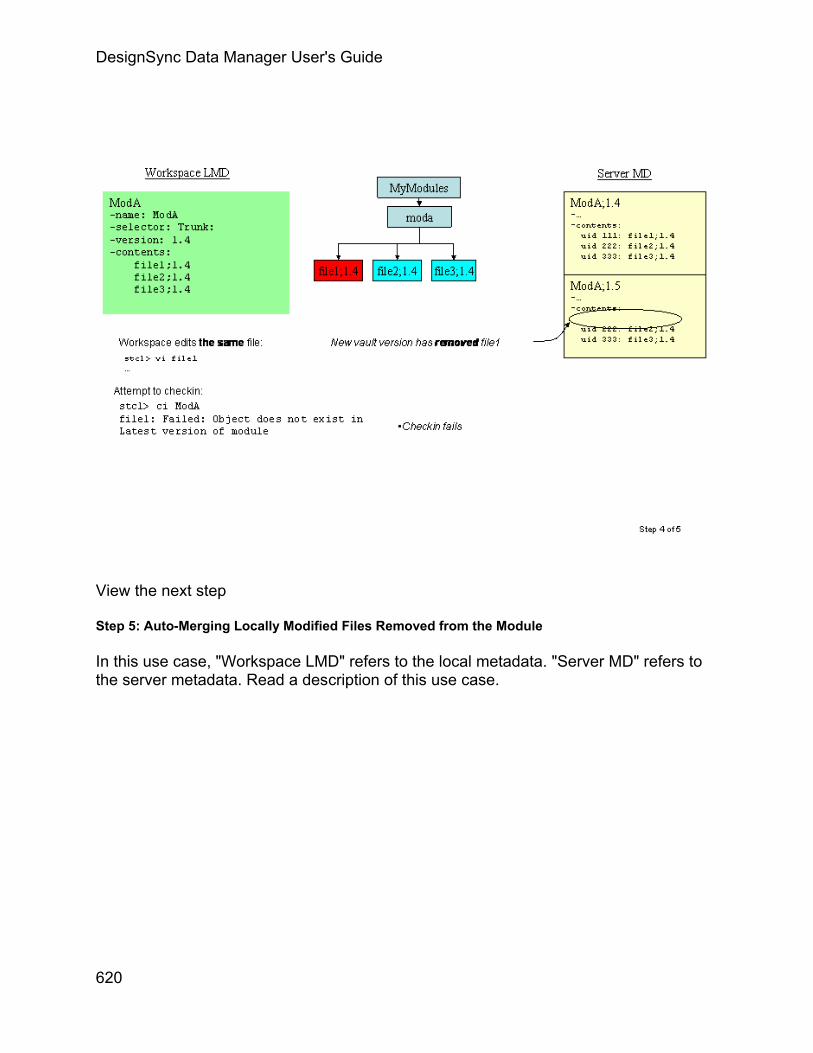
DesignSync Data Manager User's Guide
View the next step
Step 5: Auto-Merging Locally Modified Files Removed from the Module
In this use case, "Workspace LMD" refers to the local metadata. "Server MD" refers to the server metadata. Read a description of this use case.
620
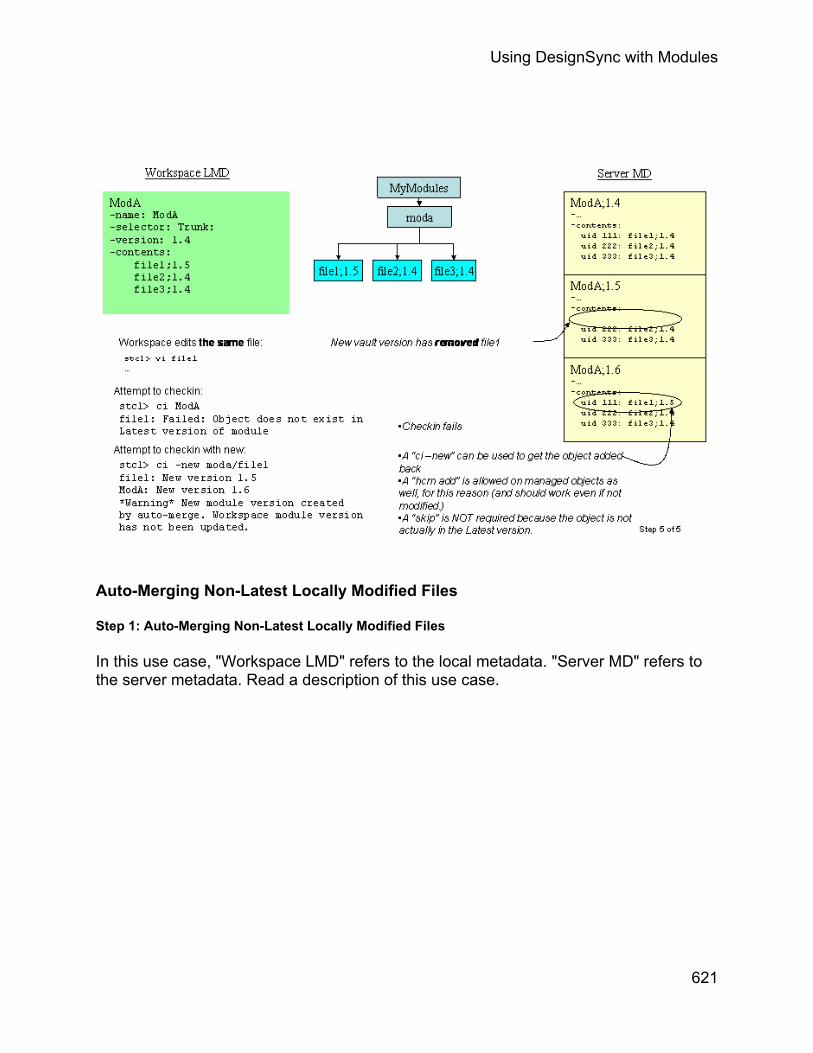
Using DesignSync with Modules
Auto-Merging Non-Latest Locally Modified Files
Step 1: Auto-Merging Non-Latest Locally Modified Files
In this use case, "Workspace LMD" refers to the local metadata. "Server MD" refers to the server metadata. Read a description of this use case.
621

DesignSync Data Manager User's Guide
View the next step.
Step 2: Auto-Merging Non-Latest Locally Modified Files
In this use case, "Workspace LMD" refers to the local metadata. "Server MD" refers to the server metadata. Read a description of this use case.
622

Using DesignSync with Modules
View the next step.
Step 3: Auto-Merging Non-Latest Locally Modified Files
In this use case, "Workspace LMD" refers to the local metadata. "Server MD" refers to the server metadata. Read a description of this use case.
623

DesignSync Data Manager User's Guide
View the next step.
Step 4: Auto-Merging Non-Latest Locally Modified Files
In this use case, "Workspace LMD" refers to the local metadata. "Server MD" refers to the server metadata. Read a description of this use case.
624

Using DesignSync with Modules
Auto-Merging Locally Modified Files Renamed in the Module
Step 1: Auto-Merging Locally Modified Files Renamed in the Module
In this use case, "Workspace LMD" refers to the local metadata. "Server MD" refers to the server metadata. Read a description of this use case.
625
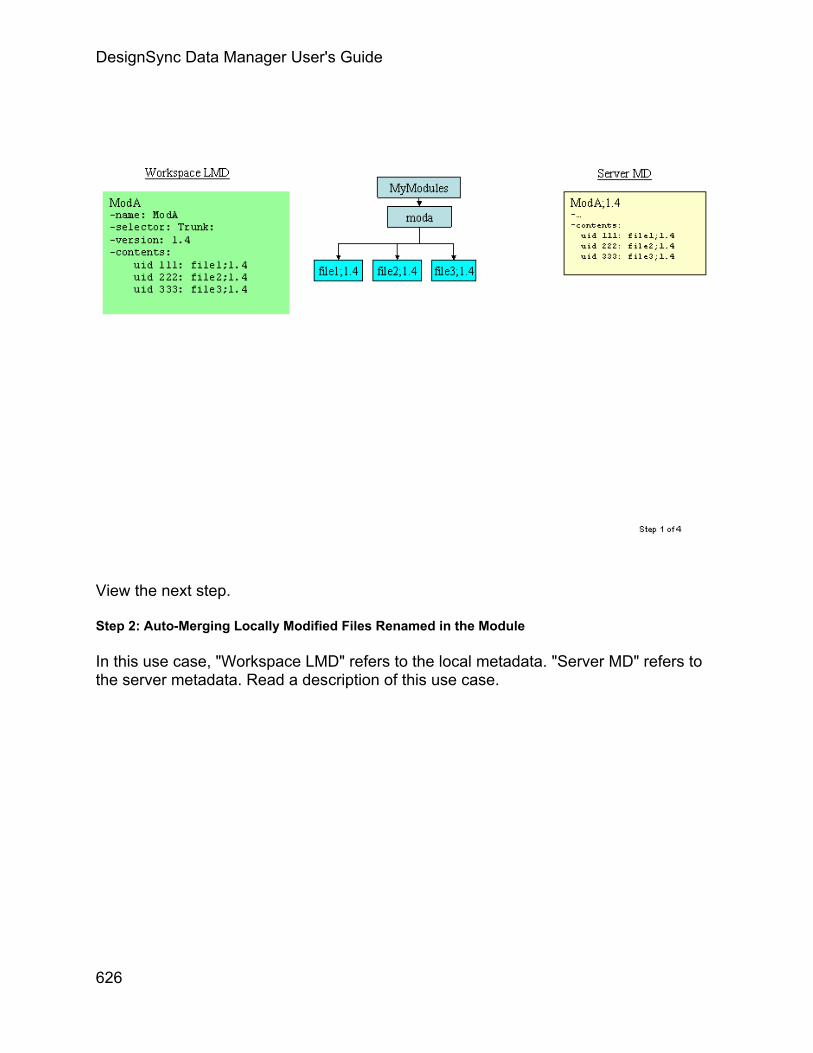
DesignSync Data Manager User's Guide
View the next step.
Step 2: Auto-Merging Locally Modified Files Renamed in the Module
In this use case, "Workspace LMD" refers to the local metadata. "Server MD" refers to the server metadata. Read a description of this use case.
626

Using DesignSync with Modules
View the next step
Step 3: Auto-Merging Locally Modified Files Renamed in the Module
In this use case, "Workspace LMD" refers to the local metadata. "Server MD" refers to the server metadata. Read a description of this use case.
627

DesignSync Data Manager User's Guide
View the next step
Step 4: Auto-Merging Locally Modified Files Renamed in the Module
In this use case, "Workspace LMD" refers to the local metadata. "Server MD" refers to the server metadata. Read a description of this use case.
628

Using DesignSync with Modules
Auto-Merging Locally Modified Files with Other Files Renamed in the Module
Step 1: Auto-Merging Locally Modified Files with Other Files Renamed in the Module
In this use case, "Workspace LMD" refers to the local metadata. "Server MD" refers to the server metadata. Read a description of this use case.
629

DesignSync Data Manager User's Guide
View the next step.
Step 2: Auto-Merging Locally Modified Files with Other Files Renamed in the Module
In this use case, "Workspace LMD" refers to the local metadata. "Server MD" refers to the server metadata. Read a description of this use case.
630
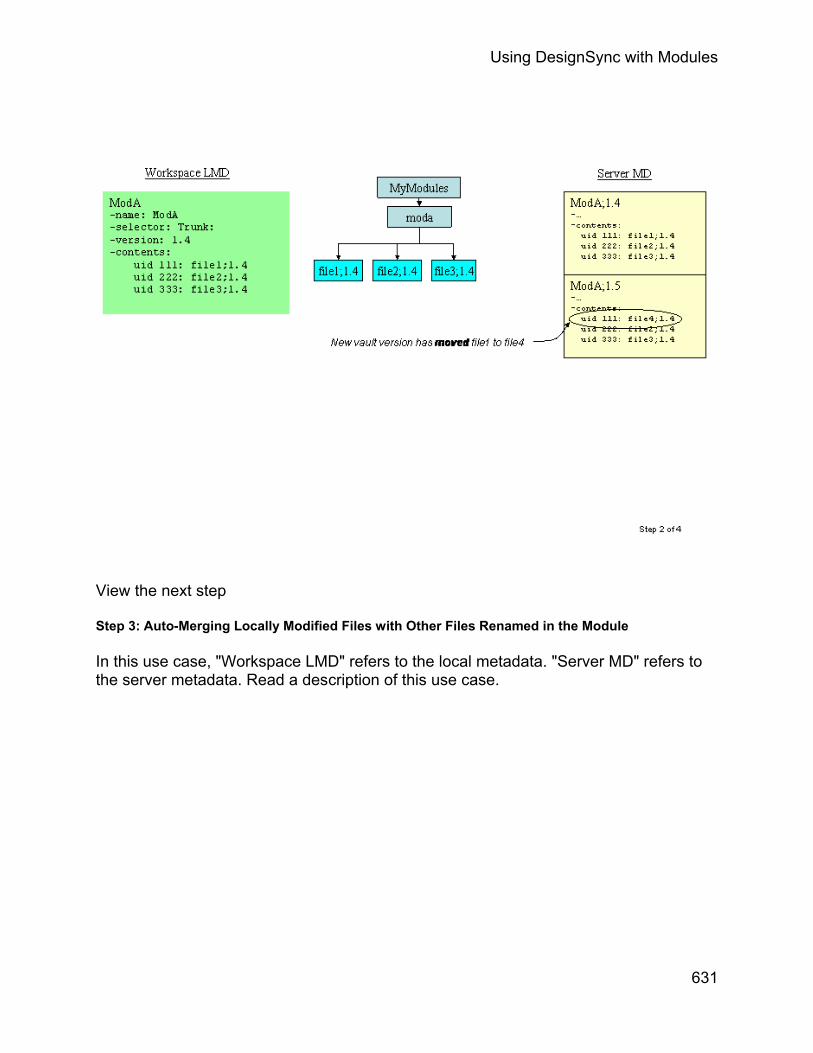
Using DesignSync with Modules
View the next step
Step 3: Auto-Merging Locally Modified Files with Other Files Renamed in the Module
In this use case, "Workspace LMD" refers to the local metadata. "Server MD" refers to the server metadata. Read a description of this use case.
631
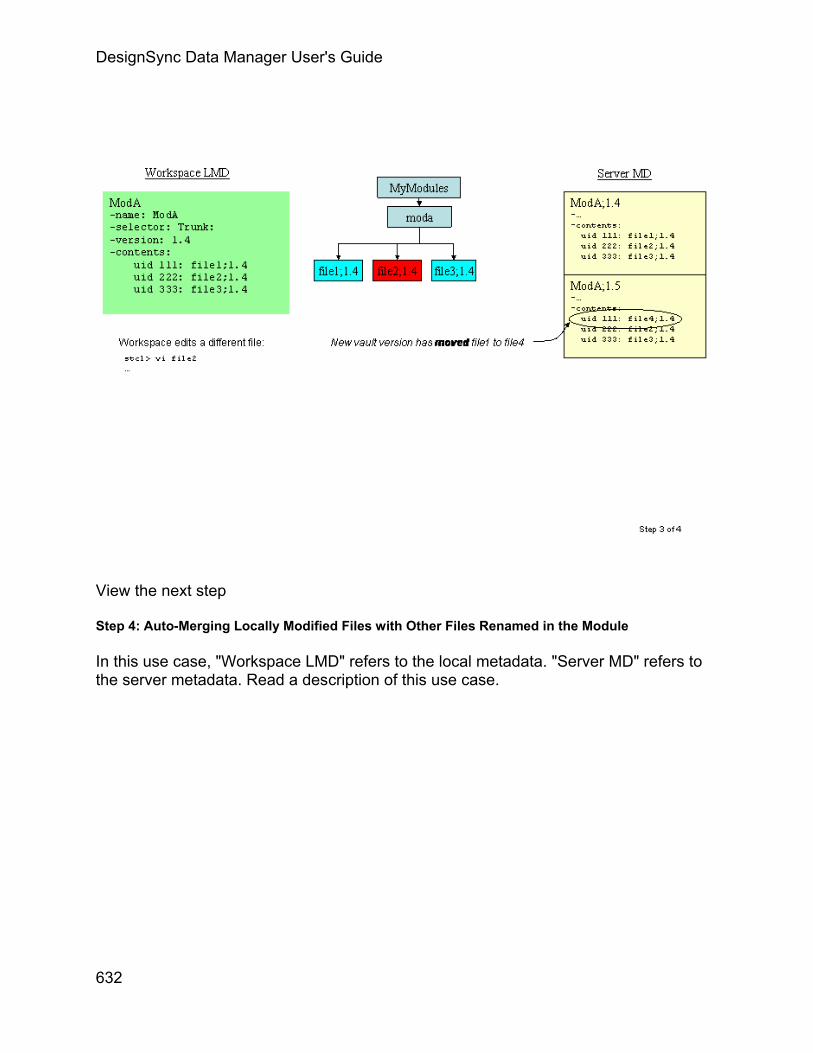
DesignSync Data Manager User's Guide
View the next step
Step 4: Auto-Merging Locally Modified Files with Other Files Renamed in the Module
In this use case, "Workspace LMD" refers to the local metadata. "Server MD" refers to the server metadata. Read a description of this use case.
632

Using DesignSync with Modules
In-Branch Merging of Locally Added Files
Step 1: In-Branch Merging of Locally Added Files
In this use case, "Workspace LMD" refers to the local metadata. "Server MD" refers to the server metadata. Read a description of this use case.
633

DesignSync Data Manager User's Guide
View the next step.
Step 2: In-Branch Merging of Locally Added Files
In this use case, "Workspace LMD" refers to the local metadata. "Server MD" refers to the server metadata. Read a description of this use case.
634

Using DesignSync with Modules
View the next step.
Step 3: In-Branch Merging of Locally Added Files
In this use case, "Workspace LMD" refers to the local metadata. "Server MD" refers to the server metadata. Read a description of this use case.
635

DesignSync Data Manager User's Guide
View the next step.
Step 4: In-Branch Merging of Locally Added Files
In this use case, "Workspace LMD" refers to the local metadata. "Server MD" refers to the server metadata. Read a description of this use case.
636
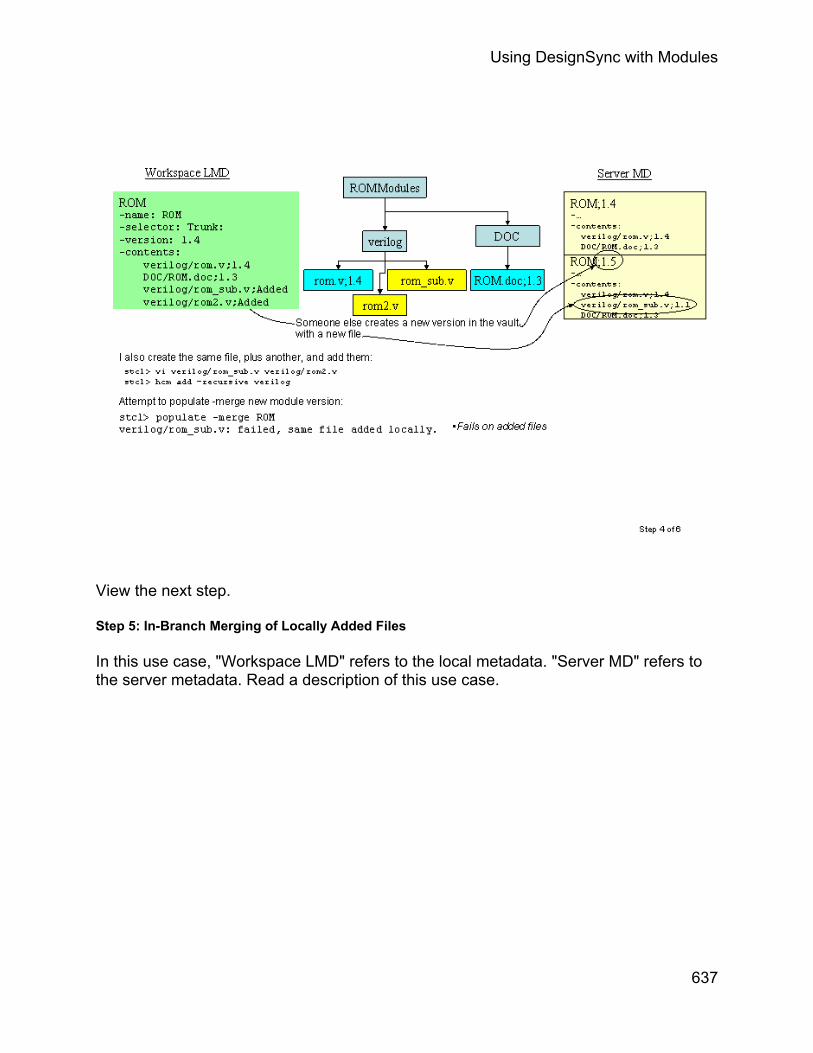
Using DesignSync with Modules
View the next step.
Step 5: In-Branch Merging of Locally Added Files
In this use case, "Workspace LMD" refers to the local metadata. "Server MD" refers to the server metadata. Read a description of this use case.
637

DesignSync Data Manager User's Guide
View the next step.
Step 6: In-Branch Merging of Locally Added Files
In this use case, "Workspace LMD" refers to the local metadata. "Server MD" refers to the server metadata. Read a description of this use case.
638

Using DesignSync with Modules
In-Branch Merging of Locally Modified Files
Step 1: In-Branch Merging of Locally Modified Files
In this use case, "Workspace LMD" refers to the local metadata. "Server MD" refers to the server metadata. Read a description of this use case.
639

DesignSync Data Manager User's Guide
View the next step.
Step 2: In-Branch Merging of Locally Modified Files
In this use case, "Workspace LMD" refers to the local metadata. "Server MD" refers to the server metadata. Read a description of this use case.
640
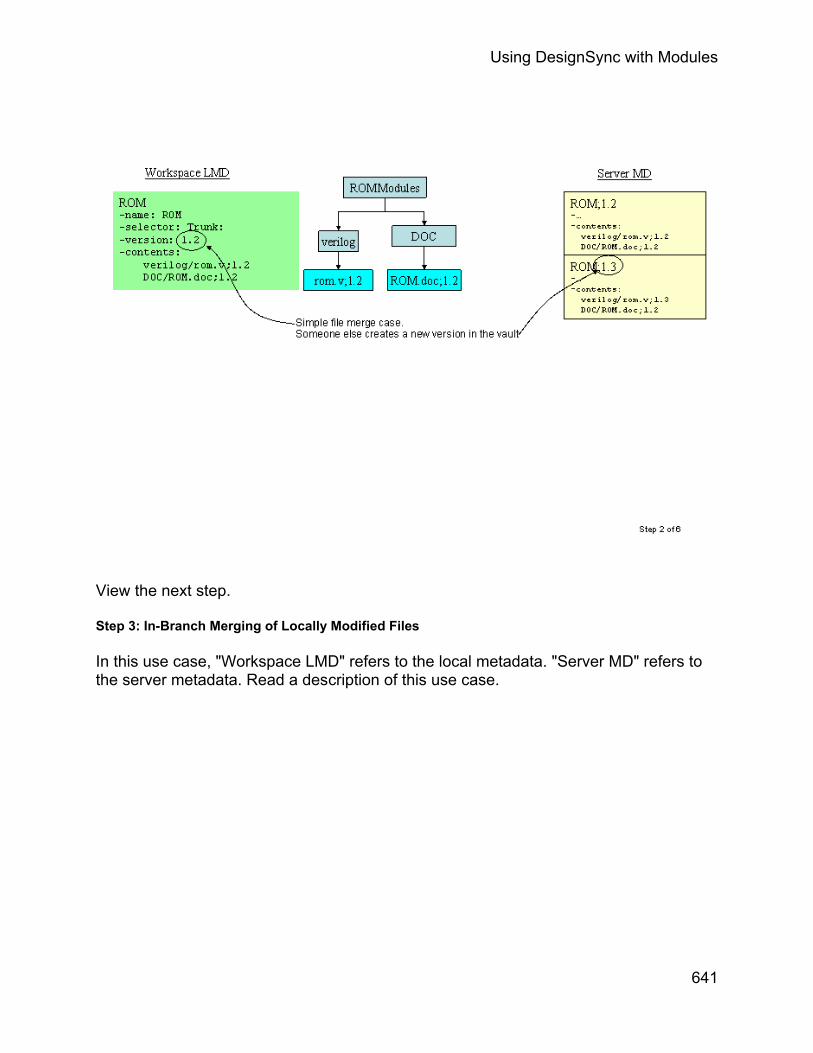
Using DesignSync with Modules
View the next step.
Step 3: In-Branch Merging of Locally Modified Files
In this use case, "Workspace LMD" refers to the local metadata. "Server MD" refers to the server metadata. Read a description of this use case.
641

DesignSync Data Manager User's Guide
View the next step.
Step 4: In-Branch Merging of Locally Modified Files
In this use case, "Workspace LMD" refers to the local metadata. "Server MD" refers to the server metadata. Read a description of this use case.
642

Using DesignSync with Modules
View the next step.
Step 5: In-Branch Merging of Locally Modified Files
In this use case, "Workspace LMD" refers to the local metadata. "Server MD" refers to the server metadata. Read a description of this use case.
643

DesignSync Data Manager User's Guide
View the next step.
Step 6: In-Branch Merging of Locally Modified Files
In this use case, "Workspace LMD" refers to the local metadata. "Server MD" refers to the server metadata. Read a description of this use case.
644

Using DesignSync with Modules
645

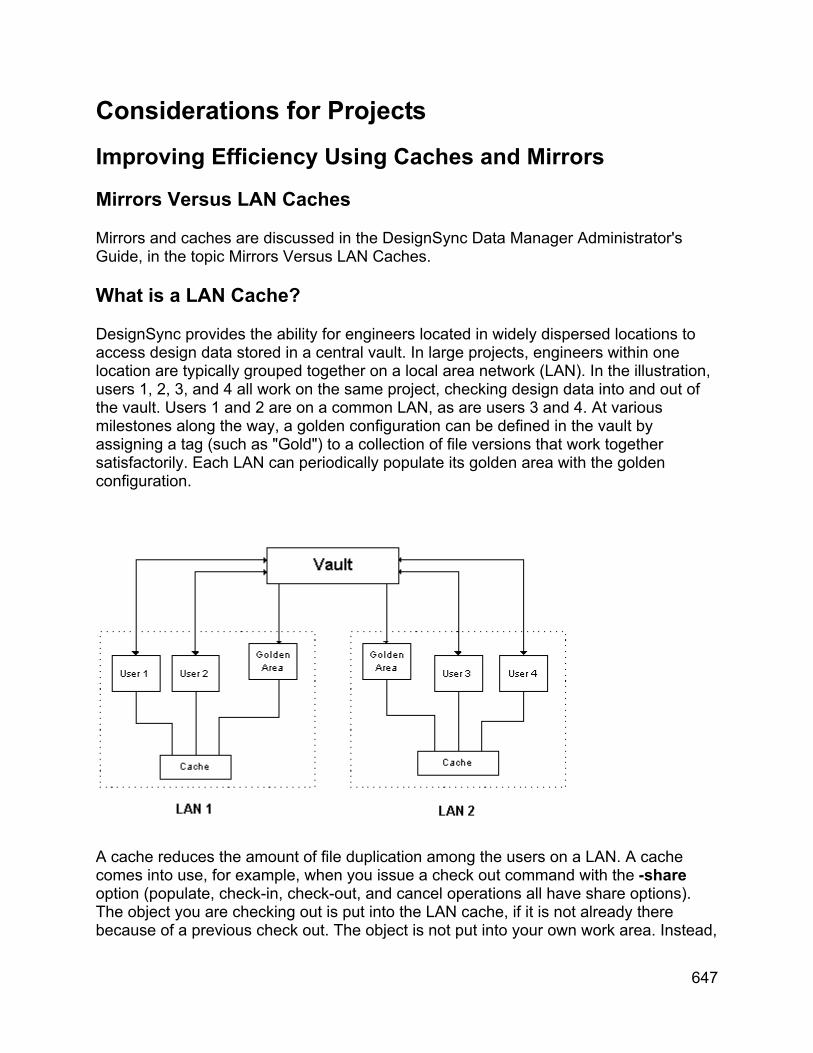
Considerations for Projects
Improving Efficiency Using Caches and Mirrors
Mirrors Versus LAN Caches
Mirrors and caches are discussed in the DesignSync Data Manager Administrator's Guide, in the topic Mirrors Versus LAN Caches.
What is a LAN Cache?
DesignSync provides the ability for engineers located in widely dispersed locations to access design data stored in a central vault. In large projects, engineers within one location are typically grouped together on a local area network (LAN). In the illustration, users 1, 2, 3, and 4 all work on the same project, checking design data into and out of the vault. Users 1 and 2 are on a common LAN, as are users 3 and 4. At various milestones along the way, a golden configuration can be defined in the vault by assigning a tag (such as "Gold") to a collection of file versions that work together satisfactorily. Each LAN can periodically populate its golden area with the golden configuration.
A cache reduces the amount of file duplication among the users on a LAN. A cache comes into use, for example, when you issue a check out command with the -share option (populate, check-in, check-out, and cancel operations all have share options). The object you are checking out is put into the LAN cache, if it is not already there because of a previous check out. The object is not put into your own work area. Instead,
647
DesignSync Data Manager User's Guide
a symbolic link to it is put into your working directory, visible through the UNIX ls command.
Notes:
• Objects in the cache have DesignSync-generated filenames. DesignSync manages the cached files, so you do not need to deal with these meaningless names. However, the links in your work area to the files in the cache use these meaningless names, for example:
$ ls -l top.v
top.v -> /home/tgoss/sync_cache/s64/s64a06945af4f7c9b-1.1-982002979-f216a783154b31cc
For more information about these cache link files, see How DesignSync Manages Caches.
• If your team is using a cache methodology, your project leader may have defined a default fetch state of 'share'. This default fetch state eliminates the need for specifying the -share option each time you perform a revision-control operation.
• Because caching is implemented using symbolic links, only UNIX systems can take advantage of this capability.
Related Topics
Why Use a LAN Cache?
DesignSync Data Manager Administrator's Guide: Setting up a LAN Cache
DesignSync Data Manager Administrator's Guide: Mirrors Versus LAN Caches
Why Use a LAN Cache?
The purpose of using a cache is to save both disk space on the LAN and to save time for individual fetches of updated files.
A cache is useful when, for example, the members of a team populate their simulation directories. Each user first designates the server vault location that is to act as the source for the simulation data by using the setvault command. Then, when the first user issues a populate -recursive -share command, the vault folder hierarchy is copied to the cache directory and symbolic links are created in the user's simulation directory that point to the corresponding cache files. The cache file names are encoded in a way that allows the client to decrypt the source vault location from which the file originated. For populate operations that are subsequently executed by other users, the
648

Considerations for Projects
client does not copy any file to the cache that is already present. It must only establish a link to the existing file.
After a user's simulation directory is populated with links to the cache, any files that need to be individually modified by the user can be checked out with the -lock option. This operation will check out a copy of the file from the server vault into the user's simulation directory and then delete the link to the cache copy. Now the user can make modifications to the real file to diverge the simulation behavior from that produced by the standard vault simulation. However, the bulk of the directory tree is still shared in a read-only mode with the other project members. The cache copy of a file is removed automatically when the final user removes the last link.
Related Topics
What is a LAN Cache?
What is a Module Cache?
A module cache (mcache) can be thought of as a shared workspace. The DesignSync administrator or Project manger can create module caches to contain the common tools, modules, resource libraries, SITaR baselines, etc. required by the entire development team. By populating a module cache link into their workspaces, they populate a single DesignSync object, rather than the full contents of the module.
For UNIX workspaces, which link to the module in the mcache, this reduces populate time, load on the SyncServer, and saves disk space. For Windows workspaces, which do not link to a module cache, but can copy from the cache, it reduces load on the SyncServer during the populate and updates.
A project leader fetches modules into a module cache, preferably in "share" mode, to utilize DesignSync's file caching. When users populate module data, they can specify, using the Module Cache Mode option, whether to link to modules in the module cache, copy the files from the module cache to their local system, or fetch modules from the server. When the module cache is populated, it is assigned an instance name. This allows the team leader to maintain the module cache as any other module. The default module cache path, and the default module cache mode, can be defined in the registry by the team leader or by an individual user.
When users populate module cache links, the symbolic link created is identified as a "Link to mcache" object type and assigned a module instance to allow the user to maintain the mcache link as any other module.
Module caches that contain non-legacy modules must designate the topmost directory of the module cache as a workspace root directory. Use the 'setroot' command to define the topmost directory as a root and then proceed to populate the DesignSync modules into the module cache.
649
DesignSync Data Manager User's Guide
Legacy modules can be linked to, or copied from, a module cache. The module cache mode of "copy" only applies to legacy modules. Attempting to copy a non-legacy module from a module cache fetches the module from the server.
Related topics
Using a Module Cache
Procedure for Creating a Module Cache Link
DesignSync Data Manager Administrator's Guide: Procedure for setting up a Module Cache
Synchronicity Administrator Help: Module Options
Mirroring Overview
A mirror exactly mimics the data set defined for your project vault. Mirrors provide an easy way for multiple users to point to the file versions that comprise their project's data. The file versions in the mirror belong to the configuration defined by the project lead. For example, the configuration could be the Latest version of files on the main Trunk branch. A mirror for a development branch may be defined to always contain the file versions on that branch with a specific tag. When the file versions comprising the configuration change, for example, if Latest versions are being mirrored and a new version of a file is checked into the vault, the mirror directory is automatically updated with the new version. Without mirroring, users would need to frequently update their work areas using the populate command to reflect the project's current data set. You can find where vault data is being mirrored, and the status of those mirrors. (See the Related Topics below.)
The setmirror command associates a workspace with a mirror directory. A mirror will always have accurate metadata because any action that writes to a mirror directory updates the local metadata in the mirror directory. When you use the setmirror command to associate a mirror directory, checking in an object will:
• create the new version in the vault, • update the file in the associated mirror associated, and then • update the metadata.
Mirror can be updated and administered automatically. See the section Administering Mirrors for details. As of Version 4.2, the legacy Remote Mirror Assurance package is no longer supported.
Mirror Attributes
650

Considerations for Projects
• All actions that write to a mirror directory will update the local metadata in the mirror directory. When looking at a workspace that has objects in the mirror state, a combination of the workspace’s and the mirror directory’s local metadata will be used to determine the correct version of the objects. This allows you to use the ls or url command on objects in the workspace to show the correct state of the object.
• Mirrors support all defined configurations. • When a check-in occurs from a client, it creates a new version in the vault,
returns control back to the client, and the client writes the object into the mirror and updates the local metadata in the mirror directory.
• A mirror write through will occur for all fetch states. Regardless of the fetch state, if a mirror write through is done, then the metadata is updated to reflect what was written to the mirror directory.
• No other commands, with or without the -mirror option, write through to the mirror. Commands like populate -mirror and cancel -mirror do not write to the mirror directory. However, the co -mirror command writes through to the mirror directory if the correct up-to-date version is not already in the mirror. Most commands only create links from a workspace to the files in the mirror directory.
As a DesignSync administrator, you can:
• Set up a mirror directory and navigate through this mirror knowing that everything is being kept up-to-date.
• Set up your environment (from that LAN where the check-ins occur) to write through to your mirror when checking a new version into the server. You do not have to wait for the mirror update process to update the mirror.
Restrictions
• Because mirroring is implemented with UNIX links, mirrors are not supported on Windows platforms.
• The mirror directory and the users accessing it must be on the same LAN. • Only one process can write to the mirror subdirectory at a time. The system
ensures that when you check in a new version, there will be a lock on the mirror subdirectory. The lock is held for the duration of the client check-in from the workspace subdirectory. The system will display a "waiting on metadata lock" message while the system processes the workspace. This may cause a delay if someone is checking in a large amount of objects or large files.
• Mirrors for modules cannot be linked to from a workspace. A module cache should be used instead.
Related Topics
General Mirror Topics:
651

DesignSync Data Manager User's Guide
Mirrors Versus Caches
Using a Mirror
ENOVIA Synchronicity Command Reference: mirror wheremirrored
Mirror Administration Topics:
Administering Mirrors
Finding Mirrored Data
Locking, Branching, and Merging
What Is Merging?
Merging combines changes made on two branches, or within a branch. Branching without merging has limited usability – two developments streams diverge forever and can never be reconciled.
There are several important notions related to the general concept of merging that are equally applicable to file merging and module merging:
Merge Conflicts
Two-Way Merge
Three-Way Merge
Merge Edges
Module merging has additional factors to consider because instead of merging specific files, you are merging a set of changes. For more information on module merging, see Merging Module Data.
Related Topics
Merging Module Data
Using the Merging Work Style
Parallel (Multi-Branch) Development
652

Considerations for Projects
Merge Conflicts
Two-Way Merge
Three-Way Merge
Merge Edges
Locking and Merging Work Styles
Locking and Merging Work Styles
DesignSync supports the two common design-management (DM) work styles: locking and merging (non-locking).
• Locking Style
With the locking style, you always check out with a lock an object that you plan to edit. DesignSync locks the branch associated with the version you are checking out, prohibiting other team members from creating new versions on that branch. You, the holder of the lock, reserve the right to create the next version on that branch. Other team members can fetch (check out without a lock) the object, but no one else should make changes while you hold the lock.
For example, Barbara checks out with a lock version 1.3 (the Latest version) of a file. Jack then tries to check out with a lock the same file, but the checkout fails and DesignSync reports that the file is already locked. Jack contacts Barbara to let her know that he needs to edit the file. Barbara finishes her changes and checks the file in, creating version 1.4. Jack can now check out version 1.4 with a lock, make his changes, then check in the file to create version 1.5.
Note that in multibranch environments, each branch of an object can be independently locked and unlocked. Therefore, different team members can modify the same object on different branches even when using the locking work style.
• Merging Style
With the merging style, more than one person can fetch the same object with the intention of editing the object. The first person to check the object back in creates the next version. The other person must first merge the changes from this new Latest version into his or her local copy, manually resolve any merge conflicts, then check in the merged object.
For example, Barbara and Jack both check out version 1.3 (the Latest version) of a file. Jack checks in his changes first, creating version 1.4. To check in her
653

DesignSync Data Manager User's Guide
changes, Barbara must first merge the new Latest version (1.4) into the modified version in her work area. She manually resolves any conflicts between her changes and Jack's changes. She then checks the merged version in, creating version 1.5.
Note that DesignSync also supports merging across branches. See Parallel (Multi-Branch) Development for information.
Which work style is appropriate for your team depends on various factors:
• Comfort with design management
Teams new to design management often use the locking style. The locking style avoids merges, which can be intimidating to novice users. As projects get bigger and teams gain more experience, teams tend to shift to the merging style to facilitate extensive sharing of files.
• Frequency of sharing objects
Cases where there is typically one team member modifying a given object at a time are well suited to the locking style. If multiple users commonly want to simultaneously modify a given object, then the merging style is appropriate.
• Data format
Merges require that design data be ASCII (text), as opposed to binary. If your team is managing binary data, you must use the locking work style, at least for the binary data.
DesignSync also lets you mix the two work styles, although doing so is not generally recommended. For example, your team is using the merging style, but you check out with a lock an object that you want no one else to modify.
Related Topics
Using the Locking Work Style
Using the Merging Work Style
Using the Locking Work Style
The following operations define the locking work style:
• To check out an object for editing, lock the object: o From the Check Out dialog box, select Locked copies. o From the Populate dialog box, select Locked copies o When using the co or populate commands, use the -lock option.
654

Considerations for Projects
• To check in an object while continuing making changes, retain the lock: o From the Check In dialog box, select Locked copies. o When using the ci command, use the -lock option.
• To cancel your check out when you have an object locked but have decided not to make changes, select Revision Control => Cancel Checkout or use the cancel command. Note that to control the state of the object (local copy, link to the cache, link to the mirror, reference) after the checkout, you must use the cancel command; canceling from the graphical interface always uses your default fetch state if defined, otherwise leaves a local copy.
• To remove a lock held by another user, select Revision Control => Unlock or use the unlock command. Note that removing another user's lock is not a typical operation and one that is often access controlled. Consult your team leader.
• If you have already made changes to an object, you can still obtain a lock for the object by using the co command with the -lock option. DesignSync lets you acquire the lock without fetching the object and overwriting your work. If another user has checked in changes to the object or has acquired a lock on the object, DesignSync does not let you lock the object. You can also obtain the lock by using the Check Out dialog box and selecting Locked copies.
• If you regularly regenerate a large file but you want to lock the file before regenerating, you can save time by using co with the -lock and -reference options. You save time because DesignSync creates a reference to the file instead of fetching the previously generated file. You can also obtain a locked reference by using the Check Out dialog box and selecting Locked references.
Your project leader can use access controls to enforce a locking style by limiting check-in operations to locked objects. See the ENOVIA Synchronicity Access Control Guide: Access Control Scripting for a sample script to enforce a locking model. The ability to perform a merge can also be restricted; see the access control definition.
Related Topics
Locking and Merging Work Styles
Using the Merging Work Style
ENOVIA Synchronicity Command Reference: co
ENOVIA Synchronicity Command Reference: populate
ENOVIA Synchronicity Command Reference: ci
ENOVIA Synchronicity Command Reference: cancel
ENOVIA Synchronicity Command Reference: unlock
Resolving Merge Conflicts
655

DesignSync Data Manager User's Guide
Whenever you merge, whether the merge is between two versions on the same branch (see Using the Merging Work Style) or between branches (see Parallel (Multi-Branch) Development), there may be merge conflicts. Merge conflicts occur when different changes were made to the same region of the two versions that are being merged. DesignSync cannot automatically determine which changes are the correct ones; you must resolve the conflicts manually.
DesignSync alerts you to conflicts during the merge, and conflicts are indicated by the Status field of the List View and from the ls command. You can also use the url inconflict command.
To resolve conflicts, you must edit the merged object. Conflicts are shown as follows:
<<<<<<< versionID Lines from Latest version (same-branch merge) or overlaid version ======= Lines from locally modified version >>>>>>>
DesignSync considers the conflicts resolved when the file no longer contains any of the conflict delimiters (exactly 7 less-than, greater-than, or equal signs starting in column 1).
Note:
DesignSync records "merge edges" – information about what versions participated in the merge -- with the new version resulting from the merge. DesignSync uses merge edges in future calculations of closest common ancestors instead of always going back to the original ancestor. This capability relieves you from having to resolve the same merge conflicts during future merges. See the ENOVIA Synchronicity Command Reference: url resolveancestor command for more information.
Related Topics
Using the Merging Work Style
Parallel (Multi-Branch) Development
ENOVIA Synchronicity Command Reference: Is
ENOVIA Synchronicity Command Reference: url inconflict
Selecting Versions and Branches
Selecting Versions and Branches
656

Considerations for Projects
Some revision-control operations, such as checkout and populate, operate on versions of design objects (files or collections). Other operations, such as checkin and retire, operate on branches. One operation, tagging, can operate on both versions and branches. How DesignSync determines what version or branch to operate on varies by operation but can include the following:
• The current branch or version of the object in your work area
For operations such as retiring, unlocking, and tagging design objects, the default behavior is to operate on the current version or branch of objects in your work area.
• The branch or version you explicitly specify using a selector or selector list
Many command-line commands have a -branch or -version option so that you can specify the branch or version on which to operate. The DesignSync graphical user interface (GUI) lets you specify a branch or version using Version and Branch fields where appropriate. For example, the Check Out, and Populate and Tag dialog boxes have Version fields. The Check In, Unlock, Retire, and Tag dialog boxes have Branch fields.
• The branch or version identified by the object's persistent selector list
Every object has a persistent selector list -- a selector or selector list that is stored in local metadata (or inherited from the parent folder) and is used by some commands in the absence of an explicit branch or version selector list. By default, the persistent selector list is Trunk (shorthand for Trunk:Latest), which is the default tag name for branch 1. Check-in, check-out, populate, and import operations obey the persistent selector list.
Note:
Using CONFIG statements in sync_project.txt files, you can map a configuration to a single selector or a selector list. See Using Vault References for Design Reuse for more information.
Specifying Branches and Versions Using Fields or Vault URLs
Some DesignSync commands (for example, mkbranch, retire, tag, and unlock) provide two ways to specify a particular version or branch for the command to operate on:
• Use the Branch or Version fields (or -branch or -version command-line options). For example:
stcl> tag -recursive alpha -version baseline ASIC/top/alu
657

DesignSync Data Manager User's Guide
DesignSync tags all objects that have the baseline version tag in the alu folder and all its subfolders.
stcl> unlock -branch RelA:Latest -recursive sync://apollo:2647/Projects/Sportster/code
DesignSync unlocks branch RelA:Latest for all objects in the code folder and all its subfolders.
• Specify a branch or version selector with the object's URL.
dss> retire "sync://apollo:2647/Projects/Sportster/top/top.v;Main:Latest"
DesignSync retires the version of top.v that has the branch selector Main:Latest. Note: Enclose the vault URL between quotation marks (") in the stcl shell if the string contains a semicolon (;).
If you enter a value in the Branch or Version field (or use a -branch or -version option) and you specify a vault object URL that includes a branch or version selector, the vault object URL selector takes precedence. For example, suppose you enter:
stcl> tag -version alpha beta "sync://apollo:2647/Projects/ASIC/top/top.v;1.2"
DesignSync ignores the alpha version selector and tags version 1.2 of top.v.
Related Topics
What Are Selectors?
What Are Selector Lists?
What Are Persistent Selector Lists
Selector Formats
What Are Selectors?
A selector is an expression that identifies a branch and version of a managed object. For example, the version selector 'gold', the branch selector 'Rel2:Latest', the version number '1.4', and the reserved keyword 'Latest' are all selectors.
Static Selectors Versus Dynamic Selectors
658

Considerations for Projects
Static selectors denote a set of objects whose contents are fixed. These fixed objects might constitute a 'release' of the group of objects. Static selectors include version selectors such as gold and branch selectors with fixed versions, such as Rel2:gold. The objects denoted by a static selector do not change with subsequent checkins.
Dynamic selectors denote a set of objects whose contents are not fixed. A branch selector such as Rel2:Latest is a dynamic selector because the objects denoted by the selector change; a new Latest version is created on the Rel2 branch with each subsequent checkin.
How Branch and Version Selectors Are Resolved
Branch tags and version tags share the same name space. To distinguish version selectors from branch selectors, you append :<versiontag> to the branch name; for example, Gold:Latest is a valid branch selector. You can leave off the Latest keyword as shorthand; for example, Gold: is equivalent to Gold:Latest. The selector Trunk is also a valid branch selector. Trunk is a shorthand selector for Trunk:Latest.
You cannot assign the same tag name to both a version and a branch of the same object. For example, a file called top.v cannot have both a version tagged Gold and a branch tagged Gold. However, top.v can have a version tagged Gold while another file, alu.v, can have a branch tagged Gold.
Consider adopting a consistent naming convention for branch and version tags to reduce confusion. For example, you might have a policy that branch tags always begin with an initial uppercase letter (Rel2.1, for example) whereas version tags do not (gold, for example).
If the selector identifies a version, DesignSync resolves the selector to both the object's version number and branch number. For example, if version 1.2.1.3 is tagged Gold, DesignSync resolves Gold as both version 1.2.1.3 and branch 1.2.1. A version selector only resolves if the object has a version tag of the same name; it does not resolve if the tag is a branch tag.
If the selector identifies a branch, DesignSync resolves the selector to both that branch and the Latest version on that branch. If branch 1.2.4 has branch tag Rel2, DesignSync resolves Rel2:Latest as both branch 1.2.4 and the Latest version on that branch (say, 1.2.4.5). This behavior is important because some commands (such as Check Out) operate on a version, some (such as Check In) operate on a branch, and others (such as Tag) operate on either a version or branch. If the tag cannot be resolved as a branch, DesignSync searches for a version of the same name, determines which branch the version is on, and resolves to the Latest version on that branch. For example, suppose an object, netlist.txt, has a version tagged beta on its 1.2.4 branch. If the selector is beta , DesignSync first searches for a beta branch. Finding
659

DesignSync Data Manager User's Guide
no beta branch, DesignSync searches for a beta version. DesignSync finds the beta version, determines its branch, 1.2.4, and resolves to the Latest version on the 1.2.4 branch.
A selector can also specify both a branch and a version, for example Rel2:gold. This selector resolves if there is a branch Rel2 and if a version tagged gold exists on the Rel2 branch.
A selector might not match any branch or version of a given object. For example, a file may not have a branch or version tagged Gold. Because selectors can fail, it is common to specify selector lists.
Note: To resolve a selector, DesignSync does not search above the root of a workspace where a setvault has been applied. Thus, if a folder has no selector or persistent selector set, DesignSync searches up the hierarchy only as far as the first folder that has a vault association.
Related Topics
Selecting Versions and Branches
What Are Selector Lists?
What Are Persistent Selector Lists
Selector Formats
What Are Selector Lists?
You can combine selectors into a selector list, a comma-separated list of selectors. No white space between items is allowed. Examples of selector lists are:
gold,silver,bronze,Trunk:Latest
auto(Test),Main:Latest
Dev2.1:Latest,Rel2.1:Latest,Trunk
Selector lists are used by commands that fetch objects (co, populate, and import). They provide a search order for identifying and retrieving versions. DesignSync operates on each element of a selector list in the same way it operates on an individual selector. If the first selector in the list does not resolve to a version, then DesignSync looks at the next selector in the list. The first matching version is used. The command fails if none of the selectors in the list resolves to a version. In the case of tags, DesignSync first looks for a branch with the specified tag, and if found, resolves to the Latest version on that branch. Otherwise, DesignSync looks for a version with that tag.
660

Considerations for Projects
For example, if you want to populate with "the most stable configuration", you might define your selector list as green,yellow,red,Trunk, where your team's development methodology is to use version tags of green, yellow, and red to indicate decreasing levels of stability. With this selector list, DesignSync retrieves the first of the following versions it locates:
1. The version tagged green. 2. The version tagged yellow. 3. The version tagged red. 4. The Latest version on the branch tagged Trunk. Trunk (shorthand for
Trunk:Latest) is the default tag name for branch 1.
If your team is using a branching methodology and you want to populate with "the most stable configuration", you might define your selector list instead as Green:Latest,Yellow:Latest,Red:Latest,Trunk. With this selector list, DesignSync retrieves the first of the following versions it locates:
1. The Latest version on the branch tagged Green. 2. The Latest version on the same branch as the version tagged Green. 3. The Latest version on the branch tagged Yellow. 4. The Latest version on the same branch as the version tagged Yellow. 5. The Latest version on the branch tagged Red. 6. The Latest version on the same branch as the version tagged Red. 7. The Latest version on the branch tagged Trunk.
Selector lists are a powerful mechanism, but can also add complexity. To avoid accidental checkins to unintended branches when you have complicated selector lists, the 'ci' and 'co -lock' commands consider only the first selector in a selector list. If the first selector resolves to a branch, the operation continues, otherwise the operation fails.
Note: Using CONFIG statements in sync_project.txt files, you can map a configuration to a single selector or a selector list. See Using Vault References for Design Reuse for information.
Related Topics
Selecting Versions and Branches
What Are Selectors?
What Are Persistent Selector Lists
Selector Formats
What Are Persistent Selector Lists
661

DesignSync Data Manager User's Guide
Some operations (check in, check out, populate, and import) support persistent selector lists. Persistent selector lists specify what branch or version a command operates on in the absence of an explicit branch or version selector list (Version or Branch fields in the graphical interface, -version or -branch command-line options). Commands that do not obey the persistent selector list typically operate on the current version or current branch of the object in your work area.
You explicitly set the persistent selector list, typically on an entire work area, using the setselector command. You can also set the selector at the same time you set the vault with the setvault command. DesignSync also sets the persistent selector list in the following cases:
• When populating a configuration-mapped folder. This behavior is a performance optimization. See the populate help topic for details.
• When populating or checking out with the -overlay option and an object exists on the overlay branch but not on the branch being overlaid (the work area branch). DesignSync may augment the object's persistent selector list with the Auto() selector so that the object is automatically branched when checked in. See the -overlay option to the populate or co command for details.
A persistent selector list is stored in an object's local metadata, or it is inherited from its parent folder. If a persistent selector list has not been defined, the default is "Trunk".
Note: Selector lists are not supported if you map configurations using REFERENCEs in sync_project.txt files.
Related Topics
Selecting Versions and Branches
What Are Selectors?
What Are Selector Lists?
Selector Formats
ENOVIA Synchronicity Command Reference: setselector
ENOVIA Synchronicity Command Reference: setvault
ENOVIA Synchronicity Command Reference: populate
ENOVIA Synchronicity Command Reference: co
Selector Formats
A selector can have one of several formats:
662
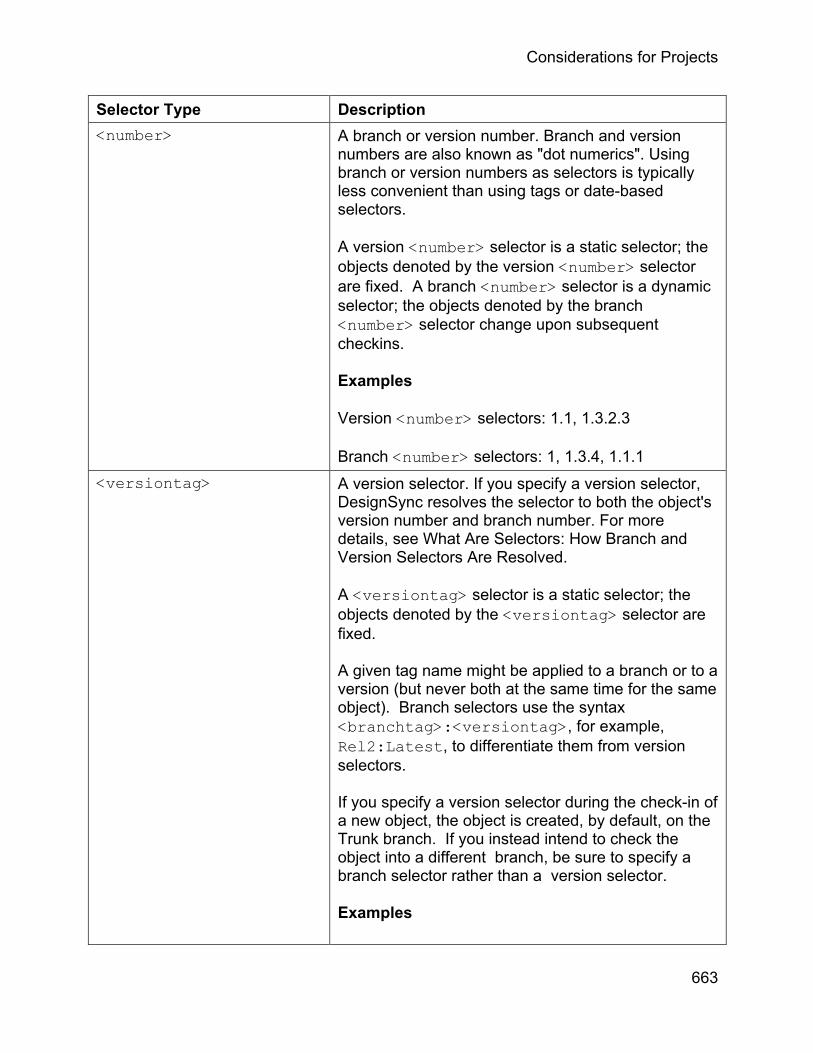
Considerations for Projects
Selector Type Description <number> A branch or version number. Branch and version
numbers are also known as "dot numerics". Using branch or version numbers as selectors is typically less convenient than using tags or date-based selectors.
A version <number> selector is a static selector; the objects denoted by the version <number> selector are fixed. A branch <number> selector is a dynamic selector; the objects denoted by the branch <number> selector change upon subsequent checkins.
Examples
Version <number> selectors: 1.1, 1.3.2.3
Branch <number> selectors: 1, 1.3.4, 1.1.1 <versiontag> A version selector. If you specify a version selector,
DesignSync resolves the selector to both the object's version number and branch number. For more details, see What Are Selectors: How Branch and Version Selectors Are Resolved.
A <versiontag> selector is a static selector; the objects denoted by the <versiontag> selector are fixed.
A given tag name might be applied to a branch or to a version (but never both at the same time for the same object). Branch selectors use the syntax <branchtag>:<versiontag>, for example, Rel2:Latest, to differentiate them from version selectors.
If you specify a version selector during the check-in of a new object, the object is created, by default, on the Trunk branch. If you instead intend to check the object into a different branch, be sure to specify a branch selector rather than a version selector.
Examples
663

DesignSync Data Manager User's Guide
gold
alpha
664
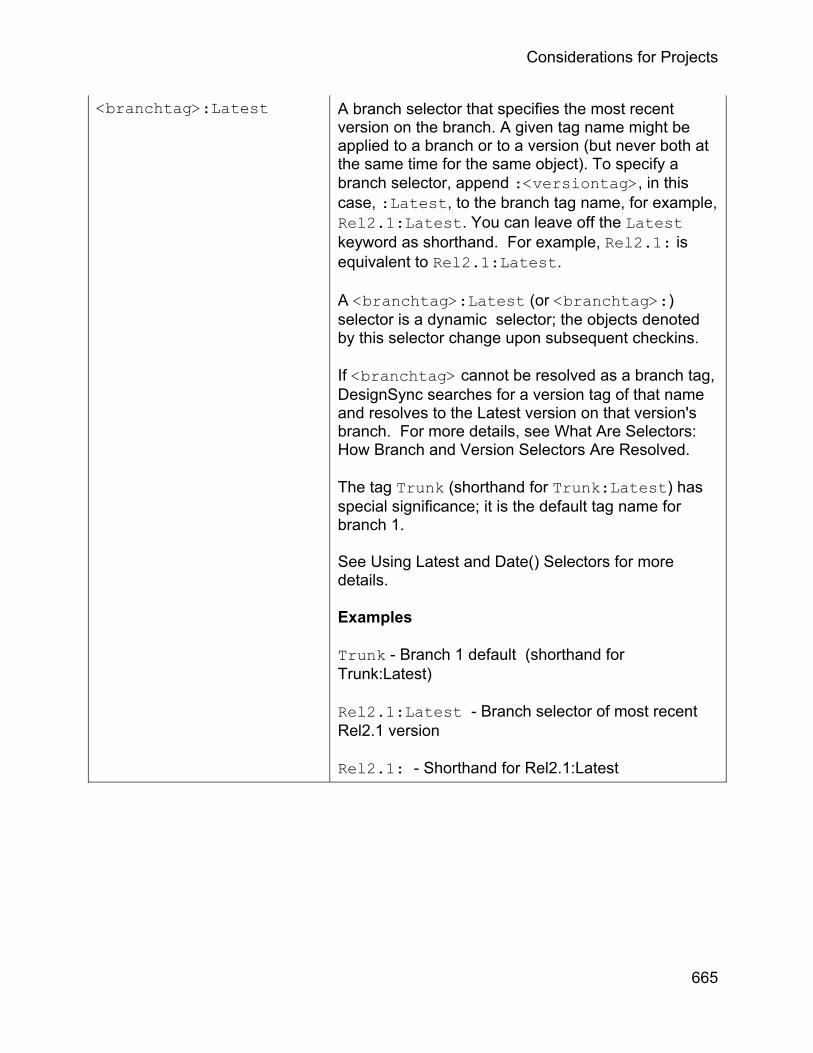
Considerations for Projects
<branchtag>:Latest A branch selector that specifies the most recent version on the branch. A given tag name might be applied to a branch or to a version (but never both at the same time for the same object). To specify a branch selector, append :<versiontag>, in this case, :Latest, to the branch tag name, for example, Rel2.1:Latest. You can leave off the Latest keyword as shorthand. For example, Rel2.1: is equivalent to Rel2.1:Latest.
A <branchtag>:Latest (or <branchtag>:) selector is a dynamic selector; the objects denoted by this selector change upon subsequent checkins.
If <branchtag> cannot be resolved as a branch tag, DesignSync searches for a version tag of that name and resolves to the Latest version on that version's branch. For more details, see What Are Selectors: How Branch and Version Selectors Are Resolved.
The tag Trunk (shorthand for Trunk:Latest) has special significance; it is the default tag name for branch 1.
See Using Latest and Date() Selectors for more details.
Examples
Trunk - Branch 1 default (shorthand for Trunk:Latest)
Rel2.1:Latest - Branch selector of most recent Rel2.1 version
Rel2.1: - Shorthand for Rel2.1:Latest
665

DesignSync Data Manager User's Guide
<branchtag>:<versiontag>
A specific version on a specific branch. The <branchtag> and <versiontag> values are themselves selectors. This format is often used with Date() and Latest selectors to identify a version on a particular branch.
To specify a specific branch and version, the selector must contain both the branch and version. :<versiontag> is illegal. <branchtag>: resolves to the Latest version on the specified branch.
A selector such as Trunk:gold is valid and indicates a version tagged gold only if it is on a branch called Trunk; otherwise, the selector fails.
A selector of the form Gold:Latest looks for a branch tagged Gold, and if found, fetches the Latest version on that branch. If a Gold branch is not found, DesignSync looks for a version tagged Gold, and if found, retrieves the Latest version on the branch that the Gold version is on. Selectors of the form Gold:Date(<date>) behave similarly. See Using Latest and Date() Selectors for more details.
Unlike the dynamic <branchtag>:Latest selector, a <branchtag>:<versiontag> selector is a static selector; the objects denoted by the <branchtag>:<versiontag> selector are fixed.
Examples
Rel2:alpha
Trunk:Date(yesterday)
666

Considerations for Projects
<branchtag>:Date(<date>)
The most recent version on the specified branch that was created on or before the specified date. The Date keyword is case insensitive. Note that the Latest selector is equivalent to <branchtag>:Date(<a_date_in_the_future>).
A <branchtag>:Date(<date>) selector is a dynamic selector; the objects denoted by this selector are dependent on the date.
You specify the Date selector as follows: <branchtag>:Date(<date>) where <branchtag> is a branch tag. If <branchtag> cannot be resolved as a branch tag, DesignSync searches for a version tag of that name and resolves to the most recent version created on or before the specified date on that version's branch.
See the Date Formats for details on how to specify dates. See Using Latest and Date() Selectors for more information about specifying date selectors.
Examples
Trunk:Date(yesterday) - Resolves to the last version checked in yesterday on the Trunk branch
gold:date(4/11/00)- If no branch is named gold, but there is a version selector gold, DesignSync resolves this selector to the last version checked in on or before 4/11/00 on the branch containing the gold version
Rel2:Date(today) - Resolves to the last version checked in today on the Rel2 branch
667

DesignSync Data Manager User's Guide
VaultDate(<date>) The most recent version on any branch that was created on or before the specified date. The VaultDate keyword is case insensitive. Like the Date selector, the VaultDate specification can accept a branch tag, in the format:
<branchtag>:VaultDate(<date>)
where <branchtag>: is optional.
See Date Formats for details on how to specify dates.
A VaultDate(<date>) selector is a dynamic selector; the objects denoted by this selector are dependent on the date.
Examples
VaultDate(yesterday)
VaultDate(4/11/00)
Rel40:VaultDate(today)
Auto(<tag>) Used for auto-branching, which creates branches on an as-needed basis as opposed to branching an entire project. This methodology is useful for "what if" scenarios. In general, Auto(<tag>) is equivalent to just <tag>. The 'Auto' is significant only for operations that can create branches (ci, co -lock, populate -lock). The Auto keyword is case insensitive. An Auto(<tag>) selector is a dynamic selector.
Examples
Auto(Dev)
auto(Rel2.1_p1)
Notes:
• The value supplied to the auto-branch selector must be a branch or version name, not a branch selector. Auto(Golden:) and Auto(Golden:Latest) are illegal selectors.
• The current version is always the branch-point
668

Considerations for Projects
version when Auto() creates a new branch. • If present, Auto(<tag>) must be the first
selector in a selector list.
Using Latest and Date() Selectors
• <branchtag>:Latest is equivalent to <branchtag>:Date(<a_date_in_the_future>).
• When used with the setselector command or as part of a selector list argument (more than one selector) to the -version option, Latest and Date() must be qualified with a branch:
<branchtag>:Latest
<branchtag>:Date(<date>)
• For backward compatibility, DesignSync supports selectors of the form <version_number>:Latest and <version_number>:Date(<date>). DesignSync uses the branch of the specified version, and then applies the Latest or Date() selector. For example, 1.2:Latest resolves to 1:Latest, and 1.3.2.1:Date(yesterday) resolves to 1.3.2:Date(yesterday).
• When used as the only selector to a -version option, DesignSync augments the selector with the persistent selector list. For example, if the persistent selector list is Gold:,Trunk and you specify co -version Latest, the selector list used for the operation is Gold:Latest,Trunk:Latest; the persistent selector list remains Gold:,Trunk after the operation.
669

DesignSync Data Manager User's Guide
Exception: When you check in an object whose branch you have locked (having done a checkout or populate with the -lock option), the date selector augments the current branch, not the persistent selector list. You typically want to remain working on the locked branch even if the persistent selector list has changed.
These restrictions are required to avoid ambiguity about which branch a Latest or Date() selector applies to.
Related Topics
Selecting Versions and Branches
What Are Selectors?
What Are Selector Lists?
What Are Persistent Selector Lists
Date Formats
ENOVIA Synchronicity Command Reference: setselector
Date Formats
This section describes how you can specify dates when using Date(<date>) and VaultDate(<date>) selectors. DesignSync uses a public-domain date parser that supports a wide range of date and time specifications. The parser is the same one used by the Gnu family of tools. Visit a Gnu website for a complete specification. This section documents the more common formats.
Note: If the date specification contains spaces, you must surround the entire selector list with double quotes. For example: "Gold:Date(last tuesday),Trunk"
Year
You can specify the year using 2 or 4 digits. DesignSync interprets 2-digit year specifications between 00 and 69, inclusive, as 2000 to 2069, and specifications between 70 and 99, inclusive, as 1970 to 1999. If you omit the year, the default is the current year.
Month
You can specify the month as a number (1 through 12), or using the following names and abbreviations:
670
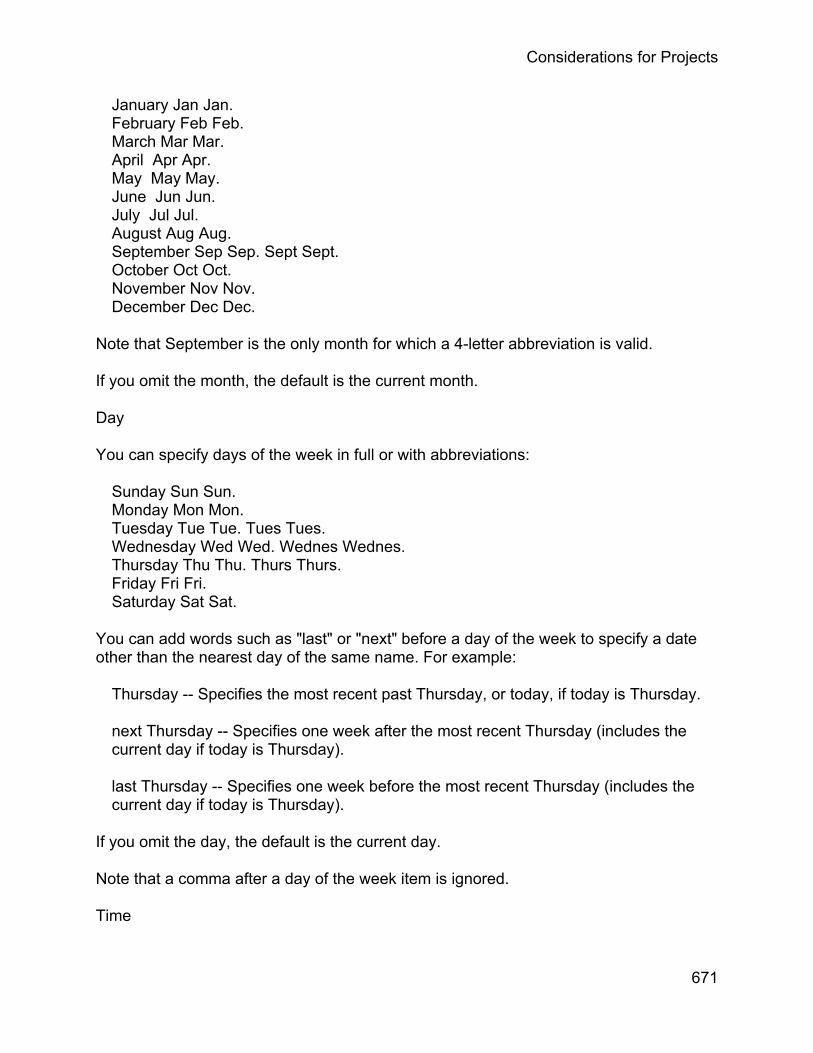
Considerations for Projects
January Jan Jan. February Feb Feb. March Mar Mar. April Apr Apr. May May May. June Jun Jun. July Jul Jul. August Aug Aug. September Sep Sep. Sept Sept. October Oct Oct. November Nov Nov. December Dec Dec.
Note that September is the only month for which a 4-letter abbreviation is valid.
If you omit the month, the default is the current month.
Day
You can specify days of the week in full or with abbreviations:
Sunday Sun Sun. Monday Mon Mon. Tuesday Tue Tue. Tues Tues. Wednesday Wed Wed. Wednes Wednes. Thursday Thu Thu. Thurs Thurs. Friday Fri Fri. Saturday Sat Sat.
You can add words such as "last" or "next" before a day of the week to specify a date other than the nearest day of the same name. For example:
Thursday -- Specifies the most recent past Thursday, or today, if today is Thursday.
next Thursday -- Specifies one week after the most recent Thursday (includes the current day if today is Thursday).
last Thursday -- Specifies one week before the most recent Thursday (includes the current day if today is Thursday).
If you omit the day, the default is the current day.
Note that a comma after a day of the week item is ignored.
Time
671

DesignSync Data Manager User's Guide
You specify the time of the day as hour:minute:second, where hour is a number between 0 and 23, minute is a number between 0 and 59, and second is a number between 0 and 59.
Any portion not specified defaults to "0", so a date specification of 03/04/00 defaults to a time of 00:00:00, which is the start of the day (end of the previous day).
Examples
All of the following examples specify the same calendar date:
Note:
The preferred order in the U.S. may be ambiguous compared to other countries usage of DD-MM-YY if the number of either the month or the day is less than 10. For example, a date such as 9/12/00 means September 12, 2000 in the U.S. but December 9, 2000 in many other countries.
2000-09-24 ISO 8601. 00-09-24 00 indicates year 2000. 00-9-24 Leading zeros are not required. For example,
"9" is equivalent to "09". 09/24/00 U.S. preferred order. See previous note. 24-sep-00 Three-letter month abbreviations are allowed. 24sep00 Hyphen and slashes are not required
delimiters. 23 sep 00 Spaces are permitted, but the entire selector
list must be placed within double quotes. 20:02:00 2 minutes after 20 (8pm, local time). 20:02 2 minutes after 20 (8pm, local time), zero
seconds implied. 8:02pm 2 minutes after 8pm, local time. 20:02-0500 2 minutes after 8pm Eastern U.S. Time. The
time is Eastern U.S. time because -0500 means 5 hours behind UTC (Coordinated Universal Time, also known as Greenwich Mean Time).
01/24/00 20:02 2 minutes after 8pm on January 24th 2000. Contains spaces, so the entire selector list must be placed within double quotes.
672

Considerations for Projects
Related Topics
Selecting Versions and Branches
What Are Selectors?
Selector Formats
Parallel (Multi-Branch) Development
Using the Merging Work Style
The following operations define the merging work style:
• To check out an object for editing, fetch an unlocked copy: o From the Populate dialog box, select Unlocked copies. o From the Check Out dialog box, select Unlocked copies. o When using the co or populate commands, use the -get option.
• To check in your changes:
• 1. Determine whether you must first merge. The Status column in the List
View or from the ls -report status command displays "Needs Merge" if a newer version of the object has been checked in, in which case you must merge. If no merge is required, go to step 4.
2. Perform a merge: o From the Check Out dialog box, select Unlocked copies and
Merge with workspace. o From the Populate dialog box, select Unlocked copies and Merge
with workspace. o When using the co or populate commands, use the -merge
option. 3. Resolve merge conflicts, if any. 4. Check in the merged object using the Check In dialog box or ci command
selecting whichever state option you want, except lock.
Your project leader can use access controls to enforce a merging style by denying all check-out operations that request a lock. See the access controls documentation for additional information, particularly the access control definition.
Related Topics
Locking and Merging Work Styles
Using the Locking Work Style
Resolving Merge Conflicts
673
DesignSync Data Manager User's Guide
ENOVIA Synchronicity Command Reference: co
ENOVIA Synchronicity Command Reference: populate
ENOVIA Synchronicity Command Reference: ci
ENOVIA Synchronicity Command Reference: ls
Parallel (Multi-Branch) Development
Design processes, for both software and hardware projects, are complex. There are typically many places where tasks can be performed in parallel. DesignSync uses the design management features of branching and merging to implement parallel design processes. Parallel development, when properly managed, can result in:
• Increased quality by isolating new feature development • Increased productivity by increasing the bandwidth of a design team and
allowing multiple tasks to be managed on multiple branches • Increased flexibility by allowing decomposition and experimentation of features
separate from the main line of development
Branches can have different purposes depending on your project's development methodology:
• Feature Branch
Each new project feature is isolated on its own branch, minimizing the risk of the feature negatively impacting other parts of the design. This approach assumes that you are starting from a stable, high-quality branch (baseline). As features mature, they are merged back into the baseline. It may make sense to group several related features on the same branch, reducing the number of branches needed for the project. See Feature or Subproject Branches for an example of a feature branch lifecycle.
• Release Branch
Each branch is associated with a release milestone. For example, as the 2.1 version of a product nears its release, a branch is created off the main development branch. Final bug fixes and qualification can take place on the 2.1 branch as new development for a follow-on release takes place on the main branch. Two styles of release branching can be used: central main and cascading main. In the central main approach, all side branches eventually merge back to the main branch. In the cascading main approach, a side branch can itself become the main development branch.
• Policy Branch
674

Considerations for Projects
A policy branch supports a new design policy, such as a new tool or a new version of an existing tool being incorporated into the design flow. The new policy or methodology is developed on a side branch so as not to disrupt other development on the main branch. When the policy has been implemented, the policy branch becomes the main development branch. See Policy Branches for an example of a policy branch lifecycle. SITaR, the Submit, Integrate, Test and Release methodology, uses this development style. For more information on SITaR, see Overview of SITaR Workflow.
• Variant Branch
A variant branch supports the investigation of different approaches to the same design. Work done on one variant does not affect other variants. The variant branches never merge. Instead, the variants are developed in parallel until a variant is no longer needed, at which time the variant branch is abandoned.
• Platform Branch
A platform branch supports a specific hardware platform or a process technology. For a software project, this model would facilitate porting the source code to multiple platforms. In chip design, this model might apply to supporting multiple process technologies for the same design.
Creating branches is a simple process. When the branches are in use, however, managing multiple active branches can be difficult. Study your design process and determine where parallel development might benefit you. You should clearly weigh the costs in time and effort of adopting a parallel design process:
• Up-front design, training, and resources
A project manager must define the branching structures and nomenclature to assist in the naming of branches. The project manager must communicate clearly the branch structure, and designers must be trained in the design process to avoid making changes on the wrong branch.
• Process maturity
If your design team has not defined its processes, it is difficult to suddenly mandate a highly structured parallel development process. A parallel design process is refined over many projects. The tools used for parallel development need to conform to your design process; the tool should not dictate a design process that you must follow.
• Branch management and administration
675

DesignSync Data Manager User's Guide
Dedicated project managers are often required to monitor the number of branches and avoid unnecessary and confusing branch creation, to create and merge branches, and to mentor users about the design process.
Related Topics
Creating Branches
Other Branch Operations
Feature or Subproject Branches
Policy Branches
Autobranching: Exploring "What If" Scenarios
Merging Module Data
Methods for Creating Branches
DesignSync recommends and supports two methods for creating branches: project branching and autobranching.
Project branching, also known as formal or explicit branching, involves creating a new branch for every object in a project. When there is a need for a new branch, a single person, typically a release engineer or project manager, uses the mkbranch command to branch all design objects at the same time. If you are using the GUI, use the Revision Control => Make Branch dialog. Users can then create a new work area for the new branch. Project branching is typically used to implement the branch types discussed in the Parallel Development topic.
Autobranching, also known as informal or implicit branching, involves creating a new branch for individual objects on an as-needed basis. Autobranching is typically used by a single or small group of developers who need to try "what if" scenarios, where the life of the branch is known to be limited and will affect only a small portion of the objects in the project. Autobranching in implemented by individual developers using the Auto(<branchTag>) selector. When the developer checks in or checks out with a lock an object, a new branch is created if the branch does not already exist. If the branch already exists, then operations take place on that auto-created branch. See Autobranching:Exploring "What If" Scenarios.
The following diagram shows a file that has several branches with versions on each branch:
676

Considerations for Projects
DesignSync does not limit you to one branch off a given version. For example, cpu.vhd version 1.2 has two branches off it.
Note that referring to a branch by its branch number is not recommended. DesignSync requires that a branch tag be associated with a branch when it is created, whether using mkbranch or Auto(). Use branch tags to identify branches. A branch can have more than one branch tag.
Related Topics
Parallel (Multi-Branch) Development
Other Branch Operations
Other Branch Operations
In addition to creating branches, DesignSync supports the following branch operations:
• To view what branches an objects has, use Go to Vault from the graphical interface or the vhistory command.
• To add, move, or delete branch tags, use the tag command. • To lock a branch, check the branch out with a lock using Check Out or Populate
from the graphical interface or the co or populate command. • To merge two versions on the same branch, check out the Latest version of an
object with the merge option using Check Out or Populate from the graphical interface or the co or populate command. See the Using the Merging Work Style topic for details.
• To merge across branches, use the co or populate command with the -merge and -overlay options.
677

DesignSync Data Manager User's Guide
• To unlock a branch you have locked in your work area due to a check-out operation, use Check In from the graphical interface or the ci command to check in your changes and release the lock, or use Cancel Checkout from the graphical interface or the cancel command to cancel your checkout. To unlock a branch locked by another user or locked by you when you no longer have the object in your work area, use Unlock from the graphical interface or the unlock command.
• To retire a non-module branch, use Retire from the graphical interface or the retire command. You cannot retire a module branch. Retiring obsolete branches discourages users from making change to files on the branch. You can also make the branch harder to access by removing the branch tags as described in Tagging Versions and Branches from the graphical inferace or the tag command.
• To create or remove merge edges used when a module is merged across branches, use the mkedge or rmedge commands.
• To discourage changes to a non-module branch (not a module version, branch, or member) that's become obsolete, you can use the retire command to retire the DesignSync branch or use the tag command to remove all the branch tags from the branch.
• To completely remove a non-module branch (not a module version, branch or member), use the purge command.
Note: DesignSync does not support deleting or retiring module branches.
Related Topics
ENOVIA Synchronicity Command Reference: vhistory
ENOVIA Synchronicity Command Reference: tag
ENOVIA Synchronicity Command Reference: co
ENOVIA Synchronicity Command Reference: populate
ENOVIA Synchronicity Command Reference: ci
ENOVIA Synchronicity Command Reference: ls
ENOVIA Synchronicity Command Reference: cancel
ENOVIA Synchronicity Command Reference: unlock
ENOVIA Synchronicity Command Reference: retire
ENOVIA Synchronicity Command Reference: purge
Example Branching Scenarios
678

Considerations for Projects
Feature or Subproject Branches
Feature or subproject (a set of related features) branches are used for feature isolation. The main development branch, or baseline, remains relatively stable as each feature or subproject is developed on a separate branch. When a feature is complete, or at least stable, the feature branch is merged back to the baseline. Multiple feature branches may be active in parallel, but are isolated from each other in order to simplify the development cycle for each feature.
In this diagram, features A and B are developed on separate side branches of the main project baseline. Development on the main baseline continues, mostly for bug fixes or minor features that will not compromise the stability of the baseline. Development for feature C started later than features A and B, but also takes places on a separate branch. The dots (red if viewed online) in the diagram show where each feature is merged back into the baseline once that feature's isolated development and testing is completed. After the merge, testing on the baseline evaluates the compatibility of the feature with the rest of the baseline. Changes necessary to correct post-merge problems with the feature are performed on the baseline.
Isolating features from the main baseline makes it easy to abandon a feature that is no longer desired or that will not be completed in time for the next product release. You do not merge from the feature branch to the baseline until the feature's future is certain.
The lifecycle of a feature branch is:
1. The project manager creates the branch. 2. The team members create work areas for the feature branch and begin their
development. 3. When the feature is completed, the project manager collapses the feature branch
back into the baseline. 4. Team members begin working on another branch in a different work area.
Creating a Feature Branch (Project Manager)
Creating a feature branch is typically the role for a single project manager or release engineer.
679

DesignSync Data Manager User's Guide
1. Create a work area for the main baseline if you do not already have one. For example, if the project vault is sync://myhost.mycom.com/Projects/Xproject, the baseline is the Trunk branch, and the local work area you want to create is /home/relmgr/Projects/Xproject/Trunk
dss> scd /home/relmgr/Projects/Xproject
dss> mkfolder Trunk
dss> scd Trunk
dss> setvault sync://myhost.mycom.com/Projects/Xproject@Trunk .
The @Trunk syntax is a shortcut for the setselector command to set the persistent selector list for the work area. Trunk (shorthand for Trunk:Latest) is DesignSync's default persistent selector list, so unless a different persistent selector list has been defined on a parent folder, the @Trunk can be omitted in this example. However, if your baseline is any branch other than Trunk, you must set the persistent selector list.
The directory structure of having branch directories (Trunk) under project directories (Xproject) under some top-level projects directory (Projects) is only one of many possible hierarchies. Another reasonable organization is to have project directories under branch directories. This organization might facilitate branch-related operations that span projects.
2. Create DesignSync references to the versions from the baseline from which the feature branch will be created. DesignSync references do not exist on disk, so do not require the transfer of data. For example, if you are branching from the Latest versions on Trunk:
dss> populate -recursive -reference
The populate command obeys the work area's persistent selector list and populates from Trunk, and by default DesignSync fetches the Latest versions. If you are branching from versions other than Latest, use the -version option to the populate command to specify a selector such as a version tag or Date() selector.
3. Tag the branch-point versions. While not required, tagging the branch points can be valuable for later troubleshooting activities. Use a meaningful tag name, such as appending "-bp" (branch point) to the name of the branch you are creating.
680

Considerations for Projects
For example, if you are creating two branches, devA and devB, you would apply two branch tags:
dss> tag -recursive devA-bp .
dss> tag -recursive devB-bp .
4. Create the branches:
dss> mkbranch -recursive devA .
dss> mkbranch -recursive devB .
Working on the New Branch (Team Members)
Once the project manager creates the feature branch, team members can set up work areas and begin working on the new branch. For example, team members working on feature A create a work area for the devA branch:
1. Create a new work area for the devA branch:
dss> scd /home/goss/Projects/Xproject
dss> mkfolder devA
dss> scd devA
dss> setvault sync://myhost.mycom.com/Projects/Xproject@devA:Latest .
By setting the persistent selector list (@devA:Latest) on the devA folder, populate, check-in, and check-out operations will take place on branch devA automatically. Notice that to specify a branch selector, you append the version to the branch tag name, in this case the branch tag is devA to which you append :Latest.
2. Populate the new work area:
dss> populate -get -recursive
DesignSync fetches the Latest versions from devA. If no new version of a given object has been created on the devA branch, then DesignSync fetches the branch-point version from the baseline (Trunk).
3. You can now check out, make edits, and check in files to develop feature A. On any given branch, the team can use the locking or merging work style. For
681

DesignSync Data Manager User's Guide
example, the team uses the merging work style. You want to make changes to top.v, so you fetch the Latest version, make changes, merge in changes made by another team member, resolve any merge conflicts, then check in the merged version:
dss> co -get -comment "Addressing defect #4545" top.v
[Edit the file.]
dss> ci -keep top.v
[The checkin fails because someone has checked in a newer version.]
dss> co -merge top.v
[Resolve any merge conflicts.]
dss> ci -keep top.v
You should also periodically populate to pick up changes made by other team members working on the devA branch. If you are using the locking model, then run:
populate -get -recursive
If you are using the merge model, then run:
populate -merge -recursive
4. Changes made to other branches do not affect the branch you are working on. However, there may be times when you want to pick up an important change from another branch. In such cases, you can merge individual files or groups of files into your work area. For example, if a developer fixes a problem in the file alu.vhd on the Trunk branch, and that bug fix is needed for feature A development, then you can merge that file into the feature A development stream. From the devA work area:
dss> co -merge -overlay Trunk alu.vhd
[Resolve any merge conflicts]
dss> ci -comment "Picked up fix from Trunk" alu.vhd
Other team members working on the devA branch will pick up the fix the next time they populate or check out alu.vhd. These types of individual merges may need to be coordinated through a team leader.
682
Considerations for Projects
Collapsing the Feature Branch (Project Manager)
When the feature branch has reached a level of maturity where it no longer makes sense to maintain a separate branch, the project manager can merge from the feature branch to the baseline.
1. Alert all users of the feature branch (devA) that the merge is taking place and have them check in their final changes.
2. Restrict checkins for the duration of the merge operation. Having activity on either branch complicates the process. To restrict checkins, define an access control:
access allow Checkin only users $ProjectManager
Remember to have the SyncServer re-read the access-control files (access reset) after defining this new access control.
3. Update the Trunk work area with the Latest versions of design files:
dss> scd /home/relmgr/Projects/Xproject/Trunk
dss> populate -get -recursive
4. Tag the merge-point versions on the baseline. As with tagging the branch-point versions, this step is optional but recommended. Use a meaningful tag name, such as appending "-mp" (merge point) to the branch name:
dss> tag -recursive devA-mp .
5. Perform an overlay merge from the feature branch (devA) to the baseline (Trunk):
dss> populate -recursive -merge -overlay devA:Latest
The merge can produce new files from the devA branch that did not exist on Trunk, files that merge without conflicts, and files where you need to resolve merge conflicts manually.
6. Resolve any merge conflicts. 7. Check in the merged results:
dss> ci -recursive -comment "Merged from devA" .
Any object that was introduced on the feature branch (did not exist on the baseline prior to the merge) is automatically branched so that the object can be checked into the baseline.
683

DesignSync Data Manager User's Guide
8. For completeness, you may want to tag the final versions on the devA branch to indicate the versions that participated in the merge:
stcl> tag -recursive -version devA final [url vault .]
This command tags the Latest versions on the devA branch. As you would expect, the command fails for any object in your Trunk work area that does not have a devA branch. Note: To use the programming variable, you must be in stcl mode.
9. Optionally, for non-module objects, retire the feature branch to prevent accidental checkins to the branch and indicate that the branch is no longer active:
dss> retire -recursive -branch devA *
10. Run regression tests or any other checks to ensure that the baseline is stable and ready for development to continue. Fix any problems that are identified on baseline branch (Trunk).
11. Re-open the vault by removing the access control statement that denied checkins (and remember access reset).
Starting Work on a Different Branch (Team Members)
Once the feature branch is no longer active, team members should start working on a different branch -- the baseline branch or another feature branch. Developers should leave the feature-branch work area intact and create a new work area for future development. DesignSync supports re-using work areas (setselector -recursive to change the persistent selector list, then populate with a new configuration), but doing so introduces risks such as losing files that were never checked into a branch, or checking into the wrong branch. If disk space is a concern, consider archiving (compressed tar files or tape backups) and deleting old work areas.
Related Topics
Parallel (Multi-Branch) Development
ENOVIA Synchronicity Command Reference: setselector
ENOVIA Synchronicity Command Reference: populate
ENOVIA Synchronicity Command Reference: retire
Policy Branches
This section describes the lifecycle of a policy branch, which is most effective when introducing major changes in a design flow. This policy change could be moving to a
684

Considerations for Projects
new compiler for a software project, changing to a new vendor of cell libraries in an ASIC project, introducing a new simulation tool and syntax, or a design overhaul. A designated team works on a branch in order not to interfere with continued development on the main branch. Once the new policy branch is well defined and stable, it becomes the main development branch.
The lifecycle of a policy branch is similar to that of a feature branch. The primary difference is that the policy branch eventually becomes the main development branch, whereas the feature branch is merged back to the main branch.
The lifecycle of a policy branch is:
1. The project manager creates the branch. 2. The team members create work areas for the policy branch and begin their
development. 3. When the policy change has been implemented and the policy branch is stable,
the project manager merges the old baseline into the new policy branch. 4. All team members continue development on the new baseline.
Creating a Policy Branch (Project Manager)
Creating a policy branch is typically the role for a single project manager or release engineer.
1. Create a work area for the main baseline if you do not already have one. For example, if the project vault is sync://myhost.mycom.com/Projects/Xproject, the baseline is the Trunk branch, and the local work area you want to create is /home/relmgr/Projects/Xproject/Trunk:
dss> scd /home/relmgr/Projects/Xproject
dss> mkfolder Trunk
dss> scd Trunk
685

DesignSync Data Manager User's Guide
dss> setvault sync://myhost.mycom.com/Projects/Xproject@Trunk .
The @Trunk syntax is a shortcut for the setselector command to set the persistent selector list for the work area. Trunk (shorthand for branch Trunk:Latest) is DesignSync's default persistent selector list, so unless a different persistent selector list has been defined on a parent folder, the @Trunk can be omitted in this example. However, if your baseline is any branch other than Trunk, you must set the persistent selector list.
The directory structure of having branch directories (Trunk) under project directories (Xproject) under some top-level projects directory (Projects) is only one of many possible hierarchies. Another reasonable organization is to have project directories under branch directories. This organization might facilitate branch-related operations that span projects.
2. Update your work area to contain the versions from the baseline from which the policy branch will be created. For example, if you are branching from the Latest versions on Trunk:
dss> populate -recursive -get
The populate command obeys the work area's persistent selector list so populates from the Trunk branch, and by default fetches the Latest versions. If you are branching from versions other than Latest, use the -version option to the populate command specify a selector such as a version tag or Date() selector.
3. Tag the branch-point versions. While not required, tagging the branch points can be valuable for later troubleshooting activities. Use a meaningful tag name, such as appending "-bp" (branch point) to the name of the branch you are creating. For example, if the policy branch is NewCompiler:
dss> tag -recursive NewCompiler-bp .
4. Create the branch:
dss> mkbranch -recursive NewCompiler .
Working on the New Branch (Team Members)
Once the project manager creates the policy branch, team members involved in the policy development can set up work areas and begin working on the new branch.
1. Create a new work area for the NewCompiler branch:
686

Considerations for Projects
dss> scd /home/goss/Projects/Xproject
dss> mkfolder NewCompiler
dss> scd NewCompiler
dss> setvault sync://myhost.mycom.com/Projects/Xproject@NewCompiler:Latest .
By setting the persistent selector list (@NewCompiler:Latest) on the NewCompiler folder, populate, check-in, and check-out operations will take place on branch NewCompiler automatically. Notice that to specify a branch selector, you append the version to the branch tag name, in this case the branch tag is NewCompiler to which you append :Latest.
2. Populate the new work area:
dss> populate -get -recursive
DesignSync fetches the Latest versions from NewCompiler. If no new version of a given object has been created on the NewCompiler branch, then DesignSync fetches the branch-point version from the baseline (Trunk).
3. You can now check out, make edits, and check in files to develop the new policy. On any given branch, the team can use the locking or merging work style. For example, the team uses the merging work style. You want to make changes to top.v, so you fetch the Latest version, make changes, merge in changes made by another team member, resolve any merge conflicts, then check in the merged version:
dss> co -get -comment "Addressing defect #4545" top.v
[Edit the file.]
dss> ci -keep top.v
[The checkin fails because someone has checked in a newer version.]
dss> co -merge top.v
[Resolve any merge conflicts.]
dss> ci -keep top.v
687

DesignSync Data Manager User's Guide
You should also periodically populate to pick up changes made by other team members working on the NewCompiler branch.
4. Changes made to other branches do not affect the branch you are working on. However, there may be times when you want to pick up an important change from another branch. In such cases, you can merge individual files or groups of files into your work area. For example, if a developer fixes a problem in the file alu.vhd on the Trunk branch, and that bug fix is needed for the new compiler work, then you can merge that file into the NewCompiler branch. From the NewCompiler work area:
dss> co -merge -overlay Trunk alu.vhd
[Resolve any merge conflicts]
dss> ci -comment "Picked up fix from Trunk" alu.vhd
Other team members working on the NewCompiler branch will pick up the fix the next time they populate or check out alu.vhd. These types of individual merges may need to be coordinated through a team leader.
Switching to the New Baseline (Project Manager)
When the policy development is complete or at least stable, the project manager merges the old baseline into the policy branch so that the policy branch becomes the new baseline.
1. Alert all users that the merge is taking place and have them check in their final changes to both Trunk and NewCompiler.
2. Restrict checkins for the duration of the merge operation. Having activity on either branch complicates the process. To restrict checkins, define an access control:
access allow Checkin only users $ProjectManager
Remember to have the SyncServer re-read the access-control files (access reset) after defining this new access control.
3. Update the NewCompiler work area with the Latest versions of design files:
dss> scd /home/relmgr/Projects/Xproject/NewCompiler
dss> populate -get -recursive
688

Considerations for Projects
4. Tag the merge-point versions on the NewCompiler branch. As with tagging the branch-point versions, this step is optional but recommended. Use a meaningful tag name, such as appending "-mp" (merge point) to the branch name:
dss> tag -recursive NewCompiler-mp .
5. Perform an overlay merge from the old baseline (Trunk) to the policy branch (NewCompiler).
dss> populate -recursive -merge -overlay Trunk
The merge can produce new files from Trunk that did not exist when NewCompiler was branched, files that merge without conflicts, and files where you need to resolve merge conflicts manually.
6. Resolve any merge conflicts. Because NewCompiler will be the baseline going forward, merge conflicts are generally resolved in favor of the changes on the NewCompiler branch.
7. Check in the merged results:
dss> ci -recursive -comment "Merged from Trunk" .
Any object that was introduced on the baseline after the policy branch was created (did not exist on the policy branch prior to the merge) is automatically branched so that the object can be checked into the policy branch.
8. For completeness, you may want to tag the final versions on the Trunk branch to indicate the versions that participated in the merge:
dss> tag -recursive -version Trunk final .
This command tags the Latest versions on the Trunk branch. As you would expect, the command fails for any object in your NewCompiler work area that does not have a Trunk branch.
9. Going forward, NewCompiler is the main baseline, so you might consider applying a new branch tag to the old Trunk and moving the Trunk branch tag to the NewCompiler branch.
dss> tag -recursive TrunkPriorToNewCompiler -branch Trunk .
dss> tag -recursive -replace Trunk -branch NewCompiler .
10. Optionally retire the old baseline branch to prevent accidental checkins to the branch and to generally flag the branch as no longer active:
689
DesignSync Data Manager User's Guide
dss> retire -branch TrunkPriorToNewCompiler *
Note that the retire command does not have a recursive option, so you must execute this command in every folder in the hierarchy, or create a script to traverse the hierarchy for you.
11. Run regression tests or any other checks to ensure that the new baseline is stable and ready for development to continue. Fix any problems that are identified on the NewCompiler baseline branch, which is now also tagged Trunk.
12. Re-open the vault by removing the access control statement that denied checkins (and remember access reset).
Starting Work on the New Baseline (Team Members)
Team members who were not working on the policy branch must now create work areas for the policy branch, which is now the new Trunk baseline. Developers should leave the previous Trunk work areas intact and create new work areas for future development. DesignSync supports re-using work areas (setselector -recursive to change the persistent selector list, then populate with a new configuration), but doing so introduces risks such as losing files that were never checked into a branch, or checking into the wrong branch. If disk space is a concern, consider archiving (compressed tar files or tape backups) and deleting old work areas.
Team members who were working on the policy branch should change their persistent selector list from NewCompiler to Trunk:
dss> setselector -recursive Trunk .
This operation does not re-use a work area, but reflects the fact that the branch associated with the current work area is now identified as Trunk.
Related Topics
Parallel (Multi-Branch) Development
ENOVIA Synchronicity Command Reference: setselector
ENOVIA Synchronicity Command Reference: populate
ENOVIA Synchronicity Command Reference: retire
Autobranching: Exploring "What If" Scenarios
Autobranching allows individuals or small teams to try out new ideas in the context of the work in progress without impacting the baseline development. This informal approach to branching places the responsibility for branching and merging on individual
690
Considerations for Projects
team members instead of the project manager who is responsible for formal branching activities. Unlike formal project branching, where all the objects in a project are branched at the same time, autobranching creates branches only for objects that change.
Autobranching is most effective when the number of people working on the branch, the number of project files affected, and the duration of the effort are small. The larger the effort, the more likely it would benefit from formal branching.
DesignSync implements autobranching using the Auto(<tag>) selector. See Selector Formats for details.
Assume that you and a few other team members have an idea for a bug fix for "Yproject" that you are not sure will work out. Your main development branch is Rel2.1 (a release branch), and you will test your bug fix using an autobranch called DevFix.
1. You (and each team member working on DevFix) create a DevFix work area:
dss> scd /home/goss/Projects/Yproject
dss> mkfolder DevFix
dss> scd DevFix
dss> setvault sync://myhost.mycom.com/Projects/Yproject .
dss> setselector Auto(DevFix),Rel2.1:Latest .
To set the persistent selector list, you could have used the @Auto(DevFix),Rel2.1:Latest syntax to the setvault command as a shortcut for the setselector command.
The Auto(DevFix) selector indicates that you are autobranching to the DevFix branch. The second selector in the persistent selector list, Rel2.1:Latest, indicates that Rel2.1 is your baseline branch from which DevFix branches are created as needed.
2. Populate the work area:
dss> populate -get -recursive
DesignSync fetches Latest versions of files with a DevFix branch (probably none at this point, unless one of your DevFix team members already autobranched an object), then fetches from Rel2.1.
691

DesignSync Data Manager User's Guide
3. You and your team members perform check-out, check-in, populate, and other operations as you normally would. Because of autobranching:
• DesignSync automatically creates a DevFix branch when you check in or check out with a lock an object that does not have a DevFix branch.
• For fetch operations DesignSync first tries to fetch from the DevFix branch and failing that fetches from Rel2.1.
You and the DevFix team are effectively working on two branches with one branch serving as the baseline while your new development takes place on the autobranch . Because only you and the other team members working on this experimental fix have work areas that reference the DevFix branch other team members working on Rel2.1 do not see the DevFix development.
4. There may be times when the DevFix team is making changes to the same files that are being modified on the baseline. If the changes on the baseline are needed on DevFix, you can merge from Rel2.1. For example, to pick up changes to reg8.vhd and reg16.vhd:
dss> co -merge -overlay Rel2.1:Latest reg8.vhd reg16.vhd
As with any merge, you may need to resolve merge conflicts, and then you can check in the merged version to the DevFix branch:
dss> ci -comment "Merged changes done on Rel2.1" reg8.vhd reg16.vhd
5. Eventually, DevFix development needs to be merged back to the baseline, unless the fix was unsuccessful, in which case this merge step is skipped. To merge the DevFix branch back to the Rel2.1 baseline, a designated user would go to a fully populated Rel2.1 work area (the persistent selector list set to Rel2.1:Latest, not Auto(DevFix),Rel2.1:Latest), then merge:
dss> scd /home/goss/Projects/Yproject/Rel2.1
dss> url selector .
Rel2.1:Latest dss> populate -get -recursive
dss> populate -merge -overlay DevFix:Latest -recursive
Resolve any merge conflicts, and then the merged files can be checked into Rel2.1:
dss> ci -comment "Merged from DevFix" -recursive .
692

Considerations for Projects
The checkin fails for any object that was introduced on the autobranch because the object does not exist on the baseline branch. For these objects, you need to create the branch and then check in. For example, if test.asm and test.mem were introduced on DevFix:
dss> mkbranch Rel2.1 test.asm test.mem
dss> ci -comment "Introduced on DevFix" test.asm test.mem
6. At this point, the autobranch development was a success and the branch was merged back to the baseline, or the autobranch development was not successful. Either way, it is time to abandon the branch -- future development takes place on the baseline branch (Rel2.1). You can optionally retire the DevFix branch to prevent accidental checkins to that branch:
dss> retire -branch DevFix *
Note that the retire command does not have a recursive option, so you must execute this command in every folder in the hierarchy, or create a script to traverse the hierarchy for you.
DesignSync supports reusing work areas (setselector -recursive to change the persistent selector list, then populate with a new configuration), so in the autobranch scenario, the same work area could have been used before, during, and after the DevFix development. However, reusing work areas introduces risks such as losing files that were never checked into a branch, or checking into the wrong branch.
Tip: Define a work area for each development branch. If disk space is a concern, consider archiving (compressed tar files or tape backups) and deleting old work areas.
Related Topics
Parallel (Multi-Branch) Development
ENOVIA Synchronicity Command Reference: setvault
ENOVIA Synchronicity Command Reference: retire
ENOVIA Synchronicity Command Reference: setselector
ENOVIA Synchronicity Command Reference: populate
Working with Legacy Modules
How DesignSync 5.0 Handles Legacy Modules
693

DesignSync Data Manager User's Guide
In DesignSync 5.0 the structure of modules has been enhanced to provide greater functionality and speed. However, to use the new functionality available in DesignSync 5.0, legacy modules from previous versions of DesignSync require an upgrade
To take advantage of the new module functionality, all 4.x data must be upgraded with the hcm upgrade command.
Because there is an upgrade required to access the new functionality, you might find yourself working in an environment that requires you to use both new modules and legacy modules during the transition period. To allow users to continue to be productive during the upgrade process from the DesignSync 4.x architecture to the DesignSync 5.0 architecture, users can use a 4.x client to modify legacy modules.
There are some restrictions in the DesignSync client that control how you can use legacy modules. How DesignSync handles legacy modules in a mixed 4.x/5.0 server and client installation is shown in the graphic below:
694

Considerations for Projects
Note: A user of a 5.x client can not write to a legacy module. The module can only be populated in a read-only mode.
Related Topics
ENOVIA Synchronicity Command Reference Help: hcm upgrade
Upgrading Legacy Modules
In this version of DesignSync, you can create modules to manage your design data. Legacy modules, or those modules created with the hcm mkmod command in
695
DesignSync Data Manager User's Guide
DesignSync versions prior to 5.0, are read-only from this DesignSync client. To take advantage of the functionality of new modules, and use your legacy modules in interactive mode, you can upgrade your legacy modules using the hcm upgrade command.
Legacy modules can be upgraded on an as-needed basis. Modules that have not been upgraded are still available to users in read only mode.
Legacy modules use configurations to associate versions of objects together into a collective "module" unit. These configurations are described in the sync_project.txt file under the legacy module’s vault folder. The hcm upgrade command uses this sync_project.txt file as a guide for upgrading the legacy module’s configurations into the new module. Other branch or selector configurations might be defined in additional sync_project.txt files within the legacy module vault hierarchy.
Important: Before you upgrade a legacy module, you must check in any modifications and release any locks.
The command allows you to specify the name of the new module as well as a category path. For example, if your legacy module is located on the server at some level below the /Projects area on the server, you may use the –category option in conjunction with the –name option on the hcm upgrade command to define the same directory structure as your original project vault.
For example, if the URL of the original legacy module is:
sync://granite:2647/Projects/Memory/ROM
Then you may use the following hcm upgrade command line:
hcm upgrade sync://granite:2647/Projects/Memory/ROM –category NewMemory –name ROM1
The URL of the upgraded module object would be:
sync://granite:2647/Modules/NewMemory/ROM1
Custom access controls are not upgraded along with the module. If custom access controls are desired for the new module, they can be added either before or after the module is upgraded. After an upgrade completes, the server's administrator is notified by email that the module was upgraded, and the custom access controls were not carried forward to the new module.
Access controls restricting access to the legacy module are added by the upgrade process, while it is in progress, to prevent modifications to the legacy module. The
696

Considerations for Projects
legacy module access controls remain in place after the upgrade has completed to prevent accidental upgrades to the legacy module.
Notes:
• All ProjectSync notes associated with the legacy module and its configurations are also associated with the new module after the upgrade is complete. However, any email subscriptions associated with elements from the legacy module vault hierarchy are not modified and must be added manually by the users. If DesignSync is configured to create a RevisionControl note for upgrade, and email notifications is enabled, the upgrade process sends an email to all users currently subscribed to activity on the legacy module vault folder informing them of the vault’s upgrade to a module. The users should then update their subscriptions.
• It is also important to note that this upgrade occurs on the server only. Any existing workspaces will continue to point to the existing legacy module configuration. The new module resulting from the upgrade will need to be populated into a new workspace.
An upgrade log is created on the server to allow the user to track the progress of the upgrade. This log remains after the upgrade is complete and can be viewed at the following URL:
http://<host>:<port>/syncserver/upgrade/upgrade_<category>_<name>.html
Notes:
• All slashes in the <category> field will be replaced with underscores. • If server customizations have been imported to a different server after a module
upgrade, the upgrade log may not appear at the URL provided for monitoring the upgrade. If the URL is not found, you may still access the upgrade log from the ModuleUpgrade sub-directory. For more information on the ModuleUpgrade sub-directory, see the hcm upgrade command documentation in the ENOVIA Synchronicity Command Reference.
Types of Objects Created During the hcm upgrade Command
The following types of objects are created as a result of performing an upgrade on a legacy module.
Module:
A module with the specified name and category path.
Module branches:
697

DesignSync Data Manager User's Guide
• A default module branch is created and is assigned an immutable module branch tag of “Trunk”.
• If any release configurations are defined for the legacy module, a module branch is created from module version 1.1 and a mutable module branch tag named “Releases” is added to that branch. This branch will contain each release configuration (as a module version) defined for the legacy module.
• A module branch is created from module version 1.1 for every branch configuration and selector configuration. The configuration name is added to the module branch as a mutable module branch tag. The first module version is created on the module branch and the member versions that are part of the configuration are added to the module version.
Module versions:
• Module version 1.1 is created to include all members matching the “Trunk:Latest” selector. If no files resolve to this selector, the module version is empty. If a Trunk configuration is defined to be mapped to a different selector, the upgrade process issues a warning noting that the Trunk branch will contain the members matching the Trunk:Latest selector and not the selector defined in the sync_project.txt file.
• Each module branch is created with an initial module version comprised of member versions that were part of the legacy module configuration.
• A new module version is created on the “Releases” branch for each release configuration with all member versions that are part of that release. The module versions will be created in chronological order by release.
Module branch tags:
For each configuration that is exactly equal to the Latest on the legacy module’s branch, a mutable module branch tag with the same name is added to the module branch created for the configuration.
For example, if your legacy module’s sync_project.txt file contains the entry “CONFIG Silver Main:Latest”, a module branch named “Silver” is created and the mutable module branch tag “Main” is added to the branch, as long as a Main configuration is not also defined.
Module version tags:
• An immutable module version tag is created for every release configuration, using the release name as the tag name, and added to the module version that was created for the release configuration.
• A mutable module version tag is created for every legacy module alias configuration, using the alias name as the tag name and adding the tag to the module version (previously created for the release configuration) to which the alias refers.
698

Considerations for Projects
• For each configuration that is exactly equal to a version tag, a mutable module version tag with the same name will be added to the first module version on the branch that was created for the configuration. For example, if your legacy module’s sync_project.txt file contains the entry “CONFIG Gold Alpha”, a module branch named “Gold” is created and the mutable module version tag named “Alpha” is added to the first module version on the “Gold” branch.
Hierarchical References:
• Legacy module hrefs are associated with a configuration of a legacy module. During the upgrade, the configurations will be converted to either a module branch (for branch and selector configurations) or a module version (for release or alias configurations). The legacy module href is converted to a new module href and added to the module branch (the first module version on the branch) or to the module version that was created for this configuration.
• The href will refer to another legacy module, a DesignSync vault folder or an IP Gear deliverable.
By default, or If the –maphrefs command option was specified, the upgrade attempts to determine whether the target of the href has already been upgraded to a new module. If so, the href will point to the new module rather than the legacy module with the new module’s branch selector or module version selector recorded as the dynamic hrefmode value and the new module version’s number recorded as the static hrefmode value.
An href can only be mapped if the target’s configuration was converted to a module branch or module version. For example, if a target configuration was not defined in the legacy module’s sync_project.txt file, the target configuration is not transferred to the new module since the mapping process does not have a branch or version in which to place this href. An error is issued during the mapping process and the upgrade terminates without creating the new module.
If you want the mapping errors treated as warnings instead, use the -nomaperror option to transfer the original href. Mapping errors are issued if a href’s target was upgraded but the new module does not exist, if there is no matching branch or version for the href’s target configuration, or if the href target’s server is not accessible.
Tip: If you plan on upgrading an entire legacy module hierarchy, you should do so in a bottom-up fashion, performing the top-module upgrade last, so the hrefs map to the newly upgraded modules.
After the upgrade is complete, you may migrate any of the tags that did not get transferred to the new module with the hcm migratetag command. Any existing selector list, except date selectors, can be specified with hcm migratetag to create a
699

DesignSync Data Manager User's Guide
new module branch later. The supported selectors, such as version tags, or branch selector can also be combined to create a new module branch.
Please refer to the hcm upgrade or hcm migratetag command topics in the ENOVIA Synchronicity Command Reference for more detailed information.
An Example of Upgrading a Legacy Module
The following scenario illustrates the procedure for upgrading an existing legacy module to a module.
1. Amy, the designer of an ALU design, ALU, is managing her design through the use of a legacy module, which now needs to be upgraded to use the new module structure available in DesignSync 5.0.
The legacy module, ALU, located at sync://granite:2647/Projects/ALU has the following structure in its associated sync_project.txt file:
NAME ALU DESCRIPTION HCM module OWNER amy COMPONENT FALSE CONFIG Platinum Trunk amy * CONFIG_DESC HCM configuration CONFIG First_Release_Of_Platinum First_Release_Of_Platinum-1165686270--R amy * CONFIG_DESC HCM release CONFIG alias_of_platinum First_Release_Of_Platinum-1165686270--R amy * CONFIG_DESC HCM alias
The legacy module also contains one hierarchical reference to a DesignSync vault folder on the Platinum configuration to:
sync://granite:2647/Projects/Development/vault1
2. Amy contacts her project manager, who upgrades this legacy module by as follows:
dss> hcm upgrade sync://granite:2647/Projects/ALU –name ALU
As a result of the upgrade, a new module is created at the following location:
sync://granite:2647/Modules/ALU
The new module has the following contents:
700
Considerations for Projects
• Module branch 1, tagged “Trunk”. This module branch contains one module version, 1.1.
• Module branch 1.1.1, tagged “Releases”. This module branch contains one module version, 1.1.1.1 tagged with “First_Release_Of_Platinum” and “alias_of_platinum”.
• Module branch 1.1.2, tagged “Platinum”. This module branch contains one module version, 1.1.2.1. This module version contains a hierarchical reference named “vault1” with a reference target of:
sync://granite:2647/Projects/Development/vault1
Related Topics
ENOVIA Synchronicity Command Reference: hcm upgrade
ENOVIA Synchronicity Command Reference: hcm migratetag
Upgrading DesignSync Vaults
In DesignSync 5.0, you can create modules to manage your design data. To use these new capabilities with existing DesignSync data, you must upgrade your existing DesignSync vault hierarchies to modules with the hcm upgrade command.
Important: Before you upgrade a legacy module, you must check in any modifications and release any locks.
The hcm upgrade command uses the sync_project.txt file as a guide for upgrading the relevant configurations into the new module.
Note: If a design configuration exists for your vault directory but has not been defined in ProjectSync’s sync_project.txt file, the design configuration is not propagated to the new module. You should verify that the configurations you want to upgrade have an entry in this file. To add new design configurations to ProjectSync’s sync_project.txt, either hand edit the file or use ProjectSync’s Configuration panel.
The command allows you to specify the name of the new module as well as a category path. For example, if the vault directory you want to upgrade is located on the server at some level below the /Projects area on the server, you may use the –category option in conjunction with the –name option on the hcm upgrade command to define the same directory structure as your original project vault.
For example, if the original project is:
sync://granite:2647/Projects/ProjectA/one/two/ROM
Then you may use the following hcm upgrade command line:
701

DesignSync Data Manager User's Guide
hcm upgrade sync://granite:2647/Projects/ProjectA/one/two/ROM –category ProjectA/one/two –name ROM
The URL of the upgraded module object would be:
sync://granite:2647/Modules/ProjectA/one/two/ROM
Custom access controls are not upgraded along with the DesignSync vault hierarchy. If custom access controls are desired for the new module, they can be added either before or after the module is upgraded. After an upgrade completes, the server's administrator is notified by email that the vault hierarchy was upgraded, and the custom access controls were not carried forward to the new module.
The original vaults and data remain unchanged and unaffected by the hcm upgrade procedure. However, during the upgrade, access controls restricting write access to the DesignSync vault hierarchy are added to prevent modifications to the original vaults. The access controls on the original vaults remain in place after the upgrade has completed to prevent accidental updates to the original vaults.
Notes:
• All ProjectSync notes associated with the vault directories will also be associated with the new module after the upgrade is complete. However, email subscriptions on the vault are not modified and must be upgraded manually by the users. Users currently subscribed to activity on the vault will receive an email informing them of the vault’s upgrade to a module and the need to update their subscriptions. The upgrade process informs this subset of users by email.
• All ProjectSync notes associated with an object in the original vault hierarchy are also associated with the new module after the upgrade is complete. However, any email subscriptions associated with the original vault hierarchy are not modified and must be added manually by the users. If DesignSync is configured to create a RevisionControl note for upgrade, and email notifications is enabled, the upgrade process sends an email to all users currently subscribed to activity on the vault folder informing them of the vault’s upgrade to a module. The users should then update their subscriptions.
• This upgrade occurs on the server only. Any existing workspaces will continue to point to the existing DesignSync vault. The new module resulting from the upgrade needs to be populated into a new workspace.
An upgrade log is made available on the server to allow the user to track the progress of the upgrade. This log remains after the upgrade is complete and is located at:
http://<host>:<port>/syncserver/upgrade/upgrade_<category>_<name>.html
Notes:
702

Considerations for Projects
• All slashes in the <category> field will be replaced with underscores. • If server customizations have been imported to a different server after a module
upgrade, the upgrade log may not appear at the URL provided for monitoring the upgrade. If the URL is not found, you may still access the upgrade log from the ModuleUpgrade sub-directory. For more information on the ModuleUpgrade sub-directory, see the ENOVIA Synchronicity Command Reference: hcm upgrade help.
The following types of objects are created as a result of performing an upgrade on a DesignSync vault directory:
Module:
A module with the specified name and category path.
Module branches:
• A default module branch is created and is assigned an immutable module branch tag of “Trunk”.
• For each configuration, a module branch is created from module version 1.1 and tagged with the configuration name as a mutable module branch tag.
Module versions:
• Module version 1.1 is created to include all members matching the “Trunk:Latest” selector. If no files resolve to this selector, the module version will be empty. If a Trunk configuration is defined to be mapped to a different selector, the upgrade process issues a warning noting that the Trunk branch will contain the members matching the Trunk:Latest selector and not the selector defined in the sync_project.txt file.
• • Each module branch is created with an initial module version, comprised of member versions that were part of the configuration.
Module branch tags:
In addition to the mutable module branch tag that is created for each configuration name, other branch tags are created as follows. For each configuration that is exactly equal to the Latest on the vault’s branch, a mutable module branch tag with the same name is added to the module branch created for the configuration.
For example, if your sync_project.txt file contains the entry “CONFIG Silver Main:Latest”, a module branch named “Silver” is created and the mutable module branch tag “Main” is added to the branch.
Module version tags:
703

DesignSync Data Manager User's Guide
For each configuration that is exactly equal to a version tag on a vault’s version, a mutable module version tag with the same name will be added to the first module version on the branch that was created for the configuration.
For example, if your sync_project.txt file contains the entry “CONFIG Gold Alpha”, a module branch named “Gold” is created and the mutable module version tag named “Alpha” is added to the first module version on the “Gold” branch.
Hierarchical References:
If your vault hierarchy contains a sync_project.txt file with REFERENCE statements that point to another vault directory, these REFERENCEs are created in the module as hierarchical references.
By default, or If the –maphrefs command option was specified, the upgrade attempts to determine whether the target of the href has already been upgraded to a new module. If so, the href will point to the new module rather than the original target with the new module’s branch selector or module version selector recorded as the dynamic hrefmode value and the new module version’s number recorded as the static hrefmode value.
An href can only be mapped if the target’s configuration was converted to a module branch or module version. For example, if a target configuration was not defined in a sync_project.txt file in the original vault hierarchy, the target configuration is not transferred to the new module since the mapping process does not have a branch or version in which to place this href. An error is issued during the mapping process and the upgrade terminates without creating the new module.
If you want the mapping errors treated as warnings instead, use the -nomaperror option to transfer the original href. Mapping errors are issued if a href’s target was upgraded but the new module does not exist, if there is no matching branch or version for the href’s target configuration or if the href target’s server is not accessible.
Tip: If you plan on upgrading an entire design hierarchy, a vault hierarchy and any referenced vault hierarchies, you should do so in a bottom-up fashion, so that the REFERENCEs will map to the newly upgraded module.
After the upgrade is complete, you may migrate any of the tags that did not get transferred to the new module with the hcm migratetag command. Any existing selector list, except date selectors, can be specified with hcm migratetag to create a new module branch later. The supported selectors, such as version tags, or branch selector can also be combined to create a new module branch.
See the hcm upgrade or hcm migratetag command topics in the ENOVIA Synchronicity Command Reference for more detailed information.
An Example of Upgrading a DesignSync Vault
704

Considerations for Projects
The following scenario illustrates how an existing simple vault directory (a vault directory structure with no vault REFERENCEs) is upgraded to a module.
1. Amy, the designer of an ALU design, alu8, has previously placed a design under revision control.
dss> setvault sync://granite:2647/Projects/alu8 /home/amy/Projects/myalu8 dss> ci -recursive -new -keep -comment "8-bit ALU" /home/amy/Projects/myalu8 dss> tag -recursive baseline /home/amy/Projects/myalu8 dss> mkbranch -recursive Golden -version Trunk sync://granite:2647/Projects/alu8
2. Amy contacts her project manager, who creates a new project with an associated sync_project.txt file on the ProjectSync server. Joe also creates a new configuration for the project representing the “Golden” branch. The sync_project.txt file on the server contains the following information for this project:
NAME alu8 DESCRIPTION Project alu8 OWNER amy COMPONENT FALSE CONFIG Golden Golden:Latest amy * CONFIG_DESC Golden
3. Amy then continues to work on her design on the “Golden” branch. At this point, Amy feels that her design might be better managed using a module. 4. Amy contacts her project manager, who upgrades her vault directory to a module.
dss> hcm upgrade sync://granite:2647/Projects/alu8 –name ALU8
As a result of the upgrade, a new module is created at the following location:
sync://granite:2647/Modules/ALU8
The new module contains two branches, Trunk and Golden, and module versions are created appropriately.
Related Topics
ENOVIA Synchronicity Command Reference: hcm upgrade
ENOVIA Synchronicity Command Reference: hcm migratetag
Managing Legacy Configurations and REFERENCEs
Managing Non-HCM Configurations
705

DesignSync Data Manager User's Guide
What Is a Design Configuration?
A typical design is made up of many files. Each file can be worked on by an individual designer or several designers. At some point in time, all the files arrive at a stage where they work successfully together. For example, suppose that a design is made up of files A, B, and C. Version 1.4 of file A, version 1.2 of file B, and version 1.3 of file C work successfully together. These versions make up a "design configuration." To keep a record of this configuration, you can label them with an identifying tag -- "runnable1", for example.
If you or some other designer or group wishes to check out this configuration, you can perform the checkout using the tag. This one operation checks out all the file versions belonging to the configuration. You do not have to remember that you need version 1.4 of file A, version 1.2 of file B, and so on.
Note: This is a similar paradigm to the modules-based SITaR methodology. The Design Configuration Methodology mimics the native SITaR functionality in a non-modules based environment.
Related Topics
Overview of SITaR Workflow
Creating a Design Configuration
Tracking Development with Design Configurations
Creating Releases
Fixed Tags and Movable Tags
Creating a Design Configuration
706

Considerations for Projects
To create a design configuration, first select the items (files or folders) you want to have in the configuration, then click the Tag button on the toolbar.
Related Topics
Tagging Versions and Branches
ENOVIA Synchronicity Command Reference: tag
Tracking Development with Design Configurations
You can think of design configurations as snapshots along the path of development. Whenever development reaches a stable state, you take a snapshot of it by creating a design configuration. Each configuration should be identified by a name that makes sense. For example, when the design first reaches a runnable state, the design team can create a design configuration tagged "runnable1". Later, when development reaches a stage ready for verification, the team can create a design configuration tagged "current_verification" and hand it off to the verification team. The verification engineers then check out the configuration and run verification procedures on it.
Notice in the figure below that the files making up the chip design vary in their version numbers; file C has had many more revisions than file B. Thus, configuration tags are necessary to specify which versions work together to form a functional chip.
Mapping Configurations for Design Reuse
Designers can import modules from other design projects into their designs by mapping design configurations. In this way, designers can reuse modules from other projects.
707

DesignSync Data Manager User's Guide
Teams can develop modules independently, releasing modules on a schedule independent of the overall chip release schedule.
To map configurations, team members create a REFERENCE that maps a module to an implementation of the module using ProjectSync (in a sync_project.txt file). See Using Vault REFERENCEs for Design Reuse for a design example.
Note: When mapped configurations are configured in a mirroring environment, your mirrors should be set to always update, regardless of whether the specific configuration in the mirror is updated. For more information, see
Related Topics
Using Vault REFERENCEs for Design Reuse
Creating Releases
You create a release by creating a design configuration.
For internal releases, label the design configuration with tags such as "runnable1", "ready_for_simulation", "Bronze", "Silver", and so on. The tags should be meaningful. For example, "ready_for_simulation" can be a tag for a configuration that the design team wants to hand over to the simulation team. Note that tag names cannot contain spaces or periods ( . ).
When development and testing are complete, "Gold" is a typical tag for the configuration that represents the releasable product.
A file version can have more than one tag, since it can be a member of different configurations.
Using Tags
There are design configurations that you want to keep throughout the development process. For example, you may have a configuration that you are keeping as a possible starting point for a different line of development in the future. This tag is considered a "fixed" tag. The objects marked by the fixed tag move out of circulation. You do not use the fixed tag again in the project. You can designate a fixed tag as "immutable" when you create the tag. Immutable tags can never be moved. If you designate the tag as "mutable," it can be moved by a user with appropriate access rights, even though it is logically designated as a fixed tag.
On the other hand, there may be configurations that you use only temporarily -- for example, a configuration you use to show customers what a product looks like at the current state of development. Such a tag might be "currentDemo". A week later, you are no longer interested in that configuration, because you have achieved a more advanced configuration to use for the demo. In such a case, you would tag the more recent design
708

Considerations for Projects
configuration with the already-used "currentDemo" tag. In effect, you have thrown away the older design configuration information (even though those versions still exist). The tag is considered a "movable" one.
The logical tag types fixed or movable are used to describe ways in which you can use design configuration tags, but contain no special attributes to identify them. The responsibility of maintaining them properly rests on the design team. The physical tag types, immutable, and mutable force a more strict level of control by designating whether the tag can be moved.
Related Topics
Tagging Versions and Branches
ENOVIA Synchronicity Command Reference: tag
Using Vault REFERENCEs for Design Reuse
Using Vault REFERENCEs for Design Reuse
DesignSync eases development of a chip that relies on
• Reused modules from other projects, or • Modules developed independently of the chip
Designers can release modules on one schedule, while the chip that uses them follows an entirely different release schedule.
The following scenario illustrates how a module is distributed and used by team members. The design projects are stored in server-side vault folders on a SyncServer. Team members use vault REFERENCEs to import modules from other design projects into their own designs. A REFERENCE is a pointer you create in a ProjectSync project (in a sync_project.txt file) to map configurations.
Note: This design reuse flow shows how module clients and producers can share design modules. If your design team uses vault REFERENCEs to share modules, your team needs to have a consistent methodology governing how clients and producers create and share information about design configurations.
This flow assumes a basic understanding of the DesignSync configuration management tasks; see Using DesignSync: An Overview to gain this understanding.
1. Amy, the designer of an ALU design, alu8, places the design under revision control:
709

DesignSync Data Manager User's Guide
dss> setvault sync://granite:2647/Projects/alu8 /home/amy/Projects/myalu8
dss> ci -recursive -new -keep -comment "8-bit ALU" /home/amy/Projects/myalu8
2. Amy iteratively modifies and tests her design until she is satisfied that she has a clean version. She creates a "baseline" configuration:
dss> tag -recursive baseline /home/amy/Projects/myalu8
3. Amy informs her team coordinator that she has a stable version of her alu8 tagged "baseline" for her team members to import into their designs.
4. Joe is the team coordinator who is creating an area that will later become the beta release of the Asic_zr2 project. Joe places the Asic_zr2 project under revision control and applies the "beta" configuration tag:
dss> setvault sync://marble:2647/Projects/Asic_zr2 /home/joe/Asic_zr2
dss> ci -recursive -new -keep -comment "rev2 of zr proj" /home/joe/Asic_zr2
dss> tag -recursive beta /home/joe/Asic_zr2
5. The Asic_zr2 uses the alu8 module Amy is designing, as well as other modules being designed by other team members. In order to use these modules, Joe will create REFERENCEs within subfolders of his Asic_zr2 project to point to these modules. Joe uses ProjectSync to create a project and its associated sync_project.txt file referencing Amy's module. The sync_project.txt file contains a REFERENCE to Amy's alu8 module and a CONFIG mapping statement to ensure that team members import the correct version of the alu8. Joe could also create the sync_project.txt file using a text editor.
Note: These steps require write access to the SyncServer vault. Usually the owner of the SyncServer process performs these steps.
a. Within his Asic_zr2 project on his marble:2647 SyncServer, Joe creates a placeholder folder that will contain a REFERENCE to Amy's alu8 project .
$ mkdir <SYNC_DIR>/../syncdata/marble/2647/server_vault/Projects/
Asic_zr2/alu
710

Considerations for Projects
The path to the vault folder shown here is a typical UNIX path to a vault folder. A vault folder path on a default Windows installation has a different structure, for example C:\syncdata\server_vault\Projects\Asic_zr2\alu.
Note: If Joe were creating the sync_project.txt file by hand, he would create the file in this folder.
b. Joe creates a top-level ProjectSync project and its associated sync_project.txt file for the Asic_zr2 project:
Joe selects the Project Create menu item in the left panel of the ProjectSync window and enters the following settings:
Project Name: Asic_zr2
Description: The new version of the Asic_zr chip.
Owner: Joe Michaels
Purpose: O This project will contain files under revision control.
Vault Path: <Leave blank; Vault Path defaults to the project's vault.>
Initial Configuration: <Leave blank.>
c. Joe creates a ProjectSync project within the alu folder of the Asic_zr2 project. This step creates a sync_project.txt file containing the REFERENCE to Amy's alu8:
Joe again selects the Project Create menu and enters the following settings:
Project Name: Asic_zr2/alu
Description: References the alu8 developed by Amy
Owner: Joe Michaels
Purpose: O This project will contain files under revision control.
Vault Path: sync://granite:2647/Projects/alu8
Initial Configuration: beta
Note: See the ProjectSync documentation for step-by-step instructions on creating projects.
711

DesignSync Data Manager User's Guide
Joe selects the Create Project button at the bottom of the ProjectSync Create New Project window. The Create Project Configuration window appears.
d. Next, Joe maps the "beta" configuration used in his Asic_zr2 project to the "baseline" configuration tag name Amy has applied internally to her alu8 design, using these settings:
Project Name: Asic_zr2/alu
Configuration Name: beta
Configuration Description: Baseline version of alu8
Owner: Joe Michaels
Vault Tag: baseline
Team Members: <Joe selects Amy Jones, Paul Winslow, Zachary Jackson, and Dana Conti from the list of Available Users.>
Joe creates the configuration by selecting the Create Configuration button at the bottom of the ProjectSync Create Project Configuration window.
ProjectSync generates the following sync_project.txt file in the <SYNC_DIR>/../syncdata/ marble/2647/server_vault/Projects/Asic_zr2/alu folder:
NAME alu REFERENCE sync://granite:2647/Projects/alu8 DESCRIPTION References the alu8 developed by Amy OWNER joe COMPONENT FALSE CONFIG beta baseline joe amy paulw zach dana joe CONFIG_DESC Baseline version of alu8
The CONFIG entry in the sync_project.txt file maps the "beta" configuration -- the configuration name used by the Asic_zr2 project that will import Amy's alu8 -- to the "baseline" tag. The COMPONENT FALSE entry refers to the Purpose field in the ProjectSync Create New Project window. This entry indicates that the project will be used to manage files under revision control and not merely as a tool for organizing ProjectSync notes. See the ProjectSync documentation for more information.
712

Considerations for Projects
To add additional CONFIG mapping statements, Joe can select the Configuration menu item in the left panel of the ProjectSync window or hand-edit the sync_project.txt file.
6. After the sync_project.txt file is in place, Joe or any other team member on the Asic_zr2 project can populate to get the Asic_zr2 design, including the alu8 module's files:
dss> populate -recursive -get -version beta -dir /home/joe/Asic_zr2
Joe has already made the vault association using the setvault command in an earlier step. When DesignSync encounters the Projects/Asic_zr2/alu vault folder during the populate operation, it reads the sync_project.txt file. The sync_project.txt file directs it to populate with the "baseline" version of the alu8 files from the sync://granite:2647/Projects/alu8 vault folder.
Mapping a Configuration to a Selector List
DesignSync also allows mapping of a configuration to more than one selector. To map a configuration name to a selector list, Joe can use ProjectSync to create a configuration specifying A as the Configuration Name and gold,silver,bronze as the Vault Tag. For example:
CONFIG A gold,silver,bronze
Note: Selector names should be separated by commas, with no white space between names.
Then Joe can populate his work area with configuration A, for example:
dssc> scd /home/joe/Asic_rz2
dssc> setselector A
dssc> populate -get -recursive
DesignSync sets the persistent selector for the Asic_zr2 folder to gold,silver,bronze. When Joe checks in a file, DesignSync resolves the gold selector to a version and checks in that version. If the gold selector in the list does not resolve to a version, then DesignSync looks at the next selector in the list.
Related Topics
What Is a Design Configuration?
713

DesignSync Data Manager User's Guide
Mapping Configurations for Design Reuse
REFERENCEs and Revision Control Commands
REFERENCE Chaining
REFERENCEs and Revision Control Commands
The following details about how DesignSync revision control commands handle REFERENCEs will help your design team use REFERENCEs in sync_project.txt files to import modules. For an overview of how your team can use REFERENCEs to import modules, see Using Vault REFERENCEs for Design Reuse.
REFERENCEs and the populate Command
When you populate a configuration-mapped folder (either directly or through a recursive populate operation) and the selector you specify is mapped, DesignSync sets the persistent selector list for that folder to the mapped value.
In the example in Using Vault REFERENCEs for Design Reuse, the alu folder's persistent selector list is set to "baseline" even though the configuration specified during the populate operation is "beta". Storing the mapped configuration is a performance optimization. If a change is made to the configuration mapping -- for example, if the beta tag for the alu design is changed to map to "newbaseline" instead of "baseline" -- you must re-populate the work area using the non-mapped configuration (beta). Re-populating updates the persistent selector list for the alu folder from "baseline" to "newbaseline".
REFERENCEs and the tag Command
How DesignSync Applies a Tag to a Configuration-Mapped Folder
When you apply a tag recursively to a configuration that has been mapped using a REFERENCE, DesignSync compares the version specified for the tag operation to the configuration defined in the REFERENCE.
Note: You specify a version by using the -version option of the tag command or the Version Selector field of the DesignSync Tag dialog. If no version is specified for the tag operation used, DesignSync uses the selector for the folder.
If the configuration name matches the version specified for the tag operation, DesignSync:
• Skips the referenced folder in its tagging operation and displays a message about the skip. By skipping referenced vaults, the tagging operation respects module boundaries so that only module owners can tag modules.
714

Considerations for Projects
• Creates a CONFIG statement to the REFERENCE in sync_project.txt of the mapped vault folder.
The newly created CONFIG statement maps the configuration named by the tag command to the resolved configuration of the referenced vault. The new CONFIG statement in effect, adds a new "tag" to the referenced vault. It also allows DesignSync to skip the tagging of referenced vaults but retain the referenced vault for subsequent populate commands.
For example, given the configuration mapping example in Using Vault REFERENCEs for Design Reuse, a team member, Zach, wants to create an "alpha" configuration of the entire Asic_zr2 project. He sets the selector to the beta configuration, populates his work area with that configuration, checks in his changes, and then recursively tags his entire Asic_zr2 project work area as "alpha":
dssc> scd Asic_zr2 dssc> setvault sync://marble:2647/Projects/Asic_zr2 dssc> setselector beta . dssc> populate -recursive -get dssc> co -lock -comment "adding power-up state vector" top/decoder/decoder.v dssc> ci -keep -comment "added power-up state vector" /home/zach/Asci_zr2/top/decoder/decoder.v dssc> tag -rec alpha .
When the recursive tag command reaches the referenced alu module, DesignSync:
• Checks the folder's sync_project.txt file. In our example, this file contains the configuration statement:
CONFIG beta baseline joe amy paulw zach dana joe
• Since the configuration name (beta) matches the version specified for the tag, DesignSync skips the referenced folder in its tagging operation and displays a message about the skip. For example:
Tagging: Asic_zr2/alu : Skipping (Added Config "alpha" mapping to "baseline")
• Adds the following line to the REFERENCE in the sync_project.txt file for the vault folder. The REFERENCE for the example now contains:
NAME: ALU REFERENCE syn://granite:2647/Projects/alu8 DESCRIPTION References the alu8 developed by Amy OWNER joe
715

DesignSync Data Manager User's Guide
COMPONENT FALSE CONFIG beta baseline joe amy paulw zach dana joe CONFIG_DESC Baseline version of alu8 CONFIG alpha baseline zach *
When Zach populates the alpha version of his Asic_zr2 project, he picks up Amy's baseline alu8 files.
If the configuration name in the REFERENCE does not match the version specified for the tag operation, DesignSync descends into the mapped vault folder and applies the tag to the files there.
If the configuration name matches the version specified for the tag operation but that configuration name maps to a dynamic tag (for example, CONFIG beta Trunk zach *), DesignSync descends into the mapped vault folder and applies the tag to the files there.
If the REFERENCE configuration that maps to the referenced vault's configuration does not exist, DesignSync does not generate the new CONFIG statement. For example, the REFERENCE in the alu folder contains the following CONFIG statement:
CONFIG beta baseline joe amy paulw zach dana joe
If the beta configuration does not exist, no tagging is required.
If the tag command does not include the -version option, the newly added REFERENCE maps the Trunk configuration to the configuration of the referenced vault, in this case:
CONFIG Trunk baseline zach *
How DesignSync Deletes a Tag from a Configuration-Mapped Folder
If the tag specified for deletion matches the configuration name in the sync_project.txt file of a mapped vault folder, DesignSync deletes the CONFIG statement. For example, suppose Zach decides to delete the alpha configuration he created (in our example):
dssc> tag -delete alpha -recursive .
When the tag delete operation encounters the configuration-mapped vault folder, (alu), DesignSync compares the alpha tag to the configuration name(s) in the REFERENCE and finds that they match. DesignSync deletes the CONFIG statement:
CONFIG alpha baseline zach *
716

Considerations for Projects
leaving the original configuration definition:
CONFIG beta baseline joe amy paulw zach dana joe
If no alpha configuration is defined, DesignSync descends into the alu folder and removes the alpha tag from the files there.
How DesignSync Replaces a Tag on a Configuration-Mapped Folder
When a tag replacement operation reaches a vault folder that is mapped to another configuration (with a CONFIG statement), DesignSync:
• Compares the tag specified for replacement with the configuration names defined in CONFIG statements in the sync_project.txt file for the mapped folder.
• If the names match, DesignSync replaces the existing CONFIG statement with a new one that maps the configuration name to the new configuration tag.
To continue the example of the Asic_zr2 project, suppose Amy, the alu designer, updates her design files. She then checks them in to the alu8 vault folder and tags them newbaseline. The Asic_rz2 project leader (Joe) wants the to include Amy's latest files in alu folder for the project. He modifies the sync_project.txt file for the alu folder to change the CONFIG statement to map to the "newbaseline" configuration tag instead of "baseline".
The CONFIG statement now includes:
CONFIG beta newbaseline joe amy paulw zach dana joe CONFIG alpha baseline zach *
Suppose that Zach wants the alpha configuration for the alu design to map to Amy's latest files (tagged "newbaseline") as well. Zach sets the selector for his work area to "beta" and populates the work area, which fetches the beta configuration. He then replaces the alpha tag:
dssc> tag -recursive -replace alpha .
When the tag delete operation encounters the configuration-mapped vault folder, (alu), DesignSync determines that the alpha tag matches the alpha configuration name in the CONFIG statement of the sync_project.txt file. DesignSync replaces the old configuration definition:
CONFIG alpha baseline zach *
with the new alpha configuration definition:
CONFIG alpha newbaseline zach *
717

DesignSync Data Manager User's Guide
718
Related Topics
Using Vault REFERENCEs for Design Reuse
REFERENCE Chaining
REFERENCE Chaining
Team members use vault REFERENCEs to import modules from other design projects into their own designs. A REFERENCE is a pointer you create in a ProjectSync project (in a sync_project.txt file) to map configurations.
Note: REFERENCEs are not supported if your revision control commands use selector lists.
If a REFERENCE points to another project that also has a REFERENCE in its sync_project.txt file, DesignSync follows that REFERENCE, and so on until an actual vault is located. This is called REFERENCE chaining. The maximum number of REFERENCEs that DesignSync follows is 10.
DesignSync attempts to limit the number of times it traverses a REFERENCE chain to once per operation sequence (for example, checking in or out an entire design hierarchy). However, the greater the number of REFERENCEs in the chain, the greater the performance degradation.
Using REFERENCE Chaining to Move a Vault Folder
To change the location of a vault folder, you can chain REFERENCEs:
1. Move the vault.
See Moving Vaults for instructions.
2. Leave a REFERENCE pointing to the new vault location. 3. At some later date, remove the REFERENCE.
Until that time, users accessing the old location will be making an extra server hop to access the vault.
Diagnostics and Troubleshooting
Troubleshooting the DesignSync Client
The DesignSync Environment
In the DesignSync GUI, Tools =>Diagnostics displays the DesignSync Diagnostics dialog box. Three tabs are available:
• Environment Variables -- Displays DesignSync -related environment variables and their current settings. The SyncAdmin tool also has an Environment Variables tab that displays the same list of environment variables.
• Installation Settings -- Displays settings that were selected during the DesignSync installation or were later overridden using the SyncAdmin tool.
• Java Properties -- Displays the current Java classes, paths, and versions.
The DesignSync Diagnostics dialog box is useful for debugging your DesignSync environment. For example, ENOVIA Synchronicity Customer Support may ask you for information that is available from this dialog box when assisting you with a problem.
All of the information displayed is read-only – you cannot edit the values from the DesignSync Diagnostics dialog box.
Related Topics
ENOVIA Synchronicity Command Reference: syncinfo
DesignSync Data Manager Administrator's Guide: Using Environment Variables
About DesignSync Client Log Files
When you run DesignSync, dssc, stclc, dss, or stcl, these log files are created:
• dss_*.log file • sync_client_trace_*.log
Note: Separately, you may also log the output of a populate command. For more information, see Populate Log.
dss_*.log file
By default, for every DesignSync session you run, a log file is placed in your home directory. The default log filename is dss_<date>_<time>.log . For example, the log file dss_01102002_182640.log was created on January 10, 2002 at 18:26:40
719

DesignSync Data Manager User's Guide
hours. Because the log file is time-stamped, it is not overwritten and log files are retained from every session of DesignSync that you run.
Logging options can be set for an installation or a project, or for an individual user, using SyncAdmin's Logging pane. The logging options let you specify:
• Whether logging should begin at startup • Whether to log both commands and their results • The default location of log files • Whether log file names should be unique, or whether a specific log file name
should be reused
When using a unique log file name for each client session, all dss_<date>_<time>.log files older than two days are automatically removed when a DesignSync client starts. If there are more than 20 log files less than two days old, all log files older than one hour are removed.
Trace messages are also logged to this file when tracing is enabled. You can enable tracing by setting the SYNC_TRACE environment variable to 0 for debugging purposes. You can also enable tracing using the synctrace set command, which takes effect immediately and is in effect until you stop tracing with synctrace unset or when the client session exits. The trace messages that are logged to this file are for the most part not present in the sync_client_trace_*.log file.
Note: For logging changes to take effect, you must restart any DesignSync clients that are running, including syncd, which manages dss and stcl communication. You can restart syncd using the syncdadmin tool See SyncAdmin Help: syncdadmin for more information.
You can also use the log command to control the logging of DesignSync commands and command output.
When you restart a DesignSync client, and you have set SYNC_TRACE, you will see messages output from the initialization process. The dss_*.log file begins to capture information when the initialization process is complete.
Note: When sending client trace log files to ENOVIA support, provide both the dss_*.log files and the sync_client_trace_*.log files for the debug session.
sync_client_trace_*.log
If you set the SYNC_TRACE environment variable to 0 for debugging purposes, certain trace messages are logged to sync_client_trace_<date>_<time>.log. These trace messages are not always present in the dss_*.log file. You can also enable tracing using the synctrace set command. This log file is stored in $SYNC_USER_CFGDIR/logs.
720

Diagnostics and Troubleshooting
Note: The default value of the $SYNC_USER_CFGDIR is $HOME/.synchronicity on UNIX. On Windows, the default value is %AppData%\Synchronicity. This value is implicitly defined. To change it, create the SYNC_USER_CFDIR enivronment variable and set the value as desired.
All sync_client_trace_*.log files older than two days are automatically removed when a DesignSync client starts. If there are more than 20 log files less than two days old, all log files older than two hours are removed.
sync_client_trace_*.log files are created for each DesignSync client. When you set the SYNC_TRACE environment variable, you must restart any application you are debugging for the tracing to take effect. If you use the synctrace set command, tracing is started and enabled only for this client session or until tracing is stopped with the synctrace unset command.
No trace log files are created for dss or stcl because these applications communicate to SyncServers through the client syncd session, and the syncd creates its own log file.
Note: You can restart syncd using the syncdadmin tool See SyncAdmin Help: syncdadmin for more information.
When you restart a DesignSync client, and you have set SYNC_TRACE, you will see messages output from the initialization process. The sync_client_trace*.log file begins to capture information when the initialization is complete.
Note: When sending client trace log files to ENOVIA support, provide both the dss_*.log files and the sync_client_trace_*.log files for the debug session.
Related Topics
Running a DesignSync Client in Debug Mode
ENOVIA Synchronicity Command Reference: log command
ENOVIA Synchronicity Command Reference: synctrace set
ENOVIA Synchronicity Command Reference: synctrace unset
DesignSync System Administration Help: Using Environment Variables
Running a DesignSync Client in Debug Mode
There are several approaches to debugging a client:
• Restarting the client with debug environment variables set • Enabling debug output within a DesignSync client session
721

DesignSync Data Manager User's Guide
• Using syncdiag trace for extensive OS-level debugging
Restarting the client with debug environment variables set
The simplest debug approach is to restart the client, with a debug environment variable set:
% setenv SYNC_TRACE 0
Then start a DesignSync client.
setenv SYNC_TRACE 0 starts the client with DesignSync tracing. DesignSynctracing captures debug information pertaining to DesignSync software. The output is logged to the user's $HOME/dss*.log file and to their $HOME/.synchronicity/logs/sync_client_trace*.log file.
To disable DesignSync tracing, restart the client without the debug environment variable set:
% unsetenv SYNC_TRACE
Then start a DesignSync client.
Enabling debug output within a DesignSync client session
Use the synctrace set command to enable DesignSync-level tracing within a DesignSync session, so that you do not have to restart the client. Then, use the synctrace unset command later to disable DesignSync tracing.
Using syncdiag trace for extensive OS-level debugging
Use syncdiag trace to run a DesignSync command with DesignSync tracing, with Operating System (OS) level tracing, or with both levels of tracing. DesignSync tracing captures debug information pertaining to ENOVIA Synchronicity DesignSync Data Manager software, as if the command synctrace set has been run. OS-level tracing captures debug information pertaining to the Operating System. DesignSync tracing, and OS-level tracing, are only enabled for the duration of the DesignSync command run by syncdiag trace.
For information on the current syncdiag trace options, in your OS shell, run:
% syncdiag -help trace
Available options include:
-sync Run with DesignSync tracing (SYNC_TRACE)
722
Diagnostics and Troubleshooting
-os Run with OS level tracing -all Run with both OS and DesignSync tracing
The default behavior is -all.
For example:
% syncdiag trace -sync dssc ci -share -comment "Test" testfile
The above command creates a syncdiag.tgz package containing the debug log files.
Notes:
• If you are using an SUID installation, you need to run the syncdiag trace command as the installation owner.
• The OS-level tracing program used is platform dependent. For HP, your system administrator might need to download "tusc".
Related Topics
Overview of syncdiag Utility
About DesignSync Client Log Files
ENOVIA Synchronicity Command Reference: synctrace set
ENOVIA Synchronicity Command Reference: synctrace unset
Starting a New Browser Process Each Time Help Is Invoked
Note: This topic applies to web browsers on the UNIX platform only.
Problem: Each time help is invoked (by clicking Help, pressing the F1 key, or selecting Help => Contents and Index), your web browser starts a new process, which displays a new browser window.
Possible Cause: Each help invocation sends a browser request that causes the browser to launch a new process.
Action: Specify the nsremote script as your HTML browser. This script is located in the $SYNC_DIR/bin directory. The nsremote script calls the specified web browser with the -remote option so that browser requests connect to an active browser process if one exists instead of always starting a new process.
723

DesignSync Data Manager User's Guide
To specify nsremote as your HTML browser, use the SyncAdmin tool. See SyncAdmin Help: General Tab for more information.
Troubleshooting nsremote Issues
Problem
nsremote fails when the browser is not running.
Possible Cause
You are using nsremote with a wrapper script, and the wrapper script fails to return the status from the underlying call to the browser.
Solution
nsremote uses the status value returned from the wrapper script to determine if a connection to an existing browser session is possible.
An example of a script you might use to return the status of the call to the browser is:
#!/bin/sh FIREFOX_HOME=/usr/local/firefox1508 export FIREFOX_HOME exec $FIREFOX_HOME/firefox ${1+"$@"}
Interrupt Button Does Not Seem to Work
Problem: During a DesignSync operation (for example, a checkin) clicking Stop or choosing Tools => Interrupt doesn't seem to have any effect.
Possible Cause: When a command is run on multiple files or directories, the command operates on multiple files or directories at once, as opposed to processing one file at time, one directory at a time. When a command is interrupted, before the command stops it will complete its processing of the current files or directories being operated on.
Solution: Because the operation does not stop immediately, it may seem as if the interrupt is being ignored. However, DesignSync is working correctly and should complete the operation or display the message that the command was interrupted.
Troubleshooting Metadata Errors
Client operation stalls, "Waiting to obtain metadata lock"
Problem: You kill a DesignSync client, then restart the DesignSync client in the same workspace. Attempting a DesignSync operation in that workspace stalls, outputting:
724

Diagnostics and Troubleshooting
WARNING - Waiting to obtain metadata lock for /home/tbarbg7/SD31447testData/
Already locked by: user (tbarbg7) on host (poulenc), process id (28730)
Possible Cause:
In the above example, the user "tbarbg7" started the initial stclc session, which was killed. "tbarbg7" then restarted stclc from the same workspace in which it was killed.
Because stclc was killed, its lock on the workspace metadata was not released. This was indicated by the lock still being held by the user. When stclc restarts, if the lock file (.SYNC/Contents.sync.lck) is more than 5 minutes old the lock file is presumed to be orphaned. At that time, the lock file is removed, allowing operations to proceed.
Solutions:
• An alternative to waiting for the 30 second time period to elapse is to remove the .SYNC/Contents.sync.lck lock file, if you are certain the process that obtained the lock file (shown in the output above) has exited.
• Change the orphan timeout value from 5 minutes to a lower value, so that DesignSync clients wait less time before automatically removing the lock file. See Workspace Metadata Registry Settings for how to modify the orphan timeout value.
Setvault Command Returns Error: Metadata No Permission
Problem: You enter the setvault command and DesignSync returns the error "Metadata No Permission." For example:
[somlib-16] Failed on metadata in /home (Open failed; check permissions)
file:///u1/userA: som-E-121: Metadata No Permission.
Possible Causes:
• Your umask permissions are not set to allow write access. DesignSync needs to be able to write into the parent directory of the work area directory where you run the setvault command. For an explanation of this concept, see Local Metadata and the .SYNC Directories and The Role of setvault in Moving a Workspace.
• There is insufficient disk space to write to the local metadata file.
Solutions:
725

DesignSync Data Manager User's Guide
• Check UNIX permissions and, if necessary, set them so that you have write access to the parent directory of the work area directory.
• Make there is enough space on the disk in which the local metadata file resides.
RevisionControl Operation Returns Error: Not Metadata Owner
Problem: You perform a revision control operation and DesignSync returns the error:
"Not metadata owner." For example:
Checking out: samp.asm : [somlib-16] Failed on metadata in
/u1/userA/Sportster/code (Not Owner)
Failed:som: Error 120: Not Metadata Owner
Possible Cause:
Your umask permissions are not set to allow write access. DesignSync needs to be able to write into the parent directory of the work area directory where the setvault is being formed.
Solution: Change the umask permissions to allow write access.
For example, if user1 has a umask set to 022 (which turns off write permission for group and world), then DesignSync creates the .SYNC/Contents files with permissions 644. If user2 attempts to operate on files in user1's managed work area, user2 does not have UNIX write access to user1's .SYNC/Contents file.
Related Topics
Metadata Overview
Setting Up a Shared Workspace
Relocating a Workspace
DesignSync Data Manager Administrator's Guide: Workspace Metadata Registry Settings
Tagging Does Not Warn of Removed Objects
Problem: The tagging operation apparently succeeds even though some of the objects have been removed from the SyncServer vault.
Possible Cause: Either of these operations might cause this problem:
726

Diagnostics and Troubleshooting
• A UNIX rm command was used. (Note: rm is not recommended; use rmvault instead.)
• The rmvault -nokeepvid command was used, then the object was checked in again with ci -new. (Note: The -nokeepvid option is not recommended; use the default option, -keepvid.
Solution: Use tag -warn exists to ensure that you are notified if objects you are attempting to tag do not exist in the vault.
Files Missing from the Cache
Problem: A cache file that is still being referenced was unintentionally removed after running cachescrubber.
Possible Cause: You may have removed the file when:
• cachescrubber was run with the ‘-noref’ or ‘-preds32’ options, or • all workspaces were not supplied when cachetouchlinks was run.
Solution: When a cache file that is being referenced is removed, you can use the refreshcache command to recreate links to the cache from any workspace. The recreation of the links will also re-fetch the version into the cache if it is not already present.
Examples:
stcl> refreshcache –workspace /home/Projects/ASIC
or
stcl> refreshcache –file /home/Projects/workspace_list_file
where workspace_list_file contains a list of workspaces.
Related Topics
refreshcache command
cachetouchlinks command
cachescrubber command
DesignSync Data Manager Administrator's Guide: How DesignSync Manages Caches
727
DesignSync Data Manager User's Guide
DesignSync System Administration Help: Moving a Cache
Error Accessing or Storing to Database
Problem: During a revision control operation, DesignSync issues one of the following error messages:
Error accessing database
Error storing to database
Possible Cause: The tags database might have become corrupted.
Solution: DesignSync performs regular checkpointing of the tags database, so that if the database appears to be corrupted, the database can be restored. Upon restarting, the SyncServer automatically recovers the database by restoring from the last checkpoint, then replaying the journal. To restore the database:
1. Shut down the SyncServer by running stop_sync_server on UNIX. 2. Restart the SyncServer by running start_sync_server on UNIX.
DesignSync automatically recovers the database.
By default, checkpointing of the tags database occurs daily at 1:00 AM local time. DesignSync tool administrators can update the DBCheckpointTime registry setting to fine-tune when checkpointing is to occur. See Advanced Registry Settings for details.
Performance Issues with DesignSync GUI Client
Problem
The DesignSync GUI client (DesSync), runs slowly on Windows systems.
Possible Cause
DesignSync is attempting to access drives that have been removed or are not accessible across the network.
Solution
Modify the AllowableDriveTypes registry key to restrict the client to navigating locations that are always available. For example, fixed media only drives or RAM storage only.
For information on modifying the registry key, see the SysAdmin Help: DesignSync Client Optimizations Registry Settings
728

Diagnostics and Troubleshooting
Troubleshooting Communication Errors
Proxy Errors
Problem: Checking in a large file fails with the following error message:
som-E-13: Communication Zero Content.
Possible Cause: If you are connecting to a DesignSync server through a proxy server, the request could be timing out waiting for data to be returned from the DesignSync server.
Solution: Increase the proxy server's default timeout for services.
Problem: Attempting to access a SyncServer returns the following error message:
som-E-6: Communication Write Failure.
Solution: This is caused by an invalid "ProxyNamePort" environment variable setting or registry key. The process is probably being killed by the Windows kernel due to proxy errors that cannot be trapped.
Controlling Network Communication Timeouts
As a system administrator, you can use the Limit Transfer Timeout setting in the SyncAdmin tool to help prevent network communication timeouts when using DesignSync. See SyncAdmin Help: Performance Tab for more information.
DesignSync's default behavior is never to time out. This behavior ensures that, if communication between the client and server is interrupted, DesignSync continues processing immediately the communication is re-established.
When you turn on the Limit Transfer Timeout setting, the number of seconds you set in the Transfer Timeout field represents the maximum time of inactivity between the client and server, that is, between sending and receiving TCP/IP packets. This setting does not represent the total time of a read/write operation on a file. The default timeout is 500 seconds. If you set the Transfer Timeout value too low, for example 300 seconds, DesignSync might exit unnecessarily.
Note:
729

DesignSync Data Manager User's Guide
If, at your site, you typically move large files of data between clients and servers you should increase the time out value accordingly. For example, a 30 GB file could take 30 minutes (1800 seconds) to check in on the server side.
To turn on the Limit Transfer Timeout setting:
1. Start SyncAdmin. 2. Navigate to the Performance Tab. 3. Turn on Limit Transfer Timeout.
The Transfer Timeout field becomes active, with 500 seconds set as the default timeout value.
4. Change the Transfer Timeout value if necessary. 5. Click Apply.
The connection between the DesignSync client and server will time out after the time period you indicated in the Transfer Timeout field has elapsed without activity and you will see one of the following messages:
"Communication Read Failure"
"Communication Write Failure"
You might see a "Communication Connect Failure" message if there has been more than one read or write attempt. At this point, the read or write operation is aborted.
Troubleshooting a SyncServer
About SyncServer Log Files
Running a SyncServer creates these log files:
• sync_server_trace.log • SyncServer.log • error_log • access_log
sync_server_trace.log
Server initialization messages are captured in the log file:
<syncdata>/<host>/<port>/server_vault/sync_server_trace.log
730

Diagnostics and Troubleshooting
Trace messages are also logged to this file when tracing is enabled. You can enable tracing by setting the SYNC_TRACE environment variable to 0 for debugging purposes, before starting the server. You can also enable tracing using the synctrace set command, which takes effect immediately and is in effect until tracing is stopped with synctrace unset.
This file is overwritten whenever the server is started.
Additional trace messages are captured in the SyncServer's error_log file.
SyncServer.log
Brief error messages are logged in the SyncServer.log file:
$SYNC_CUSTOM_DIR/servers/<host>/<port>/server_metadata/SyncServer.log
Note: SYNC_CUSTOM_DIR defaults to $SYNC_DIR/custom.
The complete failure context is written to the error_log file.
error_log
The server's error_log file captures all server-related processes. The error_log is located in the directory:
$SYNC_CUSTOM_DIR/servers/<host>/<port>/logs
Any errors generated by the server are recorded in the error_log file.
Note: SYNC_CUSTOM_DIR defaults to $SYNC_DIR/custom.
Trace messages are also logged to this file when tracing is enabled. You can enable tracing by setting the SYNC_TRACE environment variable to 0 for debugging purposes, before starting the server. You can also enable tracing using the synctrace set command, which takes effect immediately and is in effect until tracing is stopped with synctrace unset.
access_log
The server's access_log file contains information about client requests to the server. The access_log is located in the directory:
$SYNC_CUSTOM_DIR/servers/<host>/<port>/logs
Note: SYNC_CUSTOM_DIR defaults to $SYNC_DIR/custom.
731

DesignSync Data Manager User's Guide
The access_log file increases in size depending on the amount of client interaction you have at your site. If you find the access_log file grows too large, you can disable its creation.
To disable logging to the access_log file:
In the server's $SYNC_CUSTOM_DIR/servers/<host>/<port>/conf/httpd.conf file, comment out the following line:
TransferLog logs/access_log
You can limit the access_log file to a certain size by using a nightly cron job. The following script moves both the access_log and error_log files to *.old files when the access_log file reaches 100 blocks.
#!/bin/sh cd $SYNC_CUSTOM_DIR/servers/<host>/<port>/logs size=100; size1=`du -a access_log | cut -f1`; if [ $size1 -gt $size ]; then mv access_log access_log.old; mv error_log error_log.old; kill -USR1 `cat httpd.pid`; fi
Note: If the SYNC_CUSTOM_DIR environment variable not defined, specify $SYNC_DIR/custom in the script, instead of $SYNC_CUSTOM_DIR.
The contents of the access_log file are defined in the "Custom Logging Format Aliases" section of the $SYNC_CUSTOM_DIR/servers/<host>/<port>/conf/httpd.conf file. If you want to modify the information that is tracked in the access_log file, edit the "Custom Logging Format Aliases" section of the httpd.conf file. See http://www.apache.org/docs for further information.
Note: SYNC_CUSTOM_DIR defaults to $SYNC_DIR/custom.
Related Topics
Running a SyncServer in Debug Mode
Mirror Log Files
ENOVIA Synchronicity Command Reference: synctrace set
732

Diagnostics and Troubleshooting
ENOVIA Synchronicity Command Reference: synctrace unset
DesignSync Data Manager Administrator's Guide:Using Environment Variables
Running a SyncServer in Debug Mode
There are several approaches to debugging a server:
• Restarting the server with debug environment variables set • Using syncdiag servercheck for extensive OS-level debugging
Restarting the server with debug environment variables set
The simplest debug approach is to restart the server, with debug environment variables set:
% stop_sync_server
% setenv SYNC_DBG trace
% setenv SYNC_TRACE 0
% start_sync_server
setenv SYNC_DBG trace starts the server with Operating System (OS) level tracing. OS-level tracing captures debug information pertaining to the Operating System. The output is logged to $SYNC_CUSTOM_DIR/servers/<host>/<port>/logs/trace_log. The trace program used is determined by the server's platform.
setenv SYNC_TRACE 0 starts the server with DesignSync tracing. DesignSync tracing captures debug information pertaining to ENOVIA Synchronicity DesignSync software. The output is logged to $SYNC_CUSTOM_DIR/servers/<host>/<port>/logs/error_log.
To disable DesignSync tracing and OS-level tracing, restart the server without the debug environment variables set:
% stop_sync_server
% unsetenv SYNC_DBG
% unsetenv SYNC_TRACE
% start_sync_server
733

DesignSync Data Manager User's Guide
Use the synctrace set command to enable DesignSync-level tracing on a running server, so that you do not have to restart the server. Then, use the synctrace unset command later to disable DesignSync tracing.
Culling the Server's error_log
Use syncdiag error_log to excerpt information from the server's error_log, based on start and end dates and times. In addition to the specified time range, certain error_log events are always included in the output, such as server restarts and crashes.
For information on the syncdiag error_log options, in your OS shell, run:
% syncdiag -help error_log
Using syncdiag servercheck for extensive OS-level debugging
Use syncdiag servercheck for more extensive OS-level debugging. The syncdiag servercheck utility
• Does not require restarting the server • Can attach either to the server's child processes or only the parent process
(issuing a server reset to spawn new child processes that are then traced) • Has an option to trim, compress, or rotate trace_log files
For information on the syncdiag servercheck options, in your OS shell, run:
% syncdiag -help servercheck
Available options include:
Option Description -keeplogs <n> With -trimtrace, keep <n> old trace files, plus current one;
default is 4 -logdir <dir> With -starttrace, put trace logs in directory <dir>; default is
$SYNC_CUSTOM_DIR/servers/<host>/<port>/logs -port <p> Server port -pstack Run pstack on all server processes -reset Reset server after -starttrace/-stoptrace; default is to attach to
running server processes -starttrace Start truss/strace -stoptrace Stop running truss/strace
734

Diagnostics and Troubleshooting
-trimtrace Trim log files while truss/strace is running; keeps trace logs from growing unbounded
Example 1: Start tracing, wait, then stop tracing
% syncdiag servercheck -starttrace
% syncdiag servercheck -stoptrace
Example 2: Start tracing, reset the server, and send the logs to /tmp.
Use -trimtrace to limit the tracing to 8 log files (2 hours worth).
% syncdiag servercheck -starttrace -reset -logdir /tmp
% syncdiag servercheck -trimtrace -keeplogs 8
Related Topics
Overview of syncdiag Utility
About SyncServer Log Files
ENOVIA Synchronicity Command Reference: synctrace set
ENOVIA Synchronicity Command Reference: synctrace unset
Troubleshooting Email Notification of RevisionControl Notes
Sometimes, after you set up automatic email notification of RevisionControl notes, users may report problems with receiving or not receiving notification.
Problem: Users report they are receiving email notification when they did not subscribe for it.
By default, ProjectSync does not send email notification to the user who performed the revision control operation when DesignSync generates a RevisionControl note. Users have to subscribe to receive notification.
To enable notification for a RevisionControl note, use the Fields Used to Build Distribution List in ProjectSync Email Administrator.
Note: Removing the Author field disables email notification to the author for all users. If you disable the field and a user still wants to receive these email notifications, he or she can set up an email subscription in ProjectSync. See ProjectSync help for steps.
Related Topics
735

DesignSync Data Manager User's Guide
DesignSync Data Manager Administrator's Guide: How Email Notification Works
Troubleshooting the Mirror System
First Steps for Troubleshooting the Mirror System
When you encounter a problem with the mirror system, capture the current log files, by using the syncdiag utility. See Mirror Log Files for details.
If there are heartbeat failures, reset the mirror daemons.
If Absent Files are appearing in the mirror, see Detecting Absent Files in the Mirror.
If a mirror is not being updated, but its mirror status shows as enabled and up-to-date, as the mirror owner, in DesignSync, cd into the mirror directory, and run populate -recursive -force -get -report verbose. If that, or the same command with the addition of -full -unifystate, do not fetch the expected data, then the mirror definition is probably incorrect (either its vault URL or selector).
The transaction log database file shown in the Architecture of the Mirror System is located in syncdata/<host>/<port>/server_vault/tlog.db . As shown in the architecture diagram, the tlog.db file exists on both RS's and MAS's. If Customer Support needs a copy of the tlog.db file, if the server is currently running the tlog.db file will not be flushed to disk, so will be incomplete.
If the server is stopped, to capture the content of the tlog.db file, in UNIX:
% cd syncdata/<host>/<port>/server_vault/Partitions/Default
% db_dump -p tlog.db > ~/tlog_listing
("-p" is to format the binary data into ascii)
If the server is running, to capture the content of the tlog.db file, in UNIX:
% db_dump -p -h $SYNC_CUSTOM_DIR/servers/<host>/<port>/logs ~/path/to/syncdata/<host>/<port>/server_vault/Partitions/Default/tlog.db > ~/tlog_listing
Related topics
Mirror Log Files
Resetting the Mirror Daemons
736

Diagnostics and Troubleshooting
DesignSync Data Manager Administrator's Guide: Architecture of the Mirror System
Mirror Log Files
When you use the mirror system several log files are created logging the operations you perform.
• Log files for Repository Server • Log files for Mirror Administration Server • dss_*.log from the Mirror Update Process • Log Files from Failed Mirror Update • Collecting log files for debugging
For both the Repository Server and the Mirror Administration Server, mirror tracing is enabled through the General Settings panel in the Mirrors section of the ProjectSync menu. When enabled, the mirror system trace messages are sent to the relevant log file for the server that has tracing enabled.
Log files for Repository Server
If your SyncSever is setup as a Repository Server (RS), it will create the following log file:
$SYNC_CUSTOM_DIR/servers/RS-host/RS-port/share/content/mirrors/logs/mpdlog.txt
To view the log file using a browser, go to the Mirrors section of the ProjectSync menu of the RS. Then select the “View All Mirrors Log” button in the Show RS Status panel. This file shows when mirrors are added, modified or removed, but not in an easily readable format.
Note: These log files are automatically rotated if the file size exceeds one megabyte. The file size limit is configurable. See Registry Settings for a Repository Server for details. The mpdlog.txt file is rotated to mpdlog.txt.last. If tracing is enabled, the log files are not rotated.
Log files for Mirror Administration Server
If your SyncServer is setup as a Mirror Administration Server (MAS), it will create the following log file:
$SYNC_CUSTOM_DIR/servers/MAS-host/MAS-port/share/content/mirrors/logs/madlog.txt
To view the log file using a browser, go to the Mirrors section of the ProjectSync menu of the MAS. Then select the "View All Mirrors Log” button in the Show MAS Status
737

DesignSync Data Manager User's Guide
panel. This file contains information such as new mirrors added, mirrors removed, resets applied.
If tracing was set (via ProjectSync's General Mirrors "Activate mirror tracing"), much more information is output, such as the commands to spawn the mups, the failures and successful updates, and when failed emails are sent or failures are cleared up.
Note: These log files are automatically rotated if the file size exceeds one megabyte. The file size limit is configurable. See Registry Settings for a Mirror Administration Server for details. The madlog.txt file is rotated to mapdlog.txt.last. If tracing is enabled, the log files are not rotated.
Detailed information for debugging
dss*.log files from failed mirror updates are moved to the $SYNC_CUSTOM_DIR/servers/MAS-host/MAS-port/share/content/mirrors/logs directory, so they could be viewed on the server via a browser. Every failure of a specific mirror overwrites the previous failed dss*log file, since the log file is moved to a hashed name.txt.
By looking in the log file you can determine the mirror name, one of the arguments that the mup was spawned with. Also, each transaction that is being applied by this MUP is also output to the file, along with comments when submirrors are being created, removed, etc. This information in the log file pertains to either a failed dss* log file or a successful one (.../logs/muplogs/).
Also in the $SYNC_CUSTOM_DIR/servers/MAS-host/MAS-port/share/content/mirrors/logs directory is the mad.log.dss, the intial MAD startup dss*log file. If dss logging is disabled, this will show nothing, because upon starting a MAD we disable dss log file logging and then do our own logging, to the madlog.txt file.
A MAS will also have a $SYNC_CUSTOM_DIR/servers/MAS-host/MAS-port/share/mirrors directory, containing:
• a madmirrors.txt file, with all the status information that the MAS uses to report status
• individual MUP change set files that are written by the MAD and read by the MUP
• a MirrorRegistry.reg file, written by the MAD on startup, and used by the MUP
dss_*.log files from the Mirror Update Process
The dss_*.log files from the mirror update process are written to: $SYNC_CUSTOM_DIR/servers/MAS-host/MAS-port/logs/muplogs
738

Diagnostics and Troubleshooting
This directory uses the normal dss_*.log cleanup procedures (see dss_*.log file). However, the muplogs can be saved aside, for debugging. See Registry Settings for Troubleshooting the Mirror System for details.
If mirror tracing is enabled for the MAS, then these log files will contain additional tracing information, similar to the tracing information captured in the dss_*.log file for a DesignSync client.
The filenames use the dss_<date>_<time>_<mirror_update_process_id>.log format. You need to grep on the mirror filename to find the corresponding log file for a specific mirror.
Log Files from Failed Mirror Update
The dss_*.log files from failed mirror update go to:
$SYNC_CUSTOM_DIR/servers/MAS-host/MAS-port/share/content/mirrors/logs
To view the log file using a browser after a mirror update failure has occurred, select the "First Failure" column on the Show MAS Status panel under the Mirrors section of the ProjectSync menu. Every instance of failure of a specific mirror overwrites the previous failed log file since the log file is moved to a unique file name. The name of the text file can be seen by selecting the link.
Looking in the directory, you can also find the log file corresponding to a specific mirror since it contains the arguments that the mirror update process was spawned with and one of these arguments is the mirror name.
Collecting log files for debugging
Use the syncdiag utility to collect log files pertaining to the mirror system. For command syntax and usage details, run this command in a UNIX shell:
% syncdiag -help mirror
The resulting mirror_logs.tgz package should be provided to Customer Support.
Related topics
About DesignSync Log Files
Overview of syncdiag Utility
Architecture of the Mirror System
739

DesignSync Data Manager User's Guide
DesignSync Data Manager Administrator's Guide: Registry Settings for a Mirror Administration Server
DesignSync Data Manager Administrator's Guide: Registry Settings for a Repository Server
DesignSync Data Manager Administrator's Guide: Registry Settings for Troubleshooting the Mirror System
Resetting the Mirror Daemons
In most cases, when a problem is detected with a mirror daemon, ProjectSync automatically resets the daemon, but if you need to manually reset the mirror daemon, you may do it either of the following ways:
• You can reset the mirror daemon for the SyncServer through ProjectSync. For more information, see ProjectSync: Resetting the Mirror Daemons.
• You can use the resetmirrordaemons command to reset an RS's mpd, or a MAS's mad (mirror administration daemon) on a specific server, all servers at a site, or all servers at all sites. For command syntax and usage details, enter the following command in a DesingSync client:
stcl> resetmirrordaemons -help
Related Topics
DesignSync Data Manager Administrator's Guide: Architecture of the Mirror System
Detecting Absent Files in the Mirror
See the Troubleshooting the Mirror System Registry Settings for more information on how to detect absent files in the mirror.
Diagnostic Utilities
Overview of syncdiag Utility
The diagnostic utility syncdiag can be used to debug a DesignSync client command, to debug a SyncServer, and to diagnose performance. Also you can used the syncdiag diagnostic for debugging the mirror system by collecting mirror related log files.
For a list of the main options and diagnostics available to syncdiag, in an OS shell run:
% syncdiag -help
740

Diagnostics and Troubleshooting
General diagnostics include:
syncinfo Print information about the DesignSync installation update Fetch the latest syncdiag from the Support server
upload Package files and send them to Support. Use this option only when directed to by a DesignSync support engineer.
Main options to syncdiag include:
-email <address>
Sends a log file of the syncdiag session to the provided email address as a file attachment called syncdiag.log.
-help With no arguments, the -help option reports a one line summary for each option available. When a diagnostic argument is specified, the -help option reports usage information for the argument.
-changelog Prints the version number of syncdiag, and its change history
-ftp <url> Uploads the log to the specified url using ftp, using ftp:// protocol:
ftp://[username>:<password>]<host>:[<port>]/<directory path>
The uploaded file name is automatically generated as syncdiag.<date><time>.log.
-version Prints the version number of syncdiag
Specific diagnostics include:
dsperf Collect performance stats for DesignSync commands error_log Cull the server's error_log link-in Test link-in with specific workspace and server mirror Diagnostics for the mirror system modperf Collect performance statistics for modules commands oscheck Check your system for recommended patches perf Display file system performance stats servercheck Check or trace a running server trace Run a DesignSync client command with debug enabled
The command syntax for syncdiag is:
741
DesignSync Data Manager User's Guide
% syncdiag -[main options] <diagnostic> -[diagnostic options]
For specific help on a diagnostic, in an OS shell, run:
% syncdiag -help <diagnostic>
or
%syncdiag <diagnostic> -help
For example:
% syncdiag -help syncinfo
syncdiag syncinfo
The most common use of syncdiag syncinfo is to report the software that is installed:
% syncdiag syncinfo -version
The above command lists, for each platform installed:
• the base release • any service packs • any hot fixes • any product overlays
syncdiag update
syncdiag update downloads the latest version of syncdiag from the Support server. syncdiag is platform dependent. The platform specific syncdiag executable that is downloaded is for the OS that you are running syncdiag from.
On Linux and Solaris, the syncdiag executable is downloaded directly into $SYNC_DIR/bin.<arch>/syncdiag .
Windows and HP do not allow a running executable to be replaced. On Windows and HP, the syncdiag executable is downloaded as syncdiag.new , parallel to the running syncdiag executable. You must then move syncdiag.new to syncdiag .
Related Topics
Running a DesignSync Command in Debug Mode
Running a SyncServer in Debug Mode
742

Diagnostics and Troubleshooting
Diagnosing Performance
Mirror Log Files
Running a DesignSync Client in Debug Mode
There are several approaches to debugging a client:
• Restarting the client with debug environment variables set • Enabling debug output within a DesignSync client session • Using syncdiag trace for extensive OS-level debugging
Restarting the client with debug environment variables set
The simplest debug approach is to restart the client, with a debug environment variable set:
% setenv SYNC_TRACE 0
Then start a DesignSync client.
setenv SYNC_TRACE 0 starts the client with DesignSync tracing. DesignSynctracing captures debug information pertaining to DesignSync software. The output is logged to the user's $HOME/dss*.log file and to their $HOME/.synchronicity/logs/sync_client_trace*.log file.
To disable DesignSync tracing, restart the client without the debug environment variable set:
% unsetenv SYNC_TRACE
Then start a DesignSync client.
Enabling debug output within a DesignSync client session
Use the synctrace set command to enable DesignSync-level tracing within a DesignSync session, so that you do not have to restart the client. Then, use the synctrace unset command later to disable DesignSync tracing.
Using syncdiag trace for extensive OS-level debugging
Use syncdiag trace to run a DesignSync command with DesignSync tracing, with Operating System (OS) level tracing, or with both levels of tracing. DesignSync tracing captures debug information pertaining to ENOVIA Synchronicity DesignSync Data Manager software, as if the command synctrace set has been run. OS-level tracing captures debug information pertaining to the Operating System. DesignSync tracing,
743

DesignSync Data Manager User's Guide
and OS-level tracing, are only enabled for the duration of the DesignSync command run by syncdiag trace.
For information on the current syncdiag trace options, in your OS shell, run:
% syncdiag -help trace
Available options include:
-sync Run with DesignSync tracing (SYNC_TRACE) -os Run with OS level tracing -all Run with both OS and DesignSync tracing
The default behavior is -all.
For example:
% syncdiag trace -sync dssc ci -share -comment "Test" testfile
The above command creates a syncdiag.tgz package containing the debug log files.
Notes:
• If you are using an SUID installation, you need to run the syncdiag trace command as the installation owner.
• The OS-level tracing program used is platform dependent. For HP, your system administrator might need to download "tusc".
Related Topics
Overview of syncdiag Utility
About DesignSync Client Log Files
ENOVIA Synchronicity Command Reference: synctrace set
ENOVIA Synchronicity Command Reference: synctrace unset
Running a SyncServer in Debug Mode
There are several approaches to debugging a server:
• Restarting the server with debug environment variables set • Using syncdiag servercheck for extensive OS-level debugging
744
Diagnostics and Troubleshooting
Restarting the server with debug environment variables set
The simplest debug approach is to restart the server, with debug environment variables set:
% stop_sync_server
% setenv SYNC_DBG trace
% setenv SYNC_TRACE 0
% start_sync_server
setenv SYNC_DBG trace starts the server with Operating System (OS) level tracing. OS-level tracing captures debug information pertaining to the Operating System. The output is logged to $SYNC_CUSTOM_DIR/servers/<host>/<port>/logs/trace_log. The trace program used is determined by the server's platform.
setenv SYNC_TRACE 0 starts the server with DesignSync tracing. DesignSync tracing captures debug information pertaining to ENOVIA Synchronicity DesignSync software. The output is logged to $SYNC_CUSTOM_DIR/servers/<host>/<port>/logs/error_log.
To disable DesignSync tracing and OS-level tracing, restart the server without the debug environment variables set:
% stop_sync_server
% unsetenv SYNC_DBG
% unsetenv SYNC_TRACE
% start_sync_server
Use the synctrace set command to enable DesignSync-level tracing on a running server, so that you do not have to restart the server. Then, use the synctrace unset command later to disable DesignSync tracing.
Culling the Server's error_log
Use syncdiag error_log to excerpt information from the server's error_log, based on start and end dates and times. In addition to the specified time range, certain error_log events are always included in the output, such as server restarts and crashes.
745

DesignSync Data Manager User's Guide
For information on the syncdiag error_log options, in your OS shell, run:
% syncdiag -help error_log
Using syncdiag servercheck for extensive OS-level debugging
Use syncdiag servercheck for more extensive OS-level debugging. The syncdiag servercheck utility
• Does not require restarting the server • Can attach either to the server's child processes or only the parent process
(issuing a server reset to spawn new child processes that are then traced) • Has an option to trim, compress, or rotate trace_log files
For information on the syncdiag servercheck options, in your OS shell, run:
% syncdiag -help servercheck
Available options include:
Option Description -keeplogs <n> With -trimtrace, keep <n> old trace files, plus current one;
default is 4 -logdir <dir> With -starttrace, put trace logs in directory <dir>; default is
$SYNC_CUSTOM_DIR/servers/<host>/<port>/logs -port <p> Server port -pstack Run pstack on all server processes -reset Reset server after -starttrace/-stoptrace; default is to attach to
running server processes -starttrace Start truss/strace -stoptrace Stop running truss/strace -trimtrace Trim log files while truss/strace is running; keeps trace logs from
growing unbounded
Example 1: Start tracing, wait, then stop tracing
% syncdiag servercheck -starttrace
% syncdiag servercheck -stoptrace
Example 2: Start tracing, reset the server, and send the logs to /tmp.
Use -trimtrace to limit the tracing to 8 log files (2 hours worth).
746

Diagnostics and Troubleshooting
% syncdiag servercheck -starttrace -reset -logdir /tmp
% syncdiag servercheck -trimtrace -keeplogs 8
Related Topics
Overview of syncdiag Utility
About SyncServer Log Files
ENOVIA Synchronicity Command Reference: synctrace set
ENOVIA Synchronicity Command Reference: synctrace unset
Diagnosing Performance
To diagnose performance, you can:
• Check whether required Operating System (OS) patches are installed • Display performance statistics pertaining to the system environment • Collect performance statistics for DesignSync commands • Test whether the environment supports the link-in performance optimization
Check whether required OS patches are installed.
Use syncdiag oscheck to check your system for recommended patches. For information on the current syncdiag oscheck options, in your OS shell, run:
% syncdiag -help oscheck
Display performance statistics pertaining to the system environment.
To analyze your system and network environment, you should run syncdiag perf
• From a client workspace, when logged into a client machine • From the server's syncdata/<host>/<port>/server_vault directory, when logged
into the server machine
For information on the current syncdiag perf options, in your OS shell, run:
% syncdiag -help perf
Note: The -ssh option to syncdiag perf 'exec's ssh. If your .cshrc is interactive (sourcing the .cshrc file prompts you to respond), then 'exec'ing ssh will hang.
Collect performance statistics for DesignSync commands.
747

DesignSync Data Manager User's Guide
The syncdiag dsperf utility measures the performance of DesignSync commands. OS commands are also run, for comparison. The dsperf tests create a data set, which is used for client-server tests. Run the dsperf tests in a test environment comparable to the production environment. Use a separate vault area, so that users do not inadvertently populate the test data.
Collect performance statistics for modules commands
The syncdiag modperf utility measures the performance of Modules commands. OS commands are also run, for comparison. The modperf tests create a module with a data set to use for client-server tests. Run the modperf tests in a test environment comparable to the production environment. Specify a module that does not exist. No other users should be using that module during the test. You may control access to the module by using access controls or other mechanism to restrict access. After the test has completed, the created module is removed.
UNIX Set-Up
Remove interactive commands from your .cshrc file.
Edit your .cshrc file, commenting out any lines that run interactive programs. Sourcing the .cshrc file cannot prompt for input, or the -scp tests will hang. Similarly, comment out any stty lines, as these lines will cause the -scp tests to fail.
Configure ssh to let you ssh to another host without requiring a password.
You must configure ssh to allow you to ssh to another host, without requiring a password. Any prompting or output from ssh will cause the -scp tests to fail. Follow these steps:
1. Generate a public key:
% ssh-keygen -t ssh-rsa
(Enter a carriage return at the password prompts.)
2. Add the public key to the authorized users list:
% cat .ssh/id_rsa.pub >> .ssh/authorized_keys2
3. Create a .ssh/config file containing the following:
Host * # two things: # 1) do not ask me to accept new host key; just do it # 2) do not fail if the host key changes StrictHostKeyChecking no
748

Diagnostics and Troubleshooting
# only use proto 2 Protocol 2
4. Restrict the UNIX permissions on the .ssh files:
% chmod 600 .ssh/* Test that scp is in your $PATH, and works: [tbarbg6@sting] echo "testing" > testfile [tbarbg6@sting] scp testfile lotti:testfile testfile 100% |*****************************| 8 00:00
In the above example, tbarbg6 is the user running the tests, on the client machine "sting", to the server hosted on "lotti".
DesignSync Set-Up
1. If the server requires user authentication, run:
% dssc password -save <host>:<port>
This saves the username/password for the server. Otherwise, the dsperf tests will fail immediately. The tests do not yet prompt for user authentication, so the workaround is to save a username/password for the server to use automatically.
2. Configure for RevisionControl notes and email.
If RevisionControl note generation is set, DesignSync generates RevisionControl notes, and subsequently sends email notification to subscribers. RevisionControl note generation itself impacts performance. Also, if sendmail is used, and sendmail is run in the foreground, that will slow performance. Use ProjectSync's Email Administrator to specify that sendmail be run in the background. The SMTP mailer always runs in the foreground, and does not have an option to background it.
3. Ensure that the user running the tests has "Delete when TYPE Vault" access, so that the tests can remove the data that is created on the server.
To ensure effective performance, avoid the following:
• Do not set OS-level tracing (for example, SYNC_DBG), as that will slow down performance substantially. Also, on Linux RedHat 8.0, tracing a process causes the process being traced to hang.
749

DesignSync Data Manager User's Guide
• Do not set SYNC_TRACE to 0, as that also will slow performance. If Sync-level tracing is requested by Support, you will be requested to set SYNC_TRACE to 26, to only capture performance-related debug information.
• Do not interrupt the tests. Interrupting tests leaves data in the workspace and in the vault. On Windows, after interrupting dsperf, attempts to exit the DOS shell hang. You must kill the leftover stclc.exe process, via the Task Manager.
Usage
For information on the current syncdiag dsperf options, in your OS shell, run:
% syncdiag -help dsperf
Besides the options shown by syncdiag -help dsperf, there is a hidden -nfiles option, to specify the number of test files to create and use. The current -nfiles default value of 3168 takes hours to run. Instead, specify a lower -nfiles value, such as 100.
You might want to run several tests, with increasing -nfiles values. Note that the -nfiles value specified does not map exactly to the number of files used, because of how the data set is constructed. But the same -nfiles value will always result in the same data set.
The -dataset option takes as its value a directory path to an existing workspace. The syncdiag utility directory and files in the workspace are copied into syncdiag's -dir working directory, and used as the data set for the dsperf tests. The -dataset option is mutually exclusive with the -nfiles option.
Running the Tests
In the example below, the tests are run from the client machine sting to a server hosted on the machine lotti. The server's host machine is also the host specified for the -scp tests.
The "SCP" test is skipped unless you specify the -scp option. The reason you need the option (and it is not the default) is because you have to specify -scp <hostname> or -scp <user>@<hostname>, and scp must be in your PATH.
For example:
[tbarbg6@sting] syncdiag dsperf -vault sync://lotti:30158/Perf -nfiles 100 -scp lotti
This command creates a syncdiag.log file, and also outputs the syncdiag.log content to the screen. A dss*.log file is created as usual.
The ending summary looks like:
750
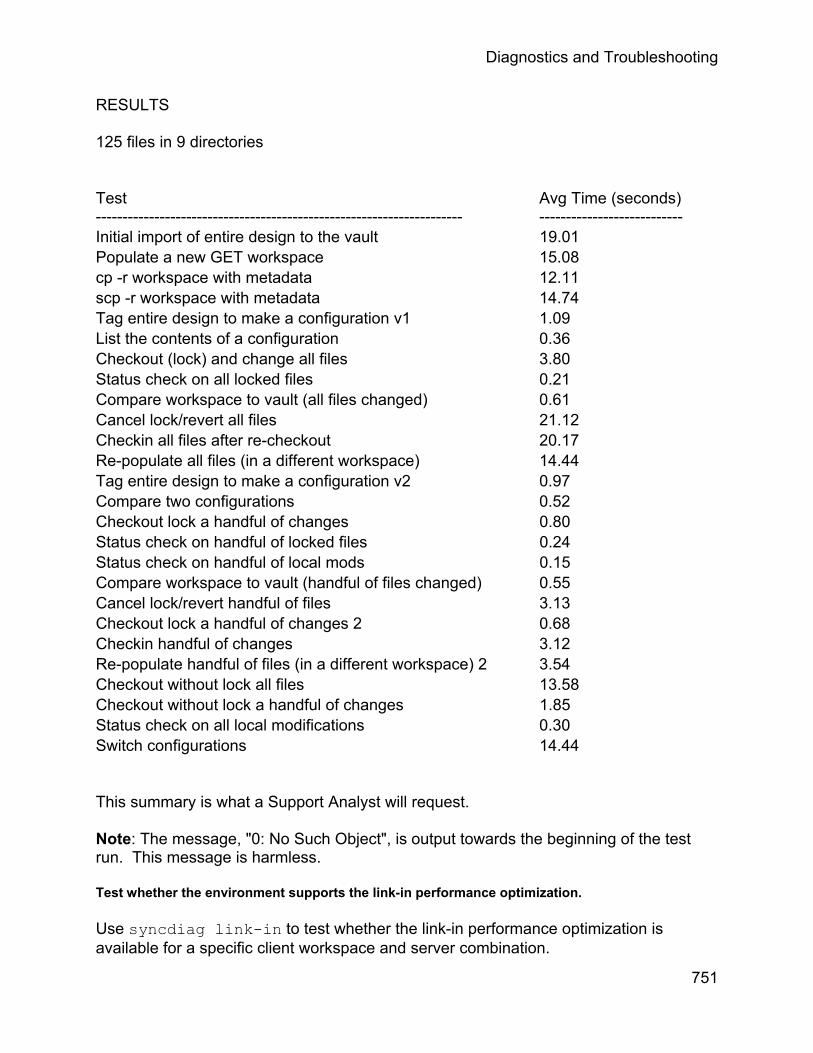
Diagnostics and Troubleshooting
RESULTS
125 files in 9 directories
Test ---------------------------------------------------------------------
Avg Time (seconds) ---------------------------
Initial import of entire design to the vault 19.01 Populate a new GET workspace 15.08 cp -r workspace with metadata 12.11 scp -r workspace with metadata 14.74 Tag entire design to make a configuration v1 1.09 List the contents of a configuration 0.36 Checkout (lock) and change all files 3.80 Status check on all locked files 0.21 Compare workspace to vault (all files changed) 0.61 Cancel lock/revert all files 21.12 Checkin all files after re-checkout 20.17 Re-populate all files (in a different workspace) 14.44 Tag entire design to make a configuration v2 0.97 Compare two configurations 0.52 Checkout lock a handful of changes 0.80 Status check on handful of locked files 0.24 Status check on handful of local mods 0.15 Compare workspace to vault (handful of files changed) 0.55 Cancel lock/revert handful of files 3.13 Checkout lock a handful of changes 2 0.68 Checkin handful of changes 3.12 Re-populate handful of files (in a different workspace) 2 3.54 Checkout without lock all files 13.58 Checkout without lock a handful of changes 1.85 Status check on all local modifications 0.30 Switch configurations 14.44
This summary is what a Support Analyst will request.
Note: The message, "0: No Such Object", is output towards the beginning of the test run. This message is harmless.
Test whether the environment supports the link-in performance optimization.
Use syncdiag link-in to test whether the link-in performance optimization is available for a specific client workspace and server combination.
751

DesignSync Data Manager User's Guide
752
For information on the current syncdiag link-in options, in your OS shell, run:
% syncdiag -help link-in
Related Topics
About DesignSync Client Log Files
Overview of syncdiag Utility
ENOVIA Synchronicity Access Control Guide: User Authentication Access Controls
ProjectSync User's Guide: Configuring Email Notifications
DesignSync Data Manager Administrator's Guide Linking Large Files

EDA Vendor Design Object Support
Collections
Collections Overview
Collections are groups of files that together define a design object. For example, a schematic may consist of dozens or even hundreds of files within any number of folders. You operate on the design object as a single entity while letting your design tools manage the object at the file level.
Within DesignSync, a collection is a single revision-controllable object; you do not perform revision-control operations directly on individual collection files. When you check out a collection object, DesignSync checks out each file contained in the collection. If you then edit one of the files, you check back in the collection object, not just the changed file. This creates a new version of the collection object and each of the collection members. DesignSync recognizes that only one file in the collection has been modified and stores only the required change information.
DesignSync supports the following collection types:
• Cadence Design Systems cell view collection, as part of DesignSync's general support for Cadence design libraries. See Cadence Design Objects Overview for more information.
• Synopsys Milkyway cell view collection, a collection object that represents a Milkyway cell in a Milkyway view directory. See Synopsys Milkyway Collections Overview for more information.
• Custom generic collection, a collection object defined by a Custom Type Package (CTP). See Custom Type Package Collections Overview for more information.
Displaying Collections
After your Designsync administrator or project leader has enabled DesignSync to recognize a collection type, you can use DesignSync to display information about the collection and its members.
As with any other object type, you can use DesignSync List View to display information about the collection object, including revision control information. To get the same information from a command shell, use the ls command.
Displaying a Collection's Members
From List View:
753

DesignSync Data Manager User's Guide
1. From List View, select the collection object. 2. Select File => Properties => Collection.
You cannot edit the listing to add or remove members. What determines the members of a collection depends on the type of collection object. For example, a function available from the Cadence software determines the members of a Cadence view and a Custom Type Package (CTP) determines the members of a custom collection.
Note:
• To have DesignSync recompute what files are members of the collection, click Update Members. For example, if you have made changes to the contents of your collection, you can click Update Members to see a list of current members.
• If DesignSync cannot determine the members of the collection object, an error message is displayed at the top of the member list. An error is also displayed when you use the ls command to display a collection.
From a DesignSync command shell:
Use the url members command and specify the collection object.
Identifying the Collection to which a Member Object Belongs
From List View:
1. From List View, select the member object. 2. Select File => Properties => Collection Member.
From a command shell:
1. Change directory to the folder containing the member object. 2. Use the DesignSync ls command with its -report OX option. Using this option
displays each object's object type and owner (the collection to which the object belongs).
Related Topics
Cadence Design Objects Overview
ENOVIA Synchronicity Command Reference: ls
ENOVIA Synchronicity Command Reference: url members
Synopsys Milkyway Collection Objects Overview
Custom Type Package Collection Overview
754

EDA Vendor Design Object Support
Cadence Collections
Cadence Design Objects Overview
Note:
Cadence library/cell/cell view recognition is not supported on Windows platforms.
Many Cadence Design Systems (CDS) tools operate on design data that is organized as libraries, cells, and cell views.
• A library is a collection of design objects, called cells. For example, you might have IC libraries from different vendors from which you build your design. On your file system, a library is a folder that contains technology files and a folder for each cell in the library.
• A cell is an individual building block of a chip or system. For example, a TTL library might have cells called AND2, AND3, and NOR2. A cell has one or more cell views that are different representations of the cell. On your file system, a cell is a folder under the library folder.
• A cell view is a specific representation of a cell. For example, a NAND2 cell may have four cell views: Verilog description, symbol, schematic, and layout. On your file system, a cell view is a folder containing several files that together define the cell view.
DesignSync chooses the files that make up a Cadence cell view collection based on the type of the cell view, as specified in the Cadence data registry file. To display collection members from List View, select the cell view folder. DesignSync displays the folder's contents and identifies members in the Type column.
The following example shows the contents of the layout view of the cell called mux2:
In addition to the cell view files used in the design, the cell view folder contains a housekeeping file called .layout.sync.cds.syncmd. When a Cadence object is identified, DesignSync creates a housekeeping file called <name>.sync.cds.syncmd to manage the collection object.
755

DesignSync Data Manager User's Guide
Note: If the Cadence-supplied function cannot determine the collection members, a CAI: error message is displayed at the top of the member list. The same error is displayed when you use the DesignSync ls command to display a collection. See How DesignSync Recognizes Cadence Data for details.
You never operate directly on the files that comprise a cell view; your design tools manage the files. DesignSync manages Cadence cell views as collection objects -- groups of files managed as a single revision-controlled object. By default, DesignSync does not perform revision control on any files in a cell view folder that are not members of a Cadence collection. You can, however, explicitly select non-member files for revision control (see Managing Non-Collection Objects).
In addition to DesignSync's support for Cadence design objects, ENOVIA Synchronicity's DesignSync® DFII product integrates many of DesignSync's design management capabilities directly into Cadence's Design Framework II (DFII) environment. See DesignSync Data Manager DFII User's Guide for more information.
Note: Do not use the DesignSync reference state when working with Cadence data unless it is a locked reference (which you can use when regenerating design data). Cadence object recognition in DesignSync and DesignSync DFII will not work properly when files are in the reference state.
Related Topics
Enabling Cadence Object Recognition
How DesignSync Recognizes Cadence Data
How DesignSync Manages Cadence Objects
DesignSync DFII Help: DesignSync DFII Design Management Overview
Enabling Cadence Object Recognition
Support for Cadence objects is enabled when you configure DesignSync DFII during the installation of DesignSync software.
To enable (or disable) recognition after installation, use the Third Party Integration panel of the SyncAdmin tool. Note: A COP (Cadence Object Processing) license must be installed in order to use DesignSync to manage these objects. See The License File for an example.
Related Topics
Cadence Design Objects Overview
756

EDA Vendor Design Object Support
SyncAdmin Help: Third Party Integration Options
How DesignSync Recognizes Cadence Data
DesignSync uses a combination of methods to determine if a folder (directory) is a Cadence library. Once a library is recognized, any folder within the library is a cell, and any folder within the cell is potentially a cell view. DesignSync then uses Cadence-supplied routines to determine the co-managed set of files that constitute a cell view.
DesignSync determines if a folder is a library as follows:
1. DesignSync constructs a list of libraries defined in cds.lib files. If a folder matches a library definition in this list, then the folder is a library.
DesignSync calls Cadence-supplied routines (from the Cadence CAI library) to locate cds.lib files in your Cadence search path. DesignSync then augments that list with cds.lib files found in the search path defined using the addcdslib command.
Note:
The directory from which a tool is invoked is included in the Cadence search path. Therefore, you should invoke DesignSync from the same directory as you invoke your Cadence DFII applications to ensure that the same libraries are recognized.
2. If a folder has a cdsinfo.tag file containing an uncommented CDSLIBRARY property, then DesignSync recognizes the folder as a Cadence library.
Note:
o DesignSync uses this method of library recognition only when cds.lib-based recognition fails to identify a folder as a library.
o The CDSLIBRARY property is only valid within a library-level cdsinfo.tag file and is not inherited from any other cdsinfo.tag found in the Cadence search path.
o A physical copy of cdsinfo.tag must remain in the folder for library recognition to function properly. Therefore, any of the following situations could cause Cadence object recognition to fail: - You perform an operation that removes cdsinfo.tag, such as populating with the force option a configuration that does not include cdsinfo.tag. - You associate a vault with a folder below the library level in your design hierarchy. DesignSync does not recognize the cell views as part of your Cadence library because the cdsinfo.tag file is at the library level,
757

DesignSync Data Manager User's Guide
above where the vault is set. - You check Cadence design objects into a vault that is mirrored before checking in the cdsinfo.tag file. The cell views are not recognized in the mirror directory. - You specify the reference or locked reference state while performing a revision-control operation on cdsinfo.tag. Note that the DesignSync populate command never leaves cdsinfo.tag in the reference or locked reference state.
Because DesignSync relies on Cadence routines to identify Cadence libraries and to determine a cell view's co-managed set of files, you must have the Cadence executables directories in your PATH environment variable (so that DesignSync can locate the cds_root executable). For example, you might have the following lines in your .cshrc file:
# The Cadence tools installation is /usr/cds setenv PATH /usr/cds/tools/bin:/usr/cds/tools/dfII/bin:${PATH}
Any errors reported by the Cadence data registry (for example, if you have errors in your cds.lib file) are reported to DesignSync as CAI errors. These errors appear either in the operating-system shell from which you invoked DesignSync or in your DesignSync window, depending on when the error was encountered.
Related Topics
Cadence Design Objects Overview
How DesignSync Manages Cadence Objects
ENOVIA Synchronicity Command Reference: addcdslib
DesignSync DFII Help: DesignSync DFII Design Management Overview
How DesignSync Manages Cadence Objects
In most ways, DesignSync treats Cadence objects like any other object under revision control. However, DesignSync depicts Cadence libraries and their contents with Cadence-specific icons and terminology:
• When you click on a directory containing a Cadence library in the Tree View, the List View shows the library folder icon and the library name. Cadence Library is listed as the Type.
• When you click on a library name in the Tree View, the List View shows the files in the library, cell folder icons, and the cell names. Cadence Cell is listed as the Type of the cell folders.
758

EDA Vendor Design Object Support
• When you click on a cell name in the Tree View, the List View shows the cell view icon and the collection-object name assigned to the cell view folder. The Type column shows Cadence View for the collection object.
Because DesignSync regards each cell view as a single revision-controllable object, DesignSync assigns a collection-object name to each cell view and its contents. DesignSync uses the collection-object name to manage the cell view folder and its contents. This name takes the form <name>.sync.cds, where <name> corresponds to the name of the cell view folder.
The following illustration shows how DesignSync displays the contents of the cell mux2 in the Cadence library master in the List View.
Note: If the cell view icon is a red X instead of the CDS symbol, then the data registry did not run properly. See How DesignSync Recognizes Cadence Data for details.
Operating on Cadence Data
You can use the DesignSync graphical interface to operate on Cadence data. For instance, to check out or check in view objects. If you specify a collection member as the object to be operated on, DesignSync skips the object and warns that the object is not versionable. If DesignSync attempts to operate on a collection member specified implicitly (through the use of wildcards or a recursive operation), DesignSync silently skips the object. You can change this behavior by using the SyncAdmin Map operations on collection members to owner setting. If you select this setting and DesignSync attempts to operate on a collection member during a revision control operation, DesignSync determines the member's owner collection and operates on the collection as a whole.
Related Topics
Cadence Design Objects Overview
Managing Non-Collection Objects
759
DesignSync Data Manager User's Guide
DesignSync does not perform recursive operations on objects in a cell view folder that are not members of a Cadence collection. However, you can view these non-member objects and perform other operations on them using DesignSync.
For example, if you specify a recursive check out of a cell, DesignSync checks out the view objects but does not traverse into the cell view folders and check out non-member files. However, you can use DesignSync to navigate into the cell view folder and check out non-collection members that it contains. You also can list non-member files in cell view folders, delete them, get their properties, and so on. This behavior is similar to Library Manager's approach to also-managed files.
You can change this behavior using a setting in your registry. If you want your revision-control operations to traverse into cell view folders and act on non-collection members by default, edit your registry file as described in SysAdmin Help: Vendor Objects Registry Settings.
Related Topics
Cadence Design Objects Overview
Collections Overview
DesignSync Data Manager Administrator's Guide: Registry Settings for Vendor Objects
Synopsys Milkyway Collections
Synopsys Milkyway Collections Overview
A Milkyway-based tool reads and writes to a set of files that conform to the Milkyway database, as defined by Synopsys. Synopsys Milkyway tools operate on design data that is organized as libraries, cells, and views.
DesignSync manages a Milkyway cell as a collection – a group of files managed as a single revision-controlled object. The Synopsys Milkyway cell view collection object represents as a single entity the latest local version of the cell in the workspace and all its attached files. DesignSync identifies this object as <cell_name>.sync.mw in the List View and in the output from the ls command.
If your DesignSync administrator or project leader has enabled DesignSync recognition of Milkyway objects, you can use DesignSync commands and the DesignSync GUI to manage Milkyway collection objects. See Displaying Collections for information.
See DesignSync MW Help: How DesignSync Handles Milkyway Data for an example List View display.
760

EDA Vendor Design Object Support
In addition to DesignSync's support for Synopsys Milkyway design objects,ENOVIA Synchronicity's DesignSync® MW(TM) (DS MW) product integrates many of DesignSync's design management capabilities directly into the environment of Milkyway-based tools. Users can access DesignSync MW capabilities from the Synchronicity menu in their Milkyway-based tool. For more information on DesignSync MW, see DesignSync MW Help: DesignSync MW Overview.
Enabling Recognition of Milkyway Objects
To use DesignSync to manage Synopsys Milkyway collection objects, you must enable DesignSync to recognize the objects. Note: The appropriate object processing license must be installed in order to use DesignSync to manage these objects.
You can enable recognition of these collection objects in either of two ways:
• To enable recognition during SyncServer installation, select:
[5] Configure for use with Synopsys' Milkyway tools and data
• To enable (or disable) recognition after installation, use the Third Party Integration panel of the SyncAdmin tool. For information, see SyncAdmin Help:Third Party Integration Options.
Related Topics:
DesignSync MW Help: DesignSync MW Overview
DS MW Help: DS MW Terms
Displaying Collections
DesignSync Data Manager Administrator's Guide: Registry Settings for Vendor Objects
Custom Type Package Collections
Custom Type Package Collections Overview
The Custom Type System (CTS) is a programming interface used to customize DesignSync to manage your unique design data. Using this interface, you can define a Custom Type Package (CTP), which is a generic collection or a group of data files that you want DesignSync to treat as an abstract object. Then you can use DesignSync to check in, check out, and tag this abstract object, called a custom generic collection, as a single object. DesignSync safeguards your data by preventing users from checking in
761

DesignSync Data Manager User's Guide
the constituent parts of the custom collection. Instead, users have to operate on the collection as a whole.
Note:
Do not use the DesignSync reference state when working with custom generic collections.
Enabling CTP Object Recognition
To enable DesignSync to recognize a CTP collection object, you install the CTP within the DesignSync custom hierarchy. When users invoke a DesignSync client, the DesignSync Custom Type System registers the CTP so that revision control operations recognize the collection types defined in your CTP. For more information, see Installing Custom Type Packages in the Custom Type System Programming Guide.
How DesignSync Recognizes CTP Data
DesignSync recognizes CTP data when you install the CTP within the DesignSync custom hierarchy. After installation, when users invoke a DesignSync client, the DesignSync Custom Type System registers the CTP so that revision control operations recognize the collection types defined in your CTP.
DesignSync displays the following information about custom collection objects:
• CTP custom collection objects have names follow the form: <object>.sgc.<collectiontype>, for example, symbol.sgc.mytool. The .sgc extension indicates the object is a custom generic object. If an icon for the custom collection object type has been defined in the CTP type catalog, List View displays the icon.
• Each object of a custom type has its object type displayed in the Type column of both List View and the output of the ls -report OX command. If an icon for the custom collection object type has been defined in the CTP type catalog, List View displays the icon.
Here is an example display in DesignSync List View:
762

EDA Vendor Design Object Support
763
If DesignSync detects a problem with an installed CTP, DesignSync prevents the check-in of the CTP data objects. In this case, DesignSync displays an error message indicating why the check-in operation failed. If you encounter this type of error when attempting to check in CTP data, contact your CTP developer. For more information on CTP data recognition, see DesignSync Recognition of Custom Type Packages in he DesignSync Custom Type System Programming Guide.


Integration with MatrixOne Program Central
Using the ENOVIA Semiconductor Accelerator for Enterprise Project Management The ENOVIA Semiconductor Accelerator for Enterprise Project Management (EPM) is a separately installed component that enables communication between DesignSync and ENOVIA Program Management. EPM lets you synchronize states between objects managed by DesignSync and by ENOVIA Program Management servers:
• On the DesignSync server, the object can be a project, a folder, or a file. The state refers to the tag applied to the object.
• On the Program Management server, the object can be a deliverable of a task, and state refers to the state defined in the policy governing the object.
The Program Management server accesses the DesignSync objects by requesting a subscription, which uses the MxBridge interface to synchronize the DesignSync tag information with the Program Management state information in the corresponding objects.
You can use EPM to create folder and file objects in Program Management that correspond to objects in a DesignSync vault. When you promote objects in Program Management, EPM automatically tags the associated files in DesignSync with the name of the stage in the policy. Conversely, when files or folders are tagged in DesignSync, the corresponding Program Management objects are automatically promoted to the policy state corresponding to the DesignSync tag.
Note: If you are subscribed to a project in Program Management which includes a number of files already tagged in DesignSync, and a promote operation in Program Management fails, DesignSync deletes the corresponding tags from the objects checked into the DesignSync vault. All files in the subscription that were given the same tag name lose the tag, including those previously tagged in DesignSync.
765

DesignSync Data Manager User's Guide
Between 1. and 2. the Program Management server sends a request for subscription. The request is processed by the DesignSync server and if it succeeds, a MxSubscription note is created in ProjectSync. The subscription id and the return status (either success or failure) is sent back to the Program Management server. The Program Management server can also request a cancellation of an existing subscription. In this case, the DesignSync server again processes the request and if it succeeds, the subscription is removed. The return status (either success or failure) is sent back to the Program Management server.
After the Program Management user has created the IC Document (which created the MxSubscription), the DesignSync user must tag the associated file in DesignSync to the initial state of the policy. Then promotion or tagging can occur from either side.
If between steps 3 and 4, when a user has tagged an object in DesignSync, there is a communication failure between DesignSync and the Program Management server, a SyncQueue note is created containing the status. The DesignSync server will periodically attempt to communicate with the Program Management server until the information is sent over and the associated Program Management object is promoted.
Note: Both the MxSubscription and SyncQueue note types are special notetypes. You should view the MxSubscription notes and SyncQueue notes purely for debugging purposes.
Here is an example demonstrating how the EPM works. Suppose you use DesignSync to manage a folder called ASIC. This folder and its contents are also tracked as IC Document objects in Program Management. The states in the Program Management policy (lifecycle) for ASIC are Preliminary, Review, Approved, and Release
766

Integration with MatrixOne Program Central
Once the EPM is installed and configured, you can:
1. Create a Program Management ASIC project and associate the project with the DesignSync ASIC project vault.
2. Create an individual Program Management IC Document object and associate it with the DesignSync ASIC folder.
Both of these steps are accomplished by supplying the DesignSync URL when creating the Program Management objects.
3. When the folder is tagged Review in DesignSync, the IC Document object in Program Management is automatically promoted to the Review state in its policy.
4. When the review is completed and the IC Document object is promoted to the Approved state in Program Management, the ASIC folder and its contents are automatically tagged Approved.
Your business administrator can define a default DesignSync server that is available when you create projects, folders, and documents in Program Management. See the ENOVIA Program Management User's Guide for details on using EPM with Program Management.
See "Installing the ENOVIA Semiconductor Accelerators" in the ENOVIA Live Collaboration Platform Installation Guide for details on installing and setting up EPM.
Related Topics
Troubleshooting the Semiconductor Accelerator
Using the ENOVIA Semiconductor Accelerator for Design to Manufacture The ENOVIA Semiconductor Accelerator for Design to Manufacture (D2M) is a separately installed component that enables communication between DesignSync and ENOVIA Program Management providing a single-source solution for designing a product and managing the product's life cycle.
Using the DSFA architecture contained within the Design to Manufacture accelerator enables two-way communication between DesignSync and ENOVIA Live Collaboration allowing an enforceable, repeatable engineering change process.
See "Installing the ENOVIA Semiconductor Accelerators" in the ENOVIA Live Collaboration Platform Installation Guide for details on installing and setting up D2M.
Related Topics
767

DesignSync Data Manager User's Guide
Troubleshooting the Semiconductor Accelerator
Using DesignSync Central DesignSync Central is a complete revision management solution. It provides issue tracking against the product components in DesignSync as well as the product life cycle with ENOVIA Live Collaboration.
Using the DSFA architecture contained within DesignSync Central enables two-way communication between DesignSync and ENOVIA Live Collaboration allowing virtual teams across the platforms, management reports, and collaborative discussion threads.
If you have been using ProjectSync, you can convert your ProjectSync notes into DesignSync Central issues and discussions. For more information, see the ENOVIA Semiconductor Accelerator ProjectSync Migration Toolkit Guide.
See "Installing the ENOVIA Semiconductor Accelerators" in the ENOVIA Collaboration Platform Installation Guide for details on installing and setting up the ENOVIA Live Collaboration component of DesignSync Central.
Related Topics
Troubleshooting the Semiconductor Accelerator
Using the ENOVIA Semiconductor Accelerator for IP Management DesignSync Central is a complete IP management solution. It provides linked IP management from the IP stored in DesignSync to the IP management infrastructure in ENOVIA Live Collaboration.
Using the DSFA architecture contained within DesignSync Central enables two-way communication between DesignSync and ENOVIA Live Collaboration allowing trackable design reuse, and cross-team collaboration.
If you have been using IP Management, you can convert your IP into ENOVIA Semiconductor Accelerator for IP Management IP. For more information, see the ENOVIA Semiconductor Accelerator IP Management Migration Toolkit Guide.
See "Installing the ENOVIA Semiconductor Accelerators" in the ENOVIA Collaboration Platform Installation Guide for details on installing and setting up the ENOVIA Semiconductor Accelerator for IP Management.
Related Topics
768

Integration with MatrixOne Program Central
Troubleshooting the Semiconductor Accelerator
Troubleshooting the ENOVIA Semiconductor Accelerators
Enterprise Performance Management
Problem
You perform a tag operation in DesignSync but the corresponding object in Program Management does not update.
Cause: The request is in the SyncServer queue waiting to be processed by the Program Management server. View the SyncQueue notes to check the status.
The DesignSync server periodically retries to communicate with the Program Management server until the information is sent over and the associated object is promoted. To view the SyncQueue notes and MxSubscription notes on an MxBridge SyncServer, use the Standard Query under Queries or the QuickView option in ProjectSync.
Note: The SyncQueue and MxSubscription note types are not listed under Note Type Manager, Advanced or Text Search or Statistics Query and are not editable. You should view the MxSubscription notes and SyncQueue notes purely for debugging purposes.
Solution: Check the DesignSync server's error_log file where you will find a detailed message explaining the reason for failure.
Problem
You create a deliverable in Program Management and specify a DesignSync URL for the location of the data, but instead of the expected results, you get a pop-up error message.
Cause: The corresponding subscribe operation has failed. Your action resulted in an attempt to create an MxSubscription note on the DesignSync server. It may also resulted in an attempt at removing a previous MxSubscription note which was the result of creating the deliverable earlier.
Solution: Check the DesignSync server's error_log file where you will find a detailed message explaining the reason for failure.
Error codes currently defined for the MxBridge::subscribe operation:
Error Code Meaning
769

DesignSync Data Manager User's Guide
SUCCESS Subscription was successfully created.
FAIL_ACCESS_CONTROL BrowseServer is not allowed by AccessControl.
FAIL_UNSUPPORTED_RCOPS Bad value provided in rcOps. FAIL_BAD_ARG Bad argument list. For example the MxPassword
is empty or the user misrepresented a file as a managed folder (that is the object URL has a trailing semi-colon).
FAIL_INTERNAL_ERROR Catch all; something else went wrong.
Error codes currently defined for the MxBridge::unsubscribe operation:
Error Code Meaning SUCCESS Subscription was successfully deleted. FAIL_SUB_NOTFOUND The subscription Id does not point to any
subscription. FAIL_NOT_OWNER The user login, (SYNC_User) is not the
owner of the subscription. FAIL_INTERNAL_ERROR Catch all; something went wrong while
processing the request.
Problem
You promote or demote a deliverable on the Program Management server and the operation to tag the associated DesignSync object fails.
Cause: Your action results in the Program Management server initiating a tag operation on the DesignSync data by either adding or removing the tag. In this case, the tagging failed.
Solution: Check the DesignSync server's error_log file where you will find a detailed message explaining the reason for failure.
Errors currently defined for the MxBridge::tag operation:
Error Code Meaning SUCCESS Subscription object(s) was successfully
tagged. FAIL_SUB_NOTFOUND The subscription ID does not point to any
770
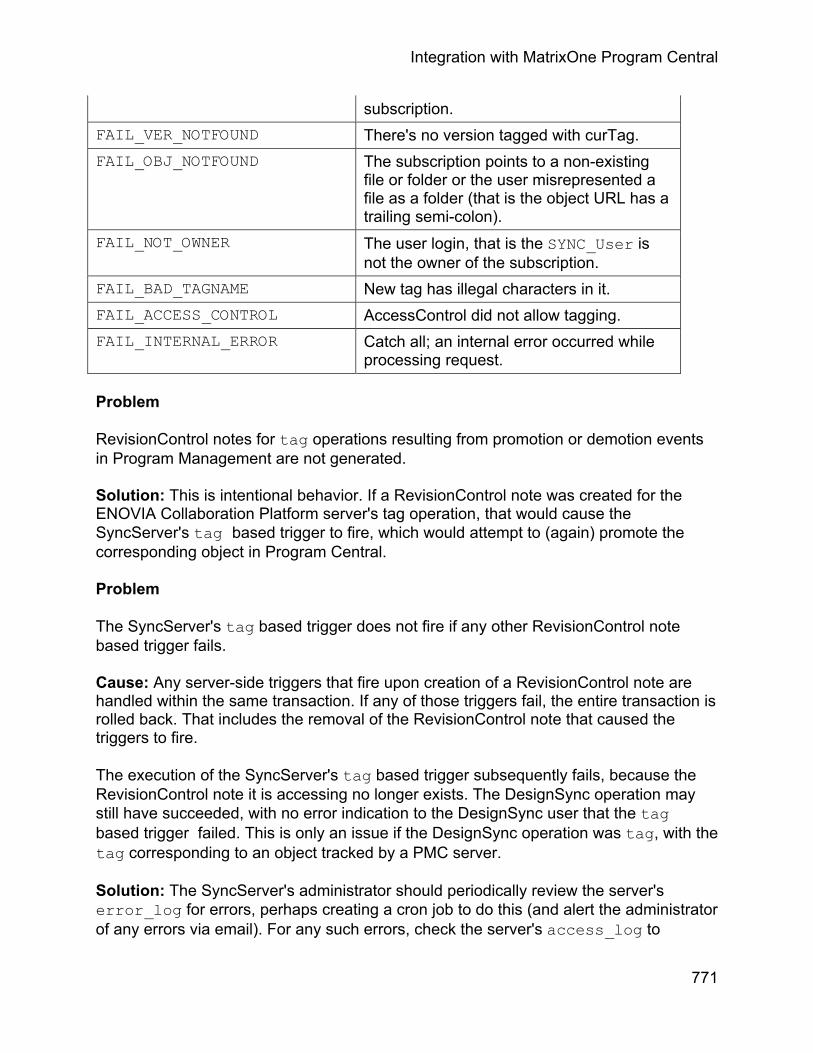
Integration with MatrixOne Program Central
subscription. FAIL_VER_NOTFOUND There's no version tagged with curTag. FAIL_OBJ_NOTFOUND The subscription points to a non-existing
file or folder or the user misrepresented a file as a folder (that is the object URL has a trailing semi-colon).
FAIL_NOT_OWNER The user login, that is the SYNC_User is not the owner of the subscription.
FAIL_BAD_TAGNAME New tag has illegal characters in it. FAIL_ACCESS_CONTROL AccessControl did not allow tagging. FAIL_INTERNAL_ERROR Catch all; an internal error occurred while
processing request.
Problem
RevisionControl notes for tag operations resulting from promotion or demotion events in Program Management are not generated.
Solution: This is intentional behavior. If a RevisionControl note was created for the ENOVIA Collaboration Platform server's tag operation, that would cause the SyncServer's tag based trigger to fire, which would attempt to (again) promote the corresponding object in Program Central.
Problem
The SyncServer's tag based trigger does not fire if any other RevisionControl note based trigger fails.
Cause: Any server-side triggers that fire upon creation of a RevisionControl note are handled within the same transaction. If any of those triggers fail, the entire transaction is rolled back. That includes the removal of the RevisionControl note that caused the triggers to fire.
The execution of the SyncServer's tag based trigger subsequently fails, because the RevisionControl note it is accessing no longer exists. The DesignSync operation may still have succeeded, with no error indication to the DesignSync user that the tag based trigger failed. This is only an issue if the DesignSync operation was tag, with the tag corresponding to an object tracked by a PMC server.
Solution: The SyncServer's administrator should periodically review the server's error_log for errors, perhaps creating a cron job to do this (and alert the administrator of any errors via email). For any such errors, check the server's access_log to
771

DesignSync Data Manager User's Guide
772
determine which DesignSync user accessed the server at the time of the error. Then follow-up with that user. If the DesignSync command run was tag, you may need to manually promote the corresponding deliverables in PMC.
Problem
A Program Central folder object is linked to a set of files in DesignSync. However, not all of the files in the set get promoted, and the subset may change.
Cause: A promotion from Program Central will cause every file from the original subscribed set that has a tag matching the present state, to be tagged with the new state. Files from the original subscription that do not have the current state tag will not receive the new state tag.
The reason why some files do not have the current state tag depends on the established use model, but generally indicates that they do not meet the established criteria for that state. Hence, those files are not candidates for promotion to the next state.

Getting Assistance
Using Help ENOVIA Synchronicity DesignSync Data Manager Product Documentation provides information you need to use the product effectively. The Online Help is delivered through WebHelp®, an HTML-based format.
Note:
Use SyncAdmin to change your default web browser, as specified during DesignSync tools installation.
To bring up the help from the tool you are using, do one of the following:
• Select Help => Help Topics from the tool you are using. The help system opens in your default browser. The Contents tab displays in the left pane and the corresponding help topic displays in the right pane.
• Click on the Help icon at the right end of the tool bar: • Click Help on forms. The help system opens to the topic that describes the form. • Press the F1 key. The help system opens to the topic that describes the current
form or window you have open.
To bring up stand-alone help, do one of the following:
• Enter the correct URL from your web browser:
http://<host>:<port>/syncinc/doc/<toolname>/<toolname.htm>
where <host> and <port> are the SyncServer host and port information. Use this server-based invocation when you are not on the same local area network (LAN) as the installation.
For example:
http://<host>:<port>/syncinc/doc/DesSync/dessync.htm
http://<host>:<port>/syncinc/doc/SyncAdmin/syncadmin.htm
• Enter the following URL from your web browser:
file:///$SYNC_DIR/share/content/doc/<toolname>/<toolname.htm>
For example:
773

DesignSync Data Manager User's Guide
file:///$SYNC_DIR/share/content/doc/DesSync/dessync.htm
file:///$SYNC_DIR/share/content/doc/SyncAdmin/syncadmin.htm
where $SYNC_DIR is the location of the DesignSync installation. Specify the value of SYNC_DIR, not the variable itself. Use this invocation when you are on the same LAN as the installation. This local invocation may be faster than the server-based invocation, does not tie up a server process, and can be used even when the SyncServer is unavailable.
When the help is open, you can find information in several ways:
• Use the Contents tab to see the help topics organized hierarchically. • Use the Index tab to access the keyword index. • Use the Search tab to perform a full-text search.
Within each topic, there are the following navigation buttons:
• Show and Hide: Clicking these buttons toggles the display of the navigation (left) pane of WebHelp, which contains the Contents, Index, and Search tabs. Hiding the navigation pane gives more screen real estate to the displayed topic. Showing the navigation pane givens you access to the Contents, Index, and Search navigation tools.
• << and >>: Clicking these buttons moves you to the previous or next topic in a series within the help system.
You can also use your browser navigation aids, such as the Back and Forward buttons, to navigate the help system.
Related Topics
Getting a Printable Version of Help
Accessing Product Documentation
Contacting ENOVIA
Getting a Printable Version of Help The DesignSync Data Manager User's Guide is available in book format. The content of the book is identical to that of the help system. Use the book format when you want to print the documentation, otherwise the help format is recommended so you can take advantage of the extensive hyperlinks available in the DesignSync Help.
PDF File
774

Getting Assistance
You must have Adobe® Acrobat® Reader™ Version 8 or later installed to view the documentation. You can download Acrobat Reader from the Adobe web site.
Accessing Product Documentation In addition to the help, you can access the complete documentation set through the ENOVIA Synchronicity DesignSync Data Manager Product Documentation page.
To access the Product Documentation page, click ENOVIA Synchronicity DesignSync Data Manager Product Documentation.
To access the Product Documentation page from outside this help system:
• On Windows, choose Start =>Programs =>ENOVIA Synchronicity DesignSync Data Manager V6R2009x =>ENOVIA Synchronicity Documentation.
• On UNIX, point your browser to one of the following:
http://<host>:<port>/syncinc/doc/index.html
file:///$SYNC_DIR/share/content/doc/index.html
Related Topics
Using Help
Getting a Printable Version of Help
Contacting ENOVIA
Contacting ENOVIA For solutions to technical problems, please do one of the following:
• Use TheLink, our web-based support system:
https://thelink.matrixone.com
From TheLink, you can access the Knowledge Base, Tech Tips and Message Board discussions. If you are not able to solve your problem using those databases, you can submit an Incident that will be answered by a ENOVIA Synchronicity DesignSync Support Engineer.
775

DesignSync Data Manager User's Guide
776
• If you are not a registered user of TheLink, send email to ENOVIA Customer Support requesting an account for product support:
Related Topics
Using Help
DesignSync Glossary
A B C D E F G H I J K L M N O P Q R S T U V W X Y Z
A
accelerator key
An accelerator key is a key associated with a menu choice. Pressing the accelerator key is acts as a shortcut to selecting the menu choice. For example, pressing F7 has the same effect as selecting Revision Control => Check In.
access control
A means of protecting design objects so that only an authorized group of users can perform operations on objects. The access control commands also let you limit the operations and design objects these users can access. See also the ENOVIA Synchronicity Access Control Guide.
active selection
At any given time, both the tree view and list view can contain a set of selected objects. However, only one of these sets is the active selection. Most menu choices operate an the active selection. The view that does not contain the active selection indicates this by using a faded color to highlight selected objects. You can make either the tree view or the list view the active selection by clicking on the view or setting the keyboard focus to that view.
add
An operation to designate an object not currently under revision control as a member of a module.
administrator
A person who sets up an ENOVIA Synchronicity tool, for example DesignSync or ProjectSync for use by others. The set-up can include defining access_controls, note types, command defaults, client defaults etc.
Apache
A public domain web server. The widely used Apache server is developed and maintained by the Apache Server Project. See the Apache web site, www.apache.org, for more information.
777

DesignSync Data Manager User's Guide
authentication
Verification performed by a software product to ensure that a particular user has the right to use the product or components of the product. DesignSync provides the capability of protecting your design data and preventing unauthorized users from accessing your data through the access control commands. See also DesignSync Data Manager User's Guide: Accessing a SyncServer with User Authentication, Access Control Guide Help: User Authentication Access Controls.
auto branching
A type of branching in which a new branch is created automatically if one does not already exist as part of a checkin or checkout with lock. Auto-branching useful when a developer wants to explore a "what if" scenario.
B
base directory
See module base directory.
bookmark
A placeholder you create in DesignSync to let you quickly visit a working directory, file, or vault you access often. See also DesignSync Data Manager User's Guide: Bookmarks.
branch
A thread of development of a managed design object that diverges from the main development thread of the object. The main branch (Trunk) is designated with branch number 1 and files on this branch have version numbers 1.1, 1.2, 1.3, and so on. The branch number always has an odd number of digits and the version number for a design object always has an even number of digits. For example, if you create the first branch from version 1.2 of a design object, the branch is designated 1.2.1 (a second branch would be designated 1.2.2) and the first version on that branch is 1.2.1.1. In this example, version 1.2 of the design object is referred to as the branch point version. See also DesignSync Data Manager User's Guide: Creating Branches.
branch-point version
A design object version that is the root of a new branch. For example, if you create a new branch off version 1.2 of a design object, that version is the branch-point version. If this is the third branch off this version, it is designated 1.2.3, and the first version on the new branch is 1.2.3.1. See also DesignSync Data Manager User's Guide: Creating Branches.
778

Source_Glossary
branch tag
A tag can be applied to either a branch or an object version. A tag applied to a branch is called a branch tag. See also tag, immutable, mutable, version tag, DesignSync Data Manager User's Guide: Tagging Versions and Branches.
C
cache
• An area on a LAN (local area network) where common files used by a team can be stored to avoid redundant local copies. A cache gives users their own view of the design data, while minimizing disk utilization. Because DesignSync caches are implemented using UNIX links, there is no support on Windows for symbolic links to cached files. See also LAN, What is a LAN Cache?
• The directory that DesignSync uses for temporary files during operations such as comparing file versions.
cancel
To undo a checkout. Cancel removes the locks on specified checked-out objects.
category
A module category is a virtual path to a module within the module area. All modules are stored in the Modules area. Categories provide a means to separate and organize the modules into related groups. Categories are created implicitly when you specify a module path in at module creation time.
cell
The fundamental element of Milkyway design data on which users operate. A cell always contains at least one file with a name that has the form <cell_name>:<local_version>, for example, route:1. A cell may contain attached files, whose names have the form <cell_name>:<local_version>_<number> (where number is any integer). For example, route:1_2.
In the file system, the files that make up a cell are located in a view directory. See also view.
cell view collection
A collection object that represents a Milkyway cell in a Milkyway view directory. DesignSync displays this object as cell.sync.mw, where cell is the cell name, for example, route.sync.mw. A cell view collection includes a cell view file and additional files called cell view attachment files.
779

DesignSync Data Manager User's Guide
Cell View File
A member of the DS MW cell view collection. This file is the primary cell file. The file has a name that has the form <cell_name>:<local_version>, for example, route:1.
cell view attachment file
A member of the DS MW cell view collection. This file is an attached file of the cell, a file whose name has the form <cell_name>:<local_version>_<number> (where number is any integer). For example, route:1_2.
cell view non-member
A DS MW cell view file or cell view attachment file that is part of a local version that is not the highest local version of the cell in the workspace. For example, suppose a cell named route has local versions route:1 and route:2. The file route:2 is a cell view file but the file route:1 is a cell view nonmember. Nonmembers are not part of the current cell collection.
A cell view non-member can also be a cell view attachment file that is no longer attached to the cell. Such a non-member can occur due to an error situation in the Synopsys Milkyway tools. DesignSync does not consider these "unattached" attached files to be part of a collection; DesignSync identifies them as non-versionable and does not check them into the vault.
cell view lock
A file created by the Milkyway tools. This file is a temporary file and cannot be checked in to the DesignSync vault.
cell view tmp file
A file created by the Milkyway tools. This file is a temporary file and cannot be checked in to the DesignSync vault.
checkin
Process of storing a snapshot of a design object in a vault. The new snapshot is called a version. See DesignSync Data Manager User's Guide: Checking in Design Files.
checkout
Process of making a revision-controlled design object available in your local area. You can check out a locked or unlocked copy of the object, a link to a cache or mirror copy of the object, or a reference to the object. See also populate, DesignSync Data Manager User's Guide: Checking out Design Files,.
780

Source_Glossary
client
A process communicating with a server process in order to use a service provided by the server. The service provided by the SyncServer process is the management of design objects under revision control. There are 5 DesignSync client applications: DesSync (DesignSync GUI), dss (DesignSync Shell), dssc (concurrent dss), stcl (Synchronicity Tcl), and stclc (concurrent stcl). There are also integrations (or add-ons) into clients to support management of design objects through the software used to create and edit those objects, for example DSDFII provides access to Cadence data, and DSVS provides access to Visual Studio projects. See also server, DesSync, dss, dssc, stcl, stclc, DesignSync Data Manager User's Guide: DesignSync Command-Line Shells.
client defaults
Most of the graphical forms used to run commands in the graphical clients, for example DSDFII, DSVS, and DesSync, allow you to save the options settings as the default value for the commands. When the command form is run again, the form preselects the saved defaults. If you do not wish to use those defaults, you can manually select different settings. These client defaults are entirely independent of each other and the command defaults allowing you to finely customize your environment.
client trigger
A trigger that is executed on the client. See also trigger, DesignSync Data Manager Administrator's Guide: Triggers Overview.
collection object
A group of files that together define a design object and are revision controlled as a single object. For example, a schematic may consist of dozens or even hundreds of files within any number of folders. You operate on the design object as a single entity while letting your design tools manage the object at the file level. See also DesignSync Data Manager User's Guide: Collections Overview.
command defaults
Default values can be set for the options specified to commands run from the command line. Default values can be set for individual commands, command families (such as all "access" sub-commands), or all commands. This simplifies invocations of commands from the command line, because the user does not need to specify "-[option] <value>" for the saved default value. Command defaults can be set by the administrator for all users on the server, or by individuals for their own commands. See also client defaults, ENOVIA Synchronicity Command Reference: command defaults.
components
781
DesignSync Data Manager User's Guide
Files or other objects that made up a project's hierarchy.
Physical - When using DesignSync, physical components are the files and directories created automatically during the normal process of checking in a design.
Logical - A logical component is an artificial project category set up for the explicit purpose of distinguishing where notes should be attached.
compression
Conversion of a data representation into an equivalent but smaller representation requiring fewer bytes. Compression optimizes storage space and speeds up transmission of data. DesignSync compresses data in its vaults. See also DesignSync System Administration Help:Turning Off Compression.
configuration
See configuration management.
configuration management
Associated design objects that together form a snapshot of a design project. DesignSync provides two methods of associating design objects: grouping the objects together into a module, or applying a common tag to the design objects. Modules can also be tagged and associated with other modules using tags or hierarchical references.
copy out
See fetch.
CVS
Concurrent Versions System. A software tool for UNIX systems that manages multiple versions of files, tracking changes and controlling shared files. CVS uses a merging work style where a design team does not lock file versions, but instead merges their edits with the latest checked-in version. See also merging work style.
D
data sheet
The information about an object under DesignSync revision control displayed in an HTML browser or the DesSync client. The information displayed depends on the type of object. For example, the data sheet for a file in your working folder contains its lock status, modification status, version number, and associated tags. See also DesignSync Data Manager User's Guide: What Are Data Sheets?.
782

Source_Glossary
DES
Data Encryption Standard. A highly effective data encryption algorithm developed at IBM in 1977. DES uses 72 quadrillion (72,000,000,000,000,000) encryption keys, chosen at random during encryption. Communication between DesignSync and SyncServers uses the DES encryption algorithm for encryption. See also encryption.
DesignSync web interface
The DesignSync web interface, built into ProjectSync, provides a method of configuring your DesignSync environment and users through a Web-page based interface.
design configuration
See configuration_management.
designer role
A user who contributes to the development of block or modules in a SITaR environment.
DesSync
The DesignSync graphical user interface (GUI), one of the DesignSync client applications. To invoke the GUI, enter "DesSync" from your operating-system window (UNIX or Windows). See also client, dssc, stclc, ENOVIA Synchronicity Command Reference: DesSync command description.
domain name
A unique alphanumeric identifier for a computer resource on the Internet. A domain name is a meaningful descriptor for a web resource used in lieu of its IP address, a string of digits. An example of a domain name is host.yourcompany.com. See also IP address, DNS.
DNS
Domain Name System. A system for maintaining a distributed list of Internet domain names and their corresponding IP addresses. DNS locates the domain names and translates these into IP addresses accessible by computers on the Internet. See also Internet, domain name, and IP address.
DSDFII
ENOVIA Synchronicity DesignSync® DFII(TM) is the integration of many DesignSync® design-management (DM) capabilities into the Cadence Design Systems DFII environment. See also DesignSync DFII Help.
783

DesignSync Data Manager User's Guide
DS MW
ENOVIA Synchronicity DesignSync® MW(TM) (DS MW) is the integration of many DesignSync design management capabilities into the environment of Milkyway-based tools. A Milkyway-based tool reads and writes to a set of files that conform to the Milkyway database, as defined by Synopsys. DesignSync MW provides features to manage large, geographically dispersed projects. See also DesignSync MW Help.
dss
The DesignSync shell, one of the DesignSync client applications. To invoke dss, enter "dss" from your operating-system window (UNIX or Windows). You can also enter "dss" followed by a DesignSync command to execute a single command. In most cases, use dssc (concurrent dss) instead of dss to take advantage of the concurrent client capabilities. The dss client uses syncd to communicate with a SyncServer. See also dssc, client, ENOVIA Synchronicity Command Reference: dss command description, DesignSync Help: DesignSync Command-Line Shells.
dssc
The concurrent version of the DesignSync shell (dss). The dssc client has several advantages over dss, because it's designed to be used concurrently with other client processes. To invoke dssc, enter "dssc" from your operating-system window (UNIX or Windows), optionally specifying a single DesignSync command to execute. The dssc client does not use syncd to communicate with a SyncServer. See also dss, client, ENOVIA Synchronicity Command Reference: dssc command description, DesignSync Data Manager User's Guide: DesignSync Command-Line Shells.
DSVS
ENOVIA Synchronicity DesignSync® VS) is the integration of many DesignSync® design-management (DM) capabilities into the Microsoft Visual Studio® environment. See also DesignSync Data Manager VS User's Guide.
dynamic href mode
The selector associated with the hierarchical reference is always evaluated to identify the version of the sub-module to be operated on.
E
EDA
Electronic design automation, the tools and processes that facilitate the design of electronic systems.
784

Source_Glossary
encryption
Process of converting data into a secure format that impedes unauthorized use of the data. The data is then "decrypted" (or "deciphered") by the intended receiver of the data using a decryption key -- the algorithm that converts the data back to its original format. A "strong encryption" is an encryption method that is seemingly impossible to break without the use of the decryption key. DesignSync encrypts communications between DesignSync and the SyncServers to protect your design data from unauthorized use using the DES encryption algorithm. See also DES, DesignSync System Administration: Overview of Secure Communications.
end user
A person who uses the system, but performs no system or site wide configuration or maintenance. The end-user benefits from the administrator's set-up. In a SITaR environment, both the designer role and integrator role are end-users.
F
fetch
To obtain a version of a design object without locking the object. You fetch an object by performing a populate, checkout, or get operation on objects without a lock. You can fetch an unlocked copy of the object, a link to a cache or mirror copy of the object, or a reference to the object. The integrations do not support fetching object references. See also SyncAdmin Help: Defining a Default Fetch State, DesignSync Help: Checking out Design Files.
file
A file is a collection of data stored in one unit, under a filename. This can be a document, a picture, an audio or video file, a library, an application, or other collection of data.
firewall
A set of programs running on an organization's gateway server that acts as a virtual barrier, protecting the organization's intranet from outside access. See also gateway server, intranet.
fixed tag
A logical tag construct applied once to a single snapshot of a set of object versions and never moved. This tag may be either mutable or immutable. A tag is considered "fixed" if you keep the tag associated with a particular snapshot rather than reapplying the tag to newer versions of the design objects. There are no special attributes for DesignSync
785

DesignSync Data Manager User's Guide
tags to indicate whether they are fixed or movable. These terms are used to describe ways in which you can use design configuration tags. See also tag, movable tag, DesignSync Help: Using Tags.
folder
A file system directory.
G
gateway server
A computer on an organization's intranet through which all communications between the intranet and the WWW are transmitted. Firewall software runs on the gateway server, ensuring that only authorized communications occur. See also firewall, intranet,.
GDM
Generic Data Manager. A Cadence Design Systems API (application programming interface) used to integrate design management tools into the Cadence architecture. DSDFII follows the GDM standard and can therefore be used with GDM-based interfaces, such as Library Manager.
get
Term used for a populate or checkout operation in DSVS. See also fetch.
groupware
Collaborative management tool used by a group of people.
H
Hercules
A Milkyway-based tool that runs layout verification.
hierarchical reference
A dependant link from a module to any of the following: a module branch or version, a legacy module, a DesignSync vault, or an IP Gear deliverable. The hierarchical reference link allows you to build a hierarchical structure to model your project usage. The SITaR model is one example of how hierarchical references can be used to facilitate controlled code reuse.
href mode
786

Source_Glossary
See hierarchical_reference, normal href model ; static href mode, dynamic href mode.
http
The portion of a URL address that indicates the protocol used by the software to determine how to access an Internet resource. The "http" protocol supports such resources as HTML files, CGI applications, and Java applets. See also URL https.
https
The portion of a URL that indicates the protocol used by the software to determine how to access an internet resource. The "https" protocol supports Secure Sockets Layer (SSL) communication. See also encryption, URL.
I
immutable
An immutable object, usually a tag, that cannot change. For example, when a module is created, branch 1 is also created with an immutable tag of "Trunk". This tag is always associated with this branch. You can also add immutable tags to a version or branch when you want to uniquely and permanently identify the branch or version. An immutable tag can be used to designate a fixed tag. See also: mutable, movable tags, tag.
integrator role
A use who verifies the stability of blocks or modules, and assembles them into functional packages to provide a qualified and stable integrated code baseline in a SITaR workflow environment.
integrations
Collective term for software packages that have plug-in or add-on DesignSync capabilities, for example, DSDFII, or DSVS.
Internet
A world-wide system of computer networks initially developed by the Advanced Research Projects Agency (ARPA) of the US government. The Internet encompasses the networks and protocols (computer communication conventions) coordinating the transfer of data between computers.
intranet
787

DesignSync Data Manager User's Guide
A network of computers internal to a company or other organization protected against unauthorized access.
IP address
Internet protocol address. A unique identifier for the location of a computer resource on the Internet. An IP address is a string of digits, for example, 127.0.01. See also domain name, DNS.
IP Gear deliverable
A IP Gear deliverable is a package of data that has been uploaded and associated with an IP Gear Catalog Component.
J
K
keyword
Placeholder used as a comment in a revision-controlled object to express information about the design object, for example, the author ($Author$), check-in time ($Date$), or revision number ($Revision$). The values of keywords are expanded when you check in the object. See DesignSync Data Manager User's Guide: Revision Control Keywords Overview.
L
LAN
Local area network. A group of interconnected computers able to access data on other machines on the local network. Using DesignSync, a team can define an area on a LAN as a cache to share access to revision-controlled design objects. See also cache.
legacy module
A grouped set of DesignSync objects that represent one level of a design hierarchy. Legacies modules can be grouped into configurations, aliases, or releases, but the individual objects are managed independently. Legacy modules were obsoleted with version 5.0 which introduced a new type of module managed as a single entity in DesignSync. Legacy modules can still be included in a module hierarchy as a sub-module to a module. Legacy modules can also be upgraded to modules. See also hierarchical reference, DesignSync Data Manager User's Guide: Upgrading Legacy Modules.
library
788
Source_Glossary
A directory tree of Milkyway data. The library has the same name as the top directory. The top directory of a library always includes the library file, a binary file called lib.
library file
A binary file containing metadata about a Milkyway library. Each Milkyway library has a library file, called lib, which resides in the top directory of the library. The information in the library file includes:
• Details of the views/cells present in the library • Library technology information • A list of reference libraries • Details of library attached files • General library properties added by various tools • Information on logical equivalence of cells
The library file is specific to the subset of cells that has been populated to a user's workspace. Two users might be collaborating on the same library, but each may have populated a different subset of cells to the workspace and therefore each may have a different library file. DS MW properly handles this file, allowing multiple users to collaborate on the same library.
library attachment
In Milkway, A file attached to a library. The file is named in the form lib_X.
library lock
The Milkyway lock file, which is a file named .lock that resides in the library directory. This file is a temporary file and cannot be checked in to the DesignSync vault.
library shadow collection
A collection object that encompasses the shadow files for the Milkyway lib file and its attached files. DesignSync displays this object as shadow.sync.mw.lib. A library shadow collection object contains the library file shadow and library attachment shadow files.
library file shadow
A member of the DS MW library shadow collection. This file contains a copy of the contents of the Milkyway library file (lib). The file has the name shadow.lib.
library attachment shadow
789

DesignSync Data Manager User's Guide
A member of the DS MW library shadow collection. This file contains a copy of the contents of the lib_X attached file. The file has the name shadow.lib.X.
An export Other Library Information operation copies the library file (lib) to the shadow.lib file and copies the library attached files (lib_X) to shadow.lib.X. Together these files form the library shadow collection object (shadow.sync.mw.lib). The export Other Library Information operation then checks in the library shadow collection object to the DesignSync vault.
When you import Other Library Information (using the Import Library Information form) DesignSync fetches the library shadow collection object from the vault to your workspace and loads the Other Library Information into your library file.
link
See symbolic link.
Local version
Multiple versions of a cell in Milkyway can exist in a library at the same time. Milkyway-based tools always operate on the version with the highest number in the library. This DS MW documentation refers to this as the local version, to distinguish it from a DesignSync version, which is created in the DesignSync vault at check-in time (a vault version).
When a Milkyway object is checked in to the DesignSync vault, DesignSync applies a tag that indicates the object's local version number. If the local version is 6, DesignSync applies the tag MW_6.
lock
Attribute of a design object indicating that you or another team member is using and most likely editing the object. The owner of the locked object has the exclusive right to check it in to create the next version. See also locking work style.
locking work style
A team work style where each member locks an object while editing it, preventing other team members from checking in local modifications as new versions, until the locker checks in again. See also DesignSync Help: Locking or Merging Work Style?.
look & feel
The DesignSync GUI client allows you to customize the look and feel to determine the appearance and behavior of the UI. For example, the appearance of the tool bar, and the accelerator keys for the Cut, Copy, and Paste operations, depend on the look and
790

Source_Glossary
feel. There are three look and feels available: Java (Metal), Motif, and Windows (not available on UNIX platforms).
M
merge
A merge allows you to combine your locally modified version of a design object with the Latest version of the object, resolving inconsistencies between the versions. In the merging work style, team members check out or populate without locking objects, thus, merging is required to reconcile the streams. Team members can "merge to" a branch to align the local metadata with the target branch, or "merge from" a branch to leave the metadata aligned with the current branch. See also merging work style.
merge edge
A merge edge indicates an extra "derived from" version for a version. The merge edge information is stored in the vault. When you perform a subsequent merge on the vault object, the merge edge is used to determine what changes have already been made, improving the efficiency of the merge.
merging work style
A team work style where team members check out objects without locking them. Multiple team members can edit the same object at one time; the first checked-in version becomes the Latest version and team members have to merge their edits in with this Latest version. See also DesignSync Help: Locking or Merging Work Style?.
metadata
Information about the objects that DesignSync manages, including the object's vault, branches (including current branch), versions and version-last-retrieved, its status (locked, unlocked, retired), its state as a local object (copy, locked copy, reference, link to cache or mirror directory), configuration tags applied to the object, and timestamps of operations on the object. Metadata is stored both on the server and locally. Local metadata is stored in .SYNC folders on your local file system. Note: DesignSync manages these .SYNC metadata folders; do not directly manipulate these folders or their contents. See also DesignSync Data Manager User's Guide: Metadata Overview.
Milkyway
The name of a database format, data model, and a directory structure that tools can adopt.
mirror directory
791

DesignSync Data Manager User's Guide
A directory that is automatically updated to contain the data set defined by a project leader for your project vault. For example, your team may always want access to the Latest version of files on the main Trunk branch. Another team may always want access to the file versions with a specific tag that are on a development branch. DesignSync creates links from users' work areas to the design objects in the mirror directory, ensuring that you have the most up-to-date configuration for your project.
A mirror directory saves team members from performing populate or check-out operations each time they want to access design changes made by team members. Because DesignSync mirrors are implemented using UNIX symbolic links, there is no support for mirrors on Windows. See DesignSync Data Manager Administrator's Guide: Mirroring Overview.
module
A module is a collection of managed objects that together make up a single entity. For example, DesignSync is a module composed of several sub-modules, such as ProjectSync and DSDFII, which contain all the code, examples, and documentation necessary to develop the applications.
The data included in a module includes its own objects and references to other modules, but not the contents of the referenced modules. See DesignSync Data Manager User's Guide: What is a Module? for more information.
module base directory
The top workspace directory of a module.
module cache
A module cache is as a shareable workspace used for storing static modules to share with users across the network. Users link to the shareable workspace instead of to the module on the SyncServer. DesignSync Administrators or Project Managers can create module caches for modules containing common tools, libraries, or other modules needed for reference. Instead of populating the full contents of a module, UNIX users can populate a module cache link that provides access to the data without copying all the files locally. This reduces the populate time for the user as well as load on the server.
A project leader fetches modules into a module cache, preferably in "share" mode, to utilize DesignSync's file caching. When users populate module data, they can specify whether to link to modules in the module cache, or fetch modules from the server. How module data is retrieved is referred to as the module cache mode. The default module cache path, and the default module cache mode, can be defined in the registry by the team leader or by an individual user.
792

Source_Glossary
Note: Legacy modules can be linked to, or copied from, a module cache. The module cache mode of "copy" only applies to legacy modules. If you attempt to copy a non-legacy module from a module cache, DesignSync fetches the module from the server.
module cache link
A managed link to a module cache (mcache). The mcache link provides access to the module contents without requiring the user to load the contents of the module into her workspace by using UNIX symbolic links.
module category
A module category is a logical folder on the DesignSync server used to group modules into related groups.
For instance, tools developed and maintained for internal use, can be in a DesignSync category "Tools" which differentiate them immediately from applications being developed for external use.
module delta
Module delta mode shows only the files, folders, and hierarchical references that have been changed or added in the current version when you expand the module version on the server.
module member
A module member is any individual file, directory, or collection object added to a module.
module root
The module root of a module is the top level directory into which a module is fetched when users populate the module to their work areas.
movable tag
A logical tag construct applied to a progression of snapshots of a set of object versions. A tag is considered "movable" if you reapply it to new versions of the objects as development progresses. A moveable tag must be mutable. If a tag is never meant to be moved, it is considered a fixed tag. See also tag, DesignSync Data Manager User's Guide: Fixed Tags and Movable Tags.
mutable
793

DesignSync Data Manager User's Guide
A mutable object has the ability to change. In DesignSync, this term is usually used in relationship to tags. For example, the creation of module branch, it is assigned an immutable module branch tag of Trunk which can not be altered. However, you can add mutable tags to versions of this module branch such as Test, Gold, Silver, Release, December. You can move these tags as needed. Mutable and immutable tags can be used to enforce logical tag constructs like movable tags and fixed tags. See also tag.
N
natural path
The natural path is the path where that object is placed under the module base directory.
normal href mode
The selector associated with the href is examined. If it represents a static version, which means that it is a version numeric, or is a version tag, or a list of such items, then that module is fetched using the selector and the mode switches to static for sub-modules. Otherwise, the module is still fetched using the selector, but the mode remains norma for subsequent levels of hierarchy.
netlist
See RTL Team, Place and Route.
note
A note is a record of information that you attach to a project or a project configuration. You can attach notes to multiple objects, including design files. Each note is of a particular note type with specific fields, or properties, you use to enter data for ProjectSync to track. See also note type, property.
note type
A note type is a database schema of fields (properties) for users to enter data for ProjectSync to track. ProjectSync provides standard note types for the ProjectSync server administrator to install. The administrator can modify the standard note types, as well as creating custom note types. See also note, property, property type.
O
object
794

Source_Glossary
A DesignSync object, commonly referred to as an "object' in the DesignSync documentation, is a file, folder, module, collection, symbolic link, or other object that can be managed by DesignSync.
other library information
Information contained in the Milkyway library file other than technology information, reference libraries, and the catalog of cells for the local directory. Examples of Other Library Information are:
• Logical equivalence of cells, such as those used by Astro during optimization • Cosmos pcells • Properties stored by Cosmos during schematic driven layout • A reference control file
Note: The Other Library Information can include the technology file. If your DesignSync administrator has disabled the "Manage technology file separately" option on the SyncAdmin Third Party Integration form, DS MW manages the technology file as part of the Other Library Information. See DSMW Help: Managing the Technology File for information.
overlapping modules
A workspace folder can be populated with files from more than one module. These modules are considered overlapping because a single workspace directory contains members of more than one module. When you have overlapping modules, you must explicitly add any new members to the correct module before checkin. You can check in or populate the modules either independently or in a single operation.
overlay
Fetching a file specified by the selector-list, and placing it in the working directory without changing the metadata. In other words, the user remains working on the same branch as before.
P
panel
A ProjectSync window or subwindow containing properties. Most panels behave like a graphical user interface (GUI) form element in which you enter data in fields and other GUI widgets. See also property.
persistent selector list
795

DesignSync Data Manager User's Guide
Specify what branch or version a command operates a version or branch is not explicitly specified. Checkin, checkout, populate, and import operations support persistent selector lists. Commands that do not use the persistent selector list typically operate on the current version or current branch of the object in your workspace. An object's persistent selector list is stored in local metadata or is inherited from the parent folder. See also selector, selector list.
place and route
One of the Milkyway-based tools (Astro) performs this step, where a netlist is used to describe which components need to be placed and which wires or "nets' need to be routed among the components.
populate
Process of making a revision-controlled design object available in your workspace. You can populate with locked or unlocked copies of objects, links to cache or mirror copies of objects, or references to objects. The objects populated reflect those objects existing in the vault and not those objects currently residing in your local area, unlike a recursive checkout where only the objects currently residing in your local area are checked out. Populate and checkout can be used interchangeably for all DesignSync objects except modules and module members which can only be populated into your workspace. See also DesignSync Help: Populating Your Work Area.
port number
Identifier for a specific server process through which a client process sends and receives data. The registered port number for SyncServer (Synchronicity server) processes is 2647.
project
A group of revision-controlled design objects stored together as a single design effort. You can manage caches on a per project basis -- in creating a project, you associate a vault with a cache to create a local view of the design data. See also DesignSync Help: What Is a Project?, DesignSync Help: Design Reuse.
ProjectSync
ENOVIA Synchronicity ProjectSync is a web-based system for managing engineering projects. ProjectSync helps engineering teams track bug reports, change orders, and continuing dialogue on engineering projects.
property
796

Source_Glossary
A property in ProjectSync is an element of a panel, like a field or other widget on a form in the graphical user interface (GUI). A property on a note type is characterized by 4 attributes - a name, a prompt string (optional), a type, and a default value (optional). See also note, note type, panel, ProjectSync User's Guide: What Are Properties?.
property type
A data type corresponding to a property on a note type. Examples of predefined property types include Boolean, Date, Integer, Float, and String. See also property, note type.
protocol
Portion of a URL address that indicates how to access the Internet resource. The "http" protocol, for example, supports such resources as HTML files, CGI applications, and Java applets. The DesignSync "sync" protocol is used to communicate with a SyncServer, while the "file" protocol can be used to navigate your local file system. See also DesignSync Data Manager User's Guide: DesignSync URLs.
proxy
A program residing on a firewall host that intercepts communications between a company's intranet and the Internet, only forwarding a request if the requesting party can be authenticated. Proxies can also perform tasks such as caching data to improve transmission speeds -- for example, the proxy might store a previously requested web page in cached memory to improve response time for subsequent requests for the data. DesignSync provides a registry setting and environment variable so that you can specify a proxy IP address and port number. See also authentication, cache, firewall, intranet.
prune
To remove unneeded versions from a vault to free up disk space. See DesignSync Help: Deleting Versions from a Vault.
Q
R
RCS
Revision Control System. A software tool for UNIX systems that manages multiple versions of files, tracking changes and controlling shared files. RCS uses a locking work style where a user locks a file version and thus has the exclusive right to check in the next version of that file. See locking work style.
reference
797
DesignSync Data Manager User's Guide
1. An object that is not physically present, but instead points to another object. The object has local metadata . When an object is checked in with the option to leave a reference to the object, the local copy is deleted, and a reference pointing to the vault replaces it. The integrations do not support references. See also Object States, regenerate.
2. REFERENCE also refers to a pointer you create in a ProjectSync project (in a sync_project.txt file); use REFERENCEs to import modules from other design projects into your design. See also DesignSync Data Manager User's Guide: Using Vault REFERENCEs for Design Reuse.
3. An ASCII file created and modified by DS MW to list the reference libraries for DesignSync maintenance. When you set up a library (using the Library Setup Options form) or export reference libraries (using the Export Library Information form), DS MW captures the path to each reference library in your design. For each reference library in your design, the refs.txt file contains a line with the structure: REFERENCE path_to_library, for example: REFERENCE /home/takeda/mde_lab/lab3/defoutlib The pathname_to_library can be an absolute or relative path. The pathname_to_library can also take the form $MW_REFLIB/path, where MW_REFLIB specifies an environment variable and path specifies a path relative to the directory defined by $MW_REFLIB. When you populate or when you check out a library to a new workspace, DesignSync fetches the refs.txt file from the vault to your workspace and loads the reference libraries the file identifies into your library file.
reference Library
A Milkyway cell in a library under DesignSync control may contain a reference to a cell in another library. The other library is called a reference library. In order to instantiate cells into your cell, you must first have declared the reference libraries with a Milkyway command, which causes a pointer to the reference library to be injected into the library file.
When you populate a new workspace, that operation cannot be completed until the library file in the new workspace is made aware of the reference libraries.
reference control file mode
Commonly, the library reference information for a Milkyway library resides in its lib file. In reference control file mode, library reference information resides in one of the library's attached files. This attached file is similar in form to the DS MW refs.txt file, except that it also contains the path to the library itself.
798

Source_Glossary
When a library is in reference control file mode, DS MW does not export the library references to a separate file. Instead, DS MW maintains the attached file as part of the Other Library Information.
To put a library into reference control file mode, use Scheme calls. See also DSMW Help: Putting a Library into Reference Control Files Mode.
Note:
• When a library is in reference control file mode, the Reference Library field of the Library Setup and Export Library Information forms cannot be edited.
• If you import a library from the vault to a different library name in your workspace (for example, if you populate a library into a new workspace with a different name), DS MW cannot determine the name of the library and therefore cannot update the library reference information in the attached file. You must edit the attached file and correct the library references manually.
regenerate
DSDFII locked reference mode used when regenerating the object from a different source rather than editing it directly. This mode does not transfer the object from the vault. This is a more efficient mode for that use model since the user does not require the latest version of the generated file as long as the source files are correct. See also reference.
registry
The key-based repository used by DesignSync to store DesignSync settings. It is designed to mirror in functionality and layout the Windows Operating System registry. The registry supports customizing settings for the entire site, a specific server, a project, and an individual user. This allows a user to personalize the DesignSync environment. For more information, see registry files, System Administration Help: Overview of Registry Files.
registry file
A file containing setup and tool configuration information for DesignSync tools. DesignSync uses different registry files for different functions. Some of these registry files are only for use by the DesignSync administrator while others can be customized by individual users or project managers. See also registry.
remove
An operation to remove a module member from a module. This removes the member from all future operations on the module. You can add the object back to the module later, if needed.
799

DesignSync Data Manager User's Guide
replica
A copy of a design object created when you fetch (check out without a lock) a version from the vault. A replica contains relational information about the original replicated object, so that DesignSync can determine, for instance, whether the original object has changed since you fetched it. See also DesignSync Data Manager User's Guide: Object States.
repository
See vault.
retire
Prevents a design object from being automatically included in populate or recursive checkout operations. Retiring an object's branch rather than deleting the object itself gives you the opportunity to reinstate the object for future populate and recursive checkouts. Module objects are never retired, they are removed from the module. See also DesignSync Data Manager User's Guide: Retiring Branches.
RevisionControl note
A ProjectSync note created when a DesignSync revision control operation takes place. The note has a built-in type, RevisionControl, that contains information about the operation, such as the name of the user, command used to invoke the operation, and execution time. See also DesignSync Data Manager Administrator's Guide: RevisionControl Notes Overview.
root directory
See workspace root directory.
RSA
Rivest, Sharmir, and Adleman Internet encryption and authentication system. RSA is a commonly used encryption and authentication algorithm embedded in most web browsers. The algorithm uses separate keys -- a public key a sender uses for encrypting and a private key used by the owner to decrypt messages. The private key is never transmitted across the Internet, thus protecting the encryption from being deciphered. See also encryption.
RTL team
A group of people who create RTL source code, typically in Verilog or VHDL format. These people put the RTL code through synthesis to produce a netlist. A netlist serves as an entry point to Place and Route.
800

Source_Glossary
S
save settings
See client defaults.
SCC (Source Code Control)
DSVS features Windows-based integration that uses MSSCCI standard and is SCC compliant meaning that in additional to be integrated with Visual Studio, DSVS can be used with any other Windows application that supports an SCC plug-in.
selector
An expression that identifies a branch and version of a managed object. For example, the version tag "gold", the branch selector "Rel2:Latest", the version number "1.4", and the reserved keyword "Latest" are all selectors. Selectors are specified with -version and -branch options to various commands or through a persistent selector list. See also selector list, persistent selector list.
selector list
A comma-separated list of selectors. DesignSync uses the selector list as a search order to select a version on which to operate. If the first selector in the list results in no match, DesignSync retries the command using the next selector in the list. The command fails only if all selectors in the list produce no match. An example of a selector list is "gold,silver,Rel3.0:Latest,Trunk". See also selector, persistent selector list.
server
A computer process that provides services to client processes. The service provided by the SyncServer process is the management of the revision control and configuration tasks on the data in the DesignSync vaults. See also client.
server-side trigger
A trigger that runs on the server. See also trigger.
SITaR (Submit, Integrate, Test, and Release)
SITaR (Submit, Integrate, Test, and Release) is a simple module-based workflow for projects that consist of multiple blocks, or modules, developed by several contributors. SITaR uses hierarchical references to create a controlled integration environment for testing the interaction between the contents of modules in the hierarchy. See also, DesignSync Data Manager User's Guide: Overview of SITaR Workflow
801
DesignSync Data Manager User's Guide
skip
The action of skipping interim versions when checking in a new version of a design object which you did not lock, and replacing the Latest version. Skipping differs from a standard checkin in that interim versions can not be seen by team members checking out the Latest version; if you want the changes from the interim versions, you must request the versions explicitly by version number and enter their changes manually, or, if the file is not a binary file, you may be able to merge the changes into the file. Note: Skipping is an advanced operation and should be used with caution because it retires versions from the vault. You can only access the skipped versions if you enter their version numbers explicitly. See also DesignSync Data Manager User's Guide: Checking in Design Files.
SSL
A protocol to provide encrypted communications across a network. SSL is indicated by the https designated in a URL.
staging area
Intermediate folder used while relocating or converting vault folders (repositories). For example, if you move a vault folder to a new SyncServer, you first export the vault folder to an intermediate folder, then import the intermediate directory into a new SyncServer.
stcl
ENOVIA Synchronicity's customized Tcl (Tool Command Language) interpreter, one of the DesignSync client applications. The stcl client combines the text commands available in dss (the DesignSync shell) with the general scripting capabilities of Tcl. To invoke stcl, enter "stcl" from your operation-system window (UNIX or Windows). You can also enter "stcl" followed by a script name to execute an stcl script, or enter "stcl -exp" followed by a DesignSync or Tcl command in quotes to execute a single command. In most cases, use stclc to take advantage of the concurrent client capabilities. See also ENOVIA Synchronicity Command Reference: stcl command description, DesignSync Data Manager User's Guide: DesignSync Command-Line Shells.
stclc
The concurrent version of stcl. The stclc client has several advantages over stcl, because it's designed to be used concurrently with other client processes. To invoke stclc, enter "stclc" from your operation-system window (UNIX or Windows). You can also enter "stclc" followed by a script name to execute an stcl script, or enter "stclc -exp" followed by a DesignSync or Tcl command in quotes to execute a single command. See also ENOVIA Synchronicity Command Reference: stcl command description, DesignSync Data Manager User's Guide: DesignSync Command-Line Shells.
802
Source_Glossary
static href mode
Resolves hierarchical references to the static version of the sub-module recorded with the href at the time the hierarchical reference was created is always used. See also hierarchical_reference, dynamic reference.
substitution tag
ProjectSync extension to HTML that lets you embed placeholders for GUI widgets within a panel's HTML template. Substitution tags are coded as HTML comments in the template in the following format:
<!-- SYNC <substname> -->
where <substname> is the substitution tag name. You can define the behavior for the substitution widget by modifying the installation (.ini) file corresponding to the panel's HTML template (or by creating an initialization file for the template if one does not exist.)
symbolic link
(UNIX symbolic link) A special UNIX file that points to another file. A link takes up less space than a copy of the original file. Use the UNIX ln command to create symbolic links. See the UNIX ln documentation for more information. See also DesignSync Data Manager User's Guide: Object States, DesignSync Data Manager Administrator's Guide: How DesignSync Handles Symbolic Links.
sync
The portion of a URL address that indicates the protocol used by the software to determine how to access an Internet resource. The "sync" protocol is used to communicate with a SyncServer. See also protocol, URL.
syncd
The Synchronicity daemon process. The syncd process manages communication between dss/stcl sessions and SyncServers. Note that dssc and stclc do not use syncd; they communicate directly with a SyncServer. See also ENVOIA Synchronicity Command Reference: syncdadmin.
SyncAdmin
The Synchronicity Administrator tool. LAN administrators can use SyncAdmin to set site-wide preferences, such as the default fetch preference, how symbolic links are managed, and which cache users should access. Users can use SyncAdmin to set user preferences such as their default editor and HTML browser. SyncAdmin is a standalone tool located in <SYNC_DIR>/bin. See also SyncAdmin Help.
803

DesignSync Data Manager User's Guide
sync_project.txt file
A file created when you create a project in ProjectSync. The sync_project.txt file includes the REFERENCE and CONFIG mapping statements that let you import modules from other projects into your designs. See also ProjectSync User's Guide.
sync_servers.txt file
A file created by a user (My Servers), project leader (Site Servers), or administrator (Enterprise Servers) that lists SyncServer or vault definitions, which facilitates entering URLs in various locations in the DesignSync graphical interface and integrations; such as the DesignSync workspace wizard and the DSDFII Join Library wizard.. See DesignSync Data Manager Administrator's Guide: SyncServer List Files.
SyncServer
A DesignSync server process that manages shared information, controls access to design files, and performs administrative functions such as user privilege validation. A SyncServer is an http server, with a special "sync" protocol layered on the http protocol, for example, sync://host:port/Projects/Sportster. See also server, protocol, DesignSync Help: What Is a SyncServer?.
T
tag
An identifier you attach to a group of design object versions that you want to identify as a group. You can then perform operations on the group of objects as a whole. For example, you might tag all versions that went into a release "Rel2_0" so that at a later date another user could fetch all versions tagged "Rel2_0" thereby recreating that release. Tags can also be applied to branches. See also design configuration, mutable, immutable, DesignSync Data Manager User's Guide: Tagging Versions and Branches.
Tcl
Tool Command Language, a scripting language and interpreter developed at University of California, Berkeley by Dr. John Ousterhout. Tcl interpreters are embedded in many EDA applications, including DesignSync. See also stcl, stclc.
TCP/IP
Transmission Control Protocol/Internet Protocol, the communication conventions, or protocol, for transferring data on the Internet. Computers accessing the Internet have copies of the TCP/IP program which manages data transmissions, decoding addresses and transmitting the data to the specified IP address. See also IP address, domain name, DNS.
804

Source_Glossary
technology file
An ASCII file (tech/tech.tf) created and modified by DS MW with the purpose of making DesignSync aware of the library technology data for a design.
When you populate or when you check out a library to a new workspace, DesignSync fetches the tech.tf file from the vault to your workspace and loads the technology data the file identifies into your library file.
Note: If your DesignSync administrator has disabled the "Manage technology file separately" option on the SyncAdmin Third Party Integration form, DS MW manages the technology file as part of the Other Library Information. See also DSMW Help: Managing the Technology File.
template
ProjectSync implements note panels with HTML templates. Administrators can generate an HTML template from an existing note type, then modify the HTML code to change its appearance.
trigger
A watchpoint (a Tcl script) that causes an action, such as sending an email, to occur automatically in response to some other action, such as checking in a file. A client trigger is a trigger that is executed on the client. A server-side trigger is a trigger that runs on the server.
U
unique identifier
Every object and folder in the vault of a module is assigned a unique identifier. These unique identifiers are used within the module's versions. There is a mapping from the unique identifier to a natural path. The natural path can change from one module version to another, however, changing the natural path in this manner does not change the object's unique identifier.
unlock
Remove a lock from a design object's branch. You can unlock branches you have locked or those locked by team members. Access controls can be set up to limit unlocking operations. See also DesignSync Help: Undoing a Check Out, DesignSync Help: Unlocking Branches.
URL
805

DesignSync Data Manager User's Guide
Uniform resource locator, an address for a resource. A URL consists of the access protocol, followed optionally by a machine name and/or the path to the object. DesignSync uses a special "sync" protocol, for example, sync://host:port/Projects/Sportster. Use the "file" protocol to access files on a local network. See also http. https, sync, IP address, domain name.
user
Any individual authorized to work with DesignSync or ProjectSync.
user profile
Attributes defined in ProjectSync by an administrator to identify a user. The administrator enters the username, password, and contact information for each team member. ProjectSync can be configured to allow access only to registered users.
V
vault
The repository of the versions, including branched versions, checked in for a particular design object. Note that a vault stores versions of a single design object. A "project vault" refers to the top-level folder of a project and thus contains a vault for each revision-controlled object in the folder. See also DesignSync Help: Vaults, Versions, and Branches.
version
A fixed snapshot of a design object, such as a file or collection, stored in a vault with a numeric identifier. Version numbers are composed of an even number of numeric fields, separated by periods. For example the following are valid version numbers: 1.3, 1.3.1.4, and 1.2.5.1.1.1.See also DesignSync Help: Vaults, Versions, and Branches.
version-extended naming
When invoking Advanced Diff from DesignSync, you can specify the files you want to compare using version-extended filenames, which consist of the filename, followed by a semicolon (;), followed by a version number or tag. For example, alu.v;1.2 is version 1.2 of alu.v, and alu.v;golden is the version that is tagged 'golden'. You can also use the following reserved tags:
• Orig The version in the vault from which your local version originated; for example, alu.v;Orig.
• Latest The most recent version in the vault; for example, alu.v;Latest. Often Latest and Orig are the same version. For example, you fetch alu.v;1.4, which is the most recent version in the vault. Version 1.4 is both Latest and Orig. If your
806

Source_Glossary
teammate then checks in version 1.5, Orig is still version 1.4, but Latest is now version 1.5.
DesignSync interprets these version-extended filenames and fetches files from the vault as needed, placing them in your DesignSync cache. These cached files may be used by the defined graphical Diff utility ; DesignSync does not use these files and users will not get links to these files if they populate from the cache.
version tag
A tag can be applied to either an object version or a branch. A tag applied to an object version is called a version tag. See DesignSync Data Manager User's Guide: Tagging Versions and Branches.
view
A way to categorize cells. Conceptually, a cell may have many different views--a place and route view, an abstract view, and so on.
In the Milkyway file system, the view is a directory beneath the library directory. The view directory contains all of the cells of that view. (Cells are made up of files in the view directory.) The file system hierarchy has this structure:
Library directory => View directory => Cell view files
W
workspace
A DesignSync workspace is a folder on your local system allows a user to gather various objects, generally under revision control, and work with them as a cohesive unit. Revision Controlled objects can be checked out or populated into the workspace, edited, and then checked in to create the next version on the server vault.
workspace root directory
See workspace root path.
workspace root path
The top folder of your workspace, where information about all modules with base directories at or below that point is stored. In DSDFII, you can manually enter a workspace root path for any modules containing Cadence libraries outside the workspace root directories already known to Cadence. See also module base directory, the DesignSync Data Manager DFII User's Guide: Setting the Workspace Root Path.
807

DesignSync Data Manager User's Guide
808
workspace wizard
A series of dialog boxes, launched by Revision Control =>Workspace Wizard, that guide you through the process of creating your own project or joining an existing project. See also Workspace Wizard Overview.
X
Y
Z

Index A
Absent status ..................................... 42
Accelerator ....................................... 767
Semiconductor .............................. 767
access_log ....................................... 732
Added By merge status ...................... 42
addhref ............................................. 400
Adding ...................................... 424, 426
HREF ............................................ 424
Addressing ....................................... 336
Architecture .......................................... 6
Authentication .................................. 108
Autobranching .................................. 678
B
Bookmarks ..................... 62, 72, 74, 133
adding a vault ............................... 140
creating ........................................... 72
deleting ........................................... 72
editing ............................................. 74
Branch column ................................... 42
Branches ..... 13, 91, 141, 240, 249, 443, 606, 678
about ....................................... 13, 678
branches queries ............................ 91
Branch-point versions ................... 141
creating ................................. 237, 678
owners ............................................ 13
tagging .......................................... 240
unlocking ...................................... 249
viewing in the vault ....................... 141
branching a module .......................... 310
Browse sequences ........................... 775
Browser ...................................... 76, 725
as used to display data sheets ....... 76
specifying a default ......................... 76
Browser navigation aids ................... 775
C
Cadence objects ...................... 757, 758
about ............................................. 757
DesignSync handling of ................ 760
displaying view members .............. 755
enabling DesignSync recognition of .................................................. 758
recognizing ................................... 759
CAI errors ......................................... 759
Cancel button ..................................... 92
809

DesignSync Data Manager User's Guide
cds_root ........................................... 759
Cells ................................................. 757
Cadence ....................................... 757
Synopsys Milkyway ....................... 762
Characters .................................. 10, 110
illegal ...................................... 10, 110
Check in ................... 126, 127, 214, 679
about ............................................. 214
Checking in Design Data .............. 214
files ............................................... 214
Specify .......................................... 127
tag on checkin .............................. 214
Check out ......................... 206, 211, 679
about ............................................. 206
files ............................................... 206
undoing ......................................... 211
Checkouts ........................................ 205
potential ........................................ 205
ci 679
cleartext ............................................ 108
Collection
member properties .......................... 83
Collections ........................................ 755
about ............................................. 755
Cadence views ..................... 757, 760
custom (CTP) ............................... 763
displaying information about ......... 755
displaying members of .................. 755
properties ........................................ 82
Synopsys Milkyway cell view ........ 762
Command Aliases ............................ 101
Command bar properties .................... 51
Command Buttons.............................. 92
command completion ......................... 96
command history ................................ 96
Command Line Completion ................ 49
Command Line Defaults System ........ 13
Command scripts ............................. 105
Command shell window ............... 13, 49
Command shell window options ......... 51
command-line editing ......................... 96
Commands ......................................... 13
default values ................................. 13
Comments
check in ........................................ 214
check out ...................................... 206
810

Index
Compare command .................. 232, 380
Comparing files ........................ 271, 276
Graphical Diff Utility ...................... 281
output ............................................ 276
completing .......................................... 96
commands ...................................... 96
filenames ........................................ 96
Configurations ............................ 91, 708
see Design configurations ............ 708
Conflict Handling .............................. 404
Conflicts ........................................... 657
resolving merge conflicts .............. 657
Contacting MatrixOne ....................... 777
Contents command .................. 229, 365
Contents tab ..................................... 775
Context Menu ..................................... 10
Controlling Timeouts ........................ 731
Creating ............................................ 678
branches ....................................... 678
CTP .................................................. 764
Custom Type System registers ..... 764
install ............................................ 764
Custom collections ........................... 763
Custom Type Package ..................... 763
Custom Type System ....................... 763
D
Data Sheets ....................................... 76
about ............................................... 76
View menu ...................................... 58
data type
specify data type ........................... 214
Date Formats ................................... 672
Debugging 723, 735, 742, 745, 746, 749
a SyncServer ........................ 735, 746
performance ................................. 749
the DesignSync client ........... 723, 745
default SyncServer ........................... 108
Defaults ...................................... 13, 108
for commands ................................. 13
Deleting ............................................ 255
Deleting Design Data .................... 252
Deleting Files ................................ 265
Deleting Folders............................ 268
Deleting mcache ........................... 417
Deleting mcache link ..................... 407
Deleting modules .......................... 417
811

DesignSync Data Manager User's Guide
Deleting Server Folders ................ 259
Deleting Vaults ............................. 255
Deleting Versions from a Vault ..... 253
Design configuration/displaying contents.............................................. 229, 365
Design configurations ....................... 708
about ............................................. 708
creating ......................................... 708
selecting ....................................... 120
tracking development with ............ 709
Design configurations/comparing .... 232, 380
Design Hierarchy .............................. 135
Design reuse .................................... 711
Designs ............................................ 711
managing ...................................... 711
DesignSync ...................................... 108
architecture ....................................... 6
command-line shells ....................... 92
invoking .......................................... 34
List view .......................................... 42
Output window ................................ 48
Tree view ........................................ 41
window ............................................ 34
DesignSync uses ............................. 108
Detecting .......................................... 742
Absent files ................................... 742
Diagnostics ............................... 721, 742
about ............................................. 721
Dialog boxes ... 118, 120, 121, 124, 125, 126
Check in ........................................ 214
Check out ..................................... 206
Create Folder ........................ 257, 267
Populate ....................... 142, 189, 341
Specifying vault location ............... 135
Tag ............................................... 240
Diff options ............... 270, 271, 276, 281
Graphical Diff Utility ...................... 281
output ............................................ 276
Differences between file versions ..... 271
Directories .................. 91, 108, 257, 267
see Folders ........................... 257, 267
directory_path/file_name .................. 108
display filters .............................. 36, 358
Displaying ................................. 229, 365
vault data .............................. 229, 365
Distributed project management ...... 711
812

Index
Documentation ................................. 777
dss .................... 49, 92, 93, 95, 104, 105
about ............................................... 92
compared to other shells ................ 93
creating scripts ............................. 104
invoking .......................................... 95
running scripts .............................. 105
using DesignSync commands in OS shell scripts ............................... 103
Dss_*.log file .................................... 721
dssc .......... 49, 92, 93, 95, 103, 104, 105
about ............................................... 92
compared to other shells ................ 93
creating scripts ............................. 104
invoking .......................................... 95
running scripts .............................. 105
using DesignSync commands in OS shell scripts ............................... 103
Dynamic HREF Mode ....................... 425
Dynamic selectors .................... 660, 664
E
Edit Menu ........................................... 58
Editing ................................................ 96
Editor .................................................. 56
as used to open files ....................... 56
specifying a default ......................... 56
EPM ................................................. 767
error_log ........................................... 732
Exclude Field ...................................... 86
Exclude files dialog box .................... 126
Exclude filters ........................... 206, 214
check in ........................................ 214
check out ...................................... 206
F
File comparison ........................ 271, 276
output ............................................ 276
File menu ........................................... 56
filename completion ........................... 96
Filenames ................................... 10, 110
illegal ...................................... 10, 110
Files .................... 69, 108, 211, 237, 276
checking in .................................... 214
checking out ................................. 206
comparing ............................. 271, 276
creating ......................................... 264
deleting ......................................... 265
deleting versions ........................... 253
813
DesignSync Data Manager User's Guide
identifying modified files ........ 223, 368
moving .......................................... 237
populating ..................... 142, 189, 341
renaming ....................................... 237
retiring ........................................... 246
selecting ......................................... 69
undoing a checkout ....................... 211
unlocking ...................................... 249
Finding ............................................... 75
text .................................................. 75
Folders ..................... 237, 257, 267, 268
creating ................................. 257, 267
deleting ......................................... 268
moving .......................................... 237
renaming ....................................... 237
Formal branching ............................. 678
Full-text search ................................. 775
G
General properties.............................. 78
command bar .................................. 51
Get versions/tags ............................... 91
H
Help .................................................. 775
Hints for Using .............................. 775
online ............................................ 775
Help menu .......................................... 68
Hierarchy .......................................... 130
host.domain ...................................... 108
host.mycompany.com ...................... 108
How should the files be checked out? dialog box ..................................... 121
HREF ............................... 424, 426, 440
Add ....................................... 424, 426
Creating a Hierarchical Reference 400
Deleting a Hierarchical Reference 403
HTML ............................................... 108
request .......................................... 108
HTML Browser ................................... 76
see Browser .................................... 76
I
Illegal characters ........................ 10, 110
Index tab .......................................... 775
Informal branching ........................... 678
instruct .............................................. 108
SyncServer ................................... 108
Internet ............................................. 108
Interrupt ............................................ 726
814

Index
Interrupt button ................................. 726
Invoking ........................................ 34, 95
a command-line shell ...................... 95
DesSync ......................................... 34
IPAddress ......................................... 108
K
key bindings ....................................... 96
key completion ................................... 96
Keys ................................................. 260
see Keywords ............................... 260
Keywords ......................................... 260
expansion ..................................... 260
reserved ........................................ 240
revision control ............................. 260
using ............................................. 261
Known problems and solutions (KPS) document .......................................... 1
KPS ...................................................... 1
L
LAN Cache ....................................... 650
legacy modules ........................ 695, 697
Libraries ........................................... 757
Cadence ....................................... 757
Synopsys Milkyway ....................... 762
Link objects .......................................... 8
Links ................................................. 649
caches .......................................... 649
list ....................................................... 91
selectors gets ................................. 91
List View ....................................... 41, 42
Branch column ................................ 42
Locker column ................................ 42
Modified column.............................. 42
Status column ................................. 42
Type column ................................... 42
Version column ............................... 42
Version Tags column ...................... 42
Local versions .. 142, 189, 206, 214, 341
Locally Modified status ....................... 42
Location bar ....................................... 38
Locked references ............................ 656
Locker column .................................... 42
List view .......................................... 42
Locking ............................................. 655
about ............................................. 655
using ............................................. 656
work style ...................................... 655
815

DesignSync Data Manager User's Guide
Locking a module ............................. 304
Log files .................................... 721, 732
access_log .................................... 732
client log ....................................... 721
error_log ....................................... 732
server log ...................................... 732
M
Main window ...................................... 34
see DesignSync window ................. 34
Managing designs ............................ 711
Managing non-collection objects ...... 761
Mapping Configurations for Design Reuse ........................................... 709
mcache ............................................. 378
Deleting a Module ......................... 417
Deleting Mcache Link ................... 407
Populating Your Work Area . 142, 189, 341
Using a Module Cache ................. 406
What is a Module Cache? ............. 651
mcache link
deleting ......................................... 407
Menu Bar ...................................... 35, 55
Menus .......................................... 35, 55
File .................................................. 56
Help ................................................ 68
Revision Control ............................. 63
Tools ............................................... 66
View ................................................ 58
Merging ............................................ 655
about ............................................. 655
Merge conflicts.............................. 657
merge edges ................. 285, 409, 679
resolving ....................................... 657
resolving conflicts ......................... 657
using ............................................. 675
work style ...................................... 655
Metadata ...................... 24, 32, 606, 726
about ............................................... 24
controlling access to ....................... 25
errors with ............................... 32, 726
Milkyway ........................................... 762
Mirror .......................... 15, 158, 739, 742
Administering Mirrors ...................... 22
Architecture of the Mirror System ... 20
log files ......................................... 739
Mirroring Overview .................. 18, 652
816

Index
Mirrors Versus LAN Caches ......... 649
syncdiag ....................................... 739
troubleshooting ............................. 742
Modified column ................................. 42
Modified objects ....................... 223, 368
module branching ............................. 310
Modules . 36, 65, 90, 130, 306, 358, 391, 395, 409, 417, 424, 442, 443, 606
Deleting a Module ......................... 417
Deleting a Module Cache Link ...... 407
hierarchy ....................................... 374
merging data ......................... 313, 409
Module Cache ...................... 378, 406
Module Context ...................... 90, 393
Module Context Field ...................... 90
Module Recursion ......................... 300
Module Version Updating ............. 405
Operating on Module Data ............ 294
Overlaying Module Data ............... 414
Rolling Back a Module .................. 419
status ............................................ 361
workspace root ............................. 336
Moving ...................................... 237, 395
examples
Moving a File ............................. 431
Moving a Folder ........................ 432
files ............................................... 237
folders ........................................... 237
module members .......................... 395
MxBridge .......................................... 767
N
Navigating
Go Menu ......................................... 60
Going to a Location ......................... 70
Using the DesignSync GUI ............. 34
Needs Merge status ........................... 42
Needs Update status .......................... 42
Netscape .......................................... 725
Network ............................................ 731
timeouts ........................................ 731
new file dialog .................................. 264
nodefaults ........................................... 13
option .............................................. 13
-nodefaults
option .............................................. 13
-nodefaults ......................................... 13
Nonlocking work style ....................... 655
817
DesignSync Data Manager User's Guide
Notes ........................................ 108, 737
troubleshooting email about .......... 737
nsremote .................................. 725, 726
O
Object ....................................... 108, 204
state .............................................. 204
Objects ....................................... 69, 246
identifying modified objects ... 223, 368
retiring ........................................... 246
selecting ......................................... 69
states ................................................ 8
types ................................................. 9
Objects/comparing ................... 270, 271
OK button ........................................... 92
Online help ....................................... 775
Original objects .................................... 8
Output window ................................... 48
P
Parallel development ........................ 676
about ............................................. 676
performance
DesignSync GUI Client ................. 730
Diagnosing Performance .............. 749
Permissions ................................ 30, 160
UNIX ............................................... 30
vault ................................................ 30
work area ........................................ 30
Persistent Populate Filter ................. 436
Persistent selectors .......................... 663
Policy branches ................................ 686
Populate ........... 142, 189, 204, 341, 436
Populating your work area 142, 189, 341
portnum/path_to_object .................... 108
Printing ............................................... 56
Project branching ..................... 237, 678
Project management ........................ 711
project vault ...................................... 115
Projects .................... 112, 113, 114, 115
about ............................................. 113
browsing a project vault ................ 115
creating ......................................... 114
defining Public Projects ................ 114
displaying ...................................... 114
populating from ............................. 112
setting up a work area for ............. 112
ProjectSync project ............................ 91
818

Index
Properties ........... 77, 79, 81, 82, 83, 114
collection member ........................... 83
collections ....................................... 82
General ........................................... 78
revision control ............................... 79
setting ............................................. 77
viewing ............................................ 77
Public Projects ................................. 113
see Projects .................................. 113
R
RAM ................................................. 606
RAM module .................................... 606
RCE .................................................. 260
Recursion Option ............................... 91
Reference chaining .......................... 720
Reference objects ................................ 8
locked ........................................... 656
REFERENCEs and Revision Control Commands ................................... 716
Related Topics ................................. 108
Release notes ...................................... 1
Releases .......................................... 710
creating ......................................... 710
Remove Member .............................. 393
Removing ......................................... 393
Deleting a Hierarchical Reference 403
Deleting a Module ......................... 417
Deleting Design Data .................... 252
Deleting Files ................................ 265
Deleting Server Folders ................ 259
Deleting Vaults ............................. 255
Deleting Versions from a Vault ..... 253
Member ........................................ 393
Renaming ......................................... 237
files ............................................... 237
folders ........................................... 237
module members .......................... 398
Replica objects ..................................... 8
request ............................................. 108
cleartext ........................................ 108
HTML ............................................ 108
Reserved keywords .......................... 240
Resolving Merge Conflicts ................ 657
Retire ................................................ 246
Retired status ..................................... 42
Revision control ............................ 5, 261
about ................................................. 5
819

DesignSync Data Manager User's Guide
keywords ...................................... 260
menu ............................................... 63
Revision Log ...................................... 79
revision-control ................................. 658
rmhref
Deleting a Hierarchical Reference 403
rollback
Rolling Back a Module .................. 419
Running ........................................ 34, 95
a command-line shell ...................... 95
DesSync ......................................... 34
S
Save Settings ..................................... 92
Save Settings button .......................... 13
Saving ................................................ 56
data sheet ....................................... 56
from View Pane .............................. 56
Scripts ...................... 102, 103, 104, 106
creating ......................................... 104
running .......................................... 105
running startup scripts .................. 106
stcl ................................................ 102
using DesignSync commands in OS shell scripts ............................... 103
Search tab ........................................ 775
Searching ........................................... 75
for text ............................................. 75
Secure Communications .................. 108
See Overview ............................... 108
See Overview ................................... 108
Secure Communications ............... 108
Selecting .................................... 69, 658
objects ............................................ 69
versions and branches .................. 658
Selector Formats .............................. 664
Selector lists ..................................... 662
Selectors .................................... 91, 660
dynamic ................................ 660, 664
static ..................................... 660, 664
Semiconductor ................................. 767
Accelerator ................................... 767
Server MD ........................ 596, 606, 619
setmirror ..................................... 15, 158
Showing ........................................... 205
checkouts ..................................... 205
Module Cache command .............. 378
sitr designer
820

Index
branching a sub-module ............... 323
creating a workspace .................... 321
editing a sub-module .................... 321
overview ....................................... 320
submitting a sub-module for integration ................................. 322
synchronizing a module with the baseline ..................................... 322
synchronizing all modules with the Baseline .................................... 323
sitr integrator
branching .............................. 328, 335
creating workspace ....................... 325
integrating ..................................... 327
locating submissions ..................... 326
overview ....................................... 324
releasing a baseline ...................... 328
selecting submissions ................... 326
testing release candidates ............ 327
workflow overview ......................... 325
workspace overview ..................... 325
sitr overview
branching ...................................... 320
Designer Role ............................... 320
Integrator Role .............................. 324
overview ....................................... 317
SITaR Environment Variables ...... 329
SITaR Module Structure ............... 318
Specify ............................................. 127
Check-In ....................................... 127
vault URL of project ...................... 118
SSL .................................................. 108
States ................................................... 8
object ................................................ 8
Static selectors ......................... 660, 664
Status column .................................... 42
stcl .... 49, 92, 93, 95, 103, 104, 105, 204
about ............................................... 92
compared to other shells ................ 93
creating scripts ............................. 104
invoking .......................................... 95
running scripts .............................. 102
using DesignSync commands in OS shell scripts ............................... 103
stclc .......... 49, 92, 93, 95, 103, 104, 105
about ............................................... 92
compared to other shells ................ 93
creating scripts ............................. 104
invoking .......................................... 95
821

DesignSync Data Manager User's Guide
running scripts .............................. 105
using DesignSync commands in OS shell scripts ............................... 103
Step .................................................. 606
Stop Button ........................................ 34
sync_project.txt file ........................... 711
sync_project.txt files ......................... 658
sync_servers.txt ......................... 41, 326
syncd .................................................. 93
in command-line shells ................... 93
syncdiag ........................................... 742
Synchronicity ............................ 108, 777
contacting ..................................... 777
SyncServer ....................................... 108
instruct .......................................... 108
Synopsys Milkyway collections ........ 762
Displaying ..................................... 755
T
Tabs ................................................. 775
used in online help ........................ 775
Tagging ............................................ 240
branches ....................................... 240
versions ........................................ 240
Tags ........................................... 91, 240
about ............................................. 240
and design configurations ............. 708
fixed .............................................. 710
movable ........................................ 710
reserved ........................................ 240
tag on checkin .............................. 214
Task or Subproject Branches (Feature Isolation) ....................................... 681
Tcl .................................. 49, 93, 95, 102
command shell window ................... 51
in command-line shells ................... 93
mode ............................................... 51
scripts ........................................... 102
Text .................................................... 75
finding ............................................. 75
TkDiff ................................................ 276
Toolbar ............................................... 34
Tools menu ........................................ 66
Tools options ...................................... 66
Tree view ............................................ 41
Tree View Pane .................................. 41
Troubleshooting ...... 723, 731, 735, 737, 738, 742, 745, 746, 749
a SyncServer ........................ 735, 746
822
Index
Cleaning Caches .......................... 729
Email Notification .......................... 737
GUI client performance ................. 730
mirror system ................................ 738
mirrors .......................................... 742
network timeouts ........................... 731
nsremote Issues ........................... 726
performance ................................. 749
tagging .......................................... 728
the DesignSync client ........... 723, 745
Timeouts ....................................... 731
Type column ....................................... 42
U
Undoing check out ........................... 211
Uniform Resource Locators .............. 108
unifystate .......................................... 204
Unknown status .................................. 42
Unlock .............................................. 249
Unresolved Conflicts status ................ 42
Upgrading ......................................... 697
Legacy Modules............................ 697
Up-to-date status ................................ 42
url selector ........................................ 692
URLs .................................. 10, 108, 110
about ............................................. 108
illegal characters in ................. 10, 110
syntax ..................................... 10, 110
Using .......................................... 15, 158
Mirror ...................................... 15, 158
V
Vaults ................................. 13, 124, 255
about ............................................... 13
adding to Bookmarks .................... 140
browsing for a file or project .......... 141
changing for a hierarchy of files .... 161
deleting versions ........................... 255
owners ............................................ 13
permissions .................................... 30
specifying location of .................... 135
Vault Association .......................... 135
Vault Data ............................. 229, 365
vault setting .................................. 135
verifying that a vault has been set 140
viewing contents of ....................... 141
Version column .................................. 42
Version Tags column .......................... 42
823
DesignSync Data Manager User's Guide
824
Versions ...... 13, 81, 141, 206, 214, 240, 253, 606
about ............................................... 13
checking in .................................... 214
checking out ................................. 206
creating ......................................... 214
deleting ......................................... 253
fetching ......................................... 206
history ................................... 224, 369
tagging .......................................... 240
viewing in the vault ....................... 141
View menu ......................................... 58
W
Web browser .................................... 725
Windows ............................................. 34
DesignSync .................................... 34
Work area ....... 26, 28, 30, 142, 189, 341
permissions .................................... 30
populating ..................... 142, 189, 341
relocation of .................................... 28
see also Working folder 142, 189, 341
shared ............................................. 26
Workspace ....................................... 133
Workspace LMD ............... 596, 606, 619
workspace root ................................. 336
Workspace Wizard ........................... 116
World Wide Web .............................. 108


