Download - Excel 2016 - Glasgow Caledonian University

Excel Using a computer for Numerical Calculations
Spreadsheets
Microsoft Office 2016

Microsoft Excel 2016
2
Table of Contents
Spreadsheets - Using A Computer For Numerical Calculations ......................................................... 4
When/If Things Go Wrong.............................................................................................................. 4
Using Help ...................................................................................................................................... 4
Opening and Starting Excel ................................................................................................................ 5
What is a Spreadsheet? ...................................................................................................................... 6
Data .................................................................................................................................................... 6
Moving about a Spreadsheet ......................................................................................................... 7
Entering Data .................................................................................................................................. 7
Inserting and editing data .............................................................................................................. 7
Saving a Spreadsheet ......................................................................................................................... 8
Closing a Spreadsheet ........................................................................................................................ 8
Opening a Spreadsheet ...................................................................................................................... 8
Editing and Formatting ....................................................................................................................... 8
Inserting rows and columns ........................................................................................................... 8
Changing column width and row height ........................................................................................ 9
Deleting data .................................................................................................................................. 9
Moving or copying data ................................................................................................................ 10
Formatting data ............................................................................................................................ 11
Naming sheets .............................................................................................................................. 12
Printing a Spreadsheet ..................................................................................................................... 12
Printing gridlines........................................................................................................................... 12
Entering Formulae ............................................................................................................................ 13
SUM formula (function) ............................................................................................................... 13
Copying formulae ......................................................................................................................... 14
Functions .......................................................................................................................................... 14
Sorting data ...................................................................................................................................... 15
Charts and Graphs ............................................................................................................................ 16
Chart Types and Uses ................................................................................................................... 16
Column/Bar Charts .................................................................................................................. 16
Line Charts ............................................................................................................................... 16
Pie Charts ................................................................................................................................. 17
XY Scatter Charts ..................................................................................................................... 17
Creating a Chart ............................................................................................................................ 17
Moving and Resizing a Chart ........................................................................................................ 18
More Data on One Chart .............................................................................................................. 19
Modifying a Series Title ................................................................................................................ 20
Modifying Axis Labels ................................................................................................................... 21
Modifying Charts .......................................................................................................................... 21

Microsoft Excel 2016
3
Formatting Charts ........................................................................................................................ 23
Supplementary Exercise ................................................................................................................... 24
These notes are designed for you to work through at your own pace. These notes do not explain
every feature of the program therefore you are expected to make use of the Help facility.
Note: This icon denotes important information – read it carefully.
Tasks This icon denotes a task which should be carried out to help you gain the skills required.
If you have any comments or queries, please contact: The ICT Skills tutor within your Learning Development Centre. Glasgow School for Business and Society – 0141 331 3300 School of Health and Life Sciences – 0141 331 3456 School of Engineering and Built Environment – 0141 273 1230

Microsoft Excel 2016
4
Spreadsheets - Using A Computer For Numerical Calculations
When you have completed these notes you should be able to:
Insert, format and edit data in a spreadsheet
Use Excel’s Help facility
Perform calculations on numbers
Save and print a spreadsheet
Create a simple chart using a spreadsheet
A spreadsheet is a program used for performing numerical calculations and analysis. For students,
spreadsheets are useful when working with numbers, e.g. when analysing numerical data, or
carrying out research. The spreadsheet program most commonly used in the University is
Microsoft Excel.
The following notes will introduce some elementary features of spreadsheets using Excel. They do
not cover all aspects of the program.
When/If Things Go Wrong
Before you start using spreadsheet software, remember that when/if an error occurs try the
following to rectify the situation:
To rectify problems such as a wrongly entered menu command:
Use the Undo option by clicking on the Undo icon from the Quick Access Toolbar.
To close a command/dialogue box:
Click on the Close icon at the top right-hand side of the box or press the Cancel button.
If all else fails, close Excel (click on the File tab and then choose the Close option), and start again.
Using Help
If there is a command or feature of Excel you would like to use but do not know how, use the help
facility within the software. This provides instructions on using all features of the software. To use
the help simply click on the Tell me what you want to do entry field, Figure 1, in the middle above
the ribbon. Some help options will be provided, or choose the Get Help option from the menu to
type a phrase to search by in the search box.
Figure 1: Tell me what you want to do text entry field
Tell me what you want to do text entry field
Suggestions options

Microsoft Excel 2016
5
Opening and Starting Excel
Excel is opened from the Start menu (displayed on the Taskbar at the bottom left of the screen).
After clicking the Start button, click on All Programs then Microsoft Office then Microsoft Excel
2016. This should open and display different workbook templates to choose from, Figure 2.
Figure 2: Excel template screen
To start working in Excel choose the Blank workbook option by clicking on it. The Blank workbook
will open ready for you to insert data, Figure 3.
Figure 3: Microsoft Excel 2016 screen
Quick Access Toolbar The Ribbon Tabs
Cell reference Formula Bar Column letter
Active cell
Row number Vertical Scroll bar
Excel’s Minimise, Maximise and Close icons
Help Functions
Sheet reference Horizontal Scroll bar View icons Zoom slider

Microsoft Excel 2016
6
What is a Spreadsheet?
A spreadsheet consists of a matrix (or grid) of rows and columns. It allows you to enter data in a
table-like format and perform calculations on the data. When you start Excel a screen similar to
that shown in Figure 3 is displayed.
Worksheet or sheet – the 2-dimensional matrix of rows and columns. Excel works with Books (or
Workbooks), each book containing a number of sheets. By default, one sheet is displayed, but
more can be added if necessary. Sheets are named Sheet1, Sheet2, etc. by default, but their
names can be changed. To move to another sheet, click on the Sheet reference tab.
Cell – where a row and column intersect. Columns are named with letters A-Z, AA-AZ, BA-BZ, etc.
and rows are numbered. In any Excel sheet there are 16,384 columns and 1,048,576 rows! On
screen you only see a small section of any one sheet.
Cell reference or address – the column letter followed by the row number e.g. A1, BG700, etc.
which gives the location, or address, of a cell.
Active cell – the selected cell where the next action such as typing or formatting will take place.
Formula Bar – displays the contents of the current or active cell.
Vertical Scroll bar – used to move up and down in a worksheet.
Horizontal Scroll bar – used to move left and right in a worksheet.
Excel’s Minimise, Maximise and Close icons – used to minimise, maximise/restore and close the
(Excel) program window.
Data
There are 3 basic types of data which can be entered into cells:
(a) Numbers – in Excel a number can only contain the following characters: 0 1 2…9 + - ( ) , £ . %
Note: When entered, numbers are right-aligned i.e. they are aligned to the right of the cell.
The , £ . % characters are left aligned unless they are accompanied by numbers.
(b) Text or labels – text can include any character from the keyboard and is used for entering sheet, row and column headings and descriptions.
Note: When entered, text is left-aligned in a cell i.e. it is aligned to the left of the cell.
(c) Formulae – these allow calculations to be performed based on the values stored in the cells. Any formula must be prefixed by the ‘=’ sign e.g. if you were to add the contents of the two cells B3 and C4 together, the formula would be entered as =B3+C4. Excel provides some standard formulae e.g. SUM, AVERAGE, STDEV, etc. called functions which are entered using menus and Wizards (see later, page 14, for instructions on how to use them). When a formula or function is entered in a cell, the result of the calculation is displayed on the sheet, while the formula itself is displayed in the Formula Bar.

Microsoft Excel 2016
7
To enter data, first select the appropriate cell (using the mouse or arrow keys), and type the data.
Then press the ENTER key, or any arrow key (to move to a new column or row), or click on the
Enter icon in the Formula Bar (which appears once you start typing into a cell).
Note: Numbers will appear to the right of a cell and text to the left. If the text is longer than
the cell width, just keep on typing. If nothing is entered in the next cell to the right, the text will
appear over it.
Moving about a Spreadsheet
When a new spreadsheet is opened, the active cell will be cell A1. The main ways to move about a
spreadsheet are to use the mouse or the arrow keys on the keyboard. When using the mouse, the
scroll bars may be used – these bars are displayed along the right hand side and the bottom of
the worksheet. Simply click on the arrows at the end of the bars or move the grey bar by clicking
and dragging.
Useful keyboard commands to move around the worksheet include:
Arrow keys – move one cell in a given direction
Page Up and Page Down – move one screen up or down
ALT + Page Up and ALT + Page Down – move one screen to the left or right
Home – move to the start of the current row
Ctrl + Home and Ctrl + End – move to the start or the end of data within the sheet
Ctrl + arrow keys – move to the end of the current row or column
Entering Data
Inserting and editing data
Data can be inserted by clicking on, or moving to, the appropriate cell and typing the data. To edit
existing data go in the cell by double clicking on it or click in the Formula Bar to edit as
appropriate.
Task 1
Enter the following data into a new spreadsheet:
Practice moving about the spreadsheet using the mouse and keyboard.
Use the Help facility to see what other keyboard commands can be used to move about a
spreadsheet.

Microsoft Excel 2016
8
Saving a Spreadsheet
To save a spreadsheet, click on the File tab and choose Save or click on the Save command
from the Quick Access Toolbar. When saving a spreadsheet for the first time, a file name and
location (i.e. the drive and folder) must be given. Further saves will use the same file name and
overwrite the previously saved version. The Save As.. command allows the file to be saved with a
different name, different location or type, leaving the original unchanged. This is useful for
keeping different versions of a file.
Note: Excel automatically adds a .xlsx suffix to the file name. It is important to get into the
habit of saving work every few minutes.
Closing a Spreadsheet
After saving a spreadsheet, it will still be displayed on the screen. To close it select File and choose
Close or click on the close icon .
Opening a Spreadsheet
To open a previously saved spreadsheet, select the File tab and choose Open. The Open options
will be displayed. Navigate to the spreadsheet you wish to open and either double click on the
name to open it, or single click on the name and click on the Open button at the bottom of the
dialogue box.
Task 2
Save the spreadsheet to your user workspace (H: drive) calling it SALES.
Close the SALES spreadsheet.
Editing and Formatting
The contents or the appearance of a spreadsheet can be changed very easily using a few simple
commands.
Inserting rows and columns
A new blank row or column can be inserted by selecting the row/column (by clicking on its header
number/letter) after the position where you want the new one to appear and clicking on the
Insert icon (not on the downward arrow under it) on the Home tab, Cells group. New
columns will be inserted to the left of the selected column; new rows will be inserted above the
selected row. If you want to have better control you can click at the downward arrow at the
bottom of the Insert icon and a drop-down menu will appear with more options.

Microsoft Excel 2016
9
Task 3
Open SALES spreadsheet.
Insert a blank row under the Week No heading and a blank column after the sales persons’
names (in Column B).
Add the following data to the spreadsheet beneath the existing data, (as shown below):
McBride J 4.5 5.6 4.8 6.5
Andrews M 6.5 6.9 5.8 6
The spreadsheet should now look like this:
Changing column width and row height
Columns, by default, can display approximately 9 characters (if using font size 11). To widen a
column to display more characters, firstly click anywhere within the column you want to modify
and then click on the Format icon from the Home tab, Cells group. From the drop-down
menu choose Column Width and enter an appropriate width or choose AutoFit Selection to
adjust the width automatically to fit the data displayed.
The height of rows can similarly be adjusted by choosing Row Height from the drop-down menu.
Task 4
Use Help to find out alternative ways (using the mouse) to widen columns and heighten rows.
Tip: try typing ‘widening columns’ in the Help search box.
Using either the menus or the mouse method, reduce the width of blank Column B, and
increase the width of Column A so that all names fit in this column.
Deleting data
Excel makes a distinction between clearing and deleting data from cells. Clearing removes the
current contents but a blank cell(s) remains as part of the spreadsheet. Deleting removes a cell(s)
from the spreadsheet so that it no longer forms part of the spreadsheet and moves surrounding
data to replace the deleted cells.
To clear the contents of a cell or cells, firstly select the cells then press the Delete key on the
keyboard. Or, from the Home tab, Editing group, click on the Clear icon . A drop-down

Microsoft Excel 2016
10
menu will appear with options to clear all, contents, formats or comments in the selected cell.
You would normally clear a cell if more data had to be entered into it to replace what was already
there. Otherwise you could delete the entire cell or group of cells from the spreadsheet by
clicking on the Delete icon from the Home tab, Cells group. Doing this will move up all the
cells below the ones deleted in the same column. If you click on the downward arrow under
the Delete icon a drop-down menu will appear with options to delete just the cell/cells or the
whole column, row or the entire sheet. If you choose to delete a cell/cells from this menu,
additional Delete options (to shift cells left, to shift cells up, to delete entire row or to delete
entire column) will appear.
Note: If you are deleting more than one cell and you click on the top half of the Delete icon
from the Home tab, depending on which cells you have selected, Excel will choose to shift cells up
or left. We therefore recommend that you use the drop-down menu by clicking on the bottom
half of the Delete icon and then choose yourself how you want the cells shifted.
To change the entire content of a cell, there is no need to clear its contents first, instead simply go
to it and start typing. Excel overwrites by default the contents of the cells if you type in it, so you
have to be careful in case you would like to keep the original content of the cell.
If you only need to modify the content of a cell, but not overwrite all the original content, fo
example, if you want to delete only a character or two from a cell, firstly go to the cell, then
double-click on the cell, or click in the Formula Bar to select the data. The Delete or Backspace keys can then be used to delete the desired characters.
Task 5
Ensure that the SALES spreadsheet is open and make the following changes to it:
Jones A should read Jones B
Figures for Smith J in week 2 should be 7.8
Figures for Andrews M in week 3 should be 6.2
Delete all data for Thomas T and move the data up from the rows below.
Moving or copying data
Data can be moved by removing (or cutting) it from one area and inserting (or pasting) it into
another. This is a 2-stage operation known as cut and paste. To move data, firstly select it, and
then click on the Cut icon in the Home tab, Clipboard group. A broken border will appear
around the selected area. To paste the data, click where it has to be inserted and click on the
Paste icon from the Home tab, Clipboard group. If you click instead on the downward arrow
below the Paste icon, a drop-down menu will appear giving you more paste options.
Similarly, to copy data follow the above icon but instead of Cut click on Copy icon , then Paste

Microsoft Excel 2016
11
the data. Press the Esc key to get rid of the broken border.
Note: When selecting a block of cells, they will appear with a darker background indicating
that they are selected. The top left cell will not appear to have a darker background but it is still
selected as part of the block!
Task 6
Insert a blank row under Jones B. Then move all the data for Brown H to this blank row. Delete
the blank row this leaves.
Copy the data for Smith J to the end of the spreadsheet (to the row beneath Andrews M) and
change it to: Smith M with the sales figures of: 4.3, 4.5, 4.4, 5
Save the spreadsheet to your user workspace (H: drive).
Your spreadsheet should now look like this:
Formatting data
Formatting data includes the use of bold, italics and underline as well as changing the size and
type of data displayed e.g. to display a £ sign or % sign or the number of decimal places. To format
data, it must firstly be selected and then:
To use bold, italics or underline, click on the appropriate icon from the Font group in the Home tab.
To change the size and font of text, use the options available from the Font group in the Home tab (similar to Microsoft Word).
To change the appearance of cells to display currency, percentage data or to change its comma
style, click on the appropriate icons from the Number group in the Home tab.
To increase or decrease the number of decimal places displayed, click on the appropriate icon from the Number group in the Home tab.
Alternatively, you can change a cell’s format by right clicking on the cell and from the menu that
appears choose the Format Cells… option. Or click the cell and the Format icon from the Cells
group in the Home tab. A drop-down menu appears, choose the Format Cells… option. The
Format Cells dialogue box which contains the formatting options will open allowing you to select
cell properties.

Microsoft Excel 2016
12
Task 7
Ensure SALES.xlsx file is open. Change the main heading (SALES FIGURES (June)) to Times New
Roman font, size 14 and bold.
Centre the week number headings and change them to bold.
Display all sales figures with 2 decimal places.
Save the spreadsheet to your user workspace (H: drive).
Naming sheets
Sheets are named by default as Sheet1, Sheet2, etc. To change the name of a sheet, simply
double-click on the Sheet reference tab at the bottom of the screen (it should appear highlighted)
and then type a new name.
Task 8
Change the name of Sheet1 to June Sales.
Add your name a few rows below the data in the spreadsheet (e.g. in Cell A14).
Save the spreadsheet to your user workspace (H: drive).
Printing a Spreadsheet
Excel gives the option of printing the entire spreadsheet, or just a section of a sheet. To print an
entire sheet, from the File tab, choose Print. The print options will open and you can select the
options required for printing e.g. which pages to print, number of copies.
To print only a section of a spreadsheet, firstly highlight the section by selecting the required cells.
Then from the File tab, choose Print, the print options will open and in the Settings section
change the default Print area from Print Active Sheets to Print Selection (a drop-down menu will
be displaying once you click on it).
You can see the Print Preview shown on the screen as you select your print settings. Click on the
Back Arrow icon at the top left hand corner of the screen to get back to your spreadsheet.
Note: Once you have seen the Print Preview, the spreadsheet will display dashed lines to
indicate where the page boundaries are, according to your current print settings.
Printing gridlines
Gridlines are the lines which separate the rows and columns on a spreadsheet. Normally when
you print out your spreadsheet it will not be printed with the gridlines shown. To make the
gridlines appear on your printed document go to the Page Layout tab, Sheet Options group and
check the Print option (put a √ in the box) to have the gridlines showing when printed. When the

Microsoft Excel 2016
13
document is printed the data will be contained within gridlines.
Task 9
Print Preview the SALES spreadsheet with the gridlines displayed.
Save the spreadsheet.
Entering Formulae
The real power of a spreadsheet is in being able to enter formulae to perform calculations on
numeric data. Calculations can include simply adding 2 cells together, adding all the numbers in a
row or column, multiplying 2 or more cells together, dividing, subtracting and working out
percentages etc. As a rule, cell references should be used when entering formulae so that if you
change the contents of a cell, the result of the formula will automatically be recalculated.
Formulae always start with an ‘=’ sign. This is to distinguish a formula from ordinary text. Note
that when a formula is entered, the result of the calculation is displayed in the cell. The actual
formula can be seen in the Formula Bar at the top of the spreadsheet.
Some simple formulae include:
=D2+C2 (addition) =B3*B4 (multiplication) =B4/A3 (division)
=C6-D10 (subtraction) =B9*10% (10% of cell B9)
=(B3*B4)/D10 (the contents of the brackets are calculated first)
Note: When you start to type a formula as you type = and then the letter of the reference
of the cell Excel will give you a list of integrated functions (which are explained in detail later)
starting with the same letter. If you do not want to use any of the suggested functions just keep
on typing and ignore the suggested functions.
Task 10
At the end of the spreadsheet data (for example in cell F14), enter a formula to subtract the
sales of Andrews M from Jones B for week 2. Type some text in the adjacent cell to label this
appropriately.
Save the spreadsheet to your user workspace (H: drive). Close the SALES spreadsheet.
SUM formula (function)
A common formula used in spreadsheets is the SUM formula which adds rows or columns of
numbers. Since this formula is used often, Excel displays an icon for it in the Editing
group of the Home tab. To add the contents of a number of cells together in a row or column,
firstly move the cursor to the cell which will contain the result of the addition, then click on the

Microsoft Excel 2016
14
icon. Excel will suggest which cells have to be added together, a broken border will appear around
the selection. If this is correct, press ENTER , otherwise type in the correct cell range separated
by a colon e.g. A5:A10 or B10:F10, or select the range using the mouse. The SUM formula will look
something like =SUM(A5:A10) – adds together the content of all cells between A5 and A10
(inclusive of A5 and A10).
Copying formulae
Any formula, once entered, can be copied to other cells. Copying a basic formula, such as SUM,
results in the row or column reference(s) within the formula being changed to correspond with
the new row(s) or column(s).
To copy a formula, click on the cell containing the formula, then click on the Copy icon from
the Home tab, Clipboard group. Next click on the cell(s) the formula has to be copied into and
press ENTER or click on the Paste icon from the Home tab, Clipboard group. Remember to
press ESC to get rid of the broken border. The formula will be copied and cell references changed
to correspond with the appropriate rows or columns.
Alternatively, a quick way to copy a formula (or any other cell contents) that will be placed
immediately adjacent to the original is to grab the square at the bottom right hand side of the cell
and drag to the new cells as shown in Figure 4 below.
Figure 4: Copying formulae
Note: When copying a formula always check if the pasted formula has the correct cell
references.
Task 11
In the SALES.xlsx file, type the text TOTAL in cells G3 and A11. Enter the SUM formula at the
end of the row showing sales for Smith J (cell G5) to total the sales for this sales person. Copy
this formula down the column for all other sales persons.
Enter the SUM formula at the bottom of the Week 1 column (cell C11) to total sales for Week 1.
Copy this formula across for all other weeks.
Note how the row and column addresses in the formula change when the formula has been
copied into other cells.
Functions
Excel has a number of built-in functions to allow more complex operations to be carried out on
data. Functions allow you to apply different operations to the data within a spreadsheet. They
Square to grab

Microsoft Excel 2016
15
include a wide range of mathematical and statistical functions for automatically inserting data
such as the date and time. They are sub-grouped into categories (for example Date & Time,
Logical, Financial etc.).
To access Functions go to the Formulas tab, Function Library group and click on the Insert
Function icon or click on the Insert Function icon at the beginning of the Formula Bar. The
Insert Function dialogue box will open as shown in Figure 5. You can then either search for a
function by entering descriptive text in the Search for a function: field or select the appropriate
category from the drop-down list. The Most Recently Used category is always displayed initially,
and the functions in this category are displayed in alphabetical order beneath. If the function you
want is already in this list you can select it from there, or you can choose another category from
the drop-down list and then select the function you want from the list displayed. For example, to
insert today’s date and time into a spreadsheet, choose the function category of Date & Time
from the drop-down list. Then select the function named Now and click OK.
Figure 5: Insert Function dialogue box
The use of some of the functions is outlined in the Excel Advanced notes, but is not covered in
these notes. Refer to these notes or Help for further instructions on how to use any other
functions.
Task 12
Insert today’s date at the top of the SALES spreadsheet using the TODAY function.
Sorting data
Data in rows or columns can be sorted either alphabetically or numerically, in ascending or
descending order. To sort data, firstly select all cells that contain the data to be sorted (not just
the column or the row data has to be ordered by), then go to the Data tab, Sort & Filter group
and click on the appropriate icon to sort the data. For advanced sorting options click on the Sort
icon the Sort dialogue box will open with further options to sort by. Remember when sorting
to select all data to be sorted – for example if you have a list of names in column A with the
Or select a category: drop-down list
Select a function: area
Search for a function: field

Microsoft Excel 2016
16
number of hours each has worked in column B, and you want to sort this list alphabetically, both
columns need to be selected, and the sort carried out on column A. This way the correct number
of hours worked will stay with the correct name.
Remember if the data has not been sorted correctly, you can use the Undo option to get the data
back to its original form, and try again.
Task 13
Sort the data alphabetically in ascending order (remember to highlight all data to be sorted, i.e.
sales persons and their associated sales, and use Undo if necessary!).
Save the spreadsheet to your user workspace (H: drive). Close the SALES spreadsheet.
Charts and Graphs
A chart is a visual depiction of information. Excel contains easy-to-use tools for creating charts
which allows you to display data contained within a spreadsheet as a chart or graph. There are
many different types of charts and graphs including line charts, pie charts, column charts and bar
charts. Displaying raw Excel data in a well-constructed chart can make the data more
understandable, meaningful and can be useful for summarising data and spotting trends.
Chart Types and Uses
There are many different types of charts and graphs including line graphs, pie charts, column
charts and scatter charts, and it is vitally important that the correct chart type is chosen.
Note: Choosing the wrong chart type can lead to the data being misinterpreted.
Column/Bar Charts
These are probably the most common chart types and are used for comparing
data. A column chart displays vertical columns, where each column represents
one of the values/categories being compared. A sub type of the column chart is
the stacked column chart and the main difference is that a stacked column
chart shows the amount each category contributes to the total, as in the
diagram. The bar chart is the same but instead of vertical columns it shows
horizontal bars.
Line Charts
Line charts are most commonly used to display trends in data, and show
continuous data over a set time period. This chart displays each value/category
as a point, the points are connected by lines.

Microsoft Excel 2016
17
Pie Charts
Pie charts are often used to show values/categories as a percentage of the total.
A pie chart is displayed as a circle which is broken into segments, the size of each
segment is determined by it’s percentage of the total. You can determine the
most important “value” within a data set using a pie chart.
XY Scatter Charts
XY scatter charts can be used to plot workbook data showing
relationships/comparisons between the data values. An XY scatter chart can be
used to display comparisons or relationships between two data values.
Creating a Chart
Constructing a chart or graph involves 4 steps:
1. Choose the data range (data to be charted). To select the data range, use the mouse to highlight all of the data you want to appear on the chart i.e. the names and numbers, as in Figure 6. If you want to select two non-adjacent rows or columns, hold down the CTRL key when selecting the data
2. Go to the Insert tab and then to Charts group. Click on the icon corresponding to the type of chart/graph required. A drop-down menu will appear showing you the available sub-types of this chart. Click on the sub-type you want. Excel will generate the basic chart for you as shown in Figure 6.
3. Add titles on the axes (for column, bar, line or scatter charts) or data labels (for pie charts) to make sure that the chart is self-explanatory. You can do that by either:
Clicking on the chart and then going to the Chart Tools - Design tab. Click on the more button next to the Quick Layout icon in the Chart Layouts group to see all chart layouts. Click on the Layout you want (make sure it has Chart title, Data labels for pie charts and Axis Titles for most other types of charts). Excel will now change the layout of the chart and will put the default titles.
Note: When changing the layout of a pie chart, make sure that the layout you choose will put labels on the sections of the pie (like Layout 1 for example).
Or
Clicking on the chart. Then click on the Chart Elements icon to the top right hand side of the chart and choose each element you want to add to your chart, i.e. Axis Titles, Chart Title, Data Labels, etc.
4. Now click on the new elements that you added, i.e. chart title, axis titles, etc. and type an appropriate text for you chart in the Formula Bar.

Microsoft Excel 2016
18
Figure 6: Chart contained within Spreadsheet
You can modify the properties of the chart by using the Chart Tools tabs. From the Chart Tools -
Design tab you can change the style of the chart, its position (on the same sheet as the data or in
a separate sheet) as well as changing the chart type.
Task 14
Open the SALES spreadsheet. Create a simple chart (select an appropriate type) displaying the
sales persons’ names and total sales figures.
Tip: you will need to press and hold the Ctrl key while selecting the salespersons’ names and the
total sales with the mouse.
Title and label it appropriately and display on the June Sales sheet (i.e. the same sheet as the
data).
Save the spreadsheet to your user workspace (H: drive). Close the SALES spreadsheet.
Moving and Resizing a Chart
When your chart is created and inserted into the current worksheet sometimes it covers the data.
If this happens you can move the chart to an empty area on the worksheet. To do this, move the
cursor to the chart, when the cursor changes to a four headed arrow, click on the white area
within the chart and hold and drag the chart to the new location.
Chart Tools Tab with Design tab showing
Columns charted (non-adjacent in this example)
Chart displayed without labels
Quick Layout drop-down menu
Further chart options: Chart Element Chart Style Chart Filter

Microsoft Excel 2016
19
Task 15
Drag the chart below the data in the spreadsheet.
Sometimes when a chart is inserted into a worksheet not all of the data can be seen. If this
happens the chart can be resized. The sizing handles of the chart can be found at the borders of
the chart and are shown with dots. To resize the chart, move the mouse to the edges. When you
do this the cursor will change to a double headed arrow. Click, hold and drag the chart frame
resizing handles to the size required.
The elements of the chart can also be resized. Click any of the elements i.e. the title box, the
legend box or the chart itself and drag to the required size. All element can also be formatted, i.e.
changing the font, font size, colour, etc., by clicking on the relevant element and then selecting
the new formatting options from the Home tab.
Task 16
Resize the chart to ensure all of the data is showing. Increase the font size of the Legend and
resize the box if needed to ensure the Legend is showing all the text.
Sometimes it is easier to operate with the chart if it is in a separate sheet in your workbook. You
can move your chart to a new sheet by clicking on the Move Chart command in the Chart Tools –
Design tab, Location group. Use the same command to move it back from a separate sheet to the
sheet where the data is taken from. When you click on the Move Chart command a dialogue box
will be displayed Figure 7. Choose the appropriate option and click OK to move the chart to the
location specified.
Figure 7: Move Chart dialogue box
Task 17
Move the chart to a new sheet in the workbook and rename the sheet Sales Chart.
More Data on One Chart
Quite often the information that needs to be presented in a chart will come in more than one
set/series. For example, the data that you have in your spreadsheets is for sales figures for 4
consecutive weeks. If you need to show this information in chart, it will have 4 separate values to
Microsoft Excel 2016
20
be presented against each person, i.e. 4 series of data.
Task 18
Go to the June Sales sheet in the workbook and create a column chart showing all sales figures
for everybody for all 4 weeks (without the total sales).
Modifying a Series Title
Click on the chart and from the Chart Tools – Design tab choose the Select Data command , or
right click over the white space in the chart and choose Select Data option from the pop-up menu.
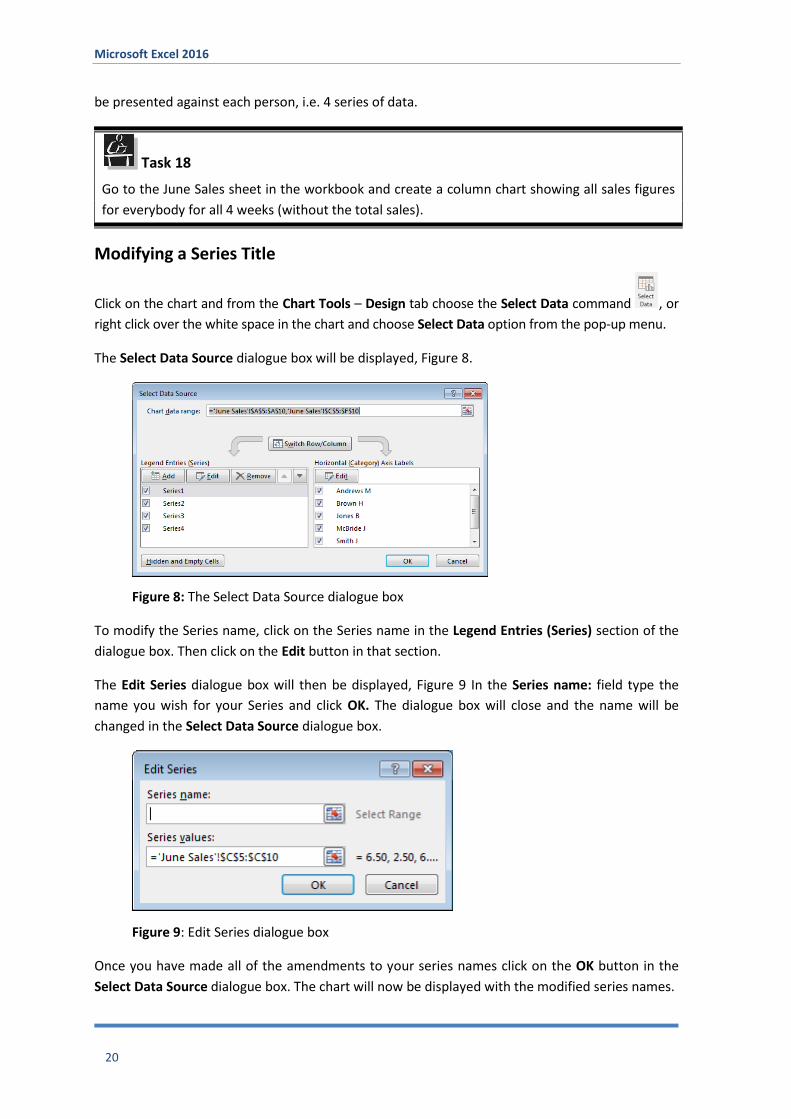
The Select Data Source dialogue box will be displayed, Figure 8.
Figure 8: The Select Data Source dialogue box
To modify the Series name, click on the Series name in the Legend Entries (Series) section of the
dialogue box. Then click on the Edit button in that section.
The Edit Series dialogue box will then be displayed, Figure 9 In the Series name: field type the
name you wish for your Series and click OK. The dialogue box will close and the name will be
changed in the Select Data Source dialogue box.
Figure 9: Edit Series dialogue box
Once you have made all of the amendments to your series names click on the OK button in the
Select Data Source dialogue box. The chart will now be displayed with the modified series names.

Microsoft Excel 2016
21
Task 19
Modify the Series labels of your chart to the corresponding week numbers.
Modifying Axis Labels
To modify the chart axis labels individually click on the Select Data command, when the Select
Data Source dialogue box is displayed, click on the Axis label that you would like to change from
the Horizontal (Category) Axis Labels section of the Select Data Source dialogue box. Then click
on the Edit button the Axis Labels dialogue box will open (see Figure 10). Change the label in the
Axis label range field and click OK. Close the Select Data Source dialogue box once you have made
all of your changes. The chart will now show the data with the labels that you have modified.
Figure 10: Axis Labels dialogue box
Modifying Charts
The functionality within Excel allows you to customise the appearance of the chart, and to ensure
the display is appealing and appropriate to the audience it is aimed at.
If you have created a chart and then feel that you have chosen, the wrong chart type you can
change it. To do this, ensure your chart is selected by clicking on it. The Chart Tools contextual
tabs will be displayed, click on the Chart Tools - Design tab, Type group and Change Chart Type
command (see Figure 11 below).
Figure 11: Chart Type commands
The Change Chart Type dialogue box will appear with all of the chart options (see Figure 12
below). Click on the chart type you would like and click OK.

Microsoft Excel 2016
22
Figure 12: Change Chart Type dialogue box
Task 20
Change the chart type to one of the ones listed. Note how it changes, decide if it works with the
data you have chosen. If not, cancel the change.
You can also change the layout of your chart. Ensure the chart is selected, and the Chart Tools -
Design tab. Then from the Chart Layouts group choose the Quick Layout command, when the
menu is displayed choose a different layout, by clicking on one of the options, (see Figure 13).
Figure 13: Chart Layouts

Microsoft Excel 2016
23
Task 21
Change the chart layout to one of the ones listed choosing an appropriate layout for the data.
Note how it changes, decide if it works with the data you have chosen. If not, cancel the change.
Note: When you change a chart layout some of the titles may be deleted. Use Undo
when this happens.
You can also change the style of your chart. To do this select the chart and from the Chart Tools -
Design tab the Chart Styles group will be displayed. To see the full range of chart styles available
click on the More button at the bottom right hand side of the gallery. From the Chart Styles
group choose a style that you would like (see Figure 14) and click on it to apply it.
Figure 14: Chart Styles group
Task 22
Change the chart style to one of the ones listed choosing an appropriate style for the data..
Note how it changes, decide if it works with the data you have chosen. If not cancel the change.
Formatting Charts
The chart can also be formatted by using the commands available within the Chart Tools - Format
tab option (see Figure 15 below).
Figure 15: Chart Tools -Format tab
Chart elements can be formatted to give emphasis. To format an element select it, a box with
sizing handles will appear around the chosen element. Choose one of the formatting options to
apply, these range from changing colour to adding effects or inserting WordArt to give emphasis.
For example, you may wish to choose different colours for bars in a bar chart or add WordArt to
axis labels.
Task 23
Change the colours of the bars in your bar chart to give each salesman a different colour.

Microsoft Excel 2016
24
Supplementary Exercise
These exercises may be undertaken to extend your knowledge and understanding of Excel.
Supplementary Exercise 1
Open a new spreadsheet and enter the following data:
Add your name a few lines below the spreadsheet data.
Change all headings to bold and change the main heading (Student Marks) to font size 14.
Widen column A to a suitable size.
Right-align the Mark out of 40 sub-heading.
Insert a blank row under the sub-headings.
Change Kennedy W to Kennedy U with a mark of 21
Rename Sheet1 calling it Student
Save the spreadsheet to your user workspace calling it MARKS
Close the file.
Supplementary Exercise 2
Open the MARKS spreadsheet. Add a sub-heading in the column to the right of the ‘Marks out
of 40’ column and label it Percentage.
Add suitable formulae to calculate each student’s percentage mark (Hint: divide the mark by 40
then display the result as a percentage using the percentage format icon).
Save the MARKS spreadsheet to your user workspace (H: drive) and close it.

Microsoft Excel 2016
25
Supplementary Exercise 3
Open the MARKS spreadsheet. Insert today’s date at the top of the sheet.
At the bottom of the spreadsheet (for example after cell A15) enter suitable formulae (look at
Help if you are unsure) to calculate:
the average mark out of 40
the average percentage mark.
maximum and minimum marks.
Tip: The formula should be in the format:
=AVERAGE(range)
=MIN(range)
=MAX(range)
(range = first cell address to last cell address, for example A5:A10)
Sort the data alphabetically in descending order. (Only include the students’ names and their
associated marks – do not include the average, maximum and minimum marks in the sort).
Save the spreadsheet to your user workspace (H: drive). Close the MARKS spreadsheet.
Supplementary Exercise 4
Using the MARKS spreadsheet, create a chart to display the students’ names and their
percentage marks. Label appropriately.
Save the spreadsheet to your user workspace (H: drive). Close the MARKS spreadsheet.


