Download - Fax Brother

8/3/2019 Fax Brother
http://slidepdf.com/reader/full/fax-brother 1/148
USER’S GUIDE
FAX-2820
FAX-2920MFC-7225N

8/3/2019 Fax Brother
http://slidepdf.com/reader/full/fax-brother 2/148
If you need to call Customer Service
Please complete the following information for futurereference:
Model Number: FAX-2820, FAX-2920 and MFC-7225N(Circle your model number)
Serial Number:*
Date of Purchase:
Place of Purchase:
* The serial number can be displayed on the LCD screen(Menu/Set, 4, 1 (FAX-2820 and FAX-2920) or Menu/Set, 6,1 (MFC-7225N)). Retain this User’s Guide with your salesreceipt as a permanent record of your purchase, in theevent of theft, fire or warranty service.
Register your product on-line at
By registering your product with Brother, you will be recorded asthe original owner of the product. Your registration with Brother:■ may serve as confirmation of the purchase date of your
product should you lose your receipt; and■ may support an insurance claim by you in the event of
product loss covered by insurance.
http://www.brother.com/registration
©1996-2005 Brother Industries, Ltd.

8/3/2019 Fax Brother
http://slidepdf.com/reader/full/fax-brother 3/148
i
THIS EQUIPMENT IS DESIGNED TO WORK WITH A TWO WIRE ANALOGUE PSTN LINE FITTED WITHTHE APPROPRIATE CONNECTOR.
APPROVAL INFORMATION
Brother advises that this product may not function correctly in a country other than where it was
originally purchased, and does not offer any warranty in the event that this product is used onpublic telecommunication lines in another country.
Compilation and Publication Notice
Under the supervision of Brother Industries Ltd., this manual has been compiled and published,covering the latest product descriptions and specifications.
The contents of this manual and the specifications of this product are subject to change withoutnotice.
Brother reserves the right to make changes without notice in the specifications and materialscontained herein and shall not be responsible for any damages (including consequential) causedby reliance on the materials presented, including but not limited to typographical and other errorsrelating to the publication.

8/3/2019 Fax Brother
http://slidepdf.com/reader/full/fax-brother 4/148
ii

8/3/2019 Fax Brother
http://slidepdf.com/reader/full/fax-brother 5/148
iii
Safety precautions
We use the following icons throughout this User’s Guide.
To use the machine safely
Please keep these instructions for later reference and read them before attempting anymaintenance.
Note
(For FAX-2820) If there are faxes in the machine's memory, you need to print them or save thembefore you turn off the power and unplug the machine. (To print the faxes in the memory, see
Printing a fax from the memory on page 4-4. To save the faxes in memory, see Forwarding faxes to another fax machine on page 11-5.)
Warnings tell you what to do to prevent possible personal injury.
Electrical Hazard icons alert you to a possible electrical shock.
Hot Surface icons warn you not to touch machine parts that are hot.
Cautions specify procedures you must follow or avoid to prevent possible damageto the machine or other objects.
Improper Setup icons alerts you to devices and operations that are not compatiblewith the machine.
Notes tell you how you should respond to a situation that may arise or give tips about
how the operation works with other features.
WARNING
There are high voltage electrodes inside the machine. Before youclean the inside of the machine, make sure you have unpluggedthe telephone line cord first and then the power cord from theelectrical socket.
Do not handle the plug with wet hands. Doing this might cause anelectrical shock.

8/3/2019 Fax Brother
http://slidepdf.com/reader/full/fax-brother 6/148
iv
After you use the machine, some internal parts areextremely HOT!To prevent injures, be careful not to put your fingersin the area shown in the illustration.
The fuser unit is marked with a caution label. Pleasedo not remove or damage the label.
■ Use caution when installing or modifying telephone lines. Never touch telephone wires or terminalsthat are not insulated unless the telephone line has been disconnected at the wall socket. Never installtelephone wiring during a lightning storm. Never install a telephone wall socket in a wet location.
■ This product must be installed near an electrical socket that is easily accessible. In case of anemergency, you must disconnect the power cord from the electrical socket to shut off the powercompletely.
Do not use a vacuum cleaner to clean up scattered toner. Doing this might cause the toner dust to igniteinside the vacuum cleaner, potentially starting a fire. Please carefully clean the toner dust with a dry,lint-free cloth and dispose of it according to local regulations.
WARNING
IMPORTANT SAFETY INSTRUCTIONS
When using your telephone equipment, basic safety precautions should always be followed toreduce the risk of fire, electric shock and injury to people, including the following:
1. Do not use this product near water, for example, near a bath tub, wash bowl, kitchen sink orwashing machine, in a wet basement or near a swimming pool.
2. Avoid using this product during an electrical storm. There may be a remote risk of electricshock from lightning.
3. Do not use this product to report a gas leak in the vicinity of the leak.
SAVE THESE INSTRUCTIONS
WARNING

8/3/2019 Fax Brother
http://slidepdf.com/reader/full/fax-brother 7/148
v
Quick Reference Guide
Sending Faxes
Automatic Transmission
1 If it is not illuminated in green, press(Fax).
2 Load your document.
3 Enter the fax number using One-Touch,Speed-Dial, Search or the dial pad.
4 Press Start.
Storing numbers
Storing One-Touch Dial numbers
1 Press Menu/Set, 2, 3, 1.
2 Press the One-Touch key where youwant to store the number.
Note
FAX-2820 and FAX-2920 only:
To access One-Touch numbers 11 to 20,hold down Shift as you press the One-Touchkey.
3 Enter the number (up to 20 digits).
Press Menu/Set.
4 Enter the name up to 15 characters (orleave it blank).
Press Menu/Set.5 Press Stop/Exit.
Storing Speed-Dial numbers
1 Press Menu/Set, 2, 3, 2.
2 Using the dial pad, enter a three-digitSpeed-Dial location number (001 - 200).
Press Menu/Set.
3 Enter the number (up to 20 digits).
Press Menu/Set.
4 Enter the name up to 15 characters (orleave it blank).
Press Menu/Set.
5 Press Stop/Exit.
Dialling operations
One-Touch Dialling / Speed-Dialling
1 If it is not illuminated in green, press
(Fax).
2 Load your document.
3 Press the One-Touch key of the numberyou want to call.
Note
FAX-2820 and FAX-2920 only: To dial One-Touch numbers 11 to 20, holddown Shift as you press the One-Touch key.
—OR—
Press Search/Speed Dial, press #.Press the three-digit Speed-Dialnumber.
4 Press Start.

8/3/2019 Fax Brother
http://slidepdf.com/reader/full/fax-brother 8/148
vi
Using Search
1 If it is not illuminated in green, press
(Fax).
2 Load your document.3 Press Search/Speed Dial, and then
enter the first letter of the name you’relooking for.
4 Press or to search the memory.
5 Press Start.
Making copies
Single copy
1 Press (Copy) to illuminate it ingreen.
2 Load your document.
3 Press Start.
Sorting copies using the ADF
1 Press (Copy) to illuminate it ingreen.
2 Load your document.
3 Use the dial pad to enter the number ofcopies you want (up to 99).
4 Press Options and ▲ or ▼ to selectStack/Sort.Press Menu/Set.
5 Press ▲ or ▼ to select Sort.
Press Menu/Set.
6 Press Start.
▲▲

8/3/2019 Fax Brother
http://slidepdf.com/reader/full/fax-brother 9/148
vii
Table of Contents
1 Introduction
Using this Guide ..................................................................................................1-1
Choosing a location.............................................................................................1-2How to access the complete User’s Guide (MFC-7225N only) ...........................1-3To view Documentation (For Windows ® ).......................................................1-3
How to find Scanning instructions .............................................................1-3To view Documentation (For Macintosh ® ) .....................................................1-4
How to find Scanning instructions .............................................................1-4Control panel overview........................................................................................1-5Load document....................................................................................................1-7
Using the automatic document feeder (ADF) ...............................................1-7About paper .........................................................................................................1-8
Recommended paper ....................................................................................1-8
Choosing acceptable paper...........................................................................1-8Paper capacity of the paper trays..............................................................1-9
How to load paper .......................................................................................1-10To load paper or other media in the paper tray .......................................1-10To load paper or other media in the manual feed slot .............................1-11
About fax machines ...........................................................................................1-12Custom features ..........................................................................................1-12
Do you have BT’s Call Minder on the phone line? ..................................1-12Why should there be problems?..............................................................1-12How can you avoid possible problems?..................................................1-12
Fax tones and handshake ...........................................................................1-13ECM (Error Correction Mode)......................................................................1-13
2 Getting started
Initial setup ..........................................................................................................2-1Setting the Date and Time.............................................................................2-1Setting Tone and Pulse dialling mode ...........................................................2-1Setting the Station ID.....................................................................................2-2Setting the Phone Line Type .........................................................................2-3
PABX (PBX) and TRANSFER...................................................................2-3
General Setup .....................................................................................................2-4Setting the Mode Timer (FAX-2820 and FAX-2920 only)..............................2-4Setting the Mode Timer (MFC-7225N only)...................................................2-4Setting the Paper Type..................................................................................2-5Setting the Paper Size...................................................................................2-5Setting the Ring Volume................................................................................2-6Setting the Beeper Volume............................................................................2-6Setting the Speaker Volume..........................................................................2-6Turning on Automatic Daylight Savings Time................................................2-7Toner Save....................................................................................................2-7Sleep Time ....................................................................................................2-7
Setting the LCD Contrast...............................................................................2-8Security..........................................................................................................2-8TX Lock (FAX-2820 only) ..............................................................................2-8

8/3/2019 Fax Brother
http://slidepdf.com/reader/full/fax-brother 10/148
viii
Setting up the password............................................................................2-8Changing the TX Lock password...............................................................2-8Turning TX Lock on ...................................................................................2-9Turning TX Lock off ...................................................................................2-9
Memory Security (FAX-2920 and MFC-7225N only).....................................2-9Setting up the password..........................................................................2-10
Changing the Memory Security password...............................................2-10Turning Memory Security on ...................................................................2-11Turning Memory Security off ...................................................................2-11
Setting Lock.................................................................................................2-11Setting up the password..........................................................................2-11Changing the Setting Lock password......................................................2-12Turning Setting Lock on...........................................................................2-12Turning Setting Lock off...........................................................................2-12
3 Setup Send
How to enter Fax mode .......................................................................................3-1How to dial ...........................................................................................................3-1
Manual dialling...............................................................................................3-1One-Touch Dialling........................................................................................3-1Speed-Dialling ...............................................................................................3-2Search ...........................................................................................................3-2Fax Redial .....................................................................................................3-3
How to Fax...........................................................................................................3-3Automatic transmission .................................................................................3-3Faxing from the ADF .....................................................................................3-3Manual transmission (with an external telephone only).................................3-3Out of Memory message ...............................................................................3-4
Basic sending operations.....................................................................................3-4Sending faxes using multiple settings ...........................................................3-4Contrast .........................................................................................................3-5Fax Resolution...............................................................................................3-5Dual Access...................................................................................................3-6Real Time Transmission................................................................................3-6Broadcasting..................................................................................................3-7Checking job status .......................................................................................3-8Cancelling a fax in progress ..........................................................................3-8
Cancelling a scheduled job............................................................................3-8Advanced sending operations .............................................................................3-9Composing the electronic Cover Page ..........................................................3-9
Composing your own comments ...............................................................3-9Cover page for the next fax only................................................................3-9Send a cover page for all faxes...............................................................3-10Using a printed cover page......................................................................3-10
Overseas Mode ...........................................................................................3-10Delayed Fax ................................................................................................3-11Delayed Batch Transmission.......................................................................3-11Setup for Polled Transmit (Standard) ..........................................................3-12
Setup for Polled Transmit with Secure Code...............................................3-13

8/3/2019 Fax Brother
http://slidepdf.com/reader/full/fax-brother 11/148
ix
4 Setup Receive
Basic receiving operations...................................................................................4-1Choosing the Receive Mode ........................................................................4-1
To select or change your Receive Mode...................................................4-2Setting the Ring Delay ..................................................................................4-2
Setting the F/T Ring Time (Fax/Tel mode only).............................................4-3Fax Detect .....................................................................................................4-3Printing a reduced incoming fax (Auto Reduction) ........................................4-4
Advanced receiving operations............................................................................4-4Printing a fax from the memory ....................................................................4-4Setting the Print Density ................................................................................4-4Reception into memory..................................................................................4-5
If Memory Receive is On at this time.........................................................4-5If Memory Receive is Off at this time.........................................................4-5
Polling............................................................................................................4-5Setup for Polling Receive (Standard) ........................................................4-5
Secure Polling ...........................................................................................4-6Setup for Polling Receive (Secure) ...........................................................4-6Setup for Polling Receive (Timer)..............................................................4-6Sequential Polling......................................................................................4-7
5 Quick-Dial numbers and dialling options
Storing numbers for easy dialling ........................................................................5-1Storing One-Touch numbers .........................................................................5-1Storing Speed-Dial numbers .........................................................................5-2Changing One-Touch / Speed-Dial numbers ................................................5-2
Setting up Groups for Broadcasting ..............................................................5-3Dialling options ....................................................................................................5-4
Access codes and credit card numbers.........................................................5-4Pause ............................................................................................................5-4Tone or Pulse ................................................................................................5-4
6 Remote Fax Options
Setting Remote Fax Options................................................................................6-1Setting up Fax Forwarding ............................................................................6-1Setting Fax Storage.......................................................................................6-1Setting PC Fax Receive (MFC-7225N only)..................................................6-2Turning off Remote Fax Options ...................................................................6-3Changing Remote Fax Options .....................................................................6-3Setting your Remote Access Code................................................................6-4
Remote Retrieval.................................................................................................6-4Using your Remote Access Code..................................................................6-4Remote commands .......................................................................................6-5Retrieving fax messages ...............................................................................6-6Changing your Fax Forwarding number ........................................................6-6

8/3/2019 Fax Brother
http://slidepdf.com/reader/full/fax-brother 12/148
x
7 Printing reports
Fax settings and activity ......................................................................................7-1Customizing the Transmission Verification Report........................................7-1Setting the Journal Period .............................................................................7-2
Printing reports ....................................................................................................7-2
How to print a report..................................................................................7-2
8 Making copies
Using the machine as a copier ............................................................................8-1Enter Copy mode...........................................................................................8-1Making a single copy .....................................................................................8-1Making multiple copies ..................................................................................8-2Stop copying..................................................................................................8-2
Using the temporary Copy key ............................................................................8-2Changing the temporary copy settings..........................................................8-3
Enlarging or reducing the image copied ....................................................8-4Quality .......................................................................................................8-5Sorting copies using the ADF....................................................................8-5Making N in 1 copies (Page Layout)..........................................................8-6
Changing the default copy settings......................................................................8-7Quality ...........................................................................................................8-7Adjusting contrast ..........................................................................................8-7
Out of Memory message .....................................................................................8-7
9 Software and Network Features (MFC-7225N only)
10 Important information
IEC 60825-1 Specification ...........................................................................10-1Laser Diode .............................................................................................10-1
Disconnect device .......................................................................................10-1LAN connection (MFC-7225N only).............................................................10-1International ENERGY STAR ® Compliance Statement...................................10-1Radio interference (220-240V Model only)..................................................10-1Important safety instructions........................................................................10-2Trademarks .................................................................................................10-3
11 Troubleshooting and routine maintenance
Troubleshooting .................................................................................................11-1Error messages ...........................................................................................11-1
Checking if the machine has faxes in its memory ...................................11-5Forwarding faxes to another fax machine ...............................................11-5Transferring faxes to your PC (MFC-7225N only) ...................................11-5
Document jams............................................................................................11-6Paper jams ..................................................................................................11-6
Paper is jammed inside the machine.......................................................11-6
Paper is jammed at the back of the machine ..........................................11-8Paper is jammed inside the drum unit and toner cartridge assembly......11-9
If you are having difficulty with your machine ............................................11-10

8/3/2019 Fax Brother
http://slidepdf.com/reader/full/fax-brother 13/148
xi
Improving the print quality .........................................................................11-15Cleaning the drum unit ..............................................................................11-16Compatibility..............................................................................................11-19
Packing and shipping the machine..................................................................11-19Routine maintenance.......................................................................................11-20
Cleaning the outside of the machine .........................................................11-20
Cleaning the scanner.................................................................................11-21Cleaning the laser scanner window...........................................................11-22Cleaning the corona wire...........................................................................11-23Replacing the toner cartridge (TN-2000)...................................................11-23How to replace the toner cartridge ............................................................11-24Replacing the drum unit (DR-2000)...........................................................11-26
Machine Information ........................................................................................11-28Checking the Serial Numbers....................................................................11-28Checking the Page Counters.....................................................................11-28Checking the Drum Life .............................................................................11-29
A Appendix A
Telephone services............................................................................................. A-1BT Call Sign (For U.K. Only) ........................................................................ A-1
To enable the machine to work with BT Call Sign(Only with your external phone) ........................................................... A-1
Advanced receiving operations........................................................................... A-2Operation from extension telephones........................................................... A-2For Fax/Tel mode only.................................................................................. A-2Using a cordless external handset ............................................................... A-2Changing the remote codes ......................................................................... A-3
Connecting an external device to your machine................................................. A-3Connecting an external telephone................................................................ A-3Connecting an external telephone answering device (TAD) ........................ A-3
Sequence ................................................................................................. A-3Connections ............................................................................................. A-4Recording outgoing message (OGM) on an external TAD....................... A-4Using extension telephones (For U.K. only)............................................. A-5
Multi-line connections (PBX) ........................................................................ A-6If you are installing the machine to work with a PBX................................ A-6
Custom features on your phone line............................................................. A-6
B Appendix B
On-screen programming..................................................................................... B-1Menu table.................................................................................................... B-1Memory storage............................................................................................ B-1
Navigation keys .................................................................................................. B-2Entering Text .............................................................................................. B-10
Inserting spaces ..................................................................................... B-10Making corrections ................................................................................. B-10Repeating letters .................................................................................... B-10
Special characters and symbols ............................................................ B-10
G Glossary

8/3/2019 Fax Brother
http://slidepdf.com/reader/full/fax-brother 14/148
xii
S Specifications
Product description............................................................................................. S-1General ............................................................................................................... S-1Print media.......................................................................................................... S-3Copy ................................................................................................................... S-3
Fax...................................................................................................................... S-4Scanner (MFC-7225N only)................................................................................ S-5Printer (FAX-2920 and MFC-7225N only) .......................................................... S-5Interfaces (FAX-2920 and MFC-7225N only) .....................................................S-6Download the optional software from the Brother Web Site
(FAX-2920 users only)..................................................................................... S-6Computer requirements (FAX-2920 and MFC-7225N only) ............................... S-7Consumable items.............................................................................................. S-8Network (LAN) (MFC-7225N only)...................................................................... S-9Optional External Wireless Print/Scan Server (NC-2200w)
(MFC-7225N only) ......................................................................................... S-10
I Index
R Remote Retrieval Access card

8/3/2019 Fax Brother
http://slidepdf.com/reader/full/fax-brother 15/148
1 - 1
1
Using this GuideThroughout this Guide you will see special symbols alerting you to important warnings, notes andactions. Special fonts identify keys you should press, messages that appear on the LCD, andimportant points or related topics.
Note
Illustrations in the User’s Guide are based on MFC-7225N.
Introduction
Bold Bold typeface identifies specific keys on the machine’s control panel.
Italics Italicized typeface emphasizes an important point or refers you to a related topic.
Courier Courier type face identifies the messages on the LCD of the machine.
Warnings tell you what to do to prevent possible personal injury.
Electrical Hazard icons alert you to a possible electrical shock.
Hot Surface icons warn you not to touch machine parts that are hot.
Cautions specify procedures you must follow or avoid to prevent possibledamage to the machine or other objects.
Improper Setup icons alerts you to devices and operations that are notcompatible with the machine.
Notes tell you how you should respond to a situation that may arise or give tipsabout how the operation works with other features.

8/3/2019 Fax Brother
http://slidepdf.com/reader/full/fax-brother 16/148
Introduction
1 - 2
1
Choosing a location
Place your machine on a flat, stable surface that is free of vibration and shocks, such as a desk.
Put the machine near a telephone socket and a standard, grounded electrical socket. Choose alocation where the temperature remains between 10°C and 32.5°C.
CAUTION
■ Avoid placing your machine in a high-traffic area.
■ Do not place the machine near heaters, air conditioners, water, chemicals, or refrigerators.
■ Do not expose the machine to direct sunlight, excessive heat, moisture, or dust.
■ Do not connect your machine to an electrical socket controlled by wall switches or automatictimers.
■ Disruption of power can wipe out information in the machine’s memory.■ Do not connect your machine to an electrical socket on the same circuit as large appliances
or other equipment that might disrupt the power supply.
■ Avoid interference sources, such as speakers or the base units of cordless phones.

8/3/2019 Fax Brother
http://slidepdf.com/reader/full/fax-brother 17/148
Chapter 1
1 - 3
How to access thecomplete User’s Guide
(MFC-7225N only)This User’s Guide does not contain all theinformation about the machine such as howto use the advanced features of the Fax,Printer, Scanner, PC Fax and Network. Whenyou are ready to learn detailed informationabout these operations, read the completeUser’s Guide located in the ‘Documentation’section of the CD-ROM.
To view Documentation(For Windows ® )
From the Start menu, select Brother, MFLPro Suite MFC-7225N from the ProgramsGroup and then select User’s Guide.
—OR—
1 Turn on your PC. Insert the Brother
CD-ROM labelled Windows ®
into yourCD-ROM drive.
2 If the model name screen appears, clickyour model name.
3 If the language screen appears, clickyour language.
The CD-ROM main menu will appear.
Note
If this window does not appear, useWindows ® Explorer to run the setup.exeprogram from the root directory of the BrotherCD-ROM.
4 Click Documentation.
5 Click the documentation you want toread.
• Quick Setup Guide: Setup andSoftware Installation Instructions
• User’s Guide (3 manuals): User’sGuide for stand-alone operations,Software User’s Guide andNetworking User’s Guide
• PaperPort ® User’s Guide: DocumentManagement Software
How to find Scanning instructions
There are several ways you can scandocuments. You can find the instructions asfollows:
Software User's Guide:
■ How to scan using Windows ® on Chapter2
(For Windows ® 98/98SE/Me/2000Professional/XP/Windows NT ®
Workstation Version 4.0)
■ Using ControlCenter2.0 on Chapter 3
(For Windows ® 98/98SE/Me/2000Professional/XP/Windows NT ®
Workstation Version 4.0)■ Network Scanning on Chapter 6
PaperPort ® User's Guide
■ Instructions for scanning directly fromScanSoft ® PaperPort ®

8/3/2019 Fax Brother
http://slidepdf.com/reader/full/fax-brother 18/148
Introduction
1 - 4
1
To view Documentation(For Macintosh ® )
1 Turn on your Macintosh ® . Insert theBrother CD-ROM labelled Macintosh ® into your CD-ROM drive. The followingwindow will appear.
2 Double-click the Documentation icon.
3 The select Language screen appears,double-click your language.
4 Click the documentation you want to
read.• Quick Setup Guide: Setup and
Software Installation Instructions
• User's Guide (3 manuals): User’sGuide for stand-alone operations,Software User’s Guide andNetworking User’s Guide
• Presto! ® PageManager ® : DocumentManagement Software
How to find Scanning instructions
There are several ways you can scandocuments. You can find the instructions as
follows:Software User's Guide:
■ Scanning from a Macintosh ® on Chapter 7
(For Mac OS ® 9.1 - 9.2/Mac OS ® X 10.2.4or greater)
■ Using ControlCenter2.0 (For Mac OS ® X10.2.4 or greater) on Chapter 7
■ Network Scanning (For Mac OS ® X 10.2.4or greater)
Presto! ® PageManager ® User's Guide
■ Instructions for scanning directly fromPresto! ® PageManager ® (Mac OS ® X)

8/3/2019 Fax Brother
http://slidepdf.com/reader/full/fax-brother 19/148
Chapter 1
1 - 5
Control panel overview
FAX-2820 and FAX-2920 have the same keys.
MFC-7225N
01/01 00:00 Fax
01/01 00:00 Fax
12

8/3/2019 Fax Brother
http://slidepdf.com/reader/full/fax-brother 20/148
Introduction
1 - 6
1
1 One-Touch Keys
These 10 keys give you instant access to 10(MFC-7225N) or 20 (FAX-2820 and
FAX-2920) previously stored dial numbers.2 Fax and telephone keys:
Redial/Pause
Redials the last number you called. It alsoinserts a pause in quick dial numbers.
Tel/R
This key is used to have a telephoneconversation after picking up the externalhandset in F/T pseudo-ringing.Also, use this key to gain access to an
outside line, or to transfer a call to anotherextension when it is connected to a PABX(PBX).
Resolution
Sets the resolution when you send a fax.
3 Navigation keys:
Menu/Set
The same key is used for Menu and Setoperations.Lets you access the Menu to program and
store your settings in the machine.
In standby mode you can press these keys toadjust the ring volume.
▼ Search/Speed Dial
Lets you look up numbers that are stored inthe dialling memory. It also lets you dialstored numbers by pressing # and athree-digit number.
Press to scroll forward or backward to amenu selection.▲ or ▼Press to scroll through the menus andoptions.
4 Dial Pad
Use these keys to dial telephone or faxnumbers and as a keyboard for enteringinformation into the machine.The # key lets you temporarily switch thedialling mode during a telephone call from
Pulse to Tone.5 Start
Lets you start sending faxes or make copies.
▲▲
6 Stop/Exit
Stops an operation or exits from the menu.
7 Reports
Print the Transmission Verification Report,Help List, Quick-Dial List, Fax Journal, UserSettings, Order Form and NetworkConfiguration*. (*MFC-7225N only)
8 Mode keys:
Fax
Lets you access Fax mode.
Scan (MFC-7225N only)Lets you access Scan mode.
Copy
Lets you access Copy mode.
9 Liquid Crystal Display (LCD)
Displays messages on the screen to help youset up and use your machine.
@ Copy key (Temporary settings):
Options
You can quickly and easily select temporarysettings for copying.
A Shift (FAX-2820 and FAX-2920 only)To access One-Touch numbers 11 to 20,hold down Shift as you press the One-Touchkey.
B Printer key:(MFC-7225N only)
Job Cancel
You can cancel a print job and clear theprinter memory.

8/3/2019 Fax Brother
http://slidepdf.com/reader/full/fax-brother 21/148
Chapter 1
1 - 7
Load document
You can send a fax, make copies, and scan
from the ADF (automatic document feeder).
Note
The scan feature is not available forFAX-2820 and FAX-2920.
Using the automaticdocument feeder (ADF)
The ADF can hold up to 20 pages, feedingeach one individually through the machine.Use standard 80 g/m2 paper and always fanthe pages before putting them in the ADF.
■ Make sure documents written with ink arecompletely dry.
■ Documents to be faxed must be from147.3 to 215.9 mm wide and 100 to 356mm long.
1 Pull out the ADF document support.
2 Fan the pages well. Make sure you
insert the documents face down, topedge first in the ADF until you feel themtouch the feed roller.
3 Adjust the paper guides to fit the width ofyour documents.
CAUTION
■ DO NOT use paper that is curled,wrinkled, folded, ripped, stapled,paper-clipped, pasted or taped.
■ DO NOT use cardboard, newspaper orfabric.
CAUTION
DO NOT pull on the document while it isfeeding.

8/3/2019 Fax Brother
http://slidepdf.com/reader/full/fax-brother 22/148
Introduction
1 - 8
1
About paper
Recommended paperTo get the best print quality, we suggest usingthe following paper.
■ Use paper that is made for plain-papercopying.
■ Use paper that is 75 to 90 g/m2.
■ Use neutral paper. Do not use acidic oralkaline paper.
■ Use long-grain paper.
■ Use paper with a moisture content ofapproximately 5%.
Choosing acceptable paper
We recommend that you test paper
(especially special sizes and types of paper)on the machine before purchasing largequantities.
For optimum printing, use a recommendedtype of paper, especially for plain paper andtransparencies. For more information onpaper specifications, call your nearestauthorized sales representative or the placewhere you purchased your machine.
■ Use labels or transparencies that are
designed for use in laser printers.■ If you are using special paper and the
machine has problems feeding from thepaper tray, try again using the manualfeed slot.
■ You can use recycled paper in thismachine.
Paper Type Item
Plain paper Xerox Premier 80 g/m2
Xerox Business 80 g/m2
M-real DATACOPY 80 g/m2
IGEPA X-Press 80 g/m2
Recycled paper Xerox Recycled SupremeTransparency 3M CG 3300
Labels Avery laser label L7163

8/3/2019 Fax Brother
http://slidepdf.com/reader/full/fax-brother 23/148
Chapter 1
1 - 9
Paper capacity of the paper trays
CAUTION
Do not use the following types of paper or envelopes, they may cause a paper jam and
damage your machine.■ Do not use:
• Inkjet paper;
• Coated paper, such as vinyl coated paper;
• Pre-printed or highly textured paper, or paper with an embossed letterhead;
• Label sheets that have had any labels removed;
• Paper that has been previously printed on;
• Paper that cannot be arranged uniformly when stacked;
• Paper that is made with a short grain;
• Damaged, curled, wrinkled, or irregularly shaped paper.
■ Do not use:
• Envelopes that are of a baggy construction;
• Envelopes that are embossed (have raised writing on them);
• Envelopes that are self-adhesive;
• Envelopes that have clasps on them;
• Envelopes that are not sharply creased;
• Envelopes that are pre-printed on the inside.
Paper size Paper types No. of sheets
Paper tray A4, Letter, Executive, A5, A6,B5 and B6
Plain paper, Recycled paper up to 250(80 g/m2)
Transparency up to 10
Manual feed slot Width: 69.9 - 215.9 mm
Length: 116 - 406.4 mm
Plain paper, Recycled paper,Bond paper, Envelope,Labels and Transparency
1
4 mm orlonger
4 mm orlonger

8/3/2019 Fax Brother
http://slidepdf.com/reader/full/fax-brother 24/148
Introduction
1 - 10
1
How to load paper
To load paper or other media in the
paper tray
1 Pull the paper tray completely out of themachine.
2 While pressing the paper guide releaselever, slide the adjusters to fit the papersize.Check that the guides are firmly in theslots.
3 Fan the stack of paper well to avoidpaper jams and mis-feeds.
4 Put paper in the paper tray.
5 Put the paper tray firmly back in themachine. Lift the ADF document output
support and unfold the output paper traysupport flap before you use themachine.
Note
When you put paper in the paper tray, pleaseremember the following:
■ Check that the paper is flat in the tray andbelow the maximum paper mark, and thatthe paper guides are touching the sides ofthe paper stack.
■ The side to be printed on must be facedown.
Maximum Paper Mark
Output Paper TraySupport Flap

8/3/2019 Fax Brother
http://slidepdf.com/reader/full/fax-brother 25/148
Chapter 1
1 - 11
To load paper or other media in themanual feed slot
You can load envelopes and special print
media one at a time into this slot. Use themanual feed slot to print or copy on labels,envelopes or thicker paper.
1 Slide the paper guides to fit the papersize.
2 Using both hands put one sheet of paperin the manual feed slot until you feel thefront edge of the paper touch the paperfeed roller. Let go of the paper when youfeel the machine feed the paper in a
short distance.
Note
When you put paper in the manual feed slot,please remember the following:
■ The side to be printed on must be face up.
■ Put the leading edge (top of the paper) infirst and push it gently into the slot.
■ Make sure that the paper is straight and inthe proper position on the manual feedslot. If it is not, the paper may not be fedproperly, resulting in a skewed printout ora paper jam.
■ Do not put more than one sheet or
envelope in the manual feed slot at a timeor you may cause the machine to jam.
8/3/2019 Fax Brother
http://slidepdf.com/reader/full/fax-brother 26/148
Introduction
1 - 12
1
About fax machines
Custom featuresDo you have BT’s Call Minder on thephone line?
If you have Call Minder on the phone linewhere you will install your new machine,there is a strong possibility that Call Minder and the machine may conflict with each other while receiving incoming calls .
Why should there be problems?
Since both the machine and Call Minder willpick up the call, after the number of rings youhave set, each of them has the ability to keepthe other from receiving calls.
For example, if Call Minder is set to answerafter two rings and your machine is set toanswer after four, Call Minder will stop yourmachine from receiving faxes.
If you set Call Minder and the Brother
machine to answer after the same number ofrings, there is no way of knowing which onewill answer first. It is important to rememberthat neither Call Minder nor the machine canpass the call back to the other after the callhas been answered.
How can you avoid possibleproblems?
A very good way to avoid problems like the
one mentioned, is to get a second phone number on your present phone line .
Many people with Call Minder choose analternative service, which is called “BT CallSign”, and they are very satisfied with it.
Another way to avoid possible problems is toreplace Call Minder with an answeringmachine. Your Brother machine is designedto work with an answering machine or TAD
(telephone answering device).(See Connecting an external telephone answering device (TAD) on page A-3.)

8/3/2019 Fax Brother
http://slidepdf.com/reader/full/fax-brother 27/148
Chapter 1
1 - 13
Fax tones and handshake
When someone is sending a fax, the fax
machine sends fax calling tones (CNGtones). These are quiet, intermittent beepsevery 4-seconds. You’ll hear them after youdial and press Start and they will continue forabout 60 seconds after dialling. During thattime, the sending machine must begin the“handshake” or connection with the receivingmachine.
Each time you use automatic procedures tosend a fax, you are sending CNG tones overthe phone line. You will soon learn to listen forthese quiet beeps each time you answer aphone on your fax line, so you will know if youare receiving a fax message.
The receiving fax responds with fax receivingtones, which are loud, chirping sounds. Areceiving fax chirps for about 40 secondsover the phone line, and the LCD showsReceiving.
If your machine is set to the Fax Only mode,it will answer every call automatically with faxreceiving tones. If the other person hangs up,your machine will continue to send the“chirps” for about 40 seconds, and the LCDcontinues to show Receiving. To cancelreceiving, press Stop/Exit.
The fax ‘handshake’ is the time in which thesending machine’s CNG tones and thereceiving machine’s “chirps” overlap. Thismust be for at least 2 to 4 seconds, so bothmachines can understand how each is
sending and receiving the fax. Thehandshake cannot begin until the call isanswered, and the CNG tones only last forabout 60 seconds after the number is dialled.So it is important for the receiving machine toanswer the call in as few rings as possible.
ECM (Error Correction Mode)
The Error Correction Mode (ECM) is a way for
the machine to check a fax transmissionwhile it is in progress. If the machine detectserrors during fax transmission, it resends thepages of the fax that had an error. ECMtransmissions are only possible between faxmachines that both have this feature. If theydo, you may send and receive fax messagesthat are continuously being checked by themachine.

8/3/2019 Fax Brother
http://slidepdf.com/reader/full/fax-brother 28/148
2 - 1
2
2Initial setupSetting the Date and Time
When the machine is not in use it will displaythe date and time. If you set up the Station IDthe date and time displayed by your machinewill be printed on every fax you send. If thereis a power failure, you may have to reset thedate and time. No other settings will be
affected.
Note
Your machine can store the date and time upto 2 hours (For FAX-2820) or 4 days (ForFAX-2920 and MFC-7225N) if there is apower failure.
1 Press Menu/Set, 0, 2.
2 Enter the last two digits of the year.
Press Menu/Set.
3 Enter two digits for the month.
Press Menu/Set.
(For example, enter 09 for September,or 10 for October.)
4 Enter two digits for the day.Press Menu/Set.
(For example, enter 06 for 6th.)
5 Enter the time in 24-Hour format.
Press Menu/Set.
(For example, enter 15:25 for 3:25 P.M.)
6 Press Stop/Exit.
The LCD now shows the date and timewhenever the machine is idle in Faxmode.
When the machine is in Sleep mode, theLCD shows Sleep. (See Sleep Time onpage 2-7.)
Setting Tone and Pulsedialling mode
1 Press Menu/Set, 0, 4.
2 Press▲ or▼ to select Pulse (or Tone).
Press Menu/Set.
3 Press Stop/Exit.
Getting started
2.Date/Time
4.Tone/Pulse

8/3/2019 Fax Brother
http://slidepdf.com/reader/full/fax-brother 29/148
Chapter 2
2 - 2
Setting the Station ID
You should store your name or company
name and fax number so they print on all faxpages you send.
It is important that you enter the fax numberin the internationally standardised format, i.e.in accordance with the following strictsequence:
■ The “+” (plus) character (by pressingkey)
■ Your Country Code (e.g. “44” for theUnited Kingdom, “41” for Switzerland)
■ Your local area code minus any leading“0” (“9” in Spain)
■ A space
■ Your number on the local exchange, usingspaces to aid readability as appropriate.
As an example, if the machine is installed inthe United Kingdom and the same line is to beused for both fax and voice calls, and yournational telephone number is 0161 444 5555,then you must set the fax and telephonenumber parts of your station ID as: +44 161444 5555.
1 Press Menu/Set, 0, 3.
2 Enter your fax number (up to 20 digits).
Press Menu/Set.
3Enter your telephone number (up to 20digits).
Press Menu/Set.
(If the telephone number and faxnumber are the same, enter the samenumber again.)
Note■ You cannot enter a hyphen in the number.
To enter a space press once between
numbers.■ The telephone number you enter is only
used for Cover Page features.(See Composing the electronic Cover Page on page 3-9.)
4 Use the dial pad to enter your name (upto 20 characters).(See Entering Text on page B-10).
Press Menu/Set.5 Press Stop/Exit.
Note
If the Station ID has already beenprogrammed, the LCD will ask you to press 1 to make a change or 2 to exit withoutchanging.
3.Station ID
▲

8/3/2019 Fax Brother
http://slidepdf.com/reader/full/fax-brother 30/148
Getting started
2 - 3
2
Setting the Phone Line Type
If you are connecting the machine to a line
that features a PABX (PBX) or ISDN to sendand receive faxes, it is also necessary tochange the Phone Line Type accordingly bycompleting the following steps.
1 Press Menu/Set, 0, 5.
2 Press ▲ or ▼ to select PBX, ISDN (orNormal).
Press Menu/Set.3 Press Stop/Exit.
PABX (PBX) and TRANSFER
The machine is initially set to Normal, whichlets the machine connect to a standard PSTN(Public Switched Telephone Network) line.However, many offices use a centraltelephone system or Private AutomaticBranch Exchange (PABX). Your machine can
be connected to most types of PABX (PBX).The machine’s recall feature supports timedbreak recall only (TBR). TBR will work withmost PABX (PBX) systems allowing you togain access to an outside line, or transfercalls to another extension. The feature workswhen Tel/R is pressed.
Note
You can program a Tel/R key press as part ofa number stored in a One-Touch orSpeed-Dial location. When programming theOne-Touch or Speed-Dial number (Menu/Set 2, 3, 1 or 2, 3, 2) press Tel/R first (the screendisplays "!"), then enter the telephonenumber. If you do this, you do not need topress Tel/R each time before you dial using aOne-Touch or Speed-Dial location. (SeeStoring numbers for easy dialling on page5-1.) However, if PBX is not selected in thePhone Line Type setting, you cannot use the
One-Touch or Speed-Dial number that Tel/R press is programmed into.
5.Phone Line Set

8/3/2019 Fax Brother
http://slidepdf.com/reader/full/fax-brother 31/148
Chapter 2
2 - 4
General Setup
Setting the Mode Timer(FAX-2820 and FAX-2920only)
The machine has two temporary mode keyson the control panel: Fax and Copy. You canchange the number of seconds or minutesthe machine takes after the last Copyoperation before it returns to Fax mode. If youselect Off, the machine stays in the modeyou used last.
1 Press Menu/Set, 1, 1.
2 Press ▲ or ▼ to select 0 Sec,30 Secs, 1 Min, 2 Mins, 5 Mins orOff.
Press Menu/Set.
3 Press Stop/Exit.
Setting the Mode Timer(MFC-7225N only)
The machine has three temporary mode keyson the control panel: Fax, Scan and Copy.You can change the number of seconds orminutes the machine takes after the last Scanor Copy operation before it returns to Faxmode. If you select Off, the machine stays inthe mode you used last.
1 Press Menu/Set, 1, 1.
2 Press ▲ or ▼ to select 0 Sec,30 Secs, 1 Min, 2 Mins, 5 Mins orOff.
Press Menu/Set.
3 Press Stop/Exit.
1.Mode Timer
1.Mode Timer

8/3/2019 Fax Brother
http://slidepdf.com/reader/full/fax-brother 32/148
Getting started
2 - 5
2
Setting the Paper Type
To get the best print quality, set the machine
for the type of paper you are using.1 Press Menu/Set, 1, 2.
2 Press ▲ or ▼ to select Plain, Thin,Thick, Thicker, Transprncy (Transparency) or Recycled (Recycledpaper).
Press Menu/Set.
3 Press Stop/Exit.
Note■ The machine ejects paper with printed
surfaces face down onto the output papertray in the front of the machine. When youuse transparencies or labels, removeeach sheet immediately to preventsmudging or paper jams.
■ You can select Transprncy in Step 2 ifLetter or A4 paper size has beenselected (Menu/Set, 1, 3).
Setting the Paper Size
You can use seven sizes of paper for printing
copies: Letter, A4, B5, A5, B6, A6 andExecutive and two sizes for printing faxes:Letter and A4. When you change the size ofpaper you load in the paper tray, you will needto change the paper size setting at the sametime so your machine can fit an incoming faxor a reduced copy on the page.
Note
If you selected Transprncy as the papertype (Menu/Set, 1, 2) you will only be able toselect Letter or A4 size paper in Step 2.
1 Press Menu/Set, 1, 3.
2 Press ▲ or▼ to select Letter, A4, A5,A6, B5, B6 or Executive.
Press Menu/Set.
3 Press Stop/Exit.
2.Paper Type
3.Paper Size

8/3/2019 Fax Brother
http://slidepdf.com/reader/full/fax-brother 33/148
Chapter 2
2 - 6
Setting the Ring Volume
You can turn the ring Off or you can select
the ring volume level.1 Press Menu/Set, 1, 4, 1.
2 Press ▲ or ▼ to select Low, Med, High or Off.
Press Menu/Set.
3 Press Stop/Exit.
—OR—You can adjust the ring volume when yourmachine is idle (not being used).
In mode (Fax), press or toadjust the volume level. Every time you pressthese keys, the machine will ring so you canhear the active setting as the LCD shows it.The volume changes with each key press.The new setting will stay until you change it
again.
Setting the Beeper Volume
You can change the beeper volume. The
default setting is Med. When the beeper is on,the machine will beep when you press a key,make a mistake, or after you sent or receiveda fax.
1 Press Menu/Set, 1, 4, 2.
2 Press ▲ or ▼ to select Low, Med, High or Off.
Press Menu/Set.3 Press Stop/Exit.
Setting the Speaker Volume
You can adjust the machine’s one-wayspeaker volume.
1 Press Menu/Set, 1, 4, 3.
2 Press ▲ or ▼ to select Low, Med, High or Off.
Press Menu/Set.
3 Press Stop/Exit.
1.Ring
▲▲
2.Beeper
3.Speaker
8/3/2019 Fax Brother
http://slidepdf.com/reader/full/fax-brother 34/148
Getting started
2 - 7
2
Turning on AutomaticDaylight Savings Time
You can set the machine to changeautomatically for Daylight Savings Time. Itwill reset itself forward one hour in the Springand backward one hour in the Autumn. Makesure you have set the correct date and time inthe Date/Time setting.
1 Press Menu/Set, 1, 5.
2 Press ▲ or ▼ to select On (or Off).Press Menu/Set.
3 Press Stop/Exit.
Toner Save
You can conserve toner using this feature.When you set Toner Save to On, printappears lighter. The default setting is Off.
1 Press Menu/Set, 1, 6, 1.
2 Press ▲ or ▼ to select On (or Off).
Press Menu/Set.
3 Press Stop/Exit.
Sleep Time
Setting the Sleep Time reduces power
consumption by turning off the fuser insidethe machine while it is idle. You can choosehow long the machine is idle (from 00 to 99minutes) before it goes into sleep mode. Thetimer is automatically reset when the machinereceives a Fax or PC data* (*MFC-7225Nonly) or makes a copy. The factory setting is05 minutes. While the machine is in sleepmode you will see Sleep on the LCD. If youtry to print or copy in sleep mode, there will bea short delay while the fuser warms up to its
working temperature.
1 Press Menu/Set, 1, 6, 2.
2 Use the dial pad to enter the length oftime the machine is idle before it goesinto sleep mode (00 to 99).
Press Menu/Set.
3 Press Stop/Exit.
Note■ If you want to turn off sleep mode, press
Start and Options simultaneously in Step2.
■ If the machine is in sleep mode when youchange the Sleep Time, the new settingwill take effect the next time the machinecopies, prints or is turned off and on.
5.Auto Daylight
1.Toner Save
2.Sleep Time

8/3/2019 Fax Brother
http://slidepdf.com/reader/full/fax-brother 35/148
Chapter 2
2 - 8
Setting the LCD Contrast
You can change the contrast to help the LCD
look lighter or darker.1 Press Menu/Set, 1, 7.
2 Press ▲ or ▼ to select Light or Dark.
Press Menu/Set.
3 Press Stop/Exit.
Security
You can set up your machine with multiplelevels of security using TX Lock (FAX-2820only), Memory Security (FAX-2920 andMFC-7225N only) and Setting Lock.
TX Lock (FAX-2820 only)
TX Lock lets you prevent unauthorized
access to the machine. You will not be able tocontinue to schedule Delayed Faxes orPolling jobs. However, any pre-scheduledDelayed Faxes will be sent even if you turn onTX Lock, so they won’t be lost.
While TX Lock is on, the following operationsare available:
■ Receiving faxes
■ Fax Forwarding(if Fax Forwarding was already on)
■ Remote Retrieval(if Fax Storage was already on)
While TX Lock is on, the following operationsare NOT available:
■ Sending faxes
■ Copying
Setting up the password
Note
■ If you have already set the password andwant to change it, please see Changing the TX Lock password below.
■ If you forget the TX Lock password,please call your Brother dealer for service.
1 Press Menu/Set, 1, 8, 1.
2 Enter a four-digit number for thepassword.
Press Menu/Set.
If you are entering the password for thefirst time, the LCD shows Verify.
3 Re-enter the password.
Press Menu/Set.
4 Press Stop/Exit.
Changing the TX Lock password
1 Press Menu/Set, 1, 8, 1.
2 Press ▲ or▼ to select Set Password.
Press Menu/Set.
3 Enter the registered four-digit password.
Press Menu/Set.4 Enter a four-digit number for the new
password.
Press Menu/Set.
5 If the LCD shows Verify, re-enter thenew password.
Press Menu/Set.
6 Press Stop/Exit.
7.LCD Contrast
1.TX Lock
1.TX Lock

8/3/2019 Fax Brother
http://slidepdf.com/reader/full/fax-brother 36/148
Getting started
2 - 9
2
Turning TX Lock on
1 Press Menu/Set, 1, 8, 1.
2 Press ▲ or ▼ to select Set TX Lock.
Press Menu/Set.
3 Enter the registered four-digit password.
Press Menu/Set.
The machine goes offline and the LCDshows TX Lock Mode.
Turning TX Lock off
1 Press Menu/Set.
Enter the registered four-digit password.
2 Press Menu/Set.
TX Lock is automatically turned off.
Note
If you enter the wrong Password, the LCD
shows Wrong Password and stays offline.The machine will stay in TX Lock Mode untilthe registered password is entered.
Memory Security (FAX-2920and MFC-7225N only)
Memory Security lets you preventunauthorized access to the machine. You willnot be able to continue to schedule DelayedFaxes or Polling jobs. However, anypre-scheduled Delayed Faxes will be senteven if you turn on Memory Security, so theywon’t be lost.
While Memory Security is on, the followingoperations are available:
■ Receiving faxes into memory
(limited by memory capacity)■ Fax Forwarding
(if Fax Forwarding was already on)
■ Remote Retrieval(if Fax Storage was already on)
While Memory Security is on, the followingoperations are NOT available:
■ Sending faxes
■ Printing received faxes
■ Copying■ PC printing (MFC-7225N only)
■ Scanning (MFC-7225N only)
Note■ To print the faxes in memory, turn off
Memory Security.
■ MFC-7225N only: You must turn off PC Fax Receive beforeyou can turn on Memory Security.
(See Turning off Remote Fax Options onpage 6-3.)
1.TX Lock

8/3/2019 Fax Brother
http://slidepdf.com/reader/full/fax-brother 37/148
Chapter 2
2 - 10
Setting up the password
Note
■ If you have already set the password andwant to change it, please see Changing the Memory Security password below.
■ If you forget the Memory Securitypassword, please call your Brother dealerfor service.
1 Press Menu/Set, 1, 8, 1.
2 Enter a four-digit number for thepassword.
Press Menu/Set.
If you are entering the password for thefirst time, the LCD shows Verify.
3 Re-enter the password.
Press Menu/Set.
4 Press Stop/Exit.
Changing the Memory Securitypassword
1 Press Menu/Set, 1, 8, 1.
2 Press ▲ or▼ to select Set Password.
Press Menu/Set.
3 Enter the registered four-digit password.
Press Menu/Set.
4 Enter a four-digit number for the new
password.Press Menu/Set.
5 If the LCD shows Verify, re-enter thenew password.
Press Menu/Set.
6 Press Stop/Exit.
1.Mem Security
1.Mem Security

8/3/2019 Fax Brother
http://slidepdf.com/reader/full/fax-brother 38/148
Getting started
2 - 11
2
Turning Memory Security on
1 Press Menu/Set, 1, 8, 1.
2 Press▲ or ▼ to select Set Security.
Press Menu/Set.
3 Enter the registered four-digit password.
Press Menu/Set.
The machine goes offline and the LCDshows Secure Mode.
NoteIf there is a power failure, the data in thememory will remain for up to 4 days.
Turning Memory Security off
1 Press Menu/Set.
Enter the registered four-digit password.
2 Memory Security is automatically turnedoff and the LCD shows the date andtime.
Note
If you enter the wrong Password, the LCDshows Wrong Password and stays offline.The machine will stay in Secure Mode untilthe registered password is entered.
Setting Lock
Setting Lock lets you prevent unauthorized
access to the machine settings.While Setting Lock is On, the followingoperations are NOT available withoutpassword:
■ Date & Time
■ Station ID
■ Set Quick-Dial (One-Touch Dial,Speed-Dial and Setup Groups)
■ Mode Timer
■ Paper Type■ Paper Size
■ Volume
■ Auto Daylight
■ Ecology (Toner Save and Sleep Time)
■ LCD Contrast
■ Security (TX Lock or Memory Security andSetting Lock)
Setting up the password
Note■ If you have already set the password and
want to change it, please see Changing the Setting Lock password on next page.
■ If you forget the Setting Lock password,please call your Brother dealer for service.
1.Mem Security

8/3/2019 Fax Brother
http://slidepdf.com/reader/full/fax-brother 39/148
Chapter 2
2 - 12
1 Press Menu/Set, 1, 8, 2.
2 Enter a four-digit number for thepassword.
Press Menu/Set.
If you are entering the password for thefirst time, the LCD shows Verify.
3 Re-enter the password.
Press Menu/Set.
4 Press Stop/Exit.
Changing the Setting Lock password
1 Press Menu/Set, 1, 8, 2.
2 Press ▲ or ▼ to select Set Password.
Press Menu/Set.
3 Enter the registered four-digit password.
Press Menu/Set.
4 Enter a four-digit number for the newpassword.
Press Menu/Set.
5 If the LCD shows Verify, re-enter thenew password.
Press Menu/Set.
6 Press Stop/Exit.
Turning Setting Lock on
1 Press Menu/Set, 1, 8, 2.
2 Press ▲ or ▼ to select On.
Press Menu/Set.
3 Enter the registered four-digit password.
Press Menu/Set.
4 Press Stop/Exit.
Turning Setting Lock off1 Press Menu/Set, 1, 8, 2.
2 Enter the registered four-digit password.
Press Menu/Set twice.
3 Press Stop/Exit.
NoteIf you enter the wrong Password, the LCDshows Wrong Password. The machine willstay in Setting Lock mode until the registeredpassword is entered.
2.Setting Lock
2.Setting Lock
2.Setting Lock
2.Setting Lock

8/3/2019 Fax Brother
http://slidepdf.com/reader/full/fax-brother 40/148
3 - 1
3
3
How to enter Fax modeBefore sending faxes or changing fax send or
receiving settings, make sure (Fax) is
illuminated in green. If it is not, press
(Fax) to enter Fax mode. The default settingis Fax mode.
How to dial
You can dial in any of the following ways.
Manual dialling
Press all of the digits of the phone or faxnumber.
One-Touch DiallingPress the One-Touch key of the location youwant to call. (See Storing One-Touch numbers on page 5-1.)
Note■ FAX-2820 and FAX-2920 only:
To dial One-Touch numbers 11 to 20, holddown Shift as you press the One-Touchkey.
■ Shift is not available for MFC-7225N.
Setup Send
MFC-7225NFAX-2820 andFAX-2920

8/3/2019 Fax Brother
http://slidepdf.com/reader/full/fax-brother 41/148
Chapter 3
3 - 2
Speed-Dialling
Press Search/Speed Dial, #, and then the
three digit Speed-Dial number. (See Storing Speed-Dial numbers on page 5-2.)
Note
If the LCD shows Not Registered whenyou enter the One-Touch or Speed-Dialnumber, a number has not been stored at thislocation.
Search
You can search for names you have stored in
the One-Touch and Speed-Dial memories.Press Search/Speed Dial and the navigationkeys to search. (See Storing One-Touch numbers on page 5-1 and Storing Speed-Dial numbers on page 5-2.)
* To search alphabetically, you can use thedial pad to enter the first letter of the nameyou are looking for.
Three-digit number
To search numerically
To search alphabetically*

8/3/2019 Fax Brother
http://slidepdf.com/reader/full/fax-brother 42/148
Setup Send
3 - 3
3
Fax Redial
If you are sending a fax manually and the line
is busy, press Redial/Pause, and then pressStart to try again. If you want to make asecond call to the last number dialled, youcan save time by pressing Redial/PauseandStart.
Redial/Pause only works if you dialled fromthe control panel.If you are sending a fax automatically and theline is busy, the machine will automaticallyredial up to three times at five minuteintervals.
How to Fax
Automatic transmissionThis is the easiest way to send a fax.
Press Start immediately after dialling. (For anexample of automatic faxing, follow the stepsin Faxing from the ADF on this page.)
Faxing from the ADF
1If it is not illuminated in green, press
(Fax).
2 Put the document face down in the ADF.
3 Dial the fax number.
Press Start. The machine startsscanning the document.
Manual transmission (with anexternal telephone only)
Manual transmission lets you hear thedialling, ringing and fax-receiving tones whilesending a fax.
1 If it is not illuminated in green, press
(Fax).
2 Load your document.
3 Pick up the handset of the externalphone and listen for a dial tone.
4 On the external phone, dial the faxnumber you want to call.
5 When you hear the fax tone, pressStart.
6Replace the handset of the externalphone.

8/3/2019 Fax Brother
http://slidepdf.com/reader/full/fax-brother 43/148
Chapter 3
3 - 4
Out of Memory message
If you get an Out of Memory message while
scanning the first page of a fax, pressStop/Exit to cancel the fax.
If you get an Out of Memory message whilescanning a subsequent page, you will havethe option to press Start to send the pagesscanned so far, or to press Stop/Exit tocancel the operation.
Note
If you get an Out of Memory message while
faxing and you do not want to delete yourstored faxes to clear the memory, you cansend the fax in real time. (See Real Time Transmission on page 3-6.)
Basic sendingoperations
Sending faxes using multiplesettings
When you send a fax you can choose anycombination of these settings: cover page,contrast, resolution, overseas mode, delayedfax timer, polling transmission or real timetransmission.
1 If it is not illuminated in green, press(Fax).
After each setting is accepted, the LCDwill ask if you want to enter moresettings:
2 Press 1 to select more settings. The
LCD will return to the Setup Send menu.
—OR—
Press 2 if you have finished choosingsettings and go to the next step.
Next
1.Yes 2.No

8/3/2019 Fax Brother
http://slidepdf.com/reader/full/fax-brother 44/148
Setup Send
3 - 5
3
Contrast
If your document is very light or very dark, you
may want to change the contrast.Use Light to send a light document.
Use Dark to send a dark document.
1 If it is not illuminated in green, press
(Fax).
2 Load your document.
3 Press Menu/Set, 2, 2, 1.
4 Press ▲ or▼ to select Auto, Light orDark.
Press Menu/Set.
Fax Resolution
After you load the document, you can use the
Resolution key to change the settingtemporarily (for this fax only). In Fax mode
, press Resolution and▲ or ▼ to
select the setting you want, and then pressMenu/Set.
—OR—
You can change the default setting:
1 If it is not illuminated in green, press
(Fax).
2 Press Menu/Set, 2, 2, 2.
3 Press ▲ or ▼ to select the resolutionyou want.
Press Menu/Set.
1.Contrast
Standard Suitable for most typeddocuments.
Fine Good for small print andtransmits a little slowerthan Standard resolution.
S.Fine Good for small print orartwork and transmitsslower than Fineresolution.
Photo Use when the document
has varying shades of greyor is a photograph. Thishas the slowesttransmission time.
2.Fax Resolution

8/3/2019 Fax Brother
http://slidepdf.com/reader/full/fax-brother 45/148
Chapter 3
3 - 6
Dual Access
You can dial a number, and begin scanning
the fax into memory—even when themachine is sending from memory, receivingfaxes or printing PC data* (*MFC-7225Nonly). The LCD shows the new job number.
Note■ The number of pages you can scan into
the memory will vary depending on thedata that is printed on them.
■ If you get an Out of Memory messagewhile scanning the first page of a fax,press Stop/Exit to cancel scanning. If youget an Out of Memory message whilescanning a subsequent page, you canpress Start to send the pages scanned sofar, or press Stop/Exit to cancel theoperation.
Real Time Transmission
When you are sending a fax, the machine will
scan the documents into the memory beforesending. Then, as soon as the phone line isfree, the machine will start dialling andsending.
If the memory is full, the machine will send thedocument in real time (even if Real TimeTX is set to Off).
Sometimes, you may want to send animportant document immediately, withoutwaiting for memory transmission. You can set
Real Time TX to On for all documents orNext Fax:On for the next fax only.
1 If it is not illuminated in green, press
(Fax).
2 Press Menu/Set, 2, 2, 5.
3 To change the setting, press▲
or▼
toselect On, Next Fax:On,Next Fax:Off or Off.
Press Menu/Set.
5.Real Time TX

8/3/2019 Fax Brother
http://slidepdf.com/reader/full/fax-brother 46/148
Setup Send
3 - 7
3
Broadcasting
Broadcasting is when the same fax message
is automatically sent to more than one faxnumber. You can include Groups,One-Touch, Speed-Dial numbers and up to50 manually dialled numbers in the samebroadcast.
Press Menu/Set between each of thenumbers. Use Search/Speed Dial to helpyou choose the numbers easily. (To set upGroup dial numbers, see Setting up Groups for Broadcasting on page 5-3.)
After the broadcast is finished, a BroadcastReport will be printed to let you know theresults.
1 If it is not illuminated in green, press
(Fax).
2 Load your document.
3 Enter a number using One-Touch,
Speed-Dial, a Group number, Search ormanual dialling using the dial pad.
Press Menu/Set after each number.
4 After you have entered all the faxnumbers, press Start.
Note■ If you did not use up any of the numbers
for Groups, access codes or credit card
numbers, you can ‘broadcast’ faxes to asmany as 260 (MFC-7225N) or 270(FAX-2820 and FAX-2920) differentnumbers.
■ The available memory will vary dependingon the types of jobs in the memory and thenumber of locations used forbroadcasting. If you broadcast to themaximum numbers available, you will notbe able to use Dual Access and Delayed
fax.■ Enter the long dialling sequence numbers
as you would normally, but remember thateach One-Touch and Speed-Dial numbercounts as one number, so the number oflocations you can store becomes limited.(See Access codes and credit card numbers on page 5-4.)
■ If the memory is full, press Stop/Exit tostop the job or if more than one page hasbeen scanned, press Start to send theportion that is in the memory.
8/3/2019 Fax Brother
http://slidepdf.com/reader/full/fax-brother 47/148
Chapter 3
3 - 8
Checking job status
Check which jobs are still waiting in the
memory to be sent. (If there are no jobs, theLCD shows No Jobs Waiting.)
1 Press Menu/Set, 2, 6.
2 If you have more than one job waiting,press ▲ or ▼ to scroll through the list.
3 Press Stop/Exit.
Cancelling a fax in progress
If you want to cancel a fax, while the machineis scanning, dialling or sending it, pressStop/Exit.
Cancelling a scheduled job
You can cancel a fax job that is stored and
waiting in the memory.1 Press Menu/Set, 2, 6.
Any jobs that are waiting will appear onthe LCD.
2 If you have more than one job waiting,press▲ or▼ to select the job you wantto cancel.
Press Menu/Set.—OR—
If you only have one job waiting, go toStep 3.
3 Press 1 to cancel.
To cancel another job go to Step 2.
—OR—
Press 2 to exit without cancelling.
4 Press Stop/Exit.
6.Remaining Jobs
6.Remaining Jobs

8/3/2019 Fax Brother
http://slidepdf.com/reader/full/fax-brother 48/148
Setup Send
3 - 9
3
Advanced sendingoperations
Composing the electronicCover Page
The Cover Page is sent to the receivingparty’s machine. Your Cover Page includesthe name or number stored in the One-Touchor Speed-Dial memory. If you are diallingmanually, the name is left blank.
The Cover Page shows your Station ID and
the number of pages you’re sending. (SeeSetting the Station ID on page 2-2.) If youhave Cover Page set to On for all faxes(Menu/Set, 2, 2, 7), the number of pages isnot shown on the cover page.
You can select a comment to include on yourCover Page.
1.Comment Off
2.Please Call
3.Urgent
4.Confidential
Instead of using one of the preset comments,you can enter two personal messages of yourown, up to 27 characters long. Use the charton B-10 for help entering characters. (SeeComposing your own comments on thispage.)
5.(User Defined)
6.(User Defined)
Most of the Setup Send settings aretemporary to allow you to make changes foreach fax you send. However, when you setup your Cover Page and Cover PageComments, you are changing the defaultsettings so they will be available while faxing.
Composing your own comments
You can set up two comments of your own.
1 If it is not illuminated in green, press
(Fax).
2 Press Menu/Set, 2, 2, 8.
3 Press ▲ or ▼ to choose 5 or 6 for yourown comment.Press Menu/Set.
4 Use the dial pad to enter yourcustomized comment.Press Menu/Set.(See Entering Text on page B-10.)
Cover page for the next fax only
If you have not yet set your Station ID thisfeature will not work. Make sure you haveprogrammed the Station ID beforecontinuing. (See Setting the Station ID on
page 2-2.) If you only want to send a CoverPage with a particular fax, your machine willask you to enter the number of pages you aresending so it can be printed on the CoverPage.
1 If it is not illuminated in green, press
(Fax).
2 Load your document.
3 Press Menu/Set, 2, 2, 7.
4 Press ▲ or ▼ to select Next Fax:On (or Next Fax:Off).
Press Menu/Set.
8.Coverpage Note
7.Coverpg Setup

8/3/2019 Fax Brother
http://slidepdf.com/reader/full/fax-brother 49/148
Chapter 3
3 - 10
5 Press ▲ or ▼ to select one of thestandard or your own comments.
Press Menu/Set.
6 Enter two digits to show the number ofpages you are sending.
Press Menu/Set.
(For example, press 0 2 for 2 pages orenter 0 0 to leave the number of pagesblank. If you make a mistake, pressto back up and re-enter the number ofpages.)
Send a cover page for all faxes
If you have not yet set your Station ID thisfeature will not work. Make sure you haveprogrammed the Station ID beforecontinuing. (See Setting the Station ID onpage 2-2.)
You can set the machine to send a coverpage whenever you send a fax. The numberof pages in your fax is not included when youuse this setting.
1 If it is not illuminated in green, press
(Fax).
2 Press Menu/Set, 2, 2, 7.
3 Press ▲ or ▼ to select On (or Off).
Press Menu/Set.
4 If you selected On, press ▲ or ▼ toselect one of the standard or your owncomments.
Press Menu/Set.
Using a printed cover page
If you prefer to use a printed cover page thatyou can write on, you can print the sample
page and attach it to your fax.
1 If it is not illuminated in green, press
(Fax).
2 Press Menu/Set, 2, 2, 7.
3 Press ▲ or▼ to select Print Sample.
Press Menu/Set.
4 Press Start. Your machine prints a copyof your cover page.
Overseas Mode
If you are having difficulty sending a faxoverseas due to possible interference on thephone line, we recommend that you turn on
the Overseas Mode. After you send a faxusing this feature, the feature will turn itselfoff.
1 If it is not illuminated in green, press
(Fax).
2 Load your document.
3 Press Menu/Set, 2, 2, 9.
4 Press ▲ or ▼ to select On (or Off).
Press Menu/Set.
▲
7.Coverpg Setup
7.Coverpg Setup
9.Overseas Mode

8/3/2019 Fax Brother
http://slidepdf.com/reader/full/fax-brother 50/148
Setup Send
3 - 11
3
Delayed Fax
During the day you can store up to 50 faxes
in the memory to be sent within 24 hours.These faxes will be sent at the time of day youenter in Step 4.
1 If it is not illuminated in green, press
(Fax).
2 Load your document.
3 Press Menu/Set, 2, 2, 3.
4 Press Menu/Set to accept the displayedtime.
—OR—
Enter the time you want the fax to besent (in 24-hour format).
(For example, enter 19:45 for 7:45 PM.)
Press Menu/Set.
Press 1 to leave the paper documentwaiting in the ADF.
—OR—
Press 2 to scan the document into thememory.
Note
The number of pages you can scan into thememory depends on the amount of data thatis printed on each page.
Delayed Batch Transmission
Before sending the delayed faxes, your
machine will help you economize by sortingall the faxes in the memory by destination andscheduled time. All delayed faxes that arescheduled to be sent at the same time to thesame fax number will be sent as one fax tosave transmission time.
1 If it is not illuminated in green, press
(Fax).
2 Press Menu/Set, 2, 2, 4.
3 Press ▲ or ▼ to select On (or Off).
Press Menu/Set.
4 Press Stop/Exit.
3.Delayed Fax
1.Doc 2.Memory
4.Batch TX

8/3/2019 Fax Brother
http://slidepdf.com/reader/full/fax-brother 51/148
Chapter 3
3 - 12
Setup for Polled Transmit(Standard)
Polled Transmit is when you set up themachine to wait with a document so anotherfax machine can retrieve it.
Note■ When someone polls your machine to
receive a fax, they pay for the call.
■ If you poll someone’s fax machine toreceive a fax, you pay for the call.
1 If it is not illuminated in green, press
(Fax).
2 Load your document.
3 Press Menu/Set, 2, 2, 6.
4 Press ▲ or ▼ to select Standard.
Press Menu/Set.
Press 1 to leave the paper documentwaiting in the ADF.
—OR—
Press 2 to scan the document into thememory.
Note■ If you press 1 in Step 4, the document
remains in the ADF until your machine ispolled. If you want to use the ADF beforethe polled transmission occurs, you mustuse Menu/Set, 2, 6 to cancel the job.
■ If you press 2 in Step 4, the document willbe stored in the machine’s memory andcan be retrieved from any other faxmachine until you delete the fax frommemory by using the Cancelling a Jobmenu setting. (See Cancelling a scheduled job on page 3-8.)
6.Polled TX
1.Doc 2.Memory

8/3/2019 Fax Brother
http://slidepdf.com/reader/full/fax-brother 52/148
Setup Send
3 - 13
3
Setup for Polled Transmit withSecure Code
Polled Transmit with Secure Code is a way tokeep documents from falling into the wronghands while the machine is set up for polling.
Note■ When someone polls your machine to
receive a fax, they pay for the call.
■ If you poll someone’s fax machine toreceive a fax, you pay for the call.
1 If it is not illuminated in green, press
(Fax).
2 Load your document
3 Press Menu/Set, 2, 2, 6.
4 Press ▲ or ▼ to select Secure.
Press Menu/Set.
5 Enter a four-digit number.
Press Menu/Set.
Press 1 to leave the paper documentwaiting in the ADF.
—OR—
Press 2 to scan the document into thememory.
Note■ If you press 1 in Step 5, the document
remains in the ADF until your machine is
polled. If you want to use the ADF beforethe polled transmission occurs, you mustfirst cancel this job.
■ If you press 2 in Step 5 the document willbe stored in the machine’s memory andcan be retrieved from any other faxmachine until you delete the fax frommemory by using the Cancelling a Jobmenu setting. (See Cancelling a scheduled job on page 3-8.)
■ You can use Secure Polling only withanother Brother fax machine.
6.Polled TX
1.Doc 2.Memory
8/3/2019 Fax Brother
http://slidepdf.com/reader/full/fax-brother 53/148
4 - 1
4
Basic receiving operationsChoosing the Receive Mode
There are four different Receive Modes for your machine. You can choose the mode that bestsuits your needs.
Setup Receive
LCD How it works When to use it
Fax Only
(automatic receive)
The machine automaticallyanswers every call as a fax.
For dedicated fax lines.
Fax/Tel
(fax and telephone)
(with an external orextension telephone)
The machine controls theline and automaticallyanswers every call. If the callis a fax it will receive the fax.If the call is not a fax it willring (pseudo/double ring) foryou to pick up the call.
Use this mode if you expect to receive lots of fax messagesand few telephone calls. You cannot use an answeringmachine on the same line, even if it is on a separate phonesocket on the same line. You cannot use the telephonecompany’s Voice Mail in this mode.
External TAD
(with an external telephoneanswering machine only)
The external telephoneanswering machine (TAD)automatically answers everycall.
Voice messages are stored
on the external TAD. If it is afax call, the machinereceives the Fax.
Use this mode, if you want to use an answering machineconnected to your machine.
The External TAD setting works only with an externalanswering machine. Ring Delay does not work in thissetting.
Manual
(manual receive)
(with an external orextension telephone or BTCall Sign)
You control the phone lineand must answer every callyourself.
Use this mode if you do not receive many fax messages,use BT Call Sign, or if you are using a computer on thesame line.
If you answer and hear fax tones, wait until the machinetakes over the call, then hang up. (See Fax Detect on page4-3.)

8/3/2019 Fax Brother
http://slidepdf.com/reader/full/fax-brother 54/148
Setup Receive
4 - 2
4
To select or change your ReceiveMode
1 Press Menu/Set, 0, 1.
2 Press ▲ or ▼ to select Fax Only,Fax/Tel, External TAD or Manual.
Press Menu/Set.
3 Press Stop/Exit.
Setting the Ring Delay
The Ring Delay sets the number of times the
machine rings before it answers in Fax Only or Fax/Tel mode. If you have external orextension phones on the same line as themachine or subscribe to the BT Call Signservice, keep the Ring Delay setting of 4.(See Operation from extension telephones onpage A-2 and Fax Detect on page 4-3.)
1 If it is not illuminated in green, press
(Fax).
2 Press Menu/Set, 2, 1, 1.
3 Press ▲ or ▼ to select how many timesthe line rings before the machineanswers (00 - 04).
Press Menu/Set.
(If you select 00, the line won’t ring at
all.)4 Press Stop/Exit.
1.Receive Mode
Current Receive Mode
Fax : Fax Only
F/T : Fax/Tel
TAD : External TAD
Mnl : Manual
1.Ring Delay

8/3/2019 Fax Brother
http://slidepdf.com/reader/full/fax-brother 55/148
Chapter 4
4 - 3
Setting the F/T Ring Time(Fax/Tel mode only)
If you set the Receive Mode to Fax/Tel,you’ll need to decide how long the machinewill signal you with its specialpseudo/double-ring when you have a voicecall. (If it’s a fax call, the machine receives thefax.)
This pseudo/double-ring happens after theinitial ringing from the phone company. Onlythe machine rings and no other phones on thesame line will ring with the special
pseudo/double-ring. However, you can stillanswer the call on any telephone on the sameline as the machine. (See For Fax/Tel mode only on page A-2.)
1 If it is not illuminated in green, press
(Fax).
2 Press Menu/Set, 2, 1, 2.
3 Press ▲ or ▼ to select how long themachine will ring to alert you that youhave a voice call (20, 30, 40 or 70seconds).
Press Menu/Set.
4 Press Stop/Exit.
Note
Even if the caller hangs up during thepseudo/double-ringing, the machine willcontinue to ring for the set time.
Fax Detect
When you use this feature, you don’t have to
press Start or the Fax Receive Code 51 when you answer a fax call. Selecting On allows the machine to receive fax callsautomatically, even if you lift the handset ofan extension or external phone. When yousee Receiving on the LCD or when youhear ‘chirps’ through the handset of anextension phone connected to another wallsocket/phone socket, just replace thehandset and your machine will do the rest.
Note■ If your machine does not connect a fax call
when you lift an extension or externalphone handset (either because thisfeature is set to Off or due to telephoneline problems), you will need to activatethe machine manually. You can do this bypressing Start on the machine.—OR—by pressing 51 if you are not at yourmachine. (See Operation from extension telephones on page A-2.)
■ If you send faxes from a computer on thesame phone line and the machineintercepts them, set Fax Detect to Off.
1 If it is not illuminated in green, press
(Fax).
2 Press Menu/Set, 2, 1, 3.
3 Press ▲ or ▼ to select On (or Off).
Press Menu/Set.
4 Press Stop/Exit.
2.F/T Ring Time
3.Fax Detect

8/3/2019 Fax Brother
http://slidepdf.com/reader/full/fax-brother 56/148
Setup Receive
4 - 4
4
Printing a reduced incomingfax (Auto Reduction)
If you choose On, the machine automaticallyreduces an incoming fax to fit on one page ofLetter or A4 size paper. The machinecalculates the reduction ratio by using thepage size of the document and your PaperSize setting (Menu/Set, 1, 3).
1 If it is not illuminated in green, press
(Fax).
2 Press Menu/Set, 2, 1, 5.
3 Use ▲ or ▼ to select On (or Off).
Press Menu/Set.
4 Press Stop/Exit.
Note■
Turn on this setting if you receive faxesthat are split onto two pages. However, ifthe document is too long the machine maystill print on two pages.
■ If left and right margins are cut off, turn onthis setting.
■ When this feature is set to On, the A4faxes people send to you may appearslightly shrunk even though your machineprints them on A4 paper. This is becausethe machine has to print the Station ID ofthe sending machine at the top of thepage.
Advanced receivingoperations
Printing a fax from thememory
If you have selected Fax Storage (Menu/Set,2, 5, 1), you can still print a fax from thememory when you are at your machine.(See Setting Fax Storage on page 6-1.)
1 Press Menu/Set, 2, 5, 3.
2 Press Start.
Setting the Print Density
You can adjust print density, making yourprinted pages darker or lighter.
1 If it is not illuminated in green, press
(Fax).
2 Press Menu/Set, 2, 1, 7.
3 Press ▲ to make the print darker.
—OR—
Press ▼ to make the print lighter.
Press Menu/Set.
4 Press Stop/Exit.
5.Auto Reduction
3.Print Document
7.Print Density

8/3/2019 Fax Brother
http://slidepdf.com/reader/full/fax-brother 57/148
Chapter 4
4 - 5
Reception into memory
As soon as the paper tray becomes empty
during fax reception, the screen will displayNo Paper Fed; please put some paper inthe paper tray. (See How to load paper onpage 1-10.)
If Memory Receive is On at this time...
The current fax reception will continue, withthe remaining page(s) being stored inmemory, subject to available memory.Subsequent incoming faxes will also bestored into memory until the memory is full,
following this no further incoming fax calls willbe automatically answered. To print all dataput fresh paper in the paper tray, and thenpress Start.
If Memory Receive is Off at thistime...
The current fax reception will continue, withthe remaining page(s) being stored inmemory, subject to available memory.
Subsequent incoming fax calls will not beautomatically answered until fresh paper isput in the paper tray. To print the last faxreceived, put paper in the paper tray, andthen press Start.
1 If it is not illuminated in green, press
(Fax).
2 Press Menu/Set, 2, 1, 6.
3 Press ▲ or ▼ to select On (or Off).
Press Menu/Set.
4 Press Stop/Exit.
Polling
Polling is the process of retrieving faxes from
another fax machine. You can use yourmachine to 'poll' other machines.
Everyone who is involved in Polling needs toset up their fax machines for Polling.
Note■ If you poll someone’s fax machine to
receive a fax, you pay for the call.
■ Some fax machines do not respond to thePolling feature.
Setup for Polling Receive (Standard)
Polling Receive is when you call another faxmachine to receive a fax from it.
1 If it is not illuminated in green, press
(Fax).
2 Press Menu/Set, 2, 1, 8.
3 Press ▲ or ▼ to select Standard.
Press Menu/Set.
4 Enter the fax number you are polling.
Press Start.
The LCD shows Dialing.
6.Memory Receive
8.Polling RX

8/3/2019 Fax Brother
http://slidepdf.com/reader/full/fax-brother 58/148
Setup Receive
4 - 6
4
Secure Polling
Secure Polling is a way to keep thedocuments from falling into the wrong hands
while the other fax machine is set up forpolling.
Setup for Polling Receive (Secure)
You need to make sure you are using thesame secure code as the other party.
1 If it is not illuminated in green, press
(Fax).
2 Press Menu/Set, 2, 1, 8.
3 Press ▲ or ▼ to select Secure.
Press Menu/Set.
4 Enter a four-digit secure code.
This is the same as the security code ofthe fax machine you are polling.
5 Press Menu/Set.
6 Enter the fax number you are polling.
7 Press Start.
The LCD shows Dialing.
Note
You can use Secure Polling only with anotherBrother fax machine. Anyone who polls toreceive a fax must enter the polling securecode.
Setup for Polling Receive (Timer)
You can set the machine to begin PollingReceive at a later time.
1 If it is not illuminated in green, press
(Fax).
2 Press Menu/Set, 2, 1, 8.
3 Press ▲ or ▼ to select Timer.
Press Menu/Set.
4 Enter the time (in 24-hour format) youwant to begin polling.
For example, enter 21:45 for 9:45 PM.
5 Press Menu/Set.
6 Enter the fax number you are polling.
Press Start.
The machine makes the polling call atthe time you entered.
Note
You can set up only one Delayed Polling.
8.Polling RX
8.Polling RX

8/3/2019 Fax Brother
http://slidepdf.com/reader/full/fax-brother 59/148
Chapter 4
4 - 7
Sequential Polling
The machine can request documents fromseveral fax machines in a single operation.
You just specify several destinations in Step5. Afterwards, a Sequential Polling Report willbe printed.
1 If it is not illuminated in green, press
(Fax).
2 Press Menu/Set, 2, 1, 8.
3 Press ▲ or ▼ to choose Standard,Secure or Timer.
Press Menu/Set when the screendisplays the setting you want.
4 If you selected Standard, go to Step 5.
• If you selected Secure, enter afour-digit number and pressMenu/Set, and then go to Step 5.
• If you selected Timer, enter the time(in 24-hour format) you want to beginpolling and press Menu/Set, and thengo to Step 5.
5 Specify the destination fax machines,you wish to poll by using One-Touch,Speed-Dial, Search, a Group (SeeSetting up Groups for Broadcasting onpage 5-3) or the dial pad. You mustpress Menu/Set between each location.
6 Press Start.
The machine polls each number orgroup in turn for a document.
Note■ Press Stop/Exit while the machine is
dialling to cancel the polling process.
■ To cancel all sequential polling receive jobs, press Menu/Set, 2, 6. (SeeCancelling a scheduled job on page 3-8.)
8.Polling RX
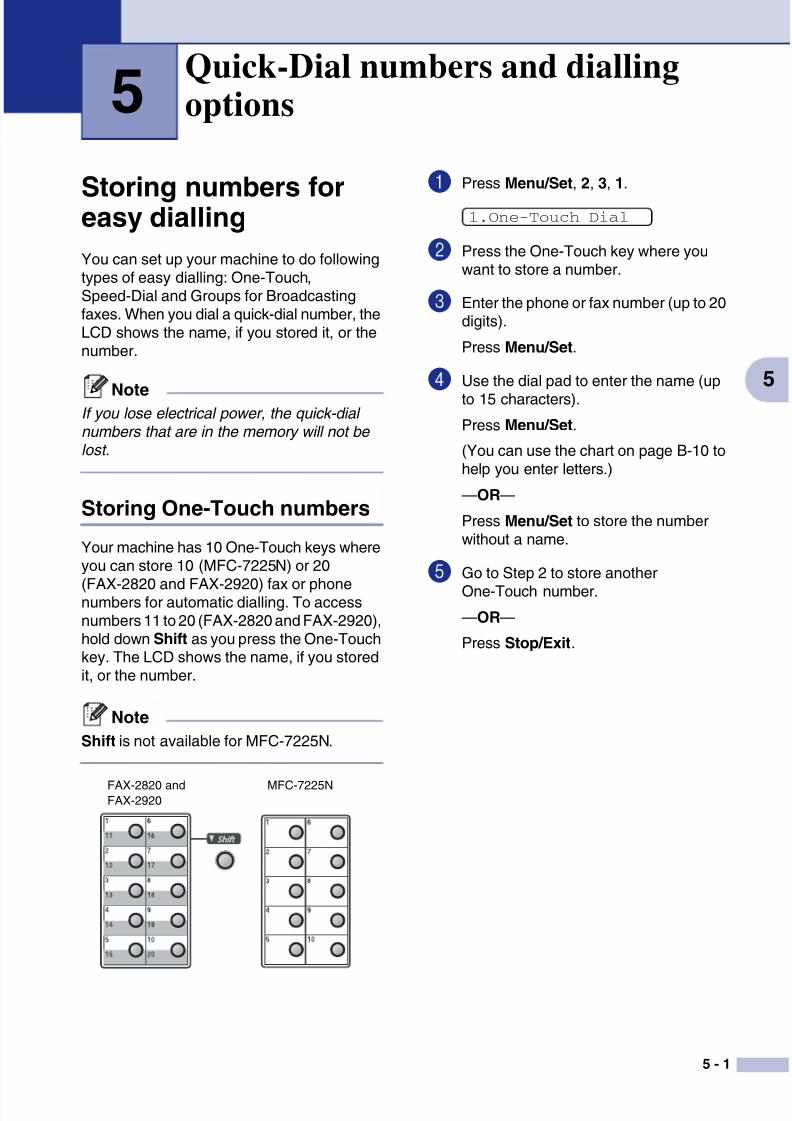
8/3/2019 Fax Brother
http://slidepdf.com/reader/full/fax-brother 60/148
5 - 1
5
5
Storing numbers foreasy dialling
You can set up your machine to do followingtypes of easy dialling: One-Touch,Speed-Dial and Groups for Broadcastingfaxes. When you dial a quick-dial number, theLCD shows the name, if you stored it, or thenumber.
NoteIf you lose electrical power, the quick-dial numbers that are in the memory will not be lost.
Storing One-Touch numbers
Your machine has 10 One-Touch keys whereyou can store 10 (MFC-7225N) or 20
(FAX-2820 and FAX-2920) fax or phonenumbers for automatic dialling. To accessnumbers 11 to 20 (FAX-2820 and FAX-2920),hold down Shift as you press the One-Touchkey. The LCD shows the name, if you storedit, or the number.
Note
Shift is not available for MFC-7225N.
1 Press Menu/Set, 2, 3, 1.
2 Press the One-Touch key where youwant to store a number.
3 Enter the phone or fax number (up to 20digits).
Press Menu/Set.
4 Use the dial pad to enter the name (upto 15 characters).
Press Menu/Set.
(You can use the chart on page B-10 tohelp you enter letters.)
—OR—
Press Menu/Set to store the numberwithout a name.
5 Go to Step 2 to store another
One-Touch number.—OR—
Press Stop/Exit.
Quick-Dial numbers and diallingoptions
MFC-7225NFAX-2820 andFAX-2920
1.One-Touch Dial

8/3/2019 Fax Brother
http://slidepdf.com/reader/full/fax-brother 61/148
Chapter 5
5 - 2
Storing Speed-Dial numbers
You can store Speed-Dial numbers, so that
when you dial you will only have to press afew keys (Search/Speed Dial, #, thethree-digit number, and Start). The machinecan store 200 Speed-Dial numbers.
1 Press Menu/Set, 2, 3, 2.
2 Use the dial pad to enter a three-digitSpeed-Dial location number. (001 - 200)
(For example, press 005.)Press Menu/Set.
3 Enter the phone or fax number (up to 20digits).
Press Menu/Set.
4 Use the dial pad to enter the name (upto 15 characters).
Press Menu/Set.
(You can use the chart on page B-10 tohelp you enter letters.)
—OR—
Press Menu/Set to store the numberwithout a name.
5 Go to Step 2 to store anotherSpeed-Dial number.
—OR—
Press Stop/Exit.
Changing One-Touch / Speed-Dial numbers
If you try to store a One-Touch or Speed-Dialnumber where a number has already beenstored, the LCD will show the name that hasbeen stored there (or number) and will askyou to do one of the following:
1
Press 1 to change the stored number.
—OR—
Press 2 to exit without making a change.
How to change the stored number or name:
• If you want to change a character, useor to position the cursor under
the character you want to change, andthen type over it.
• If you want to erase the whole numberor whole name, press Stop/Exit whenthe cursor is under the first digit or
letter. The characters above and tothe right of the cursor will be deleted.
2 Enter a new number.
Press Menu/Set.
3 Follow the directions beginning at Step4 in Storing One-Touch Dial numbersand Storing Speed-Dial numbers.(See Storing One-Touch numbers onpage 5-1 and Storing Speed-Dial numbers on this page.)
2.Speed-Dial#005:MIKE
1.Change 2.Exit
▲▲

8/3/2019 Fax Brother
http://slidepdf.com/reader/full/fax-brother 62/148
Quick-Dial numbers and dialling options
5 - 3
5
Setting up Groups forBroadcasting
Groups, which can be stored on a One-Touchkey or a Speed-Dial location, allow you tosend the same fax message to many faxnumbers by pressing only a One-Touch keyand Start or Search/Speed Dial, #, thethree-digit location and Start. First, you’llneed to store each fax number as aOne-Touch or Speed-Dial number. Then, youcan combine them into a Group. Each Groupuses up a One-Touch key or a Speed-Diallocation. You can have up to eight Groups, or
you can assign up to 219 (FAX-2820 andFAX-2920) and 209 (MFC-7225N) numbersto one large Group.(See Storing One-Touch numbers on page5-1 and Storing Speed-Dial numbers on page5-2.)
1 Press Menu/Set, 2, 3, 3.
2 Decide where you wish to store theGroup.
—AND—
Press a One-Touch key.
—OR—
Press Search/Speed Dial and enter thethree digit location, and then pressMenu/Set.
(For example, press One-Touch key 2,or press Search/Speed Dial 0 4 5 forSpeed-Dial location 045.)
3 Use the dial pad to enter the Groupnumber (1 to 8).
Press Menu/Set.
(For example, press 1 for Group 1.)
4 To include One-Touch or Speed-Dialnumbers in the Group, press them asfollows:
For example, for One-Touch number 4,press One-Touch key 4. The LCDshows 004. For Speed-Dial location009, press Search/Speed Dial, andthen 0 0 9 on the dial pad.
5 Press Menu/Set to accept the numbersfor this Group.
6 Use the dial pad and the chart on pageB-10 to enter a name for the Group.
Press Menu/Set.
(For example, type NEW CLIENTS).
7 Press Stop/Exit.
Note
You can print a list of all One-Touch andSpeed-Dial numbers. Group numbers will be
marked in the GROUP column.(See Printing reports on page 7-2.)
3.Setup Groups
Setup Group:G01
G01: 004#009

8/3/2019 Fax Brother
http://slidepdf.com/reader/full/fax-brother 63/148
Chapter 5
5 - 4
Dialling options
Access codes and credit cardnumbers
Sometimes you may want to choose fromseveral long distance carriers when youmake a call. Rates may vary depending onthe time and destination. To take advantageof low rates, you can store the access codesor long-distance carriers and credit cardnumbers as One-Touch and Speed-Dialnumbers. You can store these long dialling
sequences by dividing them and setting themup on separate One-Touch and Speed Dialnumbers in any combination. You can eveninclude manual dialling using the dial pad.(See Storing One-Touch numbers on page5-1 and Storing Speed-Dial numbers on page5-2.)
For example, perhaps you have stored ‘555’on One-Touch key 1 and ‘7000’ onOne-Touch key 2. If you press One-Touch
key 1, One-Touch key 2, and Start, you willdial ‘555-7000’.
To temporarily change a number, you cansubstitute part of the number with manualdialling using the dial pad.For example, to change the number to555-7001 you could press One-Touch key 1 and then press 7001 using the dial pad.
Pause
Press Redial/Pause to insert a 3.5-second
pause between numbers. If you are diallingoverseas, you can press Redial/Pause asmany times as needed to increase the lengthof the pause.
Tone or Pulse
If you have a Pulse dialling service, but needto send Tone signals (for example, fortelephone banking), follow the instructionsbelow. If you have Touch Tone service, youwill not need this feature to send tone signals.
1 Lift the handset of the external phone.
2 Press # on the control panel of yourmachine. Any digits dialled after this willsend tone signals.
When you hang up, the machine willreturn to the Pulse dialling service.

8/3/2019 Fax Brother
http://slidepdf.com/reader/full/fax-brother 64/148
6 - 1
6
6
Setting Remote FaxOptions
Note■ You can only use one remote fax option at
a time:Fax Forwarding—OR—Fax Storage—OR—PC FAX Receive*—OR—Off.
*MFC-7225N only
■ If you change the remote fax options andreceived faxes are left in your machine’smemory, an LCD message will appear.(See Changing Remote Fax Options onpage 6-3.)
Setting up Fax Forwarding
When you select Fax Forward, your machinestores the received fax in the memory. Themachine will then dial the fax number you’veprogrammed and forward the fax message.
1 Press Menu/Set, 2, 5, 1.
2 Press ▲ or ▼ to select Fax Forward.
Press Menu/Set.
The LCD will ask you to enter the fax
number to which faxes will beforwarded.
3 Enter the forwarding number (up to 20digits).
Press Menu/Set.
4 Press ▲ or ▼ to selectBackup Print:On orBackup Print:Off.
.
Press Menu/Set.
NoteIf you select Backup Print:On, themachine will also print the fax at yourmachine so you will have a copy. This is asafety feature in case there is a power failurebefore the fax is forwarded or a problem atthe receiving machine. The FAX-2920 andMFC-7225N can store faxes up to 4 days ifthere is a power failure. The faxes stored inthe FAX-2820 memory will be deleted.
5 Press Stop/Exit.
Setting Fax Storage
If you select Fax Storage, your machinestores the received fax in the memory. Youwill be able to retrieve fax messages fromanother location using the Remote Retrievalcommands.
1 Press Menu/Set, 2, 5, 1.
2 Press ▲ or ▼ to select Fax Storage.
Press Menu/Set.
3 Press Stop/Exit.
Note
If you have set Fax Storage, a backup copywill automatically be printed at the machine.
Remote Fax Options
1.Forward/Store
Backup Print:On
1.Forward/Store

8/3/2019 Fax Brother
http://slidepdf.com/reader/full/fax-brother 65/148
Chapter 6
6 - 2
Setting PC Fax Receive(MFC-7225N only)
If you select PC Fax Receive, yourmachine will temporarily store your receivedfax messages in its memory, and thenautomatically send the faxes to the PC. Youcan then use your PC to view and store thesefaxes.
When Backup Print is off , your fax messagesare automatically erased from your machine’smemory when they have been successfullysent to your PC. When Backup Print is on ,
your fax messages are erased when theyhave been successfully printed and sent tothe PC.
1 Press Menu/Set, 2, 5, 1.
2 Press ▲ or ▼ to selectPC Fax Receive.
Press Menu/Set.
3 Press ▲ or ▼ to selectBackup Print:On orBackup Print:Off.
Press Menu/Set.
4 Press Stop/Exit.
Note■ Before you can use PC Fax Receive or
transfer faxes to your PC you must:
• Connect your machine to a PC;
• Have the PC switched on; and
• Have the MFL Pro Suite softwareinstalled and PC-FAX Receiving running. (For details, see Setting up PC-FAX receiving in the SoftwareUser’s Guide on the CD-ROM.)
■ In the event of a power failure, theMFC-7225N will store your faxes inmemory for up to 4 days. However, if youselect Backup Print:On, the machinewill print the fax, so you will have a copy ifthere is a power failure before it is sent tothe PC.
■ If you get an error message and themachine cannot print the faxes in memory,you can use this setting to transfer yourfaxes to your PC. (For details, see Error messages on page 11-1.)
■ You must turn off PC Fax Receive before
you can turn on Memory Security.
1.Forward/Store
Backup Print:On

8/3/2019 Fax Brother
http://slidepdf.com/reader/full/fax-brother 66/148
Remote Fax Options
6 - 3
6
Turning off Remote FaxOptions
1 Press Menu/Set, 2, 5, 1.
2 Press ▲ or ▼ to select Off.
Press Menu/Set.
3 Press Stop/Exit.
Note
If you set the remote fax options to Off andreceived faxes are left in your machine’smemory, further LCD messages appear afterStep 2. (See Changing Remote Fax Options .)
Changing Remote FaxOptions
If received faxes are left in your machine’smemory when you change the remote faxoption the LCD will ask you the followingquestion:
—OR—
■ If you press 1, faxes in the memory will beerased or printed before the settingchanges.
■ If you press 2, faxes in the memory will notbe erased or printed and the setting will beunchanged. If a backup copy has alreadybeen prited it will not be printed again.
(For MFC-7225N only)If received faxes are left in the machine’s
memory when you change to PC Fax Receive from another remote faxoption (Fax Forward orFax Storage), theLCD will ask you the following message:
■ If you press 1, and Backup Print is setto On, faxes in the memory will be erasedbefore the setting changes. If you press 1
and Backup print is set to Off, faxes in thememory will be sent to your PC before thesetting changes.
■ If you press 2, faxes in the memory will notbe erased or transferred to your PC andthe setting will be unchanged.
1.Forward/Store
Erase All Doc?
1.Yes 2.No
Print All Fax?
1.Yes 2.No
Send Fax to PC?
1.Yes 2.No

8/3/2019 Fax Brother
http://slidepdf.com/reader/full/fax-brother 67/148
Chapter 6
6 - 4
Setting your Remote AccessCode
The remote access code lets you access theRemote Retrieval features when you areaway from your machine. Before you use theremote access and retrieval features, youhave to set up your own code. The defaultcode is inactive code (--- ).
1 Press Menu/Set, 2, 5, 2.
2 Enter a three-digit code using numbers0-9, or #.
Press Menu/Set. (The preset ‘ ’cannot be changed.)
Note
Do not use the same code as your FaxReceive Code ( 51) or Telephone AnswerCode (#51).(See Operation from extension telephones on
page A-2.)
3 Press Stop/Exit.
Note
You can change your code at any time byentering a new one. If you want to make yourcode inactive, press Stop/Exit in Step 2 torestore the inactive setting (--- ) and pressMenu/Set.
Remote Retrieval
You can call your machine from any touch
tone telephone or fax machine, then use theRemote Access Code and remote commandsto retrieve fax messages. Be sure to cut outthe Remote Retrieval Access Card on the lastpage and keep it with you at all times.
Using your Remote AccessCode
1 Dial your fax number from a telephoneor another fax machine using touchtone.
2 When your machine answers,immediately enter your Remote AccessCode (3 digits followed by ).
3 The machine signals if it has receivedfax messages:
1 long beep — Fax messages
No beeps — No messages
4 The machine gives two short beeps totell you to enter a command. Themachine will hang up if you wait longerthan 30 seconds to enter a command.The machine will beep three times, ifyou enter an invalid command.
5 Press 9 0 to reset the machine whenyou’ve finished.
6 Hang up.
Note
If your machine is set to Manual mode andyou want to use the remote retrieval features,you can access your machine by waitingabout 2 minutes after it starts ringing, andthen entering the Remote Access Codewithin 30 seconds.
2.Remote Access

8/3/2019 Fax Brother
http://slidepdf.com/reader/full/fax-brother 68/148
Remote Fax Options
6 - 5
6
Remote commands
Follow the commands below to access features when you are away from the machine. When you
call the machine and enter your Remote Access Code (3 digits followed by ), the system willgive two short beeps and you must enter a remote command.
Remote commands Operation details
95 Change the Fax Forwarding orFax Storage settings
1 OFF You can select Off after you have retrieved or erased all yourmessages.
2 Fax Forwarding If you hear one long beep, the change has been accepted. Ifyou hear three short beeps, you cannot change it because theconditions have not been met (for example, registering a fax
forwarding number). You can register your Fax Forwardingnumber by entering 4. (See Changing your Fax Forwarding number on page 6-6.) Once you have registered the number,Fax Forwarding will work.
4 Fax Forwarding number
6 Fax Storage
96 Retrieve a fax
2 Retrieve all faxes Enter the number of a remote fax machine to receive stored faxmessage(s). (See page 6-6.)
3 Erase faxes from the memory If you hear one long beep, fax messages have been erasedfrom the memory.
97 Check the receiving status
1 Fax You can check whether your machine has received any faxes.If yes, you will hear one long beep. If no, you will hear threeshort beeps.
98 Change the Receive Mode
1 External TAD If you hear one long beep, your change has been accepted.
2 Fax/Tel
3 Fax Only
90 Exit Press 9 0 to exit Remote Retrieval. Wait for the long beep, thenreplace the handset.

8/3/2019 Fax Brother
http://slidepdf.com/reader/full/fax-brother 69/148
Chapter 6
6 - 6
Retrieving fax messages
You can call your machine from any touch
tone phone and have your fax messages sentto a fax machine.
1 Dial your fax number.
2 When your machine answers,immediately enter your Remote AccessCode (3 digits followed by ). If youhear one long beep, you havemessages.
3 As soon as you hear two short beeps,use the dial pad to press 9 6 2.
4 Wait for the long beep, and then use thedial pad to enter the number of theremote fax machine where you wantyour fax messages sent to followed by## (up to 20 digits).
Note
You cannot use and # as dial numbers.
However, press # if you want to store apause.
5 Press 9 0 to reset the machine whenyou’ve finished.
6 Hang up after you hear your machinebeep. Your machine will call the otherfax machine, which will then print yourfax messages.
Changing your FaxForwarding number
You can change the default setting of your faxforwarding number from another telephone orfax machine using touch tone.
1 Dial your fax number.
2 When your machine answers,immediately enter your Remote AccessCode (3 digits followed by ). If youhear one long beep, you havemessages.
3 When you hear two short beeps, use thedial pad to press 9 5 4.
4 Wait for the long beep, and then use thedial pad to enter the new number of theremote fax machine where you wantyour fax messages forwarded followedby ## (up to 20 digits).
Note
You cannot use and # as dial numbers.However, press # if you want to store apause.
5 Press 9 0 to reset the machine whenyou’ve finished.
6 Hang up after you hear your machinebeep.

8/3/2019 Fax Brother
http://slidepdf.com/reader/full/fax-brother 70/148
7 - 1
7
7
Fax settings andactivity
You need to set up the TransmissionVerification Report and Journal Period in themenu table.
Press Menu/Set, 2, 4, 1.
—OR—
Press Menu/Set, 2, 4, 2.
Customizing theTransmission VerificationReport
You can use the Transmission Report asproof that you sent a fax. This report lists thetime and date of transmission and whetherthe transmission was successful (OK). If youselect On or On+Image, the report will printfor every fax you send.
If you send a lot of faxes to the same place,you may need more than the job numbers toknow which faxes you must send again.Selecting On+Image or Off+Imagewill printa section of the fax’s first page on the reportto help you remember.
Note
When the Verification Report is turned Off orOff+Image, the Report will only print if there
is a transmission error, with ERROR in theRESULT column.
1 Press Menu/Set, 2, 4, 1.
2 Press ▲ or ▼ to select On, On+Image,Off or Off+Image.
Press Menu/Set.
3 Press Stop/Exit.
Printing reports
1.XMIT Report
2.Journal Period
1.XMIT Report

8/3/2019 Fax Brother
http://slidepdf.com/reader/full/fax-brother 71/148
Chapter 7
7 - 2
Setting the Journal Period
You can set the machine to print a journal at
specific intervals (every 50 faxes, 6, 12 or 24hours, 2 or 7 days). If you set the interval toOff, you can print the report by following thesteps on Printing reports.
The default setting is Every 50 Faxes.
1 Press Menu/Set, 2, 4, 2.
2 Press ▲ or ▼ to choose an interval.
Press Menu/Set.(If you choose 7 days, the LCD will askyou to choose a day on which to beginthe 7-day countdown.)
3 Enter the time to begin printing in24-hour format.
Press Menu/Set.
(For example: enter 19:45 for 7:45 PM.)
4 Press Stop/Exit.
Note■ If you select 6, 12, 24 hours, 2 or 7 days,
the machine will print the report at theselected time and then erase all jobs fromits memory. If the machine’s memorybecomes full with 200 jobs before the timeyou selected has passed, the machine willprint the Journal early and then erase all
jobs from memory. If you want an extrareport before it is due to print, you canprint it without erasing the jobs frommemory.
■ If you select Every 50 Faxes, themachine will print the Journal when themachine has stored 50 jobs.
Printing reports
Following reports are available:
How to print a report
1 Press Reports.
2 Press ▲ or ▼ to select the report youwant.
Press Menu/Set.
—OR—
Enter the number of the report you wantto print.
For example, press 2 to print the HelpList.
2.Journal Period
1.XMIT Verify
Prints a Transmission VerificationReport for your last transmission.
2.Help List
Prints the Help List so you can seeat-a-glance how to quickly program yourmachine.
3.Quick-Dial
Lists names and numbers stored in the
One-Touch and Speed-Dial memory, innumerical order.
4.Fax Journal
Lists information about the last incomingand outgoing faxes.(TX means Transmit.) (RX meansReceive.)
5.User Settings
Lists your settings.
6.Network Config
(MFC-7225N only)
Lists your Network settings.
7.Order Form
You can print an accessories order formto fill out and send to your Brotherdealer.

8/3/2019 Fax Brother
http://slidepdf.com/reader/full/fax-brother 72/148
8 - 1
8
8
‘
Using the machine as acopier
You can use your machine as a copier,making up to 99 copies at a time.
Enter Copy mode
Before making copies, make sure that
(Copy) is illuminated in green. If it isnot, press (Copy) to enter Copy mode.
The default setting is Fax mode. You canchange the number of seconds or minutesthat the machine stays in Copy mode.(See Setting the Mode Timer (FAX-2820 and FAX-2920 only) on page 2-4 or See Setting the Mode Timer (MFC-7225N only) on page2-4.)
The printable area of your machine begins at
approximately 2 mm from both sides and3 mm from the top or bottom of the paper.
Note
This printable area shown above is for asingle copy or a 1 in 1 copy using A4 sizepaper. The printable area changes with thepaper size.
Making a single copy
1 Press (Copy) to illuminate it ingreen.
2 Load your document.(See Load document on page 1-7.)
3 Press Start.
Making copies
Copy Ratio
The LCD shows the default copy setting
QualityNo of Copies
2 mm
3 mm
Unprintable
area

8/3/2019 Fax Brother
http://slidepdf.com/reader/full/fax-brother 73/148
Chapter 8
8 - 2
Making multiple copies
1 Press (Copy) to illuminate it in
green.
2 Load your document.
3 Use the dial pad to enter the number ofcopies you want (up to 99).
4 Press Start.
Note
To sort the copies, press Options and▲ or▼
to select Stack/Sort. (See Sorting copies using the ADF on page 8-5.)
Stop copying
To stop copying, press Stop/Exit.
Using the temporaryCopy key
When you want to quickly change the copysettings temporarily for the next copy, use theOptions key. You can use differentcombinations.
Note■ The machine returns to its default settings
60 seconds after it finishes copying, or ifthe Mode Timer returns the machine toFax mode. (See Setting the Mode Timer (FAX-2820 and FAX-2920 only) on page2-4 or See Setting the Mode Timer (MFC-7225N only) on page 2-4.)
■ You can save the quality and contrastsettings you use most often by settingthem as default. (See Changing the default copy settings on page 8-7.)
Options key

8/3/2019 Fax Brother
http://slidepdf.com/reader/full/fax-brother 74/148
Making copies
8 - 3
8
Changing the temporary copy settings
Use the Options key to quickly set the following copy settings temporarily for the next copy.
Note
The factory settings are shown in Bold.
After you choose your settings by pressing Menu/Set, the LCD shows Set temporarily.
Press Start if you have finished choosing settings.
Press Menu Selections Options Page
Enlarge/Reduce 50% / 70% / 78% / 83% / 85% / 91% / 94% / 97% / 100% /
104% / 141% / 200% /
Custom(50-200%) / Auto
8-4
Quality Auto
Text
Photo
8-5
Stack/Sort Stack
Sort
8-5
Contrast ▼ -+ ▲
▼ -+ ▲
▼ -+ ▲
▼ -+ ▲
▼ -+ ▲
8-5
Page Layout Off(1 in 1)
2 in 1 (P)
2 in 1 (L)
4 in 1 (P)
4 in 1 (L)
8-6
select select
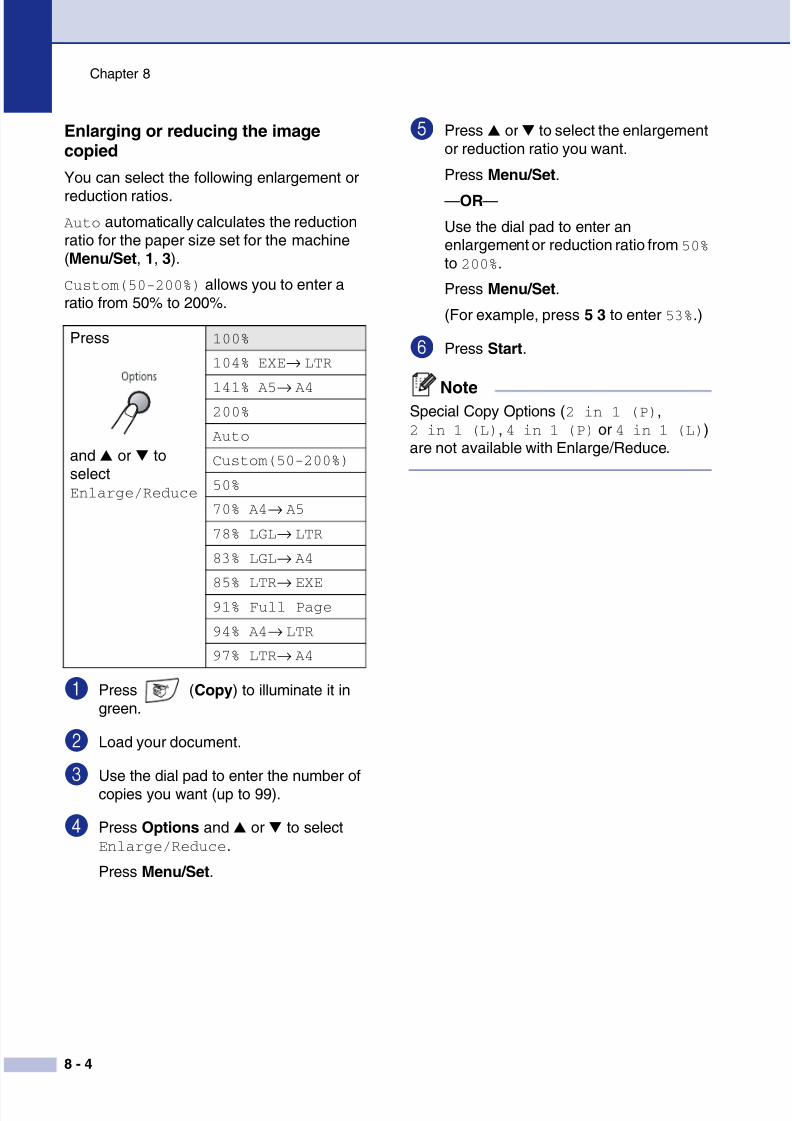
8/3/2019 Fax Brother
http://slidepdf.com/reader/full/fax-brother 75/148
Chapter 8
8 - 4
Enlarging or reducing the imagecopied
You can select the following enlargement or
reduction ratios.Auto automatically calculates the reductionratio for the paper size set for the machine(Menu/Set, 1, 3).
Custom(50-200%) allows you to enter aratio from 50% to 200%.
1 Press (Copy) to illuminate it ingreen.
2 Load your document.
3 Use the dial pad to enter the number ofcopies you want (up to 99).
4 Press Options and ▲ or ▼ to selectEnlarge/Reduce.
Press Menu/Set.
5 Press ▲ or▼ to select the enlargementor reduction ratio you want.
Press Menu/Set.
—OR—Use the dial pad to enter anenlargement or reduction ratio from 50% to 200%.
Press Menu/Set.
(For example, press 5 3 to enter 53%.)
6 Press Start.
NoteSpecial Copy Options (2 in 1 (P),2 in 1 (L), 4 in 1 (P) or 4 in 1 (L))are not available with Enlarge/Reduce.
Press
and ▲ or ▼ toselectEnlarge/Reduce
100%
104% EXE→ LTR
141% A5→
A4200%
Auto
Custom(50-200%)
50%
70% A4→ A5
78% LGL→ LTR
83% LGL→ A4
85% LTR→
EXE91% Full Page
94% A4→ LTR
97% LTR→ A4

8/3/2019 Fax Brother
http://slidepdf.com/reader/full/fax-brother 76/148
Making copies
8 - 5
8
Quality
You can select the copy quality. The defaultsetting is Auto.
1 Press (Copy) to illuminate it ingreen.
2 Load your document.
3 Use the dial pad to enter the number ofcopies you want (up to 99).
4 Press Options and▲ or ▼ to selectQuality.
Press Menu/Set.
5 Press ▲ or ▼ to select the copy qualityyou want (Auto, Text or Photo).
Press Menu/Set.
6 Press Start.
Sorting copies using the ADF
You can sort multiple copies. Pages will bestacked in the order (1, 2, 3), (1, 2, 3)
and so on.
1 Press (Copy) to illuminate it ingreen.
2 Load your document.
3 Use the dial pad to enter the number ofcopies you want (up to 99).
4 Press Options and▲ or ▼ to selectStack/Sort.
Press Menu/Set.
5 Press ▲ or ▼ to select Sort.
Press Menu/Set.
6 Press Start.
ContrastYou can adjust copy contrast to make copiesdarker or lighter.
1 Press (Copy) to illuminate it ingreen.
2 Load your document.
3 Use the dial pad to enter the number ofcopies you want (up to 99).
4 Press Options and▲ or ▼ to selectContrast.
Press Menu/Set.
5 Press ▲ to increase the contrast.
—OR—
Press ▼ to decrease the contrast.
Press Menu/Set.
6 Press Start.
Auto Suitable for documents thatcontain both text andphotographs.
Text Suitable for documentscontaining only text.
Photo Suitable for copyingphotographs.
3
21
32
1

8/3/2019 Fax Brother
http://slidepdf.com/reader/full/fax-brother 77/148
Chapter 8
8 - 6
Making N in 1 copies (Page Layout)
You can reduce the amount of copies byusing the N in 1 copy feature. This allows you
to copy two or four pages onto one page,allowing you to save paper.
Note■ Please make sure paper size is set to
Letter or A4.
■ You can use N in 1 copy feature with100% copy size only.
■ (P) means Portrait and (L) meansLandscape.
1 Press (Copy) to illuminate it ingreen.
2 Load your document.
3 Use the dial pad to enter the number ofcopies you want (up to 99).
4 Press Options and ▲ or ▼ to selectPage Layout.
Press Menu/Set.
5 Press ▲ or ▼ to select 2 in 1 (P),2 in 1 (L), 4 in 1 (P) or4 in 1 (L).
Press Menu/Set.
6 Press Start to scan the document.
When using the ADF, place the documentface down in the direction shown below.
2 in 1 (P)
4 in 1 (P)
2 in 1 (L)
4 in 1 (L)

8/3/2019 Fax Brother
http://slidepdf.com/reader/full/fax-brother 78/148
Making copies
8 - 7
8
Changing the defaultcopy settings
You can save the quality and contrastsettings you use most often by setting themas default. These settings will remain untilyou change them again.
Quality
1 Press Menu/Set, 3, 1.
2 Press ▲ or ▼ to select Auto, Text orPhoto.
Press Menu/Set.
3 Press Stop/Exit.
Adjusting contrast
You can adjust copy contrast to make copiesdarker or lighter.
1 Press Menu/Set, 3, 2.
2 Press ▲ to increase the contrast.
—OR—
Press ▼ to decrease the contrast.
Press Menu/Set.
3 Press Stop/Exit.
Out of Memorymessage
If the memory becomes full while you aremaking copies, the LCD message will guideyou through the next step.
If you get an Out of Memory message whilescanning a subsequent page, you will havethe option to press Start to copy the pagesscanned so far, or to press Stop/Exit tocancel the operation.
Note
To gain extra memory, you can turn off FaxStorage.(See Turning off Remote Fax Options onpage 6-3.)
—OR—
Print the faxes that are in the memory.(See Printing a fax from the memory on page4-4.)
When you get an Out of Memory message,
you may be able to make copies if you firstprint incoming faxes in the memory to restorethe memory to 100%.
1.Quality
2.Contrast

8/3/2019 Fax Brother
http://slidepdf.com/reader/full/fax-brother 79/148
9 - 1
9
The User’s Guide on the CD-ROM includes the Software and Network User’s Guides for features
available when connected to a computer (for example, Printing and Scanning). The availability ofthe features listed below varies by model:
■ Using the machine as a Printer(See Chapter 1 in the Software User’s Guide on the CD-ROM.)
■ How to Scan(See Chapter 2 in the Software User’s Guide on the CD-ROM.)
■ Using ControlCenter2.0(See Chapter 3 in the Software User’s Guide on the CD-ROM.)
■ Using Remote Setup(See Chapter 4 in the Software User’s Guide on the CD-ROM.)
■ Using Brother PC-FAX software(See Chapter 5 in the Software User’s Guide on the CD-ROM.)
■ Using your machine with a Macintosh ®
(See Chapter 7 in the Software User’s Guide on the CD-ROM.)
■ Network Scanning(See Chapter 6 in the Software User’s Guide on the CD-ROM.)
■ Network Printing(See Chapter 1 in the Software User’s Guide on the CD-ROM.)
Note
See also How to access the complete User’s Guide (MFC-7225N only) on page 1-3.
Software and Network Features(MFC-7225N only)

8/3/2019 Fax Brother
http://slidepdf.com/reader/full/fax-brother 80/148
10 - 1
10
10
IEC 60825-1 SpecificationThis machine is a Class 1 laser product as definedin IEC 60825-1 specifications. The label shownbelow is attached in countries where required.
This machine has a Class 3B Laser Diode whichemits invisible laser radiation in the Scanner Unit.The Scanner Unit should not be opened under anycircumstances.
Laser Diode
Wave length: 770 - 810 nm
Output: 5 mW max.
Laser Class: Class 3B
Disconnect device
This product must be installed near an electricalsocket that is easily accessible. In case ofemergencies, you must disconnect the power cordfrom the electrical socket to shut off powercompletely.
LAN connection(MFC-7225N only)
International ENERGY STAR ®
Compliance StatementThe purpose of the International ENERGY STAR ® Program is to promote the development andpopularization of energy-efficient office equipment.
As an ENERGY STAR ® Partner, Brother Industries,Ltd. has determined that this product meets theENERGY STAR ® guidelines for energy efficiency.
Radio interference(220-240V Model only)
This product complies with EN55022 (CISPRPublication 22)/Class B. When connecting themachine to a computer, ensure that you use the
following interface cables.1.A USB cable which must not exceed 2.0 metres
in length.
2.A shielded parallel interface cable withtwisted-pair conductors and that is marked“IEEE 1284 compliant”. The cable must notexceed 2.0 metres in length.
Important information
WARNINGUse of controls, adjustments or performance ofprocedures other than those specified in thismanual may result in hazardous radiationexposure.
CLASS 1 LASER PRODUCT
APPAREIL À LASER DE CLASSE 1
LASER KLASSE 1 PRODUKT
CAUTION
Do not connect this product to a LANconnection that is subject to over-voltages.

8/3/2019 Fax Brother
http://slidepdf.com/reader/full/fax-brother 81/148
Chapter 10
10 - 2
Important safety instructions
1 Read all of these instructions.
2 Save them for later reference.
3 Follow all warnings and instructions markedon the product.
4 Unplug this product from the wall socketbefore cleaning inside of the machine. Donot use liquid or aerosol cleaners. Use adamp cloth for cleaning.
5 Do not place this product on an unstablecart, stand, or table. The product may fall,causing serious damage to the product.
6 Slots and openings in the cabinet and theback or bottom are provided for ventilation;to ensure reliable operation of the productand to protect it from overheating, theseopenings must not be blocked or covered.The openings should never be blocked byplacing the product on a bed, sofa, rug, or
other similar surface. This product shouldnever be placed near or over a radiator orheater. This product should never be placedin a built-in installation unless properventilation is provided.
7 This product should be operated from thetype of power source indicated on the label.If you are not sure of the type of poweravailable, call your dealer or local powercompany.
8 This product is equipped with a 3-wiregrounded plug. This plug will only fit into agrounded power outlet. This is a safetyfeature. If you are unable to insert the pluginto the outlet, call your electrician to replaceyour obsolete outlet. Do not defeat thepurpose of the grounded plug.
9 Use only the power cord supplied with thismachine.
0 Do not allow anything to rest on the power
cord. Do not place this product where peoplecan walk on the cord.
A Do not place anything in front of the machinethat will block received faxes. Do not placeanything in the path of received faxes.
B Wait until pages have exited the machinebefore picking them up.
C Unplug this product from the power socket
and refer all servicing to Brother AuthorizedService Personnel under the followingconditions:
• When the power cord is damaged orfrayed.
• If liquid has been spilled into the product.
• If the product has been exposed to rain orwater.
• If the product does not operate normallywhen the operating instructions are
followed. Adjust only those controls thatare covered by the operating instructions.Improper adjustment of other controls mayresult in damage and will often requireextensive work by a qualified technician torestore the product to normal operation.
• If the product has been dropped or thecabinet has been damaged.
• If the product exhibits a distinct change inperformance, indicating a need for service.

8/3/2019 Fax Brother
http://slidepdf.com/reader/full/fax-brother 82/148
Important information
10 - 3
10
D To protect your product against powersurges, we recommend the use of a powerprotection device (Surge Protector).
E To reduce the risk of fire, electric shock andinjury to people, note the following:
• Do not use this product near appliancesthat use water, a swimming pool or in a wetbasement.
• Do not use the machine’s telephone duringan electrical storm (there is the remotepossibility of an electrical shock) or toreport a gas leak in the vicinity of the leak.
• Do not dispose of batteries in a fire. They
may explode. Check with local codes forpossible special disposal instructions.
Trademarks
The Brother logo is a registered trademark ofBrother Industries, Ltd.
Brother is a registered trademark of BrotherIndustries, Ltd.
Multi-Function Link is a registered trademark ofBrother International Corporation.
© 2004-2005 Brother Industries, Ltd. All rightsreserved.
Windows and Microsoft are registered trademarksof Microsoft in the U.S. and other countries.
Macintosh and TrueType are registered
trademarks of Apple Computer, Inc.PaperPort and OmniPage OCR are registeredtrademarks of ScanSoft, Inc.
Presto! PageManager is a registered trademark ofNewSoft Technology Corporation.
Each company whose software title is mentionedin this manual has a Software License Agreementspecific to its proprietary programs.
All other brand and product names mentioned
in this User’s Guide, the Software User’sGuide* and the Network User’s Guide*
(*MFC-7225N only) are registered trademarksof their respective companies.

8/3/2019 Fax Brother
http://slidepdf.com/reader/full/fax-brother 83/148
11 - 1
11
TroubleshootingError messages
As with any sophisticated office product, errors may occur. If this happens, your machine identifiesthe problem and displays an error message. The most common error messages are shown below.
You can correct most problems by yourself. If you need more help, the Brother Solutions Centeroffers latest FAQs and troubleshooting tips.
Visit us at http://solutions.brother.com.
Troubleshooting and routinemaintenance
ERROR MESSAGES
ERROR MESSAGE CAUSE ACTION
Back Cover Open The back cover is not completelyclosed.
Close the back cover of the machine.
Change Drum Soon The drum unit is near the end of its life. Use the drum unit until you have a print qualityproblem; then replace the drum unit with a new one.
See Replacing the drum unit (DR-2000) on page11-26.
Comm.Error Poor phone line quality caused acommunication error.
Try sending the fax again or try connecting themachine to another telephone line. If the problemcontinues, call the telephone company and ask themto check your phone line.
Connection Fail You tried to poll a fax machine that isnot in Polled Waiting mode.
Check the other fax machine’s polling setup.
Cooling Down
Wait for a while
The temperature of the drum unit ortoner cartridge is too hot. The machinewill pause its current print job and gointo cooling down mode. During thecooling down mode, you will hear thecooling fan running while the display onthe machine shows Cooling Down,and Wait for a while.
You must wait 20 minutes for it to cool.
Cover is Open The front cover is not completelyclosed. Close the front cover of the machine.
Document Jam The document was not inserted or fedproperly, or the document scanned fromthe ADF was too long.
See Document jams on page 11-6.
See Using the automatic document feeder (ADF) onpage 1-7.
Data Remaining
(FAX-2920 andMFC-7225N only)
Print data is left in the machine’smemory.
Re-start printing from your computer.
(MFC-7225N only)Print data is left in the machine’smemory. The USB or Parallel cable wasunplugged while the computer wassending the data to the machine.
Press Job Cancel. The machine will cancel the joband clear it from the memory.
Try to print again.
Disconnected The other person or other person’s faxmachine stopped the call.
Try to send or receive again.

8/3/2019 Fax Brother
http://slidepdf.com/reader/full/fax-brother 84/148
Troubleshooting and routine maintenance
11 - 2
11
Dust on Drum The drum unit needs to be cleaned. See Cleaning the drum unit on page 11-16.
BT Call Sign On The machine is set BT Call Sign toOn. You cannot change the ReceiveMode from Manual to another mode.
Set BT Call Sign to Off.See BT Call Sign (For U.K. Only) on page A-1.
Unit is too Hot The fuser unit is too hot. (For FAX-2920 and MFC-7225N)
Turn off the machine’s power switch, and check themachine’s environment. If it is in a location that is toohot or too cold, try to cool or warm the room by turningon the air conditioner or heater. Or, change thelocation. Then, turn on the machine’s power switch.(The machine can be disconnected for up to 4 dayswithout losing faxes stored in the memory.)
(For FAX-2820)
When you turn off the machine’s power switch, itsmemory will be cleared. (To check if faxes are in themachine’s memory, see Checking if the machine has
faxes in its memory on page 11-5.) If there are faxes,you need to save them before following thesuggestions below. (To save the faxes, seeForwarding faxes to another fax machine on page11-5.)
Then, turn off the machine’s power switch. Check themachine’s environment. If it is in a location that is toohot or too cold, try to cool or warm the room by turningon the air conditioner or heater. Or, move the machine
to another location. Then, turn on the machine’s powerswitch.
Fail to Warm up The fuser unit is too cold.
Machine too Hot The inside of the machine is too hot. Listen to the machine to check that the cooling fan isspinning.
Make sure that the air vents are not covered up orblocked.
If the fan is spinning and air vents are clear, you shouldlet the machine cool down for several minutes beforeusing it again.
If the fan is not spinning, follow the suggestions below.
(For FAX-2920 and MFC-7225N)
Turn off the machine's power switch and then on
again. If the error message continues leave themachine for several minutes and then try it again. (Themachine can be turned off for up to 4 days withoutlosing faxes stored in the memory.)
(For FAX-2820)
When you turn off the machine's power switch itsmemory will be cleared. To check whether themachine has faxes in its memory, see Checking if the
machine has faxes in its memory on page 11-5. If thereare faxes you need to save them before following thesuggestions below (See Forwarding faxes to another
fax machine on page 11-5). Turn off the machine's
power switch and then on again. If the error messagecontinues, leave the machine for several minutes andtry it again.
ERROR MESSAGES
ERROR MESSAGE CAUSE ACTION

8/3/2019 Fax Brother
http://slidepdf.com/reader/full/fax-brother 85/148
Chapter 11
11 - 3
No cartridge The toner cartridge and drum unit
assembly is not installed or is notinstalled properly.
Reinstall the toner cartridge.
No Paper Fed The machine is out of paper or paper is
not properly loaded in the paper tray.
Refill the paper in the paper tray and then press Start.
—OR—
Remove the paper and load it again and then press
Start.
No Response/Busy The number you dialled does not
answer or is busy.
Verify the number and try again.
Not Registered You tried to access a One-Touch or
Speed Dial number that is not
programmed.
Set up the One-Touch or Speed Dial number.
(See Storing One-Touch numbers on page 5-1 and
Storing Speed-Dial numbers on page 5-2.)
Out of Memory The machine’s memory is ful l. (Fax sending or copy operation in progress)Press Start to send or copy the scanned pages.
—OR—
Press Stop/Exit and wait until the other operations in
progress have finished and then try again.
—OR—
Clear the faxes from the memory. (See Out of Memory
message on page 8-7.)
(Printing operation in process (FAX-2920 and
MFC-7225N only))
Reduce print resolution. (For details Advanced tab in
the Software User’s Guide on the CD-ROM
(MFC-7225N only).)
—OR—
Clear the faxes from the memory. (See Out of Memory
message on page 8-7.)
Turn on the Page Protection function. (See Device
Options in the Software User’s Guide on the CD-ROM
(MFC-7225N only).)
Paper jam Inside The paper is jammed inside the
machine.
(See Paper jams on page 11-6.)
Paper Jam Rear The paper is jammed in the back of the
machine.
(See Paper jams on page 11-6.)
Paper Jam Tray The paper is jammed in the paper tray
of machine.
(See Paper jams on page 11-6.)
Toner Life End The toner cartridge and drum unit
assembly is not installed properly.
—OR—
The toner is used up and printing is not
possible.
Re-install the toner cartridge and drum unit assembly.
—OR—
Replace the toner cartridge with a new one.
(See Replacing the toner cartridge (TN-2000) on page
11-23.)
Toner Low If the LCD shows Toner Low, you can
still print, however, the machine is
telling you that toner is near the end of
its life and will soon need replacing.
Order a new toner cartridge now.
ERROR MESSAGES
ERROR MESSAGE CAUSE ACTION

8/3/2019 Fax Brother
http://slidepdf.com/reader/full/fax-brother 86/148
Troubleshooting and routine maintenance
11 - 4
11
Unable to Init.
(Initialize)
Unable to Print
Unable to Scan
The machine has a mechanical
problem.
(For FAX-2920 and MFC-7225N)
Turn off the machine's power switch and then onagain. If the error message continues leave themachine for several minutes and then try to print, copyor scan again. (The machine can be turned off for upto 4 days without losing faxes stored in the memory.)
(For FAX-2820)
When you turn off the machine's power switch itsmemory will be cleared. To check whether themachine has faxes in its memory, see Checking if the
machine has faxes in its memory on page 11-5. If thereare faxes you need to save them before following thesuggestions below (See Forwarding faxes to another
fax machine on page 11-5). Turn off the machine'spower switch and then on again. If the error messagecontinues, leave the machine for several minutes andthen try to print, copy or scan again.
Wrong Paper
Size
Paper is not the correct size. Load the correct size of paper (Letter or A4) and thenpress Start.
ERROR MESSAGES
ERROR MESSAGE CAUSE ACTION

8/3/2019 Fax Brother
http://slidepdf.com/reader/full/fax-brother 87/148
Chapter 11
11 - 5
Checking if the machine has faxes inits memory
1 Press Menu/Set, 9, 0, 1.
2 If the LCD shows No Data, there are nofaxes left in the machine’s memory.
—OR—
If the LCD shows Enter Fax No. there are faxes in the machine’smemory.
Note
You can transfer the Fax Journal report toanother fax machine by pressing Menu/Set,9, 0, 2 in Step 1.
• You can transfer the faxes to another faxmachine. See Forwarding faxes to another fax machine .
• (MFC-7225N only)
You can transfer the faxes from themachine’s memory to your PC. SeeTransferring faxes to your PC (MFC-7225N only) .
Forwarding faxes to another faxmachine
If you have not set up your Station ID youcannot enter fax forward mode. (See Setting the Station ID on page 2-2.)
1 Enter the fax number to which the faxeswill be forwarded.
2 Press Start.
Transferring faxes to your PC(MFC-7225N only)
You can transfer the faxes from your
machine’s memory to your PC.
1 Press Stop/Exit.
2 Make sure you have installed MFL ProSuite on your PC, and then turn onPC-FAX Receiving on the PC. (Fordetails about PC Fax Receive, seeUsing Brother PC-Fax Software in theSoftware User’s Guide on theCD-ROM.)
3 Make sure you have setPC Fax Receive on the machine.(See Setting PC Fax Receive (MFC-7225N only) on page 6-2.)
During setup the LCD will ask if youwant to transfer the faxes to your PC.
4 To transfer all faxes to your PC, press 1.
—OR—
To exit and leave the faxes in thememory, press 2.
Note
If there is an error on the machine’s LCD,after the faxes have been transferreddisconnect the machine from the powersource for several minutes, and thenreconnect it.

8/3/2019 Fax Brother
http://slidepdf.com/reader/full/fax-brother 88/148
Troubleshooting and routine maintenance
11 - 6
11
Document jams
If the document is jammed, follow the steps
below.Documents can jam if they are not inserted orfed properly, or if they are too long. Follow thesteps below to clear a document jam.
1 Open the control panel cover.
2 Carefully pull the jammed documenttoward the front of the machine.
3 Close the control panel cover.
Press Stop/Exit.
Paper jams
To clear paper jams, please follow the steps
in this section.
Paper is jammed inside the machine
1 Pull the paper tray completely out of themachine.
2 Pull the jammed paper out of the papertray opening.
WARNING
After you have just used the machine,some parts inside the machine areextremely hot. When you open the frontcover or back cover of the machine, nevertouch the shaded parts shown in thefollowing diagram.

8/3/2019 Fax Brother
http://slidepdf.com/reader/full/fax-brother 89/148
Chapter 11
11 - 7
3 Open the front cover.
4 Pull out the drum unit and tonercartridge assembly. The jammed paper
may be pulled out with the tonercartridge and drum unit assembly, orthis may release the paper so you canpull it out of drum unit or the paper trayopening.
5 Put the drum unit and toner cartridgeassembly back into the machine.
6 Close the front cover.
7 Put the paper tray in the machine.
CAUTIONTo prevent damage to the machinecaused by static electricity, do not touchthe electrodes shown in the followingdiagram.

8/3/2019 Fax Brother
http://slidepdf.com/reader/full/fax-brother 90/148
Troubleshooting and routine maintenance
11 - 8
11
Paper is jammed at the back of themachine
1 Open the front cover.
2 Pull out the drum unit and tonercartridge assembly.
3 Open the back cover.
4 Pull the tab toward you to open the rearchute cover.
5 Pull the jammed paper out of the fuser
unit. If the jammed paper cannot bepulled out easily, push down the blue tabwith one hand as you gently pull out thepaper with the other hand.
6 Close the back cover.
7 Put the drum unit and toner cartridgeassembly back into the machine.
8 Close the front cover.

8/3/2019 Fax Brother
http://slidepdf.com/reader/full/fax-brother 91/148
Chapter 11
11 - 9
Paper is jammed inside the drum unitand toner cartridge assembly
1 Open the front cover.
2 Pull out the drum unit and tonercartridge assembly.
3 Hold down the lock lever on the left andpull the toner cartridge out of the drumunit. Take out the jammed paper if thereis any inside the drum unit.
4 Put the toner cartridge back into thedrum unit until you hear it lock into place.If you put it in properly, the lock lever willlift automatically.
5 Put the drum unit and toner cartridgeassembly back into the machine.
6 Close the front cover.
8/3/2019 Fax Brother
http://slidepdf.com/reader/full/fax-brother 92/148
Troubleshooting and routine maintenance
11 - 10
11
If you are having difficulty with your machine
If you think there is a problem with the way your faxes look, make a copy first. If the copy looks
good, the problem is probably not your machine. Check the chart below and follow thetroubleshooting tips.
The Brother Solutions Center offers the latest FAQs and troubleshooting tips.
Visit us at http://solutions.brother.com.
DIFFICULTY SUGGESTIONS
Printing or Receiving Faxes
• Condensed print
• Horizontal streaks
• Top and bottom of sentences are
cut off.• Missing lines
Usually this is caused by a poor telephone connection. If your copy looks good,you probably had a bad connection with static or interference on the telephoneline. Ask the other party to send the fax again.
Poor print quality. See Improving the print quality on page 11-15.
Vertical black lines when receiving Sometimes you may see vertical streaks/black lines on the faxes you receive.Your machine’s primary corona wire may be dirty, or the sending party’s faxscanner may be dirty. Clean your primary corona wire (See Cleaning the corona
wire on page 11-23), or ask the sender to make a copy to see if the problem is withthe sending machine. Try receiving from another fax machine. If the problemcontinues, call Brother or your dealer for service.
Received faxes appear as split orblank pages.
If the received faxes are divided and printed on two pages or if you get an extrablank page, your Paper Size setting may not be correct for the paper you areusing. (See Setting the Paper Size on page 2-5.) Make sure that auto reduction
menu setting is turned on. (See Printing a reduced incoming fax (Auto Reduction) on page 4-4.)
Phone Line or Connections
Dialling does not work. Check for a dial tone. Change Tone/Pulse setting. (See Tone or Pulse on page5-4.) Check all line cord connections. Check power cord connection. If an externalphone is connected to the machine, send a manual fax by lifting the handset of theexternal phone and dialling the number. Wait to hear fax receiving tones beforepressing Start.
The machine does not answerwhen called.
Make sure the machine is in the correct receiving mode for your setup.(See Basic sending operations on page 3-4.) Check for a dial tone. If possible, callyour machine to hear it answer. If there is still no answer, check the telephone linecord connection. If there is no ringing when you call your machine, ask yourtelephone company to check the line.

8/3/2019 Fax Brother
http://slidepdf.com/reader/full/fax-brother 93/148
Chapter 11
11 - 11
Sending Faxes
Poor fax send quality Try changing your resolution to Fine or S.Fine. Make a copy to check your
machine’s scanner operation. If the copy quality is not good, clean the scanner.(See Cleaning the scanner on page 11-21.)
Transmission Verification Reportsays ‘RESULT:NG’ or‘RESULT:ERROR’.
There is probably temporary noise or static on the line. Try sending the fax again.
(MFC-7225N only)
If you send a PC FAX message and get ‘RESULT:NG’ on the TransmissionVerification Report, your machine may be out of memory. To gain extra memory,you can turn off Fax Storage (See Turning off Remote Fax Options on page 6-3),print fax messages in memory (See Printing a fax from the memory on page 4-4)or cancel a Delayed Fax or Polling Job (See Cancelling a fax in progress on page3-8). If the problem continues, ask the telephone company to check your phoneline.
If you frequently get transmission errors due to possible interference on the phone
line, try changing the Compatibility setting to Basic. (See Compatibility on page11-19.)
Vertical black lines when sending. If the copy you made shows the same problem, your scanner is dirty.(See Cleaning the scanner on page 11-21.)
Handling Incoming Calls
The machine ‘Hears’ Voice as CNGTone.
If Fax Detect is set to On, your machine is more sensitive to sounds. It maymistakenly interpret certain voices or music on the line as a calling fax machineand respond with fax receiving tones. Deactivate the machine by pressingStop/Exit. Try avoiding this problem by turning Fax Detect to Off.(See Fax Detect on page 4-3.)
Sending a Fax Call to the machine. If you answered at the machine, press Start and hang up immediately. If you
answered on an external or extension phone, press your Fax Receive Code(default setting is ( 51). When your machine answers, hang up.
Custom features on a single line. If you have Call Waiting, Call Waiting/Caller ID, Voice Mail, an answering machine,an alarm system or other custom feature on a single phone line with your machine,it may create a problem sending or receiving faxes.
For Example: If you subscribe to Call Waiting or some other custom service andits signal comes through the line while your machine is sending or receiving a fax,the signal can temporarily interrupt or disrupt the faxes. Brother’s ECM featureshould help overcome this problem. This condition is related to the telephonesystem industry and is common to all devices that send and receive informationon a single, shared line with custom features. If avoiding a slight interruption iscrucial to your business, a separate line with no custom features is recommended.
Menu Setting Difficulties
The machine beeps when you try toaccess the Setup Receive andSetup Send menus.
If the Fax key is not illuminated, press it to turn on Fax mode. The SetupReceive setting (Menu/Set, 2, 1) and Setup Send setting (Menu/Set, 2, 2) areavailable only when the machine is in Fax mode.
Copy Quality Difficulties
Vertical streaks appear in copies. Sometimes you may see vertical streaks on your copies. Either the scanner or theprimary corona wire is dirty. Clean them both. (See Cleaning the scanner on page11-21, Cleaning the laser scanner window on page 11-22 and Cleaning the drum
unit on page 11-16.)
DIFFICULTY SUGGESTIONS
8/3/2019 Fax Brother
http://slidepdf.com/reader/full/fax-brother 94/148
Troubleshooting and routine maintenance
11 - 12
11
Printer Difficulties
The machine does not print. Please make sure:
• The machine is plugged in and the power switch is turned On. (See the QuickSetup Guide on page 7.)
—OR—
• The toner cartridge and drum unit are installed properly. (See Replacing the
drum unit (DR-2000) on page 11-26.)
—OR—
• The interface cable is securely connected between the machine and computer.(See the Quick Setup Guide.)
—OR—
• The correct printer driver has been installed and selected.
—OR—
• Check to see if the LCD is showing an error message. (See Error messages onpage 11-1.)
—OR—
• The machine is online. Click Start and then Printers and Faxes. Right-click‘Brother MFC-7225N’. Make sure that “Use Printer Offline” is unchecked.
The machine prints unexpectedlyor it prints garbage.
(For FAX-2920 and MFC-7225N)
Turn off the machine's power switch and then on again. If the error messagecontinues leave the machine for several minutes and then try it again. (Themachine can be turned off for up to 4 days without losing faxes stored in thememory.)
(For FAX-2820)
When you turn off the machine's power switch its memory will be cleared. To
check whether the machine has faxes in its memory see Checking if the machine has faxes in its memory on page 11-5. If there are faxes you need to save thembefore following the suggestions below (See Forwarding faxes to another fax
machine on page 11-5). Turn off the machine's power switch and then on again. Ifthe error message continues, leave the machine for several minutes and try itagain.
The machine prints first couple ofpages correctly, then some pageshave text missing.
Your computer is not recognizing the machine’s input buffer full signal. Pleasemake sure you connect the interface cable correctly. (See the Quick Setup Guide.)
The machine cannot print full pagesof a document.Out of Memory message occurs.
Reduce the printing resolution. (See Advanced tab in the Software User’s Guideon the CD-ROM (MFC-7225N only).)
Reduce the complexity of your document and try again. Reduce the graphic qualityor the number of font sizes within your application software.Turn on the Page Protection function (See Device options in the Software User´sGuide on the CD-ROM (MFC-7225N only).)
My headers or footers appear whenI view my document on the screenbut do not appear when I printthem.
Your machine can print 62 lines per page. The top two lines and bottom two linesare a restricted area that will not accept print. Adjust the top and bottom marginsin your document to allow for this.
DIFFICULTY SUGGESTIONS

8/3/2019 Fax Brother
http://slidepdf.com/reader/full/fax-brother 95/148
Chapter 11
11 - 13
Scanning Difficulties (MFC-7225N only)
TWAIN errors appear while
scanning.
Make sure the Brother TWAIN driver is selected as the primary source. In
PaperPort ®
, click Scan in the File menu and select the Brother TWAIN driver.Software Difficulties (MFC-7225N only)
Cannot install software or print. Run the Repair MFL-Pro Suite program on the CD-ROM. This program will repairand reinstall the software.
Cannot perform ‘2 in 1’ or ‘4 in 1’printing.
Check that the paper size setting in the application and in the printer driver are thesame.
Machine does not print from AdobeIllustrator
Try to reduce the print resolution. (See Advanced tab in the Software User’s Guideon the CD-ROM (MFC-7225N only).)
When using ATM fonts, somecharacters are missing or somecharacters are printed in their
place.
If you are using Windows ® 98/98SE/Me, select ‘Printer Settings’ from the ‘Start’menu. Select the properties of the ‘Brother MFC-7225N’. Click ‘Spool Setting’ onthe ‘Details’ tab. Select ‘RAW’ from ‘Spool Data Format.’
‘Unable to write to LPT1’ or ‘LPT1already in use’ Error Messageappears.
1.Make sure the machine is on (plugged into the electrical socket and the powerswitch turned on) and that it is connected directly to the computer using theIEEE-1284 bi-directional parallel cable. The cable must not go through anotherperipheral device (such as a Zip Drive, External CD-ROM Drive, or Switch box).
2.Make sure the machine is not displaying an error message on the LCD Display.
3.Make sure no other device drivers, which also communicate through the parallelport, are running automatically when you boot up the computer (such as, driversfor Zip Drives, External CD-ROM Drive, etc.) Suggested areas to check: (Load=,
Run=command lines in the win.ini file or the Setup Group )
4.Check with your computer manufacturer to confirm that the computer’s parallelport settings in the BIOS are set to support a bi-directional machine; i.e. (Parallel
Port Mode – ECP)
‘MFC is Busy’ Error Messageappears.
Paper Handling Difficulties
The machine does not feed paper.
The LCD shows No Paper Fed ora Paper Jam message.
If there is no paper, load a new stack of paper into the paper tray. If there is paperin the paper tray, make sure it is straight. If the paper is curled, you shouldstraighten it. Sometimes it is helpful to remove the paper, turn the stack over andput it back into the paper tray. Reduce the amount of paper in the paper tray, andthen try again. Check that the manual feed mode is not selected in the printerdriver.
If the LCD shows Paper Jam and you still have a problem, see Paper jams onpage 11-6.
The machine does not feed paper
from the manual feed slot.
Reinsert the paper firmly, load one sheet at a time. Make sure that manual feed
mode is selected in the printer driver.How can I load envelopes? You can load envelopes from the manual feed slot. Your application software must
be set up to print the envelope size you are using. This is usually done in the PageSetup or Document Setup menu of your software. You should refer to the manualprovided with your software application.
What paper can I use? You can use plain paper, recycled paper, envelopes, transparencies and labelsthat are made for laser machines. (For information on paper you can use, seeAbout paper on page 1-8.)
How can I clear paper jams? See Paper jams on page 11-6.
DIFFICULTY SUGGESTIONS

8/3/2019 Fax Brother
http://slidepdf.com/reader/full/fax-brother 96/148
Troubleshooting and routine maintenance
11 - 14
11
Print Quality Difficulties
Printed pages are curled. Low quality thin or thick paper can cause this problem. Make sure you select the
Paper Type that suits the media type you use. (See About paper on page 1-8.)Printed pages are smeared. The Paper Type setting may be incorrect for the type of print media you are
using—OR—The print media may be too thick or have a rough surface.(See About paper on page 1-8 and Basic tab in the Software User’s Guide on theCD-ROM (MFC-7225N only).)
Printouts are too light. If this problem occurs when making copies or printing received faxes, turn offToner Save mode in the machine´s menu setting. (See Toner Save on page 2-7.)
Set Toner Save mode to off in the Advanced tab in the printer driver.(See Advanced tab in the Software User’s Guide on the CD-ROM (MFC-7225Nonly).)
Network Difficulties (MFC-7225N only)
I cannot print over the Network Make sure that your machine is powered on and is online and in Ready mode.Print a Network Configuration list and check the current settings. (See Printing
reports on page 7-1.) Reconnect the LAN cable to the hub to verify that the cablingand network connections are good. If possible, try connecting the machine to adifferent port on your hub using a different cable. If the connections are good, themachine shows LAN Active.
DIFFICULTY SUGGESTIONS

8/3/2019 Fax Brother
http://slidepdf.com/reader/full/fax-brother 97/148
Chapter 11
11 - 15
Improving the print quality
Examples of poor print quality Recommendation
Faint
Check the machine’s environment. Conditions such as humidity, hightemperatures, and so on may cause this print fault. (See Choosing a location onpage 1-2.)
If the whole page is too light, Toner Save mode may be on. Turn off Toner Save mode in the Advanced tab of printer driver Properties.—OR—If this problem occurs when making copies or printing received faxes, turn offToner Save mode in the machine’s menu setting. (See Toner Save on page 2-7.)
Clean the scanner window and the primary corona wire on the drum unit.(See Cleaning the laser scanner window on page 11-22 and Cleaning the corona
wire on page 11-23.) If the print quality has not improved, install a new drum unit.(See Replacing the drum unit (DR-2000) on page 11-26.)
Install a new toner cartridge. (See Replacing the toner cartridge (TN-2000) onpage 11-23.)
Grey background
Make sure that you use paper that meets the recommended specifications.(See About paper on page 1-8.)
Check the machine’s environment - high temperatures and high humidity canincrease the amount of background shading. (See Choosing a location on page1-2.)
Install a new toner cartridge. (See Replacing the toner cartridge (TN-2000) onpage 11-23.)
Clean the primary corona wire on the drum unit. (See Cleaning the corona wire onpage 11-23.) If the print quality has not improved, install a new drum unit.(See Replacing the drum unit (DR-2000) on page 11-26.)
Ghost
Make sure you use paper that meets our specifications. Rough-surfaced paper orthick print media may cause this problem. (See About paper on page 1-8.)
Make sure that you choose the appropriate media type in the printer driver or inthe machine’s Paper Type menu setting. (See Basic tab in the Software User’sGuide on the CD-ROM (MFC-7225N only) and Setting the Paper Type in thisUser’s Guide.)
Install a new drum unit. (See Replacing the drum unit (DR-2000) on page 11-26.)
Toner specks
Make sure that you use paper that meets our specifications. Rough-surfacedpaper may cause the problem. (See About paper on page 1-8.)
Clean the primary corona wire and the drum unit. (See Cleaning the corona wire on page 11-23 and Cleaning the drum unit on page 11-16.) If the print quality hasnot improved, install a new drum unit. (See
Replacing the drum unit (DR-2000) on
page 11-26.)
Hollow print
Make sure that you use paper that meets our specifications. (See About paper onpage 1-8.) Choose Thick paper mode in the printer driver or in the machine’sPaper Type menu setting, or use thinner paper than you are currently using.Check the machine’s environment because conditions such as high humidity cancause hollow print. (See Choosing a location on page 1-2.)
Clean the primary corona wire on the drum unit. (See Cleaning the corona wire onpage 11-23.) If the print quality has not improved, install a new drum unit.(See Replacing the drum unit (DR-2000) on page 11-26.)
All black
Clean the primary corona wire on the drum unit. (See Cleaning the corona wire onpage 11-23.)
If the print quality has not improved, install a new drum unit. (See Replacing the drum unit (DR-2000) on page 11-26.)
ABCDEFGH
abcdefghijk
A B C Da bc de0 1 2 3 4
DE
efg
c2
ABCDEFGH
abcdefghijk
A B C Dab cd e0 1 2 3 4
ABCDEFGH
abcdefghijk
A B C Da bc de0 1 2 3 4

8/3/2019 Fax Brother
http://slidepdf.com/reader/full/fax-brother 98/148
Troubleshooting and routine maintenance
11 - 16
11
White Spots on black text andgraphics at 78.5 mm
intervals
Black Spots at 78.5 mm
intervals
Cleaning the drum unit
Dust, paper powder, glue, and so on may stick to the surface of the photosensitivedrum (OPC) and cause black or white spots to appear on printed documents.Make a few copies of a blank, white sheet of paper. (See Making multiple copies on page 8-2.)
If you still see the spots on printed documents after making multiple copies, cleanthe drum unit as follows:
1 Remove the drum unit and toner cartridge assembly, and then remove the tonercartridge from the drum unit.
2 Position the print sample in front of the drum unit so you will know the exactposition on the drum that is causing the poor print.
3 Turn the black gear on the drum as you check the surface of the OPC drum.
Do not touch the OPC drum with your fingers.
4 When you find the substance on the drum surface that matches the printsample, gently dab the surface of the OPC drum with a cotton swab that is lightlydampened with isopropyl alcohol.
Do not use a scrubbing or wiping motion because this might damage thedrum.
Do not try to clean the surface of the OPC drum with a sharp object, such asa ball-point pen, because this might cause permanent damage to the drumunit.
If the print quality still has not improved you need to install a new drum.(See Replacing the drum unit (DR-2000) on page 11-26.)
Examples of poor print quality Recommendation
78.5 mm
78.5 mm
78.5 mm
78.5 mm
OPC drum surface

8/3/2019 Fax Brother
http://slidepdf.com/reader/full/fax-brother 99/148
Chapter 11
11 - 17
Black toner marks across the page
Make sure that you use paper that meets our specifications. (See About paper onpage 1-8.)
If you use label sheets for laser printers, the glue from the sheets may sometimesstick to the OPC drum surface. Clean the drum unit. (See Cleaning the drum unit on page 11-16.)
Do not use paper that has clips or staples because they will scratch the surface ofthe drum.
If the unpacked drum unit is in direct sunlight or room light, the unit may bedamaged.
The drum unit may be damaged. Put in a new drum unit. (See Replacing the drum
unit (DR-2000) on page 11-26).
White lines across the page
Make sure that you use paper that meets our specifications. A rough surfacedpaper or thick print media can cause the problem. (See About paper on page 1-8.)
Make sure that you choose the appropriate media type in the printer driver or in
the machine’s Paper Type menu setting. (See Basic tab in the Software User’sGuide on the CD-ROM (MFC-7225N only) and Setting the Paper Type in thisUser’s Guide.)
The problem may disappear by itself. Try printing multiple pages to clear thisproblem, especially if the machine has not been used for a long time.
You may clear the problem by wiping the laser scanner window with a soft cloth.(See Cleaning the laser scanner window on page 11-22.)
The drum unit may be damaged. Put in a new drum unit. (See Replacing the drum
unit (DR-2000) on page 11-26.)
Lines across the page
Clean the primary corona wire in the drum unit. (See Cleaning the corona wire onpage 11-23.)
You may clear the problem by wiping the laser scanner window with a soft cloth.
(See Cleaning the laser scanner window on page 11-22.)The drum unit may be damaged. Put in a new drum unit. (See Replacing the drum
unit (DR-2000) on page 11-26.)
Black lines down the page
Printed pages have toner stains downthe page.
Clean the primary corona wire of the drum unit. (See Cleaning the corona wire onpage 11-23.)
Make sure the primary corona wire’s blue tab is at the home position (▲).
The drum unit may be damaged. Install a new drum unit. (See Replacing the drum
unit (DR-2000) on page 11-26.)
The toner cartridge may be damaged. Put in a new toner cartridge.(See Replacing the toner cartridge (TN-2000) on page 11-23.) Make sure that atorn piece of paper is not inside the machine covering the laser scanner window.
The fixing unit may be smudged. Call Brother or your dealer for service.
White lines down the page
You may clear the problem by wiping the laser scanner window with a soft cloth.(See Cleaning the laser scanner window on page 11-22.)
The toner cartridge may be damaged. Put in a new toner cartridge.(See Replacing the toner cartridge (TN-2000) on page 11-23.)
Page skewed
Make sure the paper or other print media is loaded properly in the paper tray andthat the guides are not too tight or too loose against the paper stack.
Set the paper guides correctly.
If you are using the manual feed slot, see To load paper or other media in the
manual feed slot on page 1-11.
The paper tray may be too full.Check the paper type and quality. (See About paper on page 1-8.)
Examples of poor print quality Recommendation
ABCDEFGH
abcdefghijk
A B C Da bc de0 1 2 3 4
ABCDEFGHabcdefghijk
A B C Da bc de0 1 2 3 4
ABCDEFGHabcdefghijk
ABCD
abcde01234
ABCDEFGH
abcdefghijk
A B C Da bc de0 1 2 3 4
ABCDEFGHabcdefghijk
ABCDabcde01234
ABCDEFGH
abcdefghijk
ABCD
abcde
01 23 4

8/3/2019 Fax Brother
http://slidepdf.com/reader/full/fax-brother 100/148
Troubleshooting and routine maintenance
11 - 18
11
Curl or wave
Check the paper type and quality. High temperatures and high humidity wil l causepaper to curl.
If you don’t use the machine very often, the paper may have been in the paper traytoo long. Turn over the stack of paper in the paper tray. Also, fan the paper stackand then rotate the paper 180° in the paper tray.
Wrinkles or creases
Make sure that paper is loaded properly.
Check the paper type and quality. (See About paper on page 1-8.)
Turn over the stack of paper in the tray or rotate the paper 180° in the input tray.
Examples of poor print quality Recommendation
B DE FG Habc efghijk
A C Dbc de1 3 4

8/3/2019 Fax Brother
http://slidepdf.com/reader/full/fax-brother 101/148
Chapter 11
11 - 19
Compatibility
If you are having difficulty sending or
receiving a fax due to possible interferenceon the phone line, we recommend that youadjust the Equalization for compatibility toreduce the modem speed for fax operations.
1 Press Menu/Set, 2, 0, 1.
2 Press ▲ or ▼ to select Basic orNormal (or High*).
(*FAX-2920 and MFC-7225N only)Press Menu/Set.
3 Press Stop/Exit.
Note■ Basic reduces the modem speed to
9600 bps. Unless interference is arecurring problem on your phone line, youmay prefer to use it only when needed.
■ Normal sets the modem speed at14400 bps.
■ High sets the modem speed at 33600 bps(FAX-2920 and MFC 7225N only).
■ When you change the Compatibility toBasic, the ECM feature is not available.
Packing and shippingthe machine
When you transport the machine, use thepacking materials that came with yourmachine. If you do not pack the machineproperly, you could void your warranty.
1 Turn off the machine’s power switch.
2 Unplug the machine from the telephonewall socket.
3 Unplug all the cables and AC powercord from the machine.
4 Open the front cover.
5 Remove the drum unit and tonercartridge assembly. Leave the tonercartridge installed in the drum unit.
6 Place the drum unit and toner cartridgeassembly into the plastic bag and seal
the bag.7 Close the front cover.
Remove the ADF document outputsupport.
8 Wrap the machine in the plastic bag andplace it in the original carton with theoriginal packing material.
1.Compatibility

8/3/2019 Fax Brother
http://slidepdf.com/reader/full/fax-brother 102/148
Troubleshooting and routine maintenance
11 - 20
11
9 Pack the drum unit and toner cartridgeassembly, AC power cord, telephoneline cord, ADF document output supportflap and printed materials in the originalcarton as shown below:
0 Close the carton and tape it shut.
Routine maintenance
Cleaning the outside of themachine
1 Pull the paper tray completely out of themachine.
CAUTION
The drum unit contains toner, so handle itcarefully. If toner scatters and your handsor clothes get dirty, immediately wipe orwash it off with cold water.
CAUTION
■ Use neutral detergents. Cleaning withvolatile liquids such as thinner orbenzine will damage the outsidesurface of the machine.
■ Do not use cleaning materials thatcontain ammonia.
■ Do not use isopropyl alcohol to removedirt from the control panel. It may crack
the panel.

8/3/2019 Fax Brother
http://slidepdf.com/reader/full/fax-brother 103/148
Chapter 11
11 - 21
2 Wipe the outside of the machine with asoft cloth to remove dust.
3 Remove any paper that is in the paper
tray.4 Wipe the inside of the paper tray with a
soft cloth to remove the dust.
5 Re-load the paper and put the paper trayin the machine.
Cleaning the scanner
1 Turn off the machine’s power switch.
2 Lift the control panel cover.
3 Moisten a small clean soft, lint-free clothwith isopropyl alcohol and carefullyremove dirt from the glass cover and thewhite bar above it.
4 Close the control panel cover.I
Control Panel Cover
White Bar
Glass Cover

8/3/2019 Fax Brother
http://slidepdf.com/reader/full/fax-brother 104/148
Troubleshooting and routine maintenance
11 - 22
11
Cleaning the laser scannerwindow
1 Before you clean the inside of themachine, turn off the machine’s powerswitch.
Unplug the telephone line cord first, andthen unplug the power cord from theelectrical socket.
2 Open the front cover and pull out thedrum unit and toner cartridge assembly.
3 Gently clean the laser scanner windowby wiping it with a clean soft, dry cloth.Do not use isopropyl alcohol.
4 Put the drum unit and toner cartridgeassembly back into the machine.
5 Close the front cover.
6 Plug the machine’s power cord back intothe electrical socket first, and then plugin the telephone line cord.
Turn on the machine’s power switch.
CAUTION
■ Do not use isopropyl alcohol to cleanthe laser scanner window.
■ Do not touch the laser scanner windowwith your fingers.
WARNING
Just after you have used the machine,some internal parts of the machine areextremely HOT! When you open the front
cover of the machine, never touch theshaded parts shown in the diagram below.
CAUTION
To prevent damage to the machine from
static electricity, do not touch theelectrodes shown below.
Laser ScannerWindow

8/3/2019 Fax Brother
http://slidepdf.com/reader/full/fax-brother 105/148
Chapter 11
11 - 23
Cleaning the corona wire
We recommend placing the drum unit and
toner cartridge assembly on a cloth or a largepiece of disposable paper to avoid spillingand scattering toner.
1 Open the front cover and pull out thedrum unit and toner cartridge assembly.
2 Clean the primary corona wire inside thedrum unit by gently sliding the blue tabfrom right to left several times.
3 Return the blue tab and snap it into theHome position (▼).
4 Reinstall the drum unit and tonercartridge assembly in the machine.
5 Close the front cover.
Replacing the toner cartridge(TN-2000)
The toner cartridge can print up to 2,500pages. When the toner cartridge is runninglow, the LCD shows Toner Low. Actual pagecount will vary depending on your averagetype of document (i.e., standard letter,detailed graphics).
Note
It is a good idea to keep a new toner cartridgeready for use when you see the Toner Low
warning.
Discard the used toner cartridge according tolocal regulations, keeping it separate fromdomestic waste. You can also check ourecology website www.brothergreen.co.uk forrecycling information. Be sure to seal thetoner cartridge tightly so toner powder doesnot spill out of the cartridge. If you havequestions, call your local waste disposal
office.We recommend that you clean the machineand drum unit when you replace the tonercartridge. (See Cleaning the laser scanner window on page 11-22 and Cleaning the corona wire on page 11-23.)
CAUTION
If you do not return the blue tab to theHome position (▼), your printed pagesmay have vertical black stripes on them.

8/3/2019 Fax Brother
http://slidepdf.com/reader/full/fax-brother 106/148
Troubleshooting and routine maintenance
11 - 24
11
How to replace the tonercartridge
1 Open the front cover and pull out thedrum unit and toner cartridge assembly.
2 Hold down the lock lever on the left andpull the toner cartridge out of the drumunit.
3 Unpack the new toner cartridge. Placethe used toner cartridge into thealuminium bag and discard it accordingto local regulations.
WARNING
Just after you use the machine, someinternal parts of the machine will beextremely HOT! Never touch the shadedparts shown in the illustration.
CAUTION
To prevent damage to the machine from
static electricity, do not touch theelectrodes shown below.
CAUTION
■ Place the drum unit on a drop cloth orlarge piece of disposable paper toavoid spilling and scattering the toner.
■ Handle the toner cartridge carefully. Iftoner scatters on your hands orclothes, immediately wipe it off or washit with cold water.
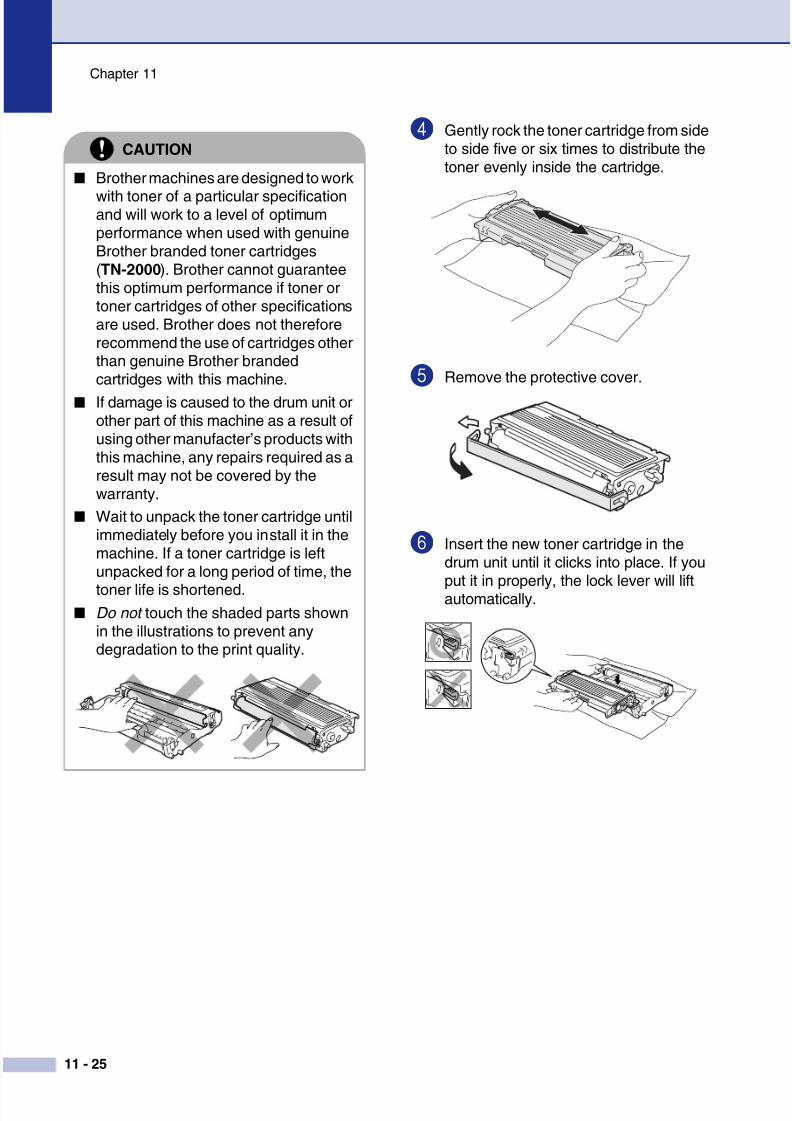
8/3/2019 Fax Brother
http://slidepdf.com/reader/full/fax-brother 107/148
Chapter 11
11 - 25
4 Gently rock the toner cartridge from sideto side five or six times to distribute thetoner evenly inside the cartridge.
5 Remove the protective cover.
6 Insert the new toner cartridge in thedrum unit until it clicks into place. If youput it in properly, the lock lever will liftautomatically.
CAUTION
■ Brother machines are designed to work
with toner of a particular specificationand will work to a level of optimumperformance when used with genuineBrother branded toner cartridges(TN-2000). Brother cannot guaranteethis optimum performance if toner ortoner cartridges of other specificationsare used. Brother does not thereforerecommend the use of cartridges otherthan genuine Brother brandedcartridges with this machine.
■ If damage is caused to the drum unit orother part of this machine as a result ofusing other manufacter’s products withthis machine, any repairs required as aresult may not be covered by thewarranty.
■ Wait to unpack the toner cartridge untilimmediately before you install it in themachine. If a toner cartridge is leftunpacked for a long period of time, the
toner life is shortened.■ Do not touch the shaded parts shown
in the illustrations to prevent anydegradation to the print quality.

8/3/2019 Fax Brother
http://slidepdf.com/reader/full/fax-brother 108/148
Troubleshooting and routine maintenance
11 - 26
11
7 Clean the primary corona wire inside thedrum unit by gently sliding the blue tabfrom right to left several times. Returnthe blue tab to the Home position (▼)before reinstalling the drum unit andtoner cartridge assembly.
8 Install the drum unit and toner cartridgeassembly in the machine.
9 Close the front cover.
Replacing the drum unit(DR-2000)
The machine uses a drum unit to create printimages on paper. If the LCD showsChange Drum Soon, the drum unit is nearthe end of its life and it is time to buy a newone.
Even if the LCD shows Change Drum Soon,you may be able to continue printing withouthaving to replace the drum unit for a while.However, if there is a noticeable deteriorationin the output print quality (even before
Change Drum Soon appears), then thedrum unit should be replaced. You shouldclean the machine when you replace thedrum unit. (See Cleaning the laser scanner window on page 11-22.)
Note
The drum unit is a consumable item, and it isnecessary to replace it periodically. There aremany factors that determine the drum life,such as temperature, humidity, type of paperand how much toner you use for the numberof pages per print job. The estimated drum life
is up to 12,000 pages. The actual number ofpages your drum will print may besignificantly less than these estimates.Because we have no control over the manyfactors that determine the actual drum life, wecannot guarantee a minimum number ofpages that will be printed by your drum.
CAUTION
When removing the drum unit, handle itcarefully because it contains toner. If tonerscatters and your hands or clothes get
dirty, immediately wipe or wash with coldwater.

8/3/2019 Fax Brother
http://slidepdf.com/reader/full/fax-brother 109/148
Chapter 11
11 - 27
1 Open the front cover and pull out thedrum unit and toner cartridge assembly.
2 Hold down the lock lever on the left andpull the toner cartridge out of the drumunit.
Note
Discard the used drum unit according to localregulations, keeping it separate fromdomestic waste. Be sure to seal the drum unittightly so toner powder does not spill out ofthe unit. If you have questions, call your localwaste disposal office.
3 Unpack the new drum unit.
4 Install the toner cartridge into the newdrum unit until it clicks into place. If youput it in properly, the lock lever will liftautomatically.
WARNING
Just after you have used the machine,
some internal parts of the machine areextremely HOT! So please be careful.
CAUTION
To prevent damage to the printer fromstatic electricity, do not touch theelectrodes shown below.
CAUTION
Wait to unpack the new drum unit untilimmediately before installing it. Place theold drum unit into the plastic bag.

8/3/2019 Fax Brother
http://slidepdf.com/reader/full/fax-brother 110/148
Troubleshooting and routine maintenance
11 - 28
11
5 Reinstall the drum unit and tonercartridge assembly in the machine.
6 Do not close the front cover.
7 Press Options.
To confirm you are installing a newdrum, press 1.
8 When the LCD shows Accepted, closethe front cover.
Machine Information
Checking the Serial NumbersYou can view the machine’s serial number onthe LCD.
1 For FAX-2820 and FAX-2920, pressMenu/Set, 4, 1.
—OR—
For MFC-7225N, press Menu/Set, 6, 1.
2 Press Stop/Exit.
Checking the Page Counters
You can view the MFC’s page counters forcopies, printer pages, reports and lists, faxesor a summary total.
1 For FAX-2820 and FAX-2920, press
Menu/Set, 4, 2.—OR—
For MFC-7225N, press Menu/Set, 6, 2.
2 Press ▲ or ▼ to select Total, Copy,Print* or List / Fax.
(* FAX-2920 and MFC-7225N only)
3 Press Stop/Exit.
CAUTION
If toner scatters and your hands or clothesget dirty, immediately wipe off or washwith cold water.
Replace Drum?
1.Yes 2.No
1.Serial No.
2.Page Counter
Total :XXXXXX
Copy :XXXXXX
Print :XXXXXX *
List/Fax :XXXXXX

8/3/2019 Fax Brother
http://slidepdf.com/reader/full/fax-brother 111/148
Chapter 11
11 - 29
Checking the Drum Life
You can view the machine’s drum life on the
LCD.1 For FAX-2820 and FAX-2920, press
Menu/Set, 4, 3.
—OR—
For MFC-7225N, press Menu/Set, 6, 3.
2 Press Stop/Exit.
3.Drum Life
Remaining:XXX%

8/3/2019 Fax Brother
http://slidepdf.com/reader/full/fax-brother 112/148
A - 1
A
Telephone servicesBT Call Sign (For U.K. Only)
This machine feature lets you use the BT CallSign subscriber service which allows you tohave at least two separate telephonenumbers on one phone line. Each phonenumber has its own distinctive ringingpattern, so you know which phone number is
ringing. This is one way you can have aseparate phone number for your machine.
Your machine has a BT Call Sign compatibledistinctive ringing function, allowing you todedicate a second phone number (on thesame phone line) just for receiving faxes.
Note■ You can switch BT Call Sign off
temporarily, then turn it back on. When
you get a new fax number, make sure youreset this function. The machine willautomatically answer incoming calls thatuse your new fax number.
■ When you set the BT Call Sign feature toON, the receive mode is set to Manual automatically. Manual mode will notrespond to incoming telephone calls,since the number you use for telephonecalls will use the normal ring pattern.
To enable the machine to work with BTCall Sign (Only with your externalphone)
1 Press Menu/Set, 2, 0, 2.
The screen displays the current settingof this feature.
2 Press ▲ or ▼ to select On (or Off).
3 Press Menu/Set.
4 Press Stop/Exit.
Note
If you turn off BT Call Sign, the receive modestays set to Manual. You will need to setreceive mode again. (See Choosing the Receive Mode on page 4-1.)
Appendix A

8/3/2019 Fax Brother
http://slidepdf.com/reader/full/fax-brother 113/148
A - 2
Advanced receivingoperations
Operation from extensiontelephones
If you answer a fax call on an extension, or anexternal telephone that is correctly connectedto the machine, you can make your machinetake the call by using the Fax Receive Code.When you press the Fax Receive Code 51,the machine starts to receive the fax.
If you answer a call and no one is on the line,you should assume that you’re receiving amanual fax.
Press 51 and wait for the chirp or until themachine’s LCD displays Receiving, andthen hang up.
Note
You can also use the Fax Detect feature tomake your machine automatically take thecall. (See Fax Detect on page 4-3.)
For Fax/Tel mode only
When the machine is in Fax/Tel mode, it willuse the F/T Ring Time(pseudo/double-ringing) to alert you to pickup a voice call.
Lift the external telephone's handset, andthen press Tel/R to answer.
If you’re at an extension phone, you’ll need tolift the handset during the F/T Ring Time andthen press #51 between the pseudo/doublerings. If no one is on the line, or if someonewants to send you a fax, send the call back tothe machine by pressing 51.
Using a cordless externalhandset
If the base unit of the cordless telephone isconnected (see page A-3) and you typicallycarry the cordless handset elsewhere, it iseasier to answer calls during the Ring Delay.

8/3/2019 Fax Brother
http://slidepdf.com/reader/full/fax-brother 114/148
Appendix A
A - 3
Changing the remote codes
If you want to use Remote Activation, you
have to turn on the remote codes. The presetFax Receive Code is 51. The presetTelephone Answer Code is #51. If you wantto, you can replace them with your owncodes.
1 If it is not illuminated in green, press
(Fax).
2 Press Menu/Set, 2, 1, 4.
3 Press ▲ or ▼ to select On (or Off).
Press Menu/Set.
4 Enter the new Fax Receive Code.
Press Menu/Set.
5 Enter the new Telephone Answer Code.
Press Menu/Set.6 Press Stop/Exit.
Note■ If you are always disconnected when
accessing your external TAD remotely, trychanging the Fax Receive Code andTelephone Answer Code to anotherthree-digit code using the numbers 0-9,
, #.
■ Remote Codes might not work with sometelephone systems.
Connecting an externaldevice to your machine
Connecting an externaltelephone
You can connect a separate telephone toyour machine as shown in the diagram below.
When you are using an external phone, theLCD shows Telephone.
Connecting an externaltelephone answering device
(TAD)
Sequence
You may choose to connect an externalanswering device. However, when you havean external TAD on the same telephone lineas the machine, the TAD answers all callsand the machine “listens” for fax calling(CNG) tones. If it hears them, the machinetakes over the call and receives the fax. If itdoes not hear CNG tones, the machine letsthe TAD continue playing your outgoingmessage so your caller can leave you a voicemessage.
4.Remote Code
ExtensionTelephone
ExternalTelephone

8/3/2019 Fax Brother
http://slidepdf.com/reader/full/fax-brother 115/148
A - 4
The TAD must answer within four rings (therecommended setting is two rings). Themachine cannot hear CNG tones until theTAD has answered the call, and with fourrings there are only 8 to 10 seconds of CNGtones left for the fax “handshake”. Make sureyou carefully follow the instructions in thisguide for recording your outgoing message.We do not recommend using the toll saverfeature on your external answering machine ifit exceeds five rings.
Note
If you do not receive all your faxes, reduce the
Ring Delay setting on your external TAD.
When the TAD answers a call, the LCDshows Telephone.
Connections
The external TAD must be connected asshown in the previous illustration.
1 Set your external TAD to one or tworings. (The machine’s Ring Delaysetting does not apply.)
2 Record the outgoing message on yourexternal TAD.
3 Set the TAD to answer calls.
4 Set the Receive Mode toExternal TAD. (See Choosing the Receive Mode on page 4-1.)
Recording outgoing message (OGM)on an external TAD
Timing is important in recording thismessage.
1 Record 5 seconds of silence at thebeginning of your message. (This allowsyour machine time to listen for the fax
CNG tones of automatic transmissionsbefore they stop.)
2 Limit your speaking to 20 seconds.
Note
We recommend beginning your OGM with aninitial 5-second silence because the machinecannot hear fax tones over a resonant or loudvoice. You may try omitting this pause, but ifyour machine has trouble receiving, then youmust re-record the OGM to include it.
Improper Setup
Do not connect a TAD elsewhere on thesame phone line.
TAD
TAD

8/3/2019 Fax Brother
http://slidepdf.com/reader/full/fax-brother 116/148
Appendix A
A - 5
Using extension telephones(For U.K. only)
It may be that your premises are already
wired with parallel extension telephones, oryou intend to add extension telephones toyour line, in addition to your machine. Whilethe simplest arrangement is straightforwardparallel connection, there are some reasonsas to why this arrangement will causeunsatisfactory service, the most obvious ofwhich is inadvertent interruption of a facsimiletransmission by someone picking up anextension telephone in order to make anoutgoing call. Additionally, Fax receive code
may not operate reliably in such a simpleconfiguration.
This machine may also be set to make adelayed transmission (i.e. a transmission at apre-set time). This pre-set job may coincidewith someone picking up an extensionhandset.
Such problems can easily be eliminatedhowever, if you arrange modification of yourextension wiring circuit, such that extensiondevices are connected “downstream” of yourmachine, in a master/slave configuration (seefig. 2 on next page). In such a configuration,this machine can always detect whether atelephone is in use, thus it will not attempt toseize the line during that time. This is knownas “telephone off-hook detection.”
The inadvisable configuration is shown infigure 1 on the next page, and therecommended master/slave configuration is
shown in figure 2.This new connection configuration can bearranged by contacting BT, Kingston uponHull Telecommunications, your PABX (PBX)maintainer or a qualified telephoneinstallation company as appropriate. Simplyexplained, the extension telephone circuitshould be terminated on a normal modularplug (BT 431A style), which in turn should beinserted into the modular socket of the white
“T”-shaped connector provided as part of theline cord assembly.
Note
These phones are now connected as externaldevices as per page A-3, because they areconnected to the fax machine via the
T-connector.
FAX
EXTENSIONSOCKET
EXTENSIONSOCKET
MASTERSOCKET INCOMING
LINE
INADVISABLE CONNECTION OF EXTENSION SOCKETSFig. 1.
EXTENSIONSOCKET
EXTENSIONSOCKET
MASTERSOCKET INCOMING
LINE
RECOMMENDED CONNECTION OF EXTENSION SOCKETSFig. 2.
FAX
FAX MACHINE MUST BE PLUGGEDINTO MASTER SOCKET
DISCONNECT

8/3/2019 Fax Brother
http://slidepdf.com/reader/full/fax-brother 117/148
A - 6
Multi-line connections (PBX)
Most offices use a central telephone system.
While it is often relatively simple to connectthe machine to a key system or a PBX(Private Branch Exchange), we suggest thatyou contact the company that installed yourtelephone system and ask them to connectthe machine for you. It is advisable to have aseparate line for the machine.
If the machine is to be connected to amulti-line system, ask your installer toconnect the unit to the last line on the system.This prevents the unit from being activatedeach time a telephone call is received.
If you are installing the machine towork with a PBX
1 It is not guaranteed that the unit willoperate properly under allcircumstances with a PBX. Any cases ofdifficulty should be reported first to thecompany that handles your PBX.
2 If all incoming calls will be answered bya switchboard operator, it isrecommended that the Receive Modebe set to Manual. All incoming callsshould initially be regarded as telephonecalls.
3 Make sure the Phone Line Type is set toPBX. (See Setting the Phone Line Type on page 2-3.)
Custom features on yourphone line
If you have Voice Mail, Call Waiting, CallWaiting/Caller ID, RingMaster, an answeringservice, an alarm system or other customfeature on one phone line it may create aproblem with the operation of your machine.(See Custom features on a single line. onpage 11-11.)

8/3/2019 Fax Brother
http://slidepdf.com/reader/full/fax-brother 118/148
B - 1
B
On-screenprogramming
Your machine is designed to be easy to usewith LCD on-screen programming using thenavigation keys. User-friendly programminghelps you take full advantage of all the menuselections your machine has to offer.
Since your programming is done on the LCD,we have created step-by-step on-screen
instructions to help you program yourmachine. All you need to do is follow theinstructions as they guide you through themenu selections and programming options.
Menu table
The Menu table that begins on page B-3 willhelp you understand the menu selections andoptions that are found in the machine’s
programs. Once you become familiar withprogramming, you can use the Menu table asa quick reference when you want to changeyour settings.
Note
You can program your machine by pressingMenu/Set, followed by the menu numbers.For example to set Beeper Volume to Low.Press Menu/Set, 1, 4, 2 and▲ or▼ to selectLow
.Press Menu/Set.
Memory storageIf there is a power failure, you will not loseyour menu settings because they are storedpermanently. Temporary settings (such asContrast, Overseas Mode, and so on) will belost. You may also have to reset the date andtime.
Appendix B

8/3/2019 Fax Brother
http://slidepdf.com/reader/full/fax-brother 119/148
B - 2
Navigation keys
You can access the menu mode by pressing
Menu/Set.When you enter the menu, the LCD scrolls.
Press 1 for General Setup menu
—OR—
Press 2 for Fax menu
—OR—Press 3 for Copy menu
Press 0 for Initial Setup
You can scroll more quickly through eachmenu level by pressing the arrow for thedirection you want: ▲ or ▼.
Select an option by pressing Menu/Set whenthat option appears on the LCD.
The LCD will then show the next menu level.
Press ▲ or ▼ to scroll to your next menuselection.
Press Menu/Set.
When you finish setting an option, the LCDshows Accepted.
Access the menuGo to the next menu level
Accept an option
Scroll through the current menulevel
Go back to the previous menulevel or forward to the next menulevel
Exit the menu
1.General Setup
2.Fax
3.Copy
.
.
.
.
0.Initial Setup
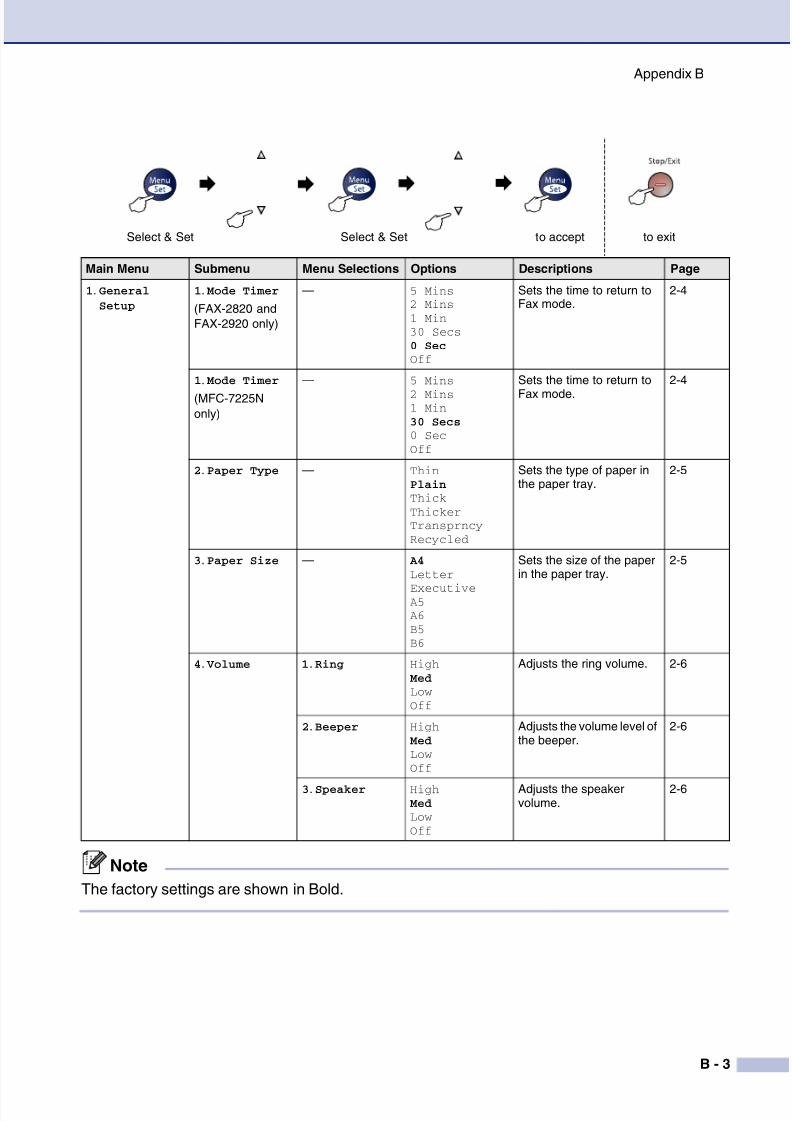
8/3/2019 Fax Brother
http://slidepdf.com/reader/full/fax-brother 120/148
Appendix B
B - 3
Main Menu Submenu Menu Selections Options Descriptions Page
1. GeneralSetup
1. Mode Timer
(FAX-2820 andFAX-2920 only)
— 5 Mins
2 Mins
1 Min
30 Secs
0 Sec
Off
Sets the time to return toFax mode.
2-4
1. Mode Timer
(MFC-7225Nonly)
— 5 Mins
2 Mins1 Min
30 Secs
0 Sec
Off
Sets the time to return to
Fax mode.
2-4
2. Paper Type — Thin
Plain
Thick
Thicker
Transprncy
Recycled
Sets the type of paper inthe paper tray.
2-5
3. Paper Size — A4
Letter
ExecutiveA5
A6
B5
B6
Sets the size of the paperin the paper tray.
2-5
4. Volume 1. Ring High
Med
Low
Off
Adjusts the ring volume. 2-6
2. Beeper High
Med
Low
Off
Adjusts the volume level ofthe beeper.
2-6
3. Speaker High
Med
Low
Off
Adjusts the speakervolume.
2-6
Note
The factory settings are shown in Bold.
to exitSelect & Set Select & Set to accept

8/3/2019 Fax Brother
http://slidepdf.com/reader/full/fax-brother 121/148
B - 4
1.GeneralSetup
(Continued)
5. AutoDaylight
— On
Off
Changes for DaylightSavings Timeautomatically.
2-7
6. Ecology 1.Toner Save On
Off
Increases the life of thetoner cartridge.
2-7
2.Sleep Time (0-99)
05 Min
Conserves power. 2-7
7. LCDContrast
— Light
Dark
Adjust the contrast of theLCD.
2-8
8. Security 1.TX Lock
(FAX-2820 only)
Prohibits most operationsexcept receiving faxes.
2-8
1.Mem Security
(FAX-2920 andMFC-7225N only)
Prohibits most operationsexcept receiving faxes intothe memory.
2-9
2.SettingLock
Prohibits the settings forDate & Time, Station ID,
Quick-Dial and GeneralSetup.
2-11
2.Fax 1. SetupReceive
(In Fax modeonly)
1.Ring Delay 00-04(02) Sets the number of ringsbefore the machineanswers in Fax Only orFax/Tel mode.
4-2
2.F/T RingTime
70 Sec
40 Sec
30 Sec
20 Sec
Sets thepseudo/double-ring time inFax/Tel mode.
4-3
3.Fax Detect On
Off
Receives fax messageswithout pressing Start.
4-3
4.Remote Code On( 51, #51)Off
You can answer all calls atan extension or externalphone and use codes toturn the machine on or off.You can personalize thesecodes.
A-3
Main Menu Submenu Menu Selections Options Descriptions Page
Note
The factory settings are shown in Bold.
to exitSelect & Set Select & Set to accept

8/3/2019 Fax Brother
http://slidepdf.com/reader/full/fax-brother 122/148
Appendix B
B - 5
2. Fax
(Continued)
1. SetupReceive
(In Fax modeonly)
(Continued)
5. AutoReduction
On
Off
Reduces the size ofincoming faxes.
4-4
6. MemoryReceive
On
Off
Automatically stores anyincoming faxes in itsmemory if it runs out ofpaper.
4-5
7. PrintDensity▼ -+ ▲▼ -+ ▲
▼ -+ ▲
▼ -+ ▲
▼ -+ ▲
Makes printouts darker orlighter. 4-4
8. Polling RX Standard
Secure
Timer
Sets up your machine topoll another fax machine.
4-5
2. Setup Send
(In Fax modeonly)
1. Contrast Auto
Light
Dark
Changes the lightness ordarkness of faxes yousend.
3-5
2. Fax
Resolution
Standard
Fine
S.Fine
Photo
Sets the default resolution
for outgoing faxes.
3-5
3. Delayed Fax — Sets the time of day in 24hour format that thedelayed faxes will be sent.
3-11
4. Batch TX On
Off
Combines delayed faxesto the same fax number atthe same time of day intoone transmission.
3-11
5. Real Time TX Off
On
Next Fax:On
Next Fax:Off
You can send a faxwithout using the memory.
3-6
6. Polled TX Standard
Secure
Sets up the document onyour machine to beretrieved by another faxmachine.
3-12
Main Menu Submenu Menu Selections Options Descriptions Page
Note
The factory settings are shown in Bold.
to exitSelect & Set Select & Set to accept

8/3/2019 Fax Brother
http://slidepdf.com/reader/full/fax-brother 123/148
B - 6
2.Fax
(Continued)
2. Setup Send
(In Fax modeonly)
(Continued)
7.CoverpgSetup
Off
On
Next Fax:On
Next Fax:Off
Print Sample
Automatically sends aCover Page you haveprogrammed.
3-10
8.CoverpageNote
— You can set up your owncomments for fax Cover
Page.
3-9
9.OverseasMode
On
Off
If you are having difficultysending faxes overseas,set this to On.
3-10
3. SetQuick-Dial
1.One-TouchDial
Stores One-Touch Dialnumbers, so you can dialby pressing one key (andStart).
5-1
2.Speed-Dial — Stores Speed-Dialnumbers, so you can dialby pressing only a fewkeys (and Start).
5-2
3.SetupGroups
— Sets up a Group numberfor Broadcasting. 5-3
4. ReportSetting
1.XMIT Report On
On+Image
Off
Off+Image
Initial setup forTransmission VerificationReport and Fax Journal.
7-1
2.JournalPeriod
Every 7 Days
Every 2 Days
Every 24 Hours
Every 12 Hours
Every 6 Hours
Every 50 Faxes
Off
7-2
Main Menu Submenu Menu Selections Options Descriptions Page
Note
The factory settings are shown in Bold.
to exitSelect & Set Select & Set to accept

8/3/2019 Fax Brother
http://slidepdf.com/reader/full/fax-brother 124/148
Appendix B
B - 7
2. Fax
(Continued)
5. Remote FaxOpt
1. Forward/Store Off
Fax Forward
Fax Storage
PC Fax Receive*(*MFC-7225Nonly)
Sets the machine toforward fax messages tostore incoming faxes in thememory (so you canretrieve them while youare away from yourmachine). The PC FaxReceive option onMFC-7225N allows you tosend faxes to your PC.
6-1
(Backup Print) If you selected FaxForward or PC FaxReceive, you can turn onthe safety feature BackupPrint.
2. RemoteAccess
--- You must set your owncode for RemoteRetrieval.
6-4
3. PrintDocument
— Prints incoming faxesstored in the memory.
4-4
6. RemainingJobs
— — Checks which jobs are inthe memory and lets youcancel selected jobs.
3-8
0. Miscellaneous 1. Compatibility
(For FAX-2820)
Normal
Basic
Adjust the Equalization fortransmission problems.
11-19
1. Compatibility
(For FAX-2920and MFC- 7225N)
High
Normal
Basic
Adjust the Equalization fortransmission problems.
11-19
2. BT Call Sign On
Off
Use with BT Call Sign. A-1
3. Copy 1. Quality — Text
AutoPhoto
Selects the Copy
resolution for your type ofdocument.
8-7
2. Contrast — ▼ -+ ▲
▼ -+ ▲
▼ -+ ▲
▼ -+ ▲
▼ -+ ▲
Adjusts the contrast forcopies.
8-7
Main Menu Submenu Menu Selections Options Descriptions Page
Note
The factory settings are shown in Bold.
to exitSelect & Set Select & Set to accept

8/3/2019 Fax Brother
http://slidepdf.com/reader/full/fax-brother 125/148
B - 8
4.Printer
(MFC-7225Nonly)
1. Emulation — Auto
HP LaserJet
BR-Script 3
Selects the emulationmode.
SeeSoftwareUser’sGuideon theCD-ROM
2. PrintOptions
1.InternalFont
— Prints a list of themachine’s internal fonts.
2. Configuration — Prints a list of the
machine’s printer settings.3. ResetPrinter
— — Returns the printer (PCL)setting to the originalfactory default settings.
5.LAN
(MFC-7225Nonly)
1. SetupTCP/IP
1.BOOT Method Auto
Static
RARP
BOOTP
DHCP
You can choose theBOOT method that bestsuits your needs.
SeeNetworkUser’sGuideon theCD-ROM
2.IP Address [000-255].[000-255].[000-255].[000-255]
Enter the IP address.
3.Subnet Mask [000-255].[000-255].[000-255].[000-255]
Enter the Subnet mask.
4.Gateway [000-255].[000-255].[000-255].[000-255]
Enter the Gatewayaddress.
5.Node Name BRN_XXXXXX Enter the Node name.
6. WINS Config Auto
Static
You can choose the WINSconfiguration mode.
7. WINS Server (Primary)000.000.000.000
(Secondary)
000.000.000.000
Specifies the IP address ofthe primary or secondaryWINS server.
8.DNS Server (Primary)
000.000.000.000
(Secondary)
000.000.000.000
Specifies the IP address ofthe primary or secondaryDNS server.
9.APIPA On
Off
Automatically allocatesthe IP address from thelink-local address range.
Main Menu Submenu Menu Selections Options Descriptions Page
Note
The factory settings are shown in Bold.
to exitSelect & Set Select & Set to accept

8/3/2019 Fax Brother
http://slidepdf.com/reader/full/fax-brother 126/148
Appendix B
B - 9
5. LAN
(MFC-7225Nonly)
(Continued)
2. Setup Misc. 1. Ethernet Auto
100B-FD
100B-HD
10B-FD
10B-HD
Selects Ethernet linkmode.
SeeNetworkUser’sGuideon theCD-ROM
0. FactoryReset
— — Restore all networksettings to factory default.
4. MachineInfo.
(FAX-2820 andFAX-2920)
1. Serial No. — — Lets you check the serialnumber of your machine.
11-28
2. PageCounter
— Total
Copy
List/Fax
Lets you check thenumber of total pages themachine has printedduring its life.
11-28
3. Drum Life — — You can check thepercentage of drum lifethat remains available.
11-29
6.Machine
Info.
(MFC-7225N)
1. Serial No. — — Lets you check the serialnumber of your machine.
11-28
2. PageCounter
— Total
Copy
List/Fax
Lets you check thenumber of total pages themachine has printedduring its life.
11-28
3. Drum Life — — You can check thepercentage of drum lifethat remains available.
11-29
0. InitialSetup
1. ReceiveMode
— Fax Only
Fax/Tel
External TAD
Manual
You can choose thereceive mode that bestsuits your needs.
4-1
2. Date/Time — — Puts the date and time onthe LCD and in headings
of faxes you send.
2-1
3. Station ID — Fax:
Tel:
Name:
Program your name andfax number to appear oneach page you fax.
2-2
4.Tone/Pulse — Tone
Pulse
Selects the dialing mode. 2-1
5. Phone LineSet
— Normal
PBX
ISDN
Select the phone line type.
Main Menu Submenu Menu Selections Options Descriptions Page
Note
The factory settings are shown in Bold.
to exitSelect & Set Select & Set to accept
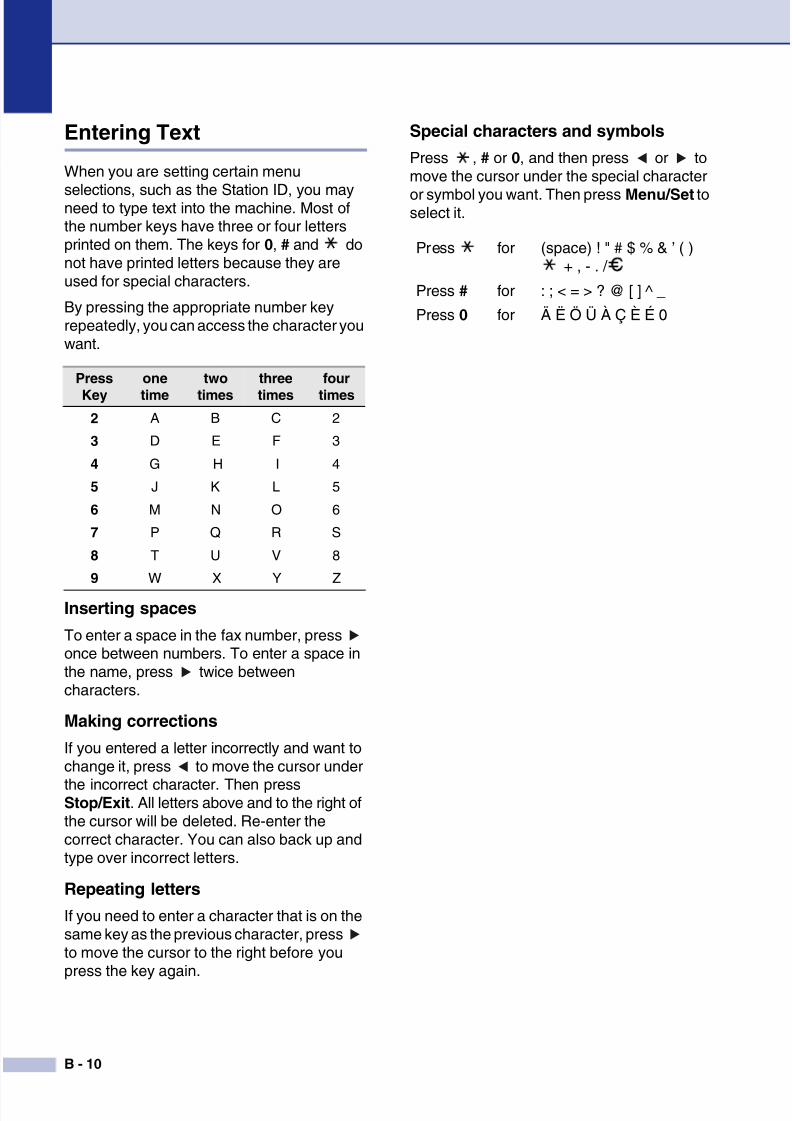
8/3/2019 Fax Brother
http://slidepdf.com/reader/full/fax-brother 127/148
B - 10
Entering Text
When you are setting certain menu
selections, such as the Station ID, you mayneed to type text into the machine. Most ofthe number keys have three or four lettersprinted on them. The keys for 0, # and donot have printed letters because they areused for special characters.
By pressing the appropriate number keyrepeatedly, you can access the character youwant.
Inserting spaces
To enter a space in the fax number, pressonce between numbers. To enter a space inthe name, press twice betweencharacters.
Making corrections
If you entered a letter incorrectly and want tochange it, press to move the cursor under
the incorrect character. Then pressStop/Exit. All letters above and to the right ofthe cursor will be deleted. Re-enter thecorrect character. You can also back up andtype over incorrect letters.
Repeating letters
If you need to enter a character that is on thesame key as the previous character, pressto move the cursor to the right before youpress the key again.
Special characters and symbols
Press , # or 0, and then press or tomove the cursor under the special character
or symbol you want. Then press Menu/Set toselect it.
Press
Key
one
time
two
times
three
times
four
times
2 A B C 2
3 D E F 3
4 G H I 4
5 J K L 5
6 M N O 6
7 P Q R S
8 T U V 8
9 W X Y Z
▲
▲
▲
▲
Press for (space) ! " # $ % & ’ ( )+ , - . /
Press # for : ; < = > ? @ [ ] ̂ _
Press 0 for Ä Ë Ö Ü À Ç È É 0
▲▲

8/3/2019 Fax Brother
http://slidepdf.com/reader/full/fax-brother 128/148
G - 1
G Glossary
ADF (automatic document feeder)The document can be placed in the ADFand scanned one page at a timeautomatically.
Auto Reduction
Reduces the size of incoming faxes.
Automatic fax transmission
Sending a fax without picking up thehandset of an external phone.
Automatic RedialA feature that enables your machine toredial the last fax number after fiveminutes if the fax did not go throughbecause the line was busy.
Backup Print
Your machine prints a copy of every faxthat is received and stored in memory.This is a safety feature so you will not losemessages during a power failure.
Batch TransmissionAs a cost saving feature, all delayed faxesto the same fax number will be sent as onetransmission.
Beeper Volume
Volume setting for the beep when youpress a key or make an error.
Broadcasting
The ability to send the same fax message
to more then one location.BT Call Sign
A service which allows you to have atleast two separate telephone numbers onone phone line.
Cancel Job
Cancels a programmed job, like DelayedFax or Polling.
CNG tonesThe special tones (beeps) sent by faxmachines during automatic transmissionto tell the receiving machine that a faxmachine is calling.
Coding method
Method of coding the informationcontained in the document. All faxmachines must use a minimum standardof Modified Huffman (MH). Your machine
is capable of greater compressionmethods, Modified Read (MR), ModifiedModified Read (MMR) and JBIG*(*FAX-2920 and MFC-7225N only), if thereceiving machine has the samecapability.
Communication error (or Comm.Error)
An error during fax sending or receiving,usually caused by line noise or static.
Compatibility groupThe ability of one fax unit to communicatewith another. Compatibility is assuredbetween ITU-T Groups.
Contrast
Setting to compensate for dark or lightdocuments, by making faxes or copies ofdark documents lighter and lightdocuments darker.
Delayed Fax
Sends your fax at a specified time laterthat day.
Dual Access
Your machine can scan outgoing faxes orscheduled jobs into memory at the sametime it is sending a fax from memory orreceiving or printing an incoming fax.
ECM (Error Correction Mode)
Detects errors during fax transmission
and resends the pages of the fax that hadan error.

8/3/2019 Fax Brother
http://slidepdf.com/reader/full/fax-brother 129/148
G - 2
Extension phone
A telephone using the same line as yourfax but plugged into a separate wall
socket.External phone
A TAD (telephone answering device) ortelephone that is connected to yourmachine.
F/T Ring Time
The length of time that the Brothermachine rings (when the Receive Modesetting is Fax/Tel) to notify you to pick up
a voice call that it answered.Fax Detect
Enables your machine to respond to CNGtones if you interrupt a fax call byanswering it.
Fax Forwarding
Sends a fax received into the memory toanother pre-programmed fax number.
Fax Journal
Lists information about the last 200incoming and outgoing faxes. TX meansTransmit. RX means Receive.
Fax Receive Code
Press this code ( 5 1) when you answera fax call on an extension or externalphone.
Fax Storage
You can store received faxes in memory.
Fax tonesThe signals sent by sending and receivingfax machines while communicatinginformation.
Fax/Tel
You can receive faxes and telephonecalls. Do not use this mode if you areusing a telephone answering device(TAD).
Fine resolution
Resolution is 203 x 196 dpi. It is used forsmall print and graphs.
Grey scale
The shades of grey available for copyingand faxing photographs.
Group numberA combination of One-Touch andSpeed-Dial numbers that are stored in aOne-Touch key or Speed-Dial location forBroadcasting.
Help list
A printout of the complete Menu table thatyou can use to program your machinewhen you do not have the User’s Guidewith you.
Journal Period
The pre-programmed time periodbetween automatically printed FaxJournal Reports. You can print the FaxJournal on demand without interruptingthe cycle.
LCD (liquid crystal display)
The display screen on the machine thatshows interactive messages during
On-Screen Programming and shows thedate and time when the machine is idle.
Manual fax
When you lift the handset of your externaltelephone or press Tel/R so you can hearthe receiving fax machine answer beforeyou press Start to begin sending.
Menu mode
Programming mode for changing yourmachine’s settings.
OCR (optical character recognition)(MFC-7225N only)
The bundled ScanSoft ® OmniPage ® software application converts an image oftext to text you can edit.

8/3/2019 Fax Brother
http://slidepdf.com/reader/full/fax-brother 130/148
Glossary
G - 3
One-Touch
Keys on the machine’s control panelwhere you can store numbers for easy
dialling.FAX-2820 and FAX-2920 only:You can store a second number on eachkey if you press Shift and the One-Touchkey together.
Out of Paper Reception
Receives faxes into the machine’smemory when the machine is out of paper.
Overseas Mode
Makes temporary changes to the faxtones to accommodate noise and static onoverseas phone lines.
Pause
Allows you to place a 3.5 second delay inthe dialling sequence stored onOne-Touch keys and Speed-Dialnumbers. Press Redial/Pause as manytimes as needed for longer pauses.
Photo resolution
A resolution setting that uses varyingshades of grey for the best representationof photographs.
Polling
The process of a fax machine callinganother fax machine to retrieve waiting faxmessages.
Pulse
A form of rotary dialling on a telephoneline.
Quick Dial List
A listing of names and numbers stored inOne-Touch and Speed-Dial memory, innumerical order.
Real Time Transmission
When memory is full, you can send faxesin real time.
Remaining jobs
You can check which jobs are waiting in
memory and cancel jobs individually.
Remote Access Code
Your own four-digit code (--- ) thatallows you to call and access your
machine from a remote location.Remote Retrieval Access
The ability to access your machineremotely from a touch tone phone.
Resolution
The number of vertical and horizontal linesper inch. See: Standard, Fine, Super Fineand Photo.
Ring Delay
The number of rings before the machineanswers in Fax Only and Fax/Tel mode.
Ring Volume
Volume setting for the machine’s ring.
Scanning (MFC-7225N only)
The process of sending an electronicimage of a paper document into yourcomputer.
SearchAn electronic, alphabetical listing of storedOne-Touch, Speed-Dial and Groupnumbers.
Speed-Dial
A pre-programmed number for easydialling. You must press theSearch/Speed Dial key, #, and the threedigit code, and Start to start the diallingprocess.
Standard resolution203 x 97 dpi. It is used for regular size textand quickest transmission.
Station ID
The stored information that appears onthe top of faxed pages. It includes thesender’s name and fax number.
Super Fine resolution
203 x 392 dpi. Best for very small print and
line art.

8/3/2019 Fax Brother
http://slidepdf.com/reader/full/fax-brother 131/148
G - 4
TAD (telephone answering device)
You can connect an external TAD to yourmachine.
Telephone Answer Code (Fax/Telmode only)
When the machine answers a voice call, itpseudo/double-rings. You can pick up atan extension phone by pressing this code(# 5 1).
Temporary settings
You can select certain options for each faxtransmission and copy without changing
the default settings.Tone
A form of dialling on the telephone lineused for Touch Tone telephones.
Transmission
The process of sending faxes over thephone lines from your machine to thereceiving fax machine.
User Settings
A printed report that shows the currentsettings of the machine.
XMIT Verify (TransmissionVerification Report)
A listing for each fax sent, that shows itsdate, time and number.

8/3/2019 Fax Brother
http://slidepdf.com/reader/full/fax-brother 132/148
S - 1
S
Product description
General
Specifications
Memory Capacity 8 MB (FAX-2820)16 MB (FAX-2920)32 MB (MFC-7225N)
Automatic Document Feeder(ADF)
Up to 20 pages
Paper Tray 250 Sheets (80 g/m2)
Printer Type Laser
Print Method Electrophotography by semiconductor laser beam scanning
LCD (Liquid Crystal Display) 16 characters × 1 line
Power Source 220 - 240V 50/60Hz
Power Consumption Copying: Average 475 W
Standby: Average 80 WSleep: Average 10 W

8/3/2019 Fax Brother
http://slidepdf.com/reader/full/fax-brother 133/148
S - 2
Dimensions
Weight Without Drum/Toner Unit:
7.25 kg
Noise Operating: 53 dB A or lessStandby: 30 dB A or less
Temperature Operating: 10 - 32.5°CStorage: 0 - 40°C
Humidity Operating: 20 to 80% (without condensation)
Storage: 10 to 90% (without condensation)
374 mm
510 mm
363 mm

8/3/2019 Fax Brother
http://slidepdf.com/reader/full/fax-brother 134/148
Specifications
S - 3
Print media
Copy
Paper Input Paper Tray
■ Paper type:
Plain paper, Recycled paper or Transparencies 1 ■ Paper size:
A4, Letter, Executive, A5, A6, B5 and B6For more details, see About paper starting on page 1-8.
■ Paper Weight:60 - 105 g/m2
■ Maximum paper tray capacity: Up to 250 sheets of 80 g/m2plainpaper or up to 10 transparencies
Manual Feed Slot
■ Paper type:Plain paper, Recycled paper, Transparencies 1, Envelopes, Bondpaper or Labels 1
■ Paper size:Width: 69.9 - 215.9 mmLength: 116 - 406.4 mmFor more details, see About paper starting on page 1-8.
■ Paper Weight:60 - 161 g/m2
■ Maximum paper tray capacity: One sheet at a time
Paper Output Up to 100 sheets of A4 size plain paper (Face-down print delivery tothe output paper tray)
1 For transparency or label, we recommend removing printed pages from the output paper tray immediately after theyexit the MFC to avoid smudging.
Color/Monochrome MonochromeDocument Size ADF Width: 147.3 to 215.9 mm
ADF Height: 100 to 356 mm
Multiple Copies Stacks or Sorts up to 99 pages
Reduce/Enlarge 50 % to 200% (in increments of 1%)
Resolution Max. Print: 600 x 300 dpiMax. Scan: 200 x 300 dpi

8/3/2019 Fax Brother
http://slidepdf.com/reader/full/fax-brother 135/148
S - 4
Fax
Compatibility ITU-T Group 3
Coding System MH/MR/MMR/JBIG* (*not available for FAX-2820)
Modem Speed Automatic Fallback:14400 bps (FAX-2820)33600bps (FAX-2920 and MFC-7225N)
Document Size ADF Width: 147.3 to 215.9 mmADF Height: 100 to 356 mm
Scanning Width Max. 215.9 mm
Printing Width Max. 215.9 mm
Grey Scale 64 levels
Polling Types Standard, Secure, Timer, Sequential
Contrast Control Automatic/Light/Dark (manual setting)
Resolution • Horizontal 203 dot/inch (8 dot/mm)• Vertical
Standard - 3.85 line/mmFine - 7.7 line/mmPhoto - 7.7 line/mm
Superfine -15.4 line/mm
One-Touch Dial 10 (MFC-7225N)20 (10 x 2) (FAX-2820 and FAX-2920)
Speed-Dial 200 stationsBroadcasting 270 stations (FAX-2820 and FAX-2920)
260 stations (MFC-7225N)
Automatic Redial 3 times at 5 minute intervals
Auto Answer 0, 1, 2, 3 or 4 rings
Communication Source Public switched telephone network.
Memory Transmission Up to 5001 / 4002 pages (MFC-FAX-2820)
Up to 6001 / 5002 pages (MFC-FAX-2920 and MFC-7225N)
Out of Paper Reception Up to 5001 / 4002 pages (MFC-FAX-2820)
Up to 6001 / 5002 pages (MFC-FAX-2920 and MFC-7225N)
1 “Pages” refers to the “Brother Standard Chart No. 1” (a typical business letter, Standard resolution, MMR code).Specifications and printed materials are subject to change without prior notice.
2 "Pages" refers to the "ITU-T Test Chart #1" (a typical business letter, Standard resolution, MMR code). Specificationsand printed materials are subject to change without prior notice.

8/3/2019 Fax Brother
http://slidepdf.com/reader/full/fax-brother 136/148
Specifications
S - 5
Scanner (MFC-7225N only)
Printer (FAX-2920 and MFC-7225N only)
Colour/Monochrome Monochrome
TWAIN Compliant Yes (Windows ® 98/98SE/Me/2000 Professional/XP/Windows NT ® Workstation Version 4.0)Mac OS ® 9.1 - 9.2/Mac OS ® X 10.2.4 or greater
WIA Compliant Yes (Windows ® XP)
Resolution Up to 1200 × 1200 dpi (interpolated)Up to 200 × 400 dpi (optical)
Document Size ADF Width: 147.3 to 215.9 mm)
ADF Height: 100 to 356 mm
Scanning Width Max. 215.9 mm
Grey Scale 256 levels
Emulation Brother Printing System for Windows ® PCL6 and BR-Script (PostScript ® ) Level 3 (MFC-7225N only)
Printer Driver Support for Windows ® 98/98SE/Me/2000 Professional/XP/WindowsNT ® Workstation Version 4.0Support for Mac OS ® 9.1 - 9.2/Mac OS ® X 10.2.4 or greater
Resolution Up to 1200 x 600 dots per inch (dpi)HQ1200 (up to 2400 x 600 dpi) (MFC-7225N only)
Print Quality Normal printing modeEconomy printing mode (save toner usage)
Print Speed up to 14 pages/minute A4 size (FAX-2920)up to 20 pages/minute (A4 size) (MFC-7225N)* Based on Brother standard pattern.Does not include the time it takes to feed the paper.
First Print Less than 10 seconds

8/3/2019 Fax Brother
http://slidepdf.com/reader/full/fax-brother 137/148
S - 6
Interfaces (FAX-2920 and MFC-7225N only)
Note
Your machine has a USB 2.0 Full-speed interface. This interface is compatible with Hi-Speed USB2.0; however, the maximum data transfer rate will be 12 Mbits/s. The MFC can also be connectedto a computer that has a USB 1.1 interface.
Please make sure you use a USB 2.0 interface cable that is no longer than 2.0 m.
Download the optional software from the BrotherWeb Site (FAX-2920 users only)
You can download the Brother Printer Driver and PC-Fax software from the Brother Solutions
Center so you can use your fax machine as a printer and send faxes from your PC.Visit us at
At the same time, you can download the Software User’s Guide for setting up and using thePC-Fax software.
Interface Recommended Cable
Parallel (MFC-7225N only) A bi-directional shielded parallel cable that is IEEE 1284 compliant andno longer than 2.0 m.
USB A USB 2.0 interface cable that is not longer than 2.0 m.
LAN cable (MFC-7225N only) Ethernet UTP cable category 5 or greater.
(Cables are not included.)
http://solutions.brother.com

8/3/2019 Fax Brother
http://slidepdf.com/reader/full/fax-brother 138/148
Specifications
S - 7
Computer requirements(FAX-2920 and MFC-7225N only)
Minimum System Requirements
Computer Platform & Operating
System Version
Processor
Minimum
Speed
Minimum
RAM
Recommended
RAM
Available Hard Disk Space
for Drivers for
Applications
Windows ® 1
Operating System98, 98SE Pentium ® II
or equivalent32 MB 64 MB 90 MB 130 MB
Me
NT ® Workstation4.0
64 MB 128 MB
2000 Professional
XP 128 MB 256 MB 150 MB 220 MB
Apple ® Macintosh ® Operating System
Mac OS ® 9.1 - 9.2
(Printing,Scanning 2 and PCFax Sending Only)
All base models meetminimum Requirements
64 MB 80 MB 200 MB
Mac OS ® X 10.2.4or greater
128 MB 160 MB
NOTE: All registered trademarks referenced herein are the property of their respective companies.
For the latest drivers, go to the Brother Solutions Center at http://solutions.brother.com/
1 Microsoft ® Internet Explorer 5 or greater.
2 Scanning is available for MFC-7225N only.
Dedicated “Scan” key and direct Network Scanning (MFC-7225N) supported in Mac OS ® X 10.2.4 or greater.

8/3/2019 Fax Brother
http://slidepdf.com/reader/full/fax-brother 139/148
S - 8
Consumable items
Note
Toner life expectancy will vary depending upon the type of average print job.
Note
There are many factors that determine the drum life, such as temperature, humidity, type of paper,toner you use and number of pages per print job.
Toner Cartridge Life (TN-2000) Standard Toner Cartridge: Up to 2,500 pages **(when printing letter or A4 size paper at 5% print coverage)
Drum Unit Life Expectancy
(DR-2000)
Up to 12,000 pages

8/3/2019 Fax Brother
http://slidepdf.com/reader/full/fax-brother 140/148
Specifications
S - 9
Network (LAN) (MFC-7225N only)
Note
BRAdmin Professional is not supported in Mac OS ® .
LAN You can connect your MFC to a network for Network Printing, NetworkScanning and PC Fax Send. Also included is the Brother BRAdminProfessional Network Management software.
Support for Windows ® 98/98SE/Me/2000/XP/Windows NT ® Workstation Version 4.0Mac OS ® 9.1 - 9.2/Mac OS ® X 10.2.4 or greater*Ethernet 10/100 BASE-TX Auto Negotiation
Protocols TCP/IP
ARP, RARP, BOOTP, DHCP, APIPA (Auto IP), WINS/NetBIOSLPR/LPD, Port9100, mDNS, FTP, TELNET, IPP, RawPort, SNMP,HTTP, TFTP, SMTP
*Network Printing and PC-FAX are available for Mac OS ® 9.1 - 9.2, Mac OS ® X 10.2.4 orgreater.*Mac OS ® 9.1 - 9.2 (Brother Laser Driver over TCP/IP)*Mac OS ® X 10.2.4 or greater (mDNS)*Dedicated “Scan” key and direct Network Scanning supported in Mac OS ® X 10.2.4 orgreater.
Included Utilities:BRAdmin Professional (Windows ® )

8/3/2019 Fax Brother
http://slidepdf.com/reader/full/fax-brother 141/148
S - 10
Optional External Wireless Print/Scan Server(NC-2200w) (MFC-7225N only)
Note
You can assign the Scan key to only one networked computer.
NC-2200w External WirelessPrint/Scan Server (Optional)
Connecting the optional External Wireless Print/Scan Server(NC-2200w) to the USB port of your MFC will allow you to print andscan over a wireless network.
Network types IEEE 802.11b wireless LAN
Support for Windows ® 98/98SE/Me/2000/XP/Windows NT ® Workstation Version 4.0
Mac OS ® X 10.2.4 or greater
Protocols TCP/IPARP, RARP, BOOTP, DHCP, APIPA (Auto IP), WINS/NetBIOS, DNS,LPR/LPD, Port9100, SMB Print, IPP, RawPort, mDNS, TELNET,
SNMP, HTTP

8/3/2019 Fax Brother
http://slidepdf.com/reader/full/fax-brother 142/148
I - 1
I
AAccess codes, storing and dialing ........... 5-4ADF (automatic document feeder) ..........1-7ADF cover .............................................11-6Answering machine (TAD) ......................A-3
connecting ............................................A-4Automatic
fax receive ............................................4-1Fax Detect .........................................4-3
fax redial ..............................................3-3transmission .........................................3-3
B
Broadcasting ...........................................3-7setting up Groups for ...........................5-3
C
CancelingFax Forwarding ....................................6-1fax jobs in memory ............................... 3-8
jobs awaiting redial ..............................3-8Cleaning
corona wire ...................................... 11-23laser scanner window ...................... 11-22
CNG tones ............................................1-13Connecting
external TAD ........................................A-3external telephone ...............................A-3
Consumable items ..................................S-8Control panel overview .....................1-5, 1-6Copy
contrast ................................................ 8-7default settings ..................................... 8-7Enlarge/Reduce ...................................8-3enter Copy mode .................................8-1multiple copies ..................................... 8-2Out of Memory ..................................... 8-7Page Layout .........................................8-6printable area ....................................... 8-1Quality key ...........................................8-5quality setting ....................................... 8-7
single copy ...........................................8-1Cordless phone .......................................A-2
Cover page
custom comments ................................3-9for all faxes .........................................3-10for next fax only ....................................3-9printed form ........................................3-10
Credit card numbers ................................5-4Custom telephone features on a single line................................................................. A-6
D
Date and Time .........................................2-1
Delayed Batch Transmission .................3-11Dialling
a pause .................................................5-4access codes and credit card numbers..............................................................5-4automatic fax redial ..............................3-3automatic transmission .........................3-3Groups ..................................................3-7manual ..................................................3-1manual transmission ............................3-3
One-Touch ...........................................3-1Speed-Dial ............................................3-2Drum unit
cleaning .................................11-16, 11-23replacing ...........................................11-26
Dual Access .............................................3-6
E
ECM (Error Correction Mode) ................1-13Equalization .........................................11-19
Error messages on LCD ........................11-1Comm. Error .......................................11-1No Paper Fed .....................................11-3Not Registered .....................................3-2Out of Memory ....................................11-3
while scanning a document ...............8-7Unable to Init. .....................................11-4Unable to Print ....................................11-4Unable to Scan ...................................11-4
Extension telephone, using .............A-2, A-5External telephone, connecting .............. A-3
Index

8/3/2019 Fax Brother
http://slidepdf.com/reader/full/fax-brother 143/148
I - 2
F
Faxreceiving ............................................... 4-1
compatibility ..................................11-19Fax Forwarding .................................6-1from extension phone ........................A-2reducing to fit on paper ..................... 4-4retrieving from a remote site .............6-6Ring Delay, setting ............................ 4-2
sending .................................................3-1automatic ...........................................3-3Broadcasting ..................................... 3-7canceling from memory .....................3-8compatibility ..................................11-19contrast .............................................3-5enter Fax mode .................................3-1from ADF ...........................................3-3from memory (Dual Access) .......3-3, 3-6overseas ..........................................3-10Real Time Transmission ................... 3-6resolution ...........................................3-5
Fax codeschanging ....................................... 6-4, A-3Fax Receive Code ................................A-2
Remote Access Code .......................... 6-4Telephone Answer Code ......................A-2Fax Forwarding
changing remotely .........................6-5, 6-6Fax Storage .............................................6-1
printing from memory ...........................4-4turning on .............................................6-1
Fax/Tel modeanswering at extension phones ............A-2double-ringing (voice calls) .................. 4-3F/T Ring Time ...................................... 4-3
Fax Receive Code ................................A-2receiving faxes .....................................A-2Ring Delay ............................................ 4-2Telephone Answer Code ......................A-2
G
Gray scale ....................................... S-4, S-5Groups for Broadcasting ......................... 5-3
H
HELPHelp List ................................................7-2
LCD messages .................................... B-1using navigation keys .......................B-2
Menu Table ...................................B-1, B-3
J
JacksEXT
external telephone ............................ A-3TAD (answering machine) ................A-3
Jams
document ............................................11-6paper ..................................................11-6
L
LCD (liquid crystal display) ..............B-1, B-2
M
Maintenance, routine ...........................11-20Manual
dialling ..................................................3-1receive ..................................................4-1transmission .........................................3-3
Memory Security ......................................2-9Memory Storage ..................................... B-1Menu Selection Table ............................. B-1Mode, entering
Copy .....................................................8-1Fax ........................................................3-1Scan .....................................................1-6
Multi-line connections (PBX) ..................A-6
O
One-Touchchanging ...............................................5-2setting up ..............................................5-1using .....................................................3-1
Out of Memory message .........................3-4

8/3/2019 Fax Brother
http://slidepdf.com/reader/full/fax-brother 144/148
Index
I - 3
P
Paper ............................................... 1-8, S-3Size ......................................................2-5
size of document ..................................1-7Type .....................................................2-5
Phone lineconnections ..........................................A-4difficulties ......................................... 11-10multi-line (PBX) ....................................A-6
Power failure ...........................................B-1Print
difficulties ......................................... 11-10drivers ..................................................S-5fax from memory ..................................4-4paper jams ......................................... 11-6report ....................................................7-2resolution .............................................S-5specifications .......................................S-5
Programming your MFC ..................B-1, B-2
Q
Quick-DialAccess codes and credit card numbers
setting up ..........................................5-4Broadcasting ........................................ 3-7
using Groups ..................................... 3-7Group dial
changing ...........................................5-2setting up Groups for Broadcasting........................................................... 5-3
One-Touch dialchanging ...........................................5-2setting up ..........................................5-1using ................................................. 3-1
Search .................................................. 3-2Speed-Dialchanging ...........................................5-2setting up ..........................................5-2using ................................................. 3-2
R
Receive Mode .........................................4-1External TAD ........................................ 4-1Fax Only ............................................... 4-1
Fax/Tel ................................................. 4-1Manual ................................................. 4-1Redial/Pause ...........................................3-3
Reducingcopies ...................................................8-4incoming faxes .....................................4-4
Remote Retrieval .....................................6-4access code .........................................6-4getting your faxes .................................6-6
Reports ....................................................7-1Fax Journal ...........................................7-2
Journal Period ...................................7-2Help List ...............................................7-2how to print ...........................................7-2Network Configuration ..........................7-2Quick-Dial List ......................................7-2Transmission Verification .....................7-1
User Settings ........................................7-2Resolutioncopy ..................................................... S-3fax (Standard, Fine, SuperFine, Photo)............................................................. S-4print ..................................................... S-5scan ..................................................... S-5setting for next fax ................................3-5
Ring Delay, setting ..................................4-2
S
Safety Instructions ............................ iii, 10-2Setting Lock ...........................................2-11Setup
Date and Time ......................................2-1Station ID (fax header)
entering text .......................................2-2Shipping the machine ..........................11-19Sleep Time ..............................................2-7Speed-Dial
changing ...............................................5-2
dialling ..................................................3-2storing ...................................................5-2
T
TAD (telephone answering device),external ............................................ 4-1, A-3
connecting ....................................A-3, A-4receive mode ........................................4-1recording OGM .................................... A-4
Text, entering ........................................ B-10
special characters ............................. B-10Toner cartridgereplacing ................................11-23, 11-24

8/3/2019 Fax Brother
http://slidepdf.com/reader/full/fax-brother 145/148
I - 4
Troubleshooting .................................... 11-1document jam .....................................11-6error messages on LCD ..................... 11-1if you are having difficulty
incoming calls ................................11-11paper handling .............................. 11-13phone line .....................................11-19printer difficulties ...........................11-12printing ..........................................11-10
paper jam ...........................................11-6
V
Volume, setting .......................................2-6beeper ..................................................2-6ring .......................................................2-6speaker ................................................2-6

8/3/2019 Fax Brother
http://slidepdf.com/reader/full/fax-brother 146/148
R - 1
R
If you plan to receive fax messages while away from your machine, carrying the Remote Retrieval
Access Card printed below will serve as a convenient reminder of the retrieval procedures. Simplycut out the card and fold it to fit your wallet or organizer. Keeping it handy will help you derive thefull benefit of your machine’s Fax Forwarding, and Remote Retrieval features.
Remote Retrieval Access card
U s i n g R e m o t e
A c c e s s C o d e
1
D i a l y o u r f a x n u m
b e r f r o m a t e l e p h o n e o r f a x m a c h i n e u s i n g
t o u c h t o n e .
W h e n y o u r m a c
h i n e a n s w e r s , i m m e d i a t e l y e n t e r y o u r
R e m o t e A c c e s s
C o d e ( 3 d i g i t s f o l l o w e d b y
) .
Y o u r m a c h i n e s
i g n a l s t h e k i n d s o f m e s s a g e s i t r e c e i v e d :
1 l o n g b e e p — F
a x m e s s a g e s
N o b e e p s —
N o m e s s a g e s .
A f t e r 2 s h o r t b e
e p s , e n t e r a c o m m a n d
.
P r e s s 9
0
t o r e s e
t y o u r m a c h i n e w
h e n y o u f i n i s h
.
H a n g u p .
2 3 4 5 6
1
4
P r e s s
9
7
1
1 l o n g b e e p — F
a x m e s s a g e s
3 s h o r t b e e p s — N
o m e s s a g e s
C H A N
G E
R E C E I V E
M O D E
P r e s s
9
8
t h e n f
o r
E x t e r n a l T A D ,
p r e s s 1
.
F a x O n l y ,
p r e s s 3
.
F a x / T e l , p r e s s 2
.
E X I T
R E M O T E
O P E R A T I O N
P r e s s
9
0 .
C H E C
K
R E C E I V I N G S
T A T U S
R E M O T E R E T R I E V A L A C C E S S C A R D
Fold Fold

8/3/2019 Fax Brother
http://slidepdf.com/reader/full/fax-brother 147/148
R - 2
P r e s s M e n u / S e t ,
2 ,
5 ,
2
f a xn um b e r wh e r e y o u w a n t y o ur f a xm e s s a g e s f o r w a r d e d
f o l l o
w e d b y
.
P r o g r a m F a x F o r w a r d i n g N um b e r , p r e s s 4 .E n t e r t h e
n e w
T ur nF a x S t o r a g e On , p r e s s 6 .
R E T R I E V E A F A X
P r e s s 9 6
t h e n t o
R e t r i e
v e a l l f a x e s , p r e s s 2 ,
t h e n
e n t e r t h e n um b e r o f r e m o t e f a xm a c h i n e f o l l o w e d b y
.
A f t e
r t h e b e e p ,h a n g u p a n d w a i t .
E r a s e
a l l f a x m e s s a g e s , p r e s s 3 .
C h an gi n gR em o t eA c c e s s C o d
e
1 2 E n t e r a t h r e e - d i g i t c o d e u s i n g n um b e r s 0
- 9 ,
o r
.
T h e
c a n n o t b e c h a n g e d .
3 P r e s s M e n u / S e t .
4 P r e s s S t o p / E x i t .
R em o t e C omm an d s
C H A N G E F A X F O R WA R D I N G S E T T I N G
P r e s s 9 5 .
t h
e n t o
T ur nf e a t ur e Of f , p r e s s 1 .
S e l e c t F a x F o r w a r d i n g , p r e s s 2 .
3
2
Fold Fold
8/3/2019 Fax Brother
http://slidepdf.com/reader/full/fax-brother 148/148


