
Free Bead Craft Patterns
Beaded Flowers, Beaded Ornaments, Pony Bead Patterns,
and More Bead Crafts

iiContents
Free Bead Craft PatternsBeaded Flowers, Beaded Ornaments,
Pony Bead Patterns, and More Bead Crafts
Snowflake Ornament R o b i n C o w a r t
This festive snowflake has many uses: decorate your holiday packages with it, dangle it
on a small suction cup with a hook in a window, or hang it on a holiday tree.
technique >> netting
BEADWORK online 1 of 3
bea
dwor
konl
ine
Copyright Beadwork® magazine, Interweave Press LLC. Not to be reprinted. All rights reserved.
Ski Sweater MatChBOx COver
by SuSan SwanSon p. 2
SPangled iSland BOttle
by inga hunter p. 1
Beaded eaSter egg
SnOwFlake OrnaMent
herringBOne weave COaSter
by Yulia CrYStal PaPakina p. 9
by robin Cowart p. 6
by beadwork deSign team p. 11
dutCh SPiral BaSket
by aliSon eaStman p. 3
Beaded Bug BOxeS
Marguerite daiSy Pin
by ramona FinoCChiaro p. 6
by arlene baker p. 6

Free Bead Craft Patternseditor, beadingdaily JENNIFER VANBENSCHOTEN
designer OCEANA gARCEAu / photography JOE COCA, ANN SWANSON
Projects and information are for inspiration and personal use only. BeadingDaily, Beadwork, and Stringing do not recommend, approve, or endorse any of the advertisers, products, services, or views advertised in this publication. Nor do BeadingDaily, Beadwork, or Stringing evaluate the advertisers’ claims in any way. You should, therefore, use your own judgment in evaluating the advertisers, products, services, and views advertised in BeadingDaily, Beadwork, and Stringing.
iii
Jennifer VanBenschoten, Beading Daily editor
Bead crafts have been around for hundreds of years. The first bead crafts were probably related to adorning clothing with thousands of tiny beads, but artists soon discovered that they could use beads to craft other items such as baskets, jars, and ornaments. There are many wonderful examples of bead crafts in museums around the world!
But beaded crafts don’t have to be big and elaborate. In fact, you probably have everything you need right now to sit down and start creating a piece of beaded art. Turn your trash into trea-sure by adding some beads! And who hasn’t admired those lovely beaded ornaments that turn up during the winter holidays?
We’ve assembled a collection of eight bead craft projects just to give you a taste of what those beads can do! We all know that beads can be used to make beautiful jewelry, but with a little imagination, beads can be used to craft all sorts of items.
•Dig through your recycling and find an old glass bottle, then turn it into a piece of beaded home decor by making Inga Hunter’s Spangled Island Bottle. The beads and sequins will brighten up any room.
•Don’t throw away that empty matchbox! Susan Swanson’s Ski Sweater Matchbox Cover fits like a glove so you can use that old matchbox to store your favorite tiny bead treasures.
•Make a decorative basket out of beads with Alison Eastman’s Dutch Spiral Basket. It’s perfect for a sunny porch or your favorite kitchen table.
•Take an ordinary mesh bug box and turn it into a work of bead art with Ramona Finocchiaro’s Beaded Bug Boxes. These are definitely NOT for the kids!
•Learn some basic French beaded flower techniques with Arlene Baker’s Marguerite Daisy Pin. Beaded flowers are beautiful at any time of the year, and this one can be made in any color for any occasion.
•Learn a new beading stitch and whip up a set of easy Herring-bone Coasters using pony beads for your next party. Choose bright colors of pony beads to make your party even more festive! The pony beads make it easy to learn a new beading stitch!
•Imagine how delightful a basket full of Yulia Crystal Papakina’s Beaded Easter Eggs would be—no refrigeration required! Hide them in the backyard for your favorite egg hunter on Easter morn-ing or tuck them into a little Easter basket with some jelly beans.
•What would the winter holidays be without a flurry of Snow-flake Ornaments by Robin Cowart? Sparkling seed beads make these beaded ornaments an essential part of your holiday decorations, and they make great beaded gift tags for your holiday packages.
Yes, beads have the power to turn the ordinary into the extraor-dinary—with just a little bit of thread, wire, and patience, you can turn an everyday object into a carefully crafted piece of bead art. Now that you’ve seen just what you can do with bead crafts, take a look around and see where you can add some more beads to your life! You never know where the beads will show up next!
Bead Happy,
Free Bead Craft PatternsBeaded Flowers, Beaded Ornaments,
Pony Bead Patterns, and More Bead Crafts

More wonderful beadwork projects are available at shop.beadingdaily.com/jewelryprojects© 2011 Interweave Press LLC. not to be rePrInted. aLL rIghts reserved.
page 1
Spangled Island Bottle I n g a H u n t e r
Materials6mm flat sequins, in two greens,
gold, blue, and iridescent blackSize 11° red, green, and black seed
beadsgold metallic Delica beadsSmall glass tabasco bottleDark-colored knit fabric (t-shirt
fabric works well)Size a Silamide beading thread
notionsSmall sturdy pillowtwo size 9 milliner’s needlesFabric marking pencil
I’m a mixed media artist from a series of islands: Jamaica, my family’s home; England, where I was born; and Australia, that enormous island at the bottom of the world, where I live. I first saw the exhibition of Haitian flags that inspired me to do sequined bottles at the Uni-versity of California, Los Angeles, in 1996 while I was on my way to see my family in Jamaica. Of course I had seen photographs before, but the reality is so much more—the brilliance just doesn’t translate. The flags were so beautiful! So colorful! With such texture—and done with a skill that I will never be able to equal. I came away dazzled.
One of the characteristics of Haitian flags which is not so clear in photo-graphs is the two layers of color. You have the sequin layer underneath, and the bead layer riding on top, so that you can play with colors in a complex, sophisticated manner. I have been using beads and sequins since I was six-teen, but I had never thought of using them in quite this way.
I had beads and embroidery gear in my suitcase, and when I arrived in Jamaica I was so enthusiastic about what I had seen, that my artist cousin Jasmine Thomas suggested that we try out the technique as soon as possible. Trouble was, no sequins! We searched Kingston, and finally found some white ones that we dyed blue, red, and purple with my hair dye. Although the dye is temporary when used on hair, it did color the sequins. I have some sequins left and the color is still there after six years, so it certainly won’t fade, but it isn’t exactly perfect—unless you actually want unevenly colored dull spangles. But it was all we had, and I did my first piece, a combination of sequins and embroi-dery. It looks a bit amateurish now, but I thought it was wonderful at the time.
Later, in Australia, I saw another exhibition of Haitian art, and bought my first flag, one by Eviland Lalanne—a bit faded but absolutely gorgeous! And a constant source of technical inspira-tion for me. At the exhibition I saw many libation bottles and nearly turned myself inside out trying to see how they were done; finally I decided to work it out for myself. In my defense, I felt, and still feel, that I share a similar back-ground with the people of Haiti, and am able to do this work without dishonor. One of the advantages of having unknown African ancestors is that you can go along with your intuition.
It wasn’t easy. I figured that the bottles had to be covered with cloth, and the sequins stitched on, so I covered a little wine bottle with old T-shirt fabric and began. Two bottles later, I had encoun-tered a whole heap of difficulties, and I was hooked. Since then I have made dozens of sequined bottles, and now that I have made most of the common mistakes, I feel that I can pass the tech-nique on to others.
Note: One square inch of spangling with these sizes uses 36 beads and sequins. The quantities will depend on the size of your bottle. These are the bead and sequin sizes I used, but you can vary the sizes at will and the bottle will still work out. It won’t be wrong, just different. Spangling is not an exact science, which is one reason I like it—improvisation is both possible and easy.
Step 1: Remove the label from the bot-tle. Stretch the fabric to cover the bottle and stitch it tightly in place. If you leave it too loose it will be hard to stitch the sequins evenly. Try to keep the seams flat. You may or may not cover the base. If the finished bottle will be standing,

More wonderful beadwork projects are available at shop.beadingdaily.com/jewelryprojects© 2011 Interweave Press LLC. not to be rePrInted. aLL rIghts reserved.
page 2
glue card stock or leather to the bottom for a base and don’t spangle there. If the bottle will hang, spangle the base. The same applies to the top opening—you can cover it up or leave it open depend-ing on the purpose of the finished bot-tle. Use the pillow to rest the bottle on as you work.
Step 2: Roughly mark the design on the fabric with the fabric marker. The drawing will be covered up, so you don’t have to be neat. For this bottle, mark two lines around the circumfer-ence, dividing the bottle into three working areas. On my bottle the middle area is 1½" wide.
Step 3: Anchor your thread securely in the fabric at the bottom of the bottle. Begin to spangle (see “Stitches,” page 84) using the gold beads and gold sequins. Position each sequin so that it overlaps half the previous sequin. Work from the bottom edge of the bottle, around and around, moving up until you reach your marked line, which should be three rounds of sequins. Vary the look of the sequins by working a row or two with a different color of beads.
Spangling
Weave your thread to the second marked line and work gold sequins and beads to approximately six rows from the top of the bottle, leaving the very top to be done later. You now have a space between two lots of gold.
Divide the middle section evenly into four wide vertical stripes and mark the fab-ric. Halve the stripes to mark rectan-gles. Leave one sequin width from the gold so you can insert another color
Step 5: Move your needle to the space on the body of the bottle at the bottom of the green and black oblongs. Add a round of blue sequins held down with three red beads. Skip the third bead and pass back through the other two beads into the sequin. Repeat this round at the second space at the top of the col-ored oblongs.
Step 6: At the top of the bottle, stitch a round of red beads with gold sequins, a round of black beads with black sequins, a round of green beads with green sequins, and cover the top with gold sequins stitched with one gold and three red beads. These beads make lit-tle red dreadlock fringes that finish the whole thing off.
Inga hunter is a mixed-media arist and writer
who lives in Leura (near sydney), australia.
Woman of Three Islands
Ph
oto
by
Ing
a h
un
ter
tips• Like all beading, spangling is a matter
of patience and rhythm.• Thread can often catch around
sequins. experienced spanglers can tell this has happened by the feel of the thread, perhaps from the tension in the thread. If you find your thread is caught, go back and restitch the sequins.
• Broken threads are always a problem, as in any beadwork. and in the same way, you don’t want your work to fall apart. to be sure it doesn’t, be aware of frayed threads. Fraying can easily happen when you’re dealing with the sharp edges of sequins.
• If your sequins are overlapping the wrong way, take a needle and flip them over or under, however you want them to lie.
later, and stitch alternating sets of green sequins held down with green beads and black sequins held down with black beads. Work up until you have reached the halfway mark, about four rows. To make a subtle design change, stitch alternate rows of sequins in the two different greens in the green area, holding them down with the one shade of green bead. Once you reach the halfway mark, change colors. Where you had green sequins held down with green beads, change to black sequins held down with green beads. Where you had black sequins held down with black beads, change to green sequins held down with black beads. The result will give you alternating squares of green and black underneath, with stripes of green and black over the top—an interesting characteristic com-mon in the Haitian technique. Work up until you are one sequin row short of the gold. Note: You get a better result by working around the bottle than work-ing in blocks of color.
Step 4: Bead the base by beginning at the outside edge; stitch one round of green beads with green sequins, one round of black beads with black sequins, a round of red beads with gold sequins, and finish with a center of red beads with blue sequins.

More wonderful beadwork projects are available at shop.beadingdaily.com/jewelryprojects© 2011 Interweave Press LLC. not to be rePrInted. aLL rIghts reserved.
page 3
Ski Sweater Matchbox Cover S u e S wa n S o n
I love to light candles all over the house but I can never find the matches. So I designed these covers so that matchboxes
are pretty enough to leave out on a table. The match safes used in the 1800s inspired the idea. When matches were invented, they
were highly flammable and were kept in little metal boxes so that they could be carried around. The metal was decorated
with intricate tooling. The English called them vesta boxes.
MaterialsDelicas in matte cream white #352
(W) and matte powder blue #760 (B)1⁄8" doll buttonsMatchboxBlue paintSize D nymo beading thread
NotioNsSize 10 or 12 beading needlesThread HeavenScissorsAleene’s Premium Bond Glass and
Bead Slick Surface Adhesive

More wonderful beadwork projects are available at shop.beadingdaily.com/jewelryprojects© 2011 Interweave Press LLC. not to be rePrInted. aLL rIghts reserved.
page 4
After I made my first matchbox cover, I ran across a felt-covered match-box at a garage sale for 10¢. It reminded me of the kitschy matchbox covers that crafters made in the 1960s. I think that my beaded version is much more ele-gant. In addition to looking pretty on a table, your covered matchbox can be carried in a beading kit for knot-melting .
Step 1: Paint the matchbox cover and the ends of the drawer. Place the cover’s seam on the bottom.
Step 2: Using a 4' length of conditioned thread and leaving a 6" tail, string a ten-sion bead (see “Stitches,’’ page 80).
Rows 1 and 2: String 5B, 3W, 17B, 3W, 15B for a total count of 43 beads.
Row 3: Hold the string of beads in your left hand on top of your index finger. String 1B and pass through the first B. Work the row in odd-count flat peyote stitch (see “Stitches,’’ page 80) using 7B, 1W, 9B, 1W, 3B. Pass through the first B of Row 1 to prepare to begin Row 4.
Row 4: Work 1B, 1W, 2B, 1W, 6B, 1W, 2B, 1W, 6B. Remove the tension bead and sew the thread tail through several beads.
Row 5: Work 6B, 1W, 1B, 1W, 1B, 1W, 5B, 1W, 1B, 1W, 1B, 1W. End the row with a turnaround (Figure 1). In odd-count peyote, every other row ends in a turn-around.
Row 6: Work 1B, 1W, 2B, 1W, 6B, 1W, 2B, 1W, 6B.
Row 7: Work 6B, 5W, 5B, 5W, 1B. Row 8: Work 2B, 2W, 2B, 1W, 2B, 1W,
2B, 2W, 2B, 1W, 2B, 1W, 1B. Row 9: Work 1B, 2W, 1B, 2W, 2B, 1W,
2B, 2W, 1B, 2W, 2B, 1W, 3B. Row 10: Work 2B, 2W, 2B, 1W, 2B, 1W,
2B, 2W, 2B, 1W, 2B, 1W, 1B. Row 11: Work 3B, 1W, 2B, 5W, 2B, 1W,
2B, 5W, 1B. Row 12: Work 1B, 1W, 2B, 1W, 2B, 2W,
2B, 1W, 2B, 1W, 2B, 2W, 2B.
Figure 1

More wonderful beadwork projects are available at shop.beadingdaily.com/jewelryprojects© 2011 Interweave Press LLC. not to be rePrInted. aLL rIghts reserved.
page 5
Row 13: Work 3B, 1W, 2B, 1W, 1B, 1W, 1B, 1W, 2B, 1W, 2B, 1W, 1B, 1W, 1B, 1W, 1B.
Row 14: Work 1B, 1W, 2B, 1W, 1B, 1W, 2B, 1W, 1B, 1W, 2B, 1W, 1B, 1W, 2B, 1W, 1B.
Row 15: Work 1B, 1W, 1B, 1W, 1B, 1W, 2B, 1W, 2B, 1W, 1B, 1W, 1B, 1W, 2B, 1W, 3B.
Row 16: Work 2B, 2W, 2B, 1W, 2B, 1W, 2B, 2W, 2B, 1W, 2B, 1W, 1B.
Row 17: Work 1B, 5W, 2B, 1W, 2B, 5W, 2B, 1W, 3B.
Row 18: Work 1B, 1W, 2B, 1W, 2B, 2W, 2B, 1W, 2B, 1W, 2B, 2W, 2B.
Row 19: Work 3B, 1W, 2B, 2W, 1B, 2W, 2B, 1W, 2B, 2W, 1B, 2W, 1B.
Row 20: Work 1B, 1W, 2B, 1W, 2B, 2W, 2B, 1W, 2B, 1W, 2B, 2W, 2B.
Row 21: Work 1B, 5W, 2B, 1W, 2B, 5W, 2B, 1W, 3B.
Row 22: Work 2B, 2W, 2B, 1W, 2B, 1W, 2B, 2W, 2B, 1W, 2B, 1W, 1B.
Row 23: Work 1B, 1W, 1B, 1W, 1B, 1W, 2B, 1W, 2B, 1W, 1B, 1W, 1B, 1W, 2B, 1W, 3B.
Row 24: Work 1B, 1W, 2B, 1W, 1B, 1W, 2B, 1W, 1B, 1W, 2B, 1W, 1B, 1W, 2B, 1W, 1B.
Row 25: Work 3B, 1W, 2B, 1W, 1B, 1W, 1B, 1W, 2B, 1W, 2B, 1W, 1B, 1W, 1B, 1W, 1B.
Row 26: Work 1B, 1W, 2B, 1W, 2B, 2W, 2B, 1W, 2B, 1W, 2B, 2W, 2B.
Row 27: Work 3B, 1W, 2B, 5W, 2B, 1W, 2B, 5W, 1B.
Row 28: Work 2B, 2W, 2B, 1W, 2B, 1W, 2B, 2W, 2B, 1W, 2B, 1W, 1B.
Row 29: Work 1B, 2W, 1B, 2W, 2B, 1W, 2B, 2W, 1B, 2W, 2B, 1W, 3B.
Row 30: Work 2B, 2W, 2B, 1W, 2B, 1W, 2B, 2W, 2B, 1W, 2B, 1W, 1B.
Rows 31–90: Repeat Rows 11–30 three times.
Rows 91–100: Repeat Rows 11–20 once. Row 101: Work 1B, 5W, 5B, 5W, 6B. Row 102: Work 6B, 1W, 2B, 1W, 6B, 1W,
2B, 1W, 1B. Row 103: Work 1B, 1W, 1B, 1W, 1B, 1W,
5B, 1W, 1B, 1W, 1B, 1W, 6B. Row 104: Work 6B, 1W, 2B, 1W, 6B, 1W,
2B, 1W, 1B.
Row 105: Work 3B, 1W, 9B, 1W, 8B. Row 106: Work 7B, 2W, 8B, 2W, 2B. Row 107: Work 3B, 1W, 9B, 1W, 8B.Step 3: Glue the beadwork to the match-
box like a book cover, leaving the striker strip exposed on one side. Glue the buttons along one edge for a decorative trim.
When the matches are gone, refill the box or insert a new drawer. If the striker strip wears out, just cut out a new one and glue it on the box. Also, you can remove the beadwork by soaking the matchbook in water for a minute. Then you can glue the beadwork to a new box
sue swanson is a bead artist and teacher from
woodbury, Minnesota. she is a member of
the Upper Midwest bead society. Contact sue

More wonderful beadwork projects are available at shop.beadingdaily.com/jewelryprojects© 2011 Interweave Press LLC. not to be rePrInted. aLL rIghts reserved.
page 6
Dutch Spiral Basket A L L I S o n E A S T m A n

More wonderful beadwork projects are available at shop.beadingdaily.com/jewelryprojects© 2011 Interweave Press LLC. not to be rePrInted. aLL rIghts reserved.
page 7
Materials5 gr size 3 Czech bugle beads5 gr size 11° Czech seed beads a
(contrasting color to bugles) 5 gr size 11° Czech seed beads B
(same color as bugles) Size o beading thread
NotioNsthread conditionerSize 12 beading needleglue or clear nail polishScissors
I developed this basket while work-ing on a Dutch spiral bracelet. I thought that the stitch would lend itself well to a bag. So I set about making a Dutch spiral bag. A wonderful thing happened halfway through. I looked down at my partially finished bag and saw the cut-est ring basket! It was the perfect size to hold earrings and rings on top of the dresser. This project can be made with any number of combinations. For instance, you can use large bugle beads, or you can make the basket monochro-matic, or make each row a different color. Fringe can even be added to the top. The variations are really endless and the project is quick enough for you to try them all.
Step 1: Using a yard of conditioned thread, string 2 A and 1 bugle bead. Repeat eight times. Tie into a circle so that the beads are snug, but not taut (Figure 1). Pass through the first seed bead.
Step 2: *String 1 bugle bead and 1 A and pass through the first seed bead of the next set (Figure 2). Repeat from * for the desired height of your basket; these samples have seven bugle beads in each vertical row.
Figure 1
Figure 2
Figure 3
Step 3: String 4 B and 1 A. Pass through the next seed bead (Figure 3). Repeat eight times around the basket.
Step 4: String 3 B and 1 A. Pass through the next A. Repeat eight times.
Step 5: String 2 B and 1 A. Pass through the next A. Repeat eight times.
Step 6: String 1 B and 1 A. Pass through the next A. Repeat eight times.
Step 7: String 1 A. Pass through the next A. Repeat eight times.
Step 8: String 1 A and pass through the next A. Pass through the next A without adding another bead. Pull tight. Repeat three times.
Step 9: String 1 A. Pass through the next 2 A. Repeat two times around the basket.
Step 10: Pass through the last 3 A added, tie and glue the thread, and trim close to work.
allison eastman has been beading for close
to ten years. over the last several years, she
has turned to sharing her knowledge of the
art through teaching and designing beading
kits. to reach her regarding this project, or for
this beading kit and others, go to
www.wonderlandbeadworks.net.

More wonderful beadwork projects are available at shop.beadingdaily.com/jewelryprojects© 2011 Interweave Press LLC. not to be rePrInted. aLL rIghts reserved.
page 8
Beadweaving on Fiberglass Screen r a M o n a F I n o C C H I a r o

More wonderful beadwork projects are available at shop.beadingdaily.com/jewelryprojects© 2011 Interweave Press LLC. not to be rePrInted. aLL rIghts reserved.
page 9
Materialsone wooden bug box12" piece of fiberglass screen15° seed beads (approx. 240 beads
per square inch)Size B beading thread in color to
complement beads11⁄4 yards gimp or braidSmall brass hasp (optional)one piece of 9" × 12" plastic canvasPaint or stain (optional)
NotioNsSize 10° beading needlesHammerScrewdriverIndelible markerglueSmall nails
My experience with bead weaving on fiberglass screen began several years ago when I was looking for a technique to make strong and flexible panels for a lampshade. I found that 15° seed beads fit in the mesh holes of ordinary fiber-glass window screening and could be secured by adapting the sewing technique of loom bead weaving. The screening is very durable and can be cut and draped, then glued or sewn to almost any sur-face. The possibilities of this technique are endless. Since my first lampshade, I have made jewelry, purses, pictures, ornaments, and even garment insertions. Depending on the type of bead you use, the finished work resembles stained glass (transparent beads) or mosaic (opaque beads).
I graphed my first designs on regular square graph paper. This is all right in some cases, but since the size 15° Miyuki rocaille bead is essentially rect-angular, measuring 1.15 mm in the direction of the thread and 1.55 mm wide, I created my own graph paper by photocopying the screen and enlarging the copy.
I hope this article will inspire you to original creations. I am continuing to
explore this fascinating technique. Who knows? Given enough time and beads, maybe a beaded window or door screen? A parade float? Happy beading!
Step 1: Beg by disassembling the bug box. Unscrew the handle and remove the doorknob if you are going to replace it with the decorative hasp. Remove the twill tape covering the edges of the screen mesh and remove the screen. You probably won’t be able to salvage this screen, because it will probably tear when you remove it.
In making my own screen for the box, I like to work with two pieces of mesh, rather than one long continuous piece; these are easier to handle, there are fewer beads to count for each row, and the handle will hide the gap between the two pieces. For each piece, measure from the center of the screw hole on the top down to the base, about 5½.
Measure the width of the box, almost to the edge, which will be about 6". Cut two pieces of the screen a little bigger than your measurements to allow an edge to grab onto as you bead. Remember to check the orientation of the screen so that it matches the direction of the rectangular beads.
Step 2: To determine the actual amount of screen you will be beading, lay the cut piece of screen up against the box. You will need about ⅜" of the screen for the margins, sides, top, and bottom. The part you will be beading will be just one row more on each side to cover the edges of the box. Count the screen holes from top to bottom. Mark the borders of your piece of screen with an indelible marking pen. Choose any design your heart desires. Many of my designs come from Dover books. You can graph any design on regular graph paper or, for less distortion, on a pho-tocopy of the screen mesh.
Step 3: Using 1½ yards of thread, tie it to the intersection of the mesh at a corner,
one intersection before the first bead, with the thread and needle below the mesh. Following your graph pattern, string the first row of beads. Note: Count and recount! If you pick up an extra bead or two you may be able to get rid of them by smashing them with needle-nose-pliers.
PT the mesh intersection before the last bead at the bottom of the row. With the thread held taut, force the beads one by one into the holes of the mesh. Size 15° beads vary considerably, but most should pop right into the mesh holes. Once the first several beads are in their holes in the mesh, carefully PBT the beads on top of the mesh. Continue through all the beads on the row, taking care that the thread is over the inter-section of each mesh to insure that all the beads stay in place. PBT the mesh where you began. Carefully pull the thread taut so it is smooth and even between all the beads. Rep until you’ve completed the needed number of verti-cal rows. Tie thread ends to the mesh.
At this point, you may wish to paint or stain the box to complement your beaded design.
Reinforcing
Step 4: Cut the plastic canvas right at the outside edges of the box. Center the beaded sections on the canvas and sew them in place. Nail the pieces to the box, taking care not to hammer the beadwork. Once the pieces are nailed, measure, cut, and glue the gimp or dec-orative braid all around to cover the nailed edges. You will need one con-tinuous piece for the front curved part and another for the back curved part; glue the final piece of trim all around the lower edge. Reattach the handle.
ramona Finocchiaro is a longtime resident of
Las vegas, nevada, where she is a member
of the local Fiber arts guild. she enjoys
spinning, weaving, and knitting in addition to
beading.

More wonderful beadwork projects are available at shop.beadingdaily.com/jewelryprojects© 2011 Interweave Press LLC. not to be rePrInted. aLL rIghts reserved.
page 10
Beaded Easter Egg Y u L I A C rY S TA L PA PA k I n A
Turn an ordinary wooden egg into something extraordinary! Weave freshwater pearls, bugles, hexes, and seed beads into a
rich-looking netting that will dress up your egg and make it the treasure everyone wants in their Easter basket this year. Or use
several to create an unforgettable centerpiece for the holiday table.
MaterialsSize 11° seed beads or
Delicas in main and accent colors (A and B)
Size 1 cut bugle or hex beads101 freshwater pearls, crys-
tals, or any 6–8mm beadswooden eggHeavy beading thread or
Fireline 6lb test
NotioNsSize 10 or 12 beading needlesScissors
Finished Size 3" high

More wonderful beadwork projects are available at shop.beadingdaily.com/jewelryprojects© 2011 Interweave Press LLC. not to be rePrInted. aLL rIghts reserved.
page 11
Step 1: Using 11⁄2 yd of thread, string 3A and pass back through the first bead leaving a 4" tail. * String 1A and pass back through the last bead strung. Repeat from * to make a two-bead-wide strip to wrap tightly around the middle of the egg (Figure 1). Stitch the ends of the strip together, tie a knot with the tail thread, and exit from the bottom of the band.
Step 2: String 3A, 1B, and 3A. Skipping 2 beads on the band, pass up through the third and down through the fourth beads just strung. Repeat around the band (Figure 2). Exit through the first 4 beads of this round.
Step 3: String 1A, 1 pearl, and 1A. Pass through the next B of the previous round (Figure 3). Repeat around the egg, keeping the thread tight.
Step 4: Exiting a B of the first round of Step 1, string 3A, 1B, and 3A. Pass through the next B. Repeat around. Exit through the first 4 beads of this round.
Step 5: String 1A, 1 hex, and 1A. Pass through the next B of the previous round (Figure 4). Repeat around the egg, keeping the thread tight.
Step 6: Repeat Steps 4, 3, 4, 5, 4, 3, 4, 5, etc. down this end of the egg. As the shape tapers, reduce the number of pearls between the net-ting. Toward the base, string 1 or 2 seed beads in place of a pearl, or every other pearl, depending on the size of the egg. When you
Figure 1
Figure 2
Figure 3
Figure 4

More wonderful beadwork projects are available at shop.beadingdaily.com/jewelryprojects© 2011 Interweave Press LLC. not to be rePrInted. aLL rIghts reserved.
page 12
Figure 5
Figure 6
near the base, work a final netted row. Exit from a point bead on one of the nets. Do not secure the thread yet.
Step 7: Begin a new thread on the other end of the egg. Repeat from Step 2, decreasing the number of pearls around the egg. You may sometimes need to work a net over two gaps of accent beads.
Step 8: Return to your thread at the bot-tom of the egg. String enough beads to reach the point of the next net and pass through it. Repeat around and cinch tight to pull the netting into a circle over the bottom of the egg. If necessary to hold the circle tight, string beads to cross to the other side of the circle and pass through a few beads of the circle. Repeat around the circle adding spokes of beads (Figure 5). Pull the thread tight, weave through several beads of the upper rows, secure your thread, and trim close to work.
Step 9: Return to the top of the egg. Continue netting to the top, decreasing to about 5 pearls with seed beads on the nets between them. Finish with a tight circle, passing through the points of each net (Figure 6). String a pearl and pass through the opposite side of the circle. Repeat twice, making sure the thread is tight. Secure your thread and trim close to the work.
Yulia Crystal was born and raised in the
Ukraine, and now lives in austrialia where
she hopes to maintain a small beaded jewel-
ry business. she’s started beading as a child,
and has been beading constantly over the last
ten years. her favorite medium is seed beads,
although she has started incorporating gem-
stones into her work. see Yulia’s work at http://
yuliacrystal.com.
RESOURCE Wooden egg: Any large craft store.

More wonderful beadwork projects are available at shop.beadingdaily.com/jewelryprojects© 2011 Interweave Press LLC. not to be rePrInted. aLL rIghts reserved.
page 13
Herringbone Weave CoasterB E A d W o r k d E S I G n T E A m
HerriNgboNe stitcHBegin with a foundation row of even-count ladder stitch. String 2 beads, pass down through the second-to-last bead in the ladder, and up through the next bead. String 2 beads, pass down the next bead and then up through the fol-lowing. repeat to the end of the row. to end the row, pass back through the last bead strung. to begin the next row, string 2 beads and pass down through the second-to-last bead of the previous row and up through the following bead. repeat, stringing 2 beads per stitch and passing down then up through 2 beads of the previous row. The 2-bead stitch will cause the beads to angle-up in each column, like a herringbone fabric.
An easy pattern to learn herringbone weave. Thread a needle with a 26" length of thread. Leave a 6" tail. String 4 white, 1 black, 1 white, 20 black, 1 white, 1 black, and 4 white. String 1 additional white bead. PT the last white bead previously strung. Work the fi rst two rows as described in the instructions on page 3. Continue by following the chart, working in herringbone weave. Finish by passing the thread through the last two and the fi rst two rows in square stitch to shore them up. Trim working thread and tail close to work.
Materials5 oz. size 5° white pony
beads2 oz. size 5° black pony
beads2 oz. size 5° gunmetal
pony beadsBlack nymo “d” thread
NotioNsSize 12 beading needleScissors

More wonderful beadwork projects are available at shop.beadingdaily.com/jewelryprojects© 2011 Interweave Press LLC. not to be rePrInted. aLL rIghts reserved.
page 14
This weave is often found in Ndebele beadwork. The herringbone stitches or pattern creates a tough fabric. It’s a tricky stitch, but once you get the knack, it can produce wonderful geo-metric shapes.
Use large-sized beads, such as pony beads, when you are learning. It also helps to use a thread and needle that will go through the beads several times. Alternate rows of light and dark beads to help you understand the mechanics of the stitch. Maintain a steady tension throughout. If you’d like to read further, there are really clear explanations of this stitch in Jeannette Cook and Vicki-Star’s Beady Eyed Women’s Guide to Exquisite Beadwork: An Off-Loom Bead Weaving Primer (San Diego, California: Beady Eyed Women Enterprises, 1996), as well as in Virginia Blakelock’s Those Bad, Bad Beads! (Wilsonville, Oregon: Virginia L. Blakelock, 1990).
to BeGINString 1 light, 2 dark, 2 light, 2 dark, 2 light,
2 dark,2 light, 2 dark, and 1 light bead (16 beads total). Leave a 6" tail.
The first row you work creates Rows 1–3.Rows 1–3: String 1 dark-colored bead. PBT the last light bead strung. Skipping 2 dark beads, PT the next light bead from the end.
String 2 dark beads. PT the next light bead. Skip 2 dark beads. PT the next light bead. String 2 dark beads. PT the next light bead. Skip 2 dark beads. PT the next light bead. String 2 dark beads. PT the next light bead. Skip 2 dark beads. PT the last light bead.
Row 4: String 1 dark and 1 light bead. PBT the dark bead just strung. *PT the first bead of the next 2-bead set. String 2 light beads. PT the next dark bead. Rep from * until you have reached the end of the row.
the first row that you work in herring-bone actually creates rows 1–3. to ease your way as you work these rows (and avoid spilled beads), hold the piece fi rmly between the thumb and forefi nger of your nonworking hand with the tail thread coiled around your little finger.
Row 5: Turn work over. String 1 light bead and 1 dark bead. PBT the light bead just strung. *PT the first bead of the next 2-bead set. String 2 dark beads. PT the next light bead. Rep from * until you have reached the end of the row.
Continue working the stitch in this alter-nating pattern until the work is the desired height.
The top and bottom rows may seem jum-bled. Correct this by running a thread through those rows in loose square stitch to tighten.
the herringbone pattern becomes apparent after working the fourth row.
More wonderful beadwork projects are available at shop.beadingdaily.com/jewelryprojects© 2011 Interweave Press LLC. not to be rePrInted. aLL rIghts reserved.
page 15
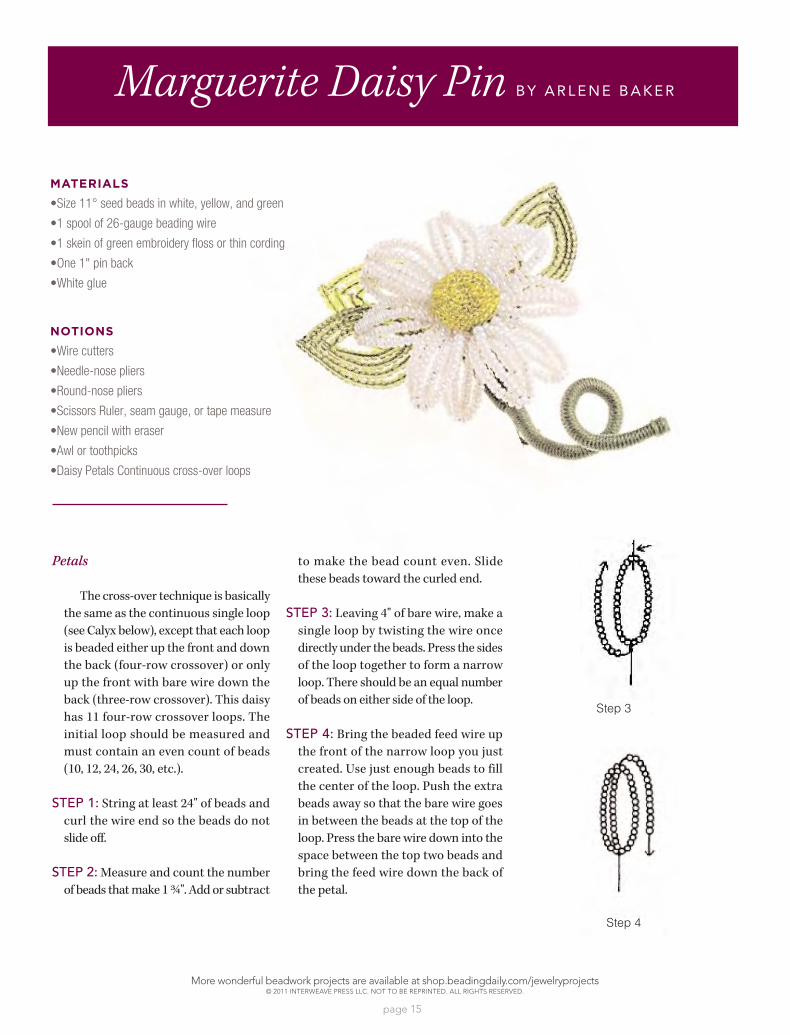
Marguerite Daisy Pin B Y A r L E n E B A k E r
Materials
•Size 11° seed beads in white, yellow, and green
•1 spool of 26-gauge beading wire
•1 skein of green embroidery floss or thin cording
•One 1" pin back
•White glue
NotioNs
•Wire cutters
•Needle-nose pliers
•Round-nose pliers
•Scissors Ruler, seam gauge, or tape measure
•New pencil with eraser
•Awl or toothpicks
•Daisy Petals Continuous cross-over loops
Petals
The cross-over technique is basically the same as the continuous single loop (see Calyx below), except that each loop is beaded either up the front and down the back (four-row crossover) or only up the front with bare wire down the back (three-row crossover). This daisy has 11 four-row crossover loops. The initial loop should be measured and must contain an even count of beads (10, 12, 24, 26, 30, etc.).
Step 1: String at least 24" of beads and curl the wire end so the beads do not slide off.
Step 2: Measure and count the number of beads that make 1 ¾". Add or subtract
to make the bead count even. Slide these beads toward the curled end.
Step 3: Leaving 4" of bare wire, make a single loop by twisting the wire once directly under the beads. Press the sides of the loop together to form a narrow loop. There should be an equal number of beads on either side of the loop.
Step 4: Bring the beaded feed wire up the front of the narrow loop you just created. Use just enough beads to fill the center of the loop. Push the extra beads away so that the bare wire goes in between the beads at the top of the loop. Press the bare wire down into the space between the top two beads and bring the feed wire down the back of the petal.
Step 3
Step 4

More wonderful beadwork projects are available at shop.beadingdaily.com/jewelryprojects© 2011 Interweave Press LLC. not to be rePrInted. aLL rIghts reserved.
page 16
Step 5: Turn the loop over and fully fill this barewire with beads to meet the twist of the first loop. Push the extra beads away and wrap the bare feed wire once around the base of the petal directly under the beads.
Step 6: Repeat Steps 4 and 5 to make 10 additional petals (Figure 1). Keep each petal as close to the previous one as possible. Keep beads close together each time you make a loop to prevent bare wire from showing. Flatten the petal in the middle so that all four rows are visible.
Step 7: After the eleventh crossover petal has been completed, measure 4" of bare wire and cut the wire from the spool. Take both 4" bare wires and twist them together two or three times just under the flower head. This will close the flower circle. Pull the two bare wires down and straighten to make the begin-ning of the flower stem (Figure 2). These hangingstems should be smooth, so don't twist down the wire. Instead, twist directly below the beads to avoid bulk.
Beehive Center
Two-bead basic, round top, round bottom, ten rows
Step 8: String at least 20" of beads on the wire and curl the end so the beads don't slide off. Make a two-bead basic (see the February/March issue of Bead-work, page 42, for detailed instruc-tions). Because the beehive center calls for ten rows (the 2 bead basic is counted as one row), you will finish it at the top single basic wire. Wrap two rows, roundtop, round bottom (Figure 3).
Step 9: Gently bend the top basic wire and the bottom basic loop down at a 45° angle. Continue to wrap the remaining rows with these wires using the same angle, one row under another.
Note: The rows made with the angled wires generally have one or two beads less than they would if you were work-ing the piece flat.
Step 10: When you have completed the tenth row, twist the bare feed wire two times around the top basic wire, directly under the beads. Cut the bare feed wire from the spool, leaving a length equal to the length of the top basic wire. Cut away the curl and trim all the ends evenly. The finished piece should look like a table with two legs on each side (Figure 4).
Step 5
Step 6
Step 7
Step 8
Step 9
Step 10

More wonderful beadwork projects are available at shop.beadingdaily.com/jewelryprojects© 2011 Interweave Press LLC. not to be rePrInted. aLL rIghts reserved.
page 17
CalyxSeven continuous loops, ten beads
per loop
Step 11: String at least 20" of beads on the wire and curl the end so the beads don't slide off. Move the beads to within 4" of the curled end of wire 'A'. Make a loop of beads by twisting the wire close to the base of the loop. Be sure the beads on the loop are tight. Twist the wires tightly together twice.
Step 12: Leave wire end A alone and work with wire end B. To form the sec-ond loop, slide another bead count close to the base of the first loop. Make a loop and twist one full twist. It makes no difference whether the twist is clockwise or counter-clockwise. Just be consistent with the direction. By turn-ing the loops of beads one full twist, the wires will cross at the base of the loops and the beads will be secured.
Step 13: Rep Steps 11 and 12 until you make seven loops. After the seventh loop has been twisted, allow 4" extra of bare spool wire and cut the wire from the spool. Cross and twist the two wires (A and B) together two or three times to close the calyx loops. Pull these two wires down and straighten to make part of the flower stem (Figure 5). Leaves — Eleven-bead open curved basic, six rows, pointed top, round bot-tom: Use the Basic Technique (pointed top, round bottom) instructions in the February/March 2001 issue of Bead-work, page 42 for this section.
Leaves
Step 14: Make an eleven-bead open curved basic, six rows, pointed top, round bottom.
Step 15: Wrap two rows of beads around the eleven-bead basic you just created. Gently curve and push the basic and one row to one side to open the center of the leaf. Maintain this open curve as you continue to wrap the remaining rows around the top and bottom basics (Figure 6).
Step 16: Gently bend and shape the leaf as desired. Straighten and smooth the wires to create the stem and cut the loop from the bottom
Step 17: Rep Steps 14 - 17 to create 3 leaves.
Step 18: Measure a length of floss two times the desired finished stem length and thread one end through the last row of beads at the base of one leaf.Work the floss between the beads and hold the end down the stem so that you wind the floss over itself as you start out. Twirl the stem and hold the floss taut, strands spread flat on the stem. Lay the strands side by side as you wind down the stem. Dab a little glue on the stem to hold the floss in place as you wind.
Step 19: Continue to wind the floss down the stem for 1". Trim the floss, glue the ends, and leave the remaining leaf stem wire bare (this will eliminate bulk when the leaves are bound to the flower stem).
Step 20: Repeat Steps 18 and 19 for the other two leaves.
Assembly and Finishing
Step 21: Put the beehive center on top of the daisy petals. Slide the two top basic wires between two of the daisy petals on one side of the flower and the two bottom basic wires between two of the daisy petals on the opposite side. Press the beehive center down firmly and bend the four basic wires toward the center back on the underside of the flower. Twist the wires together one time. These wires become part of the flower stem.
Step 11
Step 12
Step 13
Step 15

More wonderful beadwork projects are available at shop.beadingdaily.com/jewelryprojects© 2011 Interweave Press LLC. not to be rePrInted. aLL rIghts reserved.
page 18
Step 22: Thread all the flower stem wires (2 daisy petal wires and 4 beehive center wires) through the center open-ing in the calyx. Pull these wires down and straighten them as you simultane-ously push the calyx snugly against the underside of the flower. Trim all wires evenly, leaving approximately 4" of bare wire for the flower stem.
Step 23: Measure a length of floss five times the stem length and hook one end over one calyx loop.Work the floss between the beads and hold the end down the stem so that you wind the floss over itself as you start out. Make sure all pieces of the flower fit together tightly. Twirl the flower and hold the floss taut, strands spread flat on the stem. Lay the strands side by side as you wind down the stem. Dab a little glue on the stem to hold the floss in place as you wind. Wrap for 3/8". Glue the pin clasp to the bare wires, catch side down. Allow glue to dry.
Step 24: Continue wrapping while you cover the stem wires and pin clasp at the same time. Evenly bind on one leaf Step 15 stem at a time. Continue to wind the floss over the bare wires, to the bottom of the stem. Dab a little glue on the stem end and wind the floss around the end and back up the stem appro ximately 1/4". Trim the floss and glue the ends down smoothly. Allow the glue to dry thoroughly. Coil the stem by winding it around a pen or other round object two or three times.
arlene baker is a beaded wire and ribbonwork
designer who lives in downey, California, with
her husband david. Married for 31 years,
arlene says david plays and important role in
the creative process by offering his constant
support and encouragement. Contact arlene
at (562) 928-3583 to find out about her classes
and kits.

More wonderful beadwork projects are available at shop.beadingdaily.com/jewelryprojects© 2011 Interweave Press LLC. not to be rePrInted. aLL rIghts reserved.
page 19
Snowflake Ornament R o b i n C o w a r t
This festive snowflake has many uses: decorate your holiday packages with it, dangle it
on a small suction cup with a hook in a window, or hang it on a holiday tree.
technique >> netting
BEADWORK online 1 of 3
bea
dwor
konl
ine
Copyright Beadwork® magazine, Interweave Press LLC. Not to be reprinted. All rights reserved.
Snowflake Ornament r o B I n C o WA rT
Materials1 g silver metallic size 11° Japaneseseed beads16 white 3mm fire-polished rounds (a)32 white 4mm fire-polished rounds (B)Crystal FireLine beading threadg-S Hypo CementtoolsSize 12 beading needleScissors
Fire-polished rounds and silver seed beads are joined with circular netting stitches to create an 8-point snowflake.
Snowflake.
Use 6' of thread to string 4 seed beads, leaving a 3" tail. Tie a knot to form a circle, pass through all beads again, and exit between 2 seed beads (Figure 1).
RouNd 1: String 1 seed bead, 1B, 1 seed bead, 1B, 3 seed beads, 1B, 1 seed bead, 1B, and 1 seed bead. Pass through the next seed bead in the circle. Repeat, completing 4 rounded spokes around the circle (Figure 2). Pass through the first seed bead in the circle again and continue into the first spoke to pass
through 1 seed bead, 1B, 1 seed bead, 1B, 3 seed beads, 1B, and 1 seed bead. The thread is now in position for Round 2.
RouNd 2: String 1B, and pass through the 1 seed bead between the 2B on the next rounded spoke. Continue around the next spoke by passing through 1B, 3 seed beads, 1B, and 1 seed bead to exit on the other side of the spoke. Repeat to complete the round (Figure 3). Pass through the second seed bead added in Round 1 and continue to pass through the spoke beads to exit the center bead at the tip of the spoke to position the thread for Round 3.
Figure 1
Figure 2

More wonderful beadwork projects are available at shop.beadingdaily.com/jewelryprojects© 2011 Interweave Press LLC. not to be rePrInted. aLL rIghts reserved.
page 20
RouNd 3: String 2 seed beads, 1B, 1 seed bead, 1B, 1 seed bead, 1B, and 2 seed beads. Pass through only the cen-ter seed bead at the tip of the next spoke (Figure 4). Repeat to complete the round. Pass through 2 seed beads, 1B, and 1 seed bead to position the thread for Round 4.
RouNd 4: String 5 seed beads. Skip 1B on Round 3 and pass through 1 seed bead, 1B, and 2 seed beads. String 2 seed beads. Skip the center seed bead from Round 1 and pass through the next 2 seed beads, 1B, and 1 seed bead of Round 3. Repeat to complete the round (Figure 5). Pass through 2 seed beads, 1B, and 3 seed beads to position the thread for Round 5.
RouNd 5: String 1A, 3 seed beads, and 1A. Skip the center seed bead of the pre-vious round and continue through 3 seed beads, 1B, and 3 seed beads. String 1A, 3 seed beads, 1A. Skip the center seed bead of previous round and pass through 3 seed beads, 1B, and 3 seed beads (Figure 6). Repeat to complete the round.
Finishing.
Pass through Round 5 beads to exit the middle seed bead on the tip of a spoke. String 40 seed beads and pass through the middle seed bead again to form a circle. Pass through all the seed beads again to secure (Figure 7). Tie a knot, weave the thread end into several beads, and trim the thread close to the work.
Figure 3
Figure 4
Figure 5
Figure 6
Figure 7
with each new project, robin Cowart strives
to push and challenge her beading skills in
original ways. robin owns we got the bead,
a bead store in dubuque, Iowa.
RESOURCES Check your local bead shop or contact: All beads and
findings: We Got the Bead, (563) 584-0305, www.wegot
thebead.com


