FUJITSU Image Scanner
fi-800R
Consumable Replacement and Cleaning Guide
CG00002-302301 Revision A

Daily Care
This section describes how to clean the scanner.
Cleaning Materials
ATTENTION
In order to use the cleaning materials safely and correctly, read the precautions on each product thoroughly.
Name Part No. Notes
Cleaner F1
PA03950-0352
100 ml
Liquid cleaner to use for removing dirt and stains
Cleaning Sheet
CA99501-0016
20 sheets/pack
This is an A4 size-cleaning sheet.
Use two sheets to clean once.
Cleaning Wipe
PA03950-0419
24 packets
Pre-moistened with Cleaner F1. It can be used
instead of moistening a cloth with Cleaner F1.
Cotton swab
Commercially
Available
Used to clean a tiny part such as the
document sensor.
Dry cloth
Used to wipe off dirt and stains. Moisten it
with Cleaner F1 for cleaning.
● Do not use aerosol spray or spray that contains alcohol. Paper dust blown
up by strong air from the spray may enter inside the scanner, which may
cause the scanner to fail or malfunction.
Also note that sparks generated by static electricity may cause a fire.
● The inside of the ADF becomes very hot when the scanner is being used.
Before you start cleaning the inside of the ADF, make sure to turn off the
power, unplug the power cable and wait for at least 15 minutes for the
inside of the ADF to cool down.
CAUTION
For more information about the cleaning materials, contact the distributor/dealer where you
purchased this product. Refer to the contact information in the Contact List or the Contact
for Inquiries section in Safety Precautions bundled with this product and make an inquiry.
Location and Frequency
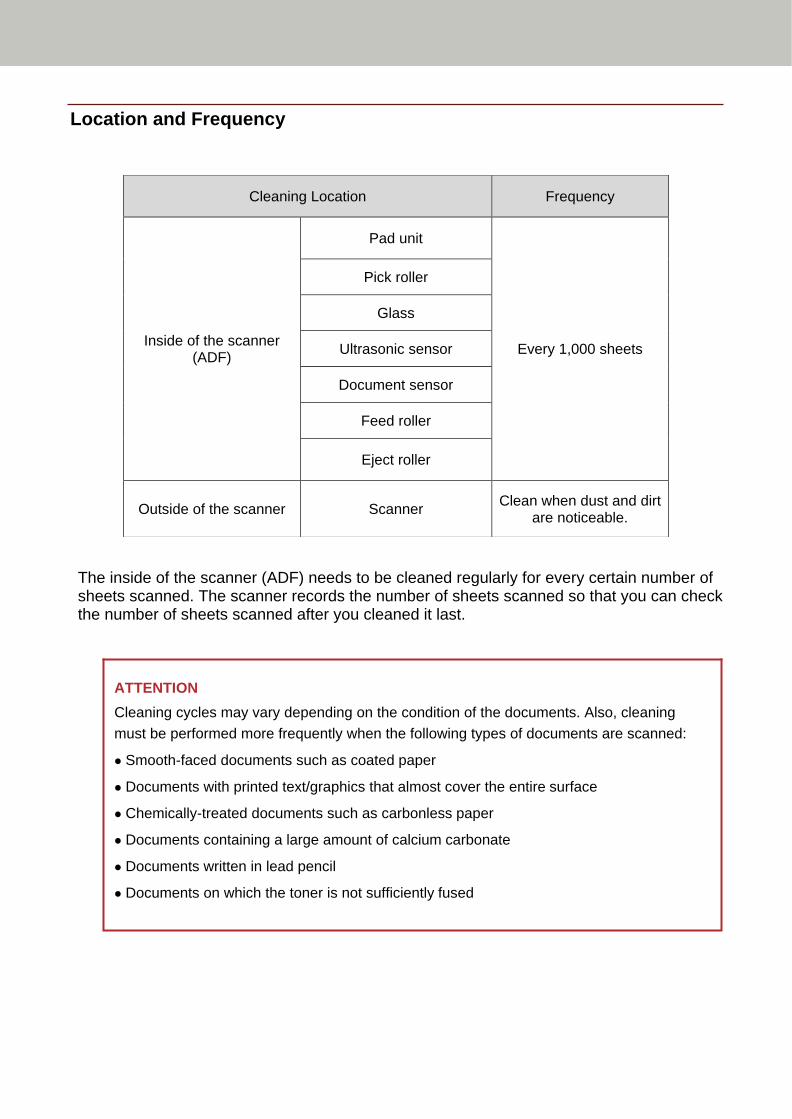
ATTENTION
Cleaning cycles may vary depending on the condition of the documents. Also, cleaning
must be performed more frequently when the following types of documents are scanned:
● Smooth-faced documents such as coated paper
● Documents with printed text/graphics that almost cover the entire surface
● Chemically-treated documents such as carbonless paper
● Documents containing a large amount of calcium carbonate
● Documents written in lead pencil
● Documents on which the toner is not sufficiently fused
Cleaning Location Frequency
Inside of the scanner (ADF)
Pad unit
Every 1,000 sheets
Pick roller
Glass
Ultrasonic sensor
Document sensor
Feed roller
Eject roller
Outside of the scanner Scanner Clean when dust and dirt
are noticeable.
The inside of the scanner (ADF) needs to be cleaned regularly for every certain number of sheets scanned. The scanner records the number of sheets scanned so that you can check the number of sheets scanned after you cleaned it last.

The scanner including the ADF paper chute (feeder) and the stacker should be cleaned with either a piece of dry cloth, a cloth moistened with Cleaner F1/mild detergent, or a sheet of Cleaning Wipe.
Cleaning the Outside of the Scanner
ATTENTION
To avoid deformation and discoloration, never use paint thinner or any other
organic solvents.
Be careful not to let any moisture or water inside the scanner during cleaning.
It may take a long time to dry if an excessive amount of Cleaner F1/mild detergent
is used. Use only a small amount. Wipe off the cleaner completely to leave no
residue on the cleaned parts.
The inside of the ADF can be cleaned with a sheet of Cleaning Paper moistened with
Cleaner F1.
As the scanner continues to feed the documents, paper dust will accumulate inside the ADF
and it may cause scanning errors. Cleaning should be performed approximately every 1,000
sheets scanned. Note that this guideline varies depending on the types of documents you
scan. For instance, it may be necessary to clean the scanner more frequently when you
scan documents on which the toner is not sufficiently fused.
1. Turn on the scanner
2. Spray the Cleaning Paper with Cleaner F1
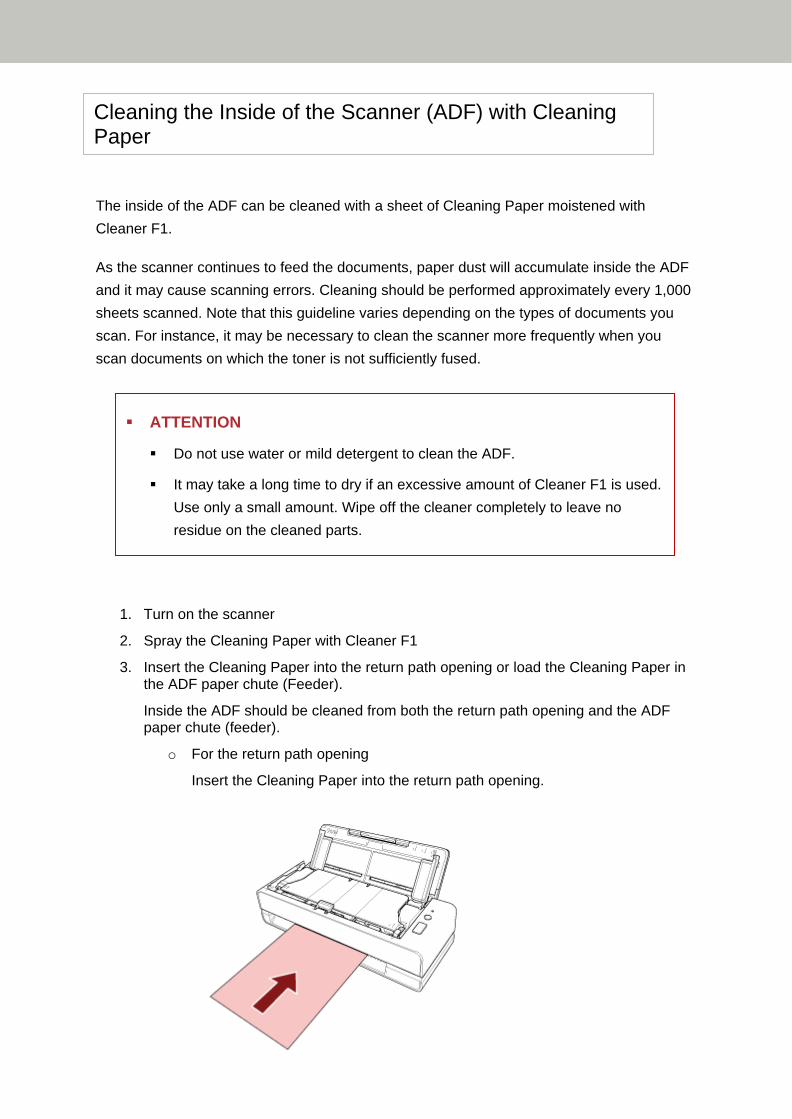
3. Insert the Cleaning Paper into the return path opening or load the Cleaning Paper in the ADF paper chute (Feeder).
Inside the ADF should be cleaned from both the return path opening and the ADF paper chute (feeder).
o For the return path opening
Insert the Cleaning Paper into the return path opening.
Cleaning the Inside of the Scanner (ADF) with Cleaning Paper
ATTENTION
Do not use water or mild detergent to clean the ADF.
It may take a long time to dry if an excessive amount of Cleaner F1 is used.
Use only a small amount. Wipe off the cleaner completely to leave no
residue on the cleaned parts.

o For the ADF paper chute (feeder)
Open the ADF paper chute (feeder), load the Cleaning Paper, and move the side guides so that there is no space between the side guides and the Cleaning Paper.
Otherwise, the Cleaning Paper may be fed skewed.
4. Scan the document with the image scanning application.
5. Clear the sheet counter after cleaning using the Software Operation Panel.
The inside of the ADF can be cleaned with a piece of cloth moistened with Cleaner F1, or a
sheet of Cleaning Wipe.
As the scanner continues to feed the documents, paper dust will accumulate inside the ADF
and it may cause scanning errors. Cleaning should be performed approximately every 1,000
sheets scanned. Note that this guideline varies depending on the types of documents you
scan. For instance, it may be necessary to clean the scanner more frequently when you
scan documents on which the toner is not sufficiently fused.
Cleaning the Inside of the Scanner (ADF) with a Cloth
The inside of the ADF becomes very hot when the scanner is being used.
Before you start cleaning the inside of the ADF, make sure to turn off the power, unplug the
power cable and wait for at least 15 minutes for the inside of the ADF to cool down.
ATTENTION
Do not use water or mild detergent to clean the ADF.
It may take a long time to dry if an excessive amount of Cleaner F1 is used. Use
only a small amount. Wipe off the cleaner completely to leave no residue on the
cleaned parts.
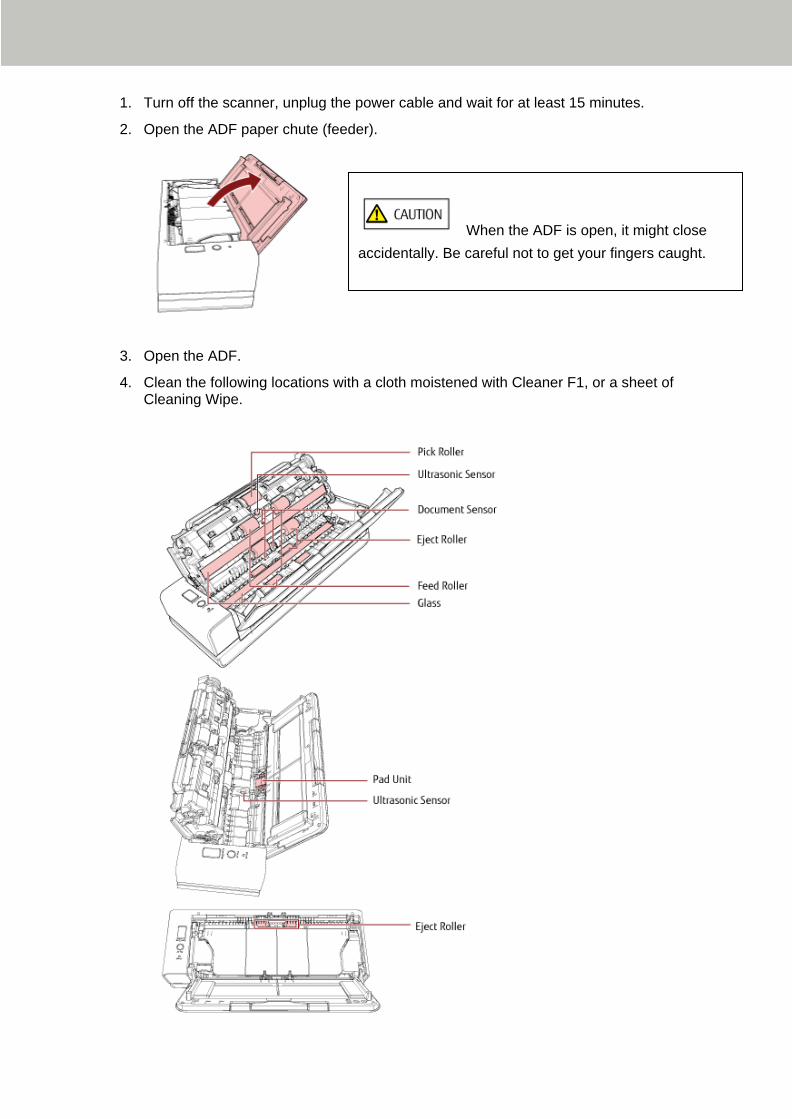
1. Turn off the scanner, unplug the power cable and wait for at least 15 minutes.
2. Open the ADF paper chute (feeder).
3. Open the ADF.
4. Clean the following locations with a cloth moistened with Cleaner F1, or a sheet of Cleaning Wipe.
When the ADF is open, it might close
accidentally. Be careful not to get your fingers caught.

o Pick Roller 1
Gently wipe dirt and dust off the roller as you rotate the roller manually, taking care not to damage the roller surface. Make sure that it is wiped properly because black residue on the roller will affect the feeding performance.
o Ultrasonic Sensor (x2) / Document Sensor (x4)
Gently wipe dirt and dust off the surface of the ultrasonic and document sensors.
o Glass (x2)
Gently wipe dirt and dust off the glass sections.
o Pad Unit (x1)
Wipe the rubber surface of the pad downward to remove any dirt and dust. Be careful not to accidentally get your hand or a cloth on the pick spring (metal part).
o Feed Roller (x4) / Eject Roller (x8)
The power must be turned on to rotate the feed/eject rollers for cleaning.
a. Plug in the power cable and turn on the scanner
b. Open the ADF
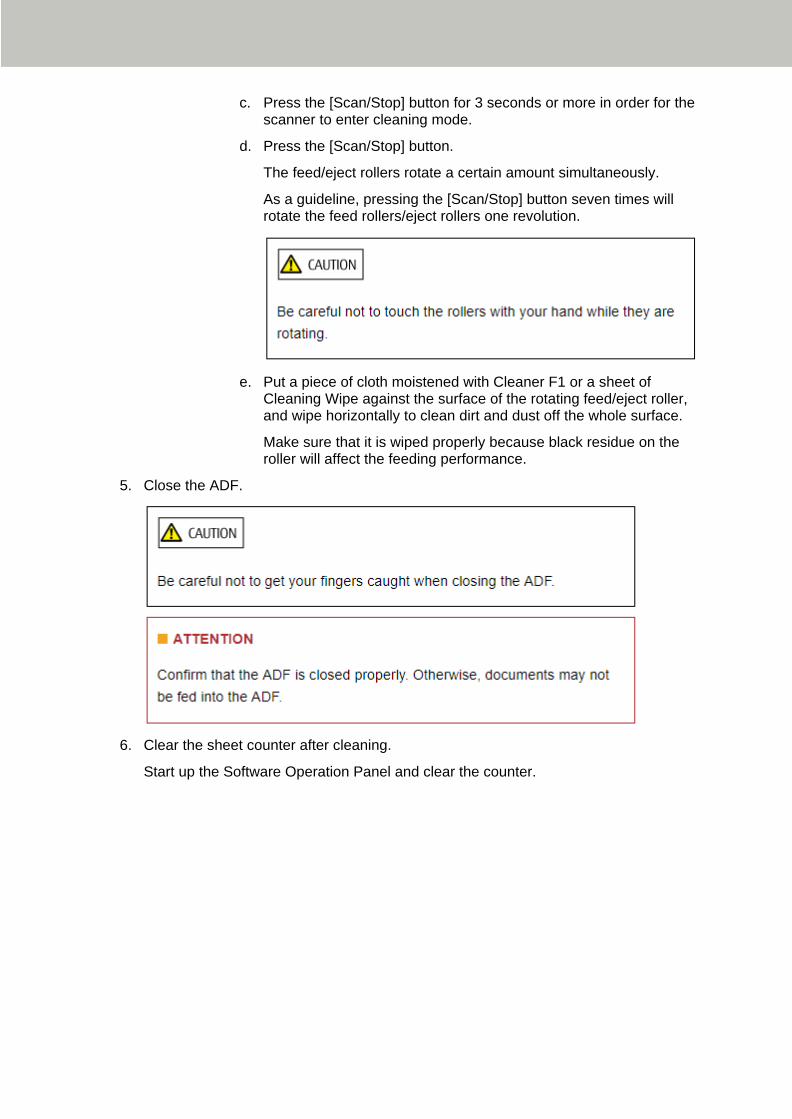
c. Press the [Scan/Stop] button for 3 seconds or more in order for the scanner to enter cleaning mode.
d. Press the [Scan/Stop] button.
The feed/eject rollers rotate a certain amount simultaneously.
As a guideline, pressing the [Scan/Stop] button seven times will rotate the feed rollers/eject rollers one revolution.
e. Put a piece of cloth moistened with Cleaner F1 or a sheet of Cleaning Wipe against the surface of the rotating feed/eject roller, and wipe horizontally to clean dirt and dust off the whole surface.
Make sure that it is wiped properly because black residue on the roller will affect the feeding performance.
5. Close the ADF.
6. Clear the sheet counter after cleaning.
Start up the Software Operation Panel and clear the counter.
The Carrier Sheet/Photo Carrier Sheet/Booklet Carrier Sheet should be cleaned with either a
piece of dry cloth, a cloth moistened with Cleaner F1/mild detergent, or a sheet of Cleaning
Wipe.
Gently wipe dirt and dust off the surface and the inside of the Carrier Sheet/Photo Carrier
Sheet/Booklet Carrier Sheet.
As you keep using the Carrier Sheet/Photo Carrier Sheet/Booklet Carrier Sheet, dirt and
dust will accumulate on the surface and the inside.
Clean it regularly because it may result in scanning errors.
Cleaning the Carrier Sheet/Photo Carrier Sheet/Booklet Carrier Sheet

Consumable Replacement
This section explains how to replace the consumables for the scanner.
Consumable Replacement Cycles
Consumables need to be replaced periodically. It is recommended that you keep a stock of new consumables and replace them before it reaches the end of the consumable life. Also, the scanner records the number of sheets scanned for each consumable (pad unit and pick roller), which allows you to determine when to replace the consumables.
Replacing the Consumables

Note that the suggested replacement cycles are guidelines for using A4 (80 g/m2 [20 lb]) wood-free or wood-containing paper, as these cycles vary depending on the type of documents scanned and how often the scanner is used and cleaned.
For information on purchasing the consumables, contact the distributor/dealer where you purchased this product. Refer to the contact information in the Contact List if supplied with this product, or refer to the contact information in the Contact for Inquiries section if provided in Safety Precautions supplied with this product, and then make an inquiry.
Replace the pad unit in following procedure.
1. Turn off the scanner, unplug the power cable and wait for at least 15 minutes.
2. Open the ADF paper chute (feeder).
3. Open the ADF
Replacing the Pad Unit
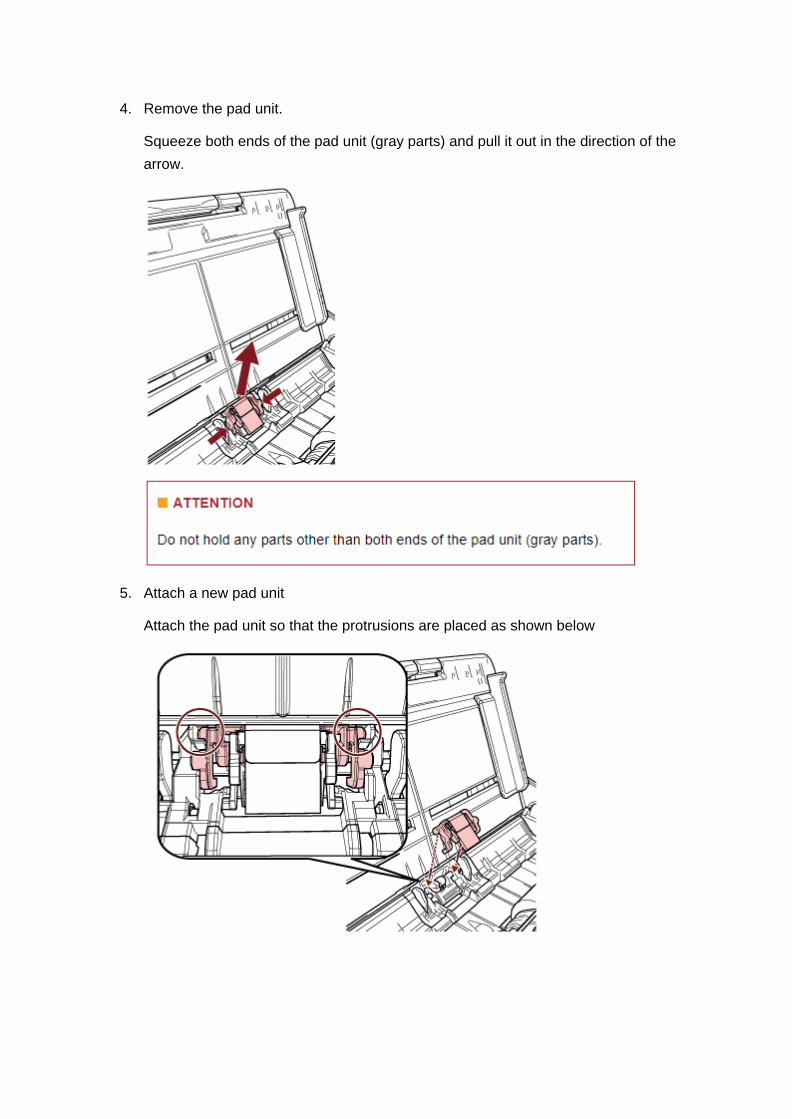
4. Remove the pad unit.
Squeeze both ends of the pad unit (gray parts) and pull it out in the direction of the
arrow.
5. Attach a new pad unit
Attach the pad unit so that the protrusions are placed as shown below
6. Close the ADF.
7. Plug in the power cable and turn on the scanner.
8. Clear the pad unit counter
Start up the Software Operation Panel and clear the counter.
Replace the pick roller in following procedure.
1. Turn off the scanner, unplug the power cable and wait for at least 15 minutes.
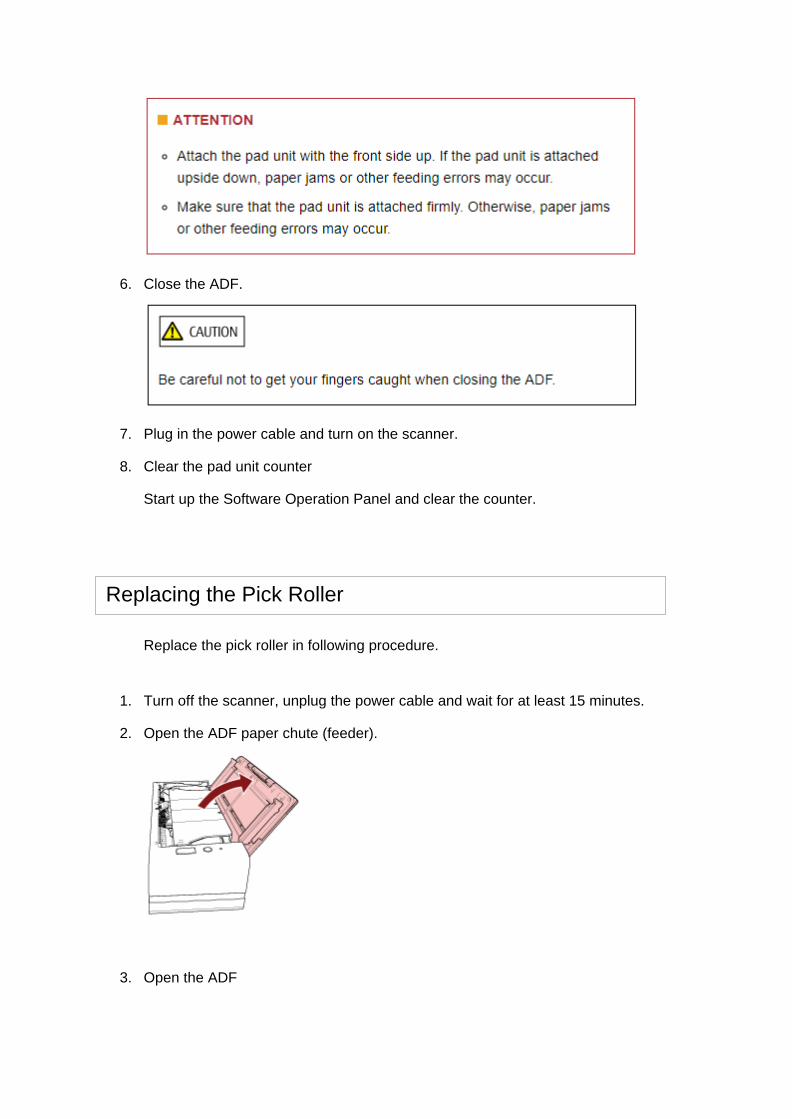
2. Open the ADF paper chute (feeder).
3. Open the ADF
Replacing the Pick Roller

4. Open the sheet guide.
5. Remove the pick roller.
Pull out the pick roller from the shaft, and then lift up the pick roller to remove it.

6. Attach a new pick roller.
Attach the pick roller to the shaft while aligning the slot of the pick roller with the
protrusion of the shaft.
7. Close the sheet guide. Make sure that both ends of the sheet guide are locked firmly.
8. Close the ADF.
9. Plug in the power cable and turn on the scanner.
10. Clear the pick roller counter.
Start up the Software Operation Panel and clear the counter.


